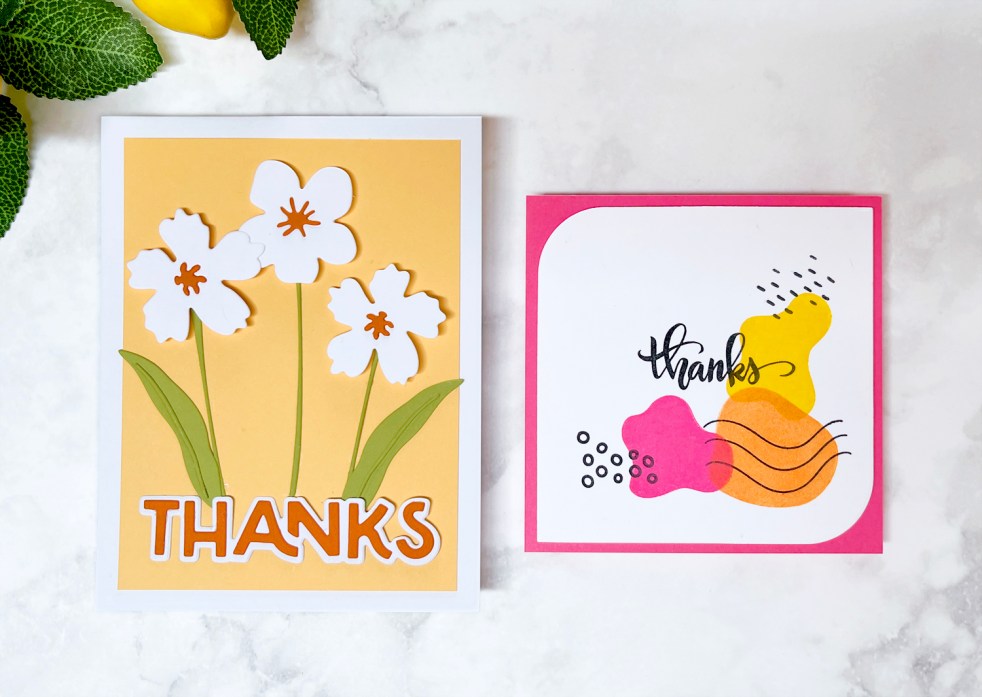
Beginner · cardmaking · Die cutting

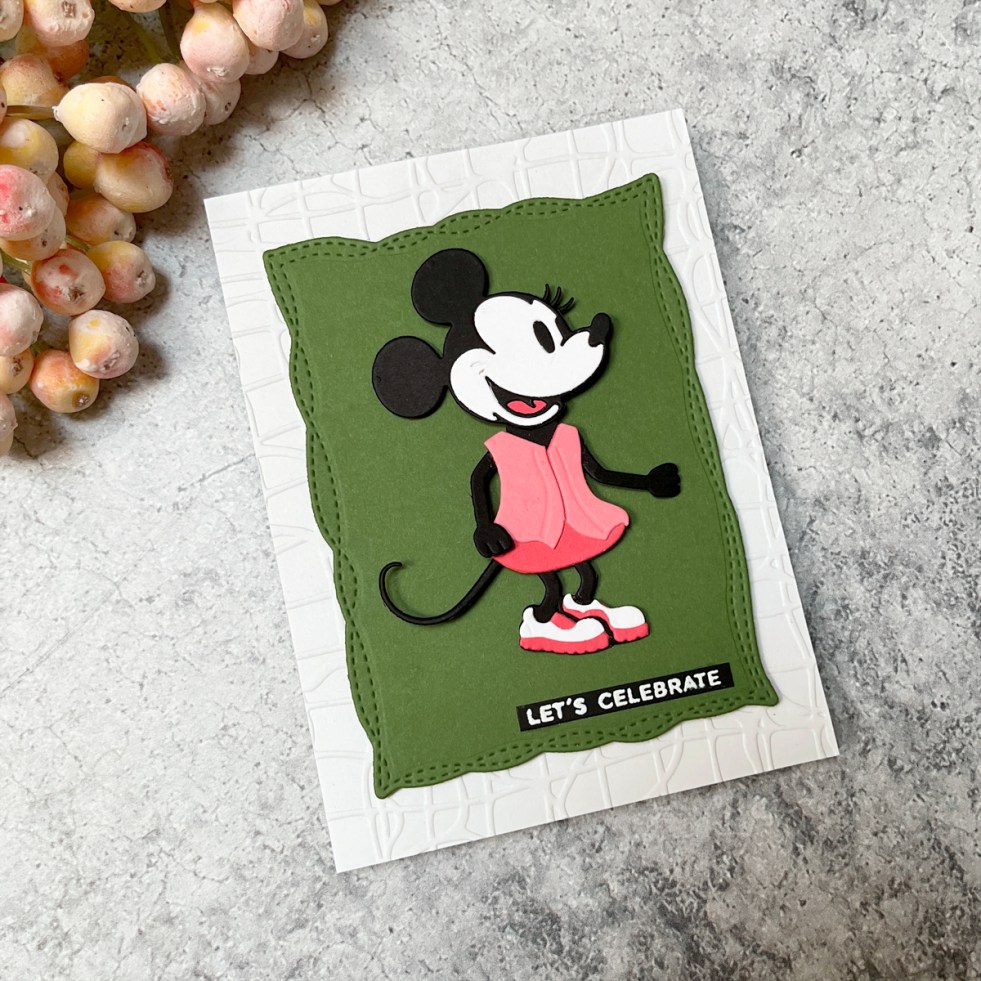
How to Make an Easy Minnie Mouse Birthday Card (One of the Best Die Sets for Beginners)

Create a charming, graphic-style character card using minimal supplies and simple die cutting techniques.


There are some cards that are fun to make… and others that instantly make you smile.

This Minnie-inspired birthday card falls squarely into the second category. In this tutorial, I’ll show you how to create a simple Minnie Mouse birthday card using die cutting techniques that are perfect for beginners.

Minnie-inspired die cut birthday card with pink dress, black and white details, and green stitched mat background
Bold graphic styles work so well on die cut cards

If you enjoy beginner-friendly cards, you might also love my House Mouse Birthday Card tutorial.

Die Cutting Series Badge

This post is part of my Die Cutting Series where I share tools, tips, and card ideas to help you create beautiful die-cut cards.

Minnie Mouse is one of the most beloved characters of all time. She’s timeless, cheerful, and full of personality—and this die set captures all of that charm beautifully.

Timeless characters make charming card focal points


📌 In This Post:

  • Creating Timeless Character-Driven Cards
  • How Minimizing Colors Makes Your Design Pop
  • Grounding Your Card with a Contrasting Mat
  • Adding Quick Texture and Dimension


✨ Product Spotlight

Today’s card features the Classic Mouse Graduation die set, which I transformed into an adorable pink-clad Minnie.

Instead of using the die exactly as intended, I omitted the sleeves on the graduation gown and turned it into a sleeveless dress. It’s a great reminder that many die sets can be adapted far beyond their original theme—making this one much more than a one-hit wonder.


Spellbinders Classic Mouse die cut birthday card with May 2026 Embossing Folder of the Month background

📌 Save this for later—perfect for beginner cardmakers!


💡 Why This Die Set Works So Well

  • Minimal supplies required (perfect for beginners)
  • Easy die cutting and assembly
  • High-impact, “wow” result
  • Universal appeal of a beloved character

👉 If you’re new to die cutting, this is an excellent starter project.


🎨 Let’s Talk Color

This card has a bold, graphic feel thanks to a very intentional color palette.

I used:

  • Pink, white, and black for Minnie
  • A striking green (Fern) for the mat

By limiting the design to just two color families (green + pink, plus neutrals), the focal point really shines.

For black cardstock, I used my go-to: Hero Arts Pitch Black—it gives the crisp, deep contrast that makes die cuts pop. After trying several black cardstocks, this is the one I always come back to for the deepest, most even color.

The remaining colors (Tutu, Dahlia, Fern) are from my ColorWheel cardstock, which I reach for constantly when I want perfectly coordinated shades.

You can see more of my favorites in my 14 Best Cardmaking Supplies

Minnie-inspired die cut with layered pink cardstock and black accents on green stitched mat and embossed white background

⏱️ Time-Saving Tip (One of My Favorites)

To keep things quick and easy, I used my go-to sentiment set: Everyday Sentiments 2 and Coordinating Die.

I almost always keep a stash of these pre-made and ready to go—it’s one of the biggest time-saving steps in my craft room.

👉 If you’ve ever felt slowed down by choosing or stamping sentiments, you might enjoy my post on the one cardmaking step that saves me the most time.

For today’s card, I chose “Let’s Celebrate,” heat embossed in white on black cardstock for a crisp, graphic finish.


🧩 Assembly Details

Die-cutting process with Platinum 6 and Minnie Mouse dies.

To ground the design, I added a contrasting Fern green mat using the Playful Stitched Panels nesting dies.

👉 If you enjoy creating custom frames, you might also like how I use these same nesting dies to build a coordinating frame in my Mixed Media Made Simple post.

To add subtle texture, I embossed the white background using the Poolside Embossing Folder of the Month—just enough detail to keep things interesting without competing with the focal point.

If you’d like to see a fun summery card using this same Poolside embossing folder, you might want to check out my Best Cardmaking Kit post.

Everything was assembled using:

The simple focal point + mat layout reminds me of a favorite earlier card featuring the most adorable little bird.


✨ Why This Card Design Works

  • Simple shapes create a strong focal point
  • Limited color palette keeps it clean and graphic
  • Minimal supplies = beginner friendly
  • Classic character adds instant charm

It’s simple—but striking.


🧰 Supplies I Used

These are the exact tools I used to create this card—and many of them are beginner-friendly staples I use again and again.

If you’d like to recreate this card, here are the exact supplies I used:

✂️ Dies & Stamps

✨ Background Texture & Detail

🎨 Cardstock & Color

🛠️ Tools & Adhesive

You can find all my go-to tools on my Favorite Cardmaking Supplies page.


🔗 More Ideas You Might Love

If you enjoy character-driven or beginner-friendly cards, you might also like:

👉 And if you’re building your craft room, take a look at:


📌 Save This for Later

Save this post so you can come back when you’re ready to create your own charming character card.

🏆 Proud to be ranked among the Top 75 Cardmaking Blogs by Feedspot


Now it’s your turn… let’s make something beautiful (and keep it simple).

What two colors would you choose for your version?


cardmaking · Stamping

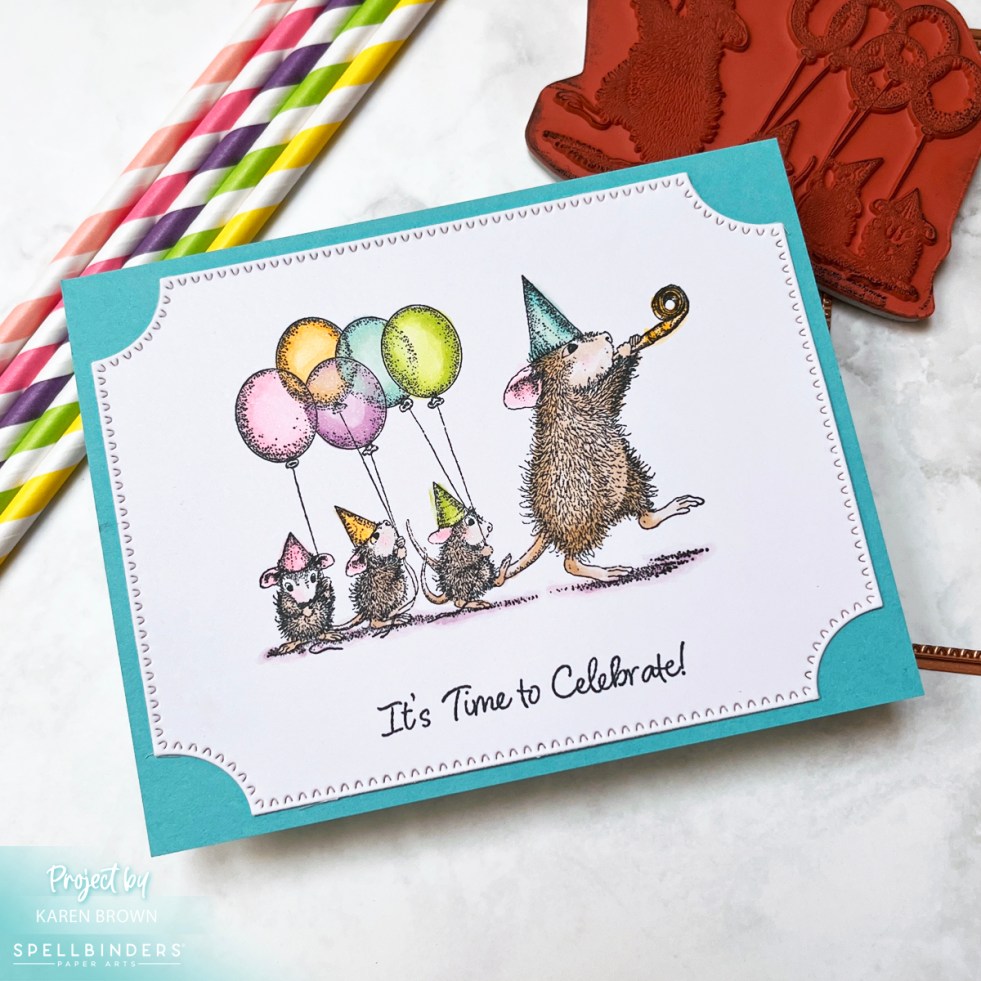
How to Make a Simple Birthday Card for Beginners (Adorable House Mouse Card)

Create a charming handmade birthday card with minimal supplies using the House Mouse Party Parade stamp set.

In this tutorial, I’ll show you how to create a simple stamped birthday card with this adorable House Mouse design. Whether you’re a beginner cardmaker or a seasoned stamper who wants something quick and charming, the House Mouse collection delivers every time.

These sweet little mice are full of personality, and the scenes practically create themselves — making them ideal for quick cards with minimal supplies.

Easy handmade birthday card featuring House Mouse Party Parade stamp set colored with alcohol markers.

If you’re just starting out, you may also find my Best Cardmaking Supplies for Beginners or 14 Best Cardmaking Products and Supplies helpful.

Easy birthday card perfect for beginner cardmakers who want to stamp and color adorable images.
Coloring the adorable Party Parade mice with alcohol markers brings this sweet celebration scene to life.

📌 Save this for later—perfect for beginner cardmakers!


In This Post

• Why House Mouse Stamps Are Perfect for Beginners
• Party Parade Card Design
• Quick Coloring with Copic Markers
• Easy Card Layout
• More Beginner Card Ideas


Product Spotlight: House Mouse Party Parade Stamp Set

Today’s card features the House Mouse Party Parade stamp set, which includes the most adorable parade of four mice holding balloons, wearing party hats and celebrating in style.

This is one of those stamp sets that works year after year for birthdays and celebrations, which makes it a great staple for any cardmaker’s collection

This design absolutely screams birthday, but it could easily work for retirement, graduation or any celebration. If there’s a reason to celebrate, this stamp set works beautifully.

One of the things I love most about this stamp set is how easy it is to create a finished card quickly. With one detailed image and a sentiment, the design does most of the work for you.

This set includes 3 sentiments:

  • It’s Time to Celebrate
  • Happy Birthday Greetings
  • Happy Birthday From All of Us

That versatility makes it a stamping staple worth keeping in your craft room.


Verstatile birthday card perfect for virtually every every recipient:  masculine, men, kids, friends

Why House Mouse Cards Are Perfect for Beginners

  • Minimal supplies required
  • One main image stamp – no complicated layering
  • Detailed line art – easy to color with markers
  • Charming designs everyone loves

Just stamp and color… cardmaking at its most pure. I used Copic alcohol markers.

If you enjoy House Mouse cards, you might also like my Cute Coffee Theme Thank You Card.

Coloring House Mouse Party Parade stamp with alcohol markers for a beginner-friendly birthday card.
Simple coloring on a stamped birthday card creates a fun celebratory scene.

I die cut the finished panel with a frame from a previous Spellbinders Club Kit — one of my favorite ways to build a versatile die collection over time.

I also created a sweet Healing Thoughts Get Well card using another House Mouse design.

Fun House Mouse Party Parade Birthday card that is so easy to create.

Keep a Few Birthday Cards Ready

I love keeping a few simple birthday cards like this in my pre-made card file, so I always have something ready when a birthday pops up unexpectedly.


More Conversations on Cardmaking Supplies


More Easy Cardmaking Ideas

📌 Save this for later so you can come back when you’re ready to try this easy card.

Thanks so much for stopping by!


.

cardmaking

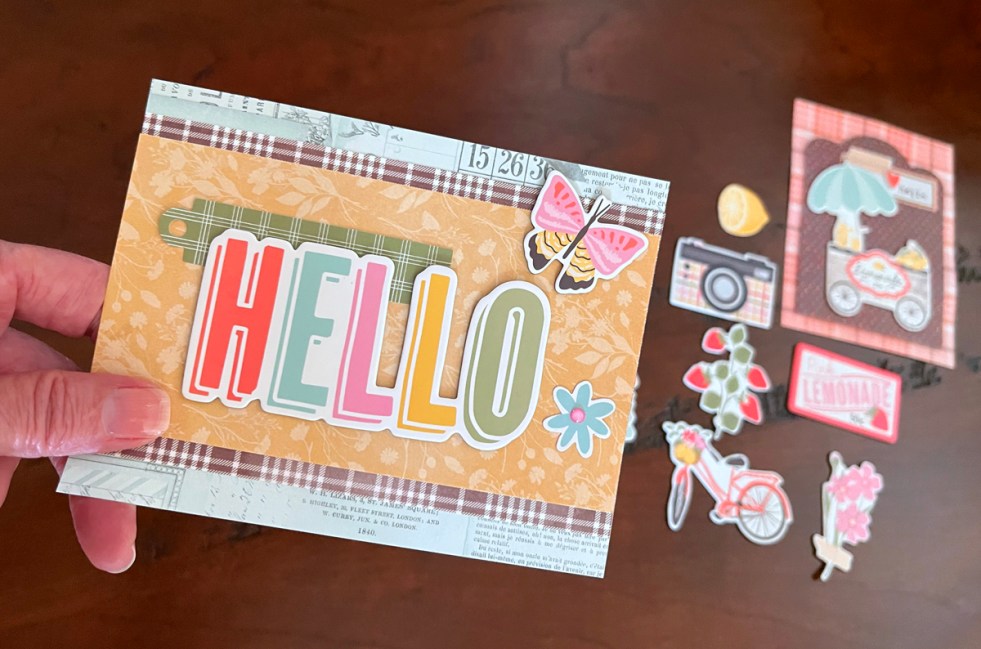
Easy Beginner Cardmaking Ideas | 2 Bright Cards Using Pre-Printed Supplies

Create cheerful handmade cards in minutes using pre-printed elements from the Pink Lemonade collection.

Beginner cardmaking idea using Simple Stories Pink Lemonade collection with layered patterned paper, chipboard embellishments pre-printed die cuts and foam stickers.

Some days you just want to craft with no fuss and no complicated techniques.

No messy mediums.
No challenging layouts.

Just pure creative fun.

That’s where pre-printed cardmaking supplies really shine.

The new Pink Lemonade Collection from Simple Stories is bright, cheerful, and incredibly easy to use — making it perfect for beginner cardmaking, quick cards, and even scrapbooking projects.

I’ve been having so much fun with this collection lately. In fact, I’ve already created six cards this month using these products — two in today’s post and four in my Lemonade Stand Easel Cards and Chalkboard Coffee Thank You Cards post from earlier this month.

If you’re just starting out in cardmaking, you may also enjoy my Beginner Starter Kit or 14 Best Cardmaking Products and Supplies , where I share the tools I reach for again and again in my craft room.


In This Post

• Why Pre-Printed Papers Are Perfect for Beginners
• Pink Lemonade Card Designs: Same Supplies, Two Quick Cards
• Fast and Easy Card Layouts
• More Beginner Card Ideas


Easy beginner cardmaking using Chipbboard focal point from Simple Stories Pink Lemonade Collection.

Product Spotlight: Pink Lemonade Collection

Today’s cards feature elements from the Pink Lemonade Collection by Simple Stories.

This collection bursts with bright color, playful lemons, cheerful florals, and adorable embellishments that make cardmaking almost effortless.

One of the things I love most about this collection is how beautifully coordinated everything is. The colors, patterns, and embellishments all work together, so you can assemble several cards quickly without worrying about matching papers or layouts.

This collection works wonderfully for many occasions:

• birthdays
• hello cards
• thank you cards
• thinking of you
• get well cards

And it’s just as perfect for scrapbooking layouts as it is for cardmaking.

There’s even a Simple Cards Card Kit available that includes everything needed to create eight card designs with step-by-step instructions, which makes it especially beginner friendly.


Why Pre-Printed Elements Are Perfect for Beginner Cardmaking

If you’re new to cardmaking, pre-printed supplies make it incredibly easy to create polished cards quickly.

Here’s why they work so well:

Focal point images are already designed and printed
Minimal supplies required
Coordinated colors and themes
Variety of images in different sizes
Fast and stress-free card assembly

All of the pieces in this collection work beautifully together, so the process becomes simple:

sort the pieces → experiment with layouts → glue and go.

The set includes everything from large statement sentiments and focal images to charming little embellishments like lemons, strawberries, butterflies, pinwheels, and florals.

I especially love the sturdy chipboard pieces, which instantly add dimension to a card.


Card Design 1

Easy and fun beginner cardmaking card featuring a chipboard lemonade cart.

For my first card, I used two pieces of pre-printed designer paper for the card base and mat.

To add a little extra visual interest, I die cut the mat with a decorative frame die — but this step is completely optional. A simple rectangle trimmed with a paper trimmer would work just as well.

To finish the design I layered:

a vintage-style chipboard lemonade cart
a cheerful “hello” sentiment
a small pink heart accent

The result is a bright and playful card that came together in just a few minutes.

Card Design 2

Easy, bright and happy card with layered designer cardstock and chipboard focal points.

For the second card I created a layered background using three pieces of patterned paper.

Measurements:

• 5½ × 4¼″ aqua base
• 3½ × 5½″ brown plaid mat
• 3 × 5½″ floral background

Once those layers were glued together, I added:

a green plaid tag
blue flower die cuts
a rainbow “hello” sentiment
• a butterfly chipboard accent

I also added enamel dots to the flower centers, which is one of my favorite simple ways to add a finishing touch.

The layered patterns create a cheerful, eye-catching design while still being incredibly easy to assemble.


A Fun Part of the Process

📌 Save this for later on Pinterest.

Sorting Pink Lemonade chipboard pieces for easy beginner cardmaking layout
Sorting the colorful chipboard pieces from the Pink Lemonade collection while planning card layouts.

One of my favorite parts of using collections like this is sorting through the embellishments.

The Pink Lemonade chipboard set includes over 50 pieces, and laying them out on my desk while planning the cards was honestly a little mood-boosting.

Sometimes the simple tactile process of arranging colorful pieces is just as enjoyable as making the card itself.


More Easy Cardmaking Ideas

If you enjoy quick and beginner-friendly card designs, you might also like these projects:

Easy Stenciled Masculine Jean Jacket Cards
Charming House Mouse Birthday Card
Mixed Media Card for Beginners


Building Your Cardmaking Toolbox

Here are the supplies I used for today’s cards:

There are also several other coordinating products in the collection:

Collection Kit (patterned paper + stickers)
Card Kit (makes eight cards)

If you are interested in adding to your toolbox, these are the exact supplies I use in my craftroom.

I’m actually working on another project using the Journal Bits Pack, so be sure to check back soo


📌 Save this for later so you can come back when you’re ready to try this technique.

I always love hearing what readers think — so feel free to leave a comment and let me know which card you like best.

Happy crafting!

cardmaking · Stenciling

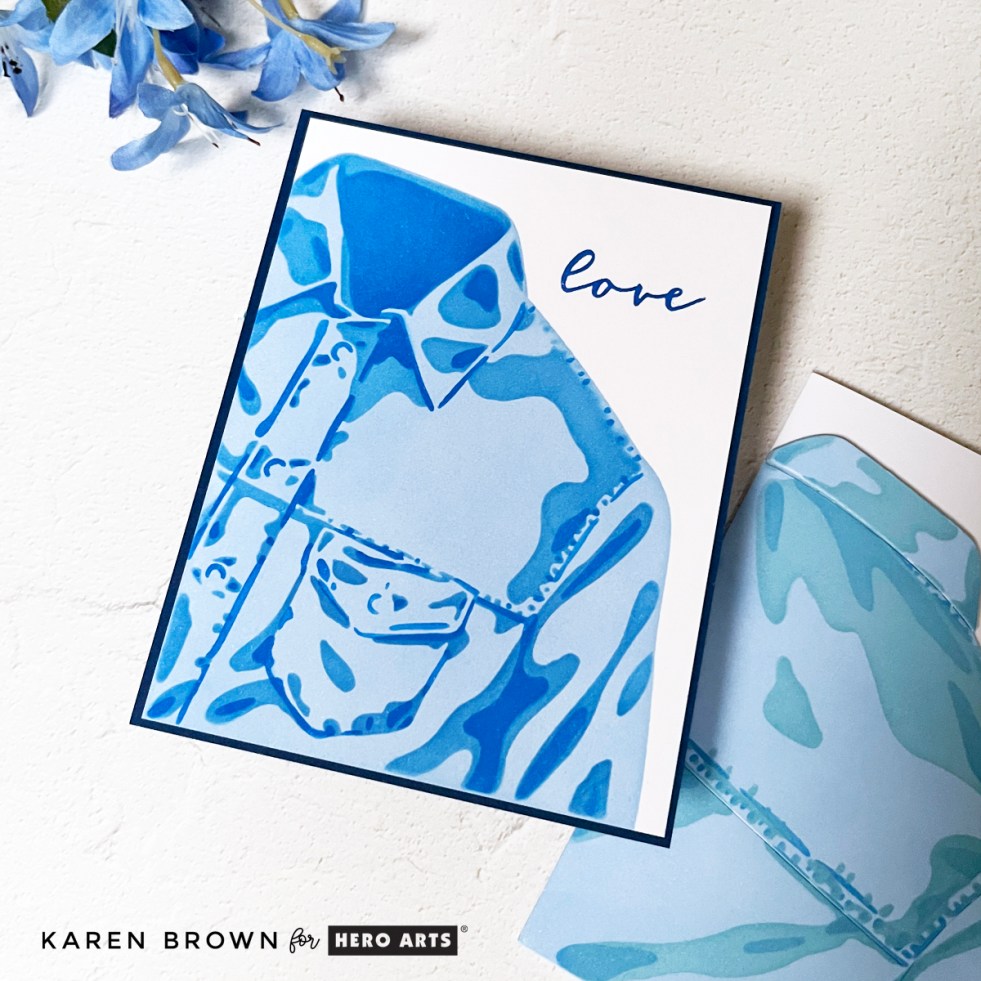
2 Easy Stenciled Masculine Cards | Beginner-Friendly Jean Jacket Design

Create Easy Masculine Cards with Layered Stencils and Three Shades of Blue Ink

Popping by today with two quick, fun and easy stenciled masculine cards — and I have to say, these might be some of my favorites lately.

There is just something about a classic blue jean jacket that feels timeless… relaxed… relatable… and perfect for so many occasions.

If you’re just starting out, you may also find my Best Cardmaking Supplies for Beginners.


✂️ In This Post, You’ll Learn:

• How to make a high-impact masculine card
• Tips for layer stenciling
• The power of monochromatic cards
• Which blending brushes work best for stenciling


These cards were absolutely created with my husband in mind (who I LOVE in blue shirts 💙). But honestly? These designs work beautifully for:

  • Birthdays
  • Father’s Day
  • Graduation
  • Get Well
  • Just Because
  • Teens
  • Kids
  • Even encouragement cards

Just swap the sentiment and you’re done!

And if you are new to cardmaking? This is such a great beginner stencil project.

Pin This Tutorial For Later.

Stenciling monochromatic blue Jean Jacket Shirt for easy eye-catching masculine card
Monochromatic stenciling creates bold dramatic handmade cards

Easy Masculine Card Ideas That Feel Classic (Not Complicated)

One-layer masculine card featuring a stenciled blue jean jacket front using layered blue inks on white cardstock with a clean background and stamped love sentiment.

This Jean Jacket Stencil is the star of this card.

Masculine cards can sometimes feel tricky.

But designs like this work because:

  • The imagery is relatable.
  • The colors are classic.
  • The layout is simple.
  • The contrast is strong.

If you’ve ever struggled with masculine designs, you might also enjoy my Masculine Speedometer Card — another clean, high-contrast design that keeps things bold without feeling busy.

And if you want a bigger supply overview, my post on 14 Best Cardmaking Products and Supplies for 2026 shares the exact basics I reach for again and again when creating cards like these.

Simple supplies. Strong contrast. Clean backgrounds. That formula works.

Why These Stencils Are So Easy to Use

Hero Arts SA325 Jean Jacket easy masculine card stenciled in 3 shades of blue,

Hero Arts created a set that feels both classic and eye-catching at the same time.

Jean Jacket Options:

The layers are clearly etched and numbered in the bottom left corner — which makes lining them up incredibly simple.

Tip: Always check the etched layer number before you start blending. It ensures your stencil is facing the correct direction.

If you’re new to layered stenciling, you might enjoy my Coloring with Stencils 4 Ways VIDEO where I walk through blending multiple stencil layers step-by-step.

And for a floral take on layered blending, my Floral Stenciling 3 Ways video shows how changing color combinations creates completely different moods — just like we’re doing here with blue tones.

Once you understand layering, the possibilities open up quickly.

No guessing. No frustration. Just blend and go.


Card 1: The Bold “Front” One-Layer Card

Two masculine stenciled cards, one of the front of the Jean Jacket and the second of the back of the shirt.

For my first card, I created a clean one-layer masculine card featuring the front of the jacket.

I own many brands of ink, but the ones I find myself reaching for the most are Hero Arts. They blend well everytime. Today, I used three shades of blue ink:

Blended onto Express It Blending Cardstock (Smooth White) for that crisp, even finish.

I kept the background completely clean and added a simple stamped blue sentiment that says “love.”

That’s it.

The contrast between the bold blues and the pristine white background gives this card so much impact without any extra embellishment.

It feels:

  • Strong
  • Graphic
  • Modern
  • Dynamic

And it was incredibly easy.

(You’ll see in my process photo how simple the setup is — stencils laid out, inks nearby, no chaos on the desk!)

Easy one layer masculine stenciled card of a denim jean jacket


Card 2: The Softer “Back” Layered Card

Layered die cut jean jacket card stenciled in soft blue tones, stacked for dimension and adhered to a white A2 card base.

For the second card, I used the “back” of the jacket stencil.

This time my ink trio was:

Just changing one ink color in the layering sequence completely softened the look.

After stenciling, I used the coordinating die to cut the jacket out.
Then I die cut two additional jackets from blue cardstock.

I glued all three together — stenciled one on top — to create dimension.

Then I adhered the stacked jacket to a white A2 card base.

Clean background. Strong focal point. Subtle dimension.

This version feels:

  • Slightly more muted
  • A little more relaxed
  • Still masculine
  • A bit softer overall

It’s fascinating how swapping just one shade can change the entire mood of a card.


Which One Do You Prefer?

I’d love to know — are you drawn to:

👉 The bold, dynamic “front” card
or
👉 The softer, dimensional “back” card

Tell me in the comments!

Two easy beginner blue denim Jean Jacket stenciled cards

Organization Win: Color-Coded Blending Brushes

I recently started using the color-coded blending brushes from Waffle Flower — and I have to say… I’m loving them. If you’re new to blending detailed layers, I recommend starting with these.

Keeping my brushes designated by color family makes blending:

  • Cleaner
  • Faster
  • More consistent

And let’s be honest… organized craft supplies just make everything more enjoyable.

If you’re building your stencil stash, this system is worth considering.


Build Your Stenciling Toolkit

These are the essentials that I personally used today.:

More In-Depth Thoughts on Cardmaking Supplies


If you’re just starting out with cardmaking — or if you want a fast design that looks impressive — this jean jacket stencil set is a wonderful place to start.

Sometimes simple really is powerful.

💙


cardmaking · Die cutting · Stamping

Best Quick & Easy Get Well Card

Clean and modern handmade get well card featuring a stamped soup cup, blue chopsticks, black enamel dots, and a yellow die-cut circle window.

The December 2025 Hero Arts Stamp & Die Kit of the Month is called Cup of Love, and it’s perfect for creating quick, modern, and heartfelt get well cards. I always need get well cards on hand, so I love having clean and simple designs that I can mass produce—and this one definitely delivers.

This month’s kit features a charming soup cup, chopsticks, labels, and warm “feel better” sentiments that make it easy to whip up comforting cards for friends and family who need a little cheer.

Clean + Modern Design With Easy Stamping

A simple and easy handmade get well card with a die cut yellow recessed circle that showcases and cup of noodle soup, crossed chopsticks and 5 black enamel dots.

For today’s card, I leaned into a fresh white and yellow color palette with pops of crisp black stamping and a hint of blue. The combination feels clean, modern, and cheerful—just the mood you want in a get well card.

Key Products Used:

How I Made the Card

  • I stamped the “cup of noodle soup” image in black ink for sharp contrast.
  • Next, I stamped the round yellow label with Lemon Drop Ink. I waited a minute for the ink to dry, stamped the sentiment “feel better soon” and die cut the image.
  • I stamped and colored the blue chopsticks, die cut them, and crossed them for a playful finishing touch.
  • For the background, I die cut a circle from the center of a white A2 cardstock panel using my Hero Arts Nesting Circle Dies.
  • I layered this white panel over a yellow A2 card base, popping it up with craft foam for dimension.
  • In the recessed yellow circle, I glued the soup cup and chopsticks.
  • Finally, I added five black enamel dots. These tiny accents brought so much contrast and visual interest to the finished design.

The result? A clean and cheerful get well card with modern charm and just enough shading and dimension to feel special—without slowing you down.

Interested in two other recent Get Well Cards I created? Click HERE.


Tip for Mass Production

If you want to make a full batch of these cards (and I definitely recommend it!), simply die cut a yellow circle and adhere it directly to a white card base. Or alternatively, you could ink blend a yellow circle. You can skip the popped-up window panel and still get the same bold pop of color.

Thanks for stopping by!

Cardmaking Video · Stenciling

Video: Easy Fun Card Idea

Watch above OR click HERE to watch video on YouTube.

Looking for an easy, beginner-friendly card idea that makes a big impact? Today I’m sharing a project using the Hero Studio July 2025 “Just Keep Going” Layering Stencils—a bold, three-layered sentiment that I paired with a coordinating ink smooshed background for a clean, summery design.

Handmade card with bold “Just Keep Going” encouraging sentiment in green, teal, and blue ink, layered over a watercolor-style ink smooshed background.

Supplies & Theme

The “Just Keep Going” stenciled sentiment is built up with three perfectly aligned stencil layers. For the sentiment and the coordinating background, I used the following Reactive Inks:

These bright, analogous colors are side-by-side on the color wheel and blend beautifully together for a unified, harmonious look.

July 2025 Layering Stencil of the Month "Just Keep Going" kit card in analgous green, aqua and blue inks.

The Background: Ink Smooshing

To complement the stenciled panel, I created an ink smooshed background using the exact same three ink colors. Ink smooshing is one of my favorite techniques—just dab ink onto a 6 x 6″ acrylic block, spritz with water, and press your watercolor paper onto the color. I flip my block and weight down with a book for 5 minutes. If there is a puddle, I dab it with a paper towel. The result? A gorgeous, watercolor-style background that’s one of a kind.

This technique is fantastic for beginners and gives your cards a fun, organic texture. It’s also a great way to bring all the color elements of your project together.

Creating an "ink smoosh" background that coordinates with your stenciled focal point

Finishing Touches

I die cut my stenciled sentiment panel using a nesting postage stamp die for extra polish. As a playful embellishment, I added a pair of sunglasses from the Hero Studio July 2025 Card Kit. The frames are cut from leftover inked cardstock, and the lenses from another panel inked with Blue Hawaii—just another way to tie everything together!

Custom coordinated ink smoosh background and bold stenciled sentiment card.

Why It Works

This card’s cohesive look comes from intentionally choosing analogous colors and using them across both the background and focal elements. Whether you’re just starting out or want a quick, cheerful design, this is a project anyone can enjoy!

cardmaking · Die cutting · Video

VIDEO: Quick and Easy Cardmaking

Fast and easy handmade card using Hero Arts Collage Backgrounds Rub-On Transfers and Magnifying Glass Die Set, featuring the sentiment "The Evidence is Clear – You're Incredible."

Hero Arts Craft Lounge Recap

Last night, I had the pleasure of joining the very first Hero Arts Craft Lounge, a FREE virtual crafting event that brought together so many creatives for an evening of inspiration, tips, and fun. If you missed it, don’t worry—you can catch the replay and enjoy the session at your own pace!

📺 Watch the replay here: Hero Arts Craft Lounge – Facebook Event

And if you haven’t joined yet, look into the new Hero Arts Collective on Facebook.

Video of creating a quick, fast and easy card using Run-On Transfers and a quick die cut focal point - a magnifying glass.

During the event, Channin Pelletier, Rosie Lopez, Michelle Lupton and I each created a unique custom card using the new Case Closed Collection. I opted for a FAST and easy card that anyone can recreate in less than an hour! And you can watch 4 different cards being created at the same time!

I used the Collage Backgrounds Hero Rub-On Transfers to create a dramatic yet effortless background. These rub-ons add instant texture and layered interest—perfect when you’re short on time but still want a showstopper.

For the focal point, I die cut elements from the Magnifying Glass Die Set and added the sentiment: “The Evidence is Clear – You’re Incredible.” The lens was die cut from vellum.

This card came together so quickly and has a sleek detective-style vibe thanks to the mix of vintage background and bold elements from the new Hero Arts release.


cardmaking · papercrafting

Fast, Fun & Fabulous: Cardmaking with Printed Paper & Stickers

Some days, you want to craft without fuss—no fussy cutting, no intricate techniques, just pure creative fun. That’s where printed paper and stickers come in! These supplies make it easy to create layered, dimensional cards that look anything but basic. Bonus: they’re beginner-friendly and perfect for a cardmaking party!

>>>You may also be interest in my Flower Shoppe Cart Card from the same collection.

I have links to the products used at the end of this post. Each of my cards features 3-5 layers, creating rich dimension in no time. Let’s take a look!

Card 1: Lavender Rain Boots in Bloom

This sweet card features a pair of lavender chipboard rain boots, filled with flowers. The background is a vintage-look mint printed paper, layered over a lavender and white polka dot card base.

Details that make this card shine:

Card 2: Framed Florals & Soft Details

For this design, I used a chipboard galvanized bucket filled with soft pink, coral, and muted red flowers. The postage frame die cut background adds a touch of vintage charm.

🖌 Layers & Textures:

  • The background is a vintage lined school paper
  • The card base is chiffon and brown plaid printed paper
  • The layered elements make it feel warm and rustic

Card 3: A Galvanized Bucket of Blooms

This card carries over the chiffon paper and lined school paper from Card #2, tying the collection together. The chipboard enameled pitcher works well for a Get Well Card.

💖 Finishing Touches:

  • Chipboard butterflies and hearts for a sweet, dimensional effect
  • A vintage look frame that enhances the soft, romantic feel

Printed cardstock gives you instant color, pattern, and texture, while chipboard stickers add depth and detail without extra effort. These elements are substantial and high quality, making them perfect for layering without feeling flimsy.

The Magic of Printed Paper & Stickers: Products Used in This Post

Why You’ll Love These Supplies

  • Fast & Easy: No stamping or coloring required—just layer and stick!
  • Beginner-Friendly: Perfect for all skill levels.
  • Great for Scrapbooking Too! These elements work beautifully in memory keeping.

Which card is your favorite? Let me know in the comments! And if you’ve tried crafting with stickers and printed paper, I’d love to hear your tips.

Happy crafting! ✂️✨

cardmaking · Die cutting · Stamping

Vintage Charm & Soft Elegance: Hero Arts March 2025 Release

Welcome to another exciting Hero Arts release! For March 2025, I created two unique cards that highlight the versatility of the new products. One is a vintage-inspired die-cut design featuring the Suitcase and Florals Fancy Die, while the other is a beautifully blended, pastel-hued circular stamped card. Let’s jump into the details!

Key Kits and Products Used:

Card 1: Vintage Suitcase & Florals

A handmade card featuring a cream and tan die-cut hat box-style suitcase with a teal bow and florals, set against an aqua background of stamped vintage maps and postmarks.

This card is all about vintage charm! The focal point is a cream-colored hat box-style suitcase with tan trim, die-cut from the Suitcase and Florals Fancy Die. A lovely teal bow is tied to the handle, and delicate die-cut flowers add a soft floral touch.

Hero Studio Suitcase and Florals die cut handmade "hello" card with a charming hat box luggage, teal bow, and flowers in orange and red. The background is a mixed media postage stamp theme.

Design Details:

  • Color Palette: Teal, aqua, alabaster cream, marigold, and red from the Color Wheel Cardstock Collection .
  • Background: I loosely ink blended Splash ink on white cardstock and then added Splash ink splatters on the aqua panel and A2 cardbase. I then randomly stamped the panel in black ink using the Vintage Maps & Ledgers and Vintage Postmarks & Tickets stamps. Using my Nesting Postage Stamp Infinity dies, I die-cut stamp shapes that would serve as my background.
  • Framing: A vivid Blue Spruce mat behind the die-cut stamps makes the alabaster hat box pop.
  • Sentiment: A die-cut, scripty “hello” (Friend Words Sentiment Dies) that complements the vintage theme. Two black enamel dots in the center of the flowers continues the bold color palette.
Pro Tip:
A deep Blue Spruce background mat is key to making lighter elements like the alabaster suitcase stand out.

Color Swatching:

To help with color coordination, I also swatched my cardstock colors using the Spellbinders Color Swatch Petal Dies—a handy way to visualize your palette before committing to a design!

Color Wheel Cardstock Colors used: Alabaster, Terracotta, Poppy, Cranberry, Carrot, Teal Topaz, Blue Spruce, Fern and Brushed Gold.

You can find the entire Color Wheel Collection HERE.


Card 2: Pastel Bow-Themed Circular Card

A round handmade card with a stamped and Copic-colored bow pattern transitioning from yellow to pink, coral, lavender, and blue. The card base is deep charcoal gray.

For my second card, I went with a soft, rainbow gradient-colored design that’s easy to recreate. This is a DIY card that’s great for beginner cardmakers, offering a fun way to experiment with color blending and shaped card designs. The 6 x 6″ Bold Print makes stamping so easy! The bows are already laid out perfectly, so no need to spend time arranging your dies.

Design Details:

  • Stamp: The “Bows” Bold Cling Stamp stamped on smooth white cardstock and colored with pastel Copic markers.
  • Color Gradient: Blends from creamy yellow at the top to soft pinks, corals, lavender, and blues at the bottom.
  • Card Shape: Using my Nesting Circle Dies, I die cut a circle from my Copic colored panel. To make my card base, I die cut two circles from Charcoal cardstock, scored the back one at 3/4″ and then glued the tops together. To make this card even easier, you could make a traditional A2 rectangular card, which would exclude using infinity dies.
  • Finishing the Card: I added a small “for you” heat embossed sentiment and some Clear Enamel Dots.

Pro Tip:

Use craft foam behind your card panels for a polished, professional look with added dimension!

An easy DIY stamped card with 10 girly bows of different shapes and sizes, Copic colored in a rainbow gradient.

Final Thoughts

Both of these cards showcase the March 2025 Hero Arts release in different ways—one with vintage textures and layers, the other with simple stamping and coloring. Whether you’re a fan of intricate die-cutting or quick, colorful stamping, there’s something in this release for you!

Let me know in the comments—which card style do you love most? And don’t forget to check out the full Hero Arts release for more inspiration!

BetterPress · cardmaking

Cozy Little Hello Cards with BetterPress: Winnie the Pooh Scenes

Step into the nostalgia of the Hundred Acre Wood with these Winnie the Pooh-inspired hello cards! Using BetterPress letterpress plates, I crafted three unique designs that bring timeless charm to life. From sepia-toned simplicity to vibrant watercolor scenes, these cards capture heartwarming moments perfect for sending a cheerful note.

Few things evoke a sense of nostalgia and warmth quite like the timeless charm of Winnie the Pooh. Using Spellbinders new Friendly Moments BetterPress letterpress plates, I created three unique hello cards that capture moments from the Hundred Acre Wood. Each design features a distinct artistic style, from sepia simplicity to watercolor wonder, and they’re all perfect for sending a heartfelt note.

If you’re new to BetterPress or want to refine your skills, check out my previous blog post, “9 Tips, Tricks and Insights for Spellbinders BetterPress Machine,” for helpful advice on how to achieve perfect impressions every time.

You might also enjoy reading my recent post: A Birthday Card Full of Whimsy: Winnie the Pooh and Piglet Scene

I have links to the key products at the bottom of this blog post.

Now let’s take a closer look at these enchanting creations!

Duo of Winnie the Pooh BetterPress handmade cards from Spellbinders Classic Pooh Collection.

Card 1: Watercolor Wonder

Hello card showing a colorful Winnie the Pooh and Christopher Robin scene, hand-painted with Inktense Watercolor Pencils over a black BetterPress impression.

I used a heartwarming scene of Christopher Robin and Pooh on the bridge and added a pop of color with Inktense Watercolor Pencils and a damp round paint brush. Pressed with Black ink on Watercolor Paper, the BetterPress impression provides crisp lines that beautifully anchor the soft, vibrant hues of the watercolors. And there was no ink bleeding when watercoloring with the BetterPress Inks! The river sparkles in shades of blue, the bridge has rustic wooden tones, and Pooh’s honey-yellow fur shines against the greenery. The Hello Sentiment is from A Friend Like You set. The card base is Cup O Joe, which is a perfect pairing for this scene. This card is a great way to add touch of whimsy and joy to someone’s day.

Card 2: Sepia Simplicity…So Quick and Easy to Make!
Vintage-inspired Winnie the Pooh hello card featuring Christopher Robin and Pooh on a bridge, pressed with Bark brown ink for a sepia look.

This second card exudes vintage charm with a sepia-inspired look. The scene of Christopher Robin and Winnie the Pooh on a bridge, gazing at a flowing river, is pressed with Bark brown ink for a classic, monochromatic feel. The texture and detail of the BetterPress plate truly shine, creating a design that’s simple yet sophisticated. Paired with a Cup O Joe card base, this card is a perfect nod to Pooh’s timeless stories.

This second card was so quick and easy to create and I think it would make a wonderful set of notecards to give as a gift.

Card 3: Polaroid Nostalgia

Whimsical Winnie the Pooh and Piglet hello card framed in a Polaroid-style die cut and colored with vibrant watercolors.

The third card captures a tender moment of Winnie the Pooh and Piglet walking down a quiet road, their backs turned to the viewer. To frame this scene, I used a Polaroid-style die cut frame and label, which adds a playful, nostalgic touch. After pressing the scene in Black ink onto Watercolor Paper, I brought it to life with Derwent Inktense Watercolor Pencils, creating a soft, storybook aesthetic. The vivid colors and the Polaroid look make this card feel like a treasured memory captured in time.


Key Products Used in the Post:

Each of these Winnie the Pooh cards brings a unique flavor of nostalgia and artistry. Which one is your favorite?