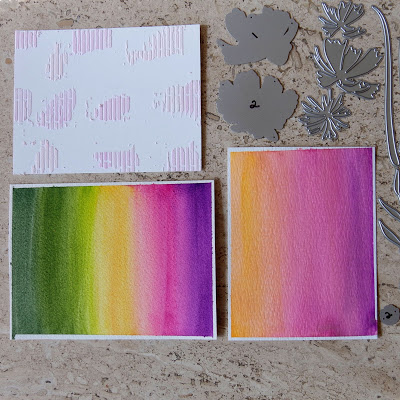
Altenew’s Cosmos Craft-A-Flower Kit is one of my all time favorite products and I wanted to combine it with Altenew’s 36 pan Watercolor Set for today’s card. I used the watercolors for the background and the panels I die cut.
I started by making a background using Altenew’s Narrow Brick Stencil. I mixed Texture Embossing Paste and Shimmer Spray which I then tinted with diluted purple Watercolor from the 36 pan set. I repeated this and added diluted pink watercolor to a second pile of embossing paste. I then ran this over the stencil in random locations. The two colors of brick are the same colors I used on the flowers.
On two panels of watercolor paper, I brushed on bold watercolors from the 36 pan set. I dried the panels and added a second layer so I had really saturated color. Above is a photo of the three panels I used to make this card.
Hello! Today is Release Day for the October 2022 Spellbinders Club Kits and I have several cards to share with you. I’ll start with the beautiful Large of Die of the Month, which is a seasonal stitched Christmas ornament. In my mind, I saw a softly watercolored bauble so I die cut the ornament from watercolor paper. Then, using the wet on wet technique, I loosely painted the die cut with three shades of aqua. I also painted a pink and green panel for the poinsettia and greenery. I used the greenery from Stitched Ornament (S4-1231), which was released earlier this year. After allowing the paint to dry, I darkened the edges with a second coat of water color.
I used three strands of blue gray embroidery floss. I created the background (3 5/8″ x 8 5/8″) with this month’s Embossing Folder of the Month. I wanted a showy card, so I used a big slimline card base (8″ x 9″, scored at 4″). I found this card so relaxing to make!
Small Die of the Month – October 2022
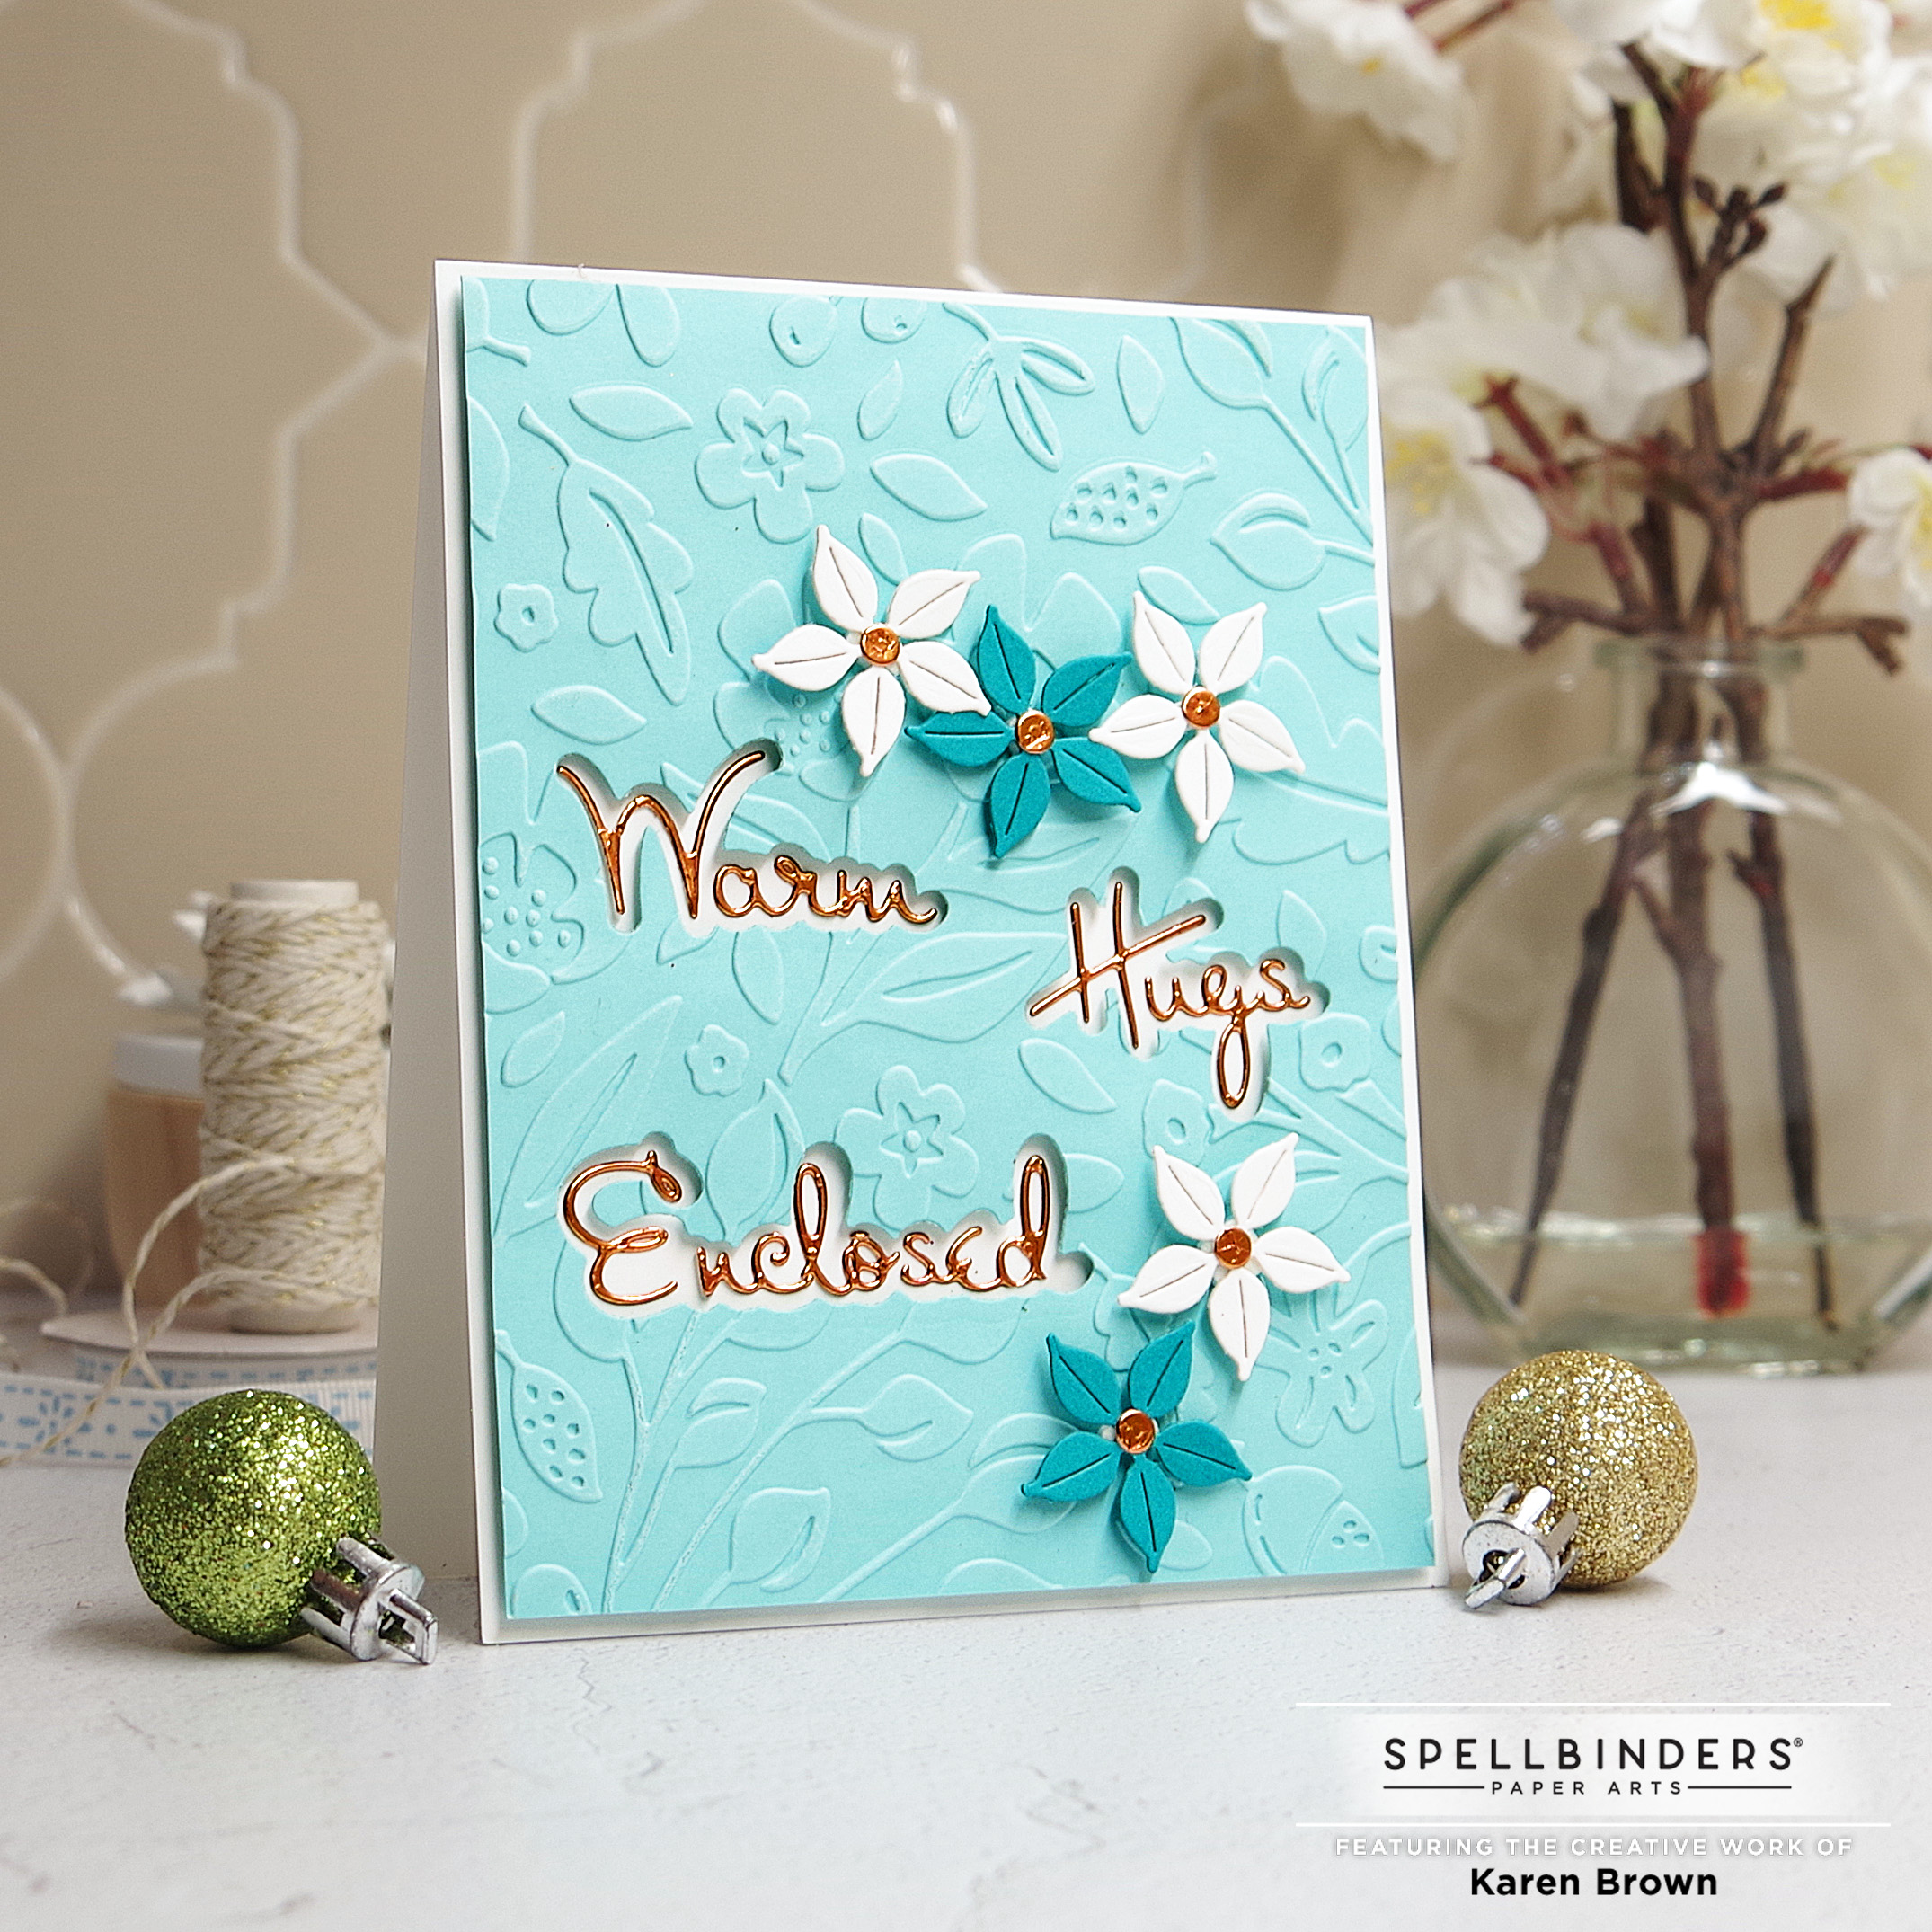
I created a cheerful Get Well card with the Small Die of the Month (Outlined Christmas Sentiments) kit. I love the ten mix and match sentiments (and shadows): Merry, Greetings, Warm, Christmas, Holiday, Wishes, Cheer, Enclosed, Joyous, Hugs.
I started by embossing my background (September 2022 Embossing Folder of the Month: Scattered Fall) on Waterfall Cardstock, and then used the shadow dies to cut an opening for the words Warm Hugs Enclosed. The sentiment was then die cut from Copper Metallic Cardstock. I’ve found it works well if you attach a sheet of double sided adhesive paper to the cardstock prior to die cutting. After you die cut, just pull away the backing paper and apply! I also die cut the poinsettias (included in this month’s kit) from Teal Topaz and white cardstock. The last step was to assemble the A2 Top Folding card with craft foam behind the background and foam tape squares behind the poinsettias.
Embossing Folder of the Month: October 2022
My last card was quick and easy! Using this month’s Embossing Folder (Scattered Christmas). I created my background with blue cardstock. I wanted the lovely embossing to be the star on this card.
I added a bold seasonal sentiment with three enamel dots and added the components to a top folding A2 card base.
I really like dimension when I am designing a card and Altenew’s Instant Dimension Foam Tape will keep me stocked for quite a while. It is a big wheel of double sided foam tape that is about 1/2″ wide and 8’+ long PLUS the release paper is floral and quite fun! I found using foam tape really makes my projects pop.
$300 in total prizes! To celebrate this special blog hop, Altenew is giving away a $50 gift certificate to 2 lucky winners and a $25 gift certificate to 8 winners! Please leave a comment on the Altenew Card Blog and/or each designer’s blog post on the blog hop list below by 10/05/2022 for a chance to win. Altenew will draw 10 random winners from the comments left on each stop of this blog hop and announce the winners on the Altenew Winners Page on 10/06/2022.
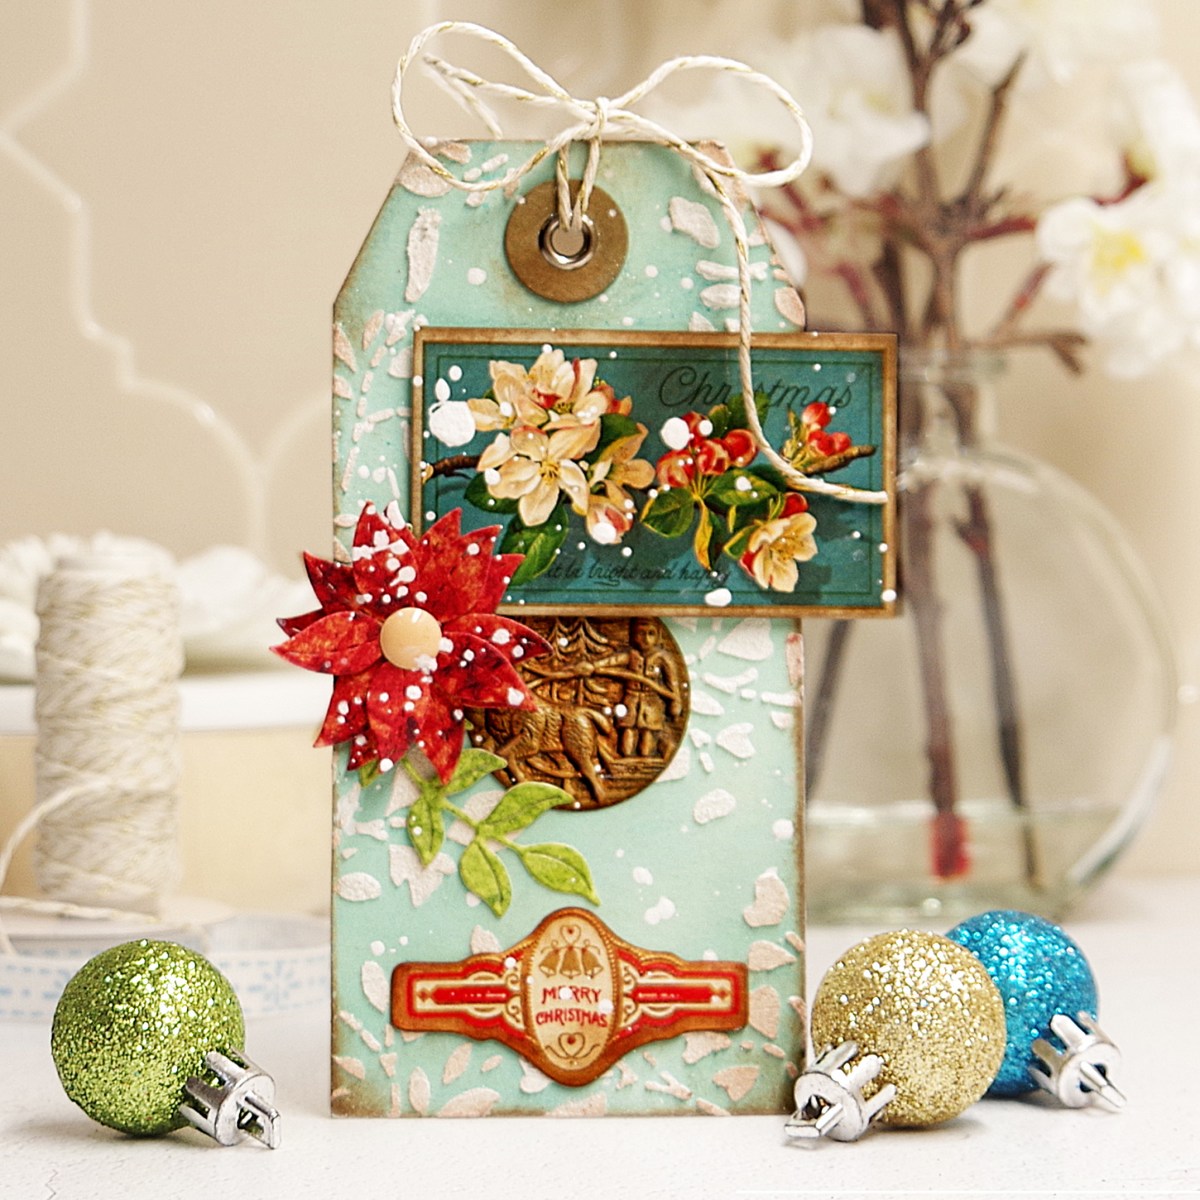
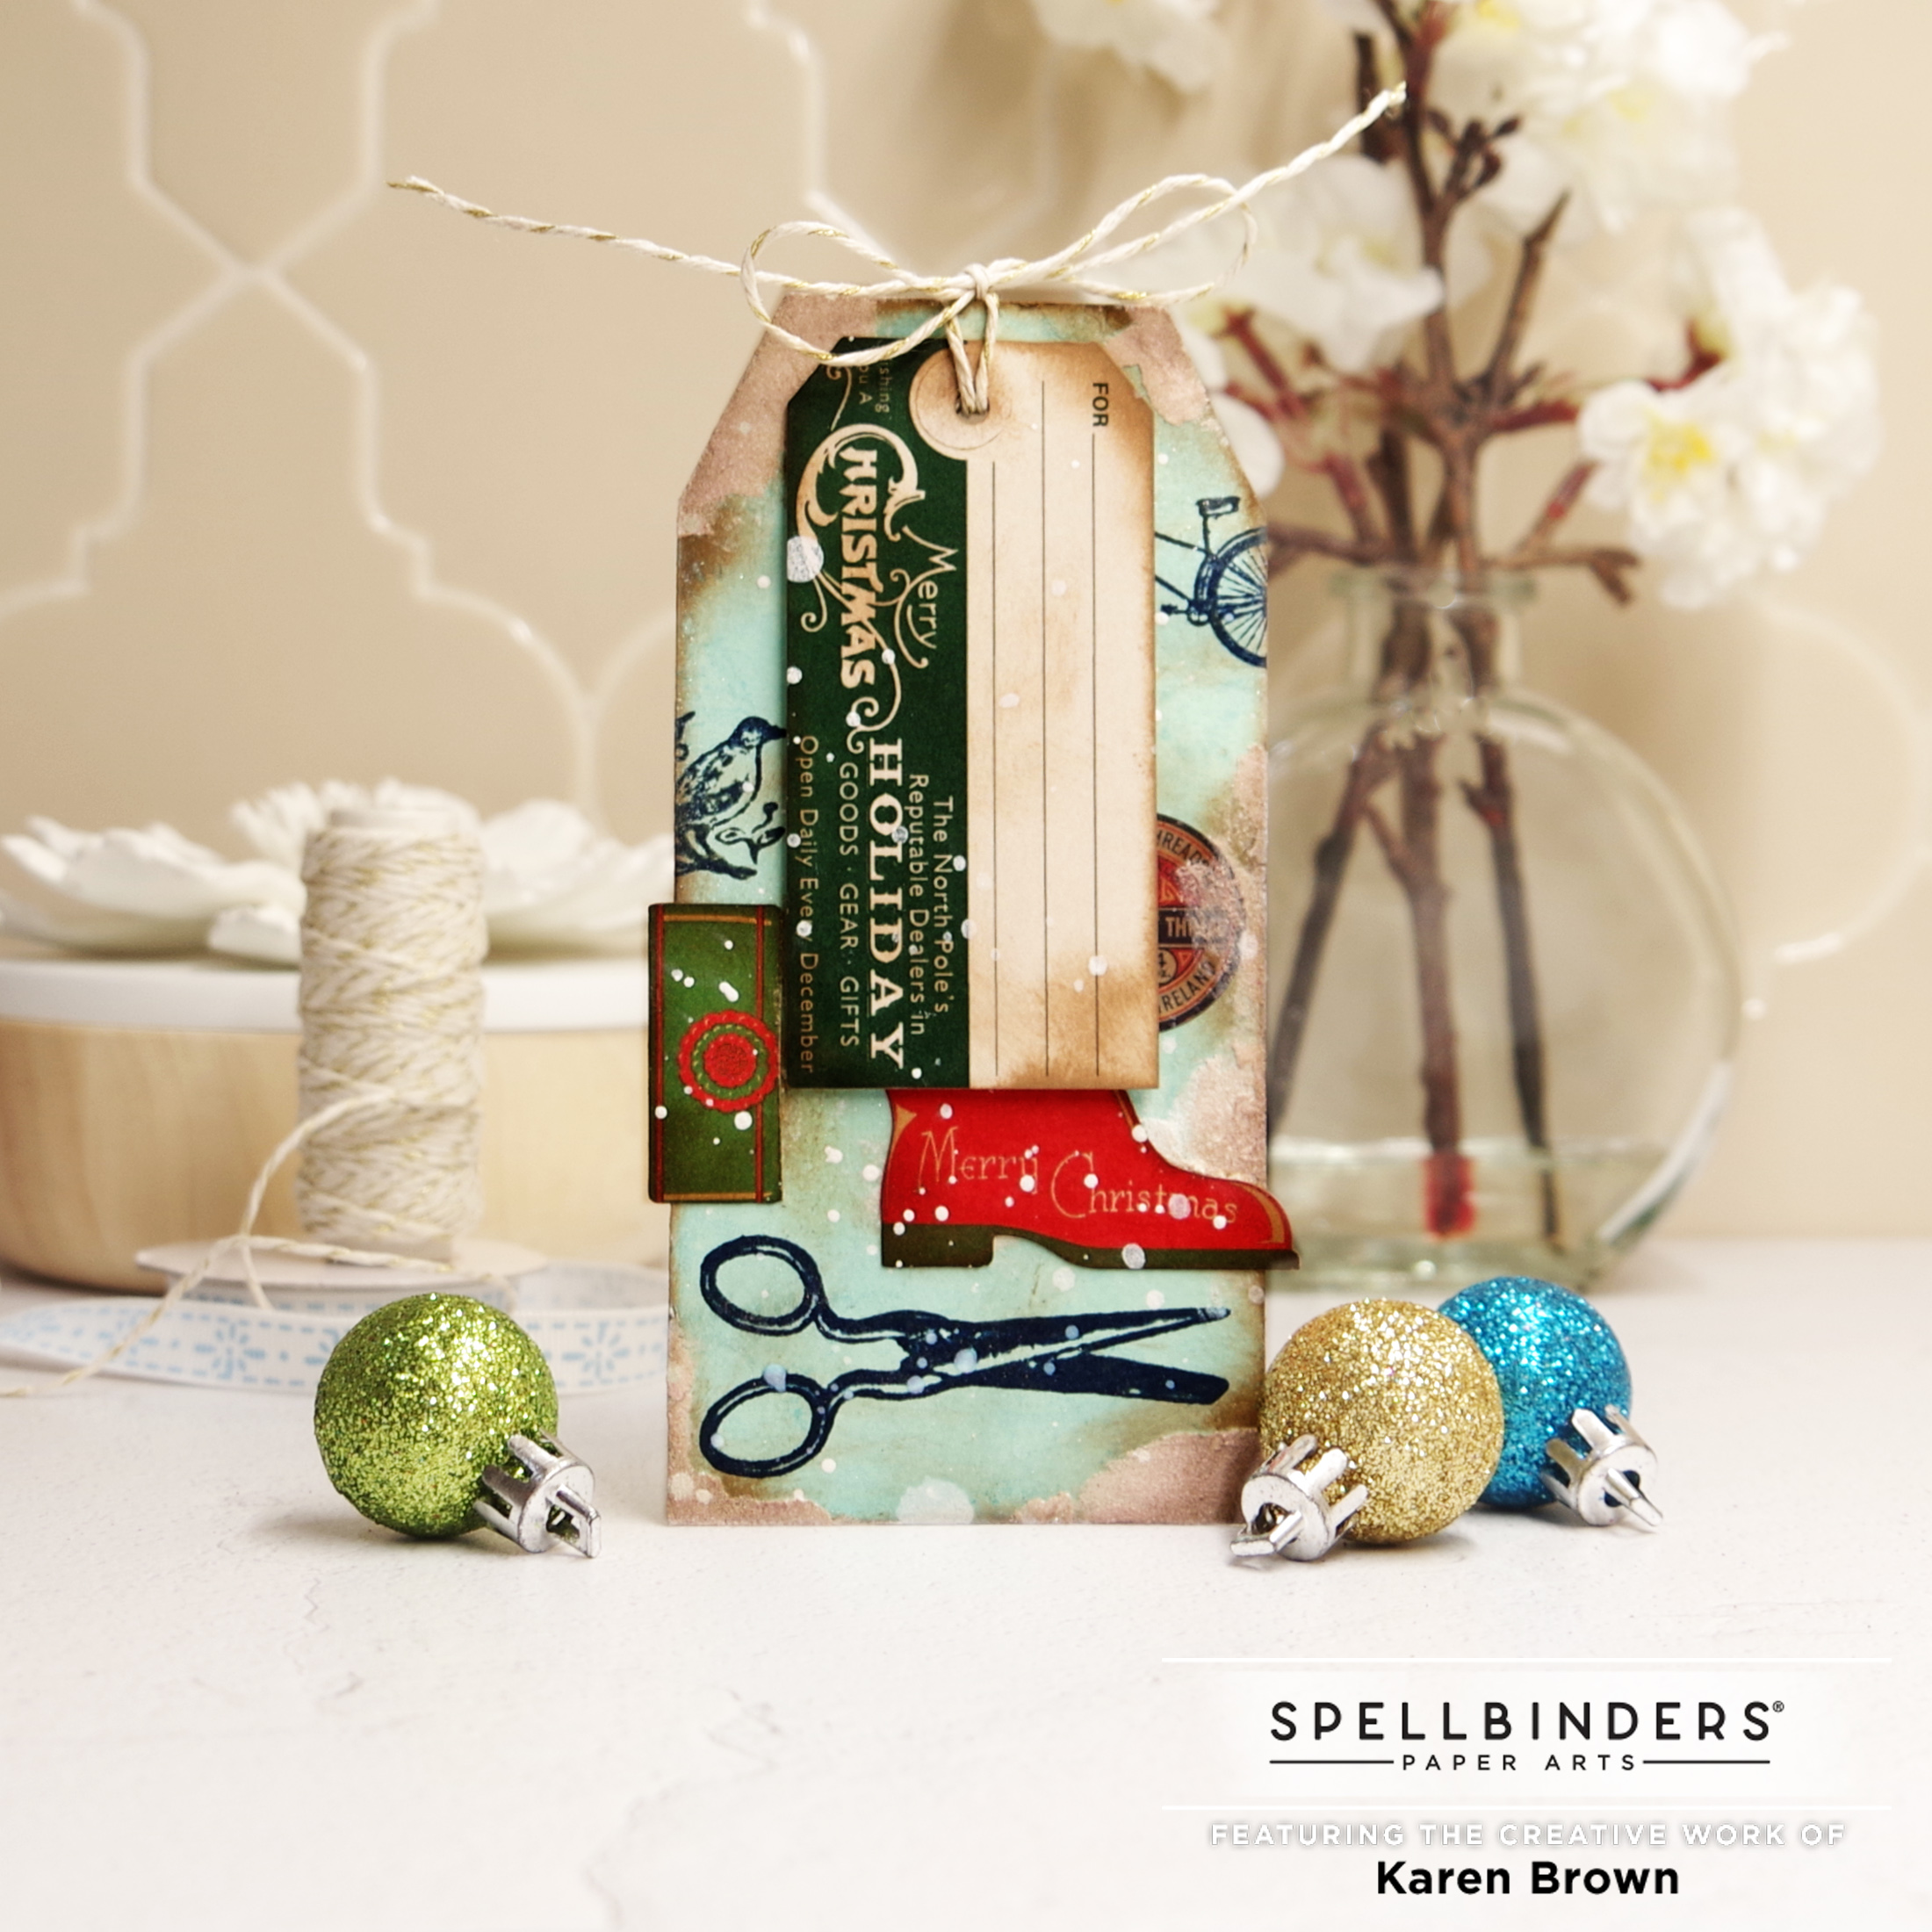
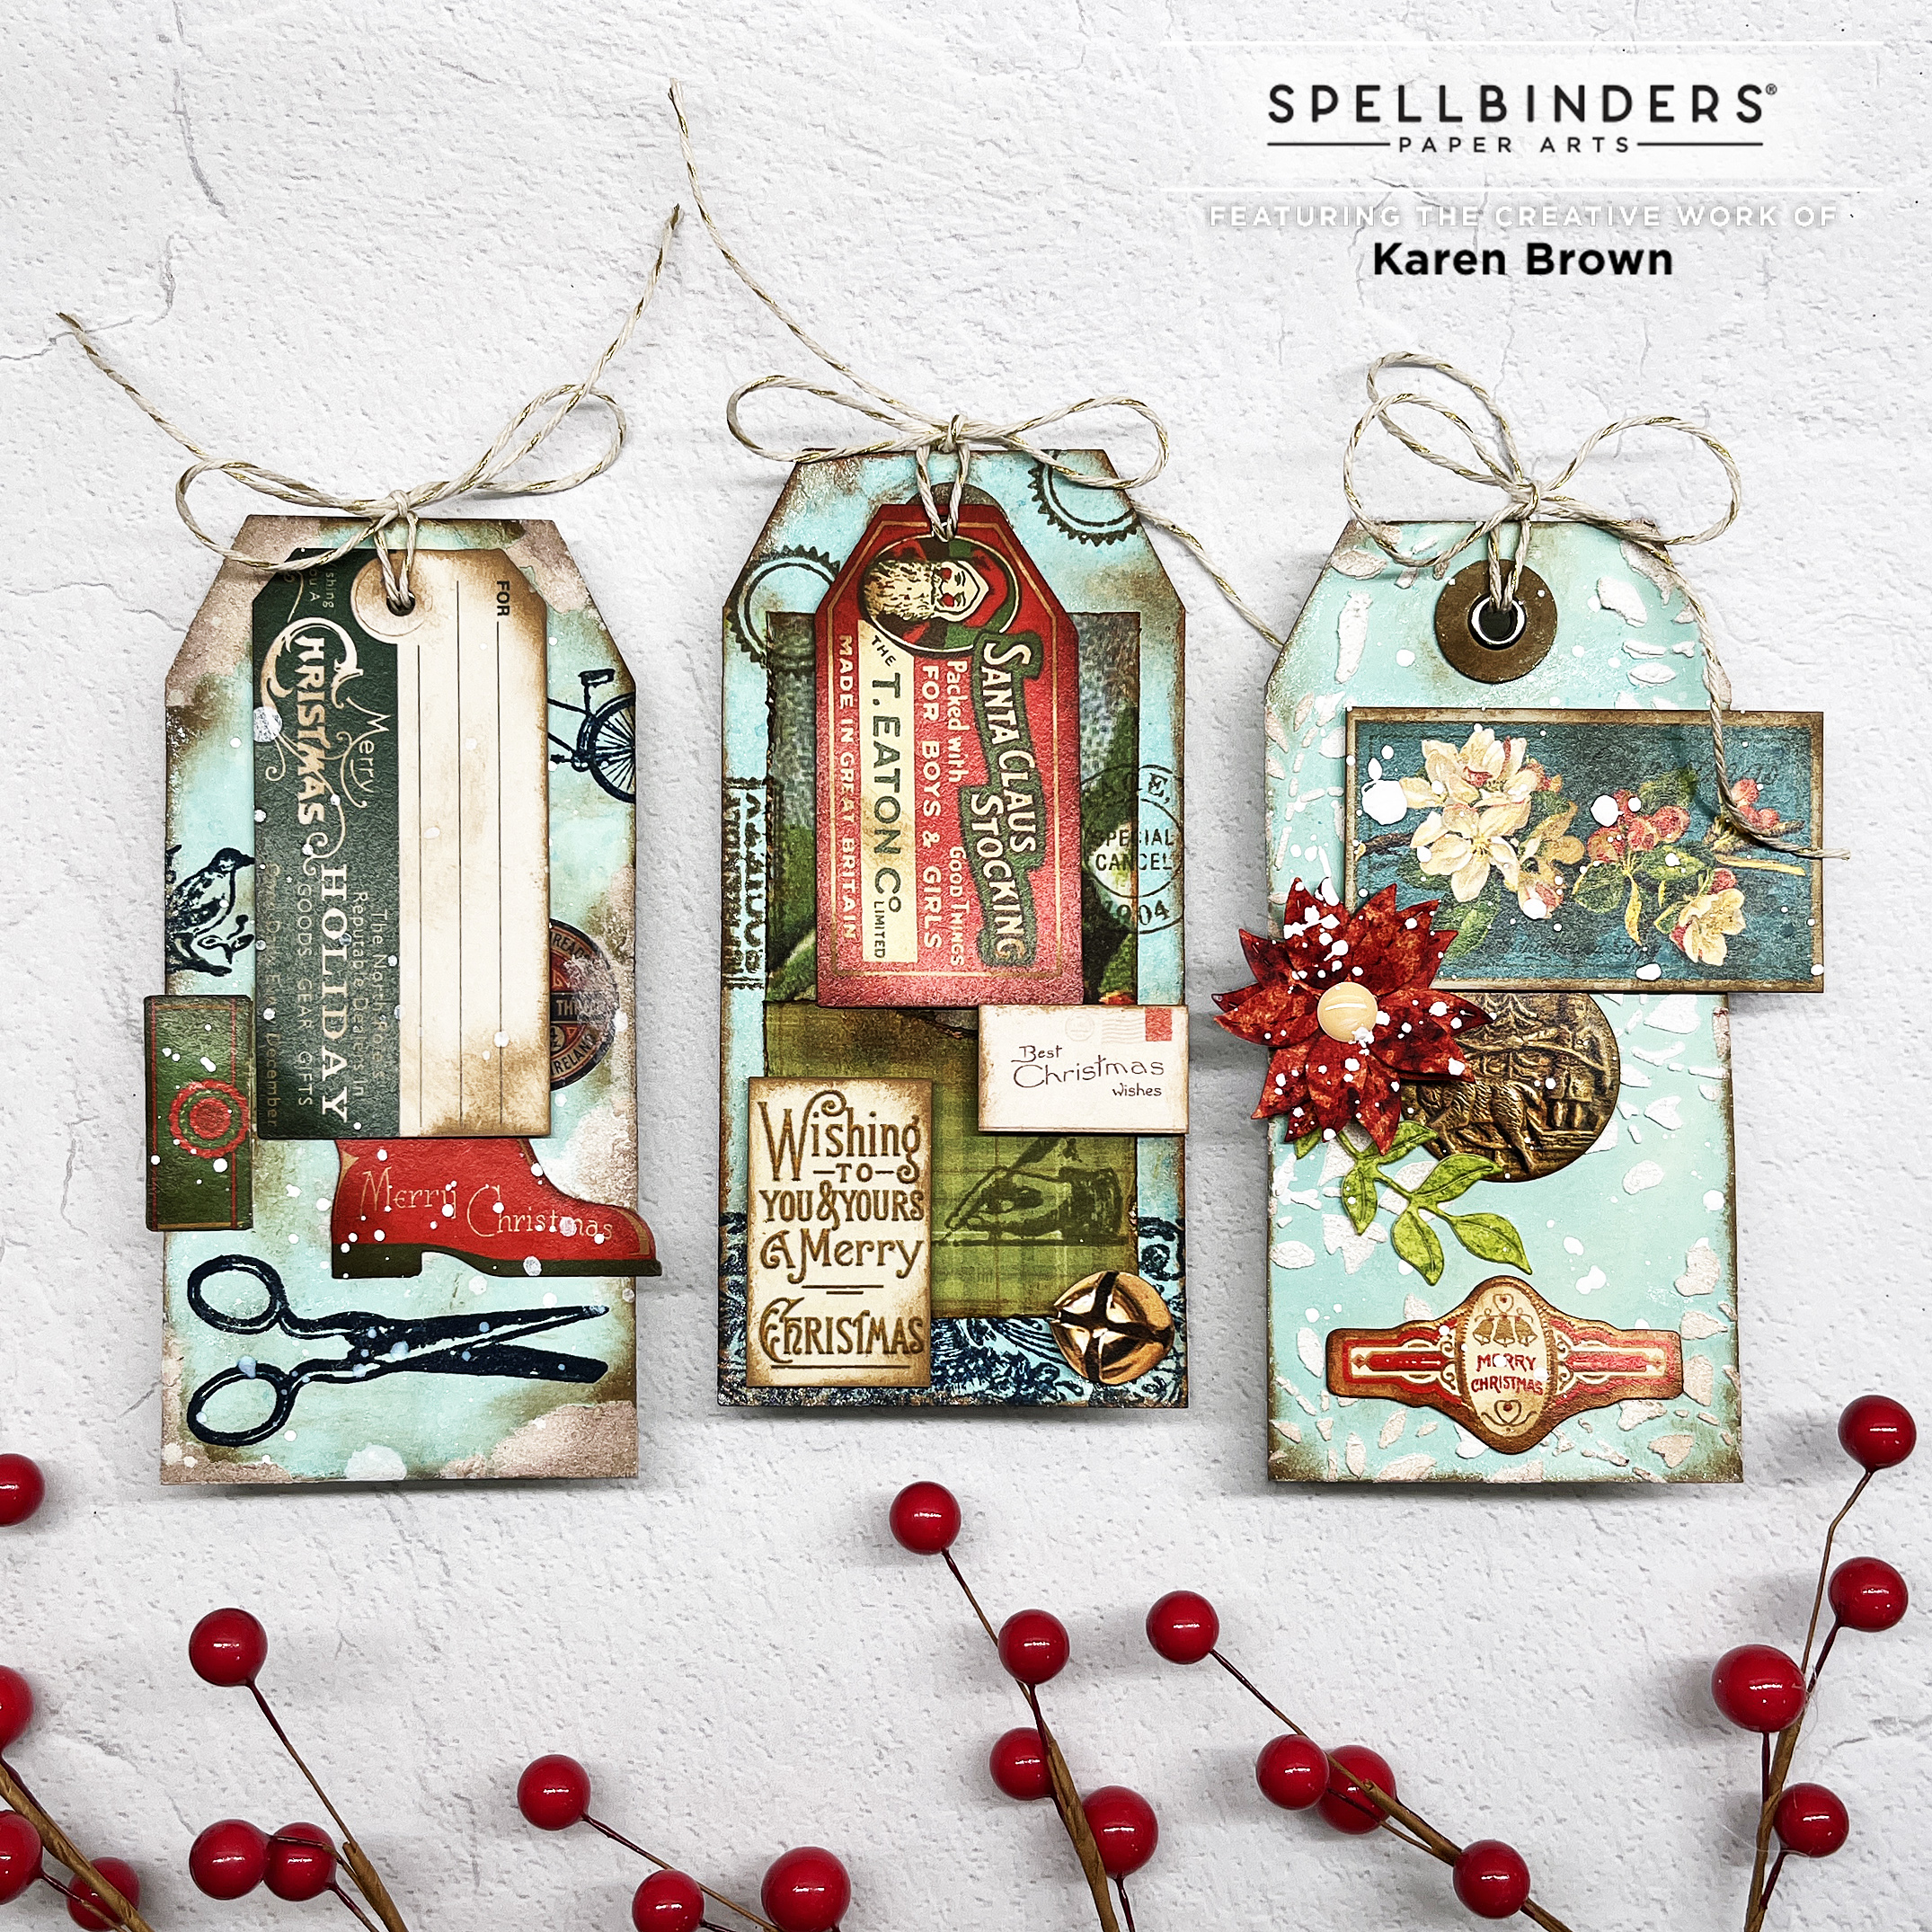
Hello! My post today features a favorite new Spellbinders collection from Cathe Holden called Christmas Flea Market Finds. Cathe included stamps, printed die cuts, paper and stickers and they are SO fun to create with!
I created three mixed media tags with a vintage vibe. For all three tags, I created backgrounds using ink sprays. I mixed Ocean Waves aqua, Shimmer Spray for extra sparkle and a little water spray to slightly dilute the color. I dabbed my tag in the mixture, dried and then repeated two more times.
Next, I worked on my layouts. I knew I wanted to stencil grit paste on one card and I wanted all of the tags to be distressed.
I love the texture and interest that the grit paste adds to the tag.
Two of the cards also include stamps. To get the vintage-look inky blue, I combined denim and brown inks. White paint splatters were added to two of the cards and I thought they added a wintry look.
When I create this type of mixed media project, I love to pull out all my supplies and just start playing. I made a huge fun mess!
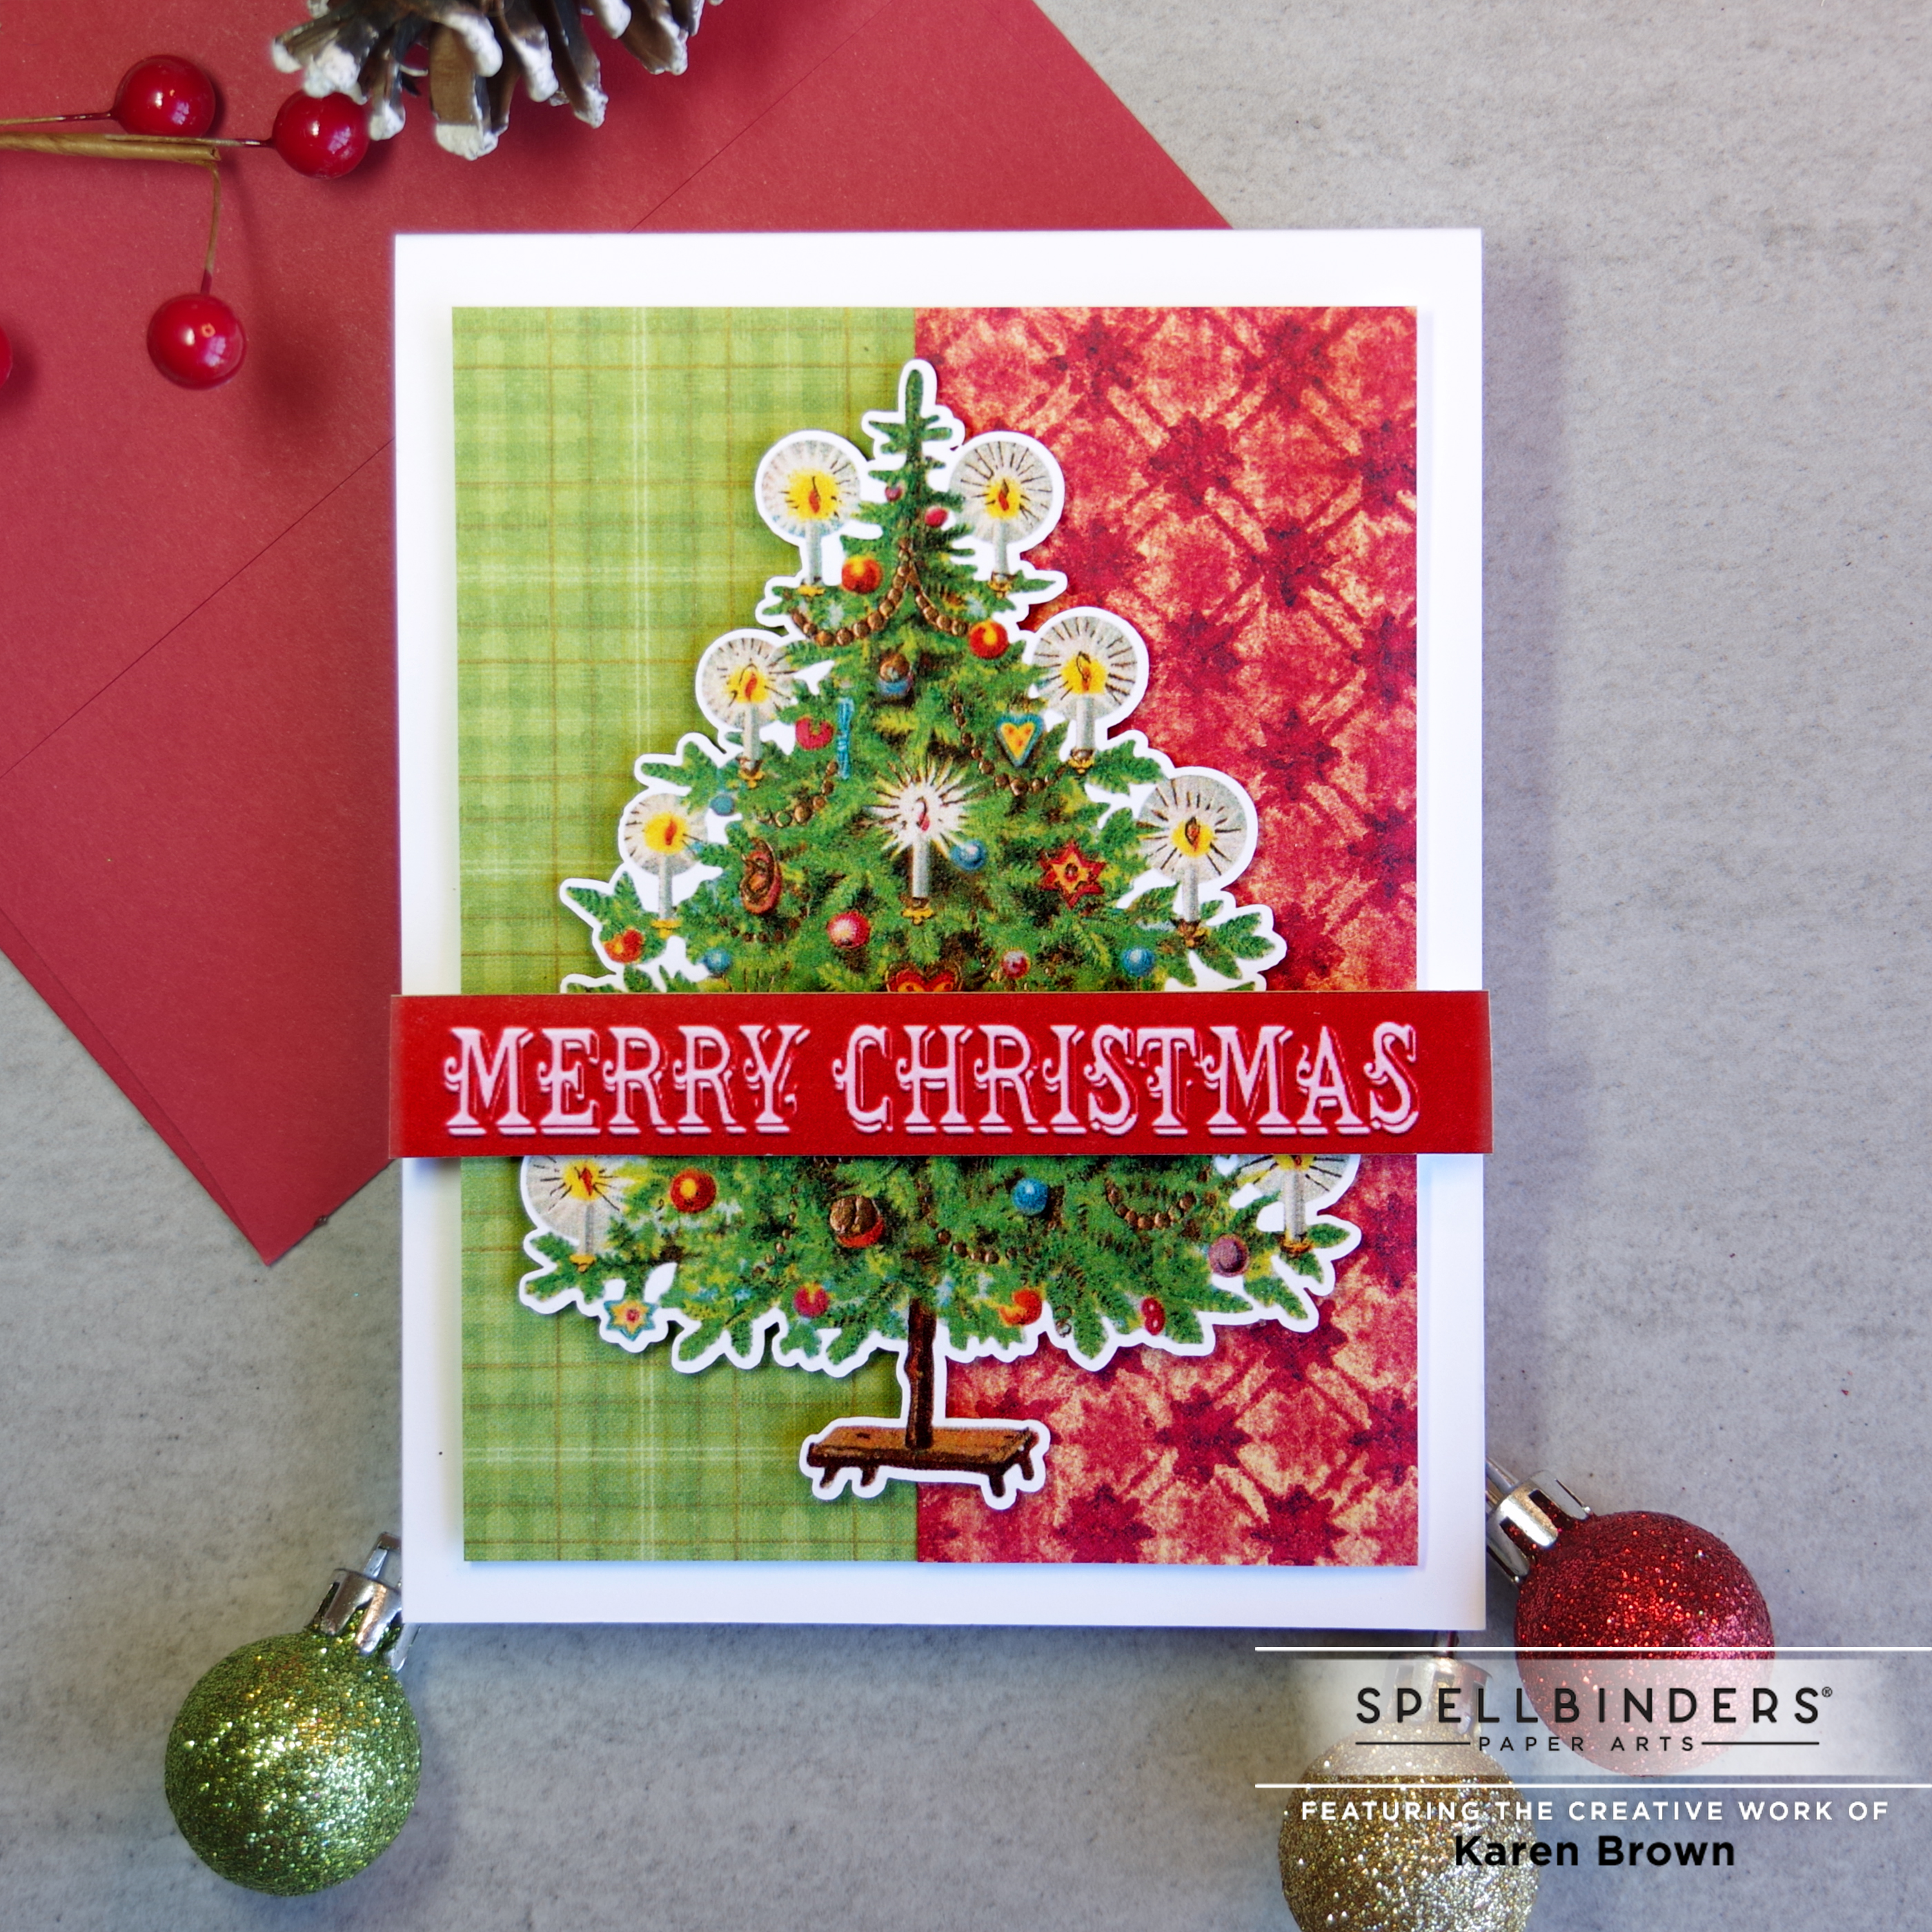
The first card was quick and easy but I love result. My background is made from 2 pages from the paper pad that I combined at the midpoint. Using craft foam for dimesion, I attached the background to an A2 card base. Then, I just popped on the Christmas Tree and sentiment with foam tape.
Cardmaking with Vintage Ephemera
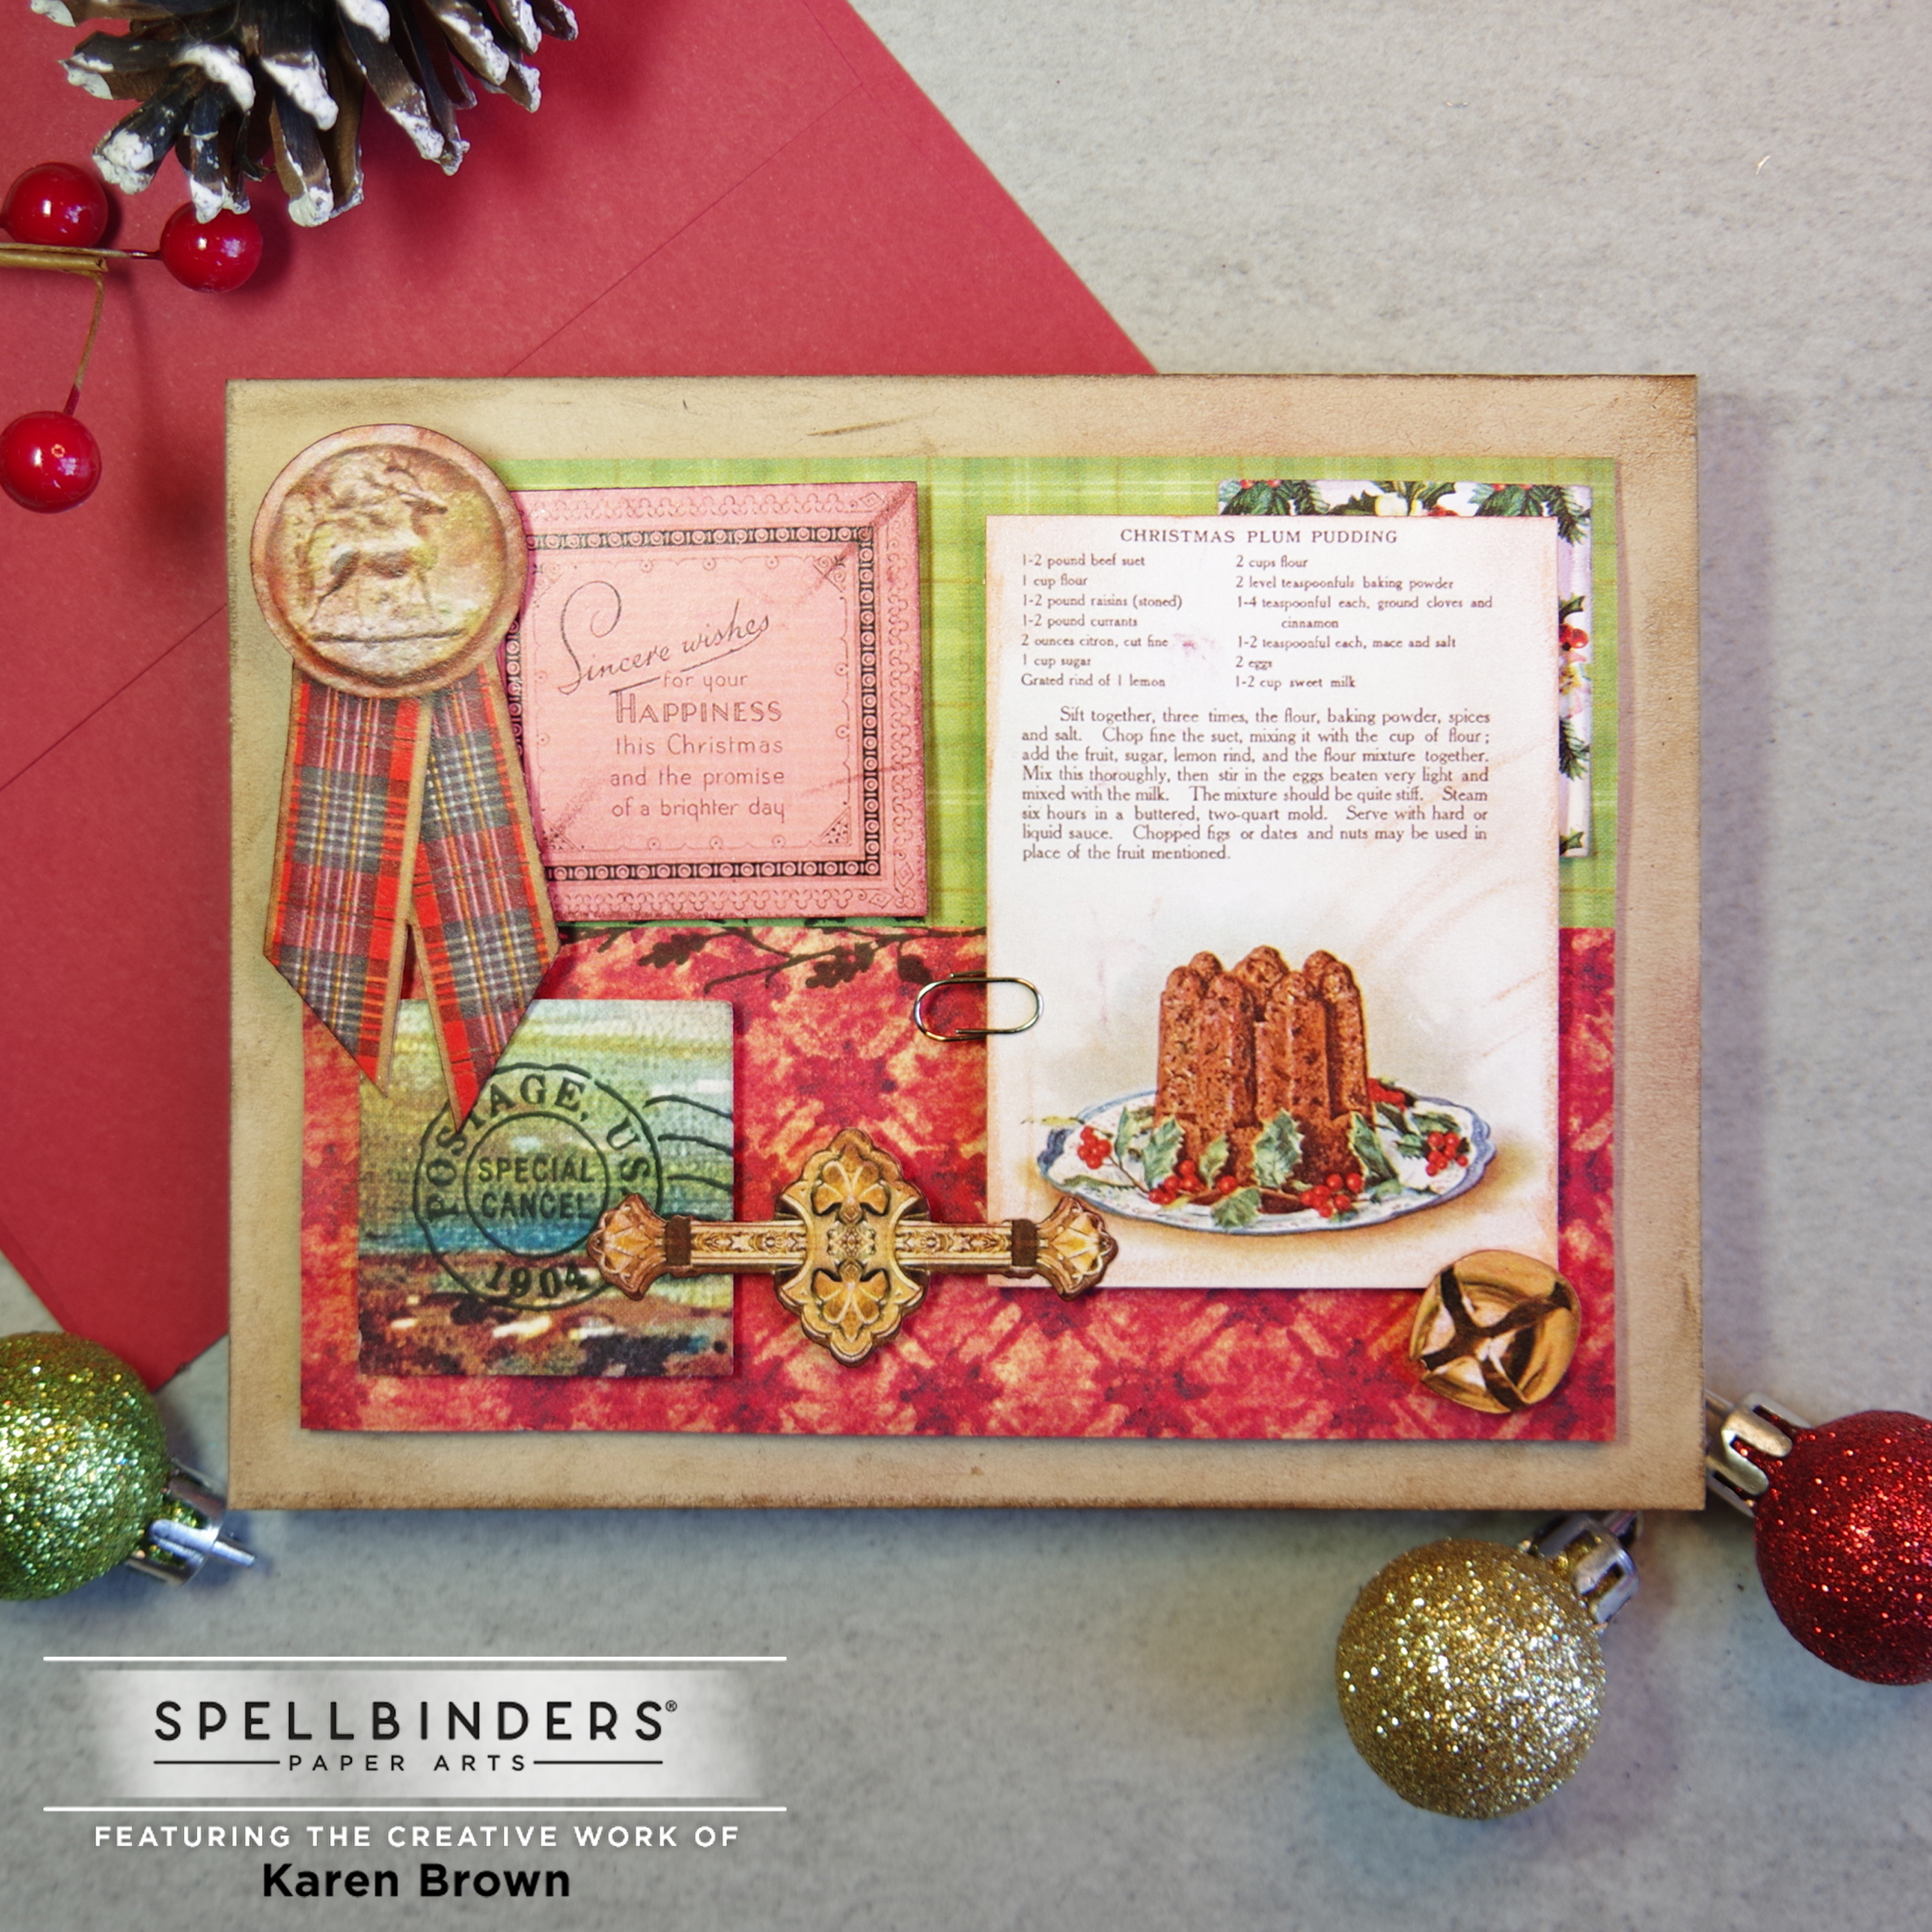
My second card is a collage style pieced together with designer paper, printed die-cuts and stamps. I used 2 rectangles and two 1.25″ squares of paper cut from the Home for the Holidays paper pad for my background. I distressed my kraft card base, background panel and the die cuts with 3 different Distress Crayons (bronze, gathered twig and aged mohogany) and then added lots of ephemera from the Jingle Bells Miscellany die cut pack. I also used 2 stamps from Cathe Holden’s previously released stamp kit called Handle with Care and added a tiny little paper clip.
Hello! I am excited to share a new Spellbinders Collection that releases today called Winter Tales that was designed by the talented Zsoka Marko. I was instantly attracted to this die kit called Magical Deer: S4-1215. I love the Nordic look and used Scandanavian red and blue as accent colors to give the neutrals some pop.
None of the dies are particularly big so I chose three browns, a red and a blue from my scrap pile. I glued all the pieces, except the deer’s head, directly to my background. I used foam tape for the head and I added crystal accents (SCS-128) to my flower centers. The sentiment is from the Amazing Paper Grace Christmas Tree kit (which is currently on sale!). For a bit more color, I added a matching red border to my background and then popped it on an A2 Top Folding Card Base. This card came together very quickly and I am pleased with the finished result.
Hello and thanks for stopping by! I was in a mood to use my paper scraps again. My old square paper punch was out of whack so I purchased a new one and put it to use cutting squares from leftover colorful gel press scraps. I LOVE this bold rainbow hued look! I die cut an extra large sentiment: Altenew’s Mega Hello to finish the card.
Its harvest time and I love the veggies and adorable tractor included with this month’s Large Die of the Month kit called Thankful Tractor! The kit is large so I made a substantial 5 x 7″ card. I used bright bold green, yellow and orange cardstock for my focal elements. To set the stage I embossed my background with the September Embossing Folder of the Month. Next, I tore a piece of kraft cardstock and then lightly ink blended my “dirt”. I assembled my project with glue and foam tape. I found using a sticky mat helped with the die cut assembly.
I love the vegetables so much that I made a second card. I again embossed the background with the September Embossing Folder of the Month. The basket was die cut from Frosted Silver Mirror Cardstock using last month’s Large Die Kit of the Month called “Strawberry Patch”.
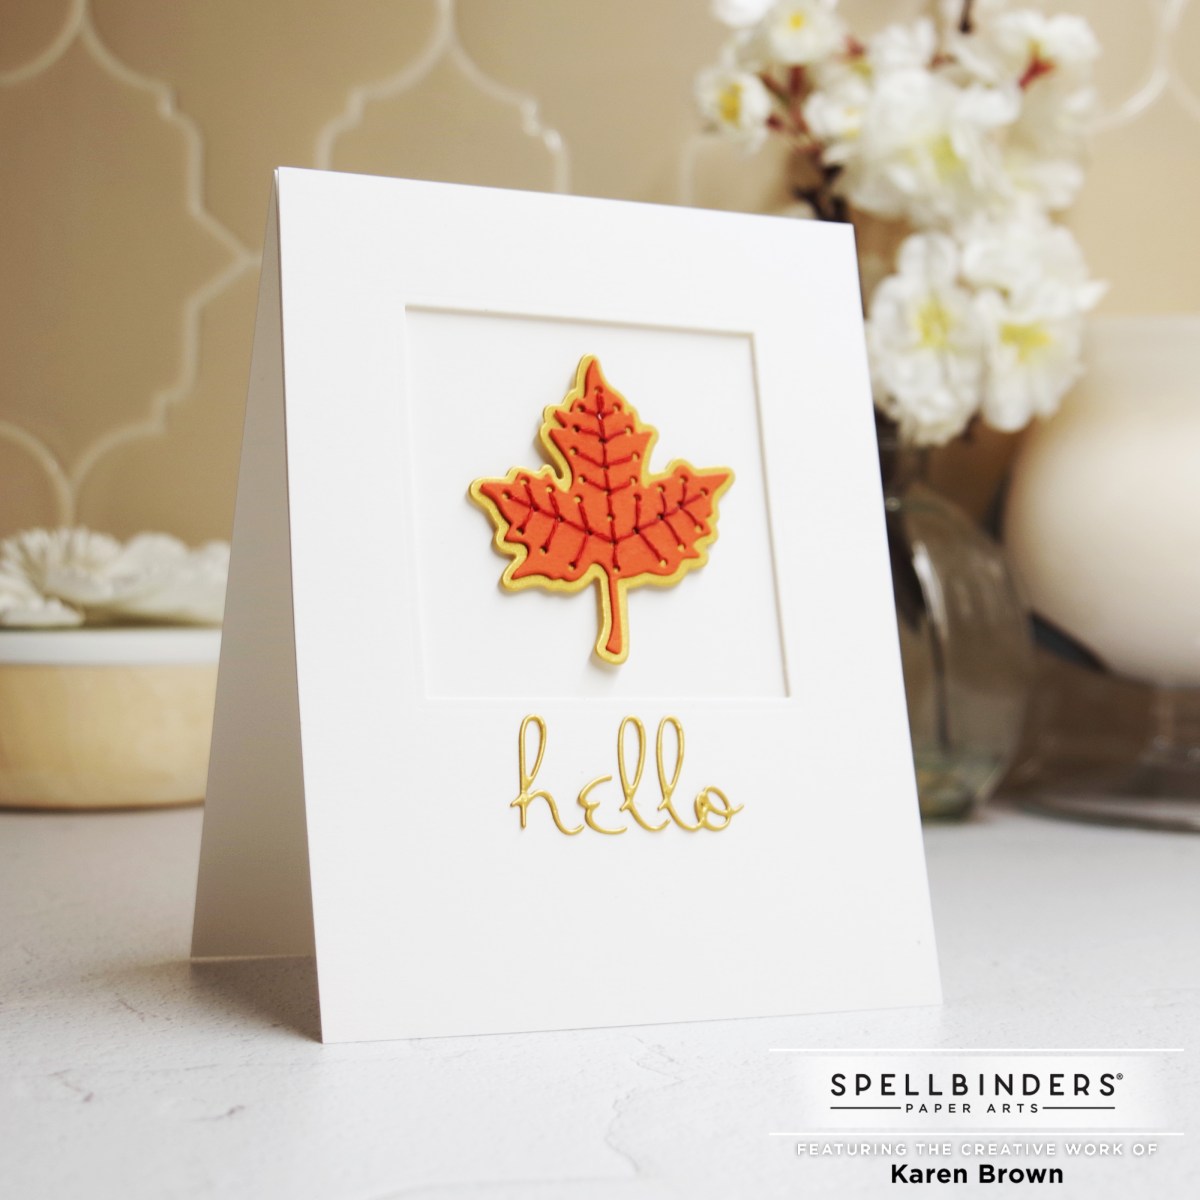
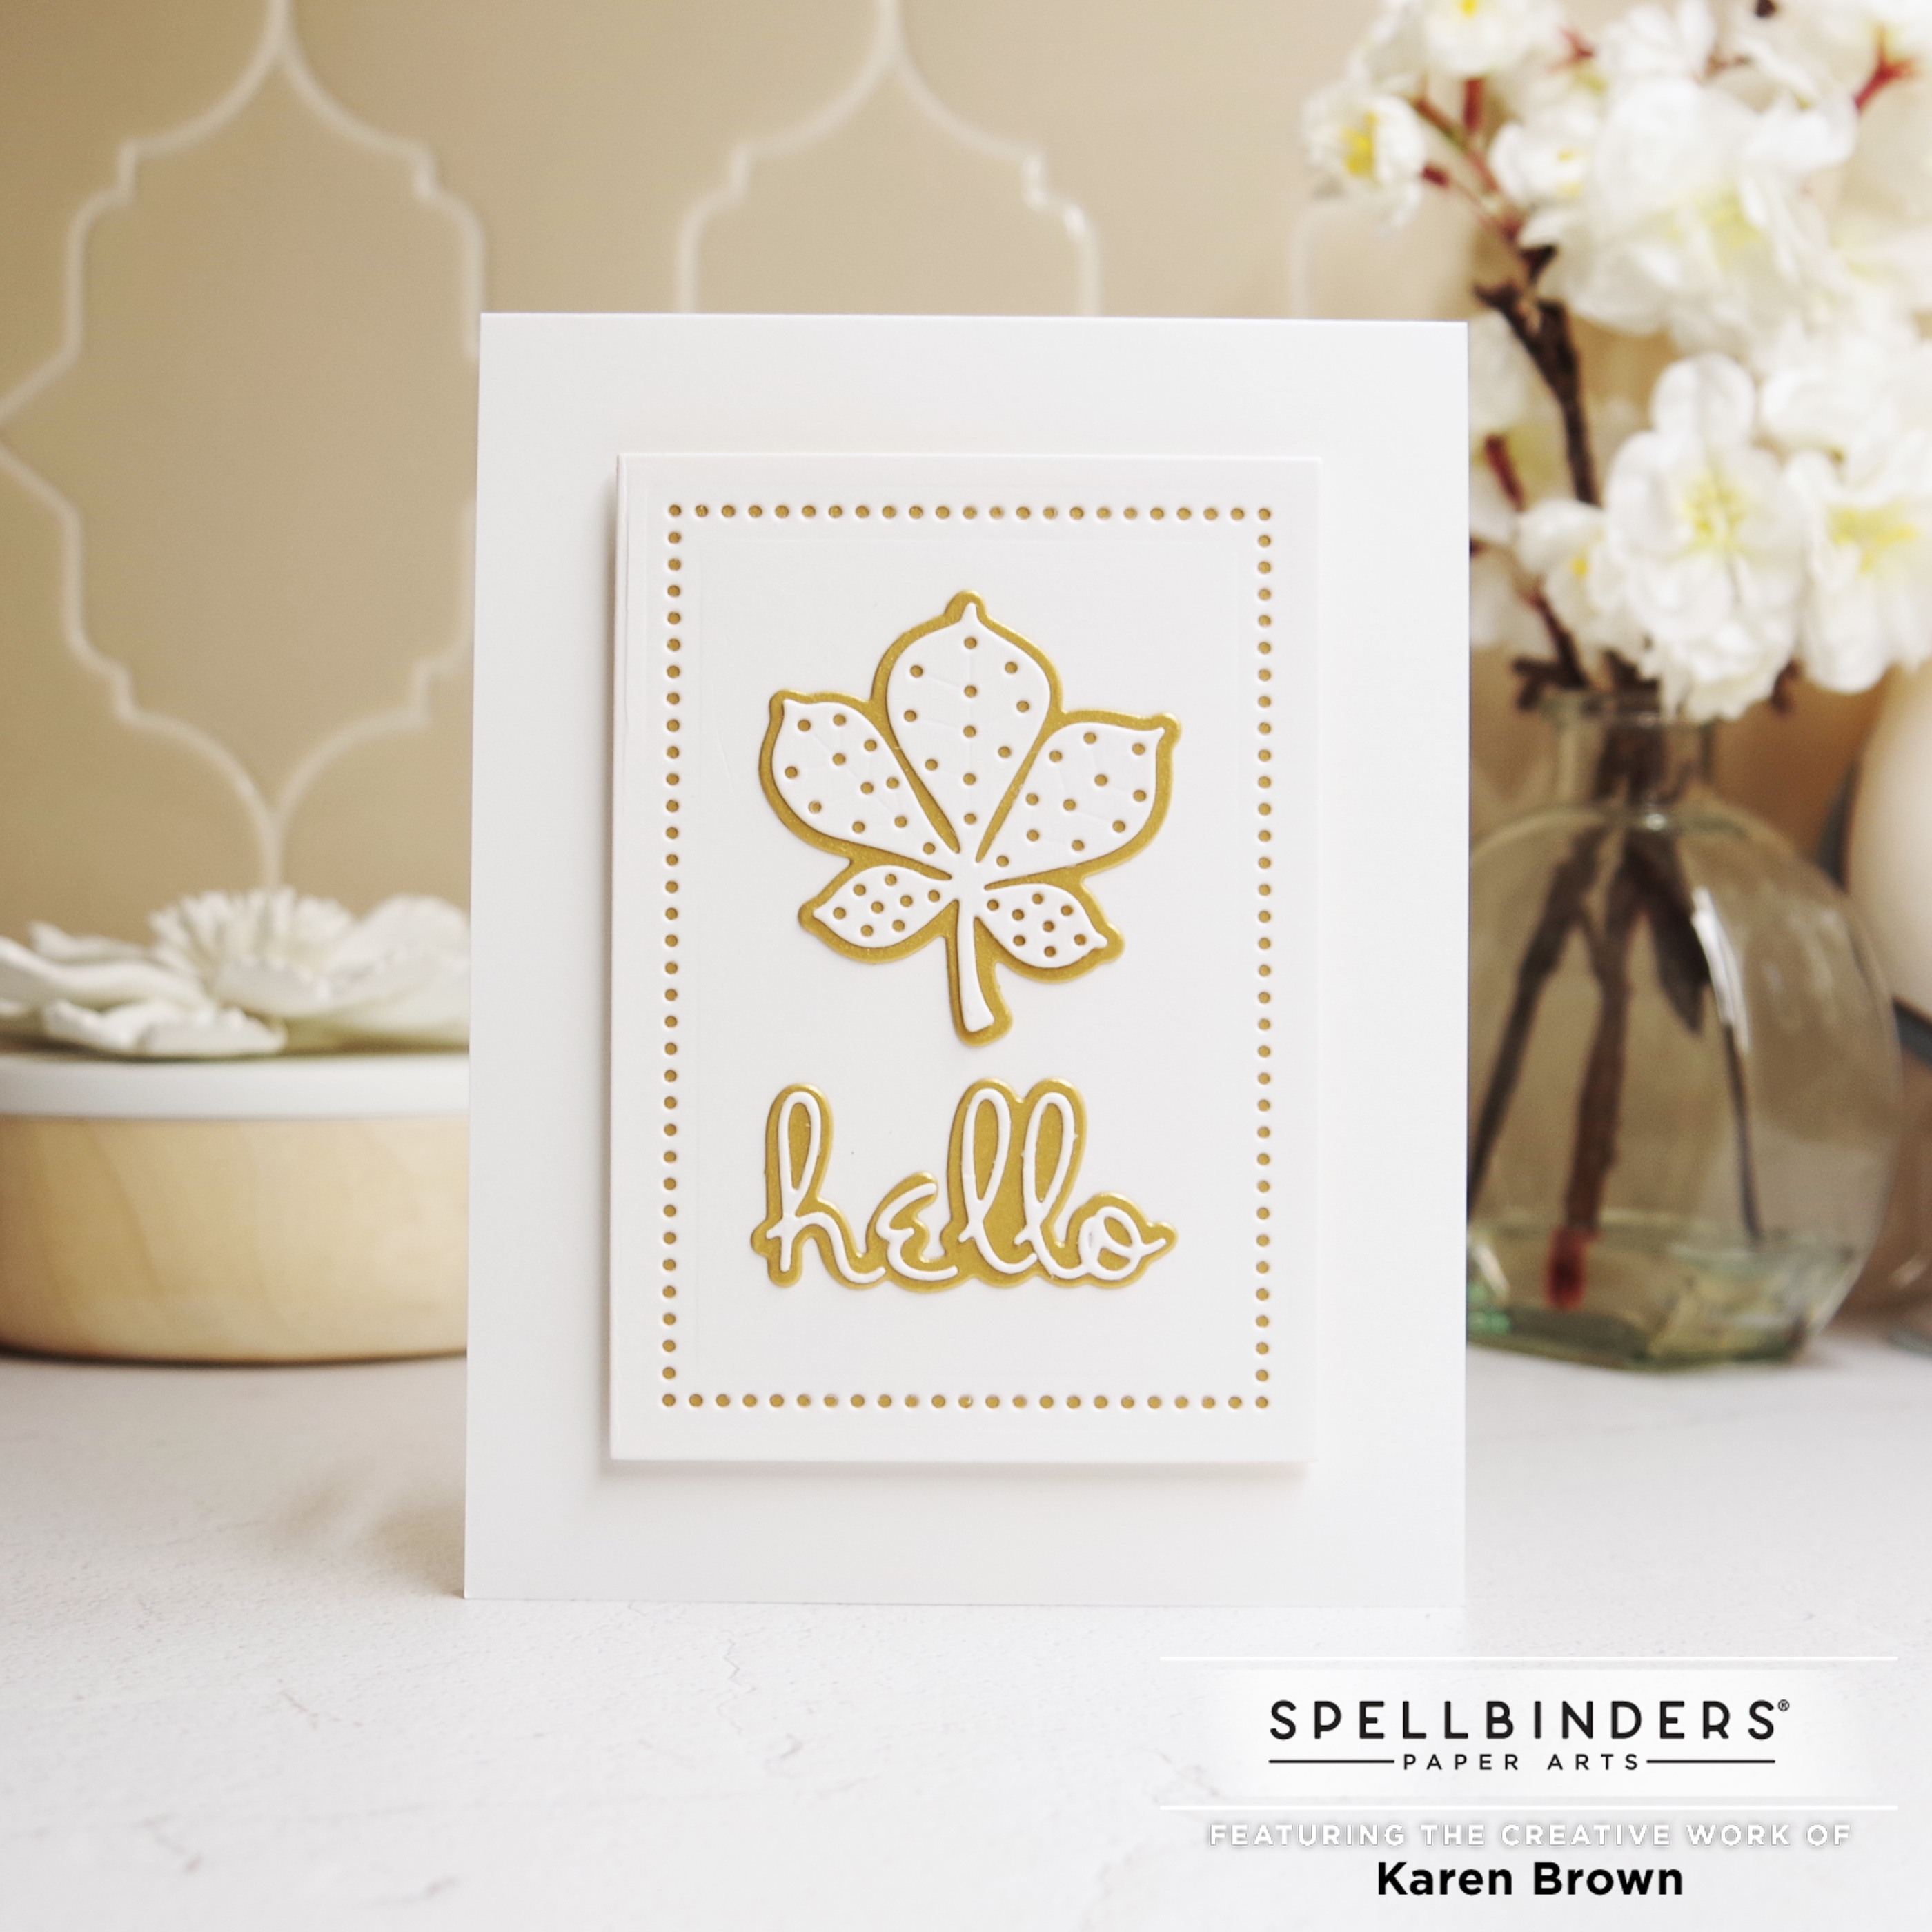
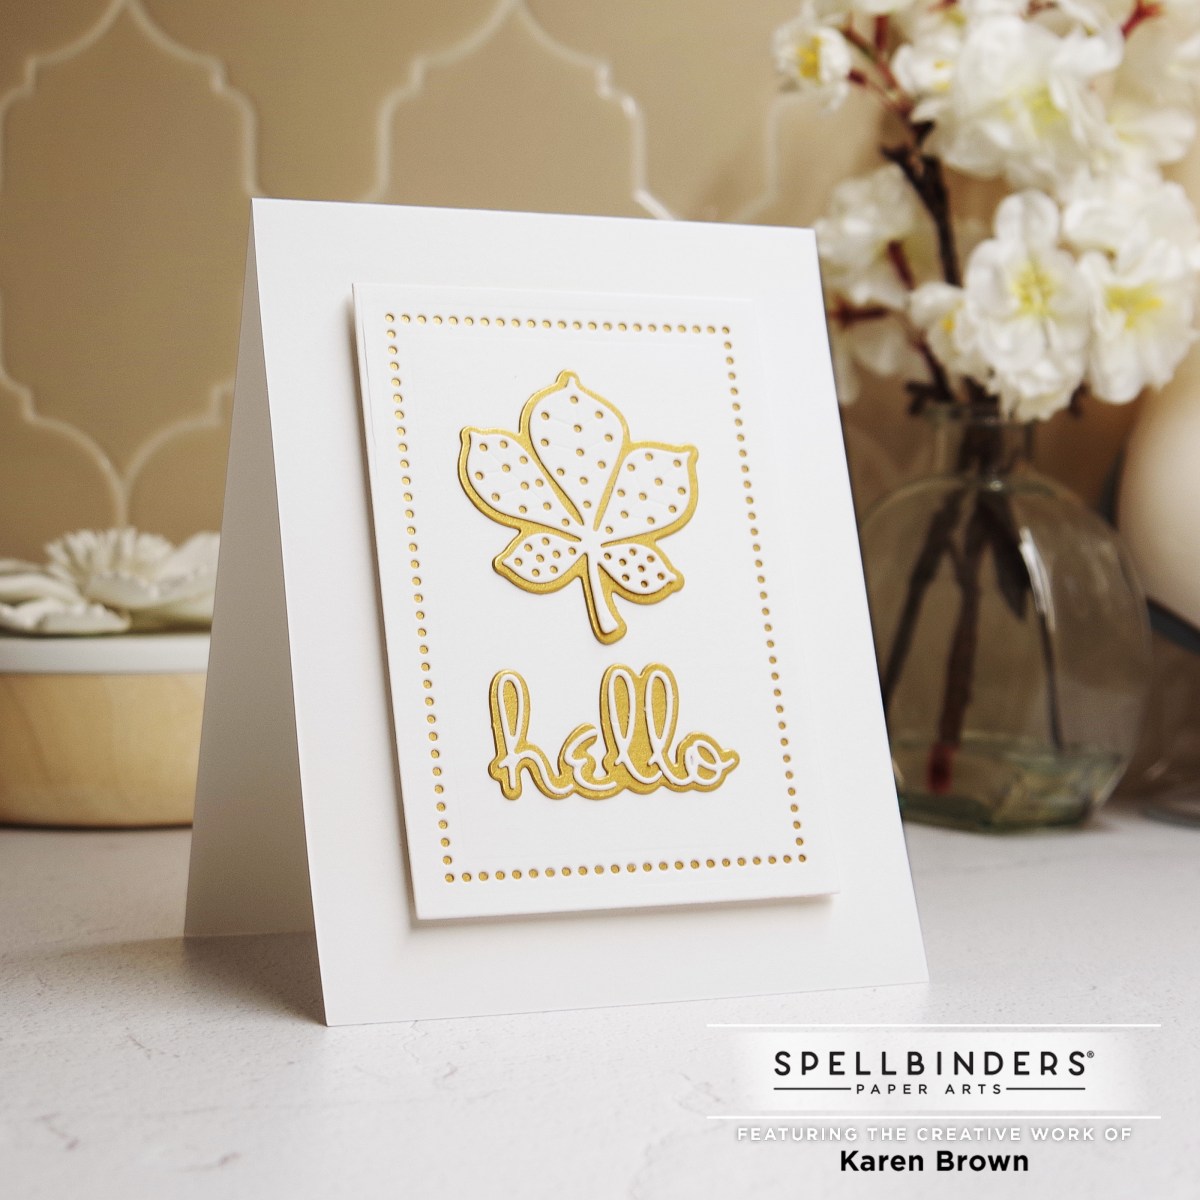
This month’s Small Die of the Month has loads of beautiful stitched leaves with coordinating shadows plus two word sentiments (hello fall). For my first card, I wanted to showcase the elegant simplicity of just one leaf. The stitching went very quickly and I kept the rest of the card clean and simple.
I used the included hello sentiment die. This is a beautiful yet delicate die and I’ve found it works well if you attach a sheet of double sided adhesive paper to the cardstock prior to die cutting. After you die cut, just pull away the backing paper and apply!
Wouldn’t it be fun to make a series of these as a gift?
DMC #355 Dark Terra Cotta Floss (I used two strands)
Large Eye Embroidery Needle
Square Die
Foam Tape
“Unstitched” Card
“Unstitched” Fall Leaves
The leaf dies in the September Small Die of the Month kit are so fun that I wanted to make a card without stitching. To keep the theme, I mounted the leaf and shadow on a panel die-cut with one of my favorites, Essential Rectangles Dies. I love how this keeps the unstitched card theme. The gold details are achieved using Brushed Gold Cardstock and I mounted the panel with foam tape on an A2 Top Fold Cardbase. I find the result is a fresh clean card.
I think the September kits are sure to be favorites…what do you think?
Masculine cards can be tricky, but I think using bold gel press prints with a mega sentiment works well for the men in our lives.
I sorted through my gel press prints looking for colorful pages that would work well together. I then tore them into strips and pieces and added some doodling with gel pens and Posca pens.
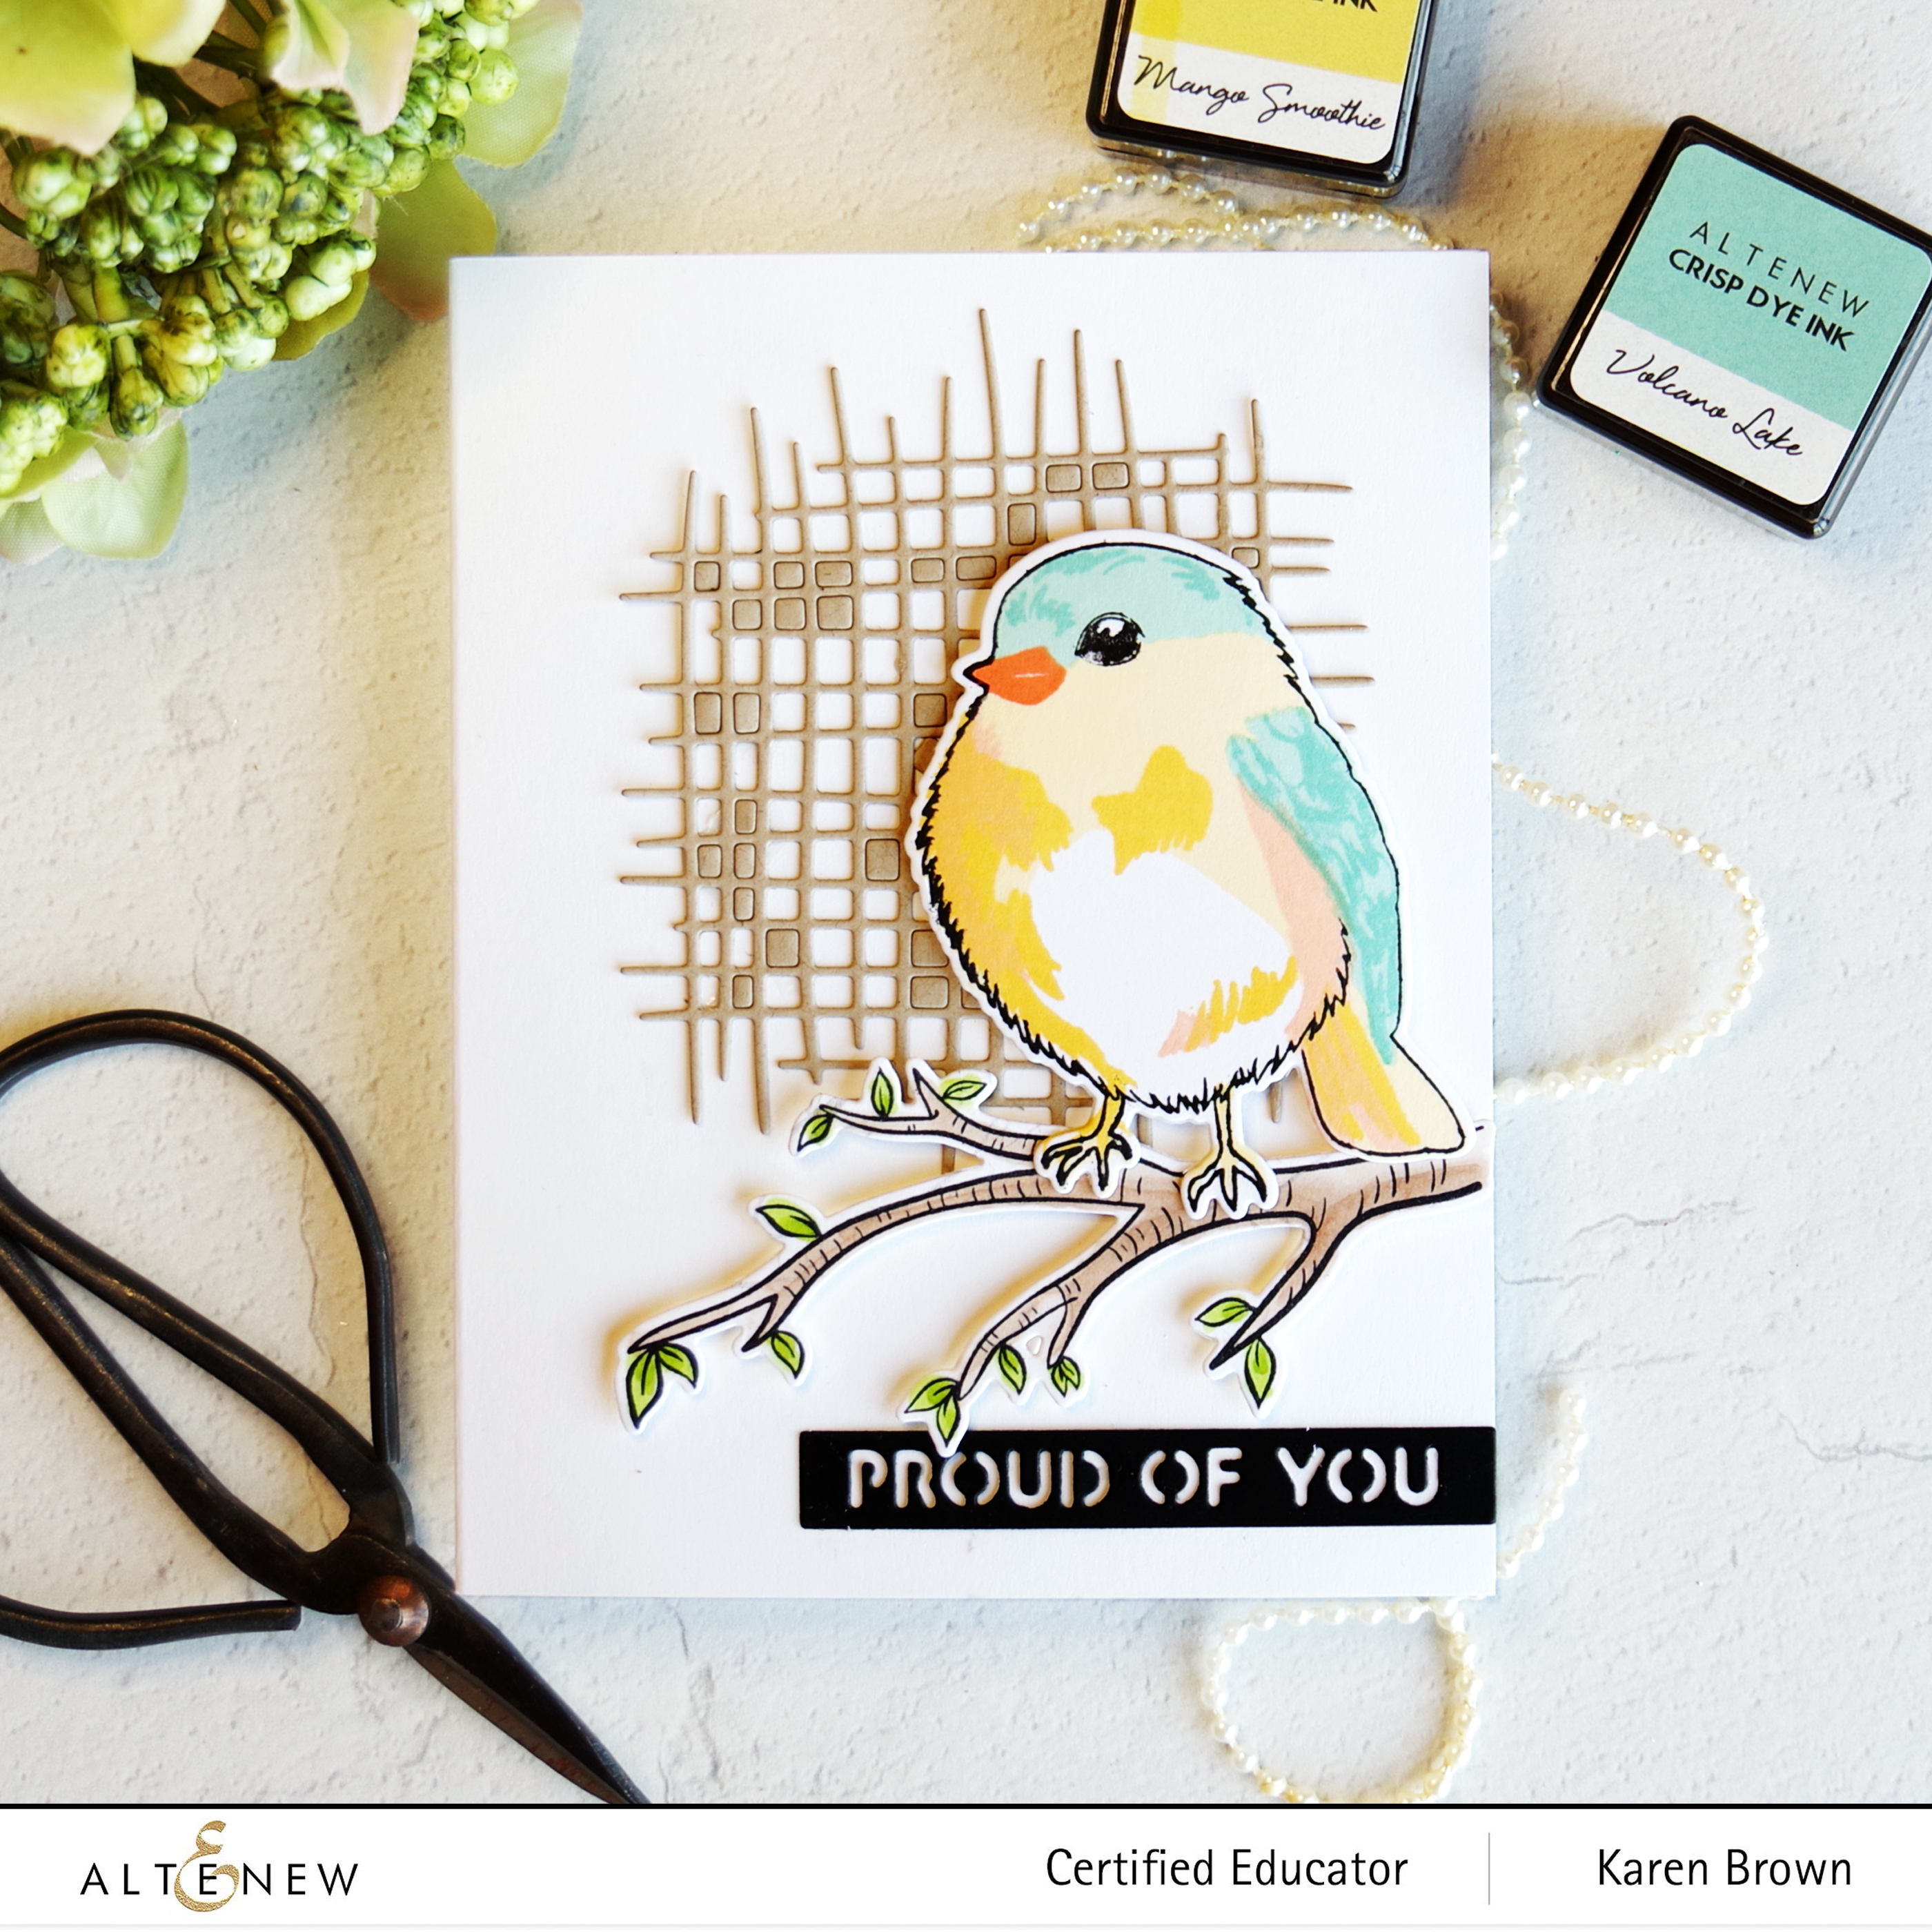
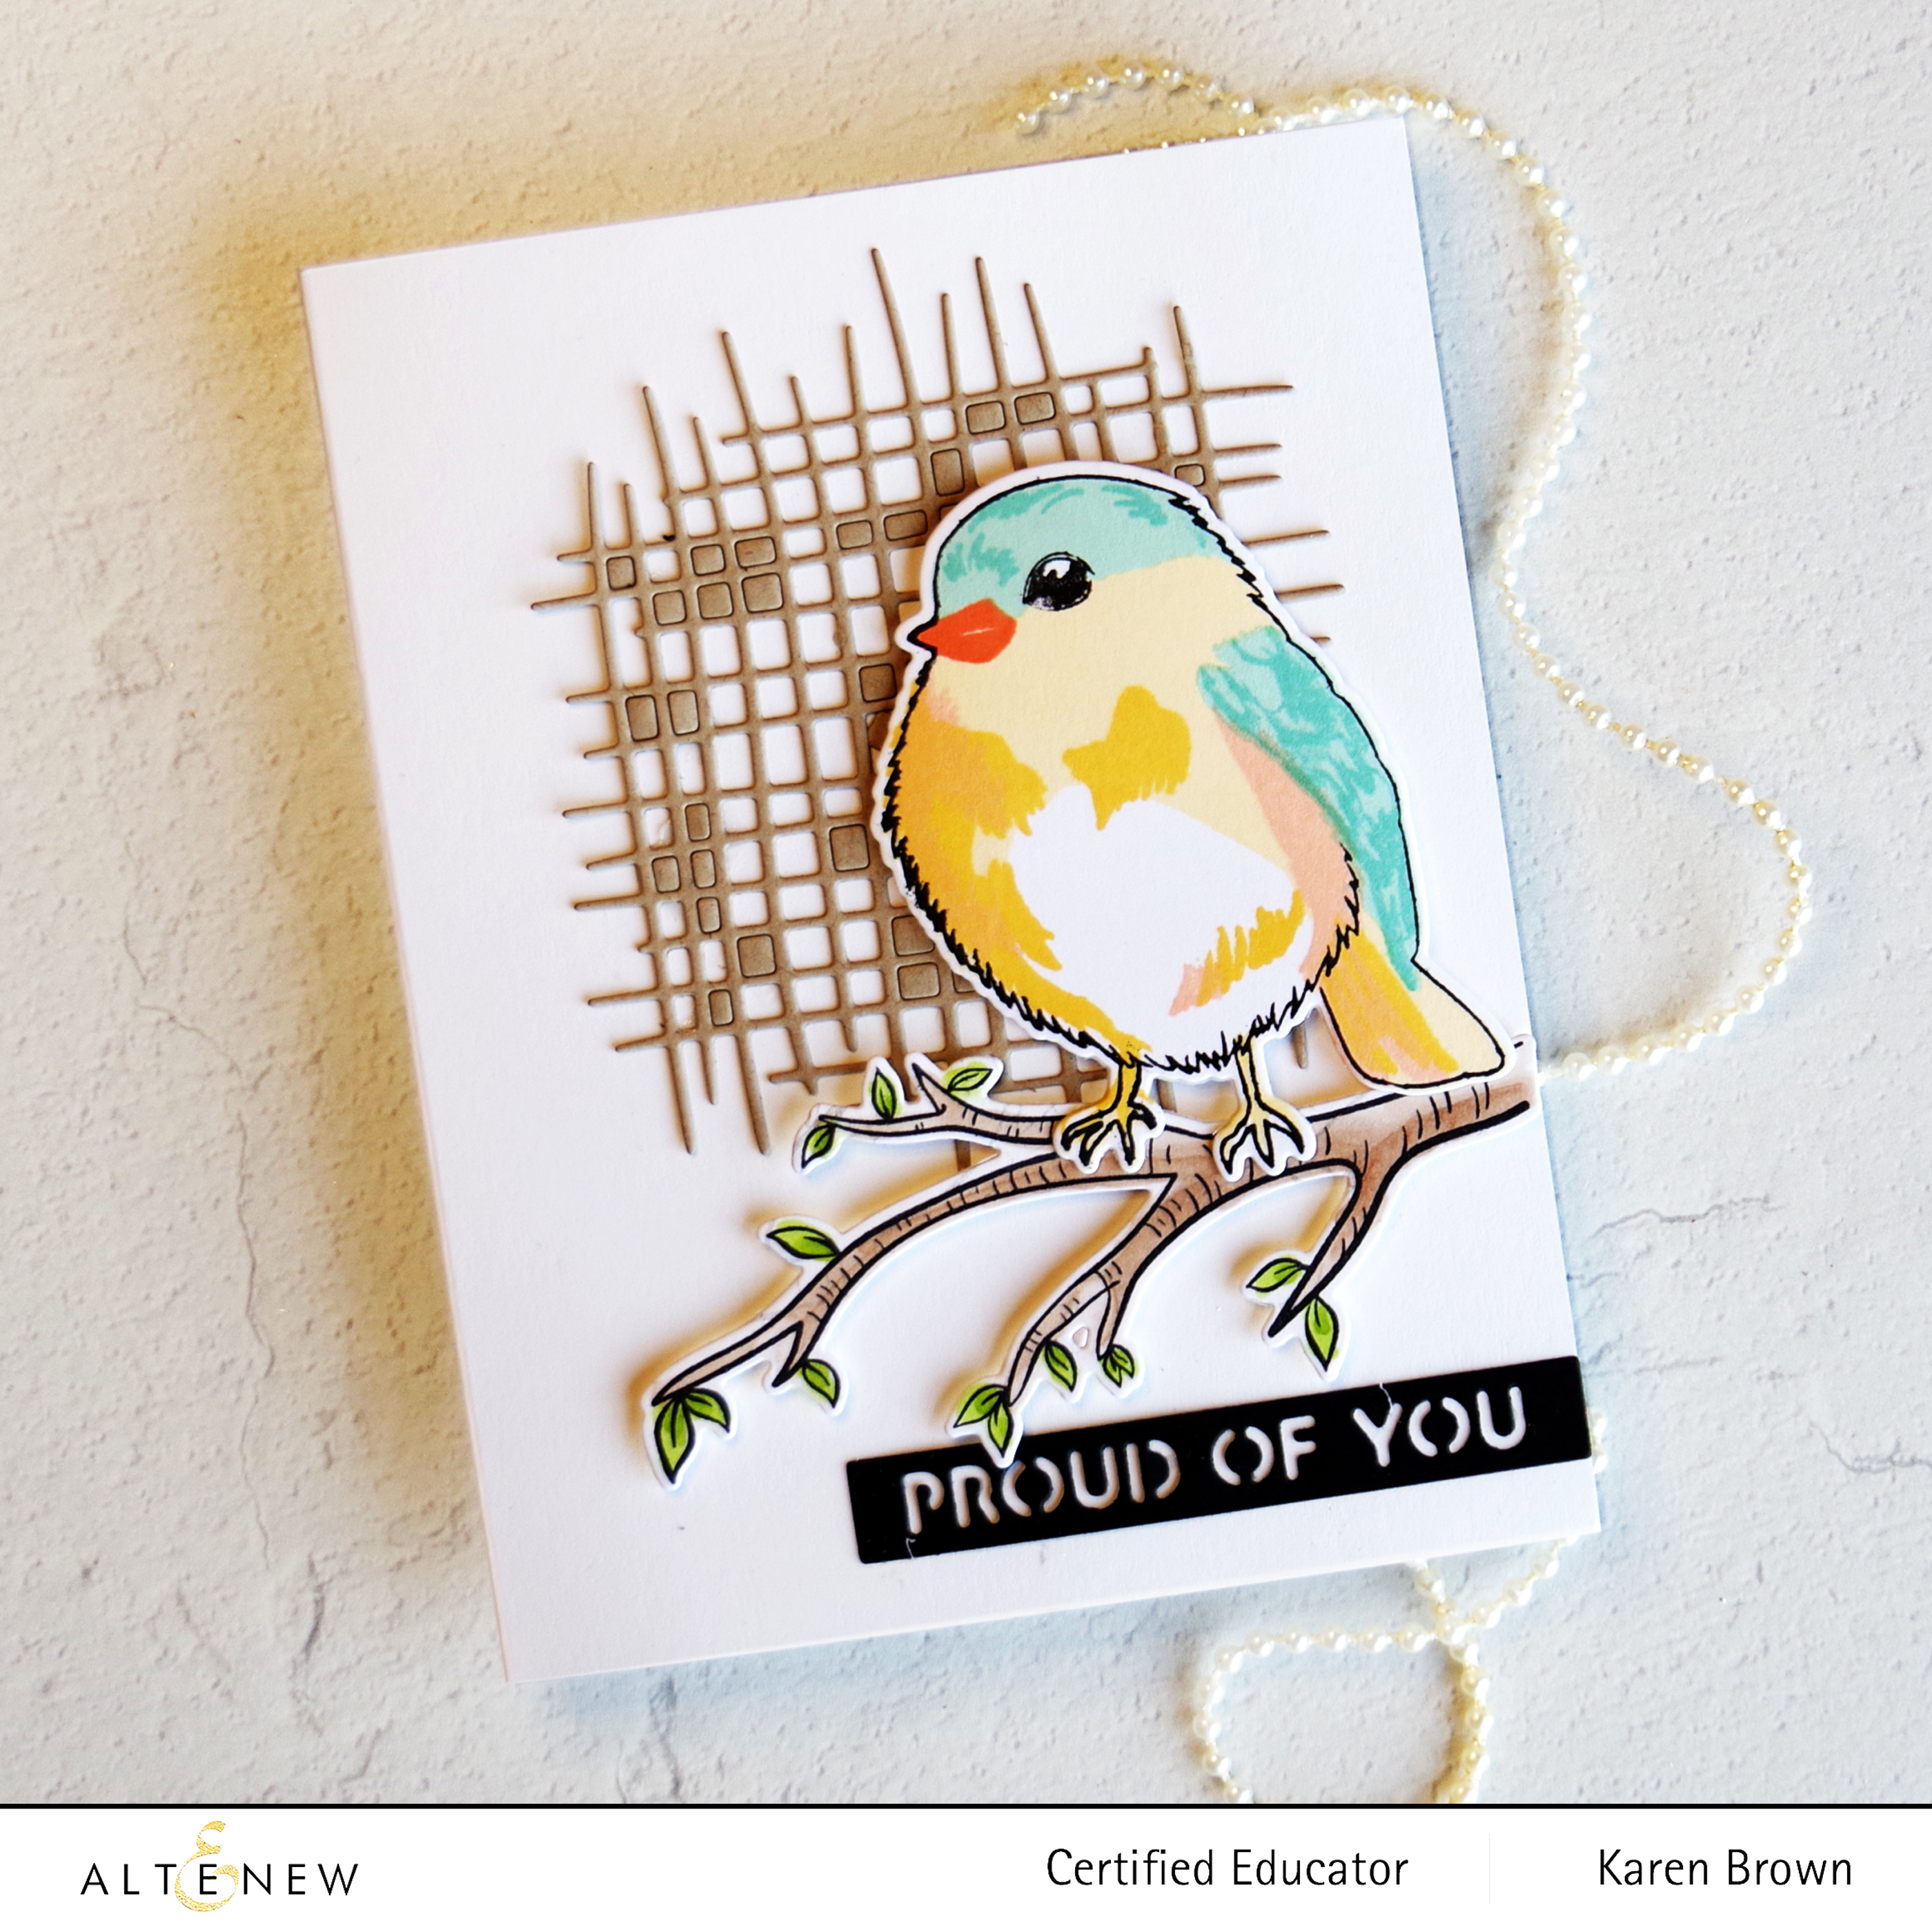
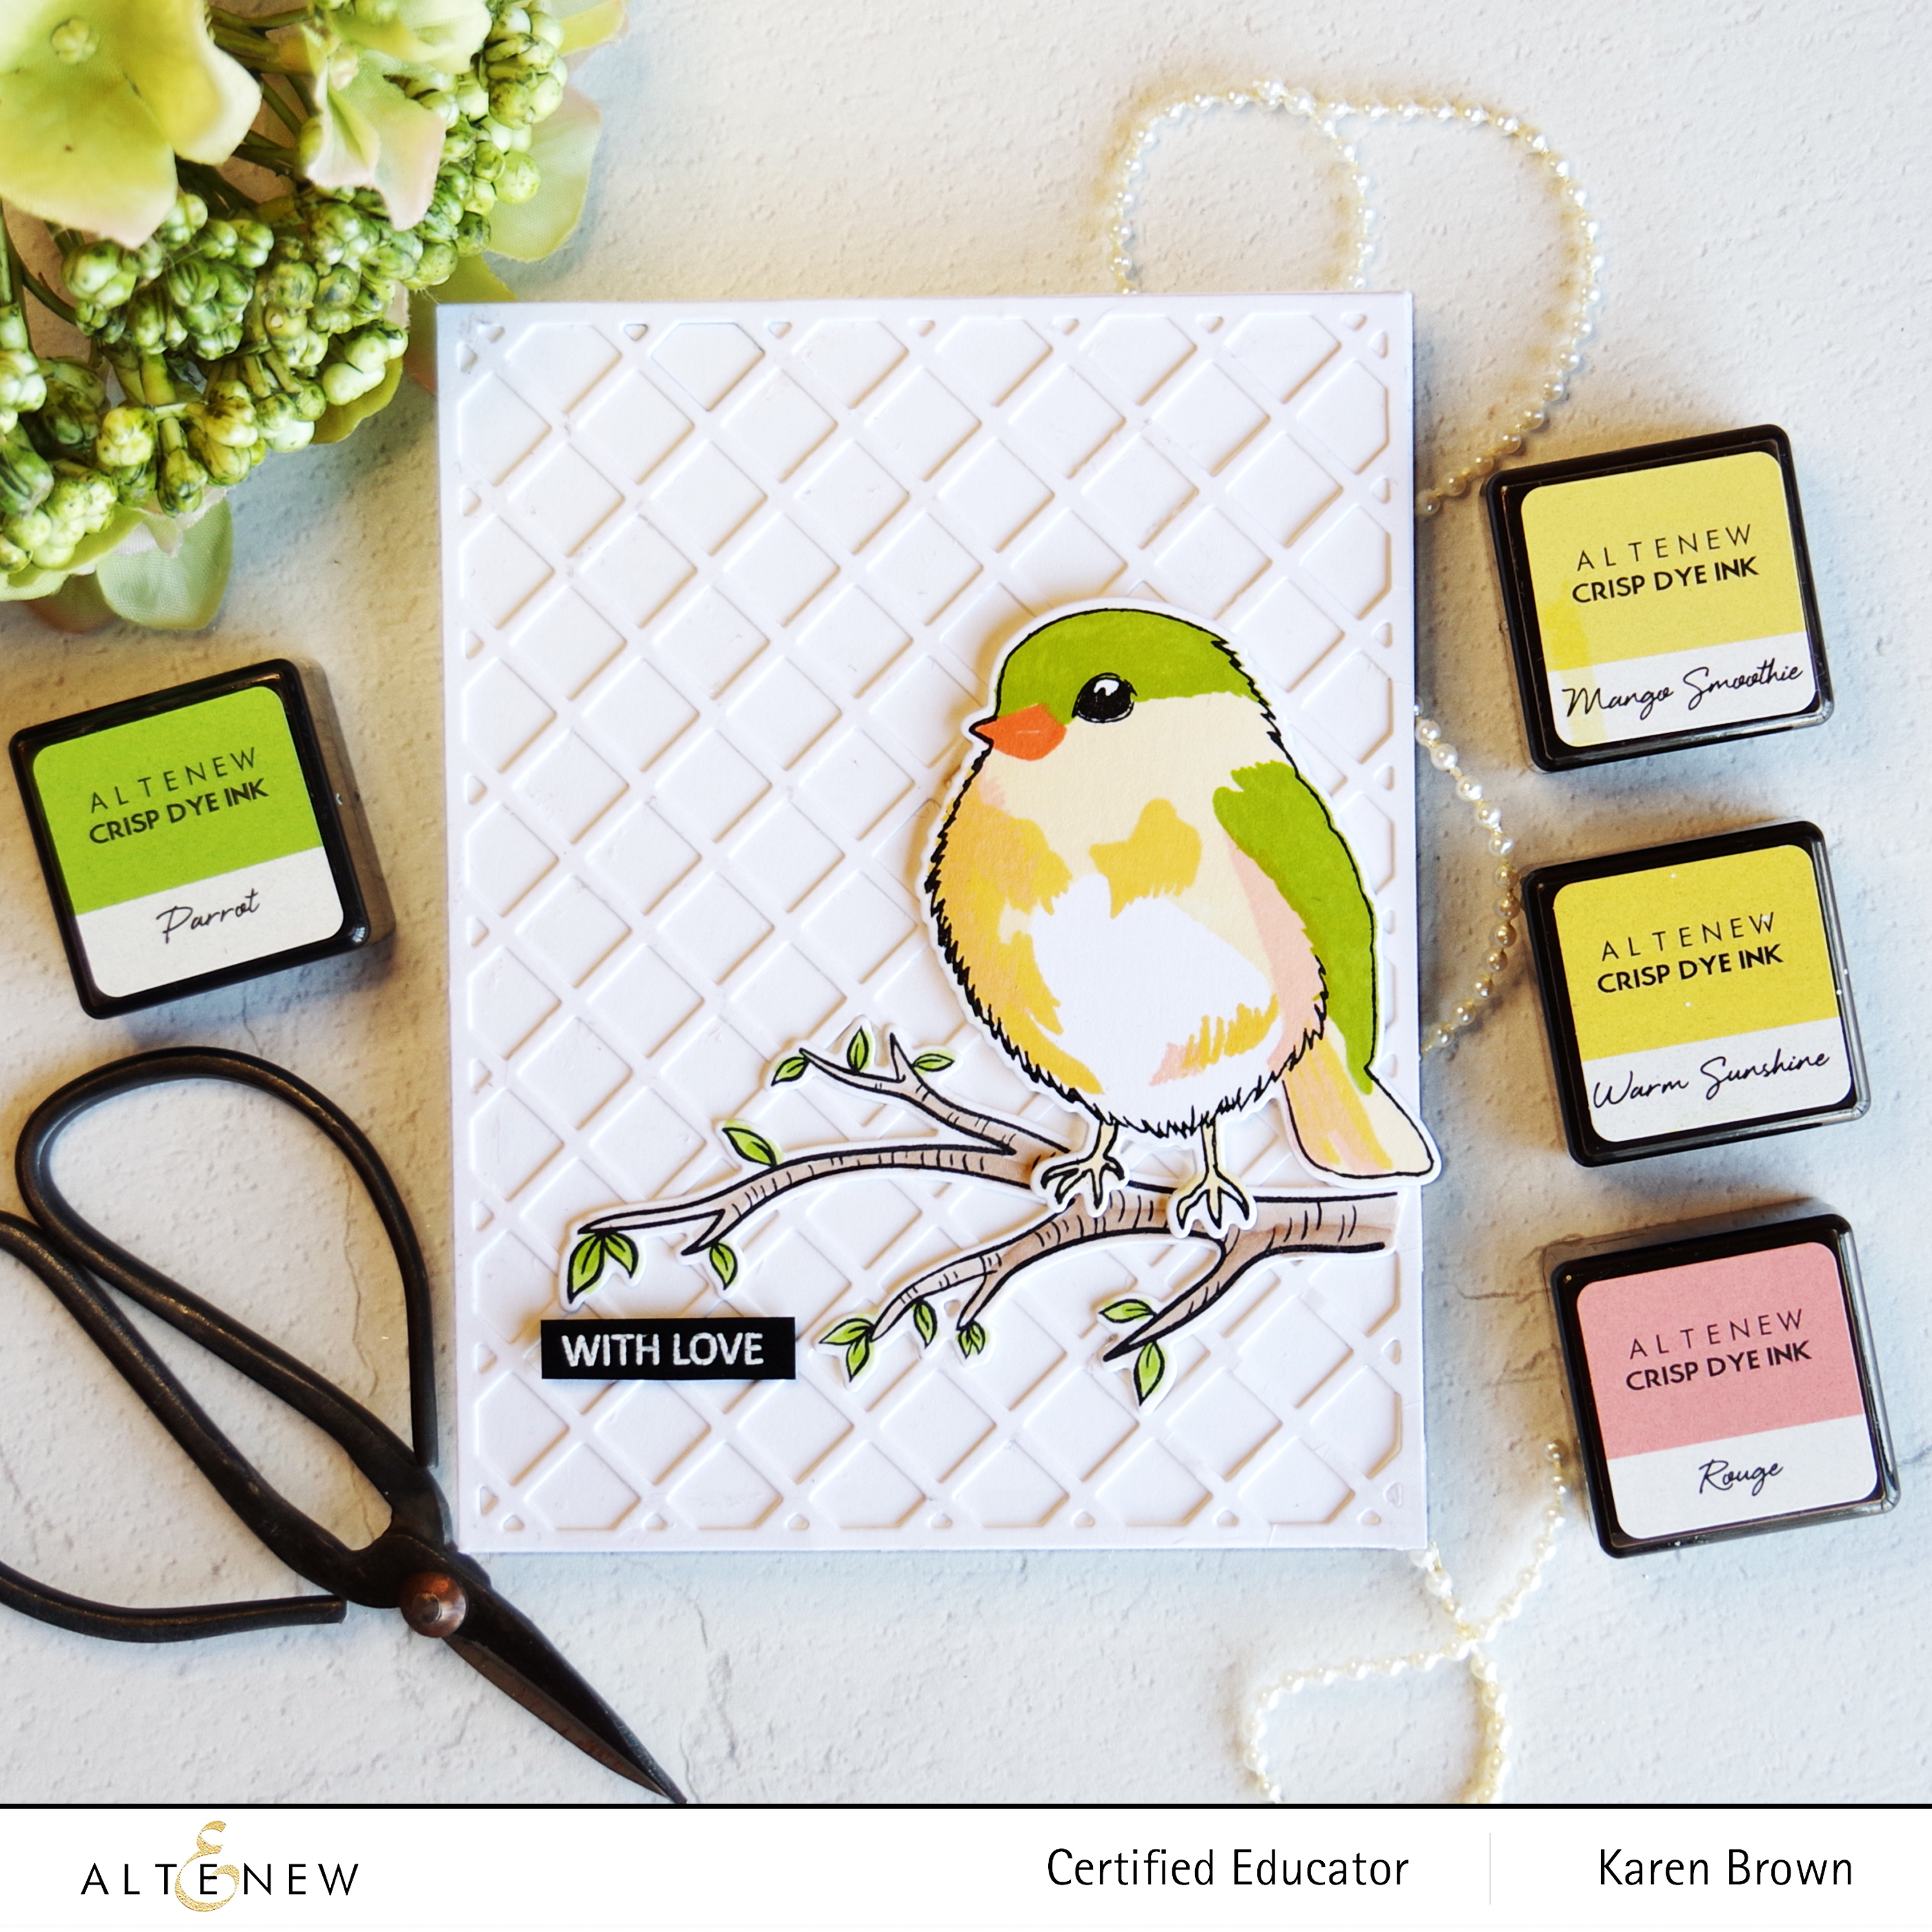
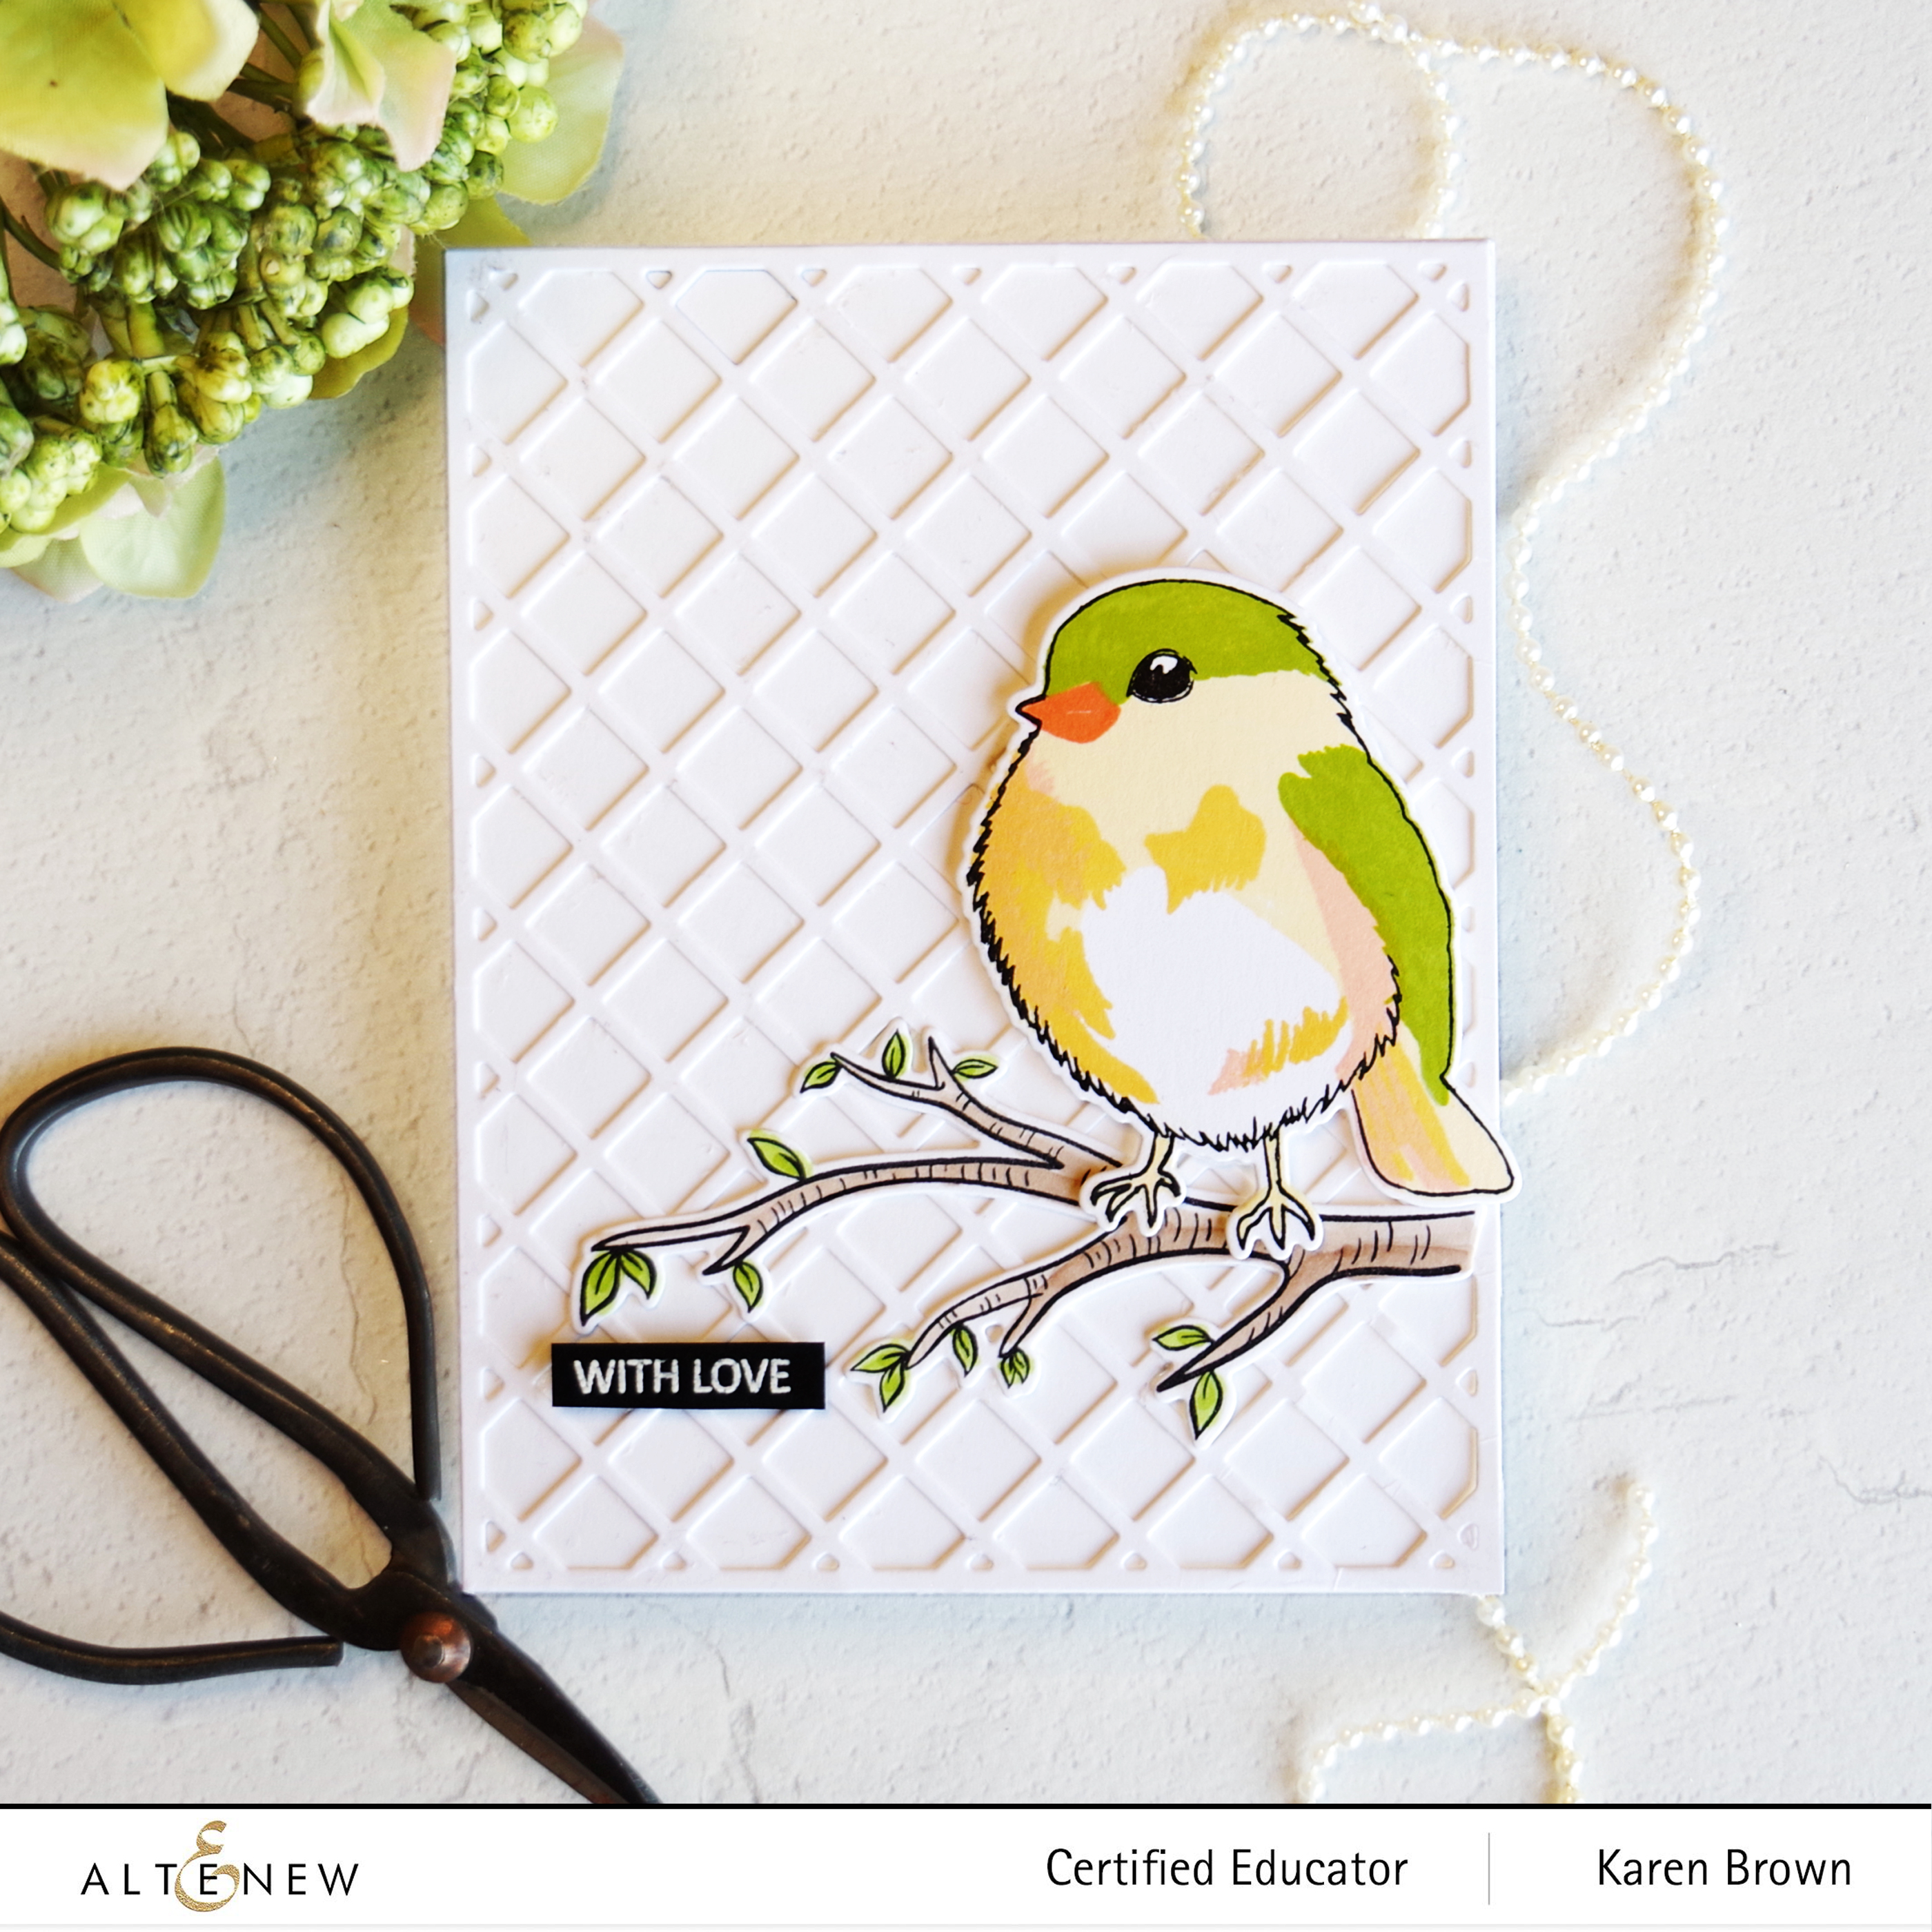
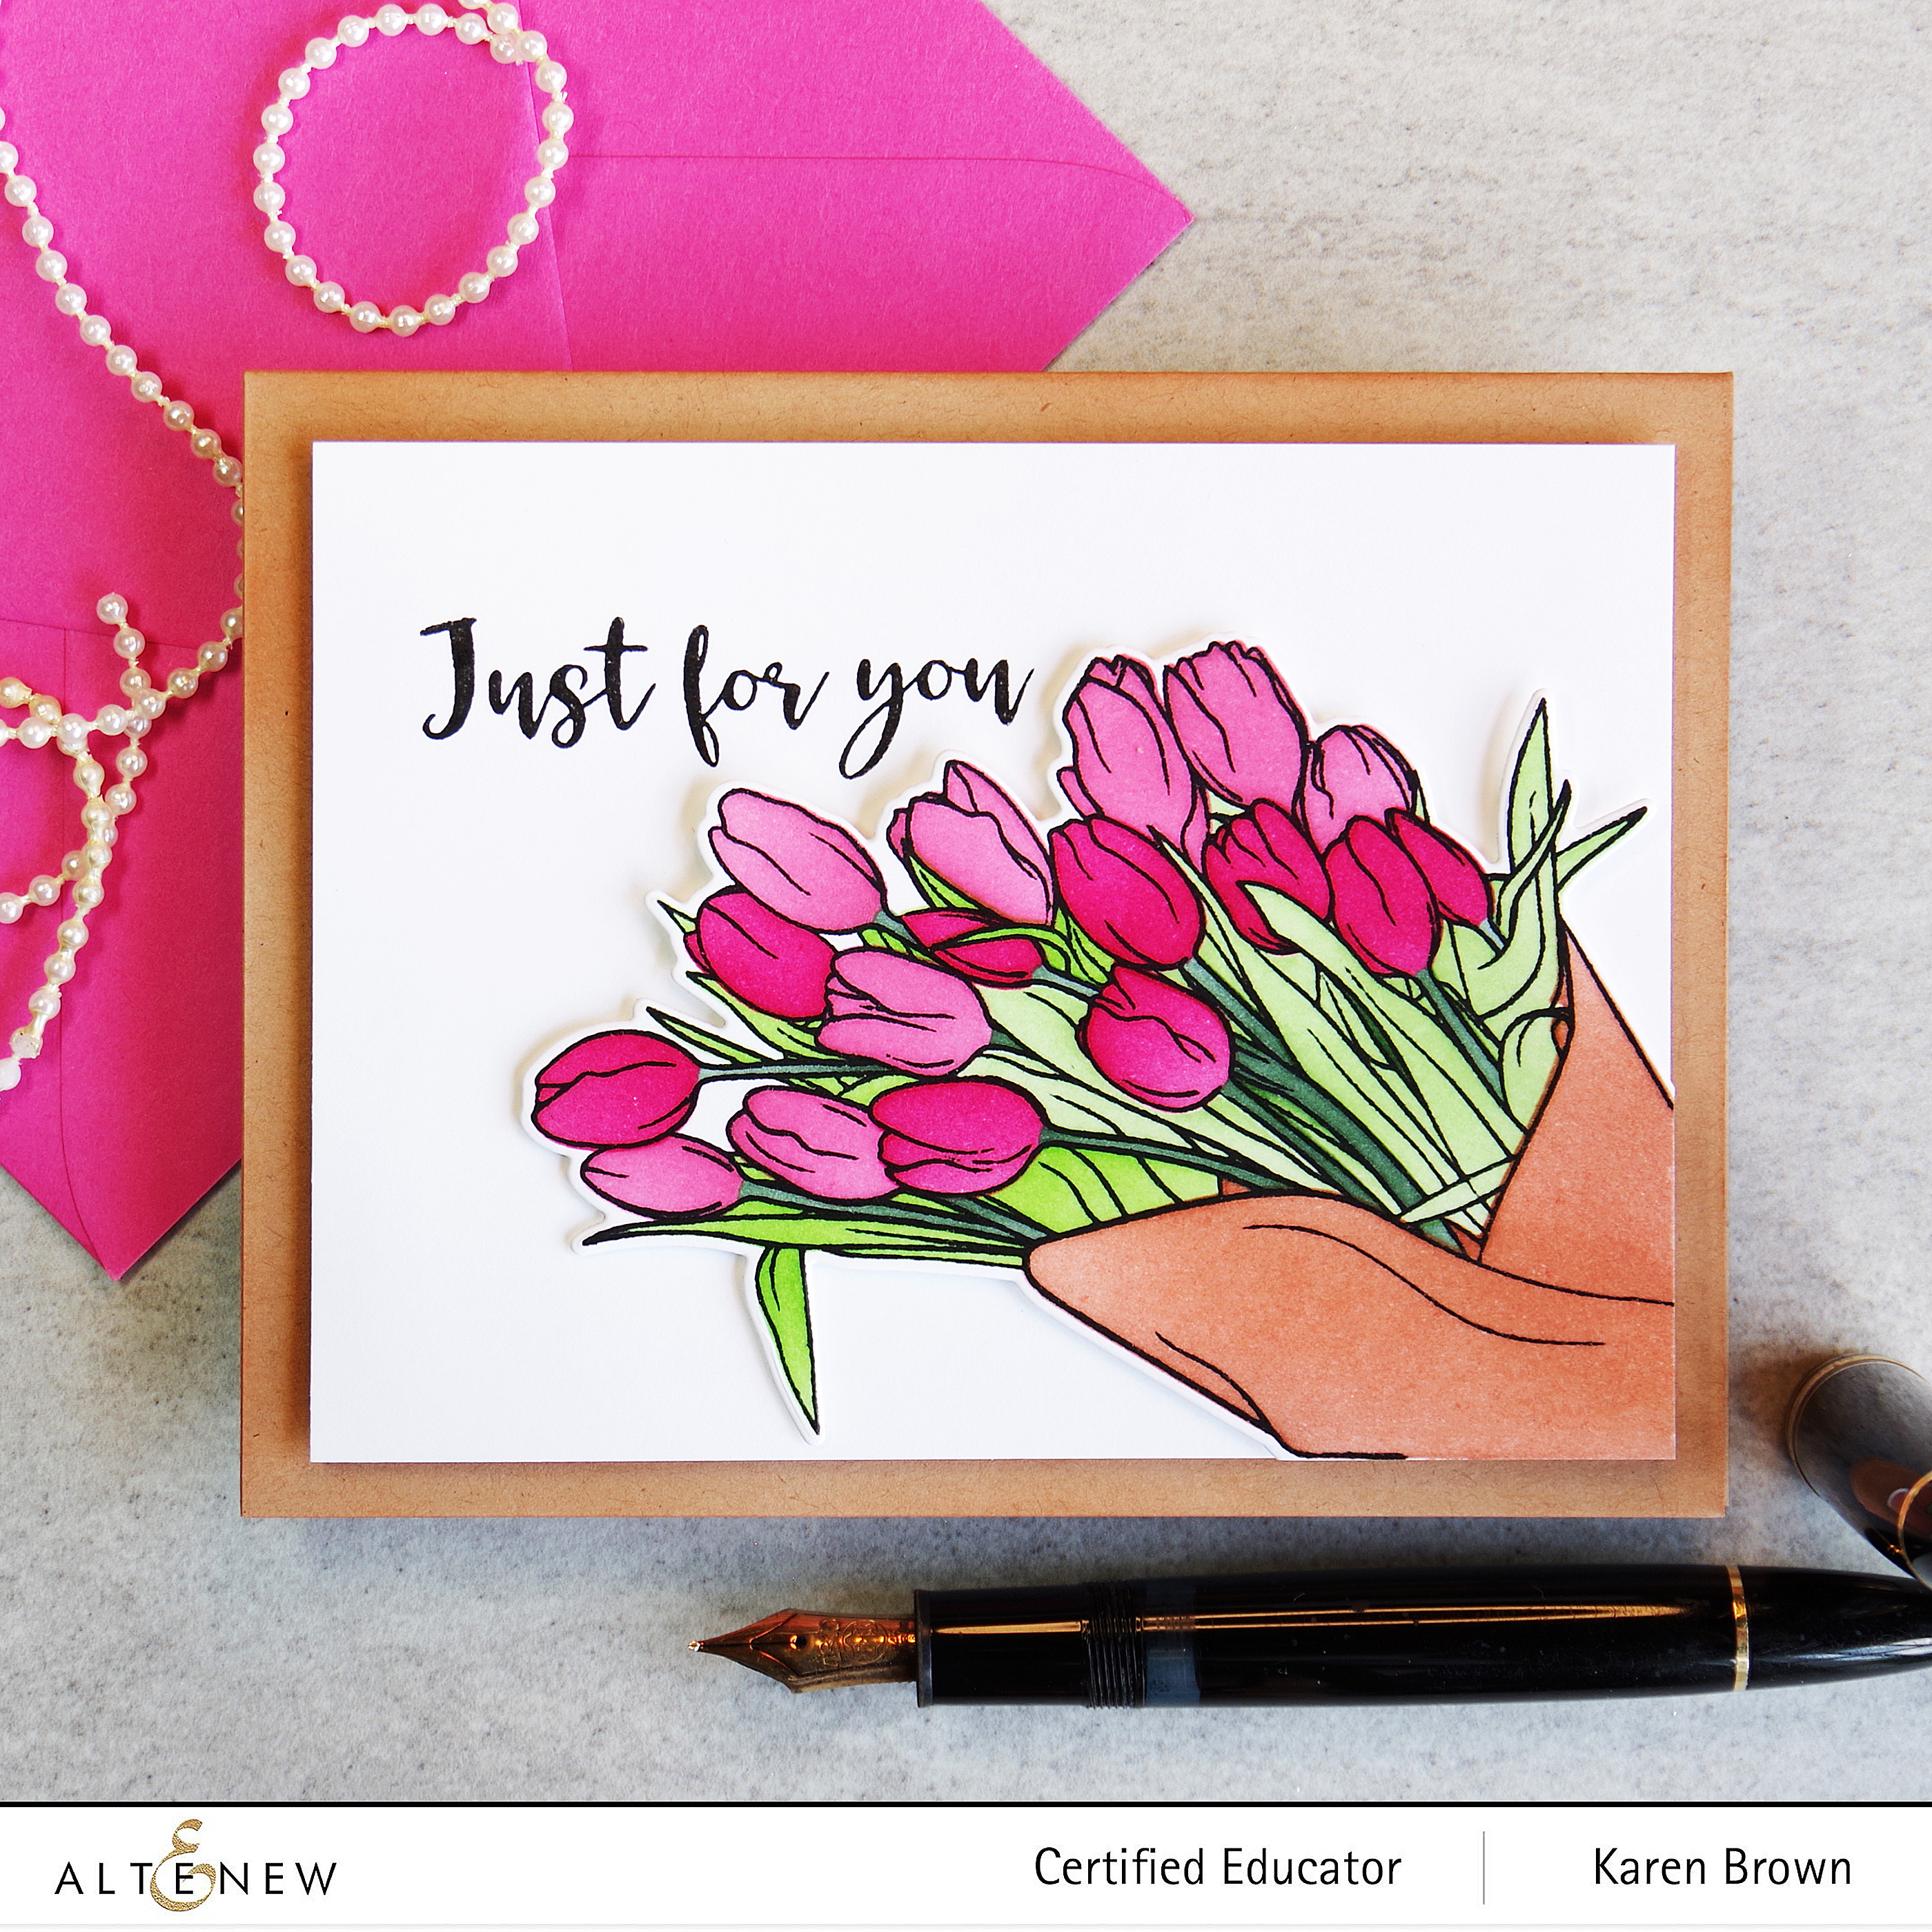
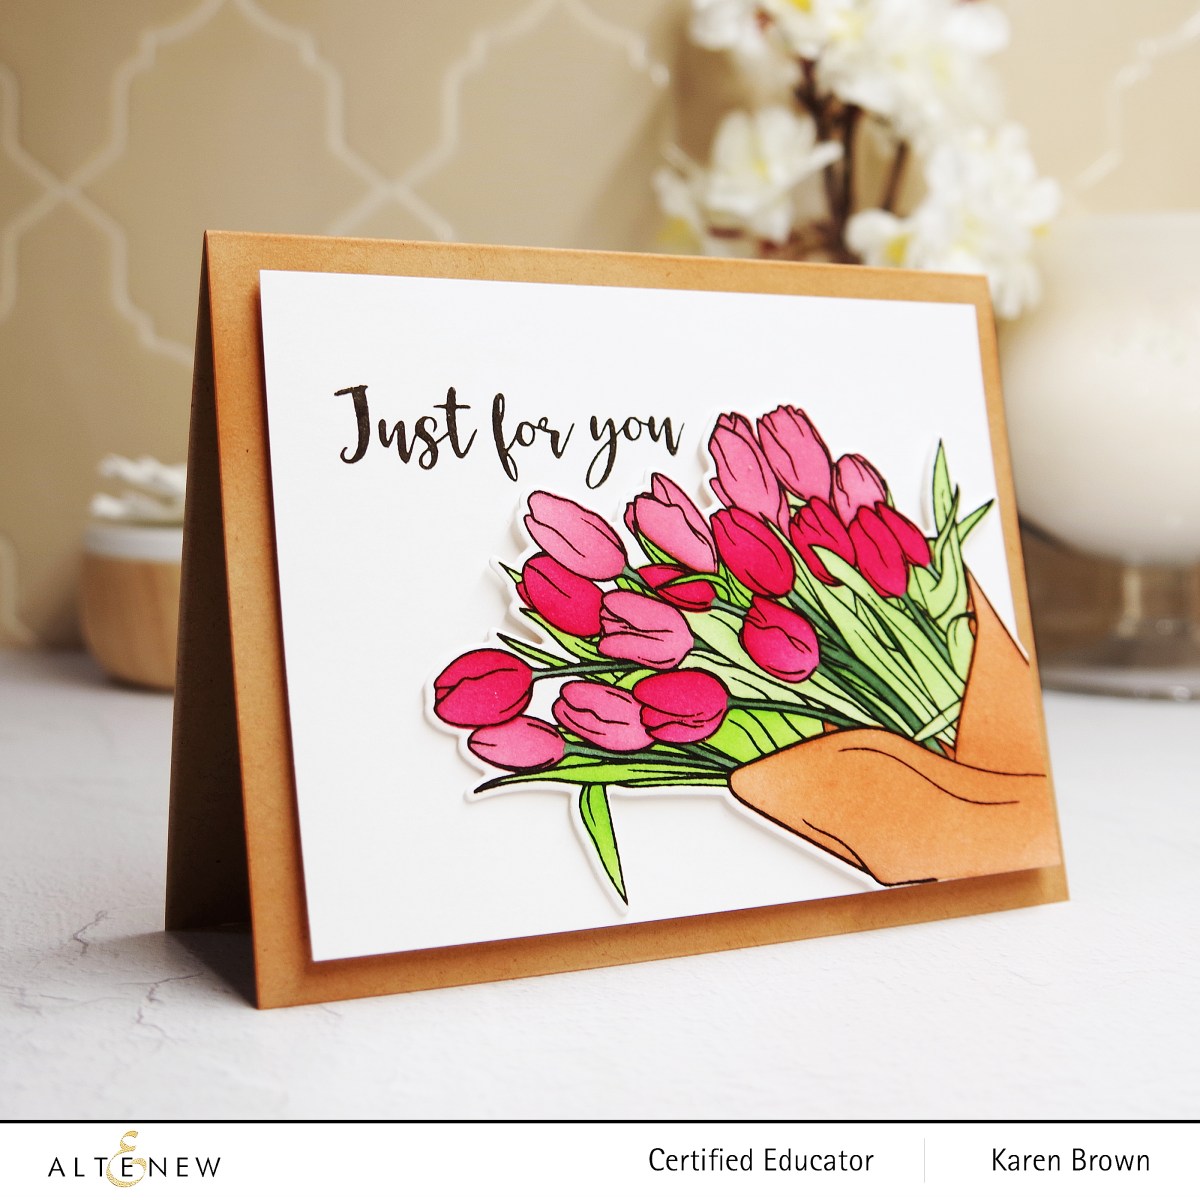
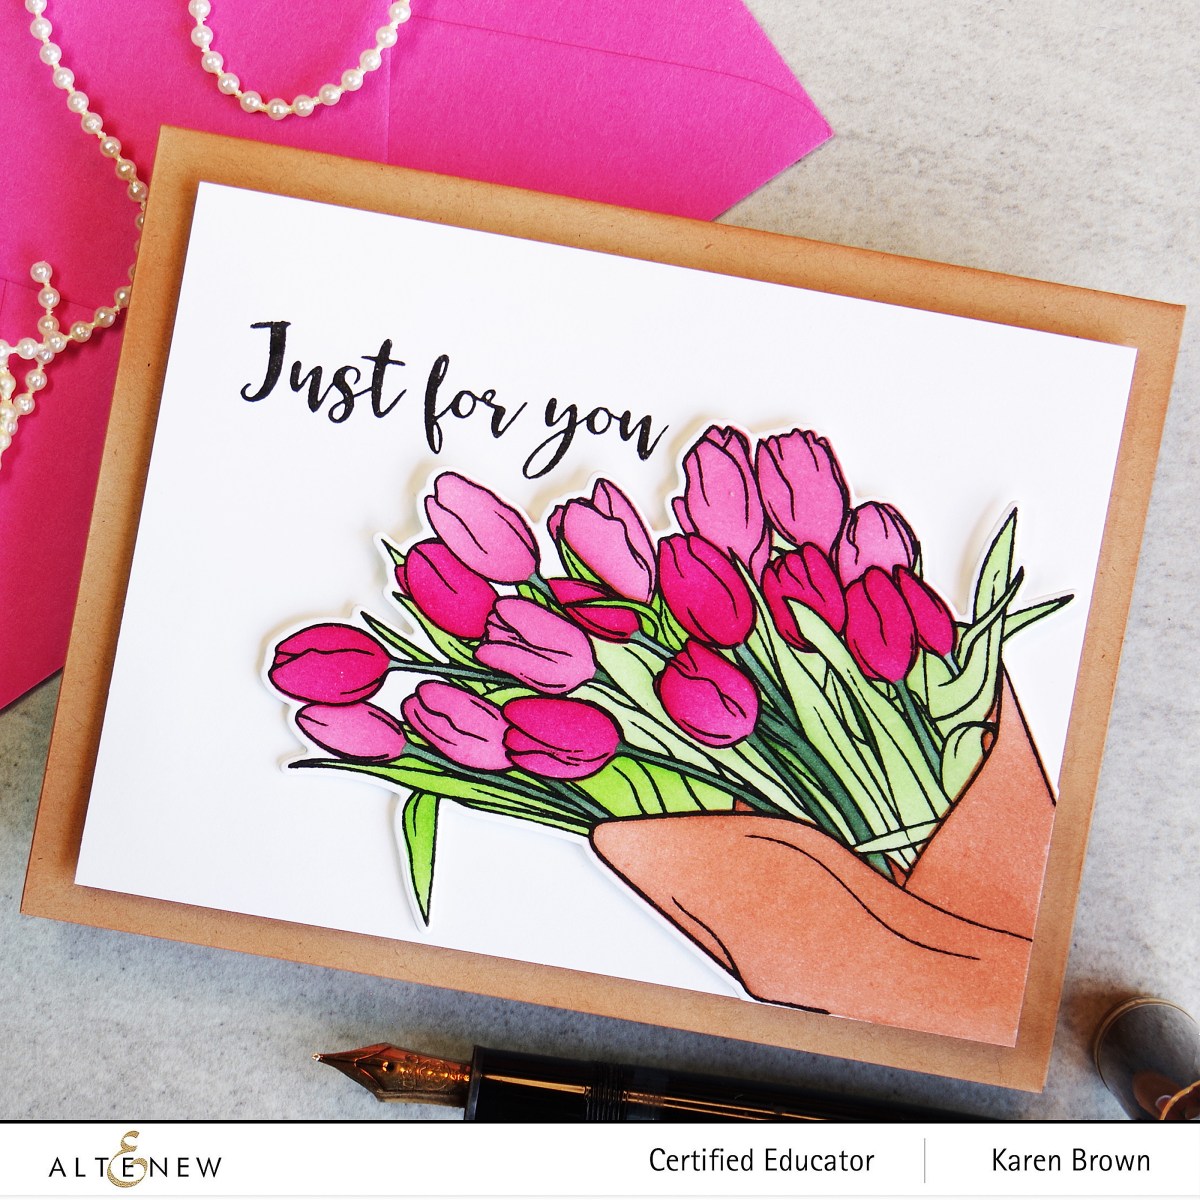
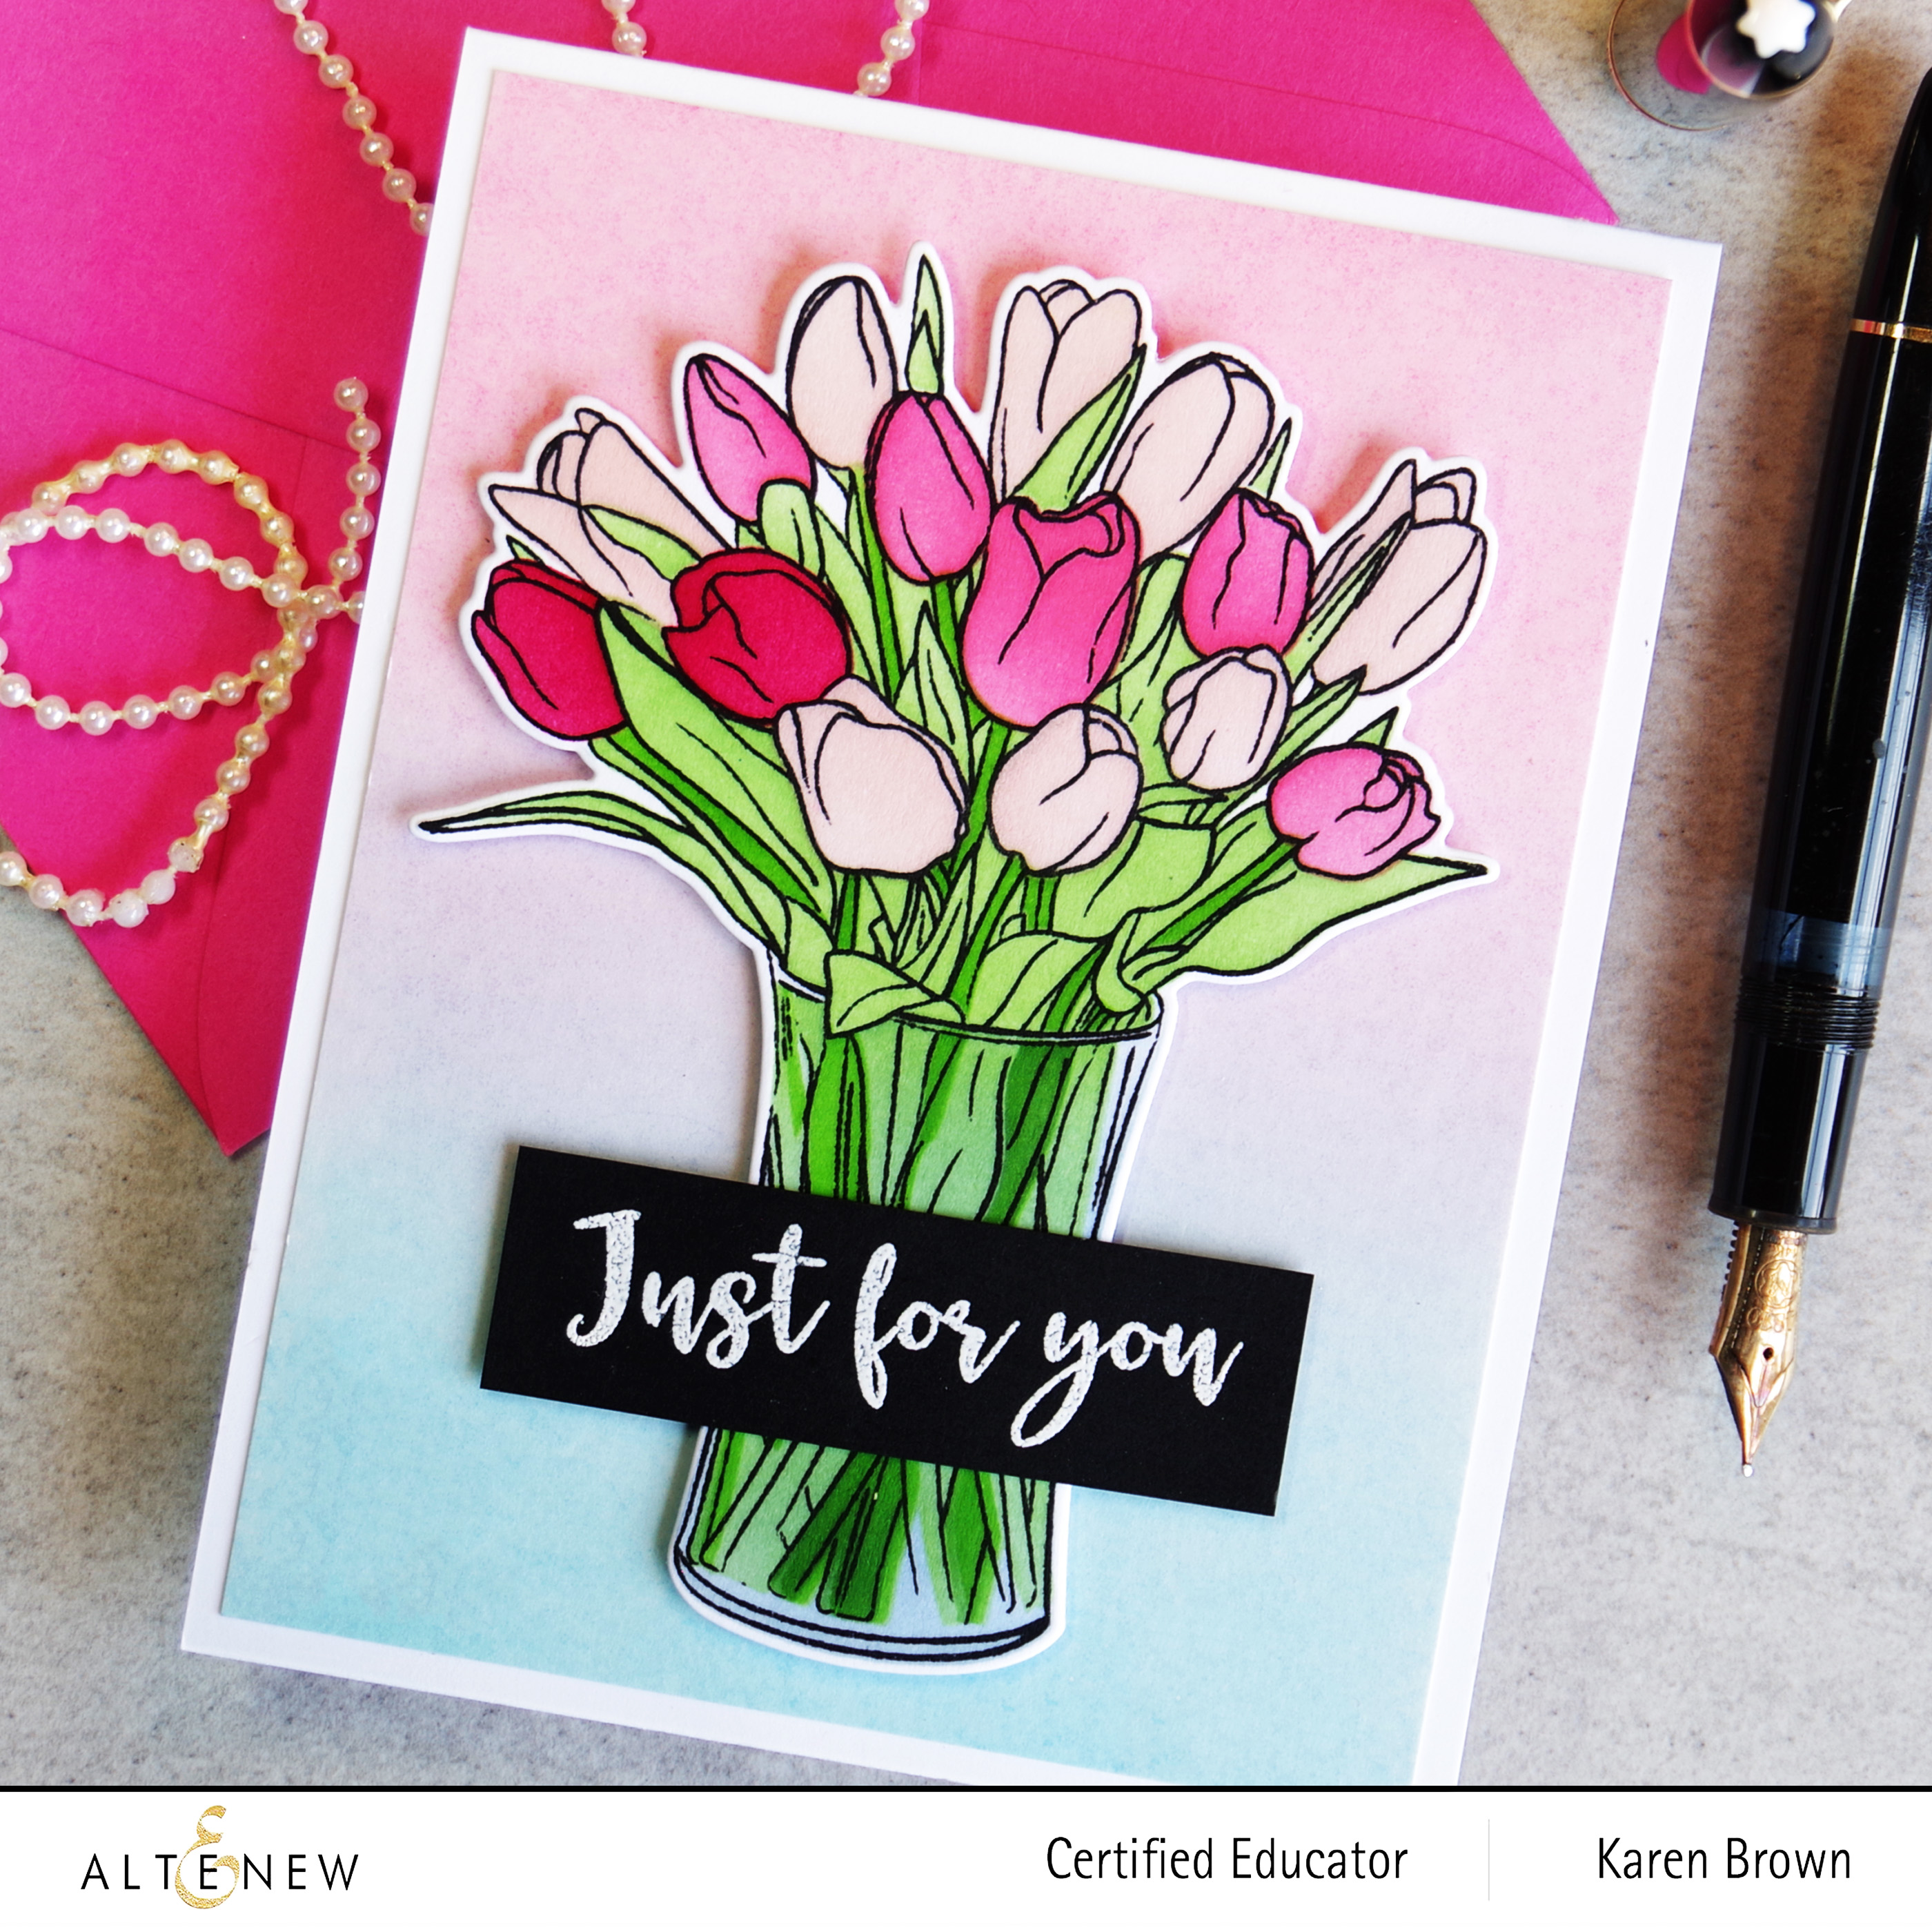
Wow, this Timeless Tulips stamp set is fabulous! Two BIG, Bold beautiful stamps with a Graphic Art Vibe and wonderful sentiments that will work for so many occasions. I could see it for Mother’s Day, a Get Well Card, Ballet Recital, Birthday, Valentine’s Day….lots of possibilites.
Both cards came together quickly because I used the coordinating coloring stencils. I started by stamping with black pigment ink. Once the ink was dry, I lined up my stencils and started coloring. I used Altenew Crisp Dye Inks in Coral Berry, Ruby Red, Paper Bag, Firefly, Green Fields and Evergreen. The image was easy to die cut and the sentiment is included with this stamp set. I used a Kraft Card base and then ink blended some Paper Bag Crisp Dye Ink along the edges to tie the card panel and base together.
$300 in total prizes! To celebrate this release, Altenew is giving away a $50 gift certificate to 2 lucky winners and a $25 gift certificate to 8 winners! Please leave a comment on the Altenew Card Blog and/or each designer’s blog post on the blog hop list below by 08/28/2022 for a chance to win.
Altenew will draw 10 random winners from the comments left on each stop of this blog hop and announce the winners on the Altenew Winners Page on 08/29/2022.