cardmaking · Mixed Media · Tutorial

Hero Arts | 2 Fun Mixed Media Cards

Hero Arts Mixed Media Cards using CM740 Vintage Postmarks and Tickets

CM739 Vintage Maps and Ledger stamps.

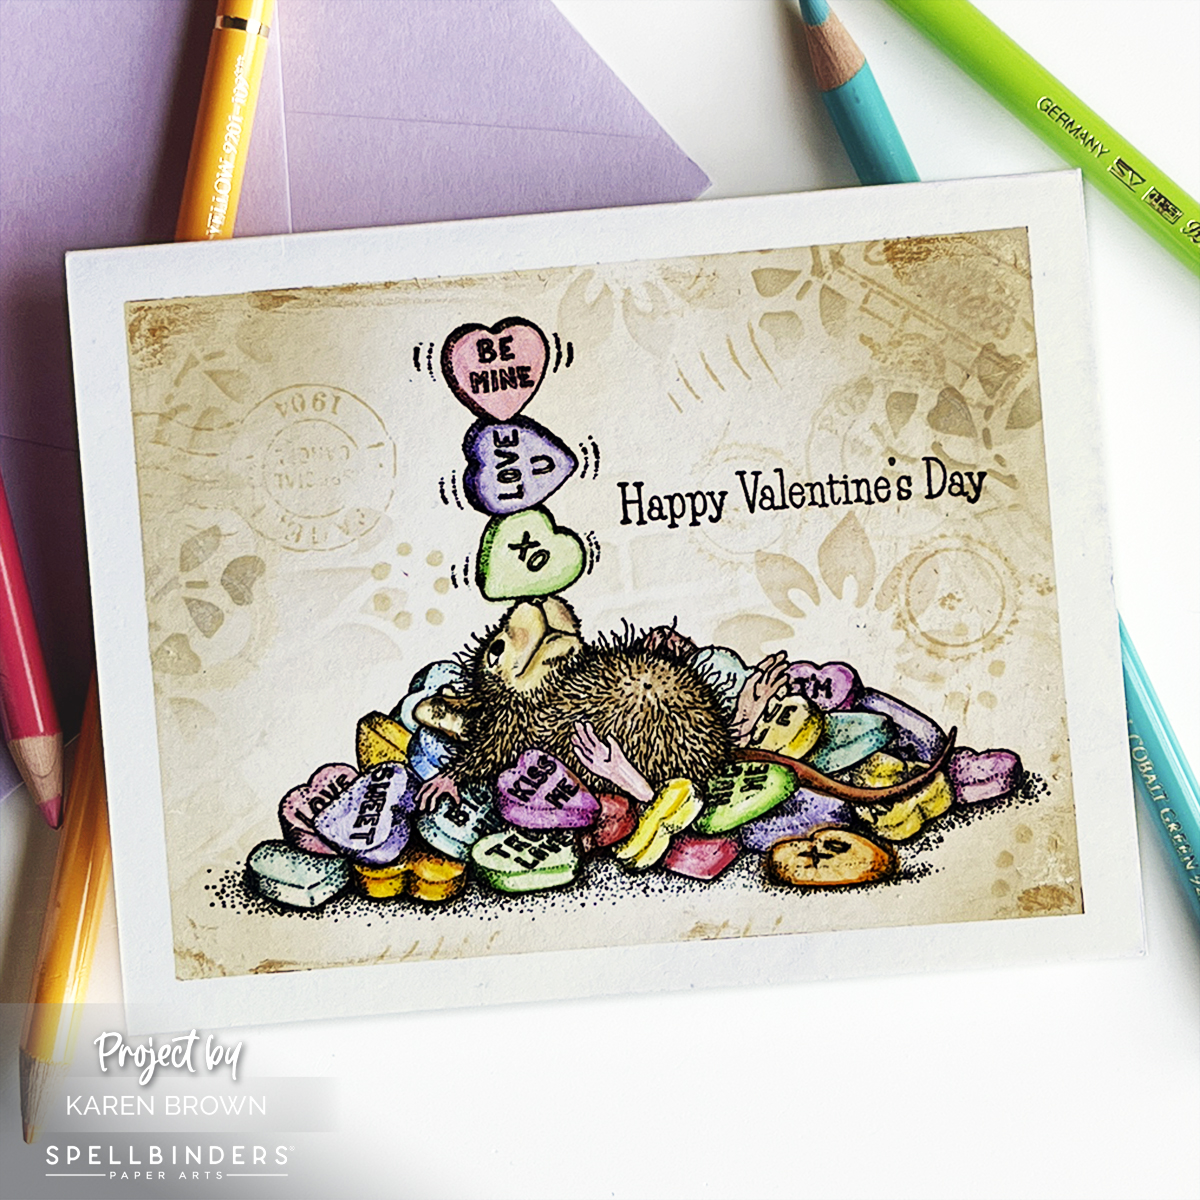
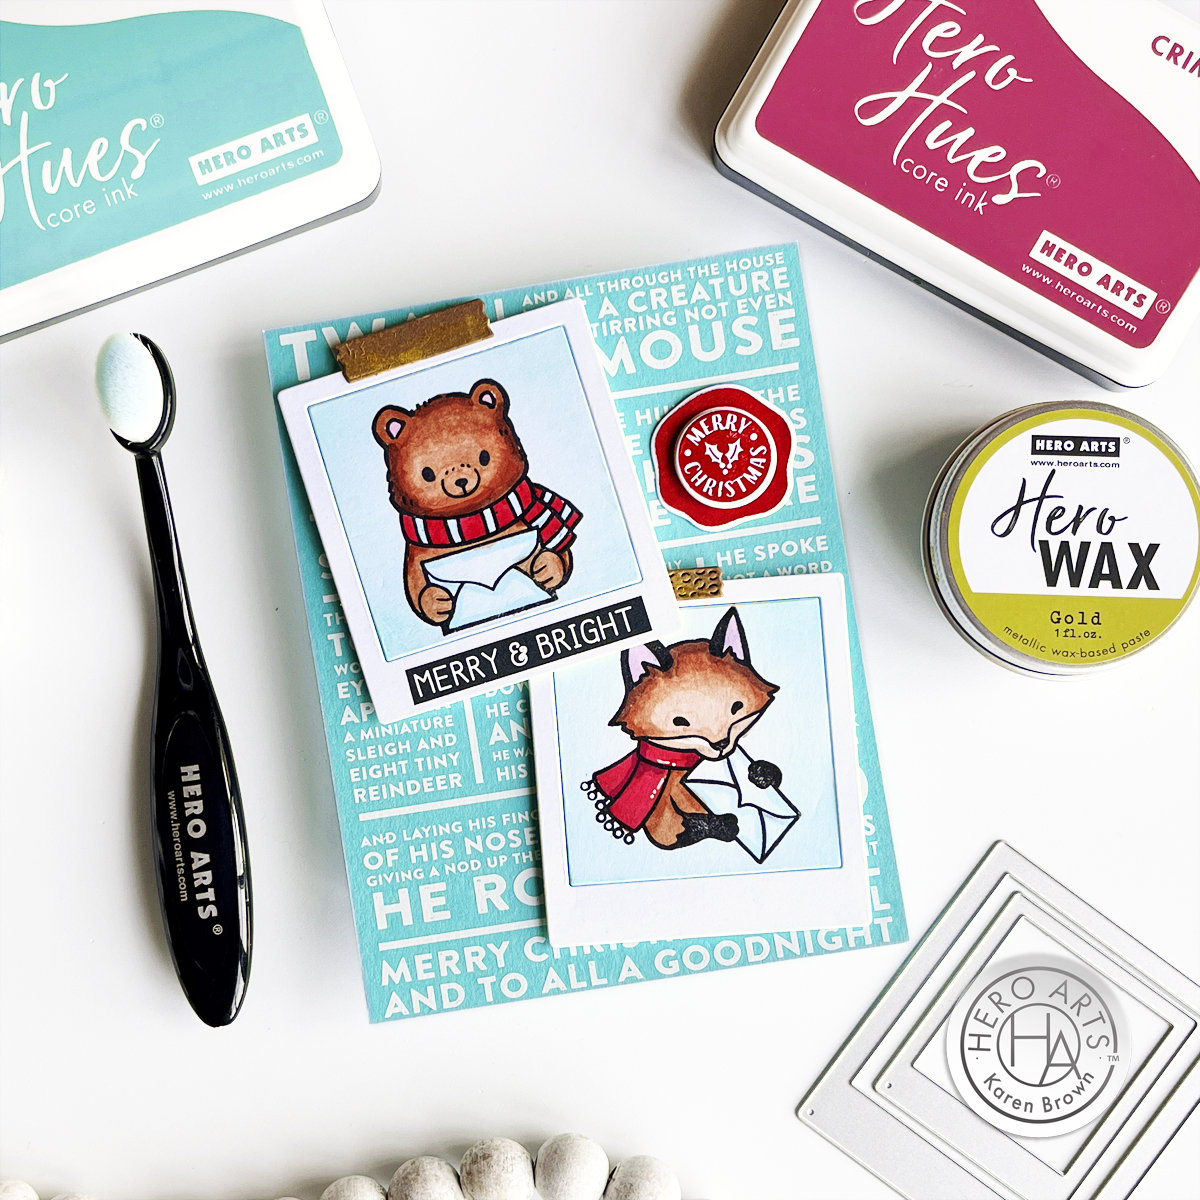
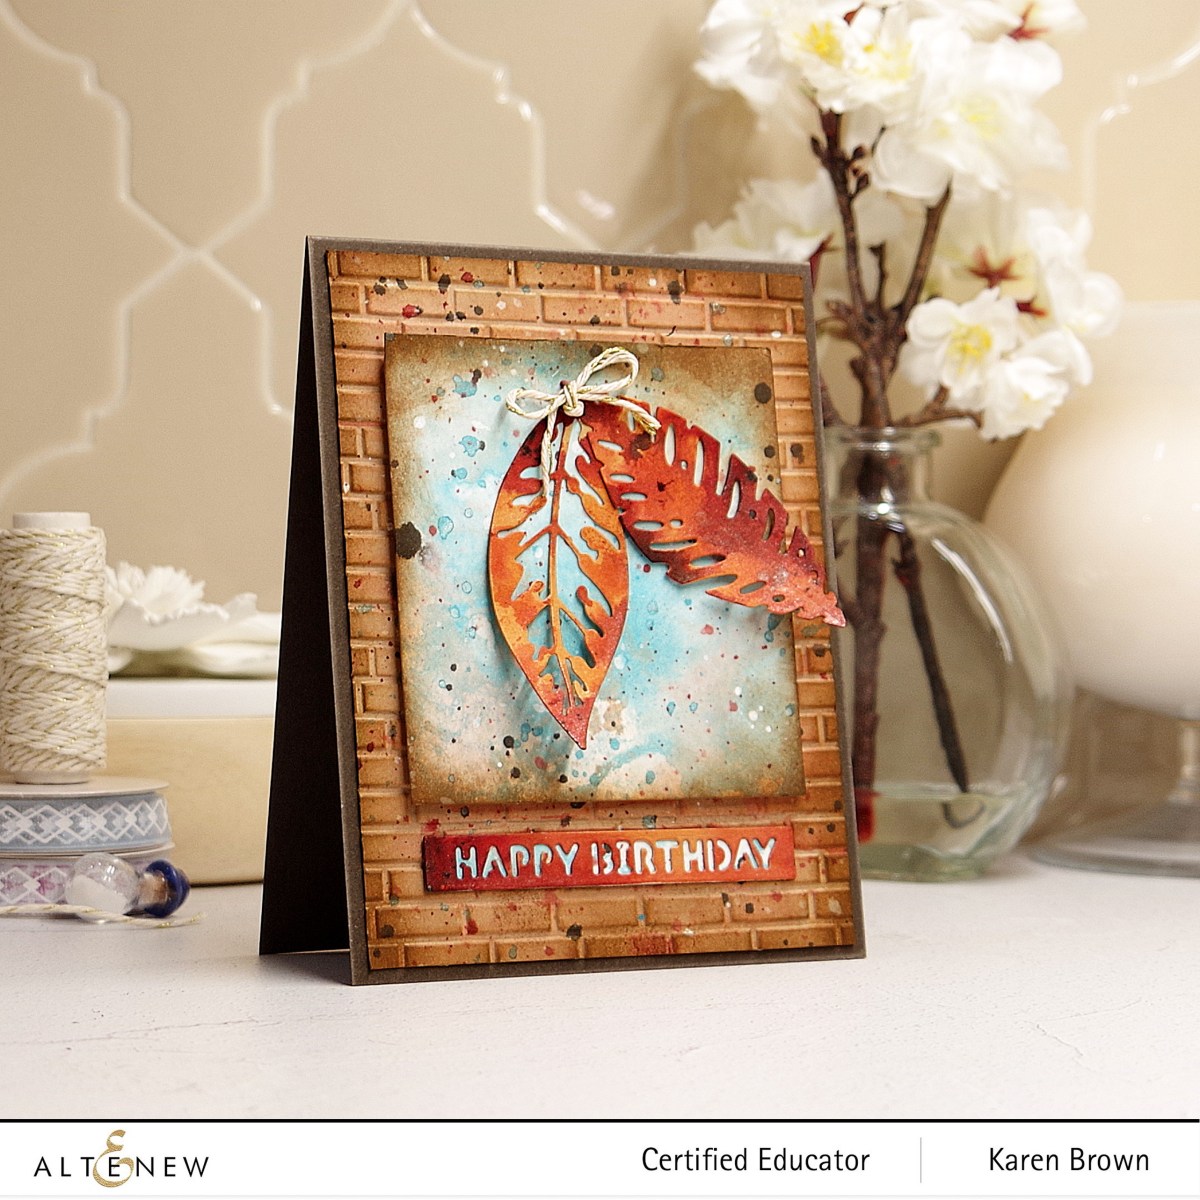
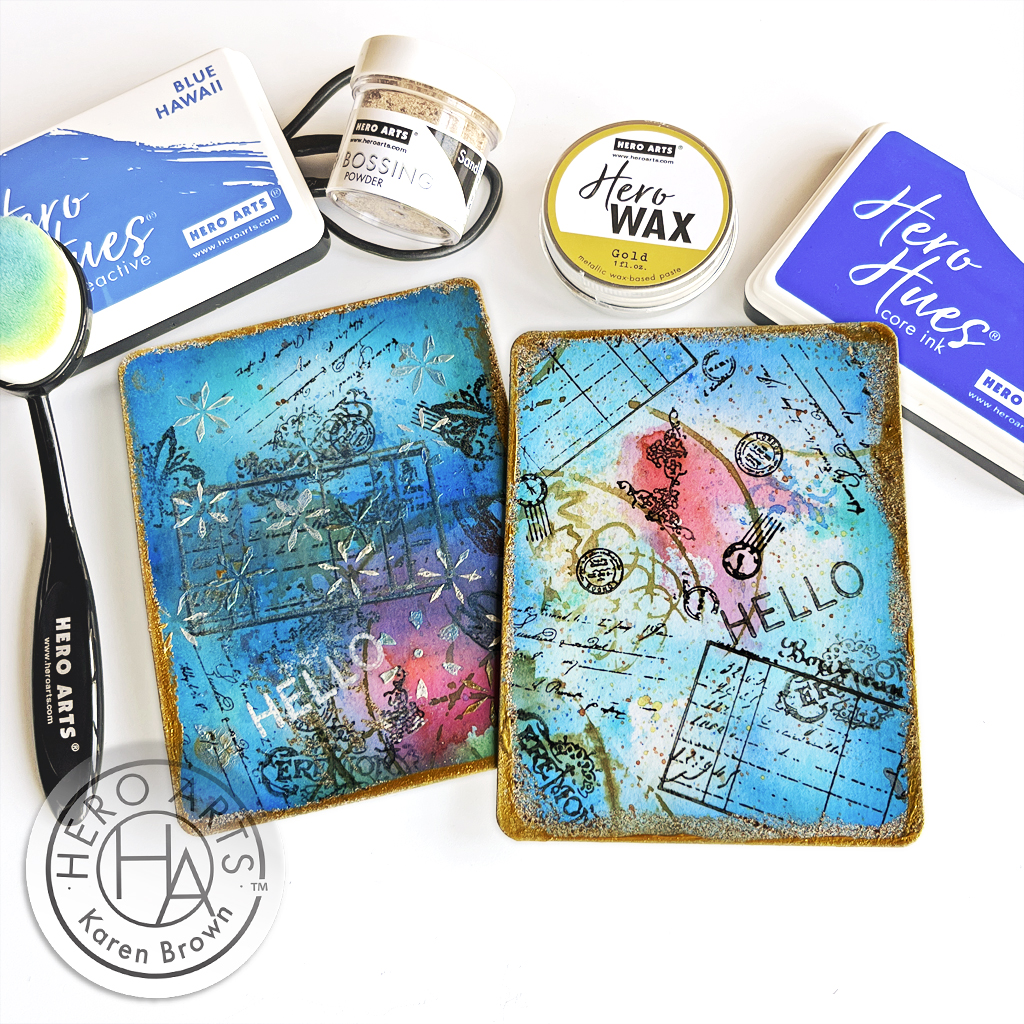
Hero Arts Spring Catalog Release is live and I love all the new Mixed Media products that they added to their line. I used a bunch of them on these two cards.

Today is the last day for Hero Art’s Blog Hop, which you can find HERE.

Hero Arts Mixed Media card using Vintage Maps and Ledgers stamps.

My Recipe:

Products Used:

Other Tools:  Acrylic Stamping Block

Additional Products Used On Second Card: White Wax + SA263 Mandala Flower Pattern Stencil, Blue Iridescent Embossing Powder

I am so glad you dropped by!

Mixed Media · papercrafting · Tutorial

Colorful Cityscape Mixed Media Card | Hero Arts

Cityscape Hero Arts Mixed Media Card

I recently attended Hero Arts Mixed Media Stamp Along and found it so informative! This card was inspired by @cheiron and her wonderful class. I used different products and colors so my card doesn’t look anything like Cheiron’s, but her class gave me the creative spark for my card. Sometimes it is fun to get inky and messy!

For this card, I was trying to simulate a Dove flying over a city at sunrise. I knew I wanted a bold background to contrast with the white Dove. 

My Process:

  • I put 5 sunrise colors of reactive ink (colors listed below) on my craft mat and spritzed with a bit of water and then painted bands of vertical color all over my watercolor cardstock panel. There is no right or wrong way just start painting! I dried and repeated two more times. During the process I also added drips of color.
  • I love Hero Rub-On Transfers and I added parts of the city map from Collage Backgrounds to three spots on my background.
  • Using Indigo and Splash Inks, I stamped the city grid from the Mixed Textures stamp set.
  • I added texture with the Cobblestone Stencil. In some places I used just Gold Hero Paste and on others I rubbed just a bit of Black Hero Wax on the Stencil and then added Gold Hero Paste. I really love the black wax and gold paste combined together.
  • Using a splatter box (for me a repurposed cardboard box) I added three layers of splatters and dried in between each color. White, Blue Shimmer and Orange Shimmer. I love the complexity the shimmer splatters add!
  • I trimmed my background using the Rounded Rectangles Infinity Die set and then lightly inked the edges with Indigo Core Ink.
  • I die cut my Dove and sentiment 3 times and then glued the components together.
Handmade Card with Dove and Olive Branch Die - DF192

Supplies Used:

This card has LOTS of layers, but it did not take as long to complete as I would have guessed….60-90 minutes.

What do you think?

cardmaking · Mixed Media · papercrafting

Spellbinders | House Mouse Candy Hearts Vintage Look Valentine Card

There’s something undeniably captivating about a vintage valentine, where every delicate stroke of ink and carefully chosen sentiment carries a timeless charm. This new House Mouse Candy Hearts rubber stamp had a very retro look to me, so I went with an old-timey mixed media vibe.

Spellibinders House Mouse Candy Hearts (RSC-022) handmade Mixed Media Valentine Card.

Easy One Layer Vintage Look Mixed Media Valentine Tutorial:

  • I started by creating my background. I masked off a border and then used two shades of tan Distress Ink to ink blend my background. (Antique Linen and Frayed Burlap)
  • With the masking tape still on the cardstock, I then used the same tan inks to stencil and stamp bits and pieces on the background. Most of the stamping was “second generation” where I stamped first on a scrap and then onto my background so that the pattern would be subtle. I also added light stenciling to the background. Cathe Holden has some great stamps and stencils that I added here and there. I also used a bit of stamping with white pigment ink, but it is hard to see in the photograph. To finish I added a touch of Gold Wax to a few places around the border.
  • Carefully remove your masking tape. I used Post It Tape, which is the best!
  • After my background was dry, I stamped the Valentine Mouse with Versafine Black Pigment Ink.
  • PRO TIP: For a crisp look, keep the stamp in your Misti stamping platform and restamp the image after you are done coloring. You won’t believe how much this one step will elevate your project!
  • I used Faber Castell Polychromo Colored Pencils to color the mouse and candy hearts.
  • Remember to restamp the image and let dry.
  • The cute sentiment is included with the stamp set and finishes off my one layer valentine.

House Mouse Products:

One layer mixed media valentine featuring a cute mouse laying in a pile of candy hearts.

If you like this card, you might also want to visit my blog post on House Mouse Designs 3 Ways.

Thanks for stopping by!

Interested in more…You can also find me at these spots too:

@karens_mini on Instagram

Pinterest: @karenabrown

FaceBook: Karens_Mini

YouTube: Karen Brown

cardmaking · Mixed Media · papercrafting

Big News + Hero Arts | November Add-Ons

I am thrilled to announce that I have been selected to join the Hero Arts Creative Team! This incredible opportunity allows me to collaborate with a group of talented and passionate artists who share a love for crafting and creativity. I am beyond excited to explore new techniques, experiment with Hero Arts’ amazing range of products, and inspire others on their own artistic journeys. Together, we’ll embark on a creative adventure filled with endless possibilities, and I can’t wait to share the magic that unfolds along the way! Stay tuned for a whirlwind of innovative projects, tutorials, and inspiration that will surely ignite your own crafting passions. 🎨✨ #HeroArtsCreativeTeam

Okay, let’s make some art together!

Handmade card with Hero Arts November Add-Ons: Winter Mail Critters, White Holiday Collage Hero Transfers, Wax Seals.

I also wanted to share a card using some of the fun Add Ons from the November My Monthly Hero Kit. This month has so many goodies and I used 4 of them today.

Handmade Christmas Card featuring a Hero Arts bear and fox each holding a letter with a Rub On Transfer background.

Hero Arts Christmas Card Tutorial:

I started by die cutting two frames and two “tapes” from the Journaling Photo Frame Infinity Dies Set. I then very lightly blended Paradise Core Ink along the edges of the photo background (using the sticky mat in my Stamp Wheel), stamped the bear and fox with my Stamping Tool and Copic colored the images (colors listed below). I also rubbed on a transfer Merry & Bright sentiment.

The background was so easy! I rubbed on the fun Twas the Night Before lettering from the White Holiday Collage Hero Transfers (RT121) with a bone folder and all the writing transfered to the paper perfectly on the first try. The card background is Paradise cardstock.

I wanted a pop of red, so I stamped and die cut a Merry Christmas Wax Seal using Crimson Core Ink. I also put a dab of Hero Wax Gold to add a little depth and shine to the “photo tape”

I assembled my card with foam tape and it is ready to send.

Cute holiday card with critters featured in  Hero Arts Journaling Photo Frame Infinity Dies DF125

Products Used:

Hero Arts November 2023 My Monthly Hero Kit and Add Ons

Winter Mail Critters Die Bundle SB385 (or stamps only)

White Holiday Collage Hero Transfers RT121

Holiday Message Strips Hero Transfers RT120

Wax Seals and Dies D306

My Monthly Hero Subscription

Journaling Photo Frame Infinity Dies DF125

Paradise Core Ink

Crimson Core Ink

Paradise cardstock.

Hero Wax Gold

Precision Glue

Compact Desktop Die Cutting Machine

Handy Desktop Tool Holder

Stamp Wheel Stamping Tool and Sticky Mat

Bone folder

Highlighter Tape (for die cutting and to tape the photo background to the frame)

White thin Posca pen to add highlights to the scarf.

Copic Colors Used:

  • Browns: E27, E15, E13, E11, E50
  • Reds: R27, R39
  • Pink: RV11
  • Blue: B00

I am so glad you stopped by!

Interested in more…You can also find me at these spots too:

@karens_mini on Instagram

Pinterest: @karenabrown

FaceBook: Karens_Mini

YouTube: Karen Brown

cardmaking · Mixed Media · papercrafting

Super Easy Cut Collage Birthday Cards | Minimal Supplies Needed

Cut Shapes Paper Collage Birthday Cards

Hello, I have a super quick post today sharing two fun collage birthday cards that I created by cutting wonky shapes from paper. So easy, anyone can make them and they require minimal supplies. I think they are so cheerful and happy.

I started by going through my acrylic gel press and scraped scraps but you could just as easily use ready made paper. I picked out some melon (just made these for my last post on covering journal covers: read HERE), green, blue and gray. After I was done sorting I decided to add some red to the mix too. I then cut out silly whimsical shapes and glued them onto an A2 notecard. I handlettered a quick sentiment to complete the card. Nothing precise or perfect here!

Easy DIY collage style birthday card made by cutting shapes from colored paper.

Now that I see card #2 finished, I think it has a real Eric Carle vibe.

Supplies:

  • Colored Paper or Mixed Media Scraps
  • Scissors
  • Glue (I used UHU stic glue)
  • Card Base
  • Black pen (for sentiment)

I found this cardmaking session very satisfying. What do you think? Would you try this?

Karen

Mixed Media · papercrafting

Colorful Collaged Journal Covers: How I Made My Handcrafted Gifts

Color-Blocked Collaged Journal Covers.

I recently signed up for Willa Wanders Fodder Challenge 2023 and I was so inspired by Instructor Barb Smucker and her Collaged Notebooks. I knew I wanted to try this technique and I am so glad that I did!

Collaged Mixed Media Notebook Covers

Color-Blocked Collaged Notebook Journal Covers.

My “How To” Process:

  • I started by creating colorful papers for my cover. Instead of using a gelli plate, I put acrylic paint on my mixed media paper and then used a scraper to move the paint around. On a palette, I started with basic primary colors and then had loads of fun custom mixing my colors. I was going for coral but wound up with several really pretty melon colored pages. On some pages I smoothed out the paint and on others I left it a bit rough with slight ridges of acrylic. I also painted marks (circles, lines, Xs and doodles…) on additional pages.
  • I also went through my gelli prints and selected some more papers that I used. The dark blue and bright orange were both gelli prints.
  • Once I selected a bunch of papers that I liked, I started playing around with layouts. I was going for a contemporary color-block look. Using a metal ruler, paper trimmer and 1 1/2″ circle punch I trimmed the pages to the sizes and shapes I wanted.
  • I laid a piece of plain paper inside the cover to protect the journal pages from excess glue during my assembly process.
  • Next, it was time to start covering my journal. I started with the the papers that would go along the spine. This journal has a cool open spine that did not need to be covered so the paper edge went directly up to the edge of the spine, but I left a 1/2″-1″ overhang for the other side. To get a nice smooth cover I dipped the paper in a pan of water for 2 seconds, blotted off the excess water, and on the back, brushed on a 50% mixture of Matte Modge Podge and Matte Medium with a flat brush. Then, I carefully put the paper up against the spine, leaving the overhang off the edge. Next, I put a piece of wax paper over the glued piece and brayered over the area to remove air bubbles and excess glue. Finally, I dabbed up the excess glue that seeped out.
  • I repeated this process until the front and back covers were complete. This journal has a nice black elastic band, but it was a little trickier to cover the back because of the grommets. For my next journals, I ordered notebooks without the elastic band. I will report back which style I like better.
  • To finish the notebooks, I folded the overhung edges (starting at the corners) toward the inner face pages and then glued securely with the glue mix I used above.
  • Last step was to glue a facing page to the front and back inside covers. I again used my mixed media painted pages for this.
  • I let my journals dry and then placed books on top overnight to keep the notebook nice and flat.
Mixed Media Collage Journal

These two journals are gifts and I plan to make more for Christmas. I hope to have another post about them this fall.

Collage Mixed Media Notebook Covers

I bought all my own supplies, but I am including links to the products used in case you’d like to give it a try.

Products Used in This Tutorial:

Products Available on Amazon:

Soho Open Spine Notebook

Liquitex BASICS Paint I used 3 Primary Colors and white

Liquitex Matte Medium

Matte Modge Podge

Brayers

Metal Ruler for Cutting and Tearing Paper

Scraper

Karen

cardmaking · Mixed Media · Video

Using Squeegee “Scraped” Acrylic Art Panels in Cardmaking

Squeege Scraped Acrylic Art + handmade cards.

Recently, some friends and I got together to experiment with “Squeegee Art”, which I find just mesmerizing. I love to watch @sharecestudios on Instagram! Sharece is an artist but I am just an experimenter, as you can see in my photos.

Squeegee Art (also known as “Scraped Art”) is created by putting acrylic paint (dots, squiggles, lines, shapes…) on cardstock and then pulling the paint down with a shower squeegee. I posted a short video below showing how I created one of the panels.

Quick Video Showing My “Squeegee Art” Process

Video: creating a squeegee scraped art panel

You know me, once I was done, I took three of my panels and made them into contemporary art cards.

Summery Acrylic Art Birthday Card

Contemporary Acrylic Squeegee Art Birthday card

I love how bright and happy this card is! This panel was from a second generation “scrape”. The first generation panel is on card #3 below. After I created panel one, I scraped the leftover paint that was on the squeegee onto a second piece of cardstock and I love how the colors blended.

Card #2 was die cut from the same panel as card #1, and it is so adorable in person!

Acrylic "Scraped" art birthday card.

Below, is a photo of the paints and supplies that I used.

Acrylic Paint + Shower Scraper + Squeegee Scrape Technique

Card #3 (shown below) was created from the “1st generation” scrape that I talked about above.

Squeegee Scraped Acrylic Art handmade card.

Contemporary Masculine Birthday Cards

Cards 4 and 5 were made from the panels created in the video above.

Contemporary Masculine Acrylic Birthday Cards.

Supplies Used:

(Affiliate links are provided below but there is no additional cost to you. For more information please see the Affiliate Programs info to the right or click on the link at the top of my blog. I purchased all the products used in this blog post, with the exception of the 2 * items from Spellbinders.)

Products Available at Amazon:

Liquitex BASICS Acrylic Paint – lots of colors and several sizes

Squeegee for Acrylic Scrape Painting

Plastic Squeeze Bottles for Acrylic Paint – 2 ounce

Tonic Studios paper trimmer

So what do you think?

Karen

cardmaking · Mixed Media

Spellbinders | House Mouse Designs Collection 3 Ways

Spellbinders House Mouse Designs | Daisy Mouse | Mixed Media handmade card.

Spellbinders just released 6 adorable House Mouse Designs Rubber Cling Stamp Kits + a bundle of the entire collection. The whimsical stamps are all so fun and today I am sharing three cards that I created.

Vintage Look Mixed Media Tutorial + Daisy Mouse (RSC-002)

Mixed Media cards have so much interest and I thought the technique would work perfectly with this Daisy Mouse (RSC-002) stamp set.

My Process:

  • I started by creating my background. I masked off a border and then used two shades of tan to ink blend my background. (Antique Linen and Frayed Burlap)
  • With the masking tape still on the cardstock, I then used the same tan inks to stencil and stamp bits and pieces on the background. Most of the stamping was “second generation” where I stamped first on a scrap and then onto my background so that the pattern would be subtle. Cathe Holden has some great stamps (Handle with Care: STP-093 and Friendly Society: STP-094) that I added here and there. I also used a bit of stamping with white pigment ink, but it is hard to see in the photograph.
  • Carefully remove your masking tape. I used Post It Tape, which is the best!
  • After my background was dry, I stamped The Daisy Mouse with Versafine Black Pigment Ink.
  • PRO TIP: For a crisp look, keep the stamp in your Misti stamping platform and restamp the image after you are done coloring. You won’t believe how much this one step will elevate your project!
  • I used Faber Castell Polychromo Colored Pencils to color the mouse and daisy. I used white, 2 shades of gray, 3 shades of yellow, orange, 2 shades of green, blue and coral.
  • PRO TIP: A bit of blue colored pencil was the secret ingredient!
  • Remember to restamp the image and let dry.
  • I also added a few white Posca Paint Pen (.9-1.3mm) dots.
  • The adorable Special Delivery sentiment is included with the stamp set.
  • I mounted my card panel on a navy card base and the finished card is 7″ x 4 3/4″. I usually add lots of foam tape, but I kept this card simple and just used Bearly liquid glue.
Spellbinders + House Mouse Designs | Daisy Mouse (RSC-002) two handmade cards

I loved the Daisy Mouse stamp so much that I made a second Copic colored version.

House Mouse Designs + Copic Coloring Tutorial

Spellbinders + House Mouse Designs | Daisy Mouse (RSC-002) Copic colored handmade card.

The detail on these stamps is so well done that coloring is so easy! I used the following Copic Colors:

  • E50, E40, E00, R20 (face, hands and tail)
  • BV0003 (shadows)
  • W0, W3, W5 (mouse body)
  • YG01, YG03 (stem and flower)
  • Y00, Y06, YR04, YR07 (flower)
Spellbinders + House Mouse Designs Collection Copic colored handmade  cards.

My final card uses Tea for Two (RSC-005). I am a tea drinker so this stamp set definitely called to me!

I used the following Copic colors:

  • E50, E40, E00, R20 (face, hands and tail)
  • BV0003 (shadows)
  • W0, W3, W5 (mouse body)
  • RV00, RV02, RV04 (teacups)
  • YG03 (stems)
  • BG05. B05 (flowers)

I wanted to add a small little sentiment in the middle of the scene, so I stamped the Hello from Fill My Heart Sentiments (STP-183)

Spellbinders + House Mouse Designs Tea for Two (RSC-005) Copic colorered handmade card.

Products Used:

Items Available at Amazon:

Faber Castell Polychromos Colored Pencils
cardmaking · Mixed Media · papercrafting

Spellbinders | The Best of 2022

LINK TO MY INSTAGRAM

At the end of the year, I enjoy looking back through my projects and this year I decided to write a post about my most popular Spellbinders projects. I loved so many of my creations, but these are the crowd favorites for 2022.

Spellbinders Layered Floral Card Creator

This first card was my most popular card on Instagram, was my most “pinned” card on Pinterest and my most read blog post! I used the November Small Die of the Month Club Kit called Layered Floral Card Creator. This set was so popular that it is sold out. Because of this, I suggest that you join the club of your choice as club members are guaranteed to receive each month’s kit. Of course, you can cancel at any time. You can see all the subscription kit options HERE.

If you would like to read my original post, you can find it HERE. I also have four other cards that were very well received in that post.

Christmas card from Spellbinders Winter Tales Collection designed by  Zsoka Marko.  Magical Deer: S4-1215.

My most popular Christmas card was from the Winter Tales Collection that was designed by the talented Zsoka Marko. I was instantly attracted to this die kit called Magical Deer: S4-1215. I love the Nordic look and used Scandanavian red and blue as accent colors to give the neutrals some pop.

You can read my original blog post HERE.

Spelllbinders Fan Motif Embossing Folder

Embossing folders have become so popular, and this Fan Motif was much loved by my readers and followers.

 You can read my original post HERE.

Patchwork Petals Quilt die from Becca Feekens Quilted Ccollection.

Becca Feeken’s Quilted Collection was just released this month but was wildly popular! There are so many possibilities and combinations and I think the dies really speak to papercrafters. On this card, I used the Stained Glass Inlay Technique with the Patchwork Petals Quilt Die Kit: S5-537

You can read my original post and see 3 other cards HERE.

Spellbinders Quilted Heart Valentine

The Blooming Heart kit has been so popular on my blog, Instagram and Pinterest.

You can read my original post HERE.

Spellbinders Strawberry Patch die kit

This Strawberry Patch die kit can be used for so many occasions and makes such a bright happy card!

I created three cards using this set that you can see in my original post HERE.

Spellbinders Stitched Ornament kit 34-1231

Stitched cards were crazy popular this year and this Stitched Ornament Kit # S4-1231, continues to be pinned and liked.

You can read my original post HERE.

Susan Tierney-Cockburn's Letter Box from The Winter Garden Collection.

The Winter Garden Collection by Susan Tierney-Cockburn was so fun and this  Letter Box is so versatile….you can use the mailbox by itself….add Christamas gifts or letters….or turn it into a birthday card by changing the colors and sentiment. 

You can read my original post HERE.

Spellbinders Stitched Fall Leaves

Here is another very popular stitched kit called Stitched Fall Leaves. The leaves are gorgeous stitched or unstitched.

You can read my original post HERE.

Spellbinders Stylized Floral Kaleidscope Slimline Kit

The Stylized Floral Kaleidscope Slimline Kit is gorgeous!

I have three cards made with this kit in my original post HERE.

Spellbindders Balloon Party Animal Die kit: S3-450

This card was so well received! I used the following products:

You can see my original post HERE. One of my closest friends loved this card and asked me to make one for her daughter-in-laws baby shower, so I have a 2nd card HERE.

Shabby Chic Christmas Tags + Cathe Holden's Christmas Flea Market Finds

These tags win the “Most Fun to Create” award. I wanted a vintage shabby chic vibe and used Cathe Holden’s  Christmas Flea Market Finds

You can find my original post HERE.

I love that you stopped by today and would love to hear which is YOUR favorite creation.

I hope to see you soon!

Karen

cardmaking · Mixed Media · papercrafting

Altenew: A Year In Review: Crafters’ Edition Blog Hop + Giveaway 

Hello friends! I am so excited to be participating again in Altenew’s A Year In Review! I really enjoyed looking back through my projects and selecting some favorite creations.

Rainbow paper weaving with Altenew's Garden Trellis Cover Die.

This first card was my most popular Altenew card on Instagram and I detailed how I created my rainbow paper weaving. You can see my original post HERE. I used Altenew’s Garden Trellis Cover Die as the base for my weaving.

Layered Stamping on a cute little bird:  Bird of the Woods by Altenew.

This year, I was a bit obssessed with the Bird of the Woods Layering Stamp set and coordinating dies and I made a bunch of cards using this bundle! This POST was by far my most popular blog post of 2022.

Altenew's Precious Doodles Layered Stamping Floral Dies

I fell in love with the Precious Doodles Bundle…when “doodles” is in the title, I know it is going to be a favorite of mine! This is a darling stamp layering set and you can find my original post HERE.

Altenew Coloring Book watercolor page framed artwork.

I received so much positive feedback on this watercolor piece! I LOVE Altenew’s watercolor products and I used them on my framed project. I started with the Poppy from Altenew’s Coloring Book and I painted it with the 36 Pan Set and Artists Brushes. You can see my original post HERE.

Messy masculine mixed media card

I love mixed media, and this card was my 2nd most popular post on Instagram. You can see my original post HERE. I got really messy and used tons of fun products to create this masculine birthday card.

Clean and Simple + Gel Press Printing Rainbow Grid Card

If there is such a thing as CAS Mixed Media, then this is it. I love the clean white contrast with the rainbow colored gel press die cut squares and the giant black Altenew Mega Hello sentiment. You can see my original post HERE.

Altenew Craft Your Life Always Sunshine Kit card

I love all of the Craft Your Life releases but this Always Sunshine Kit was especially popular with my blog readers. You can read my original post HERE: I love coloring with stencils and that is the technique I used on this card.

Altenew Craft A Flower Open Peony

I always love Altenew’s Craft-A-Flower kits and this Open Peony was my favorite Craft-A-Flower in 2022. You can read my original blog post HERE.

Altenew Timeless Tulips with coordinating ink blend background.

Who doessn’t love a floral bouquet? Altenew’s Timeless Tulips premiered in August and I think it is a gorgeous set with two big beautiful floral stamps. You can read my original post HERE.

Altenew Summer Wishes stamp, die and coloring stencil card.

I will finish with Altenew’s Summer Wishes Bundle which is oh, so fun! I created a cozy little beach scene comprised of an adirondack chair, umbrella, radio and flip flops. This is such a happy card and I know I will pull out this bundle year after year. You can find my original post HERE.

Prizes:

Over $500 in total prizes! Altenew is giving away a $100 gift card to 1 lucky winner, 3 $50 gift cards, and 27 $10 gift cards. Winners will be chosen from both blog hop #1 and blog hop #2. Please leave a comment on the Altenew Card Blog HERE by 12/27/2022 for a chance to win. 

Wait, there’s MORE!

We would also LOVE to see YOUR favorite handmade cards, layouts, home decor, etc. featuring Altenew products! Feel free to share them on social media or on your blog using the hashtag #AltenewBest2022. You may also add a link by clicking the blue button below.

FOUR lucky crafters will each win a $15 gift certificate to our store! Winners will be announced on the Altenew Winners Page on 12/29/2022. We are looking forward to seeing your beautiful creations!

Blog Hop Order:

Altenew Card Blog

Erin Thompson

Annemarie Caister

Seeka

Karen Brown You Are Here!

Claire Apostoloff Claire is Next!

Mindy Eggen

Fiona Duff

Karen Reátegui

Carol Hintermeier

Bobby Hagen

Michelle Short

Lorena Brougher

Michelle Burnier

I am so pleased that you took a moment to stop by! If you have time, I’d love to hear which project you liked best.

Wishing all my crafty friends a healthy and happy 2023!

Karen