cardmaking · Mixed Media · papercrafting

Big News + Hero Arts | November Add-Ons

I am thrilled to announce that I have been selected to join the Hero Arts Creative Team! This incredible opportunity allows me to collaborate with a group of talented and passionate artists who share a love for crafting and creativity. I am beyond excited to explore new techniques, experiment with Hero Arts’ amazing range of products, and inspire others on their own artistic journeys. Together, we’ll embark on a creative adventure filled with endless possibilities, and I can’t wait to share the magic that unfolds along the way! Stay tuned for a whirlwind of innovative projects, tutorials, and inspiration that will surely ignite your own crafting passions. 🎨✨ #HeroArtsCreativeTeam

Okay, let’s make some art together!

Handmade card with Hero Arts November Add-Ons: Winter Mail Critters, White Holiday Collage Hero Transfers, Wax Seals.

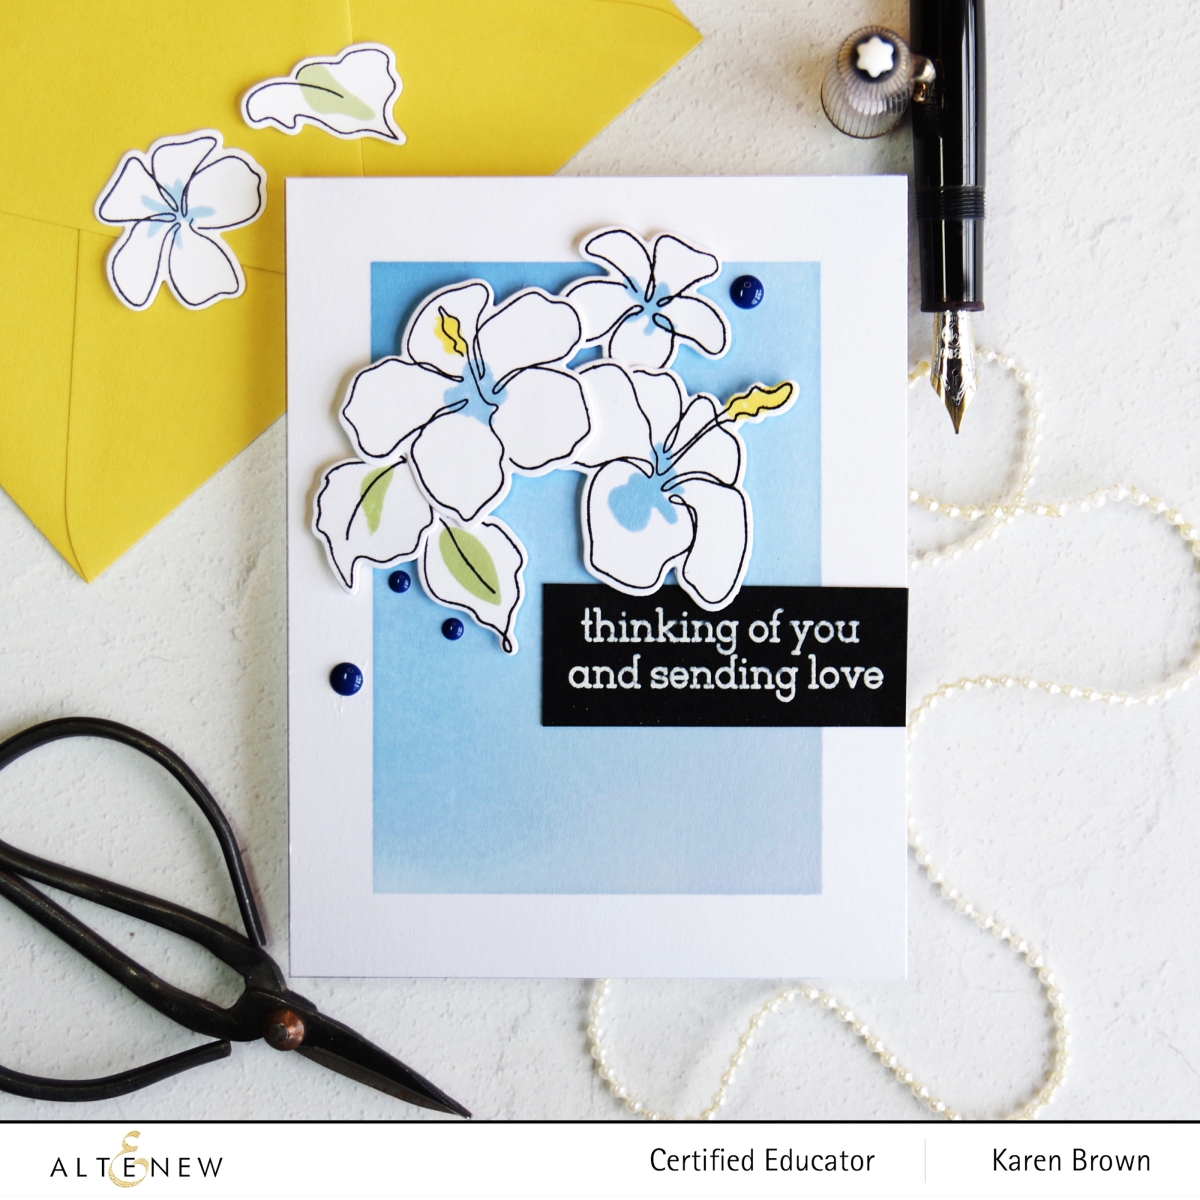
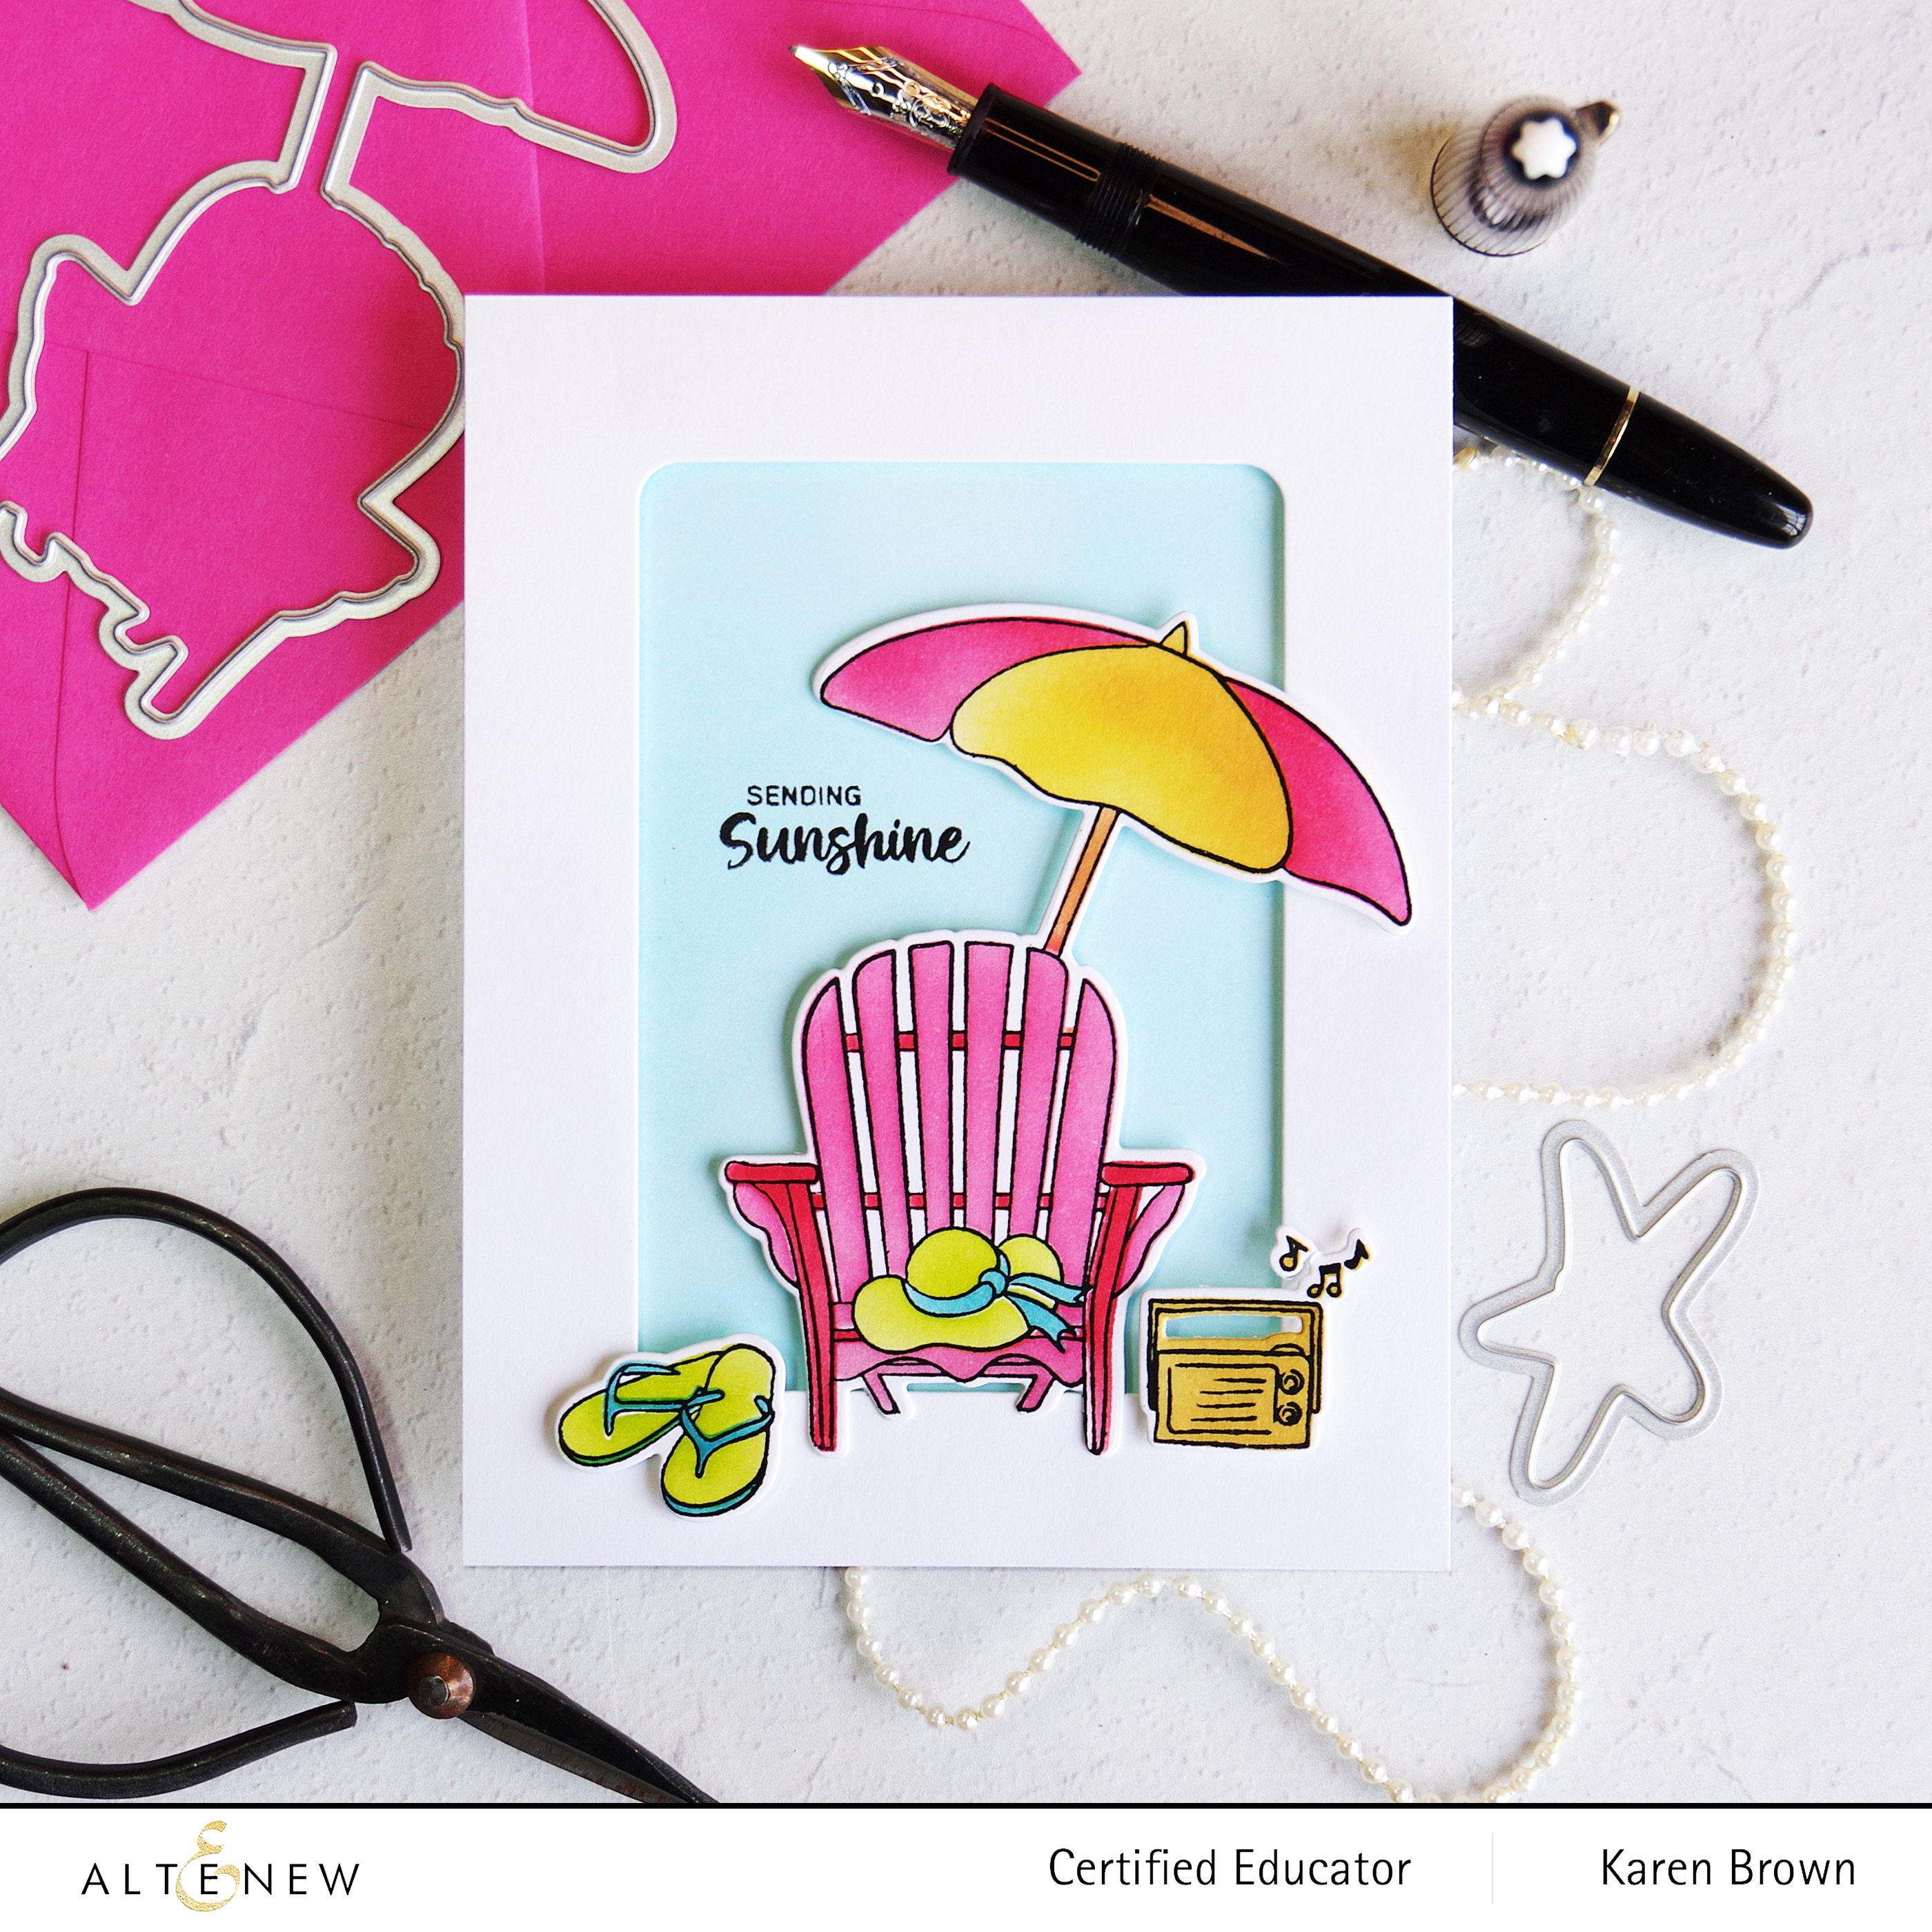
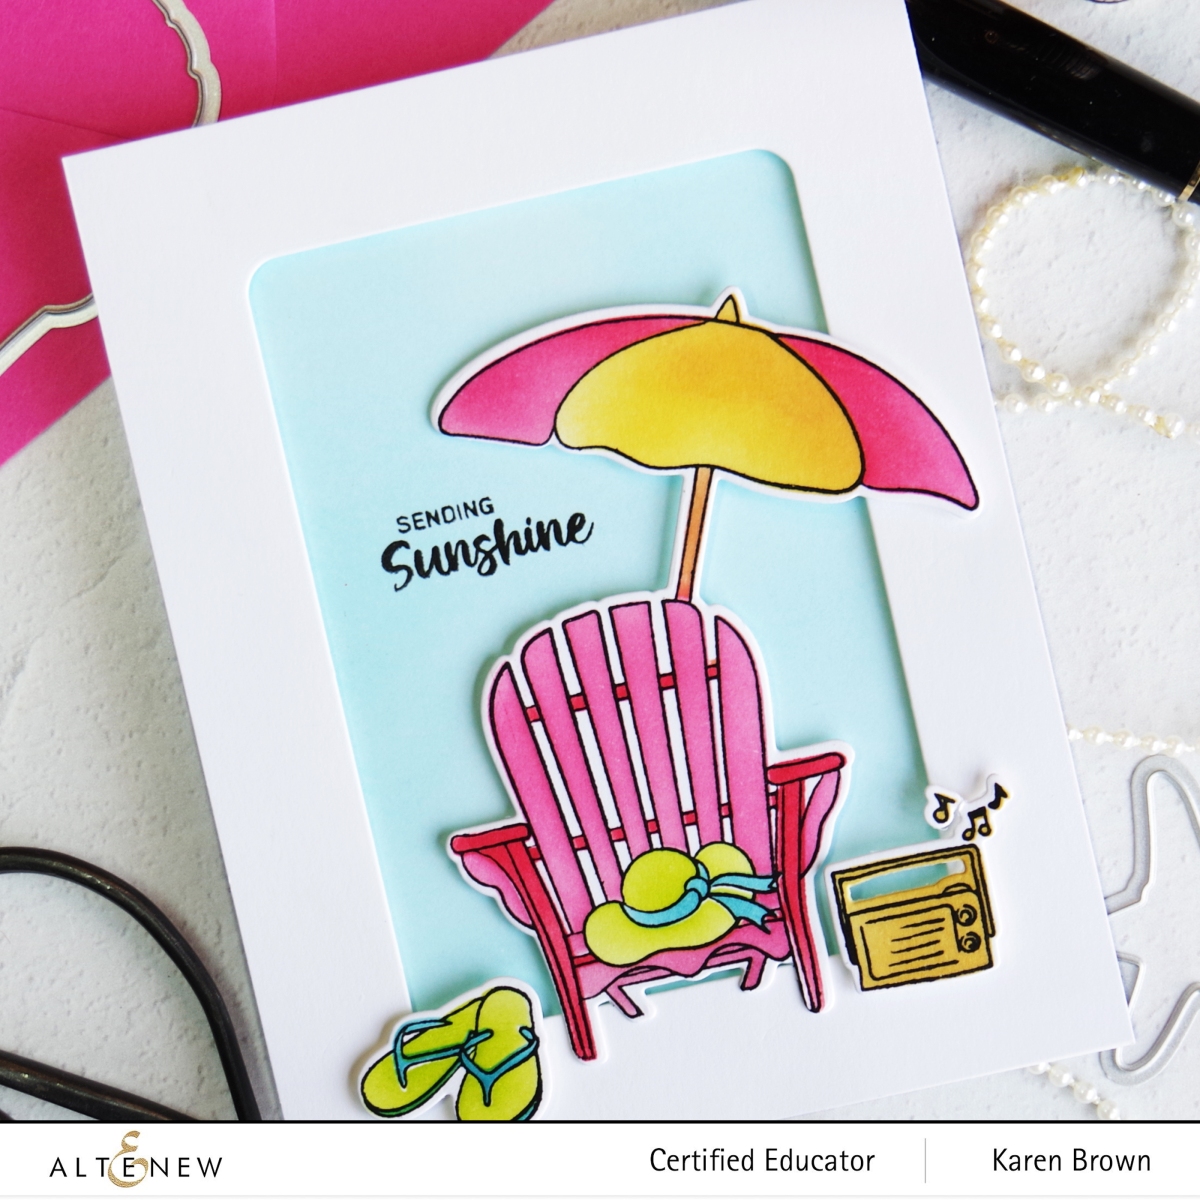
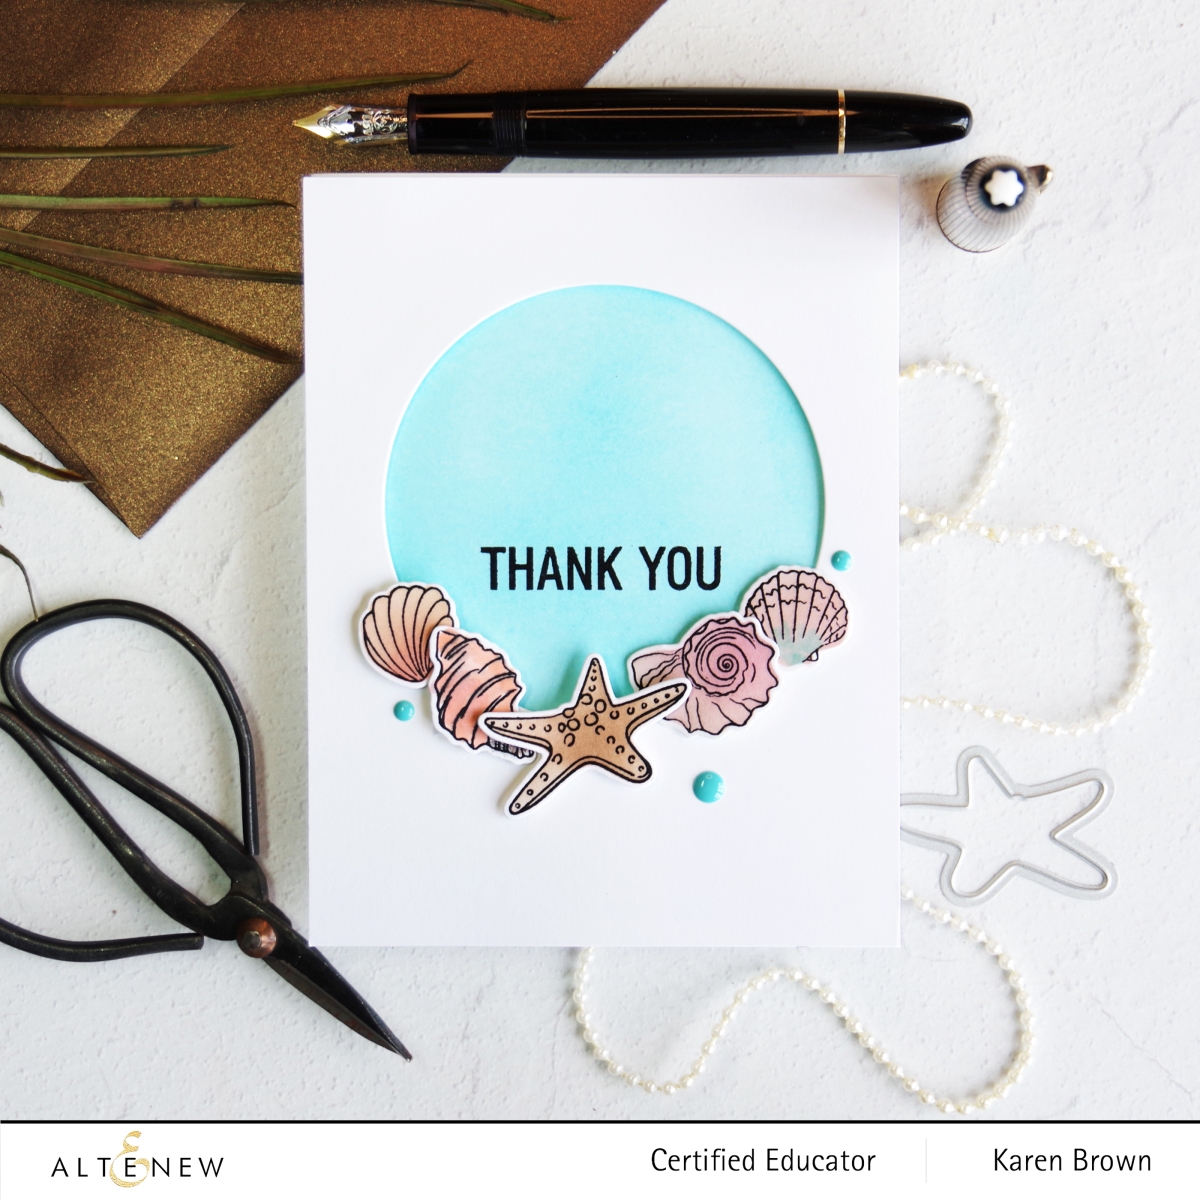
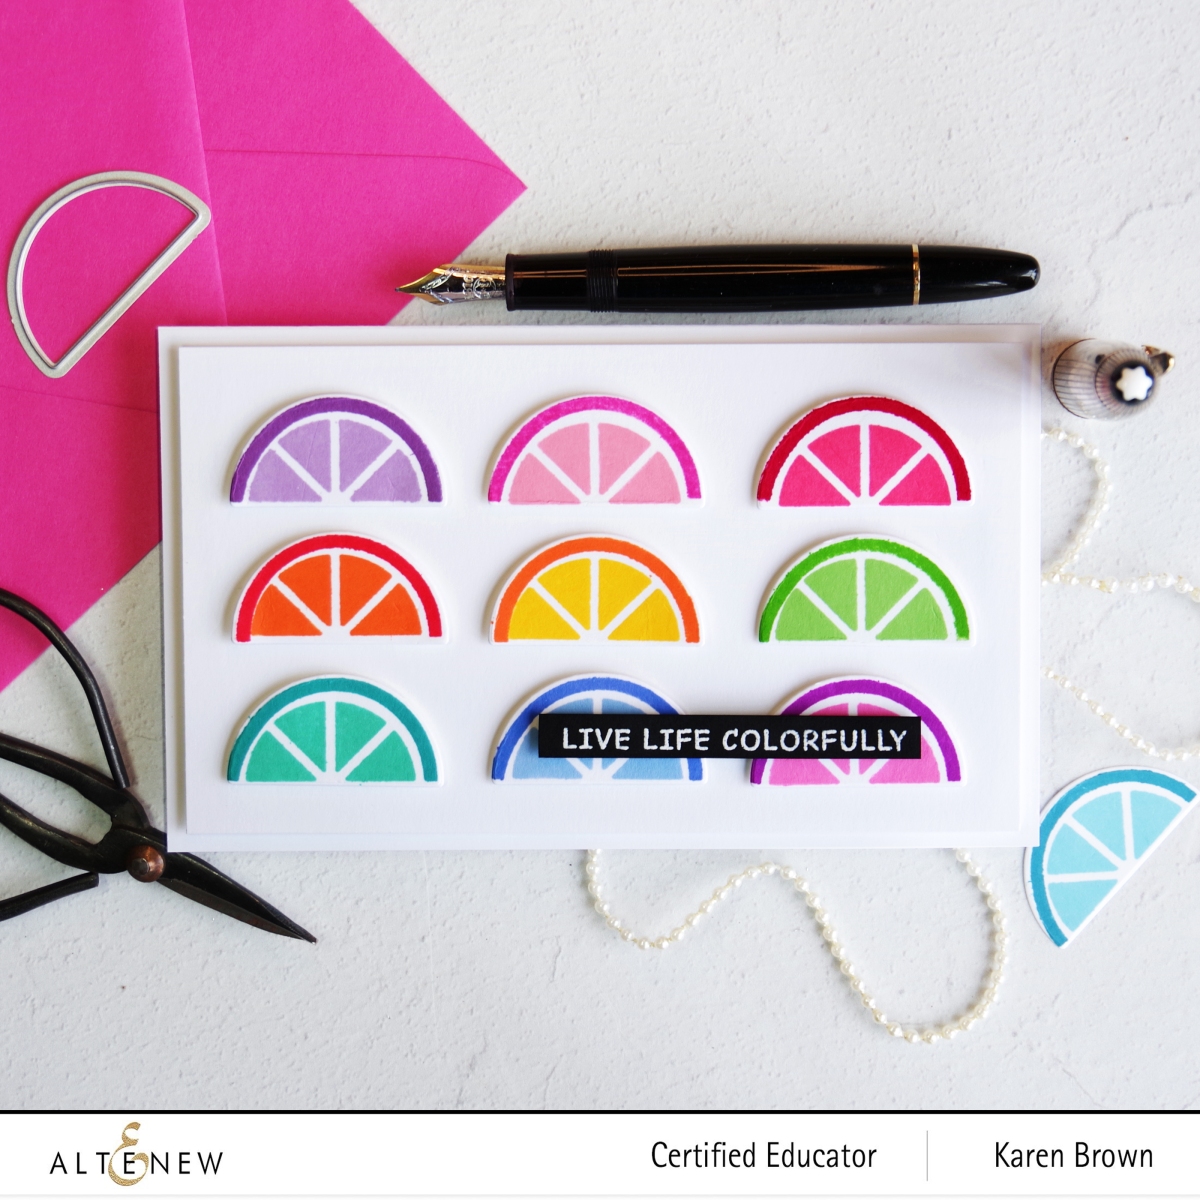
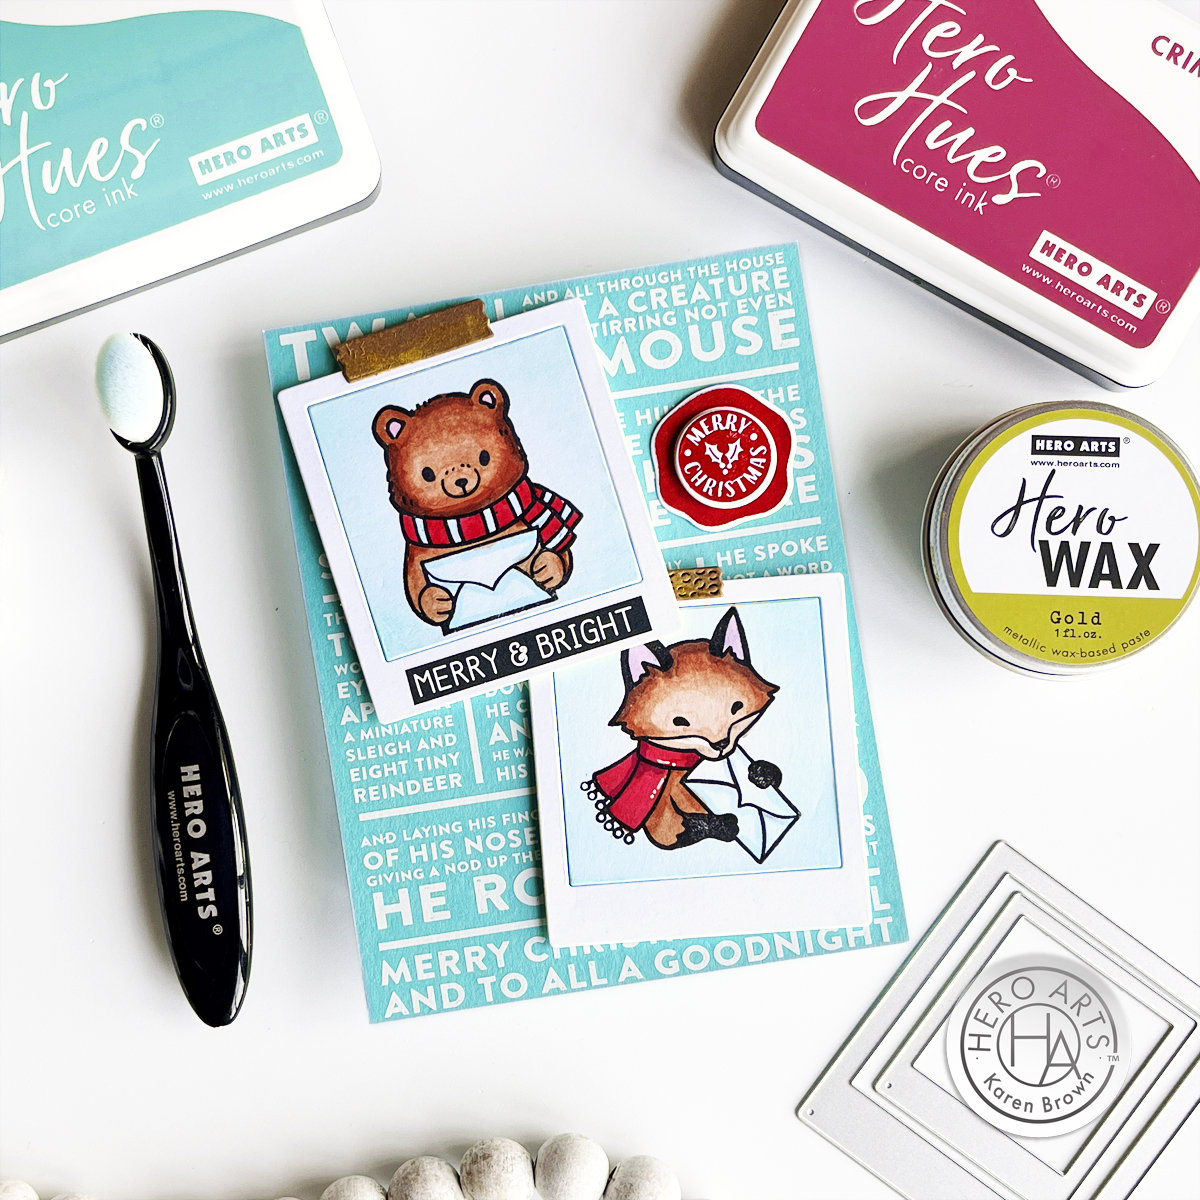
I also wanted to share a card using some of the fun Add Ons from the November My Monthly Hero Kit. This month has so many goodies and I used 4 of them today.

Handmade Christmas Card featuring a Hero Arts bear and fox each holding a letter with a Rub On Transfer background.

Hero Arts Christmas Card Tutorial:

I started by die cutting two frames and two “tapes” from the Journaling Photo Frame Infinity Dies Set. I then very lightly blended Paradise Core Ink along the edges of the photo background (using the sticky mat in my Stamp Wheel), stamped the bear and fox with my Stamping Tool and Copic colored the images (colors listed below). I also rubbed on a transfer Merry & Bright sentiment.

The background was so easy! I rubbed on the fun Twas the Night Before lettering from the White Holiday Collage Hero Transfers (RT121) with a bone folder and all the writing transfered to the paper perfectly on the first try. The card background is Paradise cardstock.

I wanted a pop of red, so I stamped and die cut a Merry Christmas Wax Seal using Crimson Core Ink. I also put a dab of Hero Wax Gold to add a little depth and shine to the “photo tape”

I assembled my card with foam tape and it is ready to send.

Cute holiday card with critters featured in  Hero Arts Journaling Photo Frame Infinity Dies DF125

Products Used:

Hero Arts November 2023 My Monthly Hero Kit and Add Ons

Winter Mail Critters Die Bundle SB385 (or stamps only)

White Holiday Collage Hero Transfers RT121

Holiday Message Strips Hero Transfers RT120

Wax Seals and Dies D306

My Monthly Hero Subscription

Journaling Photo Frame Infinity Dies DF125

Paradise Core Ink

Crimson Core Ink

Paradise cardstock.

Hero Wax Gold

Precision Glue

Compact Desktop Die Cutting Machine

Handy Desktop Tool Holder

Stamp Wheel Stamping Tool and Sticky Mat

Bone folder

Highlighter Tape (for die cutting and to tape the photo background to the frame)

White thin Posca pen to add highlights to the scarf.

Copic Colors Used:

  • Browns: E27, E15, E13, E11, E50
  • Reds: R27, R39
  • Pink: RV11
  • Blue: B00

I am so glad you stopped by!

Interested in more…You can also find me at these spots too:

@karens_mini on Instagram

Pinterest: @karenabrown

FaceBook: Karens_Mini

YouTube: Karen Brown

cardmaking

Spellbinders FransFormer Snowy Friends | Cute Quick Christmas Card | Easy Copic Coloring

Spellbinders Fransfomers Snowy Friends  cute with quick easy Copic coloring

Cute creatures + easy Copic coloring makes for an enjoyable afternoon! Spellbinders was kind enough to send me an advance copy of the new Fransformer Snowy Friends by Stupendous cling stamp set and I can’t remember the last time I enjoyed creating a card more. FransFormers are flexible clear stamps that you can squish, squeeze, shape and adjust plus they are just loads of fun!

My card is 5 1/2″ square which allowed me to add three snowmen. I used the same stamp for the left and right snowbabies, but you can see I was able to shape them so they each have their own personality. I did a little easy Copic coloring and I was done.

Three adorable snowmen in hats and scarves on a handmade Christmas card with easy Copic marker coloring.

Spellbinders Fransformer Snow Friends Flexible Cling Stamps STP-218

Copic Markers Used:,

  • Blues: B00, BG11, BG45, B24, B29
  • Pinks: BV00, BV11, RV21, RV23
  • Light Peach: E11, E21
  • Gray: N0, N1
  • Green: YG01
  • Orange: YR04

If you are interested in another easy stamped Copic colored card, check out my blog post HERE.

Let it snow, let it snow, let it snow…

Karen

Interested in more…You can also find me at these spots too:

@karens_mini on Instagram

Pinterest: @karenabrown

FaceBook: Karens_Mini

YouTube: Karen Brown

cardmaking · papercrafting

Altenew | Linear Life Tropical Garden

I love the modern look of these loose sketchy outline flower stamps! They are very versatile and would work great on clean and simple projects but I also plan to use it on some mixed media cards.

I started again by ink blending my background. I used the three lightest colors in Altenew’s Glacier Cave Mini Cube Set. I masked off a frame with washi tape and then started in the bottom right with Arctic and then moved darker toward the top left corner. I stamped the flowers and leaves with black pigment ink. Once the outlines were dry, I stamped the flower centers with Caribbean Sky Crisp Dye Ink. I die cut the blooms, assembled with foam tape and then added Glacier Caves Enamel Dots to finish the project.

Altenew Linear Life Tropical Garden Stamp and Dies + Handmade Card
Altenew Carribean Sky Crisp Dye Ink + Ink Blended Background

Thanks for stopping by!

Karen

Mixed Media · papercrafting

Spellbinders | Mixed Media Gift Tags with Cathe Holden’s Christmas Flea Market Finds

Spellbinders | Mixed Media Gift Tags with Cathe Holden's Christmas Flea Market Finds

Vintage Vibe Mixed Media Christmas Gift Tags

Hello! My post today features a favorite new Spellbinders collection from Cathe Holden called Christmas Flea Market Finds. Cathe included stamps, printed die cuts, paper and stickers and they are SO fun to create with!

Using printed die cuts in cardmaking.

I created three mixed media tags with a vintage vibe. For all three tags, I created backgrounds using ink sprays. I mixed Ocean Waves aqua, Shimmer Spray for extra sparkle and a little water spray to slightly dilute the color. I dabbed my tag in the mixture, dried and then repeated two more times.

Next, I worked on my layouts. I knew I wanted to stencil grit paste on one card and I wanted all of the tags to be distressed.

Vintage look Christmas Gift tag with stenciled grit paste background.

I love the texture and interest that the grit paste adds to the tag.

Adding texture and interest with grit paste and a stencil in cardmaking.

Two of the cards also include stamps. To get the vintage-look inky blue, I combined denim and brown inks. White paint splatters were added to two of the cards and I thought they added a wintry look.

Distressed Christmas gift tag with pre-printed die cuts, stamp and stickers with a hand dyed aqua background.

When I create this type of mixed media project, I love to pull out all my supplies and just start playing. I made a huge fun mess!

How to get a vintage look when stamping papercrafts.

Spellbinders/Cathe Holden Supplies Used:

Other Supplies:

Cathe Holden Christmas Flea Market Finds Vintage look distressed gift tags.

Last week, I added a post with Cathe Holden Christmas cards which you can read HERE.

Thanks for stopping by!

Karen

cardmaking · papercrafting

Altenew August 2022 Endless Ambition Release Blog Hop + Giveaway ($300 in Total Prizes!)

Altenew Timeless Tulips Card with coloring stencil.

Altenew Timeless Tulips Bundle

Wow, this Timeless Tulips stamp set is fabulous! Two BIG, Bold beautiful stamps with a Graphic Art Vibe and wonderful sentiments that will work for so many occasions. I could see it for Mother’s Day, a Get Well Card, Ballet Recital, Birthday, Valentine’s Day….lots of possibilites.

Card with red and pink bouquet of tulips.

Both cards came together quickly because I used the coordinating coloring stencils. I started by stamping with black pigment ink. Once the ink was dry, I lined up my stencils and started coloring. I used Altenew Crisp Dye Inks in Coral Berry, Ruby Red, Paper Bag, Firefly, Green Fields and Evergreen. The image was easy to die cut and the sentiment is included with this stamp set. I used a Kraft Card base and then ink blended some Paper Bag Crisp Dye Ink along the edges to tie the card panel and base together.

Graphic Arts floral card in pinks and reds.

Products Used on Card #1:

Altenew Timeless Tulips card with a hand inked coordinating background.

I used the coloring stencils on card #2 also. For this card, I ink blended a coordinating background using Coral Berry into Ocean Waves.

Altenew Timeless Tulips flower vase card in pinks and blues.

Products Used on Card #2:

Altenew Timeless Tulips Big Bold stamped card.

Giveaway Prizes

$300 in total prizes! To celebrate this release, Altenew is giving away a $50 gift certificate to 2 lucky winners and a $25 gift certificate to 8 winners! Please leave a comment on the Altenew Card Blog and/or each designer’s blog post on the blog hop list below by 08/28/2022 for a chance to win.

Altenew will draw 10 random winners from the comments left on each stop of this blog hop and announce the winners on the Altenew Winners Page on 08/29/2022.

BLOG HOP ORDER

Altenew Blog

Therese Calvird

Teresa Litchfield

Virginia Lu

Nicole Watt

Nathalie DeSousa

Rebecca Sogn

Terri Koszler

Penny Pynnonen

Laurie Willison

Teri Wilson

Angela Brennan

Maryám Pérez

Karen Brown

Mugdha Gujarathi

Lilith Eeckels

Bobby Hagen

Lorena Brougher

Jaycee Gaspar

Michelle Burnier

Linda Westfall

Jenny Colacicco

Soraya Maes

Caly Person

LauraJane

Emily Midgett

Kari VanNoy

Annemarie Caister

Fiona Duff

Reiko Tsuchida ***Note: Due to strict regulations in Japan, you might not be able to leave a comment on her blog post.

Bridget Casey

I can’t decide which card I like better.

I am so pleased you stopped by!

Karen

cardmaking · papercrafting

Altenew August 2022 Bold & Beautiful Release Blog Hop + Giveaway ($300 in Total Prizes!)

Altenew Precious Doodles Handmade Card.

Hello and welcome to Altenew’s August Blog Hop! I am so excited about the beautiful and fresh products that Altenew is releasing this month.

Altenew Precious Doodles Stamp and Die Bundle

I thought I would start with the Precious Doodles Bundle. When “doodles” is in the title, I know it is going to be a favorite of mine!

Precious Doodles is a happy little stamp layering set and I used Altenew Crisp Dye Inks: Cotton Candy + Coral Berry, Ocean Waves + Dusk, Parrot + Shadow Creek and Firefly + Green Fields. Once my Doodles were stamped, I embellished with Enamel Dots, die cut a frame, added the darling bee and die cut the sentiment.

Products Used on Card #1

Handmade card with stamped and die cut doodle flowers + bee.
Precious Doodles Card with Bee

Card #2 was quick and easy! I stamped and die cut four flowers, embellished with enamel dots and mounted on a simple background defined by washi tape.

Quick and Easy stamped and die cut handmade card with Altenew's Precious Doodles Stamp Layering Set.
Quick and Easy Precious Doodles Card

Products Used on Card #2:

Clean and Simple Altenew Precious Doodles handmade card.

Altenew Arch of Flowers Stamp, Stencil and Die Bundle

Handmade Card using Altenew's Arch of Flowers Stamp, Stencil and Die.
Altenew Arch of Flowers Card

The Arch of Flowers Bundle is such a fun and creative kit! For my first card, I used the stamp, coloring stencil and die. The die is gorgeous and very detailed which really adds to its beauty! The coloring stencil was very easy to line up and use and I love the effect. The stamp set also has great sentiments included, which is always a big plus! To finish the card I just added enamel dots to the flower centers.

Happy Floral Card using Altenew's Arch of Flowers bundle and Coloring Stencil.

Products Used on Card #1:

Using Coloring Stencils in Cardmaking:  Altenew's Arch of Flowers.

I also wanted to make a quick casual hello card with the stamp and coloring stencil. I angled the stamp and then quickly colored in the sunny little flower scene. Don’t the flowers look like they are reaching for the sun?

Quick and Easy Card with Altenew's Arch of Flowers Stamp and coloring stencil.
Quick and Easy Arch of Flowers Card

Products Used on Card #2:

Altenew's Arch of Flowers Stamp and Coloring Stencil.

I think this would make a cute stationary set or get well card too.

FREE GIFT OFFER!

To celebrate the release, we are running a free gift promotion. Feel free to share the promotion info with your followers. 

  • Get a FREE brand new Bold & Beautiful Mini Inspiration Guide with every order from 08/04/2022 through 08/06/2022. Shop HERE!
  • Get a FREE brand new Bold & Beautiful Stamp & Die Release Inspiration Guide e-book (worth $5.99) with every order of high-value Bold & Beautiful Bundles. Shop HERE! *Exclusions apply.
  • Get a FREE brand new Online Cardmaking Class with every order from the new Bold & Beautiful Stamp & Die Release Collection from 08/04/2022 through 08/10/2022. Shop HERE!
  • 300 in total prizes! To celebrate this release, Altenew is giving away a $50 gift certificate to 2 lucky winners and a $25 gift certificate to 8 winners! Please leave a comment on the Altenew Card Blog and/or each designer’s blog post on the blog hop list below by 08/10/2022 for a chance to win. 

Altenew will draw 10 winners randomly from the comments left on each stop of this blog hop and announce the winners on the Altenew Winners Page on 08/11/2022.

Blog Hop Order

Altenew Blog
Virginia Lu
Kari VanNoy
Laurie Willison
Caly Person
Erum Tasneem
Jenny Martin
Agnieszka Małyszek
Bobby Hagen
Mindy Eggen
Teri Wilson
Jaycee Gaspar
Terri Koszler
Annemarie Caister
Nichol Spohr
Therese Calvird
Angela Brennan
Lorena Brougher
Tenia Nelson
Nicole Watt
Lilith Eeckels
Mugdha Gujarathi
LauraJane
Maryám Pérez
Teresa Litchfield
Michelle Short
Bridget Casey
Nathalie DeSousa
Michelle Burnier
Jenny Colacicco
Fiona Duff
Svitlana Shayevich
Karen Brown You are here!
Laurie Patterson
Linda Westfall
Reiko Tsuchida ***Note: Due to strict regulations in Japan, you might not be able to leave a comment on her blog post.
Penny Pynnonen
Tania Ahmed
Dana Joy

Thanks for stopping by! I’d love to hear your thoughts on these cards.

Karen

cardmaking · papercrafting

Altenew July 2022 Summer Sunshine Collection Release Blog Hop + Giveaway ($300 in total prizes)

Altenew Summer Wishes Stamps, Dies and Stencils + Handmade Card

Hello friend! I am excited to show you some of Altenew’s new products in their wonderful July release. To kick off the release, Altenew is hosting a fun Blog Hop and we hope you will visit each stop.

Altenew’s Summer Wishes Stamps, Dies and Stencils

I’d like to start with the Summer Wishes Bundle which is oh, so fun! For my first card, I created a cozy little beach scene comprised of an adirondack chair, umbrella, radio and flip flops.

I started by ink blending my background with Altenew’s Large Blending Tool + Ocean Waves Crisp Dye Ink. Next, I stamped the elements with black pigment ink and let them dry. I colored the images with the coordinating stencil. I really like the effect of ink blending through stencils and it is so easy to do! To set the stage, I cut a frame using the Rounded Rectangles Die Set. I then die cut each element and assembled my card with foam tape.

Die Cut Beach Scene  Card with Adirondack Chair, Umbrella and Flip Flops
Beach Themed Card with Adirondack Chair and Umbrella

Products Used:

Altenew Summer Wishes Die Cut Sea Shells + Handmade Card.
Beach Themed Card with Die Cut Sea Shells

I made a companion card with the rest of the Summer Wishes shells. The background was again ink blended with Ocean Waves Dye Ink from the Cool Summer Nights Mini Ink Set.

Additional Products Used:

Clean and Simple Beach Themed Card.

Altenew Linear Life Tropical Garden

I love the modern look of these loose sketchy outline flower stamps and I know this set will become a favorite that I use over and over again. It is very versatile and would work great on clean and simple projects but I also plan to use it on some mixed media cards.

I started again by ink blending my background. I used the three lightest colors in Altenew’s Glacier Cave Mini Cube Set. I masked off a frame with washi tape and then started in the bottom right with Arctic and then moved darker toward the top left corner. I stamped the flowers and leaves with black pigment ink. Once the outlines were dry, I stamped the flower centers with Caribbean Sky Crisp Dye Ink. I die cut the blooms, assembled with foam tape and then added Glacier Caves Enamel Dots to finish the project.

Altenew Linear Life Tropical Garden Stamp and Dies + Handmade Card
Altenew Carribean Sky Crisp Dye Ink + Ink Blended Background

Altenew Mod Fruit Bowl Stamps and Dies

I LOVE citrus, so I couldn’t wait to get this set! I have three Meyer Lemon Trees that are like little babies to me and they were the inspiration for this project.

I wanted a bright happy card so I went with rainbow colors. I started by cutting cardstock into identically sized pieces so I could set up an assembly line for stamping the citrus elements. I stamped the segmented portion on the left side of my Misti and then I moved the panel to the right side and added the rind. With this assembly line, I had all the colors stamped very quickly. All I needed to do was wipe off the ink in between colors. My Mini Blossom Die Cutter made die-cutting a snap. I find it so handy to use on my desk for die cutting smaller elements. I attached the die-cuts (spaced 2″ apart) to a 6 1/4″ x 3 3/4″ panel and added my sentiment.

Altenew Mod Rainbow Fruit Bowl + Handmade Card
Rainbow Hued Handmade Citrus Card
Rainbow hand stamped  Citrus  Lemon, Lime, Orange Card

Free Gift

Get a FREE brand new Summer Sunshine  Mini Inspiration Guide with every order from 07/01/2022 through 07/03/2022. Shop HERE!

Get a FREE brand new Summer Sunshine  Stamp & Die Release Inspiration Guide Ebook  (worth $5.99) with every order of high-value Sweet Moments Bundles. Shop HERE! *Exclusions apply.

Get a FREE brand new Online Cardmaking Class with every order from the new Summer Sunshine  Stamp & Die Release Collection from 07/01/2022 through 07/07/2022. Shop HERE!

Giveaway Prizes

$300 in total prizes! To celebrate this release, Altenew is giving away a $50 gift certificate to 2 lucky winners and a $25 gift certificate to 8 winners! Please leave a comment on the Altenew Card Blog and/or each designer’s blog post on the blog hop list below by 07/17/2022 for a chance to win. 

Altenew will draw 10 random winners from the comments left on each stop of this blog hop and announce the winners on the Altenew Winners Page on 07/19/2022.

Blog Hop:

Altenew Blog

Jaycee Gaspar

Vicky Papaioannou

Erum Tasneem

Mindy Eggen

Jenny Colacicco

Caly Person

Nathalie DeSousa

LauraJane

Michelle Short

Bridget Casey

Terri Koszler

Karen Brown You Are Here!

Laurie Willison

Dana Joy

Virginia Lu

Tenia Nelson

Therese Calvird

Lilith Eeckels

Reiko Tsuchida ***Note: Due to strict regulations in Japan, you might not be able to leave a comment on her blog post.

Michelle Burnier

Agnieszka Małyszek

Angela Brennan

Emily Midgett

Linda Westfall

Maryam Perez

Laurie Patterson

Svitlana Shayevich

Annemarie Caister

Tania Ahmed

Penny Pynnonen

Adriana Arminio

Berina Rajakumar

I really enjoyed creating these cards. Thanks so much for stopping by!

Karen

cardmaking

Altenew Educators’ “Clean and Simple” Blog Hop and Linky Party + Giveaway

Altenew's Modern Eucalyptus on a Clean and Simple handmade card.

Tips for Clean and Simple Handmade Cards

Hello and welcome! You are probably here “hopping” with the Altenew Educators and I am pleased you stopped by! To start at the beginning of Altenew’s Hop, please click HERE.

Today I have two clean and simple cards to share. This is not my typical style, but I do love CAS cards. To me, Clean and Simple means LOTs of white space. To make that work, I like contrast so I used bold colors and black accents to make my card pop.

Tips for Clean and Simple Cards.

I think Mini stamps work so well with CAS cards so I chose Altenew’s Modern Eucalyptus Stamp and Die Bundle for my first card. I did some simple coloring with Altenew Artist Markers (Sets F: Sunshine Valley and G: Water Garden) and then die cut my Eucalyptus. I wanted to spotlight the plant, so I also cut a small background panel using one of my most used staples – Rounded Rectangles Dies. I heat embossed the sentiment (Birthday Greetings) and laid it over the rounded rectangle die cut. A thin black border helps tie the elements together.

Tips for Clean and Simple Cardmaking

For my second card, I used Altenew’s Tall Vase Stamp and Die Bundle. I colored and die cut the image and then mounted on a small die cut (Rounded Rectangles Dies) and added my sentiment: Birthday Greetings.

Using mini stamp sets in cardmaking.

Pro Tips for Successful Clean and Simple Cards:

  • Mini Stamps Work Great
  • Bold Simple Colors
  • Add a hint or two of black
  • Remember to use contrast
  • Don’t forget to leave lots of open white space

I think it would be fun to make a pack with thank you sentiments for a handmade gift.

Prizes:

$130 in total prizes! Altenew is giving away a $20 gift certificate to 3 lucky winners and a $15 gift certificate to 4 winners! To win, please comment on the Altenew Card Blog and/or each designer’s blog post on the blog hop list below by 07/03/2022. 

There’s MORE! Join our party! We have included an Inlinkz at the Altenew blog for you to enter your beautiful, Altenew “Clean and Simple” creations. 

We will pick one of our favorite handmade creations from those who joined the linky party, and they will receive a $10 Altenew gift certificate!

Altenew will draw 5 random winners from the comments left on each blog hop stop and announce the winners on the Altenew Winners Page on 07/04/2022.

Hop list:

Altenew Card Blog

Michelle Burnier

Annemarie Caister

Kari VanNoy

Susan Stagno

Ann Taylor

Susan Busada

Nenette S. Madero

Irina Fonina

Eva Bussom

Rosie Neustaedter

Joylita D’souza

Helen Kalb

Lana Taber

Neha Aggarwal

Penny Pynnonen

Karen Brown You Are Here! 🙂

Bridget Casey

Nandini Karmarkar

Nancy Souza

Pam Boedeker

Tenia Nelson

Rachael Shedeed

Virginia Lu

Amber Rain Davis

Roteja Galvan

Laurie Patterson

Keep hopping!

Karen

cardmaking · Mixed Media · papercrafting

Spellbinders + Cathe Holden’s Flea Market Finds

Quick and Easy Vintage Card featuring Cathe Holden's Flea Market Finds Ephemera, printed die cuts and stamps.

Cathe Holden’s “Flea Market Finds” Ephemera

Hello! I am so excited to show you Spellbinders new product line from Cathe Holden called Flea Market Finds. Cathe is a well known fabric designer and collector of vintage miscellany and she just released a wonderful assortment of printed die-cuts, paper samplers, stamps and stencils in collaboration with Spellbinders. Cathe put so much thought into every product and they all work SO well together.

For the past week, I have been playing in my craft room and I’d like to show you what I created. Hold on, becuase I have seven cards to share with you today. The card above was so fun to make!

My Recipe For Card 1:

On this card, I used all the products “as is” with no distressing. I started with the background where I layered 2 different papers, one from the neutral palette and one from the Blue Green pack. Next, I started adding stickers and diecuts. The bird image is framed with a third paper from Cathe’s Neutral Sampler.

Vintage Shabby Chic Card

Vintage Shabby Chic handmade card using Spellbinders Cathe Holden stencil and die cut ephemera.
Vintage Shabby Chic Handmade Get Well Card

For my Shabby Chic card, I started by ink blending Tumbled Glass Distress Ink on my panel. I added Frayed Burlap Ink around the ages for a vintage feel. I let the panel dry and then added Grit Paste through stencil #1 of the Layered Vintage Floral Stencil. I really like how the background turned out. I wanted an even more vintage look so I ran my Tea Dye Distress Crayon around the edges of the background and die cut and then blended the pigment with my fingers. The card base was covered with paper from the Blue Green Paper Palette.

Cardmaking With Ephemera

Vintage Collage Style Card using Spellbinders Flea Market Finds die cuts, stamps and stickers.
Aren’t the little bakers just the cutest?

My third card is a collage style card pieced together with designer paper, printed die-cuts and stamps. I used 1.25″ squares of paper cut from the Neutrals and Blue Green Samplers for my background. I distressed my background panel and the die cuts with a Distress Crayon and then added lots of ephemera.

Grunged Up Vintage Look Card

Grunged up Mixed Media Card using Spellbinders Flea Market Finds Stamps and Stickers.

I started my grunged up card by making a background panel. I blended tumbled glass distress ink and then added a bit of frayed burlap. I then ink blended a second panel for my die cut circles. I used Antique Linen Distress Ink and then added a bit of frayed burlap. I let the panels dry and then added Distress Grit Paste through my bricked stencil. I wanted it to look rough and old so I didn’t cover the entire stencil. After the grit paste was dry, I rubbed a Distress Crayon around the edges and blended it out onto the panel with my finger. I also gently rubbed some on the top of the panel so you could really see the crackle finish. Next, I die cut my circles and rubbed distress crayon around the edges and then blended onto the top with my fingers. I added two stickers to two of the circles and then stamped over them. The middle circle is just the roughly stamped cute flower truck. The matting is from the blue green sampler.

Quick and Easy Vintage Look Card

Quick and Easy Vintage Look Handmade Card using Flea Market Finds Printed Die Cuts.

This was the fastest and easiest card to make. I started with a page from the Neutral Sampler for my Background. I then layered on 3 Happy Thoughts and 2 Home Arts printed die cuts. I stamped a sentiment onto the flower basket and added a fun little paper clip from my stash.

Stenciled Background on Vintage Look Card

Spellbinders + Cathe Holden Layered Vintage Floral Stencil for Card Background,
Stenciled Background

Cathe Holden included a beautiful stencil in her collection and I used it for my background on this card. I added 2 stickers and 1 stamp to complete the card.

Using Printed Die Cuts in Cardmaking

Using Cathe Holden's Flea Market Finds in cardmaking

This was another card that came together very quickly using die cuts and stickers.

Using Flea Market Finds Miscellany on handmade cards.

Here is a group photo of the seven cards I created.

Cathe Holden Flea Market Finds handmade cards.

I had so much fun creating these cards. If you have a moment, let me know which is your favorite.

Thank you!

Karen

cardmaking · Mixed Media · papercrafting

Using Tags on Handmade Cards

Using die cut tags on handmade cards + Altenew Terrific Tags + Altenew Doodle Blooms

Hello and welcome! Don’t you just love bright summery colors? I recently posted about how to make your own glitter cardstock which I then turned into tags. I decided to take it a step further, and turned two of my tags into cards.

Handmade card with die cut Altenew Terrific Tags.
Can you see the pretty shimmer on the tag?

I used Altenew Supplies on these cards:

Altenew Doodle Blooms + Altenew Terrific Tags

I love how bright and happy the cards turned out.

Handmade glitter cardstock in cardmaking.

Tags are so versatile. Hang them on a wrapped gift, decorate a gift bag or box or turn the tag into a card.

I am so happy you stopped by!

Karen