Hello! I am excited to share a new Spellbinders Collection that releases today called Winter Tales that was designed by the talented Zsoka Marko. I was instantly attracted to this die kit called Magical Deer: S4-1215. I love the Nordic look and used Scandanavian red and blue as accent colors to give the neutrals some pop.
None of the dies are particularly big so I chose three browns, a red and a blue from my scrap pile. I glued all the pieces, except the deer’s head, directly to my background. I used foam tape for the head and I added crystal accents (SCS-128) to my flower centers. The sentiment is from the Amazing Paper Grace Christmas Tree kit (which is currently on sale!). For a bit more color, I added a matching red border to my background and then popped it on an A2 Top Folding Card Base. This card came together very quickly and I am pleased with the finished result.
Its harvest time and I love the veggies and adorable tractor included with this month’s Large Die of the Month kit called Thankful Tractor! The kit is large so I made a substantial 5 x 7″ card. I used bright bold green, yellow and orange cardstock for my focal elements. To set the stage I embossed my background with the September Embossing Folder of the Month. Next, I tore a piece of kraft cardstock and then lightly ink blended my “dirt”. I assembled my project with glue and foam tape. I found using a sticky mat helped with the die cut assembly.
I love the vegetables so much that I made a second card. I again embossed the background with the September Embossing Folder of the Month. The basket was die cut from Frosted Silver Mirror Cardstock using last month’s Large Die Kit of the Month called “Strawberry Patch”.
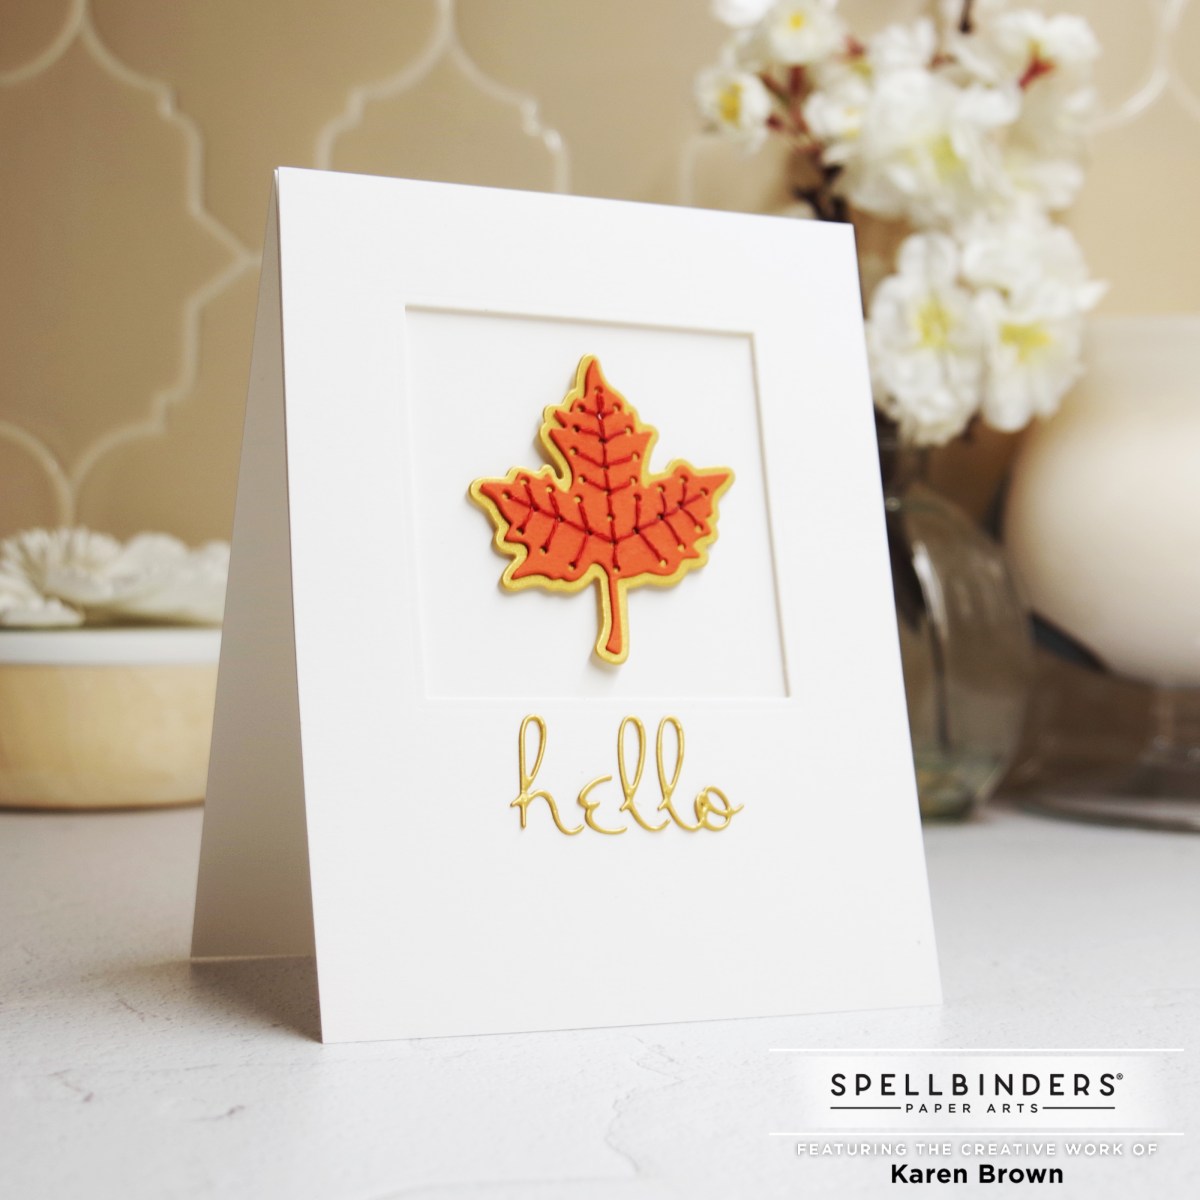
This month’s Small Die of the Month has loads of beautiful stitched leaves with coordinating shadows plus two word sentiments (hello fall). For my first card, I wanted to showcase the elegant simplicity of just one leaf. The stitching went very quickly and I kept the rest of the card clean and simple.
I used the included hello sentiment die. This is a beautiful yet delicate die and I’ve found it works well if you attach a sheet of double sided adhesive paper to the cardstock prior to die cutting. After you die cut, just pull away the backing paper and apply!
Wouldn’t it be fun to make a series of these as a gift?
DMC #355 Dark Terra Cotta Floss (I used two strands)
Large Eye Embroidery Needle
Square Die
Foam Tape
“Unstitched” Card
“Unstitched” Fall Leaves
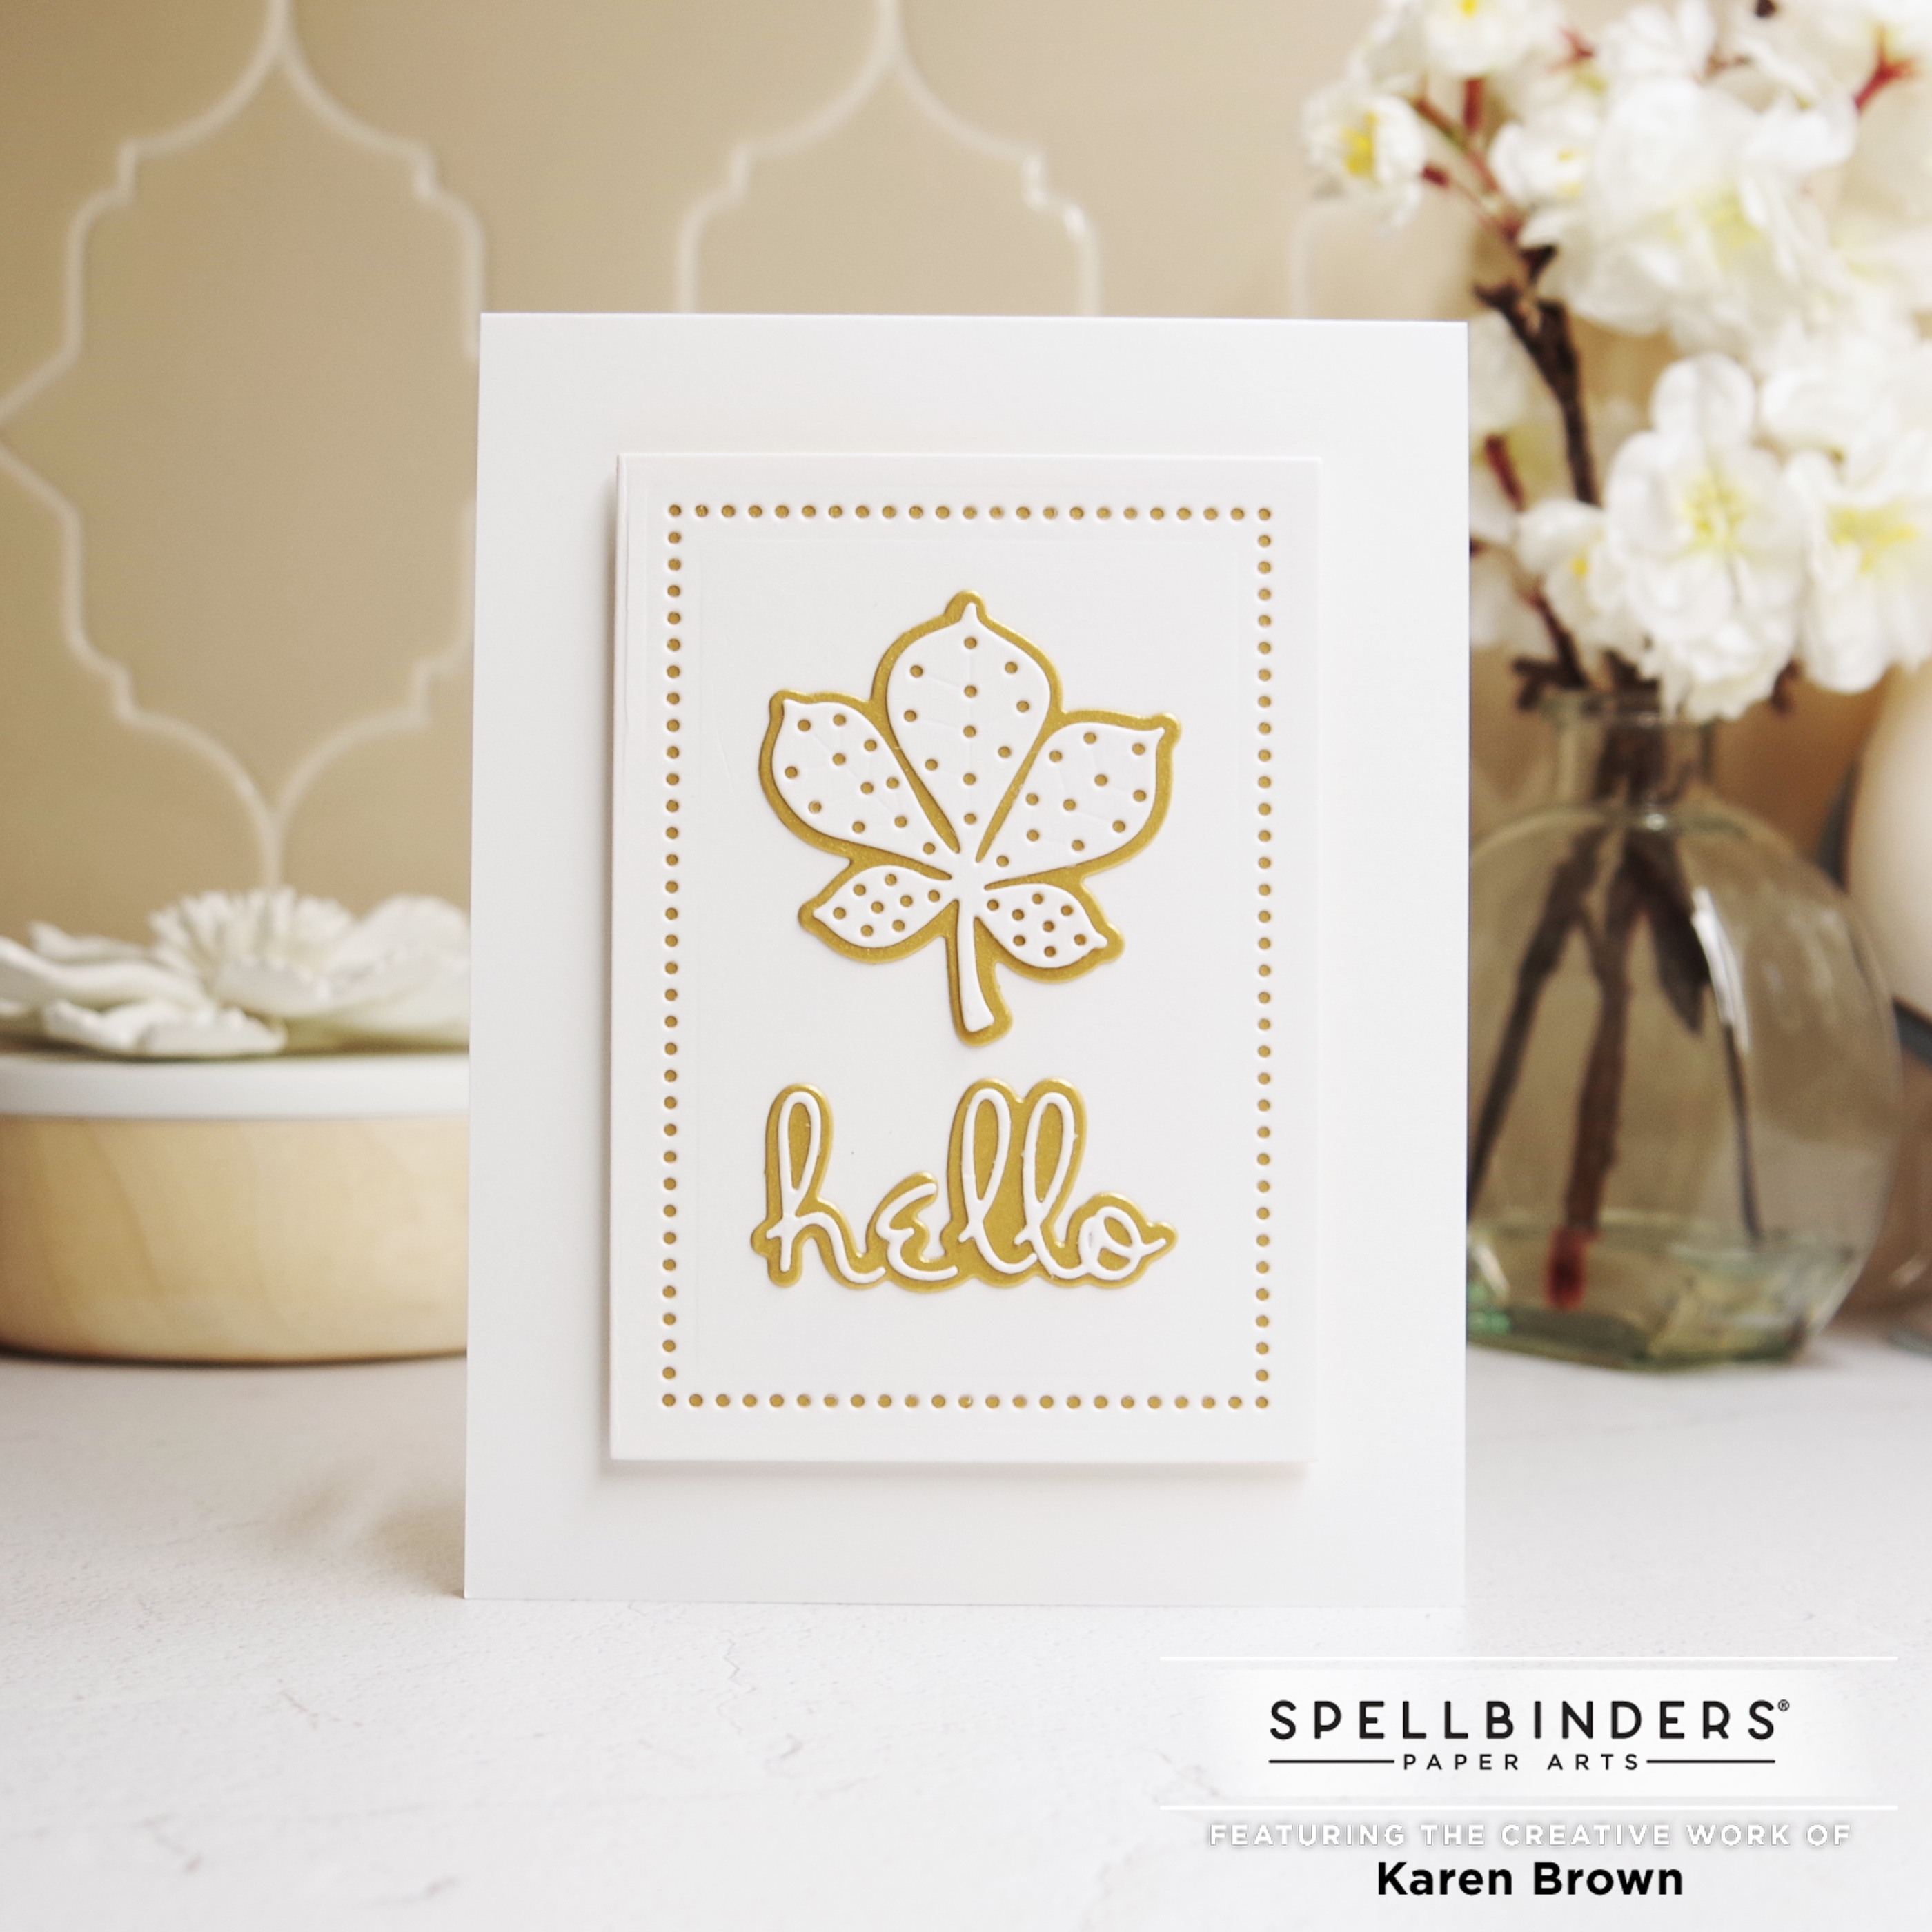
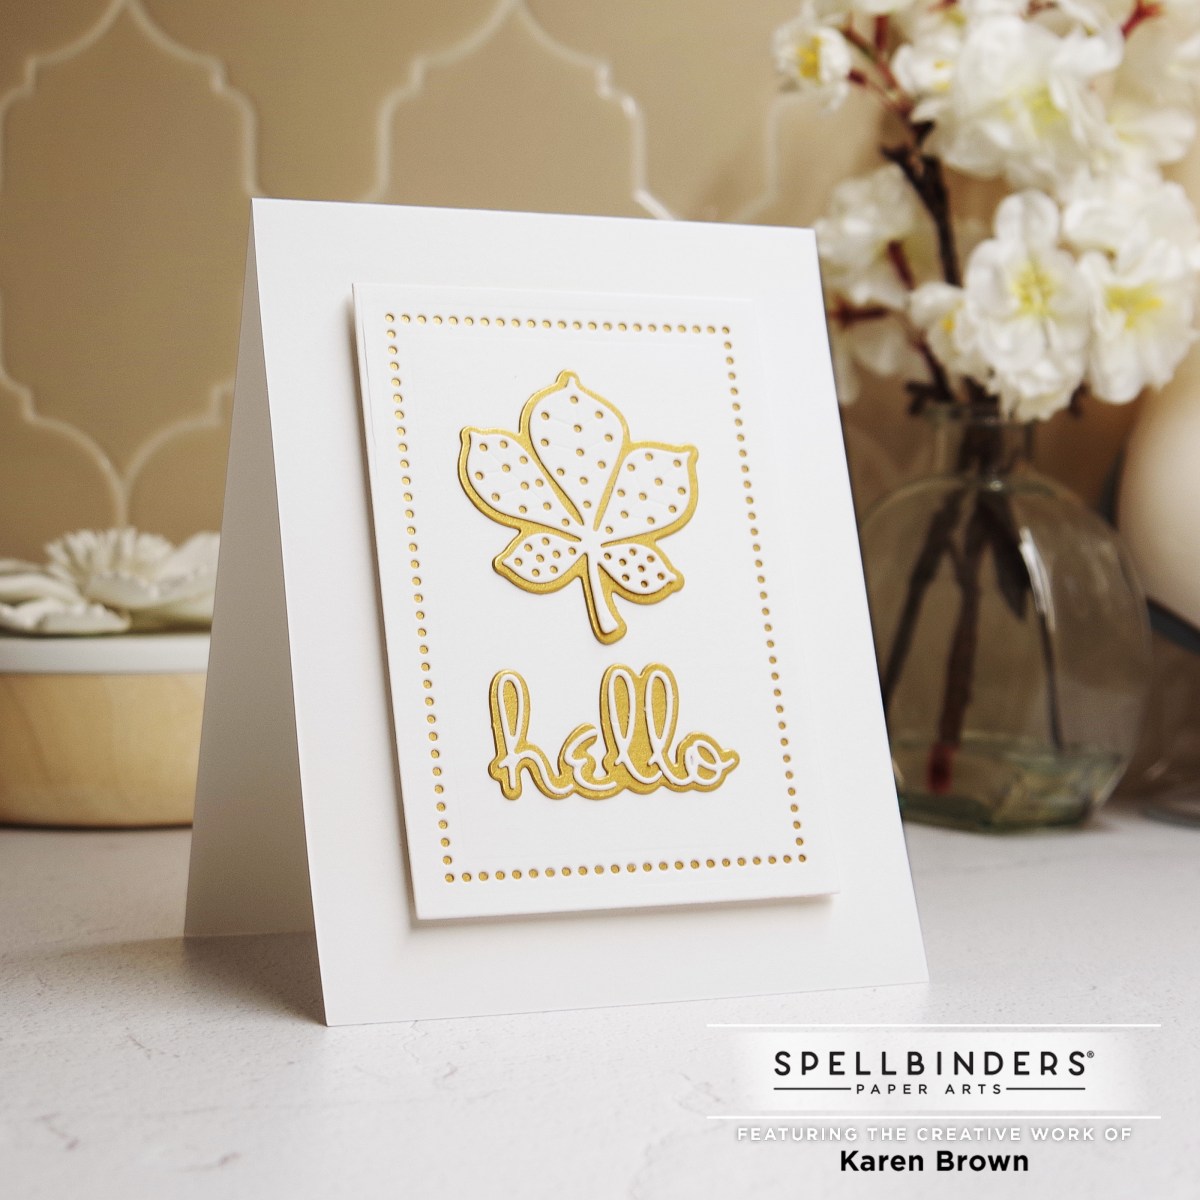
The leaf dies in the September Small Die of the Month kit are so fun that I wanted to make a card without stitching. To keep the theme, I mounted the leaf and shadow on a panel die-cut with one of my favorites, Essential Rectangles Dies. I love how this keeps the unstitched card theme. The gold details are achieved using Brushed Gold Cardstock and I mounted the panel with foam tape on an A2 Top Fold Cardbase. I find the result is a fresh clean card.
I think the September kits are sure to be favorites…what do you think?
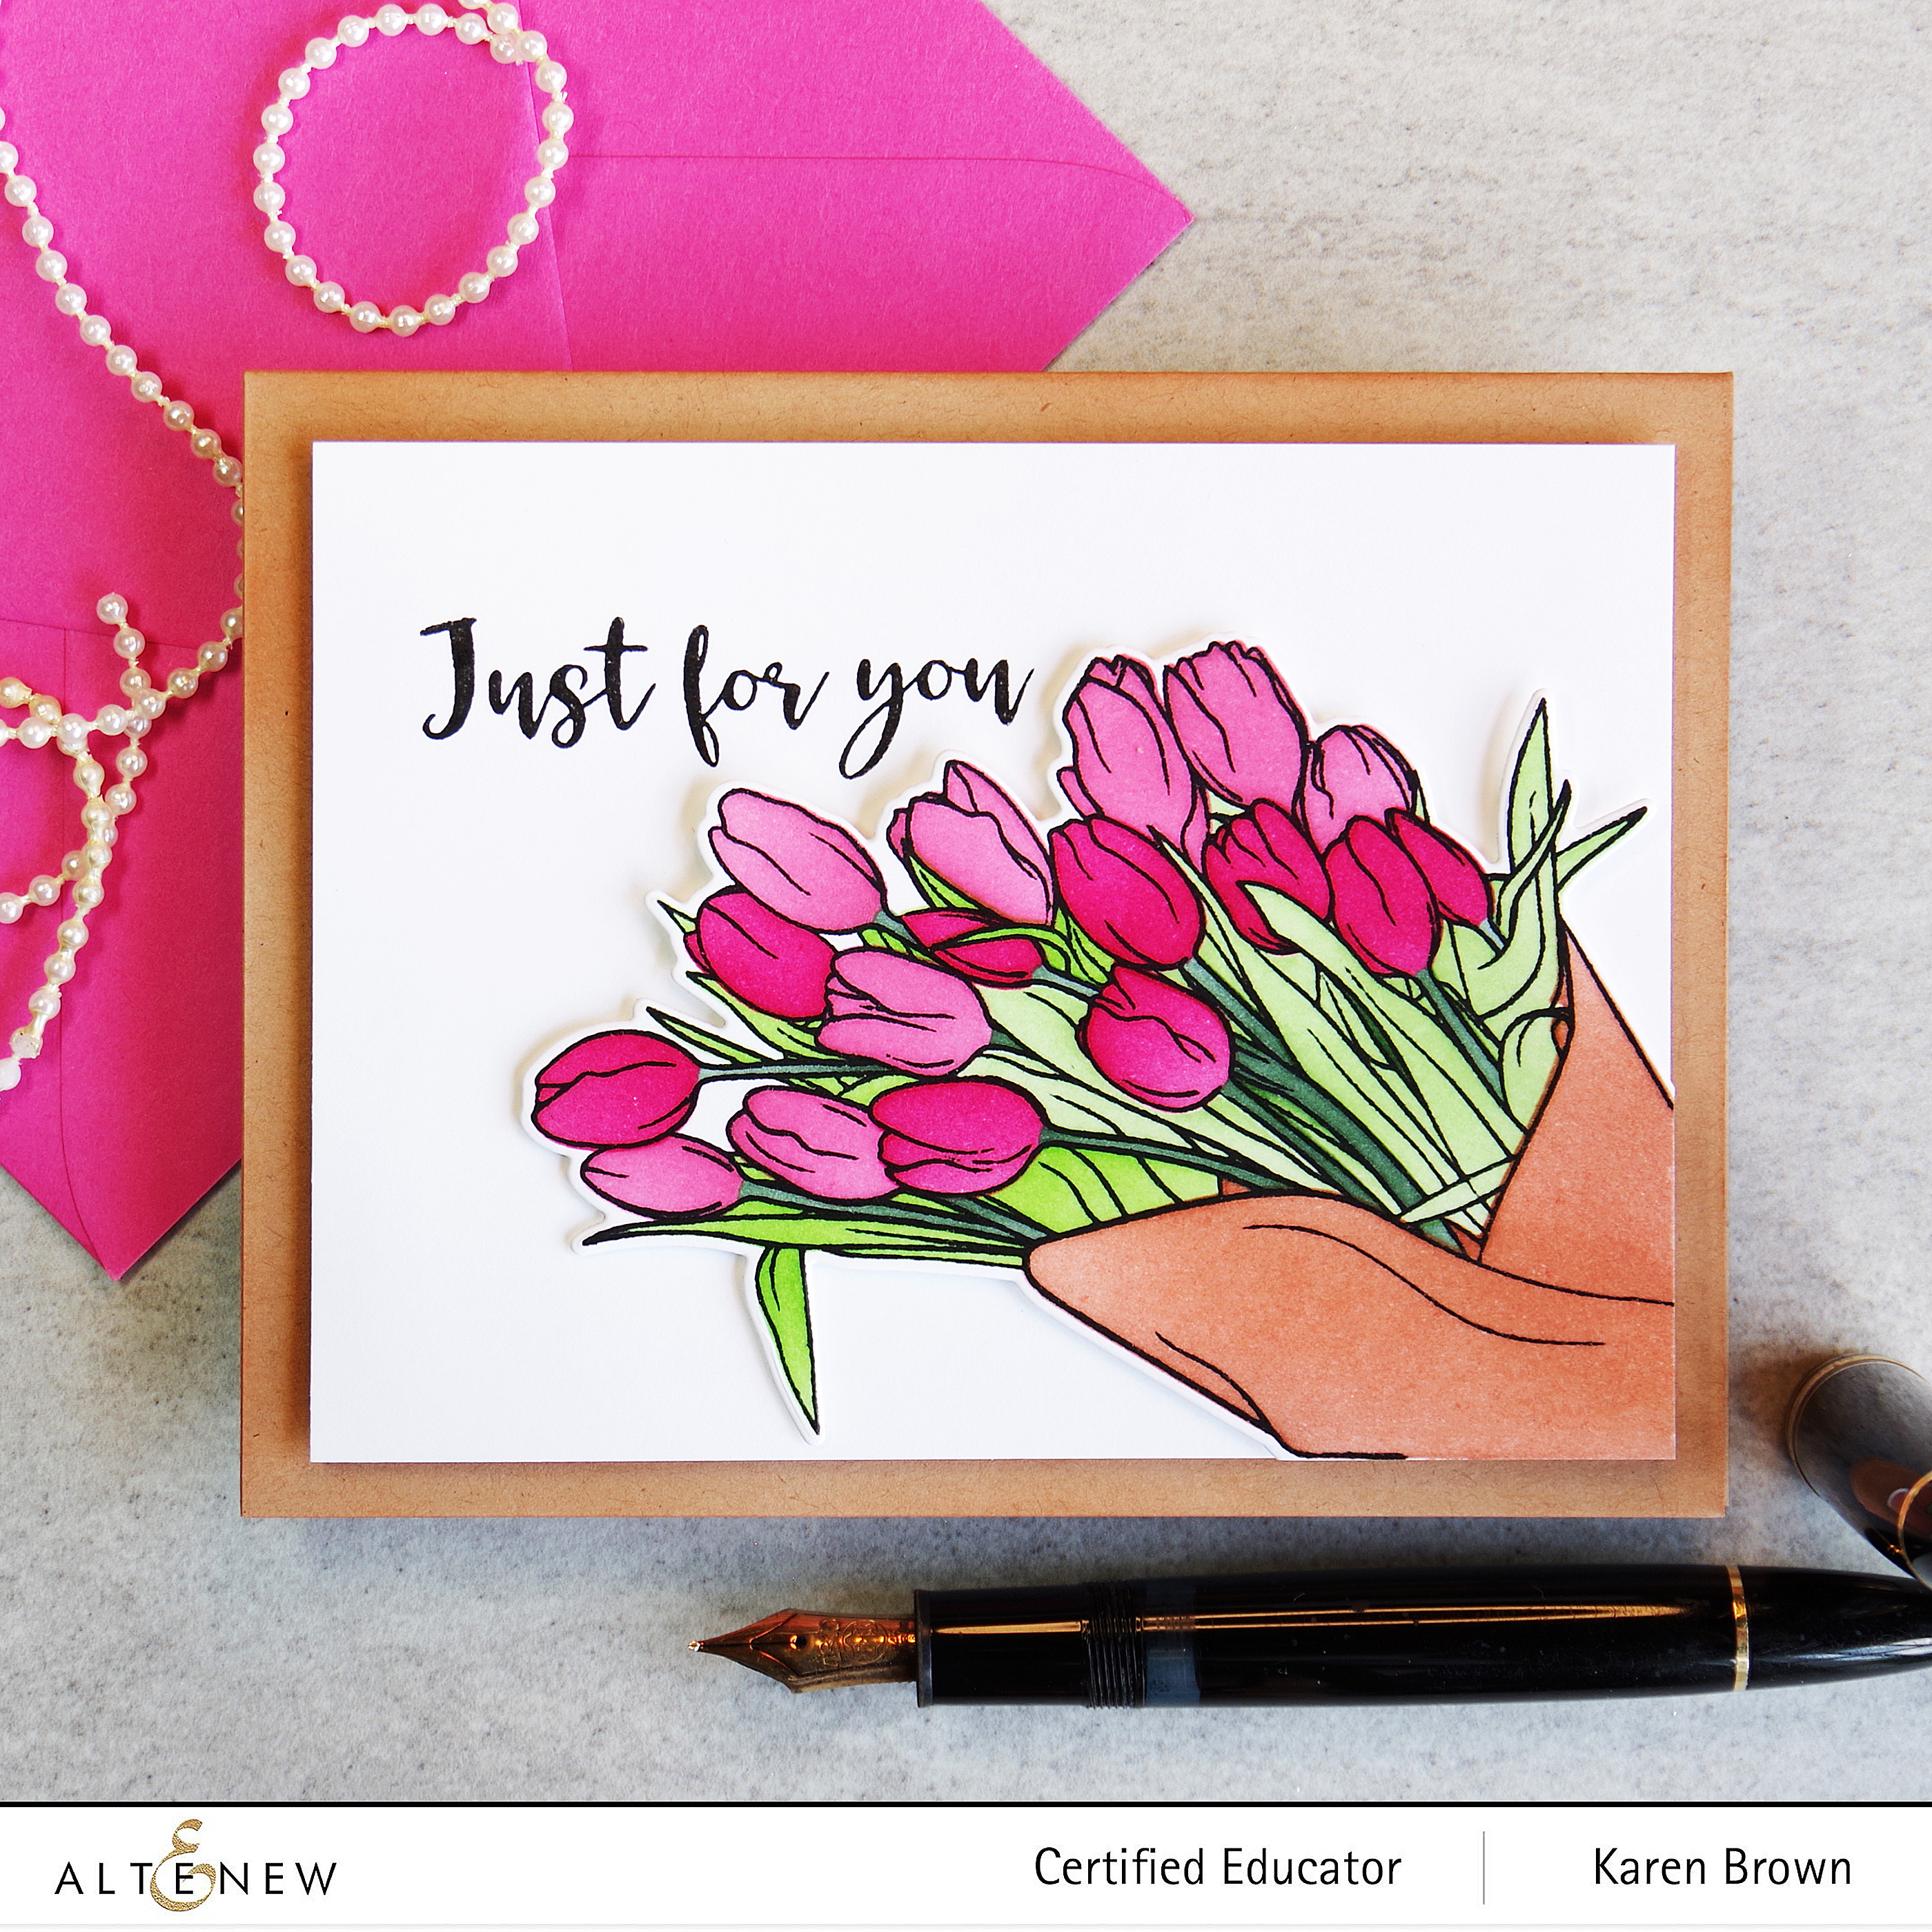
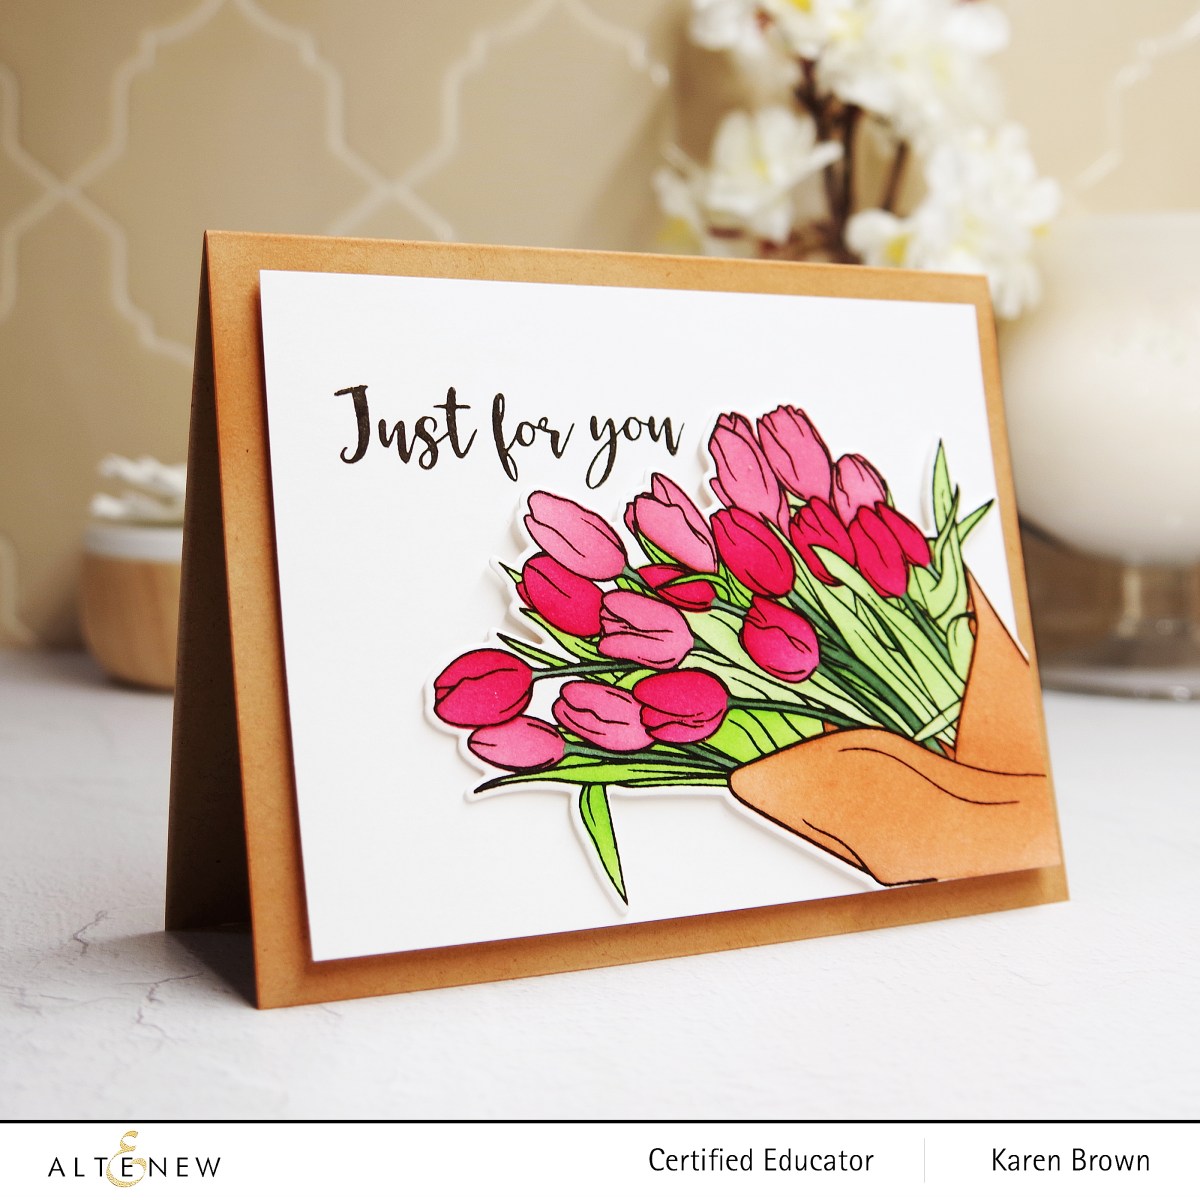
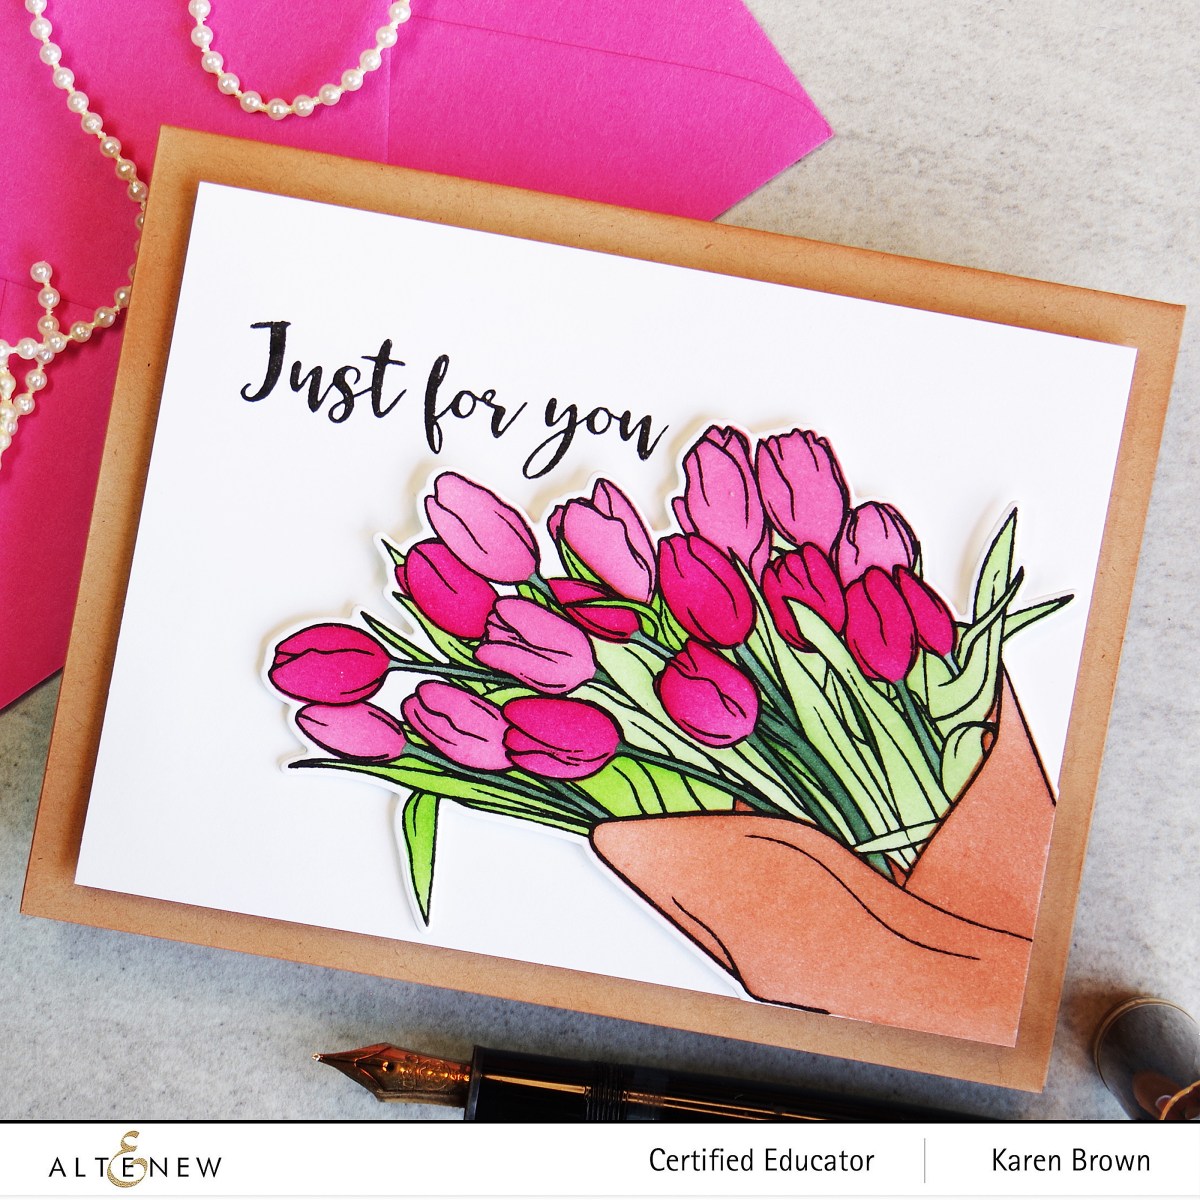
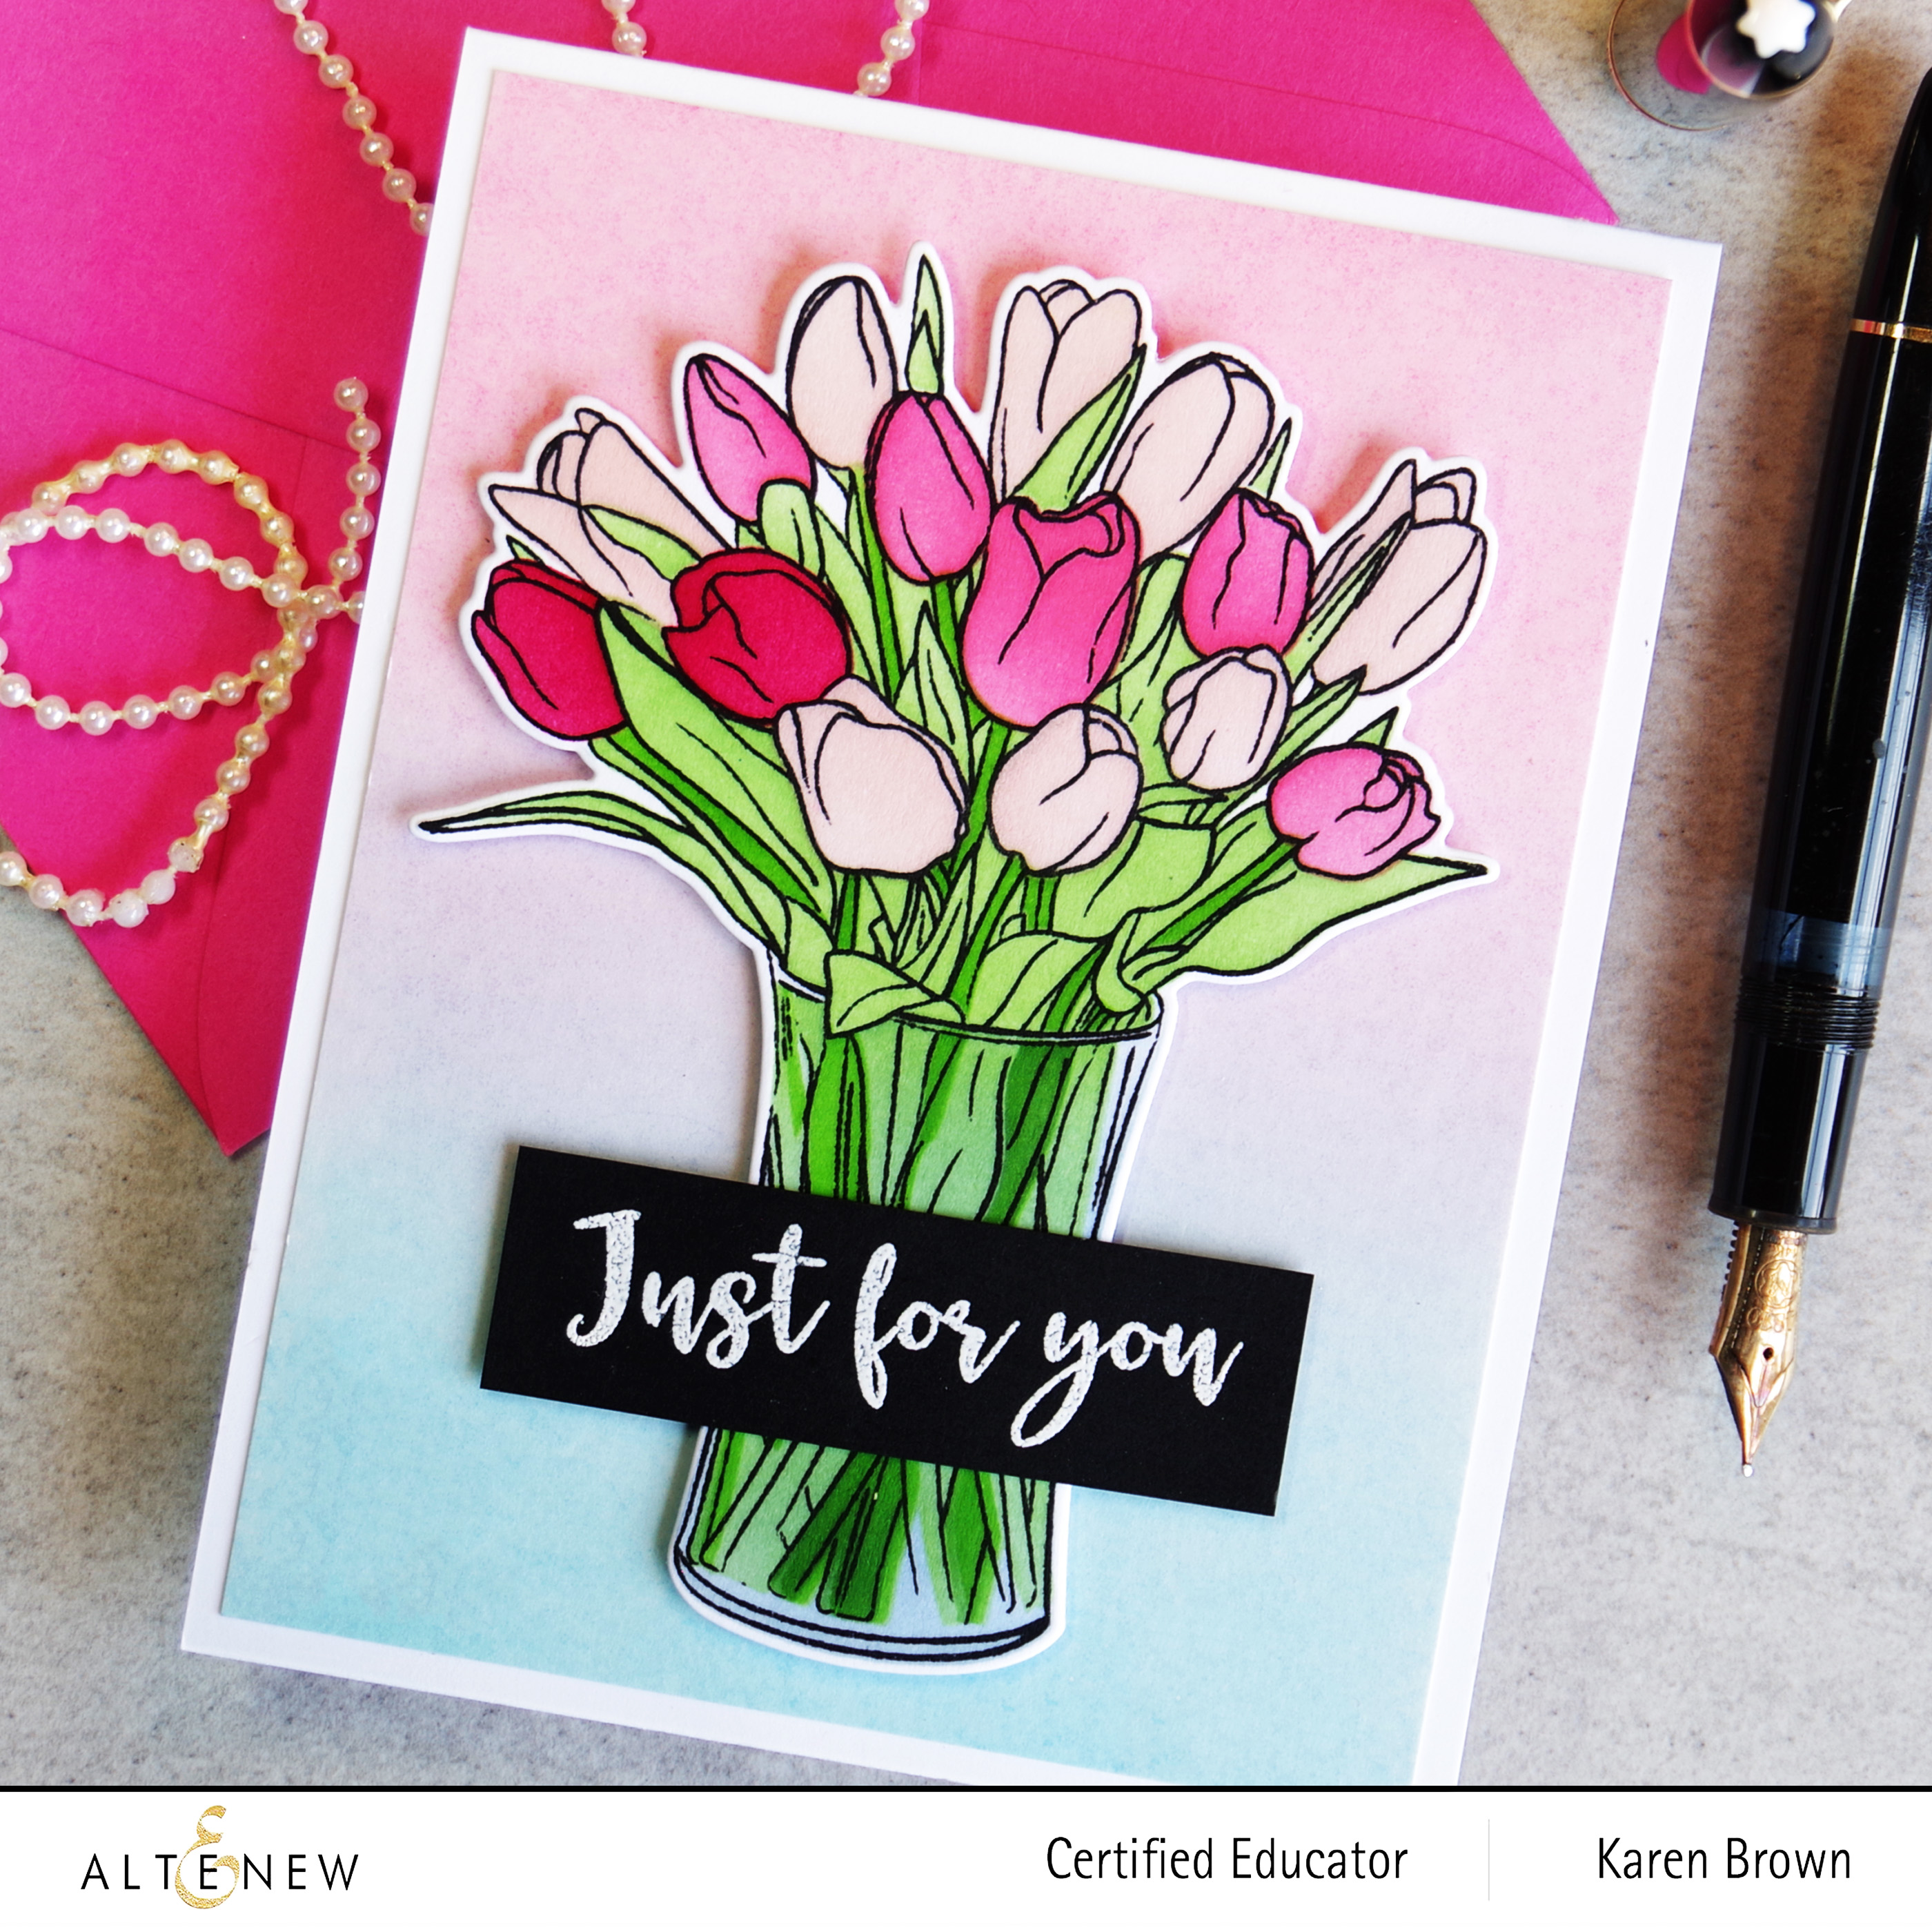
Wow, this Timeless Tulips stamp set is fabulous! Two BIG, Bold beautiful stamps with a Graphic Art Vibe and wonderful sentiments that will work for so many occasions. I could see it for Mother’s Day, a Get Well Card, Ballet Recital, Birthday, Valentine’s Day….lots of possibilites.
Both cards came together quickly because I used the coordinating coloring stencils. I started by stamping with black pigment ink. Once the ink was dry, I lined up my stencils and started coloring. I used Altenew Crisp Dye Inks in Coral Berry, Ruby Red, Paper Bag, Firefly, Green Fields and Evergreen. The image was easy to die cut and the sentiment is included with this stamp set. I used a Kraft Card base and then ink blended some Paper Bag Crisp Dye Ink along the edges to tie the card panel and base together.
$300 in total prizes! To celebrate this release, Altenew is giving away a $50 gift certificate to 2 lucky winners and a $25 gift certificate to 8 winners! Please leave a comment on the Altenew Card Blog and/or each designer’s blog post on the blog hop list below by 08/28/2022 for a chance to win.
Altenew will draw 10 random winners from the comments left on each stop of this blog hop and announce the winners on the Altenew Winners Page on 08/29/2022.
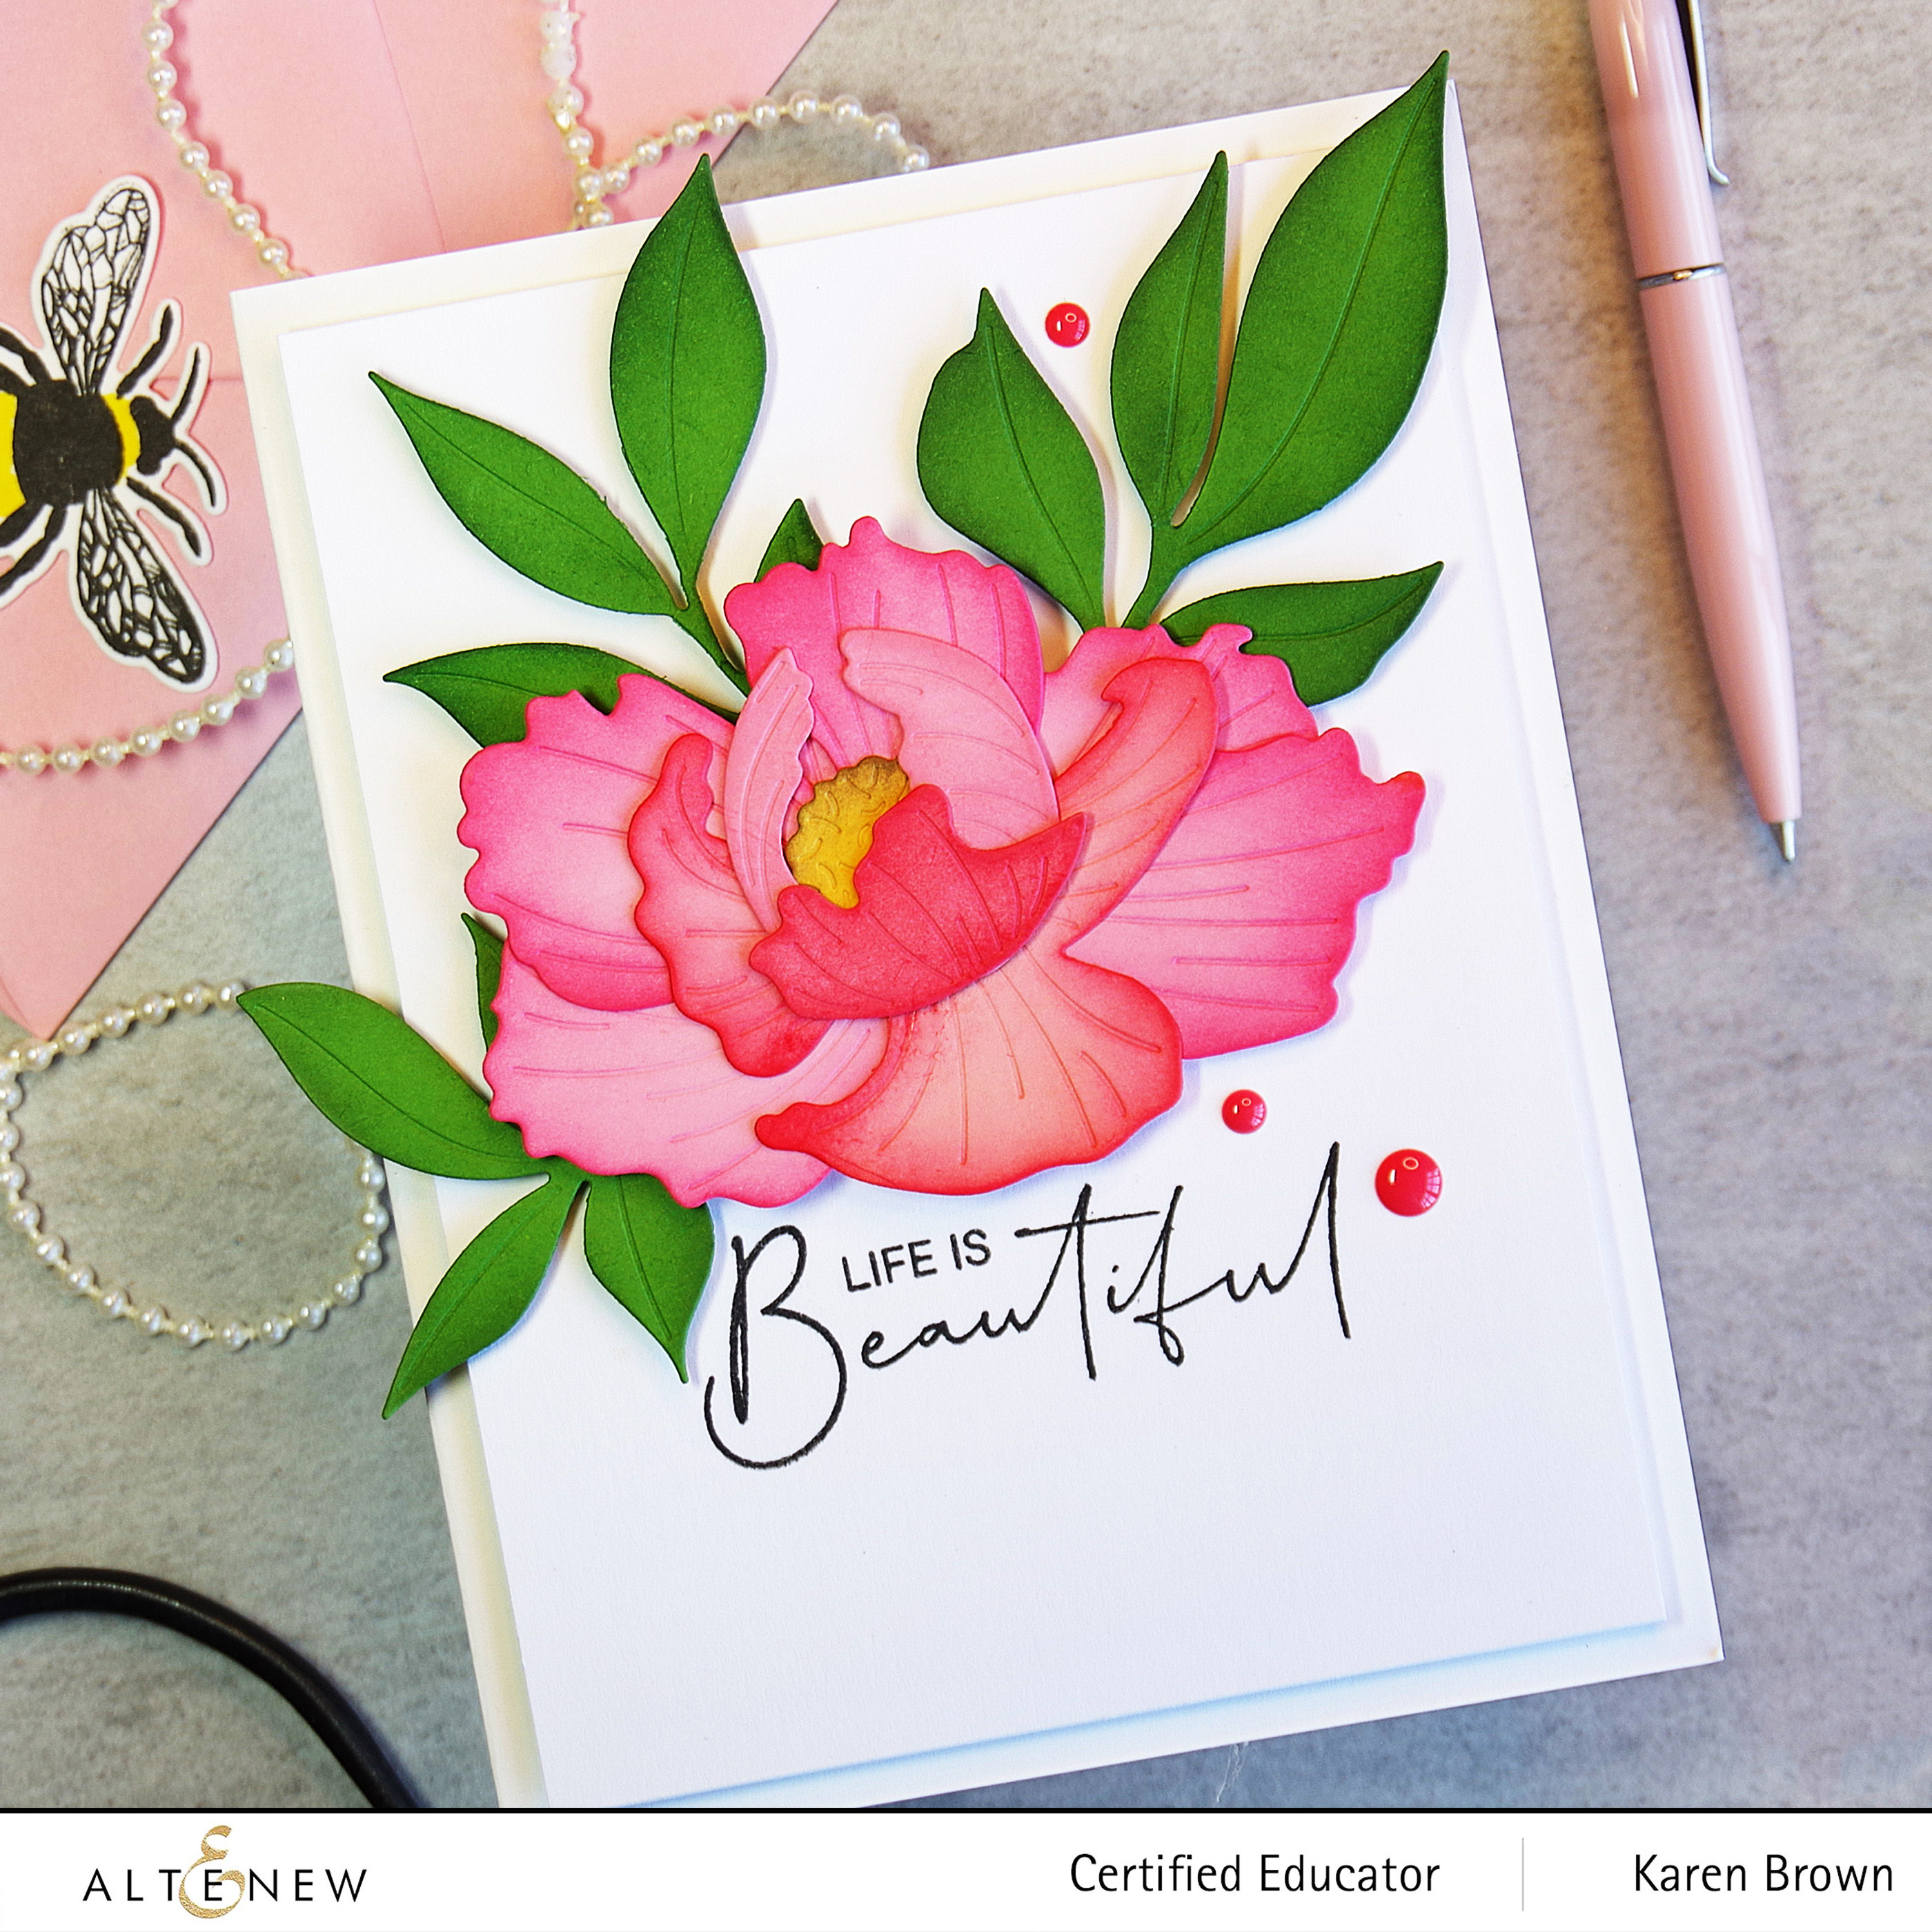
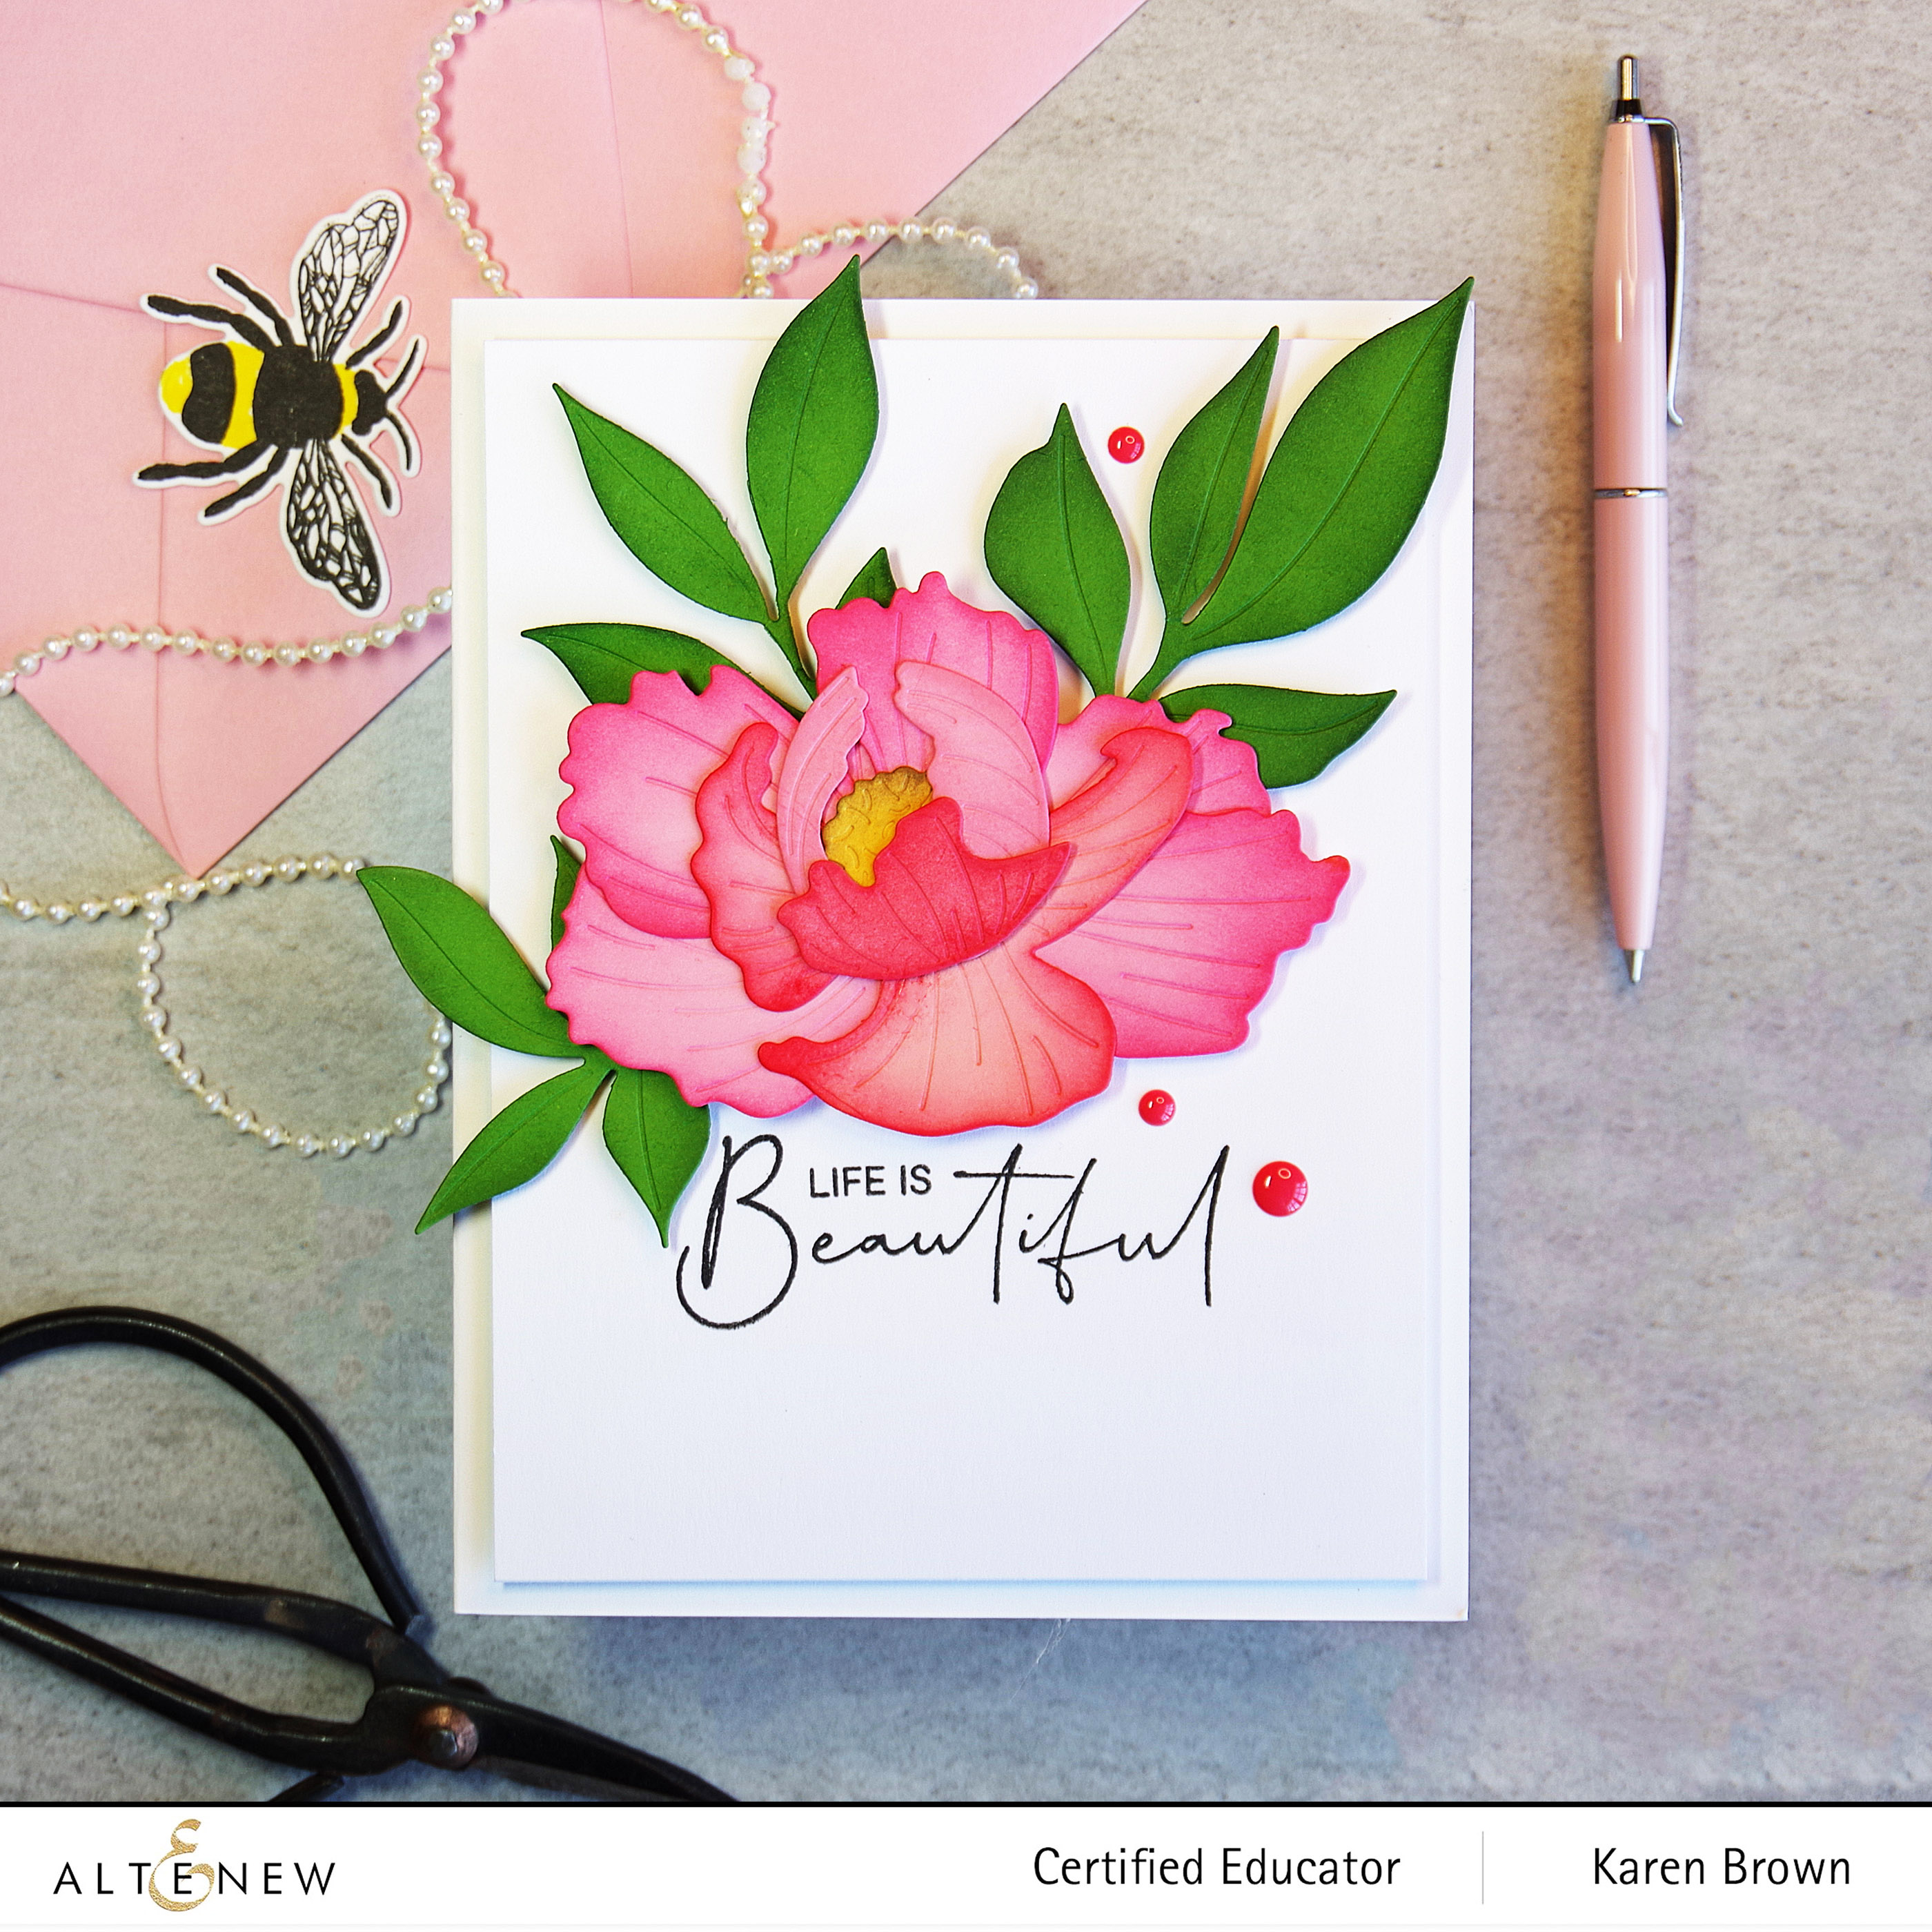
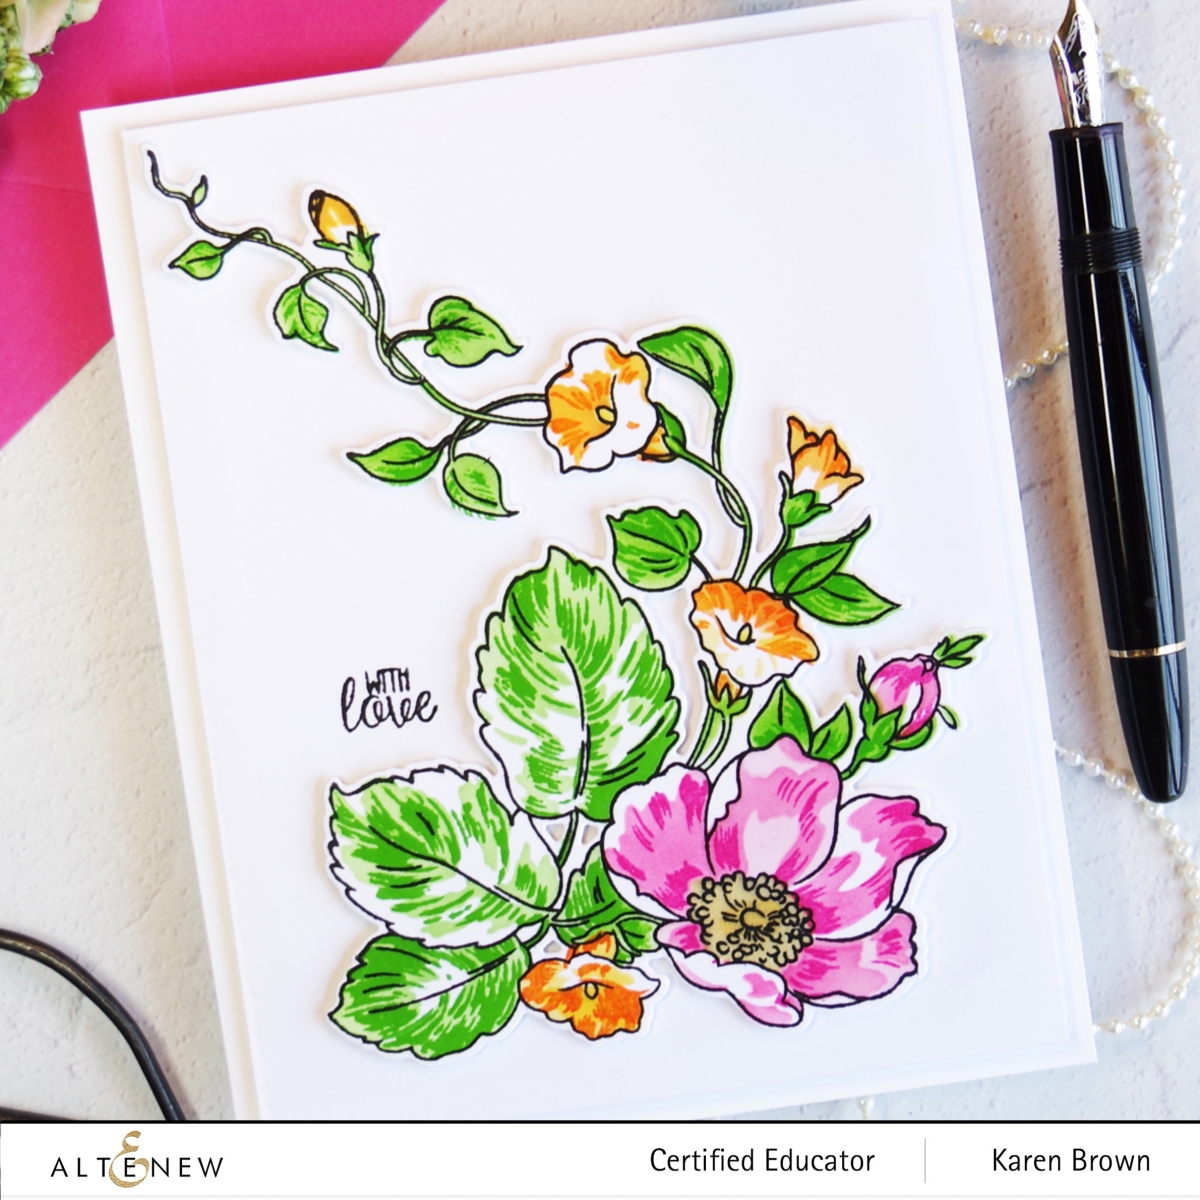
Hello and welcome! Every month, I look forward to Altenew’s Craft-A-Flower Subscription Release and this Open Peony may be my new favorite! This card is beautiful but it actually came together very quickly. My inspiration was a photograph of a Coral Charm Peony.
Ink Blending on Floral Die Cuts
I started by die cutting the floral elements from pale pink cardstock and then I ink blended Altenew’s Crisp Dye Inks on each piece. I concentrated the color around the edges. For layers #1 and #2, I used Coral Berry. Layer #3 was Coral Berry + Orange Cream. With layer #1, I added just a bit of ink and I used a heavier hand as I progressed to the top layers. Layer #4 (around the flower center) was Cotton Candy and Layer # 5 (top layer) was Crimson. I ink blended the last overlay that would go around the edges, but decided I liked the Peony without them.
For the leaves, I started with a medium green cardstock and then ink blended Mountain Pine Crisp Dye Ink around the edges. For the flower center I started with yellow cardstock and then added Warm Sunshine and Espresso ink blending.
The Peony is so beautiful that I kept the background simple. The sentiment is from Paint-A-Flower Clematis and I added three New Day Enamel Dots.
Altenew has five wonderful monthly subscription kits that you can see HERE.
Giveaway Prizes
$300 in total prizes! To celebrate this release, Altenew is giving away a $50 gift certificate to 2 lucky winners and a $25 gift certificate to 8 winners! Please leave a comment on the Altenew Card Blog and/or each designer’s blog post on the blog hop list below by 08/18/2022 for a chance to win. Altenew will draw 10 random winners from the comments left on each stop of this blog hop and announce the winners on the Altenew Winners Page on 08/20/2022.
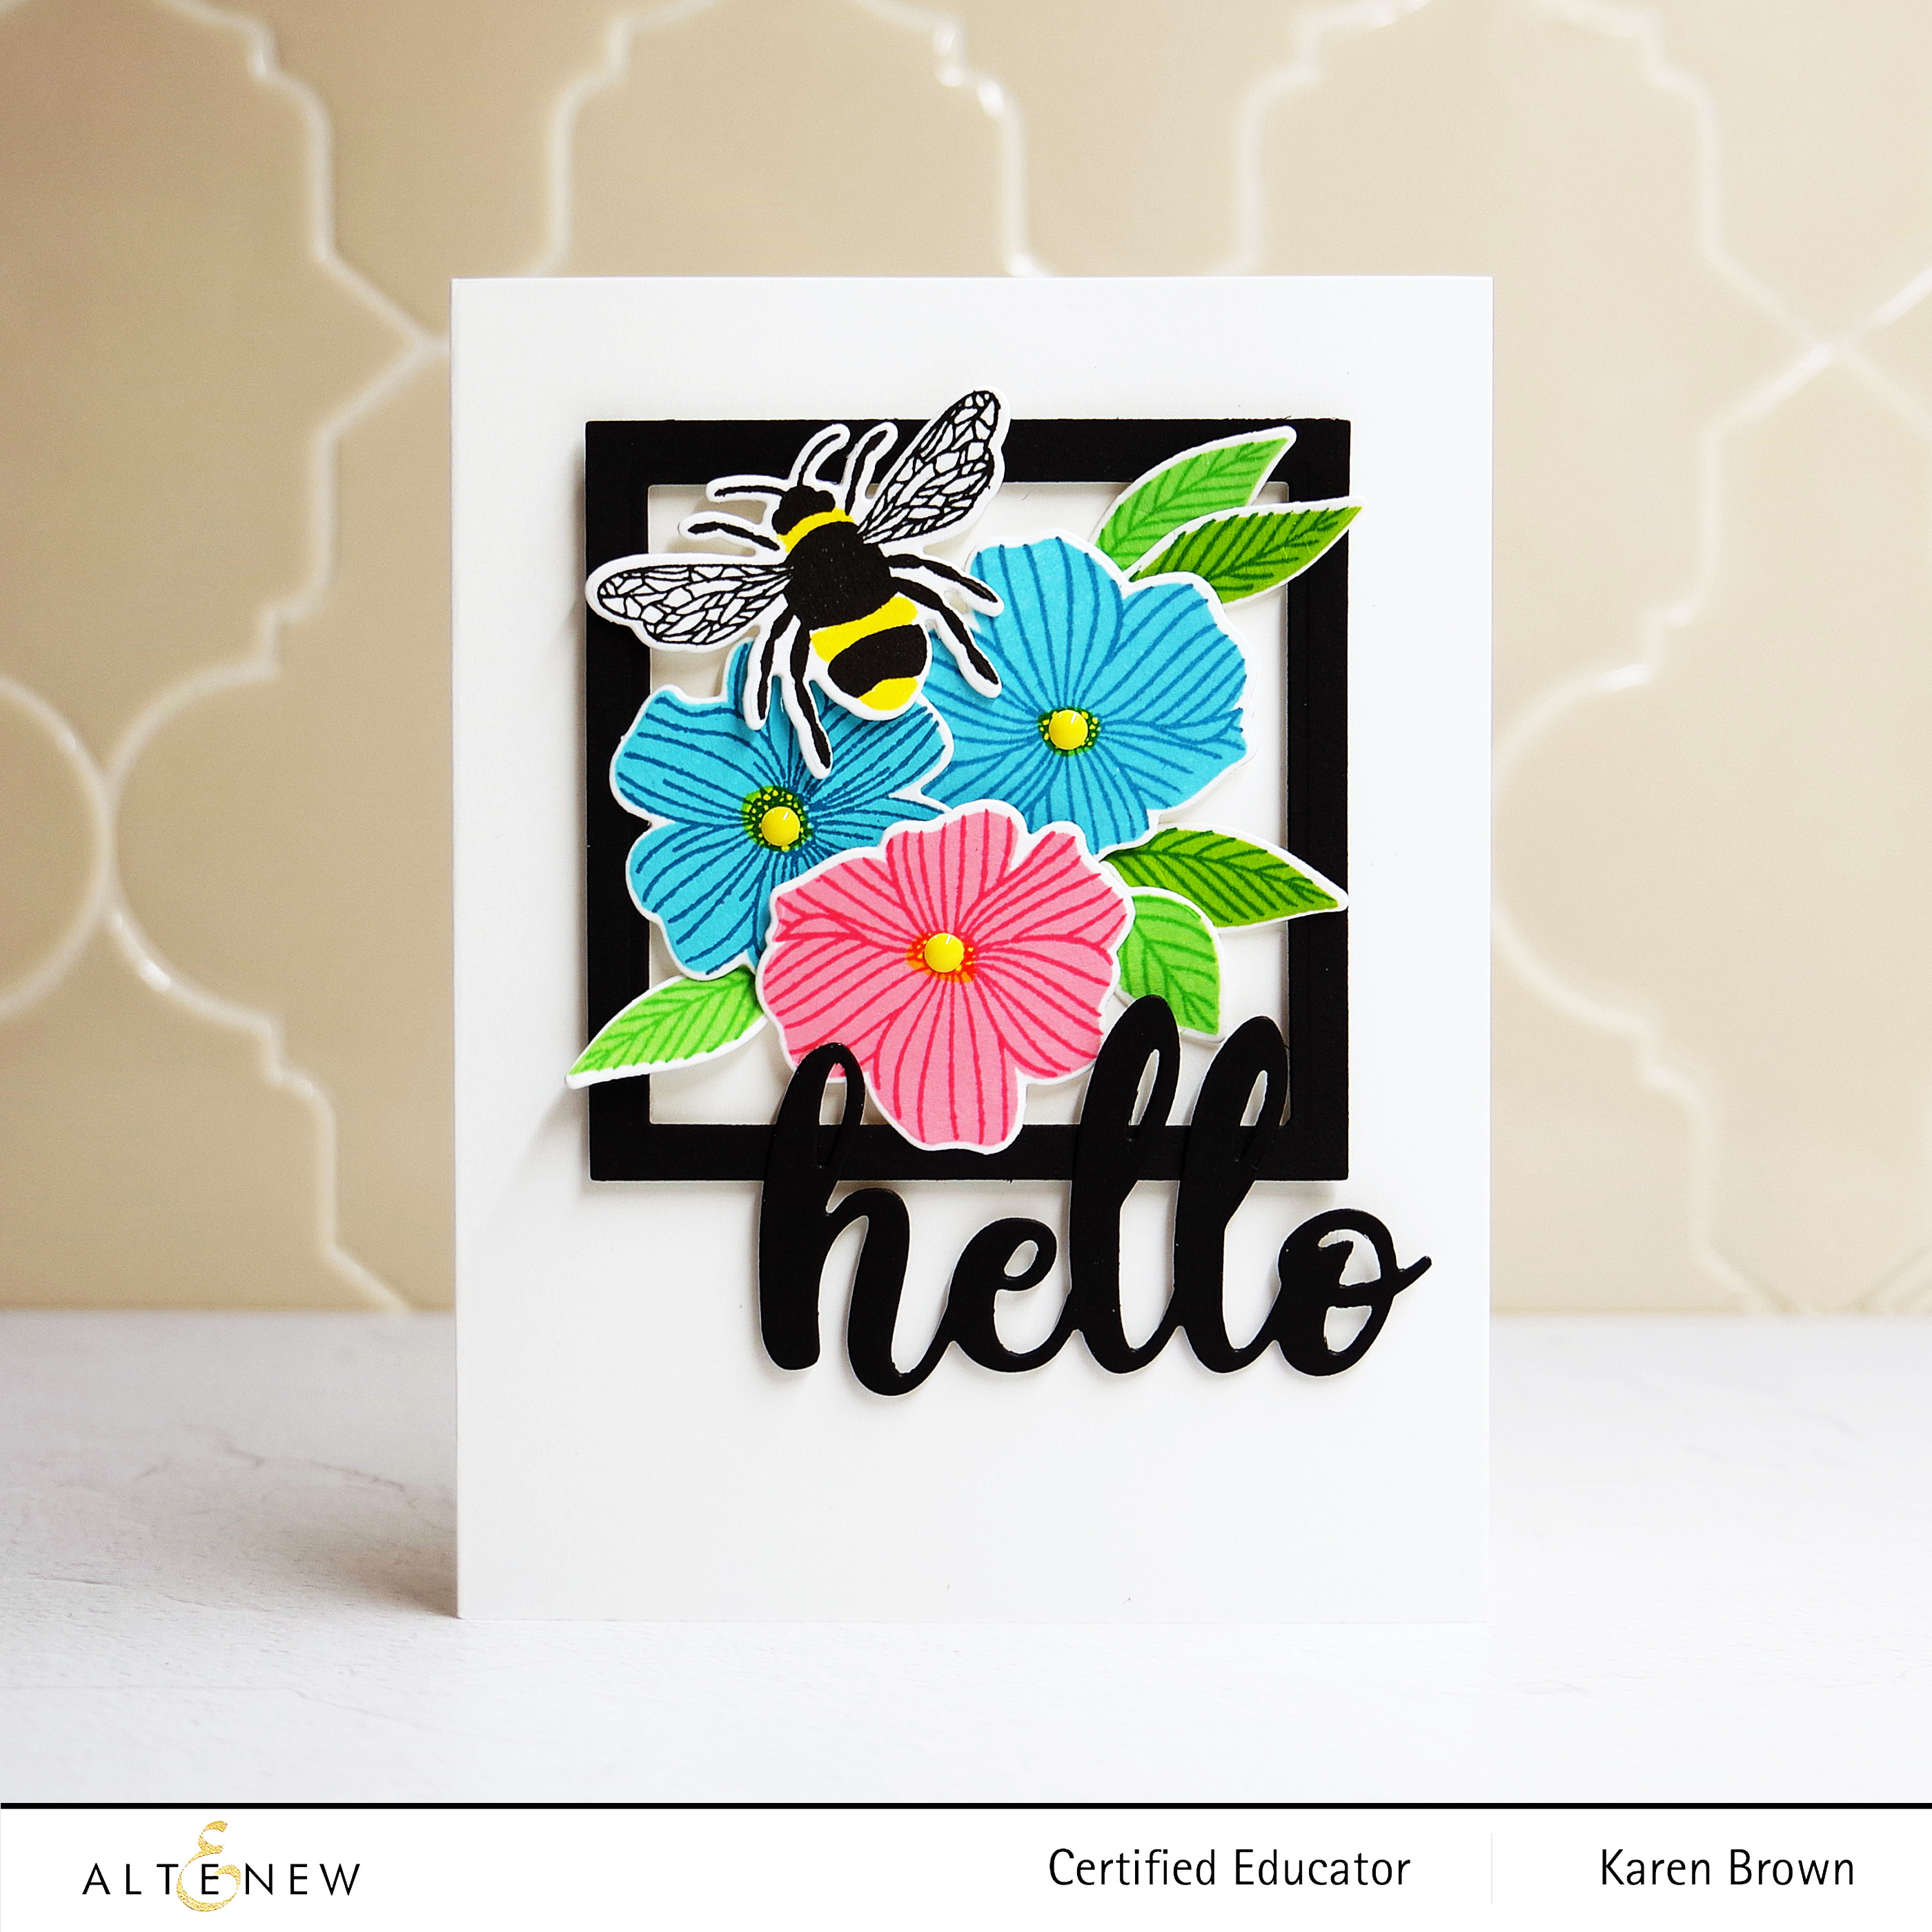
I thought I would start with the Precious Doodles Bundle. When “doodles” is in the title, I know it is going to be a favorite of mine!
Precious Doodles is a happy little stamp layering set and I used Altenew Crisp Dye Inks: Cotton Candy + Coral Berry, Ocean Waves + Dusk, Parrot + Shadow Creek and Firefly + Green Fields. Once my Doodles were stamped, I embellished with Enamel Dots, die cut a frame, added the darling bee and die cut the sentiment.
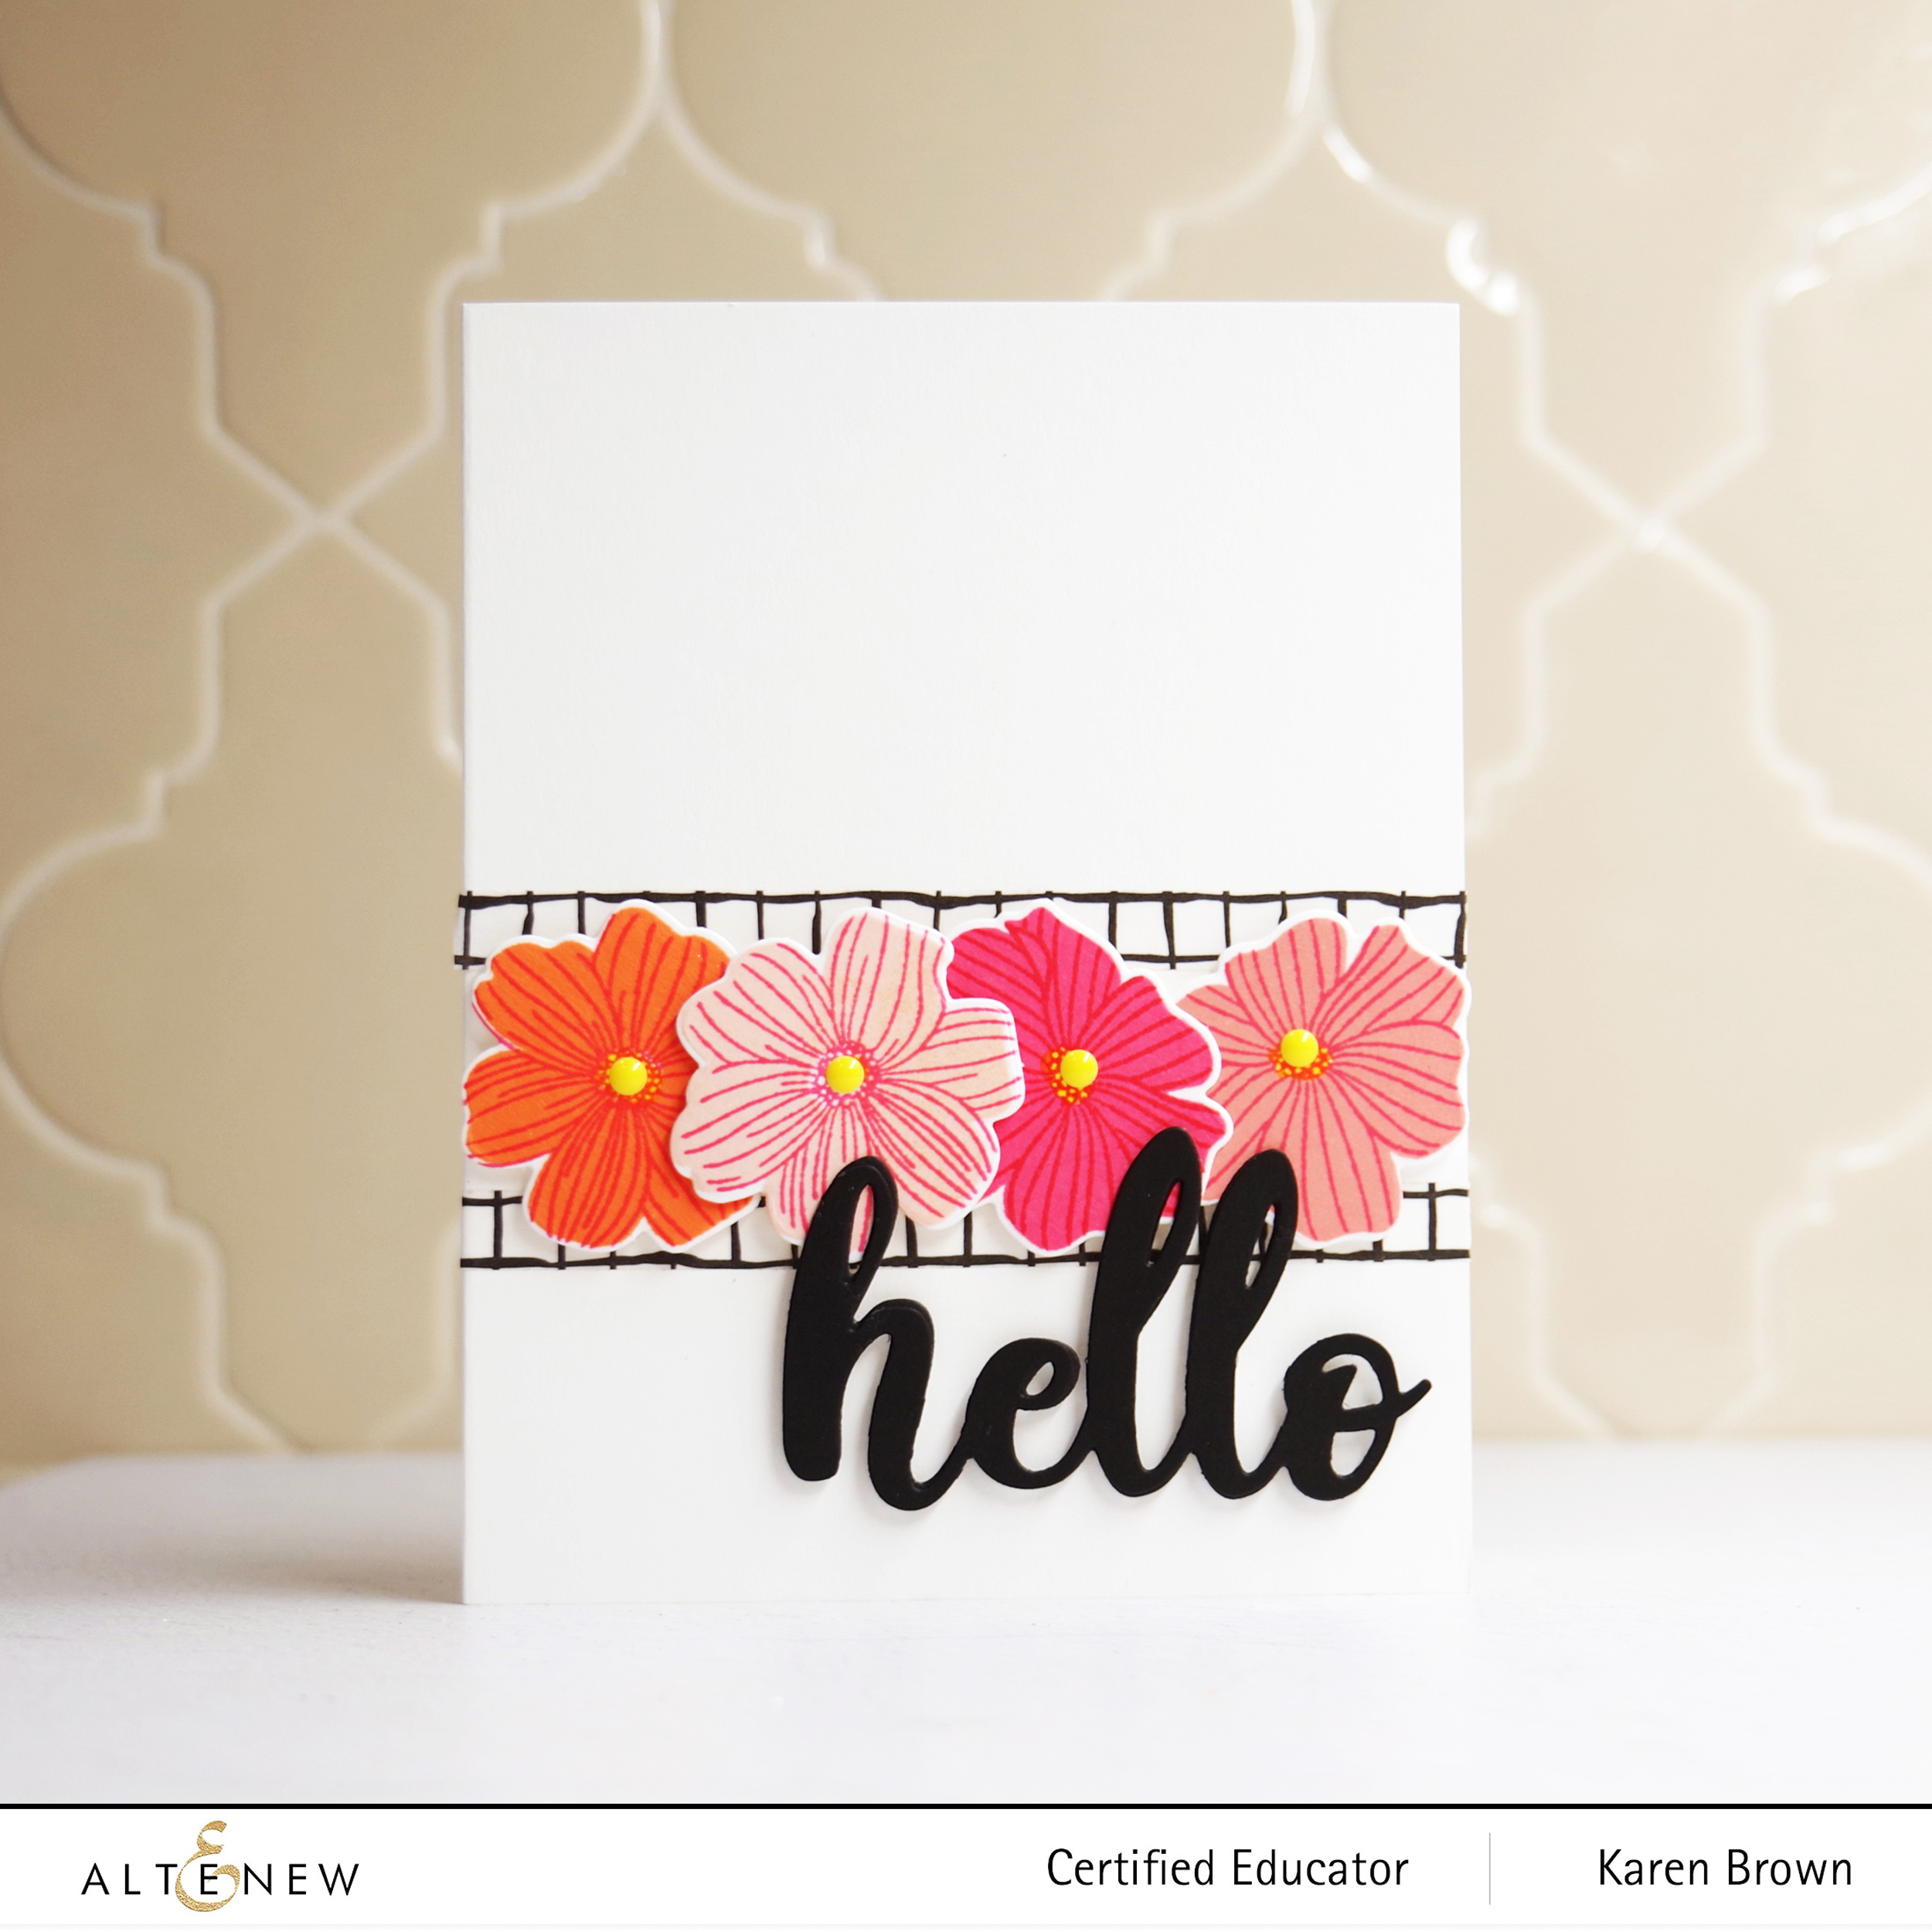
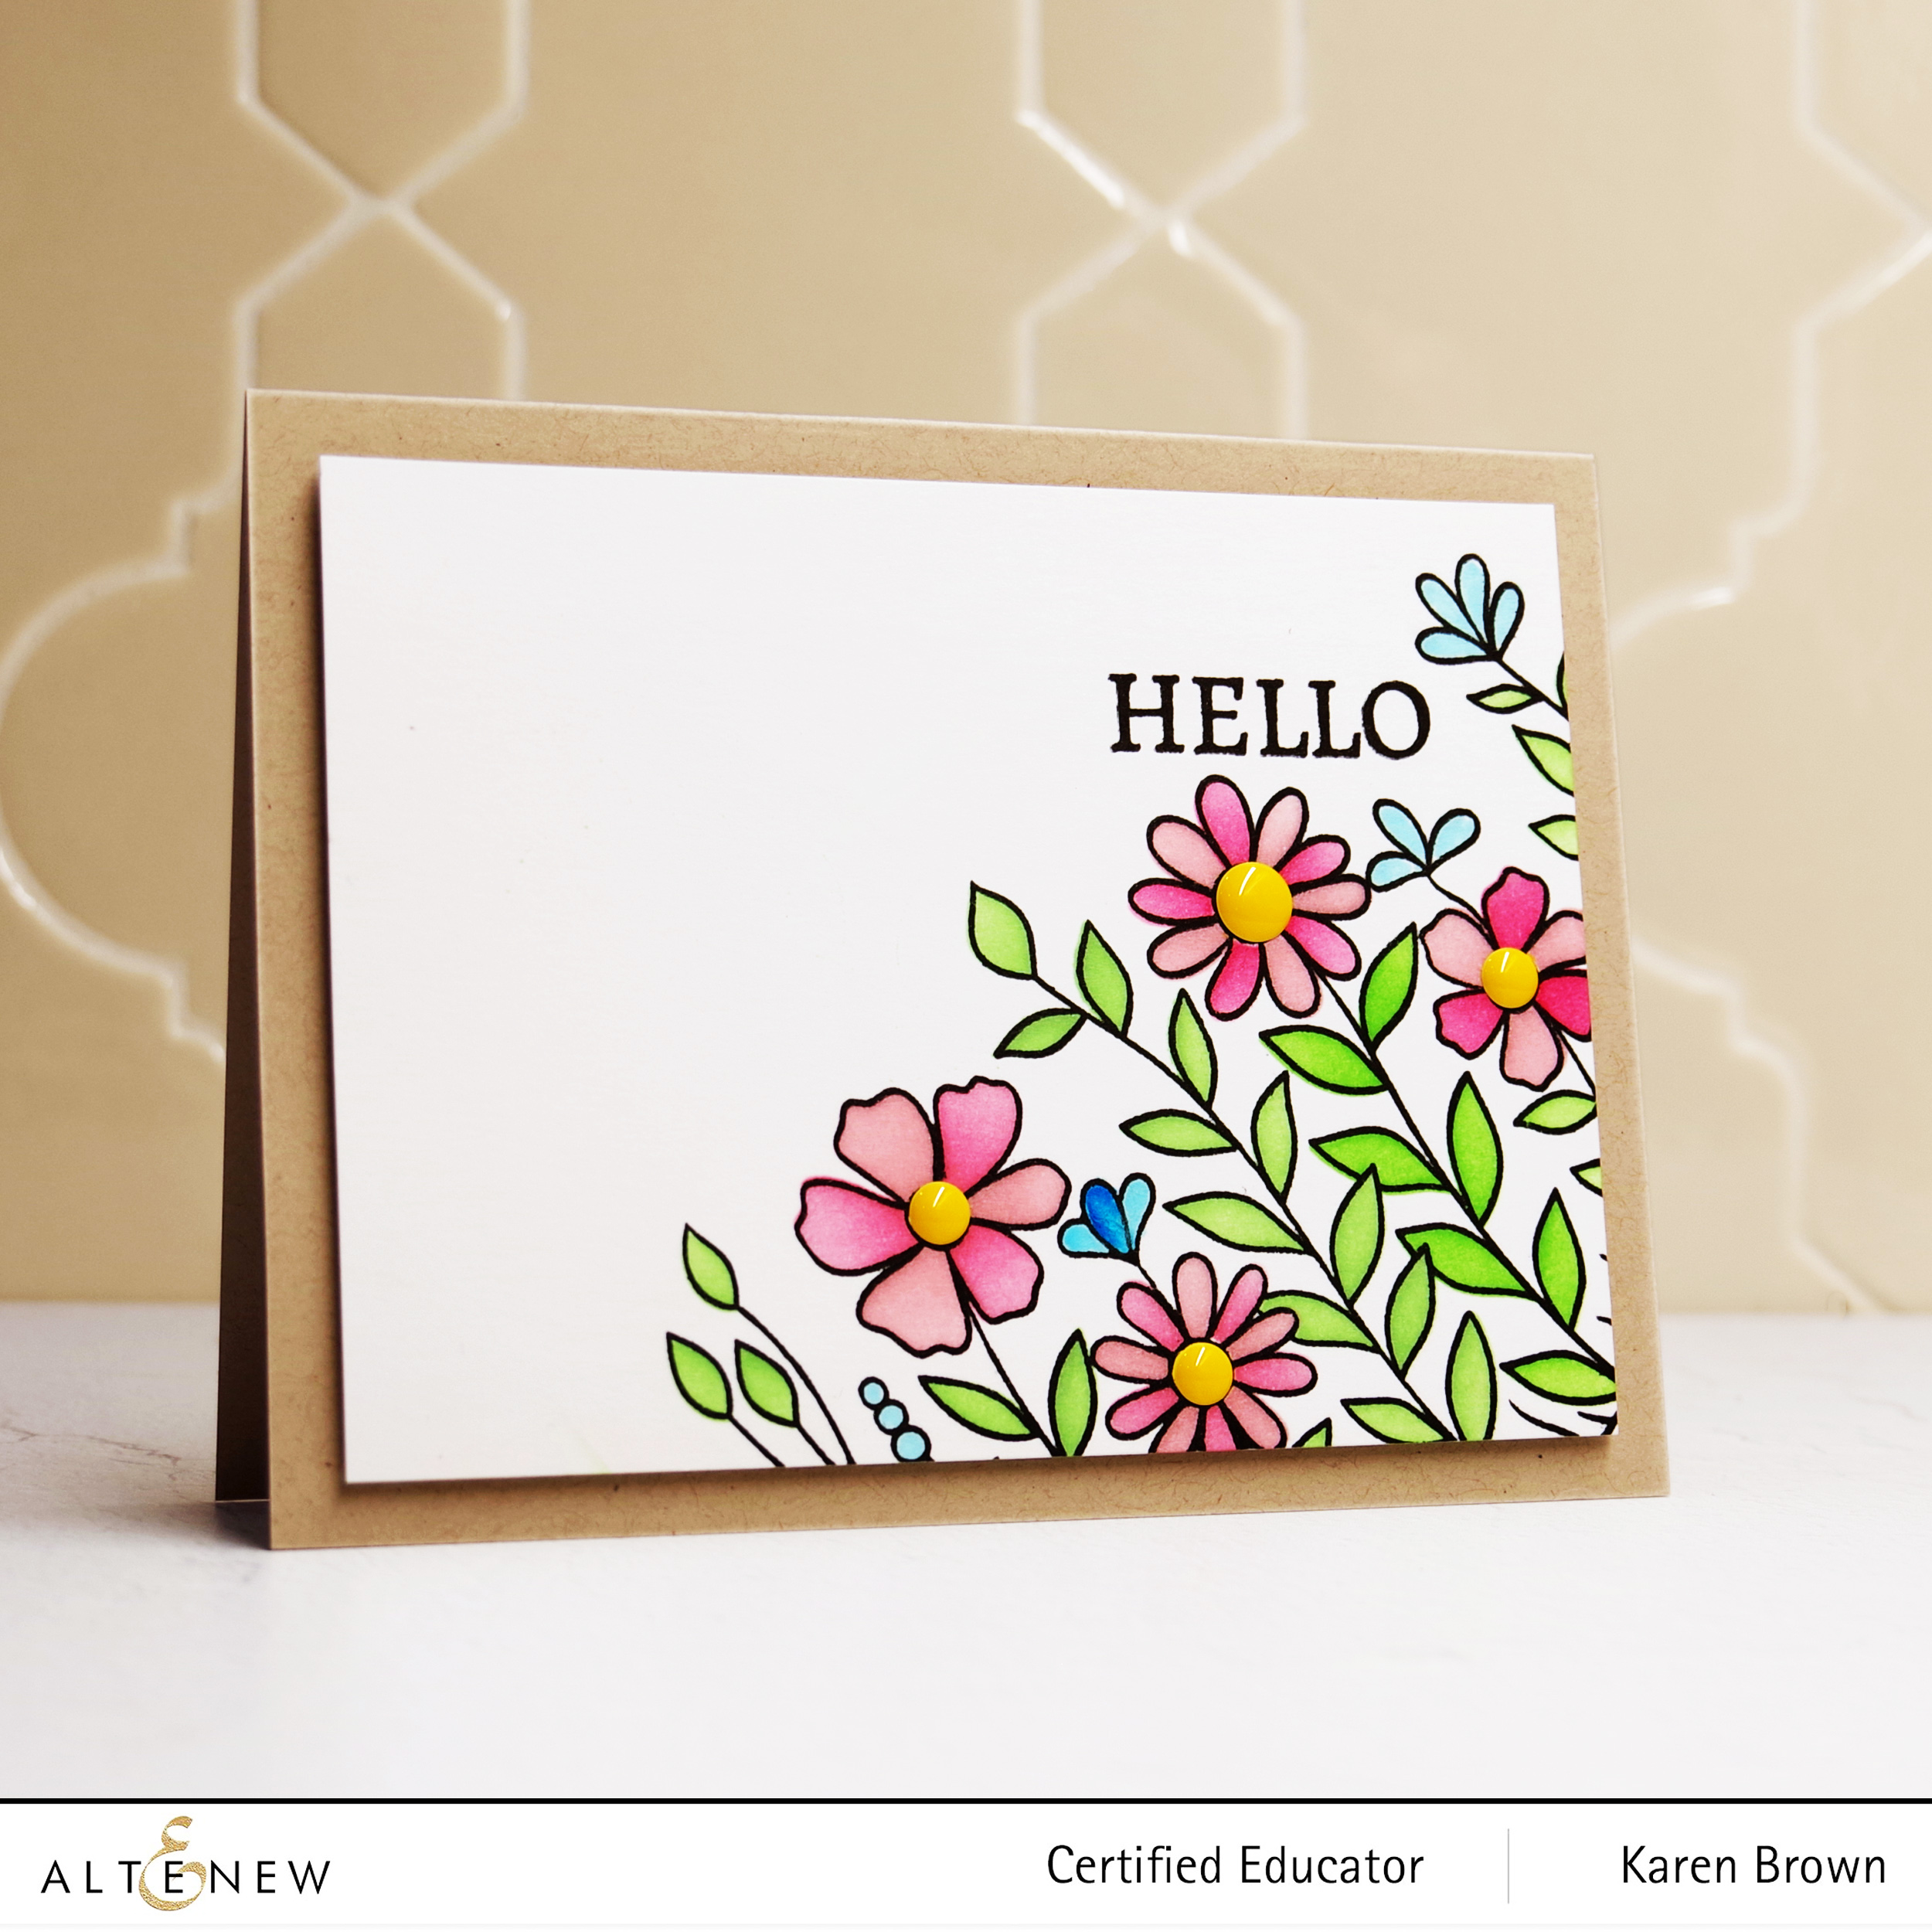
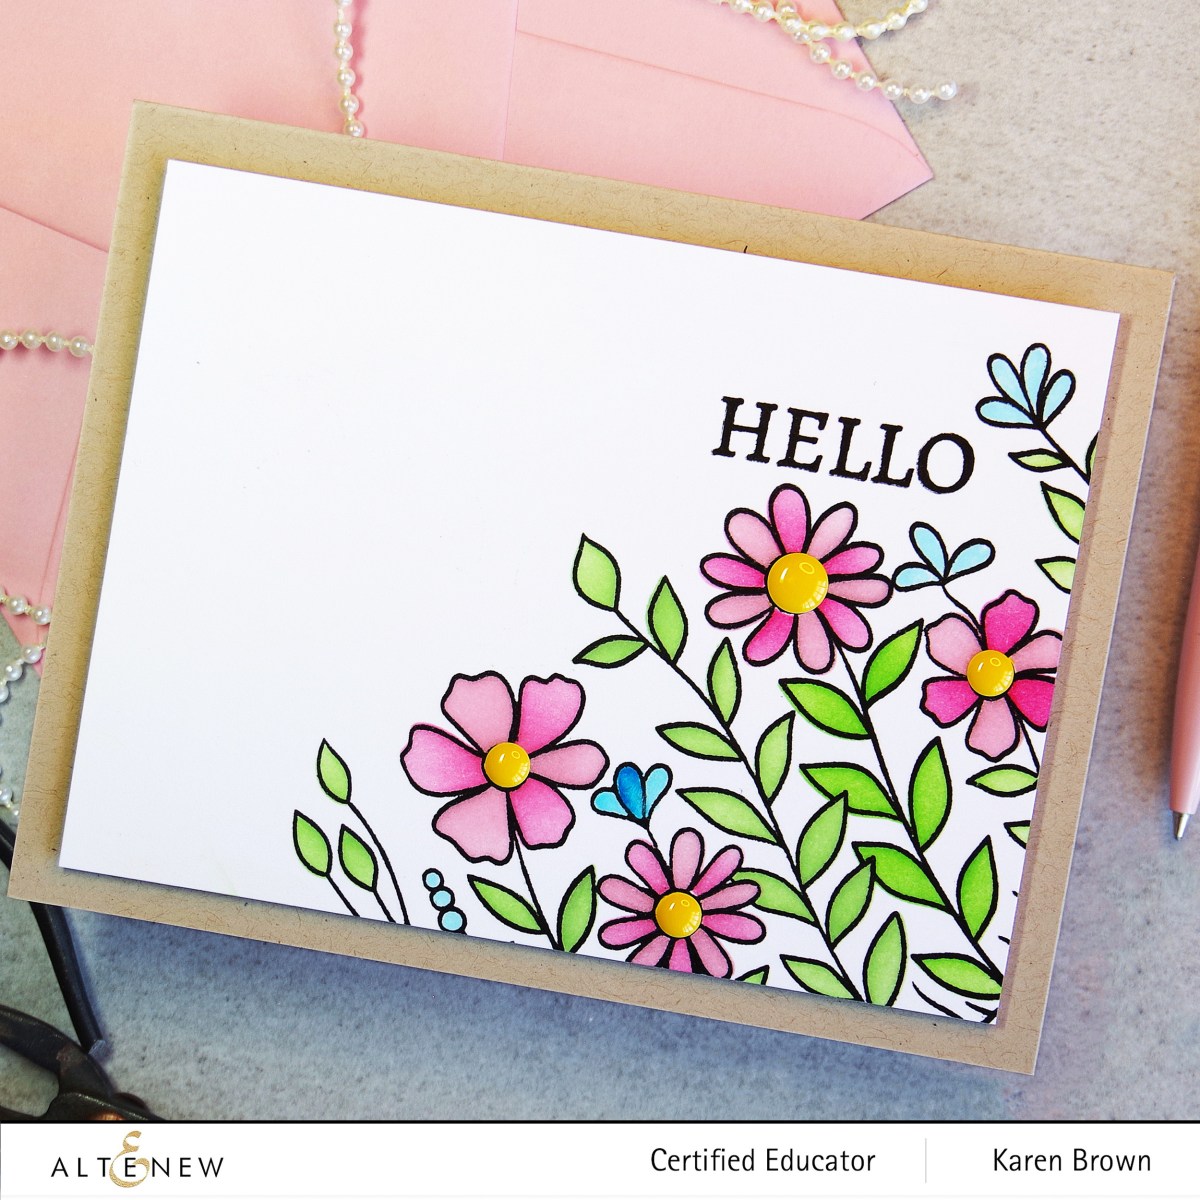
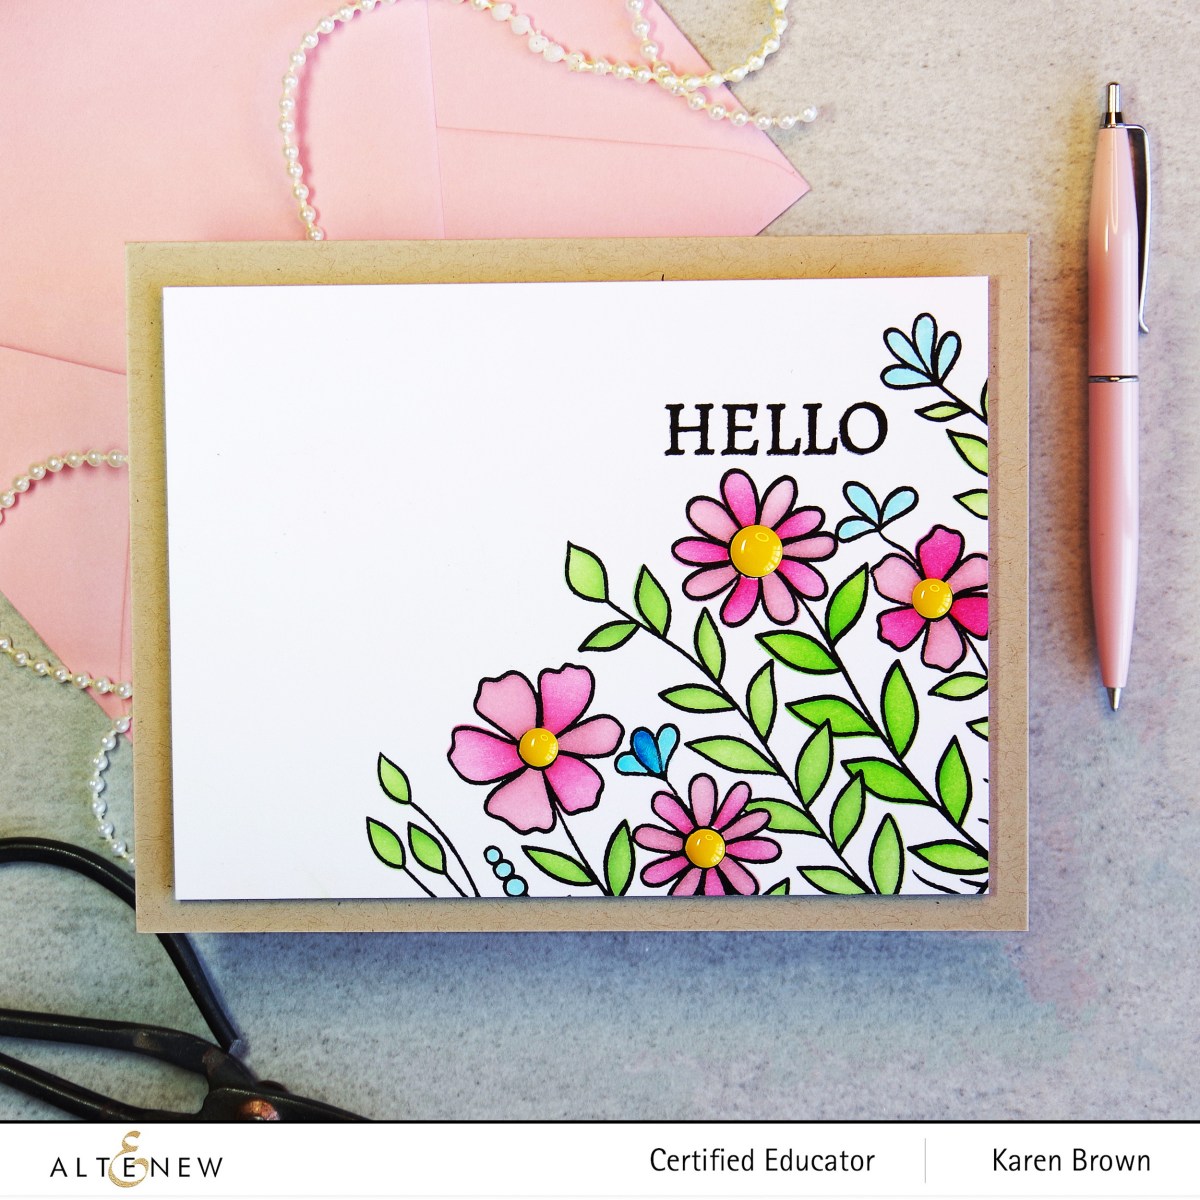
The Arch of Flowers Bundle is such a fun and creative kit! For my first card, I used the stamp, coloring stencil and die. The die is gorgeous and very detailed which really adds to its beauty! The coloring stencil was very easy to line up and use and I love the effect. The stamp set also has great sentiments included, which is always a big plus! To finish the card I just added enamel dots to the flower centers.
I also wanted to make a quick casual hello card with the stamp and coloring stencil. I angled the stamp and then quickly colored in the sunny little flower scene. Don’t the flowers look like they are reaching for the sun?
I think this would make a cute stationary set or get well card too.
FREE GIFT OFFER!
To celebrate the release, we are running a free gift promotion. Feel free to share the promotion info with your followers.
Get a FREE brand new Bold & Beautiful Mini Inspiration Guide with every order from 08/04/2022 through 08/06/2022. Shop HERE!
Get a FREE brand new Bold & Beautiful Stamp & Die Release Inspiration Guide e-book (worth $5.99) with every order of high-value Bold & Beautiful Bundles. Shop HERE! *Exclusions apply.
Get a FREE brand new Online Cardmaking Class with every order from the new Bold & Beautiful Stamp & Die Release Collection from 08/04/2022 through 08/10/2022. Shop HERE!
300 in total prizes! To celebrate this release, Altenew is giving away a $50 gift certificate to 2 lucky winners and a $25 gift certificate to 8 winners! Please leave a comment on the Altenew Card Blog and/or each designer’s blog post on the blog hop list below by 08/10/2022 for a chance to win.
Altenew will draw 10 winners randomly from the comments left on each stop of this blog hop and announce the winners on the Altenew Winners Page on 08/11/2022.
For my second card, I used the “embossed” side of the panel. Embossing means the design is raised above the panel. The August embossing folder is beautiful embossed (below) and debossed (card #1 above)
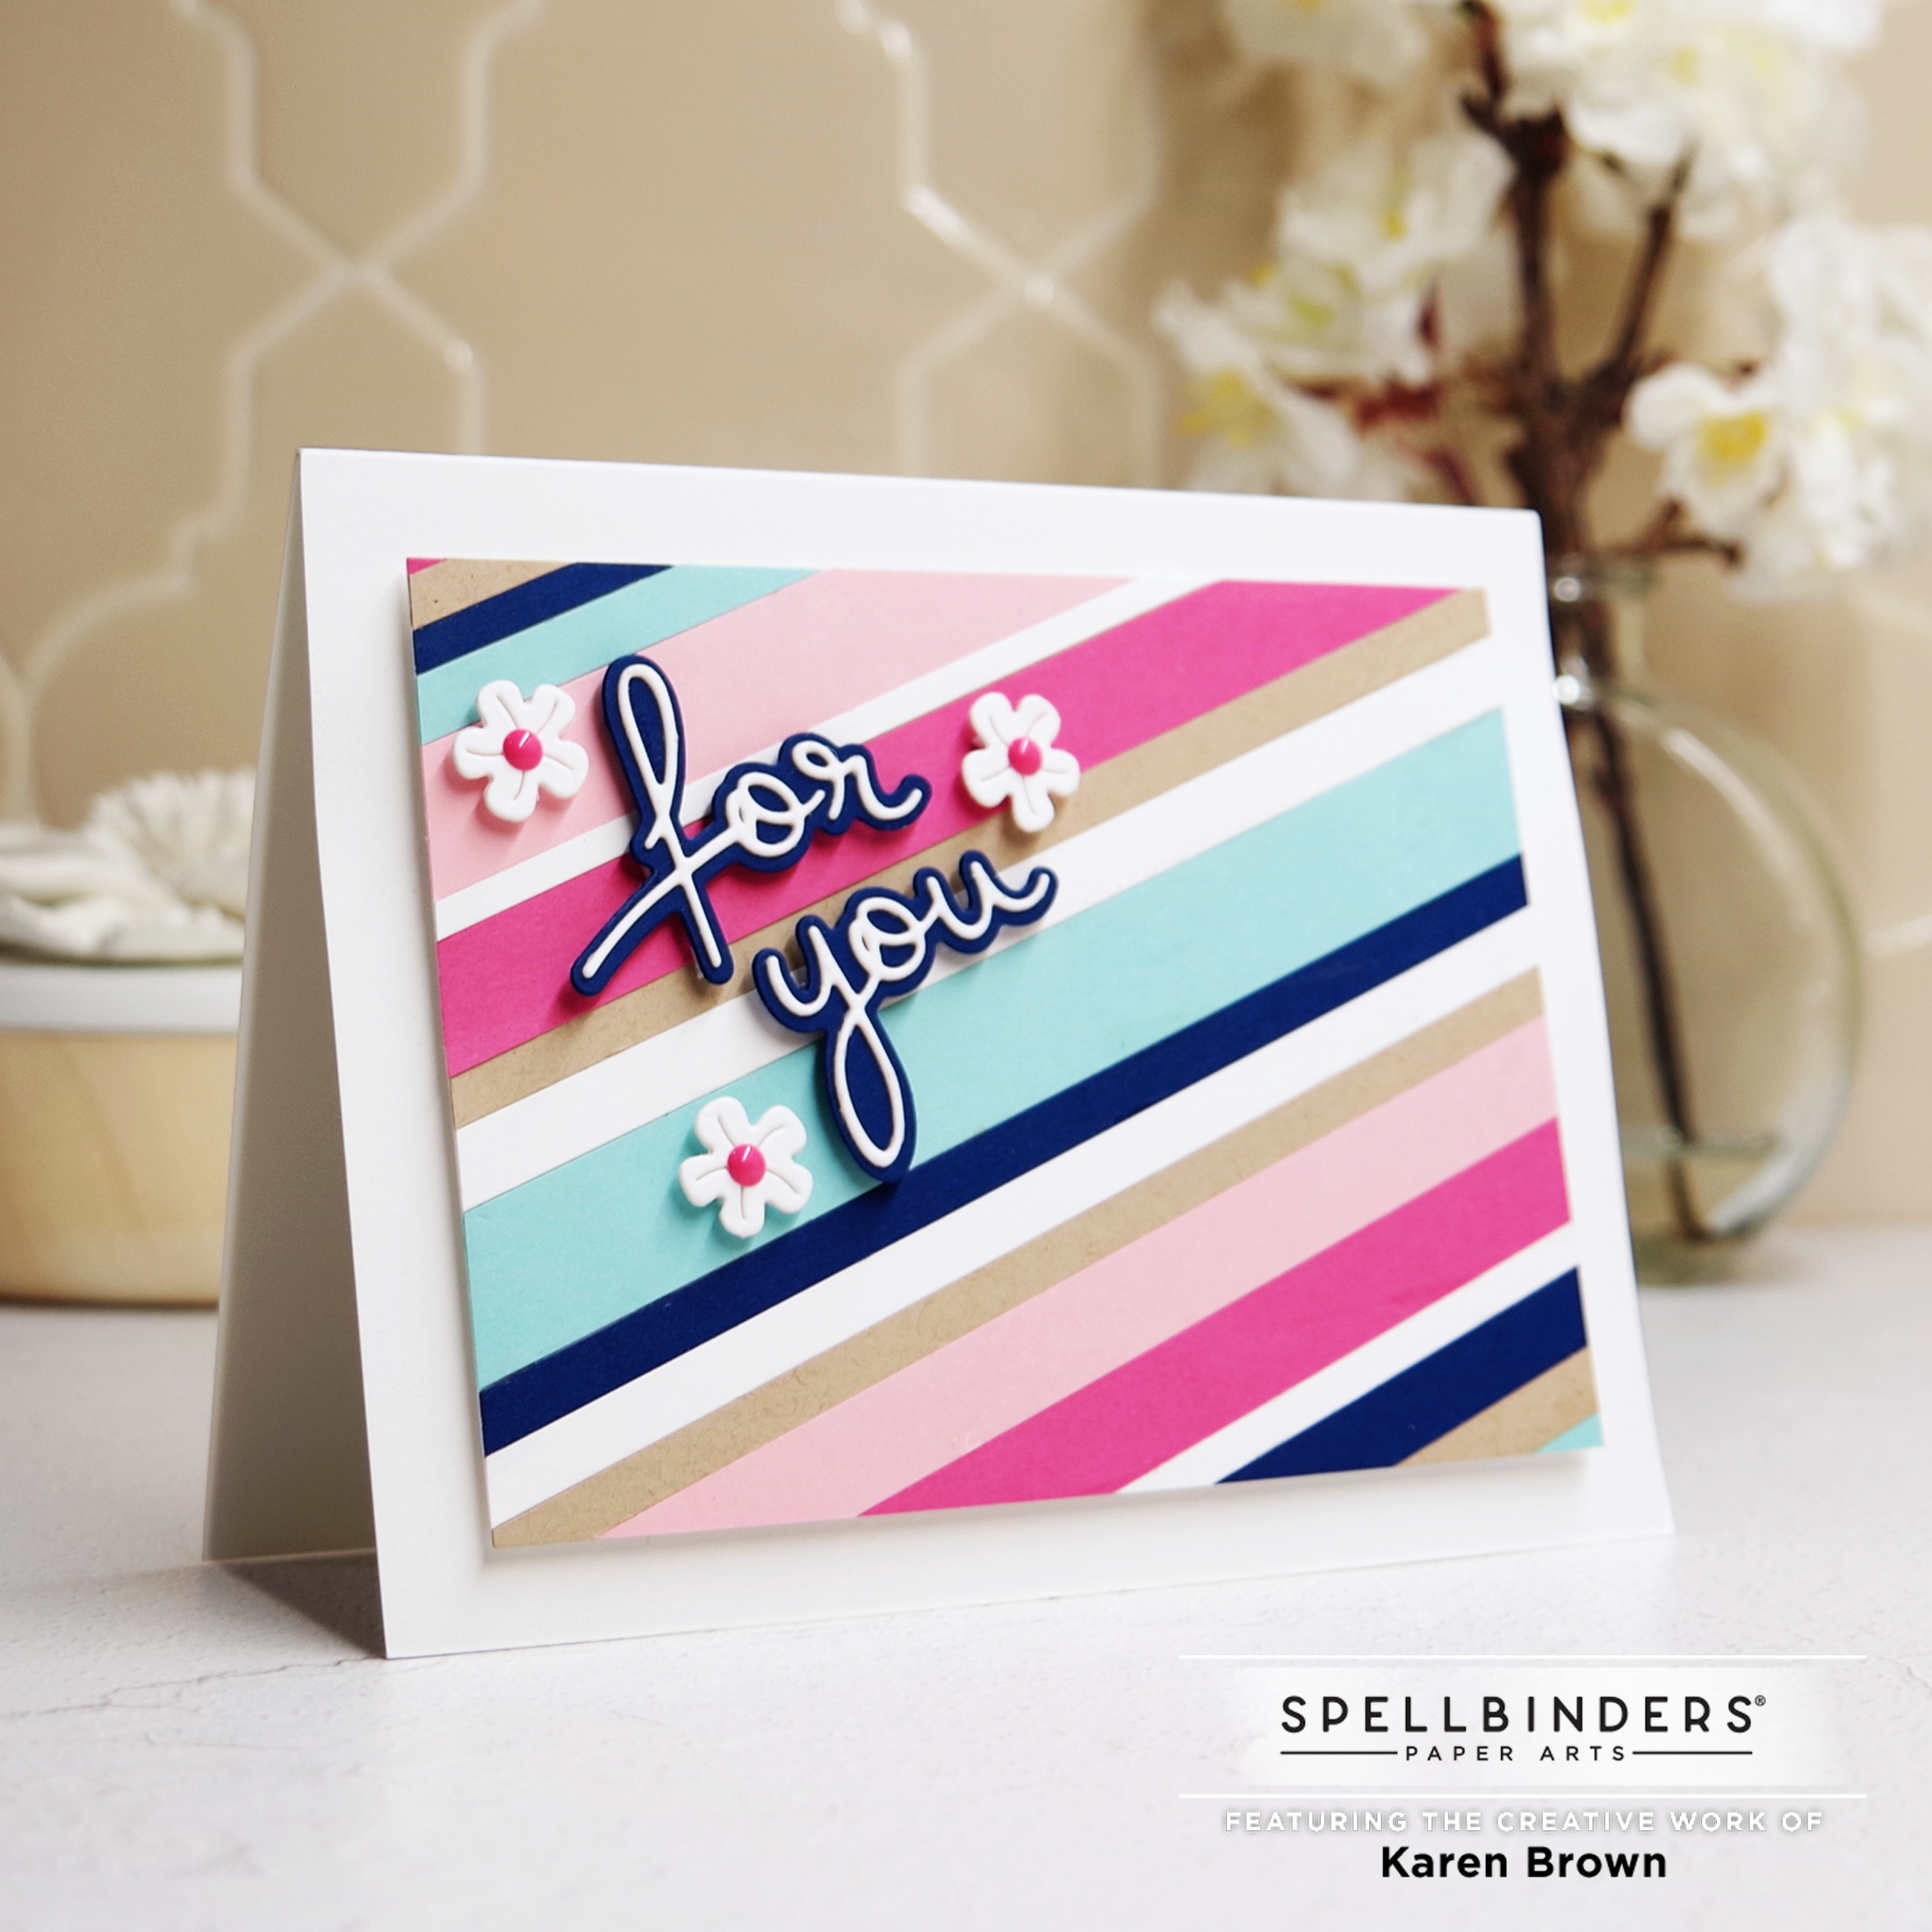
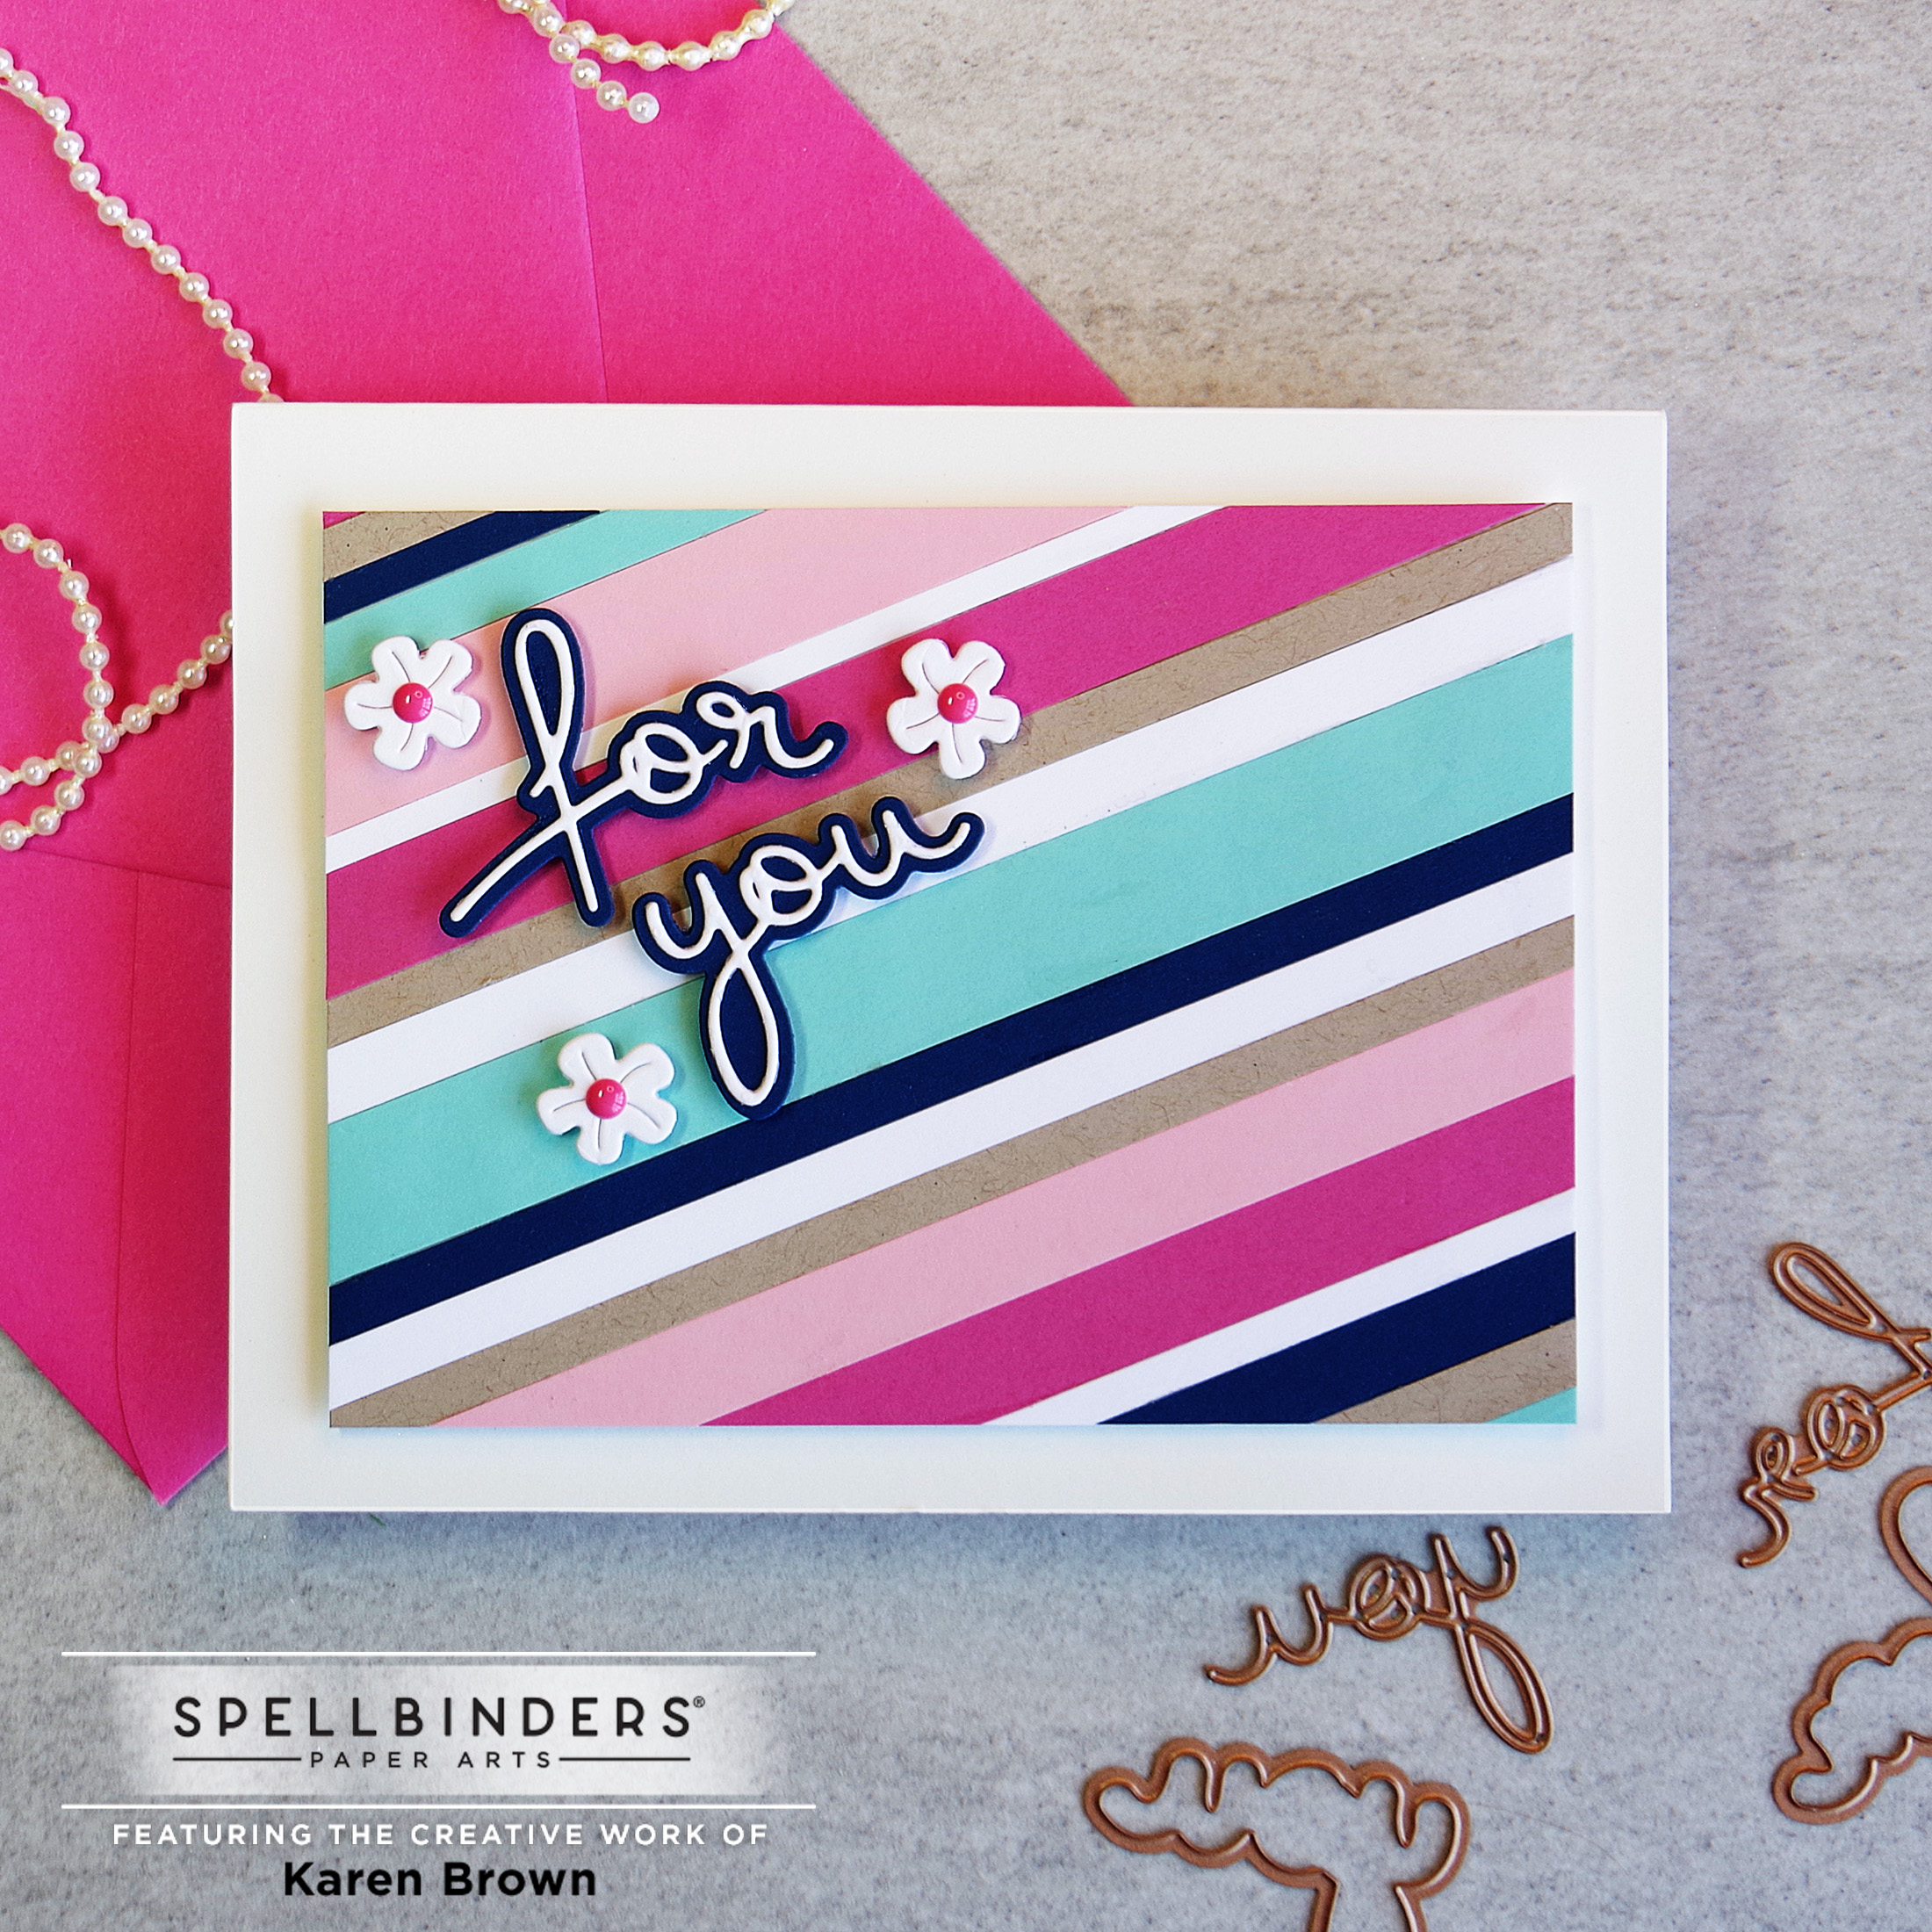
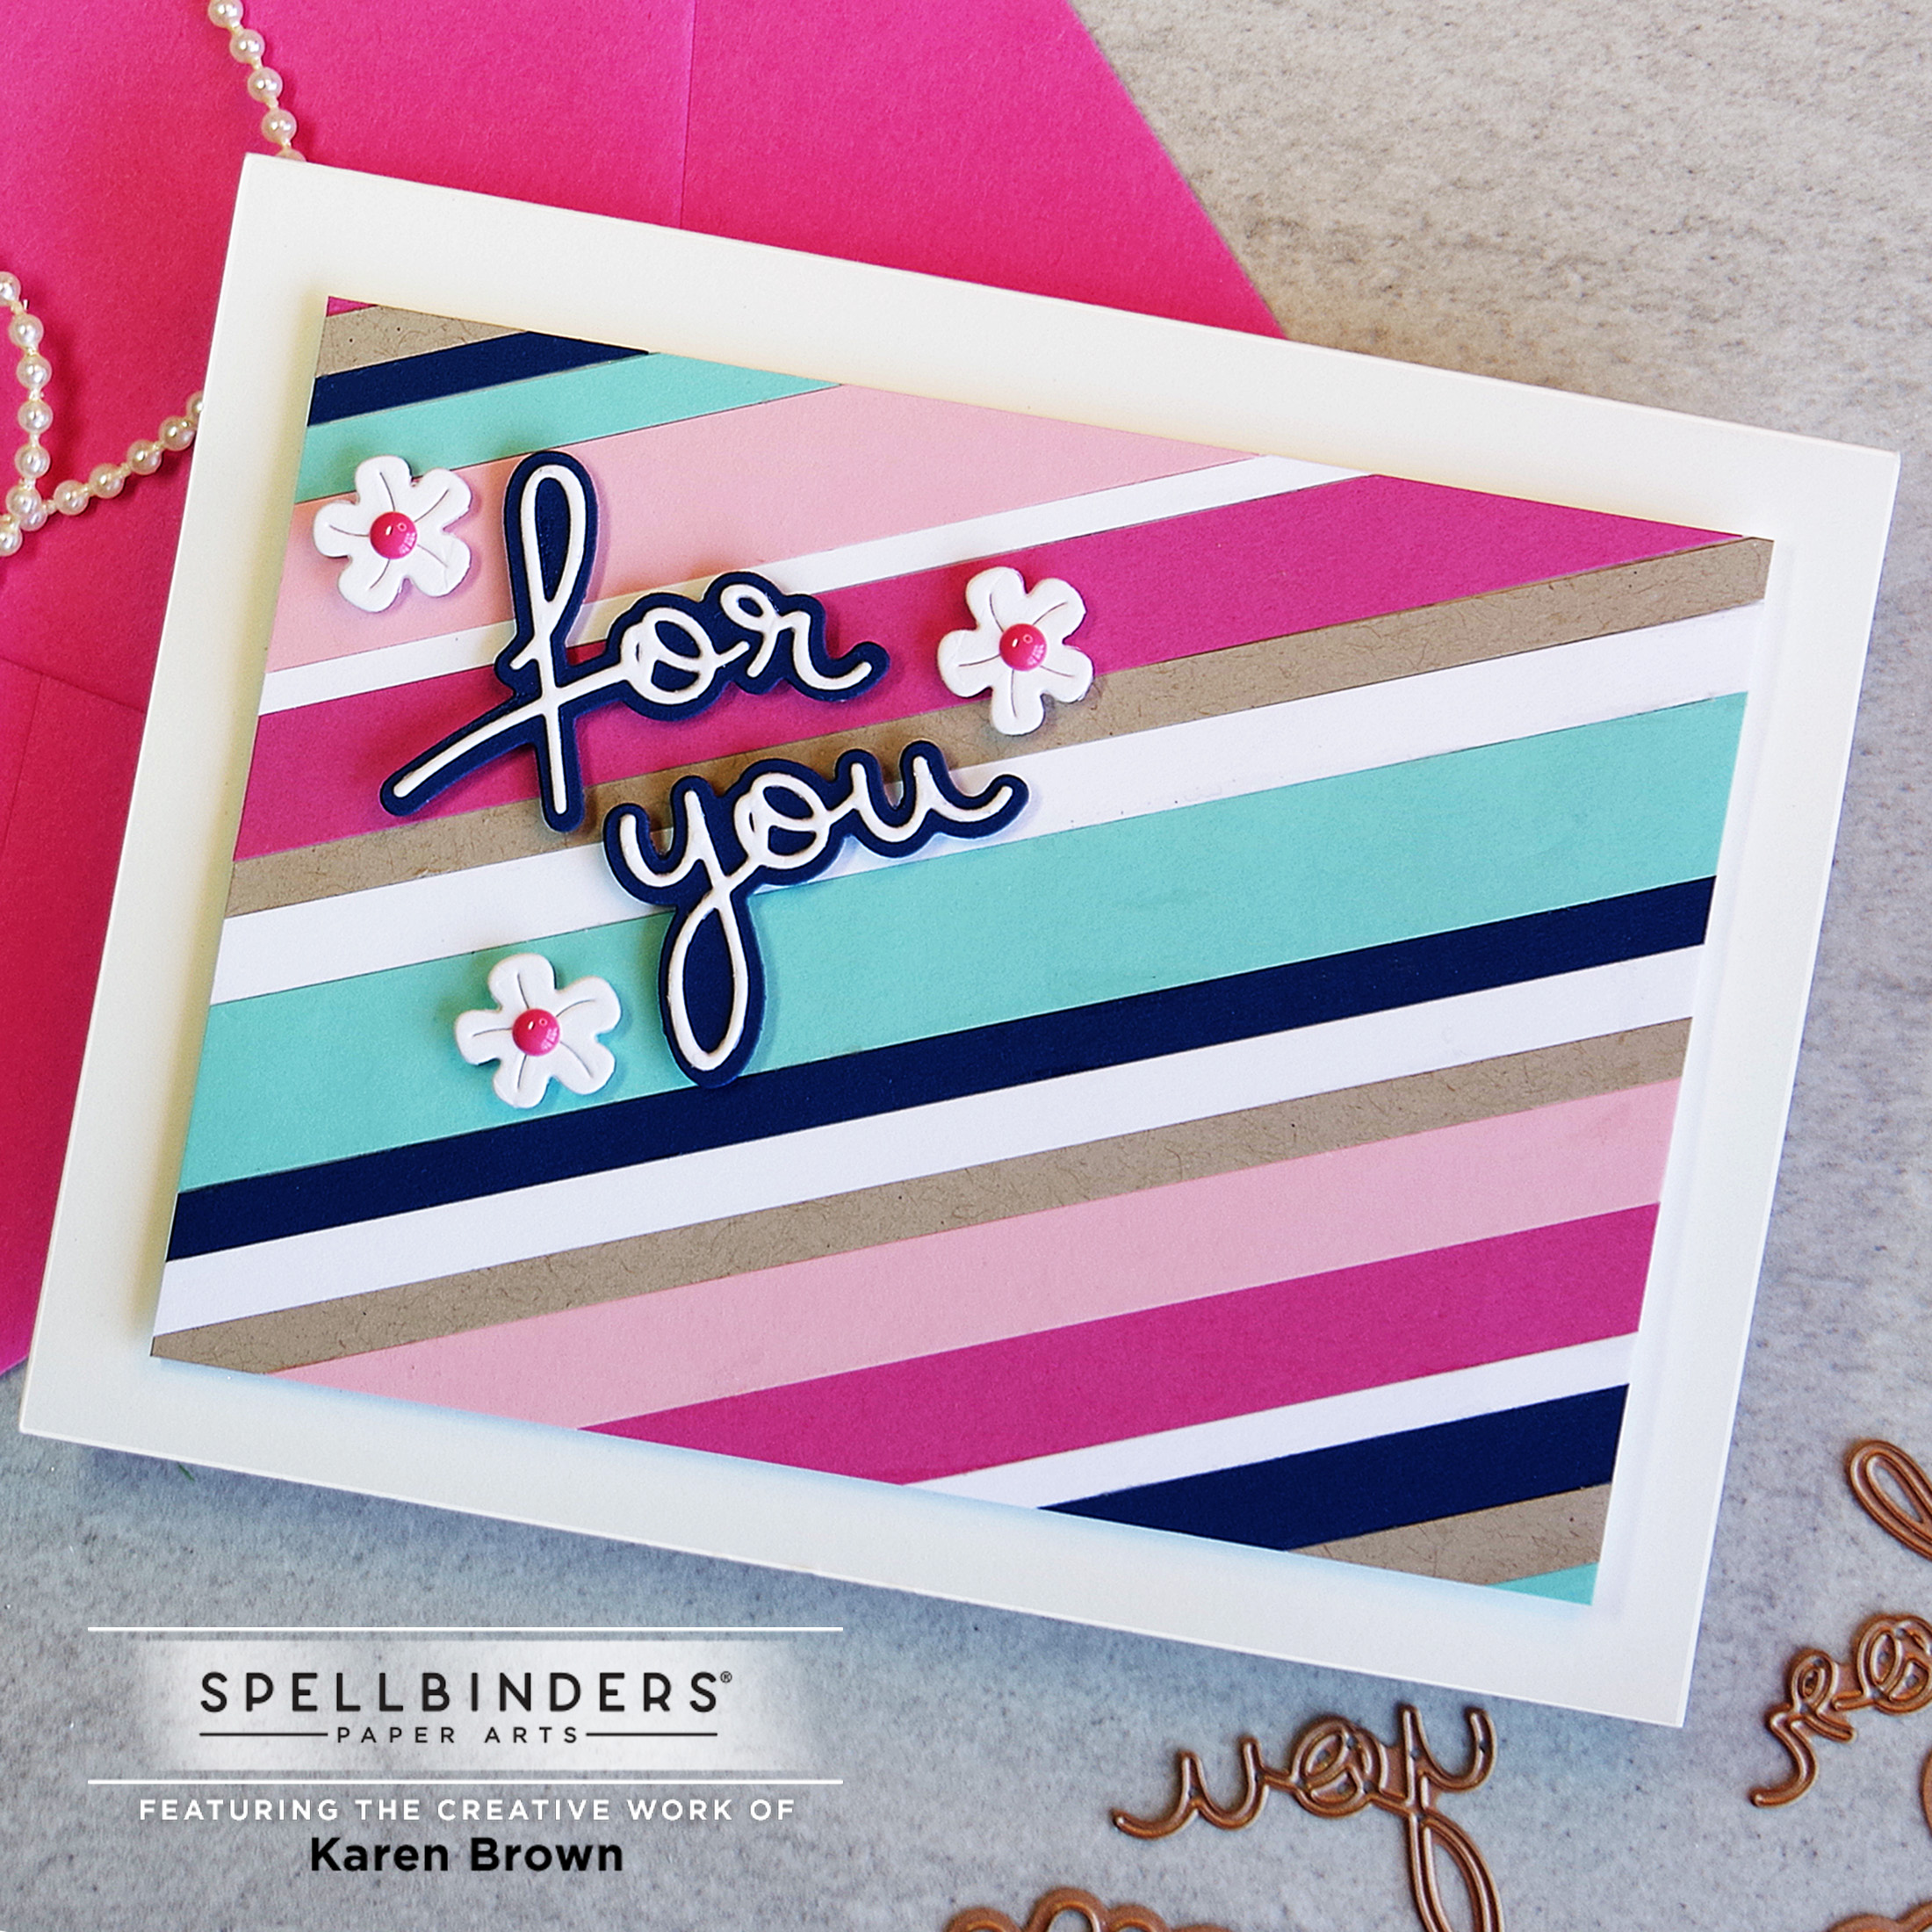
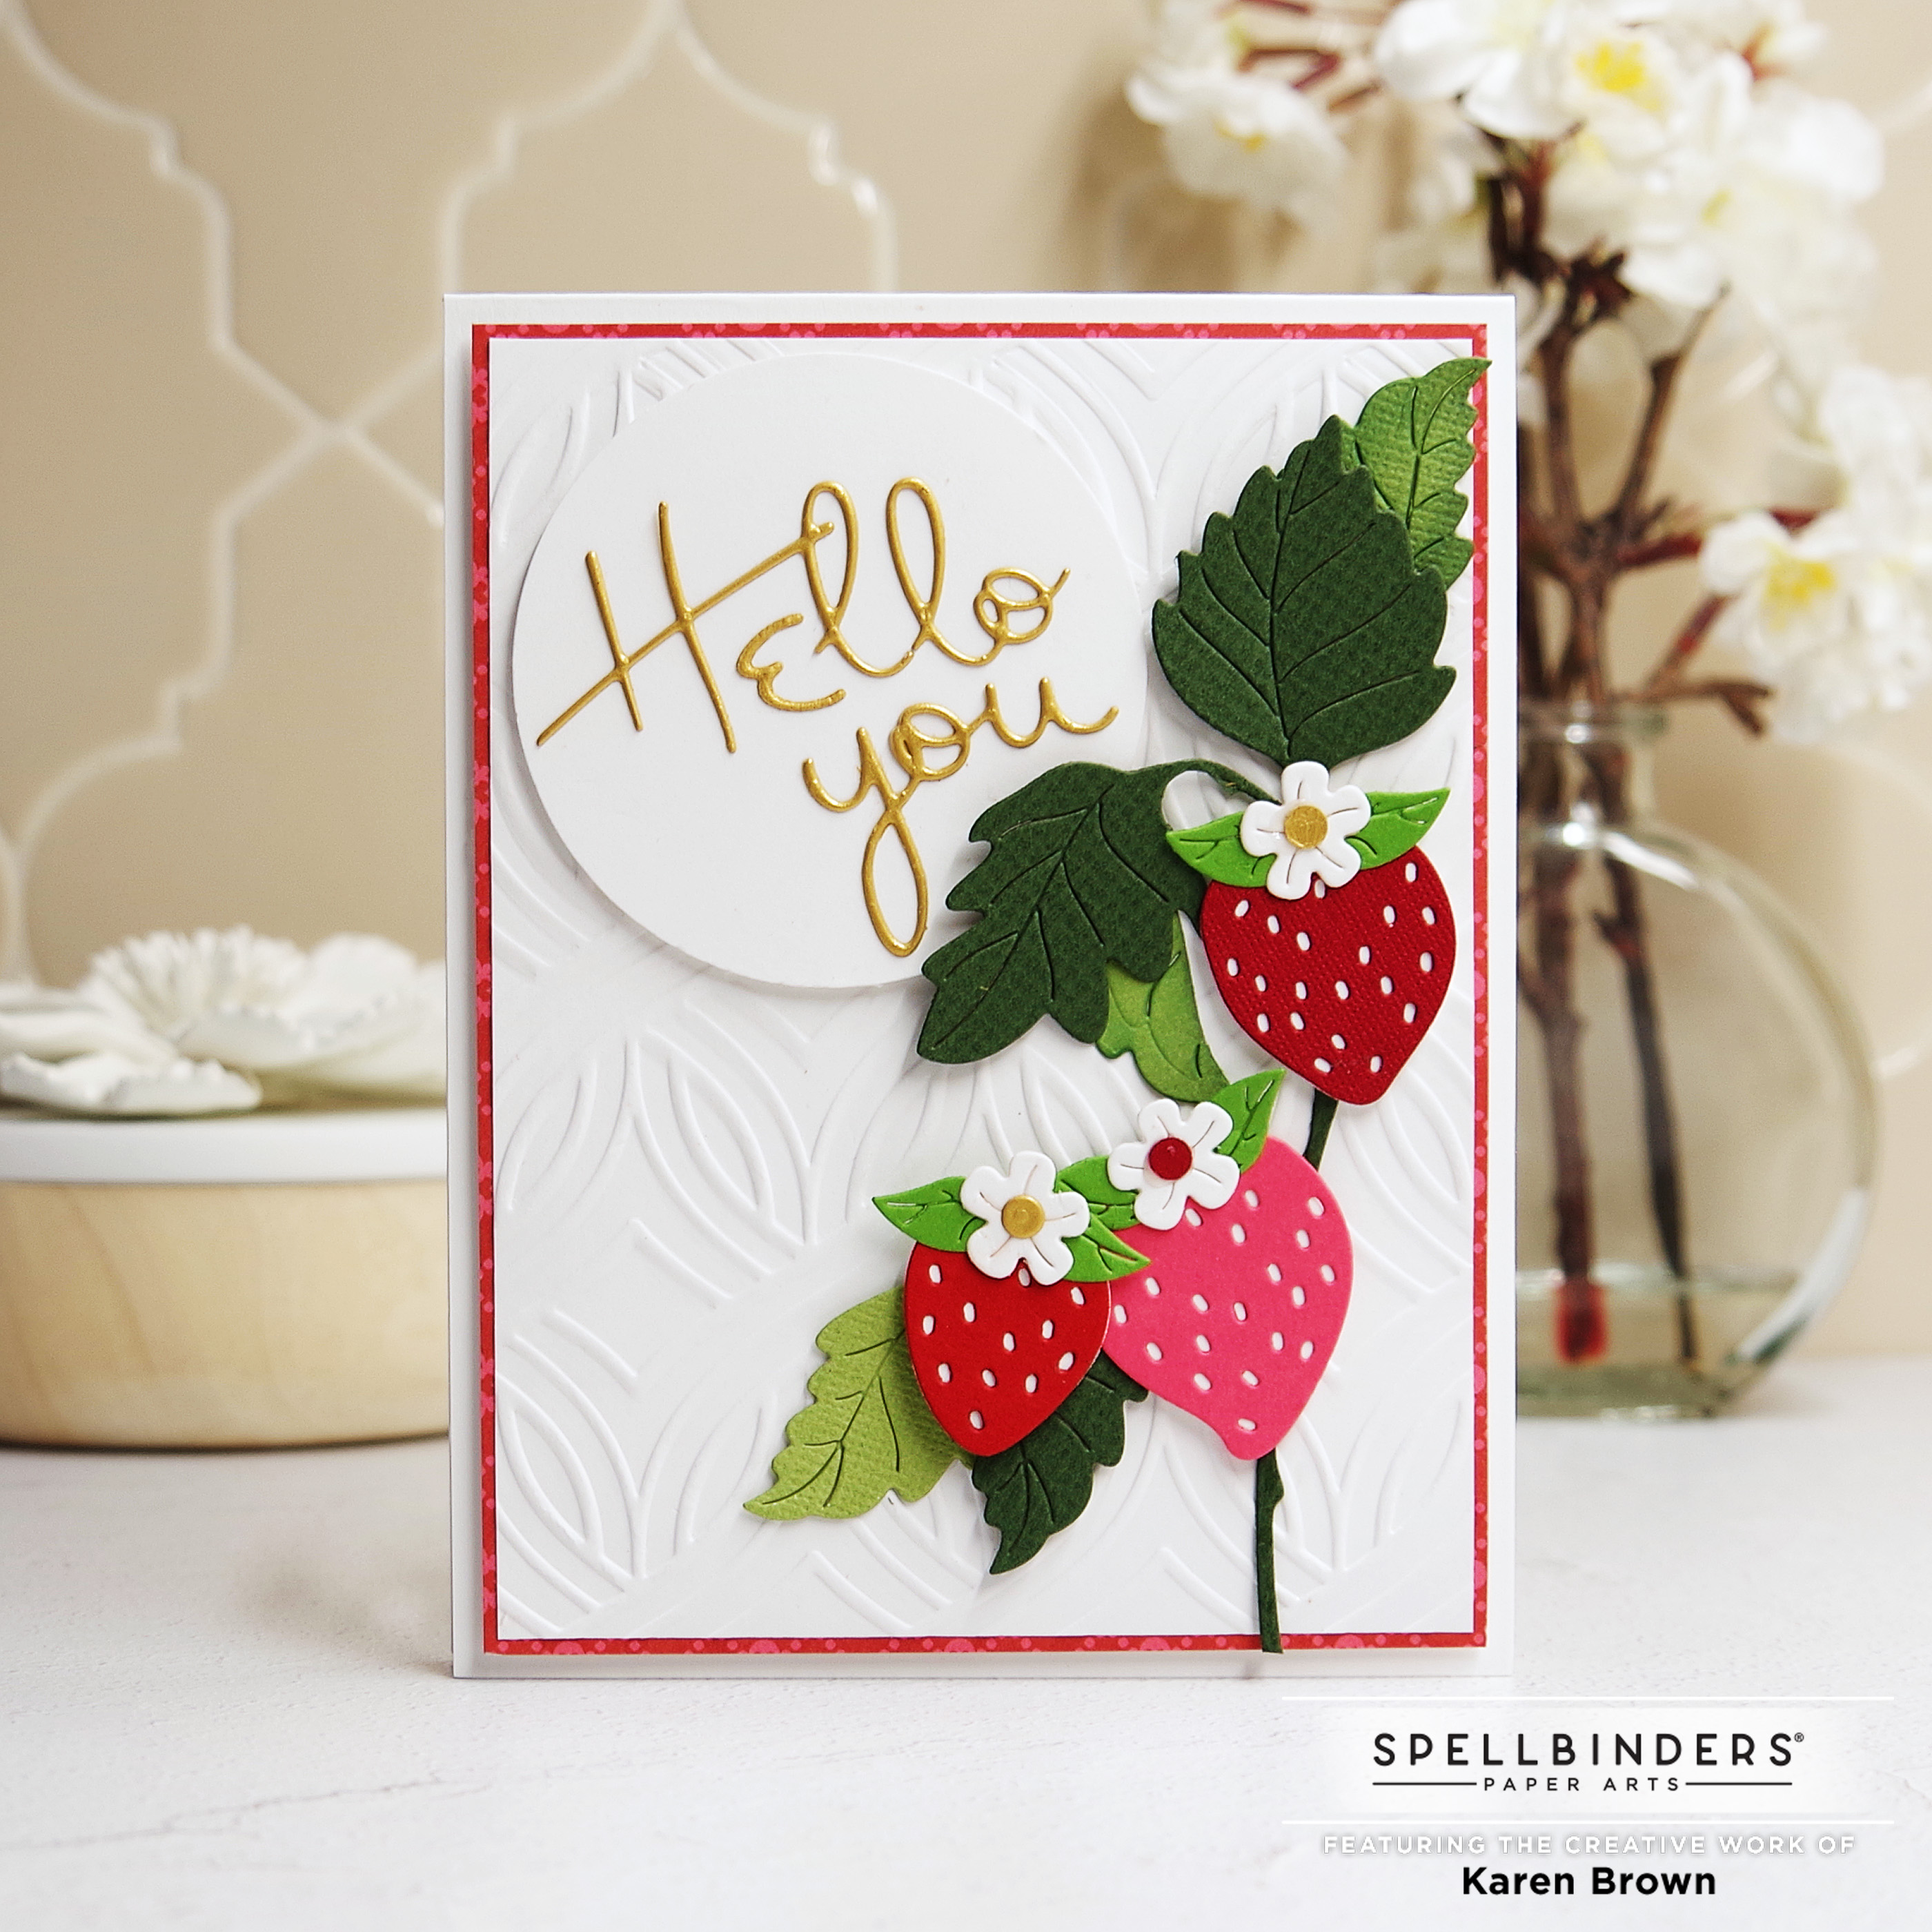
I am always looking for new fresh interesting sentiments so I was so excited to see this month’s Spellbinders Small Die of the Month Kit called Outlined Sentiments. Besides the “for” and “you” I used above, the kit includes Cheers (see card below), Thanks, Congrats and Hello (see card below) plus coordinating shadow dies that line up perfectly! There is also a cute flower, greenery and leaves in the kit.
For You Handmade Card
The die cuts are beautifully delicate so I used an extra metal shim when die-cutting the sentiments and they cut great. Before die cutting, I attached adhessive sheets to the cardstock and this made sentiment placement so easy!
For my background, I used my paper trimmer to cut strips of paper in varying widths. I didn’t measure, I just eyeballed it. I started with Waterfall, Pink Sand, Watermelon Fusion (retired), white and Cosmic Sky. It didn’t look quite right so I added Kraft cardstock and then I was happy with my color scheme. I think it is bright and cheerful with a bit of a beach vibe. I trimmed my background down to 3 1/2″ x 4 3/4″ and mounted on an A2 base with kraft foam.
I die cut my sentiments and shadows, added three strawberry blossoms from the August Large Die of the Month Kit, placed enamel dots on the flower centers and then adhered to the background with foam tape.
My last card is a bit more clean and simple, but I love the effect of the delicate die cut sentiment.
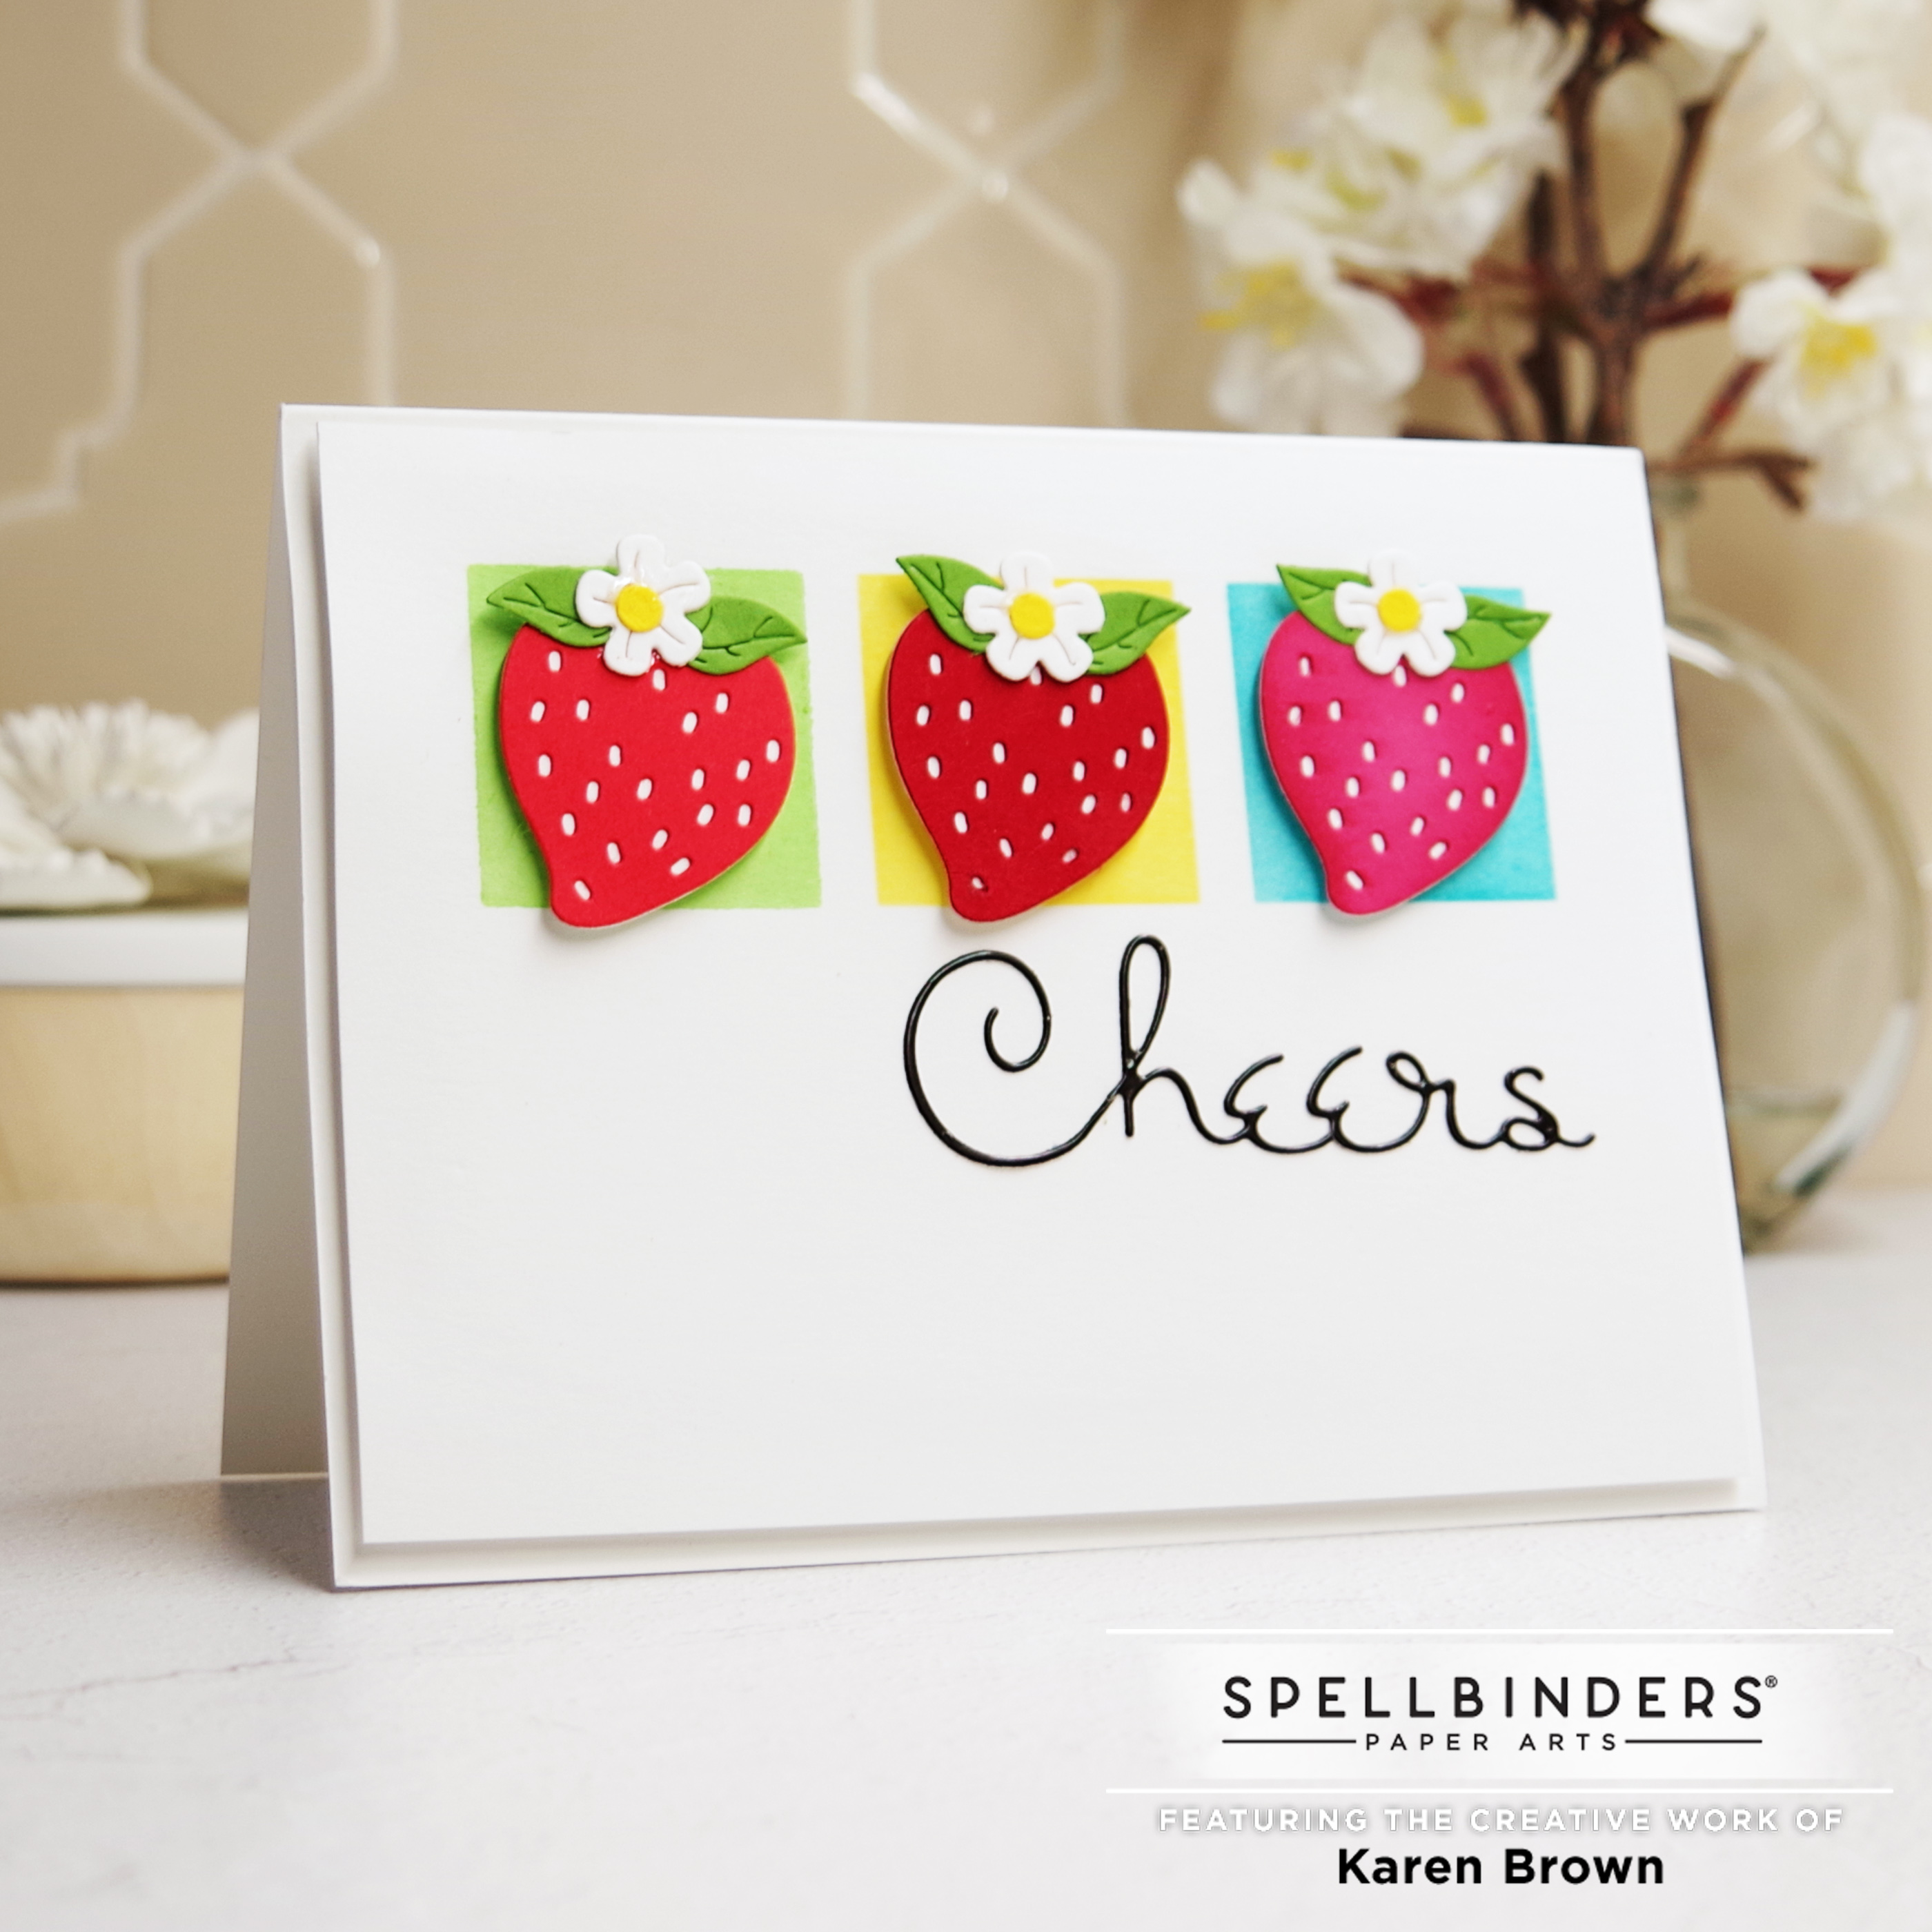
With Taylored Expressions Square Window Masking Stencil, I ink blended Grass Fields, Warm Sunshine and Peacock Feathers for my background. Using the August 2022 Large Die of the Month kit, I selected and die cut cardstock scraps so that each of the three berries would be a different shade of red. I die cut the Cheers sentiment (Spellbinder’s August 2022 Small Die of the Month Kit) from metallic black cardstock. I first adhered adhessive paper to the back of the cardstock and then die cut the sentiment which made placement so easy.
Trio of Die Cut Strawberries
I think these sentiment dies are the perfect finishing touch for cards. Thanks for stopping by!
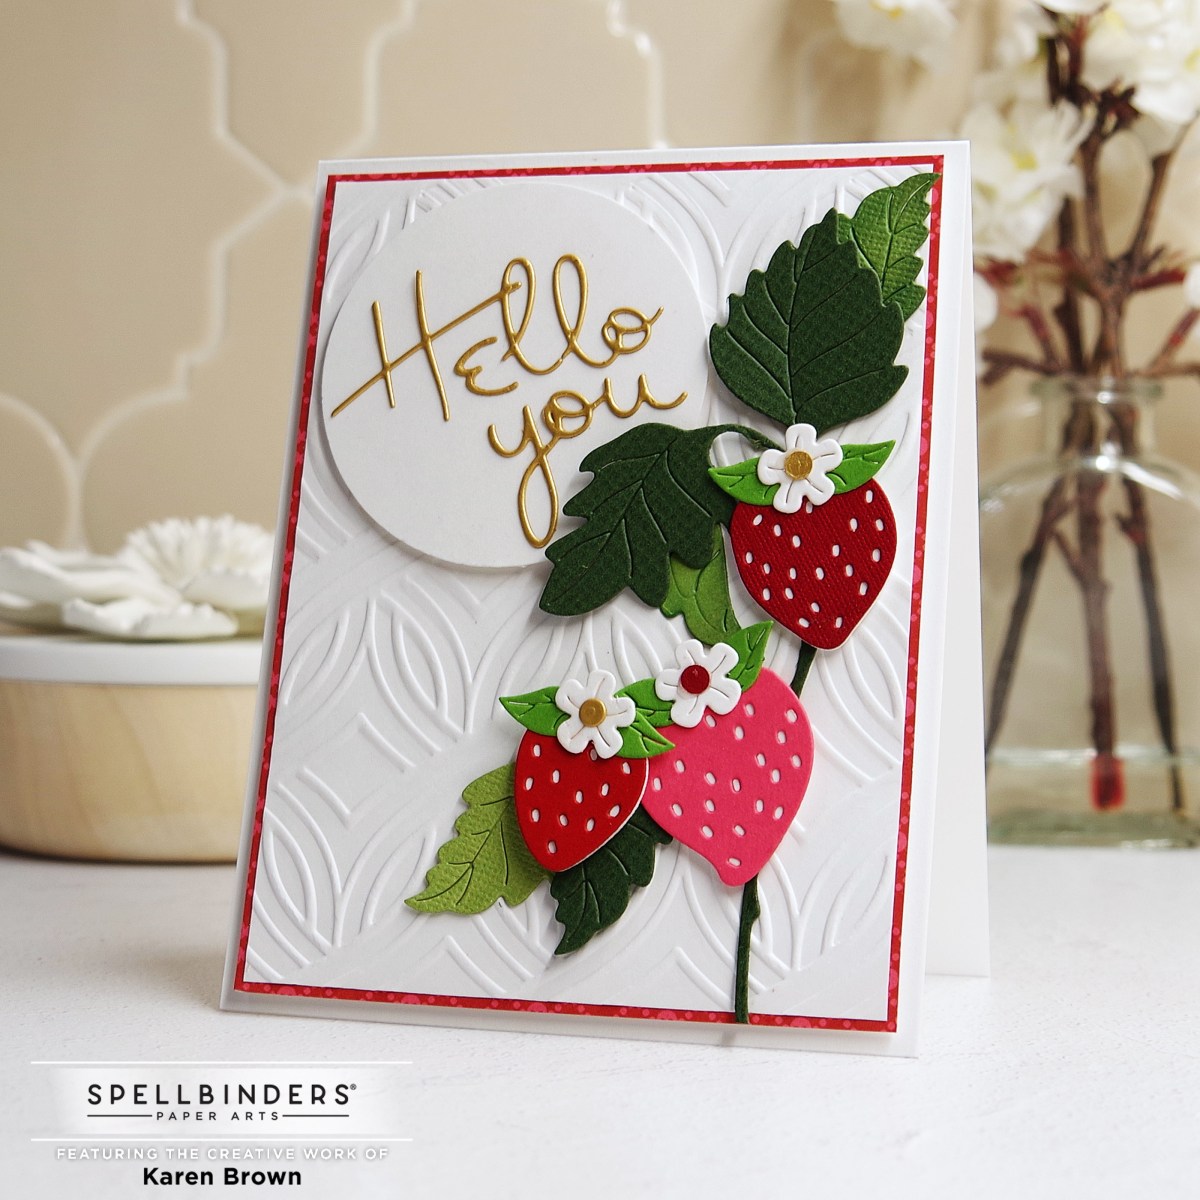
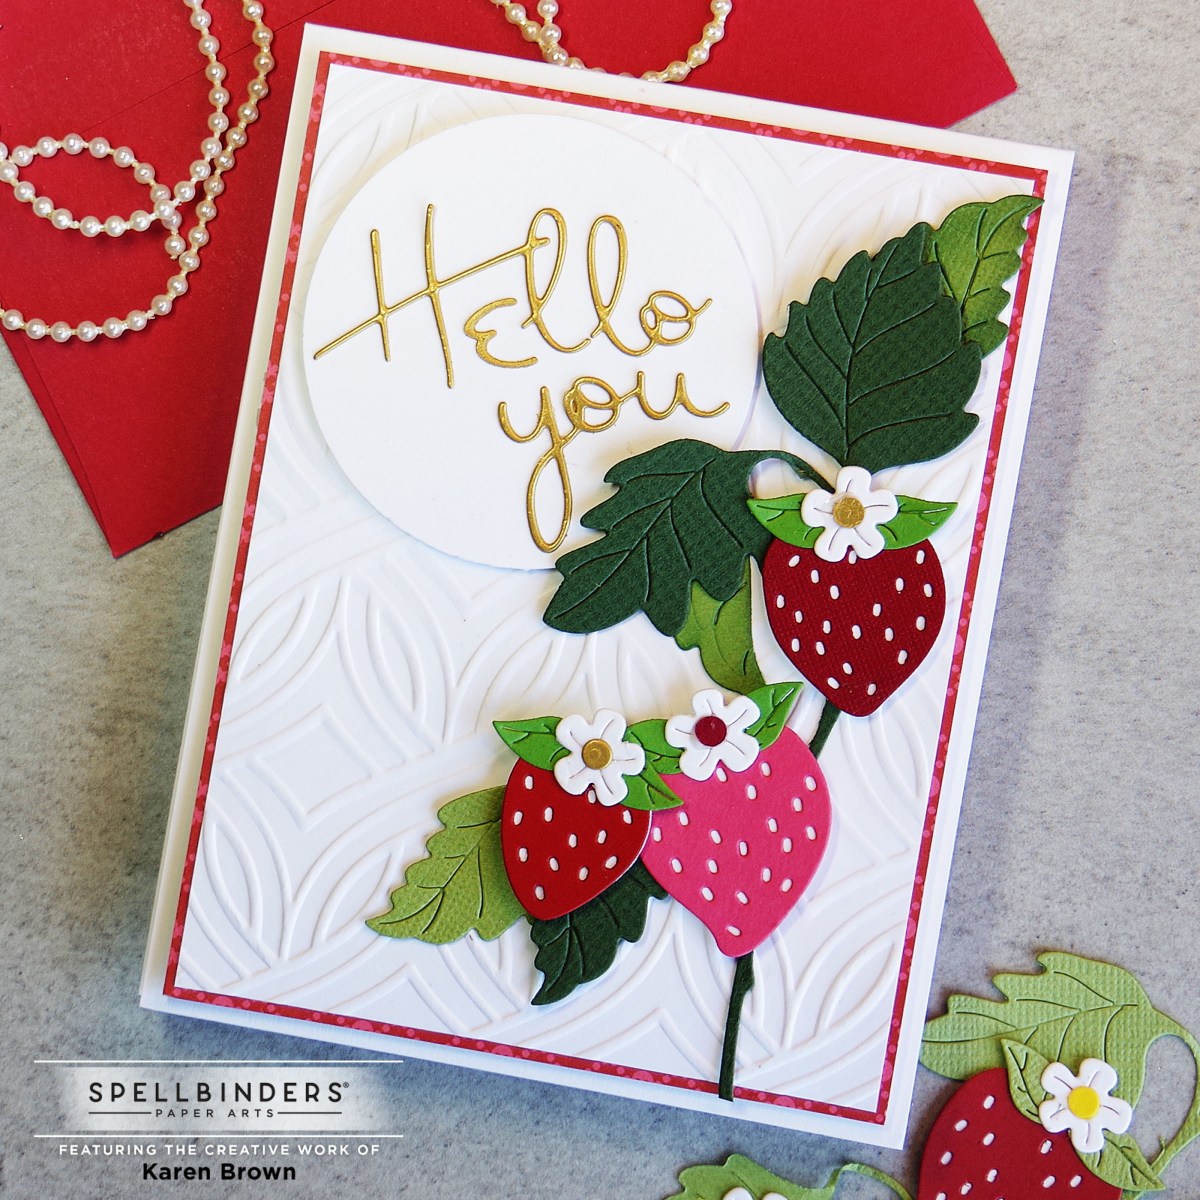
The Spellbinders August 2022 Large Die of the MonthStrawberry Patch kit is just perfect for summer! I made three cards and I can’t decide which I like best. The first one I made for my daughter and her husband to go with a housewarming gift. Doesn’t the strawberry plant look like it’s dancing? I think it is so lively and cheerful!
The dies are big and beautiful so my first card is 4 1/4″ x 6 1/2″. I wanted variations in my reds and greens so I dove into my paper scrap stash and pulled out some pretty cardstock leftovers. The basket is die cut from Brush Gold Cardstock.
Don’t you just love the pretty little strawberry blossoms? I know I will be using these on future cards because they are so fresh and happy.
Strawberry Trio Card
The die cut strawberries are so animated and joyful that I thought it would be fun to spotlight three berries with blooms on card #2. Once again, I die cut the strawberries with Spellbinders August 2022 Large Die of the Month Kit called Strawberry Patch. I used Taylored Expressions Square Window Masking Stencil and then blended Grass Fields, Warm Sunshine and Peacock Feathers for my background. I again used cardstock scraps so that each of the three berries would be a different shade of red.
The “Cheers” sentiment is from Spellbinders August Small Die of the Month kit, which is filled with great delicate sentiment dies and coordinating sentiment shadows. Before die cutting, I attached adhessive sheets to the cardstock which made sentiment placement so easy!
I die cut the two sentiments from Brush Gold Cardstock. Prior to die-cutting, I attached adhessive sheets to the cardstock and this made sentiment placement so easy! I also matted the embossed panel with red patterned paper.
Thanks for stopping by! I’d love to hear what you think about the cards.
Christmas in July? For all of you ready to start working on your holiday cards, Spellbinders has some fresh new die sets that are part of their gorgeous new Winter Garden Collection by Susan Tierney-Cockburn. The Letter Box is so versatile….you can use the mailbox by itself….add Christamas gifts or letters….or turn it into a birthday card by changing the colors and sentiment. I added fun little details from two other Spellbinders kits.
To start this card, I ink blended the blue panel on 80 lb. card stock, which I think embosses more crisply. I then embossed the background for added interest. I die cut all my pieces, “aged” the white post with a distress crayon and added a few white accents to the mail box with a gel pen. I then assembled my card with glue and foam tape.
If you’d like to see my post for the gorgeous Amazing Grace Pop-Up Christmas Tree Vingette click HERE. To see my card for Spellbinder’s Stitched Ornament, click HERE.
Spellbinders has an extensive collection of lovely “Stitched Dies” and you can see them HERE.
To celebrate the July Subscription Kits, Altenew is hosting a Blog Hop with loads of prizes and fresh inspriation so come hop with us! You probably came from Emily Midgett and her gorgeous cards.
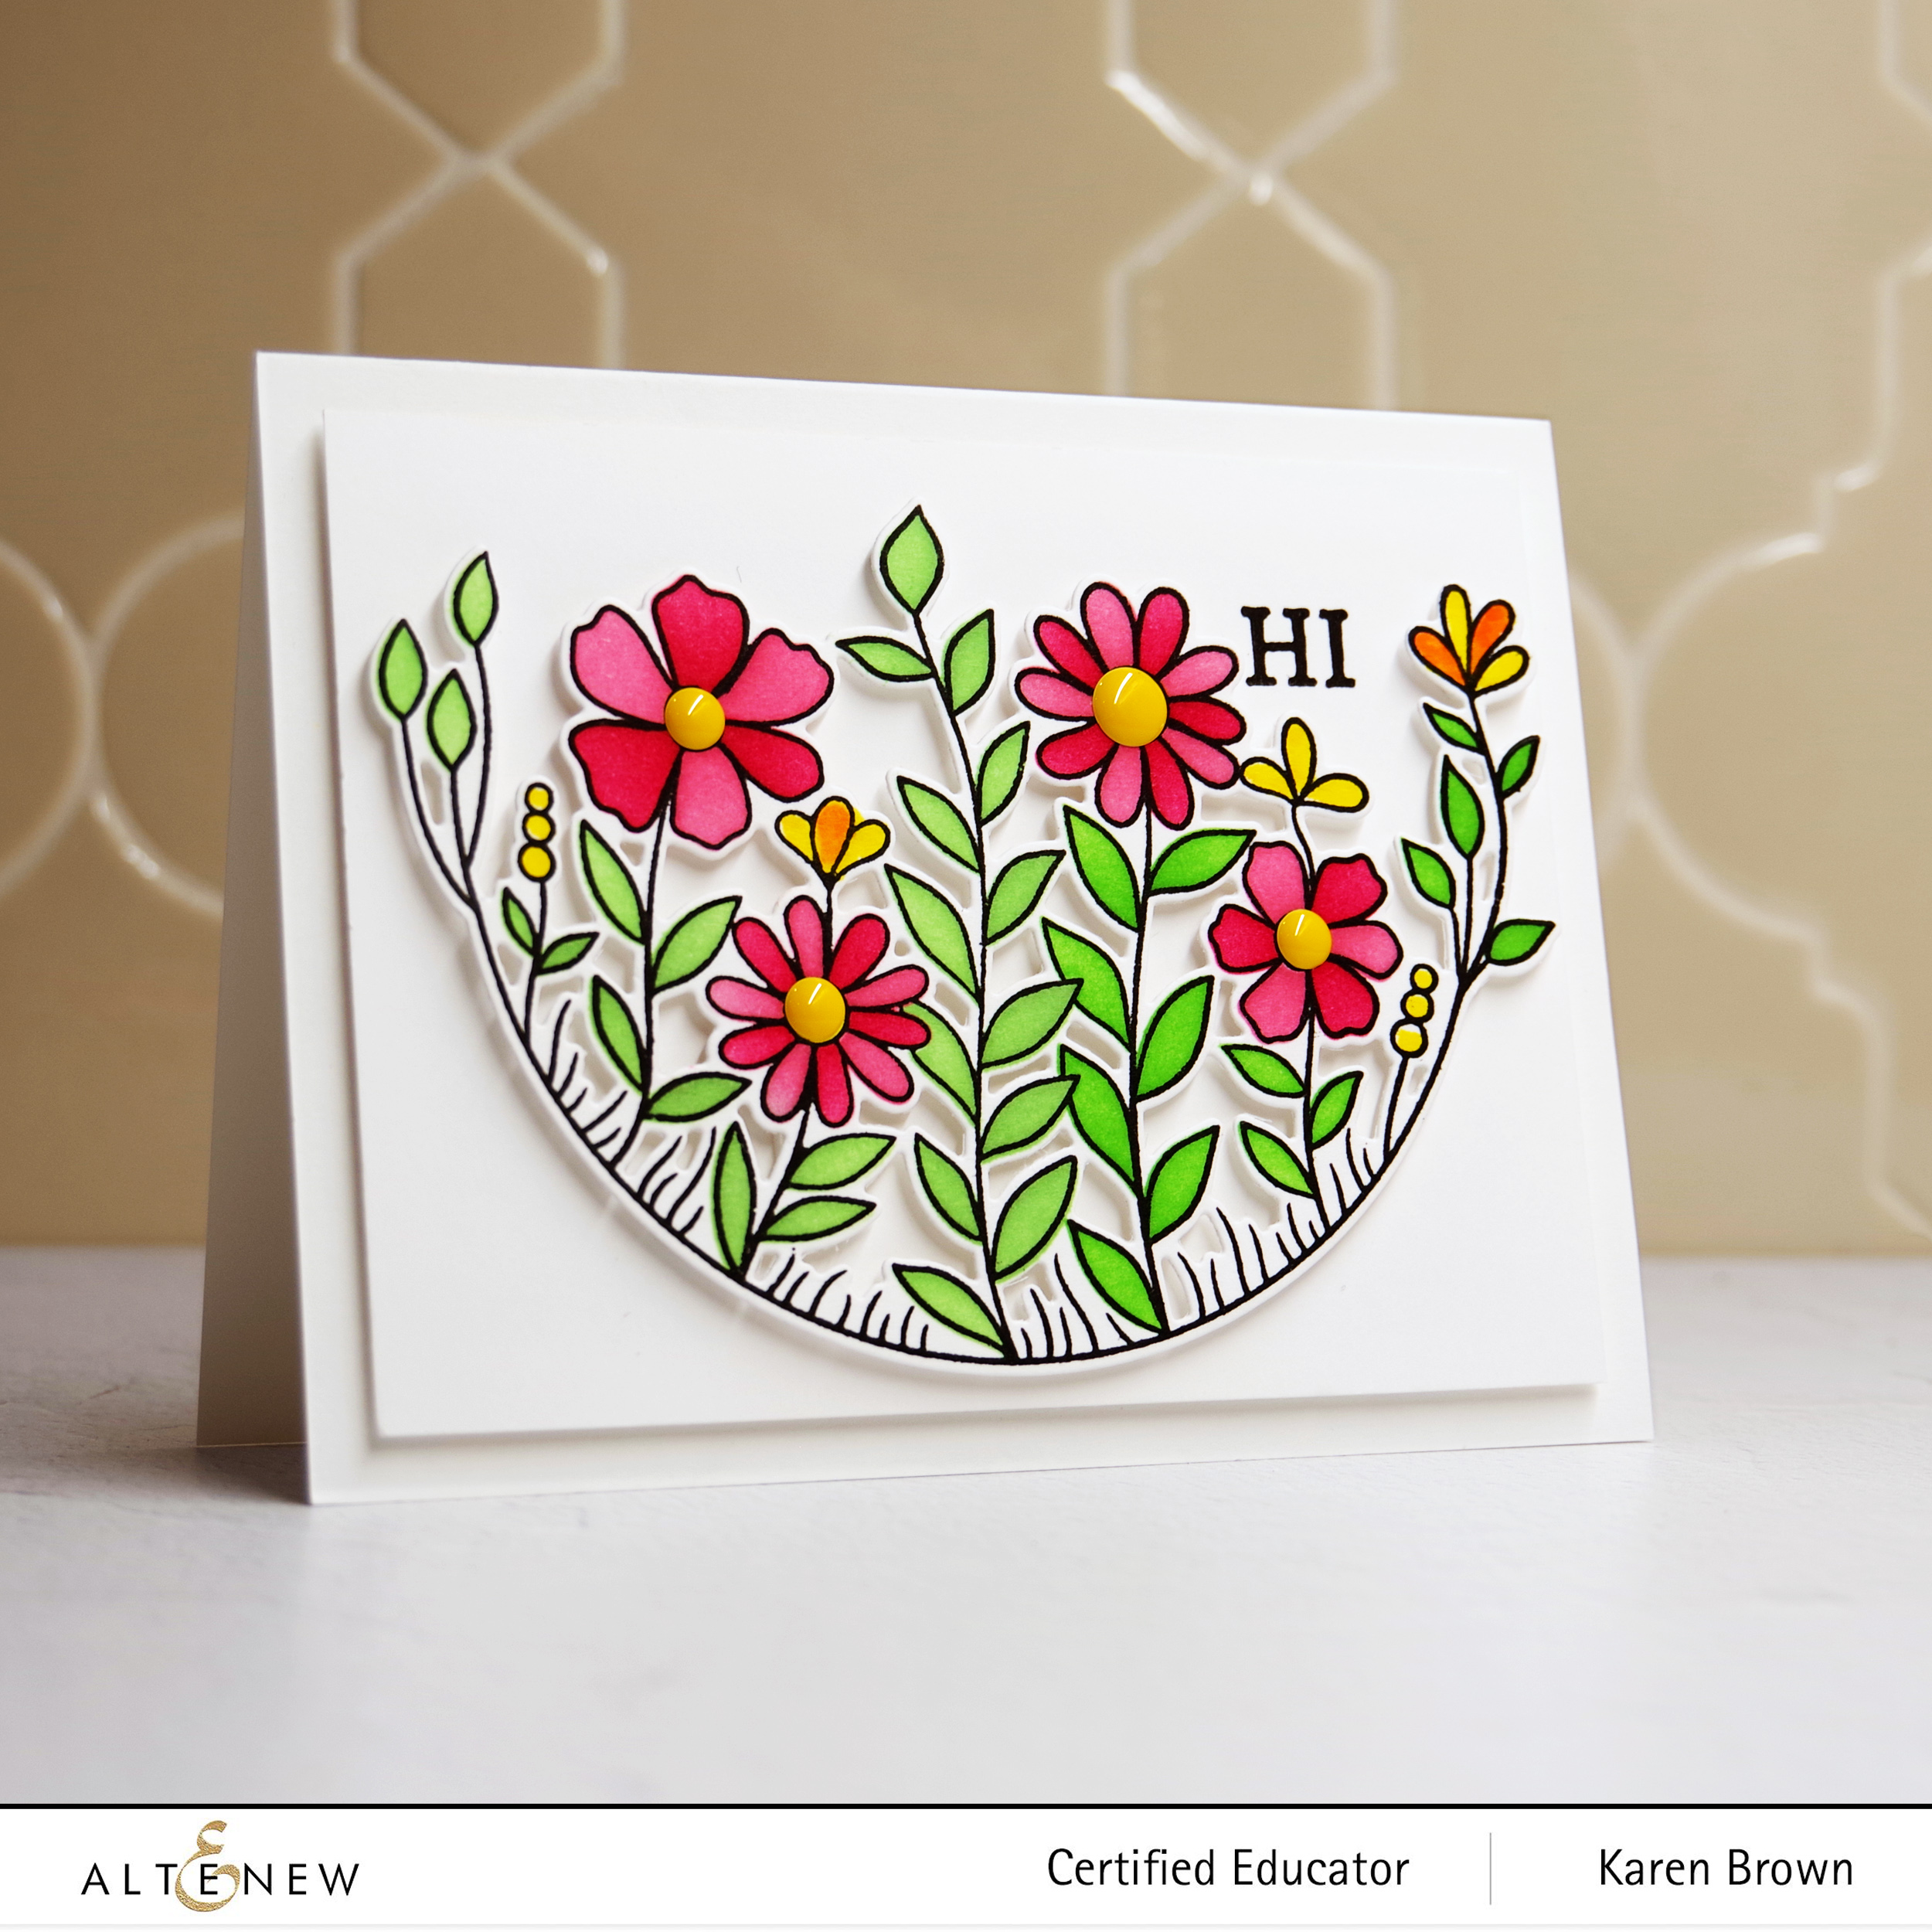
If you want to make a showy “Wow” project, you’ll want to try the July Craft Your Life kit. The flowers, leaves and vines are gorgeous! The Craft Your Life Project Kit comes with a 6 x 8 Stamp set and its coordinating Die Set, Stencil, and Embossing Folder. You will want to buy the kit becuase the items included in this kit are not sold separately.
I started by diecutting a template for my stamp. The main stamp is large and to ensure I had it positioned correctely, so it would die cut well, I set the stamp inside the template in my Misti. This little extra step makes for a much better finished project. Next, I stamped the outline with pigment ink and let it dry. I then used the coloring stencils to ink blend the flowers and leaves. I wanted a bit of fresh white so I didn’t use every stencil layer. I just love the look of coloring with stencils. To finish, I used the layering stamps to add detail and then die cut. This is a big stamp, so using foam tape, I attached the die cut to a 5″ x 6 1/2″ panel. The stamp is so beautiful that I kept the rest of the card clean and simple.
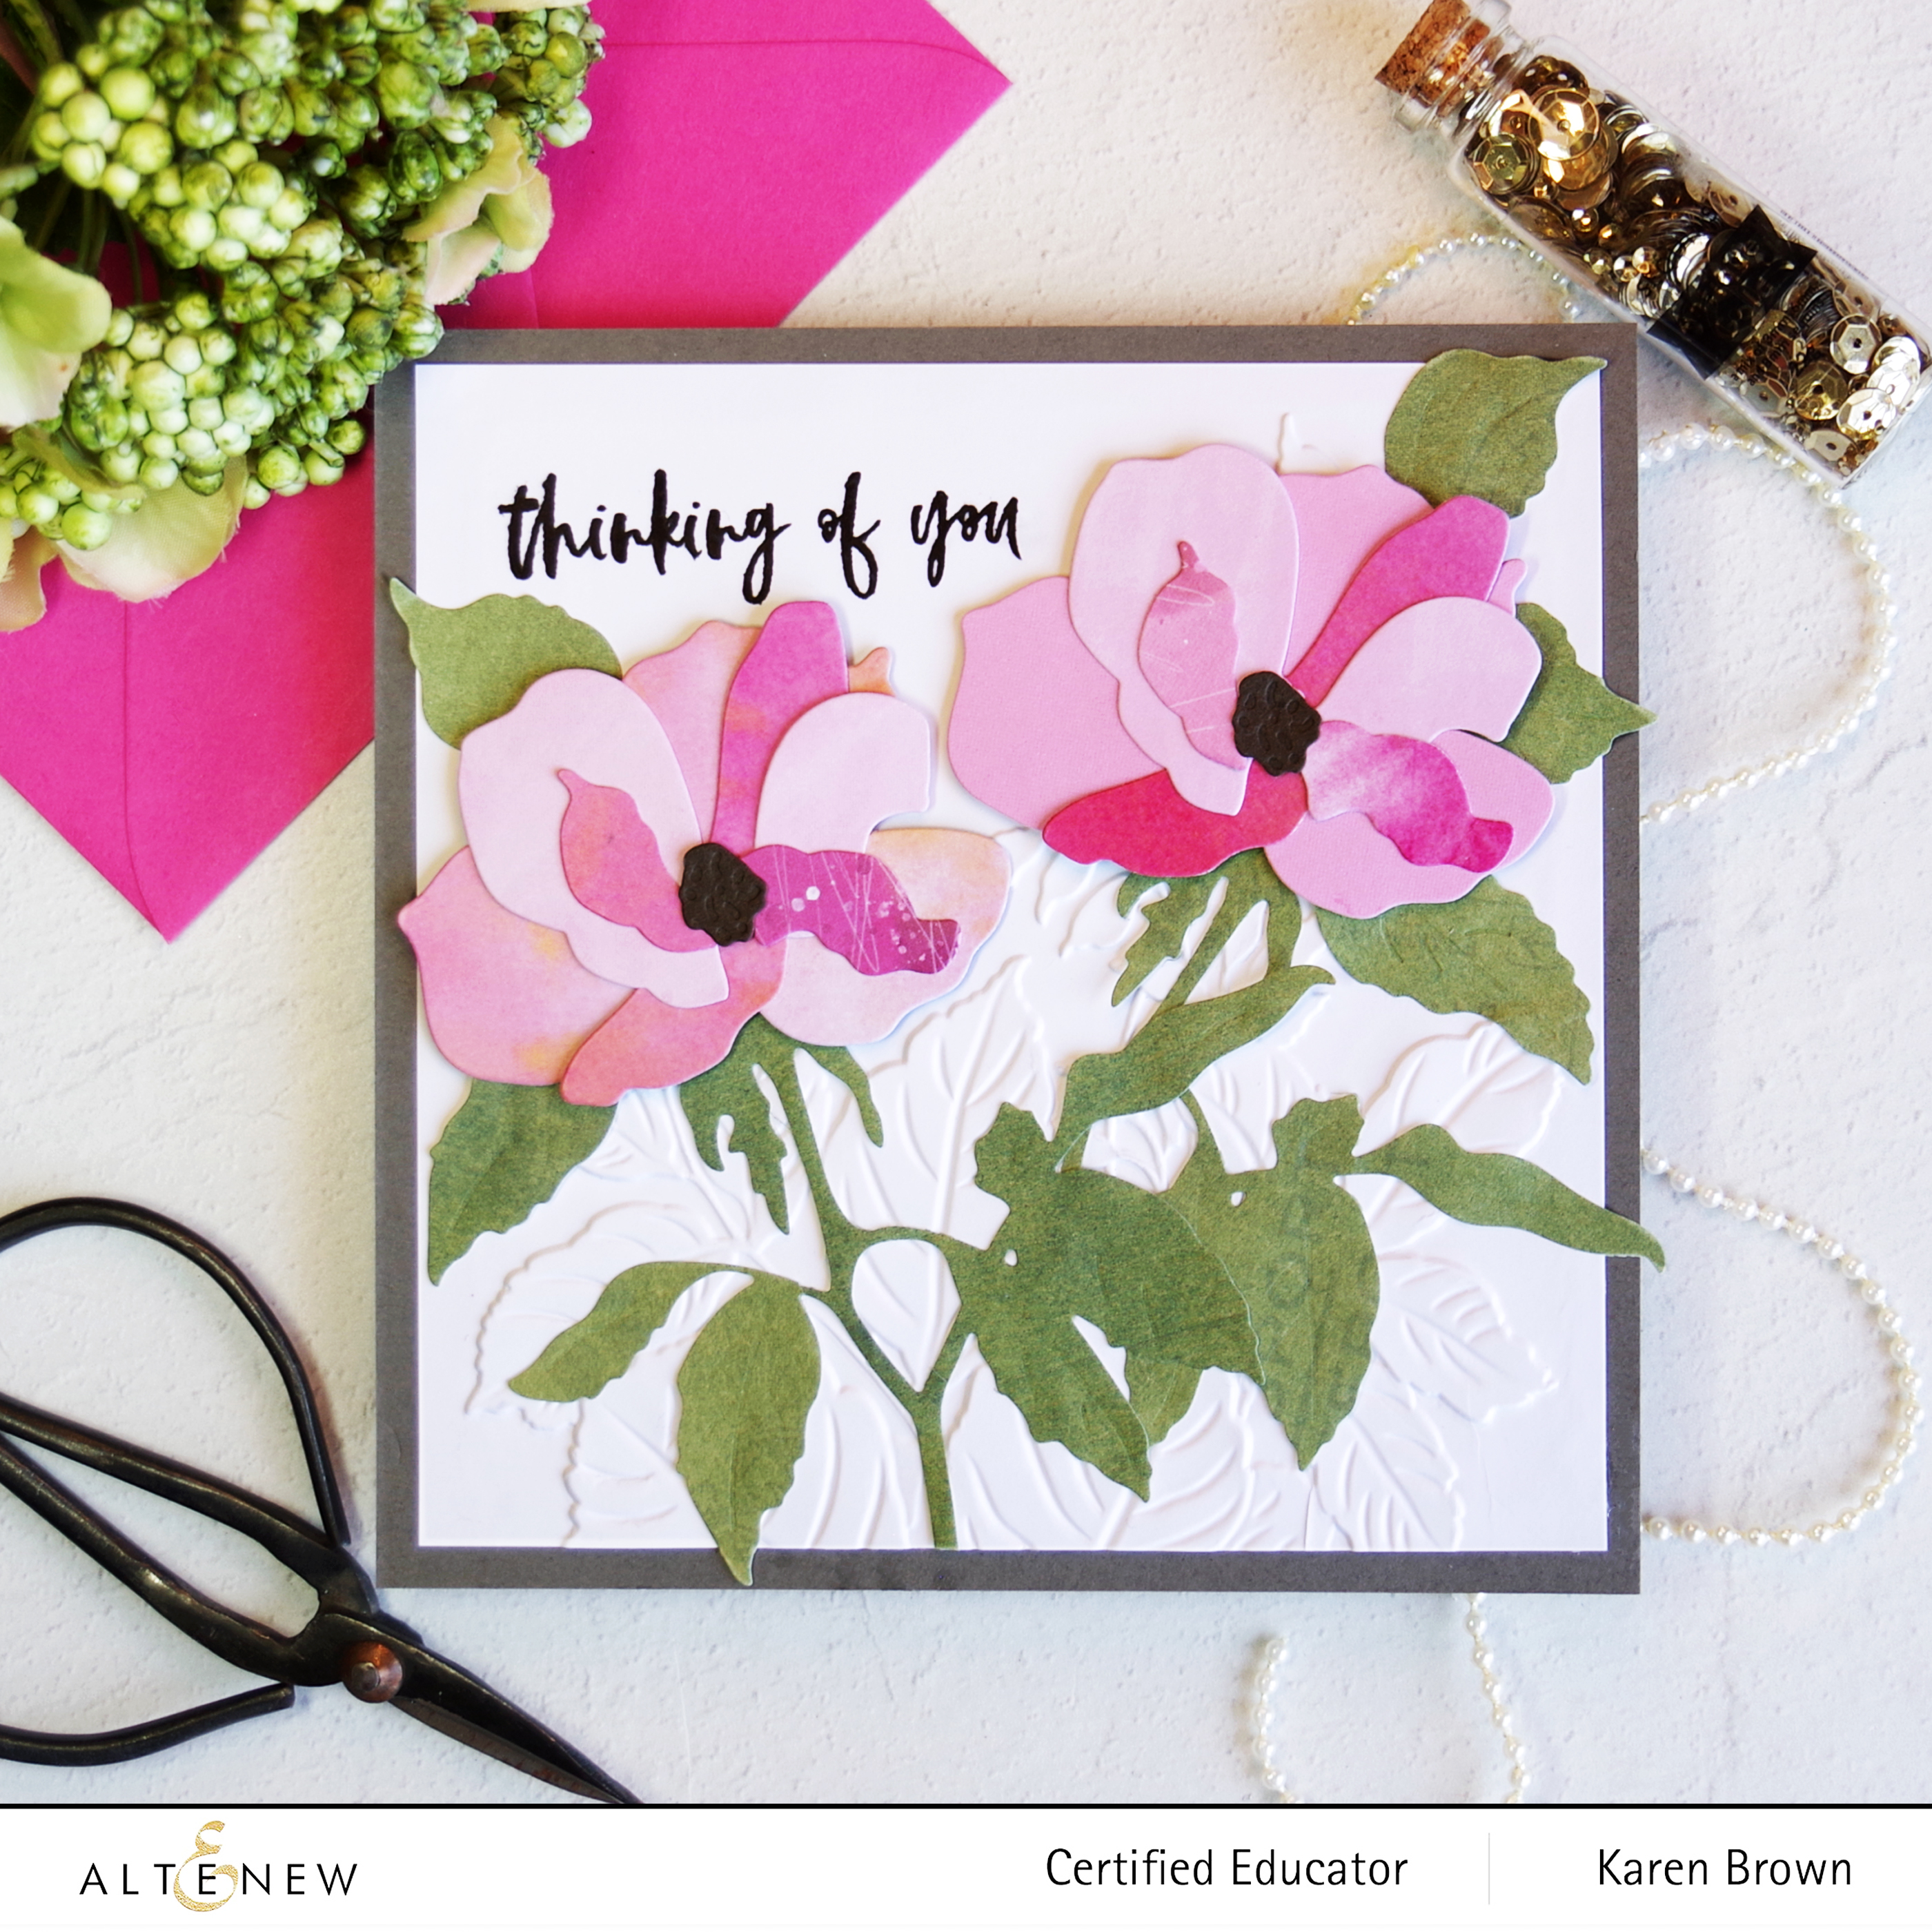
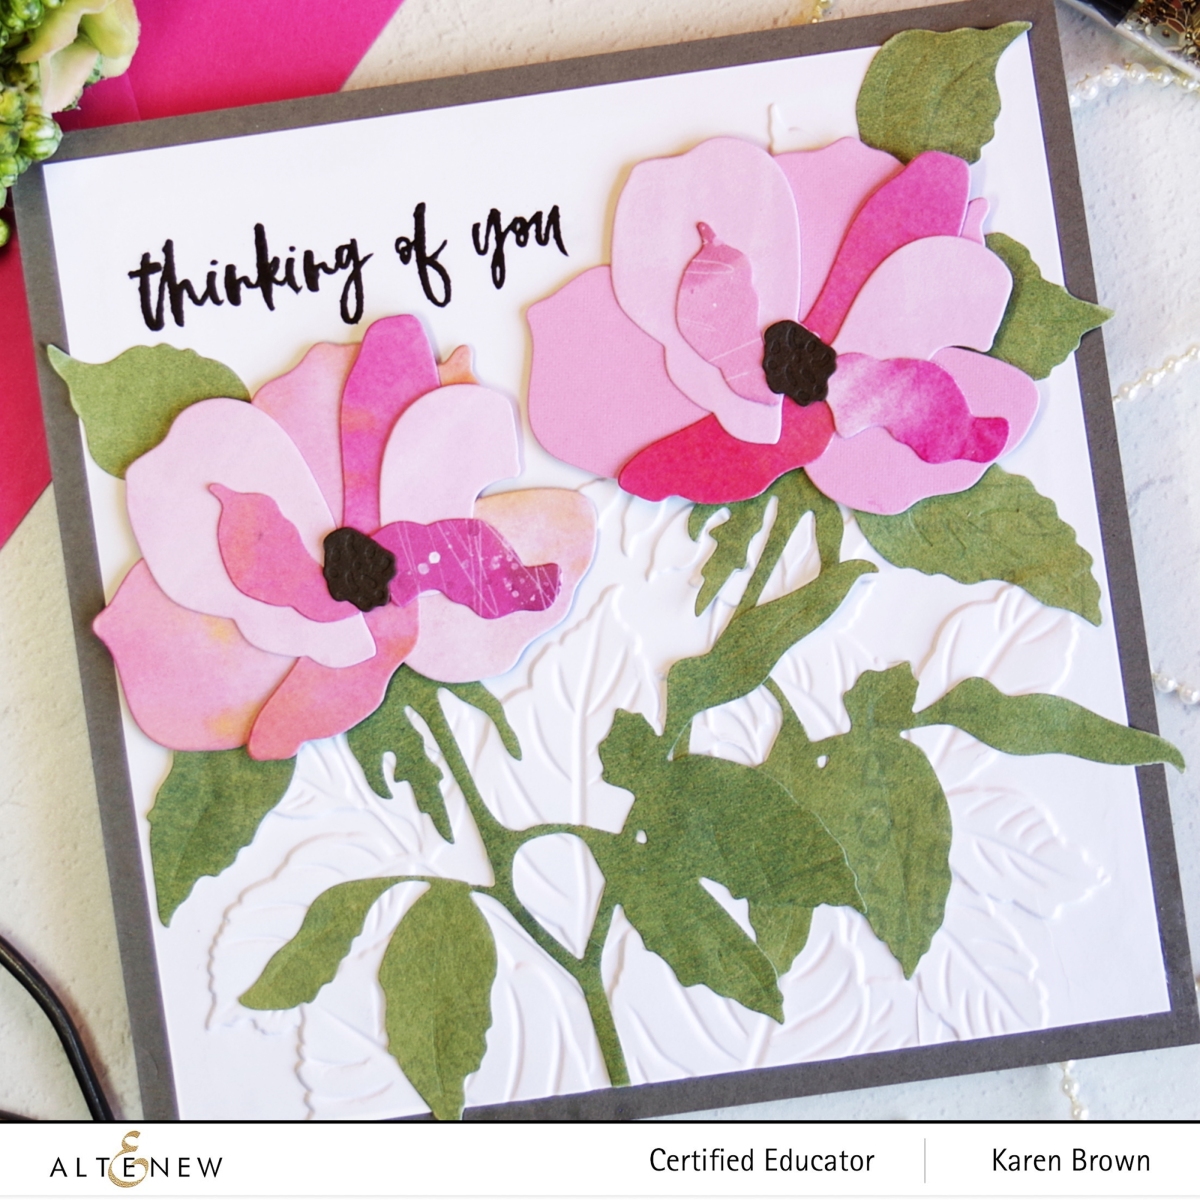
Altenew’s Craft-A-Flower kits are favorites that I use frequently. This month kit has roses, which are a classic. And, I LOVE the leaves in this month’s kit! I know I will be pulling the leaf dies out to use with future die kits.
I die cut my roses from pinks from two of Altenew’s designer paper packs and the background is from a just released 3D Embossing Folder. The “keyholes” make lining up the die-cut layers so easy!
$300 in total prizes! To celebrate this release, Altenew is giving away a $50 gift certificate to 2 lucky winners and a $25 gift certificate to 8 winners! Please leave a comment on the Altenew Card Blog and/or each designer’s blog post on the blog hop list below by 07/18/2022 for a chance to win.
Altenew will draw 10 random winners from the comments left on each stop of this blog hop and announce the winners on the Altenew Winners Page on 07/20/2022.