Cardmaking Kit · stitching

A Gift Inspired Delight | Spellbinders July 2024 Stitching Die of the Month Kit

Spellbinders July 2024 Stitching Card of the Month tutorial:  a beautiful blue die cut bow for Christmas or birthday cards.

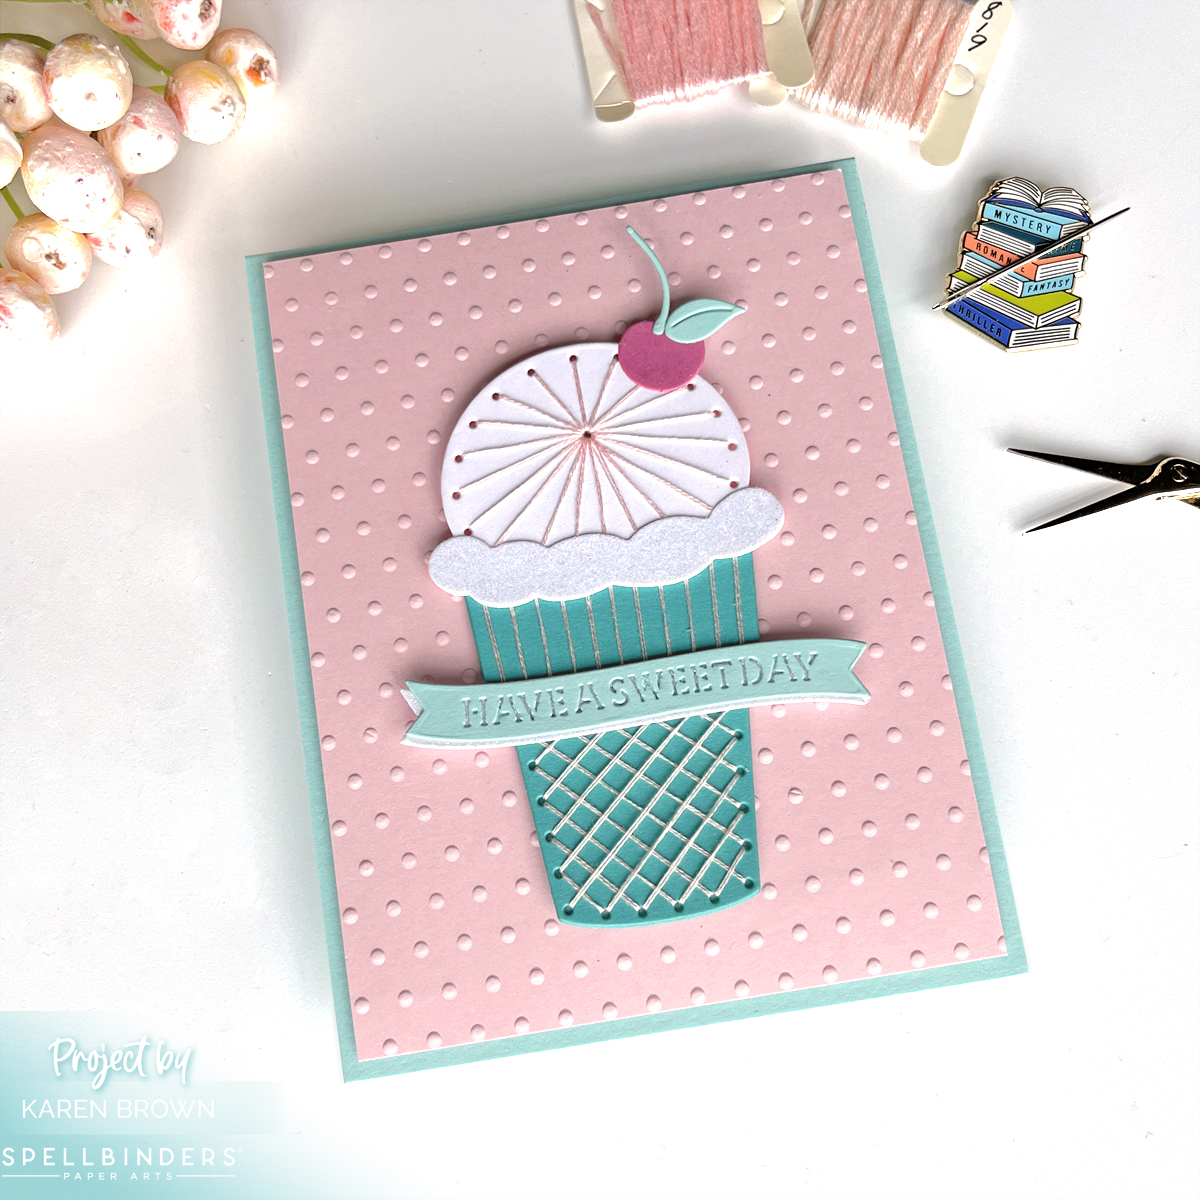
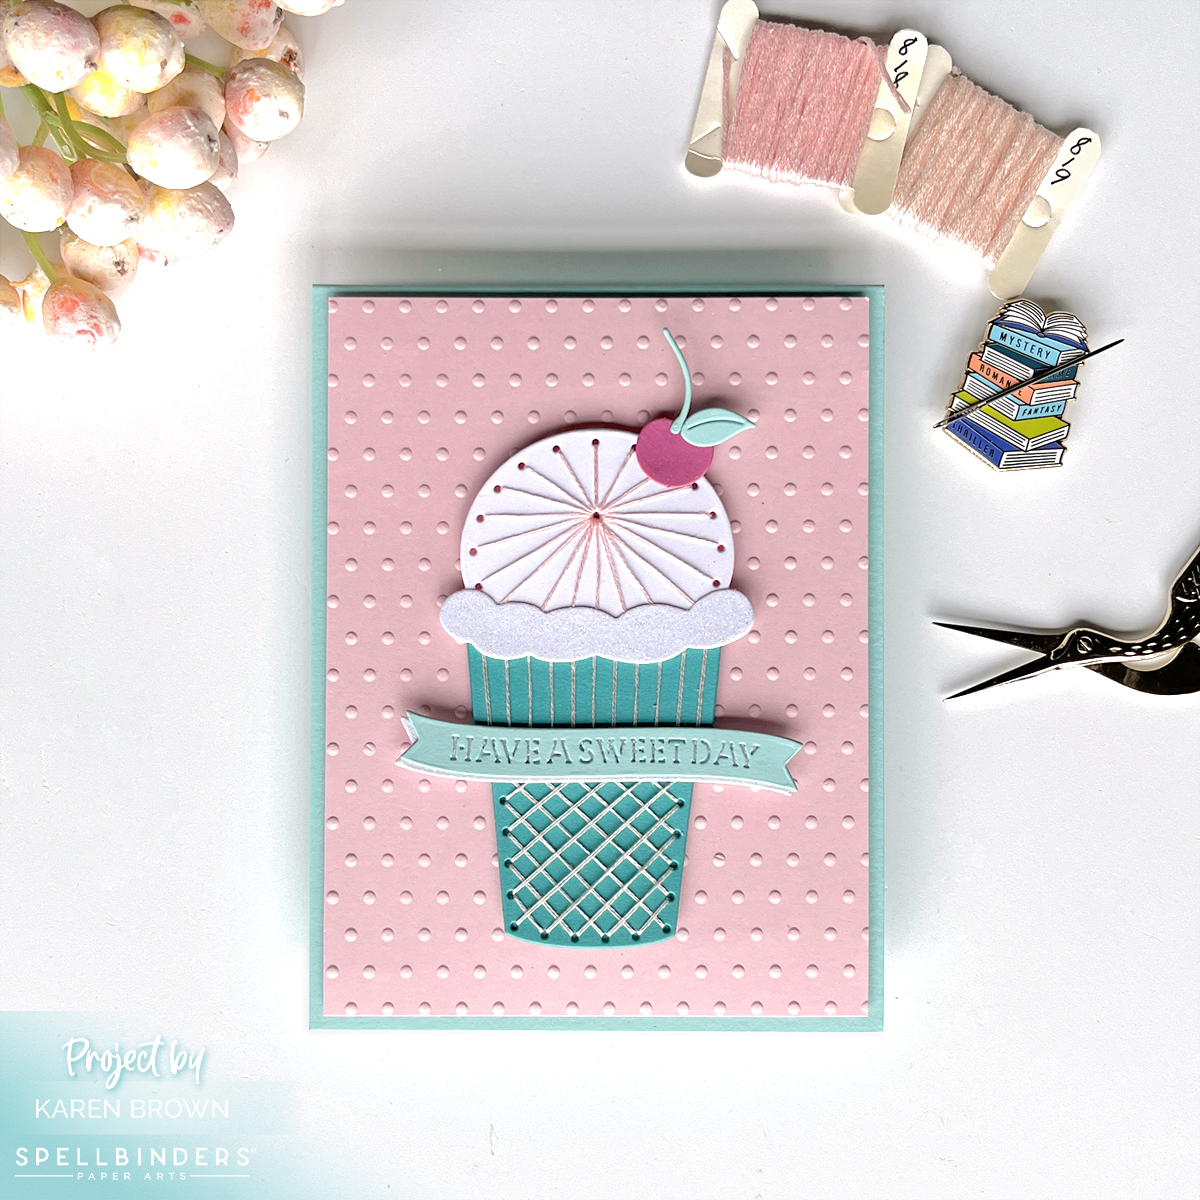
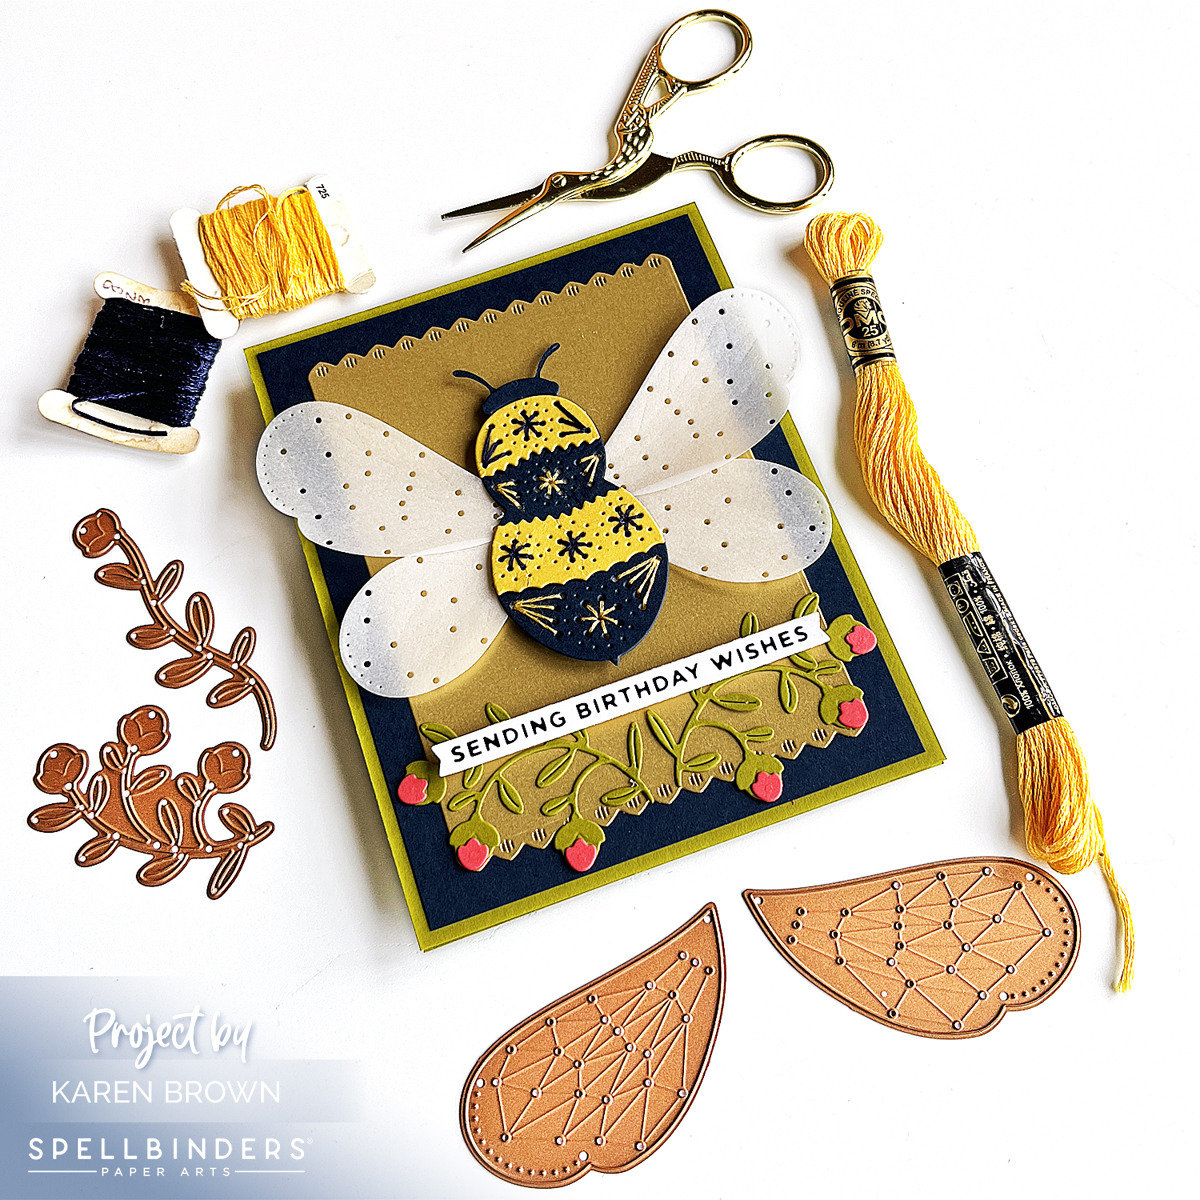
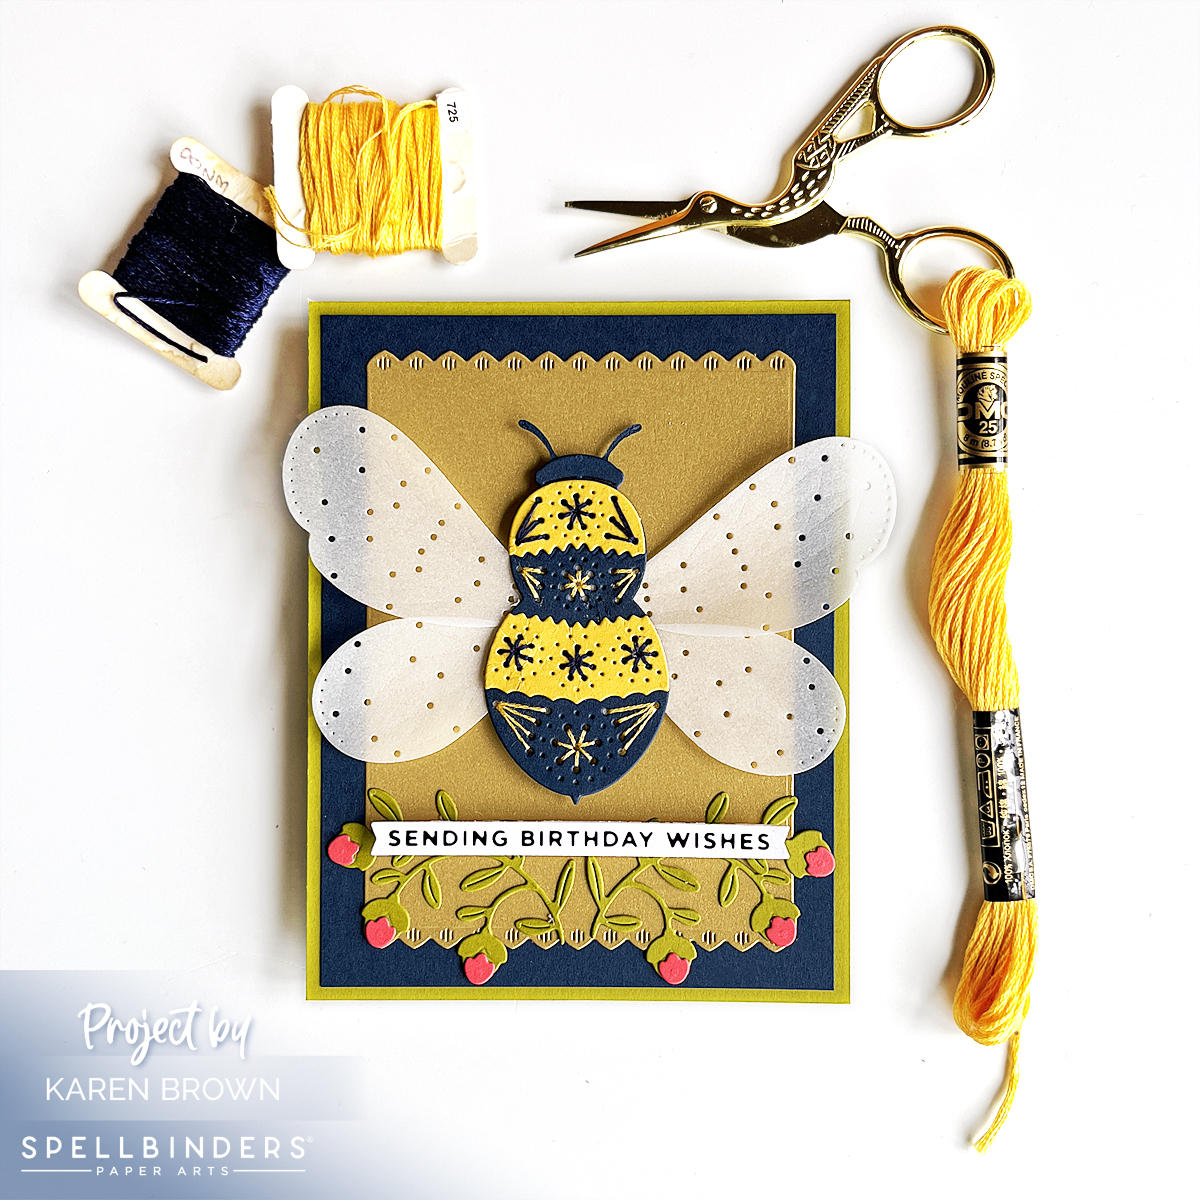
This month, Spellbinders Stitching Die of the Month Kit allows us to create a very eye-catching gift bow. The kit is perfect for creating Christmas cards and decor or you can also use it all-year-round for birthdays and other celebrations. I chose to make a birthday card as I have a lot of friends with summer birthdays.

I think bows are so eye-catching on cards and if you’d like to see another I card I created featuring a die cut bow, click HERE.

A handmade card with a beautiful stitched die cut blue gift bow for Birthday Cards and  Christmas Cards.

Stitching On-The-Go

Stitching kits are great when you want a crafting project “on-the-go”. I am on vacation in Colorado and I really loved stitching on the patio while I enjoyed the view of the mountains. I included a photo of my al fresco stitching below. I die cut my components before I left home and then packed my supplies in a zipper bag. My stitching went quickly and took about 30 minutes to complete.

Tips and Tricks for Stunning Stitched Cards:

  • I started by die cutting all my Stitching Kit pieces with my Platinum 6 die cutting machine. I used Arctic cardstock for my bow. I die cut the elements I was going to stitch 2 times and then glued them together for a substantial base.
  • Spellbinders has a nice selection of stitching accessories in their shop that you can find HERE. I used used a buttery yellow (DMC #745) today.
  • When I started stitching, I took two strands of floss, separated them one at a time, brought them together and then stroked and lengthened them until they seemed tame and ready to use.
  • I usually stitch with size 22 Tapestry needles.
  • I changed things up this month and used good ol’ Scotch tape to attach my floss to the die cut.
  • Remember to keep your floss taught as you stitch.
  • When I move from one area to the next, I run the floss through the just finished stitched area to keep the thread secure. This gives a nice look on the finished project.
  • Don’t stitch with threads that are too long or they are likely to knot. 
  • When I was done, I added a bit of Bearly Glue to the ends so that they would stay in place.
  • To make my bow a little more stable, I added one vertical and two horizontal braces (3/8″ wide) on the back of my bow.
  • To finish my project I found some old printed paper to act as my gift wrap which I glued to an A2 Top Fold Card Base.
  • I adhered my bow to the background with Bearly Glue and Foam Squares.
  • The sentiment is a Chipboard Sticker from the Serenade of Autumn set.

Helpful Links:

Spellbinders Club Info:

  • Clubs Preview on the 1st of each month.
  • Club members can cancel, upgrade or change clubs from the 1st-5th of each month. Popular Clubs frequently sell out during this period so club members get first dibs on everything.
  • NEW for 2024: Club Members get EARLY access to new releases on the 6th!
  • On the 6th, Clubs become available to non-members.
  • On the 27th, Club registration closes for the current month.
  • If a club did not sell out, you can buy under “Shop Past Clubs”. Past kits are available on the 10th of the FOLLOWING month.

Thanks for stopping by!

Karen

cardmaking · Cardmaking Kit · stitching

Spellbinders Card | June Stitching Club | 2024

Spellbinders "Stitched Ice Cream" Stitching Die of the Month Club Kit for June 2024.

This month, Spellbinders Stitching Die of the Month Kit allows us to indulge in sweet delights with a yummy hand-stitched Ice Cream Cone Card. Looking for a sprinkle of sweetness to brighten someone’s day? Look no further! This kit is a reminder to cherish the simple pleasures in life, to savor each moment, and to spread kindness wherever we go.

The “Wow Factor” of Hand-Stitched Cards

This weekend, I had the pleasure of crafting this luscious handmade card with hand-stitched details, and let me tell you, the experience was delightful. The card came together quickly, but it is definitely high impact to the recipient. I find I get the most ooohs and aaahs from stitched cards and the “Wow Factor” they bring is truly priceless.

Pink, aqua, white and turquoise die-cut and hand-stitched ice cream cone card.

Tips and Tricks for Stunning Stitched Cards:

  • The kit has 12 cutting dies and I started by cutting all my pieces with my Platinum 6 die cutting machine. I used Teal Topaz and Waterfall cardstocks. I die cut the elements I was going to stitch 2 times and then glued them together for a substantial base. I used White Glitter cardstock for the accent on the ice cream.
  • Spellbinders has a nice selection of stitching accessories in their shop that you can find HERE. I used used two shades of pink: #818 Baby Pink (ice cream) and #819 Baby Pink Light (cone).
  • When I started stitching, I took two strands of floss, separated them one at a time, brought them together and then stroked and lengthened them until they seemed tame and ready to use.
  • I usually stitch with size 22 Tapestry needles.
  • I like to use 1/8th inch double sided liner tape to attach my floss to the die cut.
  • Remember to keep your floss taught as you stitch.
  • When I move from one area to the next, I run the floss through the just finished stitched area to keep the thread secure. This gives a nice look on the finished project.
  • Don’t stitch with threads that are too long or they are likely to knot. 
  • When I was done, I added a bit of Bearly Glue to the ends so that they would stay in place.
  • To finish my project I embossed Pink Sand cardstock with the Tiny Dots embossing folder.
  • The die cut sentiment is included in the kit.

Helpful Links:

Spellbinders Club Info:

  • Clubs Preview on the 1st of each month.
  • Club members can cancel, upgrade or change clubs from the 1st-5th of each month. Popular Clubs frequently sell out during this period so club members get first dibs on everything.
  • NEW for 2024: Club Members get EARLY access to new releases on the 6th!
  • On the 6th, Clubs become available to non-members.
  • On the 27th, Club registration closes for the current month.
  • If a club did not sell out, you can buy under “Shop Past Clubs”. Past kits are available on the 10th of the FOLLOWING month.

Thanks for stopping by!

Karen

Cardmaking Kit · stitching

Spellbinders | Stitching Die of the Month | May 2024

Hand stitched Pineapple card with an embossed background and accent opal gems.

Aloha! Delight in the sweet essence of tropical charm with my latest crafting adventure using this month’s Spellbinders Stitching kit! I am diving into the art of hand-stitching to create a whimsical pineapple card that’s as vibrant as it is heartfelt. So, grab your needle, thread, and a sprinkle of creativity as we embark on this delightful journey together!

The Deluxe Caboodle

I also wanted to mention what a wonderful deal the Deluxe Caboodle Kit is. You save 60% off all TEN kits for the month + you get a bonus gift. So, if you are thinking about multiple kits, consider the Caboodle. The current cost is $120 but the kit value is $315, which is 60% off!

Stitched Pineapple Handmade Card

Die cut and hand stitched pineapple card in yellows, golds, and greens.

My Cardmaking Process:

  • The kit has 6 cutting dies and I started by cutting all my pieces with my Platinum 6 die cutting machine. I used the Happy Day Assorted Cardstock Pack + a sheet of Pesto for a 4th shade of green.
  • Spellbinders has a nice selection of stitching accessories in their shop that you can find HERE. I used a bronzy gold thread for my pineapple.
  • When I started stitching, I took two strands of floss, separated them one at a time, brought them together and then stroked and lengthened them until they seemed tame and ready to use.
  • I usually stitch with size 22 Tapestry needles.
  • I like to use 1/8th inch double sided liner tape to attach my floss to the die cut.
  • Remember to keep your floss taught as you stitch.
  • When I move from one area to the next, I run the floss through the just finished stitched area to keep the thread secure. This gives a nice look on the finished project.
  • Don’t stitch with threads that are too long or they are likely to knot. 
  • When I was done, I added a bit of Bearly Glue to the ends so that they would stay in place.
  • To finish my project I embossed white cardstock with the my longtime favorite embossing folder: Intertwined Lattice.
  • I hot foiled my sentiment with Yana’s Special Glimmer Sentiments and my Glimmer Hot Foil System.
  • I added 6 Opal Gems around the pineapple with my Ninja Pickup Tool.

Helpful Links:

Spellbinders Club Info:

  • Clubs Preview on the 1st of each month.
  • Club members can cancel, upgrade or change clubs from the 1st-5th of each month. Popular Clubs frequently sell out during this period so club members get first dibs on everything.
  • NEW for 2024: Club Members get EARLY access to new releases on the 6th!
  • On the 6th, Clubs become available to non-members.
  • On the 27th, Club registration closes for the current month.
  • If a club did not sell out, you can buy under “Shop Past Clubs”. Past kits are available on the 10th of the FOLLOWING month.

Thanks for stopping by!

Karen

Cardmaking Kit · Die cutting · papercrafting

Spellbinders Card | Stitching Die of the Month | January 2024

Spellbinders January 2024 Stitching Die of the Month - Bee Stitched - Tutorial

Bee Stitched

I am so excited about the 2024 Spellbinders Clubs! Today I am sharing a fun Bumble Bee themed card using the January Stitching Die Club Kit and it is perfect for Spring, Birthdays, Get Well and Hello cards…I think it is so fresh and fun! This Club Kit is now available for individual purchase HERE.

I created this card over the holidays and it was ideal to work on while I sat around the fire and visited with family. 

Stitched Die Cut Card Tutorial

Stitching Tutorial:

  • The kit has 13 dies and I started by die cutting all my pieces. I wanted translucent wings, so I used nice thick Vellum Layering Paper. For the body I used Gold and Navy Cardstock. The floral pieces are from Pesto and Coral cardstock and the background panel uses Brushed Gold plus a die from the December 2022 Small Die of the Month Kit.
  • Spellbinders has a nice selection of stitching accessories in their shop that you can find HERE.
  • When I started stitching, I took two strands of Gold Floss (DMC 725), separated them one at a time, brought them together and then stroked and lengthened them until they seemed tame and ready to use.
  • I like to use 1/8th inch double sided liner tape to attach my floss to the die cut.
  • Remember to keep your floss taught as you stitch.
  • When I move from one area to the next, I run the floss through the just finished stitched area to keep the thread secure. This gives a nice look on the finished project.
  • Don’t stitch with threads that are too long or they are likely to knot. This is a lesson I relearned on this card.
  • When I was done, I added a bit of Bearly Glue to the ends so that they will stay in place. You can also add a backing by die cutting another Bee body. Your backing can be a different color to add more interest. 
How to make a Stitched Die Cut Greeting Card.

A Few Notes About Spellbinders Club Kits

  • Clubs Preview on the 1st of each month.
  • Club members can cancel, upgrade or change clubs from the 1st-5th of each month. Popular Clubs frequently sell out during this period so club members get first dibs on everything.
  • NEW for 2024: Club Members get EARLY access to new releases on the 6th!
  • On the 6th, Clubs become available to non-members.
  • On the 27th, Club registration closes for the current month.
  • If a club did not sell out, you can buy under “Shop Past Clubs”. Past kits are available on the 10th of the FOLLOWING month.

Helpful Links:

Thanks for stopping by!

cardmaking · papercrafting

Spellbinders | December 2022 Club Kits

Die Cut Rainbow Heart Valentine Card using Spellbinders December 2022 Large Die of the Month Club Kit.

Rainbow Heart Die-Cut Valentine

Who is ready for Valentine’s Day? The Spellbinders December Club Kits are live and there are so many fresh ideas for Valentines Day and beyond. I am excited to show you the cards I made. I started with the Large Die of the Month called “Blooming Heart”.

I made this colorful card for my husband and I am so pleased with it! I started by cutting 20 1/4″ strips from leftover card stock scraps. The only color I repeated is the green that shows on both edges. Using a dot-liner glue runner, I added adhessive to cardstock and then I adhered each strip. This goes much more quickly than you think. Next, I die cut the heart from a 5 1/2″ x 5 1/2″ panel. Using foam tape, I attached the heart to the background panel. For me, the most difficult part was selecting a sentiment. I tried a bunch but eventually decided on this simple hot foiled sentiment from Spellbinders Mini Everday Sentiments set: GLP-260. It expresses my feelings without drawing the eye away from the rainbow heart.

Using 1/4" strips of paper to make a rainbow colored die cut heart valentine card,

December 2022 Large Die of the Month: “Blooming Heart”.

Spellbinders December 2022 Large Die of the Month Kit:  Blooming Heart.

The December Large Die of Month kit (Blooming Heart) is stunning and oh so fun! I die cut all my pieces using an additional metal shim for precise cutting. I then assembled the heart with liquid glue. Using foam tape, I attached the heart to a mushroom colored background and then adhered it to an A2 card base. The sentiment is again hot foiled using Spellbinders Mini Everday Sentiments set: GLP-260.

Die Cut Floral Heart Valentine card.

Embossing Folder of the Month: Heart Blooms

Spellbinders December 2022 Embossing Folder of the Month:  Heart Blooms Valentine Card.

Don’t you just love the texture on this gorgeous embossing folder? It is called Heart Blooms and I wanted it to be the star of this card. I embossed a panel of mushroom colored cardstock. I then added a hot foiled sentiment to a 2″ strip of cardstock and then embellished with die-cut flowers from this month’s Large Die of the Month and greenery from a previous release.

Supplies Used:

Handmade valentine using Spellbinders December 2022 Club Kits.

Small Die of the Month: Stitched Heart Card Front

Spellbinders December 2022 Small Die of the Month:  Stitched Heart Card Front "stitched valentine".

This stitched valentine kit is so pretty….the card just glows in person! I started by die cutting the diamond backdrop in salmon and brushed gold cardstock and then I stacked them. You don’t really notice the bottom layer but it adds nice dimension. I glued the two delicate pieces together with E6000 spray glue, which is perfect for this type of die cut.

The background is lovely but simple and I know I’ll be using it a lot on future cards. I cut one white panel and two from brushed gold. I assembled by scooting one of the gold panels slightly above the white and one slightly below so there is a pretty band of gold at the top and bottom. The sentiment is included in the kit.

I die cut the heart from white cardstock and then did my stitching in front of a fire in our hearth. I used DMC gold floss. I added some white enamel dots for embellishment and attached to an A2 Top Fold Card Base. I made this card for my mom.

Products Used:

"Stitched" Valentine in gold thread using Spellbinders December 2022 Small Die of the Month:  Stitched Heart Card Front

Thanks for stopping by!

Karen

cardmaking · papercrafting

Spellbinders Stitchmas Christmas

Spellbinders "Stitchmas Christmas" Stitched Ornament card.

Spellbinders Stitched Ornament Die (S4-1231)

Welcome back friends! I am excited to share a gorgeous stitched ornament die that Spellbinders just released as part of their Stitchmas Christmas line. I made an elegant Christmas Ornament Card in gold and spruce green. The stitching was easy and I spent a relaxing hour or so adding the gold thread details.

Elegant die cut and stitched Christmas Card in Green and Gold.

I started by cutting the ornament from Blue Spruce cardstock. Then I cut the ornament background, greenery and accents from Brush Gold Cardstock. Using Gold Floss, I stitched the embroidered details and then assembled my ornament. The background is a mat of Brush Gold Cardstock and a designer paper from the Cheerful Occasions pad. I love the variety and beauty of this pack!

Hand stitched Christmas Card:  Spellbinders Stitched Ornament S4-1231

You can shop Spellbinders beautiful collection of “Stitched” products HERE. I also created a Christmas scene card with a die cut mailbox that you can see HERE.

Thanks for stopping by today!

Karen

cardmaking · papercrafting

Happy Birthday Spellbinders!

Spellbinders Stitched Fringe Cake (S3-452) + Cheerful Occasions Paper Pad (SCS-191) handmade card

Happy 20th Birthday Spellbinders! I just love Spellbinders wonderful papercrafting products so I wanted to create a few projects using their new Birthday Collection to help them celebrate.

Spellbinders Stitched Fringe Cake

I started with the Stitched Fringe Cake die set, which I think makes such a festive confection! For both backgrounds, I used Spellbinders new 6×6″ paper pad (Cheerful Occcasions Paper Pad), which is full of beautiful designs! I added a bit of gold stitching to the cake to finish off the look.

Products Used:

Spellbinders Balloon Party Animal

Spellbinders Balloon Party Animal (S3-450) + Cheerful Occasions Paper Pad (SCS-191) handmade card

For my second card, I used light ink blending on my white die cuts to simulate the look of balloons. I think the balloon animal would also be adorable for a baby shower.

  • Balloon Party Animal Die Kit
  • Cheerful Occasions Paper Pad (I used 3 pages for the background)
  • Ornamental Labels for the white die cut (retired)
  • Sugar Coated Sentiments (retired)
  • Tumbled Glass Distress Ink (for ink blending the balloon animal)
  • Blue Glaze Gel Pen for the accents

Well that’s it for today…thanks for stopping by!

Karen