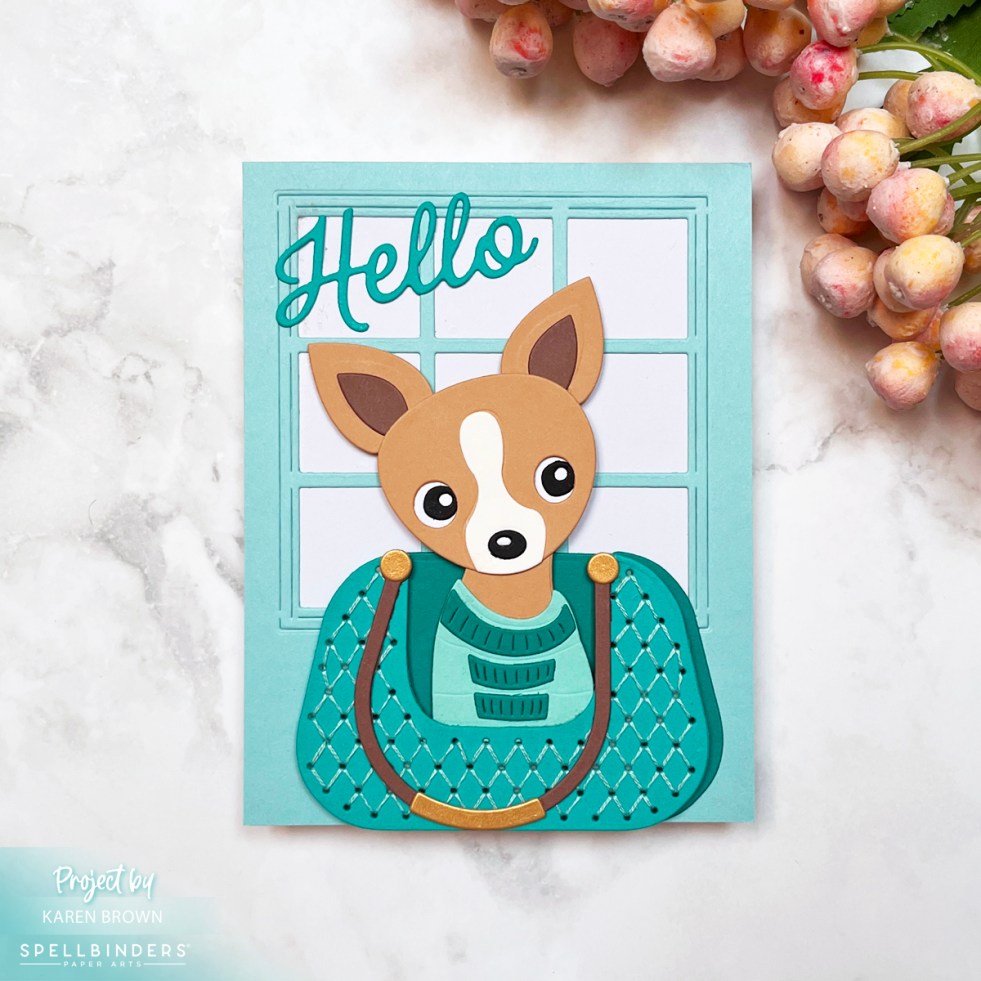
The November 2025 Spellbinders Stitching Die of the Month is pure charm — a sweet Chihuahua in a stitched handbag! I stitched my purse with aqua floss and paired it with soothing neutral browns from the ColorWheel cardstock pack. A “Hello” sentiment and a windowpane background complete the look. Dog lovers, you’ll adore this one!
Tag: papercrafting
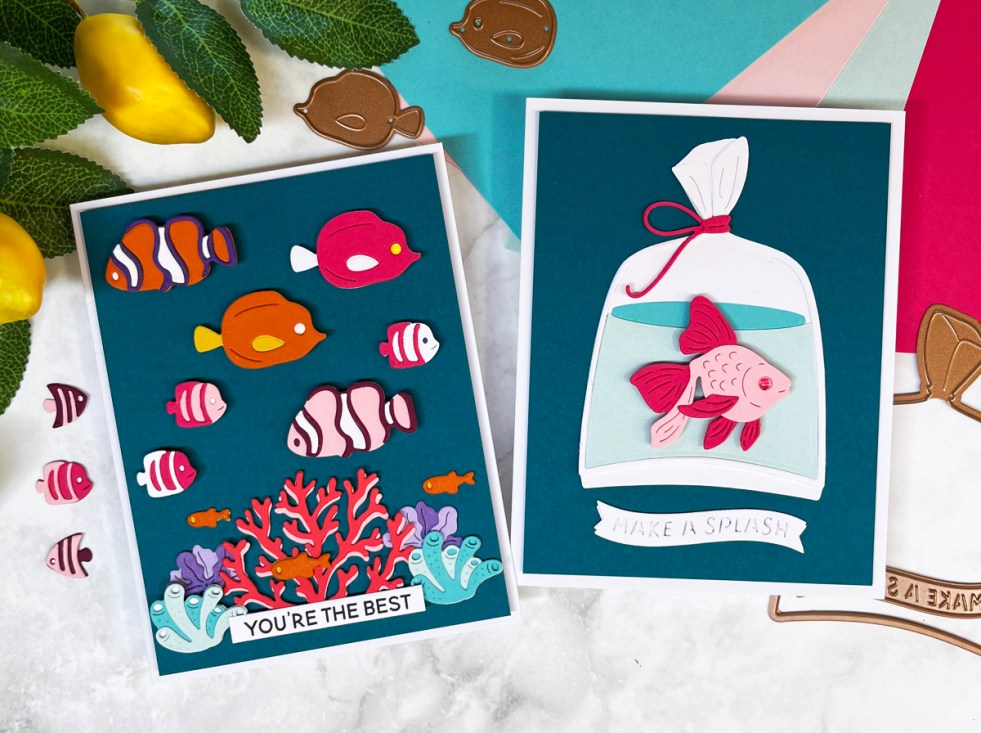
Spellbinders August 2025 Club Kits: Under the Sea Magic!
This month’s August 2025 Spellbinders Club Kits are a summer splash of color and creativity! I created three fun nautical cards featuring fish, sailboats, stitching, and more. Come see the underwater adventure and grab my tips for working with small dies and stitching too!
Spellbinders | June 2025 Club Kit Cards
The Spellbinders June 2025 Club Kits are here—and they are pure nautical magic! From a dapper walrus in a raincoat to rainbow-colored seaside houses and stitched captain’s wheels, I created four fun cards that show just how charming and versatile this month's kits can be. It's the perfect time to subscribe!
Hero Arts June Club Kits – Coastal Vibes, Picnics & Petals!
The June 2025 Hero Arts Club Kits bring major Coastal Vibes, and I couldn’t resist turning the Beach Bag die into a dreamy die cut picnic basket, complete with wine, wisteria, and baguettes! Plus, don’t miss my hydrangea stenciled card in blues and purples—perfect for all occasions!
Exploring Spellbinders’ 48 Colors – A Swatching Adventure!
Swatching Spellbinders’ 48 colors of cardstock turned out to be both a creative and relaxing process! Using the Color Swatch Petal Dies and color stamps, I organized my swatches in rainbow order and discovered both old favorites and exciting new shades. I documented the entire process—die-cutting, stamping, and assembling my swatches on a ring—and even created a reel to show how it all came together.
Ranch-Themed BetterPress Art Projects: Meet Clover and Cotton Ball
Bring a touch of farm ranch charm into your home with these BetterPress animal theme art projects featuring Clover the cow and Cotton Ball the lamb. These letterpressed, watercolored, and beautifully framed prints are rustic art pieces you’ll love. Discover the process and get inspired to create your own!
Spellbinders | Club Kit Cards | February 2025
Craft with charm and creativity using the Spellbinders February 2025 Club Kits! This month, I’ve created two whimsical scene cards—one featuring an adorable stitched bunny in a green dress, framed with delicate stitching, and another showcasing a pair of stylish die-cut shoes filled with fresh spring flowers. Both designs are packed with intricate die-cut details and soft, spring-inspired colors. Kits used: Large Die of the Month, Small Die of the Month and Stitching DOM.
Rainbows & Glitter: Tips on Making Your Own Glitter Cardstock
Add a touch of magic to your handmade cards with this floral rainbow design! Featuring vibrant stamped and die-cut elements, a dreamy glitter cardstock background, and a bold heat-embossed sentiment, this card is a colorful burst of creativity. Discover tips for making your own custom glitter cardstock and creating layered textures that truly shine. Perfect for birthdays, thank-you notes, or just a cheerful hello, this card is sure to brighten anyone's day. 🌈✨
Help Me Craft an Amazing 2025—Your Ideas Wanted!
Call to subscribers asking what papercrafting content they would like to see in 2025.
Frameable Art | Spellbinders September 2024 Stitching Club
How to create a beautiful die cut and handstitched sunflower art piece using Spellbinders September 2024 Stitching Club Kit of the Month. The project is finished off in a 4" x 6" wood frame for a bedside table.
