BetterPress · cardmaking · Die cutting

Handmade Winnie the Pooh Cards with Spellbinders Classic Pooh Baby Collection

3 Winnie the Pooh theme handmade cards for baby showers and birthdays.

There’s just something timeless about Winnie the Pooh. The gentle illustrations, the sweet stories, and the nostalgia make Pooh-themed projects extra special—and the newly released Spellbinders Classic Pooh Baby Collection captures that magic beautifully.

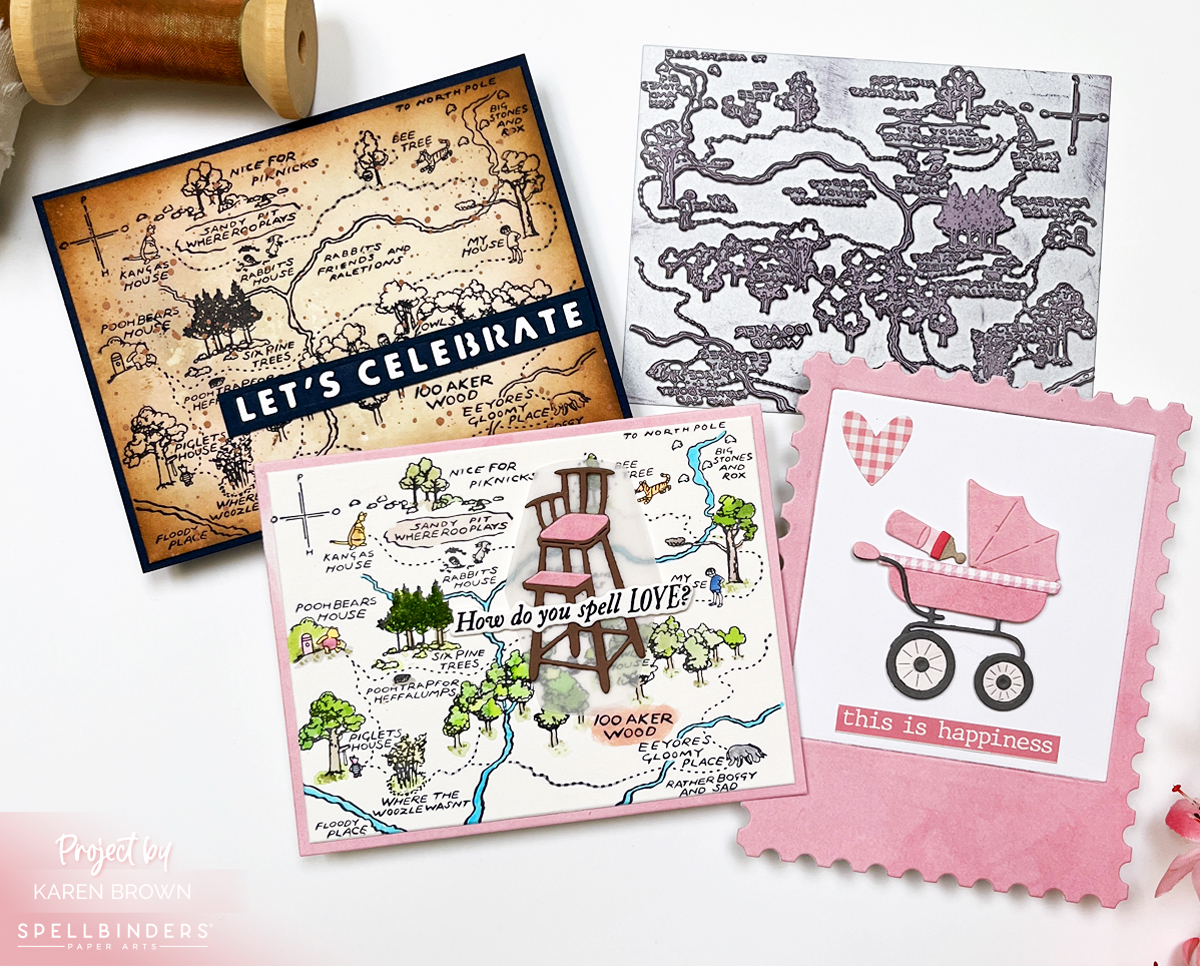
For today’s post, I created three handmade cards using this collection. Two are perfect for spring baby girl showers, and the third is a rustic birthday card with a mixed media twist. Even though the themes are different—Baby, Maps, and Pooh—they all celebrate the charm of the Hundred Acre Wood.

Card One: A Sweet Baby Shower Card from the Hundred Acre Wood

Handmade baby shower card featuring the Hundred Acre Wood BetterPress map from the Classic Pooh Birthday Collection, softly watercolored and accented with a die-cut high chair and pink  card base.

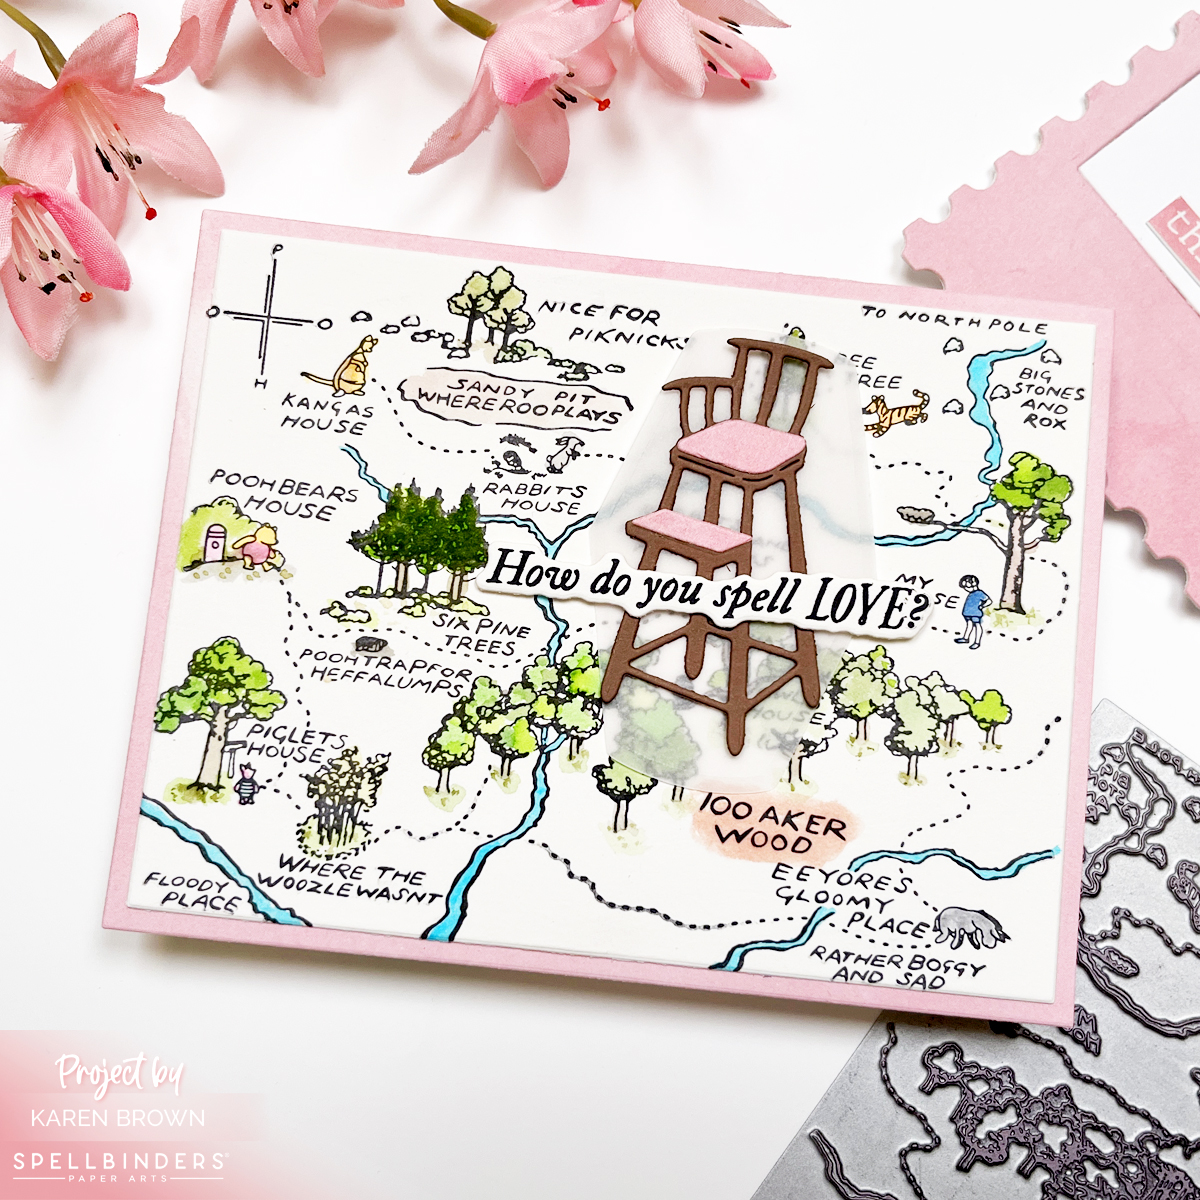
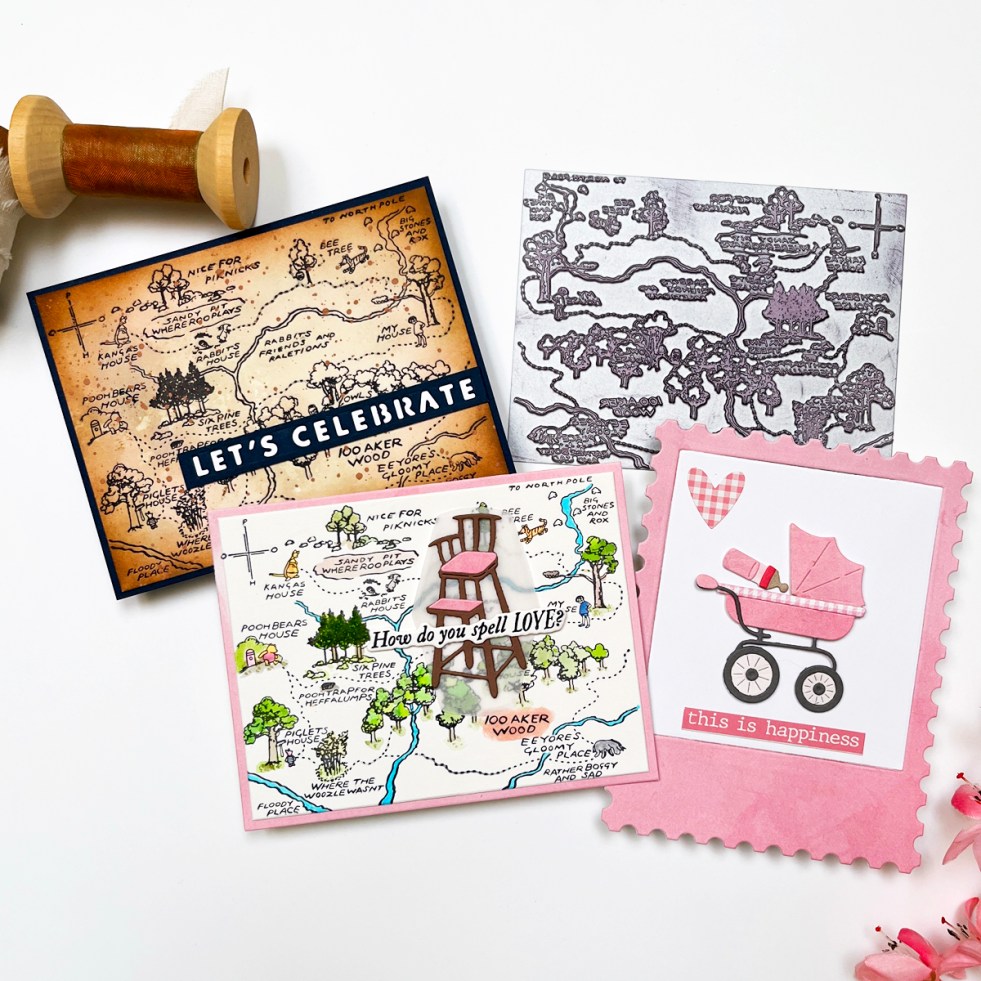
This first card absolutely stole my heart. I started with the Hundred Acre Wood BetterPress Plate, which features a detailed map of Pooh Corner—home to Pooh, Piglet, Tigger, Kanga, and friends.

I pressed the plate using my BetterPress LetterPress System and black ink onto a Bisque BetterPress A2 panel, then added soft color using Zig Watercolor Markers and a damp brush. This simple watercolor technique adds just enough storybook charm without overwhelming the delicate map details.

To give the card a baby theme, I added a die-cut high chair from the Baby Accessories Die Kit, layering it on a soft vellum die cut. The sentiment, “How do you spell LOVE?”, comes from the new Sweet Sentiments BetterPress Sentiment Set and feels just right for a baby shower.

I finished the card by mounting everything onto a pink watercolor card base, creating a soft, dreamy look that’s perfect for welcoming a baby girl.

Side-by-side photo of two handmade baby shower cards using the Classic Pooh Birthday Collection Baby Accessories dies, one featuring a BetterPress map and high chair, the other a pink stroller design.

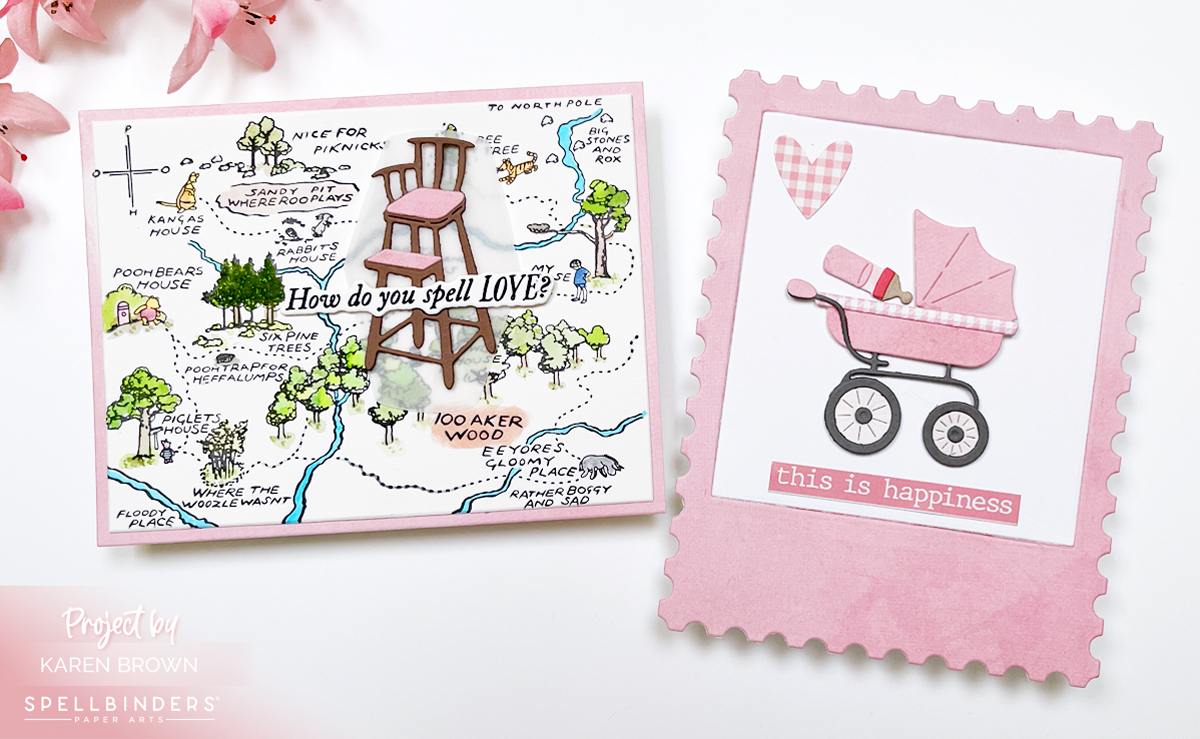
Card Two: A Traditional Pooh Baby Shower Card with a Stroller

Pink baby shower card with a die-cut stroller, postage-style background created with the Spellbinders January 2026 Large Die of the Month, and vintage-inspired embellishments.

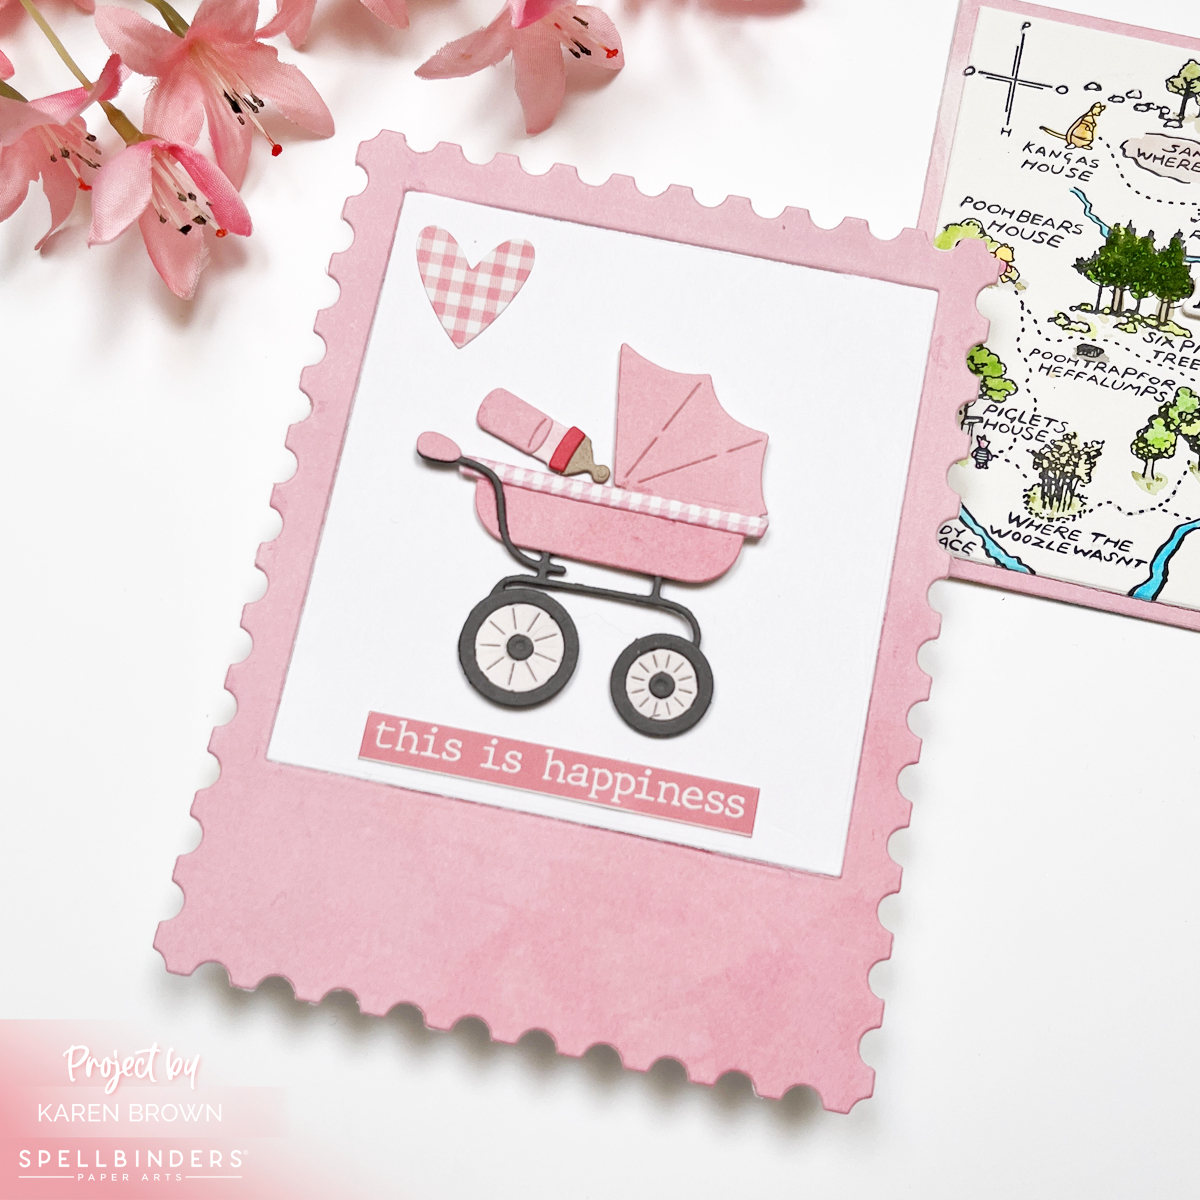
For my second baby card, I leaned into a more classic baby shower style, again using the Classic Pooh Baby Accessories Die Kit This one features a pink die-cut stroller (pram) accented with sweet sticker embellishments from Simple Stories Vintage Flower Shoppe.

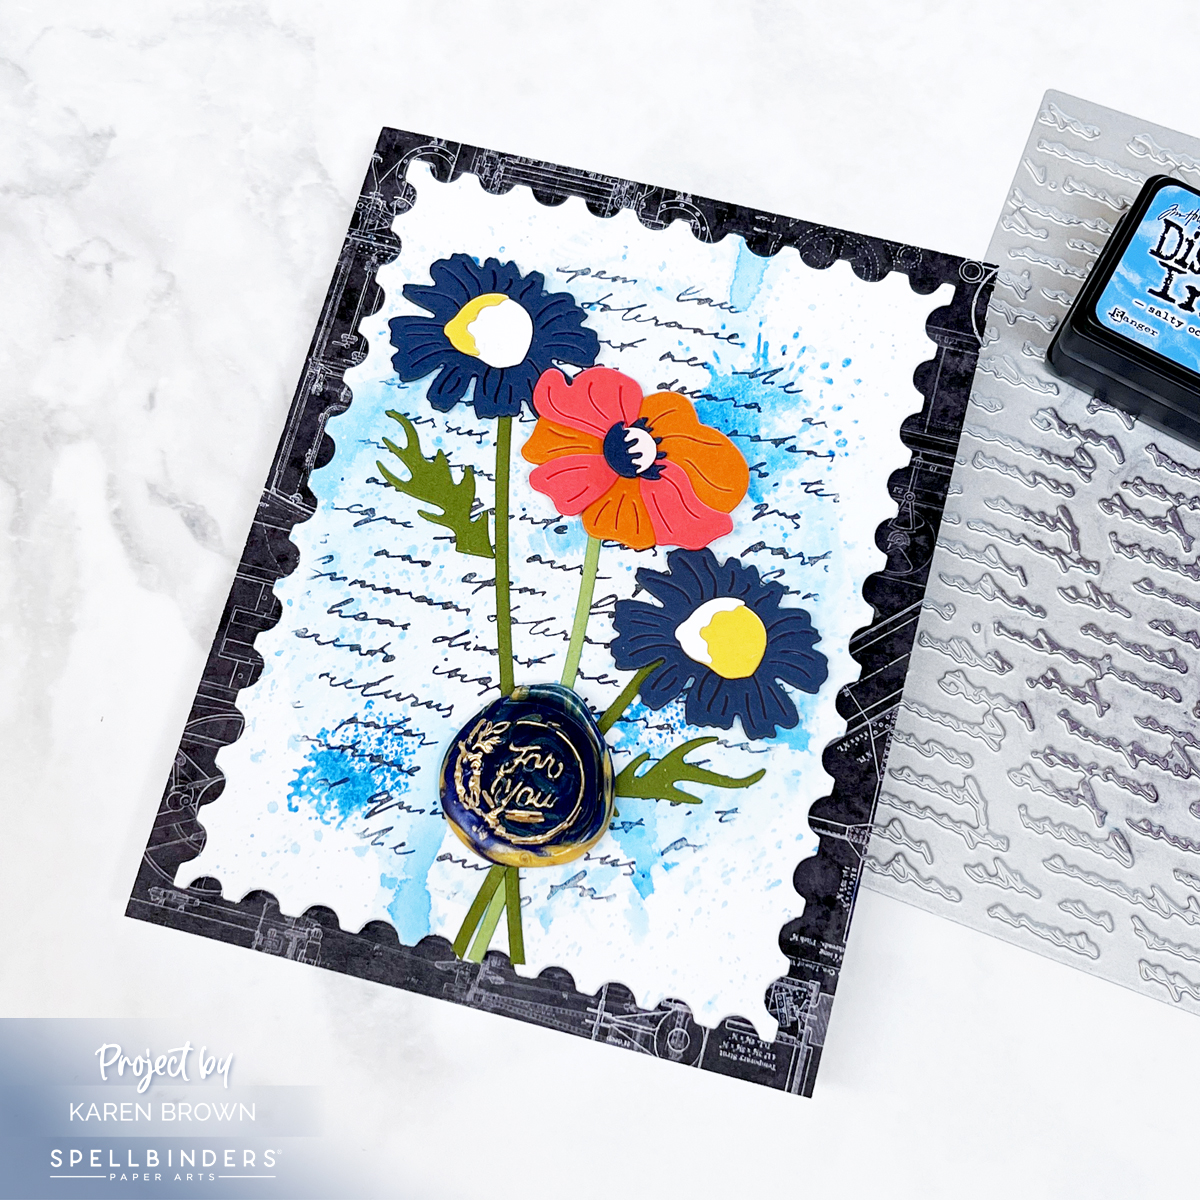
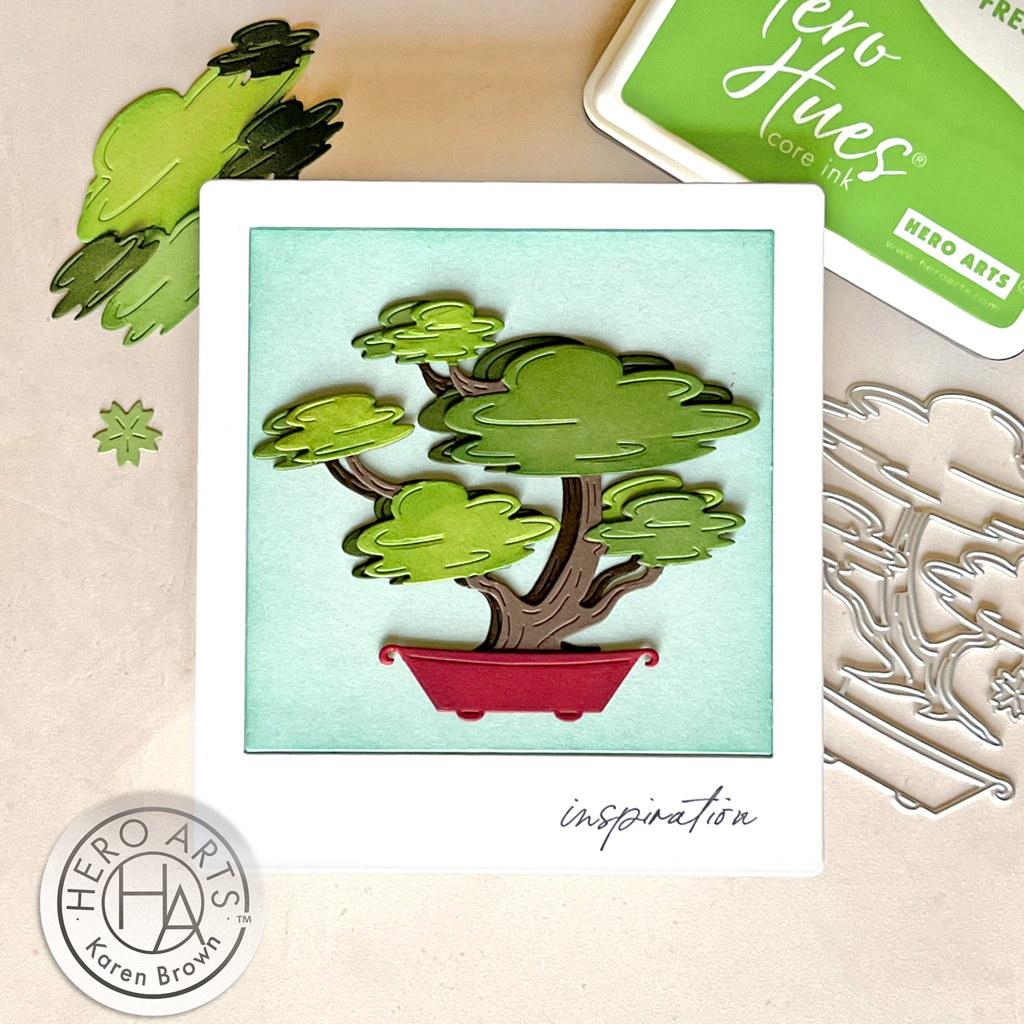
The background is one of my favorite elements—it was created using this month’s Spellbinders Large Die of the Month Kit. The postage/polaroid-style frame makes such a versatile card base and is a true cardmaking staple. If you don’t already subscribe to this kit, it’s a fantastic one to try—I’ll link to my Hummingbird Delight post where I used the full kit.

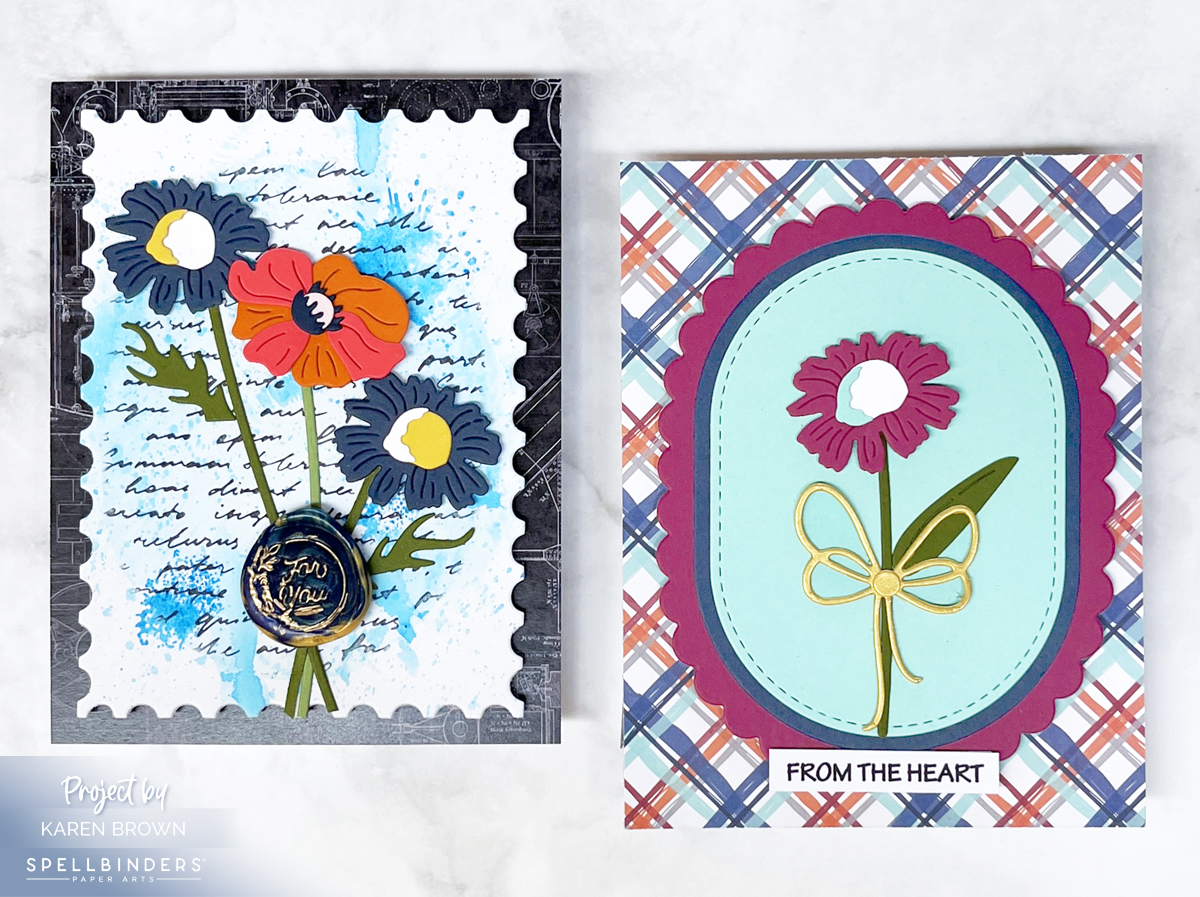
This card feels timeless, gentle, and perfect for a traditional baby shower. I also have a photo showing both baby cards together (above), highlighting how different they can feel while still using the same Pooh collection.

Same Map, Two Completely Different Looks

Side-by-side comparison of two BP343 Hundred Acre Wood BetterPress map cards—one soft and pink for a baby shower, the other rustic and masculine with mixed media details.

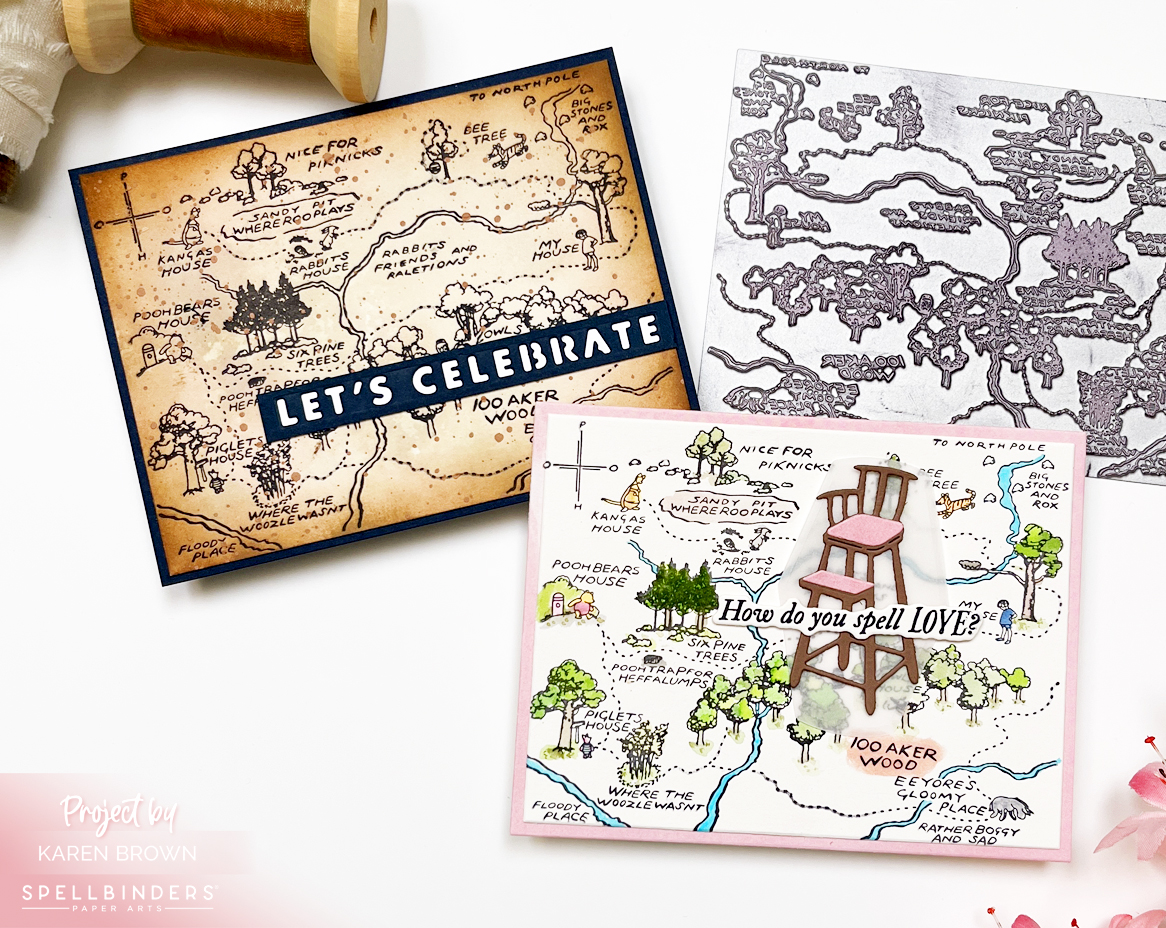
One of my favorite things about this project is seeing how versatile the Hundred Acre Wood BetterPress Plate really is. In one card, it’s soft, pink, and perfect for a baby shower. In another, it’s rustic, layered, and mixed media inspired.

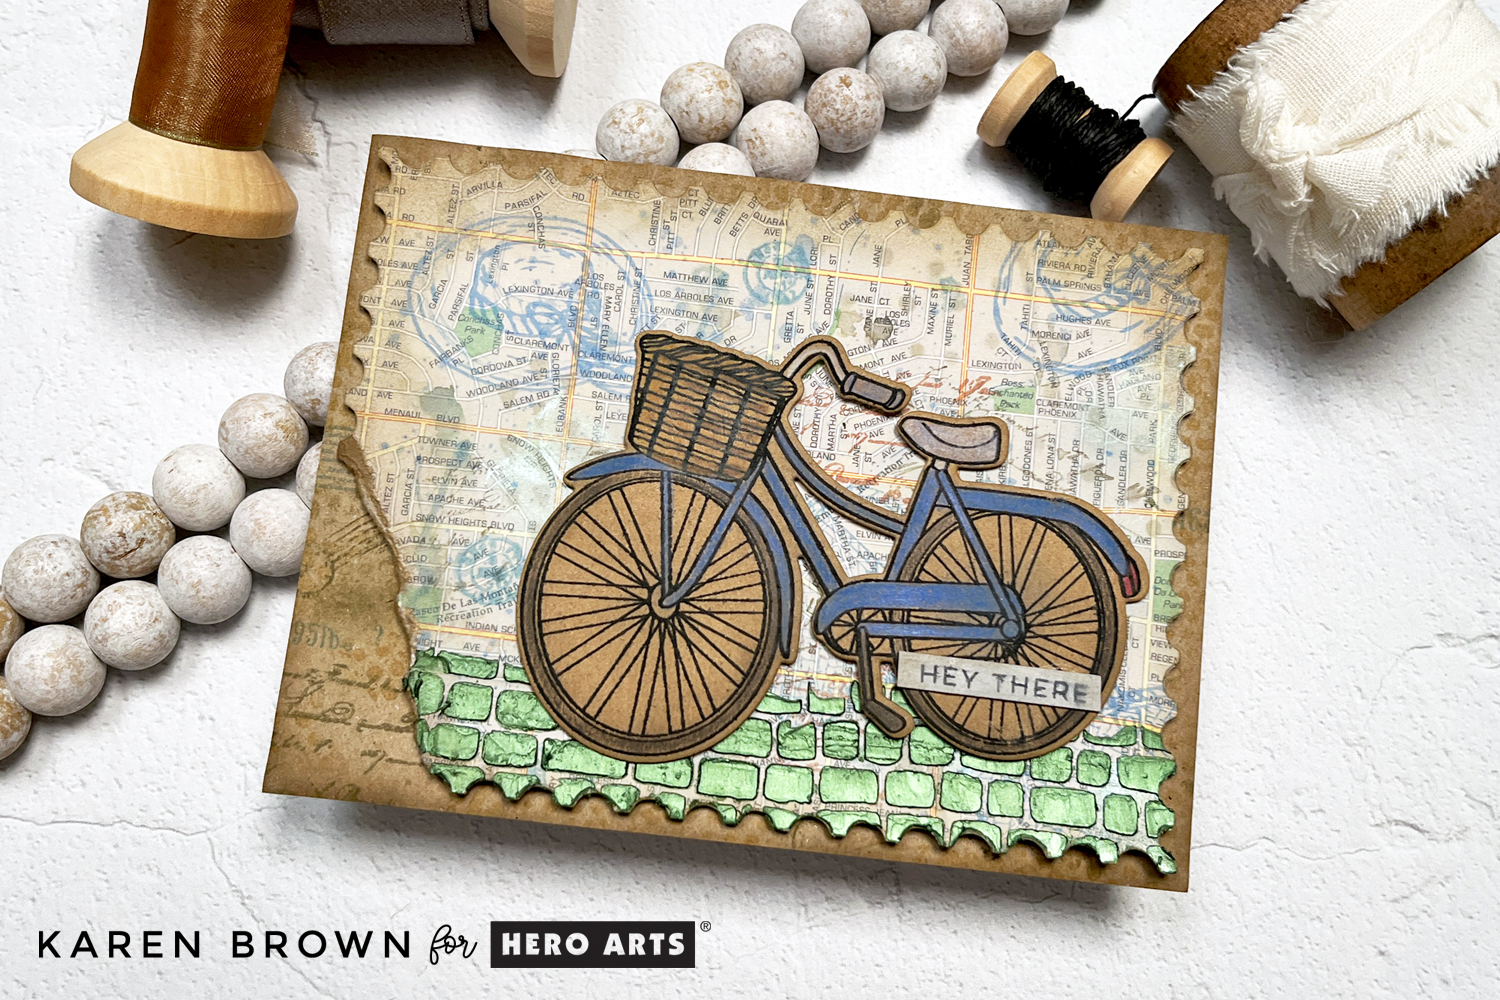
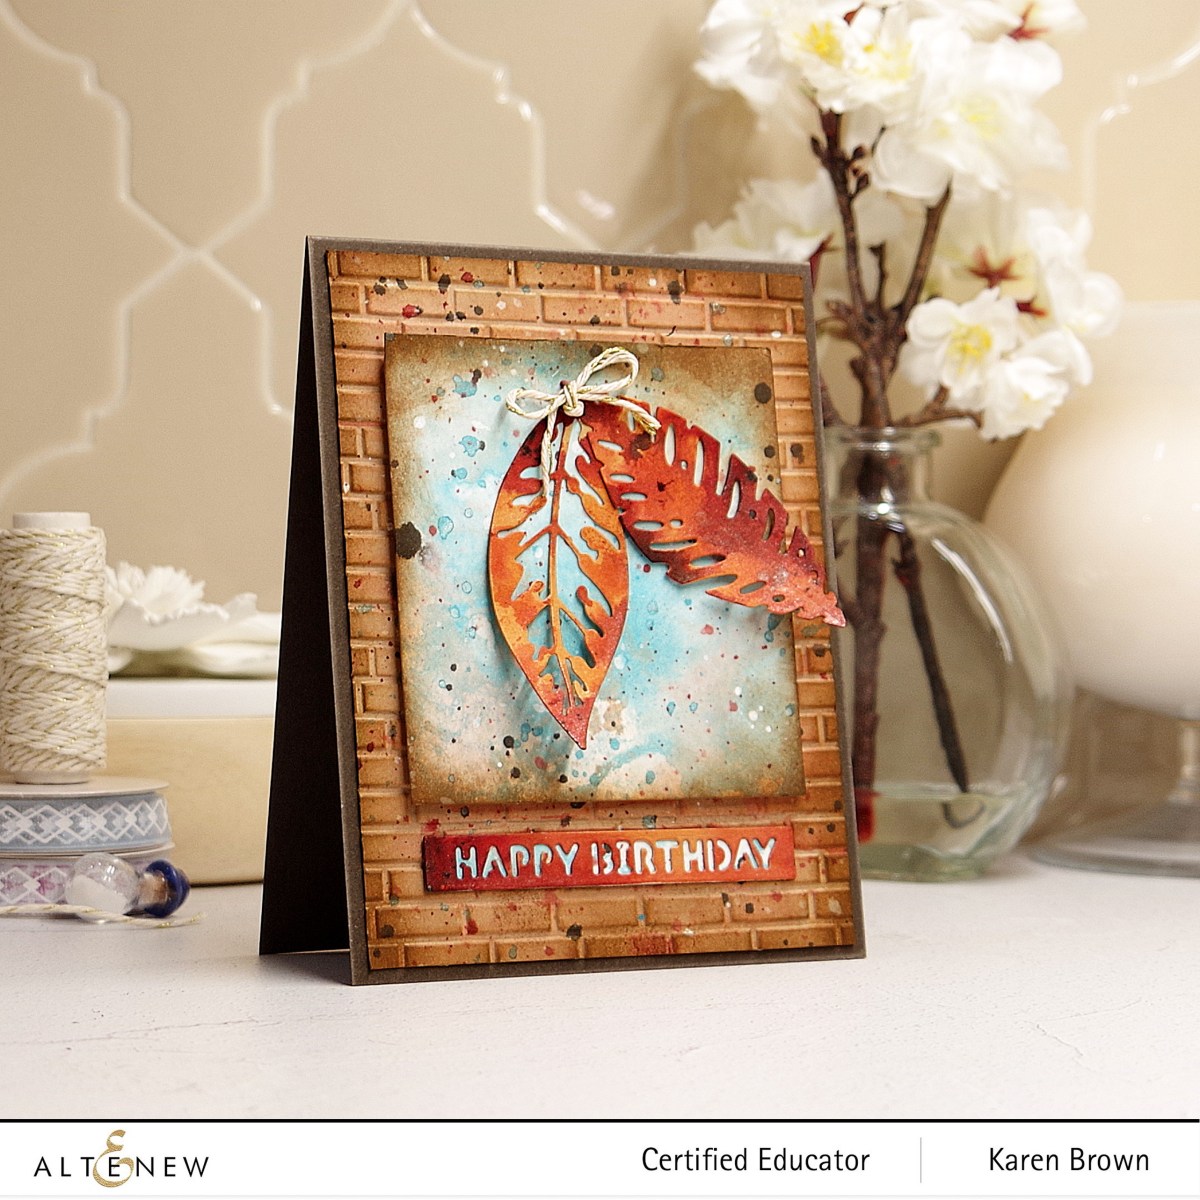
Card Three: A Rustic Pooh Birthday Card with Mixed Media

Handmade Winnie the Pooh 100 Acre Wood birthday card with an aged mixed media map background created using ink smooshing, brown splatters, and a navy “Let’s Celebrate” sentiment.

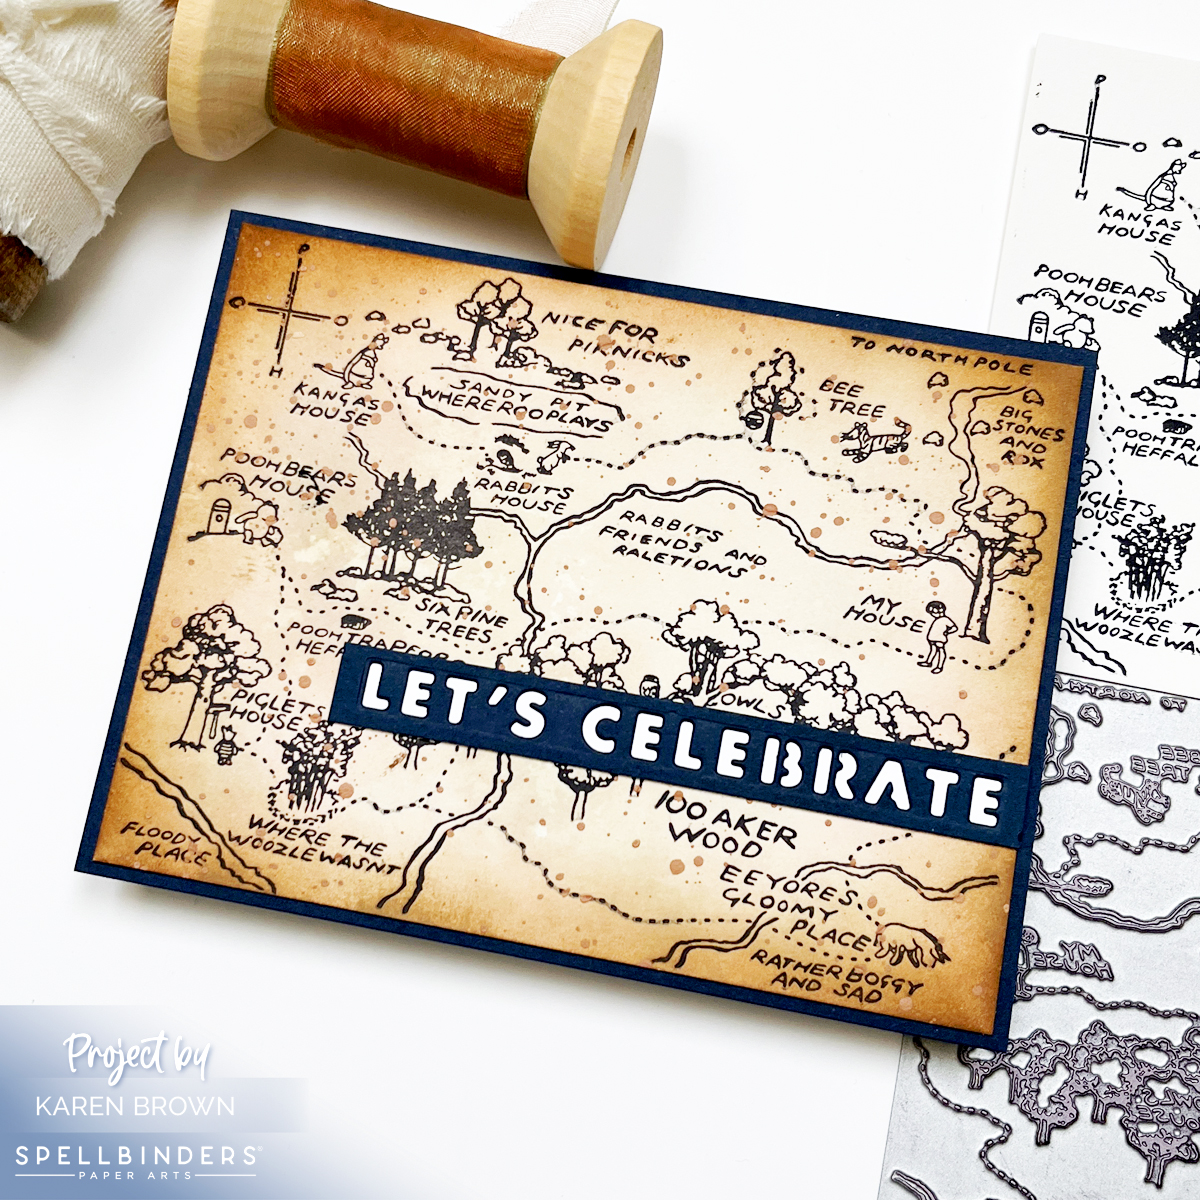
My third card takes the Hundred Acre Wood BetterPress Plate in a completely different direction. This one has a more rustic, slightly masculine vibe, making it ideal for birthdays beyond baby cards.

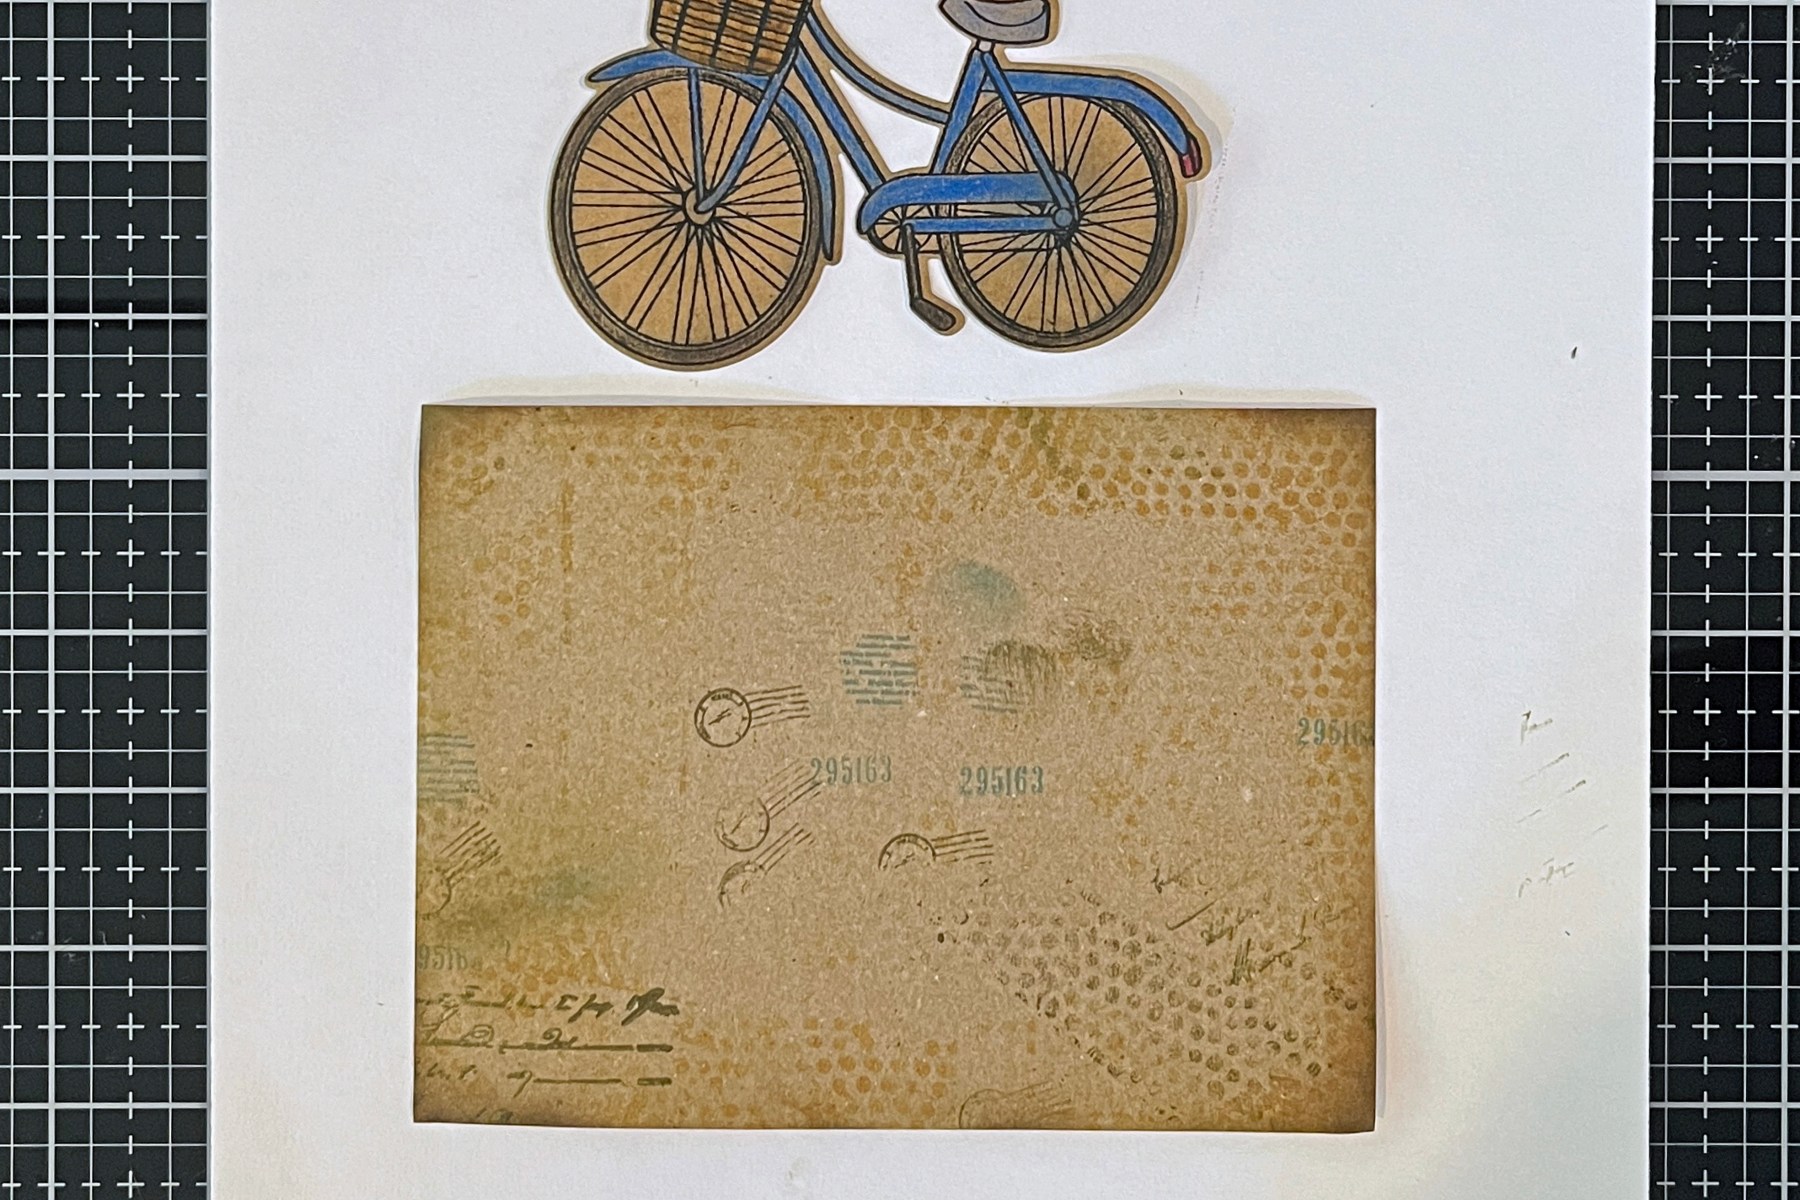
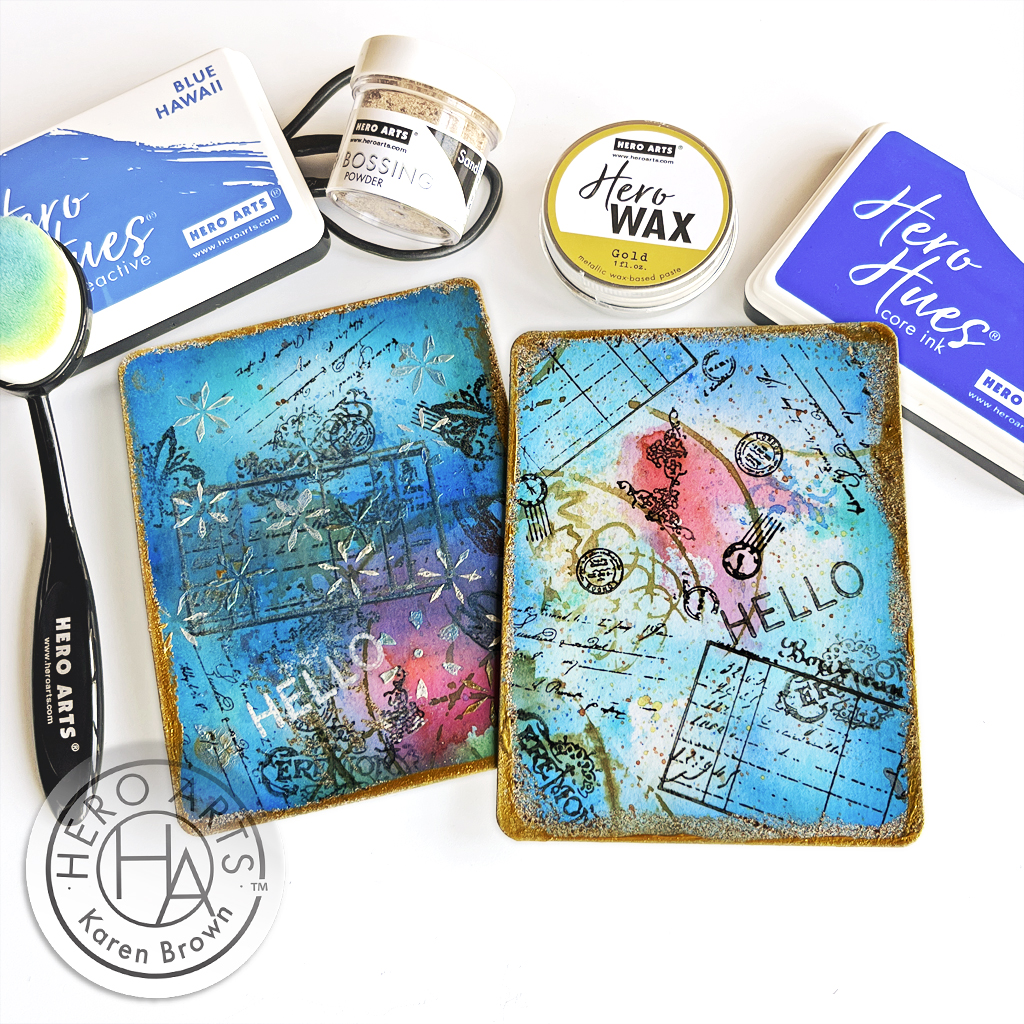
I created the background using an ink-smooshing technique with three shades of brown ink. After spritzing with water, I dipped a Bisque BetterPress panel into the ink and let it soak for about a minute (see two photos below) . Once dry (or heat set), I flattened the panel under a weight. I then used my BetterPress LetterPress System to press the map into my smooshed background.

Cardmaking process photo showing ink smooshing and the completed rustic background.

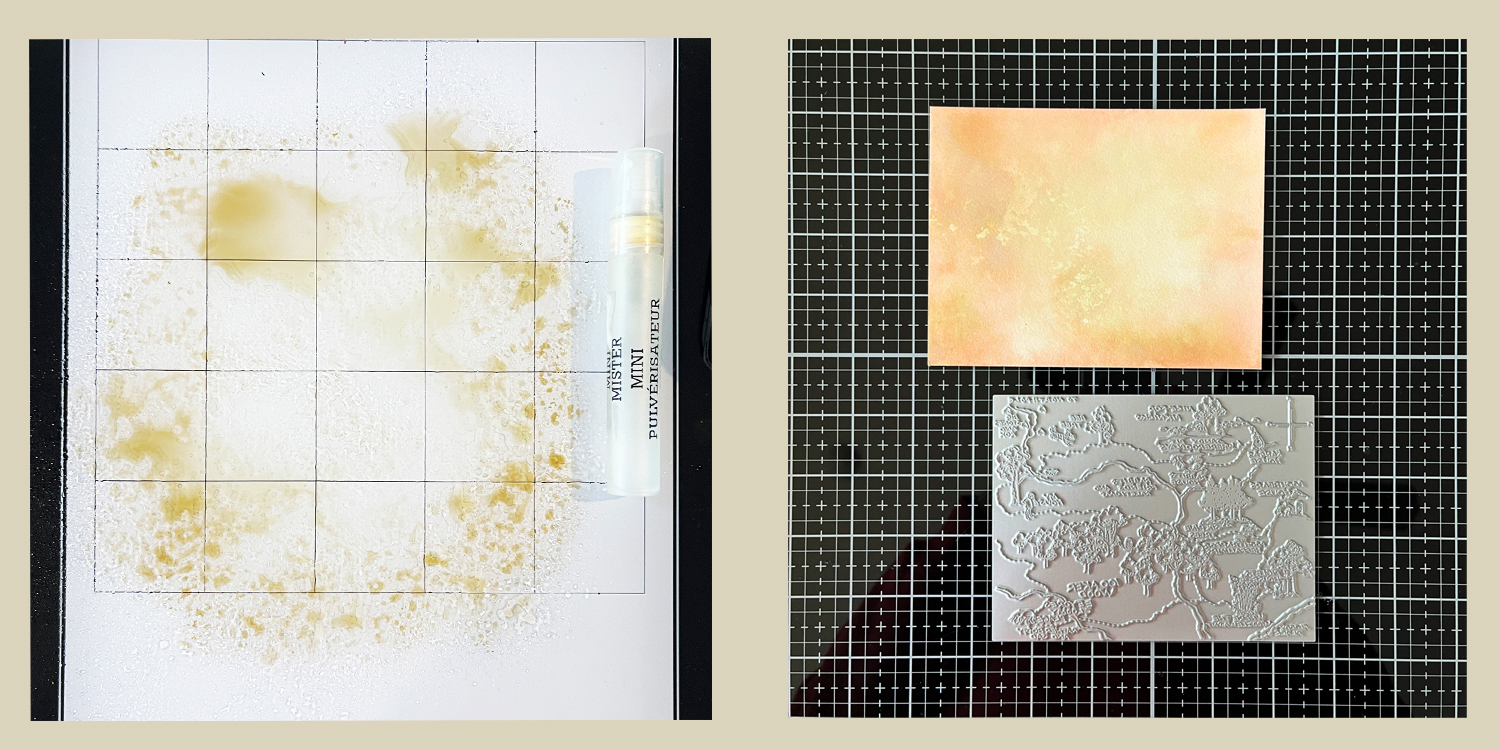
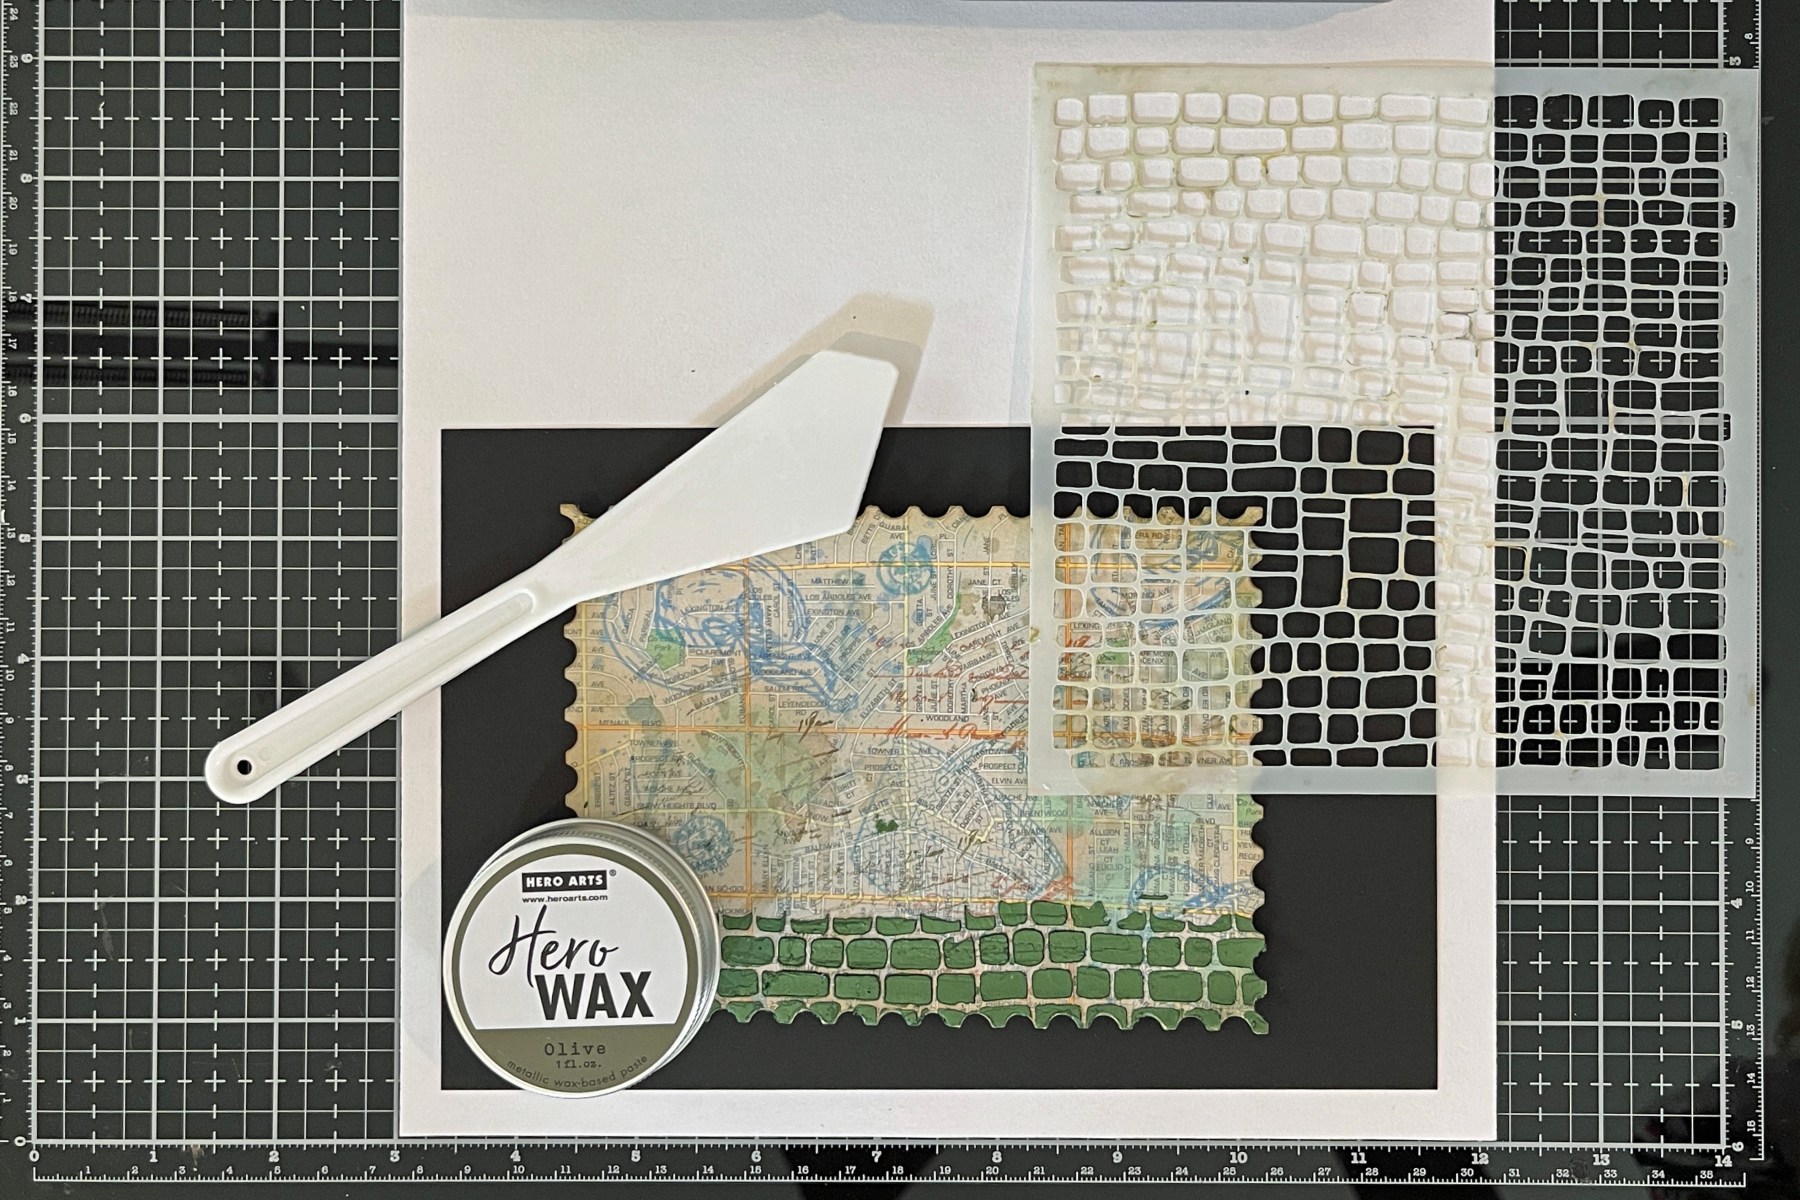
To add even more depth, I:

  • Ink blended darker browns around the edges
  • Added splatters using brown acrylic ink and a fan brush
BP343 Spellbinders The Hundred Acre Wood BetterPress rustic map birthday card

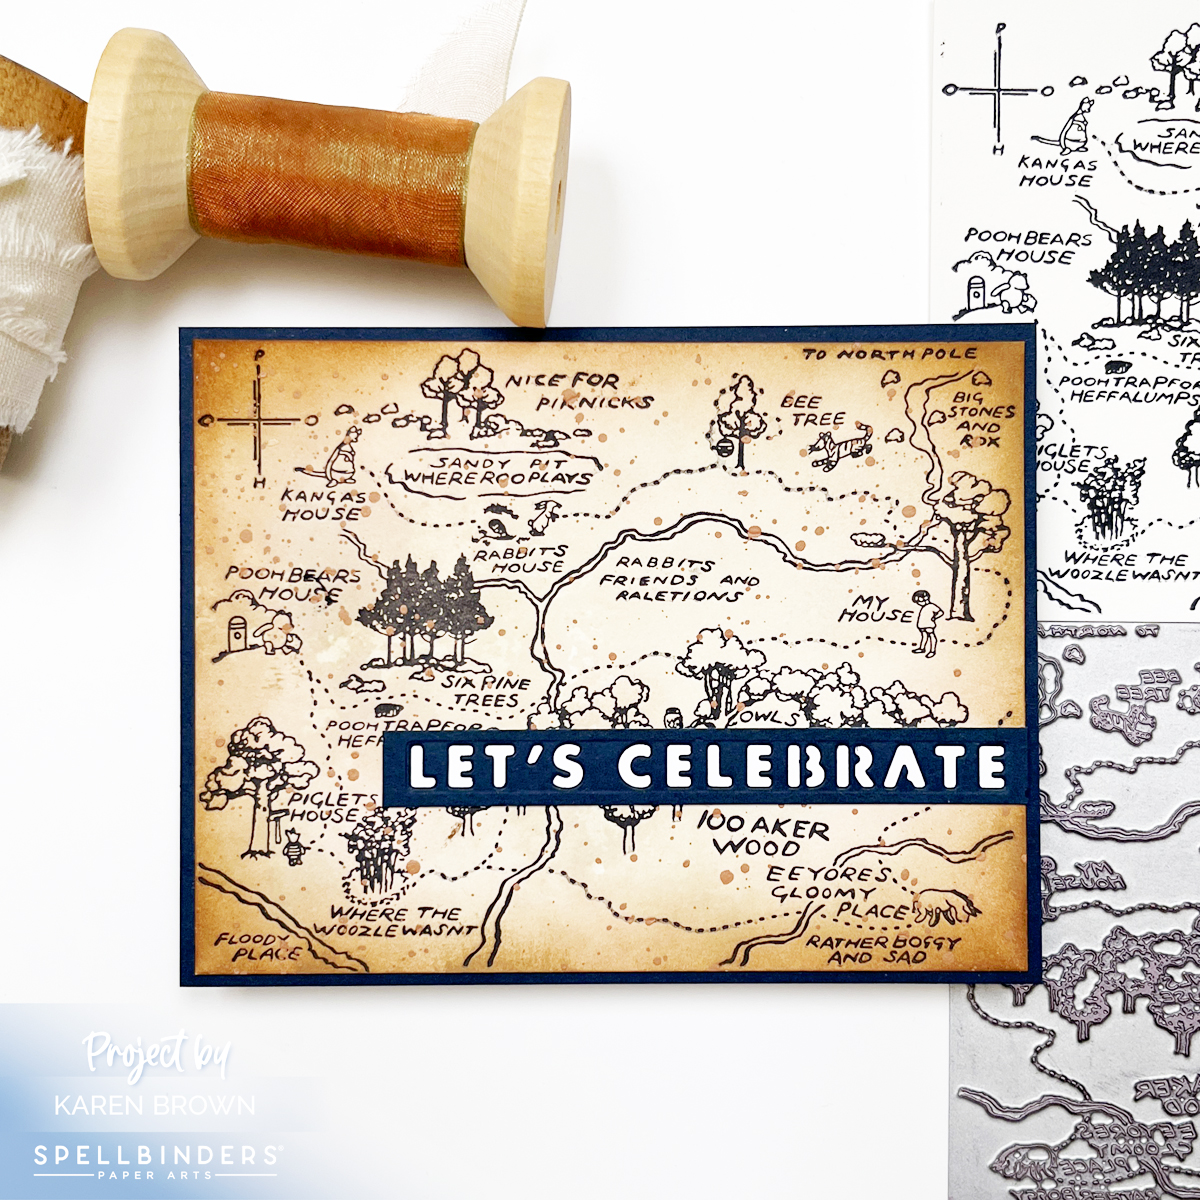
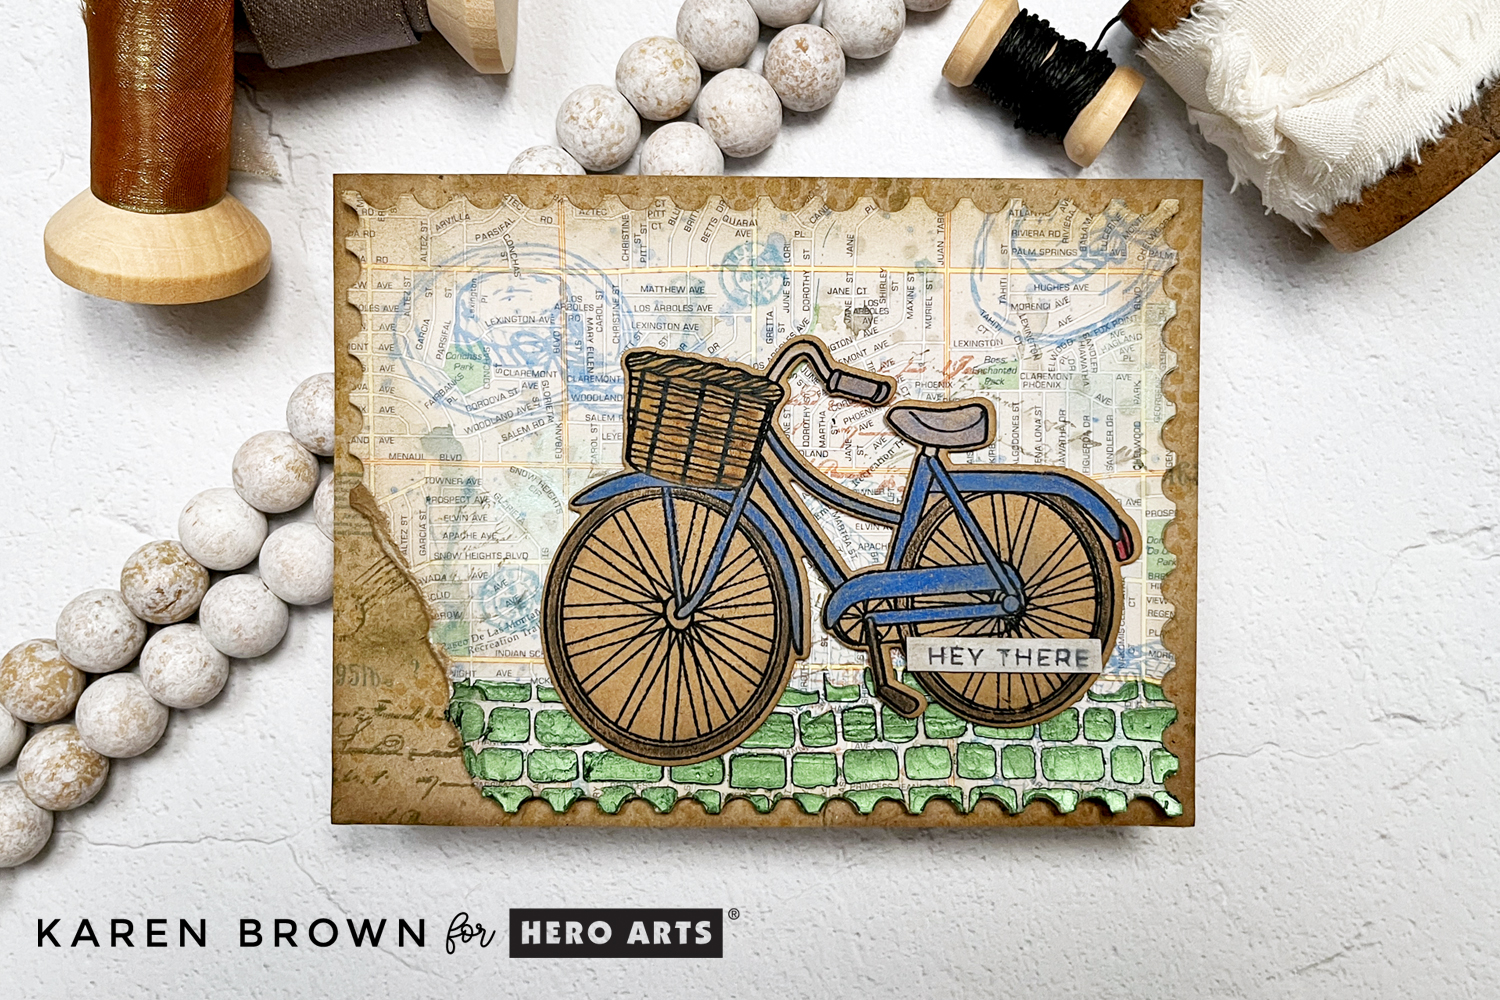
The result is a beautifully aged, mixed media map background. I mounted the panel onto a navy card base and added a bold navy “Let’s Celebrate” sentiment using the Hero Arts Hooray Birthday Cover Plate.

This card is heading to a friend who loves Winnie the Pooh, but it would also work wonderfully as a masculine birthday card.

I’ve included a photo (above) showing both map cards side by side, and I love how different they feel—even though they started with the exact same plate.

Key Products Used:

Why I Love Creating with Classic Pooh

👉 My past Winnie the Pooh Die Cut Card and BetterPress Winnie the Pooh Card have always been reader favorites, and it’s easy to see why. Pooh designs feel personal, nostalgic, and meaningful—whether you’re creating for a baby, a birthday, or someone who simply loves these classic characters.

👉 I’ll be linking to my Pooh & Piglet die-cut card from last year, which is still one of my most-loved projects. If you missed it, be sure to check it out for even more Pooh inspiration.

cardmaking · Mixed Media · Tutorial

Mixed Media Card Tutorial: A Step-By-Step Guide

How to tutorial for a tattered and torn mixed media travel theme card with a die cut bike, upcycled road atlas background and stenciled Hero Wax accent.

Today, I want to show you how to repurpose and upcycle paper to create a mixed media card.    I started with a map from an old Atlas and a brown paper shopping bag.  I used the bike stamp and die from Hero Arts June card kit as my focal point which I stamped on a panel cut from the shopping bag.

How to Create Mixed Media Cards Step-By-Step:

Above, you can see the repurposed papers that I used on my card. Here was my process:

  • I attached a piece of watercolor cardstock to the back of the Atlas page so that I would have a more substantial panel to work on.  I used Matte Medium to adhere the two pages together.  Dry.
  • To make sure there was no shine and to have the right surface texture for my mixed media project, I applied a layer of Gesso Acrylic Paint to the map. Dry.
Process photo showing how to apply Gesso to prep a mixed media project.
process photo showing stamping on a mixed media card background
  • I stenciled a few spots with the Leaves and Abstract Shapes Stencil with Root Beer ink.
  • I die cut the panel with a Nesting Postage Stamps Infinity Die and then ink blended Fawn and Root Beer along the corners and edges.  I wanted a grungy vintage look.
  • I added watered down blots of Periwinkle and Root Beer. Dab some ink on acetate, spritz with a bit of water and dab on the panel.  Tilt a bit to make it run.  Blot up if you have more ink than you want.
  • Add ink splatters with a fan brush with the same inks used above, which adds color and depth.
  • I did second generation stamping (ink stamp, lightly stamp on scratch paper and then stamp background) with Root Beer ink.  You can see I keep adding layers. 
process photo showing a mixed media background with stamping, stenciling and ink blending.
  • I stenciled Olive Hero Wax over the bottom of my map panel with the Cobblestone Stencil to simulate a road.
  • Tear the bottom left corner off the panel for a really old and tattered look.  Ink blend along the tear line.
  • After looking at my panel I decided I wanted to darken the edges even more, so I added additional ink blending around the edges and corners.
process photo showing olive Hero Wax applied through a Cobblestone stencil.

Bicycle Focal Point:

  • On a panel from the brown paper shopping bag, I stamped the bike from the Hero Studio June card kit.  I left it in the stamp positioner and colored with InkTense colored pencils. Then I restamped the bike for a crisp black look.
  • Die cut bike
  • Ink edges with root beer ink.
A process photo showing a stamped bicycle on an upcycled repurposed panel cut from a brown paper bag and colored with Inktense colored pencils.  The panel will be turned into a mixed media card.

Tattered and Worn Base Mat:

  • Cut a second panel from the brown paper bag to act as a base mat.
  • Using the Rough Dot Bold Prints Stamp, stamp with Root Beer ink and Fawn Ink on the second panel (which is slightly larger than the map panel).  Dab a bit here and there, heavier in some places, lighter in others for a vintage look. 
  • In the bottom left corner add some text stamping for interest. This is where the torn edge will be positioned, so this area of the base will be more visible. I Used Vintage Postmarks and Tickets and Vintage Maps and Ledgers again and randomly added numbers etc around the perimeter of the card base.  
  • Ink the edges and corners to darken them.
Process photo showing a vintage look background card mat.  The mat was cut from a repurposed upcycled brown paper shopping bag.

I love the inky grungy look of this card!

A mixed media card featuring the June 2025 Hero Studio card kit bike and hat stamps.

Use What You Have! Old maps, shopping bags, sewing patterns, dictionary pages, music books—they all bring unique texture and charm to your cards. Mixed media is about building interest through layers, so don’t be afraid to play!

BetterPress · Die cutting · Mixed Media

How to Create Mixed Media Backgrounds for Your Cards

Creating mixed media backgrounds is one of the most fulfilling ways to express creativity in cardmaking, and it’s a fantastic way to showcase your favorite tools and techniques. In this project, I flipped my usual process by starting with the background, rather than the focal point. The emphasis here is on the Script Text BetterPress Plate, an intricate design with a vintage, not-quite-legible script that adds the perfect textured backdrop.

🛠 Step-by-Step Instructions

  • Start with the Background: For this project, the focus was the Script Text BetterPress Plate. Begin by die cutting an oval template using the Scallops and Stitched Edge Ovals die set. Save the oval itself, but use the negative panel (with the oval opening) as an inking guide.
  • Ink with BetterPress: Place the panel over the Script Text BetterPress Plate and use Best Ever Craft Tape to hold it in place. Ink only the oval opening using Black BetterPress ink on Porcelain BetterPress Paper.
  • Important: Remove the inking guide before running the plate through your Platinum 6 machine.
    • 🐢 Tip: Use “SUPER SLOMO” speed to get the best letterpress impression.
  • Add a Watercolor Wash: Apply a light Salty Ocean watercolor wash to the center oval portion of your letterpressed background. Let dry completely.
  • Stamp Texture: Using Hero Arts Mixed Textures Stamp Set, ink up some paint splatter stamps with Salty Ocean and lightly mist the stamp with water for a more vintage look. Stamp the background 3-4 times.
  • Add Paint Splatters: Use a fan brush to add Salty Ocean paint splatters for added depth.
  • Distress the Panel Further:
    • Dilute Salty Ocean on your craft mat.
    • Dab a small portion the background panel into the ink pool 3–4 times.
    • Let the ink run slightly for an authentic mixed media effect.
  • Die Cut Blooms: Use the Layered Wildflower die set by Lisa Horton to create floral accents. This entire project features elements from Lisa Horton’s Wildflower Collection.
  • Sentiment Touch: Use a “For You” wax seal from a previous Wax Seal of the Month Kit.
  • Final Touches:

💌 Bonus Project: Layered Die Cut Background

For a second card using the same supplies:

  • Begin with a plaid base in navy, merlot, and aqua. This was cardstock I bought at a Cardmaking Convention.
  • Layer a Merlot scallop oval, Nautical Navy oval, and a Waterfall stitched oval using the Scallop and Stitched Edge Ovals dies and ColorWheel Cardstock.
  • Spotlight a single merlot wildflower die cut from Lisa Horton’s Layered Wildflower set.
  • Add a gold bow (included in the die set) for a subtle accent.
  • Finish with a “From the Heart” sentiment — a versatile option, perfect for sympathy cards.

I hope you found some inspiration today.

Handmade mixed media card featuring letterpress script background, watercolor textures, and layered wildflower die cuts from Lisa Horton’s Wildflower Collection.

Thanks for stopping by!

cardmaking · Stamping

Hero Arts | Quick Bold Shimmery Background | Congrats Card

Fuchsia and Navy Congratulations Card using Hero Arts Abstract Feather Bold Prints background stamp and Fuchsia + Gold Metallic Shimmer Spray.

Happy 50th Anniversary Hero Arts! Hero Arts is celebrating their impressive milestone!

I wanted to acknowledge the occasion with a little cardmaking, so I created this “Congrats Card” using my Premium Special (50th Anniversary) Gift that was included in my May Monthly Hero Premium Kit.

This card would also be perfect for graduation, retirement or any other congratulatory event.

Fuchsia and Nautical Congrats Card

My Process:

I really love this bold card, and it would be so easy to mass produce.

Last month, I did a trio of cards using the same technique. Click HERE if you’d like to read that post.

Thanks for stopping by….see ya next time!

cardmaking · Mixed Media · Stamping

Hero Arts | Man Card Monday | Ramen Birthday Card

Man Card Monday masculine birthday card for the Foodie

Ramen Card for the Foodie in Your Life

Masculine cards can be tricky, but when I saw Hero Arts Ramen Stamp and Die Bundle, I knew it would be the perfect set for my son-in-law’s birthday. He is a real foodie and I love the fun sentiment included!

How to Make an Ink Smoosh Background

I started by making my “Ink Smoosh” background. I dabbed Fawn, Papaya, Fog, Paradise and Pool Party inks in separate pools on my craft mat and spritzed with water. I then dipped a piece of watercolor paper in the puddle and let it dry. I did this four times.

Next, I stamped my images and then colored in with Artist Alcohol Markers. Die cutting was next. I also used my Rounded Rectangles Infinity dies to trim my background, mat and card base. The final step was to assemble my card.

Graphic Mixed Media birthday card for the masculine Foodie in your life.
Products Used:
cardmaking · Cardmaking Kit · Give Away

Hero Arts | My Monthly Hero March 2024 Blog Hop and Giveaway

Three colorful cards from Hero Arts March 2024 Release.

Boy do I love this March 2024 My Monthly Hero kit! I am sharing three cards today and they were all so fun to create. I think the Classic Kit is going to be wonderful for mixed media projects.

Classic Kit

Luscious orange mixed media card using Hero Arts March 2024 My Monthly Hero Classic Kit.

For today’s post, I created two cards using the Classic Kit. I recently discovered the wonderfulness of liquid watercolors and WOW, WOW WOW! What took me so long? So, Card #1 has a background created with the Classic Kit + three liquid watercolor colors.

My Process:

  • I added a small amount of Dandelion, Orange and Bright Pink liquid watercolor to my paint palette. With a wet brush, I painted bold strokes on my Luxe watercolor paper. I also added some drips to the panel. I dried and repeated the process one more time. I also put a large acrylic block on top for a bit so my panel would be nice and flat.
  • The Classic Kit contains two sheets of Rub-On transfers and I added portions of the transfers randomly to my background. Remember to leave a space for your sentiment.
  • I added a minimal amount of watercolor paint spatters.
  • Using Taffy and Fruit Punch inks, I stamped my sentiment and some images (crane, scribbles, bamboo leaf, character and reeds) from the included stamp set.
  • Next, I separated the circle inset from the rectangular plate with my snippers
  • Using just the rectangular plate (without the circle) I embossed my background and I love the subtle embossing and texture that it adds.
  • I painted a second piece of watercolor paper with just orange liquid watercolor. In some places I diluted the watercolor more and in others I added very saturated color so there was variation in my orange color. I dried and then weighted with an acrylic block.
  • I die cut my orange circle with the cover plate inset + a Circle Infinity Die for a medallion look. I liked this medallion so much that I created a few extras to have on hand for future mixed media projects. You can see one of them in the next photo.
  • I glued my medallion to my background and then trimmed the background with a Rounded Rectangle Infinity Die.
  • My final step was to lightly ink the edges with Tangerine Core Ink.

This card reminds me of summer and orange sherbet and I love how happy and bright it is.

Classic Kit Card Using the Included Ink Cubes

Colorful card using Hero Arts March 2024 My Monthly Hero Classic Kit with the included ink cubes.

For my second card, I followed the same process as Card #1, except I used the 3 ink cubes included in the Classic kit. I smooshed the ink on my craft mat and used a wet brush to paint my background. I also used the cover plate as it was designed and die cut the entire background panel, including the circular inset, at one time. I then backed the opening with a red panel that I created by going “direct to paper” in a circular motion with the Cherry ink cube.

Here is a photo of the contents in the March 2024 Classic Kit:

My Monthly Hero Classic Kit contents.

KIT VALUES
Classic Kit: $82 Value for $36.99
Premium Kit: $115 Value for $49.99

Subscription Options

Bonsai Die Cut Scene Card

Die Cut and ink blended Hero Arts Bonsai Tree showcased in the Journaling Photo Frame Infinity Die Set.

I LOVE die cutting so I really enjoyed making my third card featuring The Bonsai Fancy Die, which is March Add-On product. I die cut my components, ink blended a bit and popped onto a panel made using a favorite of mine, the Journaling Photo Frame Infinity Die Set. The sentiment is from the Ornate Frames Hero Transfer . If you’d like to see an additional card I made using the Photo Frame Set, click HERE.

March Get Them All Bundle

March Accessory Bundle

Lovely handmade die cut Bonsai Tree greeting card.

Supplies Used on My Bonsai Card:

Blog Hop and Giveaway:

We will give away a $50 gift card, drawn from the comments left across the hop. Enter by Sunday, March 10th at 11:59pm PT, and the winner will be announced on the Hero Arts blog the following week.

Hero Arts

Hero Arts Creative Team:
Natasha Vacca
Dana Joy
Michelle Short
Jennifer Kotas
Rosie Lopez
Heather Ruwe
Mindy Eggen
Natasha Polite
Channin Pelletier
Rachel Kleinman
Jeannie Lieu
Seeka
Karen Brown
Charlene Madrid
Pocono Pam
Kailash Naidoo
Lydia Fiedler

Special Guests:
Nichol Spohr
Emily Midgett
Kelly Taylor      

cardmaking · Mixed Media · Tutorial

Hero Arts | 2 Fun Mixed Media Cards

Hero Arts Mixed Media Cards using CM740 Vintage Postmarks and Tickets

CM739 Vintage Maps and Ledger stamps.

Hero Arts Spring Catalog Release is live and I love all the new Mixed Media products that they added to their line. I used a bunch of them on these two cards.

Today is the last day for Hero Art’s Blog Hop, which you can find HERE.

Hero Arts Mixed Media card using Vintage Maps and Ledgers stamps.

My Recipe:

Products Used:

Other Tools:  Acrylic Stamping Block

Additional Products Used On Second Card: White Wax + SA263 Mandala Flower Pattern Stencil, Blue Iridescent Embossing Powder

I am so glad you dropped by!

Mixed Media · papercrafting · Tutorial

Colorful Cityscape Mixed Media Card | Hero Arts

Cityscape Hero Arts Mixed Media Card

I recently attended Hero Arts Mixed Media Stamp Along and found it so informative! This card was inspired by @cheiron and her wonderful class. I used different products and colors so my card doesn’t look anything like Cheiron’s, but her class gave me the creative spark for my card. Sometimes it is fun to get inky and messy!

For this card, I was trying to simulate a Dove flying over a city at sunrise. I knew I wanted a bold background to contrast with the white Dove. 

My Process:

  • I put 5 sunrise colors of reactive ink (colors listed below) on my craft mat and spritzed with a bit of water and then painted bands of vertical color all over my watercolor cardstock panel. There is no right or wrong way just start painting! I dried and repeated two more times. During the process I also added drips of color.
  • I love Hero Rub-On Transfers and I added parts of the city map from Collage Backgrounds to three spots on my background.
  • Using Indigo and Splash Inks, I stamped the city grid from the Mixed Textures stamp set.
  • I added texture with the Cobblestone Stencil. In some places I used just Gold Hero Paste and on others I rubbed just a bit of Black Hero Wax on the Stencil and then added Gold Hero Paste. I really love the black wax and gold paste combined together.
  • Using a splatter box (for me a repurposed cardboard box) I added three layers of splatters and dried in between each color. White, Blue Shimmer and Orange Shimmer. I love the complexity the shimmer splatters add!
  • I trimmed my background using the Rounded Rectangles Infinity Die set and then lightly inked the edges with Indigo Core Ink.
  • I die cut my Dove and sentiment 3 times and then glued the components together.
Handmade Card with Dove and Olive Branch Die - DF192

Supplies Used:

This card has LOTS of layers, but it did not take as long to complete as I would have guessed….60-90 minutes.

What do you think?

cardmaking · Mixed Media

Spellbinders | House Mouse Designs Collection 3 Ways

Spellbinders House Mouse Designs | Daisy Mouse | Mixed Media handmade card.

Spellbinders just released 6 adorable House Mouse Designs Rubber Cling Stamp Kits + a bundle of the entire collection. The whimsical stamps are all so fun and today I am sharing three cards that I created.

Vintage Look Mixed Media Tutorial + Daisy Mouse (RSC-002)

Mixed Media cards have so much interest and I thought the technique would work perfectly with this Daisy Mouse (RSC-002) stamp set.

My Process:

  • I started by creating my background. I masked off a border and then used two shades of tan to ink blend my background. (Antique Linen and Frayed Burlap)
  • With the masking tape still on the cardstock, I then used the same tan inks to stencil and stamp bits and pieces on the background. Most of the stamping was “second generation” where I stamped first on a scrap and then onto my background so that the pattern would be subtle. Cathe Holden has some great stamps (Handle with Care: STP-093 and Friendly Society: STP-094) that I added here and there. I also used a bit of stamping with white pigment ink, but it is hard to see in the photograph.
  • Carefully remove your masking tape. I used Post It Tape, which is the best!
  • After my background was dry, I stamped The Daisy Mouse with Versafine Black Pigment Ink.
  • PRO TIP: For a crisp look, keep the stamp in your Misti stamping platform and restamp the image after you are done coloring. You won’t believe how much this one step will elevate your project!
  • I used Faber Castell Polychromo Colored Pencils to color the mouse and daisy. I used white, 2 shades of gray, 3 shades of yellow, orange, 2 shades of green, blue and coral.
  • PRO TIP: A bit of blue colored pencil was the secret ingredient!
  • Remember to restamp the image and let dry.
  • I also added a few white Posca Paint Pen (.9-1.3mm) dots.
  • The adorable Special Delivery sentiment is included with the stamp set.
  • I mounted my card panel on a navy card base and the finished card is 7″ x 4 3/4″. I usually add lots of foam tape, but I kept this card simple and just used Bearly liquid glue.
Spellbinders + House Mouse Designs | Daisy Mouse (RSC-002) two handmade cards

I loved the Daisy Mouse stamp so much that I made a second Copic colored version.

House Mouse Designs + Copic Coloring Tutorial

Spellbinders + House Mouse Designs | Daisy Mouse (RSC-002) Copic colored handmade card.

The detail on these stamps is so well done that coloring is so easy! I used the following Copic Colors:

  • E50, E40, E00, R20 (face, hands and tail)
  • BV0003 (shadows)
  • W0, W3, W5 (mouse body)
  • YG01, YG03 (stem and flower)
  • Y00, Y06, YR04, YR07 (flower)
Spellbinders + House Mouse Designs Collection Copic colored handmade  cards.

My final card uses Tea for Two (RSC-005). I am a tea drinker so this stamp set definitely called to me!

I used the following Copic colors:

  • E50, E40, E00, R20 (face, hands and tail)
  • BV0003 (shadows)
  • W0, W3, W5 (mouse body)
  • RV00, RV02, RV04 (teacups)
  • YG03 (stems)
  • BG05. B05 (flowers)

I wanted to add a small little sentiment in the middle of the scene, so I stamped the Hello from Fill My Heart Sentiments (STP-183)

Spellbinders + House Mouse Designs Tea for Two (RSC-005) Copic colorered handmade card.

Products Used:

Items Available at Amazon:

Faber Castell Polychromos Colored Pencils
cardmaking · Mixed Media · papercrafting

Altenew: A Year In Review: Crafters’ Edition Blog Hop + Giveaway 

Hello friends! I am so excited to be participating again in Altenew’s A Year In Review! I really enjoyed looking back through my projects and selecting some favorite creations.

Rainbow paper weaving with Altenew's Garden Trellis Cover Die.

This first card was my most popular Altenew card on Instagram and I detailed how I created my rainbow paper weaving. You can see my original post HERE. I used Altenew’s Garden Trellis Cover Die as the base for my weaving.

Layered Stamping on a cute little bird:  Bird of the Woods by Altenew.

This year, I was a bit obssessed with the Bird of the Woods Layering Stamp set and coordinating dies and I made a bunch of cards using this bundle! This POST was by far my most popular blog post of 2022.

Altenew's Precious Doodles Layered Stamping Floral Dies

I fell in love with the Precious Doodles Bundle…when “doodles” is in the title, I know it is going to be a favorite of mine! This is a darling stamp layering set and you can find my original post HERE.

Altenew Coloring Book watercolor page framed artwork.

I received so much positive feedback on this watercolor piece! I LOVE Altenew’s watercolor products and I used them on my framed project. I started with the Poppy from Altenew’s Coloring Book and I painted it with the 36 Pan Set and Artists Brushes. You can see my original post HERE.

Messy masculine mixed media card

I love mixed media, and this card was my 2nd most popular post on Instagram. You can see my original post HERE. I got really messy and used tons of fun products to create this masculine birthday card.

Clean and Simple + Gel Press Printing Rainbow Grid Card

If there is such a thing as CAS Mixed Media, then this is it. I love the clean white contrast with the rainbow colored gel press die cut squares and the giant black Altenew Mega Hello sentiment. You can see my original post HERE.

Altenew Craft Your Life Always Sunshine Kit card

I love all of the Craft Your Life releases but this Always Sunshine Kit was especially popular with my blog readers. You can read my original post HERE: I love coloring with stencils and that is the technique I used on this card.

Altenew Craft A Flower Open Peony

I always love Altenew’s Craft-A-Flower kits and this Open Peony was my favorite Craft-A-Flower in 2022. You can read my original blog post HERE.

Altenew Timeless Tulips with coordinating ink blend background.

Who doessn’t love a floral bouquet? Altenew’s Timeless Tulips premiered in August and I think it is a gorgeous set with two big beautiful floral stamps. You can read my original post HERE.

Altenew Summer Wishes stamp, die and coloring stencil card.

I will finish with Altenew’s Summer Wishes Bundle which is oh, so fun! I created a cozy little beach scene comprised of an adirondack chair, umbrella, radio and flip flops. This is such a happy card and I know I will pull out this bundle year after year. You can find my original post HERE.

Prizes:

Over $500 in total prizes! Altenew is giving away a $100 gift card to 1 lucky winner, 3 $50 gift cards, and 27 $10 gift cards. Winners will be chosen from both blog hop #1 and blog hop #2. Please leave a comment on the Altenew Card Blog HERE by 12/27/2022 for a chance to win. 

Wait, there’s MORE!

We would also LOVE to see YOUR favorite handmade cards, layouts, home decor, etc. featuring Altenew products! Feel free to share them on social media or on your blog using the hashtag #AltenewBest2022. You may also add a link by clicking the blue button below.

FOUR lucky crafters will each win a $15 gift certificate to our store! Winners will be announced on the Altenew Winners Page on 12/29/2022. We are looking forward to seeing your beautiful creations!

Blog Hop Order:

Altenew Card Blog

Erin Thompson

Annemarie Caister

Seeka

Karen Brown You Are Here!

Claire Apostoloff Claire is Next!

Mindy Eggen

Fiona Duff

Karen Reátegui

Carol Hintermeier

Bobby Hagen

Michelle Short

Lorena Brougher

Michelle Burnier

I am so pleased that you took a moment to stop by! If you have time, I’d love to hear which project you liked best.

Wishing all my crafty friends a healthy and happy 2023!

Karen