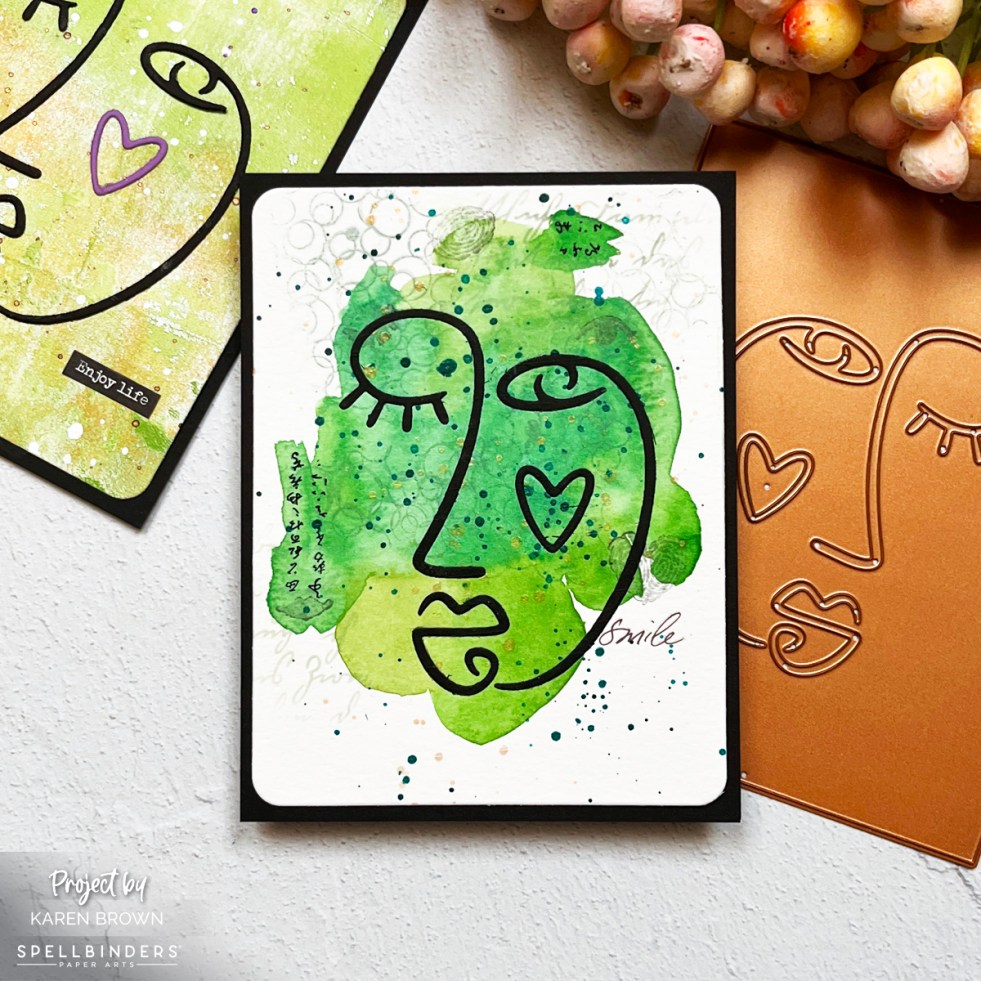
Masculine cards can be tricky, but I think using bold gel press prints with a mega sentiment works well for the men in our lives.
I sorted through my gel press prints looking for colorful pages that would work well together. I then tore them into strips and pieces and added some doodling with gel pens and Posca pens.
Hello! I recently spent a most enjoyable afternoon making acrylic gel press prints and then I turned four panels into cards. For my first card, I used Altenew’s Bubble Wrap Stencil to add varation to my background. I die cut my background using The Greetery’s Crimped Frame die, and then die cut blooms using WPlus9 Doodle Buds stamp and die bundle. I drew in stems with paint pens and assembled my card with foam squares.
For my second card, I put 7 dots of acrylic paint on my gel press and brayered one direction horizontally so the ink would gently blend but would also maintain the bands of color. I brayered the excess ink onto a second page. I added a die cut bloom, stem and Hello sentiment.
The background on Card #3 used Altenew’s Leaves and Berries stencil. My bottom layer was orange, yellow and green. Next, I placed the stencil on the wet paint and blotted most of the orange that showed through onto a piece of copy paper. I let the paint dry a minute and then gently brayered on light blue acrylic paint, removed the stencil and pulled the print. I think the background is so beautiful for a floral card. The sentiment is from Altenew’s Birthday Greetings.
The background on card #4 started with yellow and green paint on layer 1. I placed Simons Says Stamp’s Ring Cluster Stencil on the wet paint and then blotted most of the paint that showed through the stencil with a sheet of copy paper. I then brayered on light blue paint, removed the stencil and pulled the print. It was bright and fun and reminded me of the ocean so I went with an aquatic theme. The cute little puffer fish (Hero Arts I am Puffer For You) were stamped and fussy cut and a Hello sentiment was stamped on the background.,
Last week, I taught a workshop on creating Easy Mixed Media cards. The participants had never done Gel Press printing before so I guided them through the printing process.
And then we turned the prints into cards.
Some of the participant cardsLots of decisions to make in cardmakingBrainstormingWorking on the layout
I just love bright happy colors and I think they pair so well with Spring cards. Today I am sharing two Dogwood themed cards from Spellbinders new collection called Susan’s Garden Favorites.
DIY Glitter Paper Background
My Process:
I started by making pale pink and green Gel Press prints for my flowers and leaves. The branch is cut from a copper gel print because I thought brown was too plain.
I also wanted a bright fun background so I made my own glitter paper. First, I taped some watercolor paper to a hard board and brushed water over the surface. Then I mixed Salty Ocean and Mermaid Lagoon Distress Inks with Shimmer Spray (no water was added) and I painted it on the watercolor paper. I wanted an intense color so I applied three layers but I didn’t bother to let it dry in between. The background is so pretty in person but its hard to see the sparkle in the photos so I added a quick video below.
I die cut the blooms/leaves and then, using a bone folder, I molded and shaped them.
I started by making a bunch of yellow and green Gel Press prints for my flower and leaves. I’ve inlcuded a photo of some of my prints below.
I also wanted a bright fun background so I taped some watercolor paper to a hard board and brushed water over the surface. Then I mixed Salty Ocean and Mermaid Lagoon Distress Inks with Shimmer Spray (no water was added) and I painted it on the watercolor paper. I wanted an intense color so I applied three layers but I didn’t bother to let it dry in between. The background is so pretty in person but its hard to see the sparkle in the photos.
I die cut the bloom three times for each sunflower. Using a bone folder I shaped the blooms and leaves.
The flower center is die cut from and a brown gel press print and a specialty “football” paper that has the texture of a football
I started by sorting through my gel press prints. I really liked the blue print for my background and thought pink and green would look great as accent colors. The lattice die is so beautiful and I wanted to show it off so I went for a high contrast look. I like that the lattice die is the focal point of the card.
My Process:
The lattice die is both intricate and delicate, so I ran it through my die-cutting machine three times to ensure a crisp clean cut.
I die cut flowers and leaves. The tulips are from the this kit and I added flowers and greenery from Spellbinders Petite Floral Potpourri, which is a favorite of mine.
I also die cut (2X) the Adoring You sentiment included in this kit.
I wanted an A2 card so I cut my background down to 4 x 5 1/4″. I added a layer of craft foam to my card base and then attached my background.
Next I layered the elements of my card using the fine tip of Bearly Glue.
To finish the card I added enamel dots to the flower centers. I used the lightest color from Shades of Purple. I think enamel dots really help finish a project and they are probably my most used embellishment.
Valentine’s Day is coming up so I thought it was time to get busy and start creating. I love making gel press prints and thought this year it would be fun to make a batch of collage style valentines. Each one is embellished with die cut hearts.
My process was the same for each card:
I flipped through my gel press prints and pulled out some fun, busy, messy designs.
I added paint splatters and stamping to some of the gel prints.
I also used some book pages and added stamping and ink blending with stencils.
I tore pieces off the prints and played around with layouts. For each, I left the top left corner for my sentiment.
I used UHU glue stics to adhere the torn pieces to cardstock. This glue works great! It dries quickly and fully adheres so there was no need for liquid glue.
Using my silicone shaper brush, I applied a thin layer of gesso to the top left corner of the card and along the seams of the torn prints. I also added a watercolor wash to these areas.
I die cut hearts in a variety of sizes from brightly colored gel prints and then distressed the edges with Frayed Burlap Distress Ink and a finger dauber. I glued these down to my panel.
I added +s, dashes and doodles with Inktense pencils, Gel Pens, Posca Acrylic Pens and distressed the edge of the card panel with Frayed Burlap Distress Ink and a finger dauber.
I added a quick stamped sentiment, framed with black cardstock and added to an A2 card base.
The card above has more neutrals which I thought would be perfect for my husband.
I like the two stencils I used on the gel press prints for the card above.
My Valentine Quartet
These collage style valentines were SO fun to make! And, since they have a messy casual look, mistakes actually add to the appeal.
Happy New Year! I recently received a lovely package from Paper Artsy and had a fun day in my studio. I created two cards with slightly different takes. Both cards have gel press print backgrounds made with Paper Artsy’s Fresco Finish Chalk Acrylic paint. This was my first time using Chalk Acrylics and I think the end result is beautiful. I used Hey Pesto green, Butternut orange and white for both backgrounds.
For the cards, I stamped and heat embossed the Paper Artsy tree on watercolor paper and colored them with watercolor markers. I then fussy cut the images. The sentiment is Ranger Letter It: Greetings.
For this first card, I also stamped the tree with a script background stamp to enhance the whimsical feel. The card background was stamped with the tree and then my fussy cut panel was added with foam squares for a nice dimensional feel.
For this second card I went for layers. I stamped the tree directly onto the gel print, then added the fussy cut tree on top using foam squares. I also stamped and watercolored a third panel and then fussy cut four aqua segments. These four pieces were adhered on top, so that in some places, the tree has three layers of dimension. I hope you can see that from the photo above.
Multi-Media Collage Companion Card
I had some gel press prints leftover and decided to make a quick collage card. I tore off three pieces of paper (you can see the same green top right and orange bottom edge) and glued it to my panel (3.5″ x 4.75″) with UHU Gel glue stick. This glue stick works amazingly well, I didn’t need to use any liquid medium. I added some gesso, lots of stamping, paint splatters, dots-dashes-coloring (with Inktense pencils). On the top left corner I applied gesso, then did a bit of loose messy watercoloring plus the sentiment.
Hello and welcome! You likely arrived from Juhi’s blog….don’t you just love her collection?
I am so excited to be participating in Altenew’s 2021 A Year in Review Blog Hop! I really enjoyed looking back through my projects and selecting some of my favorite creations. This first card was my most popular Altenew creation on Instagram and I still have it setting on a bookshelf in my studio. I love how bright, happy and cheerful the card is. I used The Tall Tales stamp and die set and you can read my original blog post HERE.
This mixed media card was by far my most popular blog post of 2021! I created my own color palette with gel press prints and die cut my blooms using Altenew’s Cosmos Craft-A-Flower. If I had to pick one favorite 2021 product it would be this Cosmos kit. You can read my original post HERE. I have another favorite card below that also uses this Cosmos kit.
I love the Mega Alphabet Collection and I have several letters that I use frequently. This is a card I made for my friend Kathy. I used the ink smooshing technique and I really like how this project turned out. The Garden Trellis Cover Die is so versatile and I love the pop of white it provides on this card. You can read my original post HERE.
I discovered the joy of gel press printing this year and I love how this project turned out. The Peruvian Lily Layering Dies create a big showy bloom that is absolutely beautiful! Altenew’s Essential Sentiment Strips Dies are also a favorite of mine. You can read my original blog post HERE.
Weekend Doodles may be my all time favorite Altenew stamp set! On this card, I combined the Weekend Doodles with Altenew Artist Markers (I used Water Garden Set G on this card) and Cross Stitch Cover Die for a crisp clean look. You can read my original post HERE.
As I said above, Altenew’s Cosmos Craft-A-Flower Layering Die Set is my favorite 2021 crafting product. On this card I watercolored panels for my die-cutting. This was my second most popular 2021 blog post and you can read it HERE.
I adore the The Doodle Blooms Stamp and Die Set! The stamps are whimsical and just make me happy. I again made gel press prints for all the elements of this card. You can read my original post HERE for all the details on how I created this project. I’d like to add that my favorite embellishment is Enamel Dots. I find they really add beautiful detail to projects and I always like to have a variety of colors on hand.
Altenew’s Hibiscus Garden is the first layering die set that I ever bought and it is still a favorite! The potted hibiscus plants around my pool were the inspiration for this mixed media card created from gel press prints. You can read more about this project and a companion card HERE.
Sometimes a mini stamp can have a big impact on a card and I think this Bee Kind stamp and die set is adorable and at a great price point. I added a simple watercolor background combined with a Garden Trellis die cut and three enamel dots. My Bee Kind blog post with additional companion card can be found HERE.
Altenew is giving away a $30 gift certificate to 5 lucky winners and a $15 gift certificate to 4 lucky winners! Please leave a comment on the Altenew Card Blog HERE or share Altenew projects with #AltenewBest2021 on social media by 01/06/2022 for a chance to win. 9 winners will be announced on the Altenew Winners Page on 01/08/2022.
Additional Chance to Win:
WINNER: Marisela Delgado YOU are the winner of a $10 Altenew gift certificate! Please email winner@altenew.com by 01/18/2022 with the subject line Altenew 2021 Year In Review Blog Hop Winner from Karen Brown’s Blog.
I also have a $10 Gift Certificate to GIVEAWAY to the Altenew Online Store. I will choose a random winner from the commentors on this post and announce it here at my blog on 1/08/2022.
You made it to the end! I don’t have one favorite card but these are what I consider my “Best of 2021”. I’d love to hear which is your favorite card in the comments section. If you like what you see, consider following me on Instagram: @karens_mini and my blog (see the subscription bar at the top right corner of this post). Thank you for stopping by!
Flowers + Die-Cutting….one of my favorite combos! Susan Tierney-Cockburn created the most delicious collections of holiday dies and I had so much fun playing with them!
Amaryllis are always a favorite of mine, so I was excited to create a project. For my card, I made all my own papers using a gel press. I made six monoprints for my die-cuts: dark blue, medium blue, light blue (background), green and yellow-green (stamins) and tan.
Once the panels were completed, my card came together very quickly! The buds were very easy to shape for a lovely 3D effect. Both of my cards are 5 x 7″.
Susan’s collection is for the holidays, but I think the flowers are so versatile! I made the Amaryllis into a lovely birthday card by heat embossing my sentiment on the basket.
Die Cut Christmas Cactus Holiday Card
I have a Chistmas Cactus that is 25 years old so I really wanted to create a paper twin using Susan’s kit.! I have no idea how old cacti can live my mine is still hanging in there.
I again made my own gel press prints for this Christmas card. I made a blue panel for the background + two green prints, a pink coral and used the other other half of the tan monoprint for my basket. I added some pink glimmer lacquer to some of the tips for my buds.
I love both of these cards and can’t decide which is my favorite! Thanks for popping in to take a look at my post.