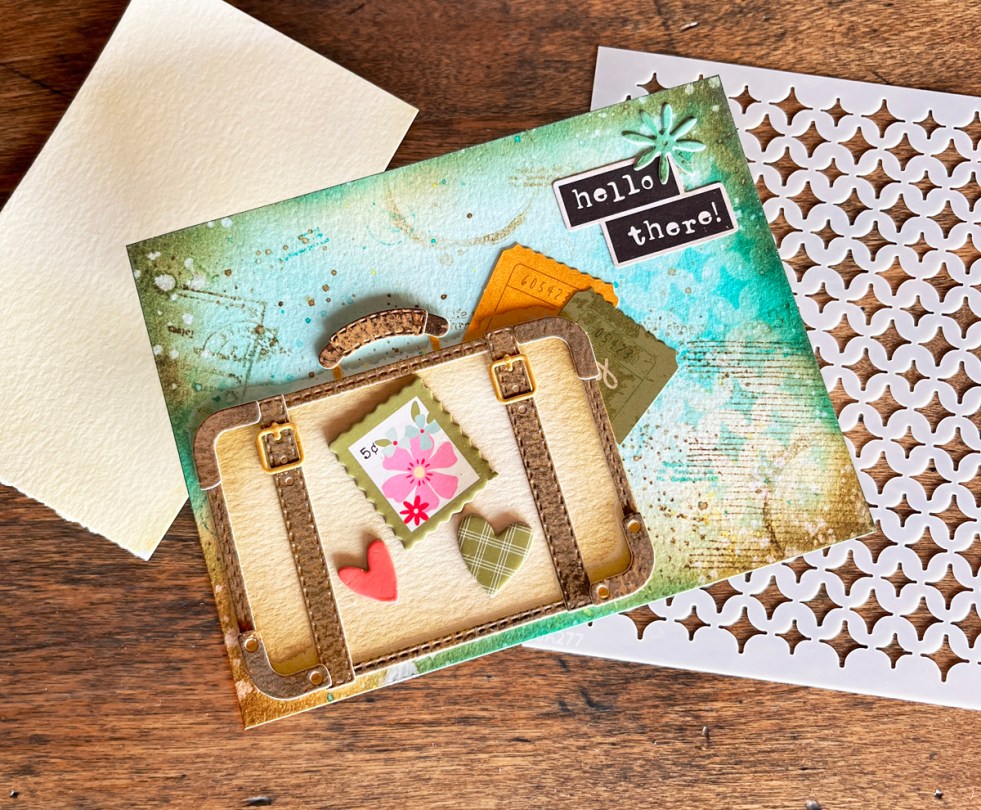
cardmaking · Mixed Media

Mixed Media Layering Made Simple: The 4 Layers I Use on Almost Every Project

A beginner-friendly guide to building beautiful, cohesive mixed media cards—without the overwhelm

Mixed media card featuring layered ink blended background with stenciling, stamping, splatters, and a vintage suitcase focal point in aqua, yellow, and brown tones.

Have you ever looked at a mixed media project and thought:

“That’s beautiful… but where do I even start?”

I’ve been there.

When I first started exploring mixed media, everything felt overwhelming. There were so many techniques, products, and styles—but very few beginner-friendly guides that actually simplified the process.

So after years of experimenting (and yes… making a glorious mess or two), I created something I wish I had from the beginning:

Karen’s Mixed Media Recipe

A simple, repeatable framework that works on almost every project.

And today I am sharing it with you.


✂️ In This Post, You’ll Learn:

• My simple 3-step mixed media framework
• How to create a quick, cohesive background
• The 4 “must-have” layers I use on almost every project
• Why limiting your color palette makes everything look better


🧁 Karen’s Mixed Media Recipe (Quick Recap)

This is the exact process I follow again and again:

Step 1: Create an interesting background
Step 2: Add 4+ layers
Step 3: Add a strong focal point

That’s it. No overwhelm. No guessing.

📌 Save this for later so you can come back when you’re ready to create.


And today? We’re diving into the part where the magic really happens…

👉 Layering

How to create vintage look mixed media cards that are simpe and beginner friendly.

If you missed earlier posts in this series:

Mixed Media Made Simple: My 3-Step Recipe for Fun & Easy Tags
Ink Smooshing 101 — My Favorite Mixed Media Background Starter

And if you try this recipe, I would LOVE to see it—tag your project with
👉 #karensmixedmediarecipe

Browse my Favorite and Most Used Cardmaking Supplies.


🎨 Step 1: Create a Background

For today’s project, I created a soft ink-blended background on watercolor paper.

I chose colors that sit near each other on the color wheel:

• Aqua
• Yellow

When these blend, they create a soft, beautiful green—no harsh transitions, no muddiness.

Beginner Tip:
Avoid opposite colors (like purple + yellow or red + green) unless you want brown.

I used reactive inks, which means they respond to water—this becomes important in our 4th layering step (hello, splatters!).

I also created a second panel in yellow for my focal point.

2 color ink blend background for mixed media card before adding layers.
Soft ink-blended panels before layering—this is our clean starting point before the “grunge magic” begins.

✨ Step 2: The Fab 4 Layers (My Go-To Every Time)

If mixed media had a “starter pack,” this would be it.

These are the four layers I use on almost every project—they are reliable, forgiving, and incredibly effective.

I call them…

💛 The Fab 4


1. Stenciling (Adds Pattern)

This is where your background starts to come alive.

I used a diamond stencil to add soft pattern using the same aqua tones.

✔ No perfect placement
✔ No covering the whole background
✔ Just touches of pattern

Think: “strategic randomness”

I’ve listed my favorite mixed media stencils in My Go-To Cardmaking Supplies page.

Stenciling, Sparkle Weave, added to a mixed media background.
The Sparkle Weave stencil works beautifully on mixed media cards.

2. Stamping (Adds Personality & Vintage Charm)

Now we add character.

I used imperfect, sketch-style stamps—dots, lines, circles—for that slightly vintage feel.

Beginner Trick:
Try second-generation stamping (stamp once on scrap, then on your panel) for softer impressions.

I introduced a third color here:

• A neutral brown

This grounds the entire design and keeps things from feeling too “floaty.”

Stamping layers on a mixed media card background.
After stamping layers—notice how the background is starting to feel more textured and dimensional.

3. Distress the Edges (Adds Depth)

Time to gently “grunge it up.”

I blended brown and a touch of blue around the edges.

This simple step:

• frames your design
• adds age and depth
• makes everything feel more finished

distressing the edges of a background with Root Beer brown ink and a blending brush.
Edges distressed for depth and contrast really start to pull the background together.

4. Splatters (Adds Movement & Magic)

This is where everything comes together.

First: water splatters (reactive inks = magic ✨)
Then: light splatters of all three colors

Turn your panel as you go—this keeps things natural and balanced.

Adding water splatters and ink splatters to a mixed media card background.
Finished background after The Fab 4—layers, texture, and movement working together.

🎯 When to Stop?

After the Fab 4, pause and look.

Ask yourself:

👉 Do I love it?
👉 Does it feel balanced?

If yes—STOP. 🎉
If not—add one more layer and reassess.

Remember: we’re going for “imperfect by design.”


🧳 Step 3: Add a Focal Point

I chose a vintage-style die cut suitcase (because… how cute is that?!).

To keep the look cohesive, I created custom panels instead of using cardstock:

• Yellow panel for the suitcase body
• Brown “leather” panel using direct-to-paper + water

This gives it that worn, travel-ready feel.

Die cutting a focal point for a layered mixed media background.
Finished layered background using four mixed media techniques

✨ Pro Tip: Instant Layering Shortcut

Even experienced mixed media artists use this:

👉 Pre-printed ephemera

I tucked in:

tickets
a sentiment (such an easy option)
small embellishments

These add detail without extra effort.

I placed the suitcase slightly off-center—like it’s ready to hop on a train and go on an adventure.

📌 Save this for later on Pinterest.


🎨 Let’s Talk Color (The Secret Sauce)

I kept everything to just three colors:

• Aqua (calm)
• Yellow (energy)
• Brown (grounding)

Using the same colors in:

✔ background
✔ layers
✔ focal point

…creates instant cohesion.

More colors ≠ better
Fewer colors = harmony


✨ Why These Layers Work

  • Easy to learn and effective everytime
  • Build depth without clutter
  • All 4 layers work well together
  • Add a polished, finished look

🧰 Supplies Used From My Toolbox

You might also be interested in my 14 Best Cardmaking Supplies for 2026 post.

Focal Point:
Retro Suitcase Die from the We Have Baggage Collection

Inks:
Reactive Inks (aqua, yellow, brown tones)

Tools & Layers:
Blending Brushes
Background Stamps: Background Builder and Vintage Maps and Ledgers
Stencils – Sparkle Weave
Ephemera – chipboard, tickets/sentiments

Basics:
Watercolor paper (140 lb.)
Die cutting machine
Adhesives


💭 Final Thoughts

If you’re new to mixed media, start here.

The Fab 4 layers will take you from:

👉 “flat and plain”
to
👉 “textured and full of life”

…without overwhelm.

Layering isn’t about doing more—it’s about doing the right things in the right order.

And now you have that order. 💛

📌 Save this for later so you can come back when you’re ready to try this technique


📌 If you try this, tag your project with #karensmixedmediarecipe
I would truly love to see what you create.


✨ Coming Next…

If you enjoyed these foundational layers, you’ll love the next step—Beyond the Basics: 3 Mixed Media Layers to Try, where I build on the Fab 4 to create richer, more dimensional designs.

cardmaking

Easy Beginner Cardmaking Ideas | 2 Bright Cards Using Pre-Printed Supplies
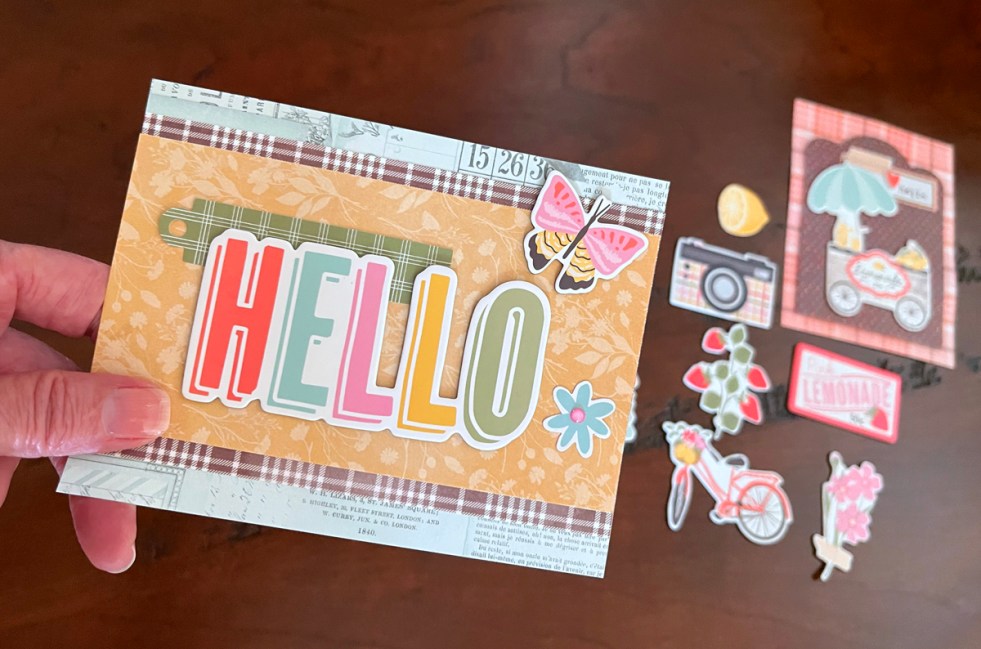
Create cheerful handmade cards in minutes using pre-printed elements from the Pink Lemonade collection.

Beginner cardmaking idea using Simple Stories Pink Lemonade collection with layered patterned paper, chipboard embellishments pre-printed die cuts and foam stickers.

Some days you just want to craft with no fuss and no complicated techniques.

No messy mediums.
No challenging layouts.

Just pure creative fun.

That’s where pre-printed cardmaking supplies really shine.

The new Pink Lemonade Collection from Simple Stories is bright, cheerful, and incredibly easy to use — making it perfect for beginner cardmaking, quick cards, and even scrapbooking projects.

I’ve been having so much fun with this collection lately. In fact, I’ve already created six cards this month using these products — two in today’s post and four in my Lemonade Stand Easel Cards and Chalkboard Coffee Thank You Cards post from earlier this month.

If you’re just starting out in cardmaking, you may also enjoy my 14 Best Cardmaking Products and Supplies for Beginners, where I share the tools I reach for again and again in my craft room.


In This Post

• Why Pre-Printed Papers Are Perfect for Beginners
• Pink Lemonade Card Designs: Same Supplies, Two Quick Cards
• Fast and Easy Card Layouts
• More Beginner Card Ideas


Easy beginner cardmaking using Chipbboard focal point from Simple Stories Pink Lemonade Collection.

Product Spotlight: Pink Lemonade Collection

Today’s cards feature elements from the Pink Lemonade Collection by Simple Stories.

This collection bursts with bright color, playful lemons, cheerful florals, and adorable embellishments that make cardmaking almost effortless.

One of the things I love most about this collection is how beautifully coordinated everything is. The colors, patterns, and embellishments all work together, so you can assemble several cards quickly without worrying about matching papers or layouts.

This collection works wonderfully for many occasions:

• birthdays
• hello cards
• thank you cards
• thinking of you
• get well cards

And it’s just as perfect for scrapbooking layouts as it is for cardmaking.

There’s even a Simple Cards Card Kit available that includes everything needed to create eight card designs with step-by-step instructions, which makes it especially beginner friendly.


Why Pre-Printed Elements Are Perfect for Beginner Cardmaking

If you’re new to cardmaking, pre-printed supplies make it incredibly easy to create polished cards quickly.

Here’s why they work so well:

Focal point images are already designed and printed
Minimal supplies required
Coordinated colors and themes
Variety of images in different sizes
Fast and stress-free card assembly

All of the pieces in this collection work beautifully together, so the process becomes simple:

sort the pieces → experiment with layouts → glue and go.

The set includes everything from large statement sentiments and focal images to charming little embellishments like lemons, strawberries, butterflies, pinwheels, and florals.

I especially love the sturdy chipboard pieces, which instantly add dimension to a card.


Card Design 1

Easy and fun beginner cardmaking card featuring a chipboard lemonade cart.

For my first card, I used two pieces of pre-printed designer paper for the card base and mat.

To add a little extra visual interest, I die cut the mat with a decorative frame die — but this step is completely optional. A simple rectangle trimmed with a paper trimmer would work just as well.

To finish the design I layered:

a vintage-style chipboard lemonade cart
a cheerful “hello” sentiment
a small pink heart accent

The result is a bright and playful card that came together in just a few minutes.

Card Design 2

Easy, bright and happy card with layered designer cardstock and chipboard focal points.

For the second card I created a layered background using three pieces of patterned paper.

Measurements:

• 5½ × 4¼″ aqua base
• 3½ × 5½″ brown plaid mat
• 3 × 5½″ floral background

Once those layers were glued together, I added:

a green plaid tag
blue flower die cuts
a rainbow “hello” sentiment
• a butterfly chipboard accent

I also added enamel dots to the flower centers, which is one of my favorite simple ways to add a finishing touch.

The layered patterns create a cheerful, eye-catching design while still being incredibly easy to assemble.


A Fun Part of the Process

📌 Save this for later on Pinterest.

Sorting Pink Lemonade chipboard pieces for easy beginner cardmaking layout
Sorting the colorful chipboard pieces from the Pink Lemonade collection while planning card layouts.

One of my favorite parts of using collections like this is sorting through the embellishments.

The Pink Lemonade chipboard set includes over 50 pieces, and laying them out on my desk while planning the cards was honestly a little mood-boosting.

Sometimes the simple tactile process of arranging colorful pieces is just as enjoyable as making the card itself.


More Easy Cardmaking Ideas

If you enjoy quick and beginner-friendly card designs, you might also like these projects:

Easy Stenciled Masculine Jean Jacket Cards
Charming House Mouse Birthday Card
Mixed Media Card for Beginners


Building Your Cardmaking Toolbox

Here are the supplies I used for today’s cards:

There are also several other coordinating products in the collection:

Collection Kit (patterned paper + stickers)
Card Kit (makes eight cards)

If you are interested in adding to your toolbox, these are the exact supplies I use in my craftroom.

I’m actually working on another project using the Journal Bits Pack, so be sure to check back soo


📌 Save this for later so you can come back when you’re ready to try this technique.

I always love hearing what readers think — so feel free to leave a comment and let me know which card you like best.

Happy crafting!

cardmaking · Mixed Media · papercrafting

Spellbinders + Cathe Holden Christmas Flea Market Finds Cards

Spellbinders + Cathe Holden Christmas Flea Market Finds Card.

Quick and Easy Vintage Look Christmas Card

Hello! Spellbinders and Cathe Holden just came out with a Christmas Edition of her Flea Market Finds and it was so fun to create with! Today, I used her Home for the Holiday’s paper pad: (CH-021) and Jingle Bells Miscellany die cuts (CH-019). I had fun laying out each item and then coming up with combinations for my cards.

The first card was quick and easy but I love result. My background is made from 2 pages from the paper pad that I combined at the midpoint. Using craft foam for dimesion, I attached the background to an A2 card base. Then, I just popped on the Christmas Tree and sentiment with foam tape.

Vintage Look Christmas card made with die cut ephemera.

Cardmaking with Vintage Ephemera

Cardmaking with Vintage Christmas Ephemera from Spellbinders + Cathe Holden

My second card is a collage style pieced together with designer paper, printed die-cuts and stamps. I used 2 rectangles and two 1.25″ squares of paper cut from the Home for the Holidays paper pad for my background. I distressed my kraft card base, background panel and the die cuts with 3 different Distress Crayons (bronze, gathered twig and aged mohogany) and then added lots of ephemera from the Jingle Bells Miscellany die cut pack. I also used 2 stamps from Cathe Holden’s previously released stamp kit called Handle with Care and added a tiny little paper clip.

Grunged Up  Mixed Media Vintage Collage and Ephemera Christmas card.

Thanks for stopping by!

Karen

cardmaking · Mixed Media · papercrafting

Spellbinders + Cathe Holden’s Flea Market Finds

Quick and Easy Vintage Card featuring Cathe Holden's Flea Market Finds Ephemera, printed die cuts and stamps.

Cathe Holden’s “Flea Market Finds” Ephemera

Hello! I am so excited to show you Spellbinders new product line from Cathe Holden called Flea Market Finds. Cathe is a well known fabric designer and collector of vintage miscellany and she just released a wonderful assortment of printed die-cuts, paper samplers, stamps and stencils in collaboration with Spellbinders. Cathe put so much thought into every product and they all work SO well together.

For the past week, I have been playing in my craft room and I’d like to show you what I created. Hold on, becuase I have seven cards to share with you today. The card above was so fun to make!

My Recipe For Card 1:

On this card, I used all the products “as is” with no distressing. I started with the background where I layered 2 different papers, one from the neutral palette and one from the Blue Green pack. Next, I started adding stickers and diecuts. The bird image is framed with a third paper from Cathe’s Neutral Sampler.

Vintage Shabby Chic Card

Vintage Shabby Chic handmade card using Spellbinders Cathe Holden stencil and die cut ephemera.
Vintage Shabby Chic Handmade Get Well Card

For my Shabby Chic card, I started by ink blending Tumbled Glass Distress Ink on my panel. I added Frayed Burlap Ink around the ages for a vintage feel. I let the panel dry and then added Grit Paste through stencil #1 of the Layered Vintage Floral Stencil. I really like how the background turned out. I wanted an even more vintage look so I ran my Tea Dye Distress Crayon around the edges of the background and die cut and then blended the pigment with my fingers. The card base was covered with paper from the Blue Green Paper Palette.

Cardmaking With Ephemera

Vintage Collage Style Card using Spellbinders Flea Market Finds die cuts, stamps and stickers.
Aren’t the little bakers just the cutest?

My third card is a collage style card pieced together with designer paper, printed die-cuts and stamps. I used 1.25″ squares of paper cut from the Neutrals and Blue Green Samplers for my background. I distressed my background panel and the die cuts with a Distress Crayon and then added lots of ephemera.

Grunged Up Vintage Look Card

Grunged up Mixed Media Card using Spellbinders Flea Market Finds Stamps and Stickers.

I started my grunged up card by making a background panel. I blended tumbled glass distress ink and then added a bit of frayed burlap. I then ink blended a second panel for my die cut circles. I used Antique Linen Distress Ink and then added a bit of frayed burlap. I let the panels dry and then added Distress Grit Paste through my bricked stencil. I wanted it to look rough and old so I didn’t cover the entire stencil. After the grit paste was dry, I rubbed a Distress Crayon around the edges and blended it out onto the panel with my finger. I also gently rubbed some on the top of the panel so you could really see the crackle finish. Next, I die cut my circles and rubbed distress crayon around the edges and then blended onto the top with my fingers. I added two stickers to two of the circles and then stamped over them. The middle circle is just the roughly stamped cute flower truck. The matting is from the blue green sampler.

Quick and Easy Vintage Look Card

Quick and Easy Vintage Look Handmade Card using Flea Market Finds Printed Die Cuts.

This was the fastest and easiest card to make. I started with a page from the Neutral Sampler for my Background. I then layered on 3 Happy Thoughts and 2 Home Arts printed die cuts. I stamped a sentiment onto the flower basket and added a fun little paper clip from my stash.

Stenciled Background on Vintage Look Card

Spellbinders + Cathe Holden Layered Vintage Floral Stencil for Card Background,
Stenciled Background

Cathe Holden included a beautiful stencil in her collection and I used it for my background on this card. I added 2 stickers and 1 stamp to complete the card.

Using Printed Die Cuts in Cardmaking

Using Cathe Holden's Flea Market Finds in cardmaking

This was another card that came together very quickly using die cuts and stickers.

Using Flea Market Finds Miscellany on handmade cards.

Here is a group photo of the seven cards I created.

Cathe Holden Flea Market Finds handmade cards.

I had so much fun creating these cards. If you have a moment, let me know which is your favorite.

Thank you!

Karen

Uncategorized

Altenew Wildflower Paper Crafting Collection Release Blog Hop + Giveaway

Hello friends!  I love paper, which I think  is one of the many reasons I am a paper crafter.  If you are fond of paper then I know you will appreciate Altenew\’s gorgeous new Wildflower Collection too. The release is full of beautiful colors, fun patterns and lovely floral papers plus two gorgeous ephemera packs.  To celebrate, Altenew is hosting a blog hop with beautiful inspiration and fun prizes.  Link To Blog Hop

Cardmaking with Altenew Ephemera and Printed Cardstock

I created three cards for this release.  On my first card, all the colored paper is from the Wildflower Collection 6×6\” Paper Pack.  I love Altenew\’s Hibiscus Garden 3D Layering Die Set and thought it would be fun to die cut the elements from different papers in the pack.  I used two pages for the flower, two different pages for the leaves and then the soft green for the background.  I added a bit of splatter with Altenew\’s Jet Black and Pure White ink sprays.  I pulled the sprayer out and tapped the hose for pefect splatter each time.  So much faster than mixing ink each time.

Altenew Hibiscus Garden 3D layering dies


The second  card uses Bitty Bits Ephemera for a fast and colorful card.  For the background, I again splattered a white card base with Pure White and Jet Black ink splatters.  Next I used the Garden Trellis Cover Die and patterned paper from the Wildflower Collection 6×6\” Paper Pad  to die cut a lovely background overlay.  I then arranged and layered the ephemera and adhered with foam tape. The packet has loads of die cuts, so I have plenty left over for future projects.  I finished off the card by adding Cherry Blossom Enamel Dots
Quick and Simple Altenew Cardmaking kit


My third card is similar with a Garden Trellis die cut overly cut from a page from the Wildflower Collection 6×6\” Paper Pad.  The background is again a paint splattered page from the same pad.  I then arranged and layered ephemera  from The Pink Posy Pack.  Lastly, I added Cherry Blossom Enamel Dots to the flower centers.

Altenew Card Kit


There is a great Wildflower Paper and Ephemera Bundle available as well as a Wildflower Paper Crafting Jump Start Class

Giveaway Prizes:

$200 in total prizes! To celebrate this release, Altenew is giving away a $50 gift certificate to 2 lucky winners and a $20 gift certificate to 5 winners! Please leave a comment on theAltenew Card Blog and/or each designer’s blog post on the blog hop list below by 05/05/2021 for a chance to win. 


Altenew will draw 7 random winners from the comments left on each stop of this blog hop and announce the winners on the Altenew Winners Page on 05/07/2021.


Blog Hop:

Altenew Blog

Nathalie DeSousa

LauraJane

Patricia Roebuck

Virginia Lu

Michelle Short

Tenia Nelson

Amanda Baldwin

Karen Brown   You Are Here!  🙂

Lilith Eeckels

Verity Biddlecombe

Maryam Perez

Jaycee Gaspar

Jenny Colacicco

Raquel Bowman

Erum Tasneem

Audrey Yeager

Kymona Tracey

Kelly Griglione

Kim Jeffress

Seeka

Zinia Redo

Bridget Casey

Victoria Calvin

Carol Hintermeier

Joylita Dsouza

Linda Westfall

Nandini Karmarkar

Sandhya Iyer

Terri Koszler

Helen Kalb

Ready to shop?  You can access Altenew\’s Shop HERE.

Thanks for stopping by!

Karen