Uncategorized

Altenew Wildflower Paper Crafting Collection Release Blog Hop + Giveaway

Hello friends!  I love paper, which I think  is one of the many reasons I am a paper crafter.  If you are fond of paper then I know you will appreciate Altenew\’s gorgeous new Wildflower Collection too. The release is full of beautiful colors, fun patterns and lovely floral papers plus two gorgeous ephemera packs.  To celebrate, Altenew is hosting a blog hop with beautiful inspiration and fun prizes.  Link To Blog Hop

Cardmaking with Altenew Ephemera and Printed Cardstock

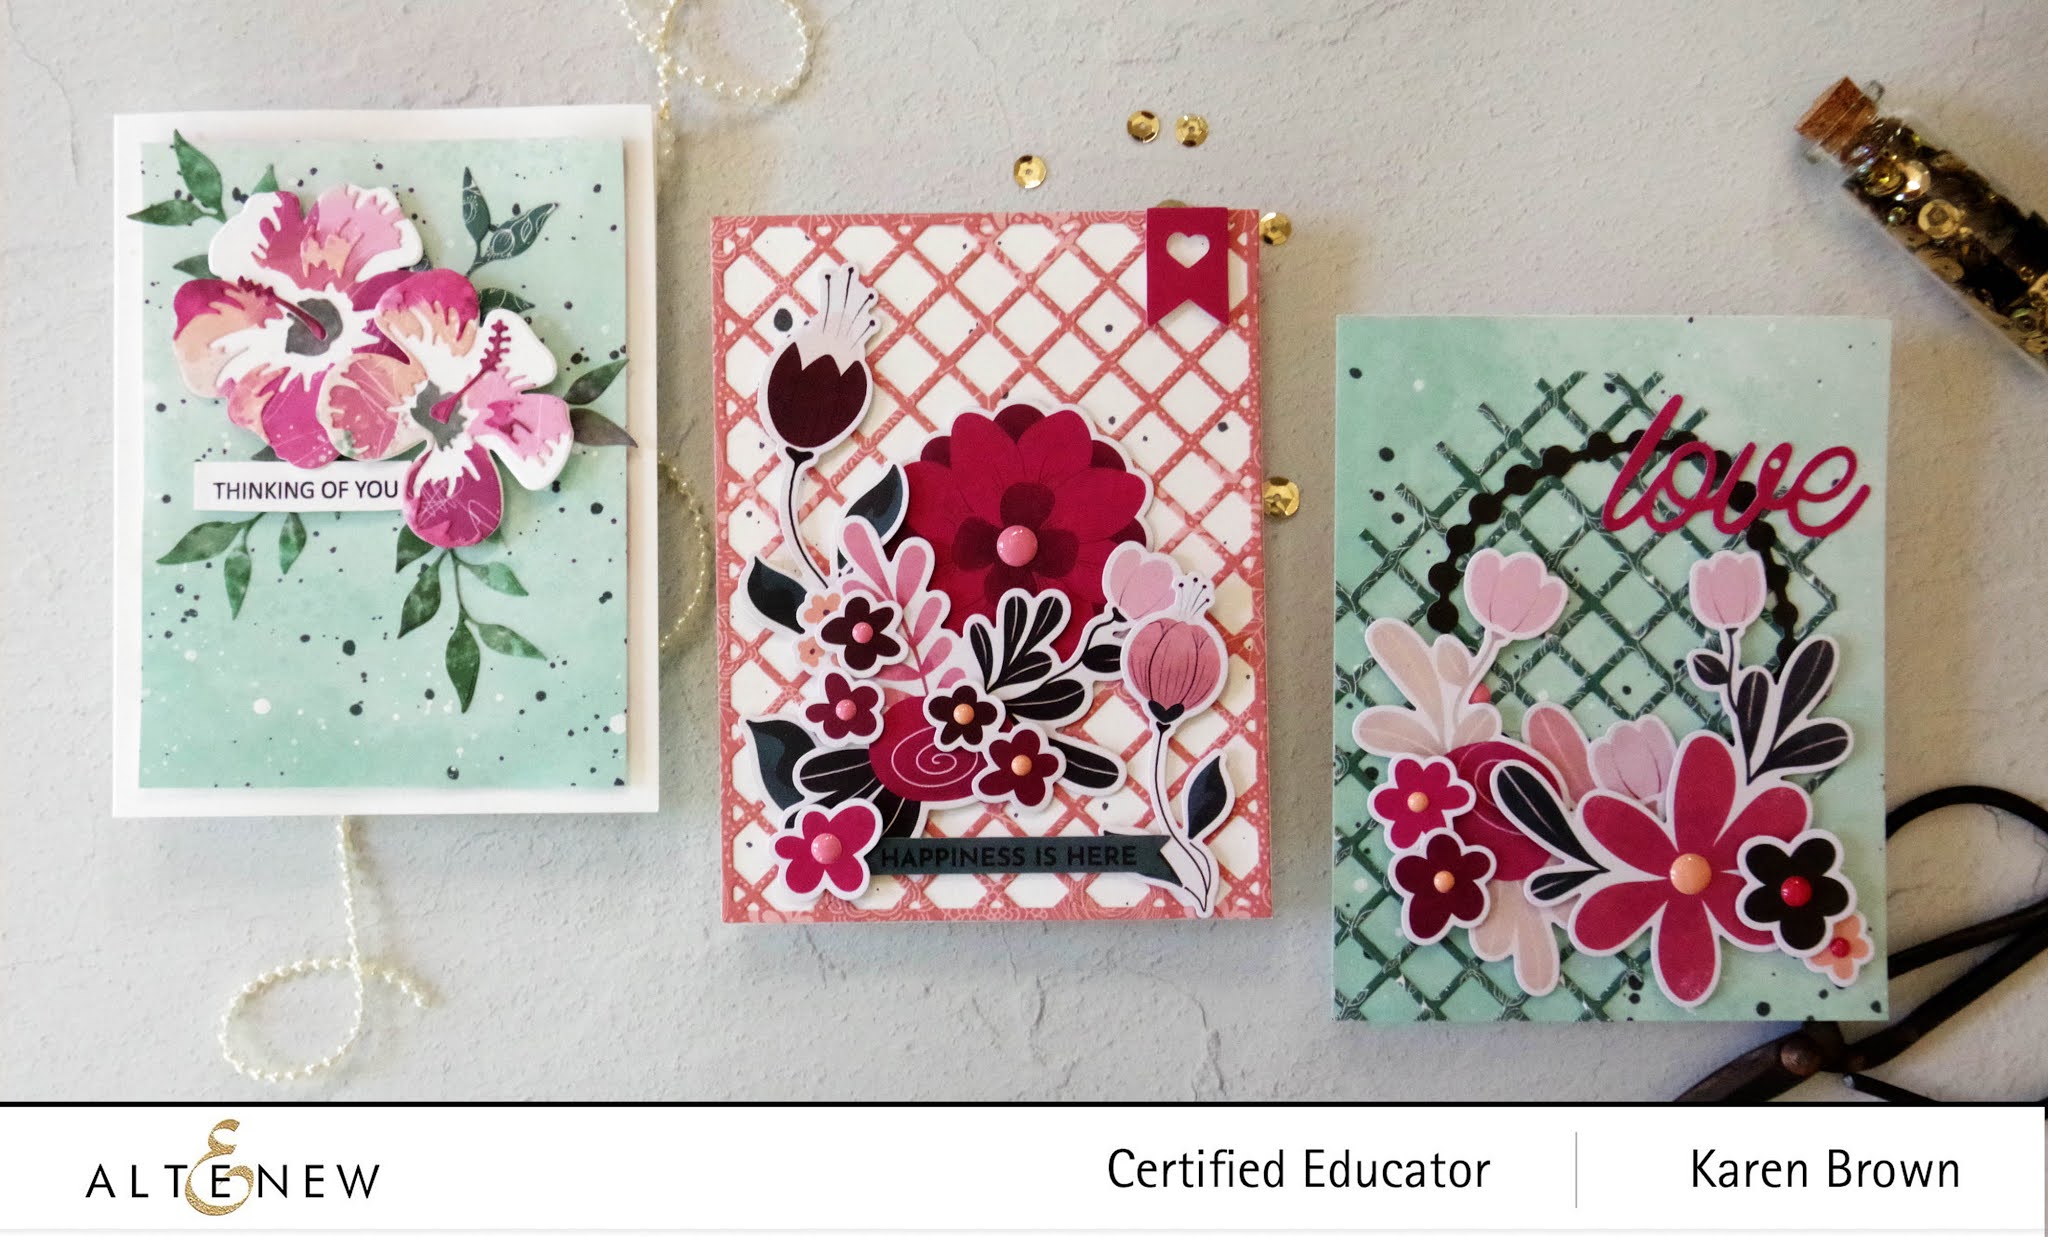
I created three cards for this release.  On my first card, all the colored paper is from the Wildflower Collection 6×6\” Paper Pack.  I love Altenew\’s Hibiscus Garden 3D Layering Die Set and thought it would be fun to die cut the elements from different papers in the pack.  I used two pages for the flower, two different pages for the leaves and then the soft green for the background.  I added a bit of splatter with Altenew\’s Jet Black and Pure White ink sprays.  I pulled the sprayer out and tapped the hose for pefect splatter each time.  So much faster than mixing ink each time.

Altenew Hibiscus Garden 3D layering dies


The second  card uses Bitty Bits Ephemera for a fast and colorful card.  For the background, I again splattered a white card base with Pure White and Jet Black ink splatters.  Next I used the Garden Trellis Cover Die and patterned paper from the Wildflower Collection 6×6\” Paper Pad  to die cut a lovely background overlay.  I then arranged and layered the ephemera and adhered with foam tape. The packet has loads of die cuts, so I have plenty left over for future projects.  I finished off the card by adding Cherry Blossom Enamel Dots
Quick and Simple Altenew Cardmaking kit


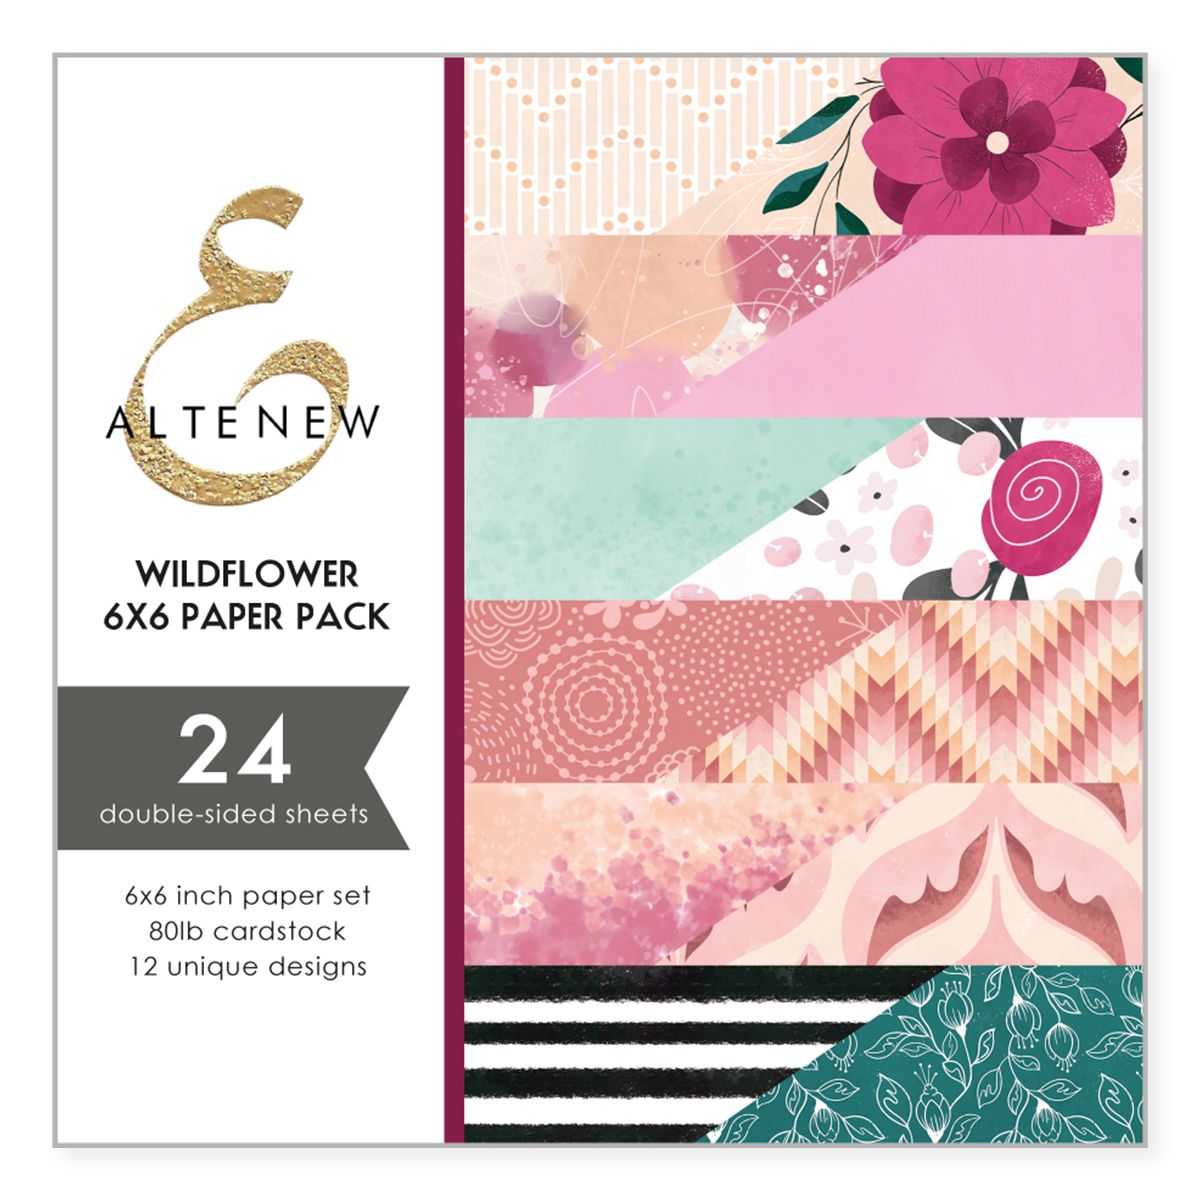
My third card is similar with a Garden Trellis die cut overly cut from a page from the Wildflower Collection 6×6\” Paper Pad.  The background is again a paint splattered page from the same pad.  I then arranged and layered ephemera  from The Pink Posy Pack.  Lastly, I added Cherry Blossom Enamel Dots to the flower centers.

Altenew Card Kit


There is a great Wildflower Paper and Ephemera Bundle available as well as a Wildflower Paper Crafting Jump Start Class

Giveaway Prizes:

$200 in total prizes! To celebrate this release, Altenew is giving away a $50 gift certificate to 2 lucky winners and a $20 gift certificate to 5 winners! Please leave a comment on theAltenew Card Blog and/or each designer’s blog post on the blog hop list below by 05/05/2021 for a chance to win. 


Altenew will draw 7 random winners from the comments left on each stop of this blog hop and announce the winners on the Altenew Winners Page on 05/07/2021.


Blog Hop:

Altenew Blog

Nathalie DeSousa

LauraJane

Patricia Roebuck

Virginia Lu

Michelle Short

Tenia Nelson

Amanda Baldwin

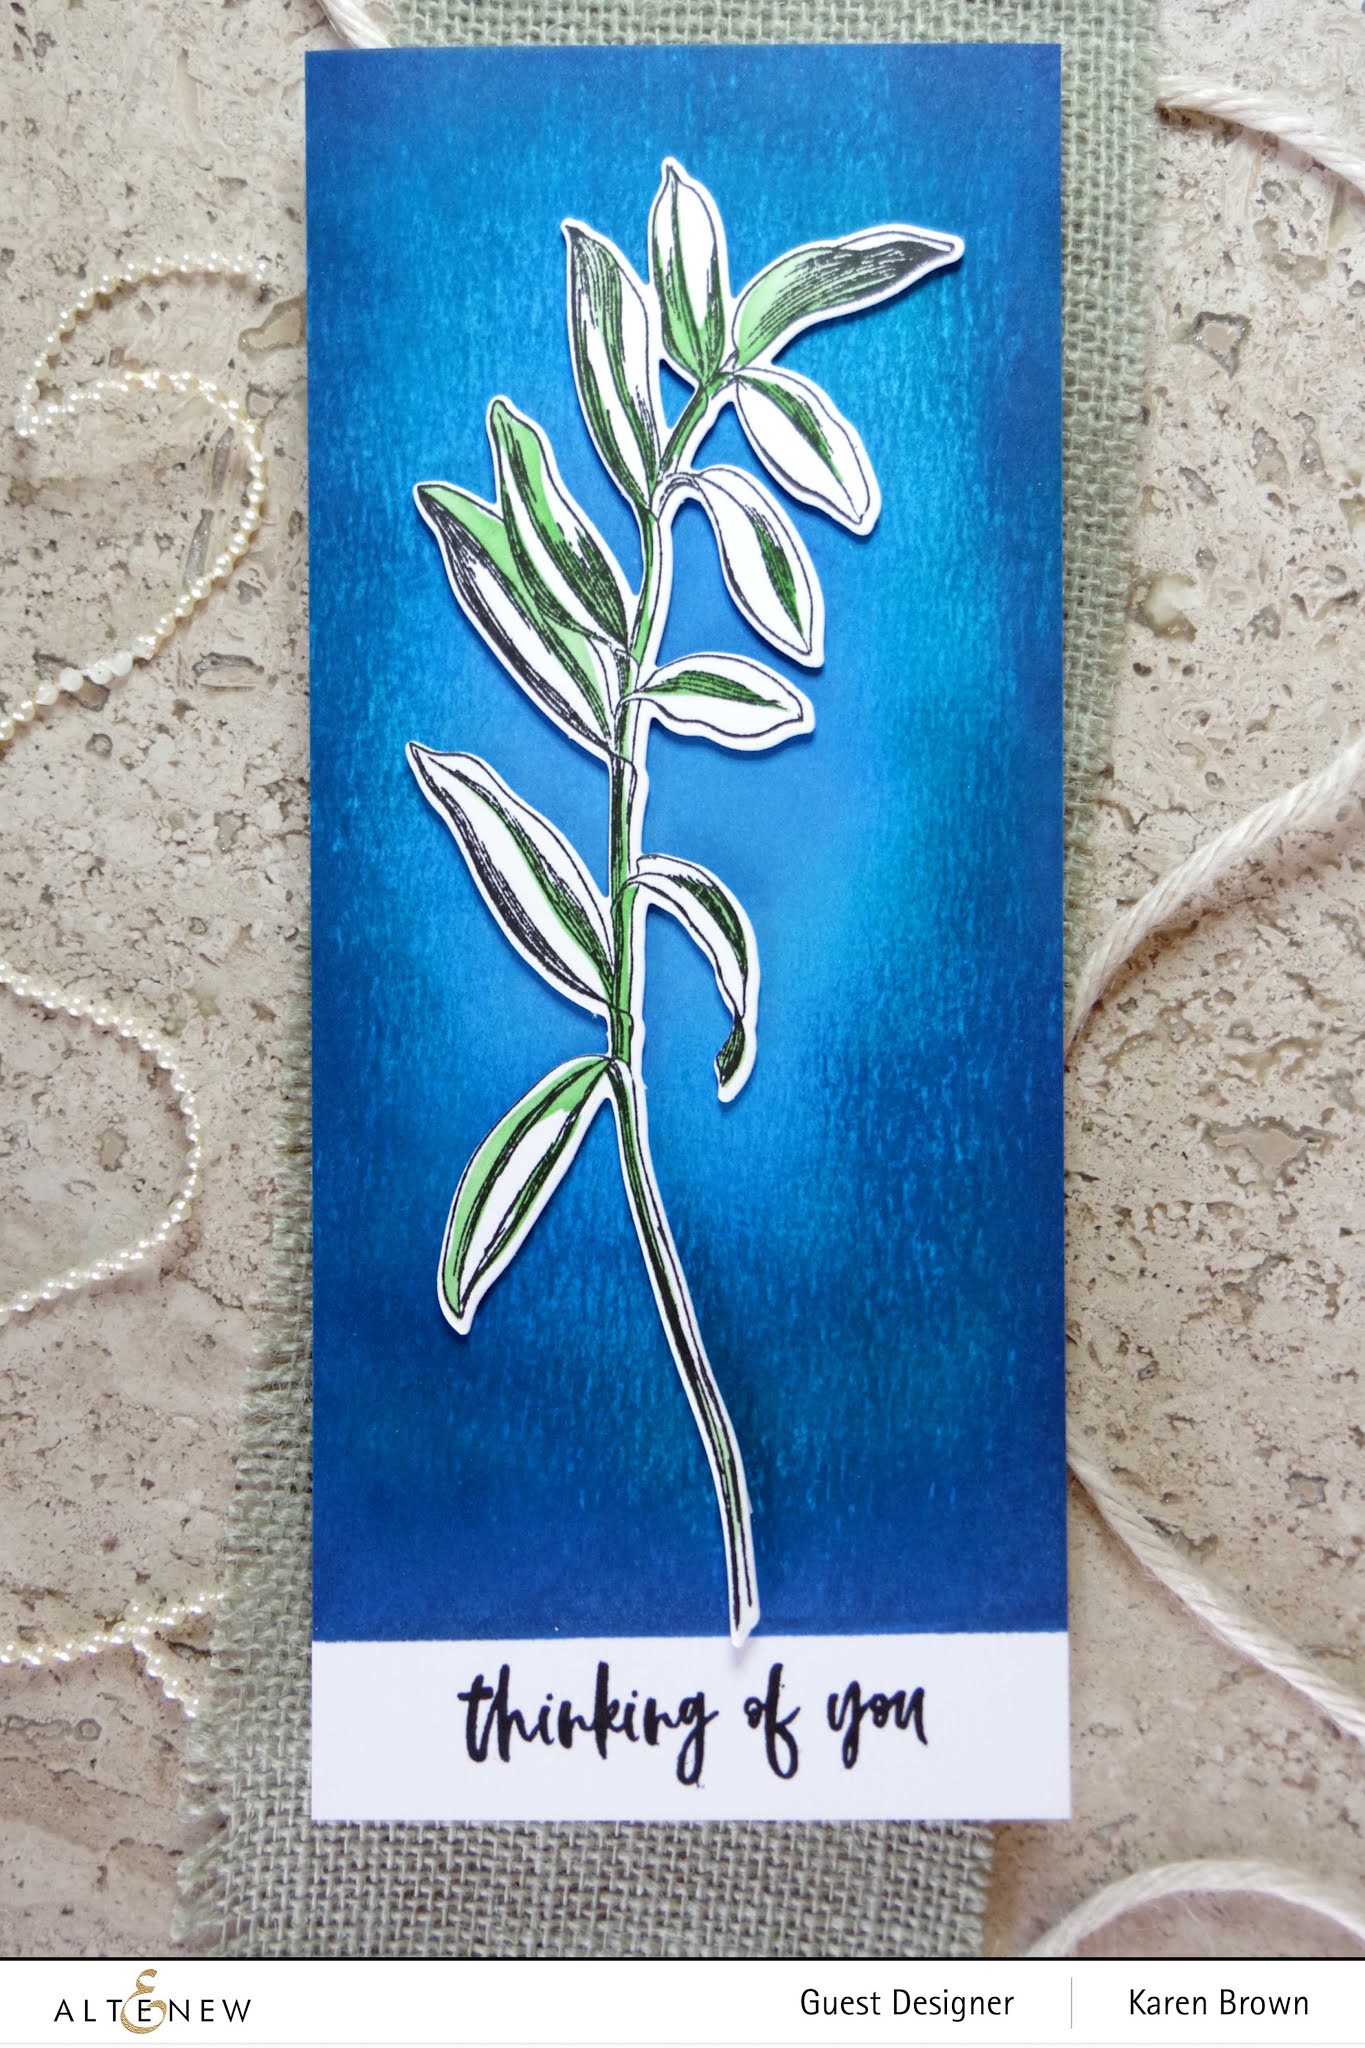
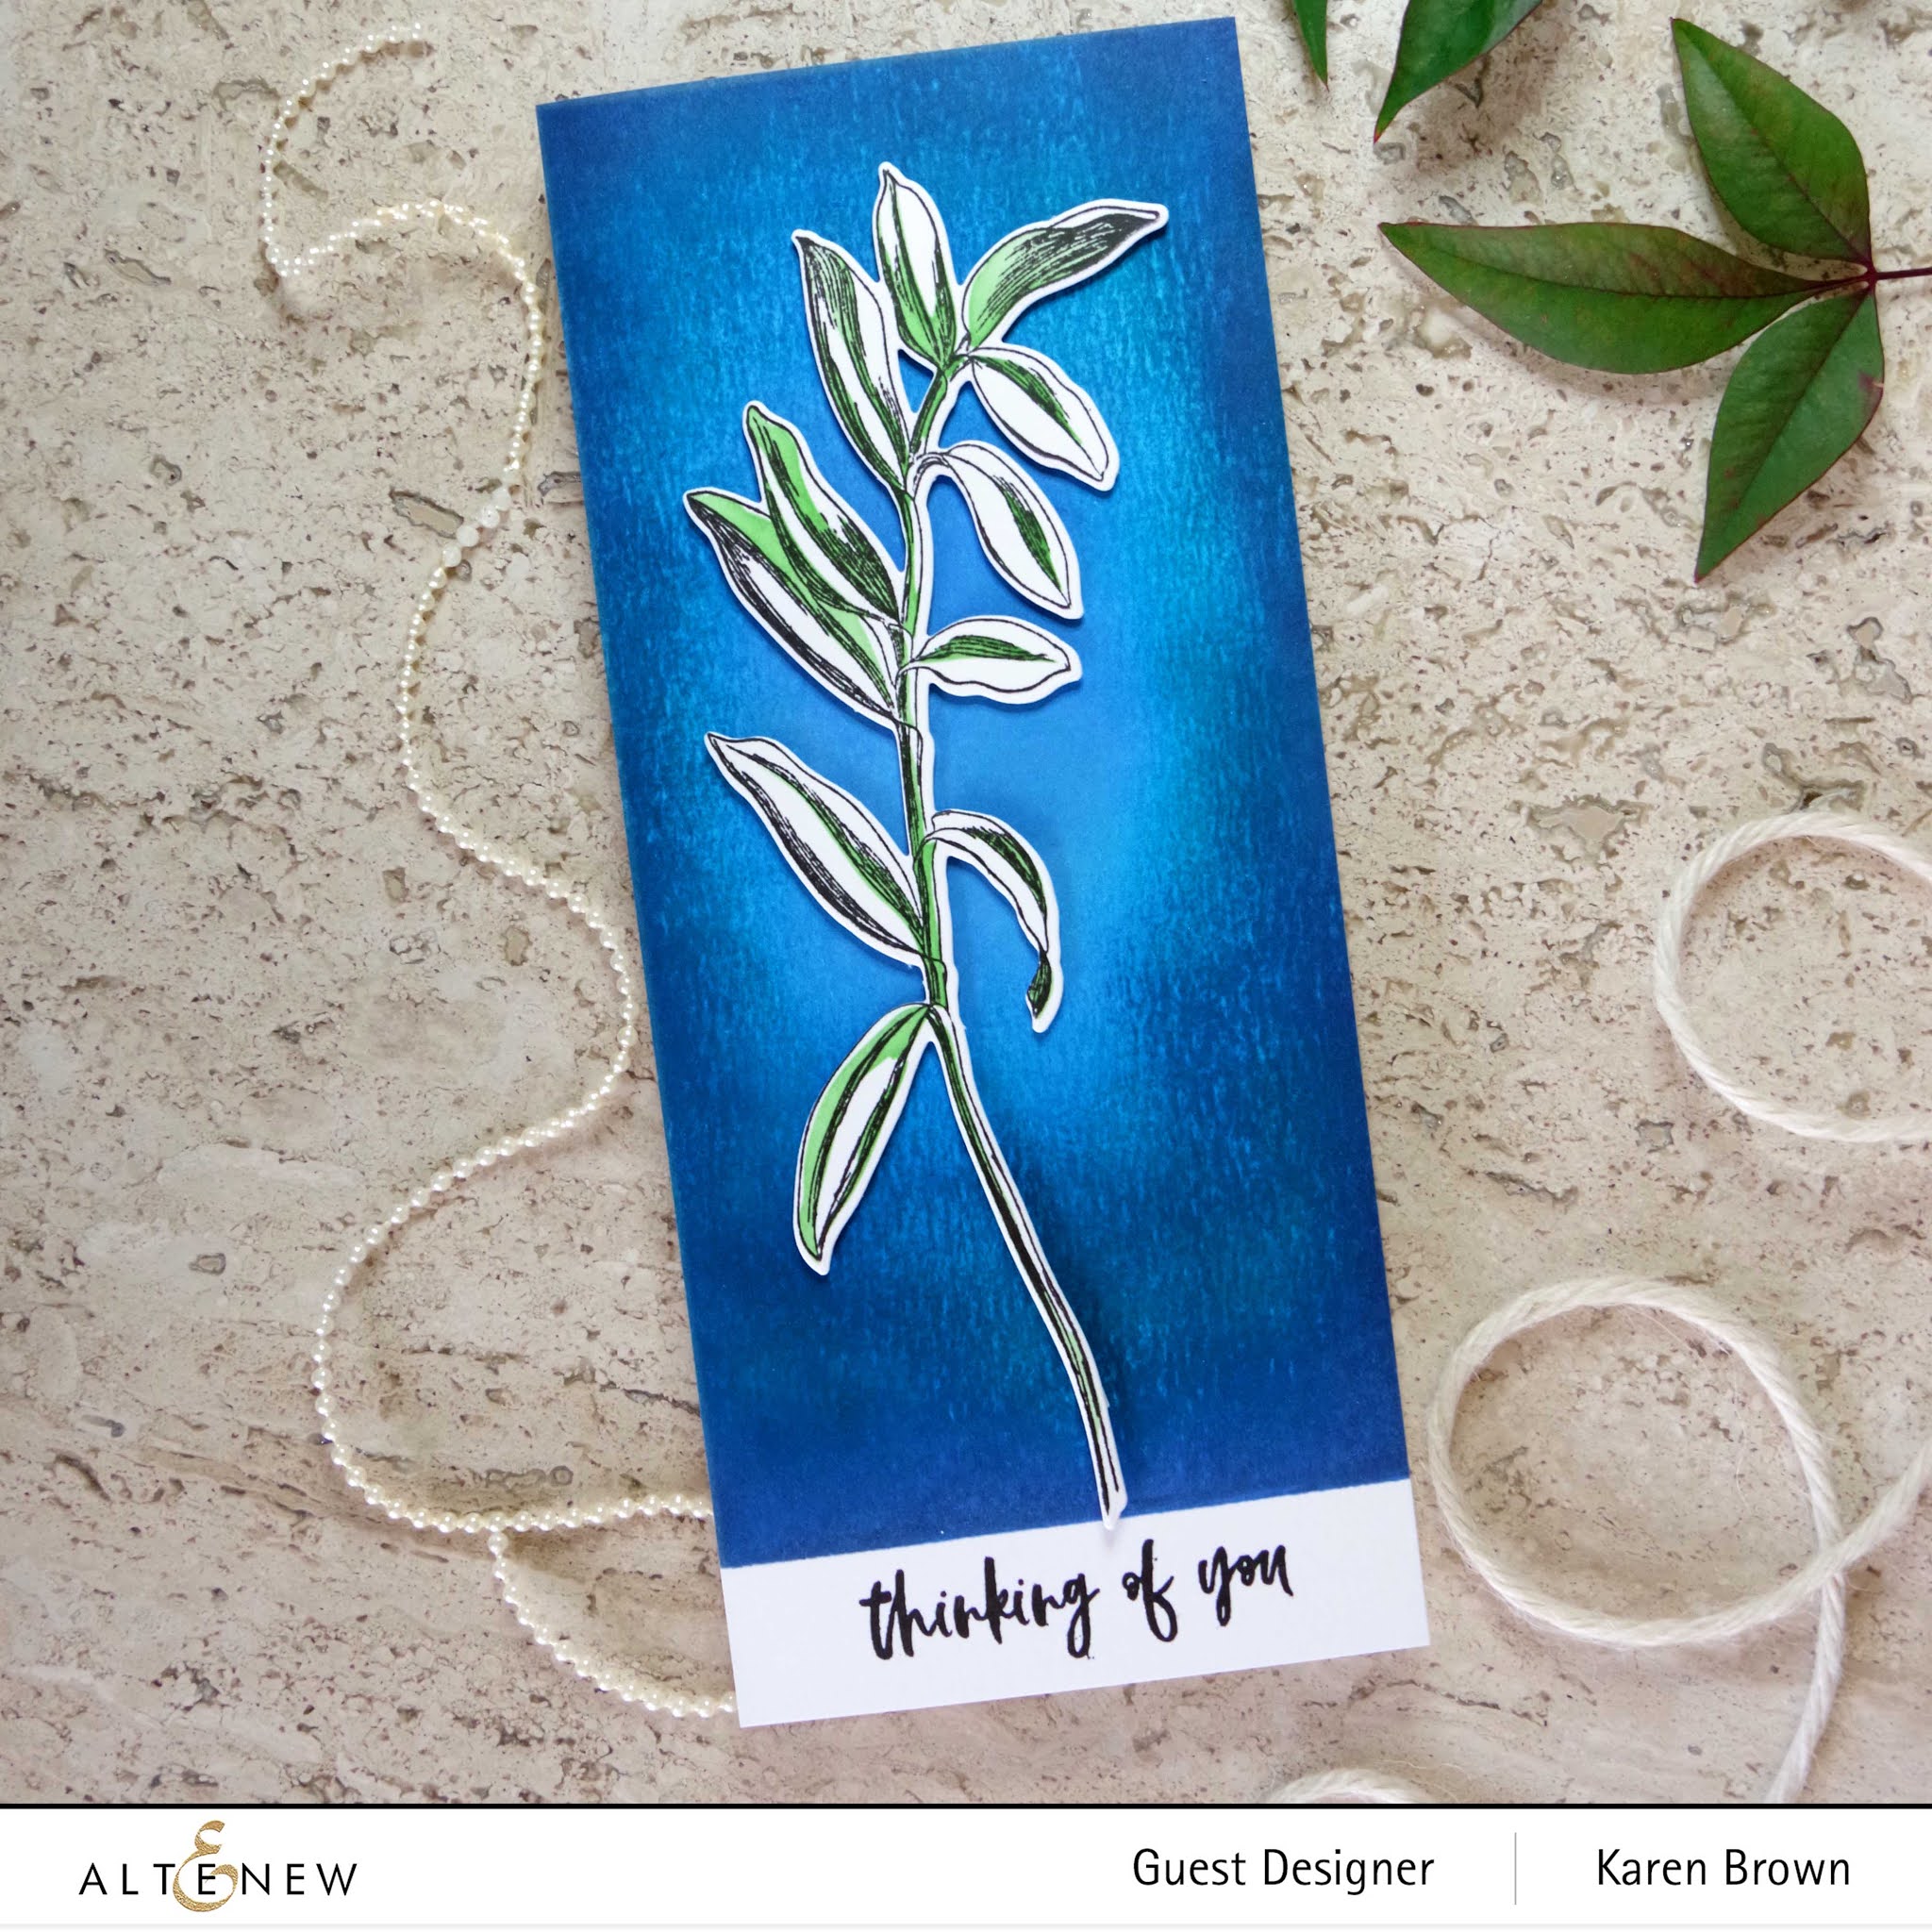
Karen Brown   You Are Here!  🙂

Lilith Eeckels

Verity Biddlecombe

Maryam Perez

Jaycee Gaspar

Jenny Colacicco

Raquel Bowman

Erum Tasneem

Audrey Yeager

Kymona Tracey

Kelly Griglione

Kim Jeffress

Seeka

Zinia Redo

Bridget Casey

Victoria Calvin

Carol Hintermeier

Joylita Dsouza

Linda Westfall

Nandini Karmarkar

Sandhya Iyer

Terri Koszler

Helen Kalb

Ready to shop?  You can access Altenew\’s Shop HERE.

Thanks for stopping by!

Karen

Uncategorized

Altenew 7th Anniversary Blog Hop Day 4 + Giveaway (over $1,400 in Total Prizes)


Happy Birthday Altenew!  I am honored to be celebrating this day along with such a talented group of designers and sponsors.  Altenew Cosmos Acrylic die cut flowers.

Die Cutting Floral Images From Acrylic Gelli Plate Prints

Recently, I spent a fun day making Acrylic Gel Press Monoprints and thought it would be fun to die-cut some of the images and make a few high contrast colorful birthday cards.  I used my favorite Altenew Craft-A-Flower kit, Cosmos Layering Dies for each of my projects.  

I sorted through my prints and selected bright colors that I thought would look nice on a card.  The first print was loosely brayered with turquoise and brown acrylic ink.  The flowers were die cut from three monoprint panels:  orange/red/gold; olive/yellow/gold and the whitish elements were cut from panels where I brayered off ink in between prints, so they have more white areas.  My sentiment is from an ancient labeler I had at the house.

Gel Press Die Cut Flowers
I love the background on this next card!  I put blue, yellow and olive on my press and then brayered gold over the Narrow Brick Stencil, which gives a beautiful textured look.  I used the Rounded Rectangles Die Set to trim down my panel.
Gel Press + Die Cut Flowers for a card.

The flower was die-cut using the  Cosmos Craft-A-Flower Kit.

Acrylic Monoprint die cut flower

For this last card, the background is from the same panel as card 1.  I again used the Rounded Rectangles and Cosmos Layering Die Set.  The sentiment is from the  Essential Sentiment Strips,

Gelli Print Handmade Card

   I think this makes a happy card.

Turquoise and Red Floral Card

Giveaway Prizes

Over $1,400 in total prizes! Altenew is giving away a $70 gift certificate to 5 lucky winners and one Altenew Academy classto 15 lucky winners. There are also 19 awesome companies/crafty friends who are celebrating with us, and they are offering the following prizes:


Be sure to leave comments by 4/18/2021 for a chance to win one of 41 prizes! To make the hop more exciting, start your comment with \”Hi from (city or country where you\’re from)!\” 41 winners will be chosen at random from the comments left on any of the blogs listed below and will be announced on the Altenew Card Blog on 4/24/2021.


So happy to see that you are hopping!  If you arrived from Auzz Trinklets N Krafts, then you are right on track.


Altenew Blog

Jennifer McGuire

Jaycee Gaspar

My Sweet Petunia

Agnieszka Małyszek

Kristina Werner

Tenia Nelson

Paige Evans

Reiko Tsuchida

Auzz Trinklets N Krafts

Karen Brown                     You Are Here!

Ellen Hutson LLC

Seeka

Katrina Howe


There is plenty more loveliness, so keep hopping…. Ellen Hutson LLC  is next!


Ready to shop?  Be sure to use the free shipping code below:


Special Offer

Enjoy FREE U.S. shipping with code HAPPY7TH or $5 OFF international shipping with code ANNIV21 at checkout. Offer valid from 4/8/2021 at 12:01 am EDT through 4/11/2021 at 11:59 pm EDT. Shop here: https://altenew.com/  Not valid on prior purchases. Cannot be combined with other promo codes. 


I am so pleased you stopped by and would love to hear which card you like best!


Thanks,
Karen
Uncategorized

Altenew Storybook Fantasy Stamps/Dies/Stencils/Embossing Folders Collection Release Blog Hop + Giveaway

Cheerful Rainbow Colored Library Bookshelves

Hi there, I am so happy you stopped by!
Rainbow colored library bookshelves.

Today we’re celebrating the Storybook Fantasy release and I have two cards to share using some of  Altenew\’s new stamps, dies and an embossing folder! If you arrived from Reiko\’s Blog, you’re right on track. If you want to start from the beginning, visit the Altenew Card Blog. Be sure to scroll to the bottom for details about the hop, giveway, free gifts and images of the full release.  Rainbow colored bookshelves

Today\’s card was so much fun to make…sometimes it is great to just sit down and color!  When I first saw this Tall Tale stamp set, I knew I wanted a cheerful rainbow colored library.  I love how happy this stamp is…perfect for birthday and get well cards.  

I stamped and colored three bookshelves and colored with Artist Markers Set F and G.   I wanted lots of shelves on this card so I used the Nesting Slim Rectangle Dies to make a slimline card.  I then cut the bookshelves to make the four shelves.  The Nesting Rectangles make it so easy to make a slimline card. The cut panel is 3 1/2\” wide and 8 1/2” tall.  

Here is a graphic of all the stamps included in the wonderul Tall Tale Stamp Set. 

Ink Blending on 3D Embossing 

Yellow ink blending on dry embossing.

For my second card, I used the  Majestic Blooms 3D Embossing Folder.  After I dry embossed my panel, I used my Large Ink Blending Tool and Warm Sunshine Ink to gently go over the top of the embossing.  I then used my Small Embossing Tool to add a second coat on the highest points. 


I die-cut the Fancy Celebrate Die from black mirror cardstock.  This embossing folder has a gorgeous large image so I created a 6×6 card.  I finished off with  yellow enamel dots from the   New Day Collection.  I like that the set has a rainbow of colors that go with any project.

Altenew Fancy Celebrate Die cut sentiment


You can see Altenew\’s new collection  HERE …and check out these free gift opportunities:

Here are THREE ways to get a FREEBIE to kickstart your creativity! Free gift will be added to cart automatically. 

  • Get a FREE brand new Storybook Fantasy Stamp & Die Release Inspiration Guide (worth $5.99) with every order of high-value Storybook Fantasy release bundles. Shop *Exclusions apply.
  • Get a FREE brand new Creative Jump Start Class with every order from the new Storybook Fantasy release collection from 03/09/2021 through 03/15/2021. Shop HERE
  • Get a FREE brand new Storybook Fantasy Stamp & Die Release Mini Inspiration Guide with every order from 03/09/2021 through 03/11/2021. Shop HERE!

Giveaway Prizes

$300 in total prizes! To celebrate this release,  Altenew  is giving away a $50 gift certificate to 2 lucky winners and a $20 gift certificate to 10 winners! Please leave a comment on the Altenew Card Blog and/or each designer’s blog post on the blog hop list below by 03/15/2021 for a chance to win. Altenew will draw 12 random winners from the comments left on each stop of this blog hop and announce the winners on the Altenew Winners Page on 03/17/2021.


Karen
Uncategorized

Altenew Certified Educators Instagram Blog Hop

Layered Floral Die-Cutting with Altenew’s Cosmos Kit

 I am so excited to be participating in my first Altenew Educator Hop!  I LOVE this month\’s Cosmos Craft-A-Flower Kit and wanted to create another bright springy card.  Here is a LINK to my first card.  

Die-cut watercolored pink flowers

Mixed Media Background

I made a background using the recently released Narrow Brick Stencil.  I mixed Texture Embossing Paste and Shimmer Spray which I then tinted with diluted purple Watercolor from the 36 pan set.  I repeated this and added diluted pink watercolor to a second pile of embossing paste.  I then ran this over the stencil in random locations.  The two colors of brick are the same colors I used on the flowers.  

Altenew Cosmos kit

Water Coloring Panels for Die-Cutting

On two panels of watercolor paper,  I brushed on bold watercolors from the 36 pan set.  I dried the panels and added a second layer so I had really saturated color.  Here is a photo of the three panels I used to make this card.

Before I begin die-cutting I like to take a permanent pen and mark the layering dies with a #1 and #2 for each flower.  It just takes just a minute but then it is so much easier to keep up with the little pieces. After I die cut, I also write the corresponding number on the back of the die-cut in pencil in case they get mixed up on my workspace.  

Pink die-cut flowers with mixed media background

These flowers are so easy to assemble and make such a gorgeous showy flower.  I used liquid glue and foam tape to assemble my card.  To finish, I added Tea Party Enamel Dots.


We would love for you to hop with us!  My Instagram Handle is: @karens_mini 

There are beautiful cards and prizes too….check it out!

Thanks so much for stopping by!
Karen
Uncategorized

Altenew Love & Friendship Stamps/Dies/Stencils/Embossing Folders Collection Release Blog Hop + Giveaway

Altenew Love and Friendship Blog Hop

Hello and welcome!  I am so excited to be hopping along with Altenew for their February 2021 Release!  They have so many beautiful new products!  I was very inspired by this Collection and I think you will be too.

I would love to show you three projects…so keep scrolling.  There are also loads of prizes so check the details below and start hopping!

Masculine Valentine

Altenew Tall Foliage Stamp, Die and Coloring Stencil

The first card is a valentine that I made for my husband using The Tall Foliage Bundle.  I positioned the two die cuts so that to me, they looked like they were dancing.  I ink blended a slimline panel using Altenew\’s Large Ink Blending Tool.  While that panel was drying, I stamped and colored the two elements using the coordinating coloring stencil and Small Ink Blending Tool.   I love the Lagoon leaves (The Rainbow Mini Cube Set) against the green background. The \”So Glad I Found You\” sentiment is included in this stamp set.

TIP:  The first thing I did was make a stamp guide template.  I die cut each element out of sturdy cardstock and then used this as a template to layout my stamp so that everything lined up well.  The stamp is tall and this method worked well for me.  You only have to make the template once and then I just store it with my bundle.  

The The Tall Foliage bundle is gorgeous and  includes the stamps along with loads of sentiments, the coordinating dies, the coloring stencil and I used all three on my two cards.  Altenew also included a multipanel inspiration guide that was very helpful. These two stamps are large…the tall foliage is 7 3/4\” tall and the flower is 6 3/4\” and adds a lot of impact to your projects.

For my second card, I wanted a dramatic background to contrast with the white and green folliage,  so I used the \”direct to paper\” inking method.  I selected 8 different colors of ink pads in shades from turqouise to dark blue.  I rubbed each color in sections of the cardstock and I kept the middle softer and the edges darker.  At first, the background looked like a terrible mess but as you add layers it turns into a bold and complex panel. 

I used the coloring stencil,  Small Ink Blending Tool and  Green Valley Mini Ink Cube Set (Shadow Creek) to shade parts of the leaves.  The sentiment is from the  Inked Lotus Bundle.


I wanted to make a coordinating background for my roses and found the The Organic Linen 3D Embossing Folder from this release was perfect!  The end result was a subtle textured background with a hint of color in the valleys of the panel. 

Organic Linen 3D Embossing Folder

I dabbed a generous amount of pink pigment ink on my work surface and then ran a brayer across the ink.  I then ran the brayer across the embossing folder, placed a sheet of cardstock in and then closed.  I found that I liked the result best when I inked the embossing folder side with the sticker.  Either, side works, but I liked that pattern the best. The sandwich I used was one embossing plate + embossing folder + magnetic shim  + plastic shim.  Note, I only used ONE embossing plate, not two.  This sandwich was recommended by Jennifer McGuire in a video I watched last year.   I did make some other panels using dye ink that I will use in a future blog post. 

3D embossing folder with pink pigment ink.

The roses are from The Bellaroma Hybrid Tea Rose  BUILD A  FLOWER that was released last week.     I wanted to make a valentine for my mom,  so I chose pink for the blooms and  vivid green for leaves.  I used The Green Valley Mini Ink Cube Set.  and used the middle two colors, Green Fields and Shadow Creek.   I added a small piece of Painted Grid Washi Tape to the top of my sentiment for a little added interest.  

Here is a  Link to Altenew\’s Love and Friendship Blog Hop.        


Click HERE to see the entire Love and Friendship Collection.                             

                                                GIVEAWAY:


$300 in total prizes! To celebrate this release, Altenew is giving away a $50 gift certificate to 2 lucky winners and a $20 gift certificate to 10 winners! Please leave a comment on theAltenew Card Blog and/or each designer’s blog post on the blog hop list below by 02/08/2021 for a chance to win. Altenew will draw 12 random winners from the comments left on each stop of this blog hop and announce the winners on the Altenew Winners Page on 02/11/2021.


Altenew is also running a free gift promotion:


                                                BLOG HOP:


Thanks for stopping by!

Karen

Uncategorized

WWC296 – Michelle\’s Challenge: Anything Feminine Goes


Hello, hello and welcome!  This week we are creating feminine cards at The Watercooler Wednesday Challenge and we would love to see your creation in our gallery.  Michelle is our hostess this week.  

I\’ve had my eye on the Altenew Hibiscus Garden 3D die set for sometime and finally bought it.  I wanted to use seasonal jewel tones  so I die cut my pieces from Altenew\’s Enchanting Washes Cardstock.  I like the gorgeous colors and the fact that it is thick like cardstock.  For the leaves I ink blendeded  4 colors of green on watercolor paper.  My background is a light watercolor wash where I then softened the edges with a towel so it fades out.  I dried the panel and then  added purple and black paint spatters.  Next I mixed gesso with Iridescent Shimmer Spray and added more splatters.  I assembled and paired with a Bold Envelope and my birthday card is now ready to mail.

I am also playing along with:

Festive Friday FF0071 I included die cuts, patterned paper (hibiscus), flowers and sentiment.  

UPDATE:  I was excited to see my card was selected as a \”Festive Fave\”!

Crafty Hazel Nuts Patterned Paper Challenge  I used Altenew Enchanting Washes Patterned Cardstock for the two hibiscus.

Karen


Uncategorized

WWC281 – Heidi\’s Challenge: All About Occasions

Hello and welcome!  This is my design team card for Watercooler Wednesday\’s All About Occasions Challenge and Heidi is our hostess.


I\’ve created a birthday card using a faux watercoloring technique.  I used bright summer colors and added a bold birthday sentiment die-cut using navy cardstock. 

Supplies Used:
Altenew Inked Lotus stamp and die bundle
Altenew Golden Peach Embossing Powder
Distress Inks:  Squeezed Lemonade, Mustard Seed, Carved Pumpkin, Pickled Raspberry, Twisted Citron, Mowed Lawn
Simon Says Stamp Happy Birthday die cut
Picket Fences Blending Brushes
Watercolor Paper
Navy Cardstock (for sentiment die cut)
Cream A2 card base

I am also playing along at:
The Flower Challenge: Summer or Fall I love summer and used bright, happy colors that I associate with summer.


Inspired By \”Pretty Blossoms\”  I was inspired by the floral theme and the colors in the bouquet.

I am so pleased you stopped by and hope to see your card in our challenge gallery.

Karen
Uncategorized

Altenew Academy "With A Twist"

I just completed Altenew Academy\’s Class \”With A Twist\” and I created a bunch of cards.  The class was all about trying the unexpected.  I am sharing my favorite card from the series and it was from Class #6 \”Die Cutting With a Twist\”.  Our instructor, Therese Calvird, showed us how to do faux embossing with die cuts.  I had never done this technique before but it does result in a dramatic and showy card.

My Process:

  • I stamped two A2 Bristol panels full of leaves and blooms from Altenew\’s Smile More stamp and die bundle.
  • I colored them with Zig markers and used a damp brush to blend the colors.
  • I die cut everything.
  • I wanted to use a big scripty sentiment so I heat embossed Enjoy on an A2 card front made of Bristol cardstock and Your Birthday on a scrap of black cardstock.
  • I played around with the layout and when I was happy, I glued the die-cuts down with liquid adhesive.  I was sure to leave all the edge images over the edge and then I took sharp scissors and trimmed  the die-cuts flush to the edge.

Pro Tips:
  • Stamp and color a lot of images.  For this card I stamped and colored two complete A2 panels worth of  blooms and leaves.  You don\’t want the card to look skimpy and there is quite a bit of waste after your trim around your card.  
  • I made my own card base out of Bristol cardstock so the cardbase and die-cuts would blend well. 
  • I stamped one panel with Ranger Archival Jet Black ink and one with Versamark Onyx black and found I got a better result with the Onyx Black. The Archival required multiple stamping and after drying for one day, one bloom still smeared a bit.
I am also playing along with:
Allsorts \”Flowers All Over\”  I \”faux embossed\”  flowers all over my cardbase.

The Flower Challenge \”Summer or Winter\”  The answer for me is summer!  I love summer…the sun, warm weather clothes, bright colors, long days….  These daisies are very summery to me.  

Thanks for stopping by!
Karen

Uncategorized

Altenew Academy – Cards For the Guys

Hello and welcome.  Today, my blog post is about making masculine cards and I\’ve chosen to do a color blocking background.  Fun, bright and eye-catching.  
Altenew Academy Cards for the Guys using Color Blocking with Altenew Mega Alphabet T die and Large Thanks Sentiment die.
I started by cutting four 2×2 squares from brightly colored card stock.  My inspiration came from Jennifer Rzasa and her class on Pop Art Color Blocking.  Once the squares were cut, I taped them together, trimmed the edges for a nice even line and then backed with craft foam for dimension.  

Next, I die cut the \”T\” from bright blue card stock and the \”thanks\” from lavender cardstock.  I die-cut each three times and then carefully glued them together for nice dimension.   I initially was going to back them with foam but didn\’t like the white shadow which I thought distracted from all the bright bold colors.  

I made a 4 1/4\” x 4 1/4\” card base and then attached the color blocked panel.  I weighted it for a few minutes with an acrylic block
Supplies Used:
Altenew Mega Alphabet T die
Altenew Large Thanks sentiment die
6 shades of brightly colored card stock
tape
liquid glue
craft foam
white cardstock for base.

I am also playing along with: Try It On Tuesday \”Cut It Out!\” Challenge  This card is all about cutting as every element was either cut with a paper trimmer or die cut.  

I really like how the card turned out and think I will do some more color blocking in the near future.

I am so pleased that you stopped by!
Karen
Uncategorized

Altenew Academy All About Layering 2

Hello, thank you for stopping by.  Today\’s blog post is showcasing my class project for Altenew Academy\’s All About Layering 2 class.  I am using Altenew\’s Bride to Be stamp and die bundle.  The cute little starflowers were my favorite.
I had not used layering stamps prior to starting Altenew Academy so I continued stamping loads of images which resulted in a nice full card.  Our instructor used an acrylic block as opposed to a stamp positioner so I followed her lead and free stamped all my images.  This was great practice for me.  
I love paint splatters on other people\’s cards but am not usually happy with the result on my cards, so I decided to practice that technique as well.  Because of this, I went very light with the ink splatters.  I think next time I will try a few more.  Lastly, I heat embossed the sentiment for a rich shiny accent.  

I think the end result is a bright, fun and cheerful card. 


Karen