cardmaking · Rainbow Colors · Stamping

Hero Arts Balloon Bash! Stamping, Ink Blending and Stenciling

Ready to party? I had a blast creating this bright and festive birthday card using brand-new goodies from the Hero Arts Let’s Celebrate Collection! This project is perfect if you’re looking for a quick, colorful card that makes a big impact.


A handmade card with seven colorful stenciled balloons in rainbow colors, layered with foam tape. Balloons feature squiggles, dots, and stripes. Sentiment reads "It’s Your Day!"

Card Details: Rainbow Balloons That Pop (Literally!)

This card features a happy cluster of seven stamped, ink-blended, and die-cut balloons, made with three coordinating products:

The process was pure fun:

  • I started by placing the cover plate die in my stamp positioner and aligning the large balloon stamp (a cluster of five balloons) over the die. Once perfectly placed, I closed the lid so the stamp was now on the positioner lid, removed the die, and was ready to stamp and die cut with precision. There is a process photo below.
  • Since I wanted seven balloons, I stamped, inked, stenciled, and die-cut the design twice.

Color & Stencil Party

Each balloon got its own personality with Hero Arts Reactive Inks in cheerful rainbow shades. I blended two shades per balloon, adding darker ink toward the bottom for dimension. The layering stencils let me add playful squiggles, dots, and lines to five of the balloons for extra party vibes.

Reactive Inks Used: Taffy, Berry Smoothie, Lemon Drop, Creamsicle, Key Lime Fizz, Green Apple, Pool Party, Blue Raspberry, Splash, Blue Hawaii, Thistle and Grape Slush.

Two balloons are adhered flat to the background, and five are popped up with foam squares so they practically float off the page! 🎈

I finished the design with a stamped “It’s Your Day!” sentiment from the Party Fans Stamp Set.

Festive rainbow hued balloon card featuring Hero Arts Balloons stamp, cover plate die and layering stencils.  CM790, DF241, SA299.

Pro Tips for Balloon Perfection:

  • Use two coordinating ink colors per balloon to make them feel round and full.
  • Add stenciled patterns after ink blending for clean, vibrant detail.
  • Pop some balloons up on foam tape to add playful movement and dimension.
7 stamped, rainbow ink blended, stenciled and die cut dancing and floating balloons on a handmade card perfect for Birthdays, Graduation or any festive occasion.

This design is fast, festive, and beginner-friendly—but has that pro finish thanks to the coordinated stamps, dies, and stencils.

Stenciled and stamped card with 7 rainbow colored balloons floating across the background.

What would you celebrate with this set? Birthday? Graduation? Just-because balloon-o-rama?

cardmaking · Die cutting · Hot Foiling

Spring Whimsy with Hero Arts: Bold Colors, Butterflies & Birthday Cheer

Spring is in the air, and so is a burst of bold color and whimsy! Today, I’m taking a closer look at the new Hero Arts Spring Whimsy Collection with four vibrant cards featuring hot foiling, ink smooshing, ink blending, heat embossing, and die cutting. Let’s get crafty!

>>> You may also be interested in my recent video and blog post: Easy and Festive Cardmaking <<<

Card 1: Hot Foil Butterfly Elegance

This card is all about shimmer and movement! I started with an aqua ink-smooshed background—the perfect backdrop for a gorgeous, hot-foiled butterfly. The butterfly itself was hot foiled onto an ink-blended panel of soft pinks, corals, and oranges before being die cut and centered on the background.

A hot-foiled butterfly in pink, coral, and orange, die-cut and placed on an ink-smooshed aqua background.

My Process for Creating This Foiled Butterfly Card:

Pro Tip: Ink smooshing is a great way to create organic, watercolor-like backgrounds.

Gorgeous Hot Foil Glimmer Butterfly card on a dreamy aqua ink smooshed background.

Card 2: Striking Ink-Blended Background & Black Butterfly

A bold ink-blended background in Fruit Punch, Creamsicle, and Taffy with a striking black die-[cut butterfly as the focal point.

For a dramatic look, I ink blended a bold background using Fruit Punch, Creamsicle, and Taffy inks. These warm hues set the stage for a striking black die-cut butterfly, creating a high-contrast, modern design.

Key Product: Delicate Butterfly Fancy Die (also used on card #1 and #3)
Bold pink, coral and orange ink blended background with a lovely die cut black butterfly focal element.  Hero Arts Delicate Butterfly Fancy Die.

Card 3: Heat Embossed Floral Background + Die Cut Butterfly

A white heat-embossed floral background over a vibrant coral and pink ink-blended panel, accented with a small black butterfly and a die cut “hello” sentiment.  Hero Arts Whimy Floral Bold Print Stamp.

This card keeps the same coral, pink, and orange hues but introduces texture with the Whimsy Floral Bold Print background stamp. I heat embossed the pattern in white over my ink-blended panel and added a small black die-cut butterfly and a “hello” sentiment for balance.

Key Products Used:

Hero Arts Floral Bold Print Stamp heat embossed over an ink blended gradient from soft orange to hot pink.

This next photo shows two cards I created with the Delicate Butterfly Fancy Die.

2 handmade cards featuring Hero Arts Delicate Butterfly Fancy Dies.  Both cards have an orange to pink gradient color scheme with black die cut butterflies.

Card 4: Elegant Window Birthday Card

A birthday card featuring a 9-pane Hero Artd Elegant Window Die with small, Copic-colored birthday images and a stamped “cheers” sentiment with Mist  blue cardstock.

For a completely different vibe, I created a charming birthday card using the Elegant Window Fancy Die. The die creates a beautiful 9-pane window, which I die cut from Mist cardstock. Each pane features a tiny, Copic-colored stamped image from the Spring Bunny Stamps, Our Day Messages, and Birthday Animal stamp sets. A simple “cheers” sentiment ties it all together.

Charming 9 window pane stamped and die cut birthday card featuring small stamped images of cake, party hats, balloon animal, duck, butterflies and flowers.

This collection is packed with so much creative potential! Whether you love hot foiling, ink blending, or stamping, there’s something here for every cardmaker. I hope these designs inspire you to play with color and try new techniques!

Four beautiful handmade cards created with Hero Arts Spring Whimsy Collection + hot foiling, ink blending, stamping, ink smooshing and die cutting.

Thank you for stopping by!

Cardmaking Video

Video Hop | Easy, Fun & Festive Birthday Cardmaking: Color, Shine, Celebrate!

Can you ever have too many birthday cards? I think not! Today, I’m sharing a fun, modern, and eye-catching birthday card featuring the Hero Arts Celebrate Stamp & Stencil Set—perfect for anyone on your list!

Click link to see the Hero Arts Spring Collection.


You can watch the video above, or you can click the link HERE to watch on YouTube.

Plus, this video is part of a Video Hop, so be sure to check out the other fabulous creators linked below.

A vibrant handmade birthday card featuring four colorful stenciled banners with flowers, created using the Hero Arts Celebrate Stamp & Coloring Stencil Set and Glitz Inks.

Bold Colors & Easy Techniques

For this card, I started with a large focal stamp of four birthday banners—such a fun and festive design! Instead of traditional coloring, I brought in Glitz Inks and Color Layering Stencils to add French Pink, Naples Yellow, Byzantine Green and Egyptian Blue to the banners. These inks add beautiful shimmer that makes the design pop without needing extra embellishments (but you know I couldn’t resist a few black enamel dots in the flower centers!). This is totally optional, but I used my Rounded Rectangle Infinity Dies to round the corners and trim down my panel.

Pro Tip: Glitz Inks are not only stunning, but they’re also super easy to clean up! A quick rinse, and your brushes are good as new.

Festive Birthday card perfect for men, women and children.  The card features 4 birthday banners stamped and colored with layering stencils in pink, yellow, aqua and green.

Organizing My Stamps & Dies

I also wanted to share a quick tip on storing stamps and dies. I use Hero Arts Magnetic Sheets and Storage Sleeves, which help keep my dies neat, tidy, and easy to find. No more hunting for that one missing die—it’s all in one place and ready for my next crafting session! I also love their Stamp Storage Sleeves. More details in the video.

Key Products Used:

Join the Celebration! Blog Hop Order:

This card was a joy to make, and I hope it inspires you to break out your Glitz Inks and stencils! Be sure to check out the Video Hop and leave a comment on my video—I’d love to hear what you think! And tell me… do you think it’s possible to have too many birthday cards? (Spoiler: I don’t!) 🎉

cardmaking · Die cutting · Tutorial

Make a Splash: Postage Collage Summer Beach Card

Nothing says “happy birthday” like a burst of bright colors and a little beachy fun! Fresh off a trip to the shore, I felt inspired to bring the ocean breeze into my craft room—minus the sand in my die-cutting machine. Today’s card features stenciled beach balls, a fun postage stamp collage, and plenty of shimmer and shine. Let’s dive in!

Bringing the Beach to Paper: Creative Ways to Use Layering Stencils

A vibrant beach-themed birthday card featuring stenciled beach balls in yellow, green, and blue with a touch of shimmer.

To set the seaside scene, I stenciled a flurry of yellow, green, and blue beach balls bouncing across the card. But what’s a day at the beach without a little shimmer? I used Glitz Inks to add a splash of shimmery shine.

Key Products Used:

Ink Blending Tips for a Seamless Look

  • Easy to Use 3 Layer Stencil: I started by stenciling my background with the fun Beach Ball Stencil. To keep my paper and stencil in place, I used my Sticky Grip Mat, which worked perfectly.
    • Click HERE to read my review on Sticky Grip Mats.
  • Use a circular motion: This prevents harsh lines and gives a softer, airbrushed effect. I also like to change direction frequently.
  • Let the shimmer do its thing: Glitz Inks add an extra pop. I used two shimmery Glitz Inks + Summer Sky for a really beachy vibe.

Postage Perfection

Nothing elevates a card quite like a postage stamp theme, so I pulled out my Waffle Flower Postage Collage die and stamp set to bring in some postal flair. Here’s what I included:

  • Postage-style die adds a fun and playful focus to your project, allowing pops of the orange mat to peek through the holes.
  • Stamped details like “sending hugs”, “50 cents”, “hugs inside”, and classic cancellation squiggles for that perfect mail-ready touch.
  • A crisp white scripty “Happy Birthday” sentiment with a black shadow, keeping it bold and readable amidst all the beachy goodness.
The Waffle Flower Postage Collage die-cut panel with stamped details like "sending hugs" and cancellation marks, framed by an orange mat.  Fun Beach Ball themed Birthday card with blue, yellow and green layered stencil ink blending.

The Final Splash

With the main panel matted in orange, this card bursts with sunny energy—perfect for anyone’s birthday, no matter their age! The beachy vibe, vibrant colors, and postal elements make it a playful, happy way to celebrate.. ☀️📬✨

cardmaking · Die cutting · papercrafting

Royal Inspiration: Playing Card-Themed Cards | Spellbinders

Die-cut handmade cards featuring The Queen of Hearts and King of Hearts with a playing card theme.  The dies are from Spellbinders Jack of All Trades Collection:  Royal Court and Pip and Rank.

Welcome, welcome! Today, we’re diving into the world of handmade cards inspired by the regal charm of playing cards. Our stars of the show? The Queen of Hearts and King of Hearts, reimagined with a dreamy color palette of lavender, plum, and aqua. These cards are extra special because they’re personalized to look like my daughter and son-in-law, making them a true celebration of love and individuality. These cards are perfect for Valentine’s Day, birthdays, anniversaries, or any occasion that calls for a touch of royal flair.

Key Products Used:


King and Queen of Hearts playing card theme die cut handmade cards.  Wonderful customizable ideas for Weddings, Anniversaries, Birthdays and more.

These cards were so fun to make! You can personalize the peeps in so many different ways…favorite colors, hair and eye color, props….

I used Cardstock in the following colors: Passion Flower, Amethyst, Plum, Antique Ivory, Cup O Joe, Periwinkle and Meadow plus Brushed Gold accents.

Queen of Hearts: Elegance in Lavender

Queen of Hearts handmade card from Spellbinders Reversible Royal Court die set.  Great for Birthdays, Anniveraries or Valentines Day.

This Queen of Hearts card is a tribute to my daughter, featuring elements that reflect her grace and personality.

King of Hearts: Bold and Regal

King of Hearts handmade card from Spellbinders Jack of All Trades Collection.  Great masculine card for birthdays or Valentines.

Inspired by my son-in-law, this King of Hearts card brings a bold and charismatic vibe to the design.

Crafting these playing card-themed designs has been such a delightful journey of personalization and creativity. Whether you’re celebrating a couple you adore or channeling your own inner royalty, these projects are a great way to share the love. So, what will your Queen and King of Hearts look like?

Karen

cardmaking · Die cutting

A Birthday Card Full of Whimsy: Winnie the Pooh and Piglet Scene

Whimsical blog post showing how I created a charming Winnie the Pooh (and Piglet too!) die cut birthday card from Spellbinders Classic Pooh Collection.

Sometimes, a handmade card can transport us to a place of pure nostalgia and joy. That’s exactly what this Winnie the Pooh-inspired birthday card does! With die cuts, soft ink blending, and a cheerful color palette, this whimsical creation captures a moment straight out of the Hundred Acre Wood.

Key Products Used:

You might also enjoy reading my recent post: Cozy Little Hello Cards with BetterPress | Winnie the Pooh Scene Cards.

A handmade Winnie the Pooh-inspired birthday card featuring Pooh and Piglet holding hands, an orange balloon, a honey pot, and a soft green grass background framed with a periwinkle postage stamp border.

Creating the Scene

This card brings to life a heartwarming scene of Winnie the Pooh and Piglet holding hands, walking side by side. The duo is accompanied by a playful orange balloon on a string, gently floating above. A honey pot rests on the ground, completing the sweet and simple vignette. The background features softly ink-blended green grass, framed by a charming postage stamp-style border in periwinkle blue, adding just the right touch of whimsy.

Techniques for Dimension and Charm

The die cuts are the stars of this card, and a touch of light ink blending adds depth and dimension to each element. Winnie the Pooh’s honey-colored body gets a subtle gradient to make him pop, while Piglet’s pink details are gently shaded for softness. The balloon shines bright in orange, with its string creating a delightful sense of movement.

The grass is ink blended in gentle greens, giving the scene a soft, storybook feel. Meanwhile, the periwinkle frame ties everything together with its postage stamp shape, reminiscent of a cherished letter from the Hundred Acre Wood.


Winnie the Pooh (and Piglet too!) handmade die cut birthday scene card in periwinkle blue, honey yellow and Piglet pink.

Why This Card is a Classic

This Pooh-themed birthday card is more than just a greeting; it’s a tiny piece of nostalgia wrapped in creativity. Perfect for anyone who loves the timeless tales of Winnie the Pooh, this card is sure to bring a smile to their face and a touch of magic to their special day.

Today’s card is for a friend’s birthday, but I think it would also be great as a Get Well Card.

Happy crafting and see ya next time!

BetterPress · cardmaking

Celebrate | 
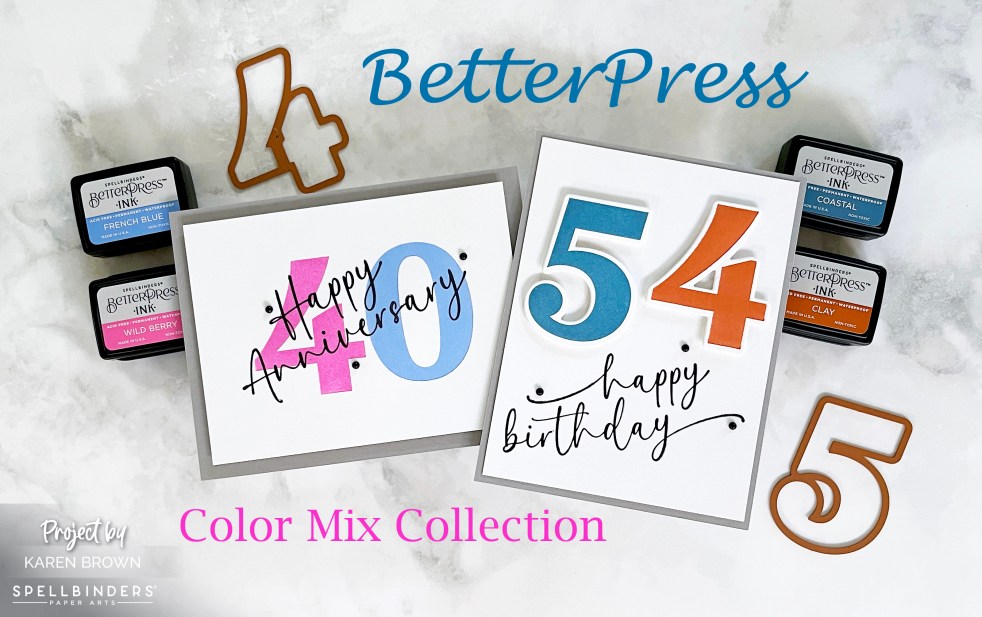
How to Get the Best Prints with Your BetterPress | Spellbinders

Creating fresh clean BetterPress cards for any celebration using Number and Sentiment press plates.

I adore the BetterPress Letterpress system! You can create beautiful, high-quality cards that blend modern design elements with traditional techniques. In this guide, I’ll show you how to use your BetterPress system to make colorful clean and simple cards that feel sophisticated and timeless. Today, I will be using Spellbinders new Color Mix Collection which is great for just about any celebration!

How to Get The Best BetterPress Letter Press Prints

Bold masculine die-cut BetterPress happy birthday card using Srellbinders Bold Color Mix Numbers and Sweeping Celebrations Sentiments.

After Experimenting for the past year, here are my tips for pristine BetterPress prints:

  • I started by using Best Ever Craft Tape to attach my BetterPress A2 Porcelain card panel to the BetterPress top plate. I wanted a clean white look, so I used the Porcelain cardstock. In my opinion, BetterPress Cotton Paper or handmade watercolor papers work the best with BetterPress.
  • The magnetic lower plate works really well to hold my Bold Color Mix Numbers and Sweeping Celebrations Sentiments impressing plates in place. 
  • I was careful to ink the impressing plates really well. I did a “Tap and Twist” technique where I tapped the ink on the plate and then twisted the ink pad a few degrees. Don’t smash and smoosh or you will wind up with little pieces of ink pad on your plate and project. I ink well because I prefer to roll through the press only once for each plate.
  • I liked the sentiment going “uphill” with the “h” and “b” lower than the “y”.
  • I rolled my sandwich SLOWLY through my Platinum 6 die cutting machine. I think “Super Slo-Mo” while doing this to help me remember to go VERY slowly. 
  • The Color Mix Numbers Bundle has coordinating dies that are just beautiful! You can use them with the press plates…or separately.
  • You’ll want a good stamp cleaner to clean your BetterPress and press plates. I’ve used Ultra Clean by Hero Arts and it works great!
  • I used the specially formulated BetterPress Inks for my pressing.  For the “54” card I used Coastal and Clay from the Desert Sun Mini Sampler. For my Happy Anniversary card, I used Wild Berry and French Blue from the Nature Tones Mini Sampler. The black comes in a Full Size and you can find the smaller size in the Regal Tones Mini Ink Set. Waterproof or Hybrid inks as work well. Pigment ink is not recommended….you want a faster drying ink. 
  • I found that my guillotine paper trimmer worked better than my Fiskar’s SureCut on cotton paper.
  • My base is Granite cardstock and I used Craft Foam, Bearly Glue and Fashion Jet Enamel Dots to finish my cards.

Spellbinders Color Mix BetterPress Collection

Colorful clean minimalist Happy Anniversary card created with Spellbinders Bold Color Mix Press plates.

Key Products I Used on My BetterPress LetterPress Prints:

Bold yet clean and simple BetterPress cards using the Bold Color Mix Numbers and Dies Bundle + Sweeping Celebrations Sentitments

By focusing on clean, minimalist designs with bold colors, you can create cards that feel modern and fresh but have all the charm of traditional letterpress.

Thanks for stopping by today!

Karen

cardmaking · Die cutting · Stamping

It’s a Jungle! | August 2024 Hero Studio Release

3 cards created with Hero Arts August 2024 Jungle Theme Relsease.

I am so excited that it is Launch Day for Hero Studio’s playful August jungle theme release. I can’t wait to show you some of Hero Arts GORGEOUS new products, so kick back and hop along with the Creative Team.

Hero will give away a $50 gift card, drawn from the comments left across the hop. Enter by Sunday, August 11th at 11:59pm Pacific, and the winner will be announced on the Hero Arts blog the following week. Links to all the Hop Participants is below.

Create Your Own Jungle | Studio Card Kit of the Month

Colorful playful "have a wild birtthday" homemade card created with Hero Studio August 2024 Card Kit of the Month.

The August Card Kit of the Month is so playful with tons of wonderful elements to incorporate into your papercrafting projects. For my first card, I used the Heroscape stamp set to create a “wild” birthday card. I think the Nesting Postage Stamp Dies give an exotic travel feel to my card.

I masked and ink blended a tiny beach for my elephants to walk along, and then stamped the rest of my scene. I used Fawn (sand), Green Apple Core, Fresh Lawn Core, Pool Party, Deep Ocean, Pale Tomato and Tangerine. I then die cut my scene and a mat and adhered to my card base with craft foam.

What’s Inside the Kit?

Curious about this month’s kit? Let’s take a peek inside the August 2024 Hero Studio Card Kit.

KIT INCLUDES:
• Jungle HeroScape Clear Stamp Set, 6″ x 8″
• 12 Coordinating Dies
• 5 Fancy Dies
• Jungle Scenics Stencil, 6″ x 6″
• Olive Hero Wax
• White Plastic Palette Knife
• 3 Reactive Ink Cubes (Key Lime Fizz, Green Apple, Fruit Punch)
• 2 Reactive Glitz Ink Pads (French Pink, Byzantine Green)
• 5 Printed Sticker Sheets, 6″ x 6″

Kit Cost:

$46 with Subscription + FREE SHIPPING
$49.99 One-Time Purchase
While Supplies Last

5 Wonderful Kit Options:

For this blog post, I created with two kits and 1 Extraordinary Extra, but there there are 5 kits plus 5 Extras available. You can also buy the Whole Studio, which includes all 5 kits at a wonderful savings.

Jungle Serenity | August Extraordinary Extra

Colorful water lily card created with Hero Arts Jungle Serenity stamp and die bundle.

I used my favorite blues and greens for this cool and calm Jungle Serenity card. I stamped my images, colored with alcohol markers and layered my backdrop using my Rounded Rectangle Infinity Dies.

PRO TIP: There is a small die in the lower left corner that is easy to overlook when you are snipping your dies apart. Be sure to separate that piece before die cutting.

Jungle Serenity Stamp and Die Bundle

Colorful thkinkig of you sympathy card that is colored with alcohol markers and die cut.
Hero Studio Layering Stencil of the Month | Monthly Mini
Colorful laering stencil jungle foliage card with die cut accent elements.

If you want a background with loads of impact, then the August Layering Stencil of the Month is definitely for you!

I ink blended my background and then continued the foliage theme by adding die cuts and a sentiment from my August Card Kit of the Month. I love how the kit themes for each month all work together….endless possibilites!

Supplies Used:

Blog Hop Links:


Hero Arts

Seeka

Rosie Lopez

Rachel Kleinman

Natasha Vacca

Natasha Polite

Michelle Short

Lydia Fiedler

Karen Brown You Are Here!

Jennifer Kotas

Jeannie Lieu

Ilina Crouse

Heather Ruwe

Charlene Madrid

Channin Pelletier
I am so happy you stopped by today!

cardmaking

Hero Studio Countdown Peek | Colorful Tropical Layering Stencil Kit | August 2024

Hero Arts "Hero Studio" August 2024 Tropical Layering Stencil Kit handmade card in colorful blues and greens.

Get ready to unleash your creativity with the soon to be released August 2024 Layering Stencil Monthly Mini Card Making Kit! Dive into a lush paradise of tropical foliage as you create stunning, multi-dimensional cards that burst with vibrant blues and greens. All of Hero Arts August kits release on Monday, so stay tuned!

Today, Hero Arts is hosting their Day 2 Countdown Blog Hop and Giveaway that you can find HERE. The Day 1 Countdown Hop is HERE.

Colorful tropical jungle theme birthday card:  Have a Wild Birthday

I love bright fun colors and this layering stencil background was perfect for aqua blues and greens. I used a few items from my August Card Kit to embellish my card and continue with the jungle foliage theme.

Colorful layering stencil birthday card with a jungle theme

Products Used:

Be sure to come back Monday for the August Release and Blog Hop!

Cardmaking Kit · stitching

A Gift Inspired Delight | Spellbinders July 2024 Stitching Die of the Month Kit

Spellbinders July 2024 Stitching Card of the Month tutorial:  a beautiful blue die cut bow for Christmas or birthday cards.

This month, Spellbinders Stitching Die of the Month Kit allows us to create a very eye-catching gift bow. The kit is perfect for creating Christmas cards and decor or you can also use it all-year-round for birthdays and other celebrations. I chose to make a birthday card as I have a lot of friends with summer birthdays.

I think bows are so eye-catching on cards and if you’d like to see another I card I created featuring a die cut bow, click HERE.

A handmade card with a beautiful stitched die cut blue gift bow for Birthday Cards and  Christmas Cards.

Stitching On-The-Go

Stitching kits are great when you want a crafting project “on-the-go”. I am on vacation in Colorado and I really loved stitching on the patio while I enjoyed the view of the mountains. I included a photo of my al fresco stitching below. I die cut my components before I left home and then packed my supplies in a zipper bag. My stitching went quickly and took about 30 minutes to complete.

Tips and Tricks for Stunning Stitched Cards:

  • I started by die cutting all my Stitching Kit pieces with my Platinum 6 die cutting machine. I used Arctic cardstock for my bow. I die cut the elements I was going to stitch 2 times and then glued them together for a substantial base.
  • Spellbinders has a nice selection of stitching accessories in their shop that you can find HERE. I used used a buttery yellow (DMC #745) today.
  • When I started stitching, I took two strands of floss, separated them one at a time, brought them together and then stroked and lengthened them until they seemed tame and ready to use.
  • I usually stitch with size 22 Tapestry needles.
  • I changed things up this month and used good ol’ Scotch tape to attach my floss to the die cut.
  • Remember to keep your floss taught as you stitch.
  • When I move from one area to the next, I run the floss through the just finished stitched area to keep the thread secure. This gives a nice look on the finished project.
  • Don’t stitch with threads that are too long or they are likely to knot. 
  • When I was done, I added a bit of Bearly Glue to the ends so that they would stay in place.
  • To make my bow a little more stable, I added one vertical and two horizontal braces (3/8″ wide) on the back of my bow.
  • To finish my project I found some old printed paper to act as my gift wrap which I glued to an A2 Top Fold Card Base.
  • I adhered my bow to the background with Bearly Glue and Foam Squares.
  • The sentiment is a Chipboard Sticker from the Serenade of Autumn set.

Helpful Links:

Spellbinders Club Info:

  • Clubs Preview on the 1st of each month.
  • Club members can cancel, upgrade or change clubs from the 1st-5th of each month. Popular Clubs frequently sell out during this period so club members get first dibs on everything.
  • NEW for 2024: Club Members get EARLY access to new releases on the 6th!
  • On the 6th, Clubs become available to non-members.
  • On the 27th, Club registration closes for the current month.
  • If a club did not sell out, you can buy under “Shop Past Clubs”. Past kits are available on the 10th of the FOLLOWING month.

Thanks for stopping by!

Karen