Uncategorized

WWC296 – Michelle\’s Challenge: Anything Feminine Goes


Hello, hello and welcome!  This week we are creating feminine cards at The Watercooler Wednesday Challenge and we would love to see your creation in our gallery.  Michelle is our hostess this week.  

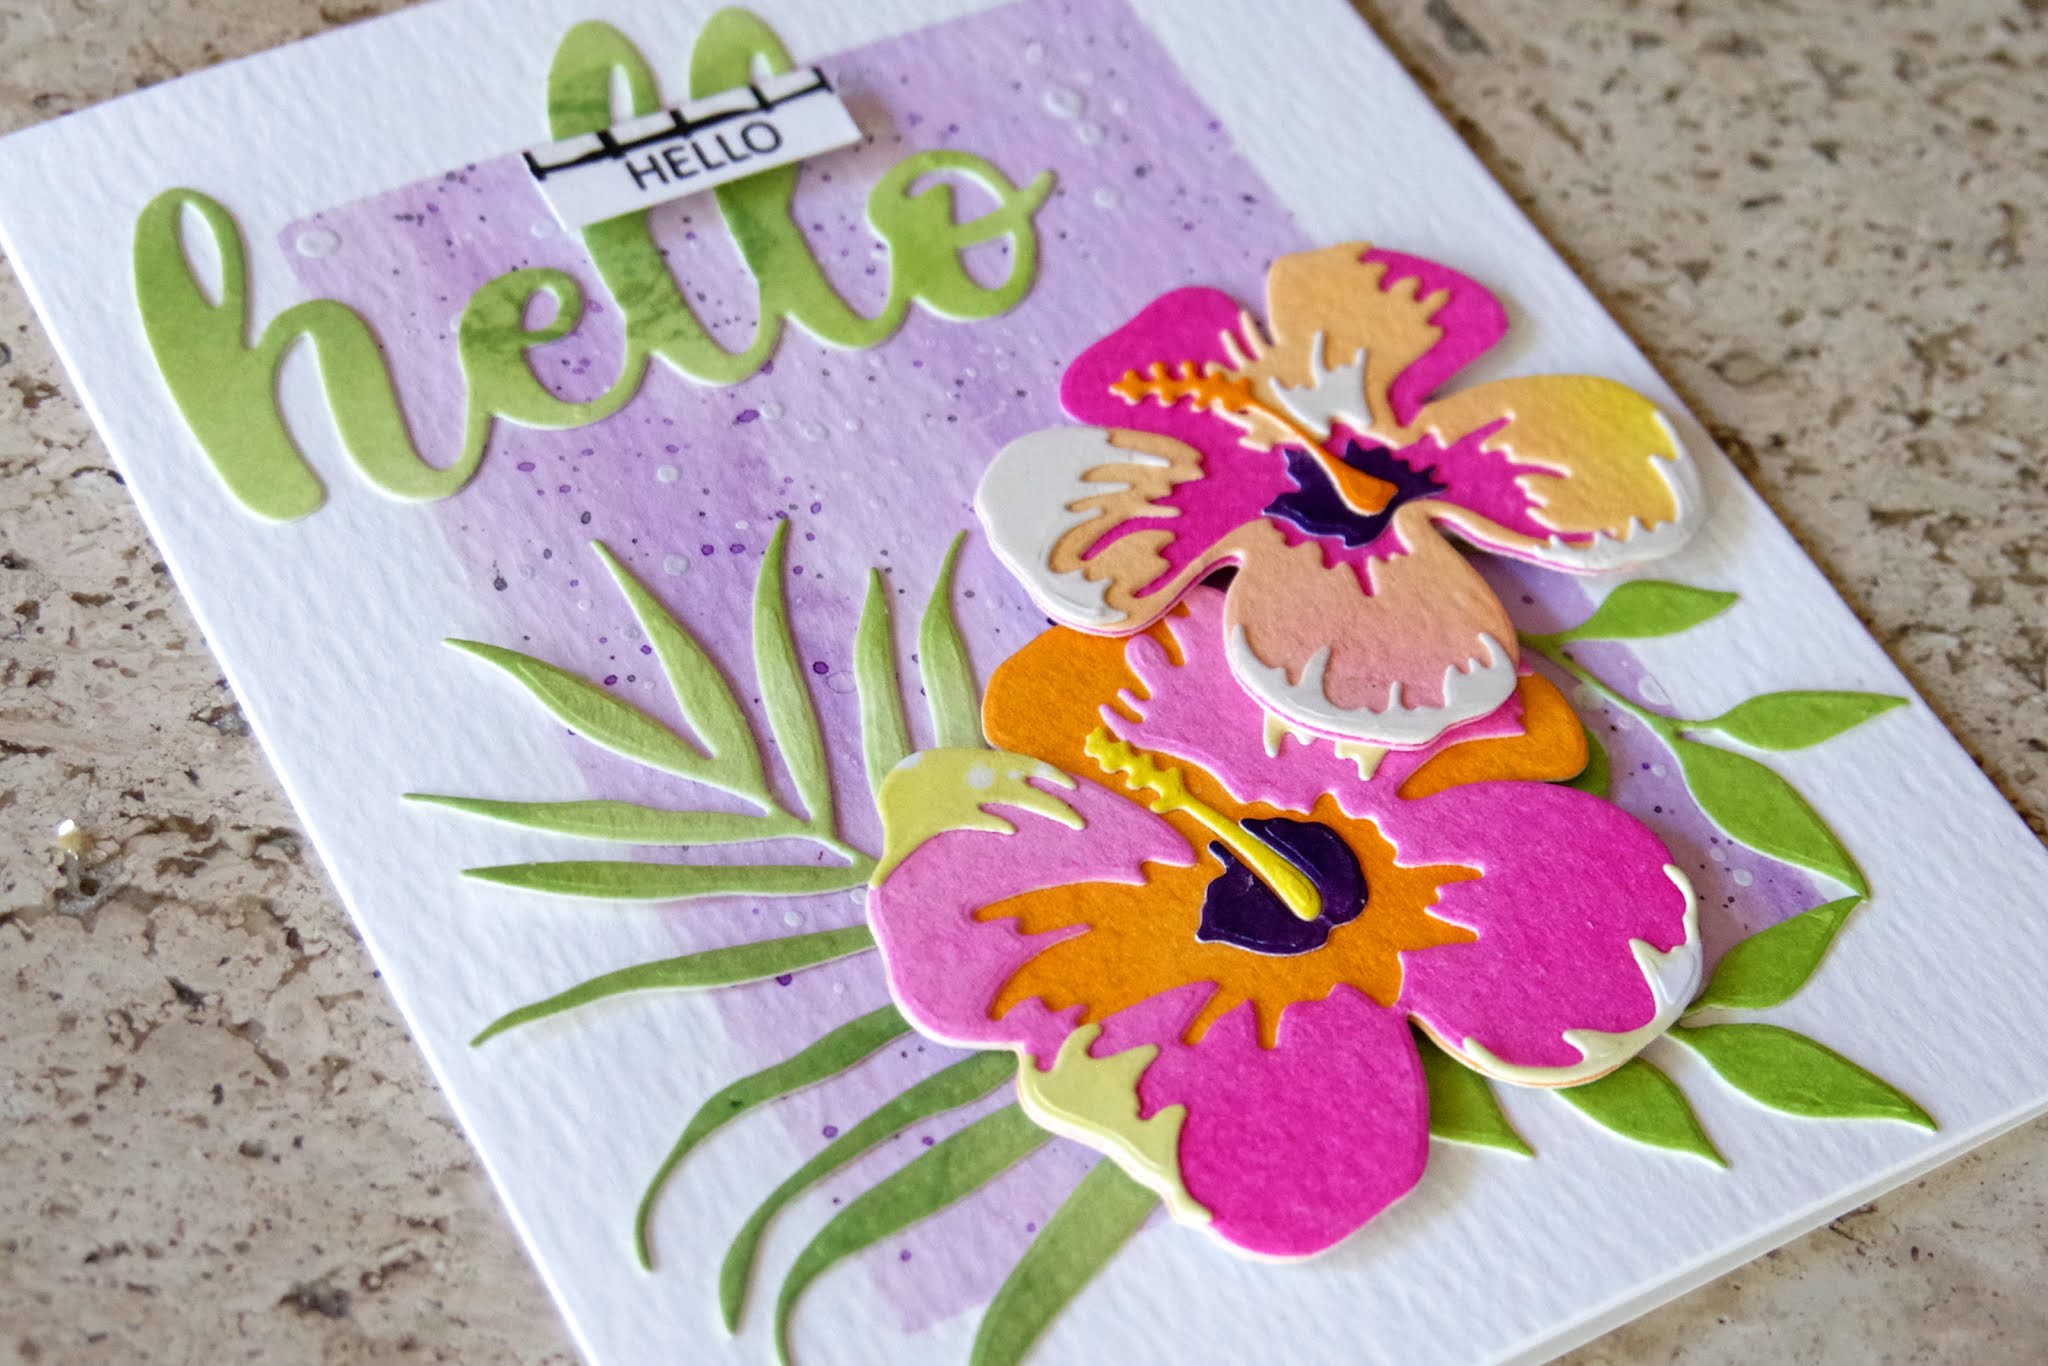
I\’ve had my eye on the Altenew Hibiscus Garden 3D die set for sometime and finally bought it.  I wanted to use seasonal jewel tones  so I die cut my pieces from Altenew\’s Enchanting Washes Cardstock.  I like the gorgeous colors and the fact that it is thick like cardstock.  For the leaves I ink blendeded  4 colors of green on watercolor paper.  My background is a light watercolor wash where I then softened the edges with a towel so it fades out.  I dried the panel and then  added purple and black paint spatters.  Next I mixed gesso with Iridescent Shimmer Spray and added more splatters.  I assembled and paired with a Bold Envelope and my birthday card is now ready to mail.

I am also playing along with:

Festive Friday FF0071 I included die cuts, patterned paper (hibiscus), flowers and sentiment.  

UPDATE:  I was excited to see my card was selected as a \”Festive Fave\”!

Crafty Hazel Nuts Patterned Paper Challenge  I used Altenew Enchanting Washes Patterned Cardstock for the two hibiscus.

Karen


Uncategorized

WWC295 – Karen\’s Challenge: All About Occasions

 Hello, hello…so glad you stopped by!  I am the hostess this week at Watercooler Wednesday and am excited to share this card.  I hope to see your card in our gallery.

I\’ve admired this stamp set for quite a while, finally ordered it in April and am just now using it for the first time.  The flowers and leaves are so fun to color!

Supplies Used:

  • Simons Says Stamp Even More Spring Flowers stamp and die bundle
  • Ranger Letter It sentiment
  • Altenew New Day Enamel Dots
  • Simon Says Stamp Stitched Circle Die
  • Copic Markers
  • White Gel Pen Accents
  • Fog A2 card base.
I am also playing along with:

Thanks for stopping by!

Karen

Uncategorized

WWC294 – Marsha\’s Challenge: Anything Goes With a Masculine Twist


Hello, hello and welcome!  This week we are creating masculine cards at Watercooler Wednesday.  I\’ve made a fun mixed media card using Altenew\’s Mega T Aphabet die and thanks die.

My Process:
  • I started with a 140 lb weight watercolor panel and then die cut the T. 
  • With a wide rough brush (I used a house painting trim brush) I applied a layer of gesso and then dried. 
  • Using a Carved Pumpkin mini distress ink cube I dabbed orange on the panel in random locations.  
  • I sprayed Iridescent Shimmer Spray to the panel which moved the distress ink around a bit and then dried with a heat tool.
  • I added another layer of randomly dabbed Carved Pumpkin Distress Ink which I again activated with the shimmer spray and then dried.
  • I then mixed gesso with Mermaid Lagoon distress ink and applied with a strip of cardstock for a rustic feel.  I then tinted the gesso a bit darker with the same distress ink and applied a bit more with the cardstock strip.  This way I have two shades of aqua on the card which I think gives added interest. Dry.
  • I dabbed a bit of Versamark ink on the panel, sprinkled on gold embossing powder and rubbed off most of it so that there were just touches of gold on the panel.  I heat set.
  • I die cut the thanks die from turquoise card stock.
  • I added the T panel to a cream colored A2 cardbase and glued on the sentiment.
This thank you card was so fun to make! There is a gorgeous shimmery sheen that does not photograph well, but the card just glows in person.

I am also playing along with:


Simon Says Stamp \”Layer It Up\”  I used 7 layers of gesso, distress ink, shimmer spray, embossing powder plus two die cut layers.  

I am so glad that you stopped by!
Karen 
Uncategorized

Ink Blending and Inlaid Die Cutting with Altenew\’s Hibiscus Garden 3D Die Set


Hello, hello and welcome!  I’ve had my eye on Altenew’s Hibiscus Garden 3D Die  for sometime and finally bought it.  I thought it would be helpful to take Therese Calvird’s 3D Floral Focus Class while I was playing with my new dies.  Therese has six wonderful lessons and I would like to share my 3D creations in this blog post.  I found this class very relaxing and therapeutic and I enjoyed thinking about  my color combinations and doing loads of die-cutting. 

This first thing I did was put the dies for each flower in individual numbered pouches so that I can just grab a pouch and start die-cutting.  This will make future card making so much more streamlined since I won’t have to sort through all the dies to find the pieces for each layer.  Next, I made a sample of each flower and leaf to use as a guide when assembling my die-cuts and I labeled the back.  Again, this makes the die-cutting and assembly go so much more quickly.

I have orange and pink potted Hibiscus plants around my pool and I used them as the inspiration for this card.  I started by ink blending all the colors I wanted on watercolor paper.  I like that watercolor paper is a bit thicker and has more texture and makes a rich substantial diecut. Next, I diecut the components of my card and the sentiment.

I then created my background.  I masked off a frame on a piece of watercolor paper and then watercolored my background with a diluted watery purple.  I dried the panel and added purple and black paint splatters.  Next I mixed gesso with Iridescent Shimmer Spray and added more splatters.  I put the panel aside to dry while I assembled my flowers.  When the panel was dry, I glued my die-cuts onto the background.  I really love the bold vibrant blooms with the softer greens and background.

For my second card, I used the inlaid diecutting technique with a color blocking twist.  Same die set but a very different vibe.  I die-cut all the pieces from scraps I had saved from Altenew\’s Jewel Tone Sampler.  The colors are bold and gorgeous!

The square panel is 2 3/4\” x 2 3/4\”.  Therese taught us to use the same color paper underneath the inlay in case there is a gap.  This worked really well for me.  To finish the card, I made a 4 1/4\” x 4 1/4\” square top folding card.

To finish both cards I added Bold Envelopes and they are now ready to mail.

I am also playing along with: Seize the Birthday \”Scraps\” Challenge 3D Dies are the perfect time to use scraps because you need lots of small pieces.  I am entering my square card.

I am so happy you stopped by!
Karen


Uncategorized

WWC293 – Tristan\’s Challenge: All About Occasions

Happy Fall Y\’all…that\’s what we say here in Texas.  I have the Jane\’s Doodles Pumpkin Spice stamp set and thought it would be fun to fussy cut three of the pumpkin images and mount them on masked inked squares. This card is up on the Watercooler Wednesday Challenge Website and we would love to see your creation in our gallery.

Supplies Used
Jane\’s Doodles Pumpkin Spice stamp set
Taylored Expressions Square Windows Masking Stencil
Distress Ink (mustard seed, carved pumpkin and mowed lawn)

I am also playing along with:
Tic Tac Toe #085  I selected left row down:  Pumpkins, Orange, Fall

UPDATE:  My card was selected as a \”Team Favorite\” at Tic Tac Toe
I am so pleased you stopped by!

Karen

Uncategorized

Multi Media Cards With Loads of Gorgeous Texture

Hello, hello and welcome!  I am excited to share a couple of cards that I made after taking Demystifying Mixed Media at Altenew Academy.  I think I can safely say this is the most fun class I\’ve taken to date.  Tania Ahmed is a wonderful and inspiring instructor and I went crazy making backgrounds!  I made 7 cards and 8 backgrounds, two of which I am showcasing in this blog post.  I will be sharing the rest of the cards in future posts.  


I love that there are really no rules with mixed media. It seems the best thing to do is lay out your messiest supplies and then select a bunch for each card.  Do not be a minimalist when experimenting with multi-media.

This first background was made by hand-dipping the background and custom tinting my embossing paste.  

  • I mixed Zig Cobalt Blue with water and Irridescent Shimmer Spray and then dipped a piece of Bristol cardstock into the colorful puddle.  I dried the panel and then repeated.
  • I tinted my Embossing Paste with Carved Pumpkin distress ink for a fallish vibe.  
  • I swiped the embossing paste over my stencil with a palette knife.  I wanted a rough look so I didn\’t cover the entire stencil and I made sure there was a variety of thickness to the paste. 
  • While the embossing paste was wet, I sprinkled just a bit of Peach Embossing Powder on the paste and then heat set. I love the texture and interest it adds. 
  • I heat embossed Altenew\’s Best Mom spray (in brown) and then watercolored and die-cut the image.  
I think the aqua, sherbet and brown make for a very striking card.

My second card uses watercolored embossing paste, tulle (a first on a card for me) and loads of paint splatters.

  • I applied texture paste through the Feathered Leaves Stencil and then heat set.
  • Using diluted watercolors mixed with shimmer spray, I loosely colored the background in blue and yellow.
  • Using a damp paint brush, I feathered the watercolor edges and then dabbed with a cloth to soften the edges.
  • I added blue, yellow and black paint splatters.  
  • I stamped, watercolored and die cut the  Weekend Doodles floral spray.
  • I cut an oval from some tulle gift wrapping ribbon and glued to the back of the floral spray and then adhered the combo to the card base.
  • I added a simple sentiment embellished with Painted Grid Washi Tape.

I am also playing along with:

Creative Artiste\’s Mixed Media Challenge I used paint, shimmer spray, embossing paste, embossing powder and of course paper.  

The Flower Challenge #49 \”Circles\”  I love the textured circles on this background.

UPDATE:  The top card won at The Flower Challenge \”Circles\” Challenge

I hope you will stop by in the near future and see the rest of the Multi-Media cards that I created.

Karen

Uncategorized

WWC292 – Dawn\’s Challenge: Anything Goes With a Feminine Twist

 Hello, hello and welcome!  I created this card for this week\’s Watercooler Wednesday Challenge.  I recently took Altenew\’s Artist\’s Watercolor 101 course taught by Emily Midgett and the last class was on painting \”white\” flowers.  Such a pretty look but I had never attempted anything like it.

I started by heat embossing these big beautiful blooms (Picket Fence Studio Lily Coloring Class stamp).  Next I created a diluted grey watercolor halo around the flowers.  I started close to the image and then pulled the water out with a damp brush.  To ensure my brush didn\’t have too much water I dabbed it on a stamp shammy. This really helps me control the amount of water I use.  I let this layer dry completely.

Next I started on the blooms.  I added very diluted grey shadows but remembered it is important to leave some uncolored white areas so the flower appears to be white.  I then added bits of diluted blue and pink. Lastly, to brighten the bloom, I added hints of yellow to the edges of the petals.

I finished the background by adding diluted blue up close the the bloom and then moving the watercolor around the panel.  I did the same with pink and yellow so the colors of the flower and background were the same. 

This watercolor technique is very delicate and understated but is beautiful in person!

I am also playing along with:

Thank you for stopping by!
Karen


Uncategorized

Quick and Simple Cards

Hello, hello and welcome!  I just completed Laurie Willison\’s Altenew Academy Class called Quick and Simple Cards and I wanted to share two of my creations.  I love making backgrounds and both of these cards focus on the backgrounds.   This first card was my homework assignment for Faux Watercoloring.  

I recently purchased  Altenew\’s Block Print stamp set and thought it would be fun to \”faux watercolor\”.  The stamp set has four vingettes and I loved this one with diagonal and vertical lines.  I inked up the stamp with Carved Pumpkin, Candied Apple and Seedless Preserves Distress Inks and then spritzed with water. 

I then pressed the stamp onto Bristol cardstock and let it sit for a few seconds.  I also did a panel on watercolor paper, but the detail was lost so on this card, I used the Bristol panel.  I really love this vibrant color combination for fall.  

I wanted the focus on the background so I kept the other elements black and white.  I stamped the darling leaves cluster from The Retro Plantines stamp and die set and then die cut.  I added a simple sentiment but added a strip of Painted Grid Washi tape to the top for a little added interest.

The second card features a three tone stenciled background.  I masked off a 3/4\” border and then taped the Feathered Leaves Stencil to the panel. Using three different analogous ink colors (Wild Honey, Carved Pumpkin, Mustard Seed), I ink blended each leaf a different color.  I thought these colors made such a pretty seasonal background.  I then heat embossed The Best Mom spray using chocolate brown embossing powder. I really like the effect on the card.  

I attached the panel to an A2 card and added a simple birthday sentiment on brown cardstock along with a couple of buttercream jewels. 

Two quick, simple and easy to make cards!  

I am also playing along with:

Thank you for stopping by!
Karen


Uncategorized

WWC291 – Fifth Week Anything Goes Challenge

Summer technically just ended but I have one more card with the summery colors I love.  I had a scrap of striped background left from a card I made a few weeks ago that was too pretty to throw away so I made it into a card for Watercooler Wednesday\’s Anything Goes Challenge.  I think bright and happy always works for birthdays.  The background uses the same colors as the striped panel.


Here is a link if you would like to see the original card I made with the watercolor panel.
I am also playing along at:

Supplies Used:

Jillibean Soup Enjoy sentiment
Distress Inks
UPDATE:  I was so pleased to see my card recognized as a Top Pick at Make My Monday Use Your Scraps!

Thanks for stopping by!
Karen


Uncategorized

Finding and Incorporating Inspiration Into Your Project

Hello, hello and welcome!  Today I am blogging about a fascinating class I took at Altenew Academy called Mission Inspiration. Nicole Watt was our instructor and instead of focusing on technique, this class was all about finding inspiration for our creations.  

For this post I wanted to use a combination of color and layout inspiration for my cards.  I envisioned a trio layout with color selection coming from Pinterest.  Nicole had great ideas for searching for \”color combos\” and I found this quite fun! I also decided to work on staging and styling my photographs and I am pleased with the result.


I loved the graphic below and used the red, orange, citronella green and teal as the color inspiration for my card. 

I hand inked the background because I thought the result was more vibrant than the colored card stock I tried first. The center of the flower is a fun enamel dot.


The second card is very similar but I used three flowers from the same stamp set and a different color inspiration graphic.

Here is the inspiration swatch for my second card.
Again, I ink blended the background and then colored the blooms in melon and pink.  The centers are enamel dots which adds a fun detail to the card.
Here are the cards together and I think they are a bright and happy duo.  Inspiration is everywhere and I will be drawing on these six classes as I create in the future.

Altenew Products Used: Link Here

Altenew Doodle Blooms

Altenew Pinstripe (sentiment)

Altenew New Day Enamel Dots

Altenew Jet Black Crisp Die Ink

Altenew Envelope Variety Pack

I am also playing along with:

As You Like It \”Bright or Pastel\”  I almost always go with bright on my cards because I love bold colors.  🙂

Thank you for stopping by!

Karen