cardmaking · Die cutting · Tutorial

4 Tips for Christmas Cardmaking

Bright, colorful Christmas card with a blue "dimpled" background, purple and orange die cut Christmas Crackers and a folliage accents.

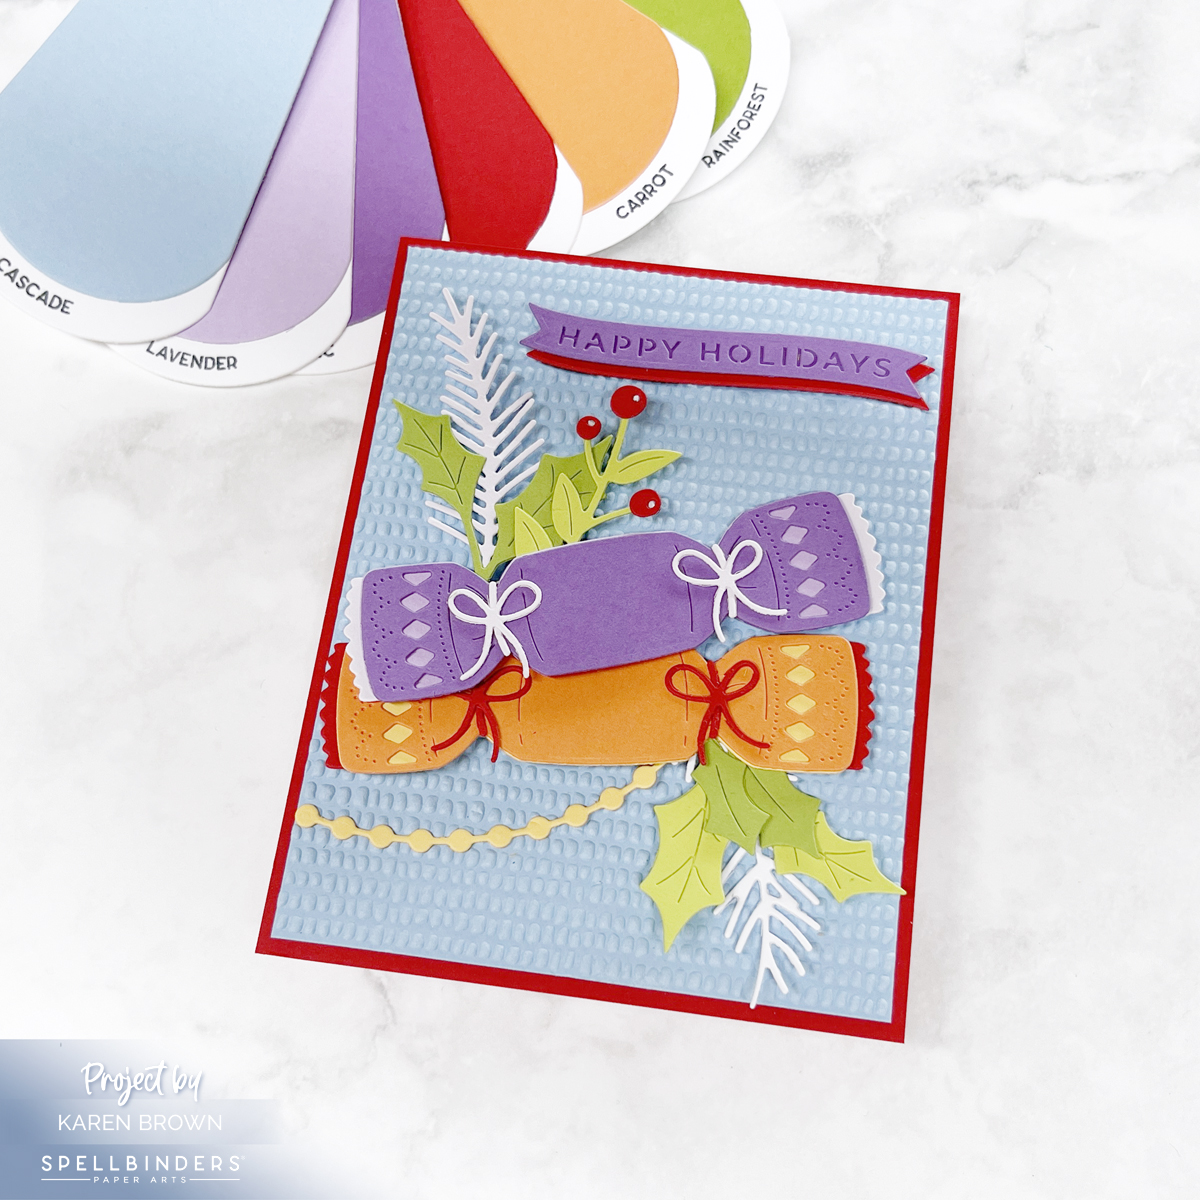
Featuring the Christmas Cracker Die Set + Dimpled Embossing Folder

The holidays are the perfect time to get crafty, and Spellbinders’ new Christmas releases make it so much fun! Today I’m sharing a festive card I created with the Christmas Cracker Die Set from Yana’s Christmas Collection and the Dimpled 3D Embossing Folder from Suzanne Hue’s Texture and Foliage Collection.

Along the way, I’ll walk you through 4 tried-and-true tips that will make your holiday cardmaking easier, more enjoyable, and more beautiful.

Tip 1: Use Quality Cardstock

Handmade Christmas card featuring a colorful die cut Christmas cracker in shades of purple, orange, blue, and green. The background is embossed with a dimpled 3D pattern, and some die cuts are raised on foam for added dimension

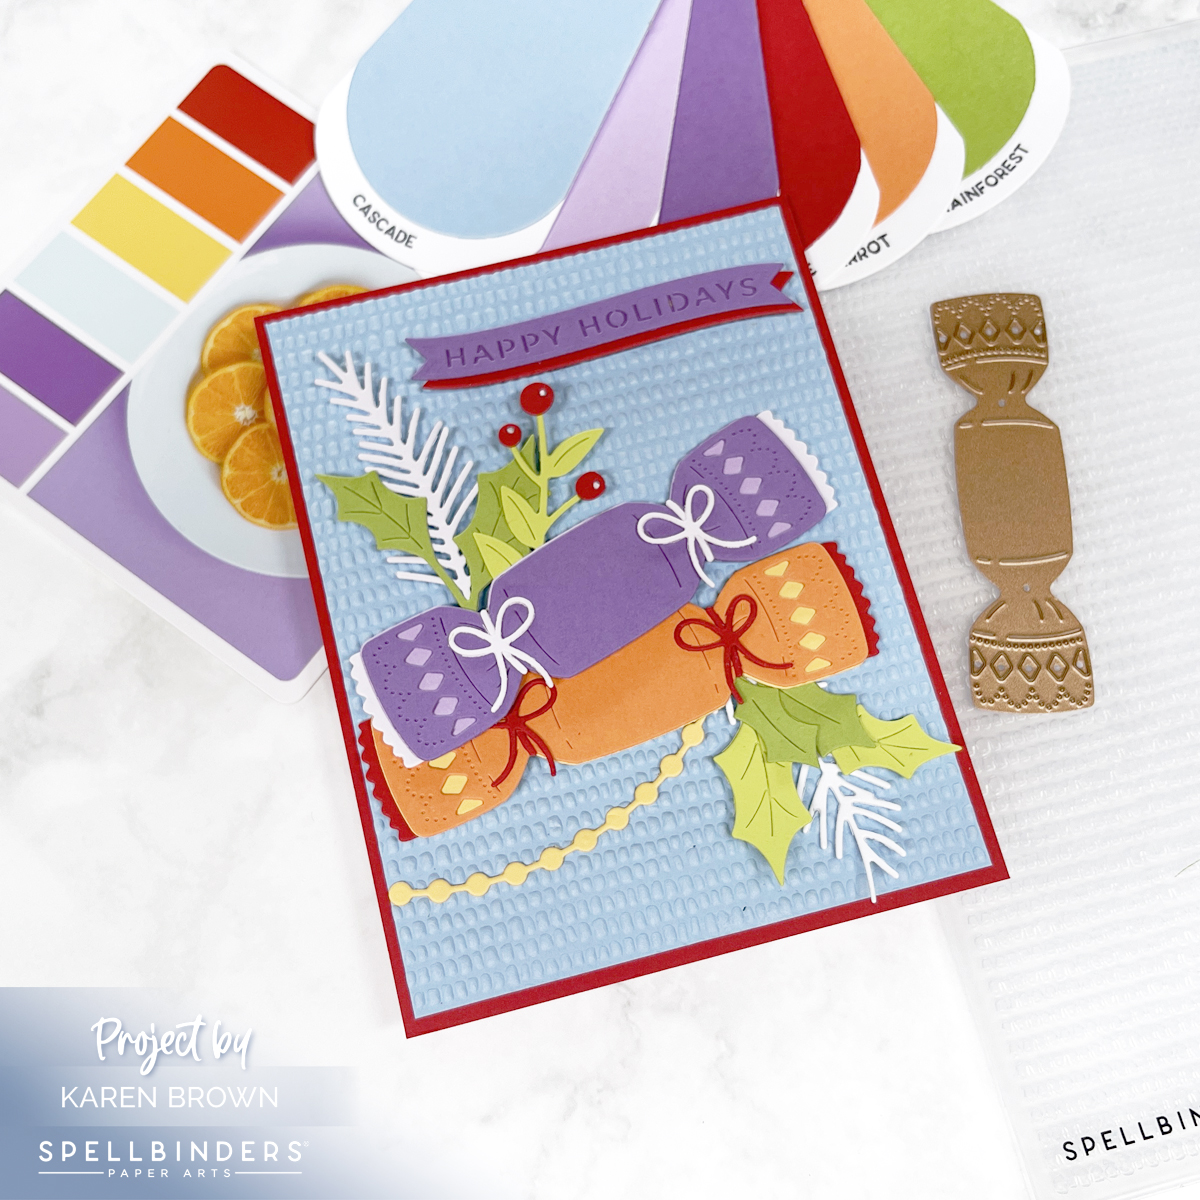
The foundation of any good die cut is quality cardstock. Thin or flimsy paper isn’t substantial enough for die cutting. For this project, I used Spellbinders’ Color Wheel Cardstock—which is heavyweight, smooth, and cuts like butter.

Here are some of the gorgeous shades I pulled:

  • 🌊 Cascade
  • 💜 Fairy Tale
  • 🌸 Lavender & Lilac
  • 🌞 Beeswax
  • 🍊 Carrot
  • 🍎 Pomegranate
  • 🌿 Peridot & Rainforest

Together these created a vibrant, cheerful, and slightly unexpected holiday palette.

Tip 2: Swatch Your Cardstock

Handmade die cut Christmas card using Spellbinders Yana's Christmas Cracker set with the Dimpled 3D Embossing folder.

Having your cardstock organized and swatched makes choosing colors so much faster. I’ll link HERE to a post where I go into detail on how I keep my swatches handy and easy to use.

For this project, I flipped through my swatches until I landed on the perfect non-traditional holiday mix. Seeing them side by side helped me visualize how the colors would work layered on the Christmas cracker.

Products Used:

Tip 3: Use Color Inspiration

Handmade die cut Christmas Card created with the non-traditional colors of blue, purple, orange, red and green.

When in doubt, let a color system do the heavy lifting! For this card, I turned to Color Cubes Volume 2, specifically palette card #252, which inspired the purple, red, orange, yellow, blue color mix. I also own Volume 1. You can find the Color Cubes Bundle HERE.

I’ll also link to a previous blog post that features Spellbinders’ Color Deck System, another fabulous way to spark ideas when you feel stuck or want to try something different.

Click HERE if you’d like to see another Christmas Card using the same #252 Color Cubes palette card.

Tip 4: Add Texture and Dimension

Die Cut Christmas cracker card with loads of texture, dimension and vivid colors.

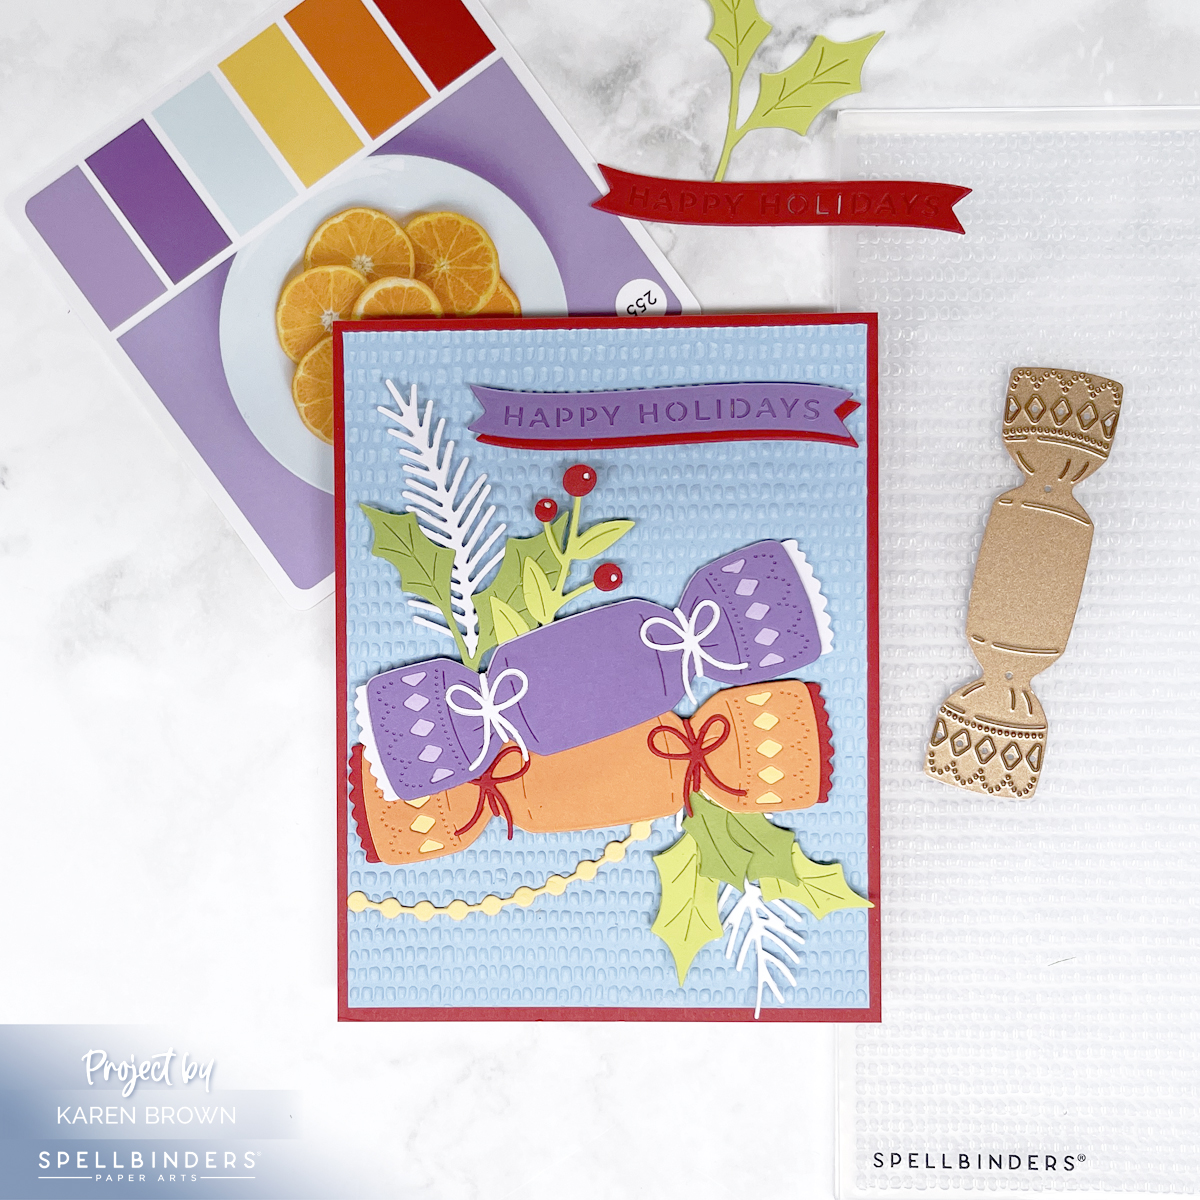
Flat die cuts are nice, but texture and lift make a card pop. For this background, I embossed a panel with the new Dimpled 3D Embossing Folder—a subtle yet impactful pattern that catches the light beautifully.

I also used foam squares behind some of the cracker die cuts to add depth and shadow. Craft foam also works great, especially on larger die cuts. The best glue for smaller die cuts is Bearly Glue. I love the fine nozzle! Simple details like these can make your handmade card feel polished and professional.

cardmaking · Die cutting

Halloween Card | Spellbinders Pupkin

Sometimes the cutest cards come together quickly—and this one might just be my favorite of the season! I couldn’t resist Spellbinders’ new Pupkin die set, which features an adorable dog all dressed up as a jack-o’-lantern and carrying a tiny skull-shaped trick-or-treat bucket. Cuteness overload!

This card is extra special because I made it for my daughter in memory of her sweet, goofy lab, Tank, who once rocked his very own pumpkin costume. ❤️

I layered several color coordinating mats from past Small Die of the Month and Large Die of the Month kits and I used ColorWheel cardstock and Sand for my pup’s body. The vibrant layers really make our little Pupkin pop! This design is fast, fun, and easy to assemble—perfect for Halloween cardmaking sessions.

cardmaking · Die cutting · Stenciling

A Simple Guide To Using Layering Stencils in Cardmaking

Purple and orange layered stencil card with gold foiled “Hello” sentiment, framed with vellum, lavender, and gold cardstock.

Some cards practically make themselves—this was one of them. Today I’m featuring a project made with the August 2025 Hero Arts Layering Stencil of the Month, Sunnyside Manor. This dreamy stencil has a charming layered interwoven scene that comes to life with just a few colors of ink.

Step-by-Step: How to Use Layering Stencils

If you’re new to layering stencils or just want to brush up, here’s how I created this scene using the Sunnyside Manor Stencil set:

1. Start with a Colored Card Base (Optional)

I used lavender cardstock to add an extra tone to the finished design before I ever inked. You can also use white for a clean slate.

For this version, I created a bold and beautiful palette using three shades of purple and a pop of orange. I started directly on a lavender card base, giving me a built-in fourth shade of purple before I even began inking.

2. Secure the First Stencil

Place Layer 1 over your cardstock and secure it using low-tack tape or a sticky mat to keep everything from shifting. Hero Arts Stencils have great square guides in the four corners so each layer lines up perfectly everytime! I take a pencil and mark each square before I begin.

If you’d like to see this process in one of my How to Stencil Videos, click HERE.

3. Blend Your First Ink Color

Using a blending brush, apply your first ink (I used Thistle). Blend evenly and lift the stencil carefully once done.

4. Repeat for Each Layer

Align Layer 2 (they’re clearly numbered on the lower left) and easy to line up with the square guides or by eye).

Ink with your second color: Purple Galaxy

Layer 3: Tangerine

Layer 4: Amethyst

Hero Arts inks dry quickly, but if you’re planning to hot foil or emboss over it, give the ink a moment to fully dry.

5. Add Your Sentiment:

Hero Studio August 2025 Sunnyside Manor layered stencil card in 4 shades of purple + orange.

The card has a soft shimmer, deep contrast, and that quiet elegance that stenciling always brings. I find stenciling to be my Zen moment—and this one was so satisfying.

Interested in more August Club Kit Cards, you can read my August 2025 Release Day Blog Post HERE.

Two Hero Studio Halloween cards and tags in purple and orange.

>>>> Hero Arts Club Kits Overview <<<<

Why I Love This Stencil

If you’re looking for a beginner-friendly but artistically satisfying project, this one is for you.

Stenciling has become my go-to technique for beautiful, relaxing cardmaking. The Sunnyside Manor Layering Stencil is especially satisfying—the layers line up easily and the design allows for infinite color combos. Whether you go soft and serene or bold and whimsical, this stencil adapts beautifully.

Interested in seeing some other layering stencils…..click HERE.

Cardmaking Kit · Die cutting · stitching

Spellbinders August 2025 Club Kits: Under the Sea Magic!

2 colorful aquatic theme die cut scene cards featuring bright bold colors, a graphic look  and LOTS of fish.

This month’s Spellbinders Club Kits dive deep into all things aquatic—and let me tell you, these kits are fin-tastic! 🐠💦 From vibrant fish to stitched sailboats, the August kits are perfect for summer crafting or anytime you want to send a smile that makes a splash. I created three nautical-themed cards using the Die of the Month, Large Die of the Month, Stitching Die of the Month, and my Caboodle Bonus Gift.

🐟 Card 1: Colorful Coral Reef Scene (Die of the Month + Caboodle Bonus Gift)

Die cut coral reef scene with colorful fish on Oceanside blue background. Made with Spellbinders August 2025 Die of the Month and Caboodle Bonus.

This card is bright, whimsical, and just so much fun to put together! I started with a rich Oceanside cardstock panel for the background “water.” Then I built a vibrant underwater world using the Die of the Month and my Caboodle Bonus Gift for even more fishy flair. I skipped the scuba diver die cuts and instead filled the scene with colorful fish in pink, coral, orange, purple, yellow, white, and aqua, all cut from my scrap bin. 🌈

TIP: Many of the elements are quite small—my Bearly Art glue with the fine-tip nozzle was essential for precise placement. I love that this card feels playful and full of life without being fussy!

Die cut card with lots of cute colorful fish swimming around a coral reef.

🐡 Card 2: Make a Splash with the Large Die of the Month

Pink fish in a plastic bag on blue background with “Make a Splash” sentiment. Made with Spellbinders August 2025 Large Die of the Month.

This Large Die of the Month card features the cutest little pink fish swimming home in a plastic bag! It’s such a clever, nostalgic design. I layered the fish-in-bag die cut over another Oceanside background and added a pink string “tie” at the top of the bag. The sentiment “Make a Splash” is included in the kit and absolutely perfect. It’s a great all-occasion card—birthday, congratulations, or just because.

If you like the graphic look of these first two cards, you might be interested in reading my post: What’s Brewing.

Darling "fish in a plastic bag" die cut card card in pinks and blues.

🚢 Card 3: Stitched Sailboat on the Sea (Stitching Die of the Month)

Stitched and die cut brown sailboat with red and yellow flags on blue sea and “Born to Shine Year After Year” sentiment. Made with Spellbinder's August 2025 Stitching Die of the Month.

My final card gives major paper boat vibes, thanks to the Stitching Die of the Month. I die cut the boat from brown cardstock and stitched the details with marine blue embroidery floss. The little red and yellow pennants waving from the mast make it feel festive and fun. 🌊 I added a blue die cut sea, a white die cut cloud, and hot foiled the uplifting La Dolce Vita sentiment:
“Born to shine year after year.”

Stitching Tip: I die cut the boat twice and layered the pieces together before stitching for extra sturdiness. I used two threads of floss for the perfect amount of detail.

Masculine die cut and hands-stitched boat card perfect for birthdays.

These cards came together so easily and would be adorable for summer birthdays, kids’ celebrations, or just brightening someone’s day. Don’t forget—this is all part of the August 2025 Club Kit Release, and if you’re a Deluxe Caboodle subscriber, you get everything plus the bonus die, and save a whopping 58%!

Helpful Links:

Cardmaking Kit · Die cutting · Stenciling

Hero Arts August 2025 | Light-Up Tags + Crystal Ball

Handmade Halloween tag with layered colorful tags, white heat embossed spider web on black cardstock, lit up with a hidden light, and “Boo to You” sentiment.

The Hero Arts August 2025 Release is here, and it’s packed with creative possibilities—from interactive Halloween tags to dreamy stenciled scenes and mystical vibes. I had so much fun with these kits and created two very different but equally inspiring projects.

>>>> Hero Arts Club Kits Overview <<<<

🕷️ Project 1: Light-Up Spider Web Halloween Tag – August Card Kit

Let’s start with a spooky showstopper! This interactive Halloween tag uses elements from the August Hero Arts Card Kit, including the spider web stamp and Press One Light that lights up the tag.

Here’s how it came together:

  • I white heat embossed the spider web on black cardstock, die cut it, and positioned one of the included Press One Lights behind the center.
  • When you press the hidden button—the web lights up! 🕸️✨
  • I layered two tags using the Nesting Tag Dies:
    • The top tag is watercolor paper with Yellow and Orange Liquid Watercolors—so vibrant and bold!
    • The bottom tag is purple cardstock with a Hero Transfer from Collage Backgrounds 2—the script texture gives a haunting Halloween vibe.

I finished it off with a heat-embossed “Boo to You” sentiment from the kit and a touch of black hemp cord. This tag is spooky, clever, and totally kid-approved.

Hero Studio light up Halloween spider web tag created with the August 2025 Card Kit, including the Pear Blossom Press One Light.

What’s Included in the August Card Kit?

  • Abraham and Katrina 6×8 Stamp Set (used on tag)
  • Abraham and Katrina Coordinating Die (used on tag)
  • Stamping Guide for stamp set
  • Victorian Frame Die Set (used on card 2)
  • Pear Blosson Press-One Light 2 Pack (used on tag)
  • 10 Sheets of Cardstock- 1 of each color, 5.5″ x 8.5″ (Cinnamon, Terra Cotta, Carrot, Coral, Bellini, Tuscan, Mint, Waterfall, Blue Spruce, Raven)
  • Holographic Rainbow Film, 1 sheet – 5.5″ x 8.5″
  • Acetate, 1 sheet – 5.5″ x 8.5″ (used on card 3)

Receive a FREE Magic Mist Stencil when you purchase The Whole Studio!

Hero Arts has many different Monthly Kits that you can subscribe to including:

Project 2: Crystal Ball Magic – August Stamp & Cut: You Are Magic

Card featuring a die cut crystal ball made from ink smooshed background and acetate layer, with the sentiment “You Are Magic” over a tone-on-tone mini rainbow background stenciled in teal and aqua shades.

This second card leans into the magical vibes with the new You Are Magic Stamp & Cut. The crystal ball die is the star here!

  • I used a leftover ink smoosh background scrap in soft blues and aquas to simulate swirling crystal magic. You can read my Ink Smoosh Tutorial HERE.
  • I die cut a circle of acetate (included in my August Card Kit of the Month) and layered it on top for a glassy, dimensional effect.
  • The sentiment “You Are Magic” is stamped and layered over the crystal ball.

For the background, I used Oceanside ColorWheel Cardstock and the Retro Rainbow Stencil from last month’s Retro Kitchen Release. I went for a tone-on-tone look using:

Mounted on an aqua card base with a few black enamel dots, this card feels subtle, sparkly, and just a little bit mystical and mysterious.

Hero Studio Blog Hop

Hero Arts will give away a $50 gift card, drawn from the comments left across the hop. Leave a comment on all stops for more chances to win!


Hero Arts
Nichol Spohr

Seeka
Rosie Lopez
Rachel Kleinman
Natasha Polite
Mindy Eggen
Michelle Short
Michelle Lupton
Lisa Tilson
Karen Brown
Jennifer Kotas
Jeannie Lieu
Charlene Madrid
Channin Pelletier
Anna Mahtani

Handmade card created from the Hero Studio August 2025 Stamp and Cut "You Are Magic" kit.

From light-up tags to dreamy stenciling and crystal energy, the August kits are perfect for stretching your creativity into fall. Which kit are you reaching for first?