BetterPress · Die cutting · Mixed Media

How to Create Mixed Media Backgrounds for Your Cards

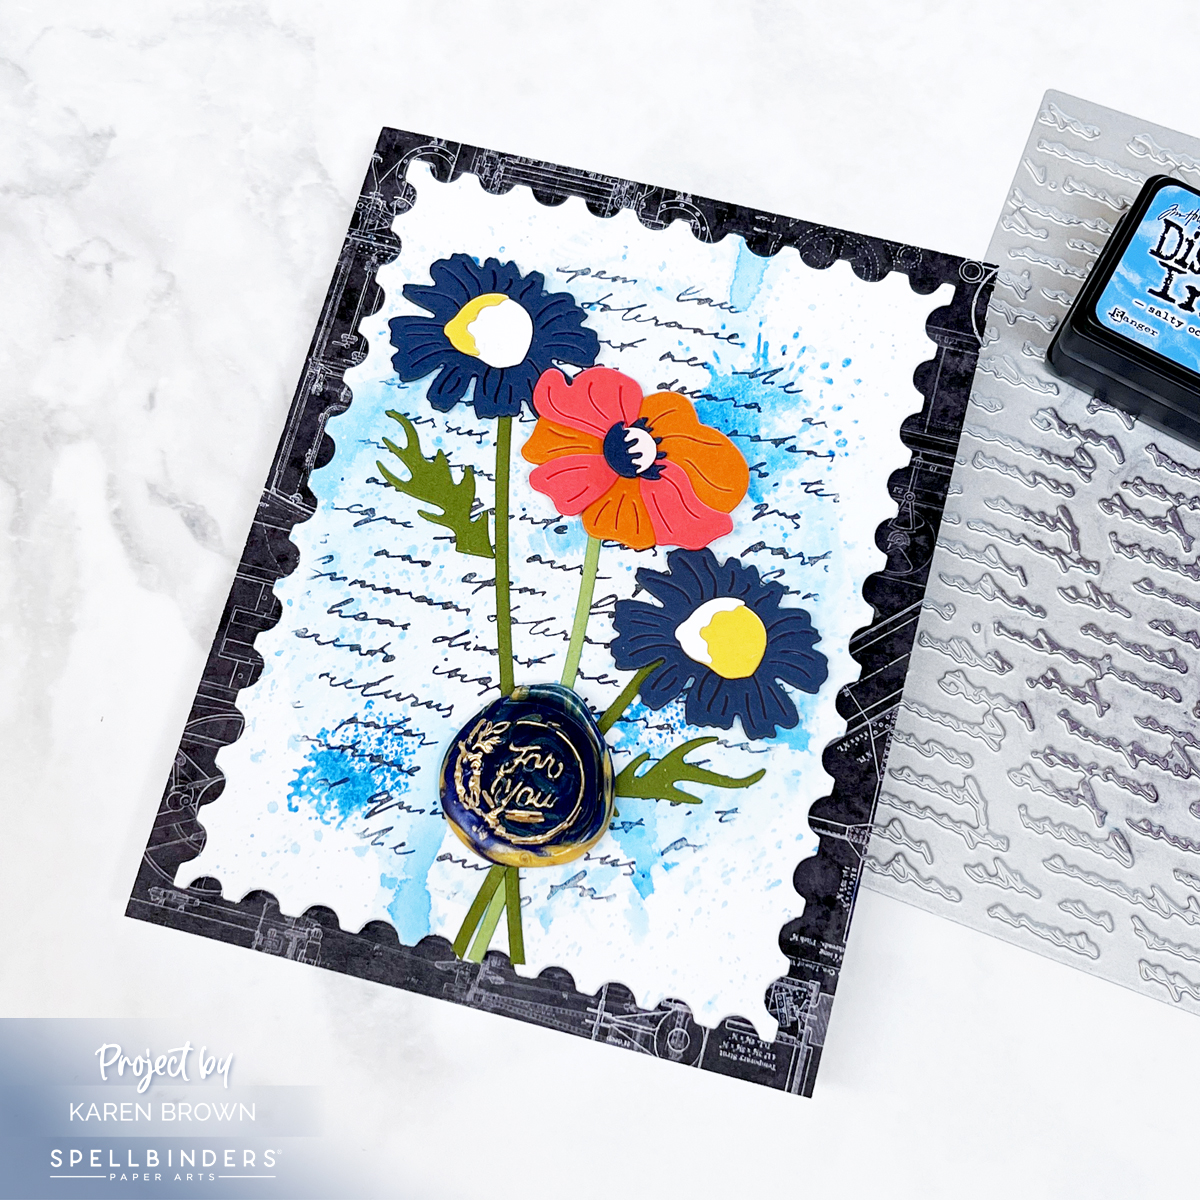
Creating mixed media backgrounds is one of the most fulfilling ways to express creativity in cardmaking, and it’s a fantastic way to showcase your favorite tools and techniques. In this project, I flipped my usual process by starting with the background, rather than the focal point. The emphasis here is on the Script Text BetterPress Plate, an intricate design with a vintage, not-quite-legible script that adds the perfect textured backdrop.

🛠 Step-by-Step Instructions

  • Start with the Background: For this project, the focus was the Script Text BetterPress Plate. Begin by die cutting an oval template using the Scallops and Stitched Edge Ovals die set. Save the oval itself, but use the negative panel (with the oval opening) as an inking guide.
  • Ink with BetterPress: Place the panel over the Script Text BetterPress Plate and use Best Ever Craft Tape to hold it in place. Ink only the oval opening using Black BetterPress ink on Porcelain BetterPress Paper.
  • Important: Remove the inking guide before running the plate through your Platinum 6 machine.
    • 🐢 Tip: Use “SUPER SLOMO” speed to get the best letterpress impression.
  • Add a Watercolor Wash: Apply a light Salty Ocean watercolor wash to the center oval portion of your letterpressed background. Let dry completely.
  • Stamp Texture: Using Hero Arts Mixed Textures Stamp Set, ink up some paint splatter stamps with Salty Ocean and lightly mist the stamp with water for a more vintage look. Stamp the background 3-4 times.
  • Add Paint Splatters: Use a fan brush to add Salty Ocean paint splatters for added depth.
  • Distress the Panel Further:
    • Dilute Salty Ocean on your craft mat.
    • Dab a small portion the background panel into the ink pool 3–4 times.
    • Let the ink run slightly for an authentic mixed media effect.
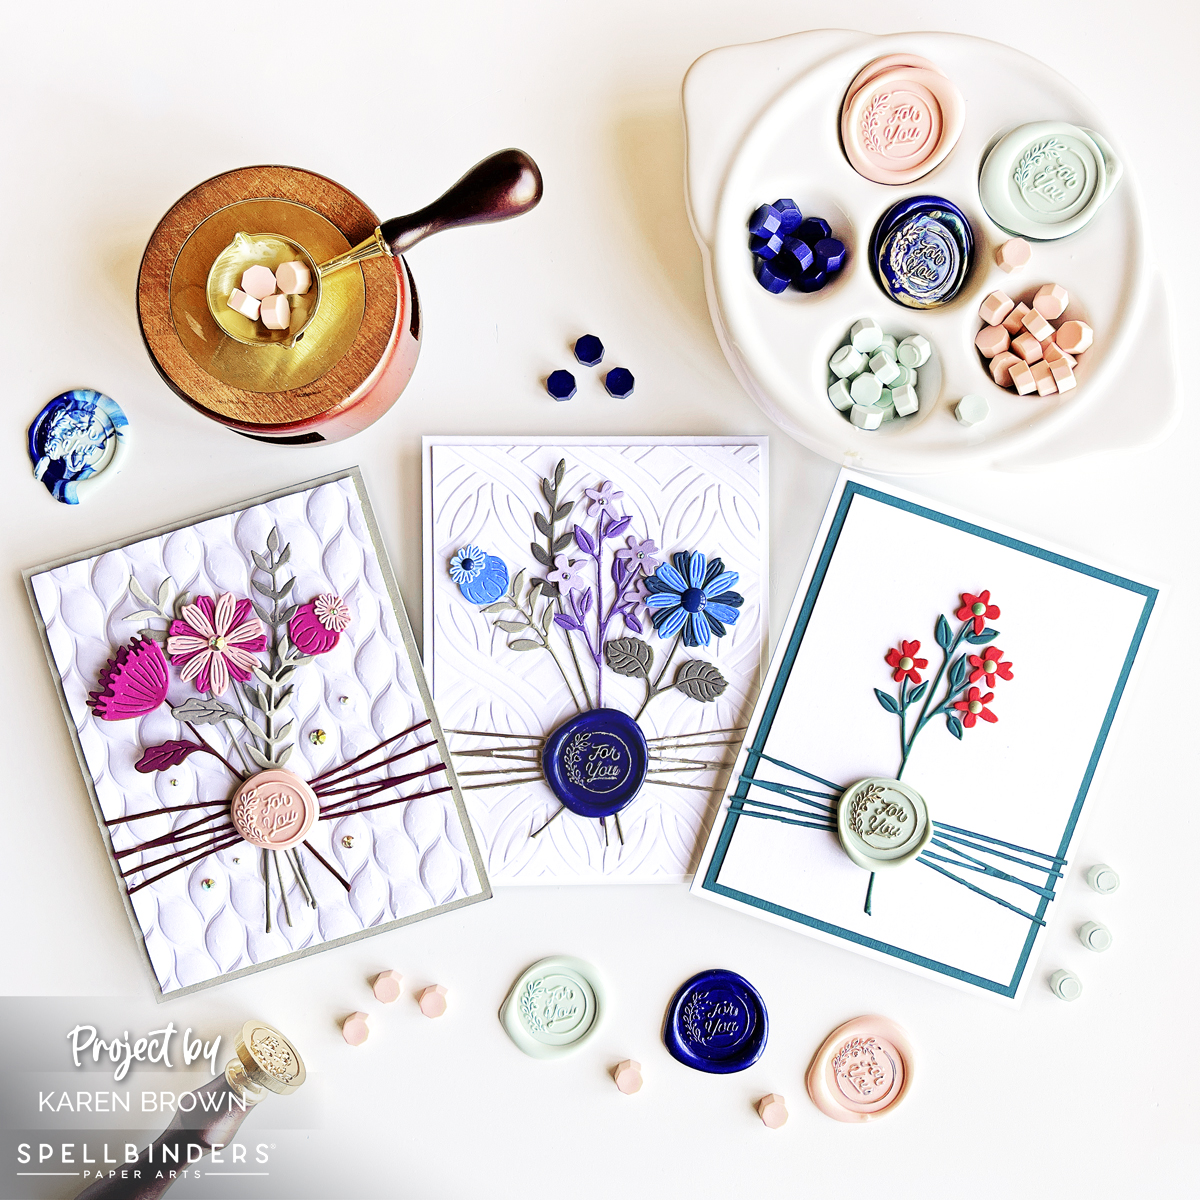
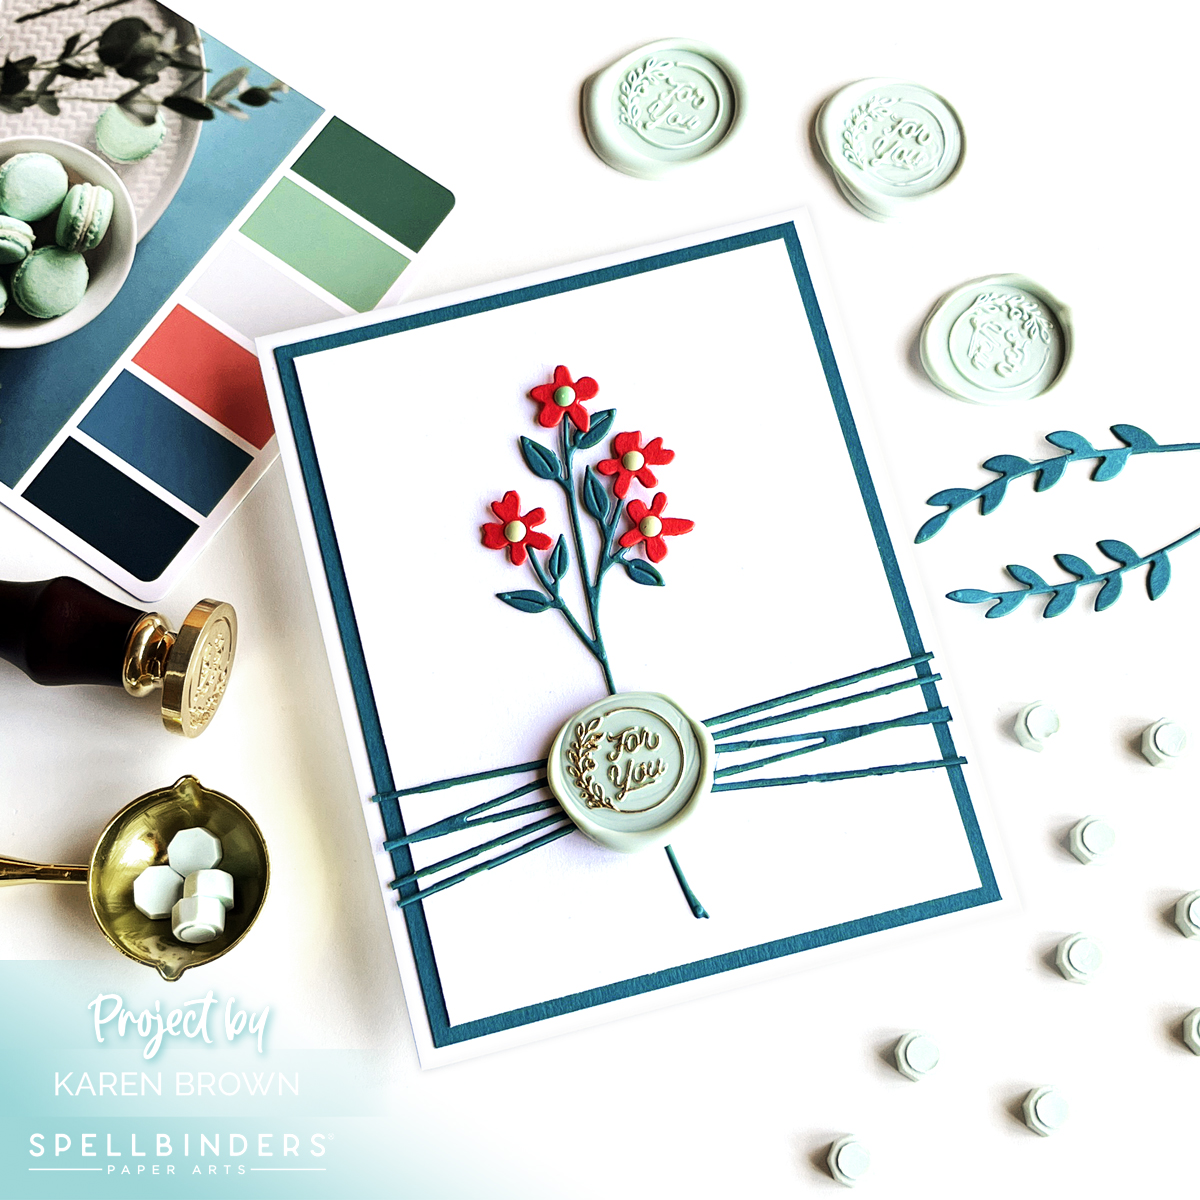
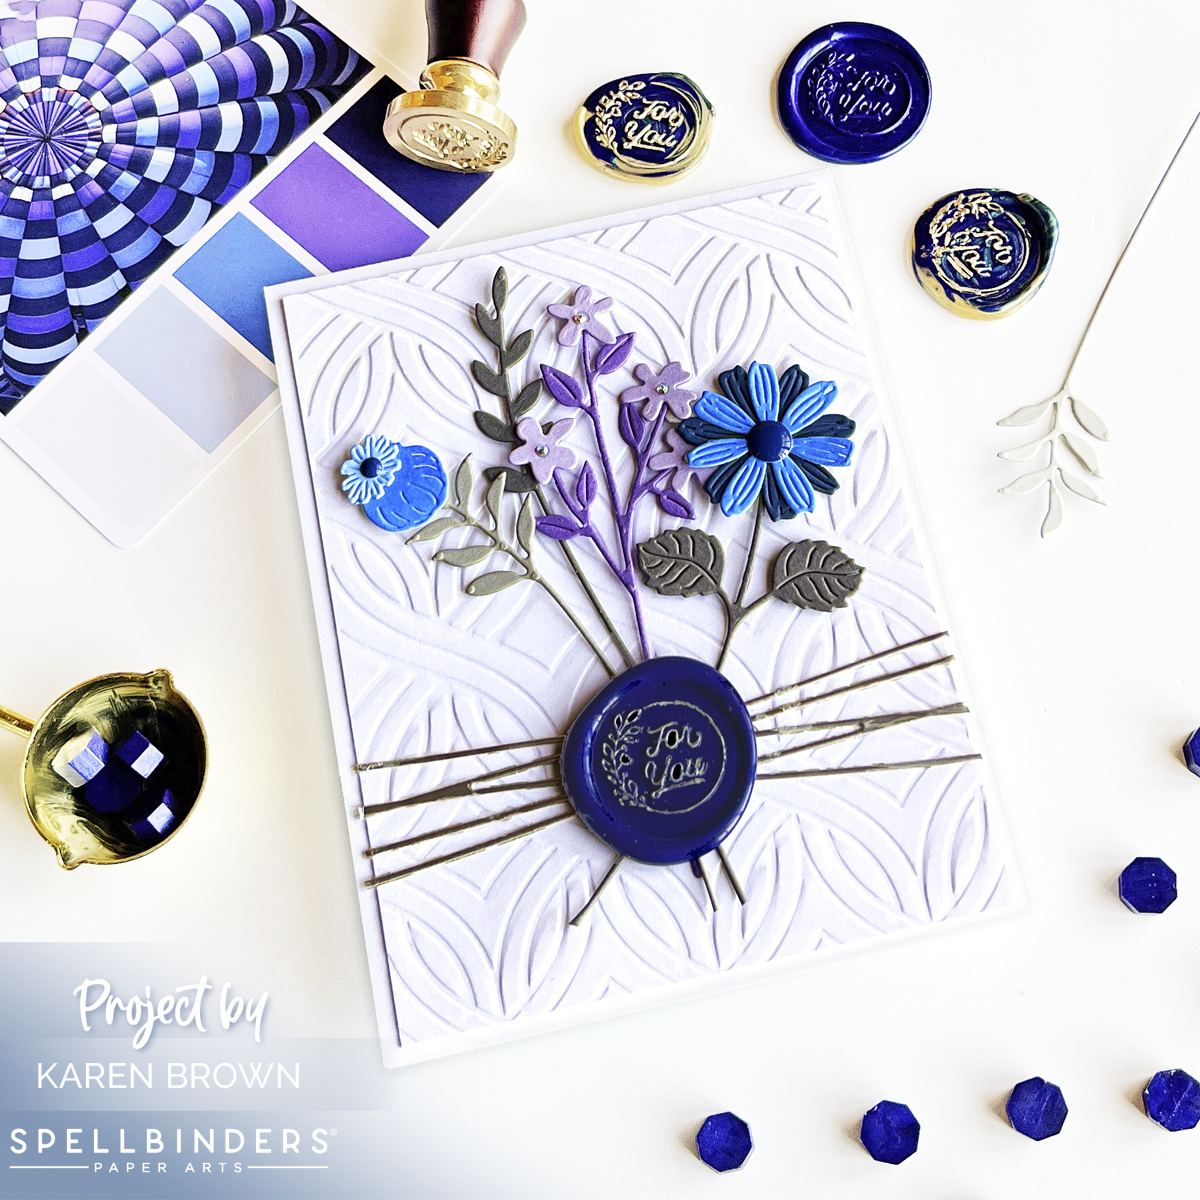
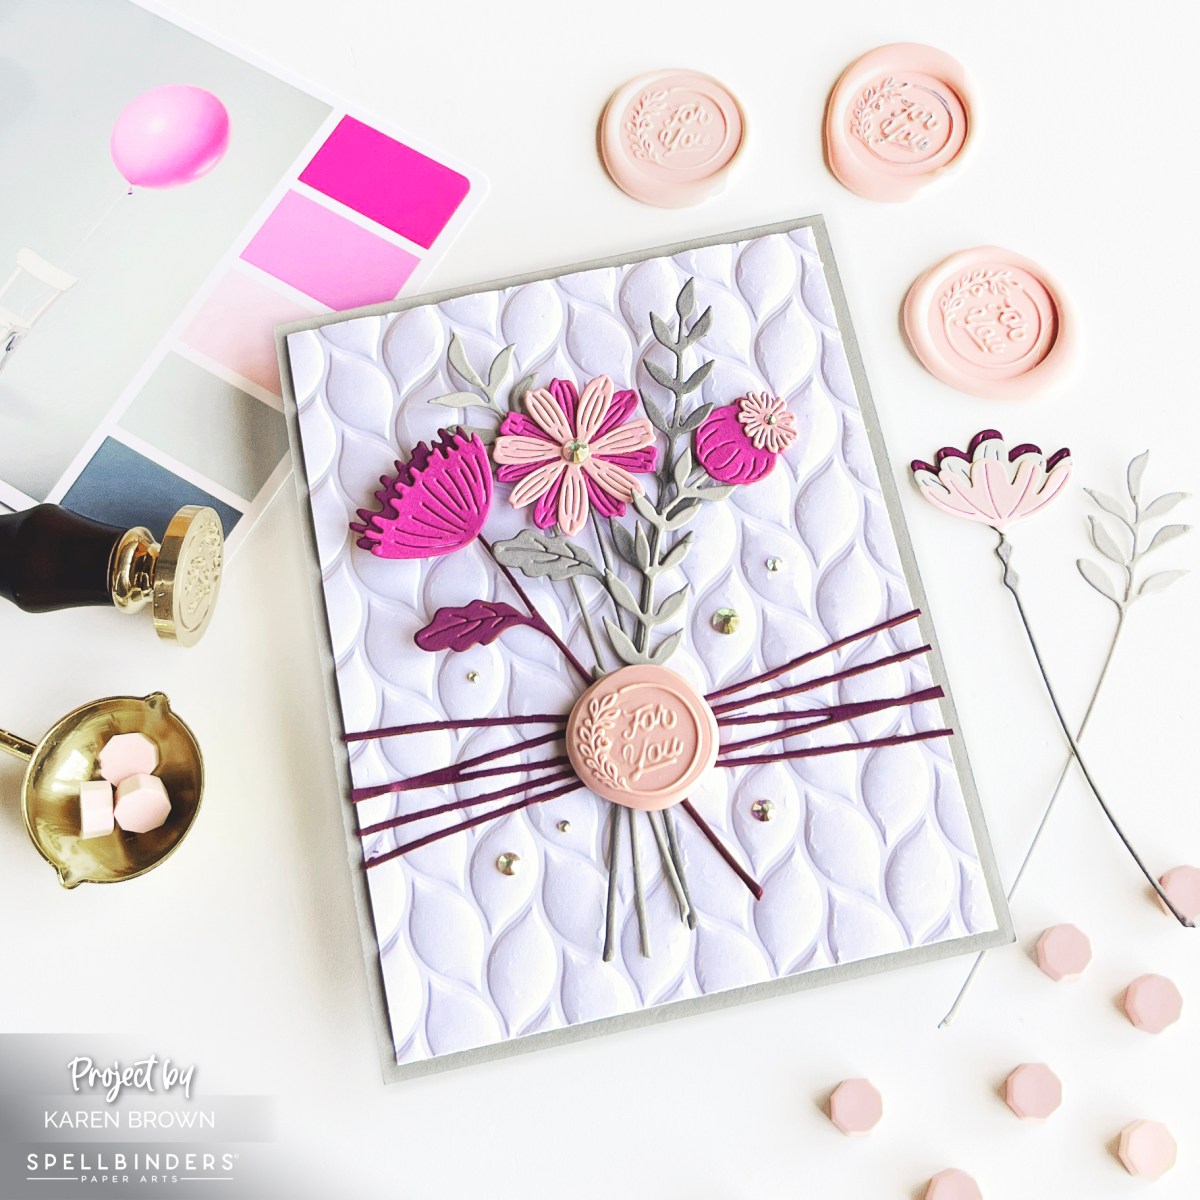
  • Die Cut Blooms: Use the Layered Wildflower die set by Lisa Horton to create floral accents. This entire project features elements from Lisa Horton’s Wildflower Collection.
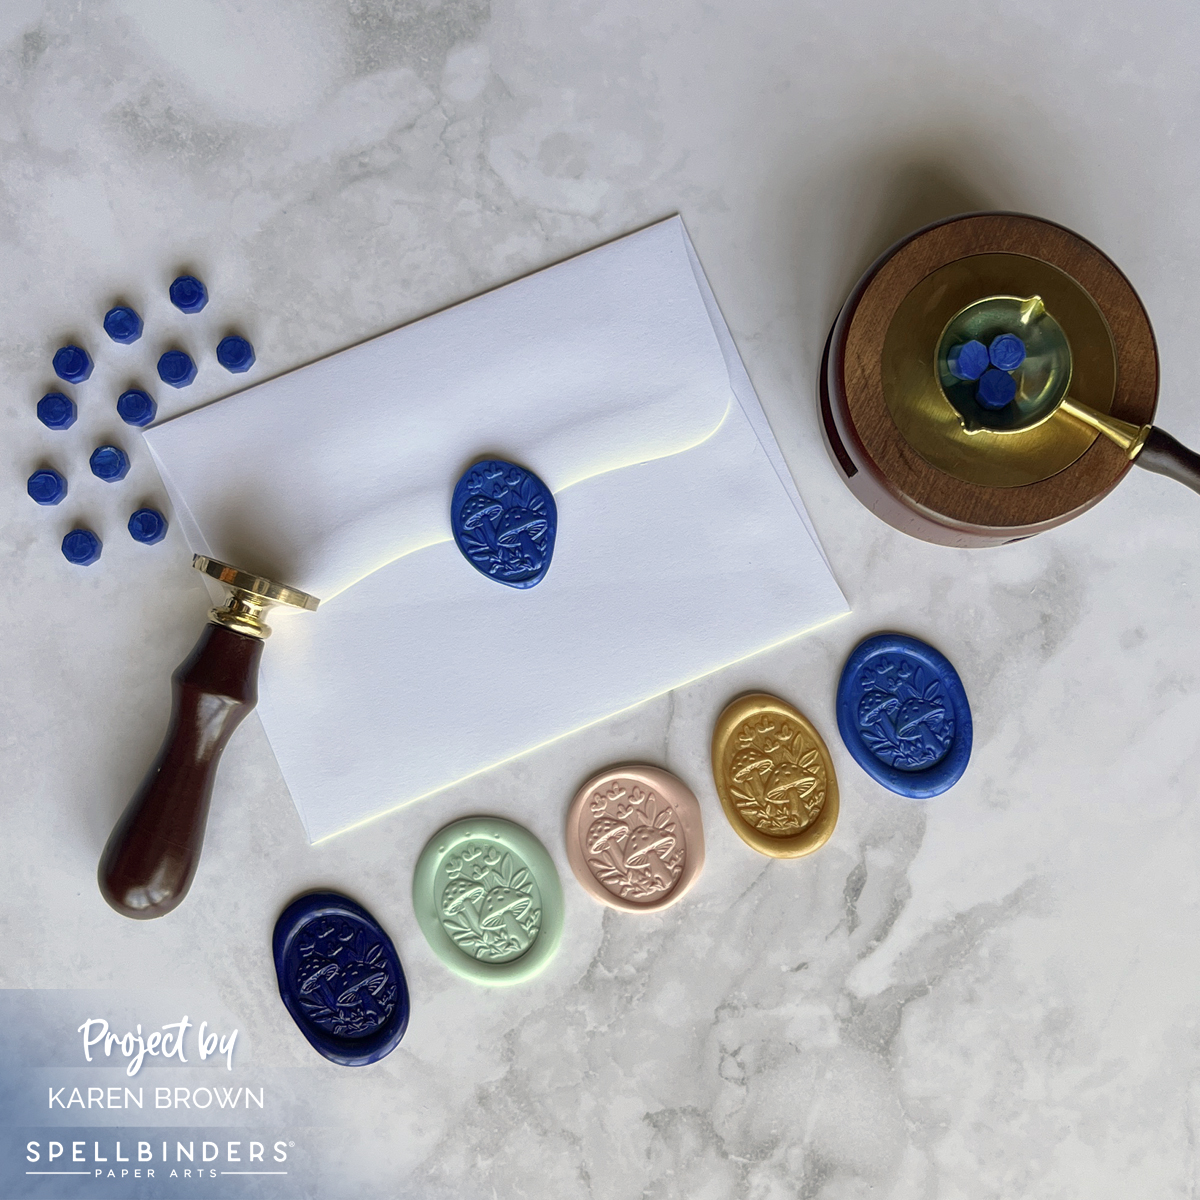
  • Sentiment Touch: Use a “For You” wax seal from a previous Wax Seal of the Month Kit.
  • Final Touches:

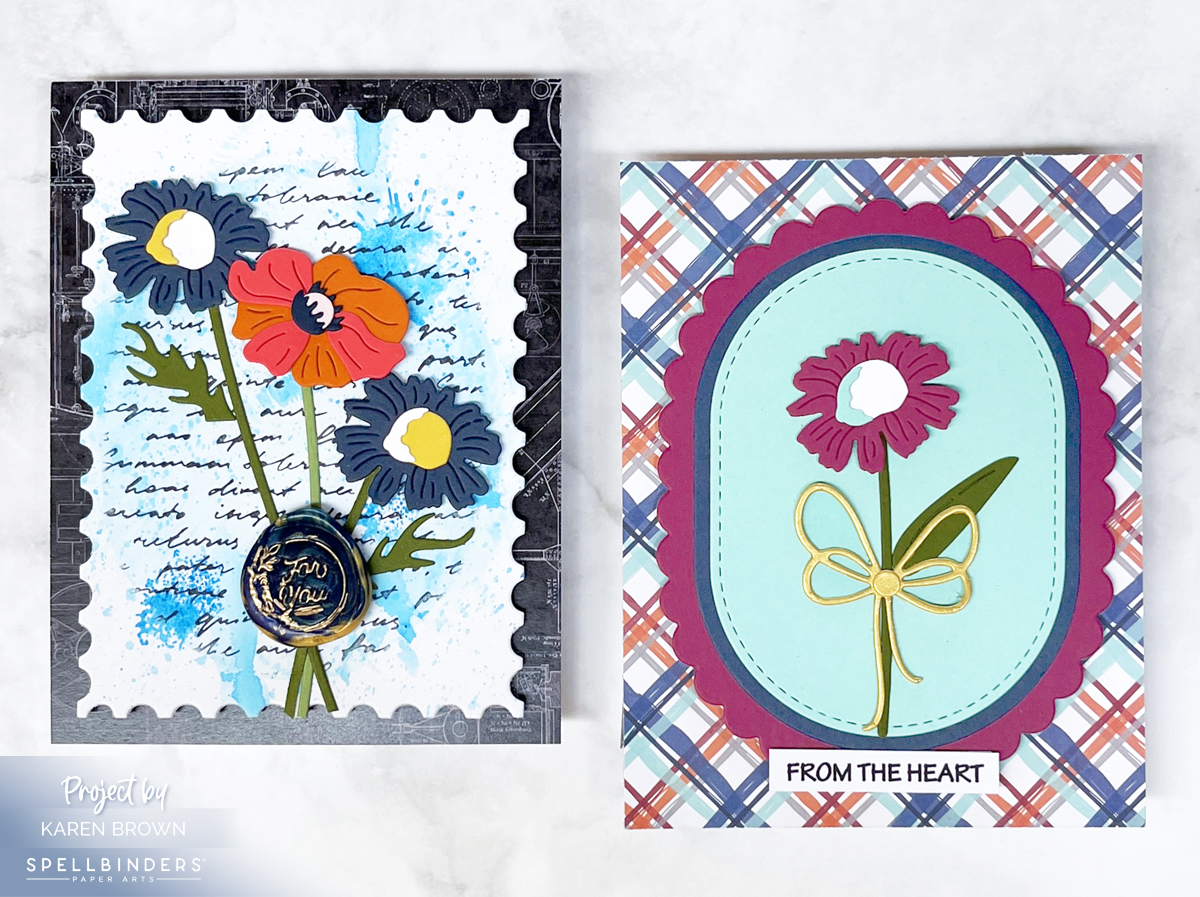
💌 Bonus Project: Layered Die Cut Background

For a second card using the same supplies:

  • Begin with a plaid base in navy, merlot, and aqua. This was cardstock I bought at a Cardmaking Convention.
  • Layer a Merlot scallop oval, Nautical Navy oval, and a Waterfall stitched oval using the Scallop and Stitched Edge Ovals dies and ColorWheel Cardstock.
  • Spotlight a single merlot wildflower die cut from Lisa Horton’s Layered Wildflower set.
  • Add a gold bow (included in the die set) for a subtle accent.
  • Finish with a “From the Heart” sentiment — a versatile option, perfect for sympathy cards.

I hope you found some inspiration today.

Handmade mixed media card featuring letterpress script background, watercolor textures, and layered wildflower die cuts from Lisa Horton’s Wildflower Collection.

Thanks for stopping by!

Best Of · cardmaking

Best and Favorite Cards of 2024: The Year’s Most-Loved Designs

As the year comes to a close, I’m taking a moment to reflect on all the creative projects I’ve shared across my Blog, YouTube channel, and Instagram. The journey has been filled with color, craftiness, and, most importantly, connecting with all of you!

Many of these items featured on my “Fan Favorites” list are currently on sale too!

  • Find Hero Arts New Year’s Eve sale items HERE
  • Hero Arts Final Sale items can be found HERE.
  • Shop Hero Arts HERE
  • Shop Spellbinders New Year’s Eve Sale HERE
  • Find Spellbinders Clearance Sale HERE
  • Shop Spellbinders newer collections HERE.

YouTube’s Card Tutorial: Most Watched Video

Best and Most Popular YouTube Cardmaking Video in 2024.

On YouTube, it was all about bringing techniques to life. Here is the tutorial that flew the highest:

Blog Post Link: Shimmery Snowflake Backgrounds 3 Ways

YouTube Link: Shimmery Snowflake Backgrounds

I created this video for HeroArts Blog and YouTube channel but I also posted on my YouTube Channel for my followers as well.

Top Blog Post in 2024

This year on my blog, I focused on techniques that ranged from beginner-friendly to advanced, and your feedback has been the cherry on top! My most read blog post this year was:

9 Tips, Tricks and Insights for Spellbinders BetterPress Machine

I received a BetterPress LetterPress system for Christmas in 2023, and I had lots of fun learning and experimenting with my new crafty toy. You can read my original blog post by clicking on the link above.

Best, Favorite, Most Popular Cardmaking Blog Post of 2024,

Instagram Reels: Quick Crafting, Big Inspiration

Favorite and Most Popular Instagram Reel in 2024.

This year, Instagram Reels became a go-to for sharing bite-sized creativity. These short videos were packed with techniques, tips, and a splash of fun. Here is my most popular 2024 Reel.

Instagram Reel Link: Floral Trove Stenciled Friend Card

Corresponding Blog Post Link: Stunning Stenciling Magic with Rainbow Colors

Instagram Highlights: Most-Liked and Commented on Creations

Instagram brought quick inspiration and behind-the-scenes sneak peeks to your feeds. Here are the top posts.

For Spellbinders, these were the fan favorites. You can find links to the corresponding blog posts below:

Best Handmade Spellbinders Cards in 2024.

And here are my most popular Hero Arts Instagram posts along with links to the correstponding Blog Posts:

Best Hero Arts Handmade Cards in 2024.

I’m so grateful to share this journey with all of you. Your comments, likes, and creations inspire me every day. Here’s to an even brighter, more colorful 2025 filled with new techniques, bold designs, and, of course, plenty of fun! Let me know in the comments—what were your favorite projects this year? I’d love to hear your thoughts!

Happy crafting, and see you in the new year! ✨☕

Karen

Die cutting · Wax Seals

Adding a Touch of Elegance: Using Wax Seals and Infinity Dies on a Floral Handmade Card

Adding wax seal elements to your cardmaking.

If you’re looking to add a touch of elegance and sophistication to your handmade cards, incorporating wax seals and infinity dies can elevate your designs to new heights. In this post, we’ll explore how to use these tools to create a stunning floral handmade card.

Today, Spellbinders released a wonderful new collection called Sealed 3D Botanical and I chose Scallop Labels and Tags Infinity Dies and the Forest Mushroom Wax Seal. Infinity Dies are definitely one of my most used craftroom essentials and wax seals are so interesting and fun!

Adding texture to your cardmaking with Mushroom Forest Wax Seals, Scallop Labels and Tags Infinity Dies and embossing folders.

Spellbinders 3D Botanical Collection

I knew I wanted to make a shaped floral card with a wax seal medallion on my vase. Here are step-by-step directions for this card:

  • I started by making a bunch of wax seals, which I really enjoy. If you’d like more details, I have a blog post titled 18 Tips and Tricks for Making Wax Seals that you can read HERE. I decided to use two Royal Blue seals and I planned my color scheme around the two seals. Spellbinders Wax Seal Kit is such a fun addition to any craftroom and I have really enjoyed playing with my kit this year.
  • Using my silver Deco Color Paint Pen, I added highlights to the wax mushrooms and foliage. Interestingly, the color looks a little more gold in the photographs, but it is silver in person.
  • I die cut my vase and flowers using one of my new favorites: Fresh Picked Vase. I used Cosmic Sky, Periwinkle, Charcoal and Coral cardstocks.
  • I wanted a bit more texture so I embossed my vase using my Luxe Backdrop Emboss and Cut 3D folder.
  • As I mentioned, I wanted a shaped card so I took an A2 Side Fold Card Base and die cut my white base with the Scallop Labels and Tag die. I made sure that the left cutting edge was to the left of the fold so it would stay intact. Then I cut a Periwinkle and White Mat and assembled my card with Bearly Glue and a few Foam Adhesive Squares.
  • I also made a coordinating wax seal envelop for my card that you can see below.

As I said, I really enjoy making wax seals so I made some extras for future projects. The other colors are Indigo Ink, Pistachio, Velvet Rose and Gold.

Adding wax seal elements to your envelops.

Conclusion

Using wax seals and infinity dies in your handmade cards adds a level of detail and elegance that will impress any recipient. These tools allow you to create intricate designs and sophisticated touches that make your cards truly stand out. Whether for birthdays, weddings, or just because, a floral handmade card with these elements will be cherished and remembered. Happy crafting!

Karen

BetterPress · cardmaking · Wax Seals

Spellbinders Cards | Better Press Spring Collection

BetterPress A Friend Like you card two ways.

I adore the timeless elegance of BetterPress letter press cards. Today I wanted to share two cards using the press plate – A Friend Like You. One card is pure letter press….no coloring or embellishment. The second card is loosely colored with Zig Watercolor Brush Markers. I love them both!

If you’d like to read my post on Tips, Tricks and Insights into the BetterPress system you can find it HERE.

A Friend Like You – Pressed Posey Collection

A Friend Like You - Pressed Posey Collection handmade card colored with Zig Watercolor markers.

My Process:

  • I taped a Porcelain cotton card panel to the top plate, inked my press plates (flower and sentiments are both included in the A Friend Like You press plate set) with Black BetterPress ink and ran the sandwich through my BetterPress system. 
  • For my watercolor card, I repeated step one using watercolor paper.
  • I cleaned the press plate and BetterPress platform with Ultra Clean.
  • I taped my watercolor panel to a hardboard with painters tape.
  • Using Zig markers, I applied watercolor along the etched lines and then used a water brush to move the color around. I did wet-on-dry painting. I also scribbled some watercolor on my work surface and using my water brush, I added additional color to some areas. I experimented with watercolor brushes and my round water brush and I found that I liked the result with the water brush best. 
  • I let my panel air dry.
  • For the watercolor panel, I made a card base using Stylish Ovals Nesting Dies.
  • I also used Stylish Ovals to cut down my watercolor panel.
  • For the black and white panel I die cut my letter press panel with Essential Rectangles, which unfortunately is retired. I matted with black and glued to an A2 top folding card base.
  • Zig Colors Used: cobalt, light blue, bright yellow, orange, yellow green, mid green, mustard, cool gray, light gray.
Black and white Spellbinders BetterPress letter press floral card.

Products Used on My “A Friend Like You” Cards:

Sealed Cord and Faux Seal Sentiments (BP-107)
Spellbinders Sealed Cord and Faux Seal Sentiments (BP-107) handmade card with a gold wax seal.

I wanted to make a traditional masculine card and I love how this one turned out. Minimalist yet elegant. The Sealed Cord press plates have 6 great sentiments, but I wanted to top my card with a wax seal. I used one of the included circular sentiments on a card that you can see HERE.

I love making and using wax seals. I have a blog post titled 18 Tips and Tricks For Making Wax Seals that you can read HERE. I used the wax beads and seal that were included in Spellbinders Wax Seal Starter Kit. I used a Posca Paint pen to highlight the sentiment. I haven’t tried it, but I think a Sharpie would also work.

Thanks for stopping by!

Karen

Die cutting · Tutorial · Wax Seals

18 Tips and Tricks for Making Wax Seals | Spellbinders

18 Tips and Tricks for Making Cards with Wax Seals.

My Husband gave me Spellbinders Wax Seal Starter Kit for Christmas, and I have been having SO much fun! I also received a Platinum 6 Die Cutting Machine and I have to say I loved the results!

In today’s post, I used three beautiful new wax bead colors: Pistachio, Velvet Rose and Ink.

Tutorial + 18 Tips and Tricks for Making Wax Seals:

  • With a Sharpie marker, I put a dot on my seal so it was easy to keep track of where the top of the design is.
  • I read that it helps reduce soot if you trim your tea candle wick, so I did this.
  • I put 4 beads in the warming spoon and it took 2 minutes to melt.
  • I poured the wax and found it is easy to make a circle pattern, but I do like seals that aren’t perfectly round.
  • Don’t press the seal into the wax, just gently position and allow gravity to work.
  • After experimenting, I found that if I wanted a thicker, more button like seal you should pour the wax and then wait 15-30 seconds before gently dropping the seal into the wax. The card with the pink seal was done this way.
  • If you like a thinner seal with a higher rim then place the seal immediately after pouring.
  • I found if I used just my thumb and pinky or middle finger that I was better able to center the seal more precisely. 
  • I left the seal in the wax anywhere from 15 to 90 seconds. The time didn’t seem to matter and no wax was ever left on the seal itself.
  • I also found it helps to move your pours around on the silicone mat so you don’t get warm spots on your work surface.
  • I also let my seal cool in between pours.
  • If you don’t like a seal, you can remelt it.
  • You can mix colors for a lovely marbled look. I really love the blue and green combination that I made which is shown in the upper left of the first photo. I also love blue and gold together and you can see two with that combination in the upper right corner on the blue card.
  • You can add flakes, glitter or pearls to the melted wax.
  • I used a paper towel to clean the spoon when changing wax colors.
  • I used a Decocolor marker on some of my seals (see the card with the green seal). I have Gold but wish I had bought silver too. Just lightly go over the raised ridges.
  • I experimented using Posca Pens too. They work, but I did like the result of the Decocolor markers better. The navy wax seal was highlighted with a silver Posca.
  • I love the Sealed Twine Die for a perfect twine look every time!
Quick and Easy Die Cut Card with Custom Handmade Wax Seal.

Each seal is so beautiful and unique!

Floral card with blue and purple flowers and Ink Navy blue Wax Seal Element.

Once, my seals were made, I got out two favorite die sets – Sealed Wildflower, and Autumn Sealed Sprigs – and started creating my floral designs. I also used the Sealed Twine die on all of my cards.

How to use wax seals on handmade greeting cards.

For two of my cards I embossed a background panel for added interest.

I’ve enjoyed my Wax Seal Kit so much that I signed up for the Wax Seal of the Month Kit.

Thanks for stopping by!

Karen

cardmaking · Mixed Media · papercrafting

Big News + Hero Arts | November Add-Ons

I am thrilled to announce that I have been selected to join the Hero Arts Creative Team! This incredible opportunity allows me to collaborate with a group of talented and passionate artists who share a love for crafting and creativity. I am beyond excited to explore new techniques, experiment with Hero Arts’ amazing range of products, and inspire others on their own artistic journeys. Together, we’ll embark on a creative adventure filled with endless possibilities, and I can’t wait to share the magic that unfolds along the way! Stay tuned for a whirlwind of innovative projects, tutorials, and inspiration that will surely ignite your own crafting passions. 🎨✨ #HeroArtsCreativeTeam

Okay, let’s make some art together!

Handmade card with Hero Arts November Add-Ons: Winter Mail Critters, White Holiday Collage Hero Transfers, Wax Seals.

I also wanted to share a card using some of the fun Add Ons from the November My Monthly Hero Kit. This month has so many goodies and I used 4 of them today.

Handmade Christmas Card featuring a Hero Arts bear and fox each holding a letter with a Rub On Transfer background.

Hero Arts Christmas Card Tutorial:

I started by die cutting two frames and two “tapes” from the Journaling Photo Frame Infinity Dies Set. I then very lightly blended Paradise Core Ink along the edges of the photo background (using the sticky mat in my Stamp Wheel), stamped the bear and fox with my Stamping Tool and Copic colored the images (colors listed below). I also rubbed on a transfer Merry & Bright sentiment.

The background was so easy! I rubbed on the fun Twas the Night Before lettering from the White Holiday Collage Hero Transfers (RT121) with a bone folder and all the writing transfered to the paper perfectly on the first try. The card background is Paradise cardstock.

I wanted a pop of red, so I stamped and die cut a Merry Christmas Wax Seal using Crimson Core Ink. I also put a dab of Hero Wax Gold to add a little depth and shine to the “photo tape”

I assembled my card with foam tape and it is ready to send.

Cute holiday card with critters featured in  Hero Arts Journaling Photo Frame Infinity Dies DF125

Products Used:

Hero Arts November 2023 My Monthly Hero Kit and Add Ons

Winter Mail Critters Die Bundle SB385 (or stamps only)

White Holiday Collage Hero Transfers RT121

Holiday Message Strips Hero Transfers RT120

Wax Seals and Dies D306

My Monthly Hero Subscription

Journaling Photo Frame Infinity Dies DF125

Paradise Core Ink

Crimson Core Ink

Paradise cardstock.

Hero Wax Gold

Precision Glue

Compact Desktop Die Cutting Machine

Handy Desktop Tool Holder

Stamp Wheel Stamping Tool and Sticky Mat

Bone folder

Highlighter Tape (for die cutting and to tape the photo background to the frame)

White thin Posca pen to add highlights to the scarf.

Copic Colors Used:

  • Browns: E27, E15, E13, E11, E50
  • Reds: R27, R39
  • Pink: RV11
  • Blue: B00

I am so glad you stopped by!

Interested in more…You can also find me at these spots too:

@karens_mini on Instagram

Pinterest: @karenabrown

FaceBook: Karens_Mini

YouTube: Karen Brown