Create Dimensional Keepsake Cards That Will Wow Your Recipient
Some die sets are fun. Others quietly become craft room staples—the kind you reach for again and again because they just work.
The new Spellbinders Pink Lemonade Stand Collection falls firmly into that second category.
With its stand-up easel chalkboard design, customizable accessories, and endless styling options, this set can go modern or playful, graphic or cozy, bold or soft. Its both eye-catching and surprisingly easy to create—even if you’ve never made a dimensional card before.
Today, I’m sharing how to turn this versatile die set into a dimensional chalkboard easel card that’s both eye-catching and surprisingly easy to create.
In This Post, You’ll Learn:
• How to create a dimensional chalkboard-style easel card
• Tips for building a stable stand-up design
• Ways to customize your card for different occasions
• How To Get Professional Heat Embossing Every Time
I’ve created two dimensional easel card designs using the same kit:
• a bright, cheerful stand-up strawberry-lemonade easel card that practically begs to be displayed
• a trio of bold, graphic coffee shop thank-you cards featuring dramatic black cardstock and heat embossing
Along the way, I’m also sharing a reliable heat embossing tutorial, tips for building sturdy easel cards, and ideas to help you get the most mileage possible out of this die set.
Product Spotlight: Pink Lemonade Stand Die Set
The chalkboard easel card featured today is built with the delightful Pink Lemonade Stand Die Set from Spellbinders.
What makes this set so versatile is the dimensional stand design and the mix-and-match accessories that allow you to style it for everything from summer lemonade stands to cozy coffee shop scenes.
Why I love it:
• Creates dimensional easel cards that display beautifully
• Includes fun accessory pieces for customizing your stand
• Works with many different themes and occasions
See the die set here.
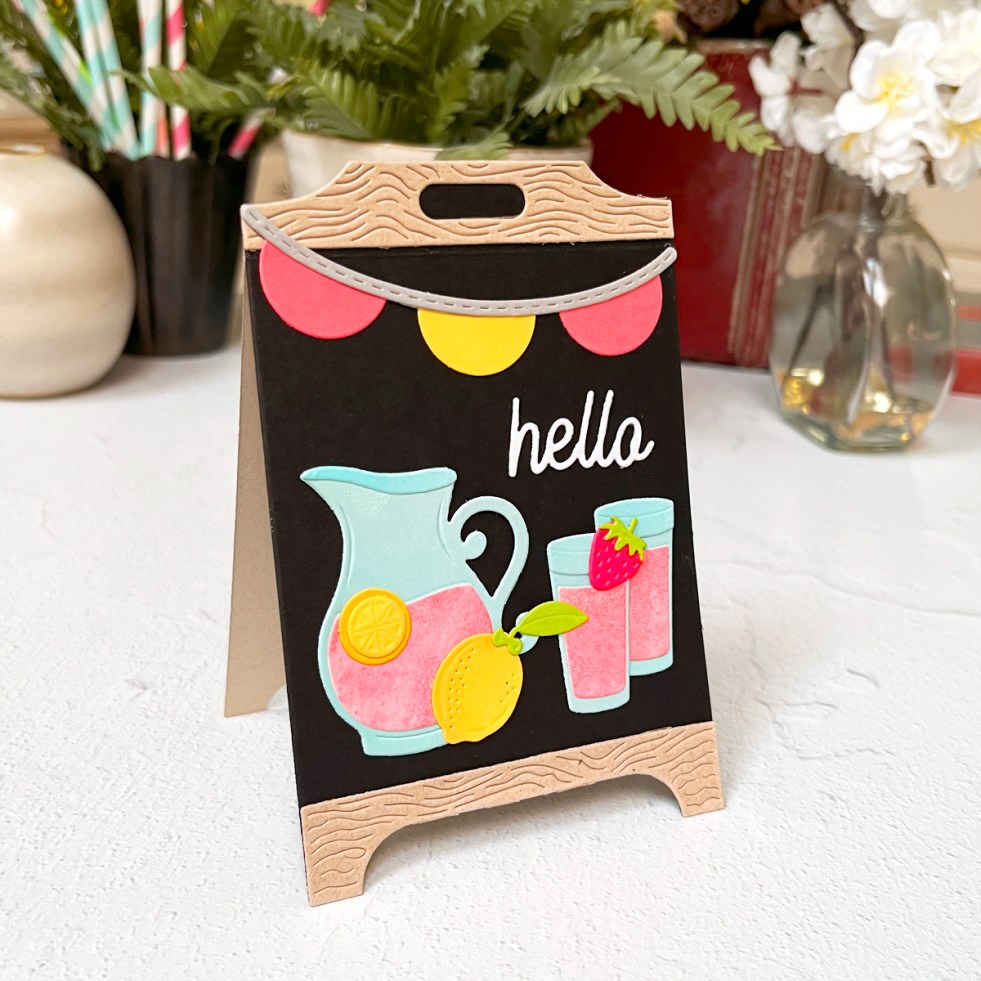
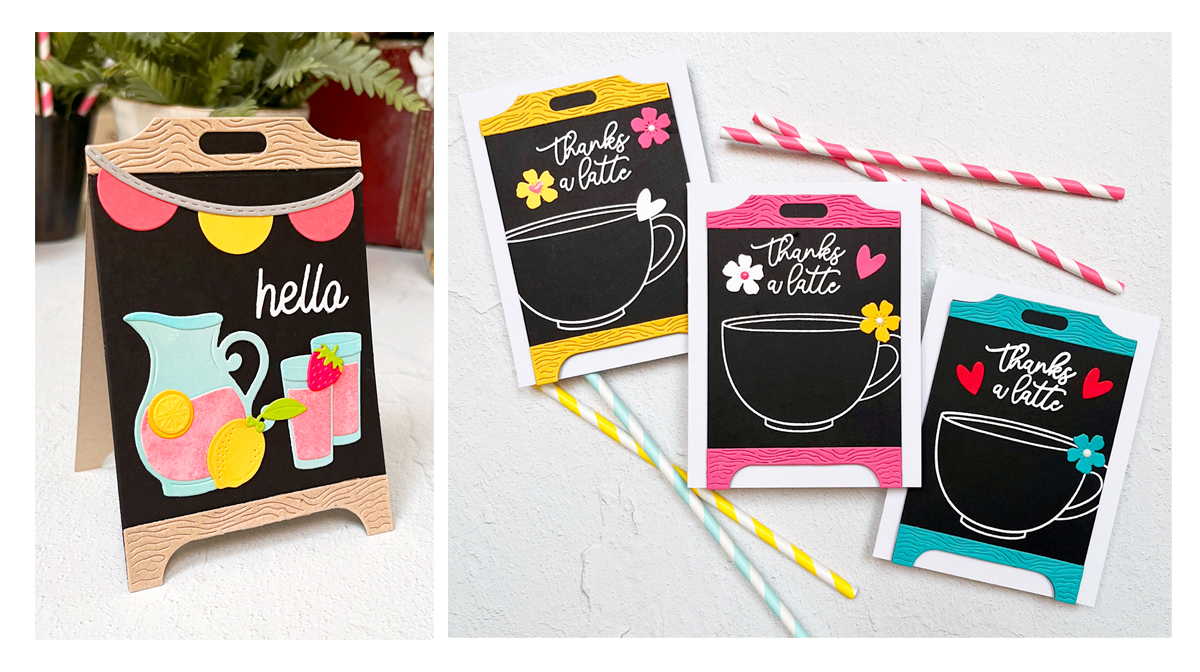
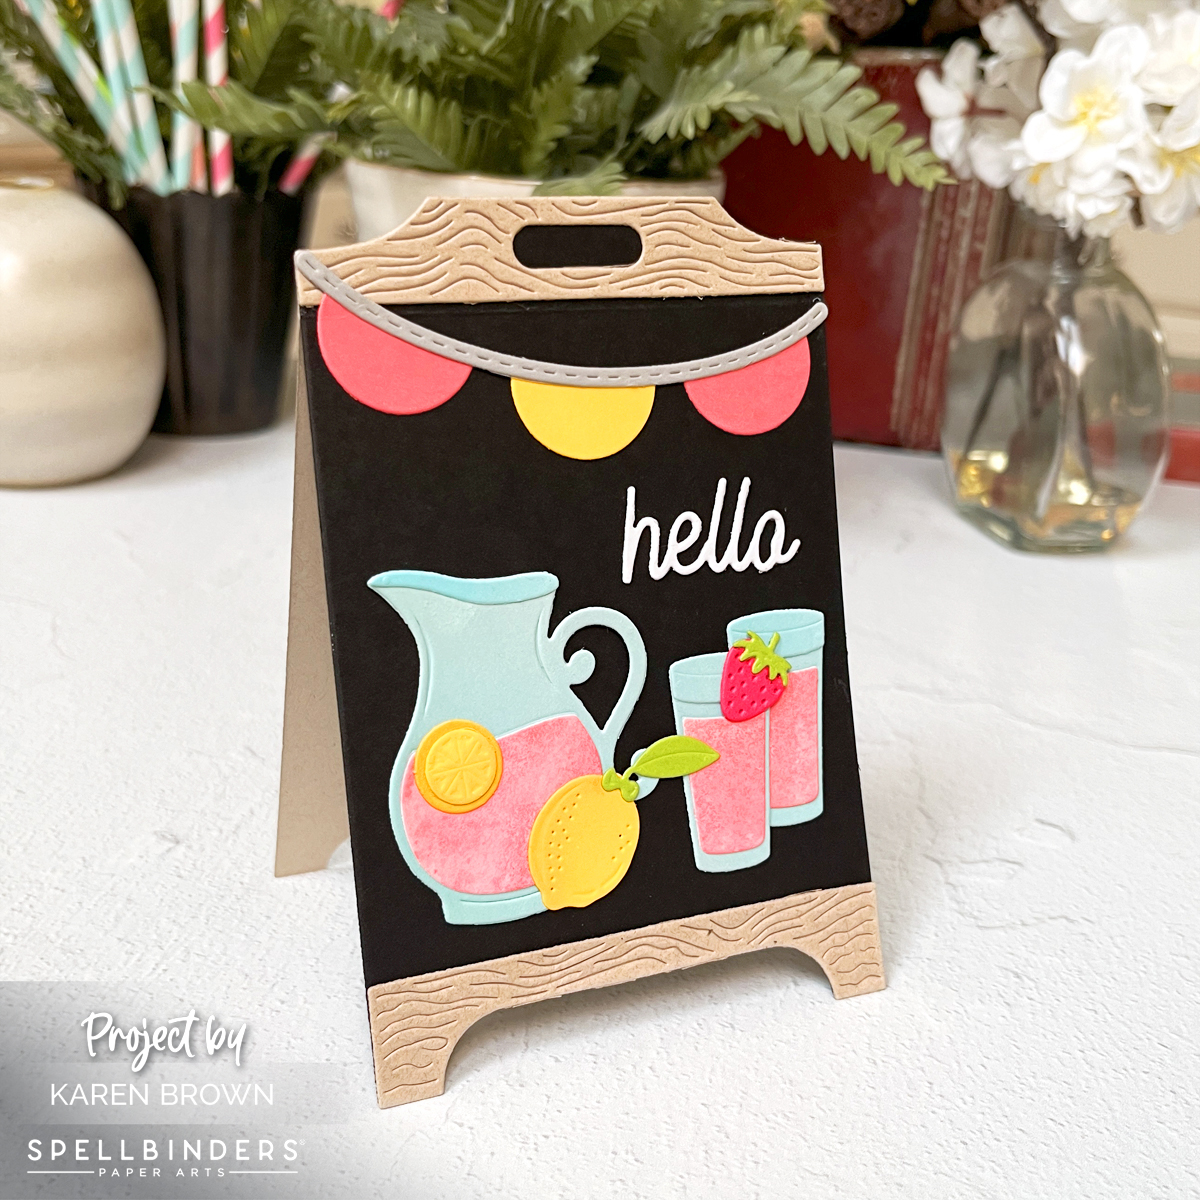
Lemonade Stand Easel Card (Bright, Happy, Display-Worthy)
For my first card, I used the Lemonade Stand die set traditionally—and it’s a show-stopper.
Design Details
- Black chalkboard center
- Tan “wood” frame top and bottom
- Die-cut pitcher of pink lemonade, glasses, lemons, and a strawberry
- Included hello sentiment
- Pink and yellow banner across the top
Color palette: pink, yellow, and pale blue—bright, happy, and eye-catching without being busy.
I cut many of my elements from lightly inked scraps, which keeps everything from looking flat. I also added a touch of ink blending to the lemons for dimension.
If lemons are your thing too, you might enjoy this favorite from last year → Lovely Lemons: Die Cutting, Ink Blending & a Touch of Gold.
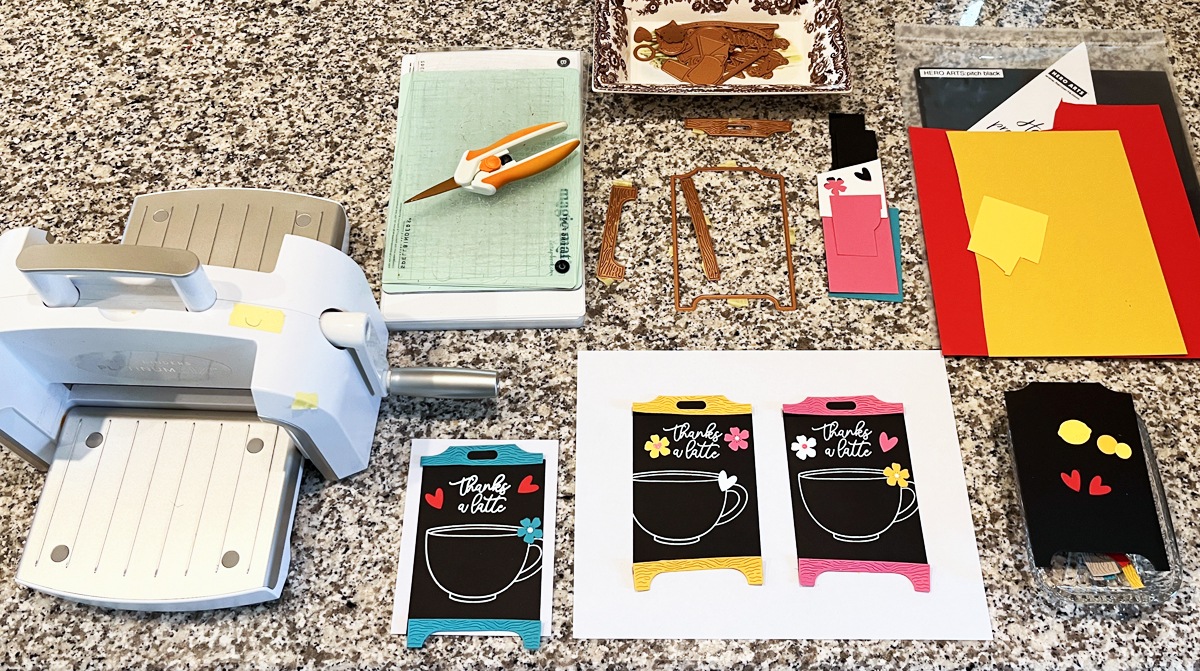
I am sharing a diecutting process photo and I talk more about why I love my Platinum 6 in my must-have cardmaking list.

Up-Right Easel Assembly Tip
- Die cut a second chalkboard backer from tan cardstock
- Score just below the top wood header on the front and back panel
- Glue only the top headers together to create a sturdy stand
These display-worthy cards are the kind recipients keep out long after the occasion.
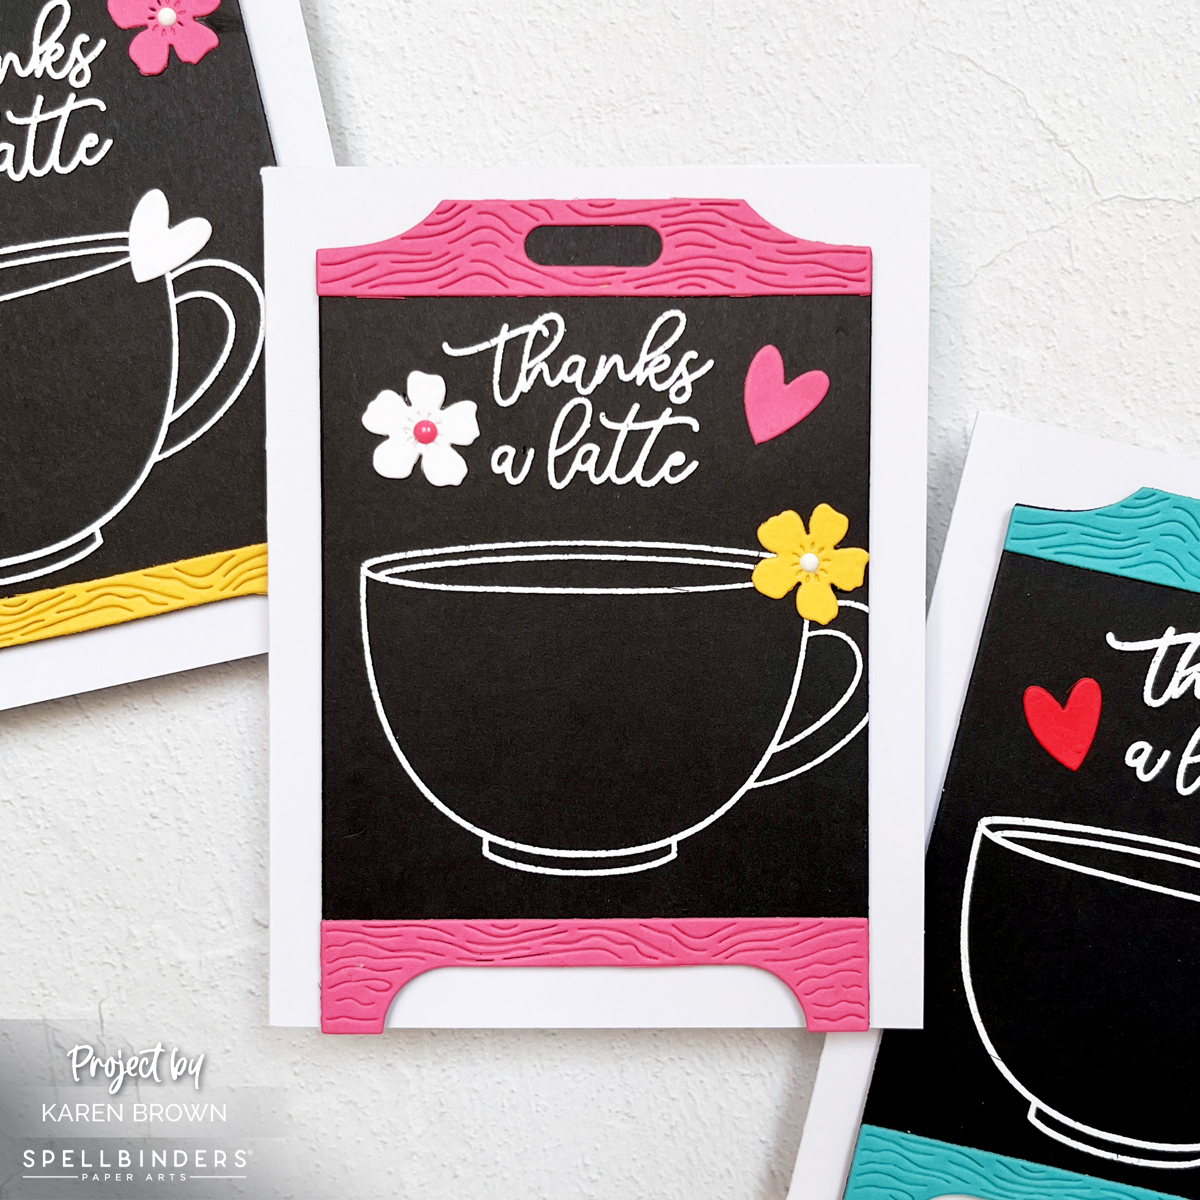
Trio of Coffee Shop Thank-You Cards (Black Cardstock = Instant Drama)
For my trio of cards, I leaned fully into a coffee shop chalkboard vibe—modern, graphic, and cozy all at once.
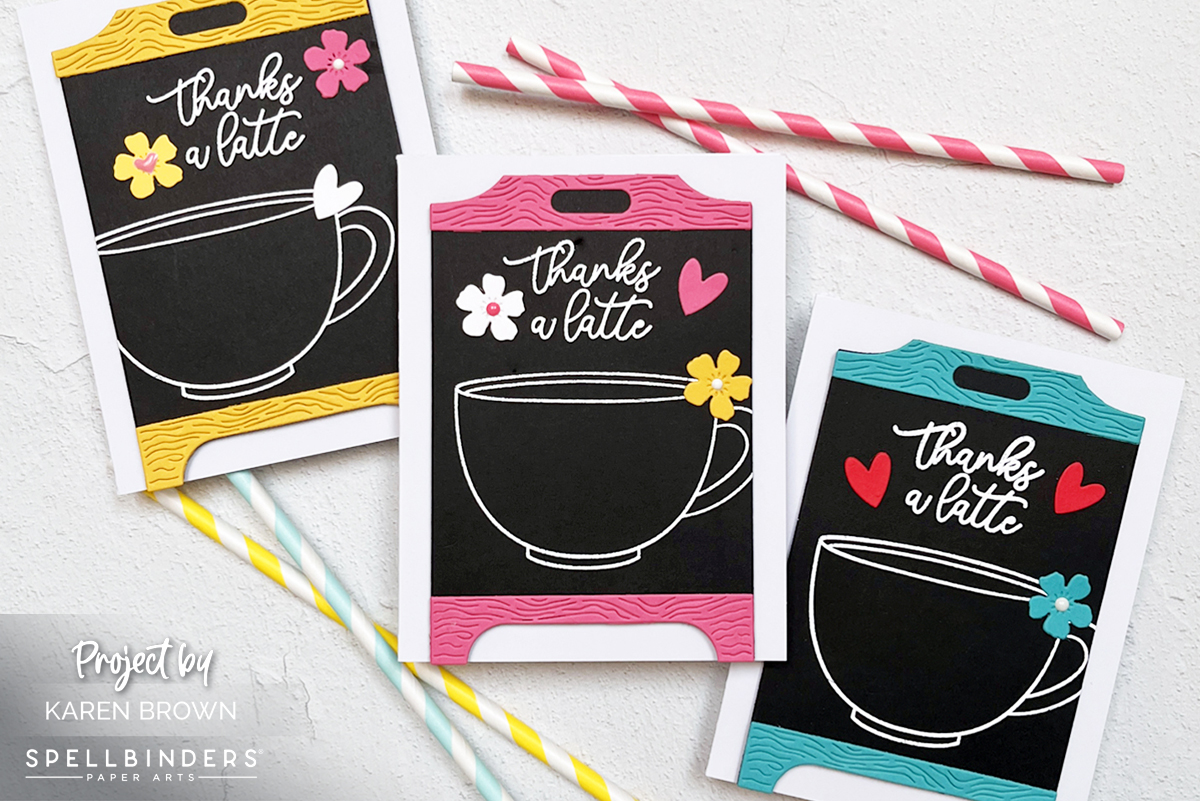
Design Details
- Lemonade Stand Easel base: Pitch Black cardstock (my favorite black—rich, crisp, and perfect for embossing)
- Chalkboard sentiment: heat-embossed coffee cup + “thanks a latte” from the Hero Arts Coffee or Tea Stamp Set
- Embellishments: small hearts and flowers from the Pink Lemonade Stand Tag accessory dies
- Color accents: hot pink, turquoise, and bright yellow
- Mounted on: white A2 card bases for maximum contrast
I trimmed the coffee cup image slightly, which instantly made the design feel more like a real café chalkboard. The glossy white embossing against deep black cardstock is one of those combinations that never fails.
If you love coffee-themed cards too, you might enjoy my bold espresso-inspired project here → What’s Brewing? A Bold & Graphic Coffee Card.

Color Breakdown (why it works)
Each card is mostly black (about 70%), with:
- one strong accent color (~15%)
- crisp white embossing
- one tiny pop of contrast (flower center or heart)
That balance is what keeps these dramatic but still cheerful.
Which color combo is your favorite—pink, turquoise, or yellow?
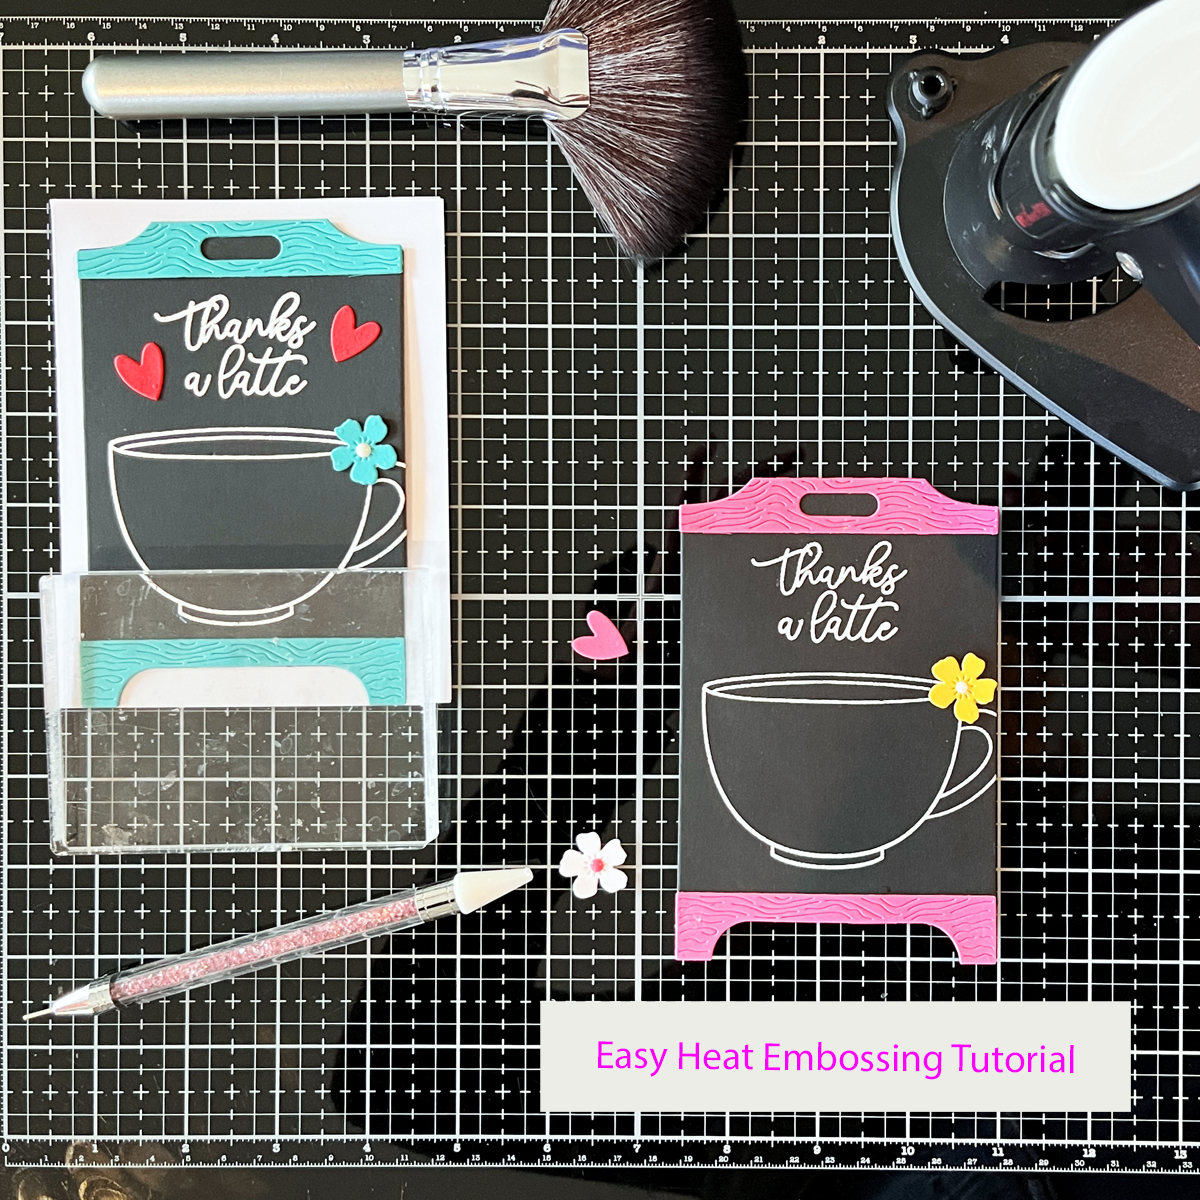
Heat Embossing on Black Cardstock
Because these cards rely on bold embossing, I wanted to include a go-to heat embossing method you can reference again and again.
How I Get Clean, Professional Heat Embossing Every Time
- Prep stamps with a stamp conditioning eraser (today I used the Hero Arts Coffee or Tea stamp set)
- Prep cardstock with an anti-static powder tool
- Use a 1″ flat brush to apply powder horizontally, then vertically
- Stamp with Unicorn White Pigment Ink
- Use white embossing powder (double white = best results)
- Preheat heat tool for at least 1 minute
- Use the easel die as a viewfinder to place images
- Stamp twice with a stamp positioner using light, even pressure
- Pour embossing powder generously, tilt panel in all directions, tap gently
- Heat emboss while constantly moving the heat tool
- Let cool, then polish lightly with a microfiber cloth
💡 Tip I’ve used for years: catch excess embossing powder in a coffee filter—easy pour-back, no mess.
I’m sharing:
- a candid workspace photo showing all three layouts “percolating” overnight
- a mid-assembly shot with one chalkboard drying under an acrylic block
If you are looking for easy relaxed cardmaking, you might be interested in some other products I used from The Pink Lemonade Collection in this Using Pre-Printed Supplies blog post.
If you love scene-building, you’ll definitely want to check out my Sneaker Bouquet scene card tutorial.
Craft Supplies Featured on This Card:
Die Cutting:
- Spellbinders Pink Lemonade Stand Die Set
- Spellbinders Pink Lemonade Stand Tag Accessory Dies
- Spellbinders Pink Lemonade Collection
- Platinum 6 Die Cutting Machine
Stamps and Cardstock:
Ink: