cardmaking · Stenciling

2 Easy Stenciled Masculine Cards | Beginner-Friendly Jean Jacket Design

Create Easy Masculine Cards with Layered Stencils and Three Shades of Blue Ink

Popping by today with two quick, fun and easy stenciled masculine cards — and I have to say, these might be some of my favorites lately.

There is just something about a classic blue jean jacket that feels timeless… relaxed… relatable… and perfect for so many occasions.

These cards were absolutely created with my husband in mind (who I LOVE in blue shirts 💙). But honestly? These designs work beautifully for:

  • Birthdays
  • Father’s Day
  • Graduation
  • Get Well
  • Just Because
  • Teens
  • Kids
  • Even encouragement cards

Just swap the sentiment and you’re done!

And if you are new to cardmaking? This is such a great beginner stencil project.

Pin This Tutorial For Later.

Stenciling monochromatic blue Jean Jacket Shirt for easy eye-catching masculine card
Monochromatic stenciling creates bold dramatic handmade cards

Easy Masculine Card Ideas That Feel Classic (Not Complicated)

One-layer masculine card featuring a stenciled blue jean jacket front using layered blue inks on white cardstock with a clean background and stamped love sentiment.

This Jean Jacket Stencil is the star of this card.

Masculine cards can sometimes feel tricky.

But designs like this work because:

  • The imagery is relatable.
  • The colors are classic.
  • The layout is simple.
  • The contrast is strong.

If you’ve ever struggled with masculine designs, you might also enjoy my Masculine Speedometer Card — another clean, high-contrast design that keeps things bold without feeling busy.

And if you want a bigger supply overview, my post on 14 Best Cardmaking Products and Supplies for 2026 shares the exact basics I reach for again and again when creating cards like these.

Simple supplies. Strong contrast. Clean backgrounds. That formula works.

Why These Stencils Are So Easy to Use

Hero Arts SA325 Jean Jacket easy masculine card stenciled in 3 shades of blue,

Hero Arts created a set that feels both classic and eye-catching at the same time.

Jean Jacket Options:

The layers are clearly etched and numbered in the bottom left corner — which makes lining them up incredibly simple.

Tip: Always check the etched layer number before you start blending. It ensures your stencil is facing the correct direction.

If you’re new to layered stenciling, you might enjoy my Coloring with Stencils 4 Ways VIDEO where I walk through blending multiple stencil layers step-by-step.

And for a floral take on layered blending, my Floral Stenciling 3 Ways video shows how changing color combinations creates completely different moods — just like we’re doing here with blue tones.

Once you understand layering, the possibilities open up quickly.

No guessing. No frustration. Just blend and go.


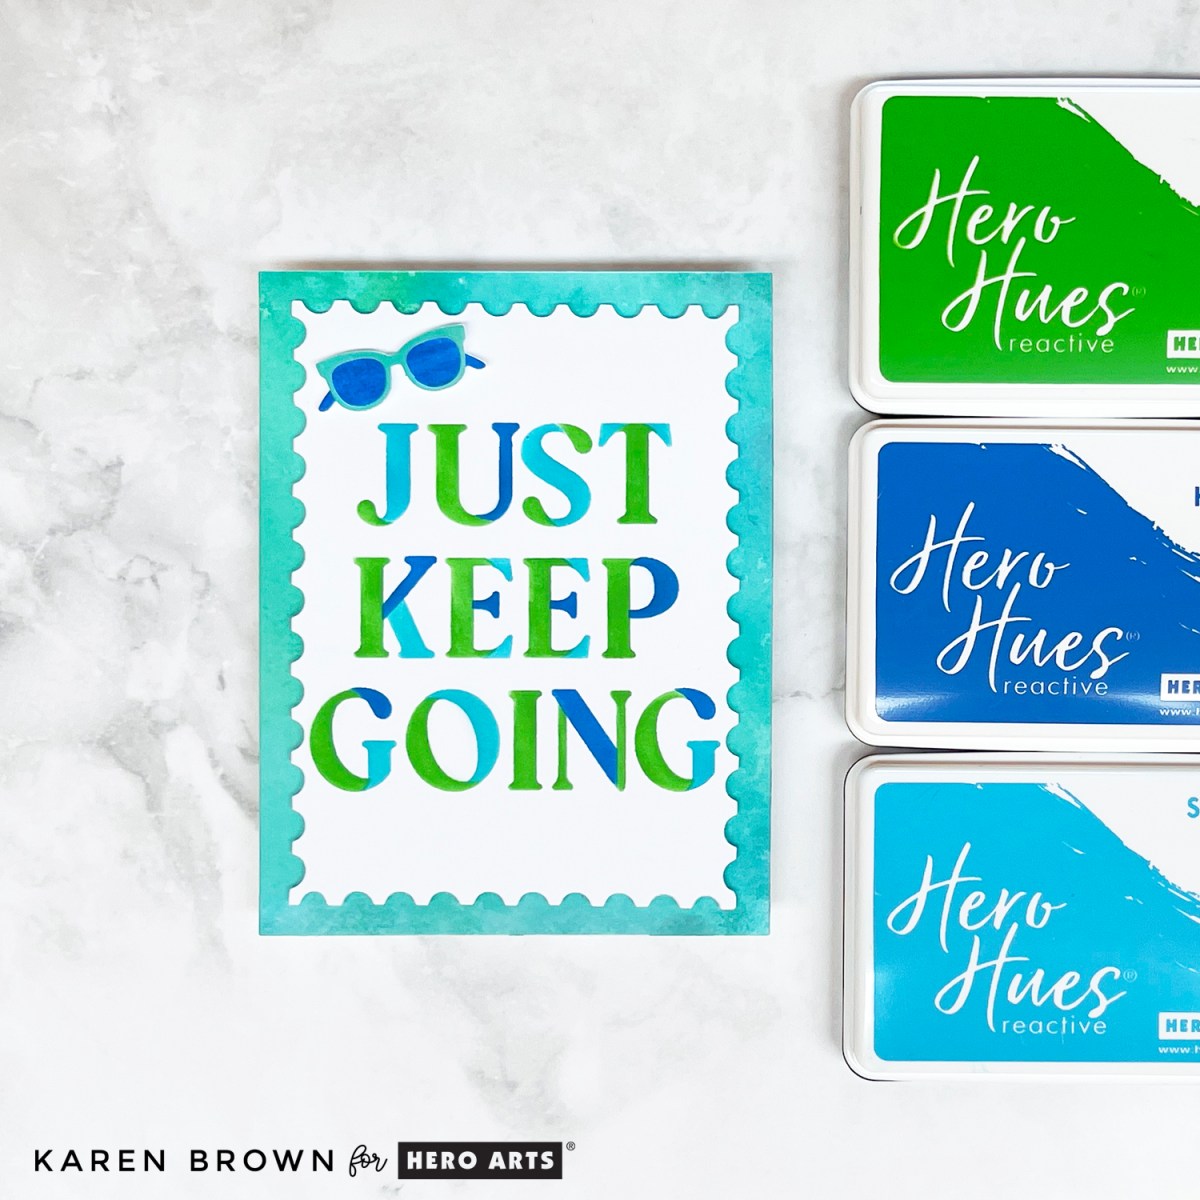
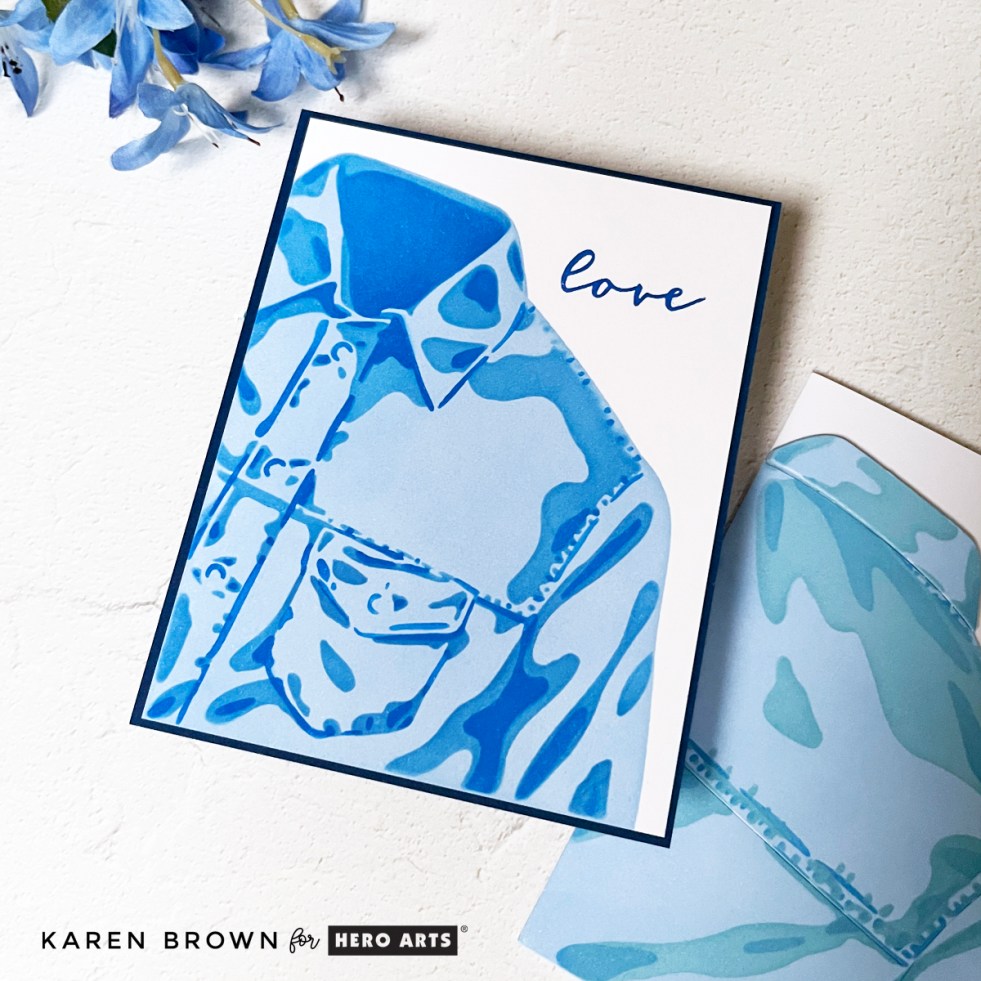
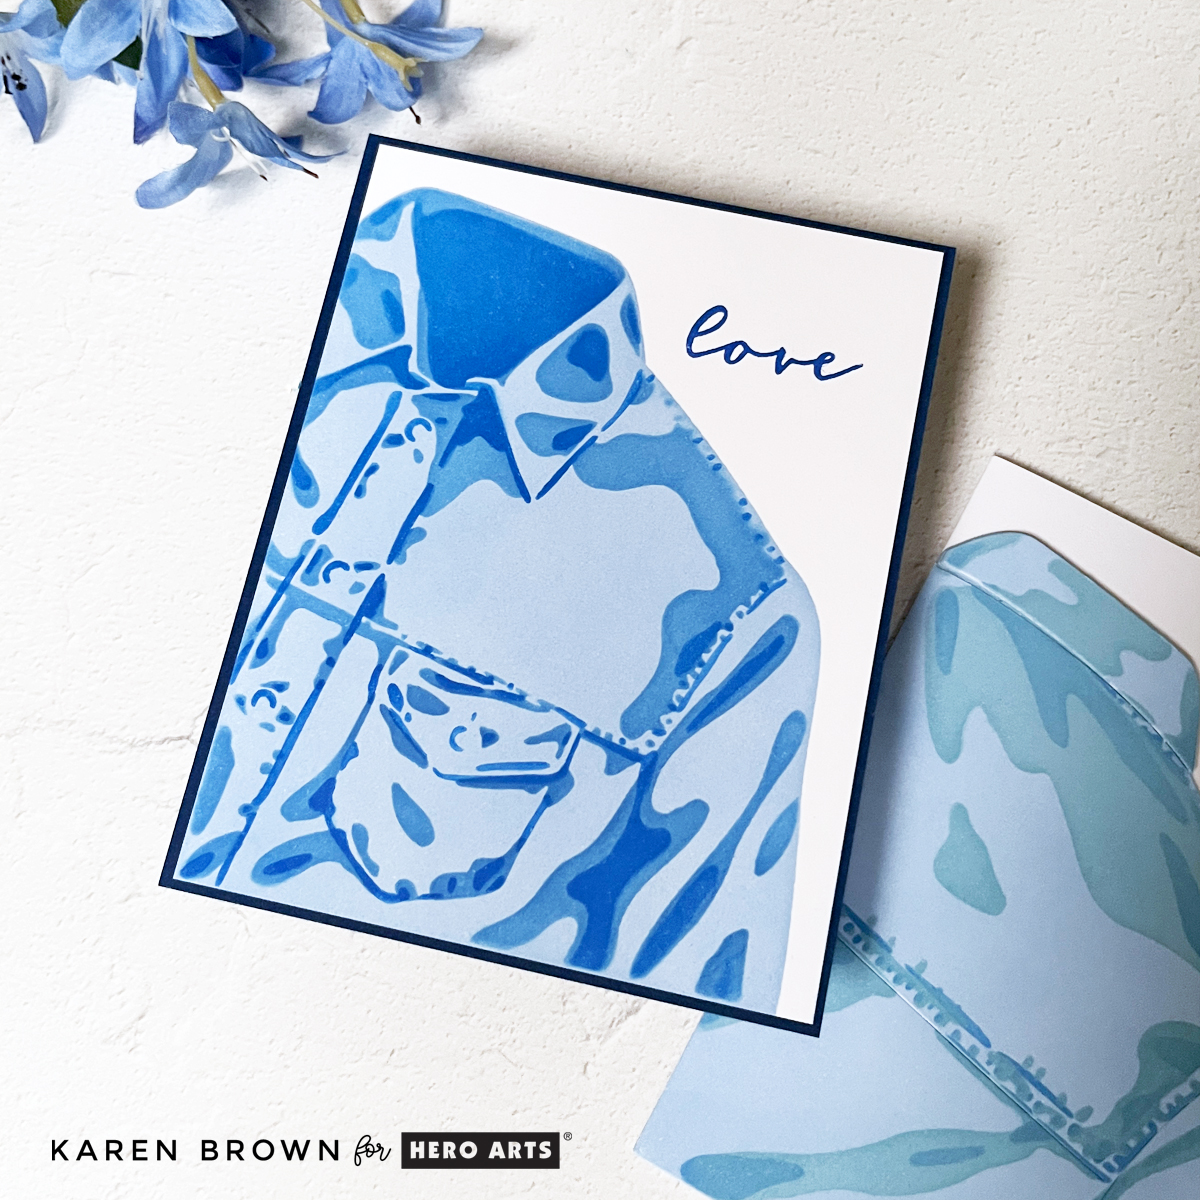
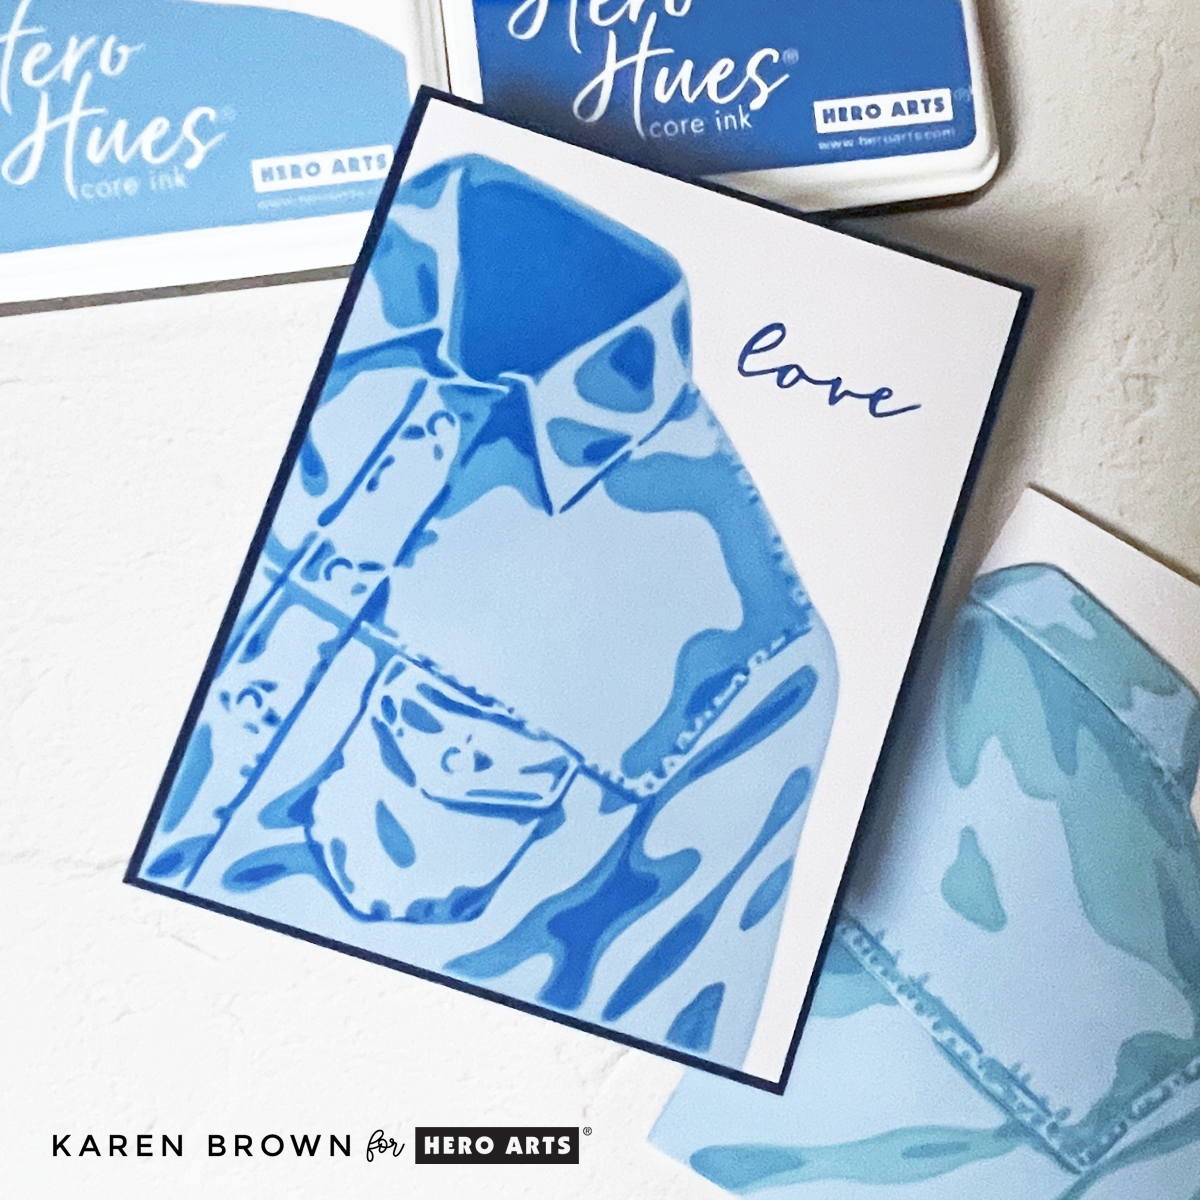
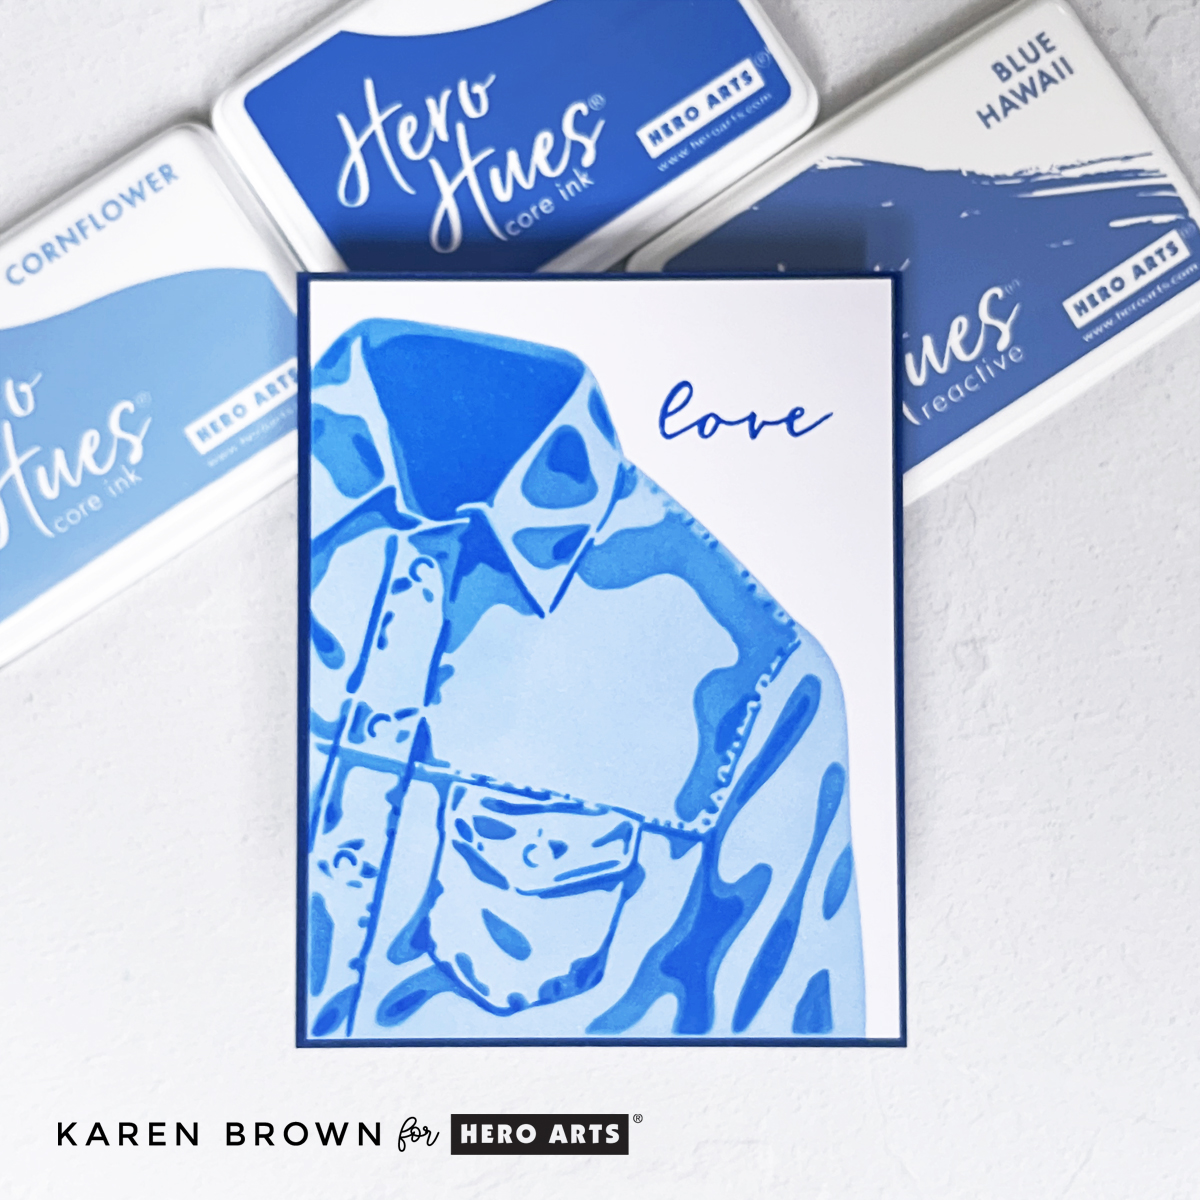
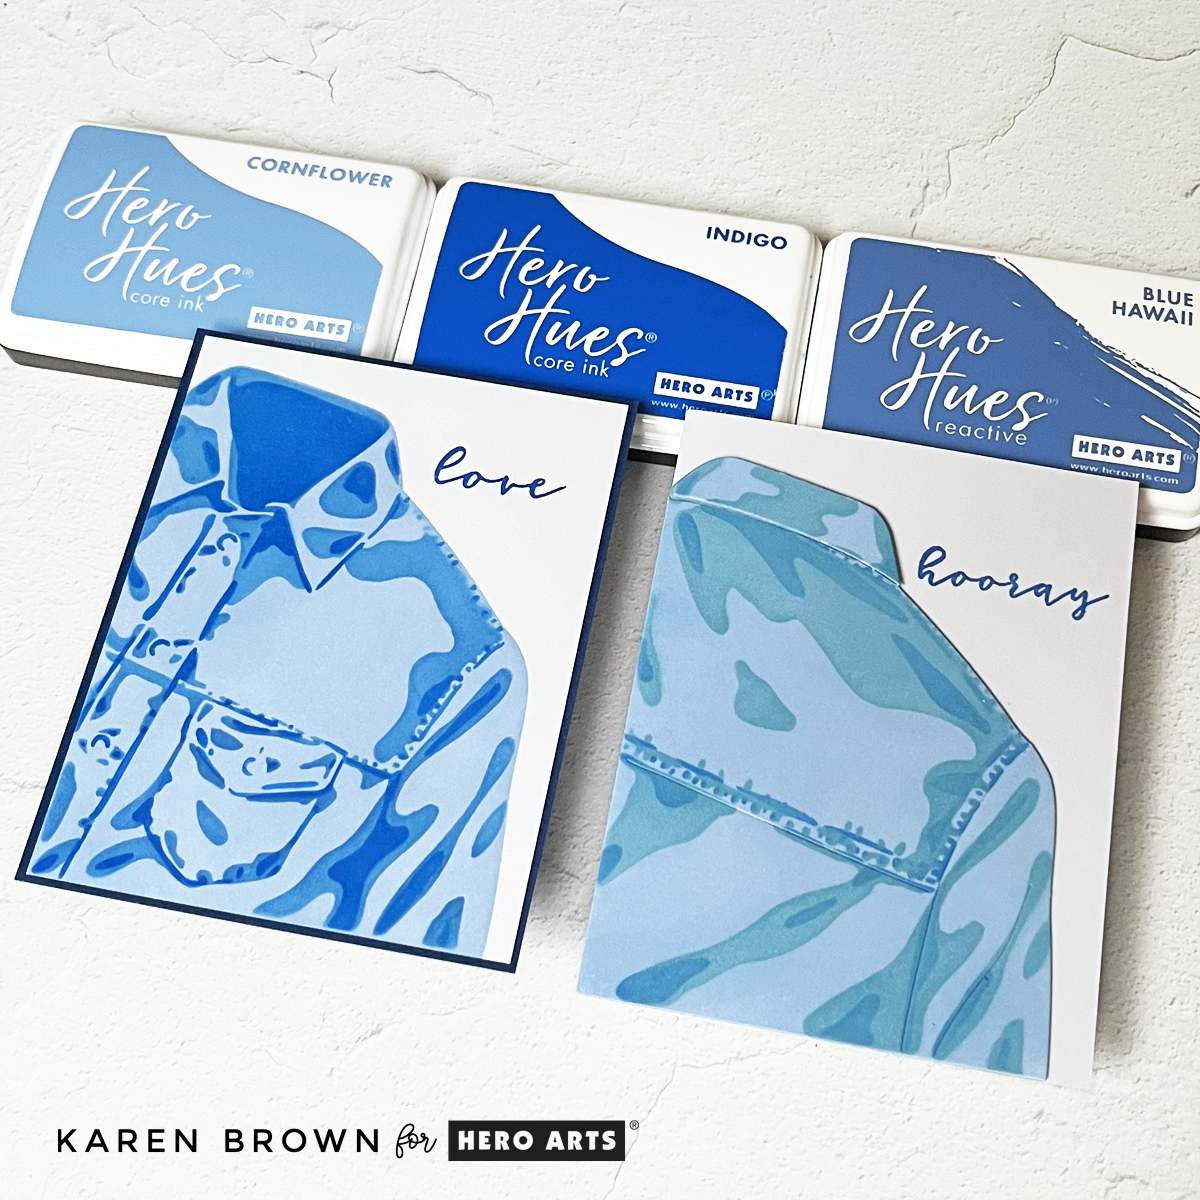
Card 1: The Bold “Front” One-Layer Card

Two masculine stenciled cards, one of the front of the Jean Jacket and the second of the back of the shirt.

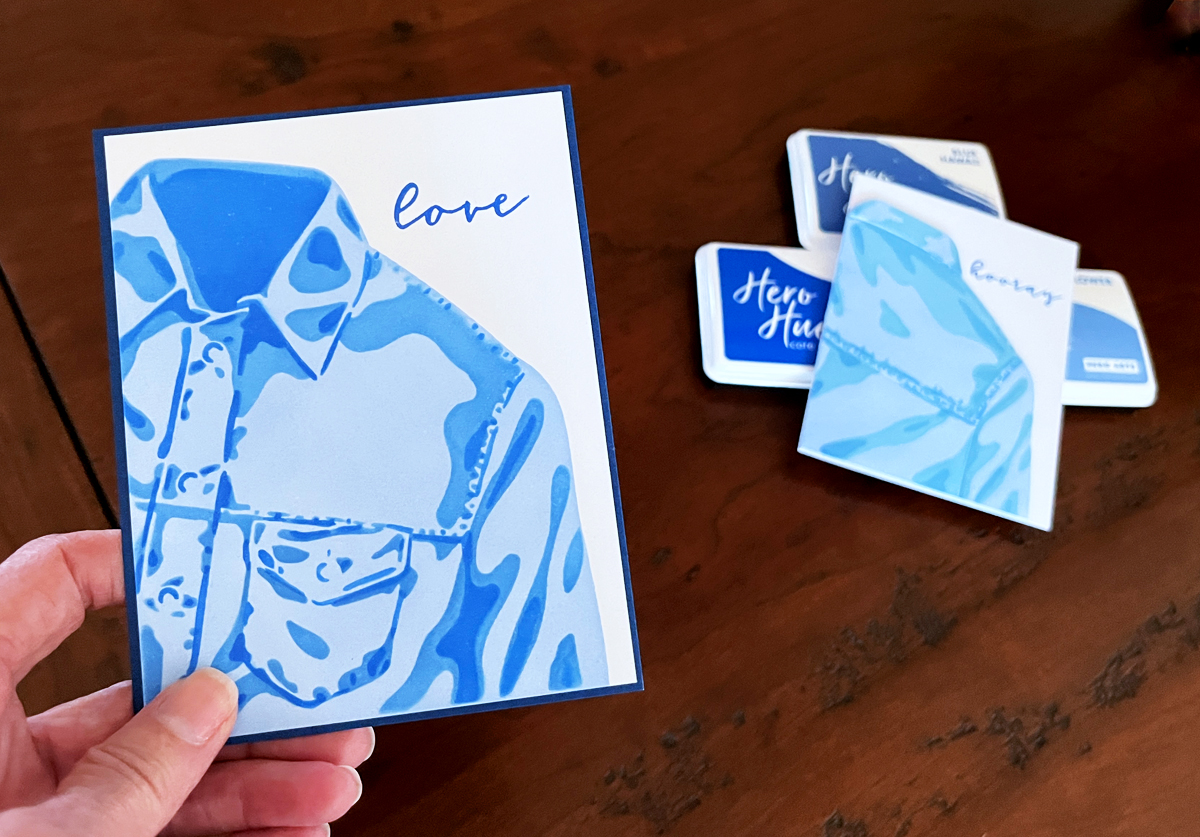
For my first card, I created a clean one-layer masculine card featuring the front of the jacket.

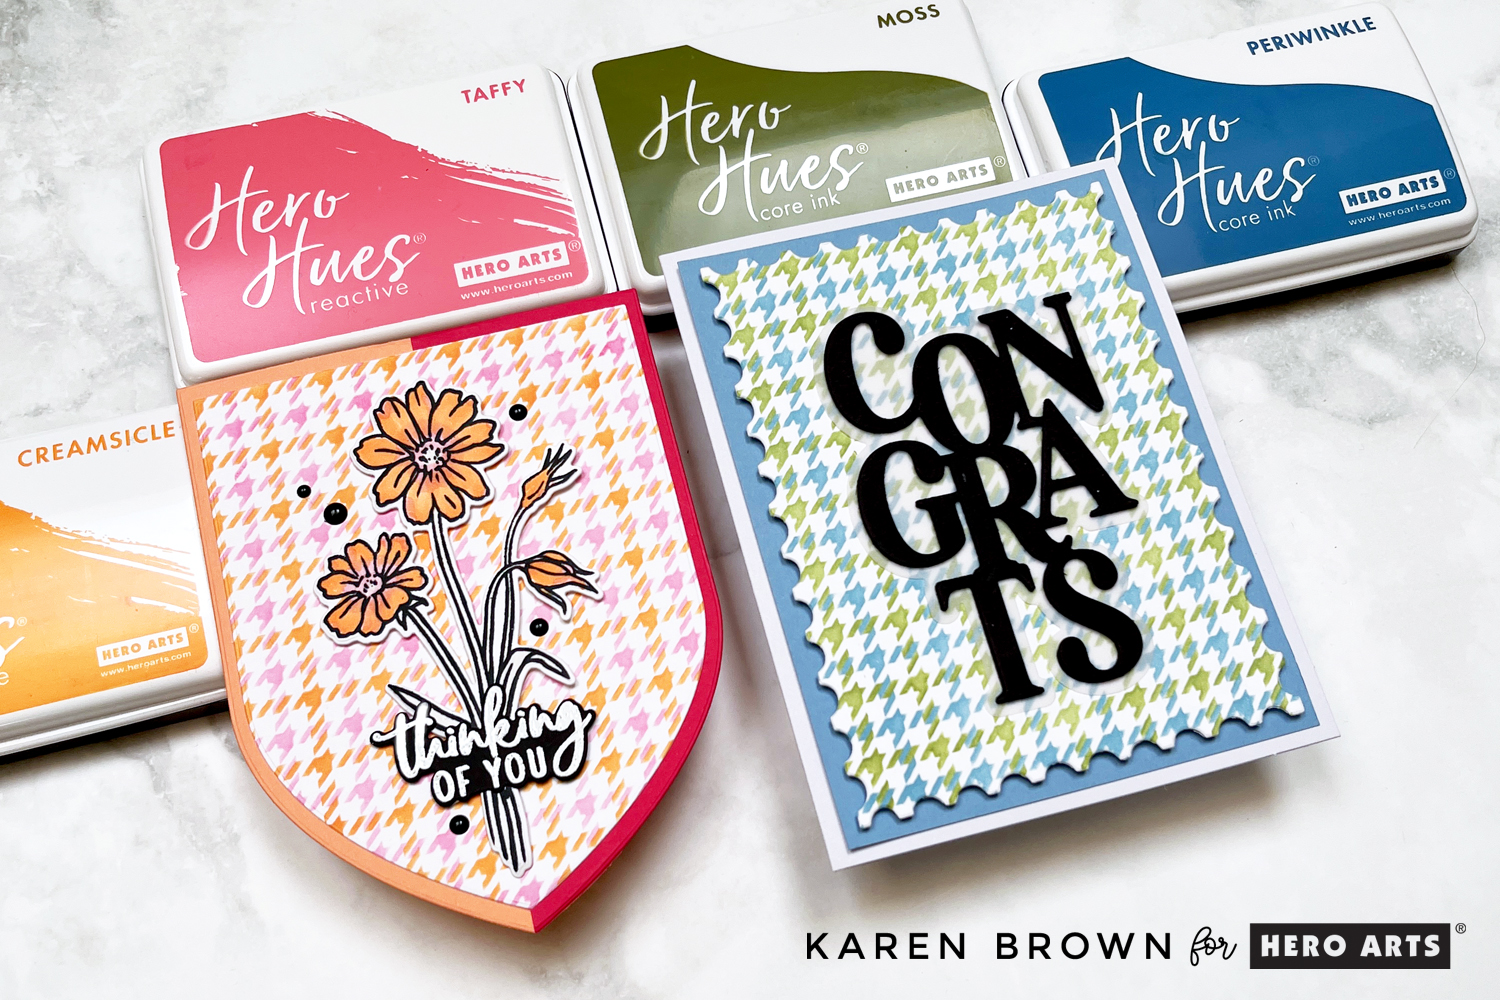
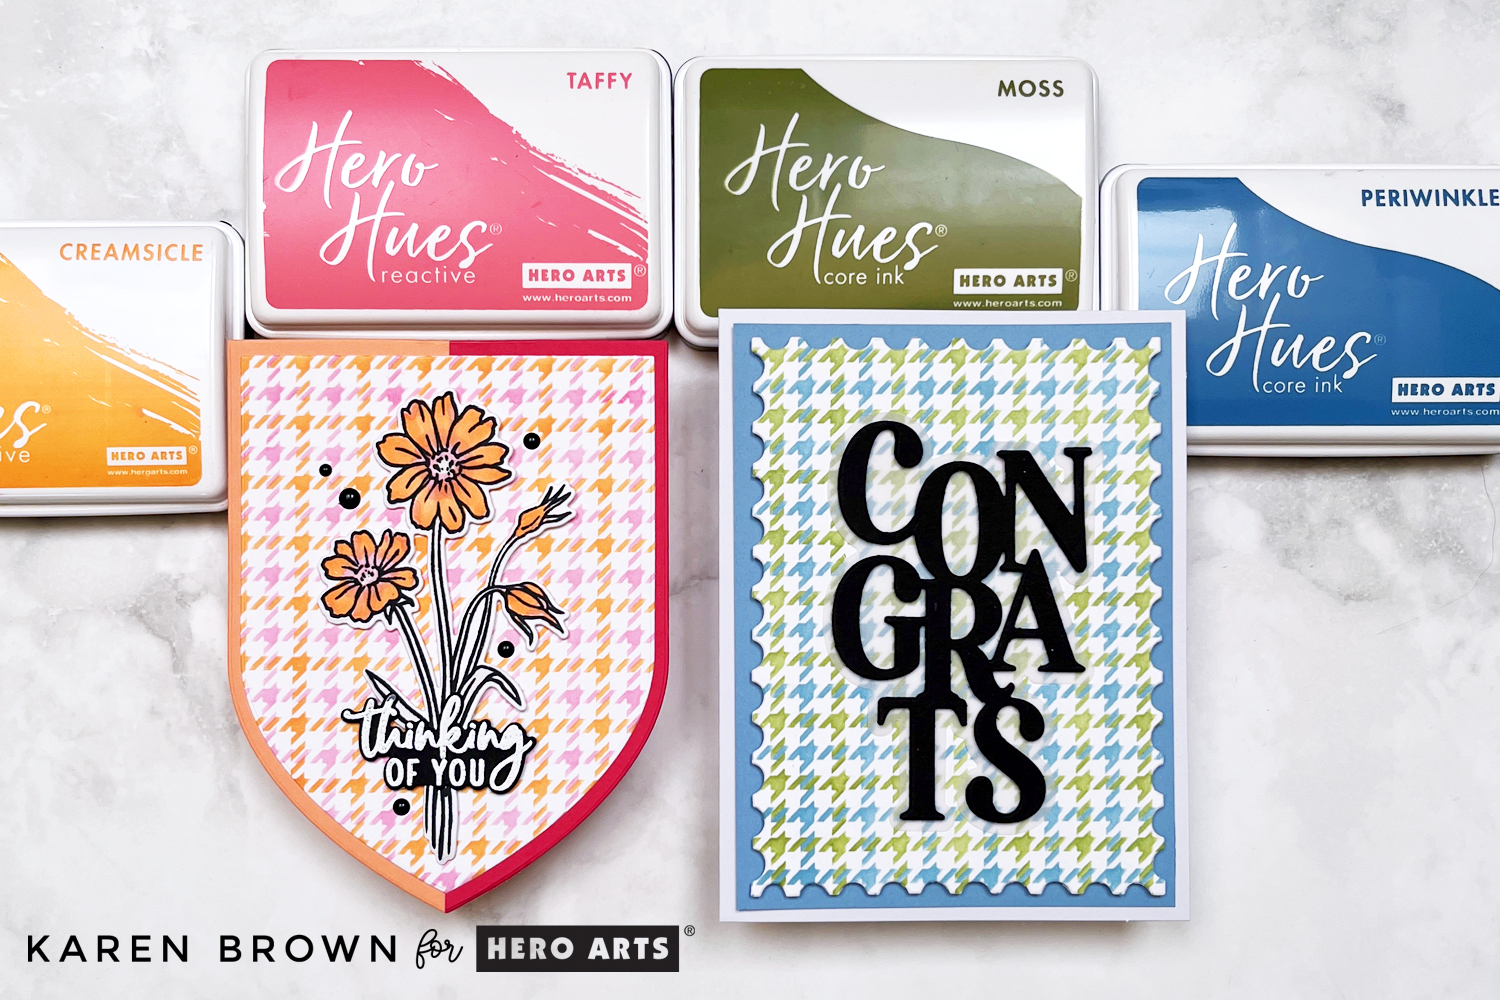
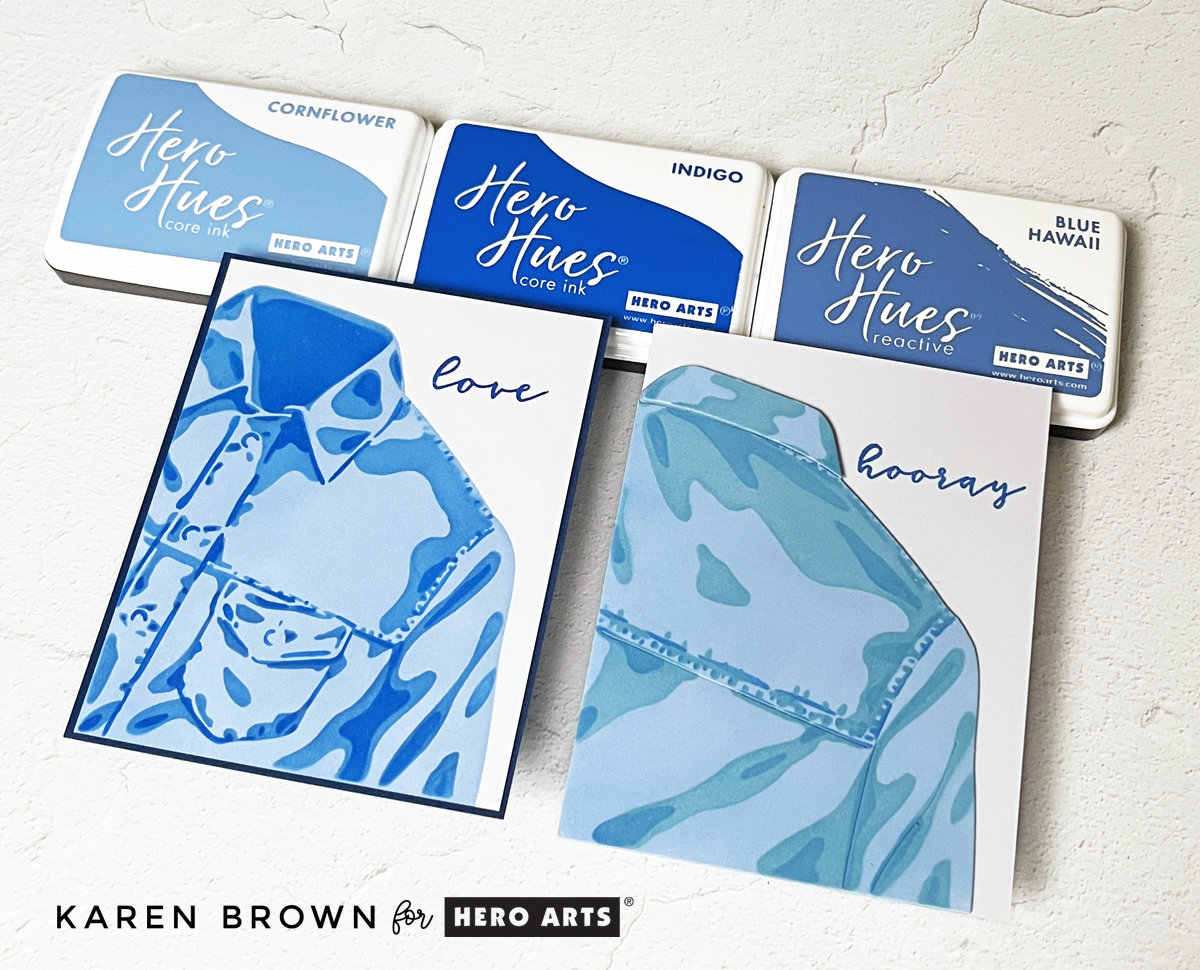
I own many brands of ink, but the ones I find myself reaching for the most are Hero Arts. They blend well everytime. Today, I used three shades of blue ink:

Blended onto Express It Blending Cardstock (Smooth White) for that crisp, even finish.

I kept the background completely clean and added a simple stamped blue sentiment that says “love.”

That’s it.

The contrast between the bold blues and the pristine white background gives this card so much impact without any extra embellishment.

It feels:

  • Strong
  • Graphic
  • Modern
  • Dynamic

And it was incredibly easy.

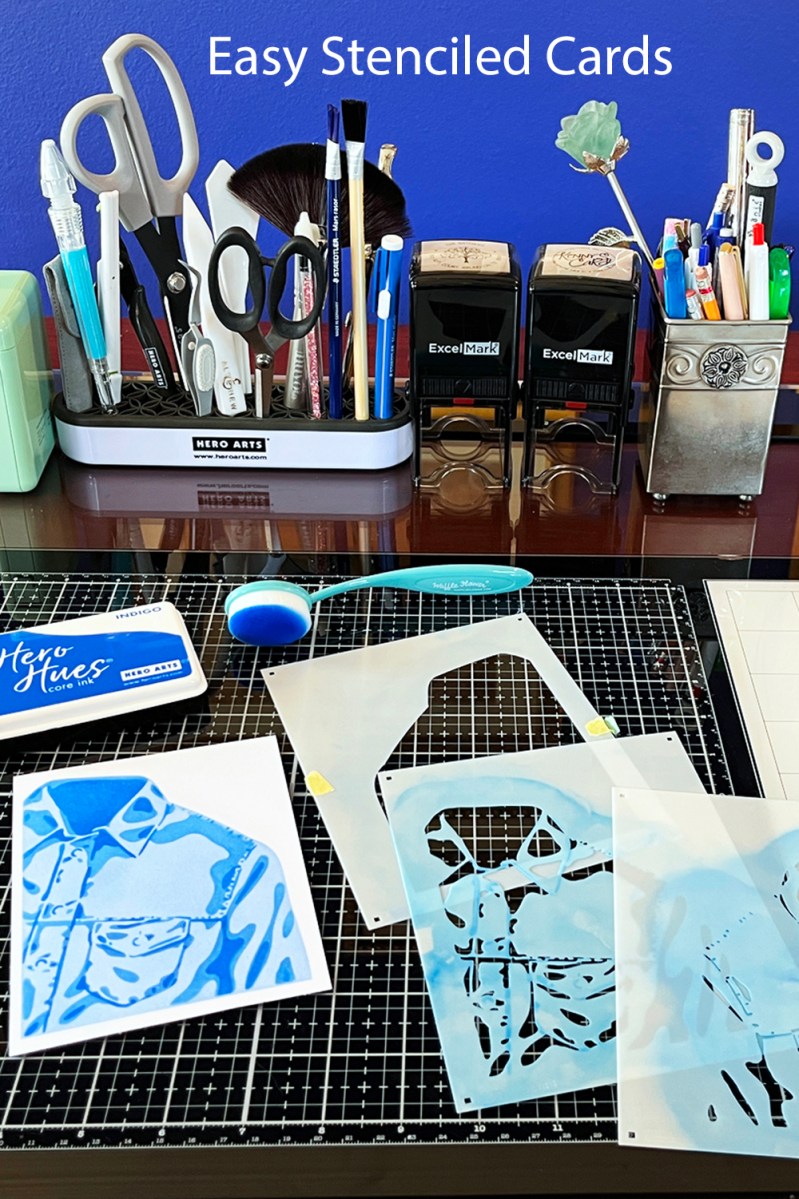
(You’ll see in my process photo how simple the setup is — stencils laid out, inks nearby, no chaos on the desk!)

Easy one layer masculine stenciled card of a denim jean jacket


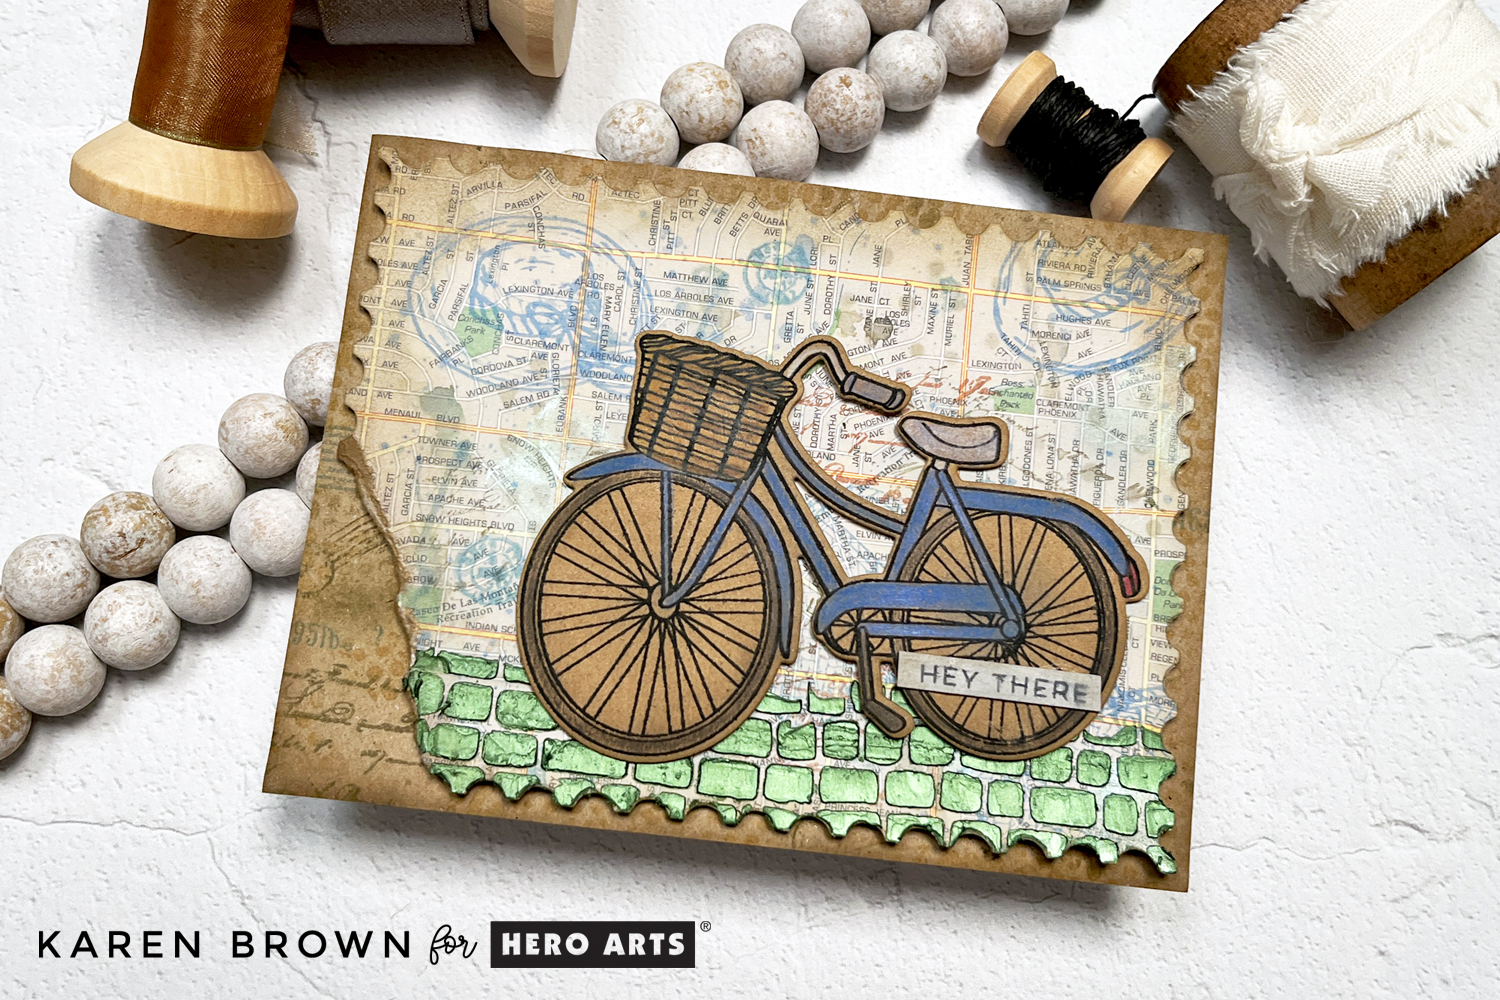
Card 2: The Softer “Back” Layered Card

Layered die cut jean jacket card stenciled in soft blue tones, stacked for dimension and adhered to a white A2 card base.

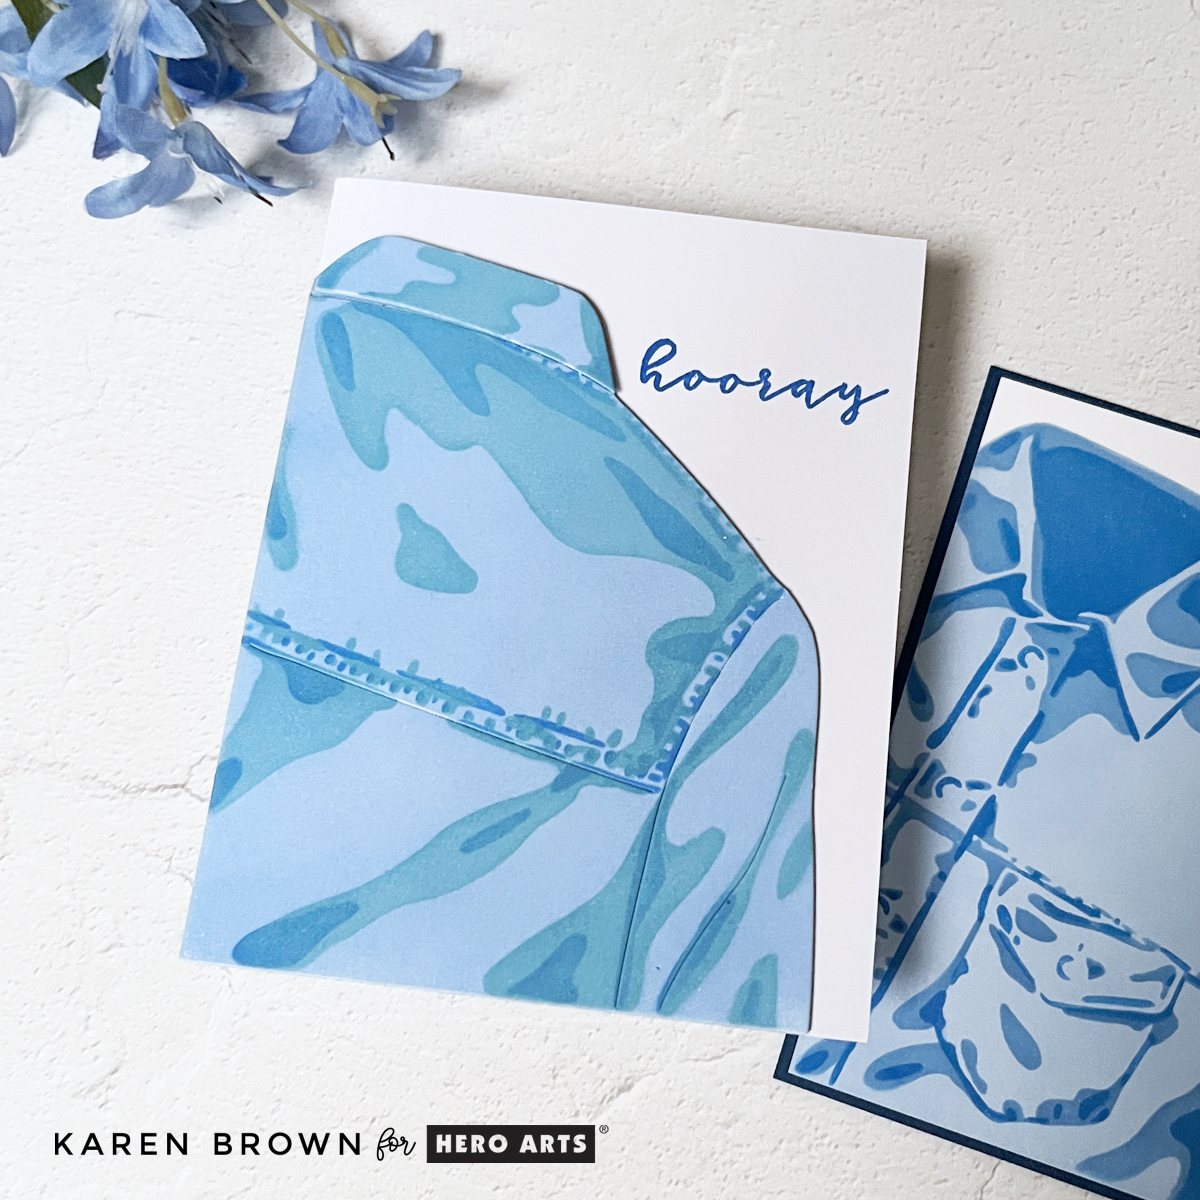
For the second card, I used the “back” of the jacket stencil.

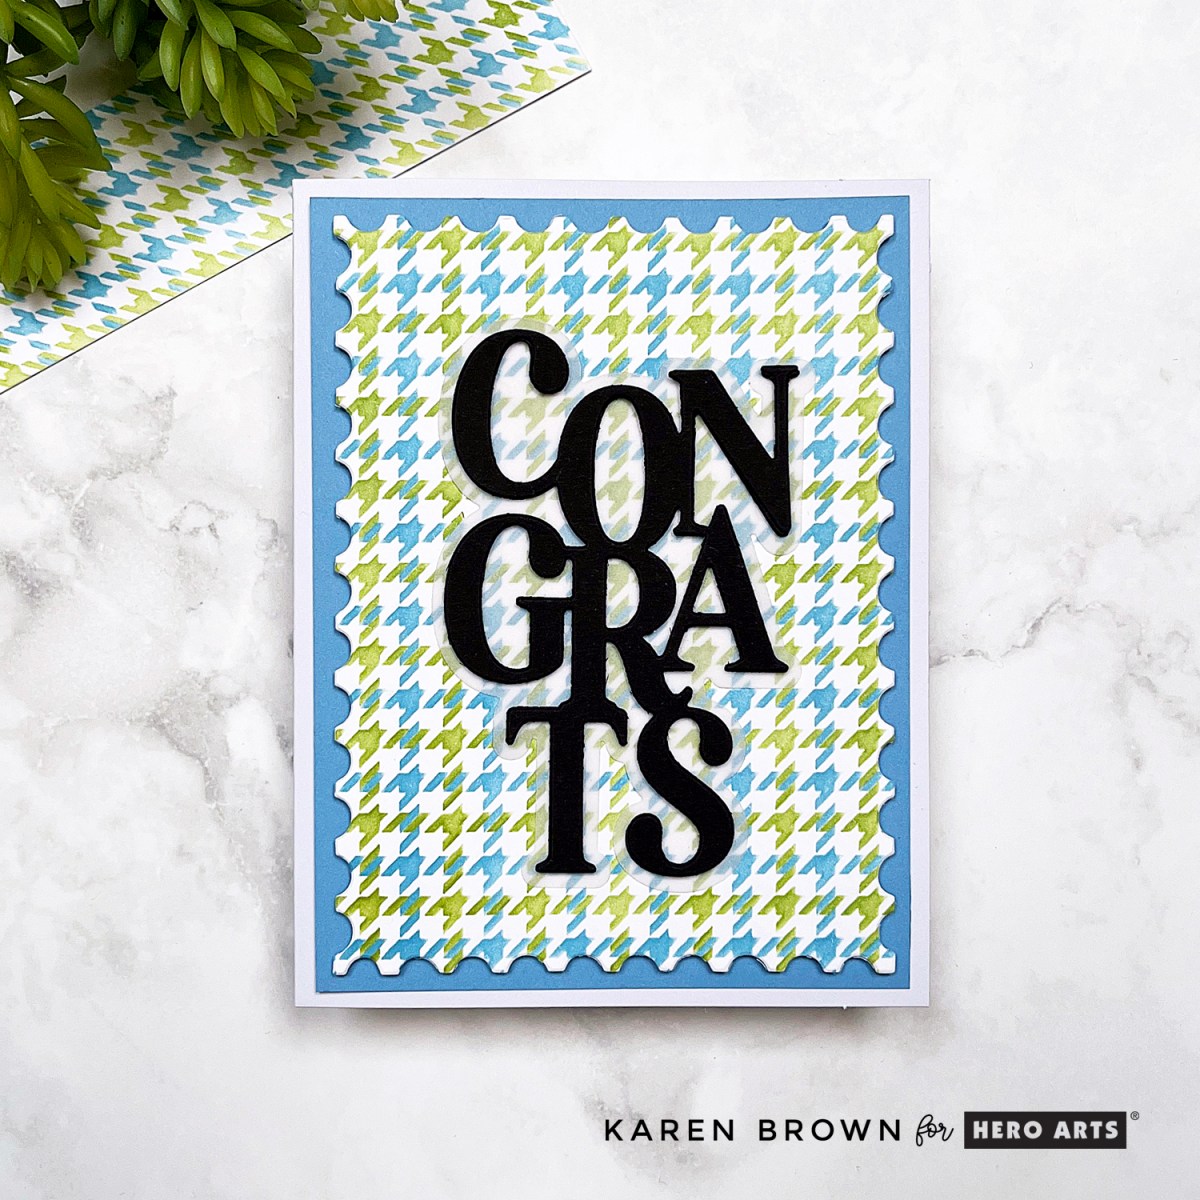
This time my ink trio was:

Just changing one ink color in the layering sequence completely softened the look.

After stenciling, I used the coordinating die to cut the jacket out.
Then I die cut two additional jackets from blue cardstock.

I glued all three together — stenciled one on top — to create dimension.

Then I adhered the stacked jacket to a white A2 card base.

Clean background. Strong focal point. Subtle dimension.

This version feels:

  • Slightly more muted
  • A little more relaxed
  • Still masculine
  • A bit softer overall

It’s fascinating how swapping just one shade can change the entire mood of a card.


Which One Do You Prefer?

I’d love to know — are you drawn to:

👉 The bold, dynamic “front” card
or
👉 The softer, dimensional “back” card

Tell me in the comments!

Two easy beginner blue denim Jean Jacket stenciled cards

Organization Win: Color-Coded Blending Brushes

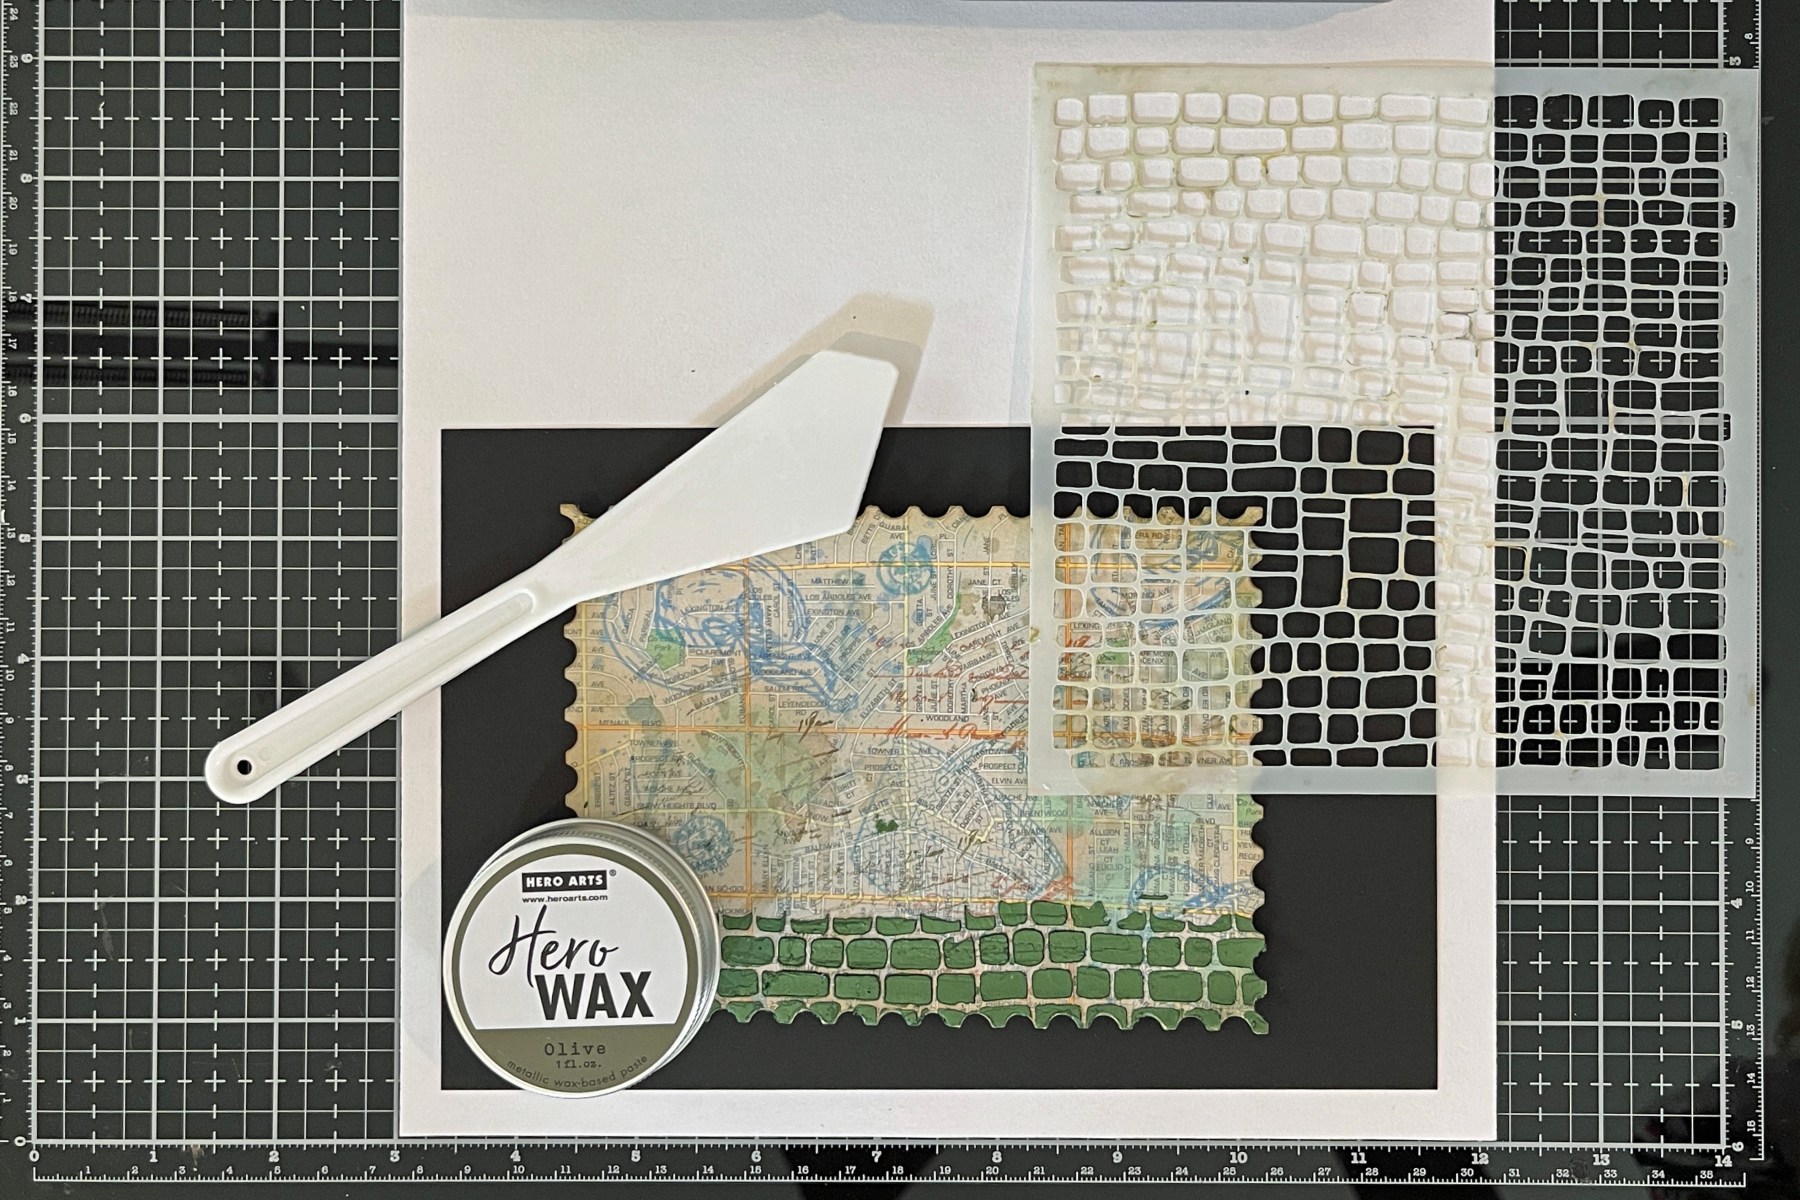
I recently started using the color-coded blending brushes from Waffle Flower — and I have to say… I’m loving them. If you’re new to blending detailed layers, I recommend starting with these.

Keeping my brushes designated by color family makes blending:

  • Cleaner
  • Faster
  • More consistent

And let’s be honest… organized craft supplies just make everything more enjoyable.

If you’re building your stencil stash, this system is worth considering.


Build Your Stenciling Toolkit

These are the essentials that I personally used today.:

More In-Depth Thoughts on Cardmaking Supplies


If you’re just starting out with cardmaking — or if you want a fast design that looks impressive — this jean jacket stencil set is a wonderful place to start.

Sometimes simple really is powerful.

💙


cardmaking · Stenciling

How to Use Analogous and Complementary Colors in Cardmaking | Tutorial

A book/reading theme handmade card created with Hero Arts Hero Studio November 2025 Kits:  On the Shelf Layering Stencils and Book Bag Die Kit.

Hello, Karen here, back with another card inspired by the November 2025 Hero Studio “One More Chapter” release! I’ve been absolutely loving this book and reading-themed collection — so much so that I couldn’t resist making one more card. (Here’s a link to my previous post where I shared two other projects from this release!)

This time, I reached for the “On the Shelf” 4-Layer Stencil Kit to build my own bold bookshelf background. I wanted a crisp, postage-themed layout, so I began by masking off a 3″ x 4⅜” rectangle on a piece of Deluxe Smooth White Cardstock — giving me a clean white frame around my stenciling.

🎨 Inky Layers

I chose four analogous ink colors (adjacent on the color wheel) that flow beautifully together for a cohesive look:

Once the inky layers were dry, I die cut the panel with the 2nd largest Nesting Postage Stamp Die to give my bookish scene a framed, mail-art feel.

Bright handmade card featuring a layered blue and green stenciled bookshelf background, orange bookworm, and scripty “Hello” sentiment framed in a white postage border

🧡 Complementary Pops of Color

For contrast, I reached for my ColorWheel Cardstock and added Carrot and Cosmic Sky accents. The playful bookworm with glasses and the scripty “Hello” sentiment (from the Book Bag Die Kit) are both cut from Carrot, with a Cosmic Sky shadow layer that really makes the greeting pop. Orange and blue are complementary colors (opposite on the color wheel), which makes the whole design lively and eye-catching.

Everything is layered with a bit of craft foam for dimension, then mounted onto a Cosmic Sky A2 card base.

Cute card featuring a stenciled book shelf background and a smiling book worm die cut accent.

The end result? A bright, cheeky, and happy card that would be perfect for a reader of any age — man, woman, or child.

Hero Arts has many different Monthly Kits that you can subscribe to including:

cardmaking · Stenciling

Ink Blending with Hero Arts The Tree Layering Stencil | October 2025 Release

Handmade Christmas card created with Hero Arts “The Tree” Layering Stencil in greens, aquas, and blues. A circular Indigo sentiment reading “So Very Very Merry” is layered over the partial tree design.

I couldn’t resist creating one more card with the October 2025 Release—this time featuring the Layering Stencil: The Tree. This gorgeous four-layer stencil creates a close-up view of a Christmas tree filled with ornaments, and it was such a joy to blend.

You can see my other October Club Kits Cards HERE.

Hero Arts October 2025 Release: The Tree Layering Stencil. This card features gorgeous ink blending in analogous shades of green, aqua, and blue, topped with a circular “So Very Very Merry” sentiment. A simple and beautiful stencil design that’s perfect for holiday cardmaking inspiration.

I chose analogous colors (neighbors on the color wheel) for a soft, harmonious look in shades of greens, aquas, and blues:

Using Deluxe Smooth White Cardstock made the ink blending go on like butter, and as always with Hero Arts stencils, the layers lined up perfectly.

For the sentiment, I used the “So Very Very Merry” circular stamp and coordinating die from the October Card Kit, stamped in Indigo ink. The deep blue ties the whole design together beautifully.

This card has already gone into my holiday stash, ready to be mailed in December!

cardmaking · Die cutting

Cozy Die Cut Scene Card

Hello, crafty friends! Karen Brown here today with a card that is extra cozy, extra cute, and full of September Hero Studio goodness. This month’s release is all about comfort and charm, and I couldn’t resist creating a sweet little bedtime scene featuring some of the most adorable die-cut critters ever.

Key Products: Hero Studio Fancy Die of the Month and Whole Studio Bonus Gift

I really LOVE this die set and I created another card that you might like to see HERE.

Card Details

For my design, I started with the September Fancy Die of the Month: Cozy Critters. At the center of the card is a fox, tucked snugly into a brass bed, clutching its “lovey”—a tiny stuffed bunny. To set the scene, I crafted a Celestial Blue quilt with lovely etched stitching details and paired it with two crisp Snow White pillows.

At the foot of the bed, a striped orange tabby cat curls up contentedly, holding its own little stuffed animal. This cutie comes from the Whole Studio Kit Bonus: Cozy Kitty, which coordinated perfectly to complete my charming bedtime vignette.

Background & Sentiment

Every good bedroom needs wallpaper, so I created a subtle patterned background. I stenciled soft stars over ColorWheel Chiffon cardstock using the Scattered Stars Stencil (from the Hocus Pocus Collection) with Peony and Contour inks. The result reminded me of Twinkle, Twinkle, Little Star—a sweet lullaby touch for a bedtime card.

To finish, I added a clean and simple sentiment, “hello there”, from the Message Strips stamp and cut set. It felt like the perfect greeting for this dreamy scene.

I had so much fun creating this bedtime scene with the September 2025 Hero Studio Release. Between the fox, the kitty, and those snuggly quilts, I think this one might be my coziest card yet! I can already picture more cards made with this die set— seasonal quilts, or even personalized critter bedrooms.

Thanks so much for stopping by today, and sweet dreams of your next crafty adventure!

Die cutting · Stamping · Stenciling

Christmas in July | Candy Canes, Color and Confections

It may be mid-summer, but it’s never too early to get a head start on your holiday cardmaking! I’m kicking off Christmas in July with two cheerful and candy-colored designs using the brand new Candy Cane Season Collection from Hero Arts.

This sweet collection is full of playful holiday charm—peppermints, bows, and bold candy cane graphics that are perfect for building quick but eye-catching holiday cards.

Card 1: Peppermint Skies & Holiday Vibes

My first card is all about peppermint joy! I started by creating a playful red and white background using the Candy Cane Toss Up Stencils and two Hero Arts inks:

  • Peony
  • Cherry

This creates the scattered look of candy canes tossed in the air—fun, festive, and full of movement. The sentiment, “Peppermint Skies and Holiday Vibes,” is stamped in black for a bold pop, centered over the background.

To bring in contrast and dimension, I added green candy canes from the Candy Cane Swag set. I stamped them in Pine ink on Mint ColorWheel Cardstock and die cut them multiple times—then did a little crafty engineering to extend the candy canes behind the sentiment strip. By layering extra pieces below the visible canes, they peek out above and below the sentiment, adding height and whimsy to the design.

This card’s theme is peppermint playfulness—and it’s a sweet way to start your stash of holiday greetings!

Card 2: Sweet but Twisted

For my second card, I kept the focus on a clean graphic layout featuring crossed candy canes as the main design element.

I used the Candy Cane Swag stamps again, stamping two canes in Pine ink on Mint ColorWheel Cardstock, then crossing them in an “X” shape at the center of the card. I added a red and white bow (stamped in Cotton Candy ink and die cut) to the center, tying the two canes together like a festive wreath.

Behind the candy canes, I layered three coordinating ColorWheel cardstock panels, trimmed using my Rounded Rectangle Infinity Dies:

  • Base Layer: Fern
  • Middle Layer: Mint
  • Top Layer: Bellini

These colors echo the classic red-and-green palette but with a soft, contemporary twist—perfect for a fun and modern holiday card.

The sentiment “Sweet but Twisted” is from the A Little Merri-Mint Stamp & Die Set, and I think it pairs perfectly with this cheeky little cane design!

Both cards feature cardstock from the ColorWheel Collection, which makes it so easy to mix and match hues while keeping your palette coordinated. And while they use some of the same elements, each card has its own unique personality—one playful and layered, the other bold and graphic.


It’s never too early to dive into the holiday spirit, especially with sweet designs like these. Whether you love traditional candy cane colors or like to mix things up, Candy Cane Season has something merry for everyone!

Cardmaking Video · Stenciling

Video: Easy Fun Card Idea

Watch above OR click HERE to watch video on YouTube.

Looking for an easy, beginner-friendly card idea that makes a big impact? Today I’m sharing a project using the Hero Studio July 2025 “Just Keep Going” Layering Stencils—a bold, three-layered sentiment that I paired with a coordinating ink smooshed background for a clean, summery design.

Handmade card with bold “Just Keep Going” encouraging sentiment in green, teal, and blue ink, layered over a watercolor-style ink smooshed background.

Supplies & Theme

The “Just Keep Going” stenciled sentiment is built up with three perfectly aligned stencil layers. For the sentiment and the coordinating background, I used the following Reactive Inks:

These bright, analogous colors are side-by-side on the color wheel and blend beautifully together for a unified, harmonious look.

July 2025 Layering Stencil of the Month "Just Keep Going" kit card in analgous green, aqua and blue inks.

The Background: Ink Smooshing

To complement the stenciled panel, I created an ink smooshed background using the exact same three ink colors. Ink smooshing is one of my favorite techniques—just dab ink onto a 6 x 6″ acrylic block, spritz with water, and press your watercolor paper onto the color. I flip my block and weight down with a book for 5 minutes. If there is a puddle, I dab it with a paper towel. The result? A gorgeous, watercolor-style background that’s one of a kind.

This technique is fantastic for beginners and gives your cards a fun, organic texture. It’s also a great way to bring all the color elements of your project together.

Creating an "ink smoosh" background that coordinates with your stenciled focal point

Finishing Touches

I die cut my stenciled sentiment panel using a nesting postage stamp die for extra polish. As a playful embellishment, I added a pair of sunglasses from the Hero Studio July 2025 Card Kit. The frames are cut from leftover inked cardstock, and the lenses from another panel inked with Blue Hawaii—just another way to tie everything together!

Custom coordinated ink smoosh background and bold stenciled sentiment card.

Why It Works

This card’s cohesive look comes from intentionally choosing analogous colors and using them across both the background and focal elements. Whether you’re just starting out or want a quick, cheerful design, this is a project anyone can enjoy!

cardmaking · Mixed Media · Tutorial

Mixed Media Card Tutorial: A Step-By-Step Guide

How to tutorial for a tattered and torn mixed media travel theme card with a die cut bike, upcycled road atlas background and stenciled Hero Wax accent.

Today, I want to show you how to repurpose and upcycle paper to create a mixed media card.    I started with a map from an old Atlas and a brown paper shopping bag.  I used the bike stamp and die from Hero Arts June card kit as my focal point which I stamped on a panel cut from the shopping bag.

How to Create Mixed Media Cards Step-By-Step:

Above, you can see the repurposed papers that I used on my card. Here was my process:

  • I attached a piece of watercolor cardstock to the back of the Atlas page so that I would have a more substantial panel to work on.  I used Matte Medium to adhere the two pages together.  Dry.
  • To make sure there was no shine and to have the right surface texture for my mixed media project, I applied a layer of Gesso Acrylic Paint to the map. Dry.
Process photo showing how to apply Gesso to prep a mixed media project.
process photo showing stamping on a mixed media card background
  • I stenciled a few spots with the Leaves and Abstract Shapes Stencil with Root Beer ink.
  • I die cut the panel with a Nesting Postage Stamps Infinity Die and then ink blended Fawn and Root Beer along the corners and edges.  I wanted a grungy vintage look.
  • I added watered down blots of Periwinkle and Root Beer. Dab some ink on acetate, spritz with a bit of water and dab on the panel.  Tilt a bit to make it run.  Blot up if you have more ink than you want.
  • Add ink splatters with a fan brush with the same inks used above, which adds color and depth.
  • I did second generation stamping (ink stamp, lightly stamp on scratch paper and then stamp background) with Root Beer ink.  You can see I keep adding layers. 
process photo showing a mixed media background with stamping, stenciling and ink blending.
  • I stenciled Olive Hero Wax over the bottom of my map panel with the Cobblestone Stencil to simulate a road.
  • Tear the bottom left corner off the panel for a really old and tattered look.  Ink blend along the tear line.
  • After looking at my panel I decided I wanted to darken the edges even more, so I added additional ink blending around the edges and corners.
process photo showing olive Hero Wax applied through a Cobblestone stencil.

Bicycle Focal Point:

  • On a panel from the brown paper shopping bag, I stamped the bike from the Hero Studio June card kit.  I left it in the stamp positioner and colored with InkTense colored pencils. Then I restamped the bike for a crisp black look.
  • Die cut bike
  • Ink edges with root beer ink.
A process photo showing a stamped bicycle on an upcycled repurposed panel cut from a brown paper bag and colored with Inktense colored pencils.  The panel will be turned into a mixed media card.

Tattered and Worn Base Mat:

  • Cut a second panel from the brown paper bag to act as a base mat.
  • Using the Rough Dot Bold Prints Stamp, stamp with Root Beer ink and Fawn Ink on the second panel (which is slightly larger than the map panel).  Dab a bit here and there, heavier in some places, lighter in others for a vintage look. 
  • In the bottom left corner add some text stamping for interest. This is where the torn edge will be positioned, so this area of the base will be more visible. I Used Vintage Postmarks and Tickets and Vintage Maps and Ledgers again and randomly added numbers etc around the perimeter of the card base.  
  • Ink the edges and corners to darken them.
Process photo showing a vintage look background card mat.  The mat was cut from a repurposed upcycled brown paper shopping bag.

I love the inky grungy look of this card!

A mixed media card featuring the June 2025 Hero Studio card kit bike and hat stamps.

Use What You Have! Old maps, shopping bags, sewing patterns, dictionary pages, music books—they all bring unique texture and charm to your cards. Mixed media is about building interest through layers, so don’t be afraid to play!

cardmaking · Cardmaking Kit · stitching

Spellbinders | June 2025 Club Kit Cards

4 Spellbinders June 2025 Club Kit Cards in a fun nautical theme featuring a walrus wearing a rain slicker, die cut seaside village, cheery little sailboat and a stitched Captains Wheel with Captain Seagull.

The June 2025 Spellbinders Club Kits are making waves—and honestly, the buzz is real. This release might just be the best in a long time. If you’ve been waiting for the perfect moment to dive into the Deluxe Caboodle (all the kits plus the bonus item and a hefty 58% savings!), now’s the time to anchor your subscription!

Set Sail with the Spellbinders June Club Kits!

This month’s kits are delightfully nautical and full of personality. I had so much fun creating four playful and unique cards that capture everything from charming seaside scenes to silly sea life.

Card 1 – Graphic Nautical with the Die of the Month

Bold inky blue background with a die cut walrus in a yellow raincoat and red hat next to a seagull holding a flag. "Ahoy!" sentiment.  Spellbinders June 2025 Die of the Month Kit card in a bold graphic style.

Minimal color, maximum charm.
I created a bold and graphic card using the Die of the Month kit. The dark Oceanside cardstock background makes the characters pop—a seriously adorable walrus in a bright Beeswax yellow rain slicker and Poppy red beanie, alongside a flag-waving seagull in matching nautical flair. The clean white “Ahoy!” sentiment lets this duo shine.

The walrus was die cut from Fog and Anchor cardstocks and softly ink blended on the muzzle for extra dimension. All the cardstock is from the Color Wheel Sampler Pack.

Who knew a walrus could steal the show?

A fun die cut card featuring a Walrus wearing a yellow raincoat and red beanie with a seagull perched on his head:  Spellbinders Die of the Month Club Kit for June 2025.

⛵ Card 2 – Cheery Sailboat with the Caboodle Bonus

Small mint green notecard with a red, white, and yellow sailboat on blue waves and the sentiment "sending a wave."  Spellbinders June 2025 Deluxe Caboodle bonus gift.

This month’s Deluxe Caboodle Bonus Gift is a sweet little die cut sailboat, and I couldn’t wait to take it for a spin!

I crafted a bright red, white, and yellow boat cruising on gently layered waves of blue-green and white cardstock. Becuase the mast is somewhat delicate, I die cut the boat twice and glued together for a sturdier focal point. The wave dies are part of the Large Die of the Month Kit. The background is a soft mint green, die cut with my go-to Postage Stamp Infinity Dies. The sentiment, “sending a wave,” perfectly matches the cheerful tone. The card is slightly smaller at 4½ x 5″—perfect for a quick note.

Adorable die cut sailboat note card with a "sending a wave" sentiment using the June 2025 Spellbinder bonus gift from the Deluxe Caboodle.

🏠 Card 3 – Rainbow Coastal Village with the Large Die of the Month

A die cut seaside village scene card with rainbow sherbet-colored houses, blue waves, and a “just for you” sentiment. Spellbinders June 2025 Large Die of the Month kit.

Next up: a charming seaside scene built with the Large Die of the Month kit. I assembled four tiny houses in sunny rainbow sherbet hues nestled beside rolling waves. It’s a joyful and relaxing little coastal village, with a “Just for You” die cut sentiment on top.

Once again, the background is mint green, die cut with my postage stamp die for that crisp framed finish.

Spellbinders June 2025 Large Die of the Month card featuring a tiny village of rainbow colored cottages with rolling waves.

⚓ Card 4 – Stitched Captain’s Wheel with a Playful Seagull

Card with a Stitched captain's wheel on an aqua stenciled background with a seagull in a red and white striped shirt and “ahoy” sentiment.  Spellbinders June 2025 Stitching Die of the Month Kit.

Stitch lovers, you’re going to adore this one! I used the Stitching Die of the Month to create a weathered captain’s wheel, stitched with DMC 437 (tan) using two strands of floss. I doubled up the die cuts for stability before stitching.

The background is stenciled using Hero Arts Pebbles and Stones Stencil with Splash ink, giving the look of water or bubbling seafoam. A goofy seagull in a red and white shirt and cap is perched just off center on the wheel for a fun focal point. The included “ahoy” sentiment completes the look.

Spellbinders June 2025 Stitched Die of the Month with Captain Seagull perched on a stitched Captain's Wheel with an aqua and white stenciled background.

Helpful Links:

Whether you’re here for the critters, the stitching, the sea breeze vibes—or all of the above—the June 2025 Club Kits deliver something truly special. ⚓💙

Cardmaking Kit · Die cutting · Stenciling

Hero Arts June Club Kits – Coastal Vibes, Picnics & Petals!

The June 2025 Hero Arts Club Kits bring major Coastal Vibes, and I couldn’t resist turning the Beach Bag die into a dreamy die cut picnic basket, complete with wine, wisteria, and baguettes! Plus, don’t miss my hydrangea stenciled card in blues and purples—perfect for all occasions!

The Hero Arts June 2025 Club Kits are here, and the theme is everything I love about summer: Coastal Vibes! Think breezy afternoons, soft ocean light, and all the charm of an elegant seaside picnic. The kits this month are overflowing with creative possibilities—from charming die cuts to gorgeous stencils. I had so much fun turning these kits into two cards that I’m excited to share with you!

Card 1: A Coastal Picnic Basket

Card featuring a die-cut tan picnic basket filled with baguettes, wine bottles, wisteria flowers, and jewel-toned scarves.

For my first card, I used the June 2025 Card Kit featuring the Beach Bag die set—but instead of a beach bag, I turned mine into a coastal picnic basket bursting with summer goodies!

Inside the basket:
🥖 Baguette-style bread
🍷 Wine bottles and glasses
🌸 Gorgeous Wisteria flowers

To add a bit of flair, I included two flowing scarves draping down the sides of the basket in rich jewel tones, which contrast beautifully with the tan base of the basket. A little light ink blending on all the die cuts added subtle dimension and warmth to the scene. I used the Nesting Postage Stamp Infinity Dies to create my background panel. This die kit is perfect for the foodie in your life or for anyone who enjoys the simple joy of a summer picnic!

Hero Arts June 2025 Card Kit of the Month card featuring a tan picnic basket filled with baguette bread, wisteria flowers, wine glasses and two bottles of wine.

What’s Inside the June 2025 Hero Studio Card Kit?

• Summer State of Mind 6×8 Clear Stamp Set
• Summer State of Mind Coordinating Dies
• Beach Bag Die set
• Sand Embossing Powder, 0.5oz
• 10 Sheets of Cardstock- 2 of each color, 5.5″ x 8.5″ (Fawn, Coral, Seaside, Waterfall, Blue Spruce)

The Whole Studio  includes ALL 5 of the monthly subscriptions in one discounted bundle. Cling of the Month, Stamp & Cut of the Month (new name for the subscription!), Layering Stencil of the Month, Fancy Dies of the Month, and the Card Kit of the Month.

Receive a FREE Hiya Friend Sentiment stamp & die set when you purchase The Whole Studio!

Hero Arts has many different Monthly Kits that you can subscribe to including:

Die Cut Summer Picnic Basket card filled with yummy foodie goodies.

Card 2: Stenciled Hydrangea in Blue & Purple

Layered Stencil Hydrangea floral card in blues and purples with a Periwinkle background.

For my second card, I turned to the stunning new June 2025 Layering Stencils – Hydrangea. I blended blue and purple Hero Arts Inks to create a lush hydrangea bloom that nearly steals the show.

After stenciling, I used my Rounded Rectangle Infinity Dies to trim the panel neatly, and mounted it on a lovely Periwinkle card base. The sentiment is a clean and simple “sending hugs”—just enough to send a warm message without distracting from the florals.

This layering stencil set is so versatile—you could use it for a Get Well, Sympathy, Birthday, Thank You, or even a Mother’s Day card. It’s a floral design that truly fits any occasion.

Hero Arts June 2025 Layering Stencil card with a beautiful blue and purple  Hydrangea.

This post is part of the Hero Arts June Release Blog Hop, so be sure to check out the inspiration from other designers and leave comments for a chance to win a $50 gift card!

 
Hero Arts
Hero Arts Creative Team:
Michelle Short
Rachel Kleinman
Jeannie Lieu
Anna Mahtani
Natasha Polite
Seeka
Channin Pelletier
Rosie Lopez
Charlene Madrid
Jennifer Kotas
Mindy Eggen
Lisa Tilson
Michelle Lupton
Karen Brown <<< You Are Here!
Special Guests:
Nichol Spohr
Jenn Shurkus

Two summery cards created with Hero Arts June 2025 Card kits.

Happy crafting and happy summer!

🧺🌸💙

cardmaking · Stenciling

🧡🩷 Custom Plaid Two Ways with Hero Arts Houndstooth Layering Stencils

Plaid, but make it personal! Today I’m excited to share two bold and beautifully customized cards using the new Houndstooth Layering Stencils from the Case Closed Collection by Hero Arts.

Click HERE if you’d like to read my companion Case Closed Blog Post.

This two-piece stencil is already becoming one of my favorite backgrounds—it’s quick, clean, and incredibly versatile! Whether you’re going soft and sweet or crisp and classic, this pattern plays nicely with every palette.

2 colorful Houndstooth Plaid cards created with Hero Arts Layering Stencils.

A Few Tips Before You Ink

Here’s what made my stenciling process smooth and successful:

  • Stencil Orientation Matters: Make sure the Hero Arts logo is facing up. To keep my layers aligned even after rotating for even inking, I added a tiny arrow sticker pointing to the logo. It’s a game-changer!
  • Alignment Squares Are Your Friend: I marked the alignment squares lightly in pencil before starting so I could line up both layers of the stencil perfectly—no guessing, just precision.

Feminine Florals in Pink & Orange

Feminine floral thhinking of you card with a pink and orange stenciled Houndstooth plaid background

For my first card, I created a lovely pink and orange plaid background using Creamsicle and Taffy inks. I die cut the stenciled background with the Pointed Arches Infinity Dies to create a shaped card—hello, visual interest!

I originally tried a single color mat but it felt flat. Splitting the mat—Coral on the left, Azalea on the right—instantly made the card pop with contrast. I layered on a cluster of Copic-colored florals from the Wild Flower Bundle, a heat-embossed “Thinking of You” sentiment (included in the bundle) in white on black cardstock, and five black enamel dots for a finishing touch.

Copic Colors: YR02, RV11, W0

Handmade card with Hero Arts Houndstooth Plaid layering stencil. The card is shaped with pink and orange color palette.

Masculine Congrats in Blue & Green

Masculine Congrats Card in blues and greens with a stenciled Houndstooth Plaid background,

Card two leans cool, classic, and masculine. I used Periwinkle and Moss inks with the Houndstooth stencils for a bold plaid base, and then die cut it using one of my tried-and-true favorites—Nesting Postage Infinity Dies.

I die cut the bold Congrats sentiment from black cardstock three times, stacked and glued for dimension, and added a soft vellum mat underneath to make it stand out. The sentiment comes from the Congrats and Yay Stamp & Cut Set. Everything was mounted on Periwinkle cardstock and attached to an A2 card base.

Hero Arts Houndstooth Plaid stenciled card in masculine blues and greens.

💡 Why I Love These Stencils

The Houndstooth Layering Stencils are officially a staple in my craftroom. They’re:

  • Fast and easy to use ✅
  • Perfectly crisp results ✅
  • Easy to customize with ANY color palette ✅

You can try monochrome, neutrals, school/team colors, or even select the recipient’s favorite colors. The options are endless—and this stencil plays well with nearly every kind of stamp or sentiment.

2 cards with customized Houndstooth plaid stenciled backgrounds.  Card 1 is floral with pink and orange plaid. Card 2 is a masculine Congrats in blue and green plaid.