Cardmaking Video · Rainbow Colors

Hero Arts Video | Coloring With Stencils 4 Ways

3 Bright Colorful cards using Hero Arts Mandala Flower Pattern Stamp and coordinating color layering stencils,

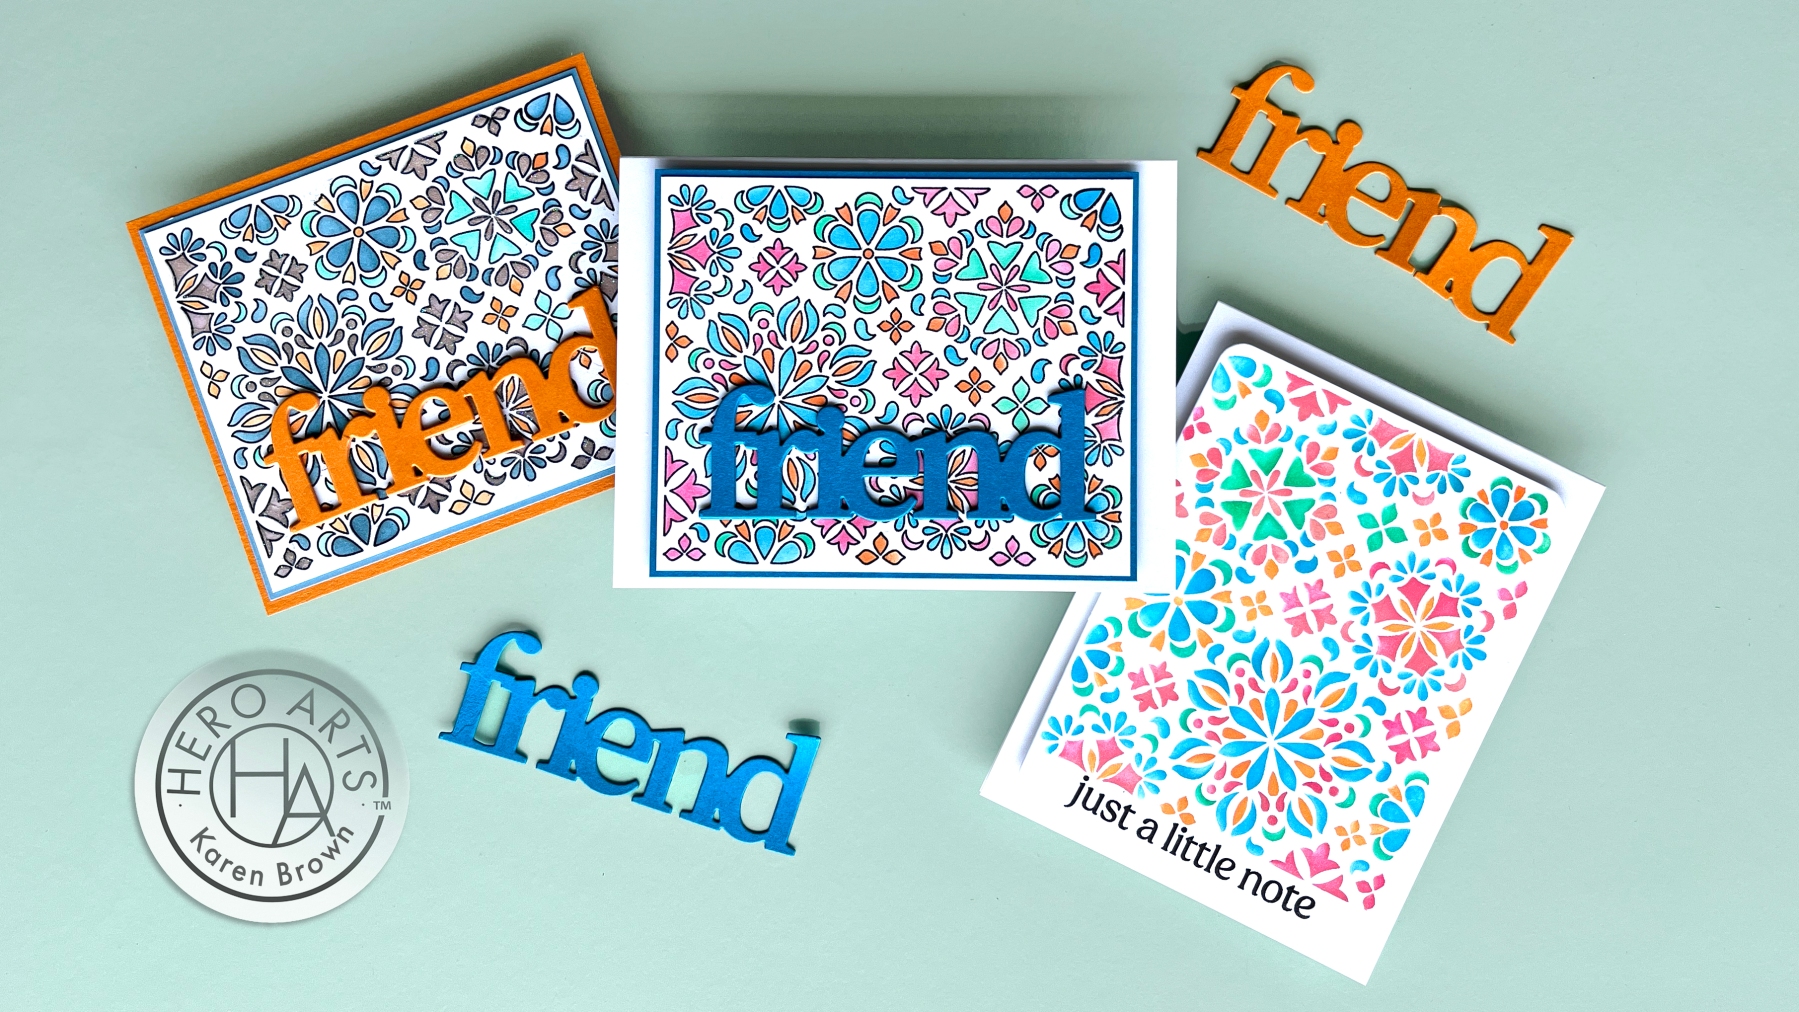
Welcome friends, Karen Brown here to share some bright fun cards using coloring stencils. Today, I used Hero Arts beautiful Mandala Flower Pattern stamp and the coordinating color layering stencils.

For a Step-By-Step Visual Tutorial, you can watch my video below:

If you are having trouble viewing this video, please click HERE to watch on YouTube.

I was so inspired by this mandala that I created 4 different cards. I love the versatility and endless possibilities!

Monochromatic Coloring

Monochromatic stamped and ink blended Mandala in blues, greens and aquas.

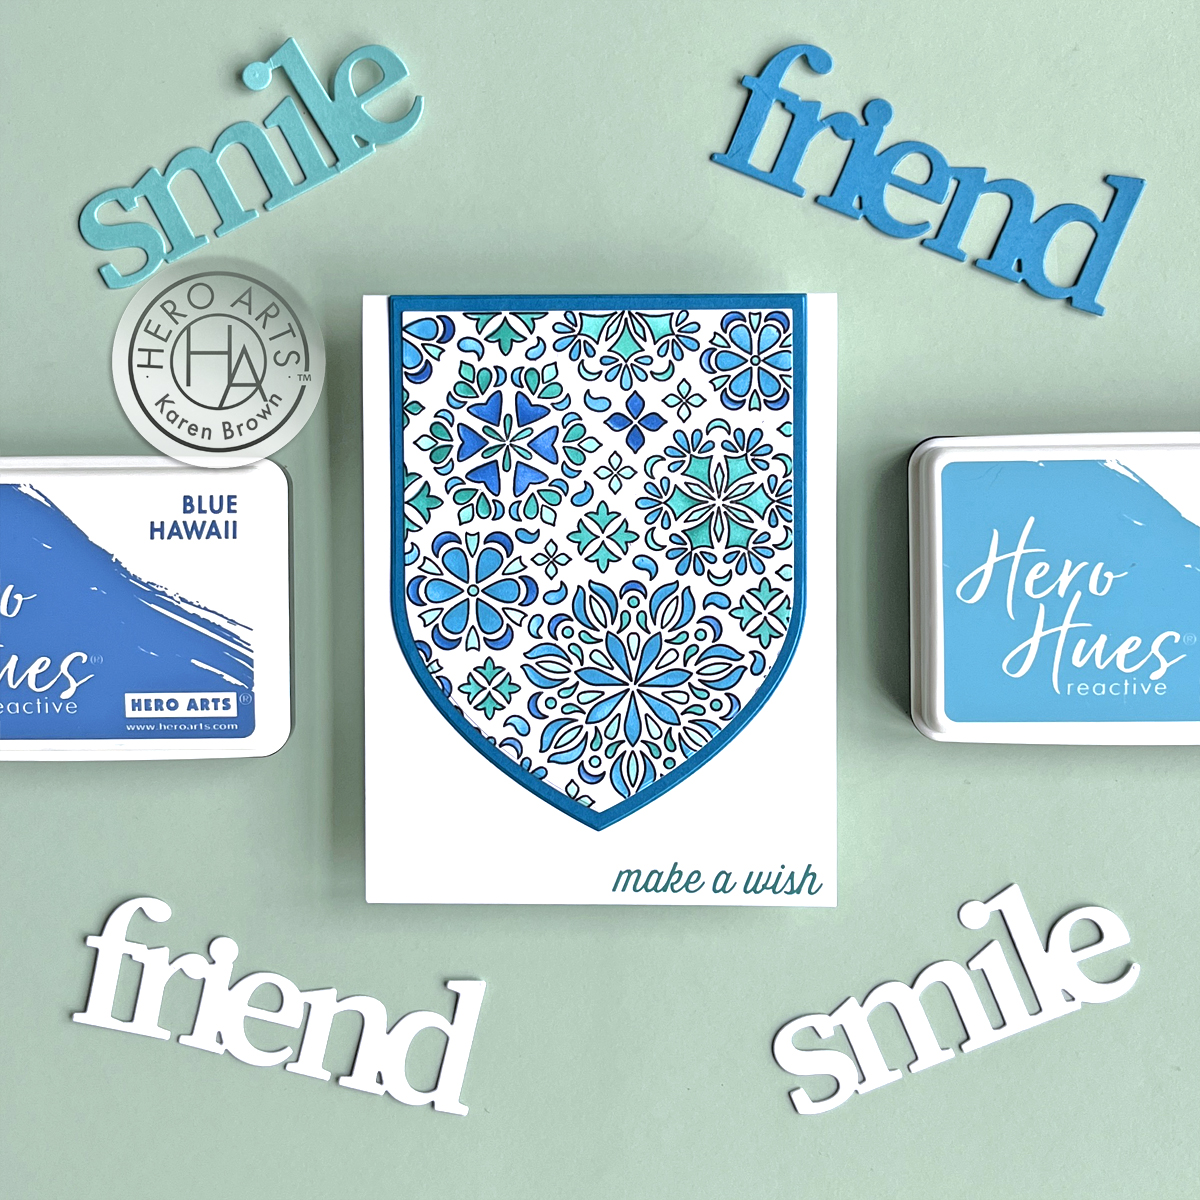
With a small blending brush, I started by coloring a monochromatic panel in blues, greens and aquas. I used Splash, Blue Raspberry, Blue Hawaii and Aegean inks for this card. I then die cut my panel and a Peacock mat using Pointed Arches Infinity Dies. I added a rub-on sentiment from the Birthday Party Hero Transfer set. I really LOVE Hero Transfers!

I used a StampWheel for both my stamping and stenciling.

Stenciling with Rainbow Colors

Next, I decided to add rainbow colors to my mandala. I did this two ways….first using the outline stamp and the second using only the stencil. I love both cards but I think the “stencil only” card is a bit more casual.

Hero Arts Color Pattern Flower Mandala:  2 Ways.   With and without the outline stamp.

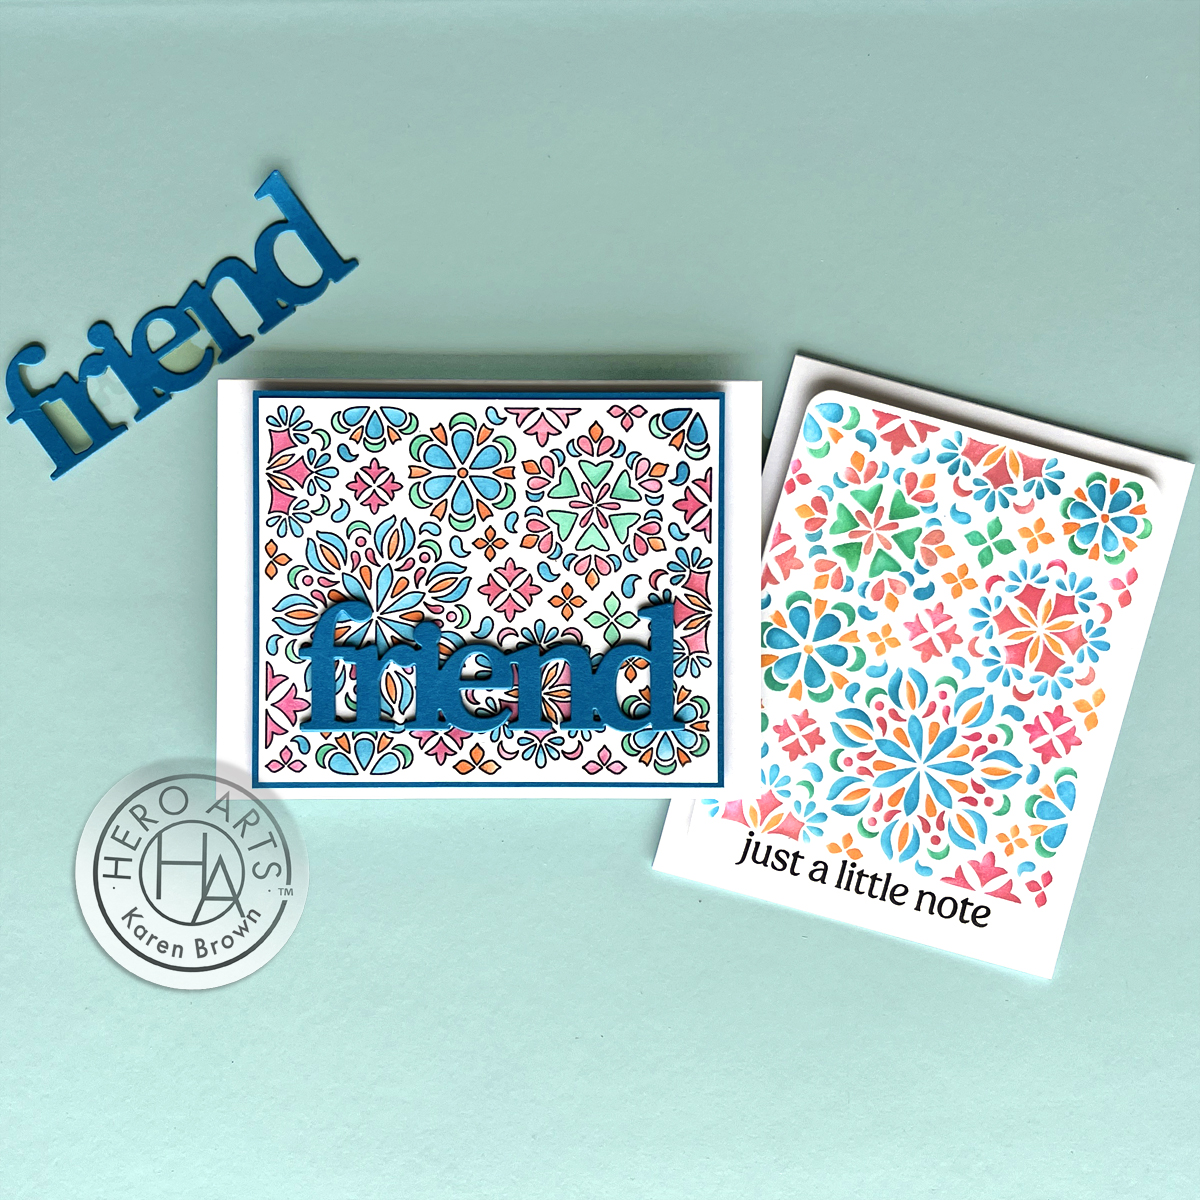
For both cards, I used Splash, Taffy, Pool Party and Creamsicle inks. For the card on the left, I used one of my favorite die-cut sentiments: Smile Friend Stamp and Cut XL.

For the “stencil only” card I also trimmed my Mandala with a Rounded Rectangle Infinity Die and used a sentiment included with the stamp set.

Stenciling with Glitter Paste

For my 4th card, I stenciled a layer of Hero Glitter Paste on my mandala and I love the result.

I recently purchased a GlassBoard Studio craft mat that was the worksurface in my video. I am very pleased with it and I have a 20% coupon code – KENNY20 – for anyone interested in upgrading their craft mat.

Hero Arts Flower Pattern Mandala Stamp and Coloring Stencils 4 Ways.

Thanks for stopping by….it was so nice to see you!

cardmaking · Mixed Media · Stamping

Hero Arts | Man Card Monday | Ramen Birthday Card

Man Card Monday masculine birthday card for the Foodie

Ramen Card for the Foodie in Your Life

Masculine cards can be tricky, but when I saw Hero Arts Ramen Stamp and Die Bundle, I knew it would be the perfect set for my son-in-law’s birthday. He is a real foodie and I love the fun sentiment included!

How to Make an Ink Smoosh Background

I started by making my “Ink Smoosh” background. I dabbed Fawn, Papaya, Fog, Paradise and Pool Party inks in separate pools on my craft mat and spritzed with water. I then dipped a piece of watercolor paper in the puddle and let it dry. I did this four times.

Next, I stamped my images and then colored in with Artist Alcohol Markers. Die cutting was next. I also used my Rounded Rectangles Infinity dies to trim my background, mat and card base. The final step was to assemble my card.

Graphic Mixed Media birthday card for the masculine Foodie in your life.
Products Used:
cardmaking · Cardmaking Kit · Give Away

Hero Arts | My Monthly Hero March 2024 Blog Hop and Giveaway

Three colorful cards from Hero Arts March 2024 Release.

Boy do I love this March 2024 My Monthly Hero kit! I am sharing three cards today and they were all so fun to create. I think the Classic Kit is going to be wonderful for mixed media projects.

Classic Kit

Luscious orange mixed media card using Hero Arts March 2024 My Monthly Hero Classic Kit.

For today’s post, I created two cards using the Classic Kit. I recently discovered the wonderfulness of liquid watercolors and WOW, WOW WOW! What took me so long? So, Card #1 has a background created with the Classic Kit + three liquid watercolor colors.

My Process:

  • I added a small amount of Dandelion, Orange and Bright Pink liquid watercolor to my paint palette. With a wet brush, I painted bold strokes on my Luxe watercolor paper. I also added some drips to the panel. I dried and repeated the process one more time. I also put a large acrylic block on top for a bit so my panel would be nice and flat.
  • The Classic Kit contains two sheets of Rub-On transfers and I added portions of the transfers randomly to my background. Remember to leave a space for your sentiment.
  • I added a minimal amount of watercolor paint spatters.
  • Using Taffy and Fruit Punch inks, I stamped my sentiment and some images (crane, scribbles, bamboo leaf, character and reeds) from the included stamp set.
  • Next, I separated the circle inset from the rectangular plate with my snippers
  • Using just the rectangular plate (without the circle) I embossed my background and I love the subtle embossing and texture that it adds.
  • I painted a second piece of watercolor paper with just orange liquid watercolor. In some places I diluted the watercolor more and in others I added very saturated color so there was variation in my orange color. I dried and then weighted with an acrylic block.
  • I die cut my orange circle with the cover plate inset + a Circle Infinity Die for a medallion look. I liked this medallion so much that I created a few extras to have on hand for future mixed media projects. You can see one of them in the next photo.
  • I glued my medallion to my background and then trimmed the background with a Rounded Rectangle Infinity Die.
  • My final step was to lightly ink the edges with Tangerine Core Ink.

This card reminds me of summer and orange sherbet and I love how happy and bright it is.

Classic Kit Card Using the Included Ink Cubes

Colorful card using Hero Arts March 2024 My Monthly Hero Classic Kit with the included ink cubes.

For my second card, I followed the same process as Card #1, except I used the 3 ink cubes included in the Classic kit. I smooshed the ink on my craft mat and used a wet brush to paint my background. I also used the cover plate as it was designed and die cut the entire background panel, including the circular inset, at one time. I then backed the opening with a red panel that I created by going “direct to paper” in a circular motion with the Cherry ink cube.

Here is a photo of the contents in the March 2024 Classic Kit:

My Monthly Hero Classic Kit contents.

KIT VALUES
Classic Kit: $82 Value for $36.99
Premium Kit: $115 Value for $49.99

Subscription Options

Bonsai Die Cut Scene Card

Die Cut and ink blended Hero Arts Bonsai Tree showcased in the Journaling Photo Frame Infinity Die Set.

I LOVE die cutting so I really enjoyed making my third card featuring The Bonsai Fancy Die, which is March Add-On product. I die cut my components, ink blended a bit and popped onto a panel made using a favorite of mine, the Journaling Photo Frame Infinity Die Set. The sentiment is from the Ornate Frames Hero Transfer . If you’d like to see an additional card I made using the Photo Frame Set, click HERE.

March Get Them All Bundle

March Accessory Bundle

Lovely handmade die cut Bonsai Tree greeting card.

Supplies Used on My Bonsai Card:

Blog Hop and Giveaway:

We will give away a $50 gift card, drawn from the comments left across the hop. Enter by Sunday, March 10th at 11:59pm PT, and the winner will be announced on the Hero Arts blog the following week.

Hero Arts

Hero Arts Creative Team:
Natasha Vacca
Dana Joy
Michelle Short
Jennifer Kotas
Rosie Lopez
Heather Ruwe
Mindy Eggen
Natasha Polite
Channin Pelletier
Rachel Kleinman
Jeannie Lieu
Seeka
Karen Brown
Charlene Madrid
Pocono Pam
Kailash Naidoo
Lydia Fiedler

Special Guests:
Nichol Spohr
Emily Midgett
Kelly Taylor      

Mixed Media · papercrafting · Tutorial

Colorful Cityscape Mixed Media Card | Hero Arts

Cityscape Hero Arts Mixed Media Card

I recently attended Hero Arts Mixed Media Stamp Along and found it so informative! This card was inspired by @cheiron and her wonderful class. I used different products and colors so my card doesn’t look anything like Cheiron’s, but her class gave me the creative spark for my card. Sometimes it is fun to get inky and messy!

For this card, I was trying to simulate a Dove flying over a city at sunrise. I knew I wanted a bold background to contrast with the white Dove. 

My Process:

  • I put 5 sunrise colors of reactive ink (colors listed below) on my craft mat and spritzed with a bit of water and then painted bands of vertical color all over my watercolor cardstock panel. There is no right or wrong way just start painting! I dried and repeated two more times. During the process I also added drips of color.
  • I love Hero Rub-On Transfers and I added parts of the city map from Collage Backgrounds to three spots on my background.
  • Using Indigo and Splash Inks, I stamped the city grid from the Mixed Textures stamp set.
  • I added texture with the Cobblestone Stencil. In some places I used just Gold Hero Paste and on others I rubbed just a bit of Black Hero Wax on the Stencil and then added Gold Hero Paste. I really love the black wax and gold paste combined together.
  • Using a splatter box (for me a repurposed cardboard box) I added three layers of splatters and dried in between each color. White, Blue Shimmer and Orange Shimmer. I love the complexity the shimmer splatters add!
  • I trimmed my background using the Rounded Rectangles Infinity Die set and then lightly inked the edges with Indigo Core Ink.
  • I die cut my Dove and sentiment 3 times and then glued the components together.
Handmade Card with Dove and Olive Branch Die - DF192

Supplies Used:

This card has LOTS of layers, but it did not take as long to complete as I would have guessed….60-90 minutes.

What do you think?

cardmaking · Cardmaking Kit · Stamping

My Monthly Hero | Countdown to Creativity | February 2024

Hero Arts My Monthly Hero Classic Kit - February 2024

Hello and welcome to the February 2024 My Monthly Countdown! I must say, this kit is full of wonderful products that I know you will love. The kit goes live tomorrow, Monday, February 5th, so stay tuned. Meanwhile, sit back and enjoy some inspiration, sneak peeks and giveaways.

WIN A KIT BEFORE YOU CAN BUY IT: Just leave a comment on this (and every) Countdown to Creativity post. Hero Arts will randomly draw one lucky winner from comments left across all countdown posts on the Hero Arts blog. The winner will be announced first thing Monday morning, February 5th, before the kit launches at 10am Pacific. The more you comment, the more chances you have to win!

Pattern Stamping

Pattern Stamping + Copic Coloring

I really enjoy pattern stamping and the stamps in the Classic Kit are just perfect for this technique. There is something so therapeutic about coloring glass jars and vases.

Products Used:

Be sure to stop by and visit the Hero Arts Blog for more inspiration and then I will be back on Monday with another post featuring the Classic Kit + some great Add-On Products. 

Cardmaking Kit · Die cutting · Stamping

Hero Arts | My Monthly Hero January 2024 Release + Blog Hop

January 2024 My Monthly Hero Premium Kit Card

Have you seen the wonderful new Hero Arts My Monthly Hero Kit for January 2024? The theme is Love, Flowers and Friendship…so versatile!


The Classic Kit is a $70 Value for $36.99
The Premium Kit is a $106 Value for $49.99

Premium Subscription Kit

I can’t seem to get enough of the fun florals in this month’s Premium Kit! (If you would like to see my first card featuring these dies, click HERE. ) I love the fresh look of these blooming dies and I so enjoyed creating and working on the layout for this card.

Die cut floral "Hello Friend" card in aqua, orange, navy and grey.

I’ve listed the products used below:

January 2024 Add-On Cards:

This month’s Add-On Collection is just wonderful! You can see the entire collection HERE. I have two Add-On cards that I wanted to share today.

Love You So Much Die Cut Valentine

Love You So Much rainbow die-cut valentine made using the inlay technique + cover plate die.

The instant I saw this Love You So Much cover die, I knew I wanted to do layers of rainbow color for each band. If you wanted to mass produce cards you could easily change up the color order and do 7+ cards in no time. I used Coral, Peacock, Paradise, Kiwi, Canary, Papaya, Amethyst and Passion Flower cardstock.

Hero Arts Arts Love You So Much Cover Plate + rainbow Valentine - DF-188

Products Used:

Valentine Wreath in Scandinavian Blue

Quick and Easy stamped and die-cut valentine wreath in Scandinavian blue.

This Valentine Wreath die is SO beautiful! It has the simple yet elegant look of Letter Press and I thought it would be quite striking with a fresh bright blue and clean white color palette. I stamped the wreath with Indigo Core Ink and then die cut the wreath, an extra floral cluster (which I added to the bottom of the wreath) and the sentiment. I cut down an A2 Top Folding Card Base to 4 1/4 x 4 1/4″ and adhered my die cuts with foam adhesive squares.

Hero Arts Valentine Wreath square card - SB-397 and CM-753

Products Used:

BLOG HOP:

Hero Arts will give away a $50 gift card, drawn from the comments left across the hop. Enter by Sunday, January 14th at 11:59pm PT, and the winner will be announced on the Hero Arts blog the following week.

Blog Hop Links:

Hero Arts

Hero Arts Creative Team:

Charlene Madrid

Michelle Short

Karen Brown    You Are Here!

Rachel Kleinman

Lydia Fiedler

Dana Joy

Rosie Lopez

Ilina Crouse

Seeka

Natasha Vacca

Mindy Eggen

Channin Pelletier

Jeannie Lieu

Natasha Polite

Heather Ruwe

Pocono Pam

Special Guests:

Nichol Spohr

Emily Midgett

Kelly Taylor

Essie   

I am so glad you could join us for this hop!

cardmaking · Mixed Media · papercrafting

Spellbinders | House Mouse Candy Hearts Vintage Look Valentine Card

There’s something undeniably captivating about a vintage valentine, where every delicate stroke of ink and carefully chosen sentiment carries a timeless charm. This new House Mouse Candy Hearts rubber stamp had a very retro look to me, so I went with an old-timey mixed media vibe.

Spellibinders House Mouse Candy Hearts (RSC-022) handmade Mixed Media Valentine Card.

Easy One Layer Vintage Look Mixed Media Valentine Tutorial:

  • I started by creating my background. I masked off a border and then used two shades of tan Distress Ink to ink blend my background. (Antique Linen and Frayed Burlap)
  • With the masking tape still on the cardstock, I then used the same tan inks to stencil and stamp bits and pieces on the background. Most of the stamping was “second generation” where I stamped first on a scrap and then onto my background so that the pattern would be subtle. I also added light stenciling to the background. Cathe Holden has some great stamps and stencils that I added here and there. I also used a bit of stamping with white pigment ink, but it is hard to see in the photograph. To finish I added a touch of Gold Wax to a few places around the border.
  • Carefully remove your masking tape. I used Post It Tape, which is the best!
  • After my background was dry, I stamped the Valentine Mouse with Versafine Black Pigment Ink.
  • PRO TIP: For a crisp look, keep the stamp in your Misti stamping platform and restamp the image after you are done coloring. You won’t believe how much this one step will elevate your project!
  • I used Faber Castell Polychromo Colored Pencils to color the mouse and candy hearts.
  • Remember to restamp the image and let dry.
  • The cute sentiment is included with the stamp set and finishes off my one layer valentine.

House Mouse Products:

One layer mixed media valentine featuring a cute mouse laying in a pile of candy hearts.

If you like this card, you might also want to visit my blog post on House Mouse Designs 3 Ways.

Thanks for stopping by!

Interested in more…You can also find me at these spots too:

@karens_mini on Instagram

Pinterest: @karenabrown

FaceBook: Karens_Mini

YouTube: Karen Brown

cardmaking · Mixed Media · papercrafting

Big News + Hero Arts | November Add-Ons

I am thrilled to announce that I have been selected to join the Hero Arts Creative Team! This incredible opportunity allows me to collaborate with a group of talented and passionate artists who share a love for crafting and creativity. I am beyond excited to explore new techniques, experiment with Hero Arts’ amazing range of products, and inspire others on their own artistic journeys. Together, we’ll embark on a creative adventure filled with endless possibilities, and I can’t wait to share the magic that unfolds along the way! Stay tuned for a whirlwind of innovative projects, tutorials, and inspiration that will surely ignite your own crafting passions. 🎨✨ #HeroArtsCreativeTeam

Okay, let’s make some art together!

Handmade card with Hero Arts November Add-Ons: Winter Mail Critters, White Holiday Collage Hero Transfers, Wax Seals.

I also wanted to share a card using some of the fun Add Ons from the November My Monthly Hero Kit. This month has so many goodies and I used 4 of them today.

Handmade Christmas Card featuring a Hero Arts bear and fox each holding a letter with a Rub On Transfer background.

Hero Arts Christmas Card Tutorial:

I started by die cutting two frames and two “tapes” from the Journaling Photo Frame Infinity Dies Set. I then very lightly blended Paradise Core Ink along the edges of the photo background (using the sticky mat in my Stamp Wheel), stamped the bear and fox with my Stamping Tool and Copic colored the images (colors listed below). I also rubbed on a transfer Merry & Bright sentiment.

The background was so easy! I rubbed on the fun Twas the Night Before lettering from the White Holiday Collage Hero Transfers (RT121) with a bone folder and all the writing transfered to the paper perfectly on the first try. The card background is Paradise cardstock.

I wanted a pop of red, so I stamped and die cut a Merry Christmas Wax Seal using Crimson Core Ink. I also put a dab of Hero Wax Gold to add a little depth and shine to the “photo tape”

I assembled my card with foam tape and it is ready to send.

Cute holiday card with critters featured in  Hero Arts Journaling Photo Frame Infinity Dies DF125

Products Used:

Hero Arts November 2023 My Monthly Hero Kit and Add Ons

Winter Mail Critters Die Bundle SB385 (or stamps only)

White Holiday Collage Hero Transfers RT121

Holiday Message Strips Hero Transfers RT120

Wax Seals and Dies D306

My Monthly Hero Subscription

Journaling Photo Frame Infinity Dies DF125

Paradise Core Ink

Crimson Core Ink

Paradise cardstock.

Hero Wax Gold

Precision Glue

Compact Desktop Die Cutting Machine

Handy Desktop Tool Holder

Stamp Wheel Stamping Tool and Sticky Mat

Bone folder

Highlighter Tape (for die cutting and to tape the photo background to the frame)

White thin Posca pen to add highlights to the scarf.

Copic Colors Used:

  • Browns: E27, E15, E13, E11, E50
  • Reds: R27, R39
  • Pink: RV11
  • Blue: B00

I am so glad you stopped by!

Interested in more…You can also find me at these spots too:

@karens_mini on Instagram

Pinterest: @karenabrown

FaceBook: Karens_Mini

YouTube: Karen Brown

cardmaking

Spellbinders FransFormer Snowy Friends | Cute Quick Christmas Card | Easy Copic Coloring

Spellbinders Fransfomers Snowy Friends  cute with quick easy Copic coloring

Cute creatures + easy Copic coloring makes for an enjoyable afternoon! Spellbinders was kind enough to send me an advance copy of the new Fransformer Snowy Friends by Stupendous cling stamp set and I can’t remember the last time I enjoyed creating a card more. FransFormers are flexible clear stamps that you can squish, squeeze, shape and adjust plus they are just loads of fun!

My card is 5 1/2″ square which allowed me to add three snowmen. I used the same stamp for the left and right snowbabies, but you can see I was able to shape them so they each have their own personality. I did a little easy Copic coloring and I was done.

Three adorable snowmen in hats and scarves on a handmade Christmas card with easy Copic marker coloring.

Spellbinders Fransformer Snow Friends Flexible Cling Stamps STP-218

Copic Markers Used:,

  • Blues: B00, BG11, BG45, B24, B29
  • Pinks: BV00, BV11, RV21, RV23
  • Light Peach: E11, E21
  • Gray: N0, N1
  • Green: YG01
  • Orange: YR04

If you are interested in another easy stamped Copic colored card, check out my blog post HERE.

Let it snow, let it snow, let it snow…

Karen

Interested in more…You can also find me at these spots too:

@karens_mini on Instagram

Pinterest: @karenabrown

FaceBook: Karens_Mini

YouTube: Karen Brown

cardmaking · papercrafting

Altenew | Linear Life Tropical Garden

I love the modern look of these loose sketchy outline flower stamps! They are very versatile and would work great on clean and simple projects but I also plan to use it on some mixed media cards.

I started again by ink blending my background. I used the three lightest colors in Altenew’s Glacier Cave Mini Cube Set. I masked off a frame with washi tape and then started in the bottom right with Arctic and then moved darker toward the top left corner. I stamped the flowers and leaves with black pigment ink. Once the outlines were dry, I stamped the flower centers with Caribbean Sky Crisp Dye Ink. I die cut the blooms, assembled with foam tape and then added Glacier Caves Enamel Dots to finish the project.

Altenew Linear Life Tropical Garden Stamp and Dies + Handmade Card
Altenew Carribean Sky Crisp Dye Ink + Ink Blended Background

Thanks for stopping by!

Karen