Die cutting · Mixed Media

Spooky Fun | Die Cut Halloween Cards

Bold colorful handmade  Halloween card backgrounds combinderd with Spellbinders Happy Haunting die kits to create 2 fun cards.

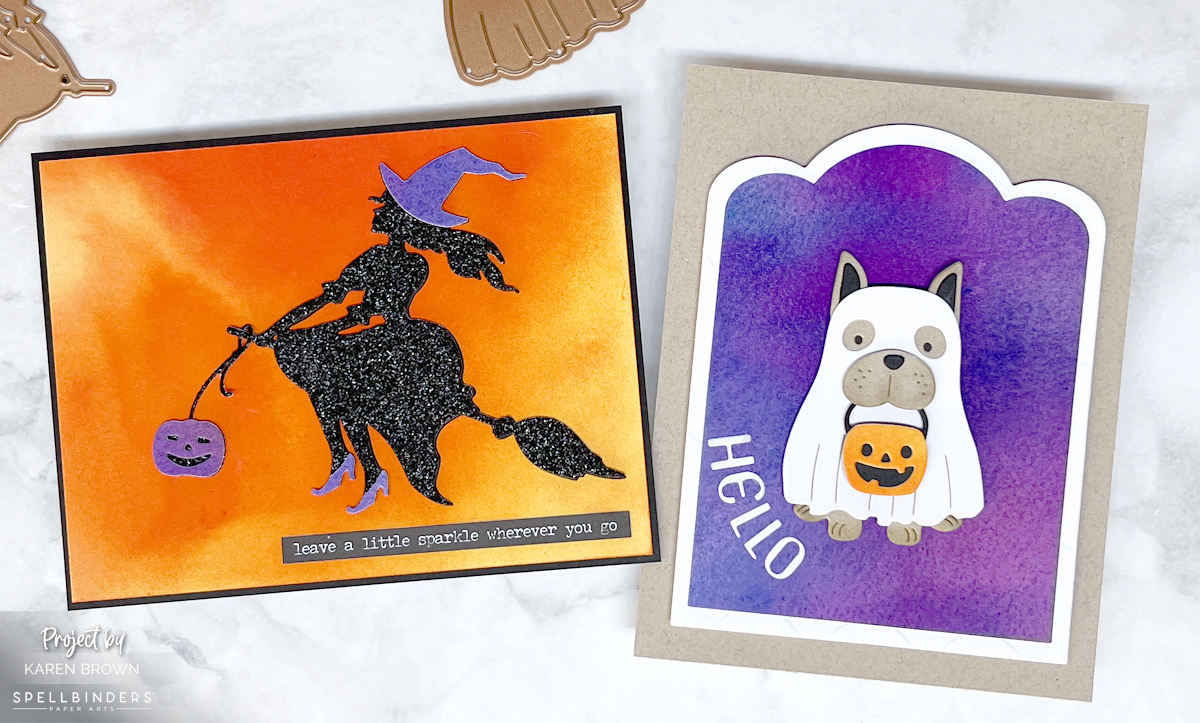
Halloween is just around the corner, and what better way to get into the spirit than by creating some spooky yet charming Halloween cards? Spellbinders has just released an adorable collection called Happy Haunting that is SO fun! I created two cards today that I am going to send to my daughters. I used Witchin” Heels (S3-525) and Woof or Treat (S3-521).

Hamdemade Halloween scene card with a witch silhouette on a broom flying though a vivid  sunset. created with orange and yellow liquid watercolor.  Witchin' Heel by Spellbinders S3-525

Spooky (and Cute!) Card Designs

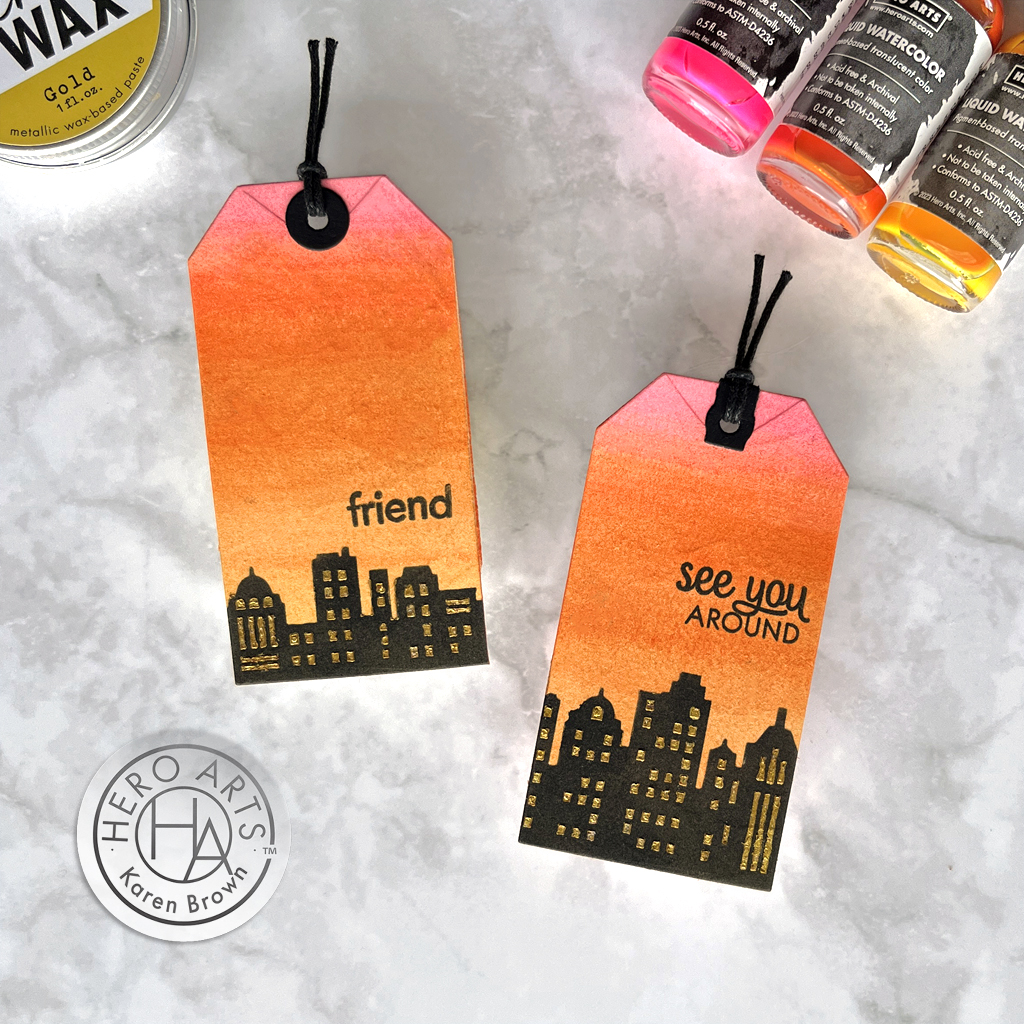
For a simple yet delightful card, I created a dramatic sunset background to contrast with my sparkly witchy silhouette. I love using Liquid Watercolors because they are so vivid.

My Design Process:

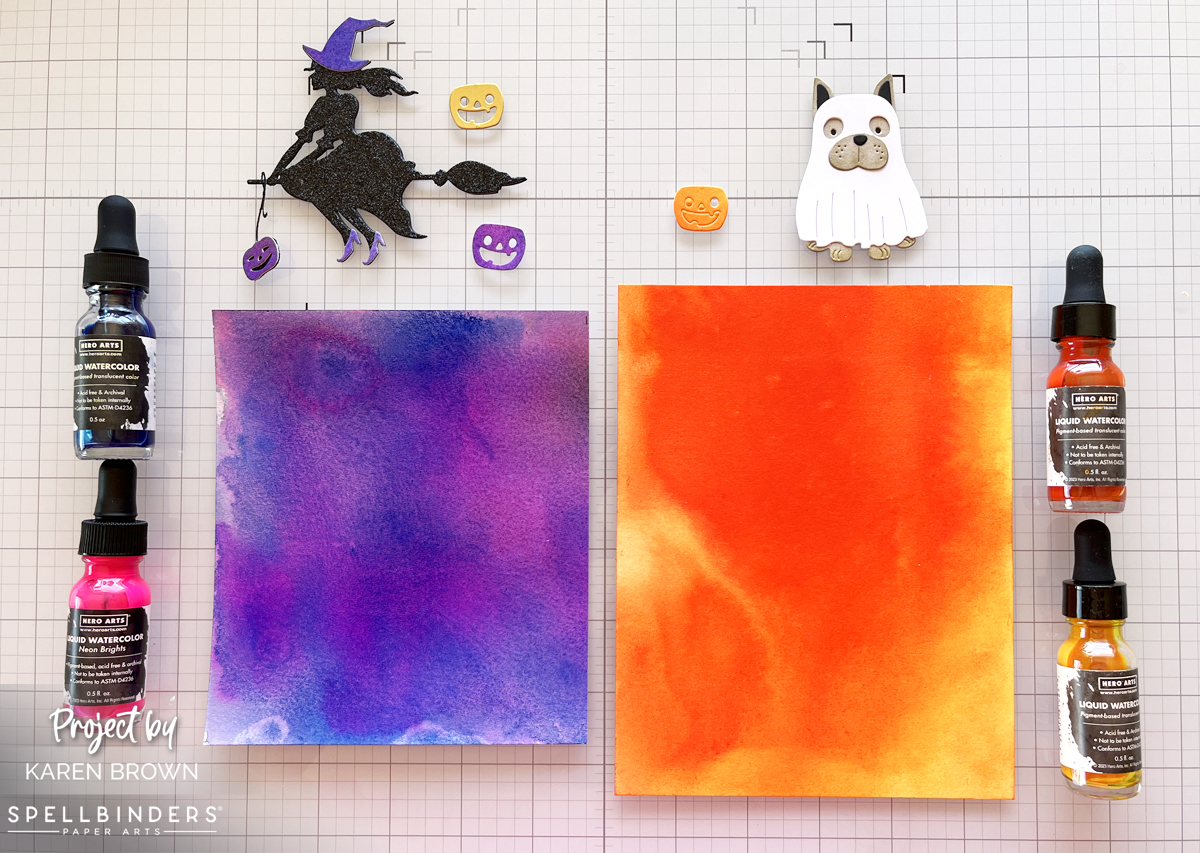
  • I started my design process by creating two bold backgrounds using liquid watercolors.
  • Witchin’ Heels background: I brushed water onto a watercolor paper panel and then used the Dandelion Yellow Liquid Watercolor eye-dropper to drop color onto the paper. I added yellow at the top and bottom of the panel and dropped Orange in the middle. I then used my mini-mister sprayer to add water to the colors, tilting different directions so that the colors blended and flowed. I repeated this process a couple of times.
  • Woof or Treat backgound: I repeated the process for my purple panel using Indigo and Neon Brights Pink Liquid Watercolors. Since I didn’t have purple watercolor I created my own by dropping a big blob of Indigo ink and then putting a smaller drop of pink in the center. I spitzed with water and then tilted to move the ink. I added several layers for an intense color.
  • I used my heat tool to speed up the drying process.
  • Below, you can see a photo of my completed backgrounds.
  • Die cutting was next. I used Black Glitter Paper for the Witch and added purple accents die cut from my purple watercolor panel. For my ghostly pup, I used khaki and added a hint of shading with a blending brush.
  • To frame my little trick-or-treater, I used my Scallop Label Infinity Dies. I also added a little dimension with foam squares and craft foam.
Adorable Woof or Treat (by Spellbinders) handmade card of a Dog trick-or-treating as a ghost with a pumpkin.  S3-521

Key Supplies Used:

How to create colorful vivid card backgrounds with liquid watercolors.

Final Thoughts:

I feel like each of these cards has a little bit of seasonal magic combined with crafty love. I adore the bold colors acheived with liquid watercolors.

I hope you found some inspiration today. Thanks for stopping by!

Karen

Cardmaking Kit

Sunny Beach Theme Cards | July 2024 Hero Studio Release

Colorful aquatic under-water theme Heroscape card created with Hero Arts Tropical Fishes stamps and die + Pebbles and Stones stencil.

Welcome to the July Hero Studio release, where we are bringing a summery beach theme in Hero Arts signature style and quality! Get ready to ignite your creativity and elevate your crafting experience with the brand new lineup of the July Hero Studio cardmaking kits. Whether you’re a seasoned pro or just starting your crafting journey, these 5 cardmaking kits offer something for everyone.

Summer is here, and there’s no better way to celebrate the sunny season than with a couple of beach-themed handmade cards. Today I’ve created two delightful designs that I hope will help inspire your crafting adventures.

Tropical Underwater Scene Card | Extraordinary Extra

Today, we’ll dive into making a vibrant, underwater-themed card featuring a stenciled background and beautifully Copic colored die-cut tropical fish. This project is perfect for celebrating summer or simply brightening someone’s day with a splash of color.

How to create a water/ocean/lake background with Hero Arts Pebbles and Stones stencil.

This aquatic card was fun to create!

  • I tried a new trick for stamping and it worked great! I put the acetate sheet with the Tropical Fishes (SB406) stamps on the sticky mat in my StampWheel and taped my cardstock to the lid and stamped away. This was a real timesaver. So much faster than peeling each stamp off and positioning it.
  • For my background, I took a 4 1/4″ x 5 1/2″ panel of Arctic cardstock and stenciled the Pebbles and Stones (SA276) with Pool Party ink and my XL Blending Brush.
  • I Copic colored my fish with blues, corals, aquas and tans and then die cut the elements.
Key Products Used:

Create Your Own Beach | Studio Kit of the Month

Heroscape Beach Scene handmade card with silhouette stamped fence, grass, cabanas and birds.

The July Studio Card Kit of the Month has SO many wonderful elements to create Heroscape Victornian beach themed cards. There are endless combinations and possibilities!

Watch a quick reel on how I created a second beach scene card.

What’s Inside the Kit?

Curious about this month’s kit? Let’s take a quick peek inside The July Hero Studio Kit:

KIT INCLUDES:
• Victorian Seaside Clear Stamp Set, 6″ x 8″
• 22 Coordinating Dies
• Sand Castle Fancy Dies
• Rock Cling Stamp, 6″ x 6″
• Victorian Seaside Reactive Palette Ink Pad
• 2 Sheets Map Hero Transfers (Rub-ons), 6″ x 8″
• 2 Sheets Each of Blue, Purple, Green Vellum, 5.5″ x 8.5″
• 2 Sheets Each of White Lava Holographic, White Rainbow Holographic Cardstock, 5.5″ x 8.5″

Kit Cost:

$46 with Subscription + FREE SHIPPING
$49.99 One-Time Purchase
While Supplies Last

My Process for This Easy Heroscape Scene Card:
Hero Arts July 2024 Studio Card Kit of the Month Beach Theme Handmade Card.

5 Wonderful Kit Options:

I created with three new Hero Studio kits and Extras in this blog post, but there are 5 kits and 6 Extraordinary Extras altogether. You can also buy The Whole Studio!

Blog Hop:

Hero Arts will give away a $50 gift card, drawn from the comments left across the hop. Enter by Sunday, July 7th at 11:59pm Pacific, and the winner will be announced on the Hero Arts blog the following week.

Hero Arts
Hero Arts Creative Team:
Channin Pelletier
Charlene Madrid
Heather Ruwe
Ilina Crouse
Jeannie Lieu
Jennifer Kotas
Kailash Naidoo
Karen Brown You Are Here 🙂
Lydia Fiedler
Michelle Short
Natasha Polite
Natasha Vacca
Rachel Kleinman
Rosie Lopez
Seeka
Special Guests:
Jenn Shurkus

Nichol Spohr

Emily Midgett
Kelly Taylor

Happy crafting!

Cardmaking Kit

Introducing 5 NEW Exciting Hero Arts Subscription Card Kits | June 2024

4 handmade cards and tags created with Hero Arts NEW Studio Subscription Card Kits - June 2024.

Elevate Your Crafting Experience

Calling all crafters and cardmaking enthusiasts! Welcome to the June release, where we are bringing the boldness of urban textures in the signature Hero Arts style and quality! Get ready to ignite your creativity and elevate your crafting experience with the brand new lineup of Hero Studio cardmaking kits. Whether you’re a seasoned pro or just starting your crafting journey, these 5 new kits offer something for everyone. Let’s dive in!

Studio Card Kit of the Month

A vibrant handmade card with rainbow colored clouds created with the June 2024 Hero Arts Studio Card Kit.

I started by creating with the new Hero Studio Card Kit, which is full of wonderfulness! This month’s theme is Urban Skyline.

For my first card, I used the HeroScape layering cloud stamps to create a dramatic sunrise. I laid down and blended LOTS of ink for a really saturated look. I love color and thought the cloud layering stamps would make a stunning, almost abstract background.

What’s Inside the Kit?

Curious to know what treasuries await you in this cardmaking kit? Let’s take a peek inside The Hero Studio Card Kit:

KIT INCLUDES:
Urban Sky HeroScape Clear Stamp Set, 6” x 8”
Neighborhood Message Clear Stamp Set, 4″ x 6″
Coordinating Dies
City Stencil, 6×6 (with 3 Fall-Out City Skylines)
5 Ink Cubes (Peony, Pitch Black, Dusty Blue, Stonewash, Amethyst)
2 Sheets each of Silver Foil, Silver Glitter, Silver Cube & Pitch Black Cardstock, 5.5″ x 8.5″
2 Sheets City Textures Hero Transfers

Kit Cost and Value:

$46 with Subscription, $95 Value (Cancel Anytime)
$49.99 One-Time Purchase (While Supplies Last)

How I Created This Urban Sunrise Card:

A colorful handmade thank you card simulating a vibrant sunrise.  The card was created with the June 2024 Hero Studio HeroScape card kit.

Colorful Sunset Cityscape Tags

I also created two tags with the Hero Studio Card Kit stencils. These tags were featured in Hero Arts Countdown Hop and you can read more about my process HERE.

Colorful DIY tags simulating a Sunset over a cityscape created with liquid watercolors, a stencil and Hero Gold Wax.

Hero Studio Fancy Dies

I love die cutting, so I had tons of fun creating my window scene card with the new Hero Studio Fancy Dies. This month’s background die is called Urban Window and I think there are endless design options. I love creating scenes, so I know I will be using this die again!

A charming handmade card window scene with birds, tree branches and a potted plant.
  • I began by selecting colored cardstock: Peacock, Papaya, Mist, Arctic and Meadow.
  • My base is a leftover piece of background from a project you can read about HERE.
  • I die cut my window frame from Peacock cardstock and trimmed off the greenery. I die cut the window frame a second time from Meadow cardstock and layered it behind the Peacock frame, so that my branches would be green. The sky is Arctic.
  • I added two birds, a potted plant and a die cut sentiment to finish my scene.

FD0624 Fancy Dies of the Month (Urban Window) $25 with Subscription, $26.99 One-Time Purchase, While Supplies Last.

Hero Arts Hero Studio Fancy Die of the month (June 2024) handmade card window scene.

I have a quick reel for the Fancy Die of the Month Kit:

I created with two Hero Studio kits in this blog post, but there are 5 kits altogether. You can also buy The Whole Studio!

Blog Hop and Giveaway:

Hero Arts will give away a $50 gift card, drawn from the comments left across the hop. Enter by Sunday, June 9th at 11:59pm Pacific, and the winner will be announced on the Hero Arts blog the following week.

Hero Arts
Hero Arts Creative Team:
Channin Pelletier
Charlene Madrid
Dana Joy
Heather Ruwe
Ilina Crouse
Jennifer Kotas
Kailash Naidoo
Karen Brown
Lydia Fiedler
Michelle Short
Natasha Polite
Natasha Vacca
Pocono Pam
Rachel Kleinman
Rosie Lopez
Seeka
Special Guests:
Nichol Spohr
Kelly Taylor

Cardmaking Kit

Hero Arts | Sneak Peek at the NEW Studio Card Kit of the Month + Blog Hop and Giveaway

Sunset cityscape tag card created with Hero Arts June 2024 Studio Card Kit of the Month.

Today, the Hero Arts Creative Team is thrilled to offer you a sneak peek into their newly re-imagined subscription cardmaking kit called Hero Studio Card Kit of the Month. Each month will have a fresh beautiful collection of handpicked supplies that are sure to ignite your creativity. The kits will go live the first Monday of the month so you can view the entire kit on Monday, June 3rd at 2:00 PM PST. Or, you can pre-order today! Until then, here is your sneak peek….

To celebrate, Hero Arts is hosting a Blog Hop and Giveaway that you can find HERE.

As we countdown to the premiere, I wanted to share two sunset cityscape tags I created with The June 2024 Studio Card Kit. Liquid Watercolors make the MOST vibrant backgrounds, which is what I wanted for this project.

Crafting the Urban Skyline: A Sneak Peek into Hero Arts Studio Card Subscription Kit

My Process:

  • I started by using Liquid Watercolors to create my sunset background. I put a sheet of Luxe Watercolor Paper on my craft mat, brushed the paper with water and then painted bands of color with Dandelion, Orange and Brights Pink liquid watercolor.
  • I dried my panel and repeated step one.
  • I put my sunset panel on my Sticky Mat, attached the cityscape stencil to my background with washi tape and applied Onyx Pigment Ink with a Small Blending Brush to create my building silhouettes.
  • Using the next stencil, I applied Gold Wax to simulate lighted windows. While the stencil was still in place, I smoothed the wax with an old gift card. Work quickly so the wax doesn’t dry on the stencil. This will give you a good result when you peel back the stencil. I did let the wax set on the stencil while I finished my tags, but I soaked it for a bit and the wax washed right off.
  • I cut my tags with Nesting Infinity Tags.
  • I used sentiments included in this months kit and then added some black twine that I had saved from some packaging.
How to create a sunset handmade card background with liquid watercolors.

Here are links to all of the new Hero Studio Kits:

Be sure to stop by the other Countdown Posts, here are the links:

You are going to love this kit and I can’t wait for you to see the big reveal on Monday!

Thanks for stopping by!

cardmaking · Die cutting · Video

Altenew | Sweet Blossoms Floral Die Cut Card With Rainbow Stripe Background + Video

How to create rainbow striped card backgrounds with colored cardstock strips  + Altenew's Sweet Blossoms floral die set.

Die Cutting with Outline Dies

Die cut flower and leaf silhouettes over a rainbow striped background makes for a colorful high impact card. I love Altenew’s Sweet Blossom’s Layering Dies and wanted to play with them again (You can see my first card HERE). This time I wanted to use just the outline dies so you could see the beautiful background I created.

Altenew Sweet Blossoms Layering Die Set handmade card

I created a short video (below) to show how I made my background panel. I love rainbow striped backgrounds so I have two pouches (see final photo) where I keep my pre-cut colored cardstock strips. The pouch on the left has a variety of widths and all the strips in the right pouch are cut to 1/4″ widths. It is easy to take a paper trimmer and cut lots of strips and then it is so quick to make a colorful background. For this card, I used PaperTrey’s Perfect Match Colored Cardstock.

Click HERE to see a card where I used just 1/4″ strips.

For this card, I wanted variety so I used colored cardstock bands from both packets. I like to use Altenew’s Glue Tape Runner when making these types of backgrounds.

I wanted my flower bloom to sit on a stem, so I did a little surgery on the larger leaf die cut, and with scissors, I cut off the top three leaves. This left me with a stem and an additional little leaf cluster to use on my card.

I wanted substantial die cuts, so using the Sweet Blossoms and Vertical Greetings sets, I die cut each element three times and then glued them together.

Quick Video: How I Created This Rainbow Striped Background

Products and Supplies Used on this Card:

Altenew No Hassle Storage Pouches

Products Available on Amazon:

Tonic Studios paper trimmer

I am SO happy you stopped by today!

Karen

Uncategorized

WWC275 – Karen\’s Challenge: All About Occasions

Hello!  I am so pleased you stopped by.  Today we are showcasing \”Occasion\” cards at The Watercooler Wednesday Challenge and I am this week\’s hostess.

Offset Ink blended background:  squeezed lemonade, mustard seed, twisted citron, cracked pistachio, salty ocean and blueprint sketch
I recently won several stamps from Crackerbox and Suzy and this is my first card with my new haul.  I think the tree is just gorgeous.  I have been doing a lot of ink blending lately and knew this tree would be perfect for this technique.  I started by masking off a 1 1/2\” border on the left of the card and then started ink blending from the bottom right to the top left.  I was very heavy handed and put down a lot of ink.  I added a navy mat as I didn\’t want the clean white swath to fade into the card base.
Supplies Used:
Crackerbox and Suzy Tree Whimsey stamp
The Greetery Crimped Frame die
Distress Inks:  Squeezed Lemonade, Mustard Seed, Twisted Citron, Cracked Pistachio, Salty Ocean, Blueprint Sketch
Neenah cardstock
Navy Mat
Versafine Onyx Black Pigment Ink
Clear Embossing Powder
SSS Birthday Mix 1 sentiment stamp and die
Masking tape

NBUS Challenge – This is my first time to use Crackerbox and Suzy\’s beautiful Tree Whimsy stamp.

I am so pleased that you stopped by!
Karen