Cardmaking Kit · Die cutting

Blog Hop: Enchanted Paper Gardens with the Hero Studio April Release!

Hero Arts Studio:  April 2025 - two whimsical die-cut cards: one featuring a lush, layered terrarium full of mushrooms, leaves, and a fluttering butterfly, and another with bold, hand-painted leaves and a cheerful “hello” sentiment. Both are packed with watercolor magic, intricate details, and playful techniques!

Once upon a time, in a land filled with ink and creativity, a whimsical cardmaker (that’s me!) discovered the Hero Studio April Release and its magical Tranquil Terrarium Kit. With a wave of my die-cutting wand and a splash of watercolor, I crafted a dreamy terrarium scene—one fit for a fairy tale!

Step into a Paper Fairy Tale: A Lush, Layered Terrarium


A handcrafted die-cut card featuring a whimsical terrarium scene with mushrooms, leaves, rocks, and an orange butterfly, all watercolored in bright, vivid hues. The background has a vintage script stencil effect, and the card base is soft Mist blue

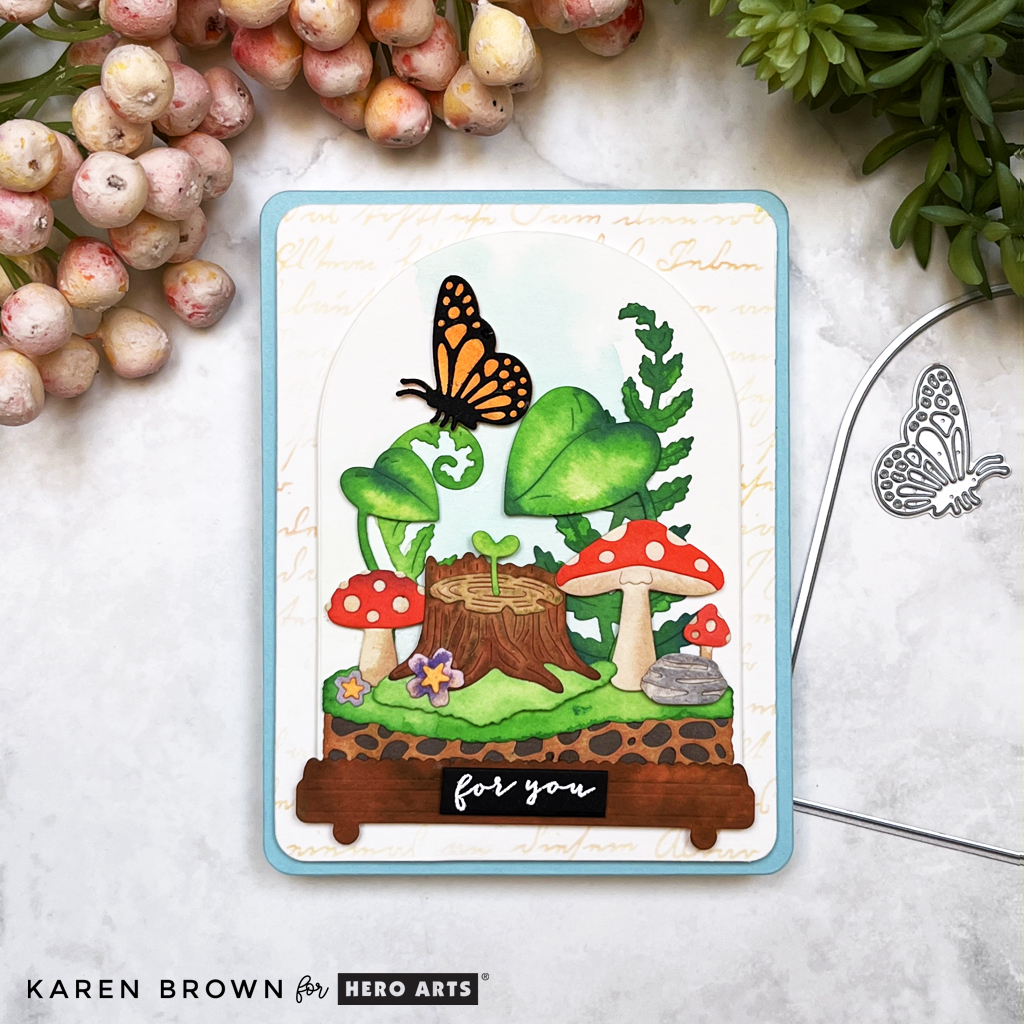
Picture this: a tiny enchanted world encased in glass (well, cardstock), teeming with lush leaves, charming red and tan mushrooms, green grass, rustic rocks, and a tiny tree stump. Perched on a delicately curled leaf is a radiant orange butterfly, completing this little forest wonderland.

  • Die-cut magic: Every element was cut from watercolor paper, allowing for beautifully blended, organic colors.
  • Coloring adventure: I used brightly colored reactive inks to hand-paint each die cut piece, adding depth and dimension. I enjoyed painting each piece individually, but you could also paint several card panels and then die cut the elements. Reactive inks used: Green Apple, Key Lime Fizz, Blue Hawaii, Granite, Purple Galaxy, Fawn, Fruit Punch,
  • Serene background: I put a light Pool Party watercolor wash on the rounded terrarium panel. It shows up better in person and adds a lovely subtle dimension.
  • Vintage charm: The background panel features a subtle Script Stencil in tan ink, lending a storybook feel to this enchanted setting. Stencil Used: Script Stencil
  • Rounded elegance: To echo the terrarium’s shape, I rounded the corners of both the panel and card base using Rounded Rectangle Infinity Dies.
  • The final touch: Layered on a dreamy Mist blue card base, this card is a burst of color, depth, and whimsy.

✨ Pro Tip: When layering die-cut scenes, use thin foam squares on select elements (like the butterfly) to create a natural sense of depth without overwhelming the design.

Botanical terrarium card  full of lush leaves, adorable red and tan mushrooms, green grass, rocks, a tree stump with a beautiful orange butterfly perched on a gently curling leaf.  I die cut my pieces from watercolor paper and then watercolored the components with brightly colored reactive inks.   Card created with Hero Studios April 2025 Card Kit of the Month

What’s Inside the April 2025 Hero Studio Card Kit?

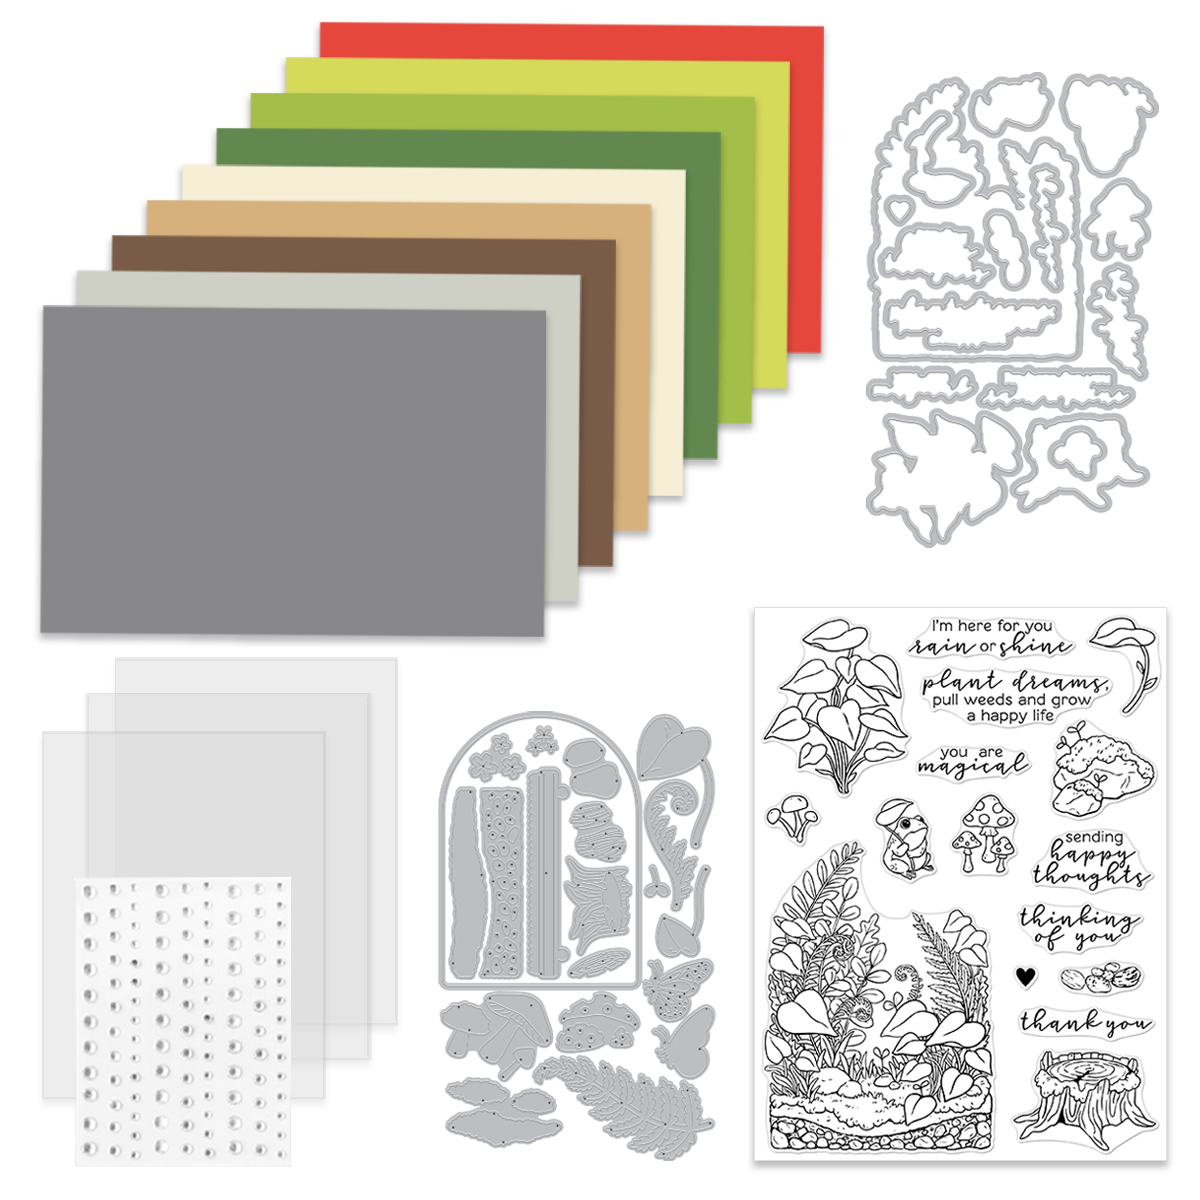
  • 20 Terrarium Fancy Dies
  • Terrarium Clear Stamp Set, 6″ x 8″
  • 16 Terrarium Coordinating Dies
  • Clear Hero Enamel Dots
  • 3 Clear Card Panels, 4.25″ x 5.5″
  • 9 Sheets of Cardstock, 5.5″ x 8.5″ (Poppy, Peridot, Rainforest, Fern, Alabaster, Fawn, Truffle, Fog, Anchor)

The Whole Studio includes ALL 5 of the monthly subscriptions in one discounted bundle. Cling of the Month, Stamp & Cut of the Month (new name for the subscription!), Layering Stencil of the Month, Fancy Dies of the Month, and the Card Kit of the Month.

This month, receive a FREE adorable “froggy” stamp & die set when you purchase The Whole Studio!

Hero Arts has many different Monthly Kits that you can subscribe to including:

Card 2: A Bold, Botanical Hello

A bold, colorful handmade card with die cut watercolored leaves and fronds on a creamy white background.  Uses Hero Studio April 2025 Fancy Dies kit.

For my second card, I embraced bold color and graphic design with the Fancy Dies of the Month Kit. This set features five striking leaf dies and a scripty “hello” with a shadow layer.

  • Hand-painted beauty: Each leaf was die cut from watercolor paper and hand-painted in vibrant greens and blue-greens. Reactive Inks Used: Splash, Key Lime Fizz, Blue Hawaii, Blue Raspberry, Green Apple. I started with the lightest color and then layered on darker shades.
  • A pop of fun: To contrast the cool tones, I painted the “hello” with Fruit Punch Reactive Ink-blended cardstock, giving it a lively coral-red pop.
  • Artful splatter: I added Licorice Reactive Ink splatters for an artsy, organic touch. I simply dabbed the ink on an acrylic block and flicked splatters on my die cuts with a fine wet watercolor brush. I turned my splatter box for even splatter distribution.
  • Design balance: The leaves are arranged in a radiating composition, leading the eye toward the bottom-right hello.
  • Crisp and clean: Everything is anchored on an Adriatic blue card base, making those greens pop!

🎨 Pro Tip: When adding splatters, dab the ink on an acrylic block and flick splatters on the die cuts with a fine wet watercolor brush. Thie results in controlled yet artistic splatters. Don’t forget to rotate your splatter box to get an even, natural distribution!

A bold handmade card with  hand-painted die-cut leaves in vibrant greens and blue-greens. The sentiment "hello" stands out in a coral-red shade.  The leaves have black ink splatters adding artistic detail. The background is clean white on a deep Adriatic blue A2 card base making the colors pop.

BLOG HOP!

Don’t forget, this is part of a blog hop, so there’s plenty more enchanting inspiration ahead! Be sure to follow along for more crafty adventures. ✂️✨

Giveaway:

Hero Arts will give away a $50 gift card, drawn from the comments left across the hop. Enter by Sunday, April 6 at 11:59pm PST, and the winner will be announced on the Hero Arts blog the following week. Leave a comment on all stops for more chances to win!


Hero Arts
Hero Arts Creative Team:
Mindy Eggen
Anna Mahtani
Seeka
Channin Pelletier
Rosie Lopez
Charlene Madrid
Michelle Short
Rachel Kleinman
Jeannie Lieu
Natasha Vacca
Jennifer Kotas
Natasha Polite
Karen Brown You Are Here!
Lisa Tilson
Michelle Lupton
Special Guests:
Nichol Spohr
Kelly Taylor

A Fairy-Tale Ending? Or Just the Beginning?

These cards brought to life the whimsy of a storybook forest and the bold beauty of botanical art, all with the magic of the Hero Arts April Release. Whether you love layered die cuts, ink blending, or just an excuse to play with paint, this kit delivers endless creative inspiration!

I’d love to hear your thoughts—which card is your favorite? Let’s chat in the comments!

cardmaking · papercrafting · Rainbow Colors

Hero Arts | Sparkle and Shine: Mastering Metallic Shimmer Sprays in Your Cardmaking

Metallic Shimmer Spray + stamping:  A trio of handmade cards in rainbow colors.

Hey there, crafty friends! Karen here and today, we’re diving into the magical world of metallic shimmer sprays and how you can incorporate them into your cardmaking and papercrafting projects. Whether you’re a seasoned crafter or just starting out, these shimmer sprays are sure to add a touch of fun and sparkle to your creations.

Today I am sharing several colorful cards. It was a play day for me as I experimented with ink sprays and a fresh new background stamp called Abstract Feather Bold Print.

Rainbow Color Shimmer Cards

Rainbow watercolor look handmade card created with metallic shimmer sprays + stamping.

My Process:

As I stated above, I wanted to try a softer watercolor look for my “Smile” card and in person, this card seems to have the most shimmer and shine. After trimming my card, I lightly ink blended the edges with Amethyst Core Ink and added my sentiment, which was die cut from Amethyst cardstock. I added Translucent Pink Enamel Dots for a little added interest.

Bold rainbow card created with Hero Arts metallic shimmer ink sprays.

Card #2 was made the same way as Card 1, except I did NOT brush water on my stamp before painting my stamp. You can really see how the amount of water used can change your project.

I finished my card with a Nautical sentiment die cut with the Smile Friend Stamp and Cut XL set plus a few Clear Hues Enamel Dots.

Minimalist Mixed Media Thank You Card

Minimalist mixed media card created with Hero Arts metallic shimmer spray, Hero Gold Paste and Hero Transfer rub-ons.

I wanted to play a bit more with my final card. I added some rub-ons from Collage Backgrounds Part 2 Hero Transfers set and then, with my Palette Knife, I added Gold Hero Paste in spots through the Leaves and Abstract Shapes Stencil. You can see a stencil process photo below. Remember to soak or wash your stencil and palette knife before the Hero Paste sets.

I stamped and die cut a sentiment from the I Appreciate You Stamp and Die Bundle set. Finally, I added a few black Neutrals Hero Hues Enamel Dots.

PRO TIP: Protect your work surface with a piece of deli paper when working with messy media. It makes for a quick and easy cleanup.

What are Metallic Shimmer Sprays?

Metallic shimmer sprays are versatile crafting tools that contain finely milled metallic pigments suspended in a liquid base. They come in a variety of metallic shades and below, you can see the six I used on my cards today. When sprayed or brushed onto paper, these shimmer sprays impart a beautiful shine and metallic sheen, adding depth and dimension to your projects.

Don’t you just love this shimmery rainbow of metallic sprays? I can’t decide which is my favorite!

Final Thoughts

Stamping with metallic shimmer sprays is a fun and easy way to elevate your cardmaking projects and add a touch of shine to your designs. Whether you’re crafting for a special occasion or just because, these metallic sprays are sure to make your creations shine bright. So, grab your stamps and start sparkling!

I hope you found this tutorial helpful and inspiring. Happy crafting!

cardmaking · Mixed Media · Stamping

Hero Arts | Man Card Monday | Ramen Birthday Card

Man Card Monday masculine birthday card for the Foodie

Ramen Card for the Foodie in Your Life

Masculine cards can be tricky, but when I saw Hero Arts Ramen Stamp and Die Bundle, I knew it would be the perfect set for my son-in-law’s birthday. He is a real foodie and I love the fun sentiment included!

How to Make an Ink Smoosh Background

I started by making my “Ink Smoosh” background. I dabbed Fawn, Papaya, Fog, Paradise and Pool Party inks in separate pools on my craft mat and spritzed with water. I then dipped a piece of watercolor paper in the puddle and let it dry. I did this four times.

Next, I stamped my images and then colored in with Artist Alcohol Markers. Die cutting was next. I also used my Rounded Rectangles Infinity dies to trim my background, mat and card base. The final step was to assemble my card.

Graphic Mixed Media birthday card for the masculine Foodie in your life.
Products Used:
cardmaking · papercrafting

Altenew July 2022 Summer Sunshine Collection Release Blog Hop + Giveaway ($300 in total prizes)

Altenew Summer Wishes Stamps, Dies and Stencils + Handmade Card

Hello friend! I am excited to show you some of Altenew’s new products in their wonderful July release. To kick off the release, Altenew is hosting a fun Blog Hop and we hope you will visit each stop.

Altenew’s Summer Wishes Stamps, Dies and Stencils

I’d like to start with the Summer Wishes Bundle which is oh, so fun! For my first card, I created a cozy little beach scene comprised of an adirondack chair, umbrella, radio and flip flops.

I started by ink blending my background with Altenew’s Large Blending Tool + Ocean Waves Crisp Dye Ink. Next, I stamped the elements with black pigment ink and let them dry. I colored the images with the coordinating stencil. I really like the effect of ink blending through stencils and it is so easy to do! To set the stage, I cut a frame using the Rounded Rectangles Die Set. I then die cut each element and assembled my card with foam tape.

Die Cut Beach Scene  Card with Adirondack Chair, Umbrella and Flip Flops
Beach Themed Card with Adirondack Chair and Umbrella

Products Used:

Altenew Summer Wishes Die Cut Sea Shells + Handmade Card.
Beach Themed Card with Die Cut Sea Shells

I made a companion card with the rest of the Summer Wishes shells. The background was again ink blended with Ocean Waves Dye Ink from the Cool Summer Nights Mini Ink Set.

Additional Products Used:

Clean and Simple Beach Themed Card.

Altenew Linear Life Tropical Garden

I love the modern look of these loose sketchy outline flower stamps and I know this set will become a favorite that I use over and over again. It is very versatile and would work great on clean and simple projects but I also plan to use it on some mixed media cards.

I started again by ink blending my background. I used the three lightest colors in Altenew’s Glacier Cave Mini Cube Set. I masked off a frame with washi tape and then started in the bottom right with Arctic and then moved darker toward the top left corner. I stamped the flowers and leaves with black pigment ink. Once the outlines were dry, I stamped the flower centers with Caribbean Sky Crisp Dye Ink. I die cut the blooms, assembled with foam tape and then added Glacier Caves Enamel Dots to finish the project.

Altenew Linear Life Tropical Garden Stamp and Dies + Handmade Card
Altenew Carribean Sky Crisp Dye Ink + Ink Blended Background

Altenew Mod Fruit Bowl Stamps and Dies

I LOVE citrus, so I couldn’t wait to get this set! I have three Meyer Lemon Trees that are like little babies to me and they were the inspiration for this project.

I wanted a bright happy card so I went with rainbow colors. I started by cutting cardstock into identically sized pieces so I could set up an assembly line for stamping the citrus elements. I stamped the segmented portion on the left side of my Misti and then I moved the panel to the right side and added the rind. With this assembly line, I had all the colors stamped very quickly. All I needed to do was wipe off the ink in between colors. My Mini Blossom Die Cutter made die-cutting a snap. I find it so handy to use on my desk for die cutting smaller elements. I attached the die-cuts (spaced 2″ apart) to a 6 1/4″ x 3 3/4″ panel and added my sentiment.

Altenew Mod Rainbow Fruit Bowl + Handmade Card
Rainbow Hued Handmade Citrus Card
Rainbow hand stamped  Citrus  Lemon, Lime, Orange Card

Free Gift

Get a FREE brand new Summer Sunshine  Mini Inspiration Guide with every order from 07/01/2022 through 07/03/2022. Shop HERE!

Get a FREE brand new Summer Sunshine  Stamp & Die Release Inspiration Guide Ebook  (worth $5.99) with every order of high-value Sweet Moments Bundles. Shop HERE! *Exclusions apply.

Get a FREE brand new Online Cardmaking Class with every order from the new Summer Sunshine  Stamp & Die Release Collection from 07/01/2022 through 07/07/2022. Shop HERE!

Giveaway Prizes

$300 in total prizes! To celebrate this release, Altenew is giving away a $50 gift certificate to 2 lucky winners and a $25 gift certificate to 8 winners! Please leave a comment on the Altenew Card Blog and/or each designer’s blog post on the blog hop list below by 07/17/2022 for a chance to win. 

Altenew will draw 10 random winners from the comments left on each stop of this blog hop and announce the winners on the Altenew Winners Page on 07/19/2022.

Blog Hop:

Altenew Blog

Jaycee Gaspar

Vicky Papaioannou

Erum Tasneem

Mindy Eggen

Jenny Colacicco

Caly Person

Nathalie DeSousa

LauraJane

Michelle Short

Bridget Casey

Terri Koszler

Karen Brown You Are Here!

Laurie Willison

Dana Joy

Virginia Lu

Tenia Nelson

Therese Calvird

Lilith Eeckels

Reiko Tsuchida ***Note: Due to strict regulations in Japan, you might not be able to leave a comment on her blog post.

Michelle Burnier

Agnieszka Małyszek

Angela Brennan

Emily Midgett

Linda Westfall

Maryam Perez

Laurie Patterson

Svitlana Shayevich

Annemarie Caister

Tania Ahmed

Penny Pynnonen

Adriana Arminio

Berina Rajakumar

I really enjoyed creating these cards. Thanks so much for stopping by!

Karen

Uncategorized

Altenew Mixed Media Madness Hop

3D Die Cutting + Acrylic on Mixed Media Paper

Hello!  The Altenew Educators have a fun Instagram Hop called Mixed Media Madness currently underway.  There are loads of prizes and lots of inspiring projects so I hope you can hop along with us. I drew my inspiration from my backyard.  The two mixed media backgrounds are my interpretation of the water in my swimming pool and the layered die-cuts are based on my potted coral Hibiscus.  I  handcrafted all the paper used to die-cut my flowers.  

Turquoise and Coral Gelli Prints.

I have been loving layering dies lately and wanted to get out an old favorite, Altenew\’s Hibiscus Garden as I think it is perfect going into summer.  I used this set as the focal point for both of my cards.  

I loosely mixed turquoise, white and pale yellow acrylic paint with a brayer for my background.  The leaves are cut from painted acrylic panels of moss, spring green and pale yellow.  The Hibiscus are cut from three panels:  orange, orange + white and a panel of white with a hint of orange.  The sentiment is from Altenew\’s Birthday Greetings stamp set.

Altenew Mixed Media Card.

The background for my second card is similar but there was leftover blue on my gel plate.  I also added an additional layer of gold using my favorite Narrow Brick Stencil . This stencil just came out this spring, but it is already my most used stencil!  I love the subtle texture and dimension it adds.  I then die cut the panel using  Altenew\’s Rounded Rectangles die.  I added craft foam to the back of the panel and adhered the flower with foam tape.

Thanks for stopping by!

Karen


cardmaking · papercrafting

Altenew 8”x11” Majestic Bouquet Stamp Set Release Blog Hop + Giveaway ($200 in Total Prizes)

Hello friends!  Today we’re celebrating Altenew’s Majestic Bouquet Layering Stamp release and I have three cards to share.  This is a beautiful layering stamp set with 41 stamps (all made in the USA!) and lots of gorgeous detail.

If you arrived from Terri Koszler lovely blog, you’re right on track and you made it to the final post. If you want to start from the beginning, please visit the Altenew Card Blog. Be sure to scroll to the bottom for details about the hop and give away.    

I love the vibrant blues in my first card!  I used the darkest three colors in the  Glacier Caves Mini Ink Cubes set and ink blended the accent panel with the darkest two colors.  All of my sentiments are from  the Birthday Greeting Stamp Set and the enamel dots are   Glacier Caves Enamel Dots, which coordinate beautifully with the ink cubes.  I kept this card simple because I wanted to empasize the bold colors and lovely floral stamp.

Altenew Glacier Caves Mini Ink Cubes + Enamel Dots

For the pink card, I combined the Majestic Bouquet Layering Stamp  with the beautiful Majestic Blooms 3D Embossing Folder.  I chose three pinks (Blush, Cotton Candy and Coral Berry) from Altenew’s 48 Crisp Die Ink Collection for my stamping and then used Coral Berry to ink blend the circle background.  I think this is such a lovely feminine card.

Altenew Pink Die Inks:  Blush, Cotton Candy and Coral Berry

For my final card, I used the three lightest colors in the Seashore Mini Ink Cube Set.  I then die cut my panel using the largest die from the  Rounded Rectangles Set. The background panel was ink blended with Lagoon ink.  To add a bit more texture, I used the Modern Squares 3D Embossing Folder  for my background panel.

Altenew Seashore Mini Ink Cube Set

Are You Ready For Some Prizes?

$200 in total prizes! To celebrate this release, Altenew is giving away a $50 gift certificate to 2 lucky winners and a $20 gift certificate to 5 winners! Please leave a comment on the Altenew Card Blog and/or each designer’s blog post on the blog hop list below by 5/16/2021 for a chance to win. Altenew will draw 7 random winners from the comments left on each stop of this blog hop and announce the winners on the Altenew Winners Page on 5/19/2021

Join Us As We Hop!

Altenew Card Blog
Jaycee Gaspar
LauraJane
Erum Tasneem
Michelle Short
Tenia Nelson
Jenny Colacicco
Norine Borys
Anna Mahtani
Agnieszka Małyszek
Victoria Calvin
Linda Westfall
Emily Midgett
Sandhya Iyer
Laurie Willison
Preeti Chandran
Seeka
Mindy Eggen
Verity Biddlecombe
Carol Hintermeier
Erin Thompson
Helen Kalb
Joylita Dsouza
Keren Baker
Teresa Litchfield
Bridget Casey
Kelly Griglione
Nandini Karmarkar
Terri Koszler
Karen Brown      Yay, made it to the end!


I am honored that you stopped by my blog…thank you!  If you have another moment, I would love to hear which card you like best.

Karen