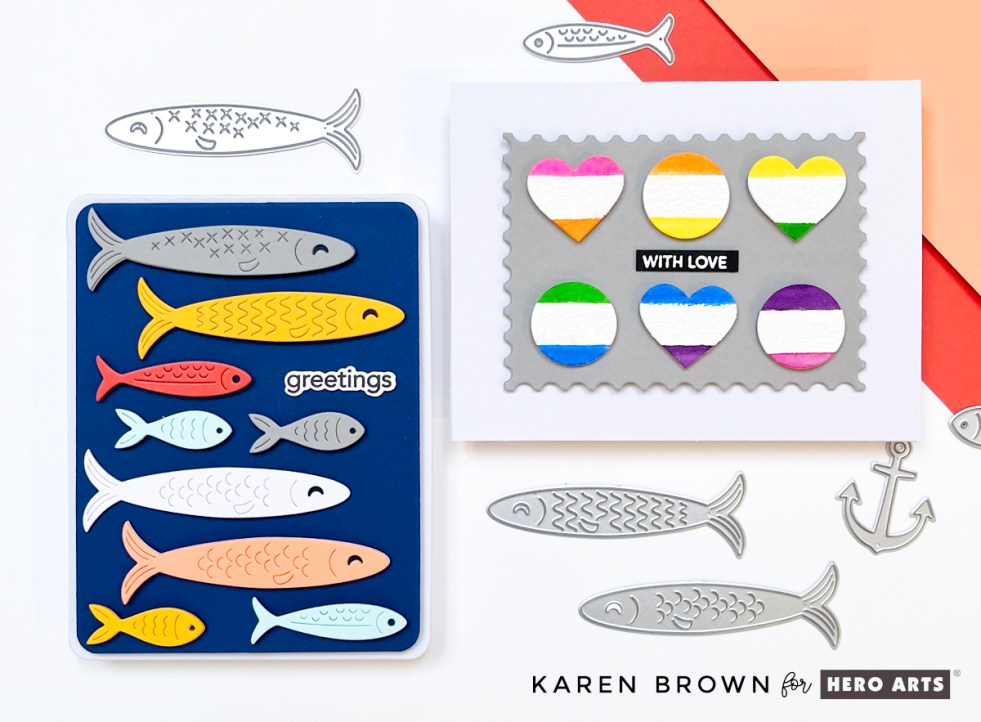
cardmaking · Die cutting · papercrafting

Waffle Flowers | Flourish Panel Cover Die 2 Ways

Waffle Flower Crafts Flourish Panel Die:  Cards Two Ways

Rainbow colors in cardmaking are always a good idea! I recently received a new cover die from Waffle Flower Crafts called Flourish Panel and it is a real beauty! I couldn’t decide whether to have the rainbow panel on the top layer or below the lattice so I opted to do it both ways. I still can’t choose which way I like it better. What do you think…..I’d love to hear your thoughts in the comments.

How To Add Dimension on Die-Cut Cards

Waffle Flower Flourish Panel + Using inexpensive Crayola Watercolors in Cardmaking

I have step-by-step directions (with process photos) below. On one card I die-cut the watercolor panel and on the second card I used the rainbow colors as a background.

Waffle Flower Crafts Flourish Panel Die + Print and Script Happy Birthday Sentiment dies.

Cardmaking Tutorial: How I Made These Two Die Cut Cards

Step 1: Make Your Rainbow Watercolor Panel. Today, I used watercolors for my colorful focal point. On the panel with the rainbow on the top layer, I used Kuretake Watercolors to blend a rainbow. I went over the watercolor panel twice to get an intense color. On the second, panel, I used inexpensive Crayola Watercolors and it worked beautifully! You could also ink blend your background.

Step 2: Die-cut your top layer with Waffle Flowers Flourish Panel Die. I have an electric Gemini Junior die-cutting machine that I used.

Step 3: You could stop die-cutting here, but I wanted a lot of dimension, so I die cut two additional panels so I could stack my layers.

Step 4: Glue Your Layers Together. Using Bearly Glue, I glued three lattice layers together for a substantial top panel. Be sure to weight them down after gluing so they stay nice and flat. I have a large acrylic block that I use. I also adhered the layers to an A2 Top-folding card.

Step 5: Add A Sentiment. I always need Birthday Cards so I used Waffle Flowers new Print and Script Birthday Sentiment Dies. I love that they come with both a cursive and block font with coordinating shadow dies. I cut the sentiments from white cardstock and the shadows from Navy.

Now I have two bright cheerful birthday cards to share.

Products Used:

cardmaking · Hot Foiling

Spellbinders | Glimmer Cardfront Birthday Sentiments 6 Ways

Spellbinders Glimmer Cardfront Birthday Sentiment handmade card in Rainbow Hot Foil

Making Your Own Backgrounds with Rainbow Strips of Cardstock

Big bold sentiments can really add a lot of impact to your cards, so I was so excited to see Spellbinders new Glimmer Cardfront Sentiment Collection. Today, I am sharing 6 different glimmer hot foil birthday cards featuring the Best Wishes on Your Birthday Foil Plate.

I love bright colored cards so I started with Rainbow Hot Foil and then created coordinating backgrounds made of colorful strips of cardstock. The sentiment panel was die cut using Stylish Oval Nesting Dies. For card #1, I used a paper trimmer to cut fifteen 1/4″ strips of cardstock. Next, I applied a tape runner over a cardstock panel and then adhered the cardstock strips in rainbow order. Surprisingly, this is actually fast and easy to do.

PRO TIP: To assemble my card, I used craft foam and liquid glue to add a layer of dimension under both the background and sentiment panel. On many projects I prefer craft foam to foam tape. With craft foam and glue, I can slide my element and make micro-adjustments for perfect placement.

Don’t you just love the shine and shimmer?

How to make your own Make Your Own Backgrounds with Rainbow Strips of Cardstock

For card #2, I used my paper trimmer to cut six 1/2″ strips of colored cardstock and then I cut five 1/8″ strips of white cardstock. I think the white dividers really brighten up the look! I again used a tape runner to adhere the white and colored strips to the background. For the second card, I used gold foil and and then matted the sentiment with brushed gold cardstock.

Spellbinders Glimmer Cardfront Birthday Sentiments 6 Ways

Using Printed Designer Paper for Quick and Easy Cards

These fun foiled sentiments do all the heavy lifting so it is easy to quickly make cards using printed designer paper for the background. Spellbinders Cheerful Occasions pad has such fun designs and I used the papers on the backgrounds of cards #3, #5 and #6.

Using Printed Designer Paper for Quick and Easy Cards + Spellbinders Glimmer Cardfront Sentiments hot foiling

Reverse Foiling | Using the Glimmer Hot Foil Negative Space for 2 For 1 Cards

I hated to throw away the foil after I created the cards above, so I created 2nd bonus cards with the leftover foil. The result is so bright and eyecatching! Card #3 uses the negative from the Rainbow Foil.

I cranked up the heat and time and ran the “foil negative” through a second time using a solid foil plate. I used the highest heat setting for 1 minute and got a beautiful result.

PRO TIP: There is a thin protective layer on top of the foil that I peeled off after my card was finished. I kept the foil covered (with the clear protective layer) during assembly to prevent scratches on the foil.

Using the Glimmer Hot Foil Negative Space for 2 For 1 Cards + Spellbinders Glimmer Cardfront Sentiments

Card #5 uses designer paper paired with the negative from the gold foil.

Quick and Easy DIY glimmer hot foil cards.

My final card pairs designer paper, black foil plus I added a second mat die cut from velum. The velum mat is subtle but very pretty.

Spellbinders Glimmer Hot Foil Cardfront Sentiments Birthday Card

Products Used:

Do you have a favorite? I’d love for you to tell me in the comments.

Karen

cardmaking · Die cutting · papercrafting

Spellbinders | Stylish Ovals Collection 4 Ways

Spellbinders Stylish Oval Hello You Floral Dies (S5-565) + Oval Nesting Dies (S5-562) on a handmade card.

Oval Shaped Cards

Shaped dies can really change the look of your cards and projects so I was excited to see Spellbinders new Stylish Ovals Collection. I created the first card for my mom’s upcoming birthday. Red is her signature color so I paired corally reds with aquas and greys for a very eye-catching color palette.

To make my oval cardbase, I used the largest oval die for the base. I took a white A2 top folding card base and put the top edge of the die just above the fold so that the die would cut around the top. I die cut the stem twice and glued together for added heft and stability.

Supplies Used:

Shaped Oval Card with Spellbinders Stylish Ovals Collection

Spellbinders Floral Die Cut Cards

Spellbinders Stylish Oval Hello You Floral Dies (S5-565) + Oval Infinity Punch and Pierce Plate Cover Die handmade card.

I needed a card for a bridal shower so I made a second oval shaped card with die cut flowers. This one is smaller than card 1, it is 5″ x 3 3/4″. I think it makes for a sweet gift encloser.

I used the same products as card one but added a pretty little oval frame from the Infinity Punch and Pierce Plate Cover Die. This die is so beautiful and a has an incredible amount of detail, but it cuts beautifully. I used just the middle section on this card and I used the other 2 sections on card #4 below.

Products Used:

White oval shaped card with die cut red flowers.

Die Cut Rainbow Arch Birthday Card

Colorful Rainbow Arch card with Spellbinders Stylish Oval Nesting Dies (S5-562) handmade card.

In case you haven’t noticed, I LOVE these oval nesting dies. Just for fun, I wanted to make a bright cheerful rainbow card so I selected 8 bright shades of cardstock and then die cut my rainbow elements.

This type of birthday card is so versatile that I love to keep them on hand. I could send this to anyone…man, woman or child.

Products Used:

Festive Rainbow Colored Die Cut Birthday card.

Spellbinders Infinity Punch and Pierce Plate Cover Die

Spellbinders Stylish Oval Infinity Punch and Pierce Plate Cover Die (S5-566) handmade card.

This cover die is gorgeous in person! I started by making a rainbow gradient background with inks and blending brushes. I then placed the center and exterior components of the cover die over the top and added two floral embellishments that echo the spring colors.

Supplies Used:

Oval pierced cover die with spring ink blending on a handmade card.

I hope I offered some inspiration for your crafting.

Karen

cardmaking · papercrafting

Tips for Making Vibrant Colorful Cards

Tips for Making Vibrant Colorful Cards

Today I wanted to share some Tips and Tricks for making bold, vibrant colorful cards. The Featured Stamps are from Altenew’s March 2023 Mini Stamp Collection.

TIP #1: Use Watercolor Markers which have tons of pigment.

Below, you can see the watercolor panel that I used for my die cut word sentiments. I added Rubelite and Autumn Blaze from Altenew’s Spring Garden Brush Markers and then used a #18 brush and water to blend the colors. I did not increase the saturation on this card, the color on the screen is the true color in person. So bright and happy!

Making backgrounds with Watercolor Markers.

Products Used:

Altenew's Mini Coneflower Stamp and Die + Altenew's Spring Garden Brush Markers

TIP #2: Use Strips of Cardstock in Rainbow Colors

I like to keep strips of colorful cardstock on hand for quick cards. The strips on this card are each 1/4″ wide and they are a snap to make with your paper trimmer.

Using strips of colored cardstock to make colorful rainbow backgrounds.

Products Used on This Card:

Altenew's Mini Dogwood Stamp and Die on a handmade card.

TIP #3: Create a Rainbow Gradient Accent Strip

On Bristol Cardstock, I blended watercolors from Altenew’s Spring Garden Brush Marker Set in Rainbow Order. I used water and a #18 Brush to blend the colors. I created a 5.5″ x 4.25 inch panel and trimmed off a 1.75″ strip for this card, reserving the remaining panel for a future project.

Altenew's Spring Garden Brush Marker Set + handmade card

Products Used:

Altenew's Mini Dahlia Stamp and Die Set + handmade card

Thanks for stopping by! What do you think…..do you have a favorite?

Karen

cardmaking · papercrafting

Altenew March 2023 Stamp/Die/Stencil & More Release Blog Hop #2 + Giveaway ($300 in Total Prizes!)

Welcome to Altenew’s March Release and Blog Hop! I have SEVEN cards to share with you today. I was so excited and inspired by the Japandi Release….I had SO many ideas! I decided to do a “Rainbow” themed post and I am so pleased you stopped by. You can see Altenew’s entire release HERE.

Rainbow Gradient cards with Altenew Zero Waste Leaf Pattern Cover Die Kit.

Rainbow Gradient Handcrafted Cards

I started by watercoloring a bunch of panels for my cards, which I find this fun and therapeutic. On watercolor paper, using water and one of Altenew’s #18 brushes, I watercolored bands of color from Altenew’s Spring Garden Brush Marker set. I love how bright and vibrant the colors are with these markers! You can see two of my finished panels below.

Negative 2-For-1 card with Altenew's Zero Waste Leaf Pattern Cover Die.

2-For-1 Cards

Once my panels were dry, I started die cutting. My first two projects are 2-For-1 Cards using the beautiful new Zero-Waste Leaf Pattern Cover Die. When you are done, you have the pieces for a “Positive” Card and a “Negative” Card, and I love them both!

The Zero-Waste Leaf Pattern Cover Die and Archway Die Set (below) are part of the Zen Garden Ensemble from Altenew.

How To Make Rainbow Gradient Die Cut Cards:

  • On Watercolor Paper, paint rainbow bands of color with Spring Garden Watercolor Brush Markers and then blend with water and a #18 Paintbrush. I taped my panel to a hardboard with blue painters tape prior to painting. Dry.
  • I used the “Press and Seal” Method. After I die cut my Zero Waste panel, I smoothed Glad Press and Seal Multipurpose Sealing Wrap over the top of the die cut panel. I then flipped it over and using tweezers added cut Instant Dimension Foam Tape to the back of each positive die cut. Next, I carefully flipped the panel over and adhered onto an A2 card base. Then I removed the Press and Seal.
  • I die cut my Simply Hello sentiment twice from black cardstock, glued the pieces together and added to the bottom right of my card.
  • For my Negative Card, I added liquid glue to the back of the panel and then adhered directly to an A2 card base. I added my Sweet Sentiments Celebrate die cut and shadow to the center of my card and voila, two bright and happy cards!
2-For-1 Cards with Altenew's Zero Waste Leaf Pattern Cover Die.

This Sweet Blossoms Layering Die Set is a real beauty and is definitely a new favorite!

Altenew's Sweet Blossoms Layering Die Kit + Rainbow Gradient Card.

You can see two of my watercolor panels just prior to die-cutting. I again used my Spring Garden Watercolor Markers and I really love the rainbow gradient across the blooms. For my sentiment, I die cut “For You” from the new Vertical Greetings Die Set and then backed with a scrap from the rainbow panel shown below.

Rainbow Gradient Card panels using Altenew's Spring Garden Watercolor Brush Markers.

Inlay Rainbow Die Cutting

Altenew's Archway Die Set + Rainbow Inlay Card.

Altenew’s new Archway Die Set is so fun and is perfect for mass producing cards. Cut the rainbow from 7 or more colors of cardstock, change the order and you can make a bunch of cards quickly. The included tree die adds a lot of interest. I added a coordinating sentiment and shadow from Altenew’s Sweet Sentiments Die Set.

Masculine Rainbow Card + Altenew's Archway Cover Die.

On card 2, I changed up the color order. I think these would be perfect for Get Well, Birthday, Graduation…

Rainbow Inlay Die Cut with Altenew's Archways Die Kit.

Quick and Easy Die Cut Cards

I thought the tree from the Archway Die Set was so pretty that I made a third quick and easy card. I die cut the tree from white cardstock and used the negative panel, placed Instant Dimension Foam Tape on the back and then adhered to my rainbow panel (watercolored with Spring Garden Brush Markers). I added a few of the white interior pieces and popped it on a fog A2 card base and added another die cut sentiment from Altenew’s Sweet Sentiments. Be sure to save the positive diecut for a future 2-For-1 card.

The Archways Die Set also comes with a third “Wave” die that I know you will also love!

Quick and Easy Rainbow Gradient Card with tree from Altenew's Archways Die Kit.

I used Altenew’s Leaf Essential Die Set for my 7th card and this card came together VERY quickly! On this card I used colored cardstock in bright vibrant hues. I added a few Enamel Dots and another Sweet Sentiments die and shadow.

Colorful Leaf Essential Die Cut Card + Altenew.

Giveaway Prizes:

$300 in total prizes! To celebrate this release, Altenew is giving away a *$100 gift certificate to 1 lucky winner and a $20 gift certificate to 10 winners! Please leave a comment on the Altenew Card Blog and/or each designer’s blog post on the blog hop list below by 03/12/2023 for a chance to win. Altenew will draw 11 random winners from the comments left on each stop of this blog hop and announce the winners on the Altenew Winners Page on 03/13/2023.

You probably came from April’s Blog and the next stop is talented Tenia! You can see the all the hop stops by clicking the button below:

You are invited to the Inlinkz link party!

Click here to enter
https://fresh.inlinkz.com/js/widget/load.js?id=c0efdbe6b4add43dd7ef

*The winner of the $100 gift certificate will be chosen from comments left on the Altenew blog. 

I am so pleased you stopped by and would love to hear which card was your favorite!

Karen

cardmaking · Video

How to Create Easy Rainbow Die Cut Cards + Video

Easy Rainbow Watercolor Sentiment Cards

Today, I am sharing how to make easy rainbow die cut cards. And, I’ve got something new….a video! Yes, I created my first video and I’d love for you to watch it.

How To Make Rainbow Sentiment Cards

These cards are are quick to make and very eye-catching. I love bright happy colors and with watercolor brush markers you can make a high impact card in a short amount of time.

Continue reading “How to Create Easy Rainbow Die Cut Cards + Video”
cardmaking · Mixed Media · papercrafting

Altenew: A Year In Review: Crafters’ Edition Blog Hop + Giveaway 

Hello friends! I am so excited to be participating again in Altenew’s A Year In Review! I really enjoyed looking back through my projects and selecting some favorite creations.

Rainbow paper weaving with Altenew's Garden Trellis Cover Die.

This first card was my most popular Altenew card on Instagram and I detailed how I created my rainbow paper weaving. You can see my original post HERE. I used Altenew’s Garden Trellis Cover Die as the base for my weaving.

Layered Stamping on a cute little bird:  Bird of the Woods by Altenew.

This year, I was a bit obssessed with the Bird of the Woods Layering Stamp set and coordinating dies and I made a bunch of cards using this bundle! This POST was by far my most popular blog post of 2022.

Altenew's Precious Doodles Layered Stamping Floral Dies

I fell in love with the Precious Doodles Bundle…when “doodles” is in the title, I know it is going to be a favorite of mine! This is a darling stamp layering set and you can find my original post HERE.

Altenew Coloring Book watercolor page framed artwork.

I received so much positive feedback on this watercolor piece! I LOVE Altenew’s watercolor products and I used them on my framed project. I started with the Poppy from Altenew’s Coloring Book and I painted it with the 36 Pan Set and Artists Brushes. You can see my original post HERE.

Messy masculine mixed media card

I love mixed media, and this card was my 2nd most popular post on Instagram. You can see my original post HERE. I got really messy and used tons of fun products to create this masculine birthday card.

Clean and Simple + Gel Press Printing Rainbow Grid Card

If there is such a thing as CAS Mixed Media, then this is it. I love the clean white contrast with the rainbow colored gel press die cut squares and the giant black Altenew Mega Hello sentiment. You can see my original post HERE.

Altenew Craft Your Life Always Sunshine Kit card

I love all of the Craft Your Life releases but this Always Sunshine Kit was especially popular with my blog readers. You can read my original post HERE: I love coloring with stencils and that is the technique I used on this card.

Altenew Craft A Flower Open Peony

I always love Altenew’s Craft-A-Flower kits and this Open Peony was my favorite Craft-A-Flower in 2022. You can read my original blog post HERE.

Altenew Timeless Tulips with coordinating ink blend background.

Who doessn’t love a floral bouquet? Altenew’s Timeless Tulips premiered in August and I think it is a gorgeous set with two big beautiful floral stamps. You can read my original post HERE.

Altenew Summer Wishes stamp, die and coloring stencil card.

I will finish with Altenew’s Summer Wishes Bundle which is oh, so fun! I created a cozy little beach scene comprised of an adirondack chair, umbrella, radio and flip flops. This is such a happy card and I know I will pull out this bundle year after year. You can find my original post HERE.

Prizes:

Over $500 in total prizes! Altenew is giving away a $100 gift card to 1 lucky winner, 3 $50 gift cards, and 27 $10 gift cards. Winners will be chosen from both blog hop #1 and blog hop #2. Please leave a comment on the Altenew Card Blog HERE by 12/27/2022 for a chance to win. 

Wait, there’s MORE!

We would also LOVE to see YOUR favorite handmade cards, layouts, home decor, etc. featuring Altenew products! Feel free to share them on social media or on your blog using the hashtag #AltenewBest2022. You may also add a link by clicking the blue button below.

FOUR lucky crafters will each win a $15 gift certificate to our store! Winners will be announced on the Altenew Winners Page on 12/29/2022. We are looking forward to seeing your beautiful creations!

Blog Hop Order:

Altenew Card Blog

Erin Thompson

Annemarie Caister

Seeka

Karen Brown You Are Here!

Claire Apostoloff Claire is Next!

Mindy Eggen

Fiona Duff

Karen Reátegui

Carol Hintermeier

Bobby Hagen

Michelle Short

Lorena Brougher

Michelle Burnier

I am so pleased that you took a moment to stop by! If you have time, I’d love to hear which project you liked best.

Wishing all my crafty friends a healthy and happy 2023!

Karen

cardmaking · Mixed Media · papercrafting

Using Colorful Paper Scraps on Handmade Cards

Using Colorful Scraps on DIY Rainbow Hued Grid Cards.

Rainbow Colored Grid Card

Hello and thanks for stopping by! I was in a mood to use my paper scraps again. My old square paper punch was out of whack so I purchased a new one and put it to use cutting squares from leftover colorful gel press scraps. I LOVE this bold rainbow hued look! I die cut an extra large sentiment: Altenew’s Mega Hello to finish the card.

Using Leftover Gel Press Scraps on handmade cards.

Thanks for popping by!

Karen

cardmaking · papercrafting

Altenew July 2022 Summer Sunshine Collection Release Blog Hop + Giveaway ($300 in total prizes)

Altenew Summer Wishes Stamps, Dies and Stencils + Handmade Card

Hello friend! I am excited to show you some of Altenew’s new products in their wonderful July release. To kick off the release, Altenew is hosting a fun Blog Hop and we hope you will visit each stop.

Altenew’s Summer Wishes Stamps, Dies and Stencils

I’d like to start with the Summer Wishes Bundle which is oh, so fun! For my first card, I created a cozy little beach scene comprised of an adirondack chair, umbrella, radio and flip flops.

I started by ink blending my background with Altenew’s Large Blending Tool + Ocean Waves Crisp Dye Ink. Next, I stamped the elements with black pigment ink and let them dry. I colored the images with the coordinating stencil. I really like the effect of ink blending through stencils and it is so easy to do! To set the stage, I cut a frame using the Rounded Rectangles Die Set. I then die cut each element and assembled my card with foam tape.

Die Cut Beach Scene  Card with Adirondack Chair, Umbrella and Flip Flops
Beach Themed Card with Adirondack Chair and Umbrella

Products Used:

Altenew Summer Wishes Die Cut Sea Shells + Handmade Card.
Beach Themed Card with Die Cut Sea Shells

I made a companion card with the rest of the Summer Wishes shells. The background was again ink blended with Ocean Waves Dye Ink from the Cool Summer Nights Mini Ink Set.

Additional Products Used:

Clean and Simple Beach Themed Card.

Altenew Linear Life Tropical Garden

I love the modern look of these loose sketchy outline flower stamps and I know this set will become a favorite that I use over and over again. It is very versatile and would work great on clean and simple projects but I also plan to use it on some mixed media cards.

I started again by ink blending my background. I used the three lightest colors in Altenew’s Glacier Cave Mini Cube Set. I masked off a frame with washi tape and then started in the bottom right with Arctic and then moved darker toward the top left corner. I stamped the flowers and leaves with black pigment ink. Once the outlines were dry, I stamped the flower centers with Caribbean Sky Crisp Dye Ink. I die cut the blooms, assembled with foam tape and then added Glacier Caves Enamel Dots to finish the project.

Altenew Linear Life Tropical Garden Stamp and Dies + Handmade Card
Altenew Carribean Sky Crisp Dye Ink + Ink Blended Background

Altenew Mod Fruit Bowl Stamps and Dies

I LOVE citrus, so I couldn’t wait to get this set! I have three Meyer Lemon Trees that are like little babies to me and they were the inspiration for this project.

I wanted a bright happy card so I went with rainbow colors. I started by cutting cardstock into identically sized pieces so I could set up an assembly line for stamping the citrus elements. I stamped the segmented portion on the left side of my Misti and then I moved the panel to the right side and added the rind. With this assembly line, I had all the colors stamped very quickly. All I needed to do was wipe off the ink in between colors. My Mini Blossom Die Cutter made die-cutting a snap. I find it so handy to use on my desk for die cutting smaller elements. I attached the die-cuts (spaced 2″ apart) to a 6 1/4″ x 3 3/4″ panel and added my sentiment.

Altenew Mod Rainbow Fruit Bowl + Handmade Card
Rainbow Hued Handmade Citrus Card
Rainbow hand stamped  Citrus  Lemon, Lime, Orange Card

Free Gift

Get a FREE brand new Summer Sunshine  Mini Inspiration Guide with every order from 07/01/2022 through 07/03/2022. Shop HERE!

Get a FREE brand new Summer Sunshine  Stamp & Die Release Inspiration Guide Ebook  (worth $5.99) with every order of high-value Sweet Moments Bundles. Shop HERE! *Exclusions apply.

Get a FREE brand new Online Cardmaking Class with every order from the new Summer Sunshine  Stamp & Die Release Collection from 07/01/2022 through 07/07/2022. Shop HERE!

Giveaway Prizes

$300 in total prizes! To celebrate this release, Altenew is giving away a $50 gift certificate to 2 lucky winners and a $25 gift certificate to 8 winners! Please leave a comment on the Altenew Card Blog and/or each designer’s blog post on the blog hop list below by 07/17/2022 for a chance to win. 

Altenew will draw 10 random winners from the comments left on each stop of this blog hop and announce the winners on the Altenew Winners Page on 07/19/2022.

Blog Hop:

Altenew Blog

Jaycee Gaspar

Vicky Papaioannou

Erum Tasneem

Mindy Eggen

Jenny Colacicco

Caly Person

Nathalie DeSousa

LauraJane

Michelle Short

Bridget Casey

Terri Koszler

Karen Brown You Are Here!

Laurie Willison

Dana Joy

Virginia Lu

Tenia Nelson

Therese Calvird

Lilith Eeckels

Reiko Tsuchida ***Note: Due to strict regulations in Japan, you might not be able to leave a comment on her blog post.

Michelle Burnier

Agnieszka Małyszek

Angela Brennan

Emily Midgett

Linda Westfall

Maryam Perez

Laurie Patterson

Svitlana Shayevich

Annemarie Caister

Tania Ahmed

Penny Pynnonen

Adriana Arminio

Berina Rajakumar

I really enjoyed creating these cards. Thanks so much for stopping by!

Karen