cardmaking · papercrafting

Spellbinders Adoring Fleurette Card Builder Dies

Mixed media card using Spellbinders Adoring Fleurette Card Builder dies from the Classically Becca Collection.

Hello! I have a mixed media card I created using Spellbinders Adoring Fleurette Card Builder dies from the Classically Becca Collection.

I started by sorting through my gel press prints. I really liked the blue print for my background and thought pink and green would look great as accent colors. The lattice die is so beautiful and I wanted to show it off so I went for a high contrast look. I like that the lattice die is the focal point of the card.

My Process:

  • The lattice die is both intricate and delicate, so I ran it through my die-cutting machine three times to ensure a crisp clean cut.
  • I die cut flowers and leaves. The tulips are from the this kit and I added flowers and greenery from Spellbinders Petite Floral Potpourri, which is a favorite of mine.
  • I also die cut (2X) the Adoring You sentiment included in this kit.
  • I wanted an A2 card so I cut my background down to 4 x 5 1/4″. I added a layer of craft foam to my card base and then attached my background.
  • Next I layered the elements of my card using the fine tip of Bearly Glue.
  • To finish the card I added enamel dots to the flower centers. I used the lightest color from Shades of Purple. I think enamel dots really help finish a project and they are probably my most used embellishment.
Spellbinders Adoring Fleurette Card Builder kit.

Thanks so much for visiting!

Karen

cardmaking · papercrafting

Mixed Media Collage Style Valentine Cards Made With Gel Press Prints

Mixed Media Gel Press Collage Valentine with die cut hearts

Valentine’s Day is coming up so I thought it was time to get busy and start creating. I love making gel press prints and thought this year it would be fun to make a batch of collage style valentines. Each one is embellished with die cut hearts.

Valentine made with Gel Press Prints + Die Cut Hearts

My process was the same for each card:

  • I flipped through my gel press prints and pulled out some fun, busy, messy designs.
  • I added paint splatters and stamping to some of the gel prints.
  • I also used some book pages and added stamping and ink blending with stencils.
  • I tore pieces off the prints and played around with layouts. For each, I left the top left corner for my sentiment.
  • I used UHU glue stics to adhere the torn pieces to cardstock. This glue works great! It dries quickly and fully adheres so there was no need for liquid glue.
  • Using my silicone shaper brush, I applied a thin layer of gesso to the top left corner of the card and along the seams of the torn prints. I also added a watercolor wash to these areas.
  • I die cut hearts in a variety of sizes from brightly colored gel prints and then distressed the edges with Frayed Burlap Distress Ink and a finger dauber. I glued these down to my panel.
  • I added +s, dashes and doodles with Inktense pencils, Gel Pens, Posca Acrylic Pens and distressed the edge of the card panel with Frayed Burlap Distress Ink and a finger dauber.
  • I added a quick stamped sentiment, framed with black cardstock and added to an A2 card base.

Masculine Valentine made with gel press prints and die cut hearts.

The card above has more neutrals which I thought would be perfect for my husband.

Mixed Media Valentine with die cut hearts

I like the two stencils I used on the gel press prints for the card above.

DIY Mixed Media Valentine card ideas
My Valentine Quartet

These collage style valentines were SO fun to make! And, since they have a messy casual look, mistakes actually add to the appeal.

I’ve linked to some of the products I used below:

Uni Posca PC-5M White Colour Paint Marker Pens 2.5mm Medium Bullet Tip Nib Writes On Any Surface Metal Wood Plastic Fabric Glass Stone (Pack of 1)

Gel Press Gel Printing Plate 5″x7″ 10810

UHU Stic – 0.29 oz / 8.2g Clear Glue Stick – Pack of 3

Derwent Inktense Pencils 24/Pkg, Colors may vary

Liquitex 104004 BASICS Gesso Surface Prep Medium Tube, 8.45-oz

Sakura 38369 10-Piece Blister Card Glaze 3-Dimensional Glossy Ink Pen Set, Assorted Color

Ranger Tim Holtz Distress Ink Pad, Frayed Burlap

Barvotti Silicone Color Shaper Brush (Mottler) – a Flat Sharp-Edged Flexible Tool to Apply, Move and Remove Acrylic Paints and Water Based Medium with Precision – A Studio Essential 1 Inch Wide

Bachmore Drawing Pad 9X12”(98lb/160g) 100 Sheets Mixed Media, Watercolor, Acrylic Art Pad for Sketching, Ink Sketchbook, Coloring in Multi-Media Top Spiral Notebook, Micro-Perforated, Heavy Weighted

Acrylic Paint Set, Caliart 52 Vivid Colors (22 ml/0.74 oz) Craft Paints Supplies for Artists Kids Students Beginners, Canvas Ceramic Wood Fabric Rock Painting Supplies, Rich Pigments Non Toxic Paints

Tombow 62191 MONO Multi Liquid Glue, 0.88 Ounce, 1-Pack. Multi-Purpose Glue with Dual Tip Dispenser for Precise to Full Coverage Application

Thanks so much for stopping by!

Karen

cardmaking · papercrafting

Paper Artsy Mixed Media Cards

Paper Artsy Whimsical Tree Mixed Media cards.

Happy New Year! I recently received a lovely package from Paper Artsy and had a fun day in my studio. I created two cards with slightly different takes. Both cards have gel press print backgrounds made with Paper Artsy’s Fresco Finish Chalk Acrylic paint. This was my first time using Chalk Acrylics and I think the end result is beautiful. I used Hey Pesto green, Butternut orange and white for both backgrounds.

For the cards, I stamped and heat embossed the Paper Artsy tree on watercolor paper and colored them with watercolor markers. I then fussy cut the images. The sentiment is Ranger Letter It: Greetings.

Paper Artsy Whimsical Tree with Fresco Finish Chalk Acrylic Background

For this first card, I also stamped the tree with a script background stamp to enhance the whimsical feel. The card background was stamped with the tree and then my fussy cut panel was added with foam squares for a nice dimensional feel.

Paper Artsy Fresco Finish Gel Print background in Hey Pesto green and Butternut Orange.

For this second card I went for layers. I stamped the tree directly onto the gel print, then added the fussy cut tree on top using foam squares. I also stamped and watercolored a third panel and then fussy cut four aqua segments. These four pieces were adhered on top, so that in some places, the tree has three layers of dimension. I hope you can see that from the photo above.

Paper Artsy Whimsical Tree with Gel Press Print background

Multi-Media Collage Companion Card

Multimedia Gel Press Collage Card with Paper Artsy Chalk Acrylic  and stamps.

I had some gel press prints leftover and decided to make a quick collage card. I tore off three pieces of paper (you can see the same green top right and orange bottom edge) and glued it to my panel (3.5″ x 4.75″) with UHU Gel glue stick. This glue stick works amazingly well, I didn’t need to use any liquid medium. I added some gesso, lots of stamping, paint splatters, dots-dashes-coloring (with Inktense pencils). On the top left corner I applied gesso, then did a bit of loose messy watercoloring plus the sentiment.

Paper Artsy Chalk Acrylic Paint and stamps on a multi-media gel press collage card.

Thanks for stopping by!

Karen

papercrafting

Spellbinders Vintage Cash Register

Amazing Paper Grace 2021 September Die of the Month Kit

Hello and welcome! I just returned from a wonderful road trip to The Pacific Northwest. My husband and I had a great time but we are back home and I was excited to get back into my craft room.

My first project was this Amazing Paper Grace September Die of the Month! Becca always creates such fun dies and this month is a beautiful vintage cash register.

Cardmaking Using Gel Press Prints

Spellbinders Vintage Cash Register Card

To keep the vintage feel, I decided to create my own papers using a gel press. I really enjoy making monoprints so I got to work making a assortment of prints. For this card I used six: dark turquoise with hints of brown and green; light turquoise; white with leftover blue, green and purple(background); copper; plus two green panels.

I die cut my components and used foam tape to adhere to my backgound. I distressed the die cuts a bit more with brown watercolor markers around the edges and around the buttons. The cash register buttons are flat clear jewels.

My card is a 5 1/2″ x 5 1/2″ square. To finish my card, I added a bit of greenery from Spellbinder’s Petite Floral Potpourri.

Die Cut Card using Gel Prints.

September’s kit was lots of fun to play with and there are so many lovely details. I think you will enjoy this die kit.

Thank you for stopping by!

Karen

Uncategorized

Altenew Mixed Media Madness Hop

3D Die Cutting + Acrylic on Mixed Media Paper

Hello!  The Altenew Educators have a fun Instagram Hop called Mixed Media Madness currently underway.  There are loads of prizes and lots of inspiring projects so I hope you can hop along with us. I drew my inspiration from my backyard.  The two mixed media backgrounds are my interpretation of the water in my swimming pool and the layered die-cuts are based on my potted coral Hibiscus.  I  handcrafted all the paper used to die-cut my flowers.  

Turquoise and Coral Gelli Prints.

I have been loving layering dies lately and wanted to get out an old favorite, Altenew\’s Hibiscus Garden as I think it is perfect going into summer.  I used this set as the focal point for both of my cards.  

I loosely mixed turquoise, white and pale yellow acrylic paint with a brayer for my background.  The leaves are cut from painted acrylic panels of moss, spring green and pale yellow.  The Hibiscus are cut from three panels:  orange, orange + white and a panel of white with a hint of orange.  The sentiment is from Altenew\’s Birthday Greetings stamp set.

Altenew Mixed Media Card.

The background for my second card is similar but there was leftover blue on my gel plate.  I also added an additional layer of gold using my favorite Narrow Brick Stencil . This stencil just came out this spring, but it is already my most used stencil!  I love the subtle texture and dimension it adds.  I then die cut the panel using  Altenew\’s Rounded Rectangles die.  I added craft foam to the back of the panel and adhered the flower with foam tape.

Thanks for stopping by!

Karen


Uncategorized

Altenew Educators "Favorite Old/New Altenew Stamp" Blog Hop and Linky Party + Giveaway


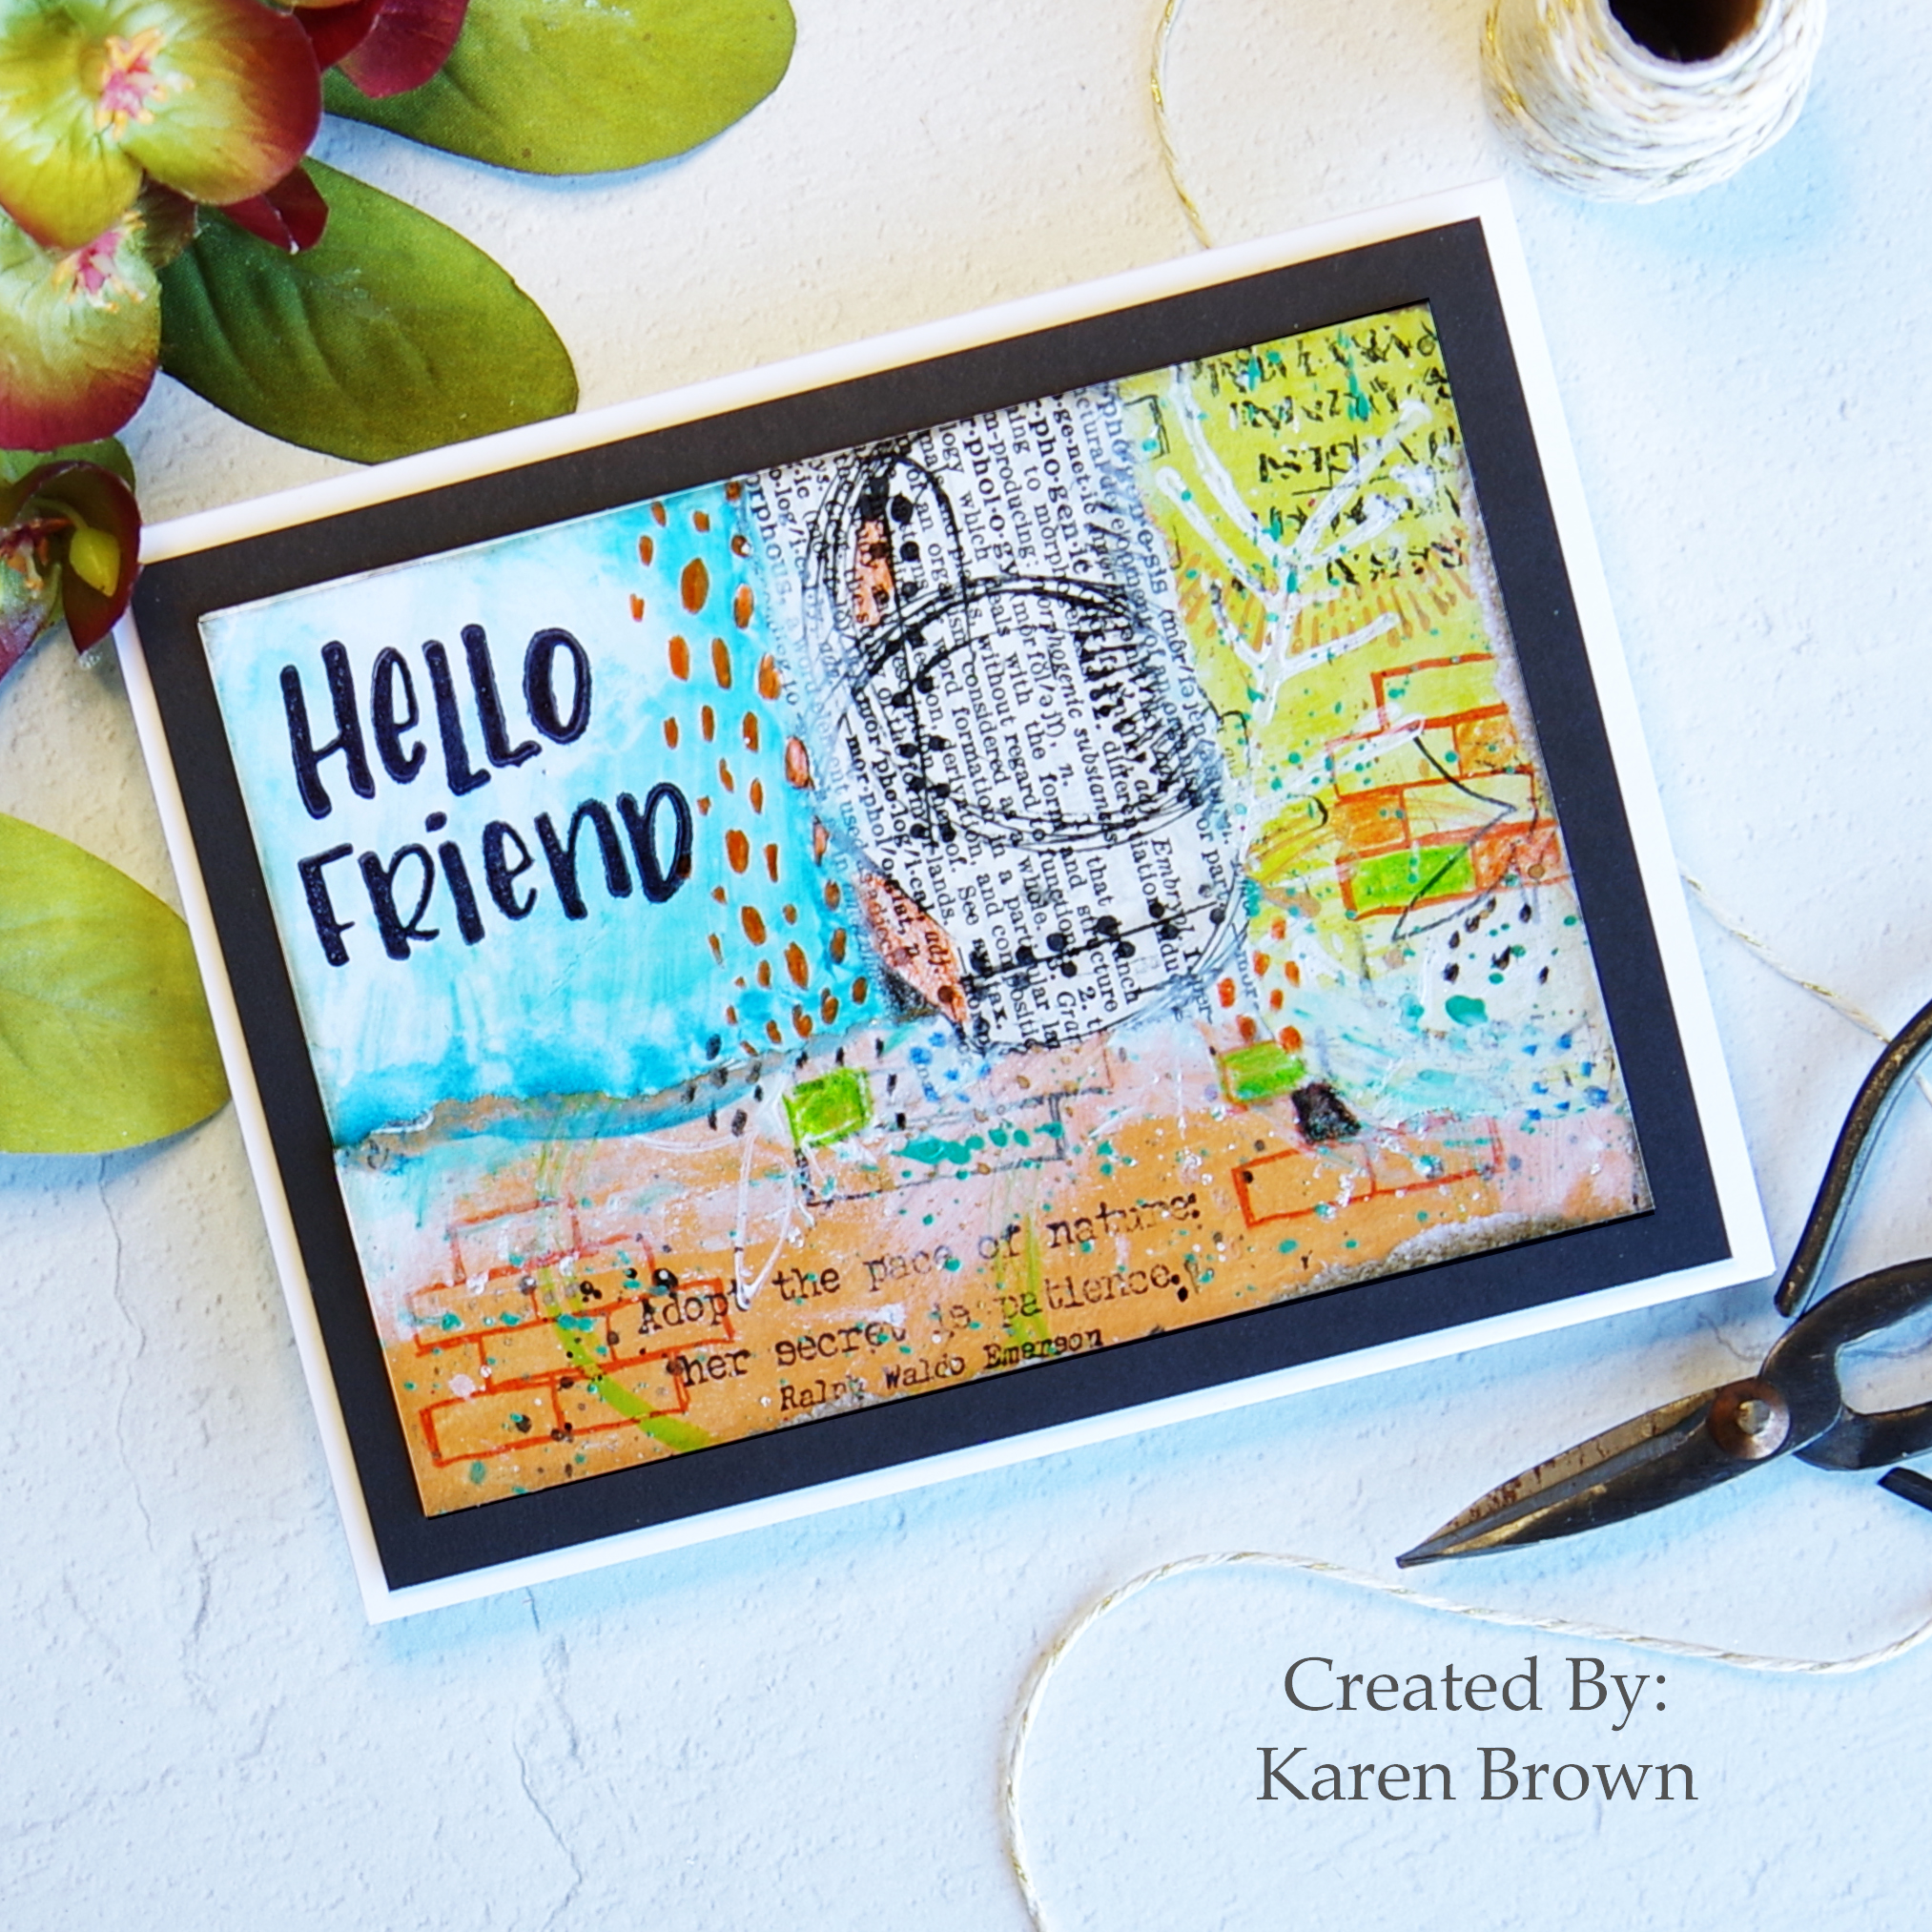
Hello friends!  I am so pleased to be participating in my first Altenew Educator Blog Hop!  I went through the certification program last year and loved every minute!  For this post, I wanted to focus on two favorite stamp sets that I purchased while I was a student in the program, Doodle Blooms and Inked Lotus

Altenew Doodle Bloom Die Cut Mixed Media Card

Using Stencils on Acrylic Gel Press Mixed Media Cards

I spent a day making 5 x 7\” acrylic gel press backgrounds in a variety of colors and using lots of Altenew stencils and stamps.  I love color and texture and wanted this \”daisy\” card to be bold and vibrant so I started with this gorgeous red panel.  With a brayer, I mixed pink, orange and brilliant red and applied to a plate that had some leftover yellow and green already on the press.  After the panel dried, I added  a layer using the Flowing Drops Stencil and then an additional layer of gold with the Narrow Brick Stencil.  You can see the lovely gold shimmer in the second photo.  

Altenew Doodle Blooms and Narrow Brick Stencil

Die Cutting Floral Images from Acrylic Gel Press Monoprints

Using the Doodle Blooms Bundle, I stamped and die-cut a bunch of blooms from some of the other hand-crafted acrylic panels.  I think this is such a happy and cheerful stamp set.  I laid the die-cut flowers on the red panel and selected the blooms I liked best on the background and adhered with foam tape.  The stems are from the Craft-A-Flower Cosmos Kit.   The flower centers are enamel dots from the  Glacier Caves and New Day collections.  I finished off by adding a sentiment with a strip of my favorite Painted Grid Washi Tape.

Tone on Tone Orange Mixed Media card.

The background from this next card is the top portion of the panel I used on the daisy card above. I die cut it with the largest Rounded Rectangle and then backed with foam for dimension.  The Inked Lotus was heat embossed and die cut from a coordinating monoprint panel for a tone-on-tone look and was adhered with foam tape.  The sentiment was die-cut from black cardstock using the Essential Sentiments Set.  

Acrylic Paint Gel Press Mixed Media Card.

I made a second similar card, but this time the Inked Lotus  was die cut from a red/orange acrylic panel where I brayered a lot of turqouise ink over the Narrow Brick Stencil.  This is my favorite stencil to use on monoprints.  The background panel was brayered with Yellow, Olive and Turquoise.  After the paint dried, layers were added with the   Leaves and Berries Stencil (blue), Mega Bloom Stencil and finally the Narrow Brick Stencil was lightly inked in gold over the background panel.  I love the dimension you get by adding layer upon layer with stencils and stamps.    

Blue and Violet Monet like Mixed Media card.

For my last card, I changed things up and used softer colors:  Sky Blue, Blue Violent, Light Purple and Brilliant Purple over a press that had some leftover Olive and Turquoise.  I then brayered over the Mega Bloom Stencil with a light coat of gold.  You can see the shimmer better in the second photo.  I again used the  Doodle Blooms Stamp and Die Bundle to stamp and cut my elements from a variety of  gel press prints.  I finished with  Glacier Caves Enamel Dots for the centers.

Blue and Violet Gel Press Card Background

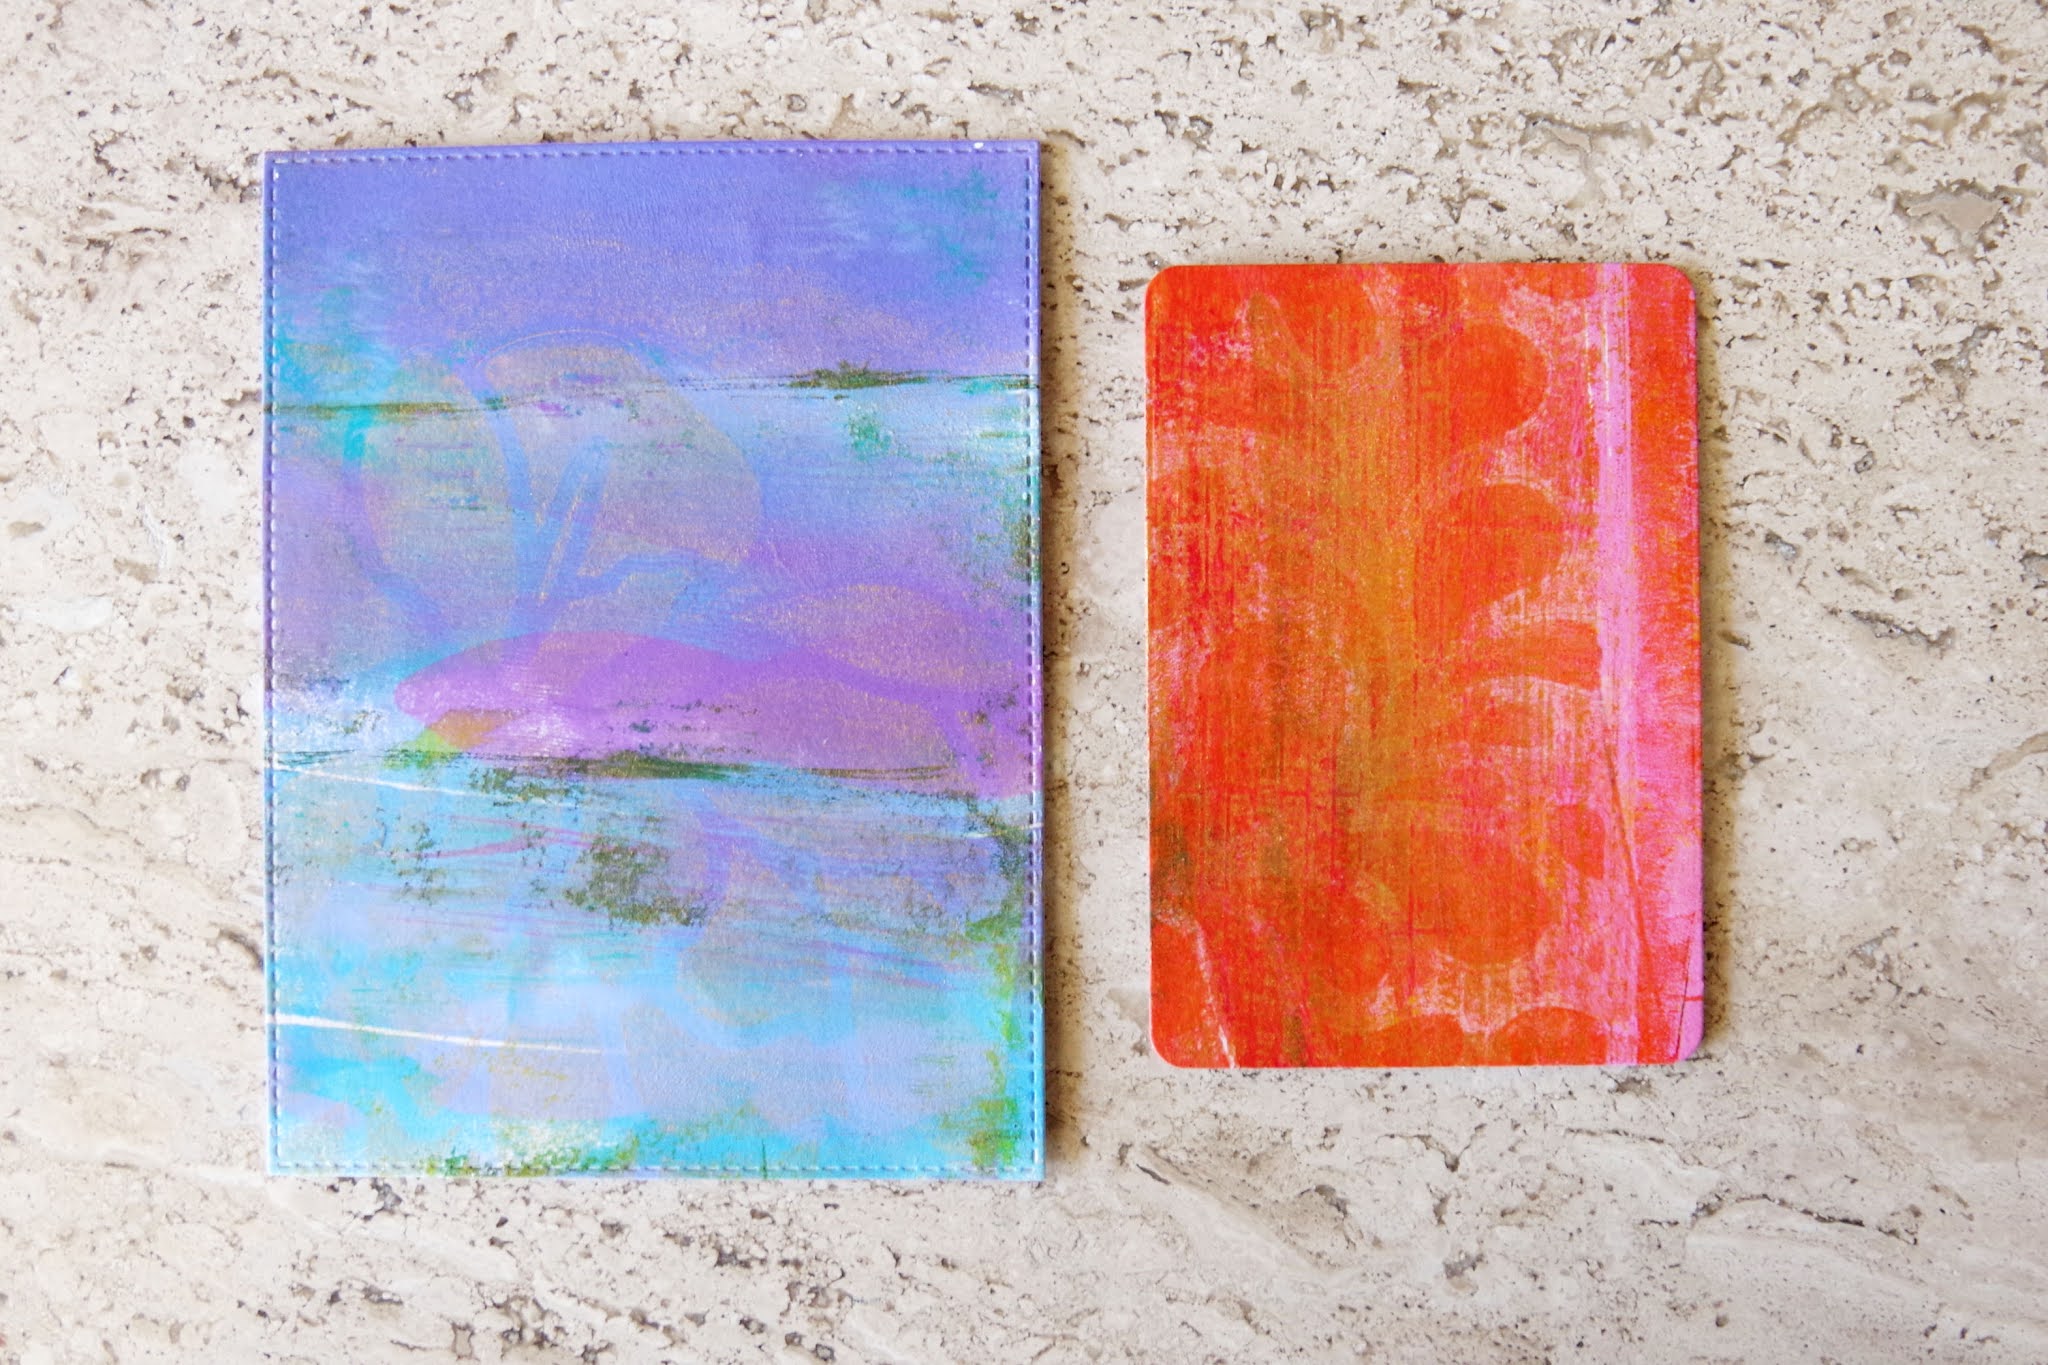
Here is a photo of two of the backgrounds prior to card assembly.  You can really see how lovely the stenciled accents look on the panels.  

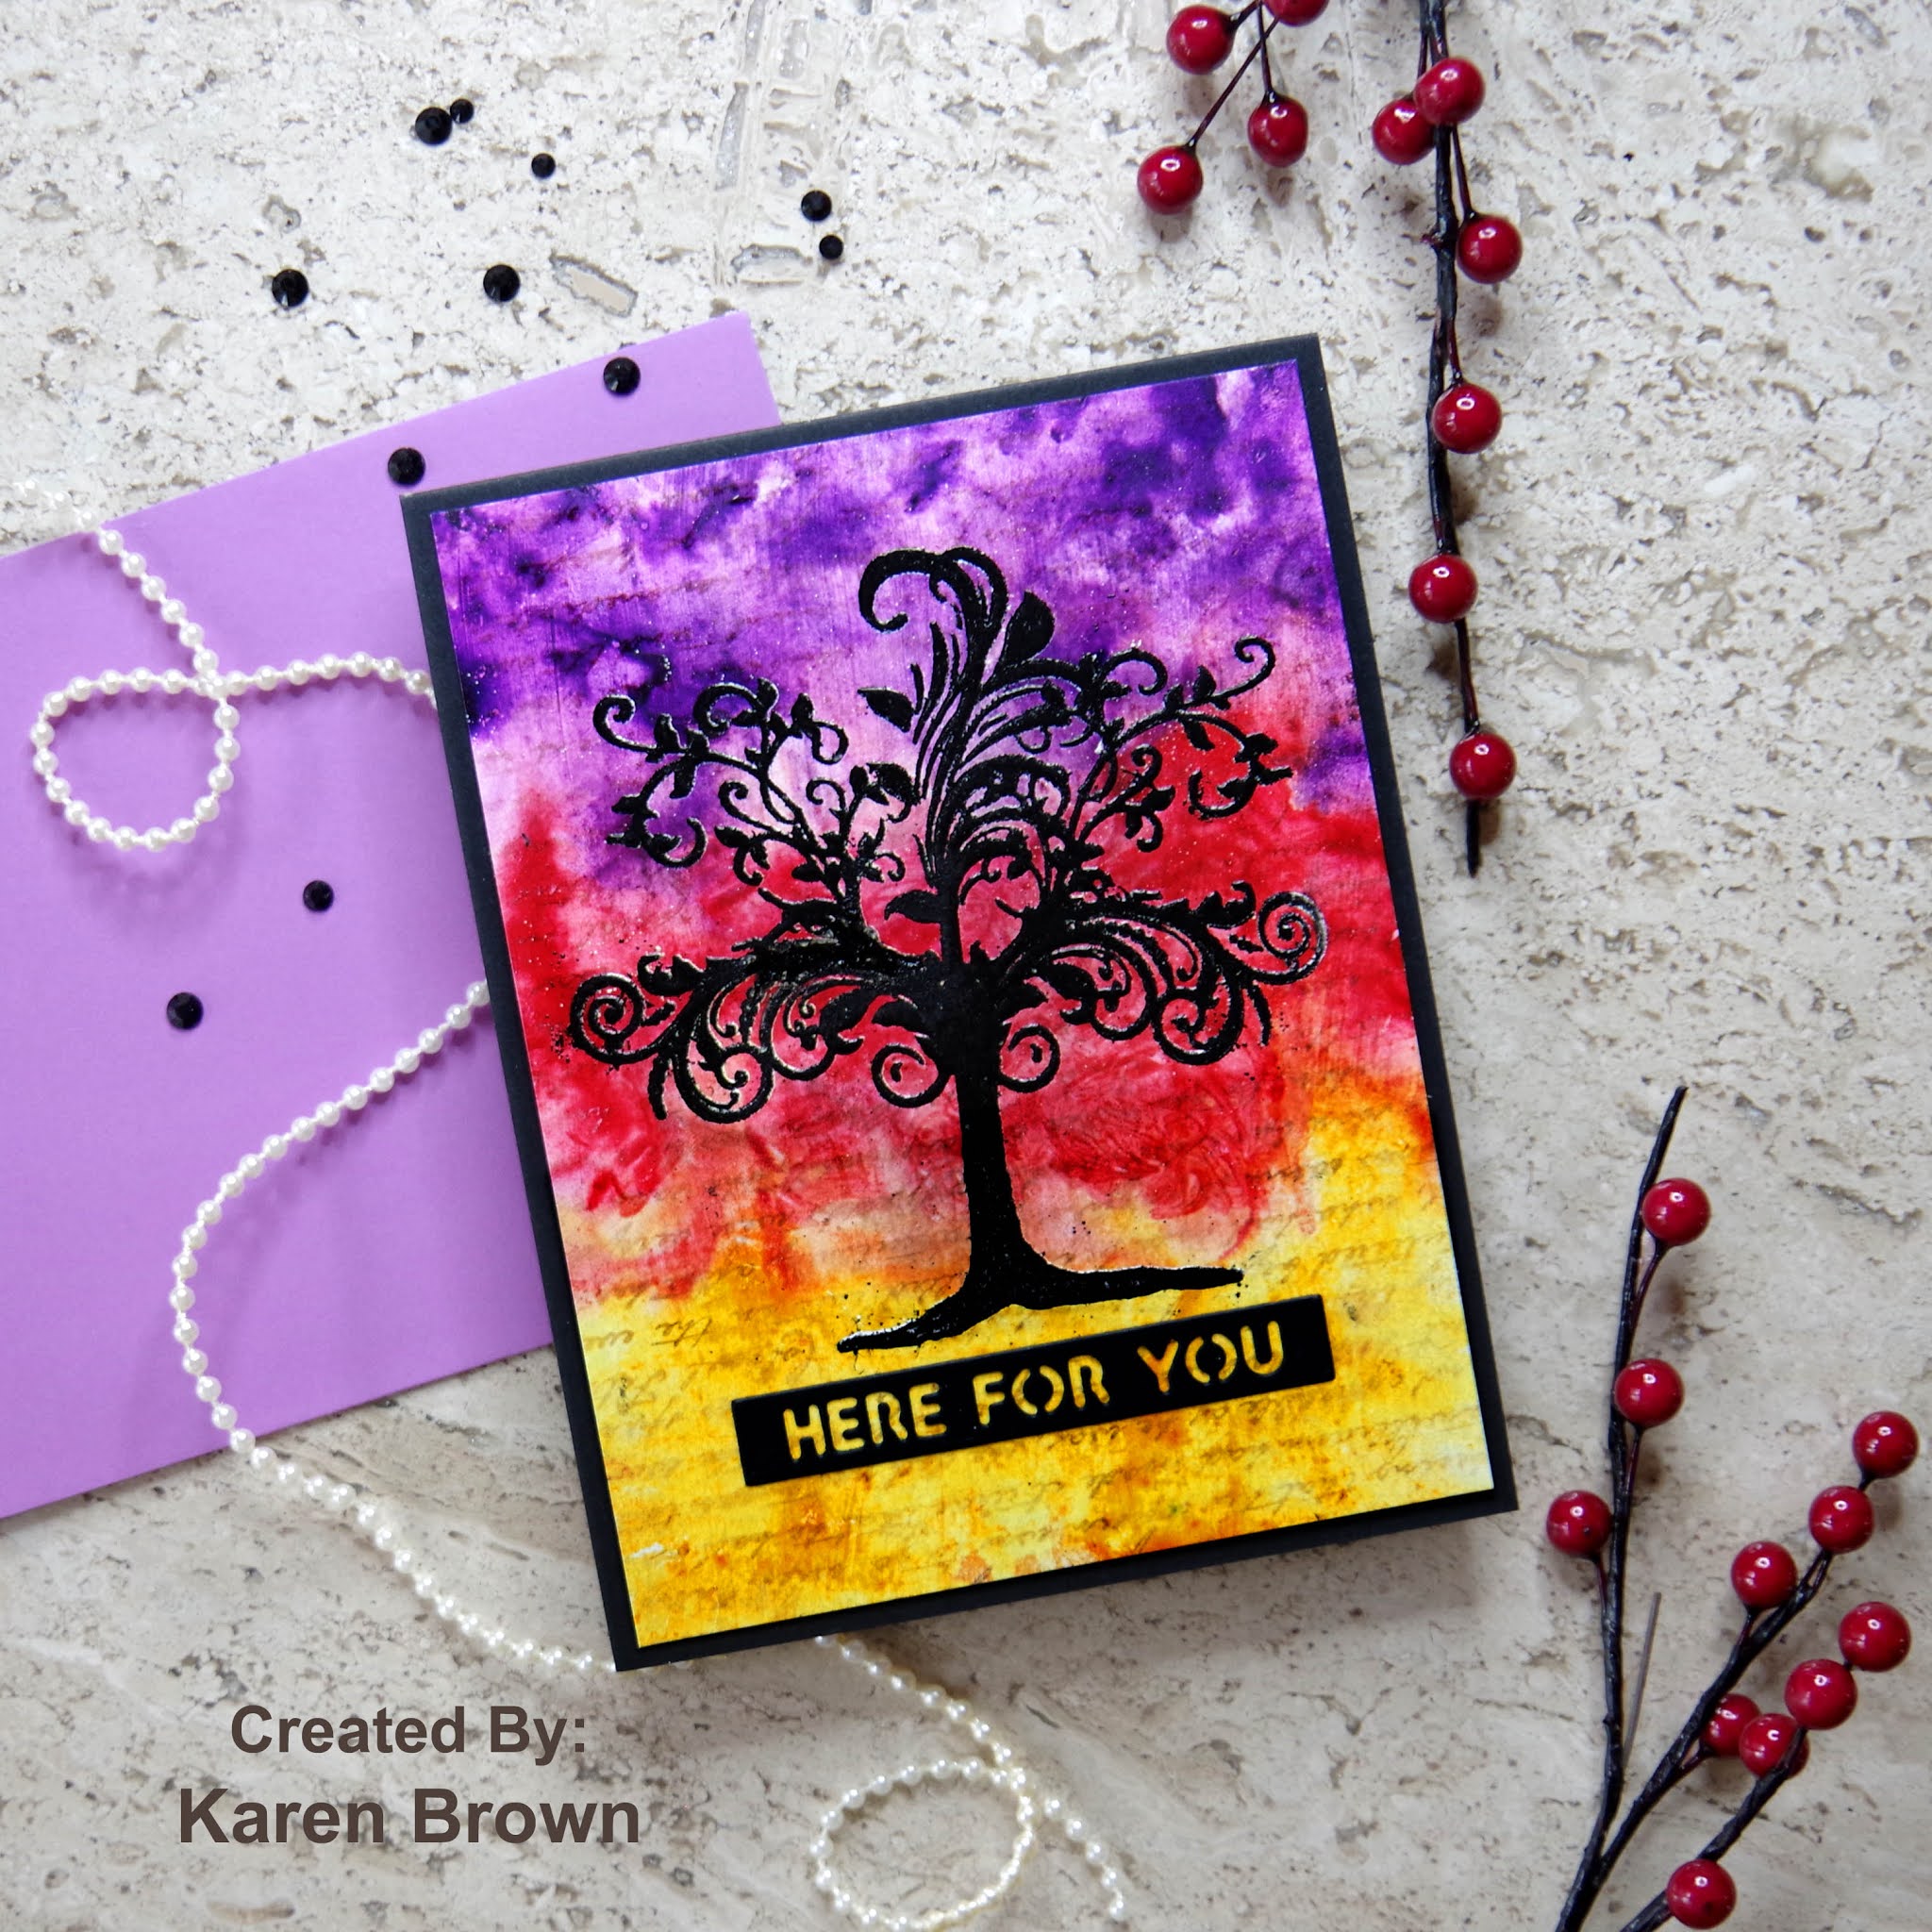
As I mentioned, I loved using these two stamps for my AECP class work.  Here are two homework assignments I submitted using the sets:

Prizes:

Altenew is giving away a $20 gift certificate to 5 lucky winners! Please leave a comment on the Altenew Card Blog (https://wp.me/p6Dps1-deu) by 4/4/2021 for a chance to win. 


We’ll also draw a winner to receive a $15 Altenew gift certificate from the comments left on each designer’s blog on the blog hop list below. All winners will be announced on the Altenew Winners Page on 4/6/2021.


We Want to See Your Creations Too!

What’s a hop without YOU?! We have included an Inlinkz at the Altenew blog for you to enter your gorgeous Altenew “Old/New Favorite Altenew Stamp” creations. We will pick 2 of our favorite handmade creations from those who joined the linky party and they will each receive a $15 Altenew gift certificate!


If you arrived from NatashaDavies you are right on track!  


Altenew Card Blog

Bridget Casey

Colleen Balija 

Teresa Litchfield

Katrina Howe

Rosie Neustaedter

Terri Marie Koszler

Tenia Nelson

Pam Boedeker

Nandini Karmarkar

Amy Hill

Irina Fonina

Natasha Davies

Karen Brown             You Are Here!

Helen Kalb

Patty Mello

Roteja Galvan

Eva Bussom

Fiona Duff

Jaycee Gaspar

Vicki Finger

Nenette S. Madero

Teri Wilson

Rachael Shedeed

Neha Aggarwal

Kari VanNoy

Teri Stokes

Amber Rain Davis

Virginia Lu

Sandra Woodson


There is plenty more loveliness, so keep hopping!   Be sure to head to Helen\’s  fun post next!


I would love to hear which card you liked best.  Thanks for stopping by!
Karen

Uncategorized

Mixed Media ATC Card

 Hello!  Last year, a cardmaking friend gave me a 1968 dictionary that was part of a classroom set that was no longer used.  I thought it was time to use a page or two in my cardmaking.  I\’ve also been fascinated by some of the ATC\’s (artist trading cards) that I\’ve been seeing on Instagram so that was the inspiration for this card.  

Mixed Media Greeting Card

Pink, Orange, Red and Aqua Acrylic Paint
Using the dictionary pages, I stamped and die cut the flowers using the  Doodle Blooms Bundle.  I then used watercolor pencils and a damp watercolor brush to shade and color the diecuts.
Altenew Doodle Blooms Mixed Media card.

I wanted a rough, colorful background, so I applied pink, orange and red acrylic ink to mixed media paper with a brayer.  After the paint dried, I used the brayer to apply aqua ink over the Narrow Bricks Stencil.  I let this dry and then used the accent leaves from the Tea Time set and the greenery from the Billowing Blossoms stamp to randomly stamp on the background.  For the ATC look, I used the Rounded Rectangles to die-cut my background panel.  The sentiment is from The Birthday Greetings Set.  With black ink, I inked the edges of the background and the sentiment strips and then applied  Tea Party Enamel Dots for the center of the flowers.  

ATC Greeting Card

Gelli Plate Monoprint Card

For this second card, I used gel press printing and acrylic paints (violet, tourquoise, yellow, olive and magenta) to make this striking background.  I used the  Flowing Drops Stencil on my second layer.   I then used Deep Iris Dye Ink to stamp a variety of small images on the background.  I was going for a grungier look on this card.  I love using LOTS of inks, stamps and stencils for a complex mixed media card.
Altenew Smile More stamp and die bundle

Next, I used the Smile More Bundle to stamp and die cut the daisies.  I again watercolored with watercolor pencils.  

violet, turqouise, yellow, olive and magenta gel press background

This was a very fun card to make!

Thank you for stopping by!

Karen

Uncategorized

WWC306 – Michelle\’s Challenge: All About Occasions


Hello and welcome.  For the The Watercooler Wednesday Challenge, I\’ve created a mixed media card for my design team project and I love the shimmer and shine it has in person.  This card was so fun to make!

My Process:

I tore three snippets of book text from a dictionary and then glued them to a card panel with gesso and a wet brush.  I used gel medium then the page and then another layer of gel medium.

I added a layer of gesso over the top and dried.

Next I added some pencil scribbles and doodles.

I dipped the panel in a combination of die ink mixed with shimmer spray.  Dried then repeated.  This gives gorgeous shine to the card.  

I heat embossed the image and sentiment and mounted on a colored A2 card base.

Supplies:

Altenew Best Mom stamp

Altenew Iridescent Shimmer Spray

Dye Ink

Gesso

Multimedia Gel

Embossing Powder

Text from a Dictionary


Thanks for stopping by!

Karen

Uncategorized

WWC304 – Kath\’s Challenge: All About Occasions


Hello and welcome!  This is my design team card for Watercooler Wednesday\’s \”All About Occasions\” Challenge.  Kath is our hostess.

I wanted to make a mixed media card and this is the bold look I came up with.  I started by spreading gesso on the cardstock with a card.  I let it dry and then used diluted watercolors to paint my background.  After the panel was dry, I spritzed it with shimmer spray,  which gives the background a pretty sheen.  Next I stamped with the script background stamp.  I finished by heat embossing the tree.  I wanted a lot of texture so I heat embossed the tree twice. 

Supplies:
Crackerbox and Suzy Tree Whimsy Stamp
Frayed Burlap Distress Ink (for script)
Gesso
Watercolor
Black Heat Embossing

Thanks for stopping by!
Karen
Uncategorized

WWC301 – Dawn\’s Challenge: All About Occasions


Don\’t you just love \”twofer\” cards?  This card is the second from a pair of mixed media thank you cards that I made.  Click here to see the first card.  I created this one for  Watercooler Wednesday\’s  All About Occasions Challenge and Dawn is this week\’s hostess.

I was wanting to make some thank you cards to use this month and thought aqua, silver and white would be festive, bright and seasonal.

My Process:
  • I glued the die-cut Altenew Mega T from my first card to a watercolor paper panel. I then painted over the top of the card with gel media.
  • I added a layer of gesso and dried.
  • I mixed Mermaid Lagoon distress ink and Shimmer Spray and painted a layer on the card.
  • I pounced some Versamark ink across the panel and silver heat embossed.
  • I mixed a more concentrated mermaid lagoon and shimmer spray combination and brushed on random areas.
  • Buffed the embossing with a baby wipe to clean up and enhance the shine.
  • I added a die cut thanks sentiment. 
Thanks so much for stopping by!
Karen