Uncategorized

WWC288 – Kath\’s Challenge: All About Occasions

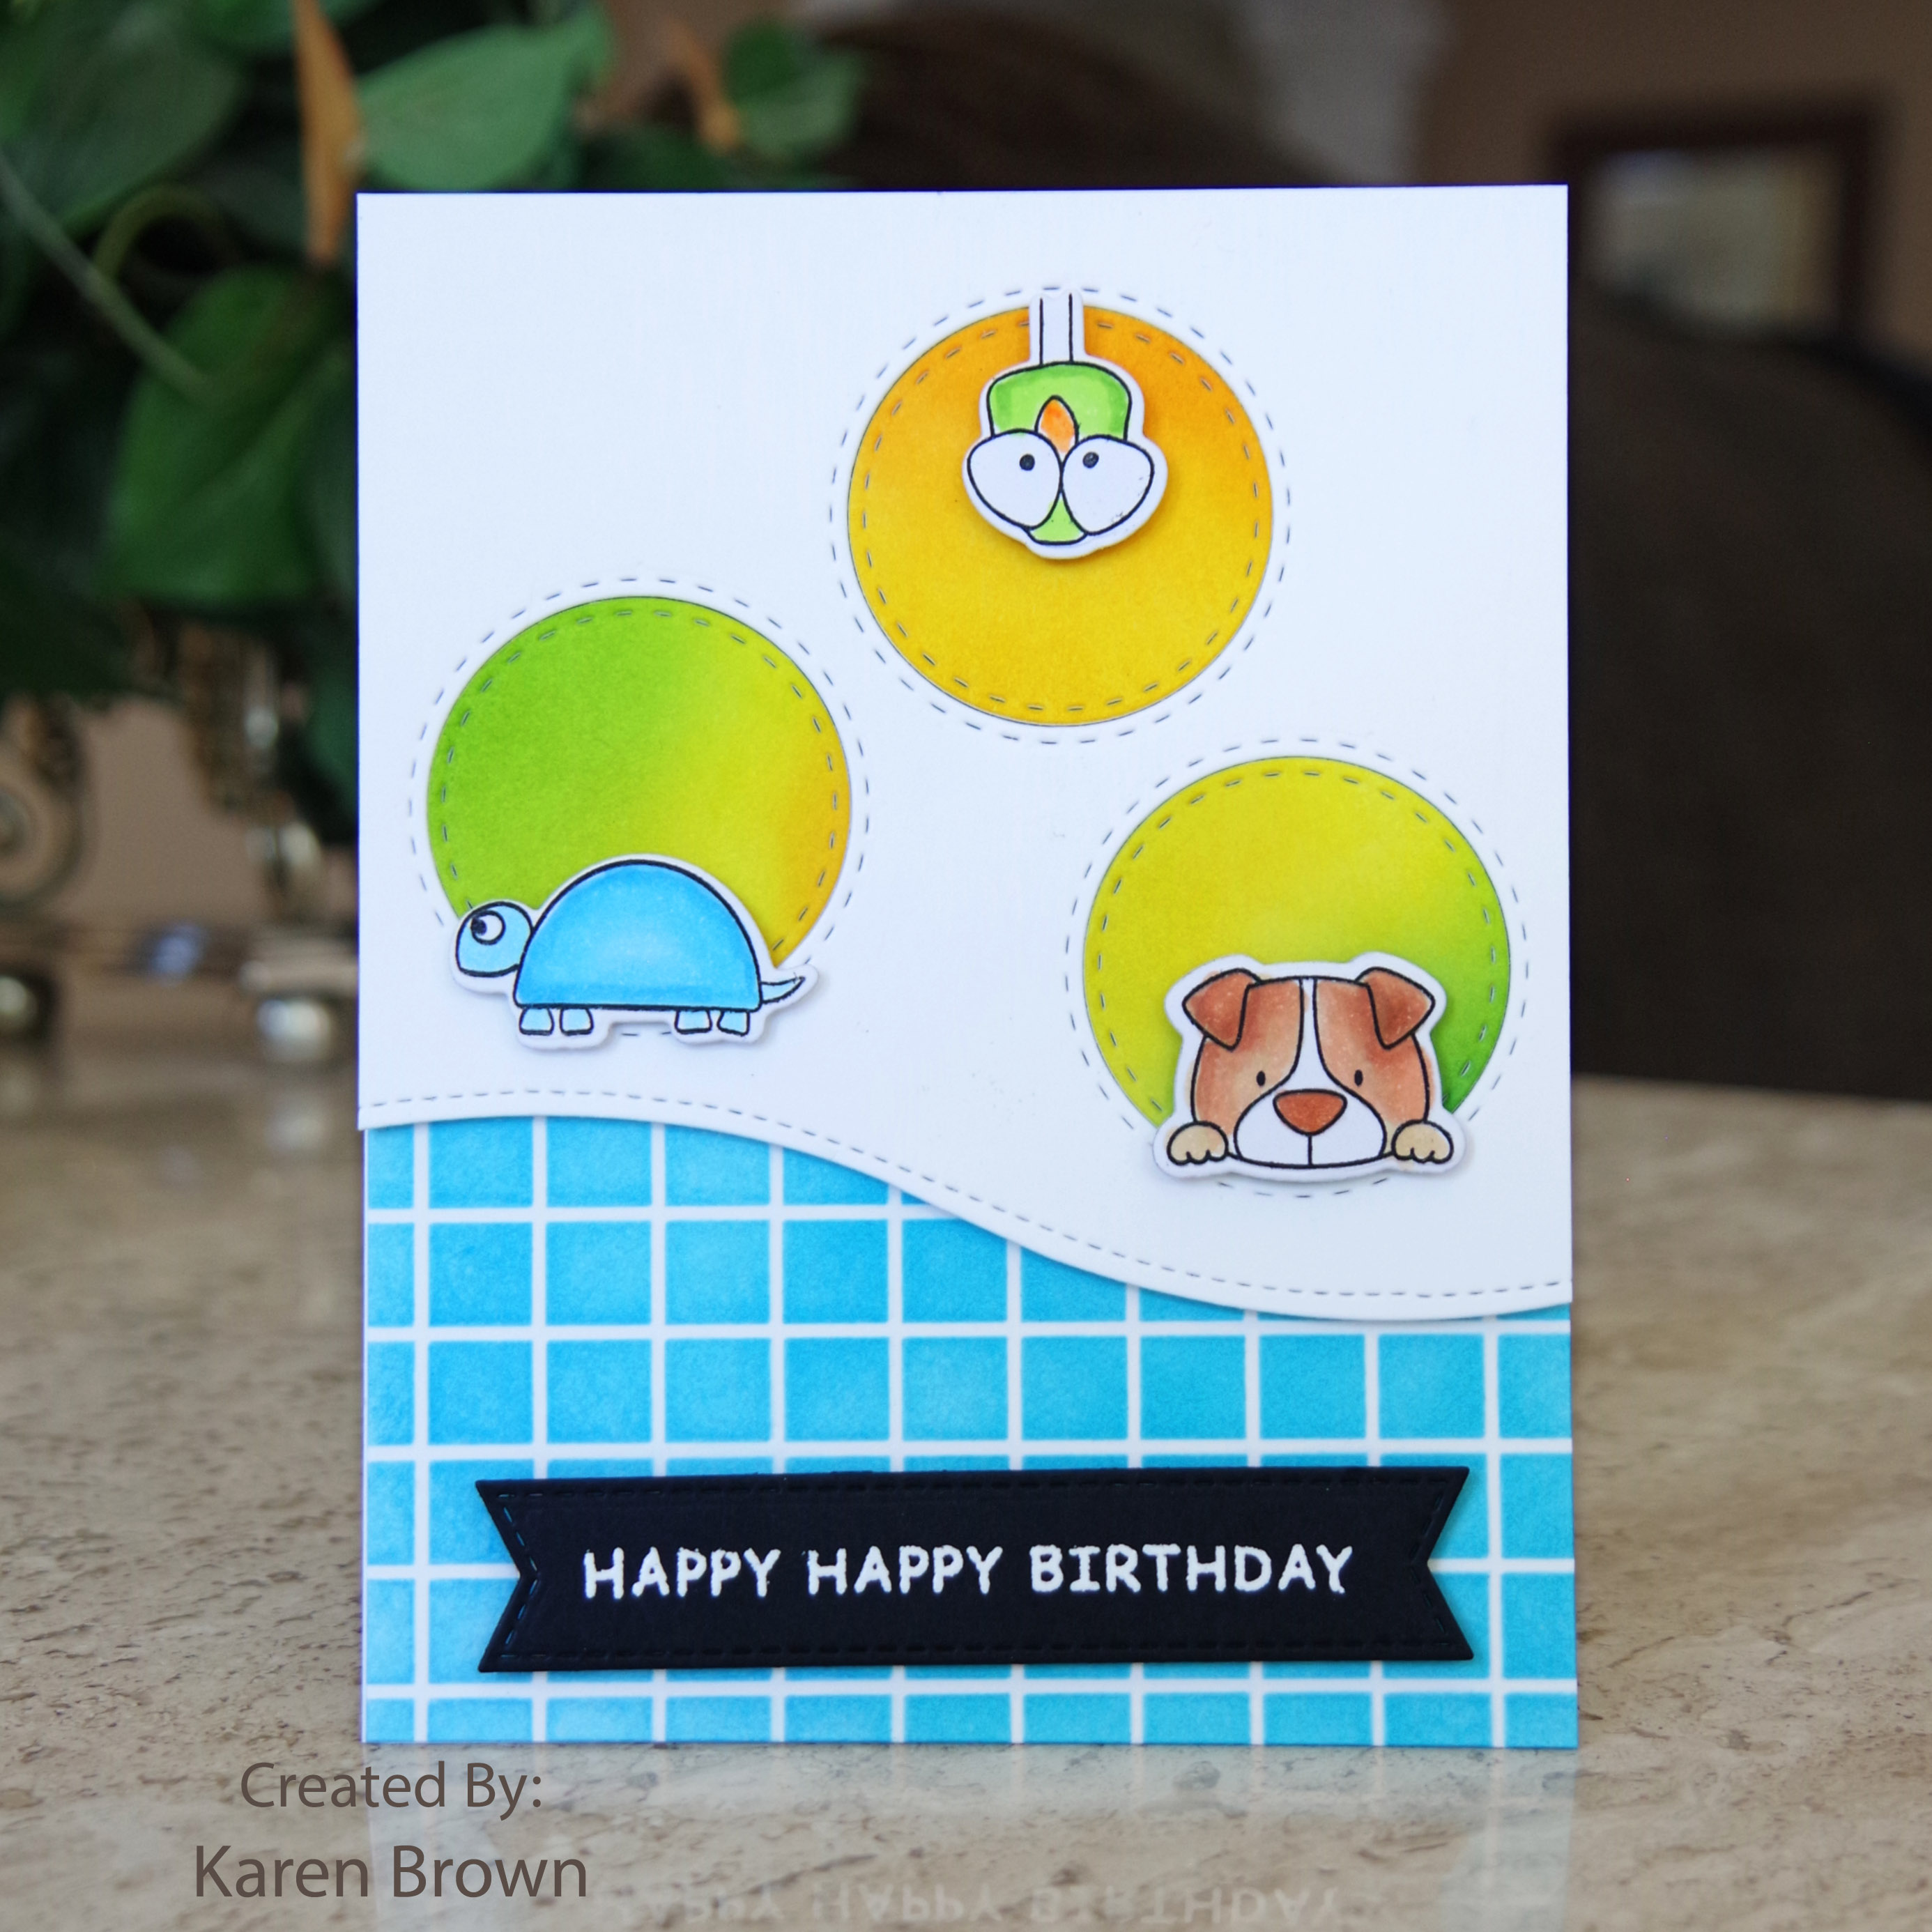
Hello!  I am excited that you stopped by to see this card…I love how bright and bold it is! 


This week at The Watercooler Wednesday Challenge we are creating Occasion cards.  Talented Kath is our hostess.  There are so many occasions and we would love to see your project in our gallery.

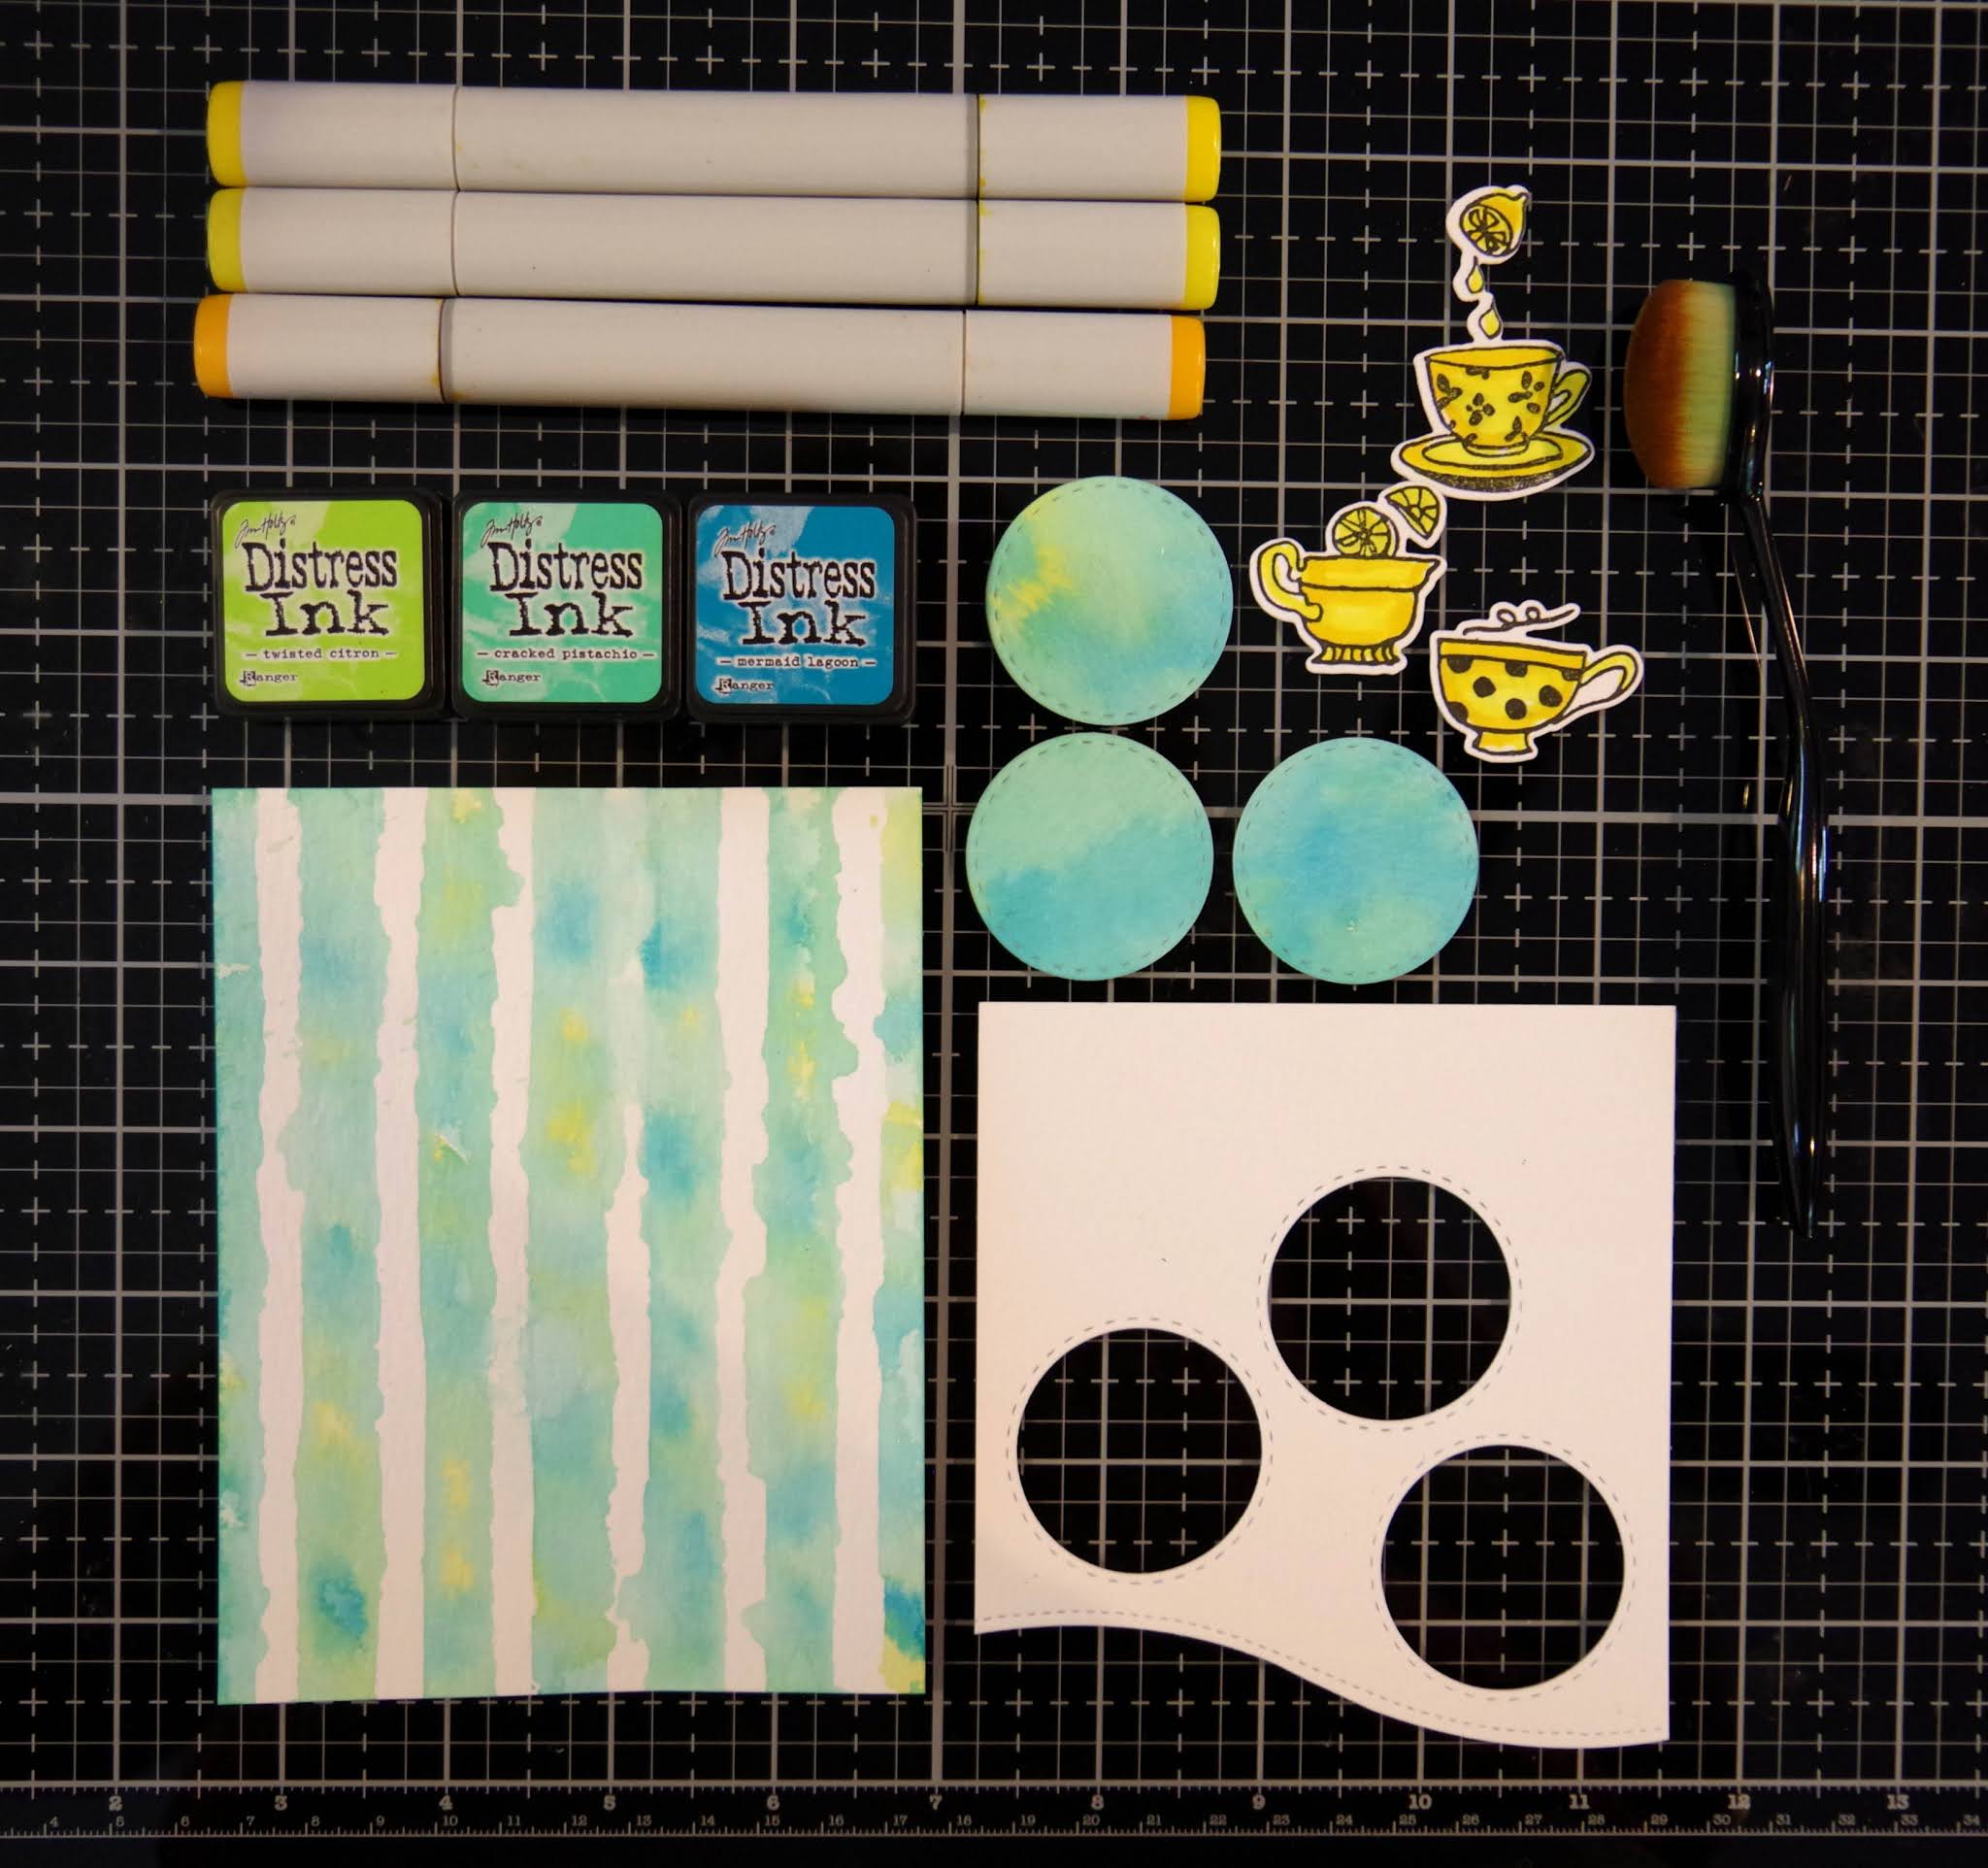
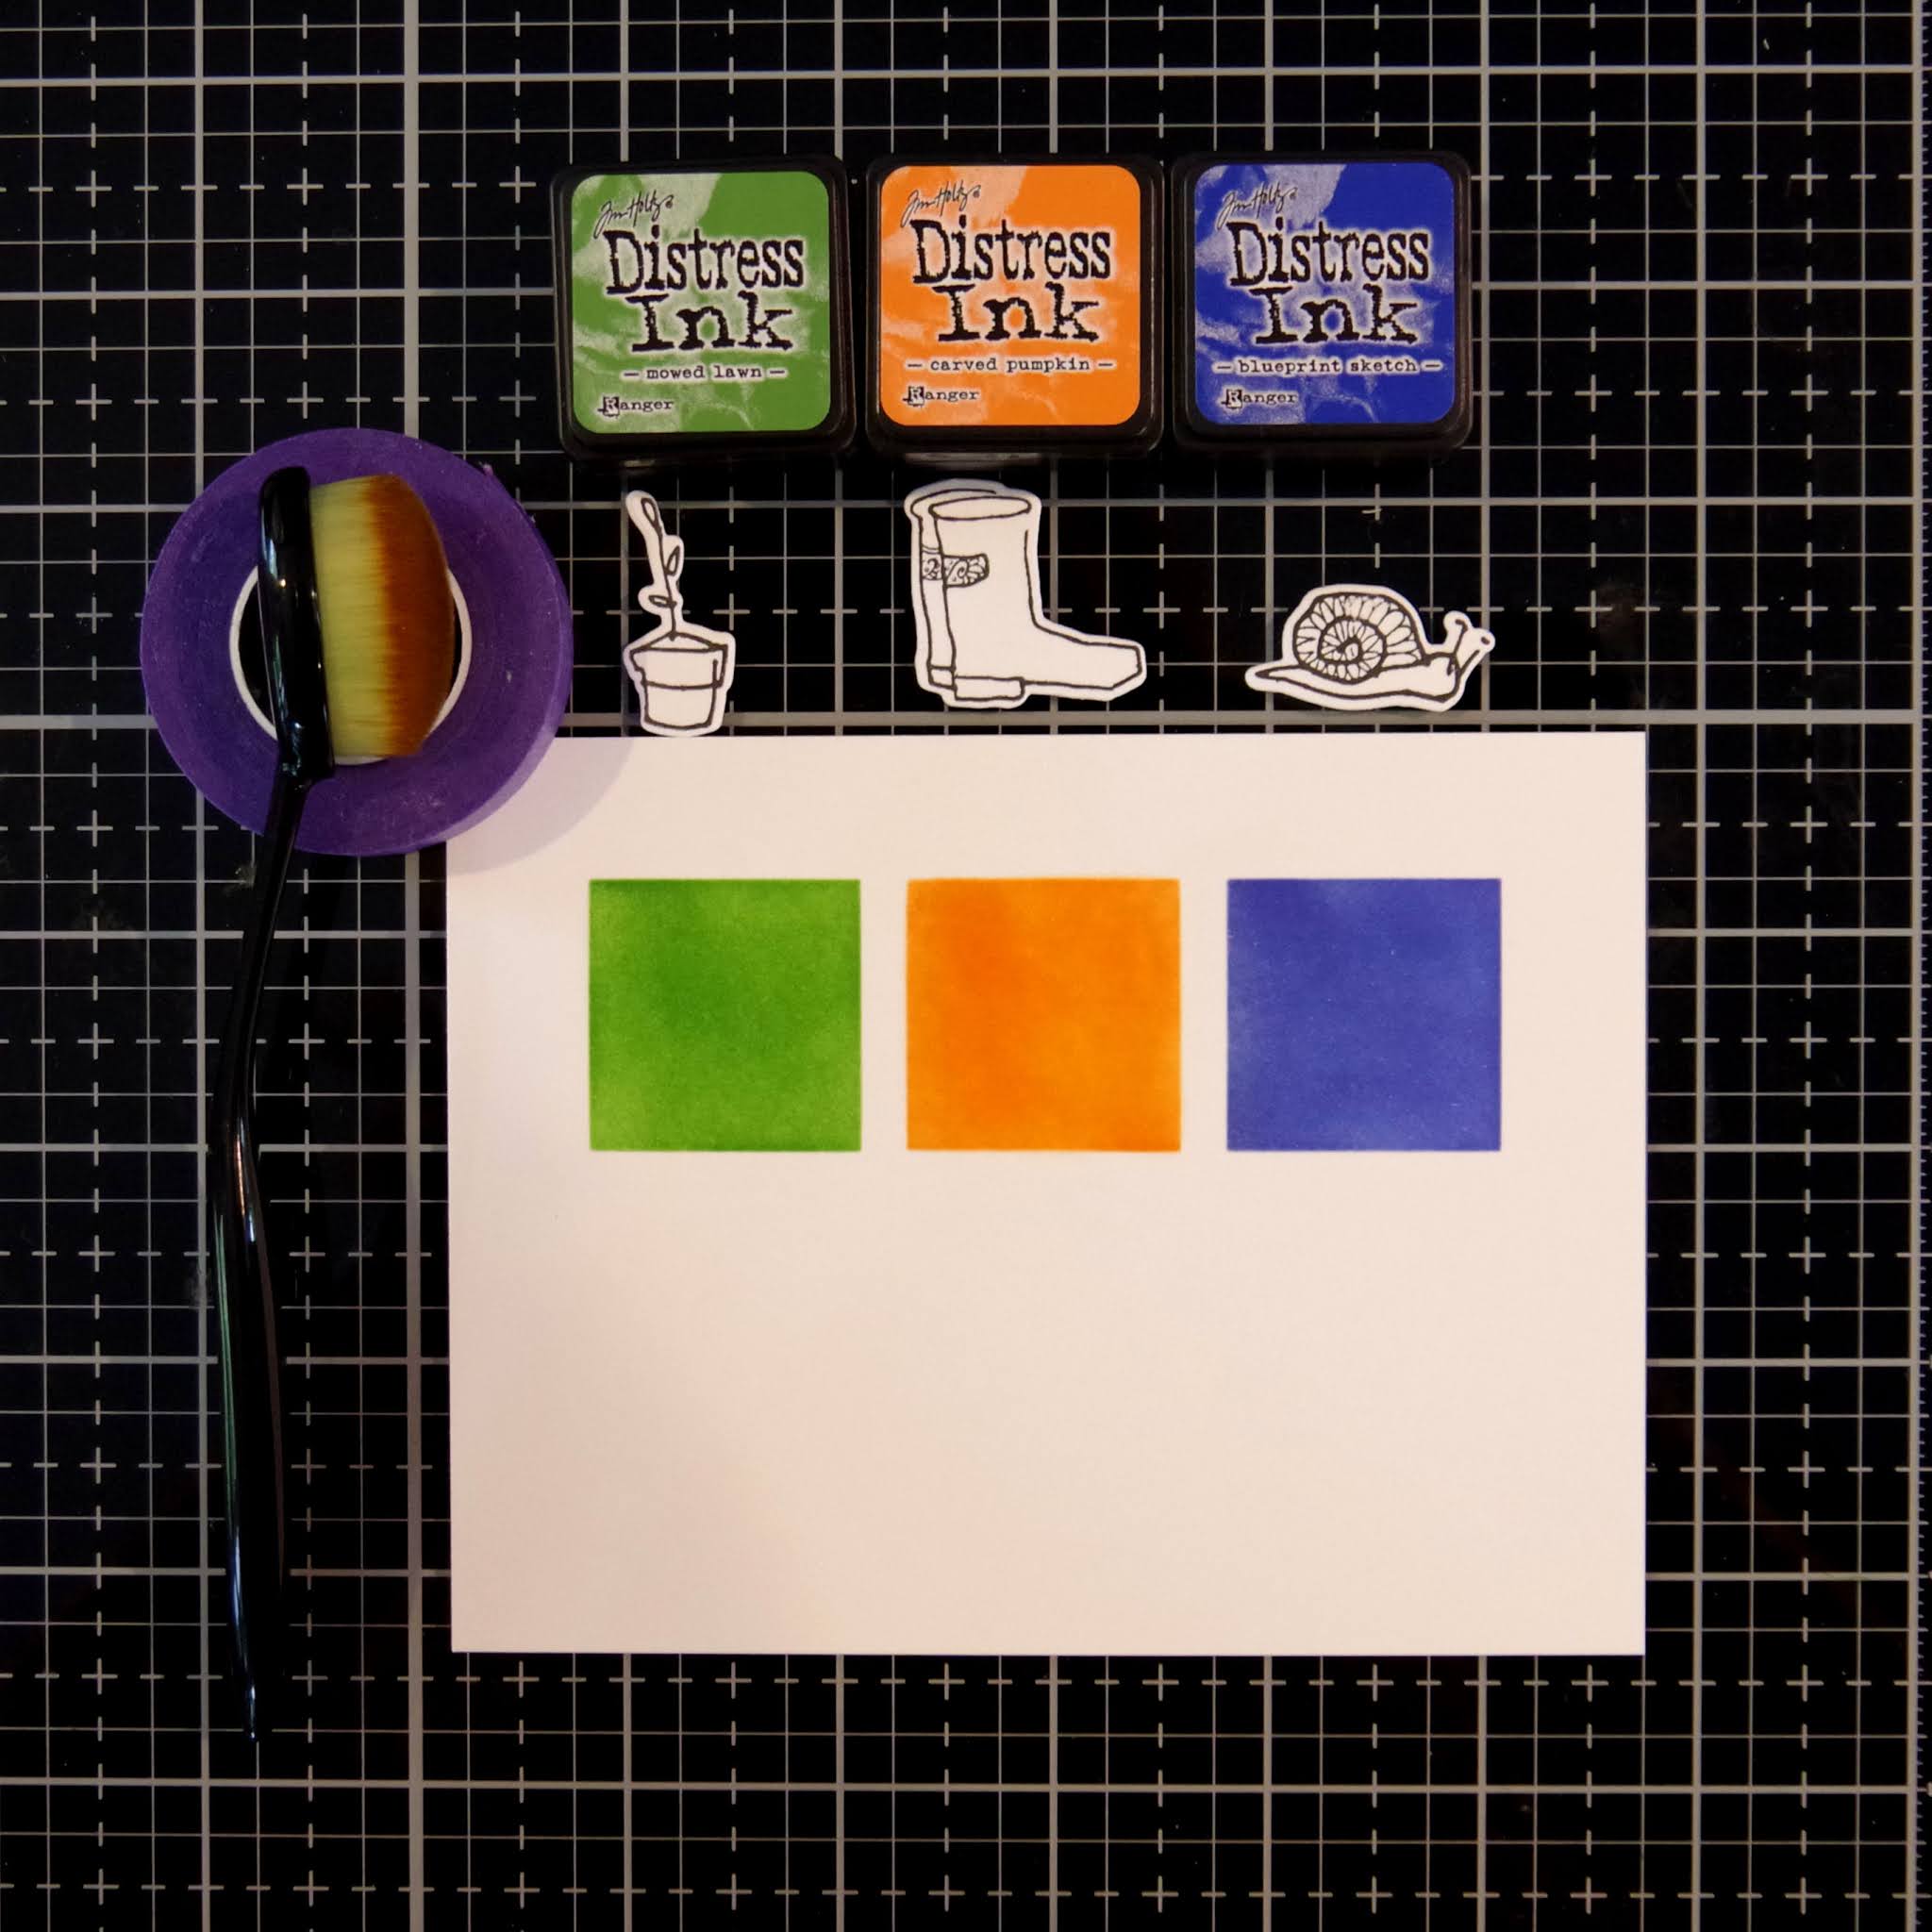
I started by stamping, Copic coloring and die-cutting two floral sprays.  I wanted to ink blend a complimentary background, but in reverse order of the colors of the flowers.  Since the card is bold, I also wanted some contrast, so I masked off 1 1/2\” on the left side of the card base.  I started ink blending in the bottom right with yellow and then added six more colors to achieve the gradient I was looking for.  I arranged the two sprays along the border of the white strip and ink blending and used foam adhesive to give added  and dimension to the focal point.
Supplies Used:
Simon Says Stamp Birthday Mix 1 sentiment stamp & die bundle
Distress Inks
Copic markers
Foam Squares
Masking tape

Time Out \”Seasons\” Challenge #169 with optional twist coloring.


UPDATE:  My card received honors at Time Out!

This card also was selected as a \”Top 3\” at Double D!

I am so pleased that you stopped by!
Karen
Uncategorized

Altenew Academy Level 2 Final Project

Hello, hello….so pleased you stopped by! I finished Altenew Academy\’s Level 2 Classes and wanted to share my final project.  I was challenged to make four masculine cards for four different occasions. I had loads of ideas and had a lot of fun creating.  To make my cards masculine, I used my husband\’s favorite colors….aqua, blue and green.   Mark probably wears an aqua or blue Columbia fishing shirt five days out of seven…he calls it his uniform!    I also used lots of die-cuts because Mark loves those on cards.   The unifying elements are handcrafted backgrounds and embossed sentiments on navy cardstock.   I\’ve learned so much over the past three months but I decided to spotlight three favorite classes:

  • Beyond Basic Backgrounds – We learned to make beautiful backgrounds to enhance our cards.
  • Celebration Stencil Techniques – We learned to expand our stenciling repertoire. 
  • Masking Unleashed – We learned various masking techniques that up the \”wow\” factor of our cards.

Encouragement Card:

This first card is my husband\’s favorite of the group. Mark\’s beverages of choice are coffee and hot tea….he makes a pot of each every day and  the color yellow is very encouraging and optimistic (In The Mood For Color). My idea was to make inlaid circle die cuts that coordinated with a hand crafted background.  We worked on inlaid die-cutting in Beyond Basic Backgrounds and stencil overlays in Celebration Stencil Techniques.  

  • I started by taping my Altenew Watercolor Stripes stencil to a watercolor paper panel.  I then wet the paper with clean water and then dabbed and pounced three colors of distress ink onto the paper.  I LOVE this technique and think it makes a very fun background.  
  • Next, I took a second watercolor panel and used the wet on wet technique to dab the same three colors of distress ink on the panel.  After the paper dried, I die cut three 1 1/2\” circles.
  • I die-cut a white watercolor paper overlay for the inlaid technique.
  • I stamped, Copic colored and die cut three coffee/tea elements from Altenew\’s Tea Time stamp and die bundle.
  • I heat embossed an encouraging sentiment on navy cardstock.
  • I assembled the card using liquid glue and foam squares (for the cups and sentiment).

PRO TIP:  Don\’t over-wet the watercolor paper.  If you do, the ink will flow under the stencil and you will lose the white lines.  You do want it watery enough that you achieve a casual watercolor look.

Birthday Card:

This card was inspired by the class on Color Blocking and the negative masking we learned in Masking Unleashed.  I think the bold colors are both festive and masculine.

  • I started by negative masking three 1 1/4\” squares.  I then used ink blending brushes to liberally apply ink to the squares.
  • I stamped and die cut three images from Altenew\’s Garden Grow stamp and die bundle.  I wanted the colors to be the star so I left the images uncolored.  I think this makes for a very eye-catching look.
  • I heat embossed a birthday sentiment on blue card stock and then assembled my card.

PRO TIP:  For a sharp edge, be sure your mask is evenly and securely adhered to the card panel.

Love/Thinking of You Card:

I love ink blending and negative masking so I again drew upon the lessons learned in Masking Unleashed.

  • I masked off a large negative mask around my card panel.  I blended in a medium blue and then applied a vivid blue around the edges.  So pretty and fun to do!
  • I stamped, Copic colored and die cut two images from Altenew\’s Garden Grow stamp and die bundle.  This is one of the first stamp sets I purchased and it is still a favorite!
  • I heat embossed my sentiment, assembled my card and attached to a top folding A2 card base.

PRO TIP:  I think using two shades of blue added depth to my one layer card background.  

Anniversary Card:

I knew I wanted to use the wreath from Altenew\’s Weekend Doodles and I thought it would be beautiful colored in green.  This was the starting point for my card.  After I had stamped, Copic colored and die cut the wreath I thought about backgrounds.  I finally decided to go with another bold color coordinated stenciled background.


  • I Copic colored the wreath with 3 different shades of yellow-green and green.  
  • I started by taping my Altenew Watercolor Stripes stencil to a watercolor paper panel.  I then wet the paper with clean water and then dabbed and pounced four colors of distress ink onto the paper.  I told you above that I love this technique!  
  • I die-cut and assembled the card on a top-folding A2 base.    


Here is a photo of all the cards.  To see what I did with the muslin bag, please keep reading.

Upcycled Item:

Finally, we were asked to upcycle or alter an item. I ordered some muslin favor bags for my daughter\’s wedding and have quite a few left so I thought this would be the basis for my upcycle project.  I thought they would be cute \”envelops\” for cards given in person or fun little gift pouches. A lot of the techniques we learned at Altenew Academy can be applied to non-card projects and I would like to share the processes I used to  decorate my muslin bags:

·        Stamping on fabric

·        Coloring on fabric

·        Ink blending on fabric

·        Felt die-cuts adhered to fabric

·        Stamp layering on fabric

I started by personalizing a little bag for each of the cards that I created above. 


For the first two cards, I ironed the bag, secured it in my Misti and stamped just once.  That is all it needed and I was afraid the fabric might shift if I stamped it a second time.  I then did some easy coloring with my Tombow markers.  The fabric colors well but you can’t do much complicated shading.


For the Encouragement Card, I masked three squares and then ink blended white pigment ink inside the squares. I let the ink dry and then I stamped (with black Pigment ink) 3 coffee mugs.  I finished by drawing a black border around each square with a permanent marker.  Simple but graphic looking.

For the Color Block Card, I again masked three squares and then ink blended with the same (distress) inks I used on the cards.  It is interesting that the colors change a bit on fabric, but the result is a bright fun pouch.

PRO TIP:  I inserted a piece of paper inside the bag to prevent the ink and glue from bleeding through to the backside. 

While I was at it, I wanted to do some felt die-cutting.  For my first card I die cut five balloons from felt and glued blue thread to the back.  For the second card I die-cut a Mega Alphabet B and added a sprig of die-cut greenery.


PRO TIP:  To keep the felt from stretching and tearing while die cutting, I first glued a piece of regular paper to the back of the felt.  I let it dry overnight and did my die-cutting the next day.  This makes a huge difference in the quality of the die-cut!

My final idea was to do a bit of stamp layering on fabric.  I used pigment ink, dried with my heat tool and then moved on to the next color.  This card is definitely feminine but I wanted to try the technique on muslin and all my layering stamps are flowers. 

Featured Altenew Products:

Altenew Watercolor Stripes stencil

Altenew Tea Time stamp and die bundle

Altenew Garden Grow stamp and die bundle

Altenew Weekend Doodles stamp and die set

Altenew Bride to Be stamp and die bundle

Altenew Mega Alphabet B die


I really enjoyed putting this project together!
Karen


Uncategorized

WWC285 – Karen\’s Challenge: Anything Goes with a Masculine Twist

Hello and welcome!  I am so pleased to be hosting this week\’s \”Masculine Challenge\” at the Watercooler Wedenesday Challenge. My husband\’s birthday is coming up and this is the card I created for him. I was going for a playful summery card.  
My process:
  • I started out by inkblending over a stencil to create the background panel.
  • I then ink blended another small panel for the circle die-cut inserts.  I let both panels dry for a few hours.
  • I die cut the decorative wave border and then three circles from a piece of white card stock.
  • I then die cut three ink-blended circles from the small panel.
  • I stamped, Copic colored  and die cut the animals.
  • I adhered the white panel to the blue background using foam tape. I also used foam tape to add the colored circle inserts for an inlaid look.  I popped on the animals with foam squares and added the sentiment.
My husband loves animal die-cuts so I think he will really like the card. 

Supplies Used:
My Favorite Things Lucky Dog
Simon Says Stamp Stacking Animals
Sugar Pea Designs Element Builder (wave border)
Simon Says Stamp Grid Stencil
Simon Says Stamp Stitched Circle dies
Distress Ink
Bristol Card Stock for ink blending
XPress It Card Stock for the animals
Copic Markers

I am also playing along with:
Inspired By “Critters” Challenge My husband loves critters, dog etc. so that is the theme of my birthday card.

AAA Birthday “Tic Tac Toe” I went with bright (summery colors), embossing (sentiment) and masculine (for my husband).

UPDATE:  I was so pleased to see my card was selected \”Top 3\”  at The AAA Birthday Challenge. 

I am so pleased that you stopped by!
Karen
Uncategorized

Altenew Academy – Impressive Heat Embossing

Hello!  I just completed another course at Altenew Academy called Impressive Heat Embossing.  So many great cardmaking techniques from Svetlana Marchenko!


This card is from lesson #3, Heat Embossing for Resist.

I love to ink-blend so I chose to ink blend over my embossing.  For ink blending it is best to start with light colors and then add the darker tones.  I started with my palest yellow, then added sunshine yellow and finished up with orange highlights.  For the stem I used two shades of green.  I die-cut my \”thanks\” from aqua paper and I like the big showy sentiment.  I love how bright and cheery this card turned out.

Altenew Supplies:
Altenew Inked Lotus
Altenew Thanks die

I am so pleased that you stopped by!
Karen

Uncategorized

Altenew Academy: Beautiful Details

Hello!  I just finished the Altenew Academy Class \”Beautiful Details\”.  I have to say our instructor, Marika Rahtu, is quite the artist and her cards are amazing!  Marika taught us that adding details can elevate our cards.


My style is more colorful and bold, but I incorporated several of her suggestions into my card.

Details I added to make this card special:

  • I love ink blending so I ink blended a complimentary background.  I reversed the colors from the floral images so I started blending from the bottom right in yellow (top flower) then added 5 other colors so that I finished with purple to get the gradient that I wanted.  I laid down a lot of ink and think this gives a bold and cohesive look to the card.  
  • I masked the left side (1\”) of the card to give contrast to the bold colors.
  • I used foam adhesive to give dimension to the focal point.
  • I added some shimmer pen to the flowers for a bit of subtle shine.
This Altenew Weekend Doodles stamp and die bundle may be my favorite set from Altenew.  I Copic colored the blooms and arranged them where the ink blending meets the white edge. 
I am also playing along with:
 Festive Friday FF0064.  I\’ve used  pink, a sweet sentiment, die cuts and colored my card for \”summer fun\”.
Little Red Wagon #560 Give Us Your Background  I used loads of distress ink to make this bold background.  
UPDATE:  I am so please that this card was chosen as a Festive Friday Fave!


Karen
 
Uncategorized

Altenew Academy: Easy Die Cutting

Hello and Welcome!  I just finished the Altenew Academy class titled Easy Die Cutting.  Yana Smakula was the instructor and she shared six wonderful lessons.   I chose to write this blog post about lesson #5:  Inlaid Die Cutting, which I found very inspirational.  I just purchased this large beautiful scripty thank you die (Altenew\’s Simply Thank You) and thought it would work great with the inlaid die cutting technique.  I learned to save all the pieces from both panels so you can can create two cards from the positive and negative die cutting.  Don\’t you just love two-for-one projects!  🙂

My Process:
I started by ink blending a bright colorful gradient on Bristol cardstock.  I didn\’t want it to smear so I let it dry overnight.  The next day I die cut the \”thank you\” from the inked panel.  I also die cut the same sentiment  from a white panel.  Then I just swapped the sentiments and glued the white die-cut into the opening on the inked panel and glued the inked sentiment onto the white panel.  I was careful to save all the die cut pieces so I could piece everything back together.  Voila…two cards!  Yana also loves embellishments so I felt encouraged to add buttercream jewels to the white background.  
These cheerful cards will come in so handy on my next thank you notes.
I am so pleased that you stopped by!
Karen
Uncategorized

WWC275 – Karen\’s Challenge: All About Occasions

Hello!  I am so pleased you stopped by.  Today we are showcasing \”Occasion\” cards at The Watercooler Wednesday Challenge and I am this week\’s hostess.

Offset Ink blended background:  squeezed lemonade, mustard seed, twisted citron, cracked pistachio, salty ocean and blueprint sketch
I recently won several stamps from Crackerbox and Suzy and this is my first card with my new haul.  I think the tree is just gorgeous.  I have been doing a lot of ink blending lately and knew this tree would be perfect for this technique.  I started by masking off a 1 1/2\” border on the left of the card and then started ink blending from the bottom right to the top left.  I was very heavy handed and put down a lot of ink.  I added a navy mat as I didn\’t want the clean white swath to fade into the card base.
Supplies Used:
Crackerbox and Suzy Tree Whimsey stamp
The Greetery Crimped Frame die
Distress Inks:  Squeezed Lemonade, Mustard Seed, Twisted Citron, Cracked Pistachio, Salty Ocean, Blueprint Sketch
Neenah cardstock
Navy Mat
Versafine Onyx Black Pigment Ink
Clear Embossing Powder
SSS Birthday Mix 1 sentiment stamp and die
Masking tape

NBUS Challenge – This is my first time to use Crackerbox and Suzy\’s beautiful Tree Whimsy stamp.

I am so pleased that you stopped by!
Karen 

Uncategorized

Altenew Academy – Easy Ink Blending Techniques

Hello and welcome.  I am excited about this new technique I learned at Altenew Academy!  I love ink blending but had never done \”faux watercoloring\” like this.   This is my homework assignment for lesson #5 and I was very inspired by our instructor, Amy Lee, and the process she walked us through. 
 This card has two firsts for me….ink blending on watercolor paper and faux watercoloring over ink blending.  I personally had never considered ink blending on watercolor paper as it is rough, but it worked beautifully! 

 I started by heat embossing 8 images from Altenew\’s Smile More stamp set.     I then inkblended yellow, pink, yellow green and blue over the embossing.  Next,  I dabbed 6 colors of dye ink on my glass media mat.  When my palette was ready, I very lightly spritzed the lower inked panel with water.   With a largish brush, I added contrast using very loose watercoloring (wet on wet). I dried the panel with my heat gun and then added more random color variation using the wet on dry technique.  In total, I used 10 different colors of dye ink to complete my watercoloring. Last, I very lightly added some blue paint splatters.  The watercolor paper warped slightly so I flattened it inside a heavy book.

I finished the card by stamping a large sentiment, mounted on a card base using craft foam for dimension and then added five buttercream jewels.  I will definitely use this technique again in the future.  
Supplies:
Altenew Smile More Stamp Set
Watercolor Paper
White Embossing Powder and Heat Gun
Picket Fence Studio Life Changing Brushes
Black Velvet Brushes (#8 for watercoloring and #2 for paint splatters)
Mini Spray Bottle

I made lots of beautiful ink blended backgrounds during this course, but
 this was my favorite card.

I am playing along at As You Like It \”Favorite Embellishment\” Challenge  I used these buttercream jewels which are my most used embellishment. The color seems to go with everything I create.

UPDATE:  I was so pleased to see my card selected as \”Top 3\” at the As You Like It Challenge.


Thanks for stopping by!
Karen  
Uncategorized

WWC272 – Helen\’s Challenge: Anything Goes with a Masculine Twist

Hello and welcome!  This week we are making masculine cards at The Watercooler Wednesday Challenge and Helen is our hostess.  My son-in-law has a May birthday so this card is for Josh.  Josh is a big dog lover and the dog in the middle is his sweet dog Asuna. 
Ink blended background using Catherine Pooler\'s Blue Suede Shoes.
I started by ink blending a blue background panel which I then put aside to dry.  On a white panel I die cut three windows for my pups and then fussy cut the curved edge.  Next, I stamped, Copic colored and die cut my pups.  Assembly was easy and I used foam tape to attach the white panel to the background and then popped the dogs on.

I saved the die cut circles and used them to make this Encouragement Card.

Supplies:
Mama Elephant Playful Pups stamps and dies
Catherine Pooler \”Its a Boy\” & \”Blue Suede Shoes\” ink
Picket Fence Studios Life Changing Brushes
SSS Stitched Circles
Neenah card stock
Copic markers
Black gel pen accents

I am playing along in:
The Paper Players CAS Men in Mind Challenge (#491)

The Paper Girls #200 \”All About the Boys\” Challenge

Paper Minutes Dog or Cat Challenge #641

I was very pleased to see this card designated \”A Cut Above\” by The Paper Players!

Thank you for stopping by!
Karen 
 

Uncategorized

WWC236 – Heidi\’s "All About Occasions" Challenge

Hello and welcome!  This week is all about occasions at Watercooler Wednesday.  Holidays, Birthdays, Weddings, Anniversary, Sympathy, Thank You, Congratulations….your choice.  Heidi is our hostess.  
I white heat embossed a bunch of random botanical images and then ink blended over the embossing.  In person, the blending looks the same color but when I photographed the card, the light played off potions of the card.

I used three inks:  Distress Shaded Lilac, Dare2B Artzy Blue Sky and SSS Steel Blue.  I finished off the cards with a few sequins.

Thanks for stopping by!
Karen
Image may contain: text