cardmaking

Adding a Personal Touch to Your Holiday Greetings | Hero Arts Holiday Catalog

Adorable Hero Arts "Peeking Bear" "Confetti Swirls" Holiday Card.

Who is ready to start creating for the holidays? Hero Arts Holiday Catalog is just full of wonderfulness and I am so excited to share cards I created with these new products.

Handmade card with adorable white polar bear in hat and scarf peeking around the edge with a die cut swirl background,

Adorable Peeking Winter Bear Die

I LOVE this adorable little peeking bear! I die cut him three times and then glued the layers together. I lightly ink blended the edges for some contrast and then added a Cranberry scarf and hat. I used Neutral Heros enamel dots for the nose and mouth. The background is die cut from Arctic cardstock with the new Confetti Swirls Die and then backed with a panel of Mist cardstock. The sentiment is from Cozy Study Stamps.

Supplies Used:

Celebrate Autumn

Handmade card with a fall foliage cover plate and liquid waterccolor leaves.

Autumn is a season of breathtaking beauty, with its vibrant foliage and crisp air. It’s the perfect time to channel that inspiration into crafting handmade cards. A die cut card featuring fall leaves is a wonderful way to capture the essence of the season and share it with your loved ones.

My Process for Creating This Autum Foliage Die Cut Card:

Hero Arts Fall Pattern leaf foliage cover plate die handmade card in yellows, greens, oranges and kraft.

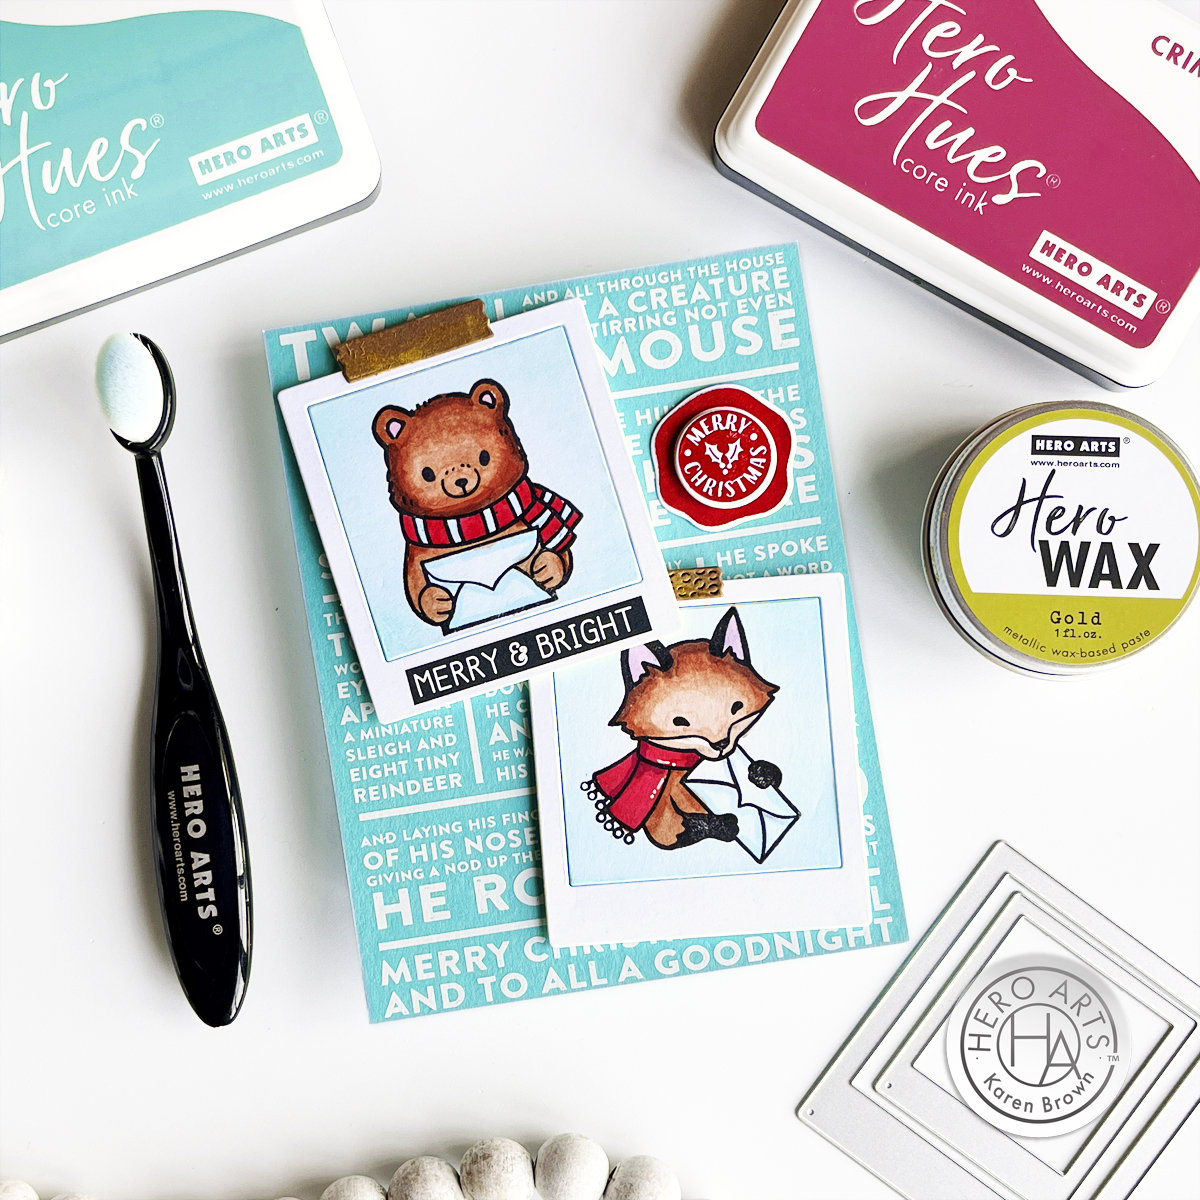
Winter Mail Critters: The Definition of Cuteness!

I really love my third card! The Winter Mail Critter stamps are the cutest! I have a few pics + directions on how I created this card below, so keep scrolling…..

Handmade Holiday card with Hero Arts Winter Mail Critters, White Holiday Collage Hero Transfers, Wax Seals.

Key Products Used:

Handmade Christmas Card featuring a Hero Arts bear and fox each holding a letter with a Rub On Transfer background.

Hero Arts Christmas Card Tutorial:

I started by die cutting two frames and two “tapes” from the Journaling Photo Frame Infinity Dies Set. I then very lightly blended Paradise Core Ink along the edges of the photo background (using the sticky mat in my Stamp Wheel), stamped the bear and fox with my Stamping Tool and Copic colored the images (colors listed below). I also rubbed on a transfer Merry & Bright sentiment.

The background was so easy! I rubbed on the fun Twas the Night Before lettering from the White Holiday Collage Hero Transfers (RT121) with a bone folder and all the writing transfered to the paper perfectly on the first try. The card background is Paradise cardstock.

I wanted a pop of red, so I stamped and die cut a Merry Christmas Wax Seal using Crimson Core Ink. I also put a dab of Hero Wax Gold to add a little depth and shine to the “photo tape”

I assembled my card with foam tape and it is ready to send.

Copic Colors Used:

  • Browns: E27, E15, E13, E11, E5
  • Reds: R27, R39
  • Pink: RV11
  • Blue: B00
Cute holiday card with critters featured in  Hero Arts Journaling Photo Frame Infinity Dies DF125

Blog Hop Info:

Hero Arts will give away TWO $50 gift cards, drawn from the comments left across the hop. Enter by Wednesday, August 28th at 11:59pm PT. The winners will be announced on the Hero Arts blog.

Hero Arts Creative Team:

Channin Pelletier

Charlene Madrid

Heather Ruwe

Ilina Crouse

Jeannie Lieu

Jennifer Kotas

Kailash Naidoo

Karen Brown

Michelle Short

Natasha Polite

Natasha Vacca

Pocono Pam

Rachel Kleinman

Rosie Lopez

Seeka

Special Guests:

Cathy Zielske

Laura Bassen

Mindy Eggen

Final Thoughts

Today I used a bunch of lovely new products from Hero Arts 2024 Holiday Catalog but there are so many other great additions that I know you will love. Thanks for stopping by today and “hopping” with Hero Arts.

cardmaking · Cardmaking Kit · Give Away

Hero Arts | My Monthly Hero March 2024 Blog Hop and Giveaway

Three colorful cards from Hero Arts March 2024 Release.

Boy do I love this March 2024 My Monthly Hero kit! I am sharing three cards today and they were all so fun to create. I think the Classic Kit is going to be wonderful for mixed media projects.

Classic Kit

Luscious orange mixed media card using Hero Arts March 2024 My Monthly Hero Classic Kit.

For today’s post, I created two cards using the Classic Kit. I recently discovered the wonderfulness of liquid watercolors and WOW, WOW WOW! What took me so long? So, Card #1 has a background created with the Classic Kit + three liquid watercolor colors.

My Process:

  • I added a small amount of Dandelion, Orange and Bright Pink liquid watercolor to my paint palette. With a wet brush, I painted bold strokes on my Luxe watercolor paper. I also added some drips to the panel. I dried and repeated the process one more time. I also put a large acrylic block on top for a bit so my panel would be nice and flat.
  • The Classic Kit contains two sheets of Rub-On transfers and I added portions of the transfers randomly to my background. Remember to leave a space for your sentiment.
  • I added a minimal amount of watercolor paint spatters.
  • Using Taffy and Fruit Punch inks, I stamped my sentiment and some images (crane, scribbles, bamboo leaf, character and reeds) from the included stamp set.
  • Next, I separated the circle inset from the rectangular plate with my snippers
  • Using just the rectangular plate (without the circle) I embossed my background and I love the subtle embossing and texture that it adds.
  • I painted a second piece of watercolor paper with just orange liquid watercolor. In some places I diluted the watercolor more and in others I added very saturated color so there was variation in my orange color. I dried and then weighted with an acrylic block.
  • I die cut my orange circle with the cover plate inset + a Circle Infinity Die for a medallion look. I liked this medallion so much that I created a few extras to have on hand for future mixed media projects. You can see one of them in the next photo.
  • I glued my medallion to my background and then trimmed the background with a Rounded Rectangle Infinity Die.
  • My final step was to lightly ink the edges with Tangerine Core Ink.

This card reminds me of summer and orange sherbet and I love how happy and bright it is.

Classic Kit Card Using the Included Ink Cubes

Colorful card using Hero Arts March 2024 My Monthly Hero Classic Kit with the included ink cubes.

For my second card, I followed the same process as Card #1, except I used the 3 ink cubes included in the Classic kit. I smooshed the ink on my craft mat and used a wet brush to paint my background. I also used the cover plate as it was designed and die cut the entire background panel, including the circular inset, at one time. I then backed the opening with a red panel that I created by going “direct to paper” in a circular motion with the Cherry ink cube.

Here is a photo of the contents in the March 2024 Classic Kit:

My Monthly Hero Classic Kit contents.

KIT VALUES
Classic Kit: $82 Value for $36.99
Premium Kit: $115 Value for $49.99

Subscription Options

Bonsai Die Cut Scene Card

Die Cut and ink blended Hero Arts Bonsai Tree showcased in the Journaling Photo Frame Infinity Die Set.

I LOVE die cutting so I really enjoyed making my third card featuring The Bonsai Fancy Die, which is March Add-On product. I die cut my components, ink blended a bit and popped onto a panel made using a favorite of mine, the Journaling Photo Frame Infinity Die Set. The sentiment is from the Ornate Frames Hero Transfer . If you’d like to see an additional card I made using the Photo Frame Set, click HERE.

March Get Them All Bundle

March Accessory Bundle

Lovely handmade die cut Bonsai Tree greeting card.

Supplies Used on My Bonsai Card:

Blog Hop and Giveaway:

We will give away a $50 gift card, drawn from the comments left across the hop. Enter by Sunday, March 10th at 11:59pm PT, and the winner will be announced on the Hero Arts blog the following week.

Hero Arts

Hero Arts Creative Team:
Natasha Vacca
Dana Joy
Michelle Short
Jennifer Kotas
Rosie Lopez
Heather Ruwe
Mindy Eggen
Natasha Polite
Channin Pelletier
Rachel Kleinman
Jeannie Lieu
Seeka
Karen Brown
Charlene Madrid
Pocono Pam
Kailash Naidoo
Lydia Fiedler

Special Guests:
Nichol Spohr
Emily Midgett
Kelly Taylor      

cardmaking · Mixed Media · papercrafting

Big News + Hero Arts | November Add-Ons

I am thrilled to announce that I have been selected to join the Hero Arts Creative Team! This incredible opportunity allows me to collaborate with a group of talented and passionate artists who share a love for crafting and creativity. I am beyond excited to explore new techniques, experiment with Hero Arts’ amazing range of products, and inspire others on their own artistic journeys. Together, we’ll embark on a creative adventure filled with endless possibilities, and I can’t wait to share the magic that unfolds along the way! Stay tuned for a whirlwind of innovative projects, tutorials, and inspiration that will surely ignite your own crafting passions. 🎨✨ #HeroArtsCreativeTeam

Okay, let’s make some art together!

Handmade card with Hero Arts November Add-Ons: Winter Mail Critters, White Holiday Collage Hero Transfers, Wax Seals.

I also wanted to share a card using some of the fun Add Ons from the November My Monthly Hero Kit. This month has so many goodies and I used 4 of them today.

Handmade Christmas Card featuring a Hero Arts bear and fox each holding a letter with a Rub On Transfer background.

Hero Arts Christmas Card Tutorial:

I started by die cutting two frames and two “tapes” from the Journaling Photo Frame Infinity Dies Set. I then very lightly blended Paradise Core Ink along the edges of the photo background (using the sticky mat in my Stamp Wheel), stamped the bear and fox with my Stamping Tool and Copic colored the images (colors listed below). I also rubbed on a transfer Merry & Bright sentiment.

The background was so easy! I rubbed on the fun Twas the Night Before lettering from the White Holiday Collage Hero Transfers (RT121) with a bone folder and all the writing transfered to the paper perfectly on the first try. The card background is Paradise cardstock.

I wanted a pop of red, so I stamped and die cut a Merry Christmas Wax Seal using Crimson Core Ink. I also put a dab of Hero Wax Gold to add a little depth and shine to the “photo tape”

I assembled my card with foam tape and it is ready to send.

Cute holiday card with critters featured in  Hero Arts Journaling Photo Frame Infinity Dies DF125

Products Used:

Hero Arts November 2023 My Monthly Hero Kit and Add Ons

Winter Mail Critters Die Bundle SB385 (or stamps only)

White Holiday Collage Hero Transfers RT121

Holiday Message Strips Hero Transfers RT120

Wax Seals and Dies D306

My Monthly Hero Subscription

Journaling Photo Frame Infinity Dies DF125

Paradise Core Ink

Crimson Core Ink

Paradise cardstock.

Hero Wax Gold

Precision Glue

Compact Desktop Die Cutting Machine

Handy Desktop Tool Holder

Stamp Wheel Stamping Tool and Sticky Mat

Bone folder

Highlighter Tape (for die cutting and to tape the photo background to the frame)

White thin Posca pen to add highlights to the scarf.

Copic Colors Used:

  • Browns: E27, E15, E13, E11, E50
  • Reds: R27, R39
  • Pink: RV11
  • Blue: B00

I am so glad you stopped by!

Interested in more…You can also find me at these spots too:

@karens_mini on Instagram

Pinterest: @karenabrown

FaceBook: Karens_Mini

YouTube: Karen Brown