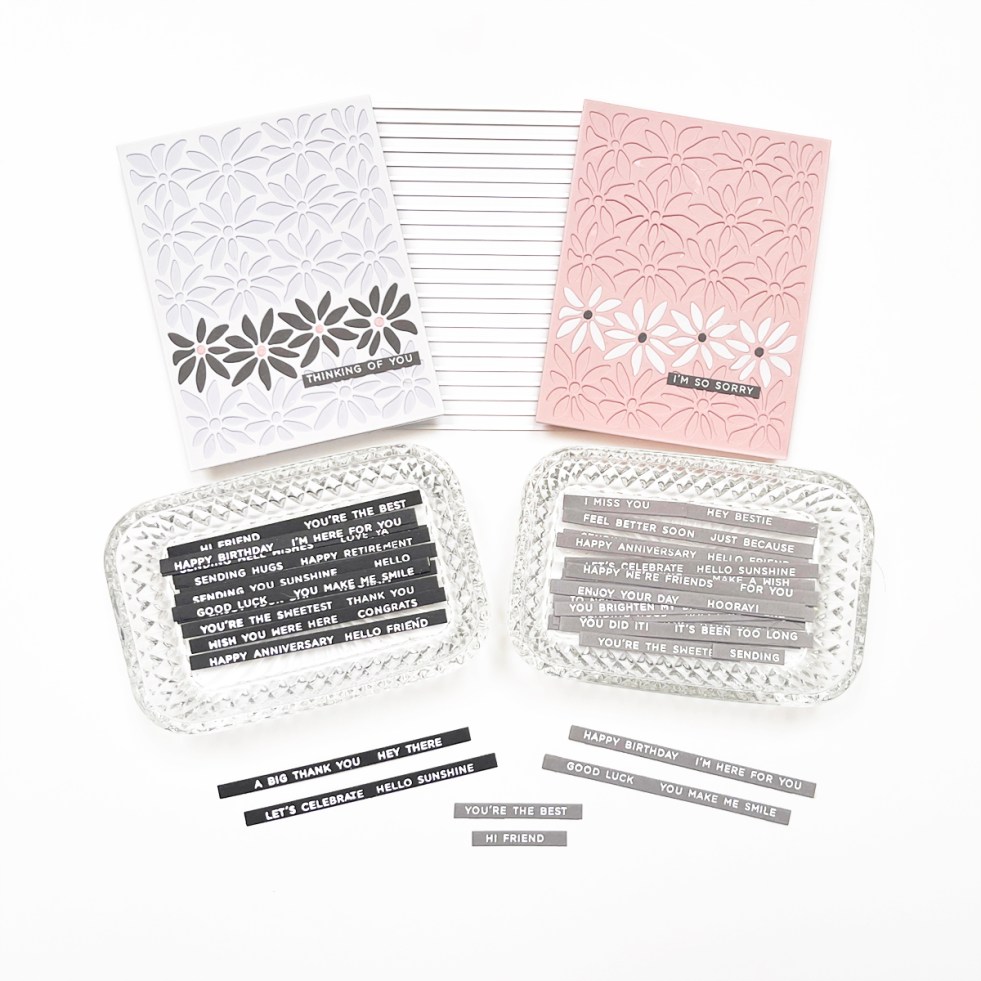
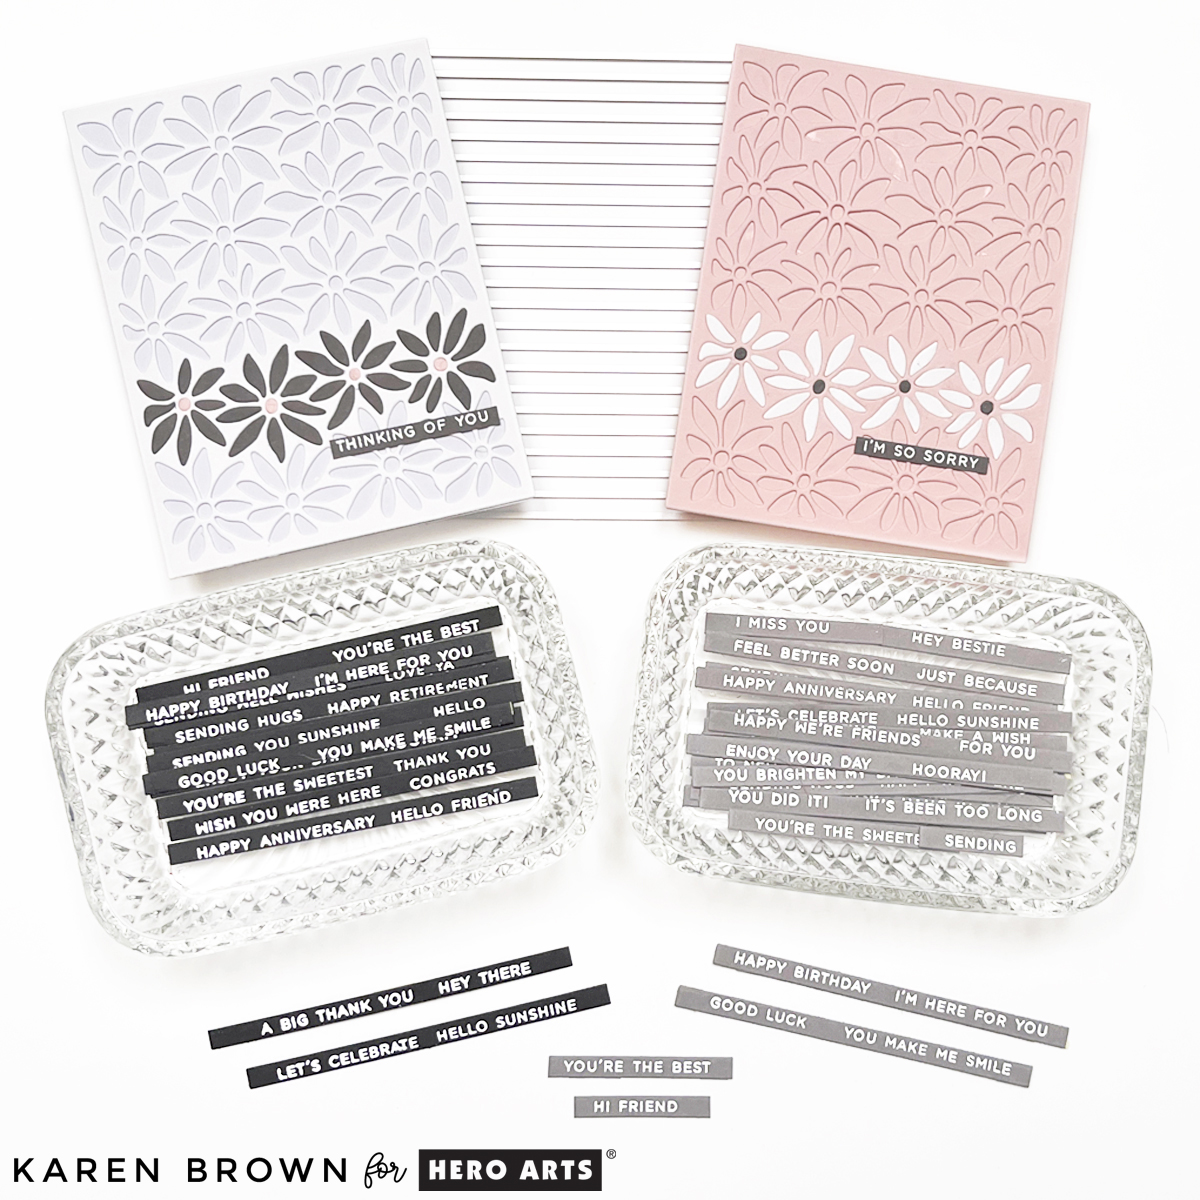
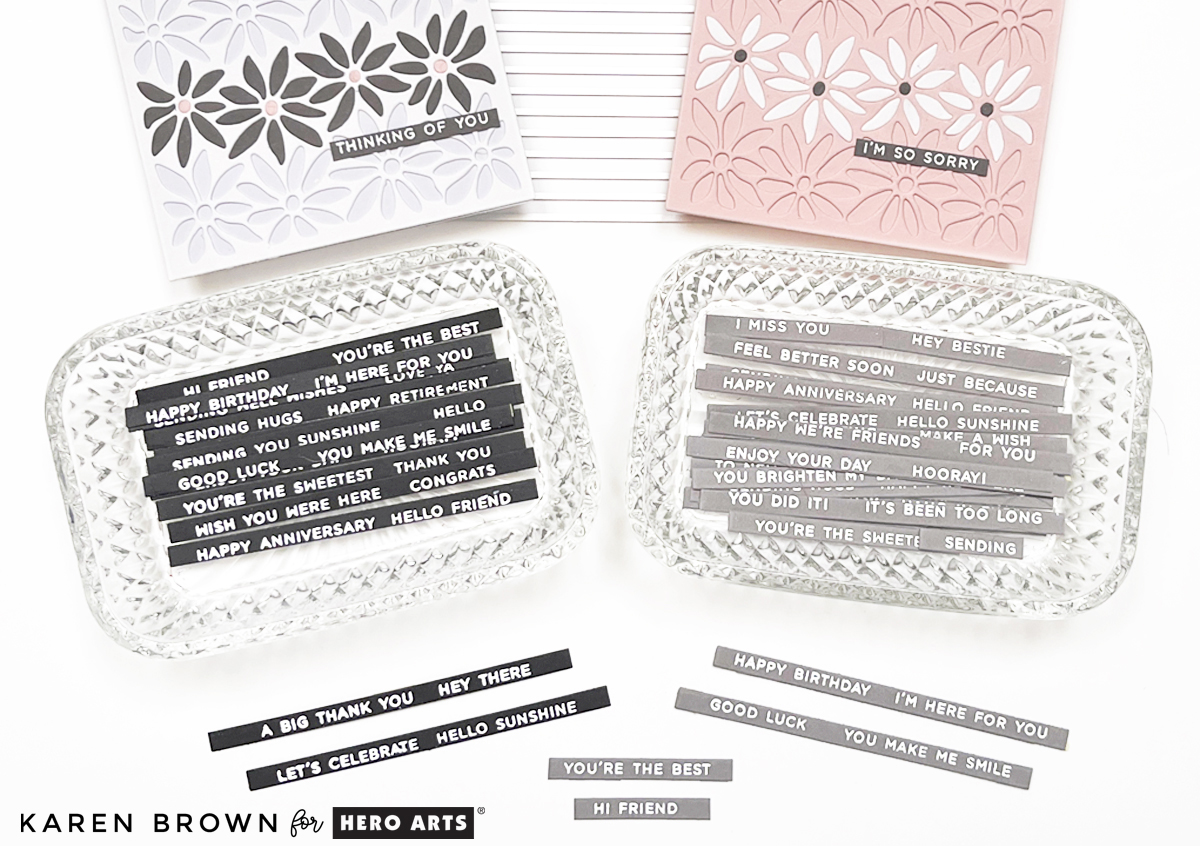
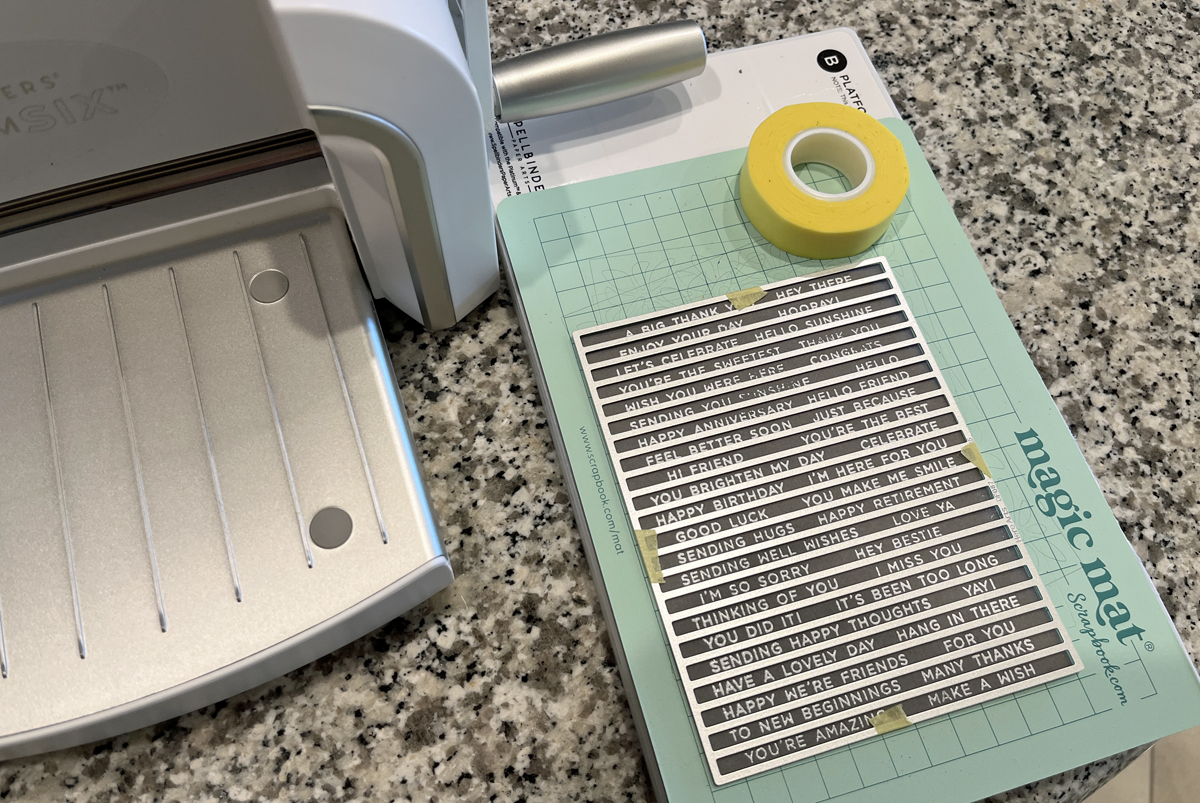
One of the biggest time-savers in my craft room is keeping premade sentiment strips ready to go. I love being able to audition sentiments while I’m designing a card—sliding options around, trying different tones, and choosing the one that feels just right.
Today I’m sharing my favorite sentiment stamps for cardmakers, how I batch-make sentiment strips, and how I used them to create thoughtful sympathy cards using a partial inlay die-cutting technique.
In This Post, You’ll Learn:
• The one step that saves me the most time when crafting • How to streamline your cardmaking process • Why batching can improve your creativity • Simple ways to work smarter (not harder)
Best Sentiment Stamps for Cardmakers (and Why I Premake Them)
Having sentiment strips prepared in advance:
Speeds up cardmaking
Reduces decision fatigue
Helps you visualize the finished card sooner
Makes it easier to create sympathy and encouragement cards thoughtfully
For this batch, I created two classic, versatile options:
White heat embossing on gray cardstock
White heat embossing on black cardstock
These neutral combinations work beautifully across many card styles and occasions. These sentiment strips would also be beautiful stamped on white cardstock.
The results were clean, bright, and incredibly readable.
I also have a process photo showing the heat-embossed panel with the coordinating die taped in place, ready to run through my Platinum 6 die-cutting machine—my favorite way to batch die cut sentiments quickly and accurately.
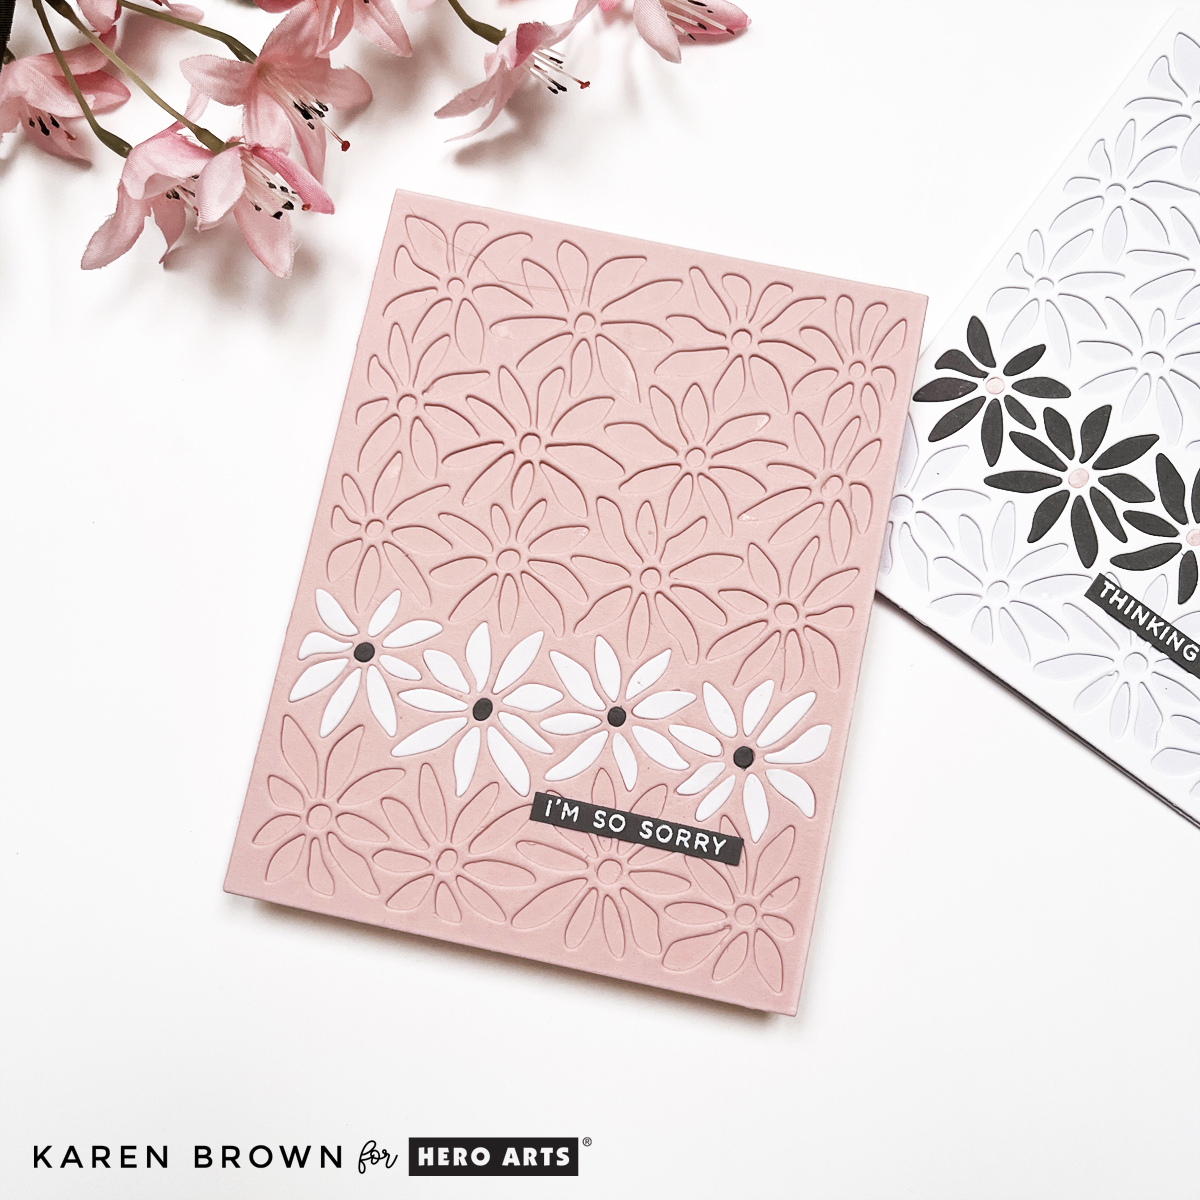
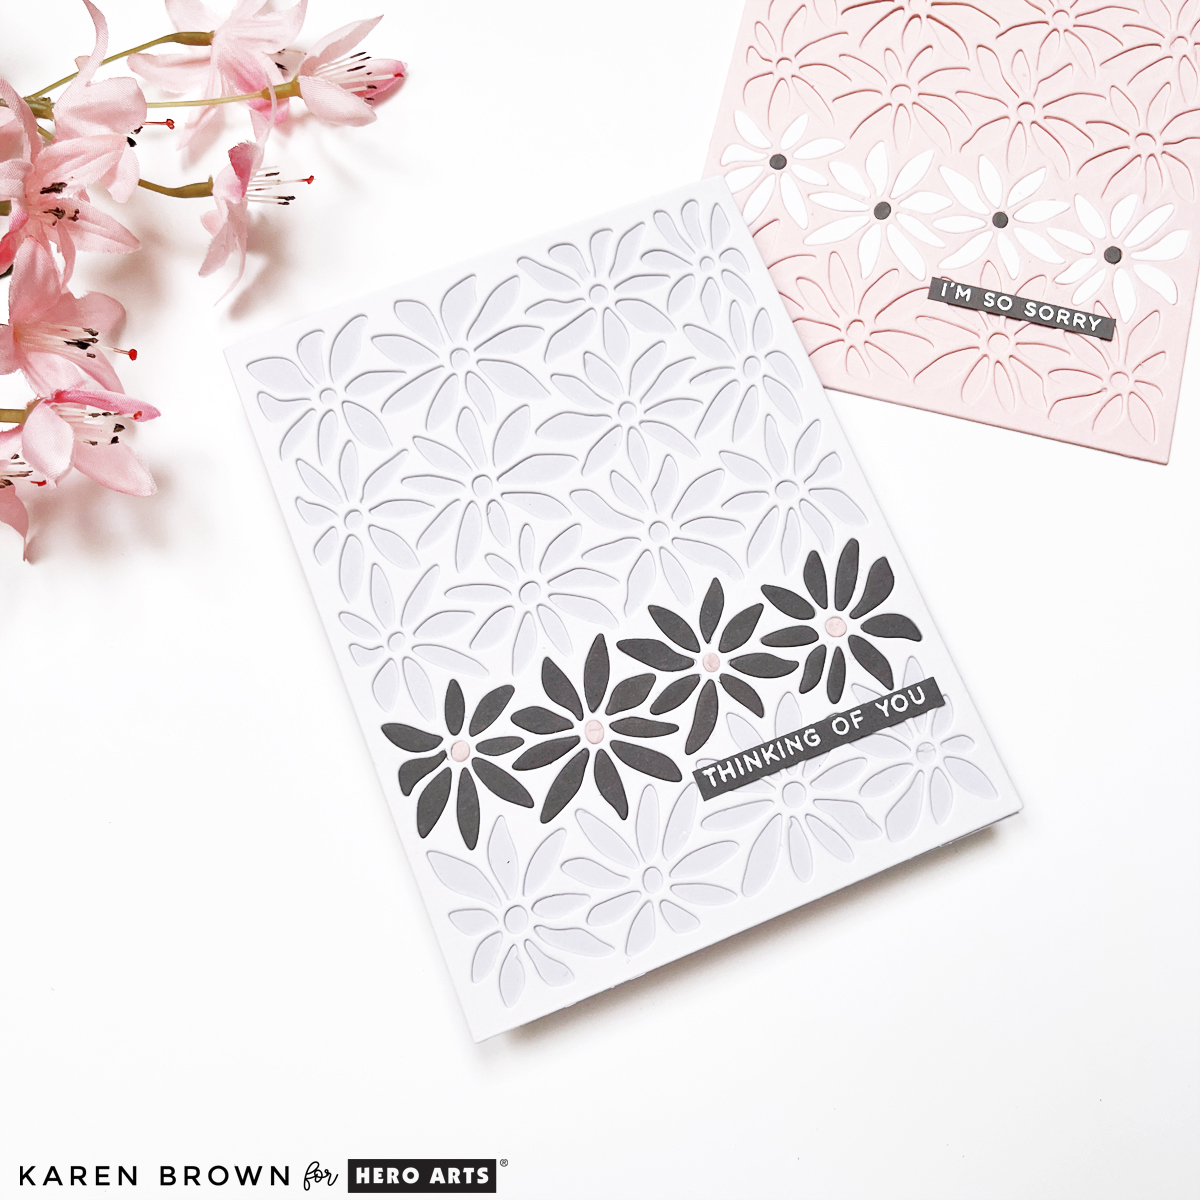
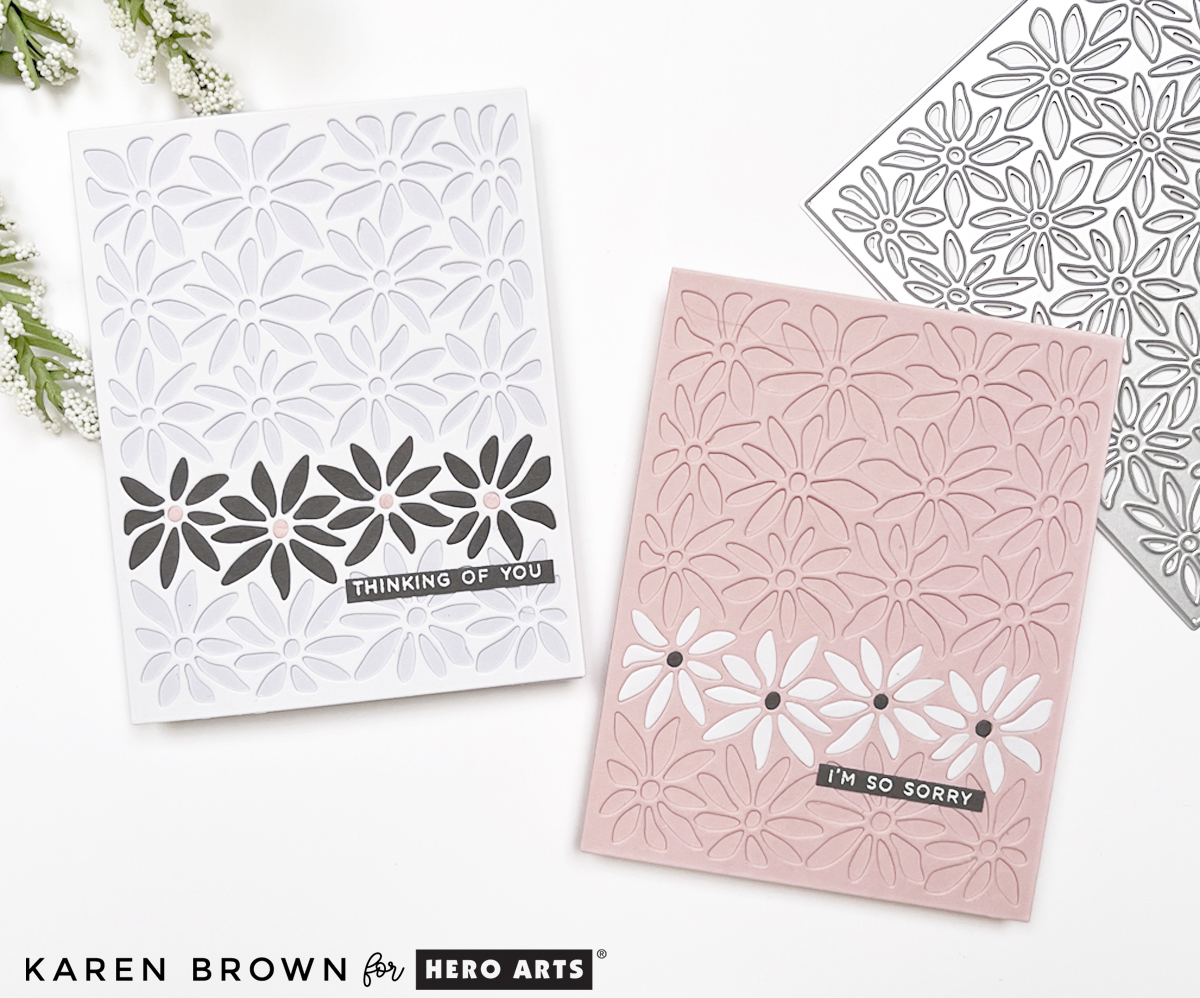
Using Sentiment Strips on Sympathy Cards
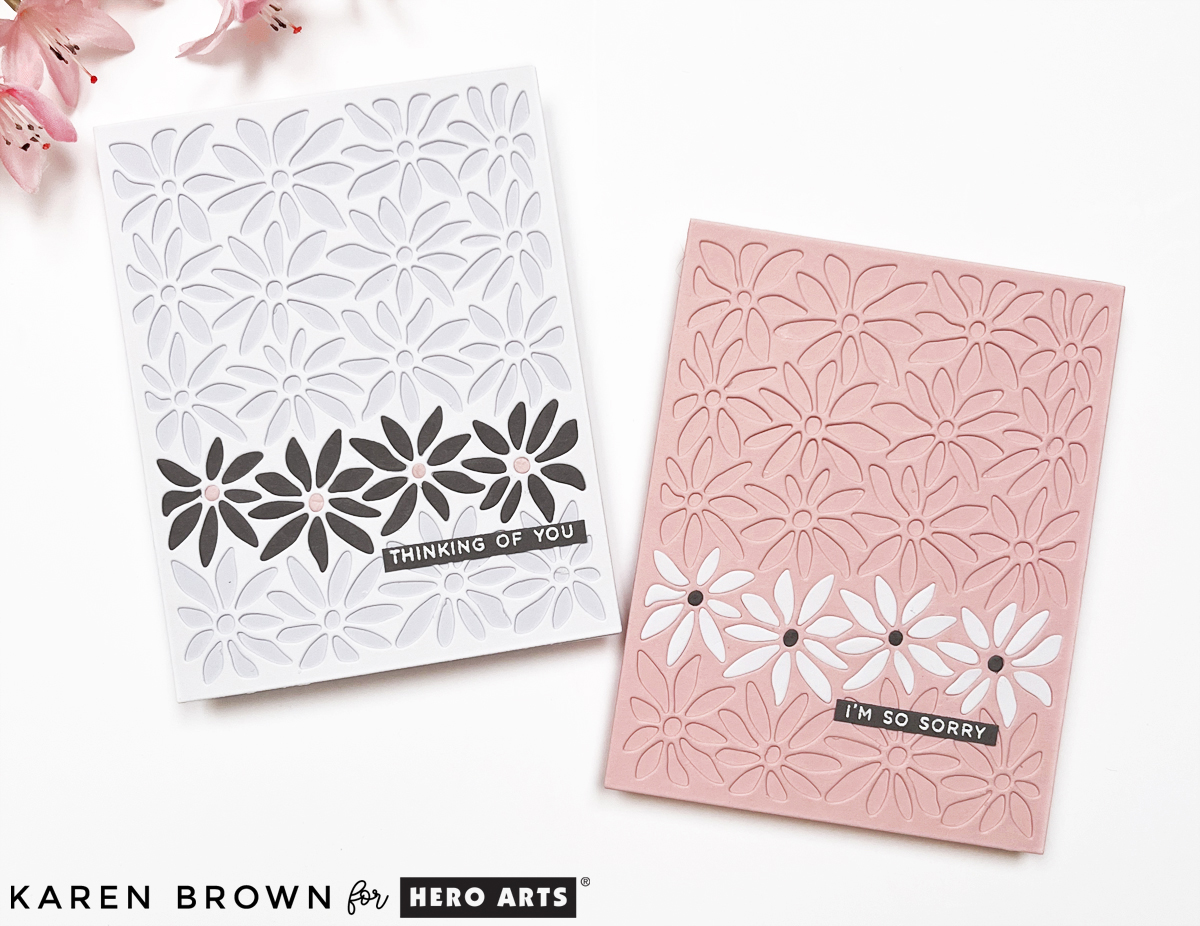
To put these sentiments to use, I created two sympathy cards using the Daisy Cover Die and a partial inlay die-cutting technique.
This technique is a bit like puzzling for cardmakers—methodical, satisfying, and surprisingly relaxing.
Because the cover die is large and detailed, I chose to emphasize just one row of daisies, allowing the rest of the panel’s texture to shine while keeping the design calm and respectful.
Finish with one of your premade heat-embossed sentiment strips
That final sentiment strip adds a thoughtful, understated finishing touch—perfect for sympathy cards.
Why This Design Works for Sympathy Cards
Clean and modern design
Subtle dimension without bulk
Soft color palette that conveys comfort and care
Color Choices:
Soft pink – tenderness, warmth, compassion
White – peace, sincerity, purity
Gray – quiet, sympathetic tone
Why I’ll Always Keep Sentiment Strips on Hand
Having premade sentiments allows me to focus on design and emotion, not last-minute stamping. Whether I’m making a sympathy card, a quick hello, or a batch of thank you cards, they’re always ready when I need them.
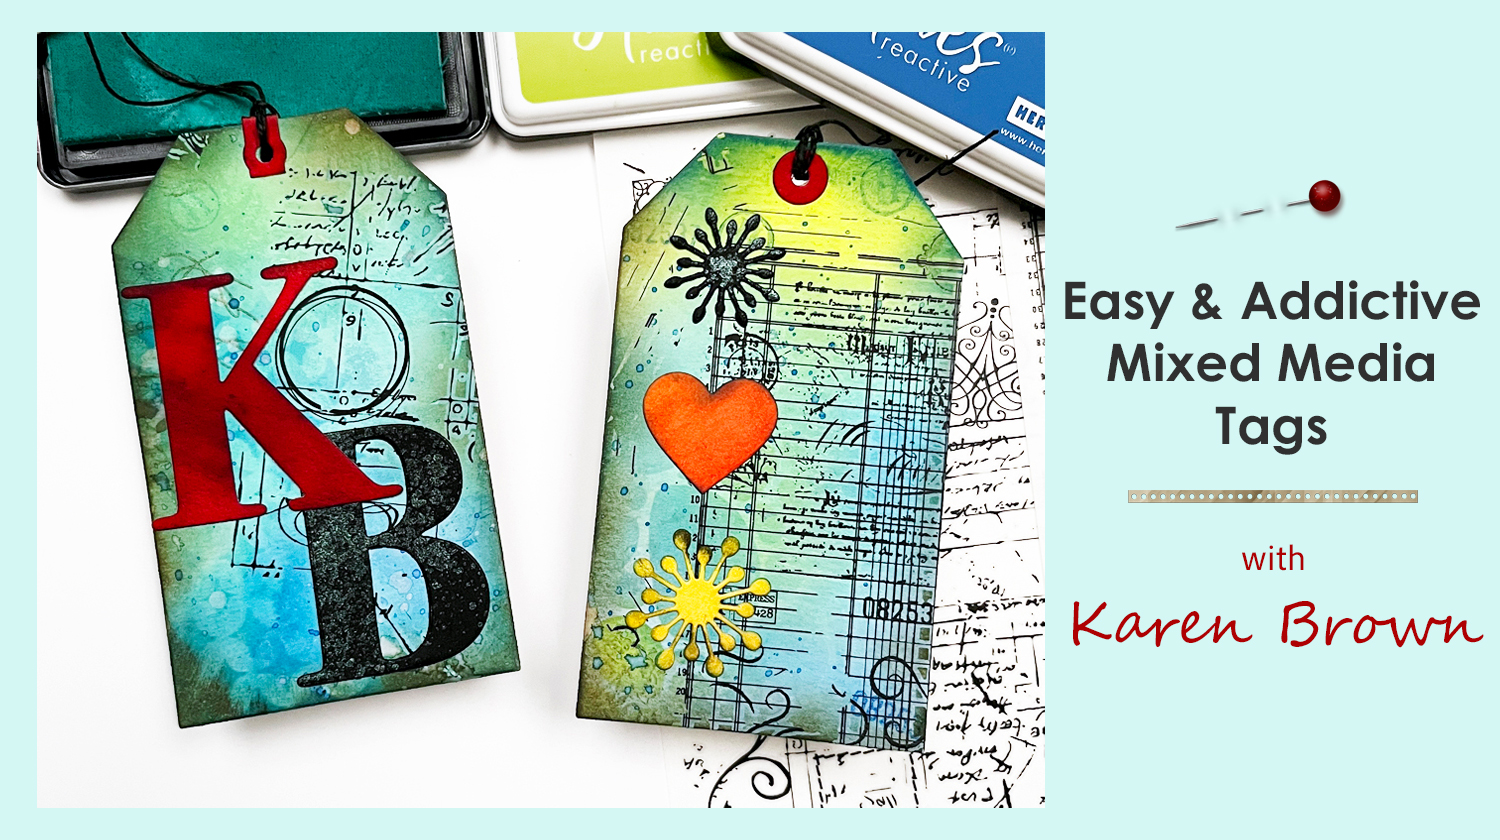
If you’ve ever wanted to try mixed media but weren’t sure where to start, this is the perfect beginner-friendly project.
In this tutorial, I’ll show you how to create easy mixed media tags using simple supplies and a few layering techniques that are both fun and surprisingly addictive.
These tags are a great way to experiment with color, texture, and stamping—without feeling overwhelmed.
This post coordinates with my YouTube videowhere I walk through every step in real time. If you like seeing the process in action, be sure to watch the video alongside this tutorial.
Exact supplies used in this post are at the bottom of this post.
Why This Is a Great Beginner Mixed Media Project
No pressure to be perfect
Great way to practice layering
Uses simple, repeatable techniques
Each tag turns out unique
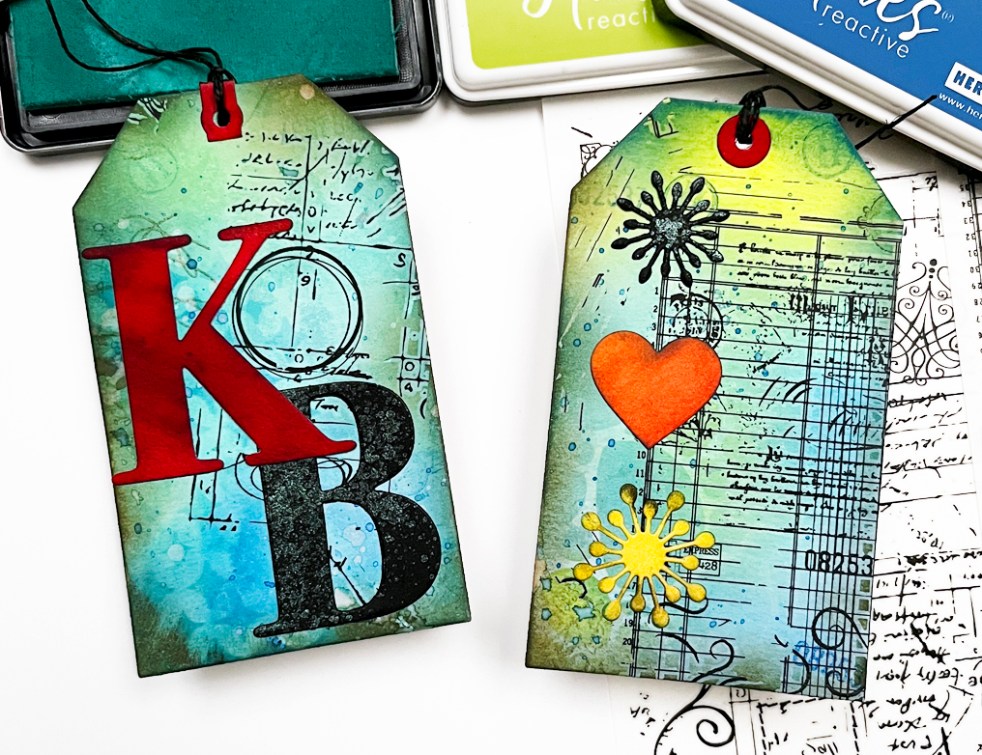
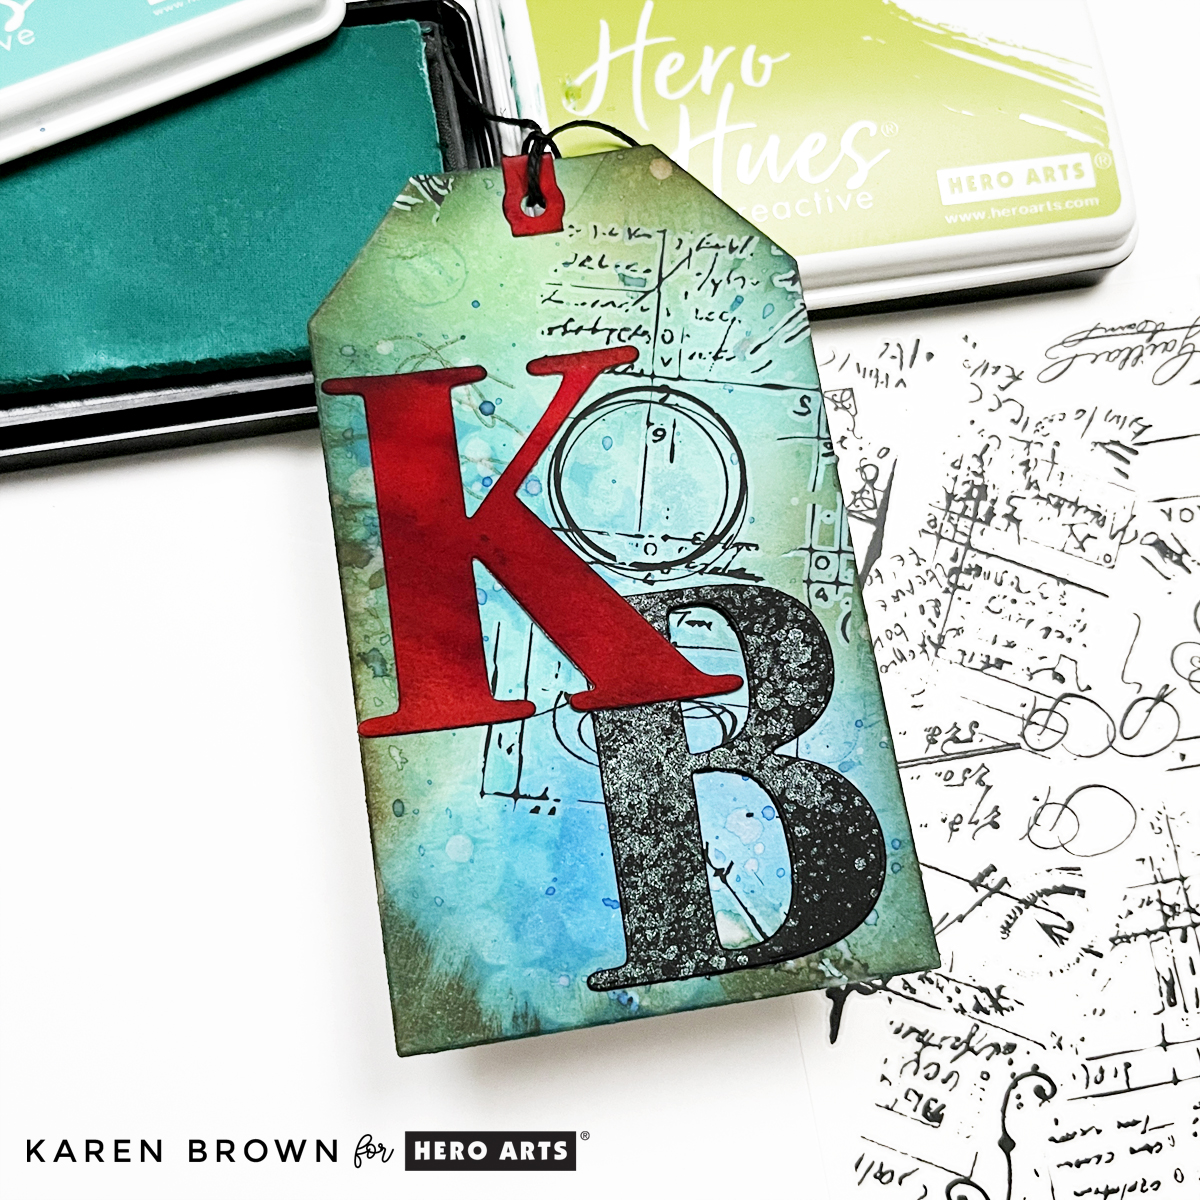
Mixed Media Tags for Absolute Beginners: 11 Easy Steps
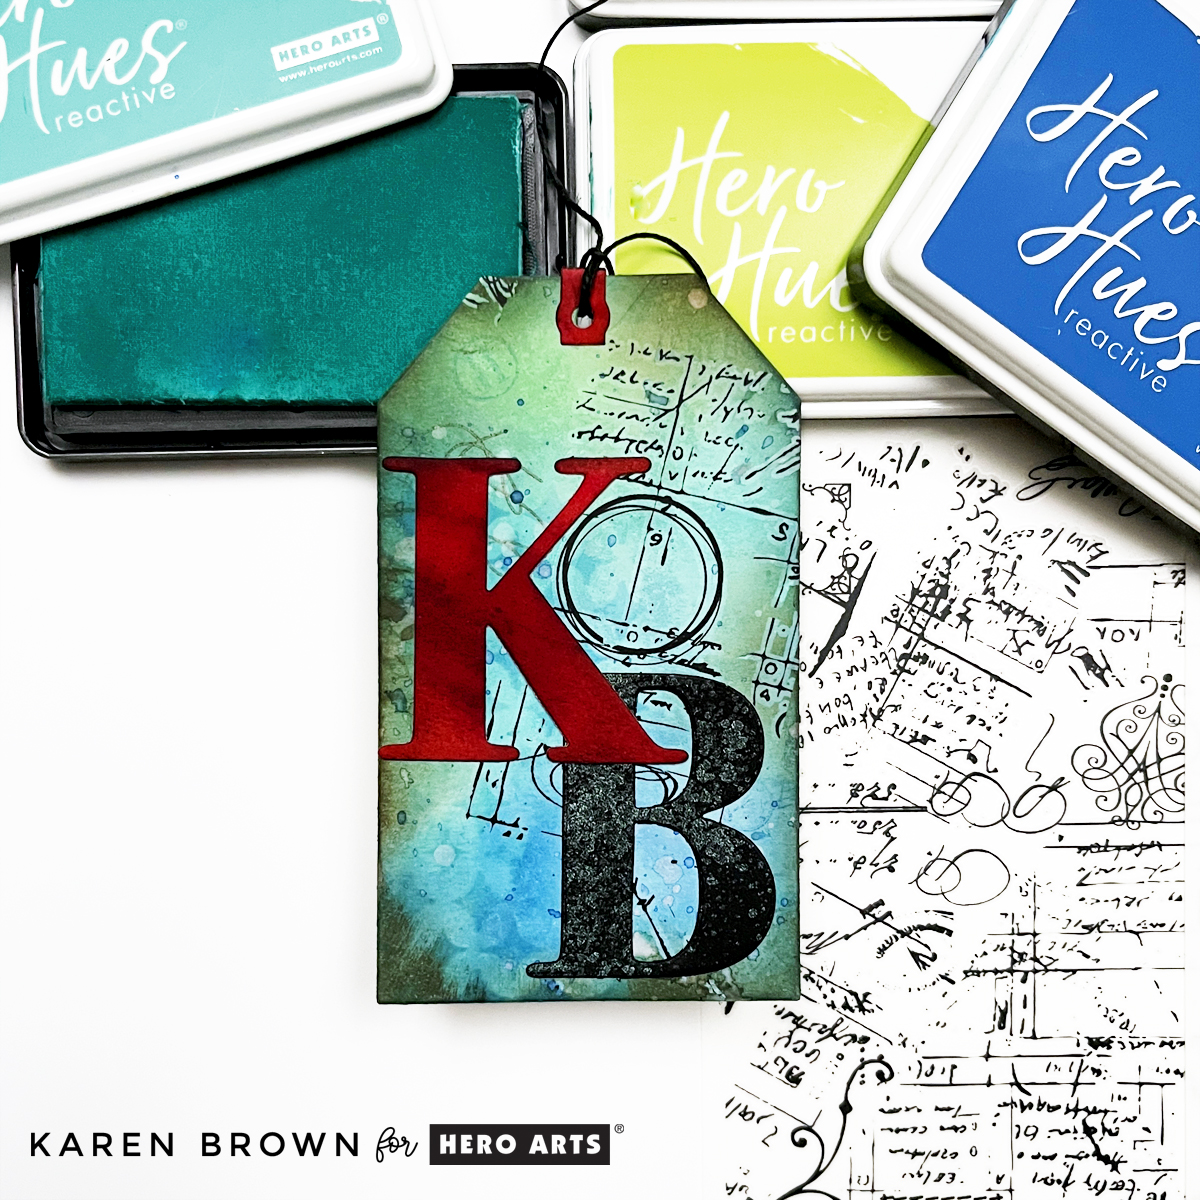
Using die-cut initials or hearts creates strong focal interest on mixed media projects.
📌 Pin this for later
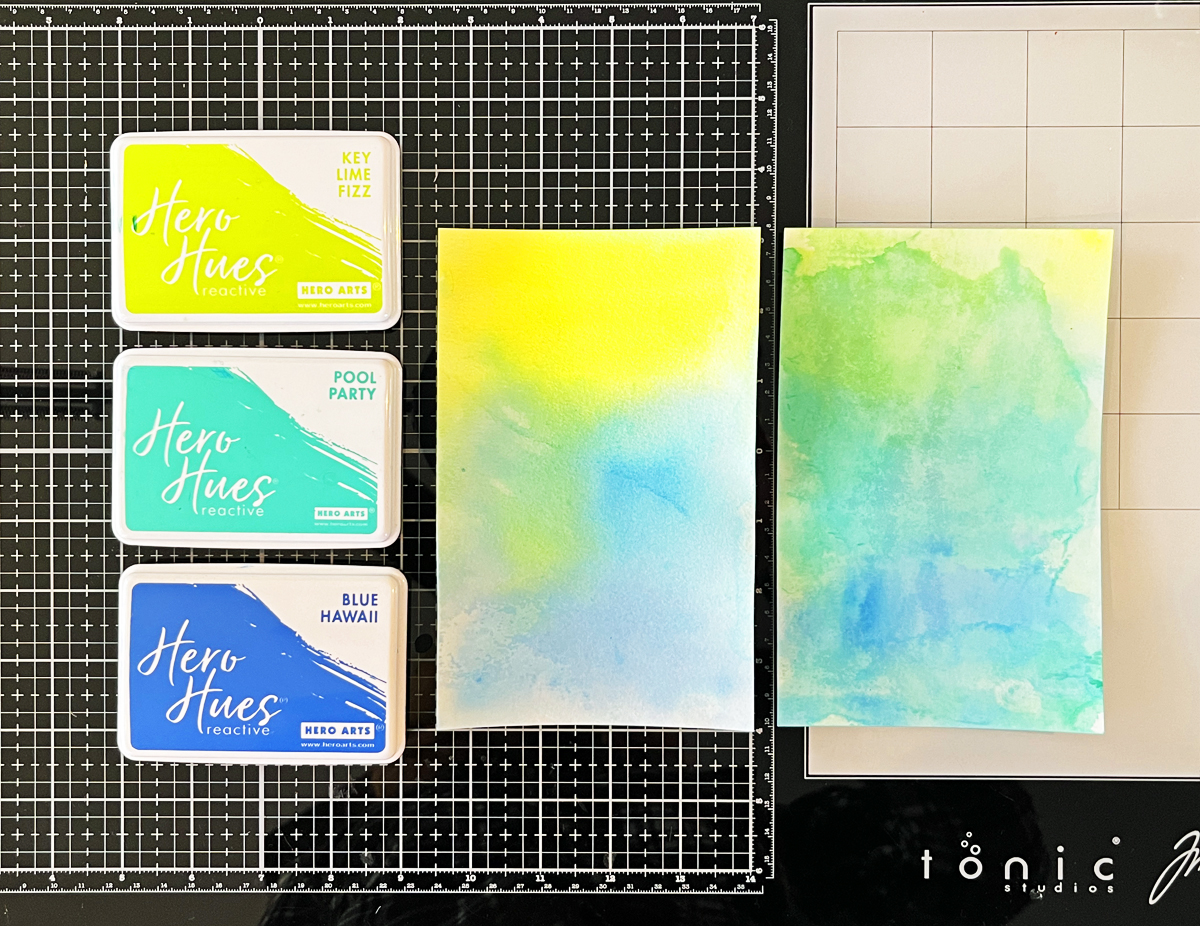
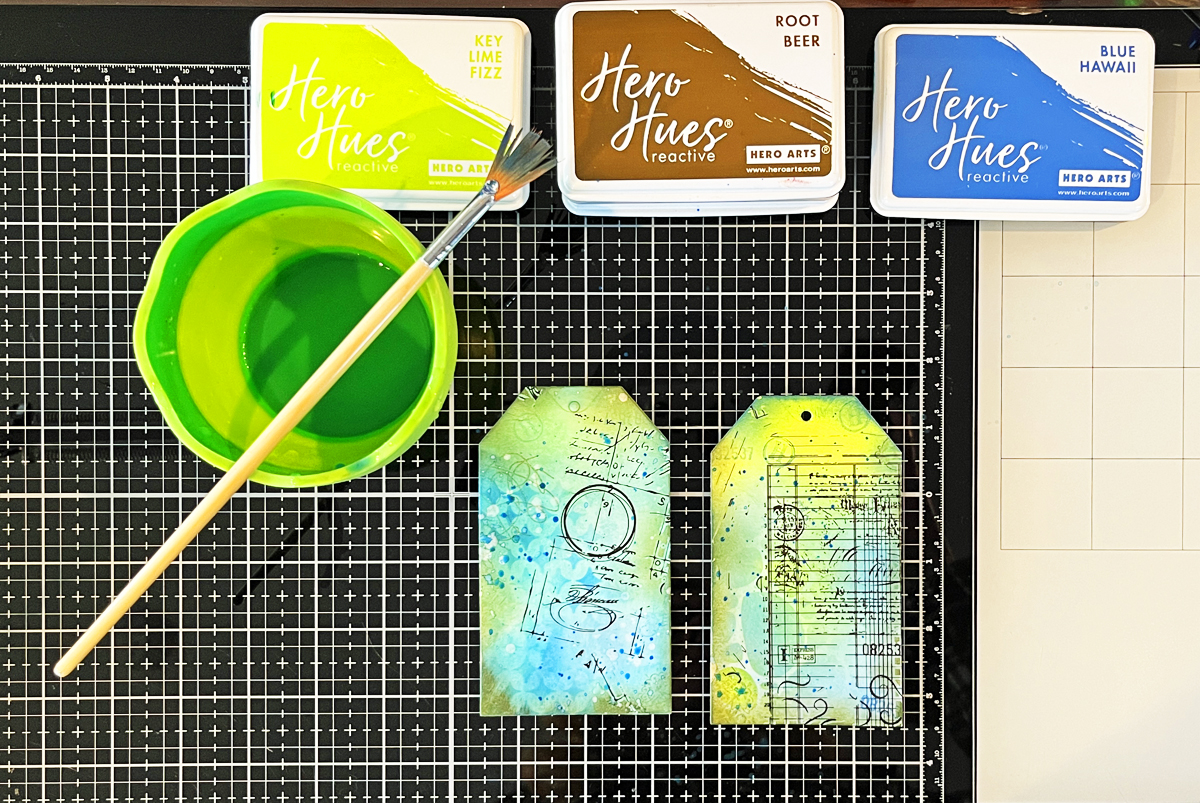
Step 1: Create a Simple Ink Smoosh Background
Add three shades of water-based reactive ink to your craft mat, spritz generously with water, and press the watercolor paper into the ink. Let sit in the puddle with an acrylic block on top for 1 – 5 minutes. The more water you use, the softer the panel. I used Key Lime Fizz, Pool Party and Blue Hawaii on my tags.
If you are interested in learning how to create an easywatercolor background, I have step-by-step directions in my tutorial how to make mixed media tags in 9 easy steps.
Step 2: Dry Your Panel
Let the panel air dry or speed things up with a heat tool. If it warps, flatten it under a book once dry.
Ink Smoosh background panels are the easiest way to start a beginner mixed media project.
Step 3: ViewFinder Trick
I like to use my tag die as a viewfinder to decide which part of my panel I want to feature.
Step 4: Die Cutting
Once I’m happy, I tape the tag die in place and run it through my Platinum 6 die cutting machine. It is one of the tools I rely on regularly—several of them are included in my list of the best cardmaking supplies for 2026.
Step 5: Stenciling
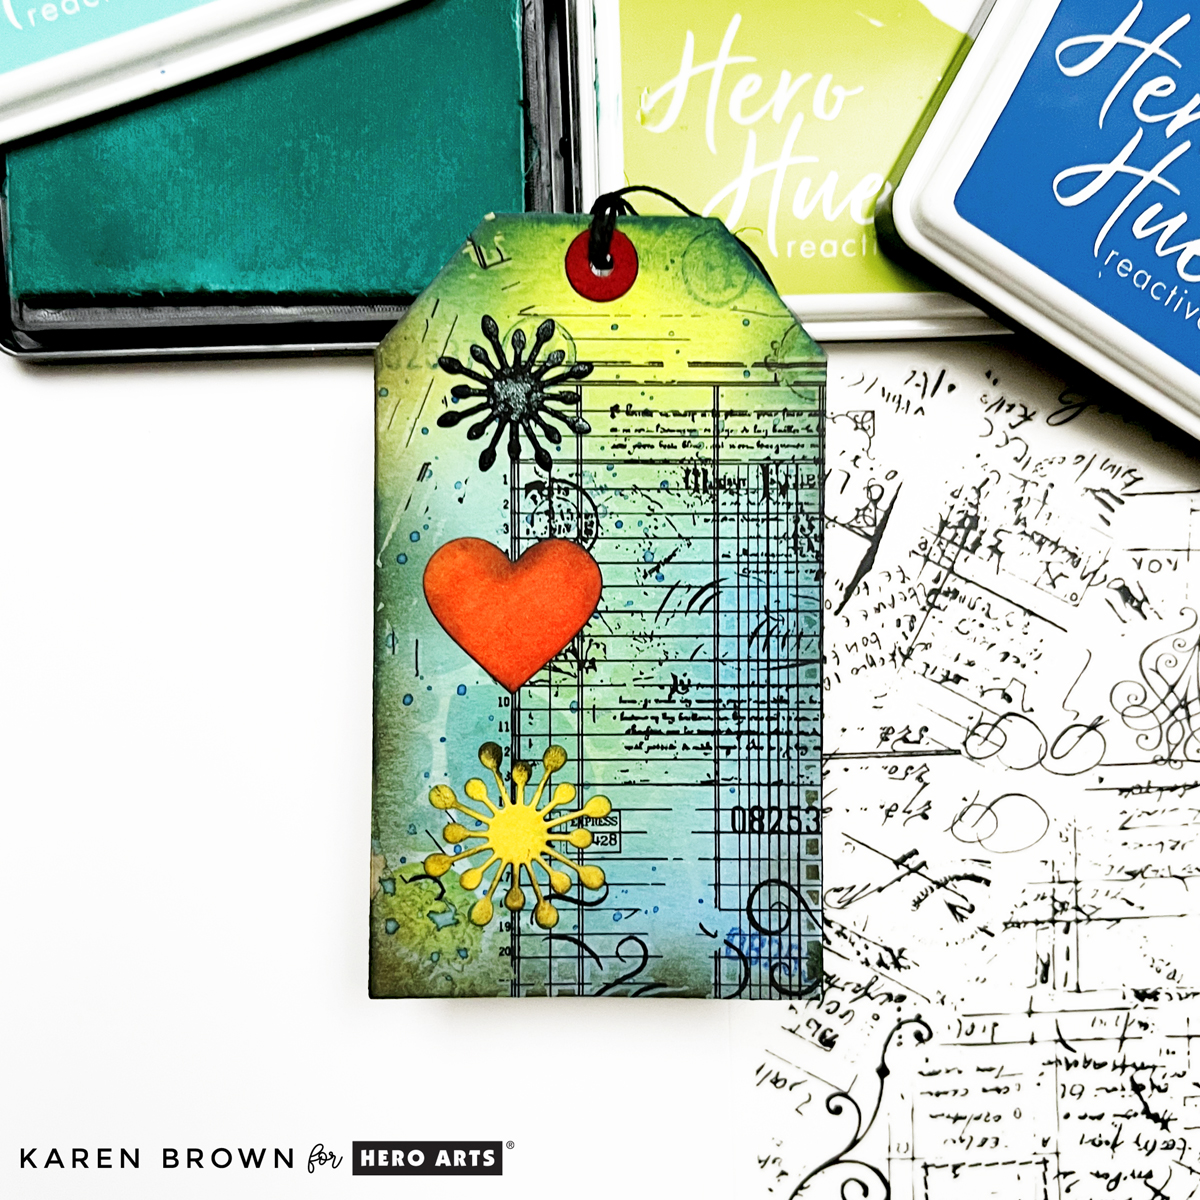
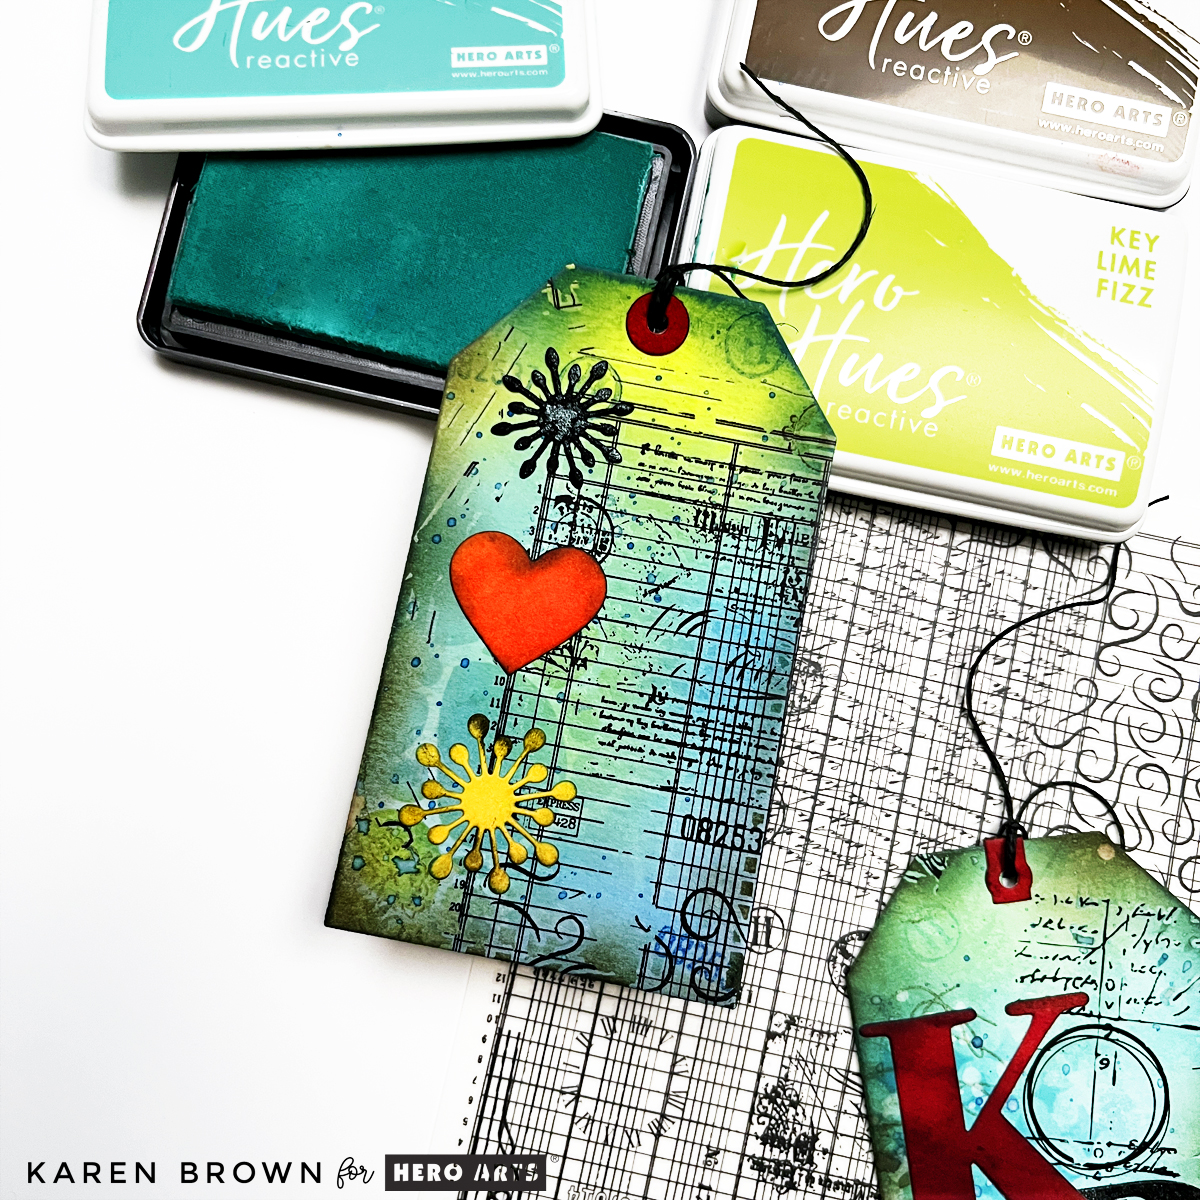
Now its time to start layering on top of our background. I add stenciling to about two thirds of each tag using the same reactive ink colors that I used in Step 1. You can use just about any stencil you have. I chose two very different designs and I love how they both turned out!
Stenciling is one of the cornerstone layers for mixed media projects.
Step 6: Second-Generation Stamping
This is one of my favorite mixed media techniques.
Ink your stamp, stamp once on scrap paper, then immediately stamp onto your background.
The lighter impression adds depth and texture while keeping things loose and organic.
Use the same colors you used on your background in Step 1. This keeps everything cohesive and soft and adds subtle interest without overpowering the background.
Rub on transfers are one of the easiest layers to add to your mixed media tags.
Cut a small section, place it on your tag, and rub it on using a bone folder or craft stick. I like angling my transfers slightly for a more vintage, organic look.
Step 8: Add Some Grunge and Ink Blend the Edges
Ink blending around the edges of the tags adds instant definition and helps ground all those layers.
This is where everything starts to come together. I like using a darker neutral ink like Root Beer to “grunge up” the edges just a bit.
Ink blending around the edges of a mixed media tag add the perfect amount of vintage grunge to your projects.
Step 9: Add Splatters
Using a fan brush, splatter water (then blot with a cloth) and them the same inks used above. This step instantly adds movement and that “mixed media magic” feel.
Splatters are the perfect finishing touch for mixed media projects.
Step 10: Add Focal Points
Now it’s time to bring in focal elements.
I used small die-cut images, lightly distressed the edges, and glued them directly to the tags. Keep the focal points simple—they should complement the background, not compete with it.
A good rule of thumb: if your background is busy, keep your focal point clean and contained.
Step 11: Finish with Twine or Ribbon
Thread twine or ribbon through the top of each tag to finish them off.
This final step adds texture, softness, and makes the tags feel complete. You can also tuck tags into cards, journals, or gift packaging.
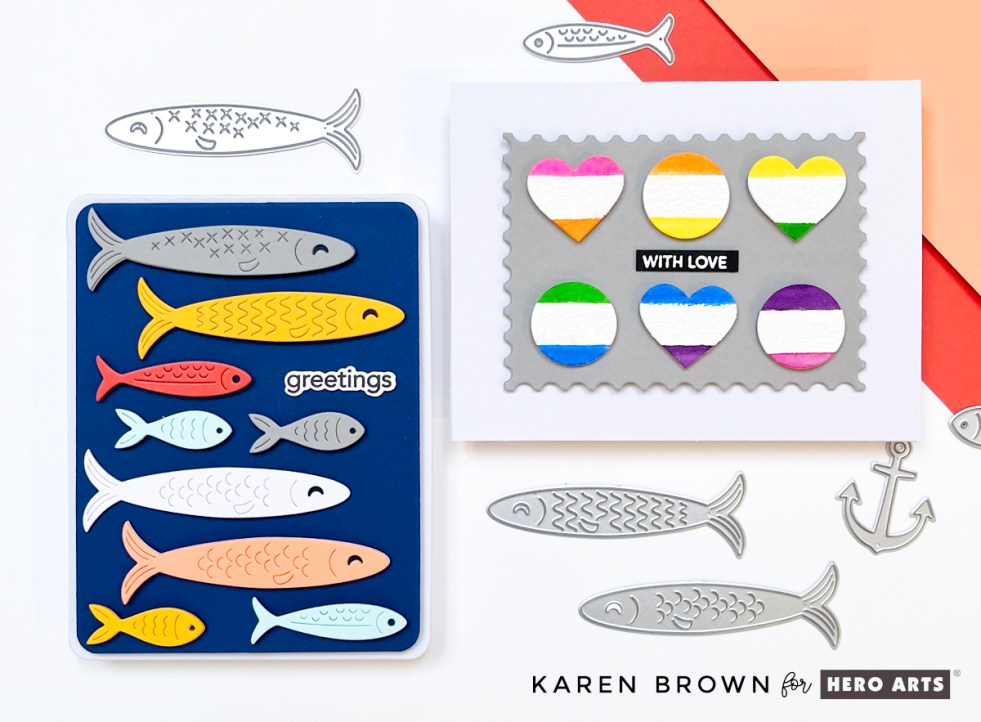
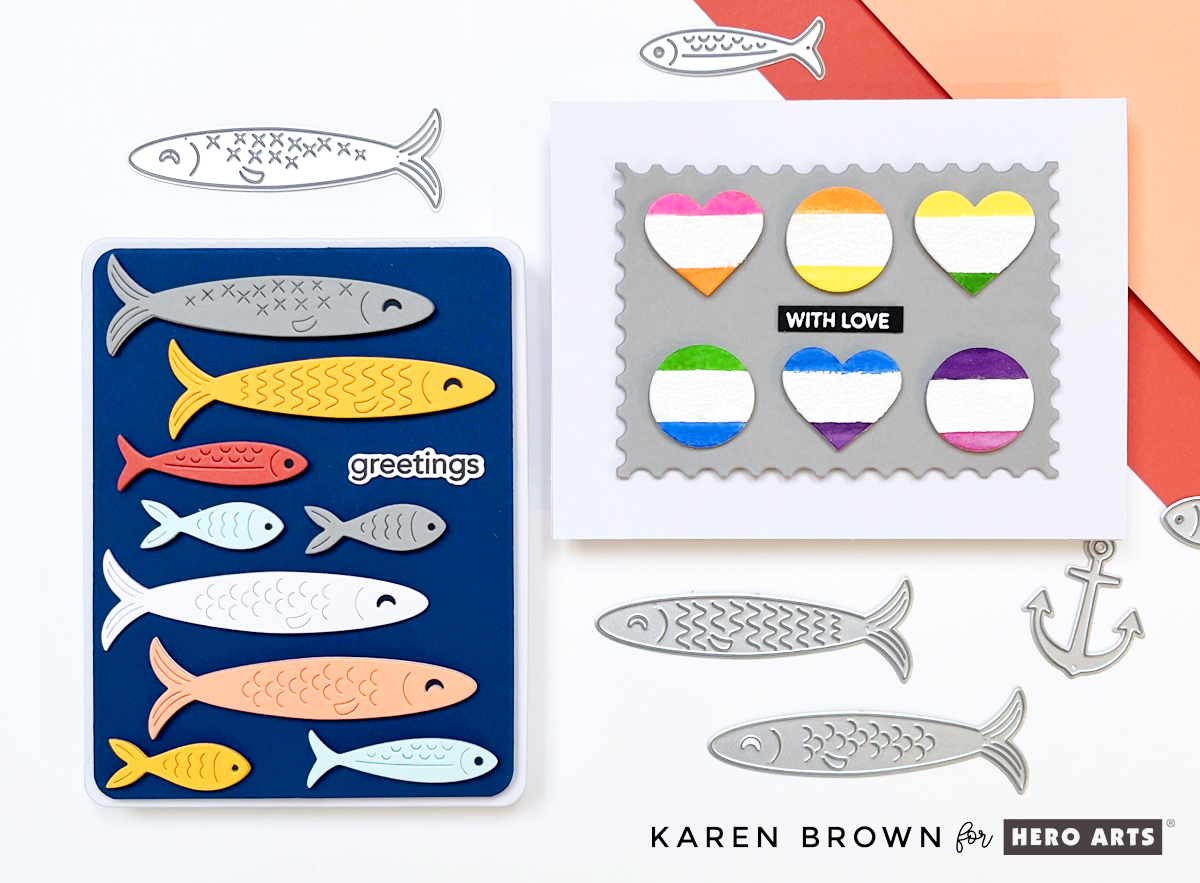
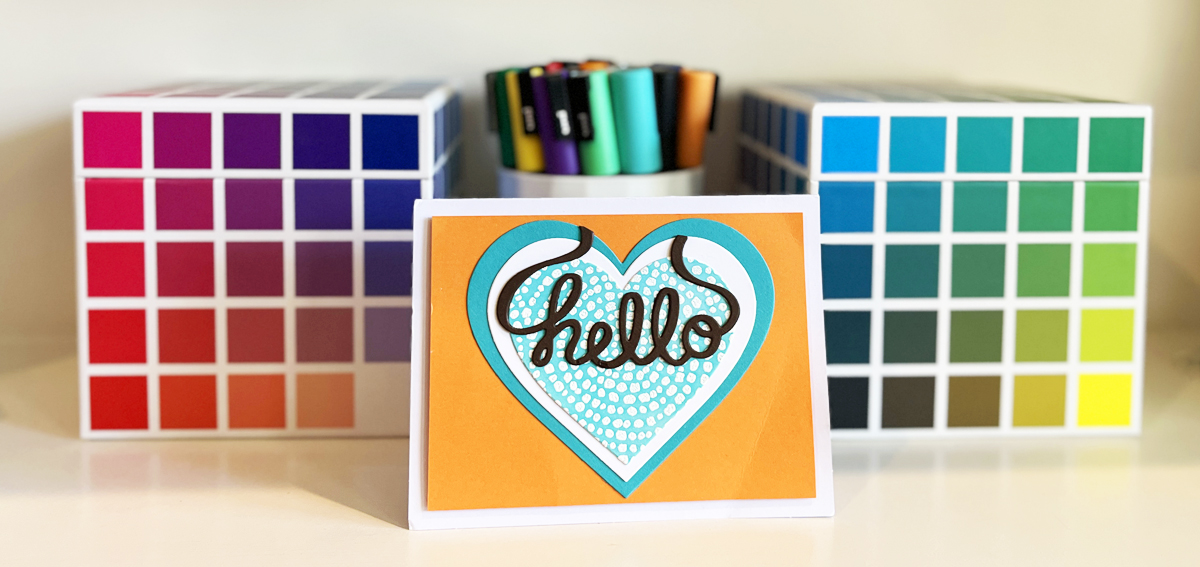
Hello friends! Karen Brown here today sharing two cheerful cards created with products from the Hero Arts Packed with Love Collection. I love when a release offers versatility, and this collection made it easy to explore different looks while keeping the designs clean, playful, and approachable.
Both cards highlight simple layouts, bold color choices, and easy-to-repeat techniques—perfect whether you’re making one special card or crafting a small batch. One card leans bright and aquatic with colorful die cut fish, while the other explores a graphic, modern style with bold shapes and happy color transitions. Together, they show just how flexible this collection can be.
Let’s take a closer look at each card!
🐟 Card Details: A Happy School of Fish
For my card, I used DF274: Big Mouth Sardine Tin Dies, but instead of building the tin, I focused solely on the fish dies. I die cut nine fish in assorted sizes and colors, then arranged them swimming horizontally across the card for a playful, modern look.
The background is Cosmic Sky ColorWheel Cardstock, trimmed with my favorite Rounded Rectangle Infinity Dies and mounted onto a crisp white A2 card base. A small, simple sentiment that reads “greetings” keeps the design clean and versatile—perfect for hello cards, encouragement, or just-because mail.
This card feels colorful, cheerful, and a little bit whimsical…like a happy school of fish swimming together. 🐠🐠🐠
To give each fish more presence and durability, I die cut every fish twice and glued the layers together. This subtle dimension makes a big difference, especially on clean and graphic designs.
I used my Spellbinders Scout desktop cutter to cut all of the fish. When I’m working with lots of small or medium-sized dies, the Scout is my go-to—it’s fast, efficient, and perfect for batch die cutting. You might also be interested in the 14 tools that I use most often in my craftroom.
🧠 Layout Tip: Arranging Die Cuts with Ease
If you’ve ever struggled with spacing repeated die cuts, here’s the method I used—and it works every time:
Start at the top of the panel (I placed the gray fish first).
Move to the bottom with the smallest fish (aqua and saffron).
Fill in the middle next.
Work up and down from the center, adjusting spacing as you go.
This approach helps keep everything visually balanced and evenly spaced without overthinking it. I’ve included a process photo (above) of the die-cut fish and dies on my craft mat.
🧷 Assembly
I used a combination of craft foam and foam squares to attach the fish and background, adding just enough dimension to create interest while keeping the card mail-friendly.
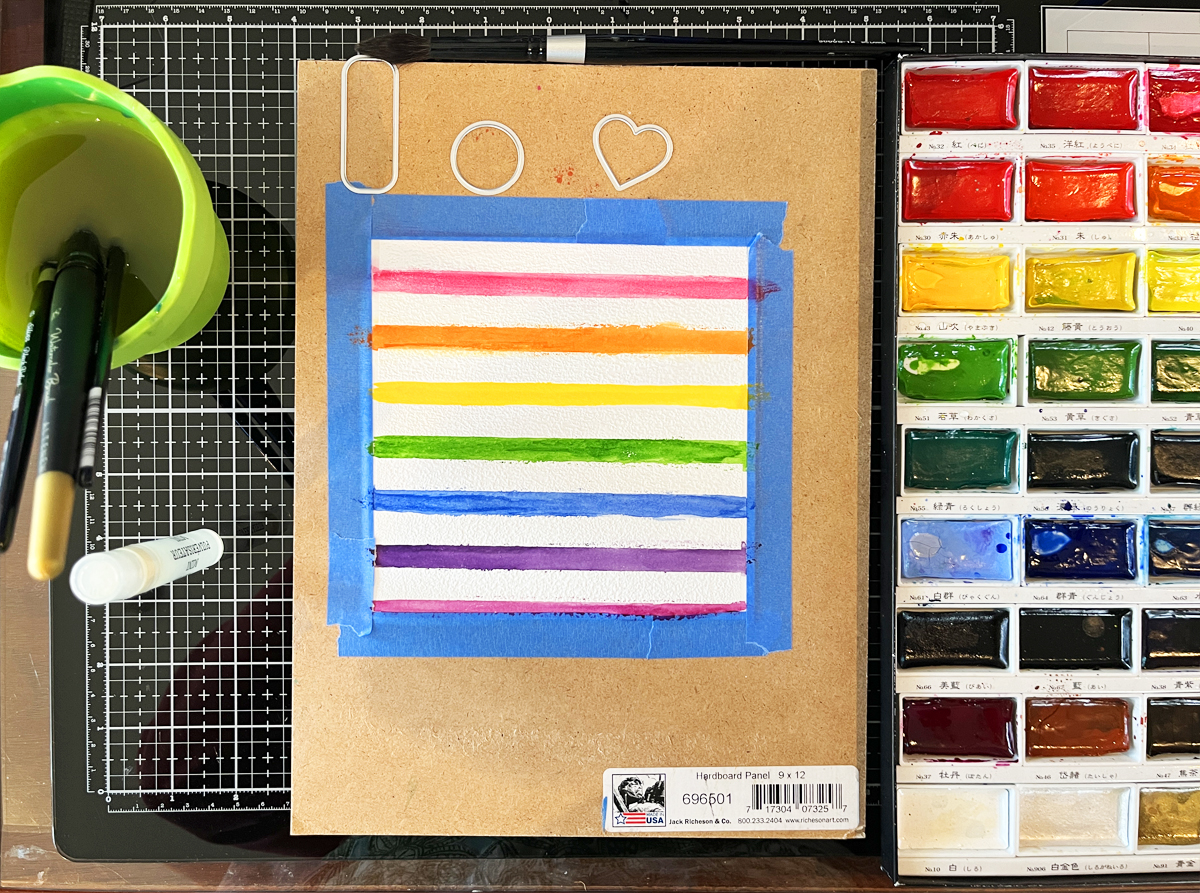
Rainbow Watercolor Wide Stripes
I stamped the Wide Stripe Background Stamp onto watercolor paper using Unicorn White Pigment Ink, then heat embossed it with white embossing powder. I knew I wanted to watercolor in between the embossed stripes, so I taped my panel to a hardboard to help minimize warping—always a helpful step when working with lots of water.
Working in rainbow order, I watercolored each stripe band by band. The raised white heat embossing created beautiful texture and helped keep each color neatly contained. I have a process photo showing this panel alongside my watercolor palette, and at this point… that was as far as the original plan went!
Sometimes the best ideas happen mid-project. I started thinking about repeating geometric shapes and how fun it would be to combine that idea with the striped watercolor background I had already created.
Using my Nesting Hearts Infinity Dies and Nesting Circle Infinity Dies, I die cut three 1-inch hearts and three 1-inch circles—perfect timing since we’re getting close to Valentine’s Day. Each die cut features the white heat embossed stripe running through the center, with one rainbow color above and the next color below.
I worked across the panel so that the bottom color of one shape becomes the top color of the next:
Pink over orange
Orange over yellow
Yellow over green …and so on.
I alternated the shapes—heart, circle, heart—creating a playful rhythm across the design.
To ground all that color, I mounted the six die cuts (two rows of three) onto a 4″ x 3″ gray mat die cut with the Nesting Postage Stamp Infinity Dies. Yes—this card uses three different Infinity Die sets, and they all worked together beautifully. The card base is a crisp white A2, keeping the focus on the cheerful pops of color.
My sentiment is small and simple: “With Love”, white heat embossed on black cardstock. This card could easily work as a Valentine, a friendship card, or a just-because note.
TIP: I love keeping pre-made heat embossed sentiment strips on hand. Using large sentiment strip stamps that coordinate with the matching Sentiment Strip die makes it easy to stamp and die cut everything at once.
For this card, I used a leftover Christmas Sentiment Strip, but I also reach for Everyday Sentiment Strips constantly—definitely worth checking out if you haven’t already. The photo above shows how many sentiments you can make at one time.
Why I Love This Collection
These two cards show how products from one collection can go in completely different directions:
One soft, artistic, watercolor-focused design
One clean, graphic, and modern card with bold shapes
This is a great reminder to let yourself play and see where your ideas lead.
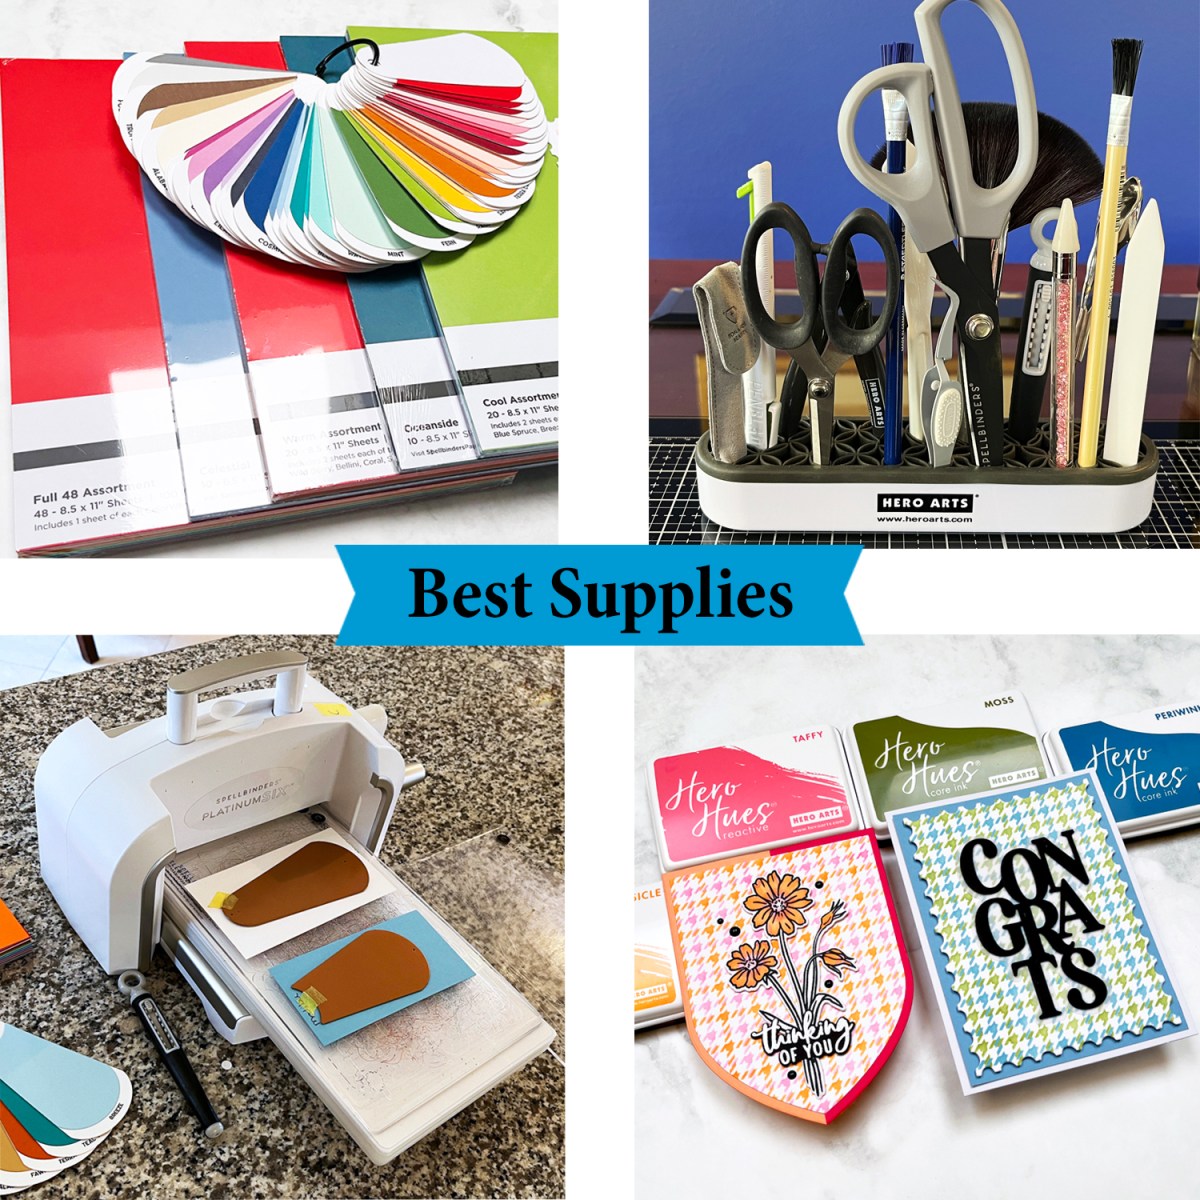
When I first started cardmaking, I bought many tools that I didn’t really need.
Today I’m sharing 14 of my most-used, most-loved cardmaking supplies for 2026. These aren’t just trendy products — they’re the tools I reach for again and again. I use them over and over in my craftroom and they are the products that I recommend to new cardmakers.
If you’re stocking your craft room, refining your supplies, or just love seeing what other cardmakers actually use, this list is for you.
📌 Save this for later on Pinterest
Karen’s Full List of Recommended Products for 2026
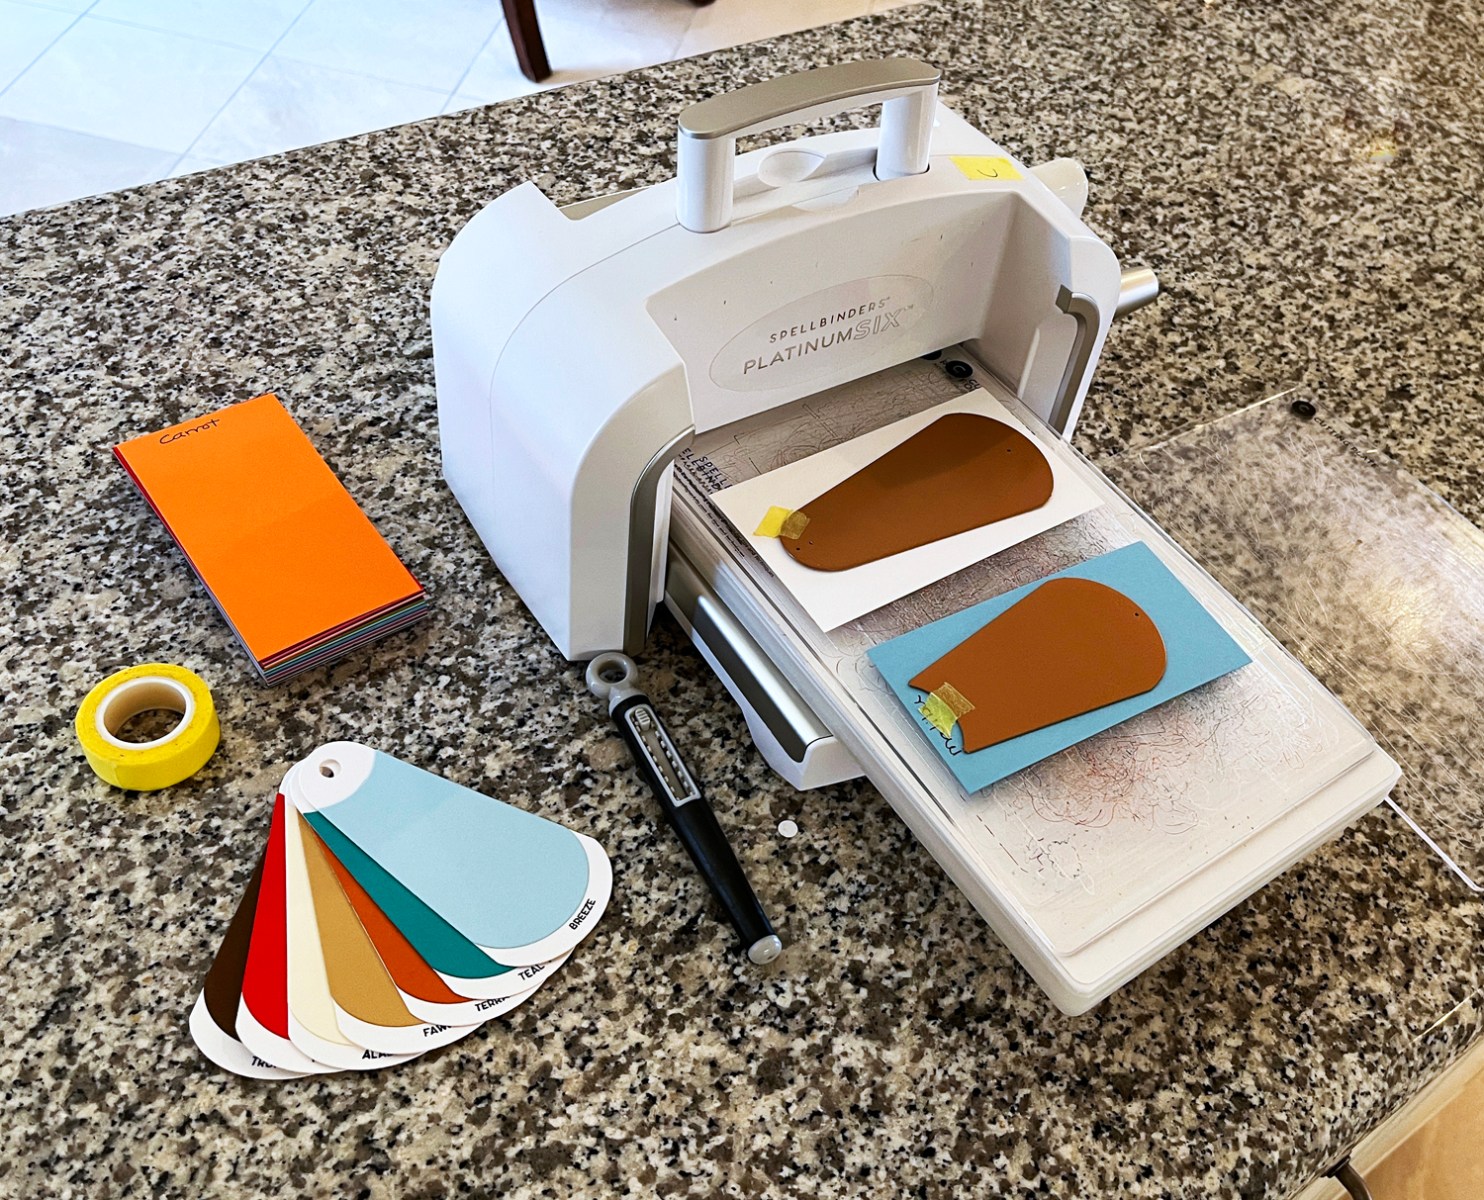
1. Best Die Cutting Machine: Spellbinders Platinum 6
My favorite die-cutting machine…and I’ve tried lots!
If you enjoy die cutting, a reliable machine is essential. I love the smooth cutting pressure and wide platform on the Platinum 6.
I use my Platinum 6 die cutting machine almost every single day. I’ve tried other machines over the years, but this one is reliable, smooth, and powerful. The others? They’re collecting dust.
Beginner Tip: Start with simpler less intricate shapes as you learn how layering works.
✨ I also have a Scoutportable die-cutter that I love to use with smaller dies or when I am taking my projects on the go.
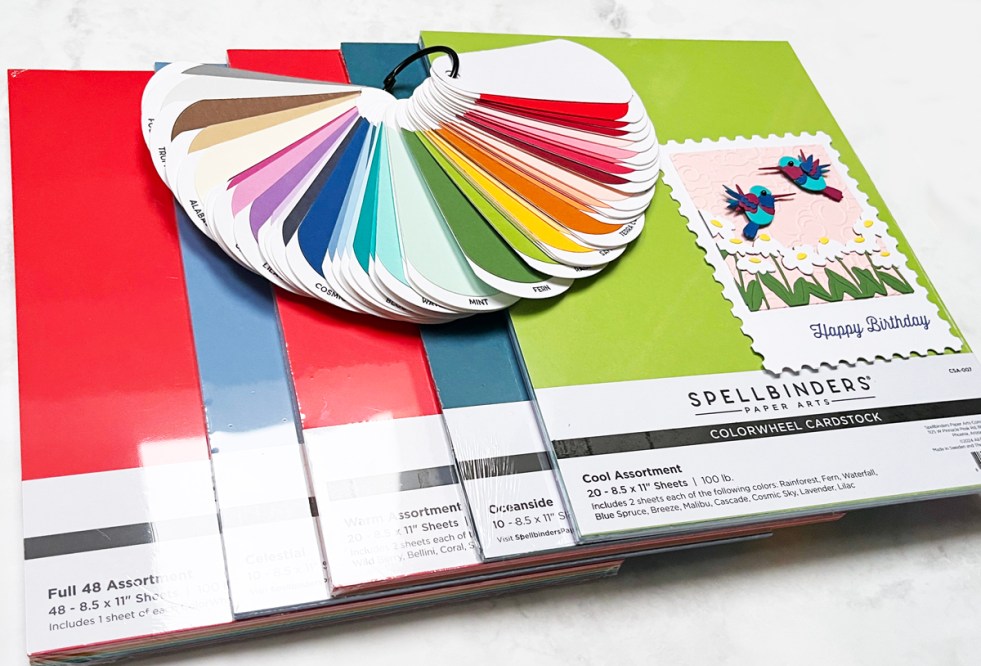
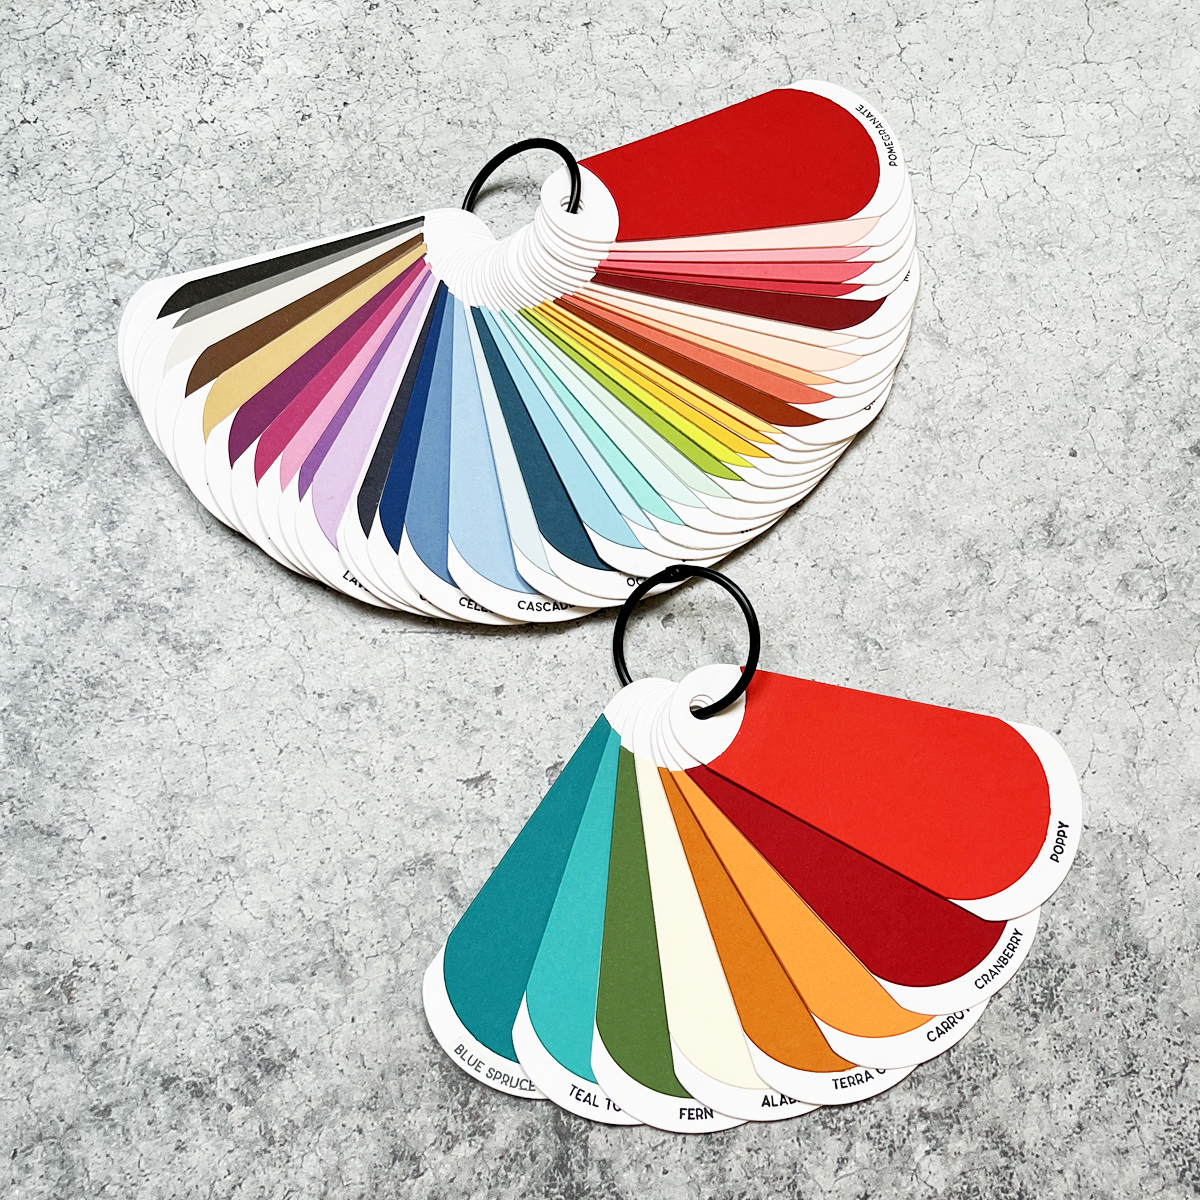
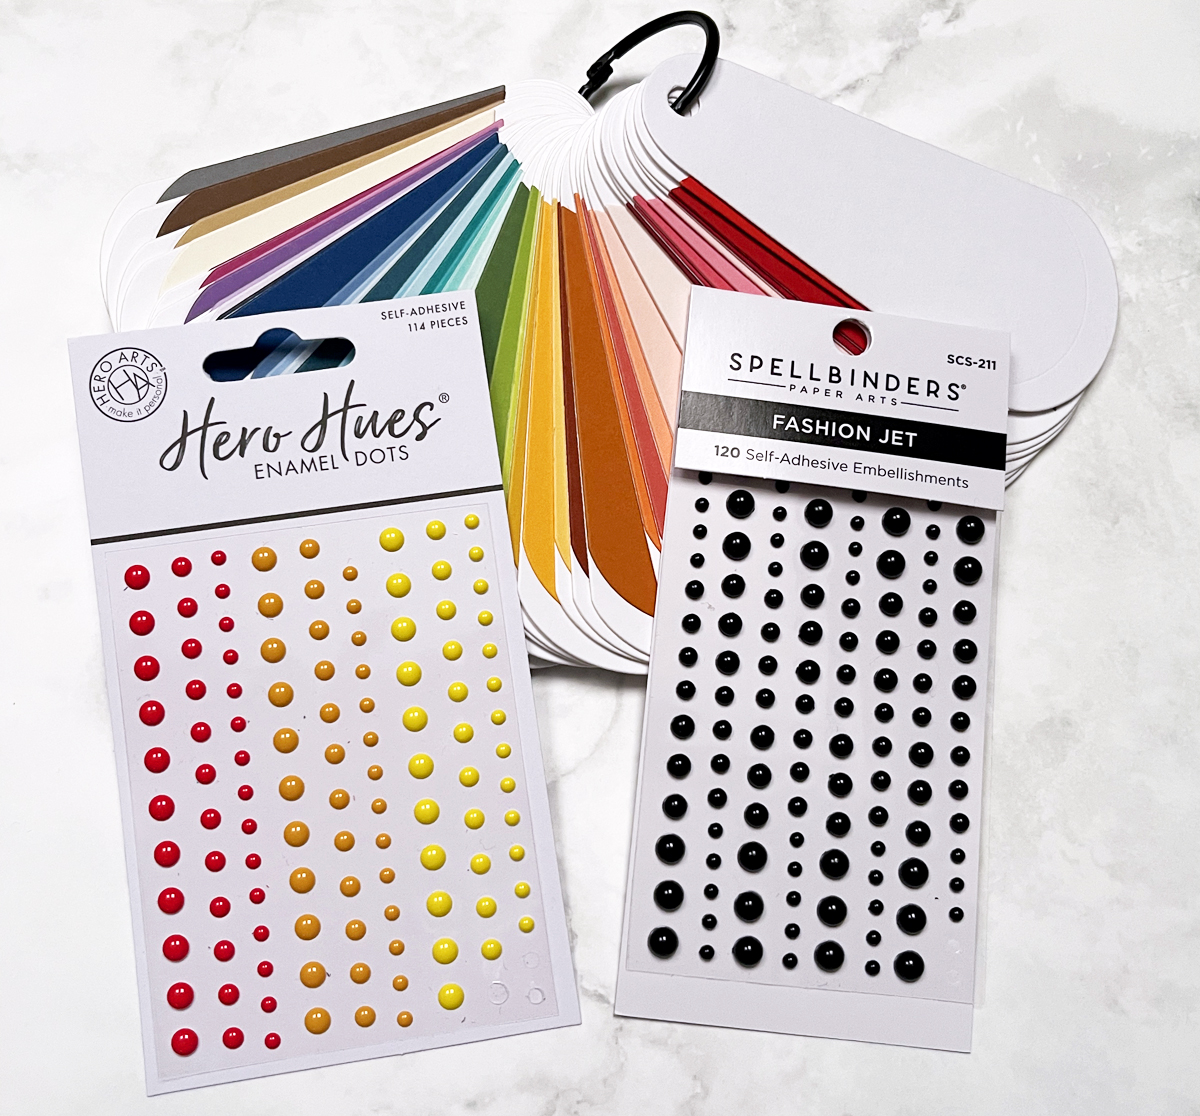
2. Best Cardstock: Spellbinders ColorWheel Cardstock
Colorful Cardstock is so important in cardmaking
With 48 gorgeous colors, ColorWheel cardstock makes color selection easy and stress-free. I use it almost exclusively and love that the result is beautiful cohesive designs.
Beginner Tip: Order the 48 Color Pack and see which colors call to you the most.
I recently placed a big order and am sharing a photo of my shipment, including:
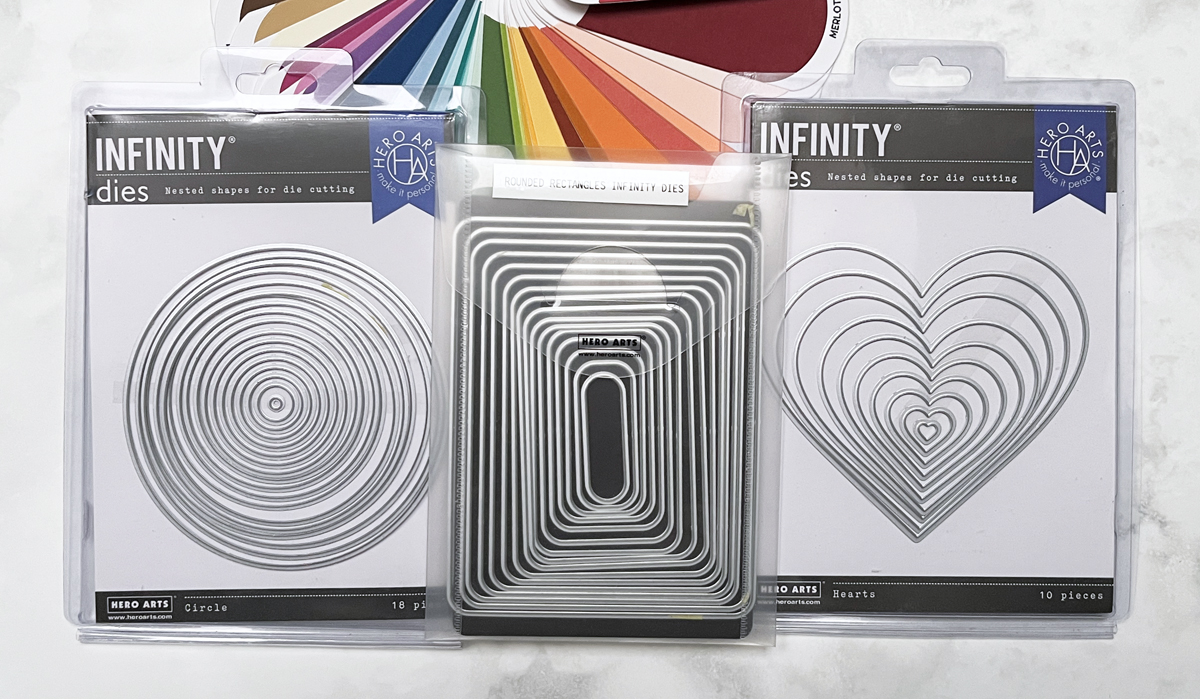
3. Best Die-Cutting Staple: Hero Arts Infinity Dies
Infinity Dies are the most versatile products in cardmaking
Nesting infinity diesare true craft room staples, and I use mine constantly. They are versatile time-savers that elevate your cardmaking and are perfect for matting, layering, spotlighting and framing.
I’ll be linking to 8 of my most-used sets in this post with my most used at the top. I’ll also link to a card using each die.
4. Favorite Card Kit Subscription: Spellbinders Large Die of the Month
Subscription card kits fuel creativity
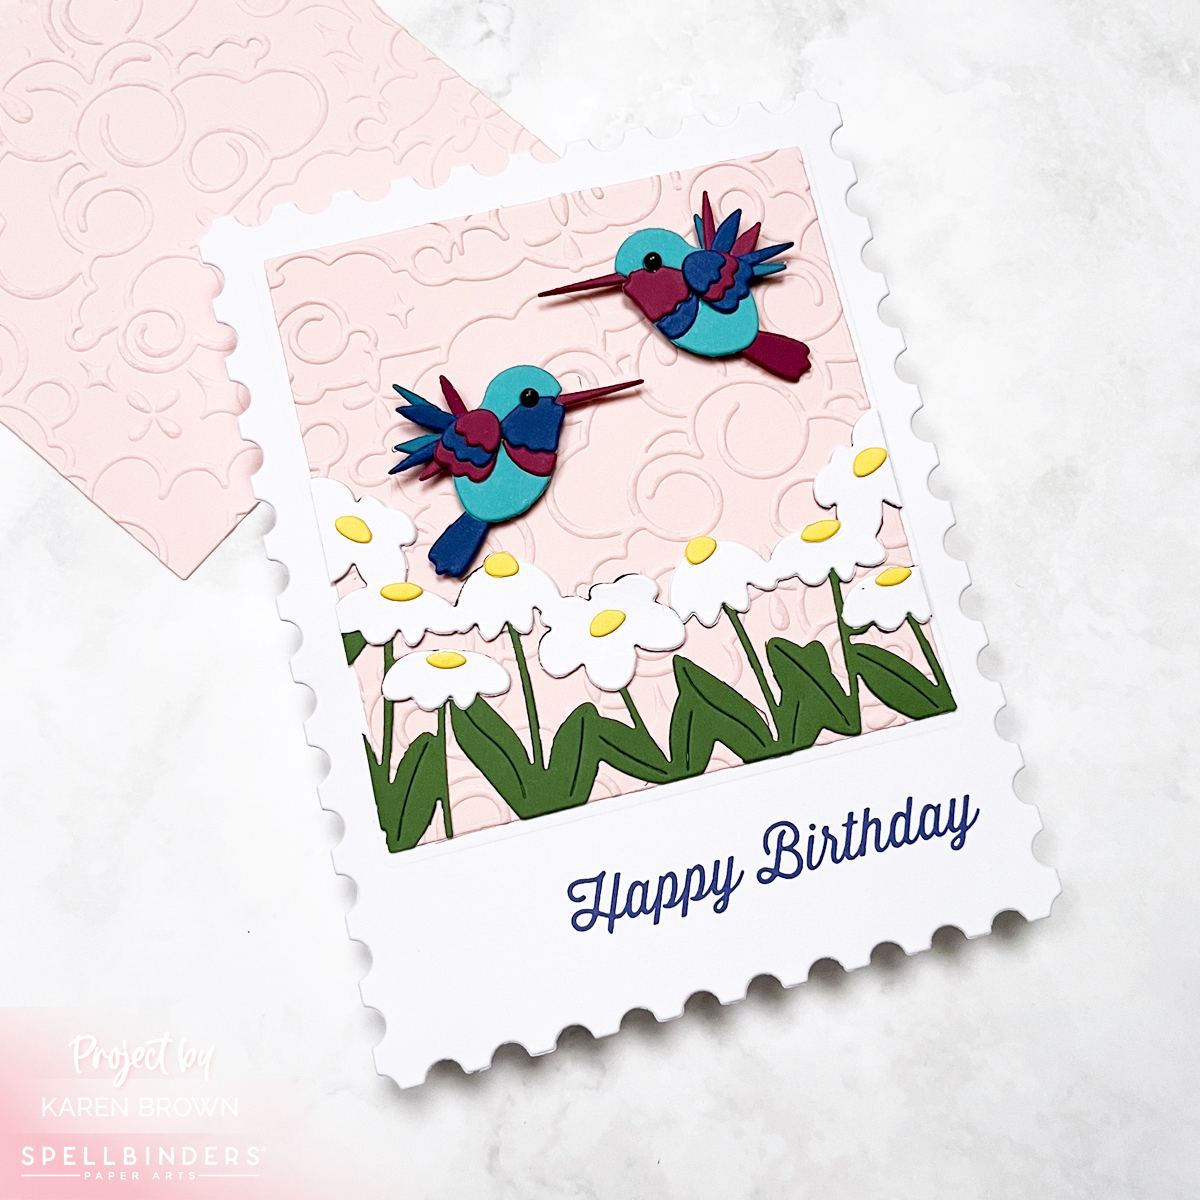
If I had to choose one subscription kit to keep, this would be it. The Spellbinders Large Die of the Month never disappoints, and January’s kit — Hummingbird Delight — truly lived up to its name.
Subscription Kits provide:
• excellent value • beautifully curated designs • coordinated supplies • inspiration delivered to your craft room every month
The Large Die of the Month Kit has the designs and versatile themes that I enjoy the most…the ones I use over and over. To illustrate for 2026:
The February Kit is perfect for kids, Easter and the young at heart.
The March Kit is great for masculine cards, but can also morph into a fun floral sneaker bouquet.
✨ Runner-Up Favorite Subscription: The very first kit I ever ordered — Hero Arts My Monthly Hero, now available in two versions for 2026:
Tip: Subscription kits are great for both beginners and experienced cardmakers.
5. Best Blending Brushes: Waffle Flower
Color coded blending brushes are an important staple in my craftroom
One of the biggest problems with ink blending is cross-color contamination.
I love that Waffle Flower blending brushes have color-coded handles, so I instantly know which brush goes with which ink family. This simple visual cue keeps me from accidentally putting my yellow brush into my blue ink, which could potentially ruin a project. It also keeps my colors bright….not muddy.
Small detail, huge time saver.
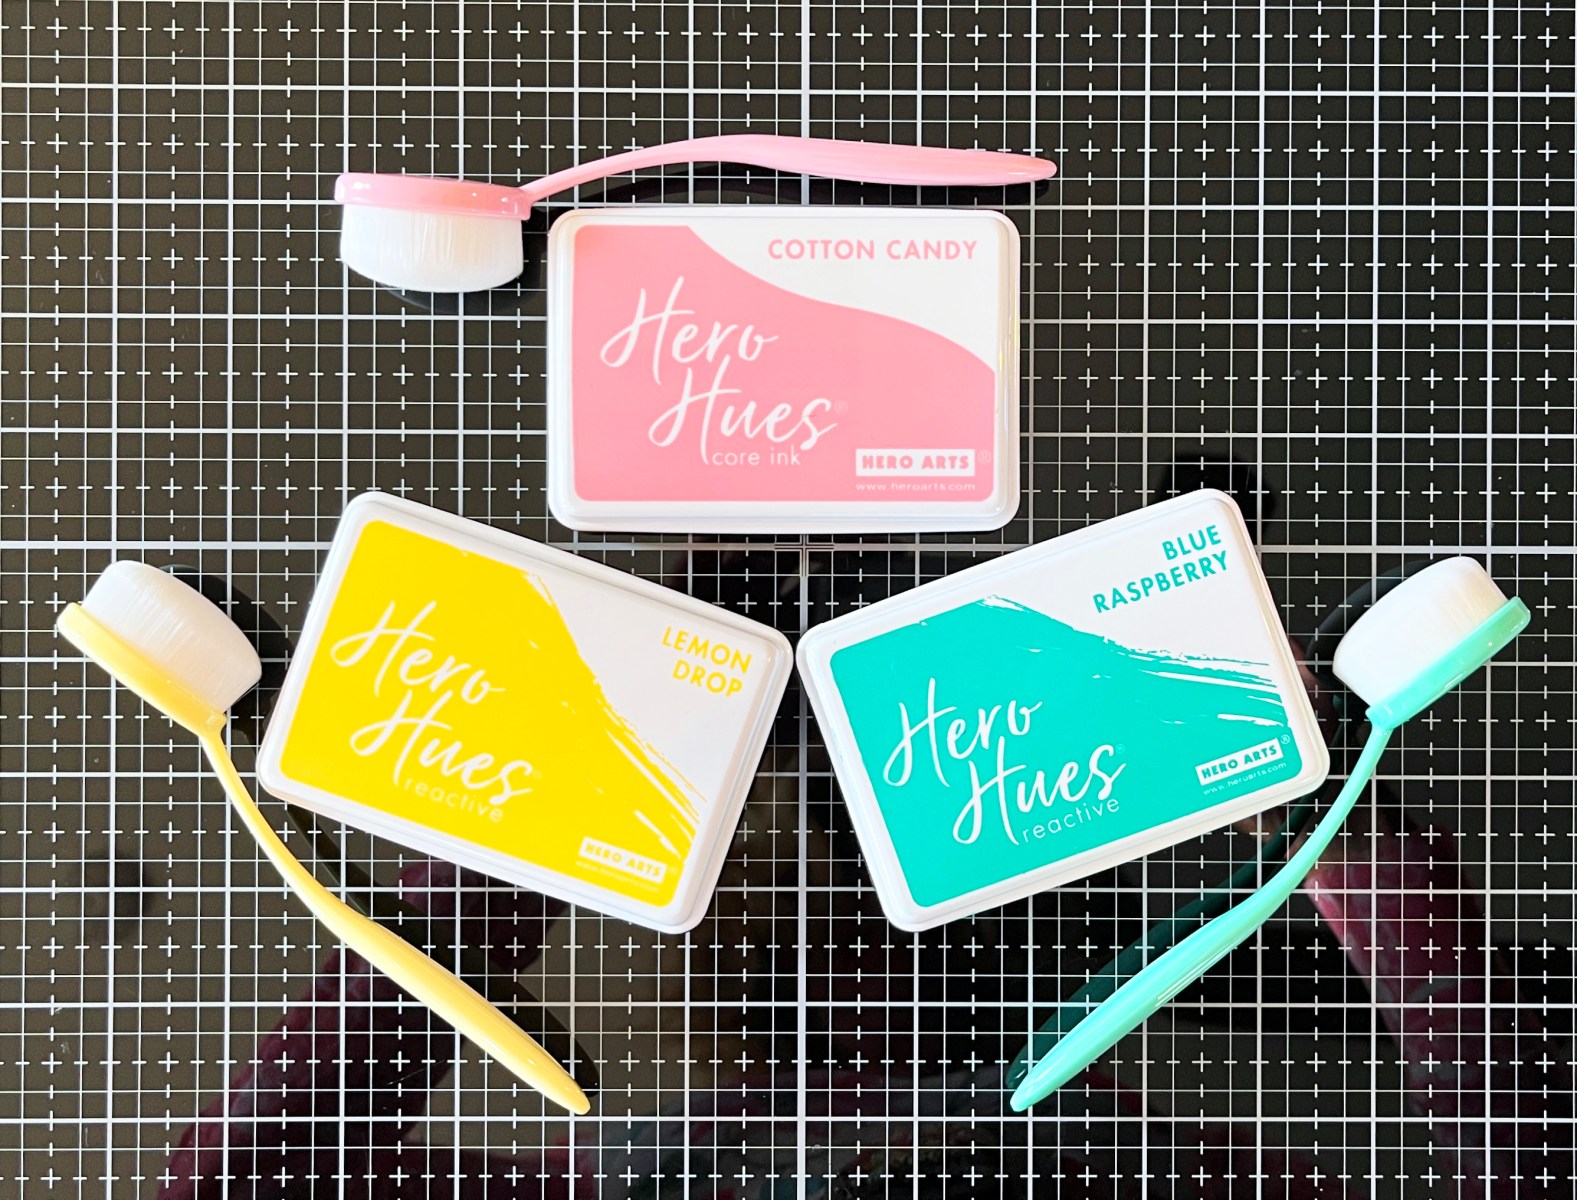
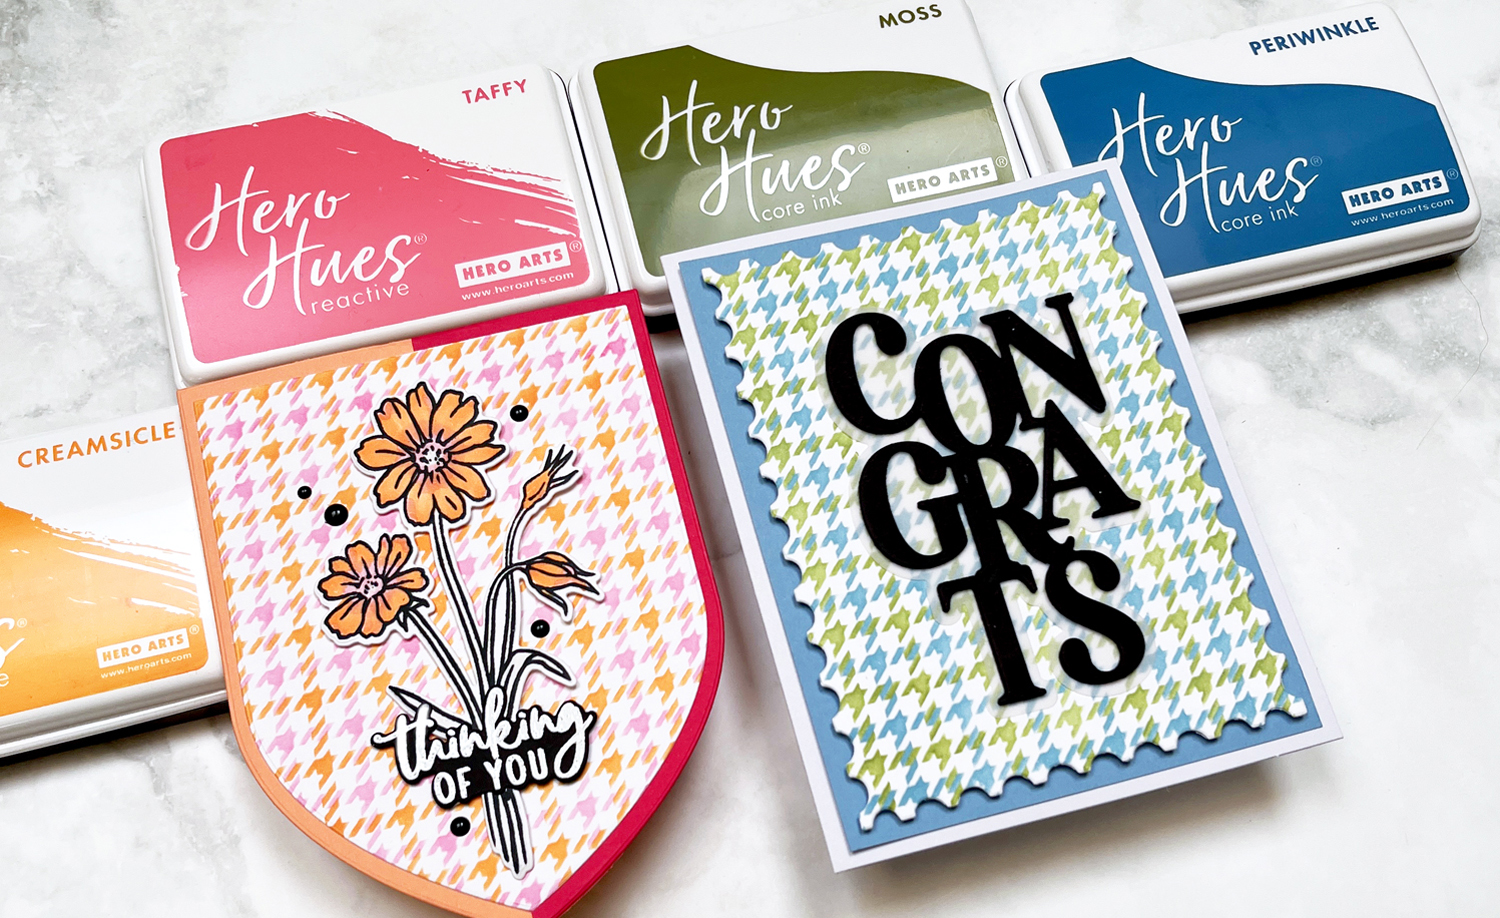
6. Best Inks: Hero Arts Reactive & Core Inks
Bright inks make such an impact in cardmaking
I have a large tub of Hero Arts inks — and honestly, I rarely reach for anything else. The colors are vibrant, blend beautifully, and are incredibly reliable. I love all the inks, but I find myself reaching for the Reactive Inks most often.
Color swatching is a great planning tool in cardmaking
I use my swatching dies on nearly every project. Being able to flip through physical cardstock swatches saves time and helps me confidently choose colors that work together.
You’ll see these swatches featured throughout this post.
8. Best Inspiration Tool: Color Cubes
Color planning is always my starting point, and Color Cubes are essential to my process. I own two volumes (1&2), a birthday gift from several years ago, and they’re well loved.
Color Cubes are such an important inspiration tool in my craftroom
I like to start with the Color Catalogue where I can search by Color, Key Word or Collection and then I grab a few cards for inspiration.
Paired with my cardstock swatches, they make choosing beautiful color palettes effortless.
Enamel dots are hands down my favorite finishing touch. I use Spellbinders and Hero Arts enamel dotsthe most — clean, modern, and endlessly versatile. They add texture, shine and color to your projects while at the same time elevating your card.
TIP: I can’t tell you how many times I’ve covered a small mistake with an enamel dot! They can truly save a project.
10. Best Way to Add Texture: Embossing Folders
Embossing Folders add such impact to cardmaking….and they are so cost effective.
Embossing folders are one of the easiest ways to add interest to a card. I subscribe to the Spellbinders Embossing Folder of the Month, and my collection has grown quickly.
Embossing folders are a cost effective way to elevate most projects. They add texture, mood and dimension in one quick step.
If you are building up your crafting Toolkit, this is one of the best additions you can invest in.
I used January’s folder, Cloud Nine, on my Hummingbird card. It’s a stylized sky with clouds — perfect for so many scene cards.
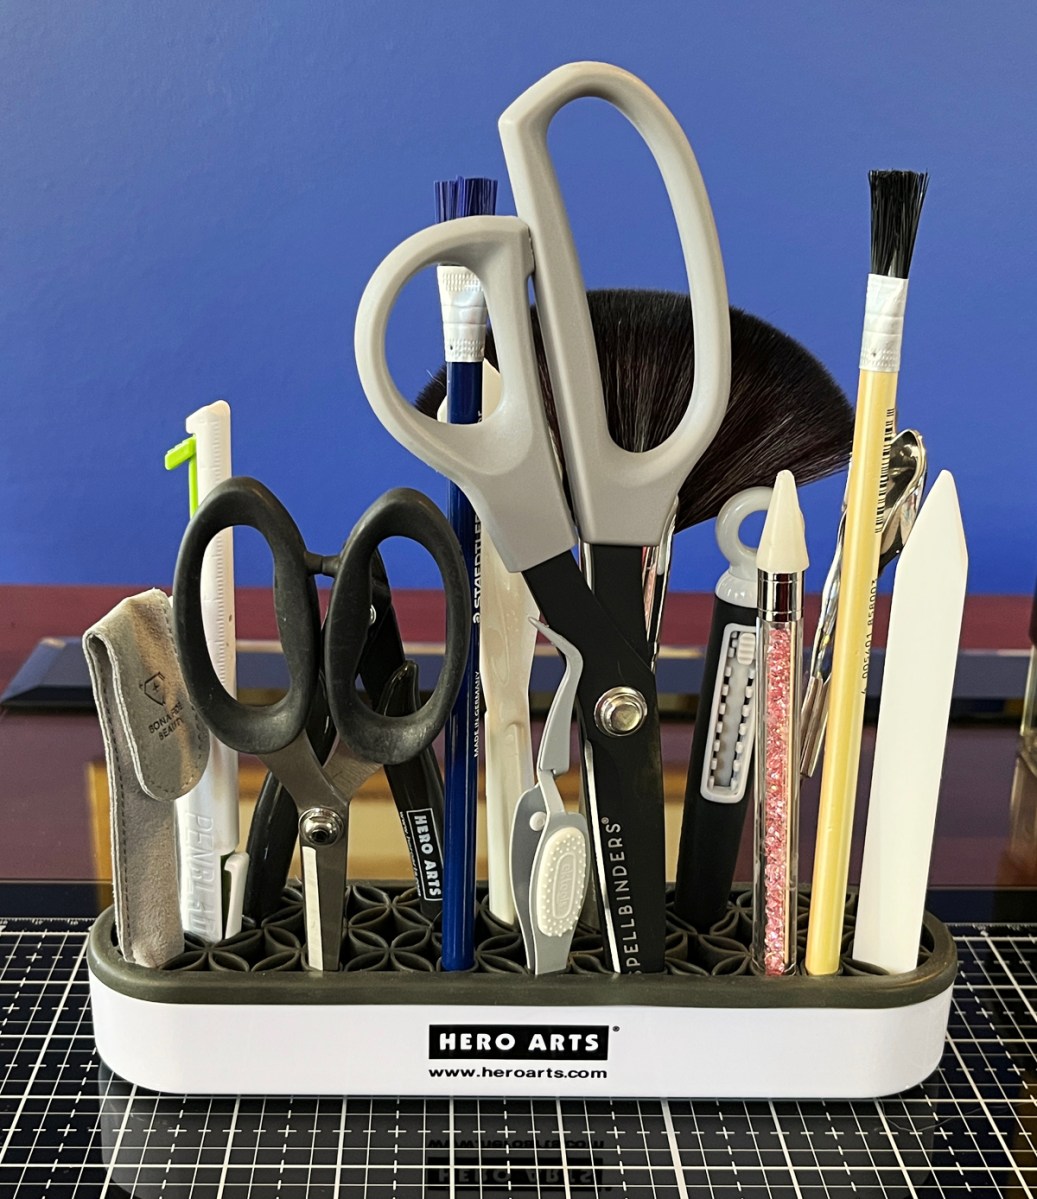
11. Best Desk Organizer: Hero Tools Handy Holder
I love a well designed crafty organizer.
This Handy Holder organizer keeps my scissors, tweezers, bone folder, palette knife, and brushes within arm’s reach. I love it so much… I own two!
They sit front and center on my desk and keep my most used (and often times oddly shaped) essentials close and organized.
I use this simple well-designed organizer everyday! Consider treating yourself.
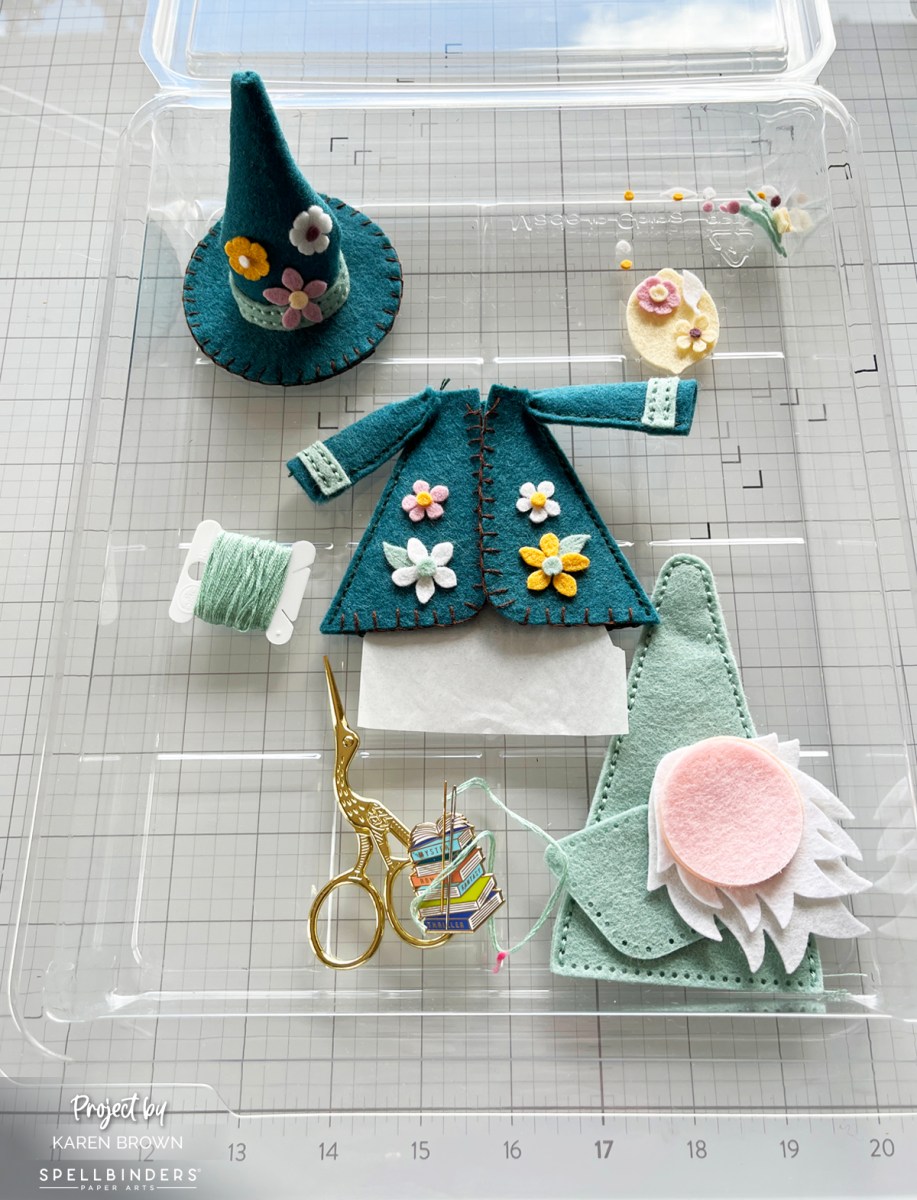
12. Best Work Surface Organizer: Craft Stax
Storage organizers are so helpful in my cardmaking.
One tool I reach for constantly while creating is Craft Stax. There are several sizes and they’re perfect for organizing, protecting, and corralling all of my crafting components as I work.
The photo above (with my Fergus Felt components) is the Stash Stax. I also love this size for storing cardstock.
I use Craft Stax to hold die-cut pieces, partially assembled cards, sentiments, and embellishments so nothing gets lost or damaged mid-project. They’re especially helpful when I’m working on detailed die-cut cards or stepping away and coming back later — everything stays exactly where I left it.
Craft Stax are so helpful mid-process in cardmaking
Craft Stax also make it easy to stack multiple projects on my desk without creating chaos (always a win!). Simple, smart, and incredibly useful — this is one of those tools you don’t realize you need until you have it… and then you can’t imagine crafting without it.
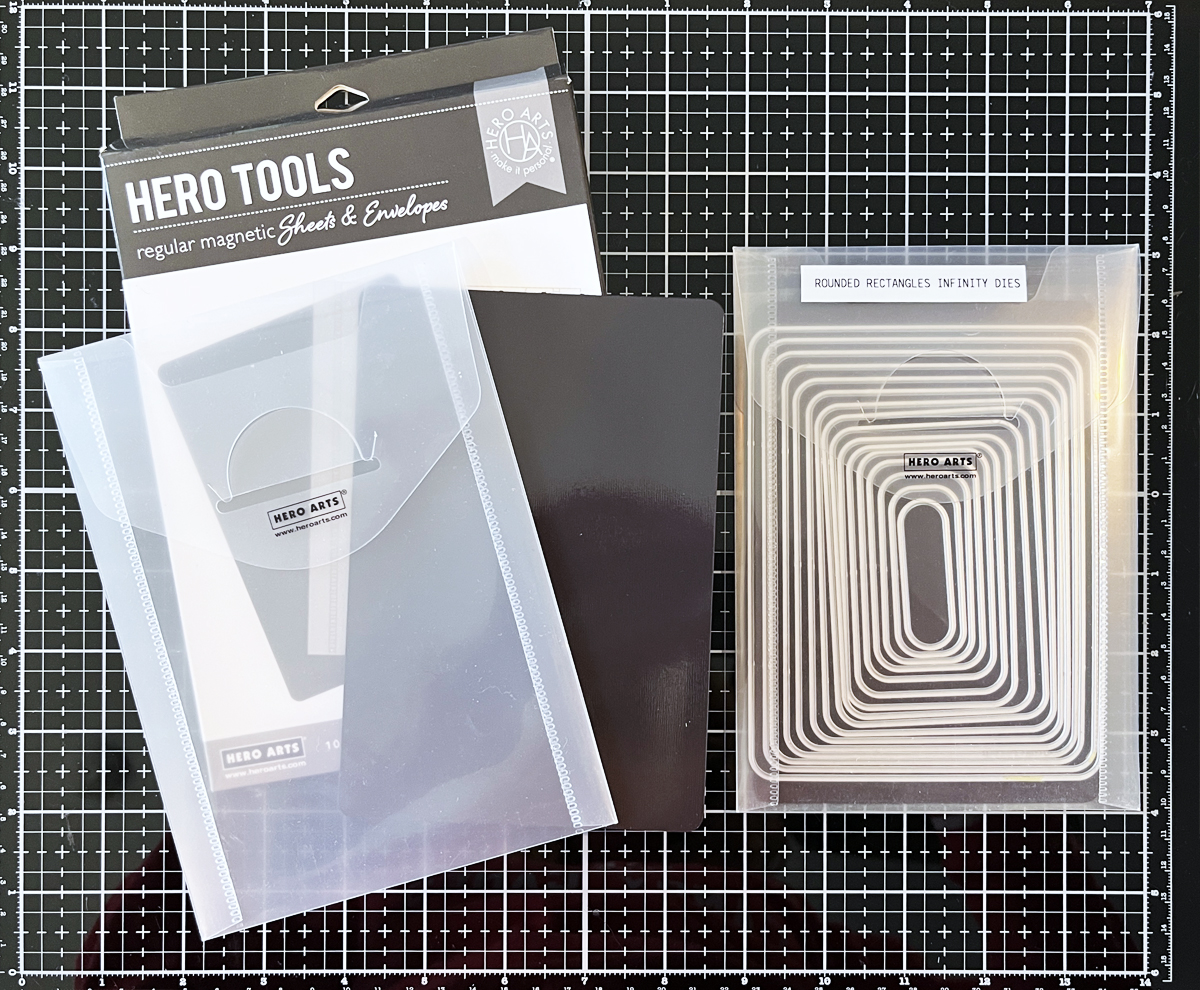
13. Best Die Organizer: Hero Arts Magnetic Sheets & Envelopes
I found magnetic sheets are the best way to organize dies
These are absolute must-haves for staying organized:
Sticky Grip Mats are perfect for stenciling and stamping. And they work great in your Misti and Mini Misti Stamp Positioners…no need for magnets anymore!
Spellbinders Platinum 6 die cutting machine. A true workhorse in my craftroom. I believe die-cutting is my favorite technique so I use my Platinum 6 most days.
These 14 products form the backbone of my cardmaking in 2026. They help me craft more efficiently, choose colors with confidence, and enjoy the creative process even more.
📌 Save this for later so you can come back when you’re ready to add to your Toolbox.
If you’re building or refreshing your craft room this year, I hope this list gives you a helpful starting point — and maybe a little inspiration too. 💛
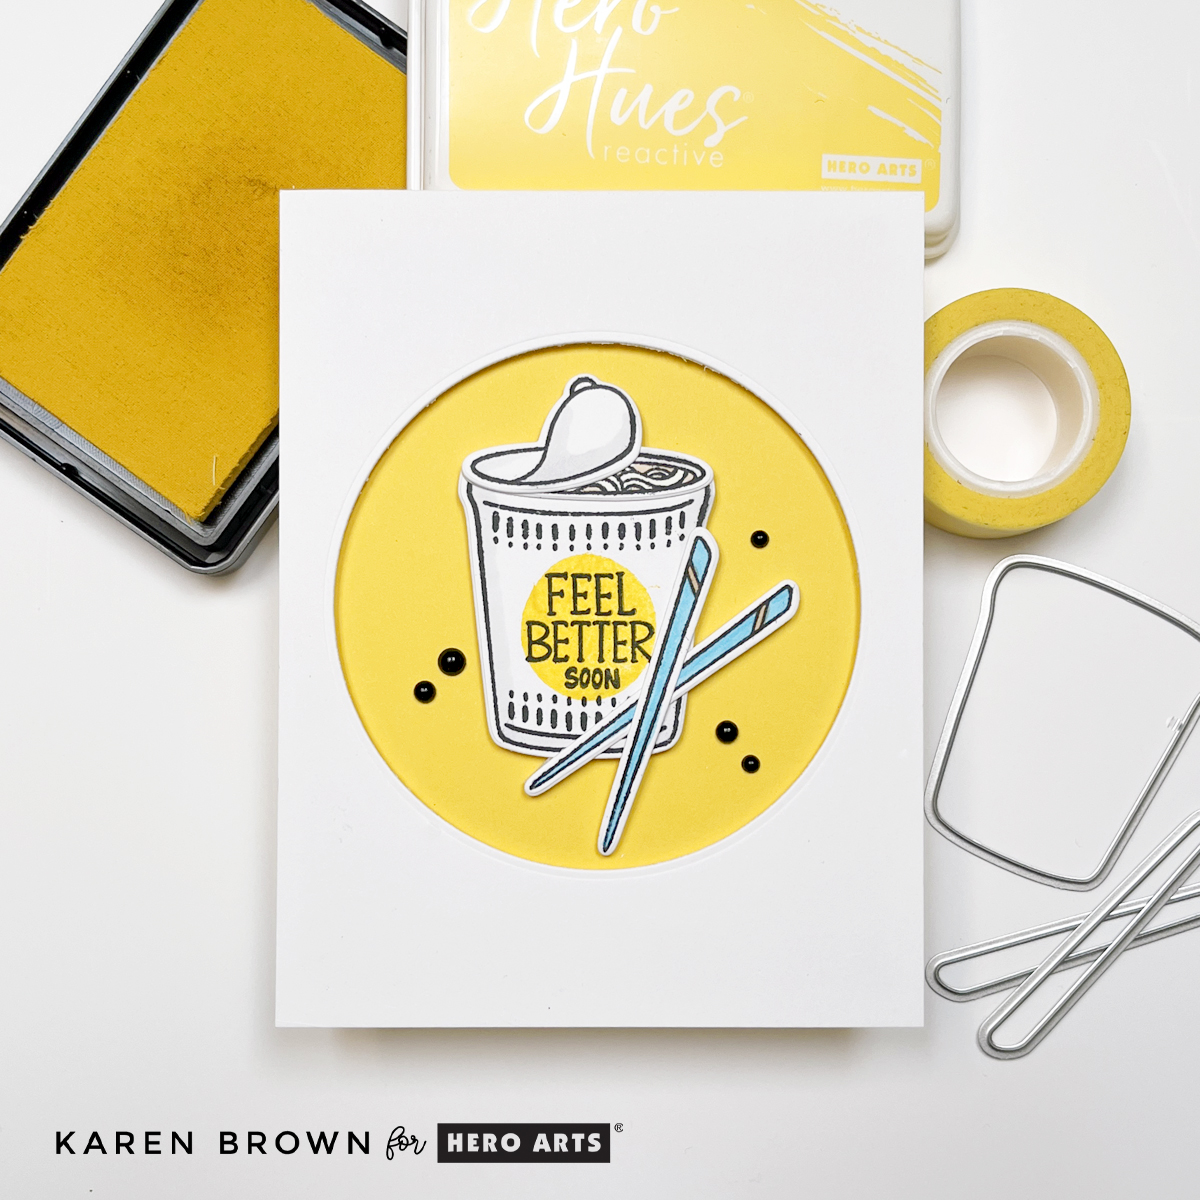
The December 2025 Hero Arts Stamp & Die Kit of the Month is called Cup of Love, and it’s perfect for creating quick, modern, and heartfelt get well cards. I always need get well cards on hand, so I love having clean and simple designs that I can mass produce—and this one definitely delivers.
This month’s kit features a charming soup cup, chopsticks, labels, and warm “feel better” sentiments that make it easy to whip up comforting cards for friends and family who need a little cheer.
Clean + Modern Design With Easy Stamping
For today’s card, I leaned into a fresh white and yellow color palette with pops of crisp black stamping and a hint of blue. The combination feels clean, modern, and cheerful—just the mood you want in a get well card.
Next, I stamped the round yellow label with Lemon Drop Ink. I waited a minute for the ink to dry, stamped the sentiment “feel better soon” and die cut the image.
I stamped and colored the blue chopsticks, die cut them, and crossed them for a playful finishing touch.
For the background, I die cut a circle from the center of a white A2 cardstock panel using my Hero Arts Nesting Circle Dies.
I layered this white panel over a yellow A2 card base, popping it up with craft foam for dimension.
In the recessed yellow circle, I glued the soup cup and chopsticks.
Finally, I added five black enamel dots. These tiny accents brought so much contrast and visual interest to the finished design.
The result? A clean and cheerful get well card with modern charm and just enough shading and dimension to feel special—without slowing you down.
Interested in two other recent Get Well Cards I created? Click HERE.
Tip for Mass Production
If you want to make a full batch of these cards (and I definitely recommend it!), simply die cut a yellow circle and adhere it directly to a white card base. Or alternatively, you could ink blend a yellow circle. You can skip the popped-up window panel and still get the same bold pop of color.
Hello friends! Karen Brown here, and today I’m sharing two cards for the Hero Arts December 2025 Release + Blog Hop. This month’s theme—Soup There It Is—is warm, clever, and absolutely perfect for building a stash of Get Well cards. I don’t know about you, but I always seem to need get well cards, and this release is packed with comforting imagery and punny sentiments that make them so fun to create.
Hero Arts just announced a fantastic price drop on their subscription programs, making this the perfect time to sign up if you’ve been on the fence. The Monthly Card Kit is now $45 instead of $60, and the Whole Studio Subscription dropped from $75 to $55. That’s a big monthly savings and an incredible value considering how many products, techniques, and creative opportunities you get in each box. If you love building your stash, trying new tools, and being inspired each month, this is truly the best time to jump in.
My two cards today both feature the December Cling Stamp of the Month: Dotty—a fantastic, versatile background stamp that deserves a spot in every crafter’s studio. To help you get the most out of this staple, I’m showing two completely different background styles: ✨ Clean, fresh, and modern 🎨 Easy, layered mixed media
Let’s jump in!
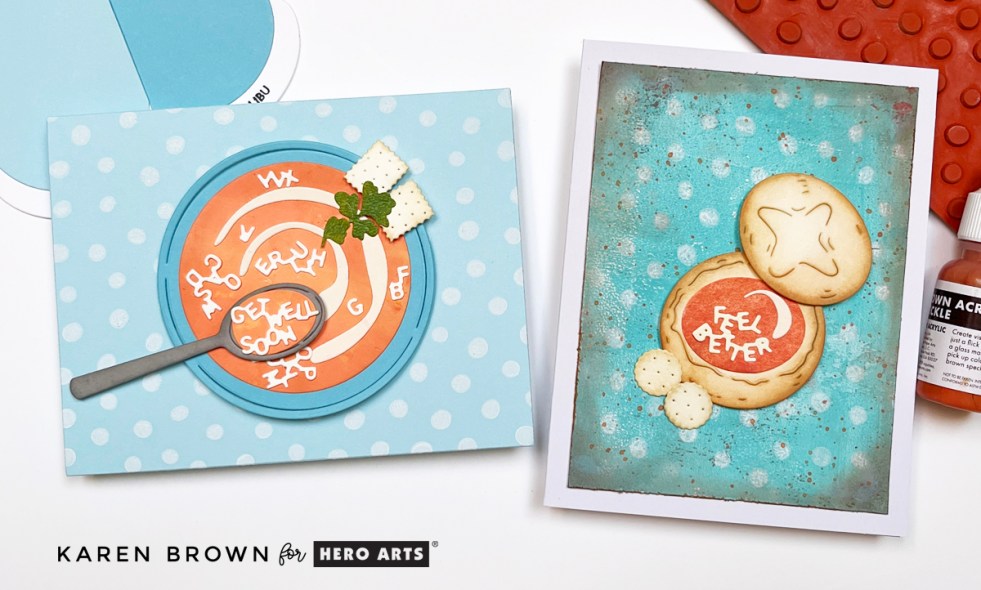
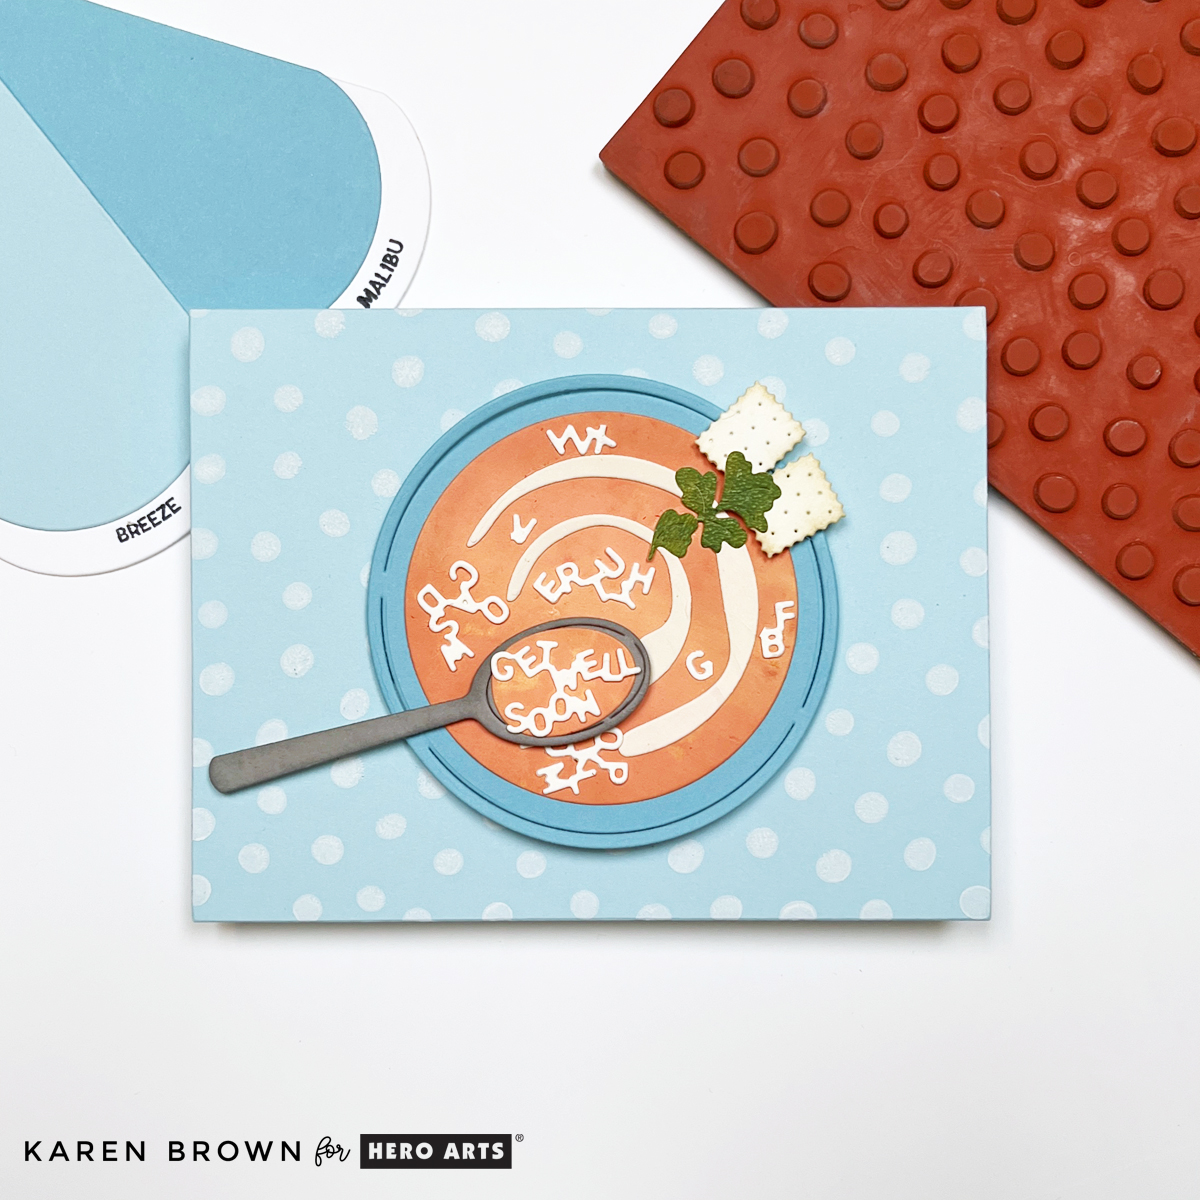
Card 1 – A Clean & Modern Background Using Pigment Ink
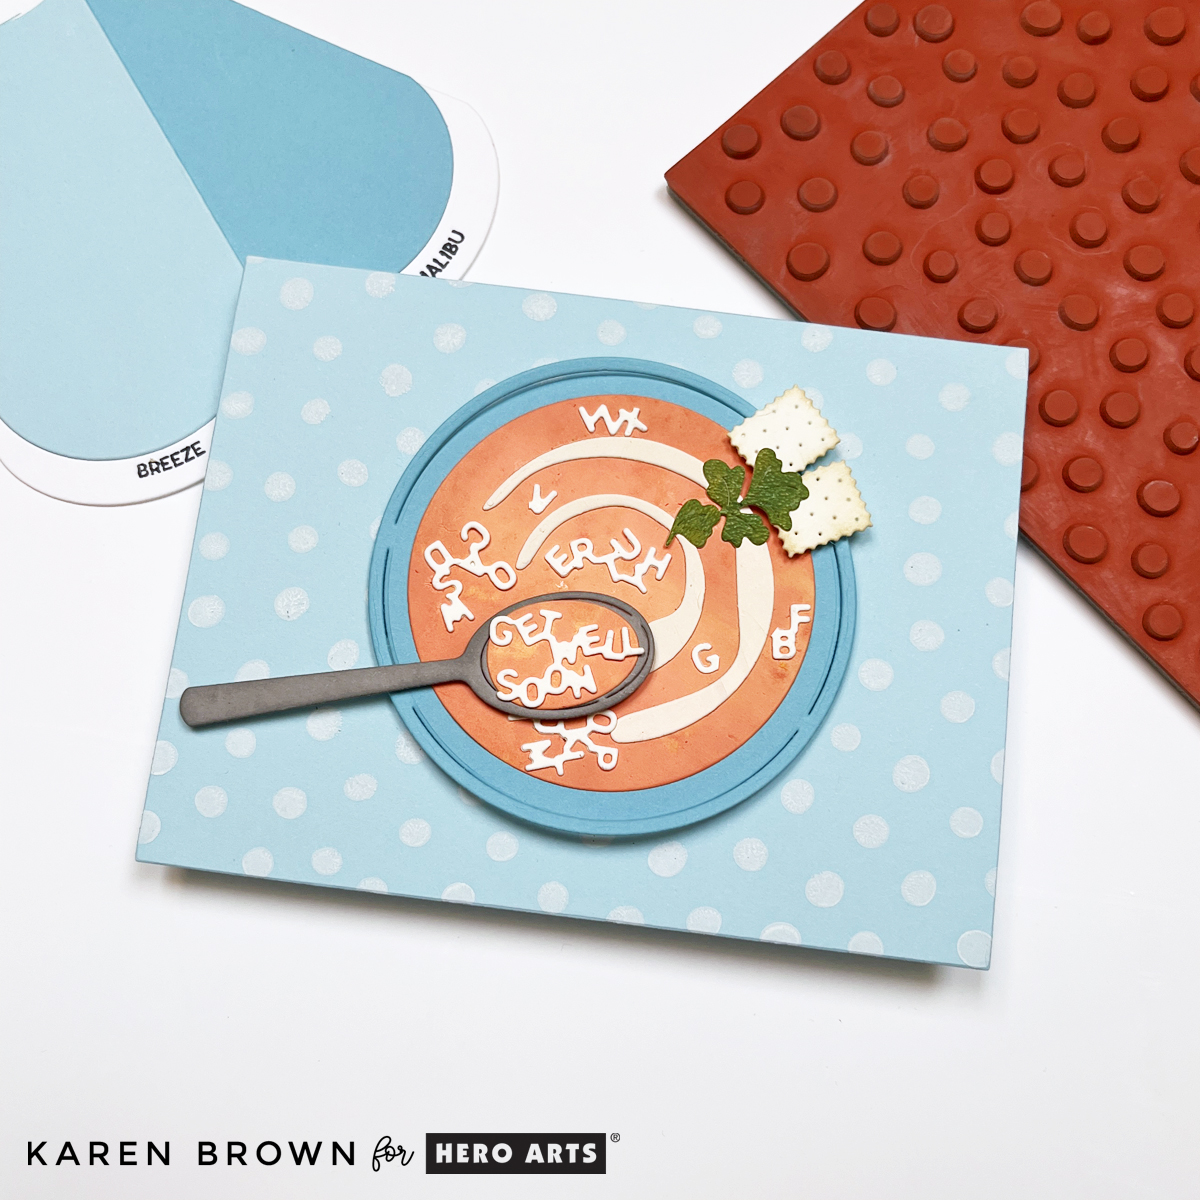
For my first card, I created a crisp and contemporary background using the Rubber Cling Dotty stamped in Unicorn White Pigment Ink on Breeze Cardstock. This combination creates a soft, airy polka dot look that works for any occasion, but feels especially soothing for a get well theme.
Background Tips:
Pigment ink gives gorgeous coverage, but it dries slowly.
Speed things along with a quick blast from your heat tool.
Try this technique on any mid-tone cardstock—it’s a great way to stretch your ink stash.
For the focal point, I used the December Die of the Month: Alphabet Soup to create an adorable soup bowl, complete with: 🥣 a spoon 🍘 cracker-style accents 🌿 sprigs of parsley …and swirling alphabetical noodles!
The spoon cleverly spells out “Get Well Soon”—such a comforting detail. This card feels clean, uplifting, and perfect for sending warm wishes to someone who needs a little TLC.
>>> Receive a FREE Bread Bowl Stamp and Cut (see card #2) when you purchase The Whole Studio!
Hero Arts has many different Monthly Kits that you can subscribe to including:
The WHOLE Studio – All 5 Kits (a 40% savings: $55 subscription + Free Shipping)
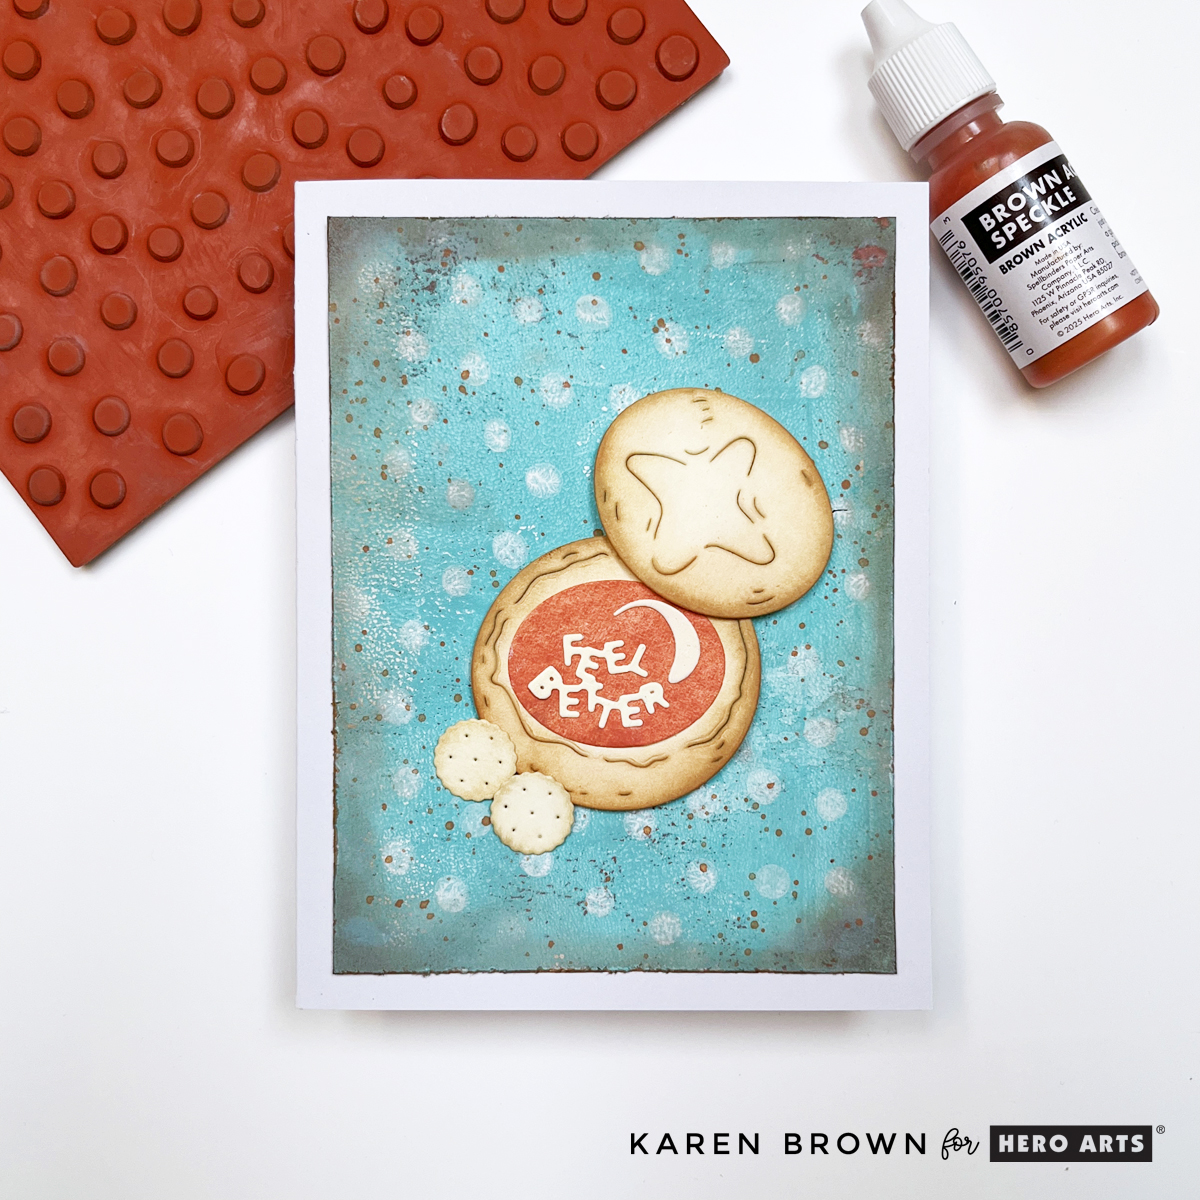
Card 2 – Easy Mixed Media Using Dotty + Gel Press Print
For my second card, I wanted to show the versatility of the Rubber Cling Dotty stamp by pairing it with a mixed media background.
I pulled a Gel Press print from my stash—a great way to use your pre-made backgrounds—and stamped Dotty over the top with Unicorn White Pigment Ink. After drying with my heat tool, I:
Distressed the edges using a distressing tool
Ink blended around the outer edges for depth and warmth
Added Brown Acrylic Speckle (from the December Card Kit) for texture and personality. I like to use a fan brush and rotate my background for even distribution.
My focal point is the die cut from the December Whole Studio Bonus Gift: Bread Bowl, shaded with inks to mimic the look of warm crusty bread. The “Feel Better” sentiment ties the whole card together in the coziest way.
This mixed media-style card is earthy, rich, and full of character—but still incredibly easy to make.
Blog Hop and Giveaway:
Hero Arts will give away a $50 gift card, drawn from the comments left across the hop. Enter by Sunday, December 7th at 11:59pm MT, and the winner will be announced on the Hero Arts blog the following week. Leave a comment on all stops for more chances to win!
Whether you prefer clean and modern or layered and artsy, the Dotty Cling Stamp opens up endless background possibilities. Paired with this month’s heartwarming soup-themed dies, you can build a versatile stash of Get Well cards to share comfort all year long.
Be sure to hop along with the rest of the designers—there are prizes to be won and loads of inspiration waiting for you! Happy crafting, friends. ❤️
Hello, Karen here, back with another card inspired by the November 2025 Hero Studio “One More Chapter” release! I’ve been absolutely loving this book and reading-themed collection — so much so that I couldn’t resist making one more card. (Here’s a link to my previous post where I shared two other projects from this release!)
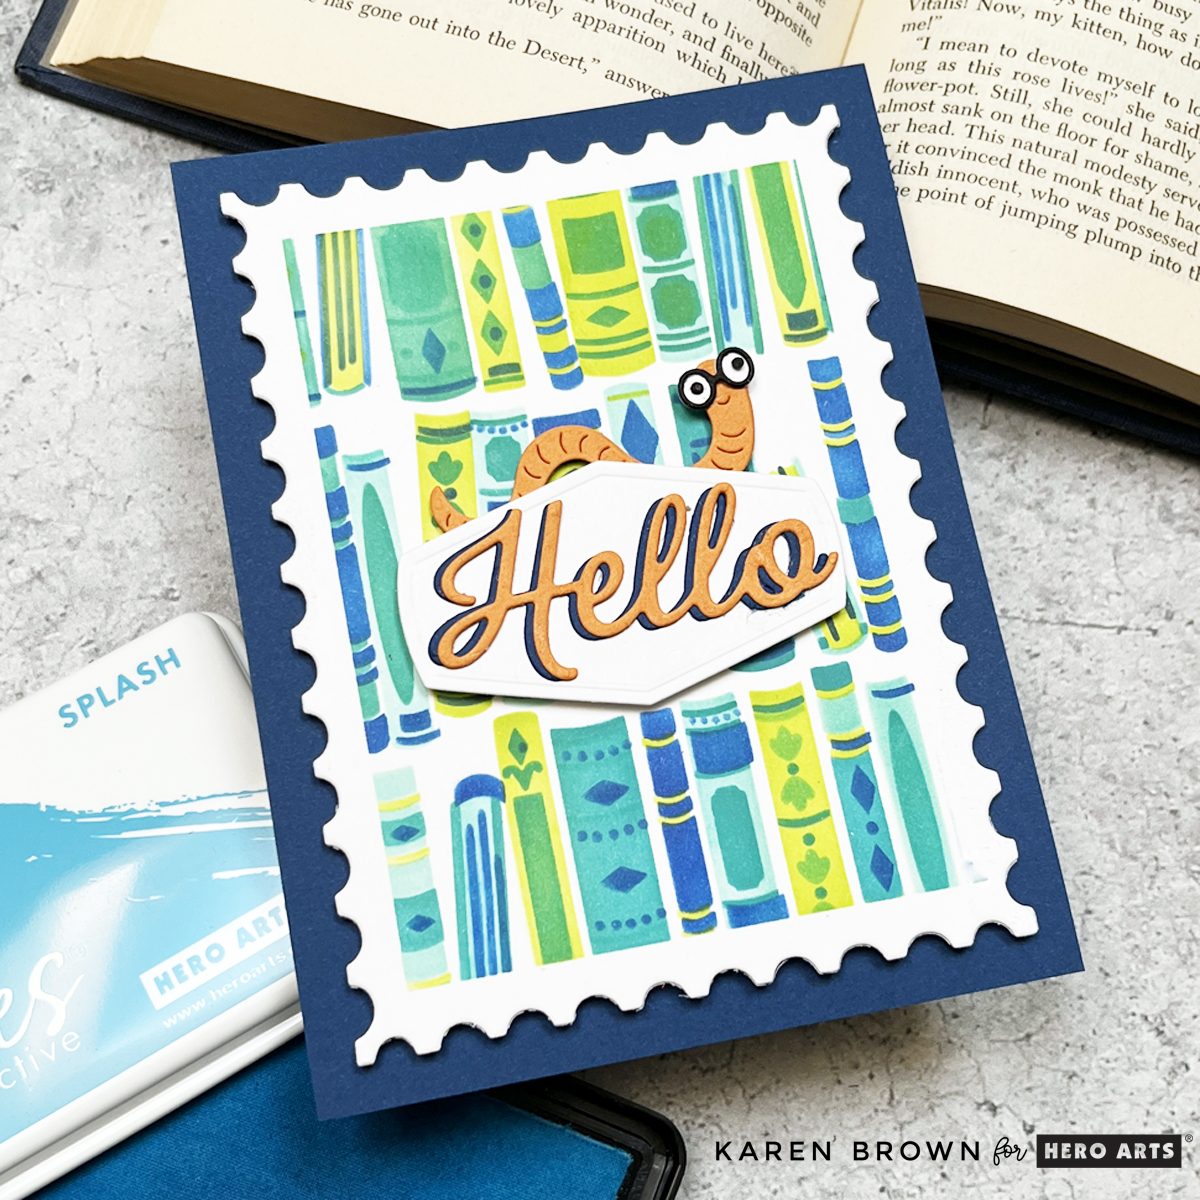
This time, I reached for the “On the Shelf” 4-Layer Stencil Kit to build my own bold bookshelf background. I wanted a crisp, postage-themed layout, so I began by masking off a 3″ x 4⅜” rectangle on a piece of Deluxe Smooth White Cardstock — giving me a clean white frame around my stenciling.
🎨 Inky Layers
I chose four analogous ink colors (adjacent on the color wheel) that flow beautifully together for a cohesive look:
Once the inky layers were dry, I die cut the panel with the 2nd largest Nesting Postage Stamp Die to give my bookish scene a framed, mail-art feel.
🧡 Complementary Pops of Color
For contrast, I reached for my ColorWheel Cardstock and added Carrot and Cosmic Sky accents. The playful bookworm with glasses and the scripty “Hello” sentiment (from the Book Bag Die Kit) are both cut from Carrot, with a Cosmic Sky shadow layer that really makes the greeting pop. Orange and blue are complementary colors (opposite on the color wheel), which makes the whole design lively and eye-catching.
Everything is layered with a bit of craft foam for dimension, then mounted onto a Cosmic Sky A2 card base.
The end result? A bright, cheeky, and happy card that would be perfect for a reader of any age — man, woman, or child.
Hero Arts has many different Monthly Kits that you can subscribe to including:
The WHOLE Studio – All 5 Kits (a 40% savings: $130 subscription + Free Shipping)
Hello, Karen Brown here — and I am curling up with a good card kit! The November Hero Studio Release is a dream come true for book lovers. This month’s theme, “One More Chapter,” celebrates cozy reading nooks, favorite stories, and the joy of escaping into a good book.
Even better, there’s a Hero Arts Blog Hop to celebrate — and prizes! So grab a cup of tea (or coffee), and come along for some page-turning inspiration.
📖 Card 1: My Happy Place
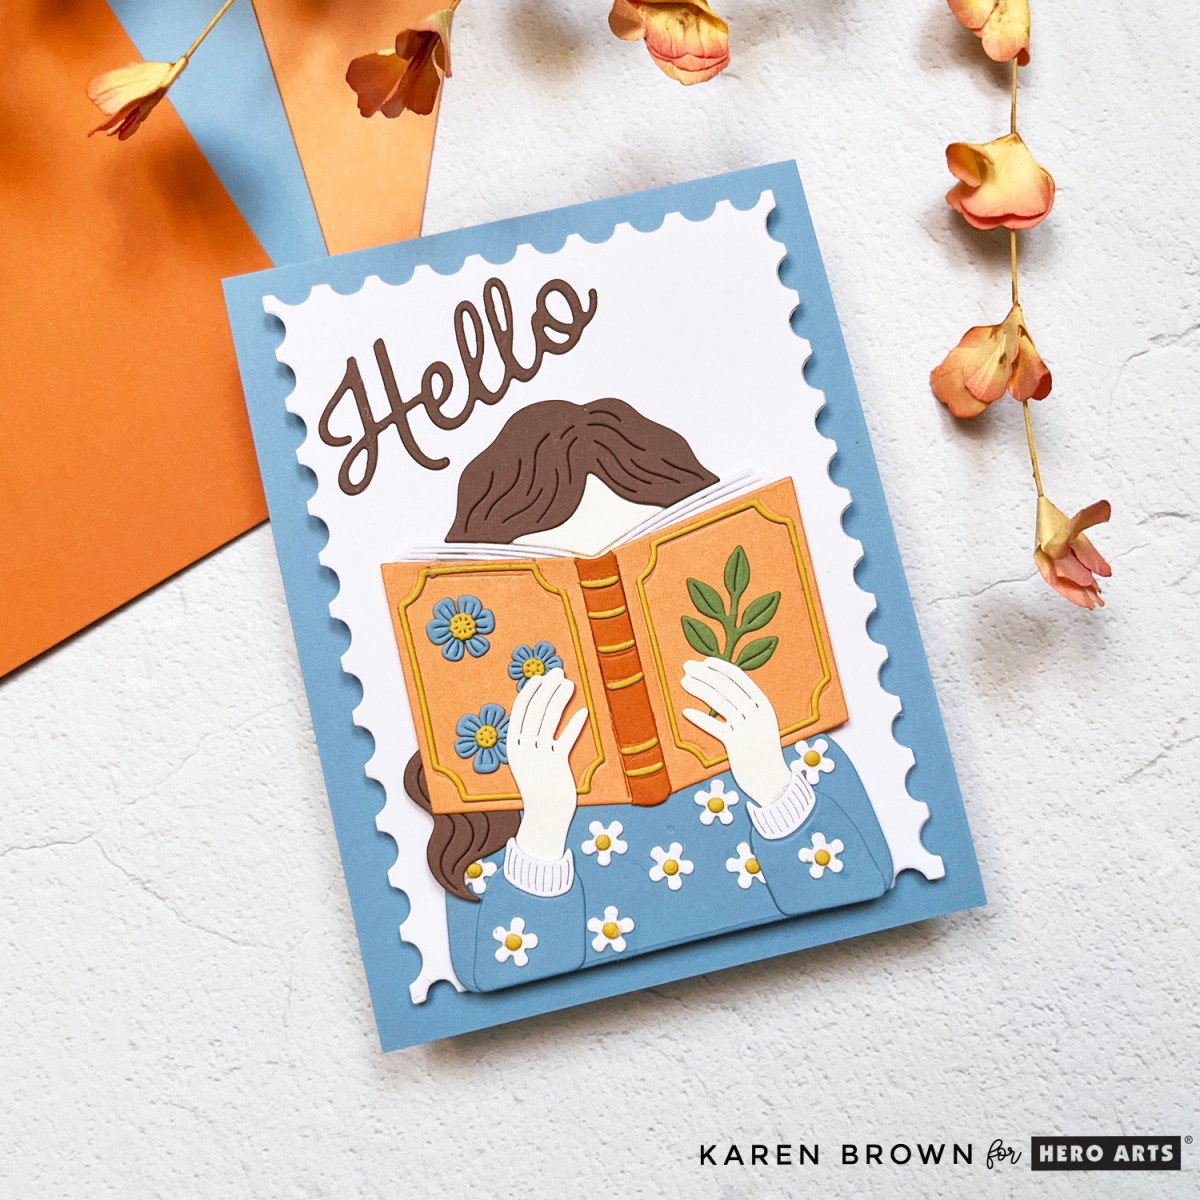
For my first project, I used the “Happy Place” die set from the November Card Kit of the Monthto create a cozy die-cut scene.
Picture this: a girl tucked in with her favorite book, surrounded by soft periwinkle blue and warm orange tones. The card has a charming, feminine feel — like a Saturday morning spent lost in a good story.
This one’s heading to a book club friend who, like me, can never resist reading just one more chapter!
What’s Included in the Kit?
• To Be Read Pile 4×6 Clear Stamp Set and Coordinating Dies • Happy Place Die Set • Professional Bookworm 3×4 Stamp & Cut • Gold Hero Wax, 1 oz. • 10 Sheets of Cardstock- 1 of each color, 5.5″ x 8.5″
>>> Receive a FREE Do Not Disturb Stamp and Cut when you purchase The Whole Studio!
Hero Arts has many different Monthly Kits that you can subscribe to including:
The WHOLE Studio – All 5 Kits (a 40% savings: $130 subscription + Free Shipping)
Next, I pulled out the Stamp & Cut of the Month: One Page at a Time. I love this set — it’s perfect for pairing bold typography with clever bookish sentiments.
I stamped the oval sentiment “Escaping Reality One Page at a Time” and used it as the O in my big JOY design. Then I die cut a bold J and Y from the Letter Fancy Die sets (J–N and W–Z) in bright orange, adding white shadows behind them to tie in the stamped oval.
The letters are large, 2 1/2″, creating a bold and dynamic visual card.
For the background, I created a tone-on-tone checkerboard using the November Cling of the Month— stamped Cornflower ink on Periwinkle cardstock for a crisp, graphic finish.
The result? A bold, cheerful, and clever card that feels fresh and literary — perfect for your favorite reader.
GIVEAWAY
Hero Arts will give away a $50 gift card, drawn from the comments left across the hop. Enter by Wednesday, November 5th at 11:59pm PT, and the winner will be announced on the Hero Arts blog the following week. Leave a comment on all stops for more chances to win!
I adore how all the November Hero Studio kits coordinate beautifully — from cozy die-cut scenes to playful sentiments and graphic backgrounds. Whether you love to stamp, die cut, or mix both, this release has something for every creative reader at heart.
And if you’re tempted by all the coordinating goodness, consider the Whole Studio Bundle — it’s a $240 value for just $130. That’s a deal worth bookmarking!
You might also want to take a peek at Past Club Kits that are still available.
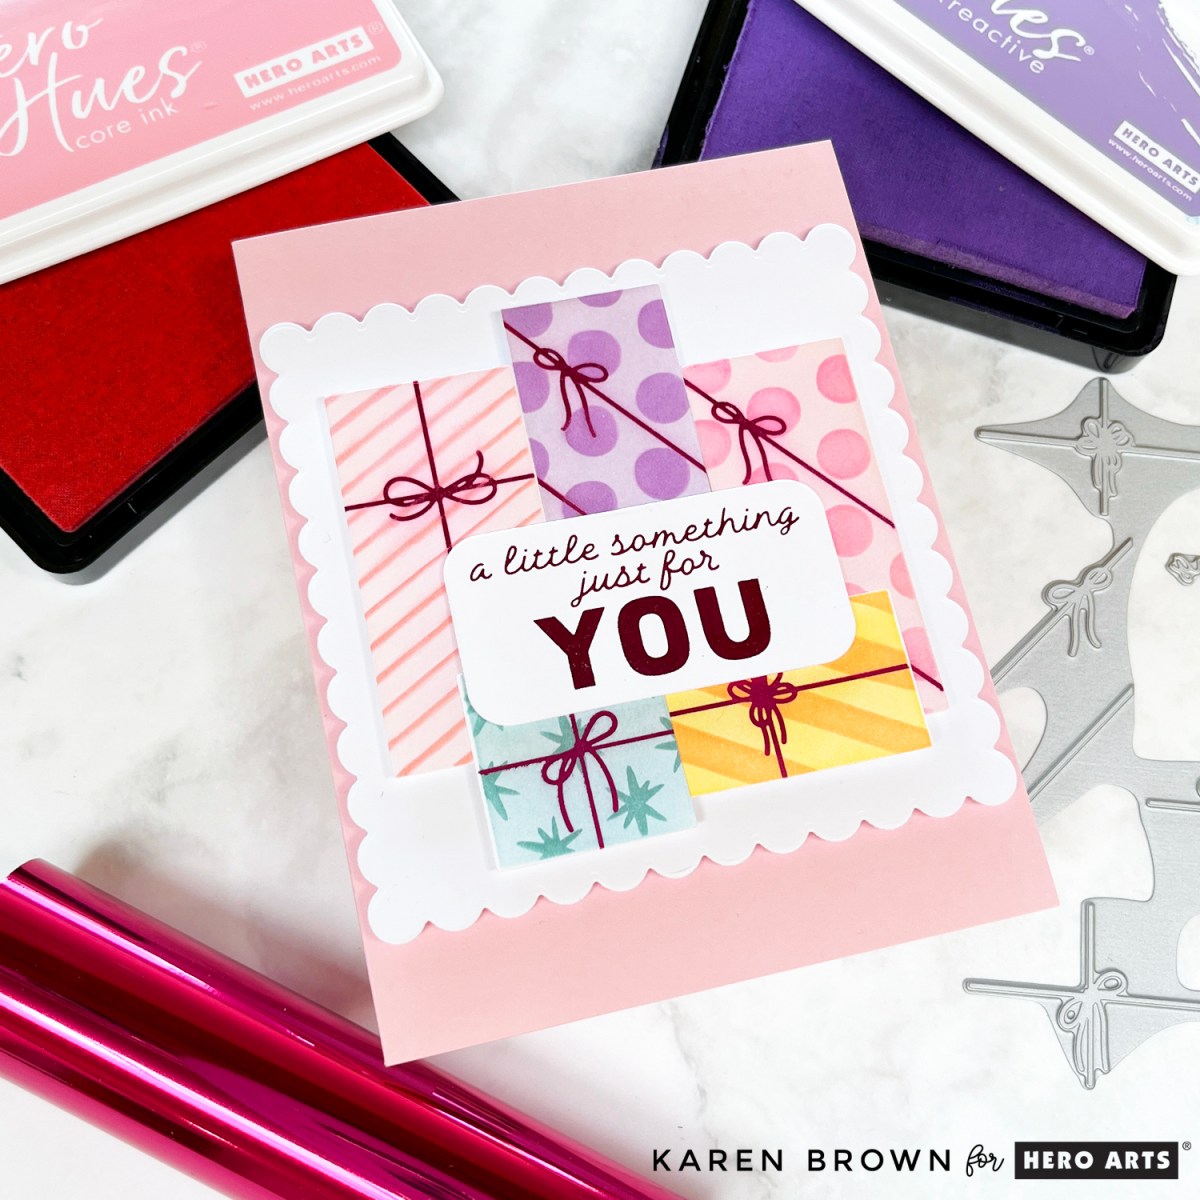
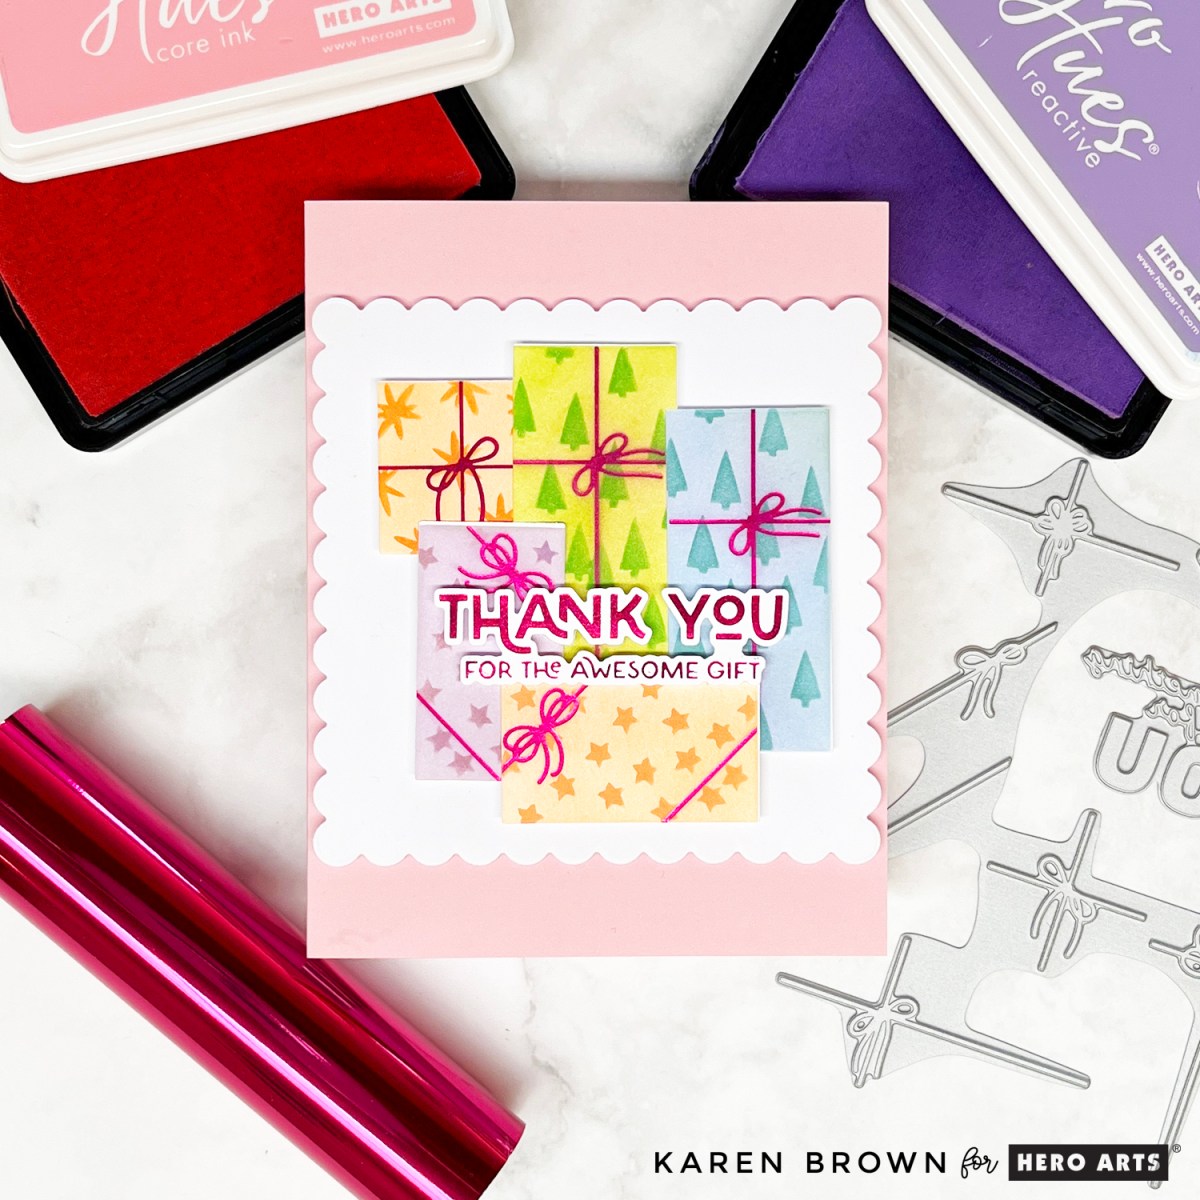
The new Hero Arts October 2025 Best Gift Ever Collection is here, and I couldn’t resist creating with the Best Gift Ever Boxes Bundle. These products are incredibly versatile—you can use them for birthdays, Christmas, graduations, showers, or anytime you need a festive card. I went with pastel rainbow colors and magenta foil for two cheerful and celebratory designs.
I arranged the die-cut gifts and sentiments into a loose square composition, mounting them with foam squares onto a white scalloped square panel (from the Square Scallop Infinity Dies). Finally, I adhered them to a pale pink card base.
The result? Two pastel, rainbow-inspired cards with a touch of elegant foil shine. These gifts are perfect for any season or occasion—and I love how the foil details elevate the look for something extra special.
💡 Foiling Note: I own two foiling machines, but I consistently get my best results with the Spellbinders Glimmer System. In fact, I haven’t reached for my other machine since 2023! This is, of course, just my personal experience, but I thought it might be helpful to share if you’re curious about foiling systems.
I am also participating in an Instagram Hop for this release, and we’d love for you to pop by! You can find all the details HERE.
Interested in another post on foiling? Click HERE.
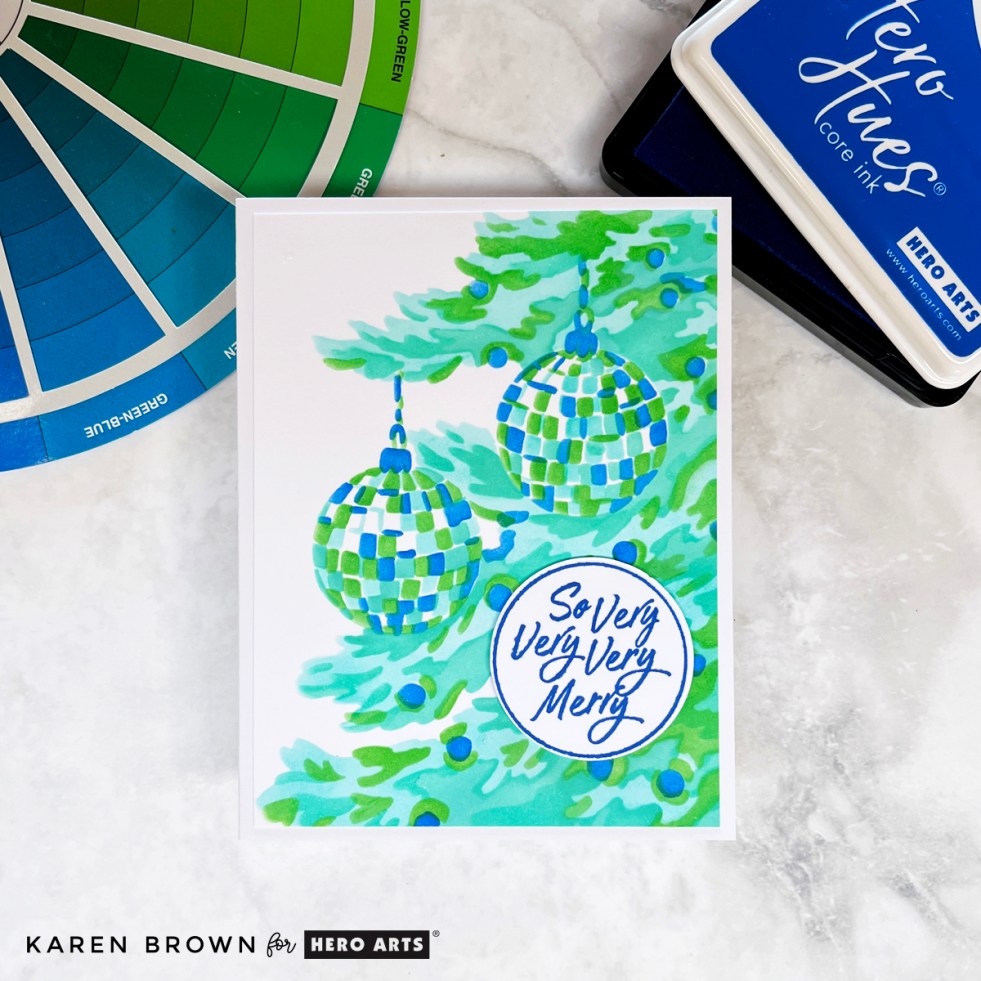
I couldn’t resist creating one more card with the October 2025 Release—this time featuring the Layering Stencil: The Tree. This gorgeous four-layer stencil creates a close-up view of a Christmas tree filled with ornaments, and it was such a joy to blend.
You can see my other October Club Kits Cards HERE.
I chose analogous colors (neighbors on the color wheel) for a soft, harmonious look in shades of greens, aquas, and blues:
Using Deluxe Smooth White Cardstock made the ink blending go on like butter, and as always with Hero Arts stencils, the layers lined up perfectly.
For the sentiment, I used the “So Very Very Merry” circular stamp and coordinating die from the October Card Kit, stamped in Indigo ink. The deep blue ties the whole design together beautifully.
This card has already gone into my holiday stash, ready to be mailed in December!