Cardmaking Kit · Die cutting · Stenciling

Hero Arts August 2025 | Light-Up Tags + Crystal Ball

Handmade Halloween tag with layered colorful tags, white heat embossed spider web on black cardstock, lit up with a hidden light, and “Boo to You” sentiment.

The Hero Arts August 2025 Release is here, and it’s packed with creative possibilities—from interactive Halloween tags to dreamy stenciled scenes and mystical vibes. I had so much fun with these kits and created two very different but equally inspiring projects.

>>>> Hero Arts Club Kits Overview <<<<

🕷️ Project 1: Light-Up Spider Web Halloween Tag – August Card Kit

Let’s start with a spooky showstopper! This interactive Halloween tag uses elements from the August Hero Arts Card Kit, including the spider web stamp and Press One Light that lights up the tag.

Here’s how it came together:

  • I white heat embossed the spider web on black cardstock, die cut it, and positioned one of the included Press One Lights behind the center.
  • When you press the hidden button—the web lights up! 🕸️✨
  • I layered two tags using the Nesting Tag Dies:
    • The top tag is watercolor paper with Yellow and Orange Liquid Watercolors—so vibrant and bold!
    • The bottom tag is purple cardstock with a Hero Transfer from Collage Backgrounds 2—the script texture gives a haunting Halloween vibe.

I finished it off with a heat-embossed “Boo to You” sentiment from the kit and a touch of black hemp cord. This tag is spooky, clever, and totally kid-approved.

Hero Studio light up Halloween spider web tag created with the August 2025 Card Kit, including the Pear Blossom Press One Light.

What’s Included in the August Card Kit?

  • Abraham and Katrina 6×8 Stamp Set (used on tag)
  • Abraham and Katrina Coordinating Die (used on tag)
  • Stamping Guide for stamp set
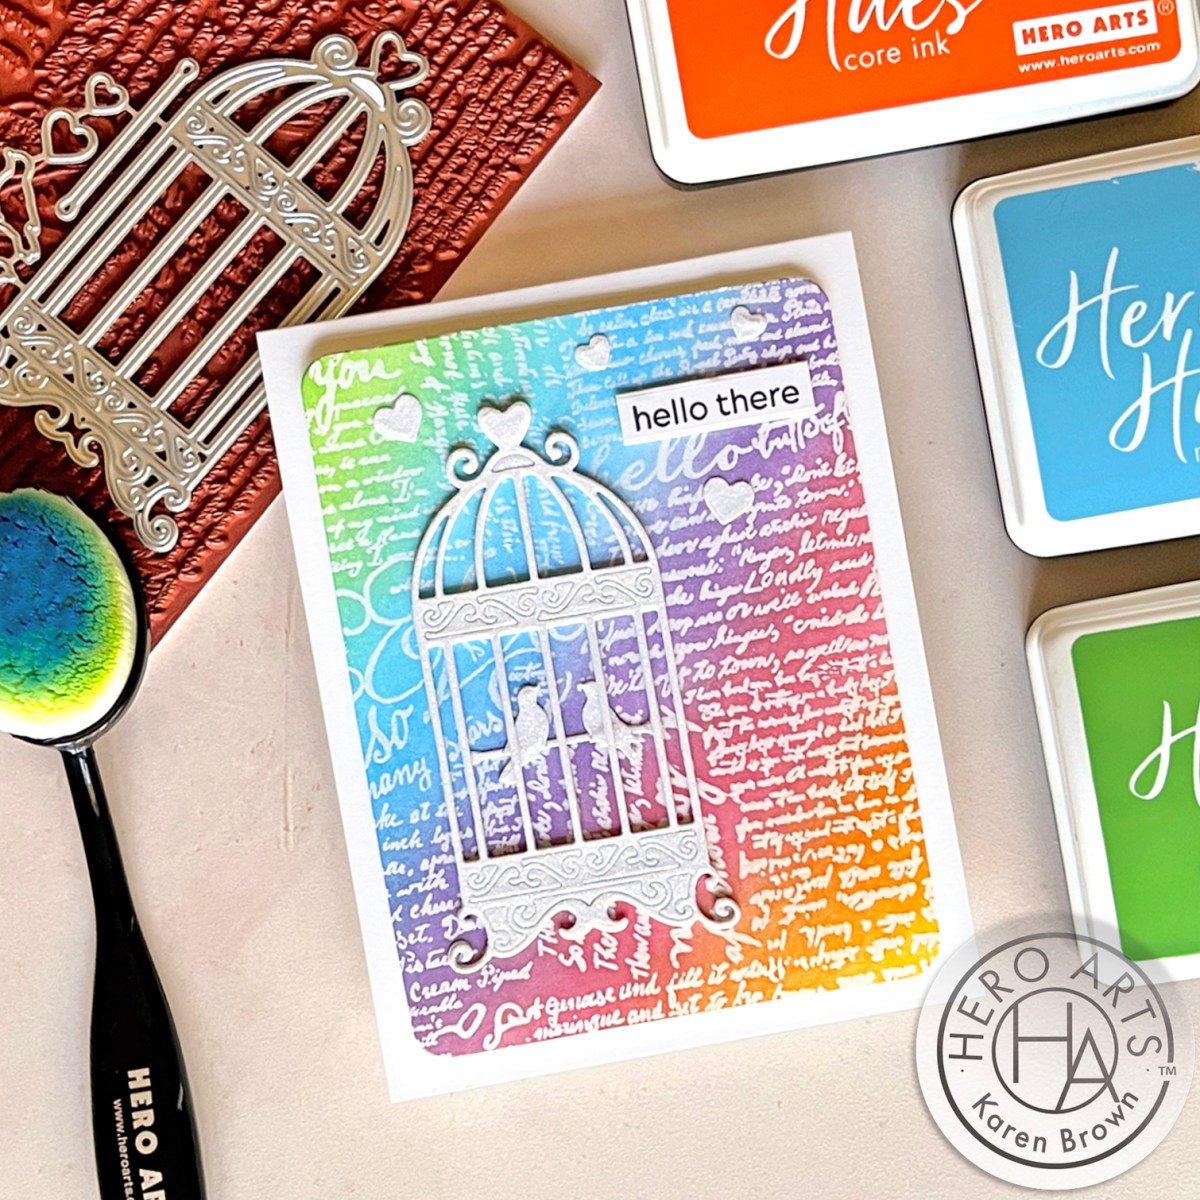
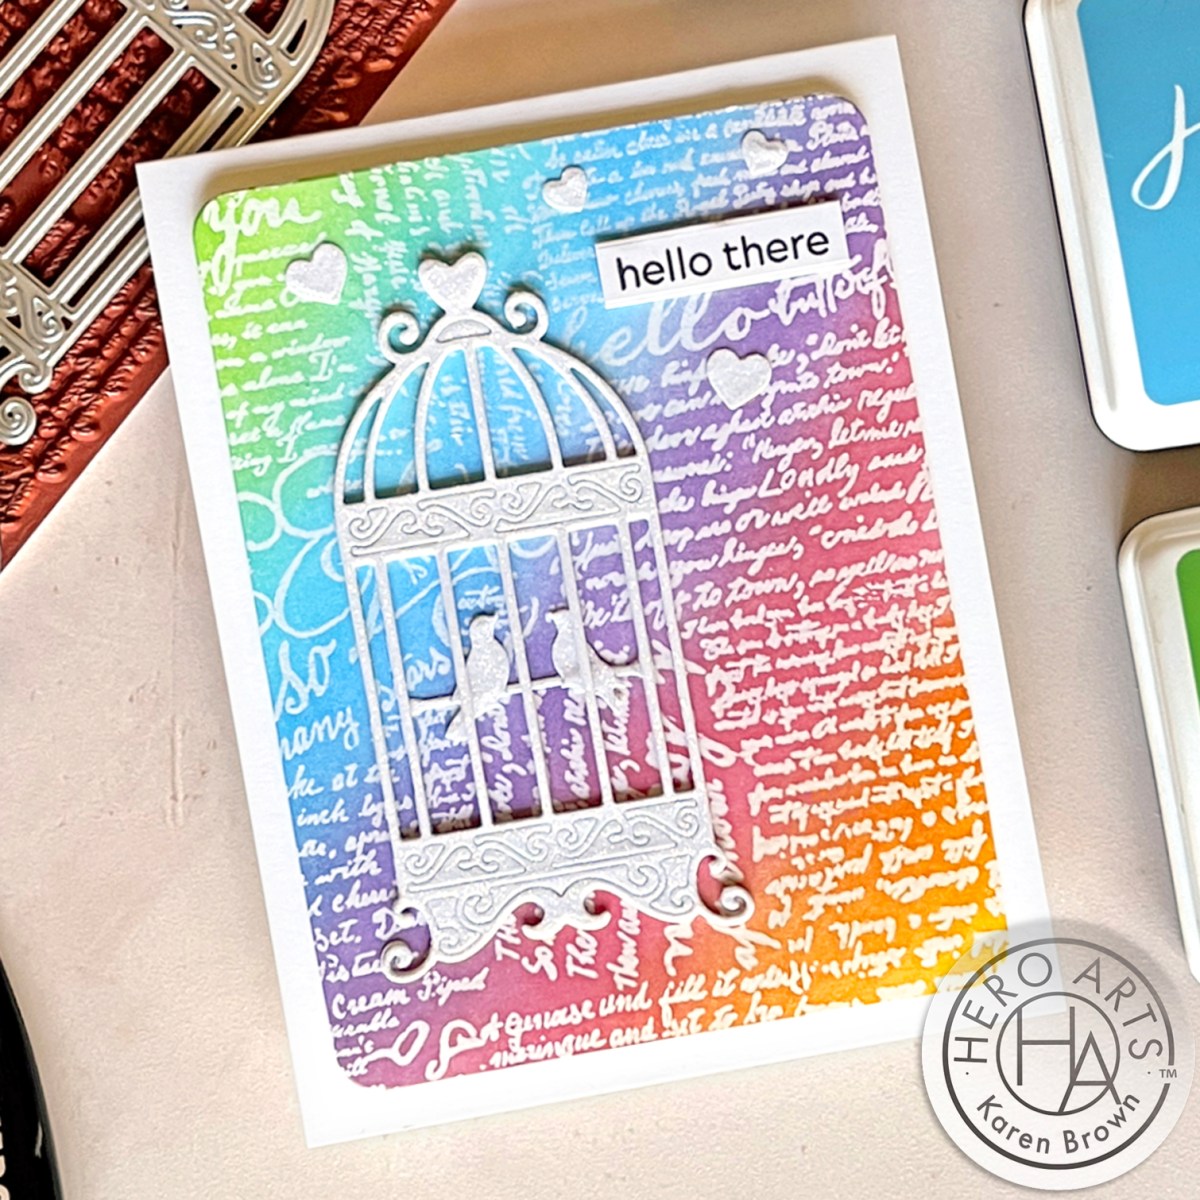
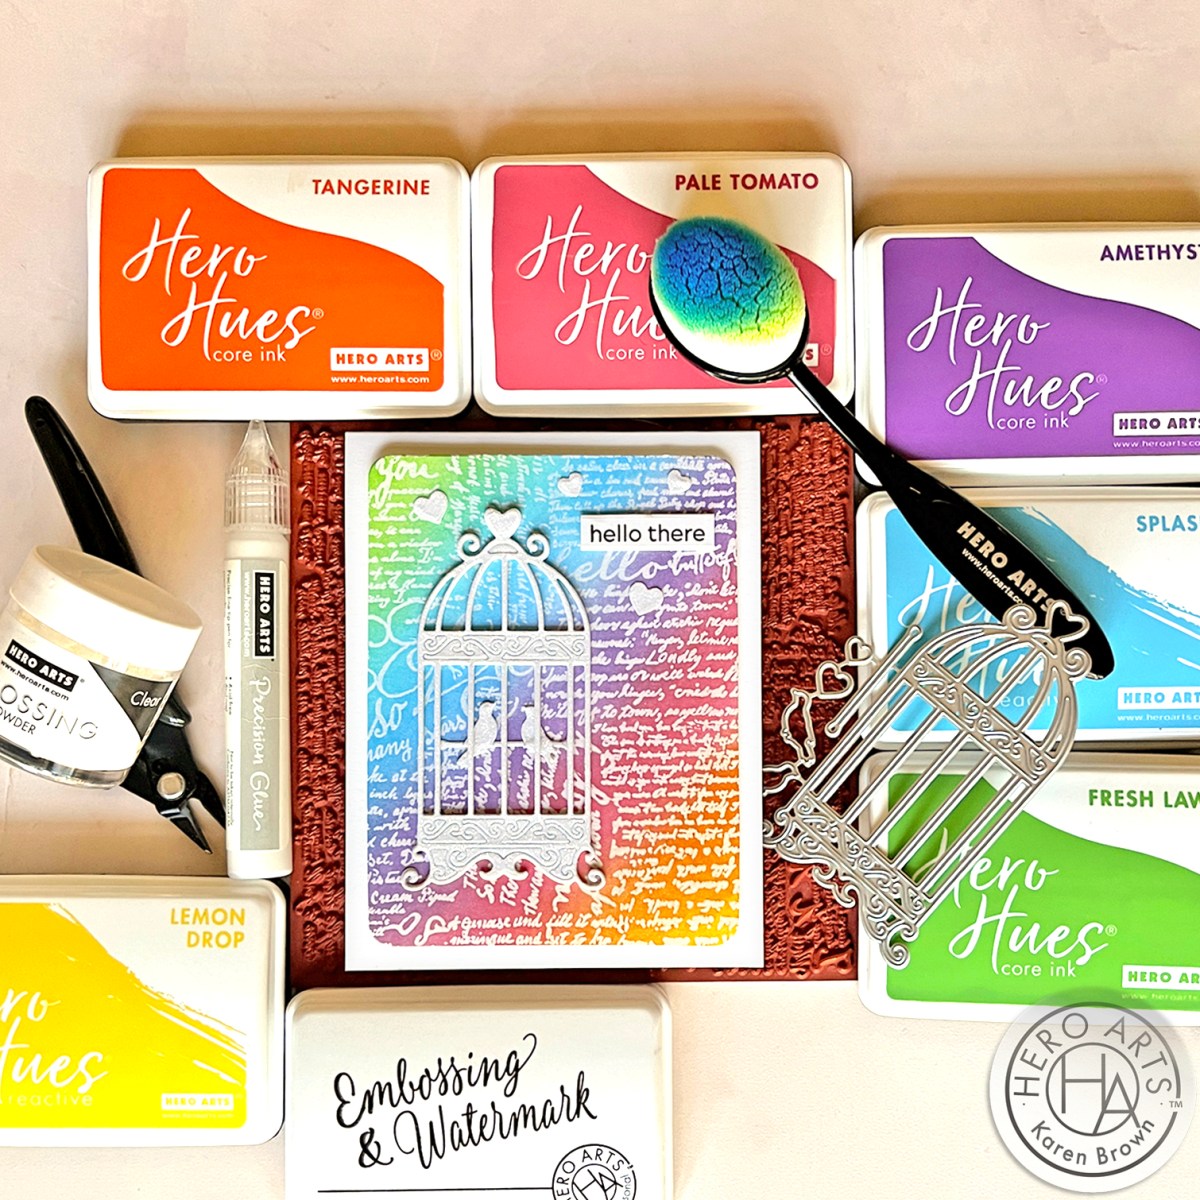
  • Victorian Frame Die Set (used on card 2)
  • Pear Blosson Press-One Light 2 Pack (used on tag)
  • 10 Sheets of Cardstock- 1 of each color, 5.5″ x 8.5″ (Cinnamon, Terra Cotta, Carrot, Coral, Bellini, Tuscan, Mint, Waterfall, Blue Spruce, Raven)
  • Holographic Rainbow Film, 1 sheet – 5.5″ x 8.5″
  • Acetate, 1 sheet – 5.5″ x 8.5″ (used on card 3)

Receive a FREE Magic Mist Stencil when you purchase The Whole Studio!

Hero Arts has many different Monthly Kits that you can subscribe to including:

Project 2: Crystal Ball Magic – August Stamp & Cut: You Are Magic

Card featuring a die cut crystal ball made from ink smooshed background and acetate layer, with the sentiment “You Are Magic” over a tone-on-tone mini rainbow background stenciled in teal and aqua shades.

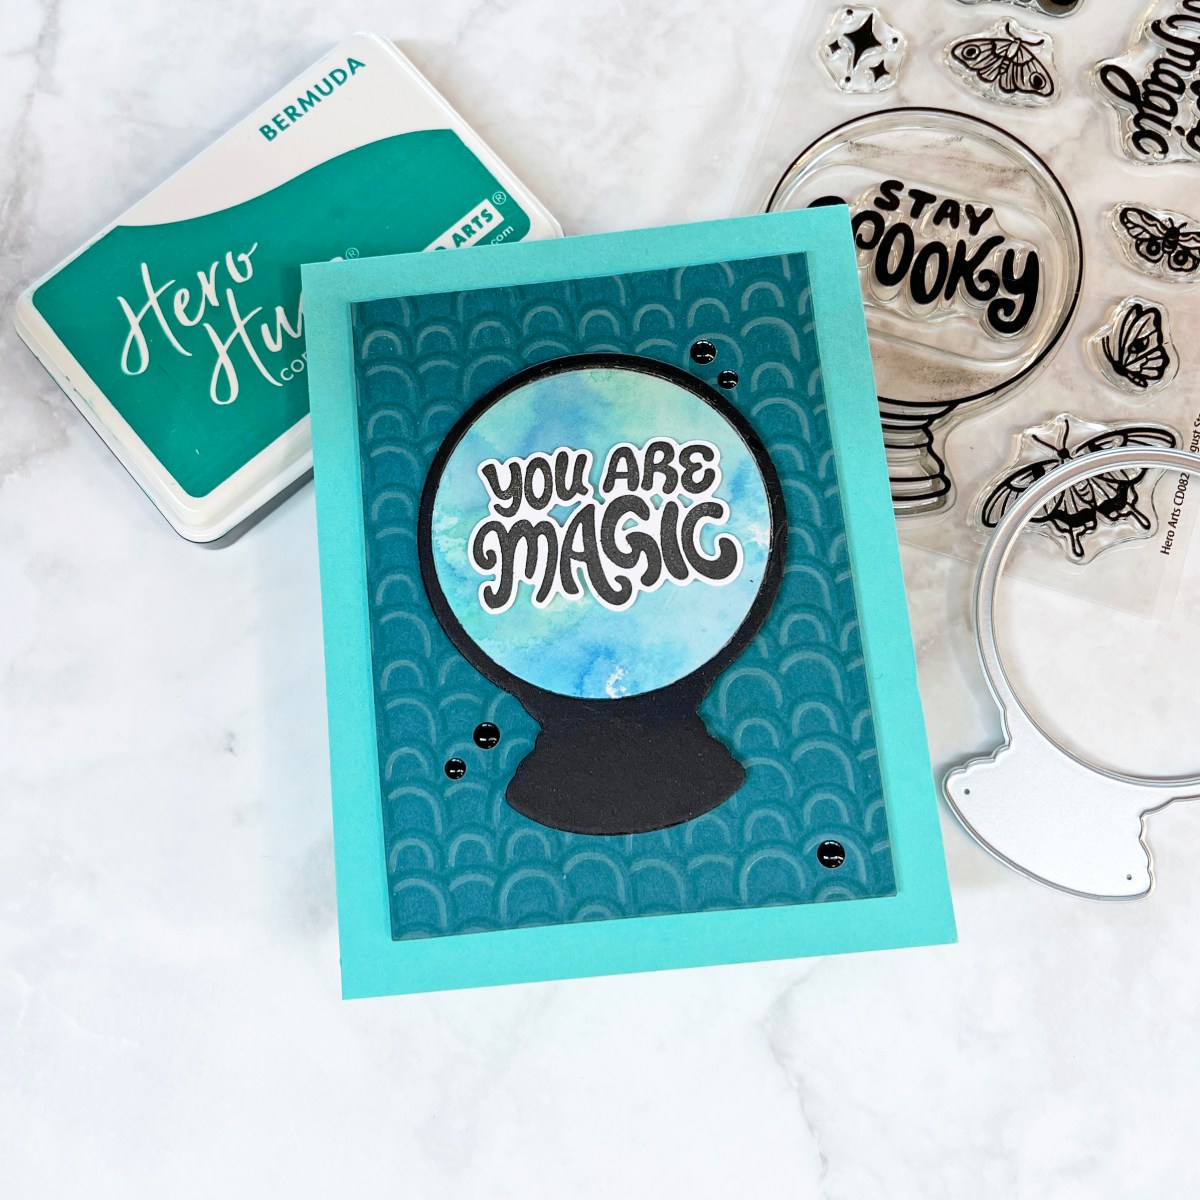
This second card leans into the magical vibes with the new You Are Magic Stamp & Cut. The crystal ball die is the star here!

  • I used a leftover ink smoosh background scrap in soft blues and aquas to simulate swirling crystal magic. You can read my Ink Smoosh Tutorial HERE.
  • I die cut a circle of acetate (included in my August Card Kit of the Month) and layered it on top for a glassy, dimensional effect.
  • The sentiment “You Are Magic” is stamped and layered over the crystal ball.

For the background, I used Oceanside ColorWheel Cardstock and the Retro Rainbow Stencil from last month’s Retro Kitchen Release. I went for a tone-on-tone look using:

Mounted on an aqua card base with a few black enamel dots, this card feels subtle, sparkly, and just a little bit mystical and mysterious.

Hero Studio Blog Hop

Hero Arts will give away a $50 gift card, drawn from the comments left across the hop. Leave a comment on all stops for more chances to win!


Hero Arts
Nichol Spohr

Seeka
Rosie Lopez
Rachel Kleinman
Natasha Polite
Mindy Eggen
Michelle Short
Michelle Lupton
Lisa Tilson
Karen Brown
Jennifer Kotas
Jeannie Lieu
Charlene Madrid
Channin Pelletier
Anna Mahtani

Handmade card created from the Hero Studio August 2025 Stamp and Cut "You Are Magic" kit.

From light-up tags to dreamy stenciling and crystal energy, the August kits are perfect for stretching your creativity into fall. Which kit are you reaching for first?

Cardmaking Kit · Die cutting

Hit the Road with Hero Arts! July 2025 Club Kits Blog Hop

3 fun summery cards for Hero Studio July 2025 in aqua blue, orange and white color palettes.

Pack your crafty bags, because this month Hero Arts is taking us on a road trip! I’m thrilled to be part of the July 2025 Club Kit Blog Hop where we celebrate this month’s travel-inspired theme. The kits are full of scenic surprises, clever sentiments, and summery fun—and I’m here to show you four creative ways to use them.

>>>> Hero Arts Club Kits Overview <<<<

You might also be interested in my VIDEO using the July Layering Stencil Kit.


Card 1: Desert Dreams Heroscape

Road trip Heroscape card with a winding desert road, blue sky, and “just keep going” sentiment.

I started with the Card Kit of the Month, which features a stunning “On the Road” Heroscape. Imagine a desert road winding into the distance with low-slung mountains and a bright blue sky. These Heroscapes are layered stamps that create dimension and realism with every step.

I kept the palette natural and sun-drenched, and chose the sentiment “just keep going” — a perfect message for road trips and life journeys alike. Heroscapes are always crowd-pleasers and this one is no exception!

Layer stamp Heroscape of a winding road through the desert mountains from the July 2025 Hero Studio Card Kit of the Month.

What’s Inside the July 2025 Hero Studio Card Kit?

  • On the Road HeroScape Coordinating Dies
  • On the Road HeroScape 6×8 Stamp Set
  • Let’s Go Die Set
  • Pine Core Ink Cube
  • 10 Sheets of Cardstock (1 of each color), 5.5″ x 8.5″ (Sicily, Coral, Bellini, Waterfall, Teal Topaz, Blue Spruce, Peridot, Beeswax, Saffron, Carrot) These are some of my absolute favorite cardstock colors and I used Carrot and Teal Topaz on two cards below.
  • Mirror Paper, 1 sheet – 5.5″ x 8.5″

The Whole Studio  includes ALL 5 of the monthly subscriptions in one discounted bundle. Cling of the Month, Stamp & Cut of the Month (new name for the subscription!), Layering Stencil of the Month, Fancy Dies of the Month, and the Card Kit of the Month.

Receive a FREE Everything’s Pine stamp & die set when you purchase The Whole Studio!

Hero Arts has many different Monthly Kits that you can subscribe to including:


Cards 2 & 3: Cobblestone Courtyard Two-Fer

2-Fer cards using Hero Arts Cobblestone Courtyard Cling Background Stamp in aqua blue with white heat embossing, die cut hearts and scripty hello sentiment.

Next up is what may be my favorite Cling of the Month EVER: Cobblestone Courtyard. This rubber background stamp is a pattern of concentric circles that looks like a cozy plaza or mosaic.

Aqua blue and white heat embossed and ink-blended Cobblestone Courtyard background card with die cut heart window and a scripty orange “hello” sentiment..

For my first card, I stamped it in Unicorn White Pigment Ink and heat embossed with White Embossing Powder on Bristol Smooth cardstock. Then I ink blended over the top using Blue Raspberry ink to create a vibrant turquoise and white background. I polished the embossing with a microfiber cloth, and the crisp, clean results had me swooning.

I couldn’t resist making a “two-fer”: I die cut a heart (from the Heart Infinity Die set) from the center of the panel and inset a scripty “hello” from the Fancy Die Kit: Mix Tape using Carrot cardstock.

Bright summery hello card with layered die cut hearts, scripty hello sentiment, and turquoise, white and orange color palette.

For the second card, I used the leftover heart die cut and layered it over a Teal Topaz heart, then a smaller white heart, and finally topped it with the turquoise Cobblestone heart. Another “hello” sentiment (this time in Woodland cardstock) finishes the look. The swooping tails of the sentiment are so charming! Two cards with a fresh, summery vibe!


📼 Card 4: Mix Tape Magic

Summery aqua ink smoosh card background with a die cut retro cassette tape and scripty hello background.

For my final card, I had fun with the Fancy Die of the Month: Mix Tape. This playful set includes a cassette tape die with the word “hello” cleverly shaped from the tape itself. I used this hello sentiment on three of my cards today.

I placed the cassette on a handmade ink-smooshed background using Blue Raspberry, Splash, and Pool Party inks. I wanted my background to look like a shimmery swimming pool. Want to try ink smooshing? Here’s how:

Ink Smooshing Quick Steps Tutorial:

  • I liberally inked a 6×6″ acrylic block with Blue RaspberryPool Party and Splash inks. This is the panel I used for my background.
  • I spritzed the ink with water and “smooshed” the block onto a piece of watercolor paper
  • I weighted the inked block with a book for 5 minutes
  • I uncovered my panel.  If the ink pooled, I dabbed with a paper towel.
  • I made a “second generation” panel for a future project by taking a piece of Bristol Cardstock and soaking up the excess ink on my work space. So this is another Two-Fer!
Retro cassette tape card with ink-smooshed blue background and whimsical “hello” shaped like audio tape.

The retro vibe of the tape plus the dreamy summer colors made this card a total blast to create.

You might be interested in another popular Ink Smooshing post I wrote.

GIVEAWAY 

Hero Arts will give away a $50 gift card, drawn from the comments left across the hop. Enter by Saturday, July 5th at 11:59pm PT, and the winner will be announced on the Hero Arts blog the following week. Leave a comment on all stops for more chances to win!
  

BLOG HOP ORDER

Hero Arts
Hero Arts Creative Team:
Anna Mahtani
Channin Pelletier
Charlene Madrid
Jeannie Lieu
Jennifer Kotas
Karen Brown <<<You Are Here
Lisa Tilson
Michelle Lupton
Michelle Short
Mindy Eggen
Natasha Polite
Rachel Kleinman
Rosie Lopez
Seeka
Special Guests:
Nichol Spohr
Lea Lawson
Sheri Gilson


🚗 Final Thoughts

Whether you love to layer, emboss, smoosh or die cut, the July 2025 Hero Arts Club Kits have something inspiring for every type of cardmaker. Don’t forget to follow along the Blog Hop to see even more road trip-ready inspiration. Thanks for stopping by—and remember: Just keep going!

cardmaking · Die cutting · Hot Foiling

Spring Whimsy with Hero Arts: Bold Colors, Butterflies & Birthday Cheer

Spring is in the air, and so is a burst of bold color and whimsy! Today, I’m taking a closer look at the new Hero Arts Spring Whimsy Collection with four vibrant cards featuring hot foiling, ink smooshing, ink blending, heat embossing, and die cutting. Let’s get crafty!

>>> You may also be interested in my recent video and blog post: Easy and Festive Cardmaking <<<

Card 1: Hot Foil Butterfly Elegance

This card is all about shimmer and movement! I started with an aqua ink-smooshed background—the perfect backdrop for a gorgeous, hot-foiled butterfly. The butterfly itself was hot foiled onto an ink-blended panel of soft pinks, corals, and oranges before being die cut and centered on the background.

A hot-foiled butterfly in pink, coral, and orange, die-cut and placed on an ink-smooshed aqua background.

My Process for Creating This Foiled Butterfly Card:

Pro Tip: Ink smooshing is a great way to create organic, watercolor-like backgrounds.

Gorgeous Hot Foil Glimmer Butterfly card on a dreamy aqua ink smooshed background.

Card 2: Striking Ink-Blended Background & Black Butterfly

A bold ink-blended background in Fruit Punch, Creamsicle, and Taffy with a striking black die-[cut butterfly as the focal point.

For a dramatic look, I ink blended a bold background using Fruit Punch, Creamsicle, and Taffy inks. These warm hues set the stage for a striking black die-cut butterfly, creating a high-contrast, modern design.

Key Product: Delicate Butterfly Fancy Die (also used on card #1 and #3)
Bold pink, coral and orange ink blended background with a lovely die cut black butterfly focal element.  Hero Arts Delicate Butterfly Fancy Die.

Card 3: Heat Embossed Floral Background + Die Cut Butterfly

A white heat-embossed floral background over a vibrant coral and pink ink-blended panel, accented with a small black butterfly and a die cut “hello” sentiment.  Hero Arts Whimy Floral Bold Print Stamp.

This card keeps the same coral, pink, and orange hues but introduces texture with the Whimsy Floral Bold Print background stamp. I heat embossed the pattern in white over my ink-blended panel and added a small black die-cut butterfly and a “hello” sentiment for balance.

Key Products Used:

Hero Arts Floral Bold Print Stamp heat embossed over an ink blended gradient from soft orange to hot pink.

This next photo shows two cards I created with the Delicate Butterfly Fancy Die.

2 handmade cards featuring Hero Arts Delicate Butterfly Fancy Dies.  Both cards have an orange to pink gradient color scheme with black die cut butterflies.

Card 4: Elegant Window Birthday Card

A birthday card featuring a 9-pane Hero Artd Elegant Window Die with small, Copic-colored birthday images and a stamped “cheers” sentiment with Mist  blue cardstock.

For a completely different vibe, I created a charming birthday card using the Elegant Window Fancy Die. The die creates a beautiful 9-pane window, which I die cut from Mist cardstock. Each pane features a tiny, Copic-colored stamped image from the Spring Bunny Stamps, Our Day Messages, and Birthday Animal stamp sets. A simple “cheers” sentiment ties it all together.

Charming 9 window pane stamped and die cut birthday card featuring small stamped images of cake, party hats, balloon animal, duck, butterflies and flowers.

This collection is packed with so much creative potential! Whether you love hot foiling, ink blending, or stamping, there’s something here for every cardmaker. I hope these designs inspire you to play with color and try new techniques!

Four beautiful handmade cards created with Hero Arts Spring Whimsy Collection + hot foiling, ink blending, stamping, ink smooshing and die cutting.

Thank you for stopping by!

Best Of · cardmaking

Best and Favorite Cards of 2024: The Year’s Most-Loved Designs

As the year comes to a close, I’m taking a moment to reflect on all the creative projects I’ve shared across my Blog, YouTube channel, and Instagram. The journey has been filled with color, craftiness, and, most importantly, connecting with all of you!

Many of these items featured on my “Fan Favorites” list are currently on sale too!

  • Find Hero Arts New Year’s Eve sale items HERE
  • Hero Arts Final Sale items can be found HERE.
  • Shop Hero Arts HERE
  • Shop Spellbinders New Year’s Eve Sale HERE
  • Find Spellbinders Clearance Sale HERE
  • Shop Spellbinders newer collections HERE.

YouTube’s Card Tutorial: Most Watched Video

Best and Most Popular YouTube Cardmaking Video in 2024.

On YouTube, it was all about bringing techniques to life. Here is the tutorial that flew the highest:

Blog Post Link: Shimmery Snowflake Backgrounds 3 Ways

YouTube Link: Shimmery Snowflake Backgrounds

I created this video for HeroArts Blog and YouTube channel but I also posted on my YouTube Channel for my followers as well.

Top Blog Post in 2024

This year on my blog, I focused on techniques that ranged from beginner-friendly to advanced, and your feedback has been the cherry on top! My most read blog post this year was:

9 Tips, Tricks and Insights for Spellbinders BetterPress Machine

I received a BetterPress LetterPress system for Christmas in 2023, and I had lots of fun learning and experimenting with my new crafty toy. You can read my original blog post by clicking on the link above.

Best, Favorite, Most Popular Cardmaking Blog Post of 2024,

Instagram Reels: Quick Crafting, Big Inspiration

Favorite and Most Popular Instagram Reel in 2024.

This year, Instagram Reels became a go-to for sharing bite-sized creativity. These short videos were packed with techniques, tips, and a splash of fun. Here is my most popular 2024 Reel.

Instagram Reel Link: Floral Trove Stenciled Friend Card

Corresponding Blog Post Link: Stunning Stenciling Magic with Rainbow Colors

Instagram Highlights: Most-Liked and Commented on Creations

Instagram brought quick inspiration and behind-the-scenes sneak peeks to your feeds. Here are the top posts.

For Spellbinders, these were the fan favorites. You can find links to the corresponding blog posts below:

Best Handmade Spellbinders Cards in 2024.

And here are my most popular Hero Arts Instagram posts along with links to the correstponding Blog Posts:

Best Hero Arts Handmade Cards in 2024.

I’m so grateful to share this journey with all of you. Your comments, likes, and creations inspire me every day. Here’s to an even brighter, more colorful 2025 filled with new techniques, bold designs, and, of course, plenty of fun! Let me know in the comments—what were your favorite projects this year? I’d love to hear your thoughts!

Happy crafting, and see you in the new year! ✨☕

Karen

cardmaking · Tutorial

BOLD Heat Embossing | Hero Arts

How to get beautiful bold heat embossing results everytime.  Hero Arts Abstract Poinsettia Pattern Cling Stamp - November 2024

Hello, Karen Brown here from kennyscard.com and today I’ve got two projects with BOLD heat embossing that practically pops off the card! Heat embossing definitely adds that wow factor to your cards and it is always a fan favorite.

Today I am using the lovely new Abstract Poinsettia Pattern Cling stamp on both my cards. With a red rubber cling stamp and a bit of heat, you can create raised glossy designs that catch the light beautifully. Embossing give cards a tactile element that feels luxurious and makes your creations stand out.

Abstract Poinsettia Pattern 2 Ways

"JOY" die cut and heat embossed Christmas card with fine black heat spatter and Adriatic teal and Crimson red color scheme.

Let’s get started!

  1. For both cards, I started by creating my backgrounds. I applied my anti-static powder tool to a 6″ x 6″ panel of Cranberry cardstock. I always like to take a clean flat brush and move the powder around the cardstock before I start stamping.
  2. Using my StampWheel, I stamped the Abstract Poinsettia Pattern background stamp with Unicorn Pigment Ink and then heat set with White Embossing Powder. I use this double white combination when I want really bright white embossing. I let my heat tool warm up for 3 minutes so it was good and hot.
  3. I die cut my JOY sentiment three times from Adriatic Cardstock and then glued the stacks together for nice dimension.
  4. I added some fine paint splatters to an A2 White Card Base using a fine brush and lightly diluted Black Licorice Ink. I like to put a dab of ink on an Acrylic Block, mist it and then flick it onto my project.
  5. I cut my background down to 2 1/8″ x 5 1/2″ and glued to the bottom of my card base.
  6. I centered and glued my sentiment, added a left over “Peace on Earth” from my October Card Kit and finished with 3 black Neutral Hues Enamel Dots.
Bold red and white heat embossing  with teal die cut JOY Letter sentiment.

I made a quick Instagram reel for Card 2 if you are interested in watching the process.

  1. I repeated steps 1-3 above.
  2. I brushed some Icelandic Hero Wax onto my die-cuts for a shimmery glow that is even prettier in person. I applied the wax with a silicone shaper brush, but you could use your finger or a sponge dauber. This wax is an inexpensive way to spice up your projects. The key is to use just a little. And don’t worry, clean up is easy!
  3. I trimmed my background down and ink blended a little Crimson and Black Licorice around the edges to frame the sentiment, but you could easily skip this step.
  4. With a little craft foam, I glued my panel to an A2 card base.
  5. I centered and glued my sentiment.
Two bold heat embossed Christmas cards in Crimson red and Aquatic Teal with bright white heat embossing.

Thanks for stopping by today. Happy embossing, and happy holidays!

Cardmaking Video

VIDEO: Shimmery Snowflake Backgrounds 3 Ways

Are you ready to add a touch of winter magic to your card-making? In today’s video, I will guide you step-by-step through the enchanting process of creating shimmery snowflake backgrounds that will leave everyone in awe!

If you are having trouble viewing the video, click HERE to watch on YouTube.

Today, we will be creating two cards and one tag using Hero Arts NEW Reactive Glitz Inks and the Kaleidoscope Snowflake Bold Print Stamp.

Adorable bright Christmas Holiday card with a "peeking penguin", shimmery background and heat embossed snowflakes.

For Card #1, My background was created with French Pink and African Violet Glitz Inks and the Kaleidoscope Snowflake Bold Print Stamp. I added a white Wood Frame and an adorable Peeking Penguin die cut to “ice” my card.

Shimmery Hero Arts Glitz Reactive Ink Christmas Holiday Card.

Look at the gorgeous shimmer from the Glitz Inks!

Snowflake Chirstmas Holiday card with heat embossed snowflakes and die cut snowflakes over a ink blended pink and purple background.

For Card #2, I did my ink blending on Peony Cardstock with French Pink and African Violet. Next, I heat embossed the Kaleidoscope Snowflake Bold Print Stamp. Then, I added Snowflakes die cut from Glitter Cardstock using the Snowflake Pattern Cover Die. Such an easy way to die cut LOADS of snowflakes!

Mixed Media Snowflake Christmas Winter Holiday Tag.

I also created a Mixed Media Tag that features Glitter die cut Snowflakes, Mini Clay Snowflake Embellishments and a Holiday Message Strips Hero Transfer Sentiment.

My background was created with Egyptian Blue and Naples Yellow Reactive Glitz inks and the Kaleidoscope Snowflake Stamp. I added a bit of Purple Galaxy around the edges.

Multiple Christmas Holiday cards and tags with Hero Arts Glitz Ink and the Kaleidoscope Snowflake Bold Print background stamp.

Other Supplies Used:

Video showing how to make Shimmery Snowflake card backgrounds for the Holidays and Christmas.

I had “Snow Much Fun” creating this trio and I hope you enjoyed the VIDEO!

cardmaking · Die cutting · Rainbow Colors

Hero Arts | Colorful Rainbow Mixed Media Card

Hero Arts Vintage Bird Cage die cut on an rainbow ink blended background card.

Hello and welcome!  Karen Brown here and I have a very fun project to share with you today featuring this delightful Vintage Birdcage die. I love color and texture and I used lots of both on this card.

Colorful rainbow ink blended background over an Ode to Andy Warhol Script Bold Print Stamp on a handmade card.

Here is my recipe:

White vintage die cut bird cage on a bright rainbow colored background.

I thought the supplies were so pretty sitting on my art desk, so I took an additional photo of most of the supplies I used.

How to ink blend a rainbow colored handmade card background.

This card was to fun for me to make and I am so happy that you stopped by!

cardmaking · Die cutting · papercrafting

Hero Arts | December 2023 My Monthly Hero Release Blog Hop

Hero Arts | December 2023 My Monthly Hero Release Blog Hop + Alphabet Cover Die

Hello My Monthly Hero lovers and welcome to the December 2023 Release Hop and Giveaway! I am excited about this month’s kit….so much wonderfulness! December’s theme is the Alphabet (Classic) and Numbers (Premium).

Classic Kit Contents ($81 Value for $36.99)

• XL Alphabet Clear Stamp Set, 8″ x 10″
• Alphabet Cover Plate Die
• 10 Pack of Watercolor Pencils
• 6 Sheets of Luxe White Watercolor Paper, 8.5″ x 11″
• Water Flow Brush

Premium Kit Contents: ($112 Value for $49.99)

• XL Alphabet Clear Stamp Set, 8″ x 10″
Numbers Clear Stamp Set, 4″ x 6″
• Alphabet Cover Plate Die
• 10 Pack of Watercolor Pencils
• 6 Sheets of Luxe White Watercolor Paper, 8.5″ x 11″
• Water Flow Brush
• Fineline Applicator
• Sea Salt Reactive Ink Reinker
• Gold Glimmer Metallic Ink

Subscribe and Save!

You can see the entire December Collection HERE.

I love them both, but this post is about the Classic Kit plus a very fun Add-On product. I am sharing three different cards with three very different looks today.

Inlay Diecutting with the Alphabet Plate Cover Die

Inlay diecutting with Hero Arts Alphabet Die Cover Plate.

This card might look difficult, but it all came together in one hour. I started by die cutting the alphabet 5 times from different colors of cardstock: Papaya, Kiwi, Passion Flower, Dove White and Granite. I saved the white die cuts to use on a future project, and then attached the white background to an A2 cardbase. Next, I laid out the letters until I had the colors where I wanted them. With the layout done, the gluing went very quickly. I added a simple heat embossed sentiment from Hero Art’s Message Strips Stamp and Cut XL (DC286). I love the bright simplicity of this card.

A bonus is that I have TONs of leftover die-cut letters to use on future projects! It is such a time saver to be able to cut 26 letters with one pass of the diecutting machine.

Colorful Die Cut Alphabet Letters

Add-On: Sparkling Fireworks Bold Prints (CG925)

Hero Arts Sparkling Fireworks Bold Prints (CG925) Graduation Card

When I saw this background stamp, I immediately thought “CELEBRATION” and decided it would be so fun for a graduation card. I went with a festive vintage vibe. After using a bit of anti-static powder, I stamped the Sparkling Fireworks Bold Prints with Clear Embossing and Watermark Ink onto a panel of Paradise Cardstock. I sprinkled on Iridescent Copper Embossing Powder and heat set. Next, I blended some Paradise Core Ink onto the panel with a blending brush. The sentiment is from Message Basics and Message Strips Stamp and Cut XL (DC286). I wanted to add a bit more grunge so I added Clear Embossing and Watermark Ink to the edges of the background and sentiments, drug them through Copper Embossing Powder and heat set. I added the background to an A2 cardbase and used foam adhessive for the sentiment.

Heat Embossing with Copper Embossing Powder

Easy Stamped & Copic Colored Card

Easy Stamped & Copic Colored Card with Hero Arts Alphabet Stamps and images.

There is something so therapeutic about covering a card front with stamps and then coloring them in. My daughter was so captivated by the XL Alphabet Clear Stamps that she created two fun word signs with images for her office.

GIVEAWAY:

We will give away a $50 gift card, drawn from the comments left across the hop. Enter by Sunday, December 10th at 11:59pm Pacific, and the winner will be announced on the Hero Arts blog the following week.

BLOG HOP:

The Hop starts at Hero Arts!

You likely arrived from Jennifer Kotas.

Your next stop is Pocono Pam.

Here is a list of the entire Hop:

Hero Arts

Natasha Vacca

Lydia Fiedler

Heather Ruwe

Seeka

Jeannie Lieu

Jennifer Kotas

Karen Brown

Pocono Pam

Channin Pelletier

Michelle Short

Rosie Lopez

Mindy Eggen

Natasha Polite

Charlene Madrid

Ilina Crouse

Rachel Kleinman

EssieKelly Taylor
Emily Midgett

I am so glad you could join us for this hop

cardmaking · Mixed Media · papercrafting

Altenew July 2022 Summer Love Collection Release Blog Hop + Giveaway ($300 in Total Prizes!)

Altenew Fantasy Emblem 3D Embossing Folder

Altenew's Fantasy Emblem 3D Embossing Folder done in  faux metallic using an Antique Bronze Distress Crayon.

Hello and thanks for stopping by! Altenew just released a lovely collection of 3D Embossing Folders as part of their Summer Love Collection, and I made 3 very different projects. I started by making a very masculine card using the Fantasy Emblem 3D Embossing Folder. My inspiration was an antique metal medallion.

My Process:

  • I started by embossing a piece of black cardstock with the Fantasy Emblem 3D Embossing Folder.
  • Next I tinted white pigment ink with Ocean Waves Crisp Dye Ink. On my craft mat, I dabbed the pigment ink and then Ocean Waves Crisp Dye Ink next to the white and then I mixed the two together. I blended this all over the embossed panel to “age” the cardstock.
  • I colored Antique Bronze Distress Crayon on the raised areas and then blended with my finger.
  • I die cut my sentiment (Script Words Die) from kraft card stock and then attached my panel to a kraft base.

This card was quick and easy to make but looks so rich in person.

Masculine Faux Metallic Medallion handmade card + 3D embossing folder

Altenew Playful Circles 3D Embossing Folder

Altenew Playful Circles 3D Embossing Folder + Craft A Flower Garden Rose + Handmade Card

This embossing folder is definitely a new favorite that will work with so many papercrafting projects! Today, I combined Altenew’s Craft-A-Flower: Garden Rose with the very versatile Playful Circles 3D Embossing Folder. The embossing folder adds loads of texture and interest to the card. The embossed panel is very pretty on both sides….depressed and impressed.

Products Used:

Altenew Playful Circles 3 D Embossing Folder + Enchanting Washes designer paper pack.

Altenew Flower Vines 3D Embossing Folder

A "Shabby Chic" handmade card + Altenew's Flower Vines 3D Embossing Folder.

For my last card I went for a whimsical Shabby Chic look.

Altenew's Flower Vines 3D Embossing Folder handmade card.

Special Offer!

  • Receive a FREE Ultra Sticky Double Sided Tape ($11.99 value) on orders over $79 from 07/22/2022 at 12:01 am EDT until 07/24/2022 at 11:59 pm EDT. The free gift will be added to cart automatically. Find more details on the Promotions page.

Giveaway Prizes

$300 in total prizes! To celebrate this release, Altenew is giving away a $50 gift certificate to 2 lucky winners and a $25 gift certificate to 8 winners! Please leave a comment on the Altenew Card Blog and/or each designer’s blog post on the blog hop list below by 07/28/2022 for a chance to win. 

Altenew will draw 10 winners randomly from the comments left on each stop of this blog hop and announce the winners on the Altenew Winners Page on 07/29/2022.

Blog Hop Order

Altenew Card Blog

Jennifer McGuire

LauraJane

Maryám Pérez

Penny Pynnonen

Erum Tasneem

Teri Wilson

Virginia Lu

Dana Joy

Mindy Eggen

Laurie Patterson

Jenny Colacicco

Berina Rajakumar

Tenia Nelson

Adriana Arminio

Nathalie DeSousa

Angela Brennan

Terri Koszler

Bridget Casey

Michelle Burnier

Reiko Tsuchida ***Note: Due to strict regulations in Japan, you might not be able to leave a comment on her blog post.

Annemarie Caister

Linda Westfall

Karen Brown You made it to the end!

I love all three projects! Thanks for stopping by!

Karen

cardmaking · Mixed Media · papercrafting

Visible Images “Live in the Moment” Stamped Dragonfly Cards

Visible Images "Live in the Moment" stamped dragonfly sympathy card.

Don’t you just love Dragonflies? I really like how this sympathy card turned out. I heat embossed the dragonfly from Visible Images “Live in the Moment” stamp set on a gel press print and added a Rubbernecker Three Line Frame border.

Heat embossed dragonfly handmade card

My sister-in-law loves dragonflies too so I made this card for her birthday this month. I ink blended my background and then heat embossed the dragonflies and sentiment.

Handmade heat embossed dragonfly card with ink blend background.

I had a strip of background left over so I made a third card…I love bonus cards!

I am so glad you stopped by!

Karen