Cardmaking Kit · Die cutting

Spellbinders September Club Kits – Seasonal Fun!

Two seasonal  die cut fall/Halloween cards featuring Spellbinders September 2025 Large Die of the Month Kit (whimsical pumpkin house) and Small Die of the Month (smiling Jack-o-lantern with black cat, ghost and flowers)

The Spellbinders September 2025 Club Kits are here, and this month’s themes are packed with seasonal charm—perfect for Halloween, autumn, and everything in between! Today, I’m sharing two cards featuring the Large Die of the Month and Small Die of the Month.

👉 A quick reminder: the last day to subscribe is September 27th—so don’t miss out!

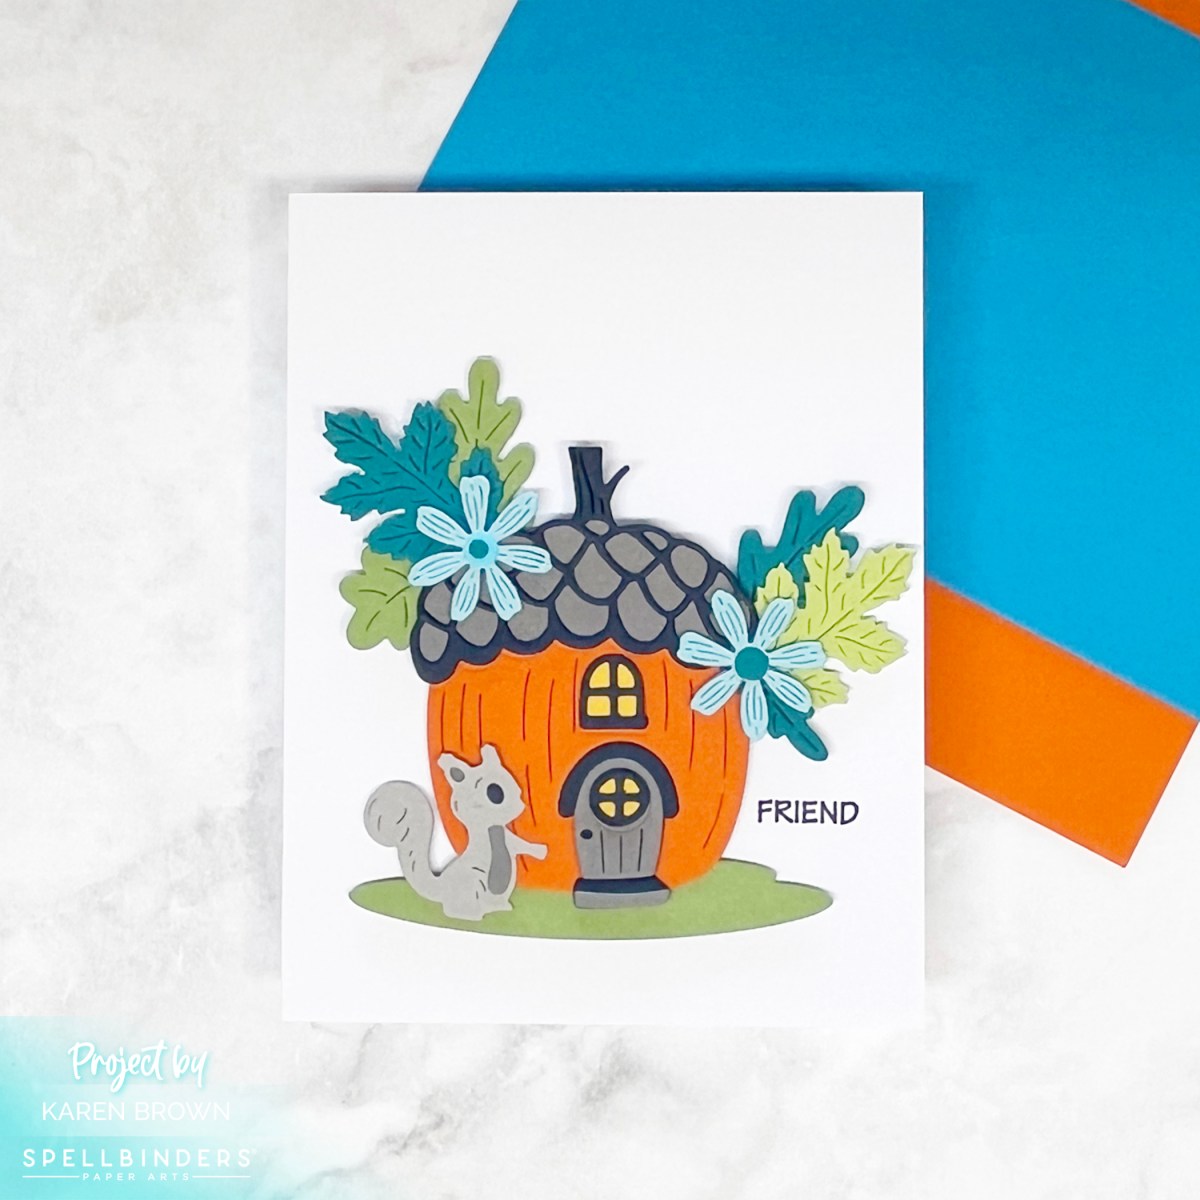
Large Die of the Month – Pumpkin House

Adorable Seasonal autumn card with vivid oranges, teals and greens created with Spellbinders September 2025 Large Die of the Month Kit

The Large Die of the Month is designed as an Acorn House, but I gave it a seasonal twist by transforming mine into a Pumpkin House! I can’t seem to get enough orange this month.

A gray squirrel is making his way to the front door, while the acorn cap roof is decorated with green and teal leaves plus two aqua flowers. The playful colors and crisp white background bring the whole scene to life.

It’s whimsical, unexpected, and full of cozy fall personality.

Die cut "pumpkin" house card, with a gray squirrel walking toward the door. The roof is decorated with teal and green leaves and two aqua flowers.

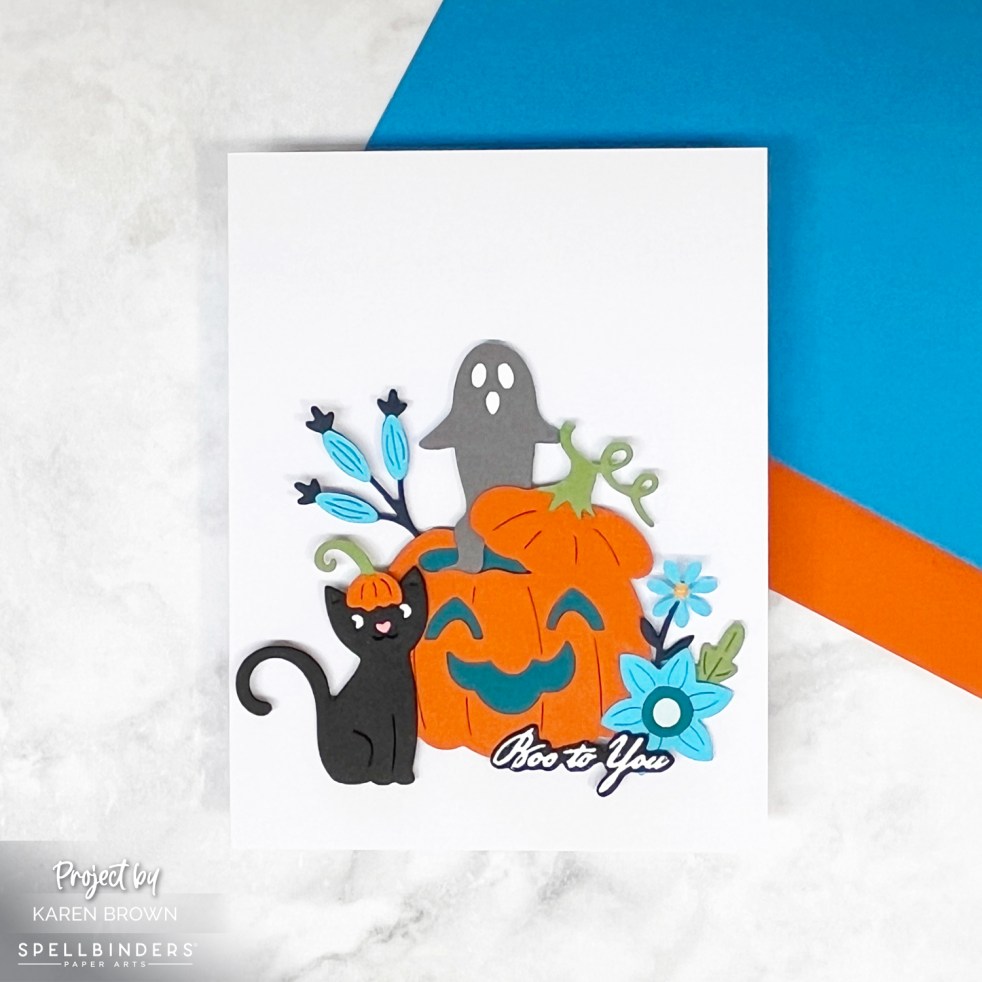
Small Die of the Month – Boo to You!

Card with a smiling jack-o’-lantern, a ghost, a cat, and flowers in bright orange, teal, aqua, and green cardstock on a white card base. Sentiment reads 'Boo to You' in heat embossed lettering.

This month’s Small Die of the Month might be one of the cutest yet! It features a smiling jack-o’-lantern, along with a sweet little cat, a friendly ghost, and whimsical flowers.

I loved carrying over the same vibrant color scheme from my Large Die card—orange, teal, aqua, and green—so the two feel like companion pieces.

I couldn’t resist heat embossing a “Boo to You” sentiment to go along with this cheerful pumpkin scene. The vivid colors—bright orange paired with teal, aqua, and green—make the characters pop against the crisp white A2 card base. A touch of gray and black adds grounding contrast while keeping the vibe playful.

This card is pure Halloween happiness! 🎃✨

Fun handmade Halloween card created with Spellbinders September 2025 Small Die of the Month Kit.

Coordinated Companion Cards

I love how these two cards—though built with different kits—look like they belong together. The shared palette of vivid oranges, aquas, teals, greens, and neutrals ties them into a cheerful seasonal set.

And if you’d like even more inspiration, I’ll also link to my September Stitching Die of the Month card—another beauty from this month’s Club collection.

Helpful Links:

cardmaking · Die cutting

Halloween Card | Spellbinders Pupkin

Sometimes the cutest cards come together quickly—and this one might just be my favorite of the season! I couldn’t resist Spellbinders’ new Pupkin die set, which features an adorable dog all dressed up as a jack-o’-lantern and carrying a tiny skull-shaped trick-or-treat bucket. Cuteness overload!

This card is extra special because I made it for my daughter in memory of her sweet, goofy lab, Tank, who once rocked his very own pumpkin costume. ❤️

I layered several color coordinating mats from past Small Die of the Month and Large Die of the Month kits and I used ColorWheel cardstock and Sand for my pup’s body. The vibrant layers really make our little Pupkin pop! This design is fast, fun, and easy to assemble—perfect for Halloween cardmaking sessions.

cardmaking · Die cutting · Stenciling

A Simple Guide To Using Layering Stencils in Cardmaking

Purple and orange layered stencil card with gold foiled “Hello” sentiment, framed with vellum, lavender, and gold cardstock.

Some cards practically make themselves—this was one of them. Today I’m featuring a project made with the August 2025 Hero Arts Layering Stencil of the Month, Sunnyside Manor. This dreamy stencil has a charming layered interwoven scene that comes to life with just a few colors of ink.

Step-by-Step: How to Use Layering Stencils

If you’re new to layering stencils or just want to brush up, here’s how I created this scene using the Sunnyside Manor Stencil set:

1. Start with a Colored Card Base (Optional)

I used lavender cardstock to add an extra tone to the finished design before I ever inked. You can also use white for a clean slate.

For this version, I created a bold and beautiful palette using three shades of purple and a pop of orange. I started directly on a lavender card base, giving me a built-in fourth shade of purple before I even began inking.

2. Secure the First Stencil

Place Layer 1 over your cardstock and secure it using low-tack tape or a sticky mat to keep everything from shifting. Hero Arts Stencils have great square guides in the four corners so each layer lines up perfectly everytime! I take a pencil and mark each square before I begin.

If you’d like to see this process in one of my How to Stencil Videos, click HERE.

3. Blend Your First Ink Color

Using a blending brush, apply your first ink (I used Thistle). Blend evenly and lift the stencil carefully once done.

4. Repeat for Each Layer

Align Layer 2 (they’re clearly numbered on the lower left) and easy to line up with the square guides or by eye).

Ink with your second color: Purple Galaxy

Layer 3: Tangerine

Layer 4: Amethyst

Hero Arts inks dry quickly, but if you’re planning to hot foil or emboss over it, give the ink a moment to fully dry.

5. Add Your Sentiment:

Hero Studio August 2025 Sunnyside Manor layered stencil card in 4 shades of purple + orange.

The card has a soft shimmer, deep contrast, and that quiet elegance that stenciling always brings. I find stenciling to be my Zen moment—and this one was so satisfying.

Interested in more August Club Kit Cards, you can read my August 2025 Release Day Blog Post HERE.

Two Hero Studio Halloween cards and tags in purple and orange.

>>>> Hero Arts Club Kits Overview <<<<

Why I Love This Stencil

If you’re looking for a beginner-friendly but artistically satisfying project, this one is for you.

Stenciling has become my go-to technique for beautiful, relaxing cardmaking. The Sunnyside Manor Layering Stencil is especially satisfying—the layers line up easily and the design allows for infinite color combos. Whether you go soft and serene or bold and whimsical, this stencil adapts beautifully.

Interested in seeing some other layering stencils…..click HERE.

Cardmaking Kit · Die cutting · Stenciling

Hero Arts August 2025 | Light-Up Tags + Crystal Ball

Handmade Halloween tag with layered colorful tags, white heat embossed spider web on black cardstock, lit up with a hidden light, and “Boo to You” sentiment.

The Hero Arts August 2025 Release is here, and it’s packed with creative possibilities—from interactive Halloween tags to dreamy stenciled scenes and mystical vibes. I had so much fun with these kits and created two very different but equally inspiring projects.

>>>> Hero Arts Club Kits Overview <<<<

🕷️ Project 1: Light-Up Spider Web Halloween Tag – August Card Kit

Let’s start with a spooky showstopper! This interactive Halloween tag uses elements from the August Hero Arts Card Kit, including the spider web stamp and Press One Light that lights up the tag.

Here’s how it came together:

  • I white heat embossed the spider web on black cardstock, die cut it, and positioned one of the included Press One Lights behind the center.
  • When you press the hidden button—the web lights up! 🕸️✨
  • I layered two tags using the Nesting Tag Dies:
    • The top tag is watercolor paper with Yellow and Orange Liquid Watercolors—so vibrant and bold!
    • The bottom tag is purple cardstock with a Hero Transfer from Collage Backgrounds 2—the script texture gives a haunting Halloween vibe.

I finished it off with a heat-embossed “Boo to You” sentiment from the kit and a touch of black hemp cord. This tag is spooky, clever, and totally kid-approved.

Hero Studio light up Halloween spider web tag created with the August 2025 Card Kit, including the Pear Blossom Press One Light.

What’s Included in the August Card Kit?

  • Abraham and Katrina 6×8 Stamp Set (used on tag)
  • Abraham and Katrina Coordinating Die (used on tag)
  • Stamping Guide for stamp set
  • Victorian Frame Die Set (used on card 2)
  • Pear Blosson Press-One Light 2 Pack (used on tag)
  • 10 Sheets of Cardstock- 1 of each color, 5.5″ x 8.5″ (Cinnamon, Terra Cotta, Carrot, Coral, Bellini, Tuscan, Mint, Waterfall, Blue Spruce, Raven)
  • Holographic Rainbow Film, 1 sheet – 5.5″ x 8.5″
  • Acetate, 1 sheet – 5.5″ x 8.5″ (used on card 3)

Receive a FREE Magic Mist Stencil when you purchase The Whole Studio!

Hero Arts has many different Monthly Kits that you can subscribe to including:

Project 2: Crystal Ball Magic – August Stamp & Cut: You Are Magic

Card featuring a die cut crystal ball made from ink smooshed background and acetate layer, with the sentiment “You Are Magic” over a tone-on-tone mini rainbow background stenciled in teal and aqua shades.

This second card leans into the magical vibes with the new You Are Magic Stamp & Cut. The crystal ball die is the star here!

  • I used a leftover ink smoosh background scrap in soft blues and aquas to simulate swirling crystal magic. You can read my Ink Smoosh Tutorial HERE.
  • I die cut a circle of acetate (included in my August Card Kit of the Month) and layered it on top for a glassy, dimensional effect.
  • The sentiment “You Are Magic” is stamped and layered over the crystal ball.

For the background, I used Oceanside ColorWheel Cardstock and the Retro Rainbow Stencil from last month’s Retro Kitchen Release. I went for a tone-on-tone look using:

Mounted on an aqua card base with a few black enamel dots, this card feels subtle, sparkly, and just a little bit mystical and mysterious.

Hero Studio Blog Hop

Hero Arts will give away a $50 gift card, drawn from the comments left across the hop. Leave a comment on all stops for more chances to win!


Hero Arts
Nichol Spohr

Seeka
Rosie Lopez
Rachel Kleinman
Natasha Polite
Mindy Eggen
Michelle Short
Michelle Lupton
Lisa Tilson
Karen Brown
Jennifer Kotas
Jeannie Lieu
Charlene Madrid
Channin Pelletier
Anna Mahtani

Handmade card created from the Hero Studio August 2025 Stamp and Cut "You Are Magic" kit.

From light-up tags to dreamy stenciling and crystal energy, the August kits are perfect for stretching your creativity into fall. Which kit are you reaching for first?

cardmaking · Die cutting

Spooktacular Fun Halloween Cards | Hero Studio September 2024 Release and Blog Hop

3 fun handmade Halloween cards created with the September 2024 Hero Studio release.

Halloween is creeping around the corner, and it’s the perfect time to brew up some crafty magic with die-cut Halloween scene cards! The September Hero Studio Release is bursting with fun new products + an exciting Blog Hop, so hop along and gather tons of inspiration from some incredibly talented crafters. Let’s dive into the cauldron of creativity and get started!

Witch’s Kitchen | Monthly Mini Clear Stamp and Die Set

Witch's Kitchen  scene card | Hero Studio September 2024 | Monthly Mini Clear Stamp and Die Set Kit.

I always love a good scene card, so I had a great time playing with the September Clear Stamps and Dies of the Month. The set is called Witch’s Kitchen and there are so many fun elements to customize your project.

I started by masking 1″ at the bottom of my card. For my floor, I ink blended Granite Core Ink over the Cobblestone stencil. For my wallpaper, I ink blended Thistle Reactive Ink over the Sparkle Weave Stencil.

Next, I stamped all the stamp elements, colored with alcohol markers and then die cut. Then, I played around with layouts until I liked my spooky little scene. A little magic potion anyone???

Witch’s Kitchen: September Clear Stamp and Dies of the Month:

$27.50 with Subscription + FREE SHIPPING
$29.99 One-Time Purchase, While Supplies Last

Magical Halloween stamp and die cut Scene card created with Hero Arts September 2024 release called Witch's Kitchen.

September 2024 Card Kit of the Month

This month’s card kit is so fun! I conjured up a little trick-or-treat scene with stamps and dies included in the kit.

Silhouette Halloween Scene Card with a spooky house, trick-or-treaters and a flying witch with a purple ink blended background.

September 2024 Card Kit of the Month

I started by ink blending my background with Taffy, Thistle and Purple Galaxy inks. On a different white card panel I stamped my elements using Intense Black ink. I stamped the black several times for a dark silhouette. I stamped the moon with Lemon Drop and Creamsicle, blending a bit on the stamp before stamping. To “light” my windows, I used a yellow and pale orange alcohol marker. After I completed my little scene, I decided my card needed a frame, so I die cut one from Pitch Black cardstock using my Wood Frame Infinity Dies.

Hero Arts Hero Studio September 2024 Card Kit of the Month handmade Heroscape scene card.

What’s Inside the Kit?

Curious about this month’s kit? Let’s take a peek inside the September Hero Studio Card Kit:

Kit Cost:

$46 with Subscription + FREE SHIPPING
$49.99 One-Time Purchase
While Supplies Last

5 Wonderful Kit Options:

For this blog post, I created with two kits and two Extraordinary Extras, but there there are 5 kits plus 5 Extras available. You can also buy the Whole Studio, which includes all 5 kits at a wonderful savings.

Halloween Words Stencil + Haunted Romance Fancy Dies | Extraordinary Extras

Hero Arts Halloween Words Stencil + Haunted Romance Fancy Dies  handmade Halloween Card.

Key Products Used:

I created a sparkly background by spraying Bright Yellow + Copper and Orange + Shimmer Spray on Luxe Watercolor Paper. I spritzed extra water on the panel and tilted it from side to side to get my color moving and blending.

Once the orange panel was dry, I stenciled Intense Black Ink over the fun Halloween Words Stencil. Using my Rounded Rectangles, I die cut my background and a Pitch Black mat.

I added a Vellum element die cut with a Postage Stamp Infinity Die and added a spider web and bats from The Haunted Romance Fancy Dies. I die cut these from Glitter Black Cardstock. The sentiment is from Witches Kitchen (clear stamp set).

Fun orange Halloween card with die cut spider web and bats + stenciled shimmer spray background.

Join the Blog Hop!

Now it’s time for the Blog Hop! What’s a Blog Hop, you ask? It’s a fun, crafty event where you can hop from one blog to another, gathering inspiration, tips, and tricks from different crafters. Each blog in the hop will feature a Halloween project (or two or three!), so you’re sure to leave with your cauldron overflowing with ideas!

Hero Arts will give away a $50 gift card, drawn from the comments left across the hop. Enter by Sunday, September 8th at 11:59pm Pacific, and the winner will be announced on the Hero Arts blog the following week.

Here’s how to join:

  1. Visit the Next Blog in the Hop: Check out the list of participating blogs (links below), and hop to the next one – Lydia Fiedler – to see what spooky creation she has brewed up!
  2. Leave a Comment: Show some love to your fellow crafters by leaving a comment on their posts. It’s a great way to connect and share the Halloween spirit!

Hero Arts

Channin Pelletier

Charlene Madrid

Ilina Crouse

Jeannie Lieu

Jennifer Kotas

Kailash Naidoo

Karen Brown You Are Here!

Lydia Fiedler

Michelle Short

Natasha Polite

Natasha Vacca

Pocono Pam

Rachel Kleinman

Rosie Lopez

Seeka

Special Guests:

Nichol Spohr

Ralph Tyndall

Mindy Eggen

Final Thoughts

Creating die-cut Halloween scene cards is a fang-tastic way to get into the spooky spirit and share some handmade love with friends and family. Plus, participating in a Blog Hop is the perfect way to find inspiration and connect with the crafting community. So, grab your dies, fire up your die-cutting machine, and let’s make this Halloween a crafty one to remember!

Happy crafting, and don’t forget to join the Blog Hop! 🎃👻

Die cutting · Mixed Media

Spooky Fun | Die Cut Halloween Cards

Bold colorful handmade  Halloween card backgrounds combinderd with Spellbinders Happy Haunting die kits to create 2 fun cards.

Halloween is just around the corner, and what better way to get into the spirit than by creating some spooky yet charming Halloween cards? Spellbinders has just released an adorable collection called Happy Haunting that is SO fun! I created two cards today that I am going to send to my daughters. I used Witchin” Heels (S3-525) and Woof or Treat (S3-521).

Hamdemade Halloween scene card with a witch silhouette on a broom flying though a vivid  sunset. created with orange and yellow liquid watercolor.  Witchin' Heel by Spellbinders S3-525

Spooky (and Cute!) Card Designs

For a simple yet delightful card, I created a dramatic sunset background to contrast with my sparkly witchy silhouette. I love using Liquid Watercolors because they are so vivid.

My Design Process:

  • I started my design process by creating two bold backgrounds using liquid watercolors.
  • Witchin’ Heels background: I brushed water onto a watercolor paper panel and then used the Dandelion Yellow Liquid Watercolor eye-dropper to drop color onto the paper. I added yellow at the top and bottom of the panel and dropped Orange in the middle. I then used my mini-mister sprayer to add water to the colors, tilting different directions so that the colors blended and flowed. I repeated this process a couple of times.
  • Woof or Treat backgound: I repeated the process for my purple panel using Indigo and Neon Brights Pink Liquid Watercolors. Since I didn’t have purple watercolor I created my own by dropping a big blob of Indigo ink and then putting a smaller drop of pink in the center. I spitzed with water and then tilted to move the ink. I added several layers for an intense color.
  • I used my heat tool to speed up the drying process.
  • Below, you can see a photo of my completed backgrounds.
  • Die cutting was next. I used Black Glitter Paper for the Witch and added purple accents die cut from my purple watercolor panel. For my ghostly pup, I used khaki and added a hint of shading with a blending brush.
  • To frame my little trick-or-treater, I used my Scallop Label Infinity Dies. I also added a little dimension with foam squares and craft foam.
Adorable Woof or Treat (by Spellbinders) handmade card of a Dog trick-or-treating as a ghost with a pumpkin.  S3-521

Key Supplies Used:

How to create colorful vivid card backgrounds with liquid watercolors.

Final Thoughts:

I feel like each of these cards has a little bit of seasonal magic combined with crafty love. I adore the bold colors acheived with liquid watercolors.

I hope you found some inspiration today. Thanks for stopping by!

Karen

Uncategorized

Handmade Halloween Card

My daughter is getting married in September so I am getting an early start on Halloween cards.  I think this Art Impressions image is so fun!

Handmade Halloween Card using watercolor markers.

I embossed the haunted house and then colored with vividly hued watercolor markers.  I also made a coordinating envelop from a Penny Black Halloween stamp set.

I am entering this card in:

Watercooler Wednesday Holiday Challenge

Addicted to Stamps Make Your Mark

Update:
I was very excited to learn that my Halloween card was chosen as a \”Watercooler Rocker\”.

Thanks for stopping by!

Karen