cardmaking · Die cutting · papercrafting

Spellbinders New Serenade of Autumn | Colorful Die Cut Cards

Colorful Die Cut Autumn Cards using Spellbinders Serenade of Autumn Collection

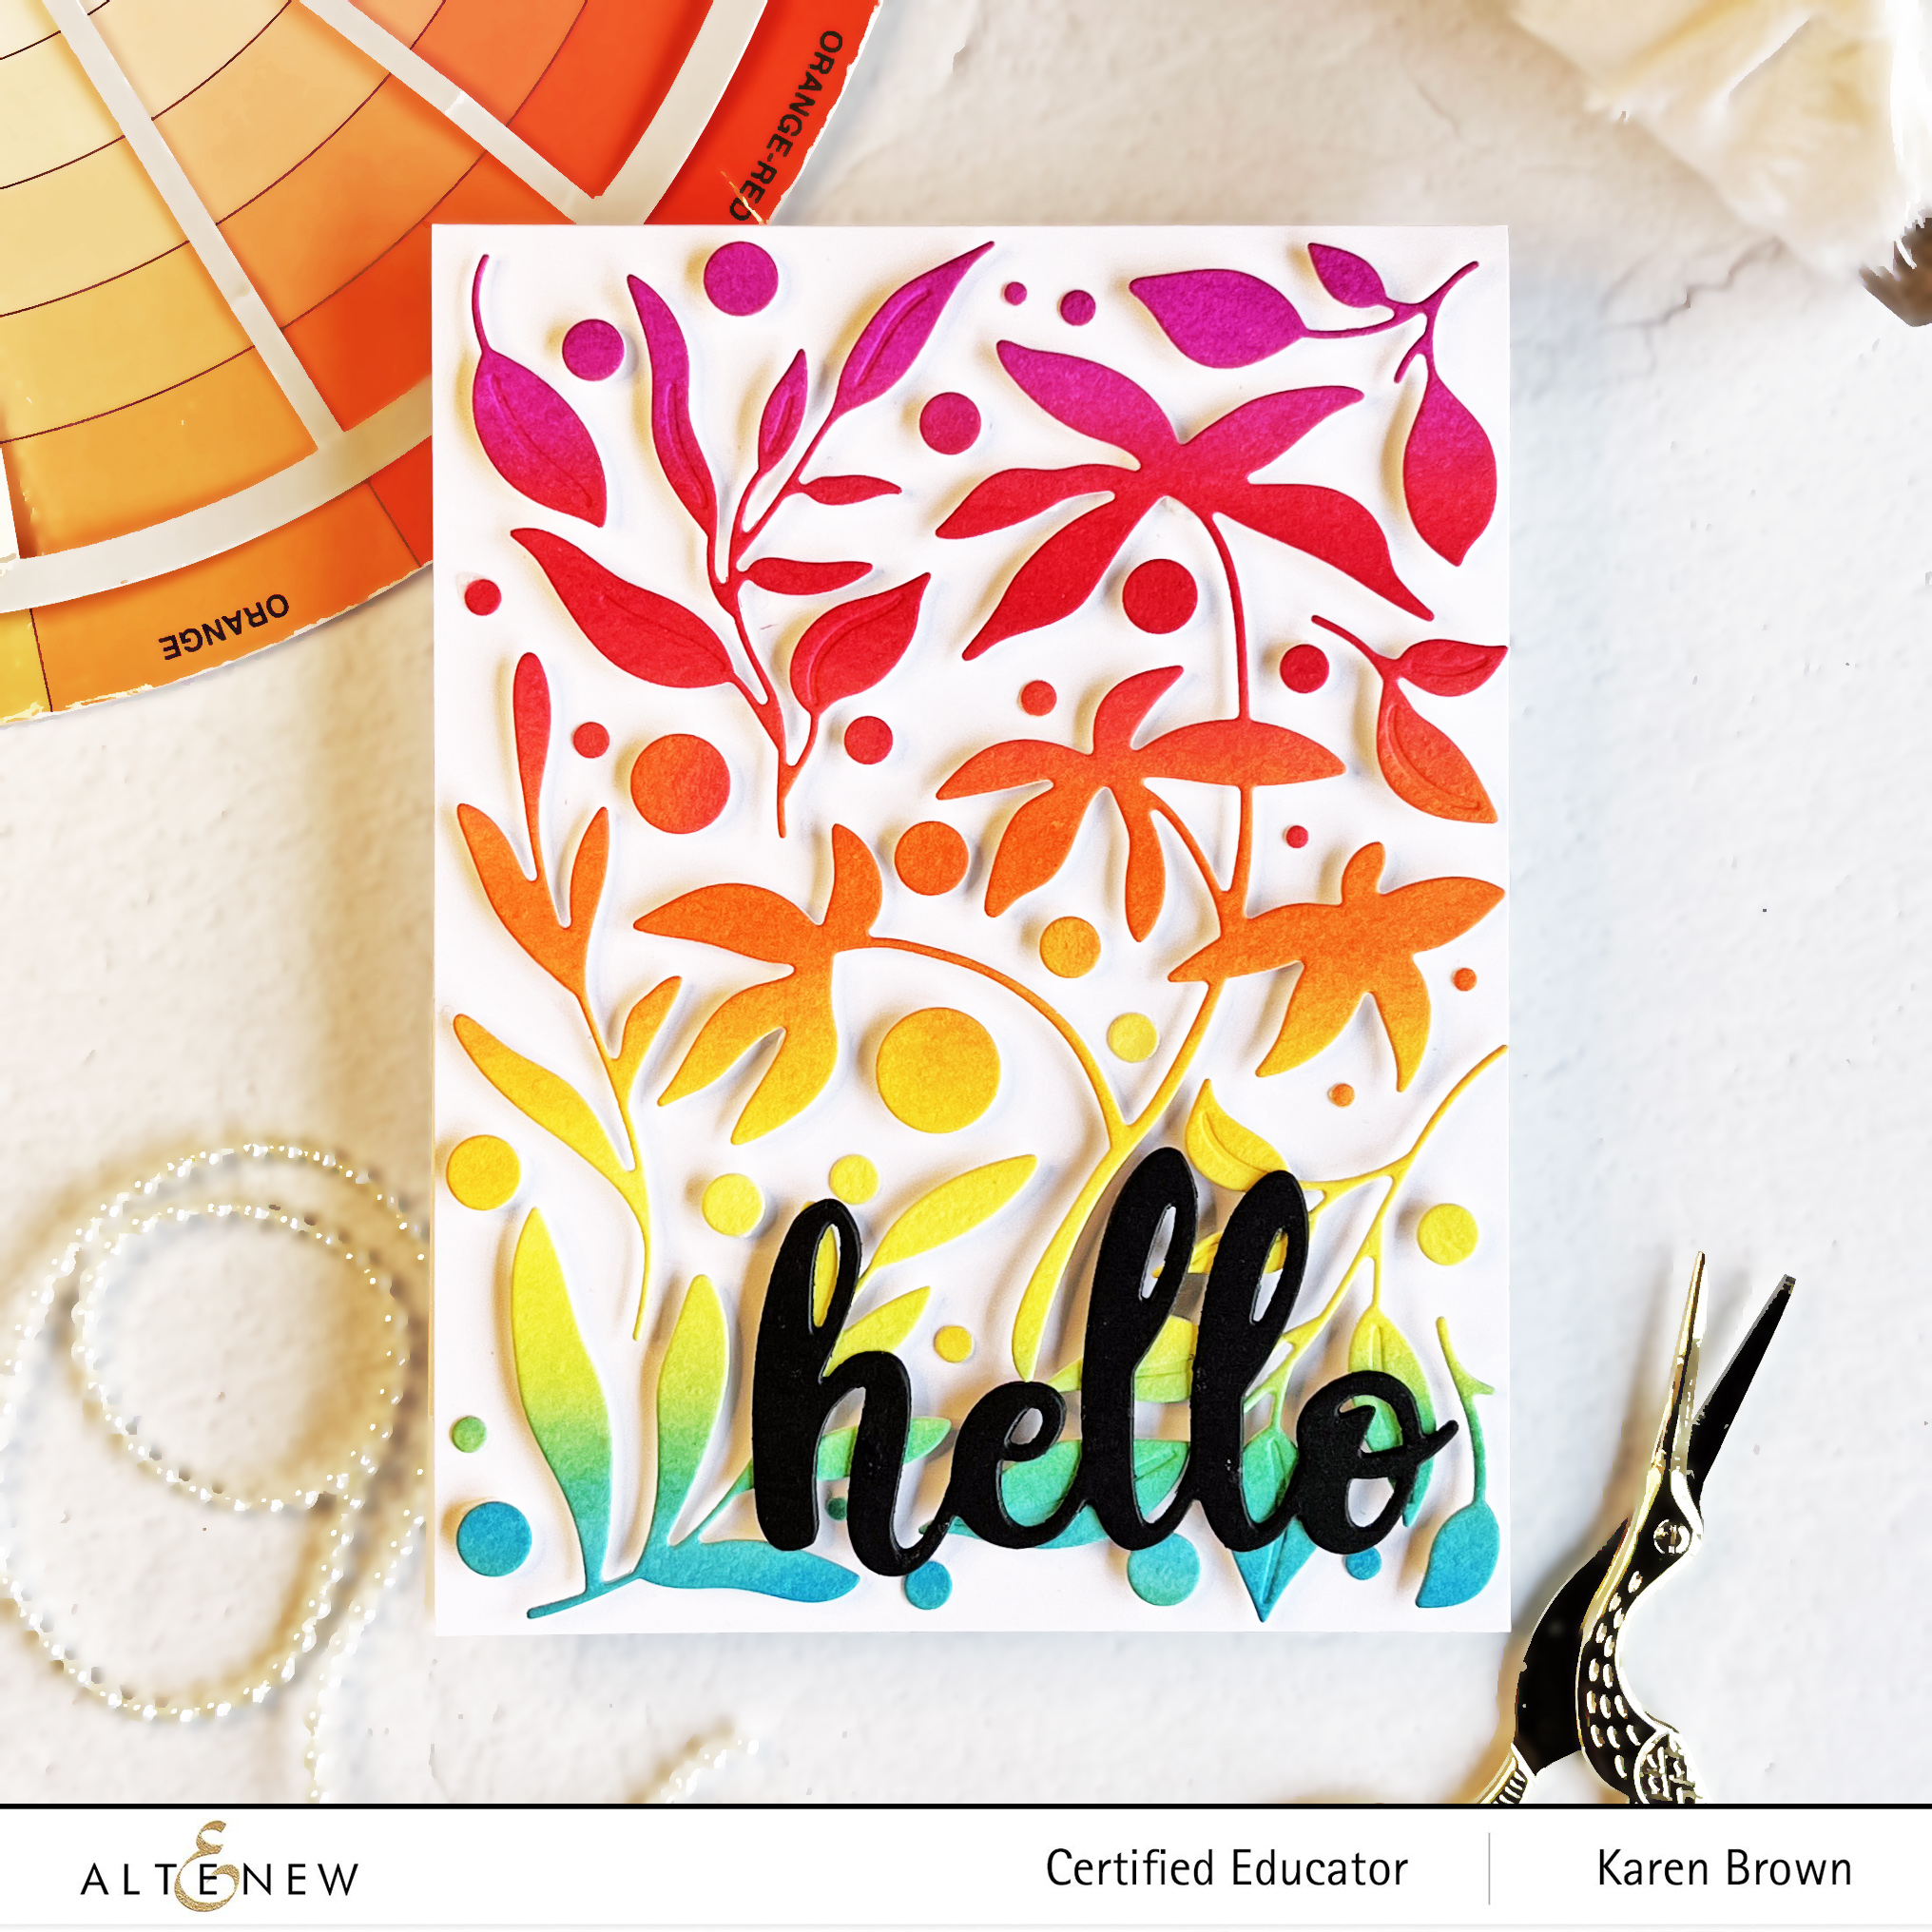
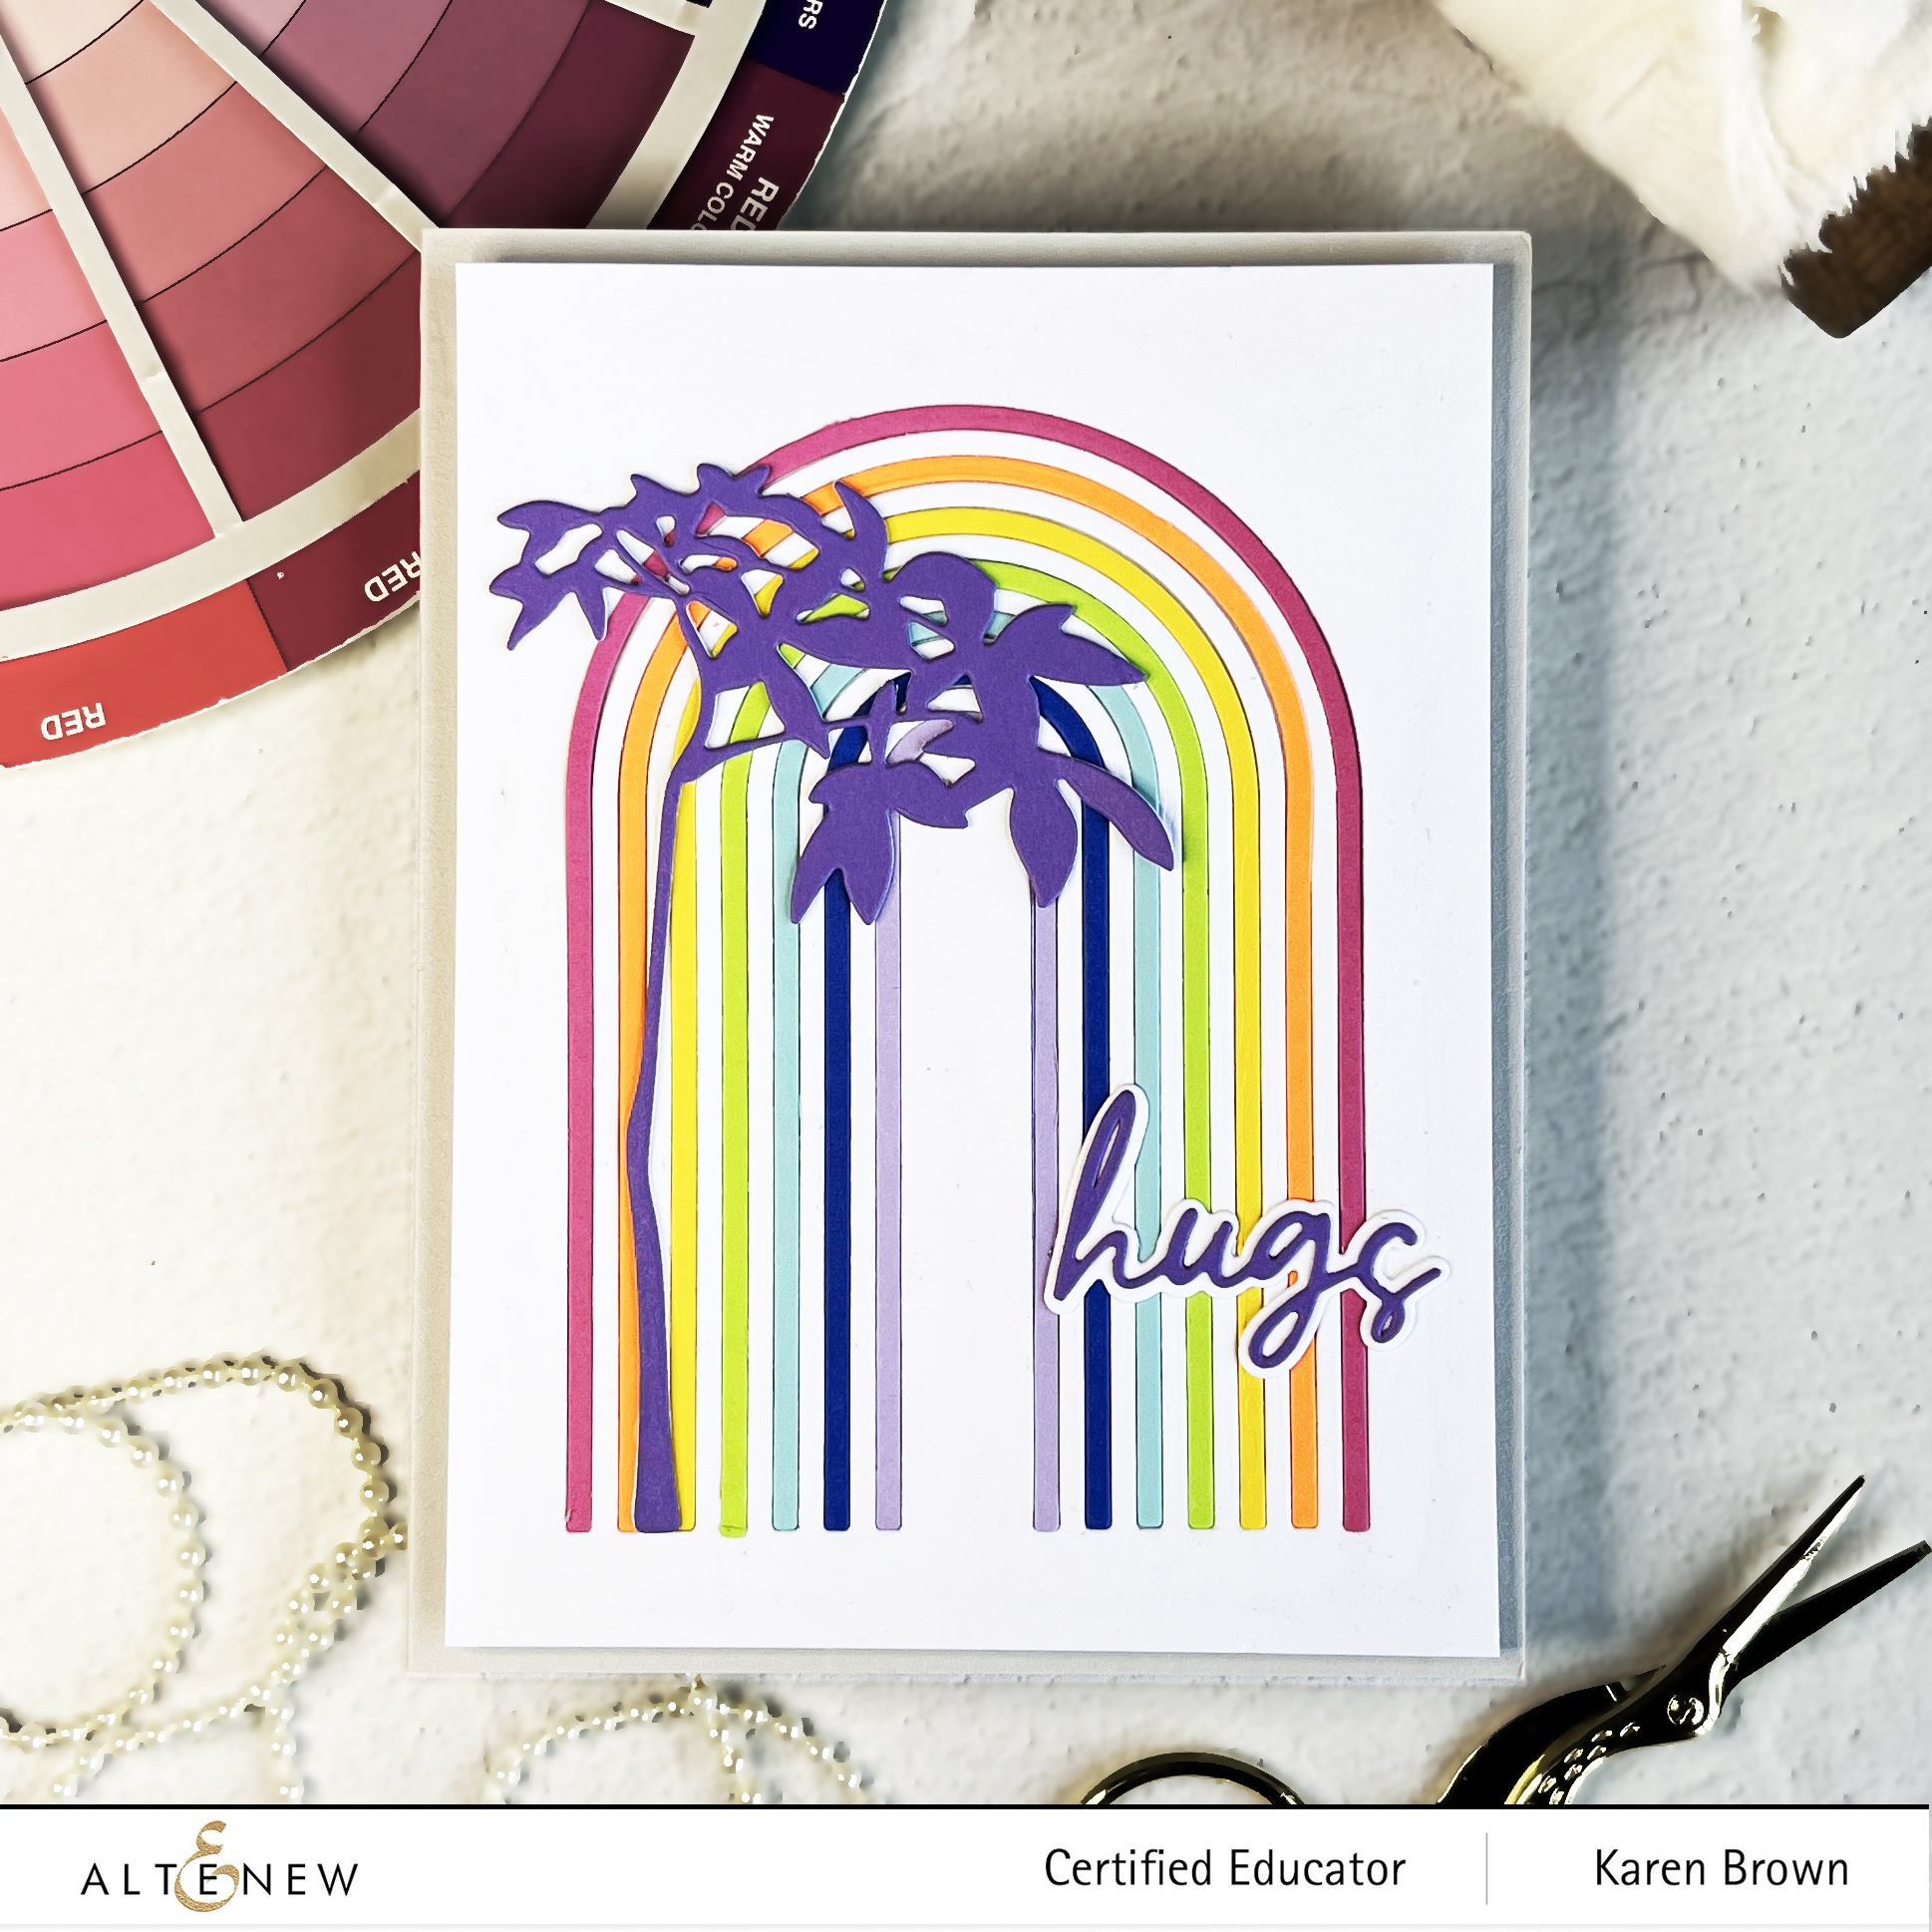
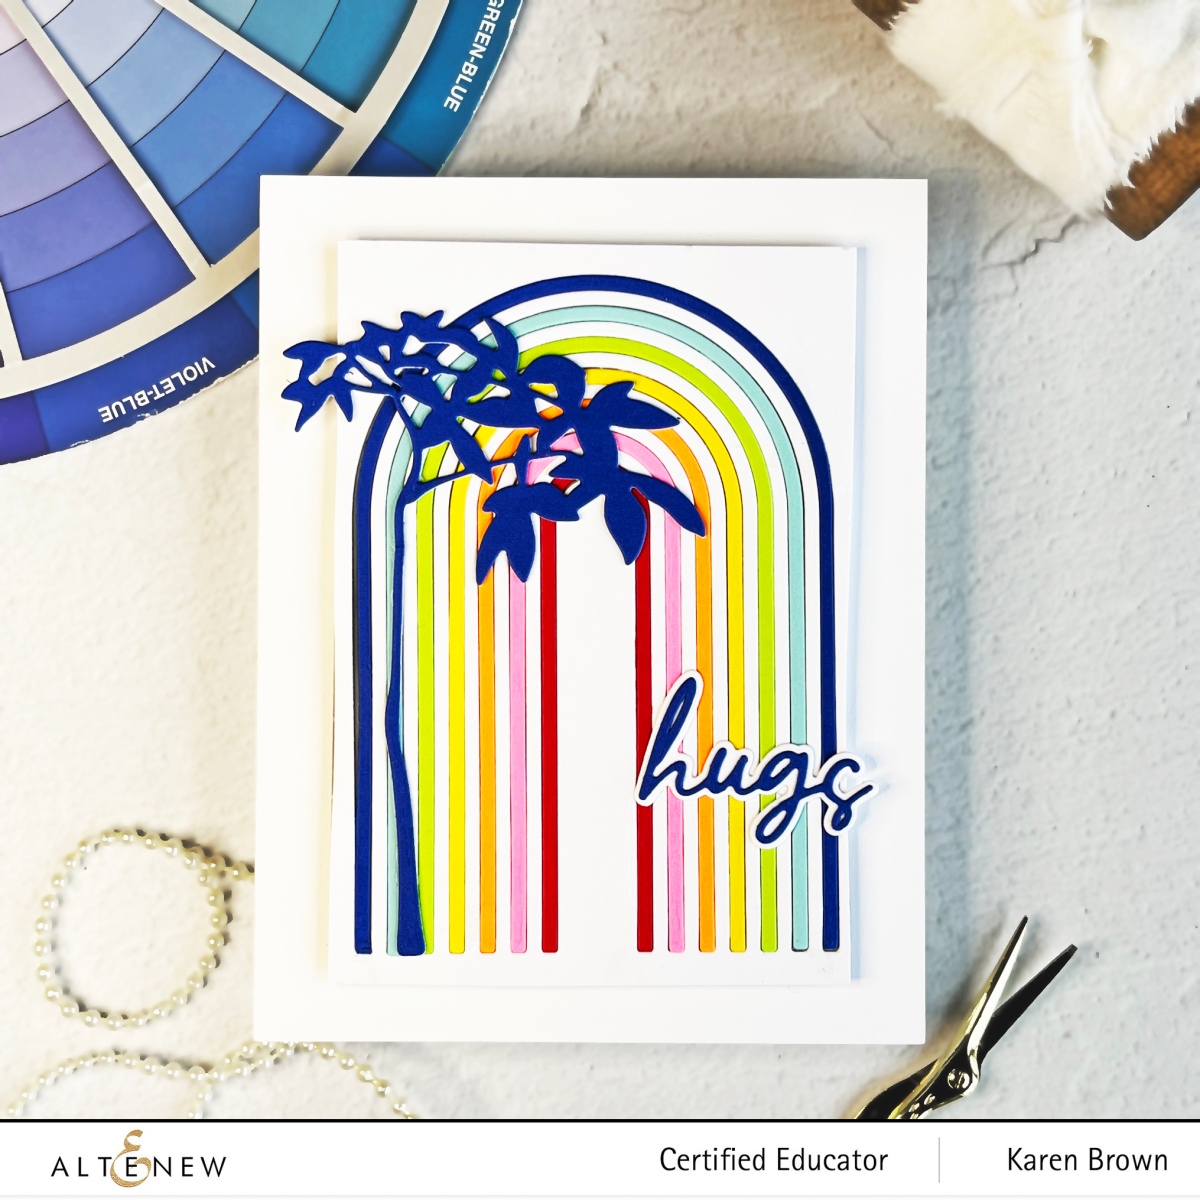
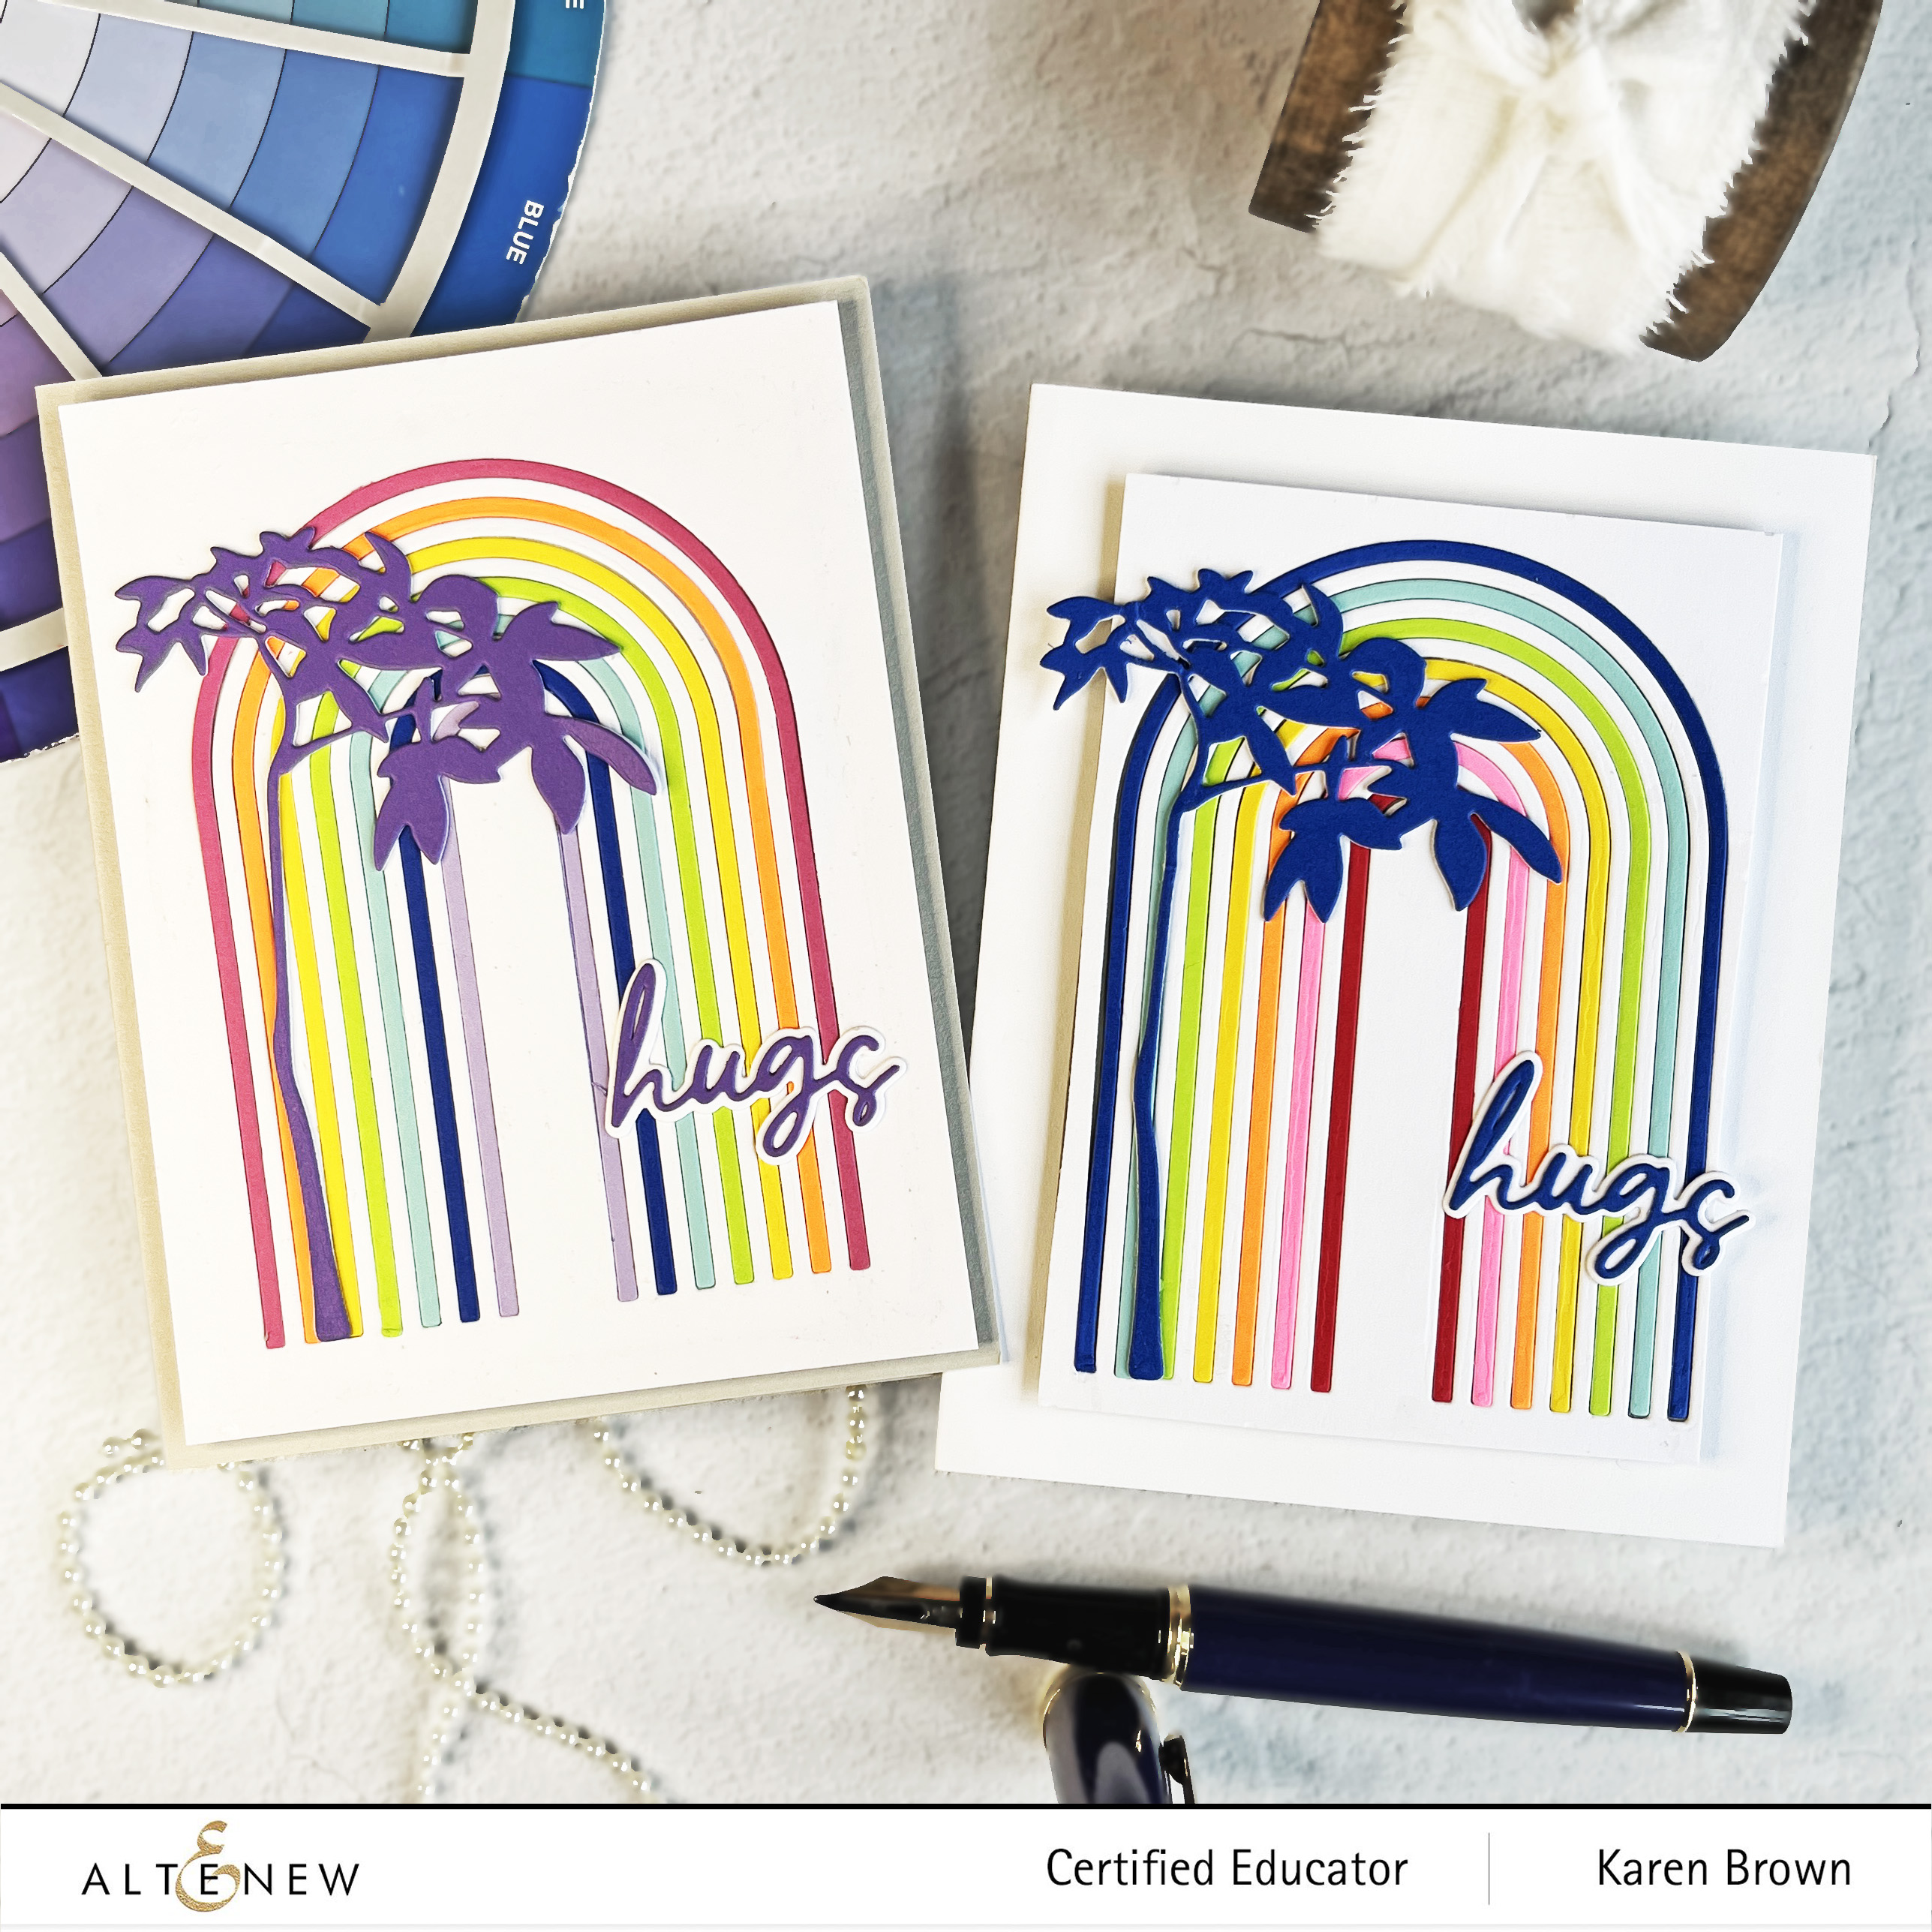
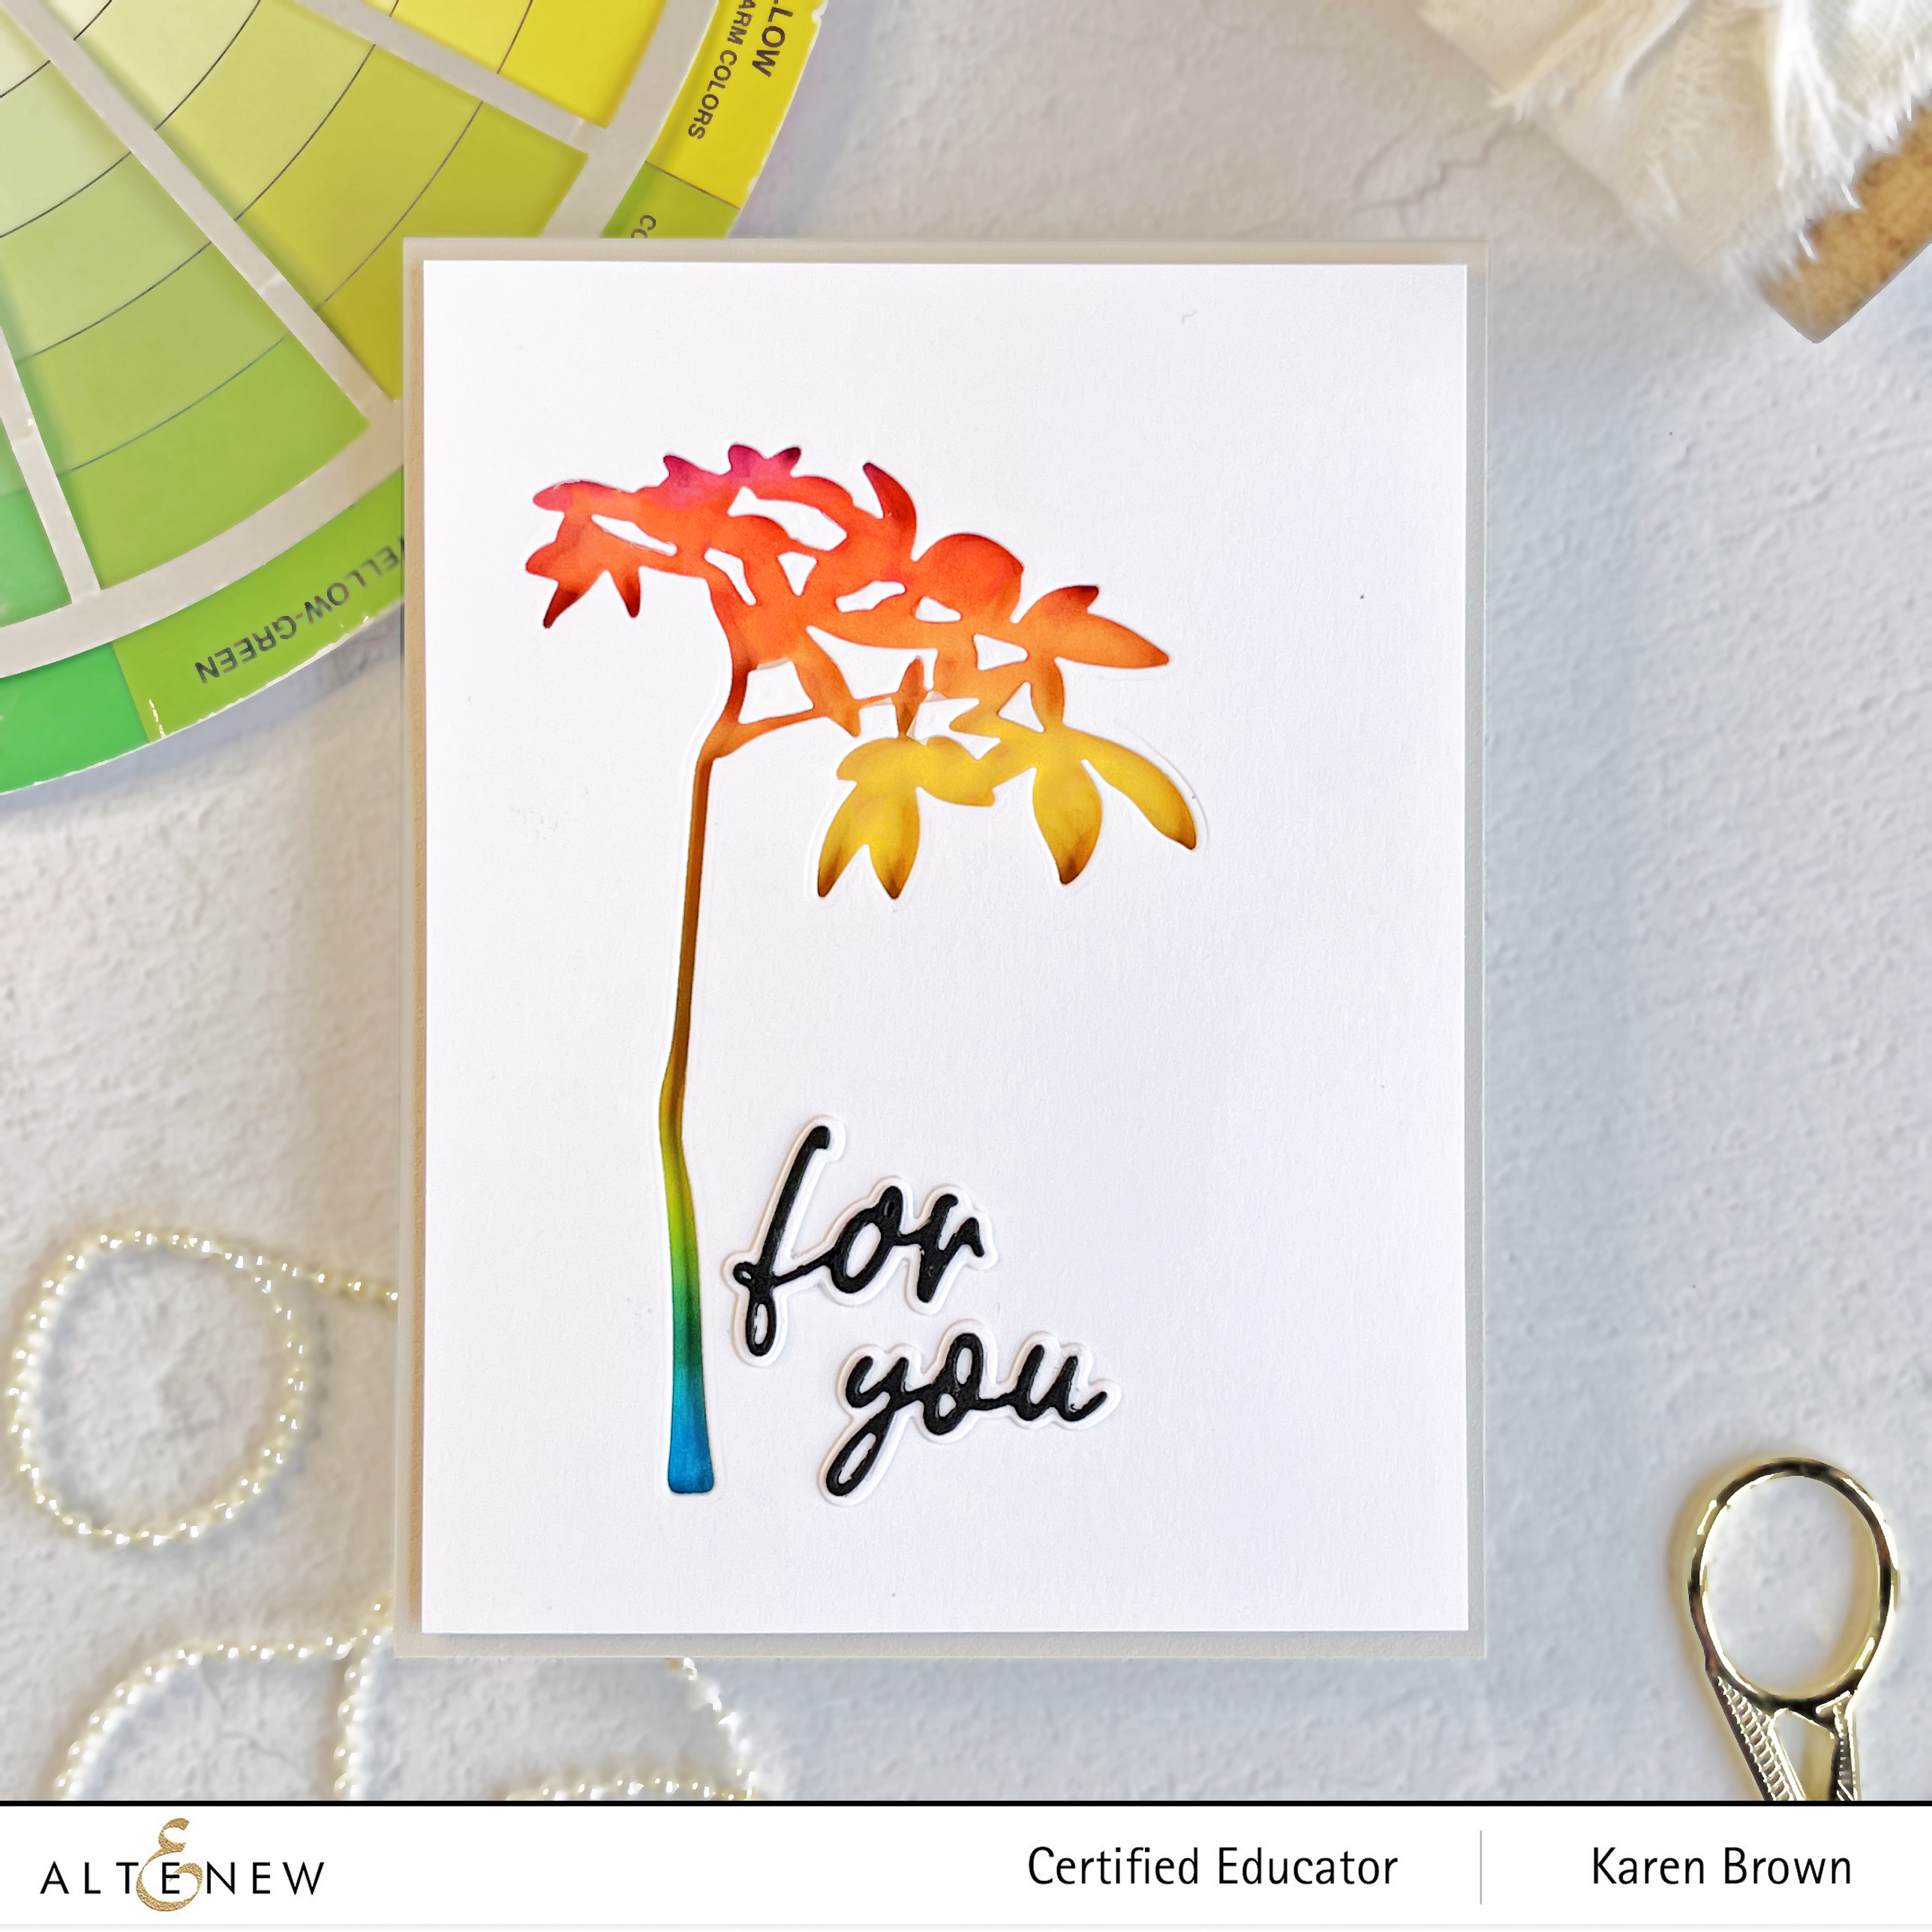
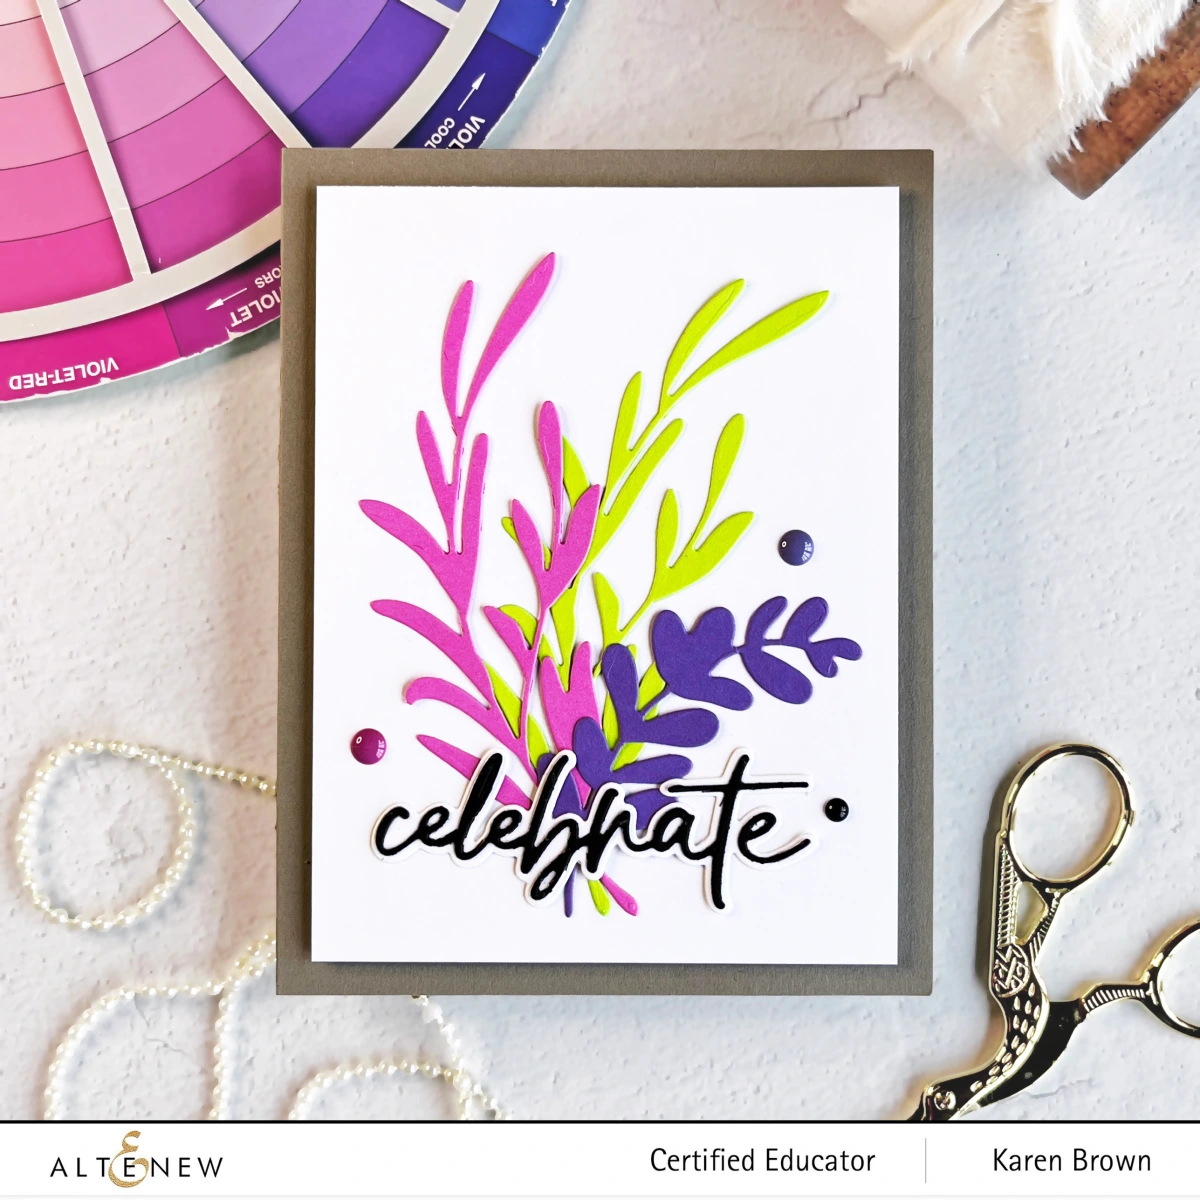
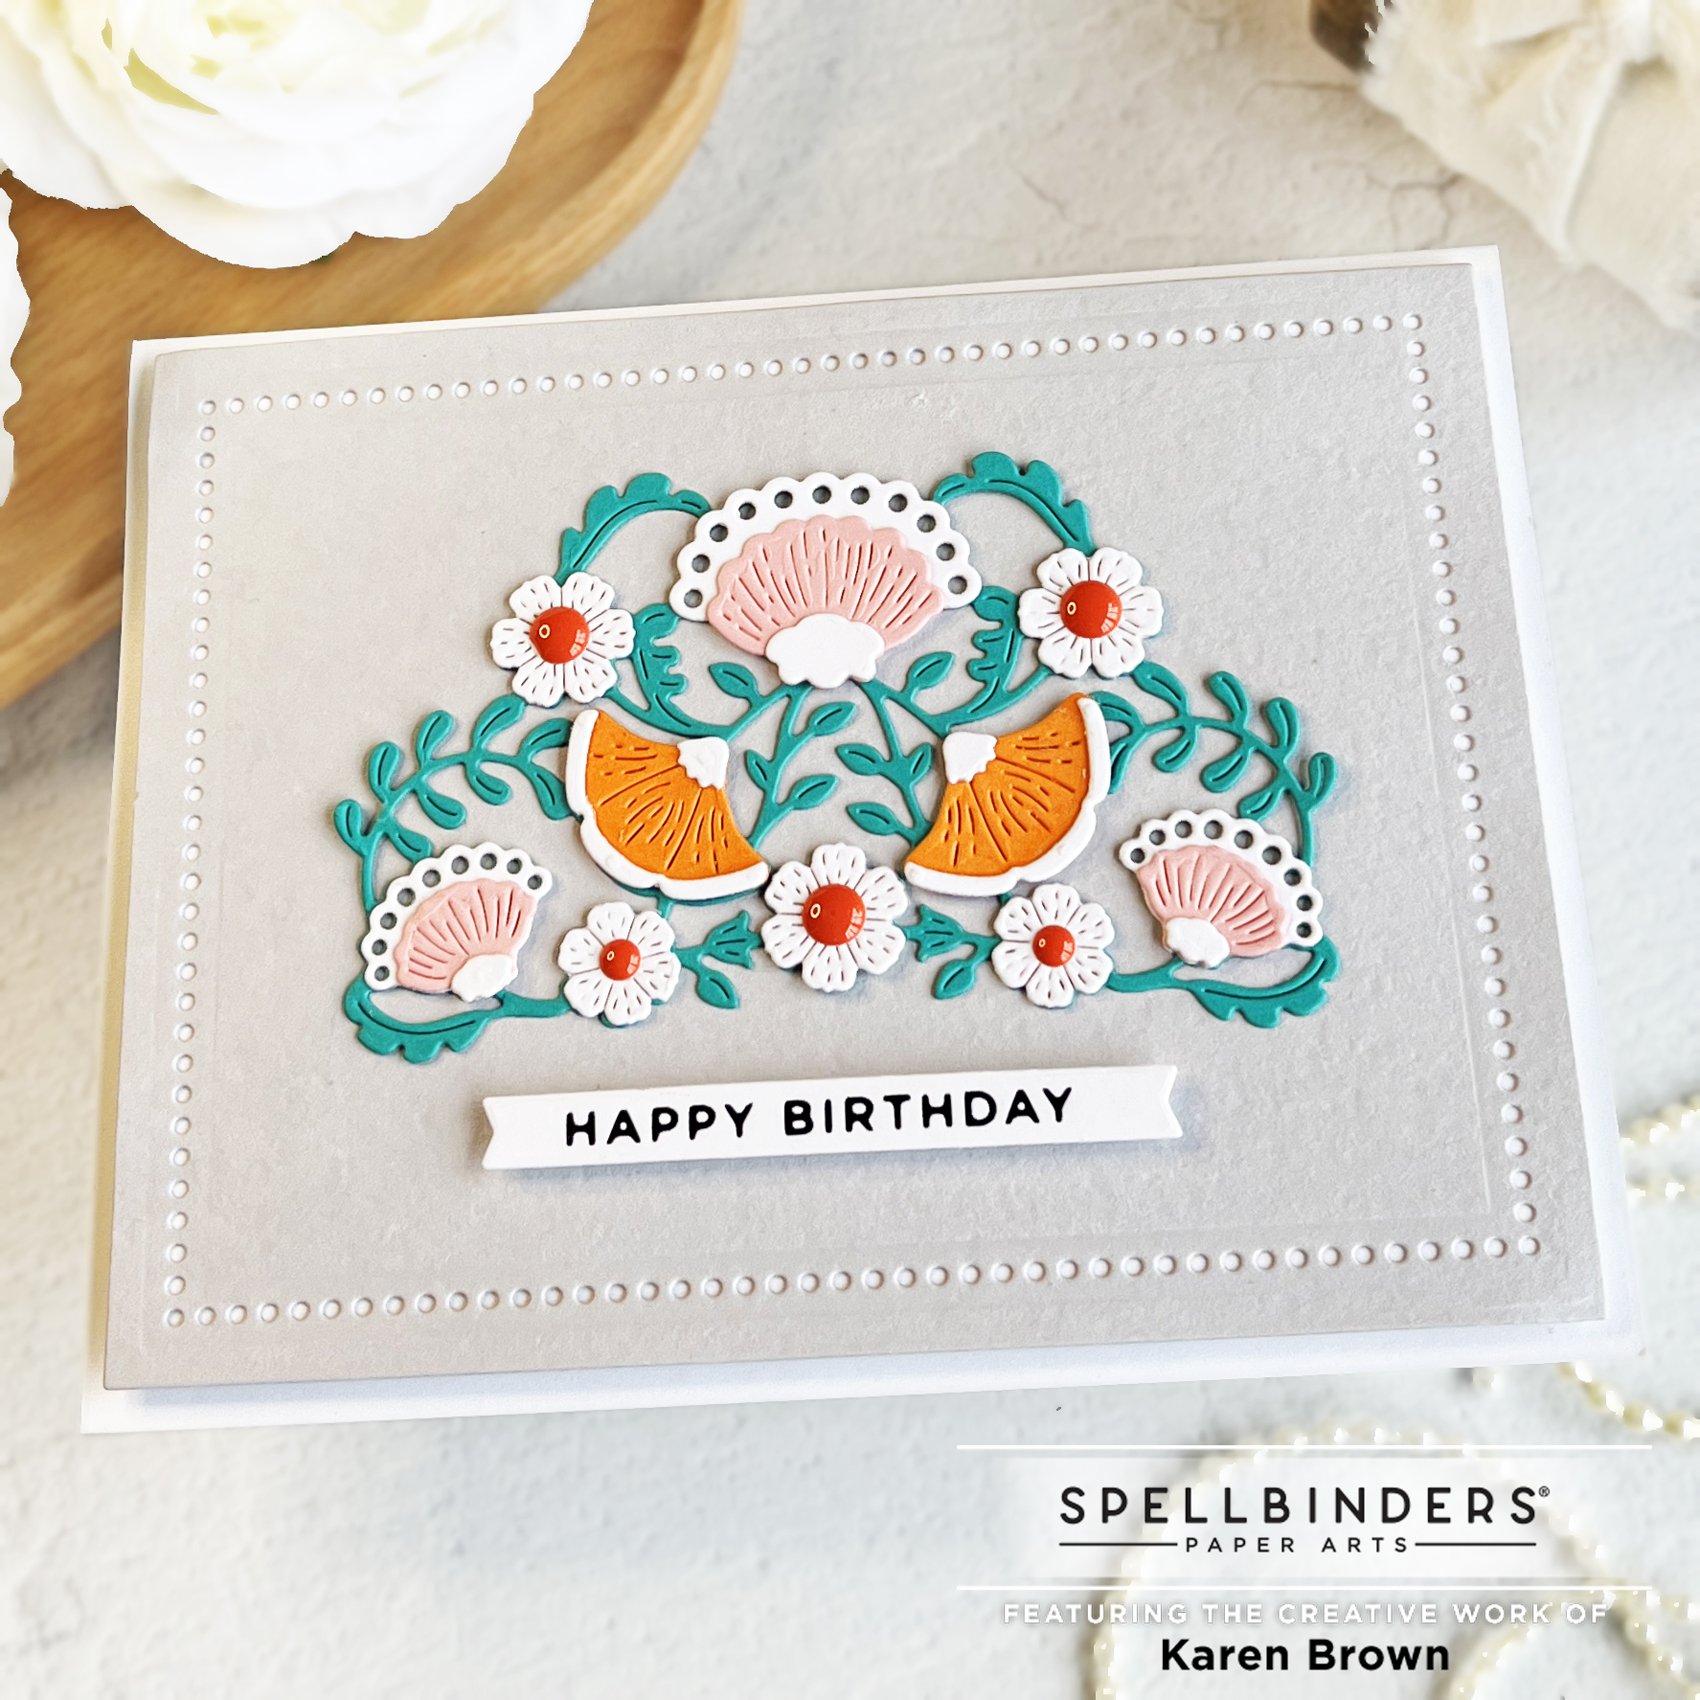
Hello papercrafters, I am back with some lovely seasonal die-cut cards for Fall! I chose some traditional autumn colors and then added beautiful pops of blue. Spellbinders just released this fun collection called Autumn Serenade and I used the Autumn Sealed Sprigs dies along with the coordinating Chipboard Stickers and pre-printed Die Cut Shapes for my cards. I found the stickers and shapes to be real time savers when assembling my cards.

I just got back from a trip to Colorado, and I found the changing folliage was so inspirational for these projects.

Using Pre-Printed Stickers and Die Cut Shapes for Quicker DIY Cards

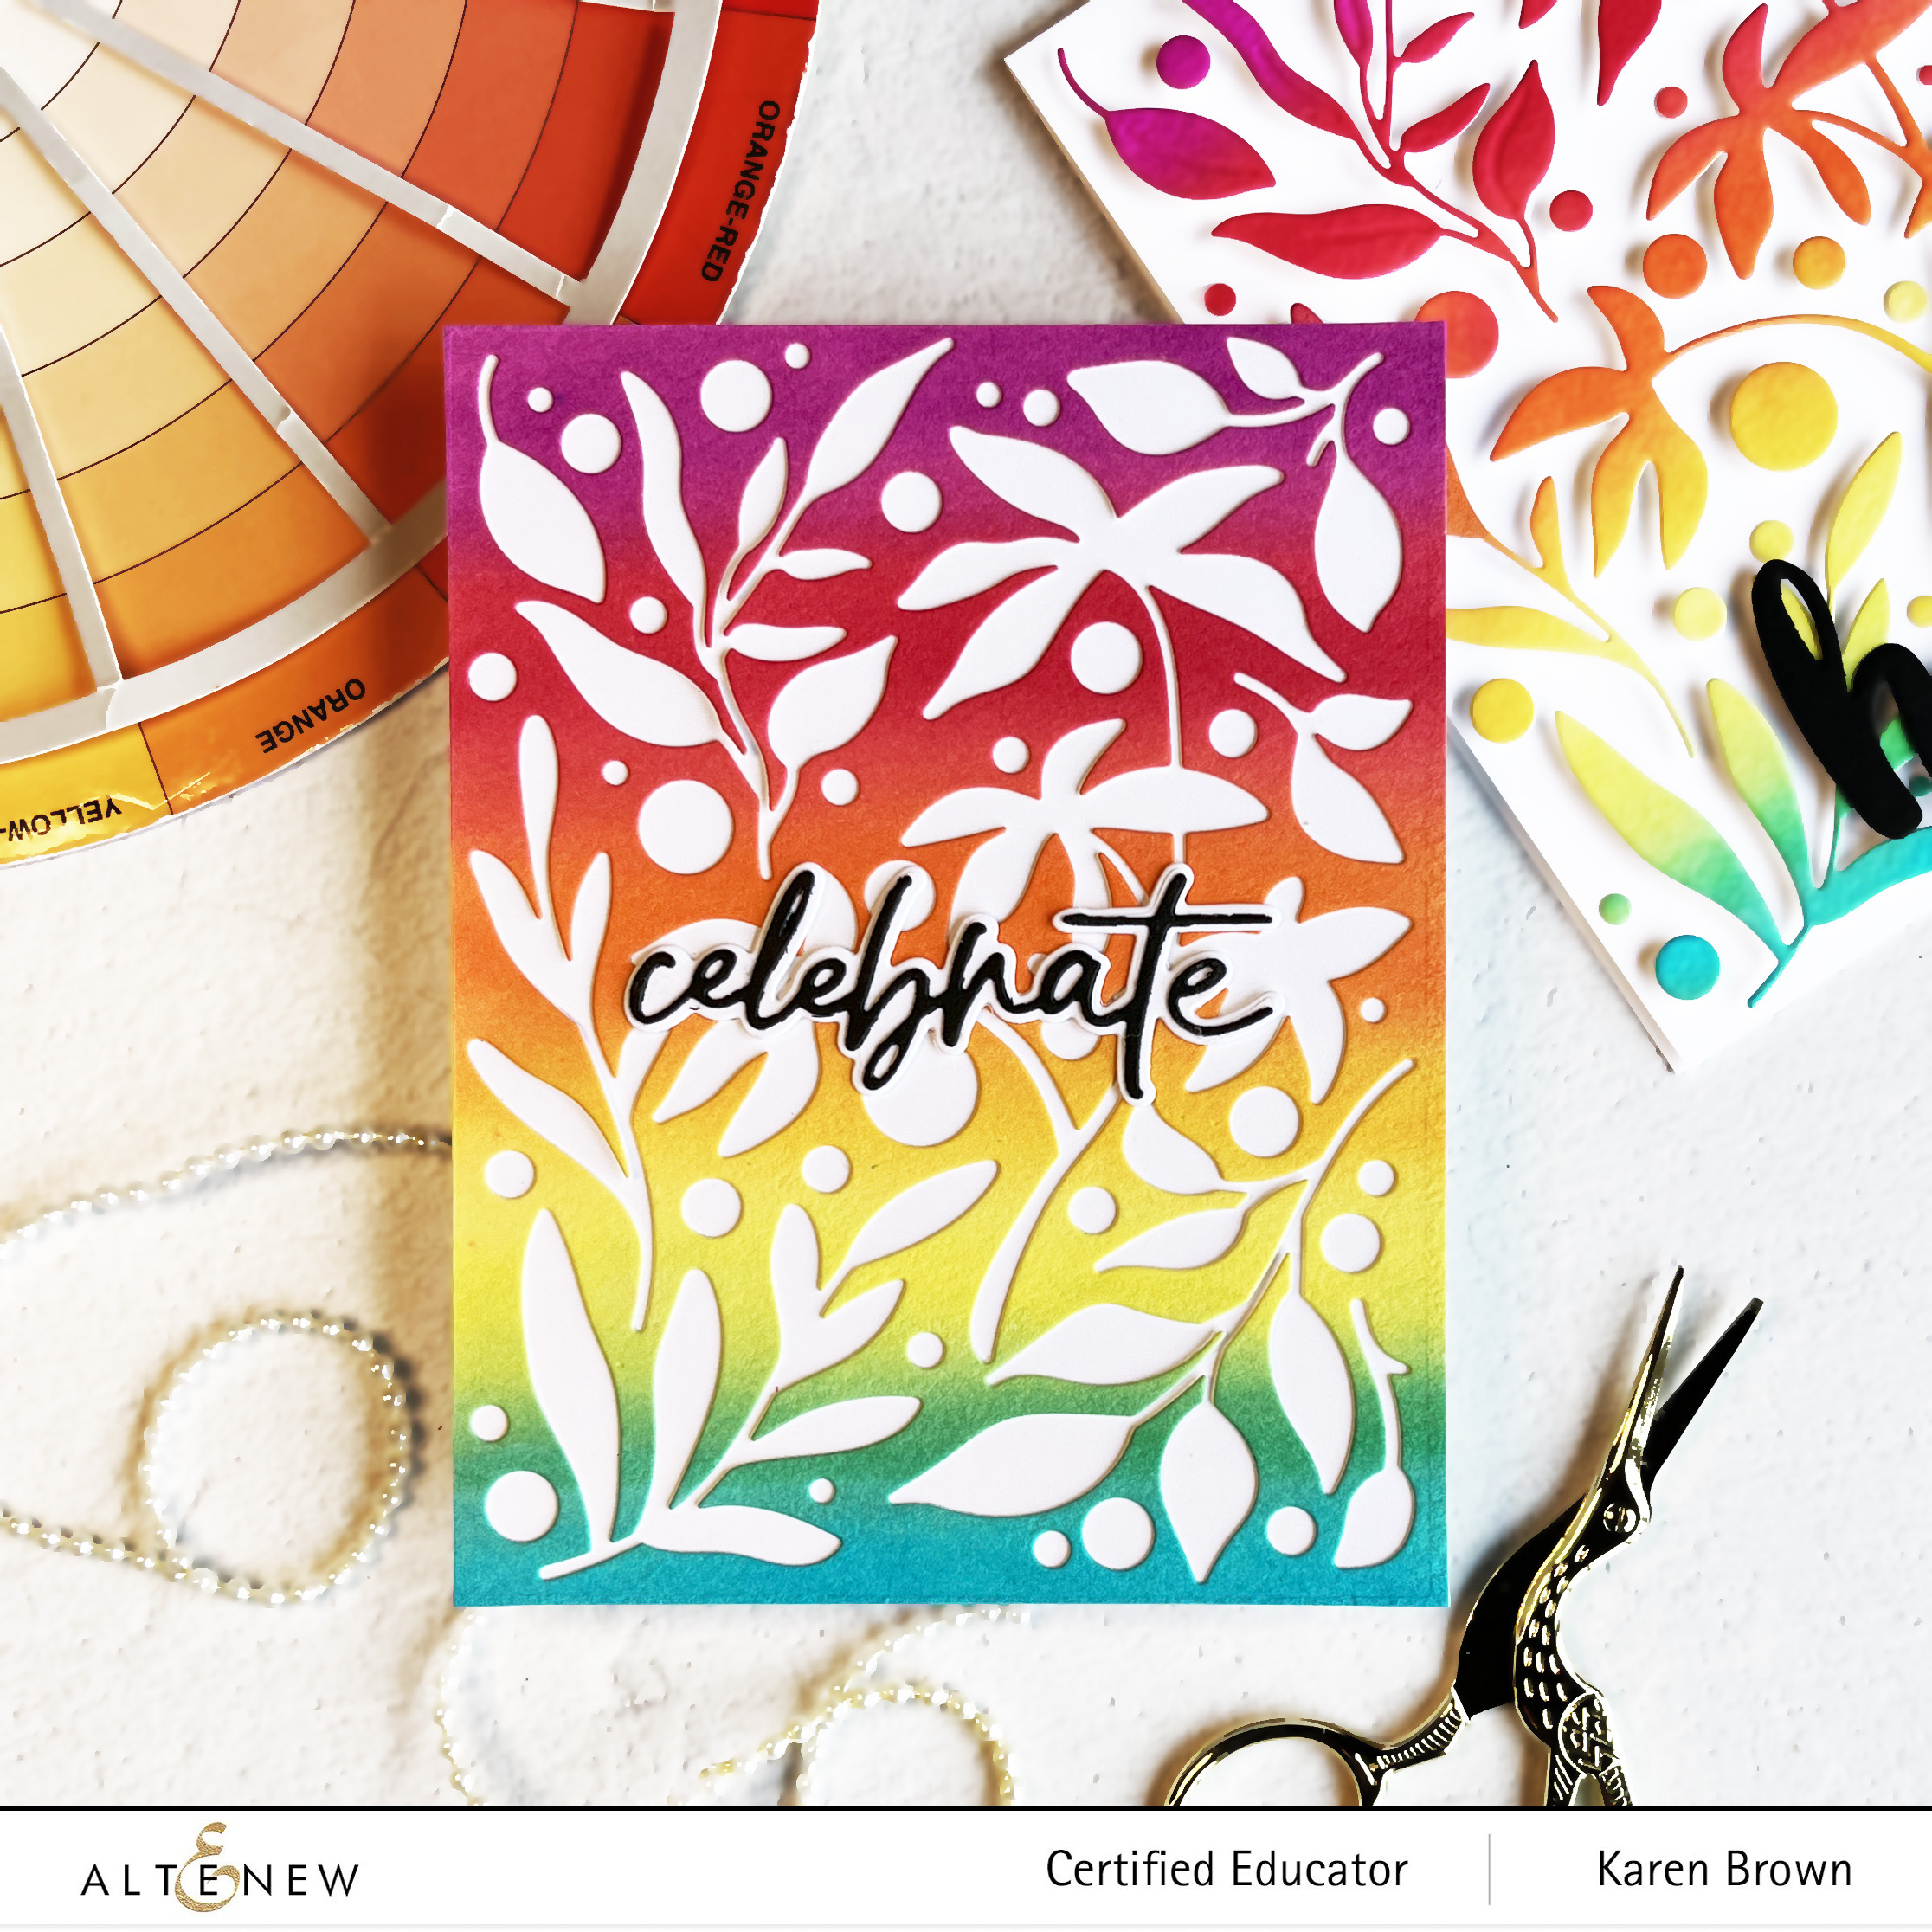
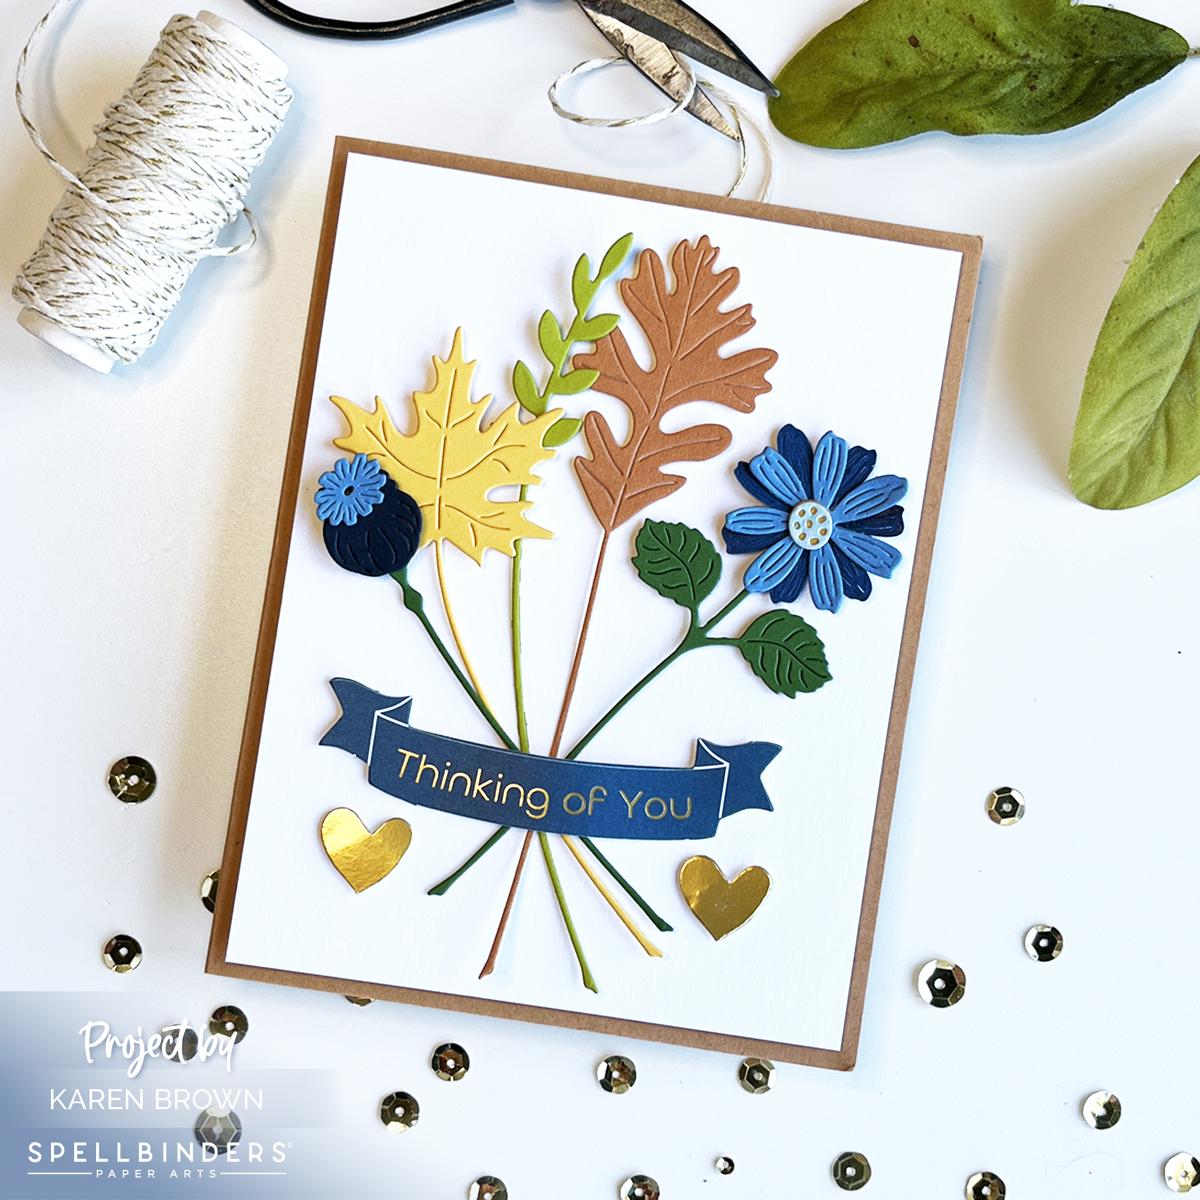
For my first card I used the Sprigs die kit and then added a sentiment plus heart die-cuts to finish my card. This Die Cut Shapes Kit includes 138 pre-printed pieces with lots of sentiments, botanicals, pumpkins, butterflies etc.

Seasonal Thinking of You Card with die cut leaves, Wheat and flowers.

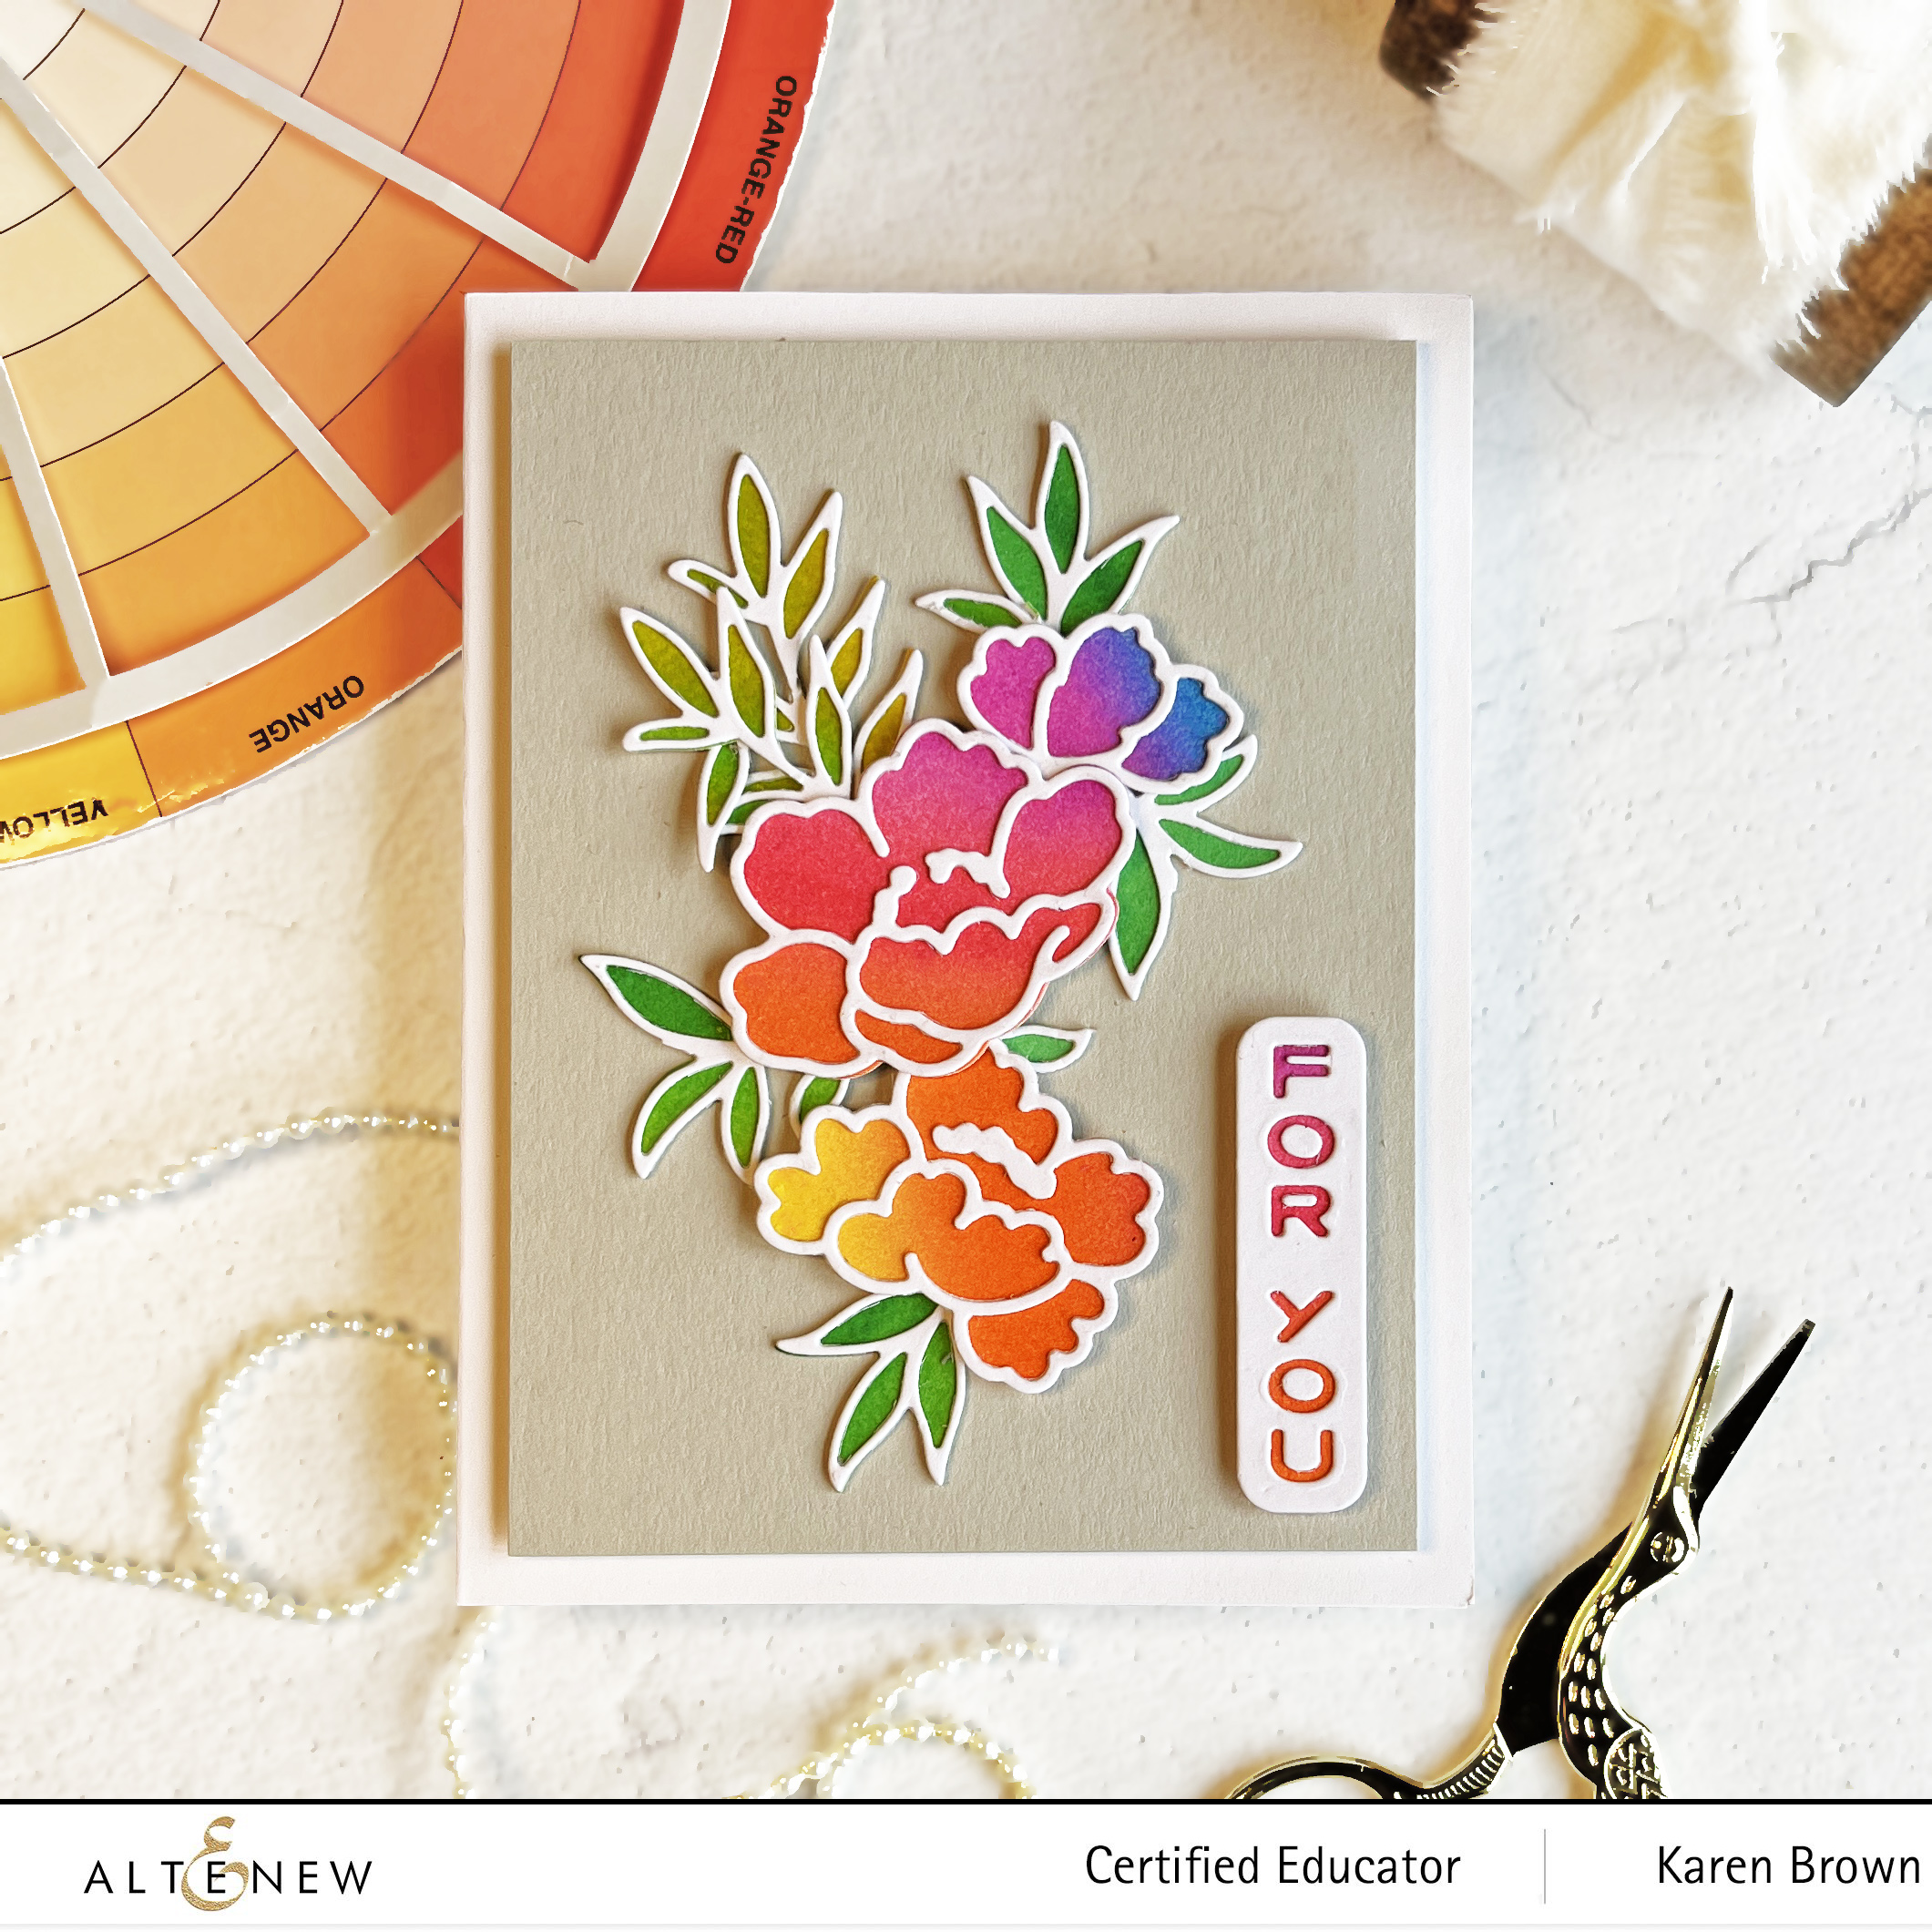
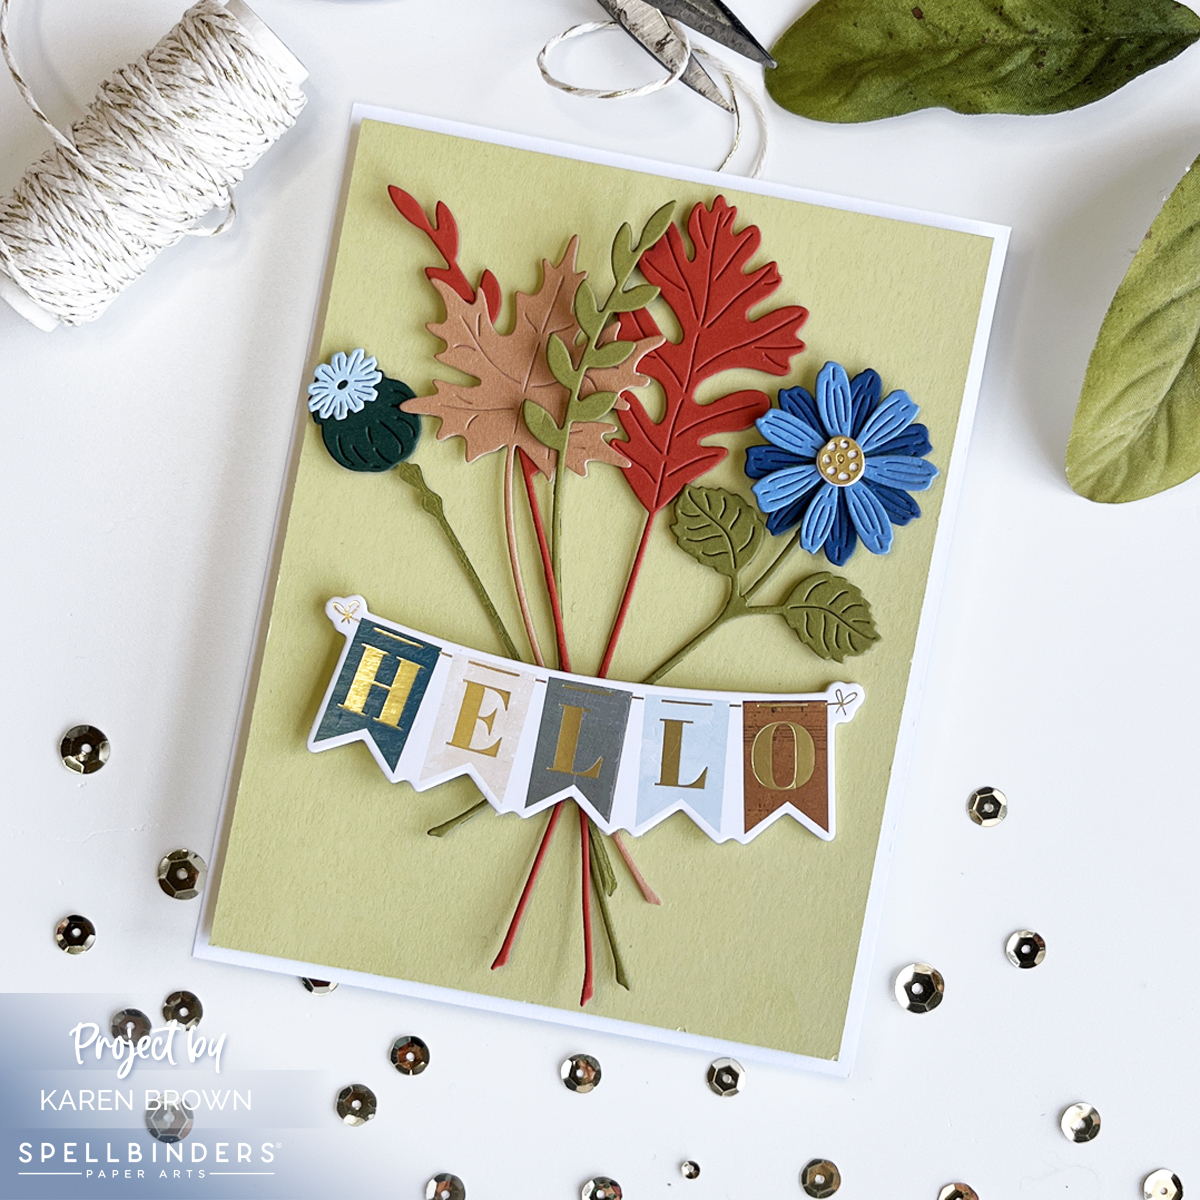
For card #2 I used this showy Chipboard Hello Banner Sticker to complete my fall bouquet. The Chipboard set includes 27 chipboard stickers pre-printed with a variety of sentiments, gold embellishments, butterflies, birds, pumpkins, leaves and flowers. I love this little package and will be using it on future projects.

This Sealed Sprigs Collection reminds me of one of my 2022 Favorite Die Sets called Floral Reflections and you can see that Blog Post HERE.

Using Pre-printed Chipboard stickers for Quick Seasonal die cut cards.

My Process:

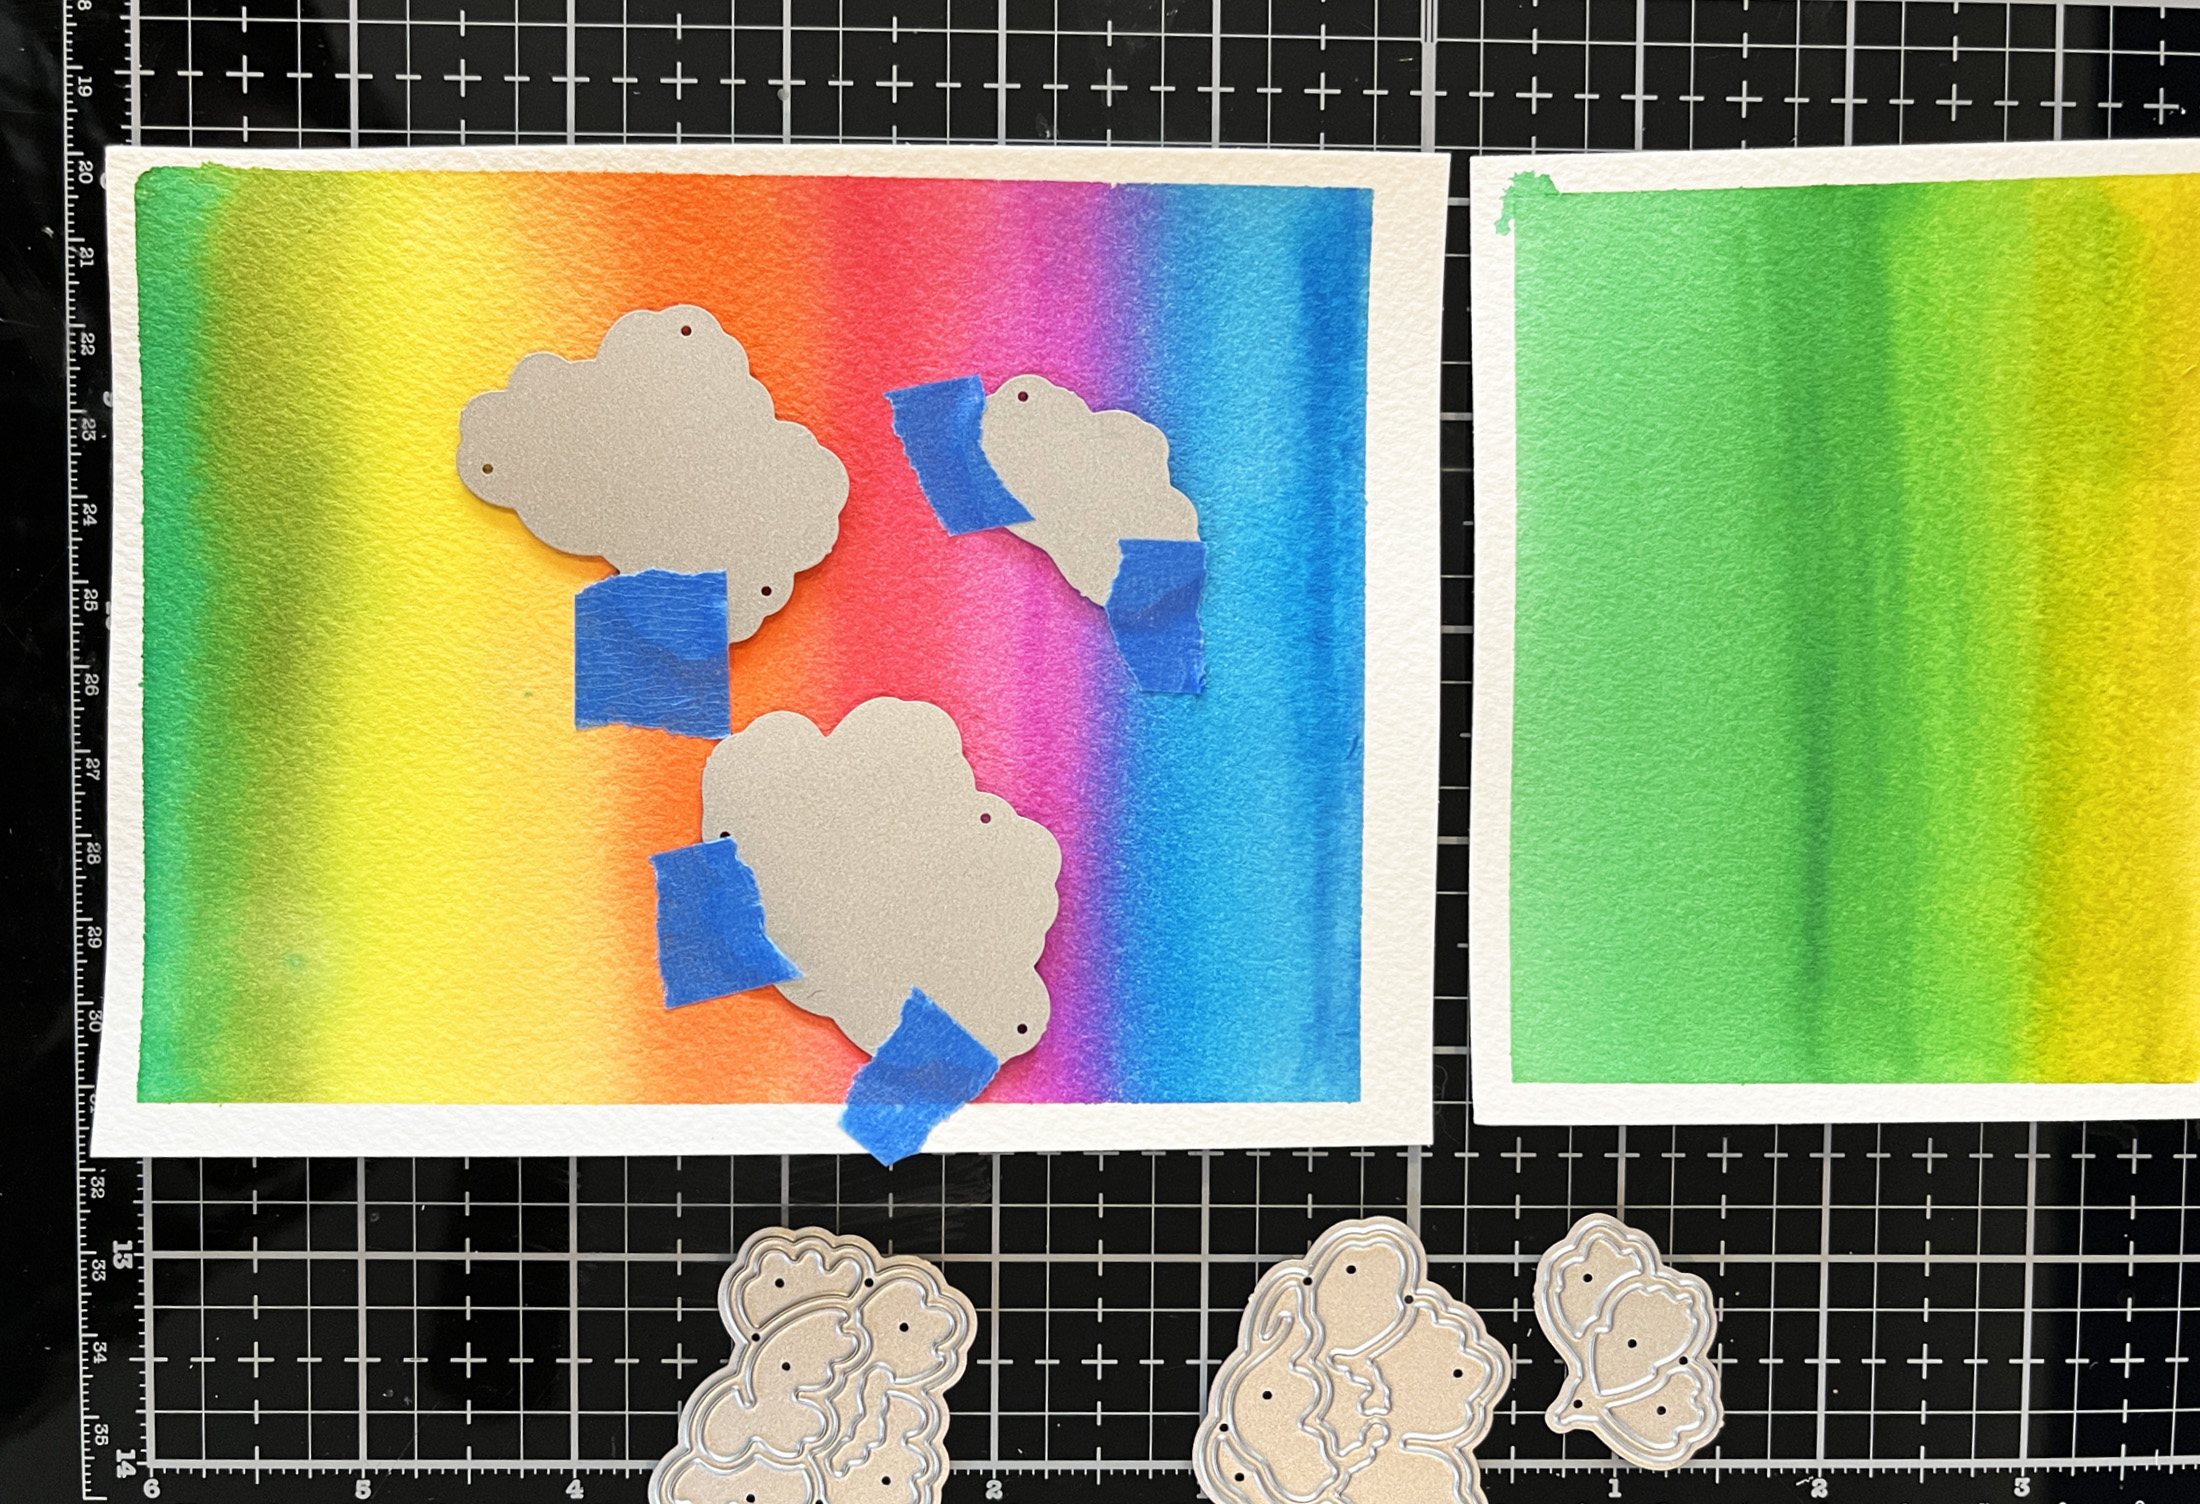
  • I started by selecting colors for my two cards. I used colored paper from two different sampler packs (listed below).
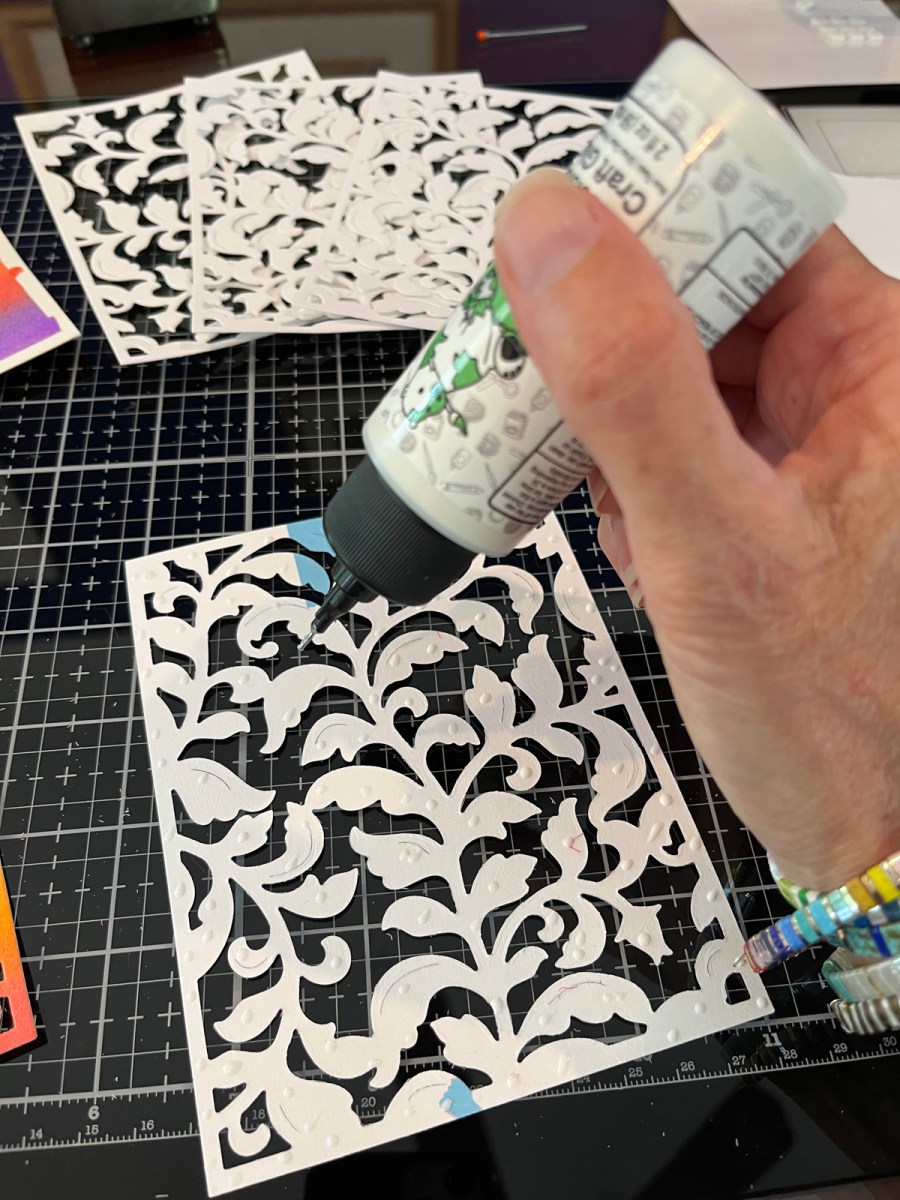
  • Next, I die cut my leaves and botanicals. I played around with layouts and then used the Press and Seal Method to keep my arrangement in place as I flipped it over and added foam adhessive squares to the back.
  • I knew I wanted a banner across the “crossed stems” on each card. The HELLO is a lovely chipboard sticker and the “Thinking of You” is a preprinted die cut. The gold accents add a nice bit of shine to the cards.

Products Used:

Interested in more…You can also find me at these spots too:

@karens_mini on Instagram

Pinterest: @karenabrown

FaceBook: Karens_Mini

YouTube: Karen Brown

cardmaking · papercrafting · Video

3 Colorful Sentiment Focused Cards +Video

3 Sentiment Focused Handmade Cards

Sometimes, you just want your sentiment to be the star of your card. Today I am sharing three cards where the focal point is the sentiment. The video (below) is also part of Altenew’s Let’s Get Sentimental Video Hop.

Love Card or Valentine

Love, Love, Love Die Cut Valentine Card

I felt like getting a little inky and messy, which is always fun in the craft room! I started by creating three gradient watercolor panels that were the basis for my sentiment die cuts. I wanted BOLD colors so I used Altenew’s lusciously pigmented Spring Garden Mix Watercolor Markers + the love die from Altenew’s Script Words set. I kept things Clean and Simple for this first card.

I made this card for my husband, but wouldn’t it be great for a Valentine?

VIDEO

I created a short video for Altenew’s “Let’s Get Sentimental “Video Hop that shows my process. Watch below on YouTube or click below to watch on my blog.

Watch on my blog:

Congratulations Card for Graduation

Die Cut Congrats Graduation Card

I needed a Graduation card for my nephew and I came up with this design using Altenew’s Archway die set (includes both the wave and tree + a rainbow that I used twice HERE) + Script Words Congrats Die. The Archway die set is one of my favorite 2023 releases.

Hello Friend Card

Hello Friend handmade card.

I wanted to add some texture to my next card so I embossed my background with Altenew’s Playful Circles. The die cuts are Simply Hello and Simply Friend.

Here is another variation of a bright fun “hello friend” card I did a few months ago.

Altenew Spring Garden Mix Watercolor Markers +  Script Word Dies + Archways die set.

Supplies:

Here are links to the supplies I used on these cards….click the icon to start shopping. Compensated Affiliate links are used at no additional cost to you. Your support helps me bring you new projects, content and videos. Thank you!

Other Supplies Available at Amazon:

Faber Castell Collapsible Watercolor Cup

Tonic Studios paper trimmer

Removeable Highlighter Tape

Tonic Studios Craft Pick

3M Painter’s Tape
Altenew Script Words "love" die + handmade card.

I took a bunch of photos and am including the rest here.

Altenew Script Words die cut handmade cards.

And finally, one standing photo…. Don’t you just love top fold cards?

Clean and Simple CAS Valentine

Thanks for stopping by!

Karen

cardmaking · Die cutting · Video

Altenew | Sweet Blossoms Floral Die Cut Card With Rainbow Stripe Background + Video

How to create rainbow striped card backgrounds with colored cardstock strips  + Altenew's Sweet Blossoms floral die set.

Die Cutting with Outline Dies

Die cut flower and leaf silhouettes over a rainbow striped background makes for a colorful high impact card. I love Altenew’s Sweet Blossom’s Layering Dies and wanted to play with them again (You can see my first card HERE). This time I wanted to use just the outline dies so you could see the beautiful background I created.

Altenew Sweet Blossoms Layering Die Set handmade card

I created a short video (below) to show how I made my background panel. I love rainbow striped backgrounds so I have two pouches (see final photo) where I keep my pre-cut colored cardstock strips. The pouch on the left has a variety of widths and all the strips in the right pouch are cut to 1/4″ widths. It is easy to take a paper trimmer and cut lots of strips and then it is so quick to make a colorful background. For this card, I used PaperTrey’s Perfect Match Colored Cardstock.

Click HERE to see a card where I used just 1/4″ strips.

For this card, I wanted variety so I used colored cardstock bands from both packets. I like to use Altenew’s Glue Tape Runner when making these types of backgrounds.

I wanted my flower bloom to sit on a stem, so I did a little surgery on the larger leaf die cut, and with scissors, I cut off the top three leaves. This left me with a stem and an additional little leaf cluster to use on my card.

I wanted substantial die cuts, so using the Sweet Blossoms and Vertical Greetings sets, I die cut each element three times and then glued them together.

Quick Video: How I Created This Rainbow Striped Background

Products and Supplies Used on this Card:

Altenew No Hassle Storage Pouches

Products Available on Amazon:

Tonic Studios paper trimmer

I am SO happy you stopped by today!

Karen

cardmaking · Die cutting · papercrafting

Waffle Flowers | Flourish Panel Cover Die 2 Ways

Waffle Flower Crafts Flourish Panel Die:  Cards Two Ways

Rainbow colors in cardmaking are always a good idea! I recently received a new cover die from Waffle Flower Crafts called Flourish Panel and it is a real beauty! I couldn’t decide whether to have the rainbow panel on the top layer or below the lattice so I opted to do it both ways. I still can’t choose which way I like it better. What do you think…..I’d love to hear your thoughts in the comments.

How To Add Dimension on Die-Cut Cards

Waffle Flower Flourish Panel + Using inexpensive Crayola Watercolors in Cardmaking

I have step-by-step directions (with process photos) below. On one card I die-cut the watercolor panel and on the second card I used the rainbow colors as a background.

Waffle Flower Crafts Flourish Panel Die + Print and Script Happy Birthday Sentiment dies.

Cardmaking Tutorial: How I Made These Two Die Cut Cards

Step 1: Make Your Rainbow Watercolor Panel. Today, I used watercolors for my colorful focal point. On the panel with the rainbow on the top layer, I used Kuretake Watercolors to blend a rainbow. I went over the watercolor panel twice to get an intense color. On the second, panel, I used inexpensive Crayola Watercolors and it worked beautifully! You could also ink blend your background.

Step 2: Die-cut your top layer with Waffle Flowers Flourish Panel Die. I have an electric Gemini Junior die-cutting machine that I used.

Step 3: You could stop die-cutting here, but I wanted a lot of dimension, so I die cut two additional panels so I could stack my layers.

Step 4: Glue Your Layers Together. Using Bearly Glue, I glued three lattice layers together for a substantial top panel. Be sure to weight them down after gluing so they stay nice and flat. I have a large acrylic block that I use. I also adhered the layers to an A2 Top-folding card.

Step 5: Add A Sentiment. I always need Birthday Cards so I used Waffle Flowers new Print and Script Birthday Sentiment Dies. I love that they come with both a cursive and block font with coordinating shadow dies. I cut the sentiments from white cardstock and the shadows from Navy.

Now I have two bright cheerful birthday cards to share.

Products Used:

cardmaking · Hot Foiling

Spellbinders | Glimmer Cardfront Birthday Sentiments 6 Ways

Spellbinders Glimmer Cardfront Birthday Sentiment handmade card in Rainbow Hot Foil

Making Your Own Backgrounds with Rainbow Strips of Cardstock

Big bold sentiments can really add a lot of impact to your cards, so I was so excited to see Spellbinders new Glimmer Cardfront Sentiment Collection. Today, I am sharing 6 different glimmer hot foil birthday cards featuring the Best Wishes on Your Birthday Foil Plate.

I love bright colored cards so I started with Rainbow Hot Foil and then created coordinating backgrounds made of colorful strips of cardstock. The sentiment panel was die cut using Stylish Oval Nesting Dies. For card #1, I used a paper trimmer to cut fifteen 1/4″ strips of cardstock. Next, I applied a tape runner over a cardstock panel and then adhered the cardstock strips in rainbow order. Surprisingly, this is actually fast and easy to do.

PRO TIP: To assemble my card, I used craft foam and liquid glue to add a layer of dimension under both the background and sentiment panel. On many projects I prefer craft foam to foam tape. With craft foam and glue, I can slide my element and make micro-adjustments for perfect placement.

Don’t you just love the shine and shimmer?

How to make your own Make Your Own Backgrounds with Rainbow Strips of Cardstock

For card #2, I used my paper trimmer to cut six 1/2″ strips of colored cardstock and then I cut five 1/8″ strips of white cardstock. I think the white dividers really brighten up the look! I again used a tape runner to adhere the white and colored strips to the background. For the second card, I used gold foil and and then matted the sentiment with brushed gold cardstock.

Spellbinders Glimmer Cardfront Birthday Sentiments 6 Ways

Using Printed Designer Paper for Quick and Easy Cards

These fun foiled sentiments do all the heavy lifting so it is easy to quickly make cards using printed designer paper for the background. Spellbinders Cheerful Occasions pad (I think this pad sold out) has such fun designs and I used the papers on the backgrounds of cards #3, #5 and #6.

Using Printed Designer Paper for Quick and Easy Cards + Spellbinders Glimmer Cardfront Sentiments hot foiling

Reverse Foiling | Using the Glimmer Hot Foil Negative Space for 2 For 1 Cards

I hated to throw away the foil after I created the cards above, so I created 2nd bonus cards with the leftover foil. The result is so bright and eyecatching! Card #3 uses the negative from the Rainbow Foil.

I cranked up the heat and time and ran the “foil negative” through a second time using a solid foil plate. I used the highest heat setting for 1 minute and got a beautiful result.

PRO TIP: There is a thin protective layer on top of the foil that I peeled off after my card was finished. I kept the foil covered (with the clear protective layer) during assembly to prevent scratches on the foil.

Using the Glimmer Hot Foil Negative Space for 2 For 1 Cards + Spellbinders Glimmer Cardfront Sentiments

Card #5 uses designer paper paired with the negative from the gold foil.

Quick and Easy DIY glimmer hot foil cards.

My final card pairs designer paper, black foil plus I added a second mat die cut from velum. The velum mat is subtle but very pretty.

Spellbinders Glimmer Hot Foil Cardfront Sentiments Birthday Card

Products Used:

Do you have a favorite? I’d love for you to tell me in the comments.

Karen

cardmaking · Die cutting · papercrafting

Waffle Flower | Four Festive Birthday Cards

Welcome to the Waffle Flower May Release Blog Hop! I’m happy to be hopping with the folks from Waffle Flower to show you all the fun new stuff awaiting you on the Waffle Flower website! Be sure to check out each stop in today’s blog hop for fun, inspiration, and chances to win some of these new release goodies! 

Waffle Flower Layered Party Hat (421360) die cut handmade birthday cards

Today I created four festive birthday cards for Waffle Flowers May 2023 Blog Hop. I hope you’ll “hop” along with us and visit each stop along the way.

Waffle Flower Layered Party Hat Die Set

Waffle Flower Layered Party Hat (421360) handmade card in bright festive colors.

I had so much fun with this Layered Party Hat die set and I cut loads of colorful elements. I posted two cards here but I have lots of leftovers that I plan to make into cards when I get back from my trip with friends.

I started by picking vibrant colored cardstock, then I die cut and started making combinations with the hats. For this post, I really liked using the darker color on the base and then adding a lighter shade on top. And the confetti made the hats even more fun! For my sentiment, I chose the new Print and Script Birthday Sentiment die set that has a fun cursive Happy Birthday and a coordinating shadow.

Die cut birthday hat card in bright colors:  red, orange, pink and yellow

For my second card I wanted a rainbow grid look so I cut a 5 1/2″ x 5 1/2″ base and added 6 hats. I used a new Subsentiments Birthday Die Cut Embellishment for my sentiment. I love how easy it is to finish cards with preprinted sentiments.

Die Cut Grid Birthday Card featuring Waffle Flower Layered Party Hat (421360),

Pro Tip: Instead of adhering the hats with foam tape, I used craft foam. This allowed me to microadjust the hats to get them lined up the way I wanted. Putting liquid glue on the craft foam enabled me to wiggle and move the hats until I was happy with their placement.

Waffle Flower Layered Party Hat (421360) handmade Birthday card.

Waffle Flower Balloon Background Die and Stencil Trio

Waffle Flower Balloon Background Die and Stencil Trio:  421354 and 421355

If you love ink blending then you will adore these Festive Balloon Background Dies with coordinating stencils.

Color selection is one of my favorite parts about cardmaking so this card was extra fun for me. I chose 14 inks in rainbow colors and then started blending away.

PRO TIP: I found it easiest to lay my inks out in order so that I wouldn’t get confused during the ink blending process. I included a process photo to illustrate.

PRO TIP 2: Remember to turn your background for more even blending.

To compliment this release, Waffle Flower included two wonderful new birthday sentiments. One has a beautiful scripty font and the other is a bold print.

I love both new sentiments so I made a rainbow balloon card with each.

Waffle Flower Print and Script Happy Birthday cards:  421352

Don’t you just love cards that are so versatile? This is the type of card I love to keep on hand….each could be used for a friend, child, man, female.

Products Used in This Blog Post:

Didn’t you just love Jeanne’s creations?

Laurie Willison   is next on the hop!

Here are links to all of the Hop participants:

Waffle Flower Blog

Cathy Zielske

Galina Filippenko

Laura Bassen

JJ Bolton

Amanda Rochaix

Caly Person

Renee Day

Jeanne Jachna 

Karen Brown You Are Here!

Laurie Willison

Dana Kirby

Dilay Nacar

Amy Kolling

Laura Evangeline

Channin Pelletier

Giveaways:

For today’s hop, Waffle Flower is giving away $25 gift certificate to THREE lucky winners. You can leave a comment on this blog and along the hop by 11:59pm EST on Tuesday May 9th, 2023 for your chances to win. Winners will be chosen at random from the comments left on any of the posts in this blog hop and will be announced on the Waffle Flower Blog on 05/10/2023.

Additional Gift Certificate for One of My Commentors:

I am excited that there is an additional Gift Certificate for one lucky commentor on my Blog Post! I really love reading your comments…you all make me smile!

Specials:

From now till May 8th, 2023, all orders placed at waffleflower.com will receive a mysterious gift (No code required!).

For those of you who are new to Waffle Flower, they have a Last Chance section on their website that lists many goodies for 25% off until they are gone! This would be a great place to start your collection! And don’t forget to check out their monthly Flash Sales!

Thanks for stopping by!

Karen

cardmaking · Die cutting · papercrafting

Spellbinders | Stylish Ovals Collection 4 Ways

Spellbinders Stylish Oval Hello You Floral Dies (S5-565) + Oval Nesting Dies (S5-562) on a handmade card.

Oval Shaped Cards

Shaped dies can really change the look of your cards and projects so I was excited to see Spellbinders new Stylish Ovals Collection. I created the first card for my mom’s upcoming birthday. Red is her signature color so I paired corally reds with aquas and greys for a very eye-catching color palette.

To make my oval cardbase, I used the largest oval die for the base. I took a white A2 top folding card base and put the top edge of the die just above the fold so that the die would cut around the top. I die cut the stem twice and glued together for added heft and stability.

Supplies Used:

Shaped Oval Card with Spellbinders Stylish Ovals Collection

Spellbinders Floral Die Cut Cards

Spellbinders Stylish Oval Hello You Floral Dies (S5-565) + Oval Infinity Punch and Pierce Plate Cover Die handmade card.

I needed a card for a bridal shower so I made a second oval shaped card with die cut flowers. This one is smaller than card 1, it is 5″ x 3 3/4″. I think it makes for a sweet gift encloser.

I used the same products as card one but added a pretty little oval frame from the Infinity Punch and Pierce Plate Cover Die. This die is so beautiful and a has an incredible amount of detail, but it cuts beautifully. I used just the middle section on this card and I used the other 2 sections on card #4 below.

Products Used:

White oval shaped card with die cut red flowers.

Die Cut Rainbow Arch Birthday Card

Colorful Rainbow Arch card with Spellbinders Stylish Oval Nesting Dies (S5-562) handmade card.

In case you haven’t noticed, I LOVE these oval nesting dies. Just for fun, I wanted to make a bright cheerful rainbow card so I selected 8 bright shades of cardstock and then die cut my rainbow elements.

This type of birthday card is so versatile that I love to keep them on hand. I could send this to anyone…man, woman or child.

Products Used:

Festive Rainbow Colored Die Cut Birthday card.

Spellbinders Infinity Punch and Pierce Plate Cover Die

Spellbinders Stylish Oval Infinity Punch and Pierce Plate Cover Die (S5-566) handmade card.

This cover die is gorgeous in person! I started by making a rainbow gradient background with inks and blending brushes. I then placed the center and exterior components of the cover die over the top and added two floral embellishments that echo the spring colors.

Supplies Used:

Oval pierced cover die with spring ink blending on a handmade card.

I hope I offered some inspiration for your crafting.

Karen

cardmaking · papercrafting

Tips for Making Vibrant Colorful Cards

Tips for Making Vibrant Colorful Cards

Today I wanted to share some Tips and Tricks for making bold, vibrant colorful cards. The Featured Stamps are from Altenew’s March 2023 Mini Stamp Collection.

TIP #1: Use Watercolor Markers which have tons of pigment.

Below, you can see the watercolor panel that I used for my die cut word sentiments. I added Rubelite and Autumn Blaze from Altenew’s Spring Garden Brush Markers and then used a #18 brush and water to blend the colors. I did not increase the saturation on this card, the color on the screen is the true color in person. So bright and happy!

Making backgrounds with Watercolor Markers.

Products Used:

Altenew's Mini Coneflower Stamp and Die + Altenew's Spring Garden Brush Markers

TIP #2: Use Strips of Cardstock in Rainbow Colors

I like to keep strips of colorful cardstock on hand for quick cards. The strips on this card are each 1/4″ wide and they are a snap to make with your paper trimmer.

Using strips of colored cardstock to make colorful rainbow backgrounds.

Products Used on This Card:

Altenew's Mini Dogwood Stamp and Die on a handmade card.

TIP #3: Create a Rainbow Gradient Accent Strip

On Bristol Cardstock, I blended watercolors from Altenew’s Spring Garden Brush Marker Set in Rainbow Order. I used water and a #18 Brush to blend the colors. I created a 5.5″ x 4.25 inch panel and trimmed off a 1.75″ strip for this card, reserving the remaining panel for a future project.

Altenew's Spring Garden Brush Marker Set + handmade card

Products Used:

Altenew's Mini Dahlia Stamp and Die Set + handmade card

Thanks for stopping by! What do you think…..do you have a favorite?

Karen

cardmaking · papercrafting

Altenew March 2023 Stamp/Die/Stencil & More Release Blog Hop #2 + Giveaway ($300 in Total Prizes!)

Welcome to Altenew’s March Release and Blog Hop! I have SEVEN cards to share with you today. I was so excited and inspired by the Japandi Release….I had SO many ideas! I decided to do a “Rainbow” themed post and I am so pleased you stopped by. You can see Altenew’s entire release HERE.

Rainbow Gradient cards with Altenew Zero Waste Leaf Pattern Cover Die Kit.

Rainbow Gradient Handcrafted Cards

I started by watercoloring a bunch of panels for my cards, which I find this fun and therapeutic. On watercolor paper, using water and one of Altenew’s #18 brushes, I watercolored bands of color from Altenew’s Spring Garden Brush Marker set. I love how bright and vibrant the colors are with these markers! You can see two of my finished panels below.

Negative 2-For-1 card with Altenew's Zero Waste Leaf Pattern Cover Die.

2-For-1 Cards

Once my panels were dry, I started die cutting. My first two projects are 2-For-1 Cards using the beautiful new Zero-Waste Leaf Pattern Cover Die. When you are done, you have the pieces for a “Positive” Card and a “Negative” Card, and I love them both!

The Zero-Waste Leaf Pattern Cover Die and Archway Die Set (below) are part of the Zen Garden Ensemble from Altenew.

How To Make Rainbow Gradient Die Cut Cards:

  • On Watercolor Paper, paint rainbow bands of color with Spring Garden Watercolor Brush Markers and then blend with water and a #18 Paintbrush. I taped my panel to a hardboard with blue painters tape prior to painting. Dry.
  • I used the “Press and Seal” Method. After I die cut my Zero Waste panel, I smoothed Glad Press and Seal Multipurpose Sealing Wrap over the top of the die cut panel. I then flipped it over and using tweezers added cut Instant Dimension Foam Tape to the back of each positive die cut. Next, I carefully flipped the panel over and adhered onto an A2 card base. Then I removed the Press and Seal.
  • I die cut my Simply Hello sentiment twice from black cardstock, glued the pieces together and added to the bottom right of my card.
  • For my Negative Card, I added liquid glue to the back of the panel and then adhered directly to an A2 card base. I added my Sweet Sentiments Celebrate die cut and shadow to the center of my card and voila, two bright and happy cards!
2-For-1 Cards with Altenew's Zero Waste Leaf Pattern Cover Die.

This Sweet Blossoms Layering Die Set is a real beauty and is definitely a new favorite!

Altenew's Sweet Blossoms Layering Die Kit + Rainbow Gradient Card.

You can see two of my watercolor panels just prior to die-cutting. I again used my Spring Garden Watercolor Markers and I really love the rainbow gradient across the blooms. For my sentiment, I die cut “For You” from the new Vertical Greetings Die Set and then backed with a scrap from the rainbow panel shown below.

Rainbow Gradient Card panels using Altenew's Spring Garden Watercolor Brush Markers.

Inlay Rainbow Die Cutting

Altenew's Archway Die Set + Rainbow Inlay Card.

Altenew’s new Archway Die Set is so fun and is perfect for mass producing cards. Cut the rainbow from 7 or more colors of cardstock, change the order and you can make a bunch of cards quickly. The included tree die adds a lot of interest. I added a coordinating sentiment and shadow from Altenew’s Sweet Sentiments Die Set.

Masculine Rainbow Card + Altenew's Archway Cover Die.

On card 2, I changed up the color order. I think these would be perfect for Get Well, Birthday, Graduation…

Rainbow Inlay Die Cut with Altenew's Archways Die Kit.

Quick and Easy Die Cut Cards

I thought the tree from the Archway Die Set was so pretty that I made a third quick and easy card. I die cut the tree from white cardstock and used the negative panel, placed Instant Dimension Foam Tape on the back and then adhered to my rainbow panel (watercolored with Spring Garden Brush Markers). I added a few of the white interior pieces and popped it on a fog A2 card base and added another die cut sentiment from Altenew’s Sweet Sentiments. Be sure to save the positive diecut for a future 2-For-1 card.

The Archways Die Set also comes with a third “Wave” die that I know you will also love!

Quick and Easy Rainbow Gradient Card with tree from Altenew's Archways Die Kit.

I used Altenew’s Leaf Essential Die Set for my 7th card and this card came together VERY quickly! On this card I used colored cardstock in bright vibrant hues. I added a few Enamel Dots and another Sweet Sentiments die and shadow.

Colorful Leaf Essential Die Cut Card + Altenew.

Giveaway Prizes:

$300 in total prizes! To celebrate this release, Altenew is giving away a *$100 gift certificate to 1 lucky winner and a $20 gift certificate to 10 winners! Please leave a comment on the Altenew Card Blog and/or each designer’s blog post on the blog hop list below by 03/12/2023 for a chance to win. Altenew will draw 11 random winners from the comments left on each stop of this blog hop and announce the winners on the Altenew Winners Page on 03/13/2023.

You probably came from April’s Blog and the next stop is talented Tenia! You can see the all the hop stops by clicking the button below:

You are invited to the Inlinkz link party!

Click here to enter
https://fresh.inlinkz.com/js/widget/load.js?id=c0efdbe6b4add43dd7ef

*The winner of the $100 gift certificate will be chosen from comments left on the Altenew blog. 

I am so pleased you stopped by and would love to hear which card was your favorite!

Karen

cardmaking · Die cutting · Hot Foiling

Spellbinders | Four Petal Collection

Spellbinders Four Petal Bloom Reflection Die Kit: S4-1263 handmade card.

Hi friends, I am sharing two cards from Spellbinders new Four Petal Collection. The cards are very different but they are both so pretty!

Spellbinders Four Petal Bloom Reflection Die Kit: S4-1263

I adore die-cutting so The Four Petal Bloom Reflection Kit called to me. I love all the gorgeous detail on these dies! I added an extra metal shim while die-cutting which resulted in beautiful die-cut results. I framed the florals with the Essential Rectangles die as I liked the way it complimented the small die-cut circles on the fan flowers. I also embellished the white flowers with enamel dots.

Products Used:

Spellbinders Four Petal Bloom Reflection Die Kit: S4-1263 + Handmade Card

Spellbinders Four Petal Scroll Label Hot Foil Plate: GLP-370

Last year, I finally bought myself a foiling system and I really love the results! For this card, I used the new Four Petal Scroll Label Foil Plate. The shine can be difficult to photograph, but I did my best. This card just glows in person!

Spellbinders Four Petal Scroll Label Hot Foil Plate + handmade card

I used Gold Foil on Yupo paper and the results are beautiful! I then ink blended Lagoon and Parrot ink over the foiling and let the ink dry overnight so it would not smear. I like foiling on the slick Yupo paper but it does take longer for the ink to dry. The next day, I matted with Brushed Gold cardstock and added some Crystal Gems to further enhance the beautiful shine of the foiling. The sentiment is included in the kit.

Spellbinders Four Petal Scroll Label Hot Foil Plate:  GLP-370 + ink blending over gold foil.

Products Used:

I am so happy you stopped by!

Karen