Cardmaking Video

VIDEO: Shimmery Snowflake Backgrounds 3 Ways

Are you ready to add a touch of winter magic to your card-making? In today’s video, I will guide you step-by-step through the enchanting process of creating shimmery snowflake backgrounds that will leave everyone in awe!

If you are having trouble viewing the video, click HERE to watch on YouTube.

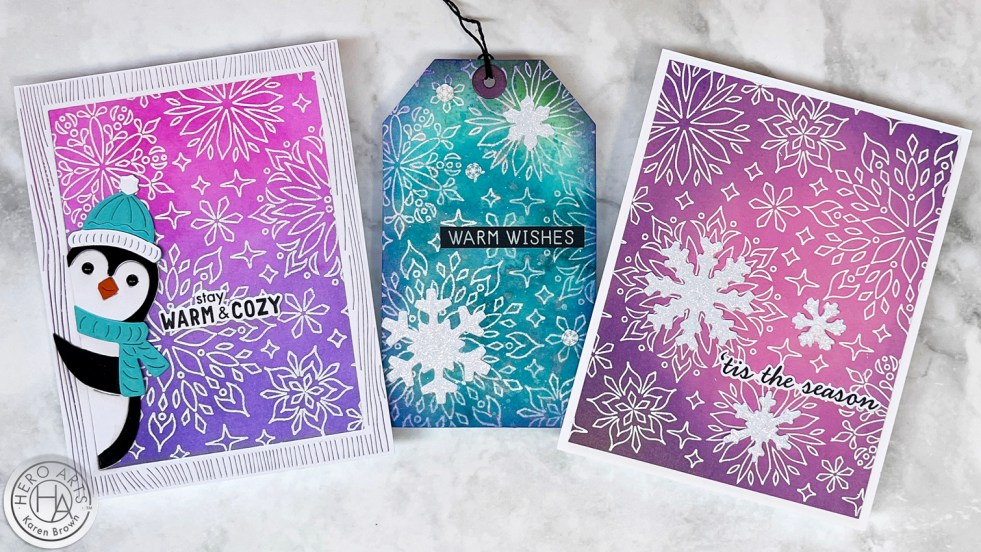
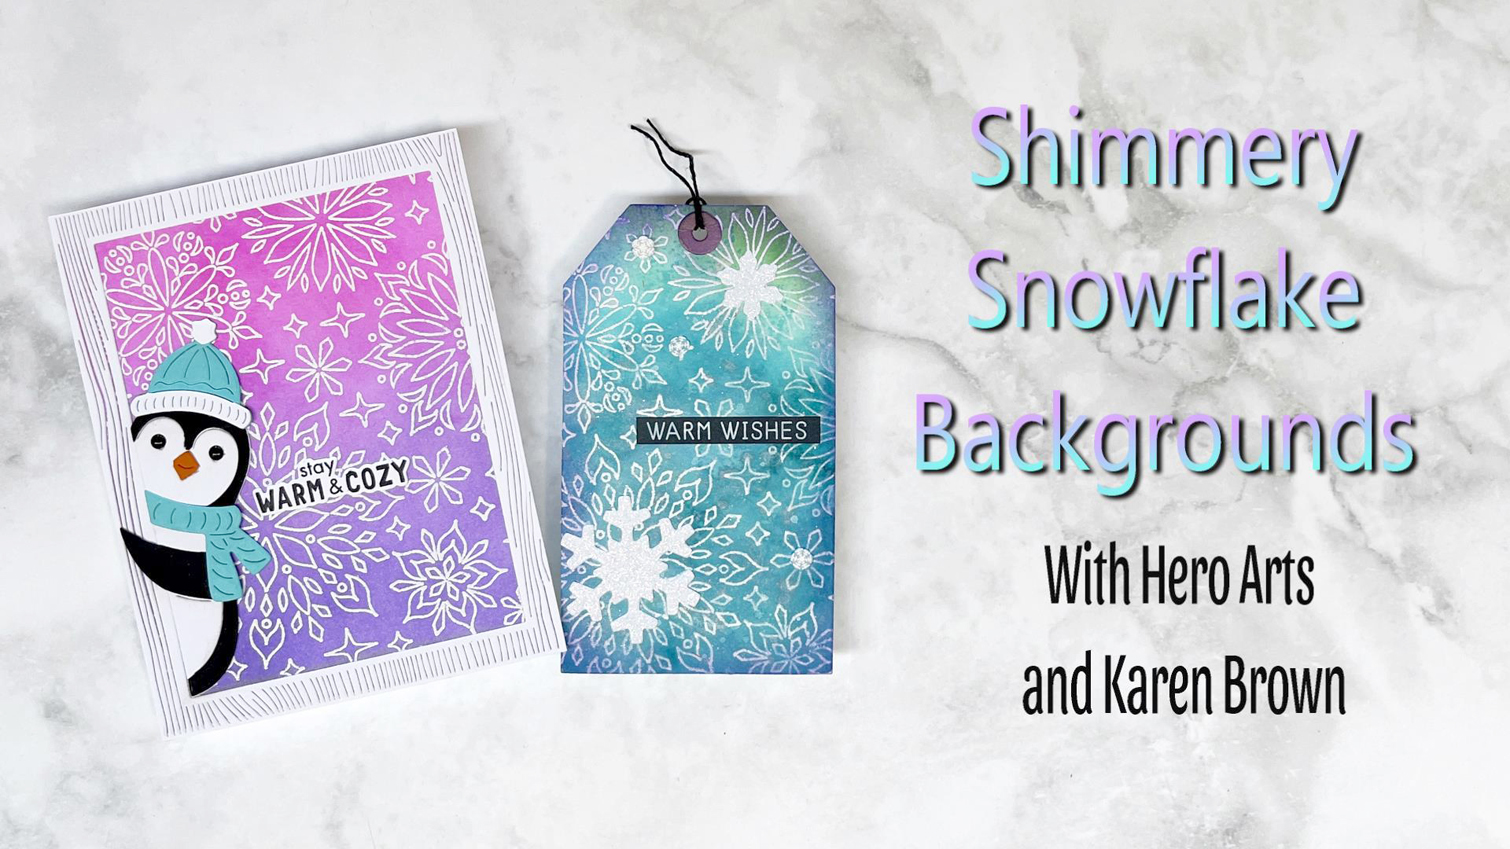
Today, we will be creating two cards and one tag using Hero Arts NEW Reactive Glitz Inks and the Kaleidoscope Snowflake Bold Print Stamp.

Adorable bright Christmas Holiday card with a "peeking penguin", shimmery background and heat embossed snowflakes.

For Card #1, My background was created with French Pink and African Violet Glitz Inks and the Kaleidoscope Snowflake Bold Print Stamp. I added a white Wood Frame and an adorable Peeking Penguin die cut to “ice” my card.

Shimmery Hero Arts Glitz Reactive Ink Christmas Holiday Card.

Look at the gorgeous shimmer from the Glitz Inks!

Snowflake Chirstmas Holiday card with heat embossed snowflakes and die cut snowflakes over a ink blended pink and purple background.

For Card #2, I did my ink blending on Peony Cardstock with French Pink and African Violet. Next, I heat embossed the Kaleidoscope Snowflake Bold Print Stamp. Then, I added Snowflakes die cut from Glitter Cardstock using the Snowflake Pattern Cover Die. Such an easy way to die cut LOADS of snowflakes!

Mixed Media Snowflake Christmas Winter Holiday Tag.

I also created a Mixed Media Tag that features Glitter die cut Snowflakes, Mini Clay Snowflake Embellishments and a Holiday Message Strips Hero Transfer Sentiment.

My background was created with Egyptian Blue and Naples Yellow Reactive Glitz inks and the Kaleidoscope Snowflake Stamp. I added a bit of Purple Galaxy around the edges.

Multiple Christmas Holiday cards and tags with Hero Arts Glitz Ink and the Kaleidoscope Snowflake Bold Print background stamp.

Other Supplies Used:

Video showing how to make Shimmery Snowflake card backgrounds for the Holidays and Christmas.

I had “Snow Much Fun” creating this trio and I hope you enjoyed the VIDEO!

cardmaking

Adding a Personal Touch to Your Holiday Greetings | Hero Arts Holiday Catalog

Adorable Hero Arts "Peeking Bear" "Confetti Swirls" Holiday Card.

Who is ready to start creating for the holidays? Hero Arts Holiday Catalog is just full of wonderfulness and I am so excited to share cards I created with these new products.

Handmade card with adorable white polar bear in hat and scarf peeking around the edge with a die cut swirl background,

Adorable Peeking Winter Bear Die

I LOVE this adorable little peeking bear! I die cut him three times and then glued the layers together. I lightly ink blended the edges for some contrast and then added a Cranberry scarf and hat. I used Neutral Heros enamel dots for the nose and mouth. The background is die cut from Arctic cardstock with the new Confetti Swirls Die and then backed with a panel of Mist cardstock. The sentiment is from Cozy Study Stamps.

Supplies Used:

Celebrate Autumn

Handmade card with a fall foliage cover plate and liquid waterccolor leaves.

Autumn is a season of breathtaking beauty, with its vibrant foliage and crisp air. It’s the perfect time to channel that inspiration into crafting handmade cards. A die cut card featuring fall leaves is a wonderful way to capture the essence of the season and share it with your loved ones.

My Process for Creating This Autum Foliage Die Cut Card:

Hero Arts Fall Pattern leaf foliage cover plate die handmade card in yellows, greens, oranges and kraft.

Winter Mail Critters: The Definition of Cuteness!

I really love my third card! The Winter Mail Critter stamps are the cutest! I have a few pics + directions on how I created this card below, so keep scrolling…..

Handmade Holiday card with Hero Arts Winter Mail Critters, White Holiday Collage Hero Transfers, Wax Seals.

Key Products Used:

Handmade Christmas Card featuring a Hero Arts bear and fox each holding a letter with a Rub On Transfer background.

Hero Arts Christmas Card Tutorial:

I started by die cutting two frames and two “tapes” from the Journaling Photo Frame Infinity Dies Set. I then very lightly blended Paradise Core Ink along the edges of the photo background (using the sticky mat in my Stamp Wheel), stamped the bear and fox with my Stamping Tool and Copic colored the images (colors listed below). I also rubbed on a transfer Merry & Bright sentiment.

The background was so easy! I rubbed on the fun Twas the Night Before lettering from the White Holiday Collage Hero Transfers (RT121) with a bone folder and all the writing transfered to the paper perfectly on the first try. The card background is Paradise cardstock.

I wanted a pop of red, so I stamped and die cut a Merry Christmas Wax Seal using Crimson Core Ink. I also put a dab of Hero Wax Gold to add a little depth and shine to the “photo tape”

I assembled my card with foam tape and it is ready to send.

Copic Colors Used:

  • Browns: E27, E15, E13, E11, E5
  • Reds: R27, R39
  • Pink: RV11
  • Blue: B00
Cute holiday card with critters featured in  Hero Arts Journaling Photo Frame Infinity Dies DF125

Blog Hop Info:

Hero Arts will give away TWO $50 gift cards, drawn from the comments left across the hop. Enter by Wednesday, August 28th at 11:59pm PT. The winners will be announced on the Hero Arts blog.

Hero Arts Creative Team:

Channin Pelletier

Charlene Madrid

Heather Ruwe

Ilina Crouse

Jeannie Lieu

Jennifer Kotas

Kailash Naidoo

Karen Brown

Michelle Short

Natasha Polite

Natasha Vacca

Pocono Pam

Rachel Kleinman

Rosie Lopez

Seeka

Special Guests:

Cathy Zielske

Laura Bassen

Mindy Eggen

Final Thoughts

Today I used a bunch of lovely new products from Hero Arts 2024 Holiday Catalog but there are so many other great additions that I know you will love. Thanks for stopping by today and “hopping” with Hero Arts.

cardmaking · Give Away · papercrafting

Hero Arts | Spring Catalog Collection Release + Blog Hop

Bright and colorful Smile Friend sentiment handmade card from Hero Arts.

I am so excited about Hero Arts Spring Catalog release, which goes live TODAY! There is so much wonderfulness that I can’t wait for you to see. To celebrate, Hero Arts is hosting a Blog Hop and Giveaway.

I wanted to start off with two fabulous new sentiment dies that I just love from Smile Friend Stamp and Cut XL. I went crazy die cutting a bunch so I will have them on hand for future cards.

Products Used on Smile Friend Card:

Flower Pattern Cover Die

Rainbow ink blending + Inlaid die cutting using Hero Arts Flower Pattern Cover Die.

I LOVE cover dies so I was excited to create with this Flower Pattern Cover Die, which is perfect for Spring and Summer. I started by ink blending a rainbow panel which I then die cut with the cover plate and then used the inlay technique to create a one layer background. This went more quickly than you would think because the die cuts fit like a good quality puzzle. My placement and gluing took about 20 minutes.

TIP: Keep your die-cuts in the panel until you start gluing so you know the orientation and position on your background.

Products Used on My Flower Pattern Cover Die Card:

Birthday Animals Stamps + Pointed Arches Infinity Dies

Fun and happy Copic colored Alligator Gator Birthday Card using Hero Arts Birthday Animal Stamps  + Pointed Arches Infinity Dies.

Isn’t this Alligator the cutest? He is one 7 animal stamps included in the Birthday Animals Bundle. The set also includes 8 birthday/everyday sentiments. I combined the stamps with the Pointed Arches Infinity Dies. Infinity Dies are definitely staples in my craft room and I like the interest the arches add to projects. 

Products Used on The Gator Card:

Easy One Layer Sympathy Card

Easy one layer Sympathy Card Using With Sympathy Hero Rub-on Transfers.

I love everything about Rub-on transfers. I love how easy they are to use, the look they add to projects and how fun they are to apply! This Spring, Hero Arts included “Sympathy Transfers” in their release. I did some quick ink blending on my background and then added my Hero Transfers for a quick and easy card.

Products Used on My Sympathy Card:

Blog Hop and Giveaway Information:

Hero Arts will be giving away two $50 gift cards, drawn from the comments left along the hop. Comment on all the blogs for more chances to win! You have until Wednesday, February 21st at 11:59pm to enter. The winners will be announced on the Hero Arts blog.

Kailash Naidoo is next on the hop and I have links to everyone below.

Hero Arts
Hero Arts Creative Team:
Mindy Eggen
Natasha Vacca
Ilina Crouse
Charlene Madrid
Lydia Fiedler
Heather Ruwe
Natasha Polite
Seeka
Jeannie Lieu
Dana Joy
Pocono Pam
Rachel Kleinman
Michelle Short
Jennifer Kotas
Rosie Lopez
Karen Brown
Kailash Naidoo
Channin Pelletier
Special Guests:
Nichol Spohr
Ralph Tyndall
Laurie Willison
Cathy Zielske
Laura Bassen
Caly Person

I am so glad you could join this Hop!

cardmaking · Mixed Media · papercrafting

Altenew November 2022 Simply Scientific Stamps/Dies/Stencils Release + Giveaway ($300 in Total Prizes!) 

A bright cheerful card using Altenew's Radial Circles Cover Die.

Altenew’s Radial Circles Cover Die

Hello and welcome to Altenew’s Simply Scientific Release and Blog Hop! There is lots of wonderfulness in this collection. I was instantly attracted to the Radial Circles Cover Die and I used it on three of my cards today.

I started by making a background using the “Direct To Paper” method. I used 8 colors of Altenew Crisp Dye Inks in blues, greens and aquas and I just swipped the ink cube over my cardstock. I wanted the edges darker than the middle but that was the extent of my plan. Don’t worry about blending, it will look great under the die cut panel. I love the bold vivid color from this technique.

Direct to Paper Background panel.
Direct to Paper Background

For the cover die, I used a metal shim for precise die cutting.

I thought a wreath would look pretty around the sentiment and I colored the leaves with my Altenew watercolor brush markers for a bright cheerful card.

A bright colorful card using Altenew's Radial Circles Cover Die and the Weekend Doodles Stamp and Die Bundle.

Products Used:

"Direct to Paper" background with blues and aquas using Altenew Radial Circles Cover Die,

Quick and Easy Card

If you want a quick and easy card with loads of impact, you can quickly make a background with the Direct to Paper technique described above and then just pop on a die cut cover panel and stamp a sentiment.

A quick and easy bold handmade card in blues, aquas and greens.

Altenew’s Chemistry Vases Stamp, Die and Coloring Stencil

For my next card, I used bright bold primary colors for a “school vibe”. My daughter is a scientist at a university and I made this card for her.

I started by making a background with strips cut from gel press prints. The background was easy to make and came together very quickly.

I used the Chemistry Vases stamp, coloring stencil and die for my beaker. I used Altenew Crisp Dye Inks in the following colors: Soft Lilac for the shadow, Coral Berry, Puffy Heart, Moon Rock for the beaker outline and Jet Black for the markings.

A handmade card using Altenew's Chemistry Vases stamp, die and coloring stencil bundle.

Products Used:

I love the adorably punny sentiments included in this set!

Handmade card with Bright Primary Colors for a School Vibe perfect for a teacher, professor, scientist or student.

For my last card, I combined Altenew’s Chemistry Vases Bundle with the Radial Circles Cover die. I have a friend who runs a medical laboratory and I thought this card would be perfect for her birthday. I used a taupe A2 card base, added a floral embellishment from the Bitty Bits Ephemera Kit and topped it with a pink enamel dot.

A birthday card for a scientist using Altenew's Chemistry Vases stamp, die and coloring stencil.

I think this Chemistry Vases set is perfect for students, teachers, scientists, professors, and medical professionals.

Altenew's Radial Circles Cover Die + Chemistry Vases Bundle.

Giveaway Prizes:

$300 in total prizes! To celebrate this release, Altenew is giving away a $50 gift certificate to 2 lucky winners and a $25 gift certificate to 8 winners! Please leave a comment on the Altenew Card Blog and/or each designer’s blog post on the blog hop list below by 11/06/2022 for a chance to win. 

Altenew will draw 10 random winners from the comments left on each stop of this blog hop and announce the winners on the Altenew Winners Page on 10/08/2022.

Blog Hop Order:


Altenew Blog

Anna Mahtani

Caly Person

Emily Midgett

Helen Kalb

Jaycee Gaspar

Jenny Colacicco

Karen Brown. You Are Here!

Nathalie DeSousa. Nathalie is next and I know you will love her post!

Therese Calvird

I am so pleased you stopped by!

Karen