December is finally here, and I couldn’t be more excited to kick off the festive season with my Spellbinders Paper ArtsCrafty Advent Calendar! If you’re anything like me, the thought of crafting something new each day leading up to Christmas brings so much joy—and this year, the fun starts with a surprise die inside Day 1. Let’s open it together and make a holiday card!
The anticipation is real. As I carefully peel open Day 1, I reveal… a beautiful hot air balloon die! It’s intricate yet versatile, perfect for adding that extra touch of winter magic to any holiday card.
This balloon die is just adorable with tons of detail! So here is a quick tutorial on how I created this bright happy card:
I started by die cutting my balloon 3 times in the following combinations: orange and hot pink, aqua and lime, lavendar and purple. This project is perfect for my compact desk top Scout Die Cutting Machine.
The only die I added is the cloud from the Fly Away die set. I use this cloud on a lot of projects and find it is a great accent to have in my craft room.
My background panel is 4 1/4″ x 6″. I little longer than an A2 card but I like the layout better with a bit more vertical space.
My card base is charcoal grey for a bit of lovely contrast.
And There You Have It!
I can’t wait to see what’s behind the other doors! Stay tuned for more crafty inspiration as we count down to Christmas together. I will be back in a few days with more Crafty Advent Inspiration.
If you’re already dreaming of decking your craft room with fresh supplies, Hero Arts December Release is about to paint your world with inspiration! This month’s theme is color, and it’s bursting with playful possibilities. Imagine stamps that bring your designs to life, a fancy circle-shaped die perfect for creating a BOLD striking focal point, and a die-cut box of crayons that’s as whimsical as it is nostalgic. And let’s not forget the butterflies—because no colorful creation is complete without a touch of fluttery elegance. It’s everything you need to make your cards shine brighter.
A Kaleidoscope of Creativity: December’s Theme is “Color”!
A Colorful Recipe for Success: Hero Studio December Card Kit of the Month
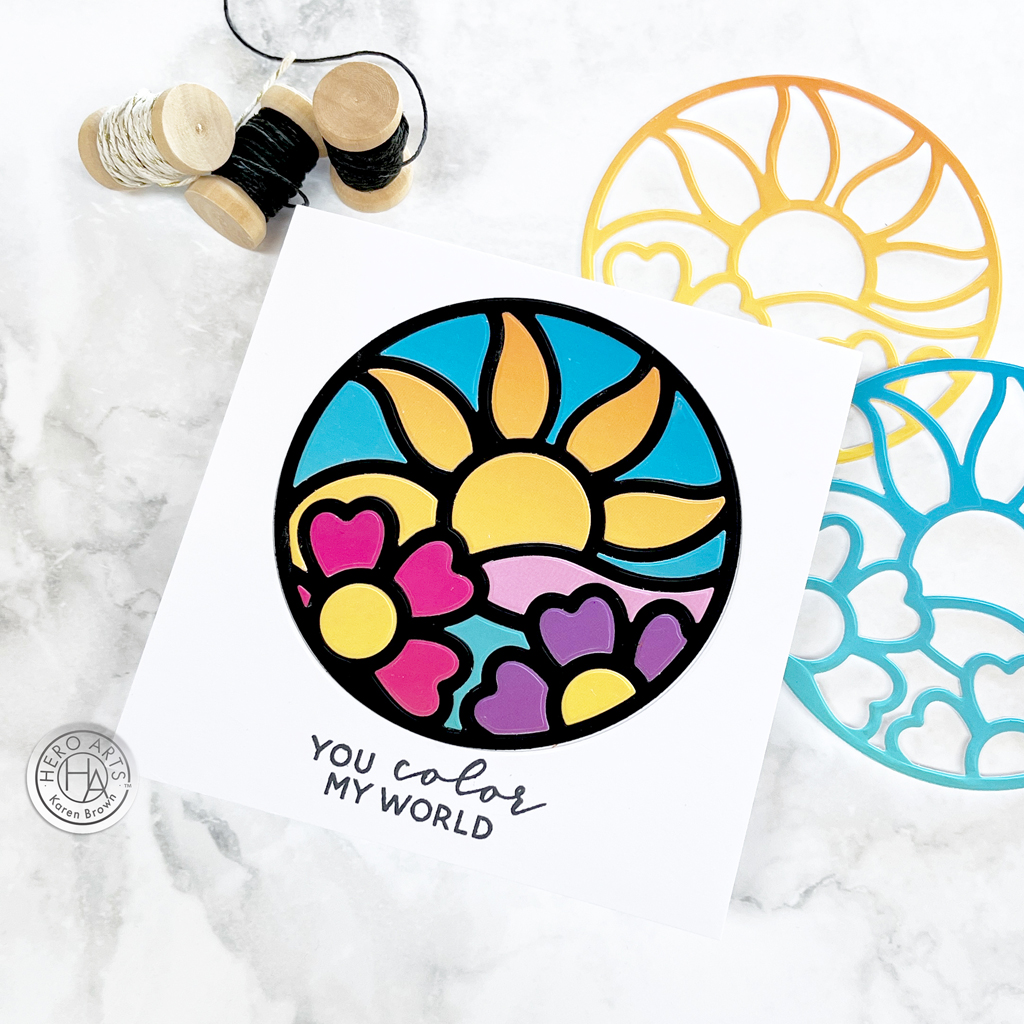
I wanted a bold color palette with variations in shade so I grabbed the new Sky Ombres Hero Transfers for die cutting my Floral Circle Fancy Die (part of the December Card Kit). I used the Inlay Die Cutting Technique which produces a beautiful “stained glass window” look.
Select the colors you want from the Sky Ombres Hero Transfers and rub on white cardstock. I enjoy using Rub-On Transfers and I love the beautiful gradients in this sampler.
With the Floral Circle Fancy Die, cut a circle in a 5″ x 5″ white cardstock panel and stamp the sentiment (included in the kit).
Glue the white panel created in step 3 to a second 5″ x 5″ panel of white cardstock.
Insert your black frame in the round window.
Die cut your colors using the panels you created in step 2. Inset these into the black frame. I kept all the die cut pieces in a small bowl until I was sure I had all the pieces I needed to create my stained glass. I placed each piece prior to gluing to make sure they were all in the correct spot. Once I was happy with my placement, I put glue in the “well” and then placed and glued the die cut components.
This techinque is great for mass-producing cards. You can see two of the leftovoer frames in the top right corner of the photo. These would be beautiful just glued to a card for a bright clean and simple look.
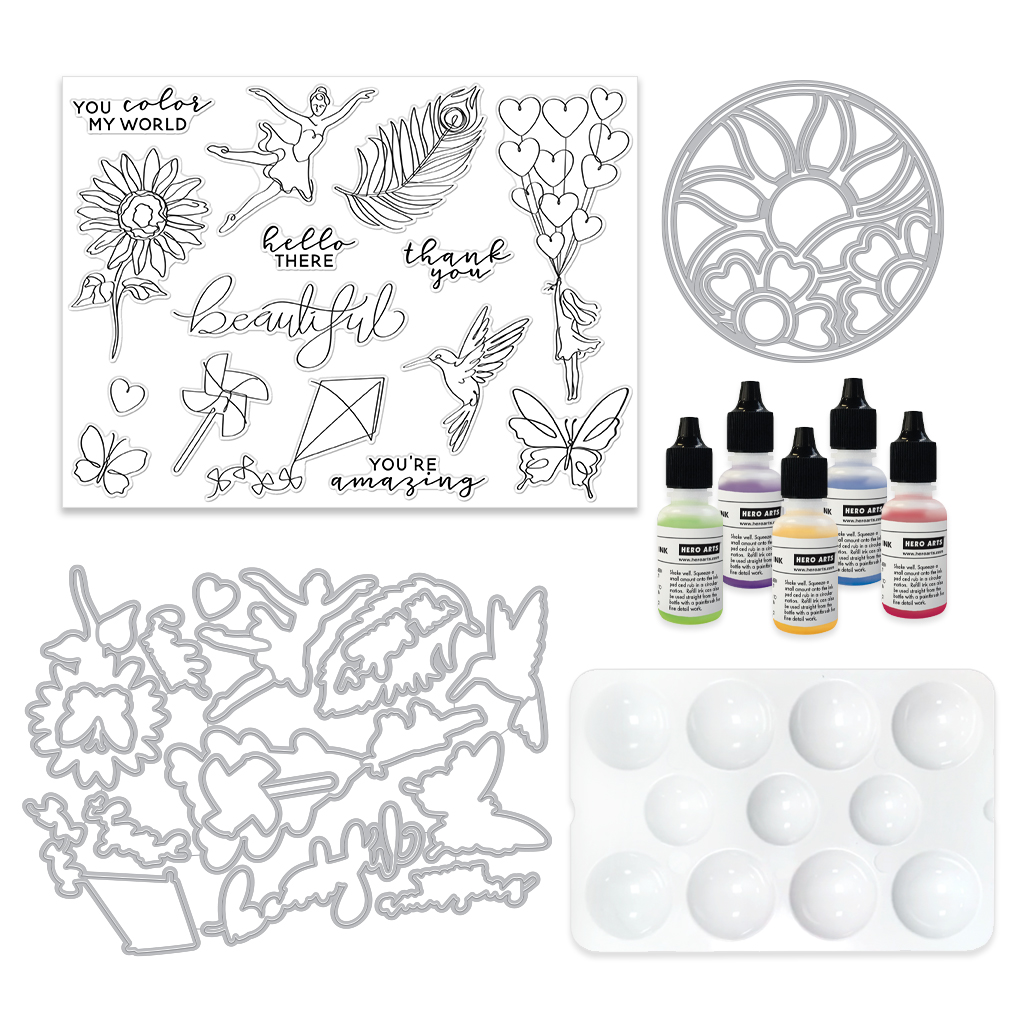
• Clear Stamp Set, 6” x 8” • 15 Coordinating Dies • Floral Circle Fancy Die • 5 Reinkers, 1/2 oz. (Purple Galaxy, Blue Hawaii, Green Apple, Lemon Drop, Fruit Punch) • Plastic Watercolor Palette
5 Wonderful Kit Options:
For this blog post, I created with the December Kit, The Clear Stamp and Dies Kit and two Extraordinary Extras, but there are 5 kits plus 6 Extras available. You can also buy the Whole Studio, which includes all 5 kits at a wonderful savings.
Hero Arts has many different Monthly Kits that you can subscribe to including:
The WHOLE Studio – All 5 Kits ($120 subscription + Free Shipping)
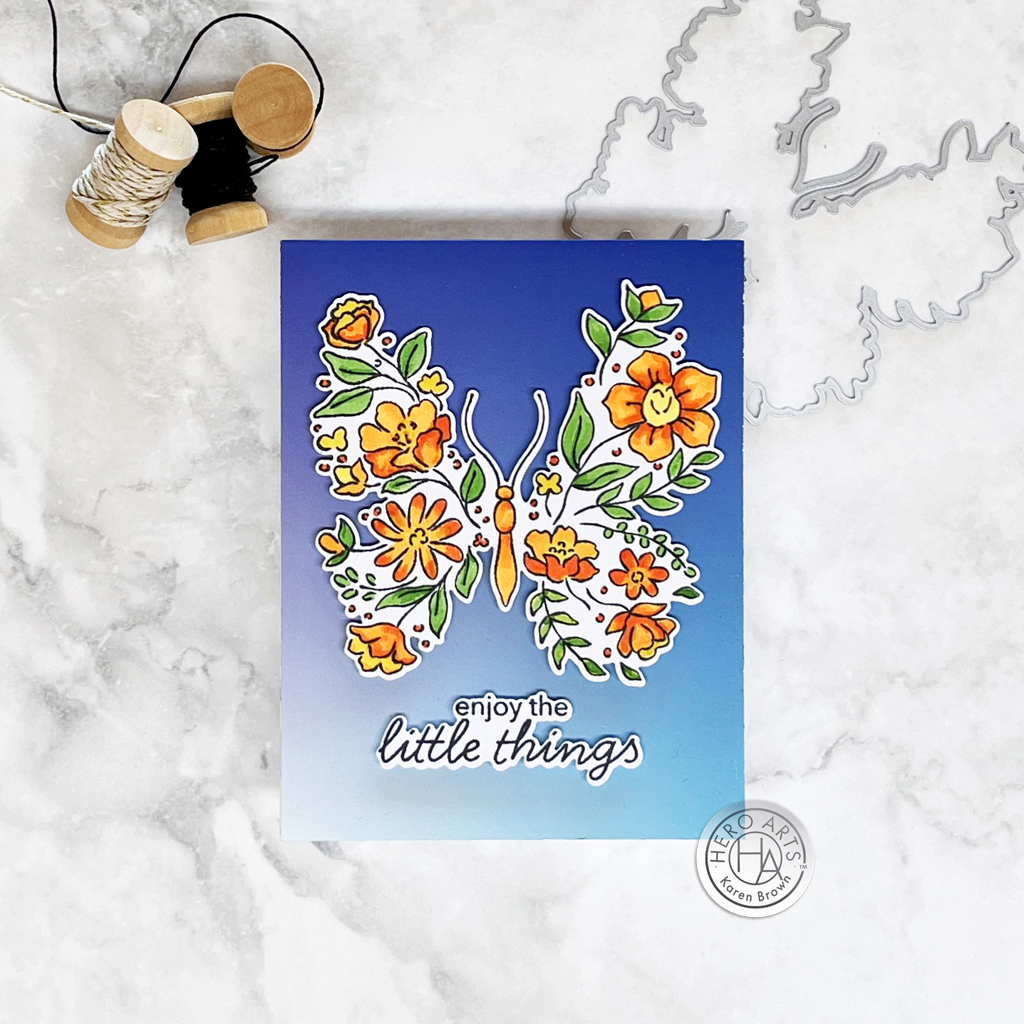
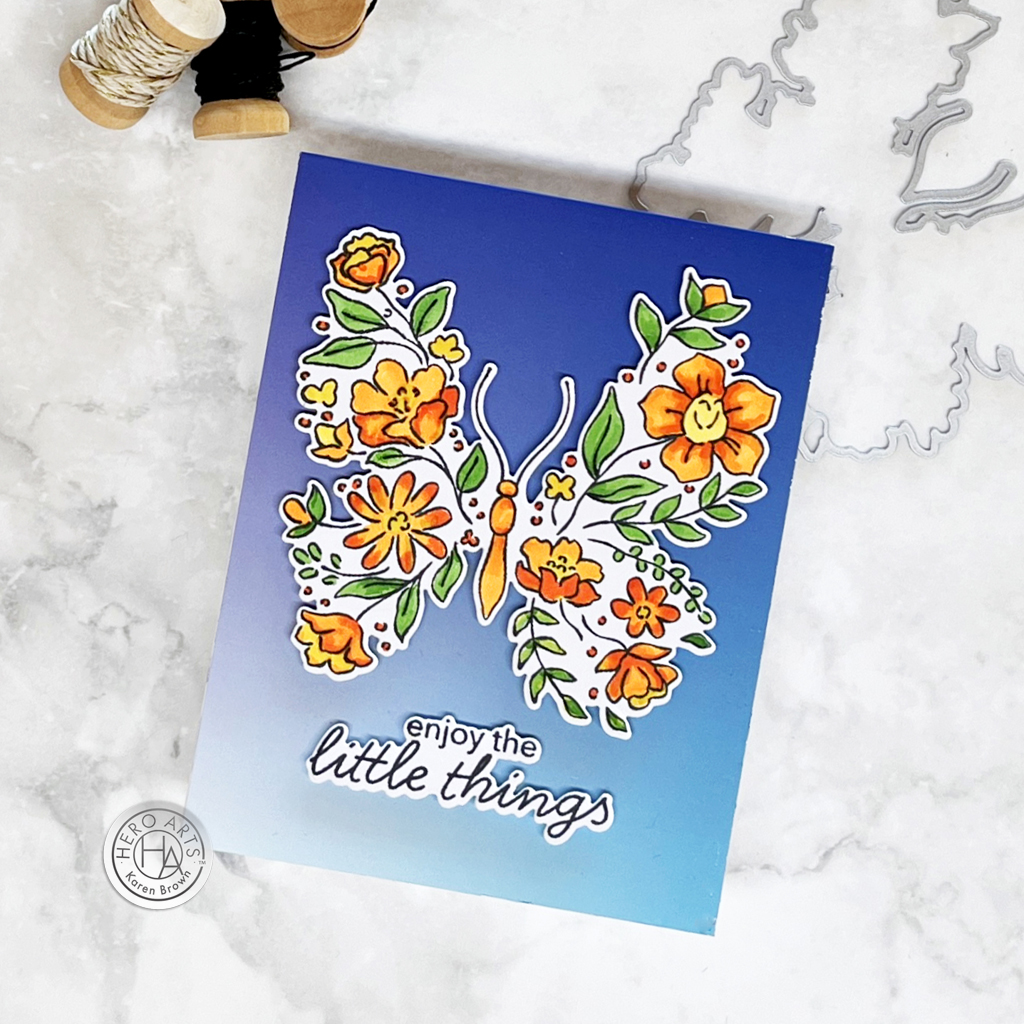
Clear Stamp and Die of the Month: Floral Butterfly
For a card that truly takes flight, try stamping the gorgeous Floral Butterfly as your centerpiece. Use alcohol markers to bring it to life with vibrant shades—blend rich oranges, sunny yellows, and lush greens to make those petals pop. Once your butterfly is a kaleidoscope of color, grab your coordinating die and cut it out. Adhere it to an ombre blue sky background, fading from light to dark, for a dreamy effect. I created my background panel by “rubbing” on the Sky Ombres Hero Transfer onto cardstock. So easy and beautiful! It’s like sending a little piece of summer to your favorite person, no sunscreen required! 🦋✨
Make their birthday extra colorful with a slimline card that’s all about the crayons! I used Box of Crayons Fancy Dies and started by die-cutting a cheerful box of crayons and filling it with every shade imaginable—this is your chance to go full rainbow mode. Hero Arts recently introduced a limited edition sampler of Rainbow Cardstock that is perfect for your favorite colorful die cutting.
I die cut each crayon in two shades of each color and then trimmed the top of the lighter toned “label” with scissors to make for a more realistic crayon look.
Hero Arts will give away a $50 gift card, drawn from the comments left across the hop. Enter by Sunday, December 8 at 11:59pm PST, and the winner will be announced on the Hero Arts blog the following week.
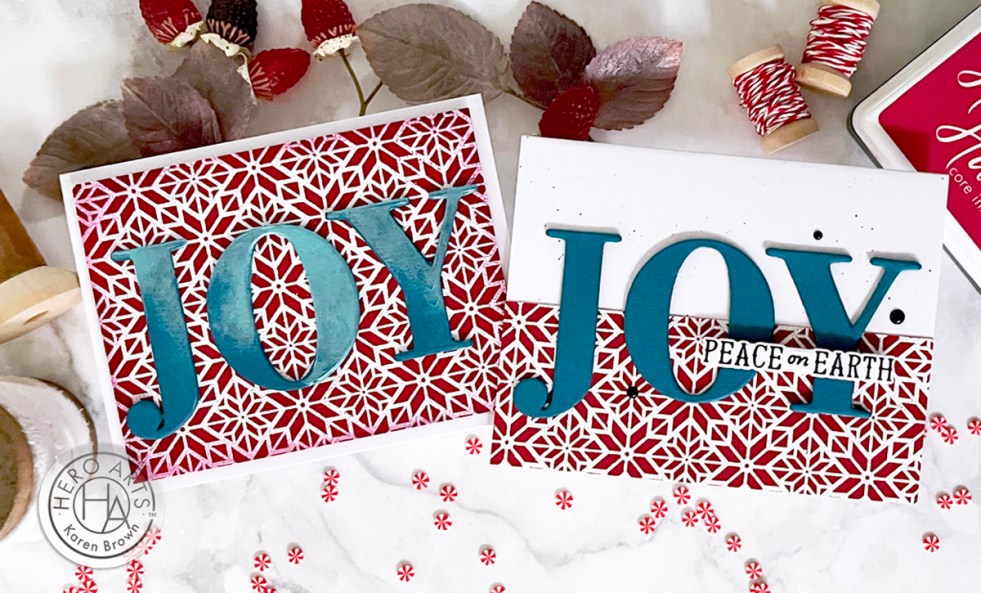
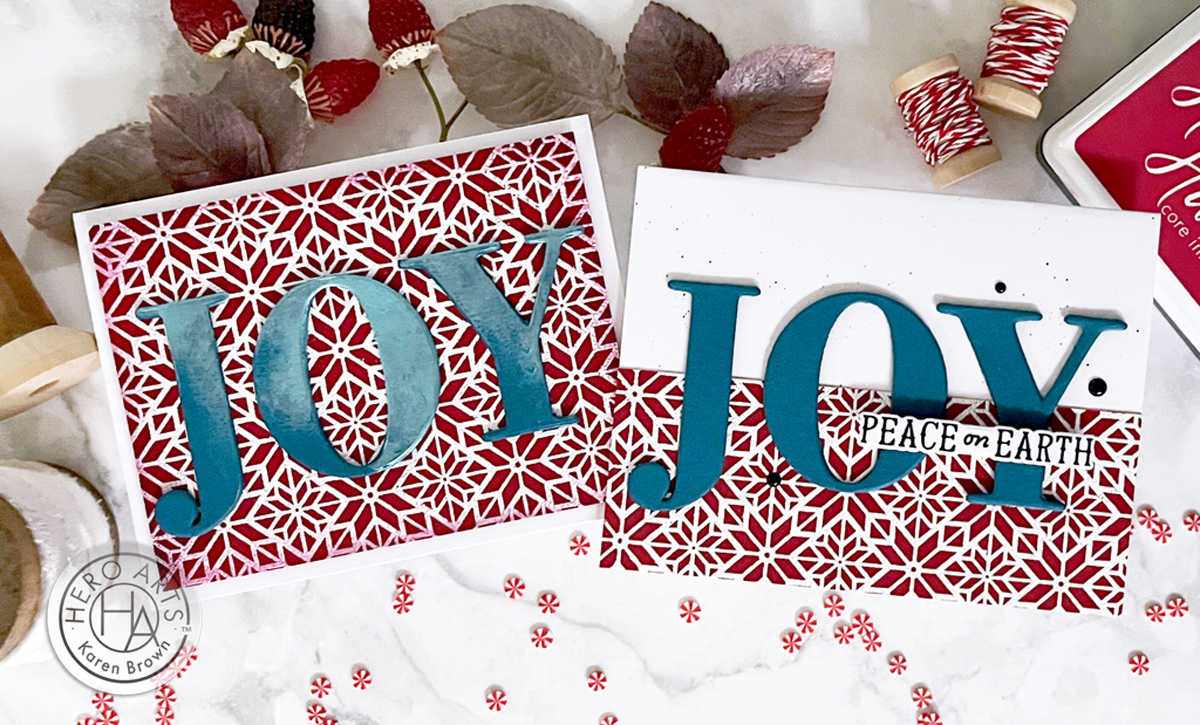
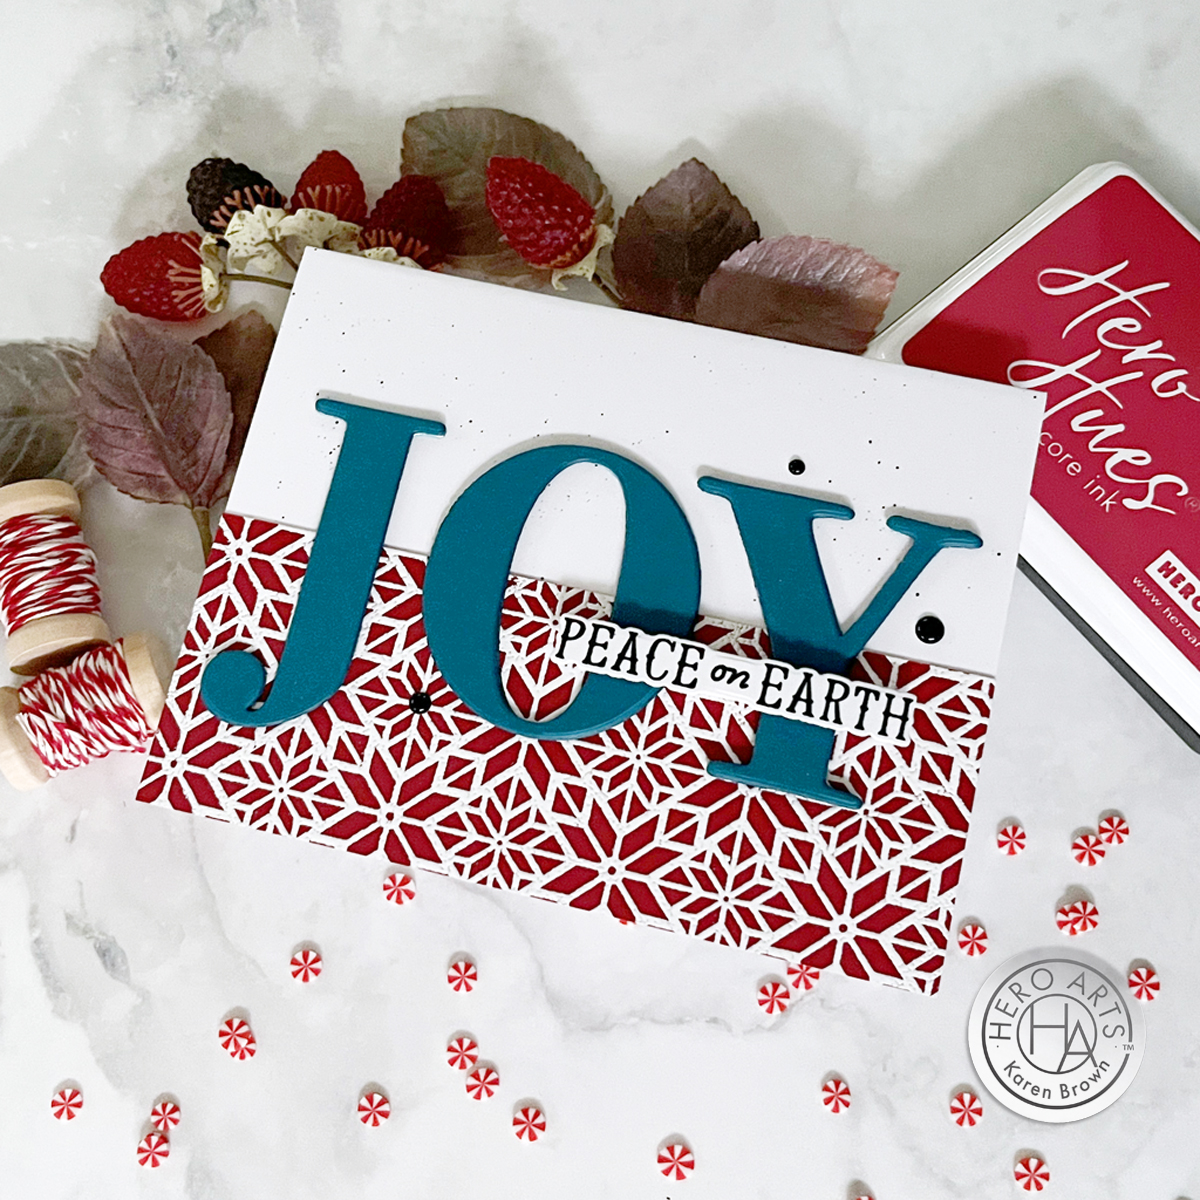
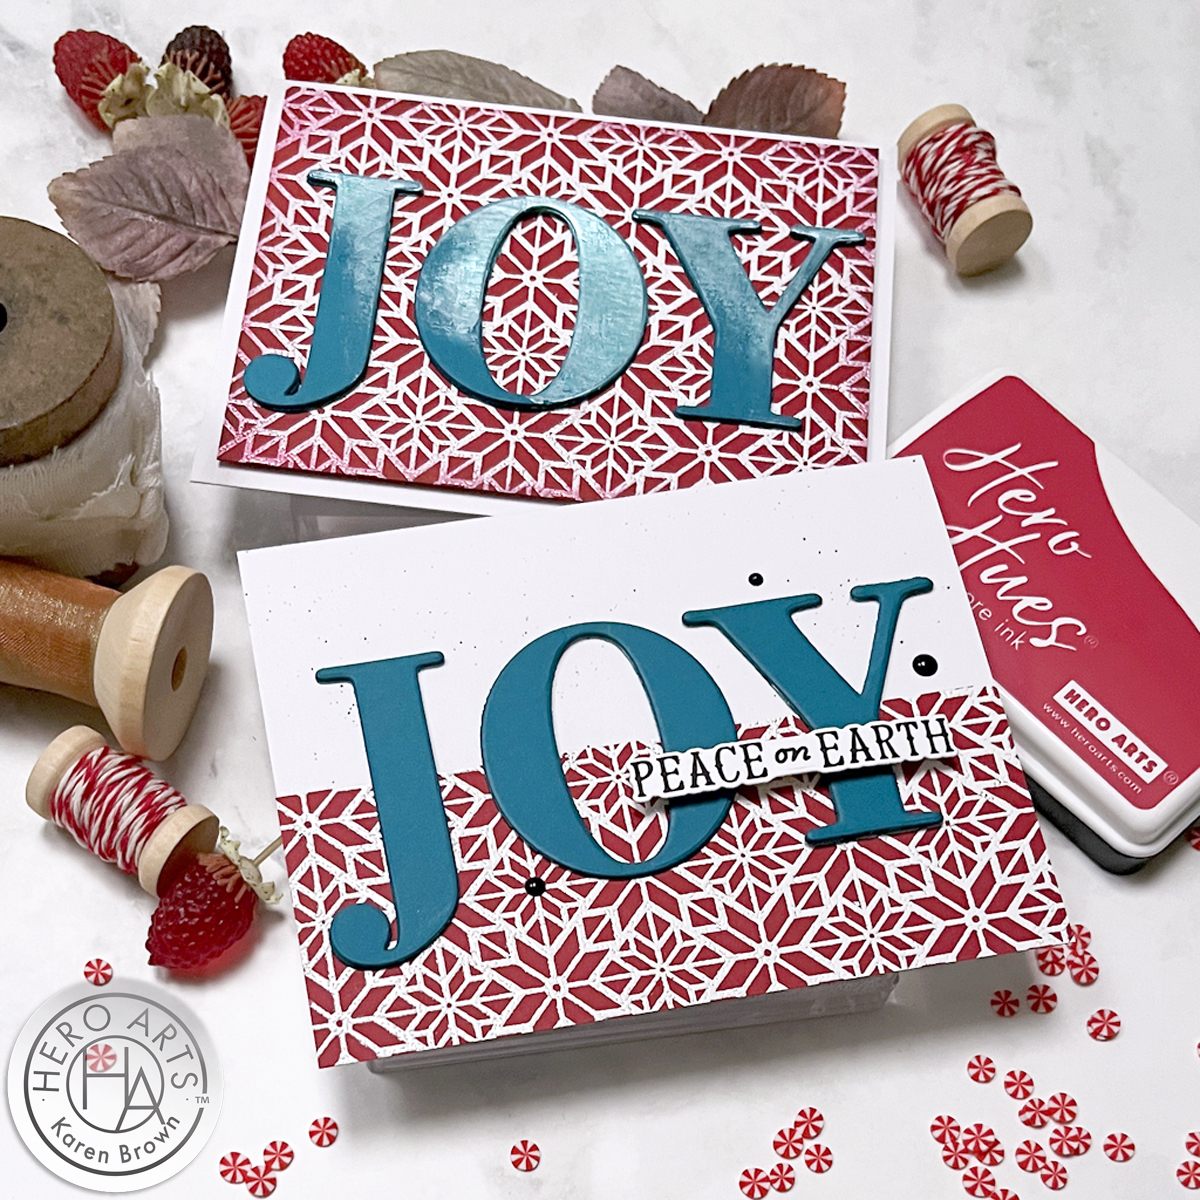
Hello, Karen Brown here from kennyscard.com and today I’ve got two projects with BOLD heat embossing that practically pops off the card! Heat embossing definitely adds that wow factor to your cards and it is always a fan favorite.
Today I am using the lovely new Abstract Poinsettia Pattern Cling stamp on both my cards. With a red rubber cling stamp and a bit of heat, you can create raised glossy designs that catch the light beautifully. Embossing give cards a tactile element that feels luxurious and makes your creations stand out.
Abstract Poinsettia Pattern 2 Ways
Let’s get started!
For both cards, I started by creating my backgrounds. I applied my anti-static powder tool to a 6″ x 6″ panel of Cranberry cardstock. I always like to take a clean flat brush and move the powder around the cardstock before I start stamping.
Using my StampWheel, I stamped the Abstract Poinsettia Pattern background stamp with Unicorn Pigment Ink and then heat set with White Embossing Powder. I use this double white combination when I want really bright white embossing. I let my heat tool warm up for 3 minutes so it was good and hot.
I die cut my JOY sentiment three times from Adriatic Cardstock and then glued the stacks together for nice dimension.
I added some fine paint splatters to an A2 White Card Base using a fine brush and lightly diluted Black Licorice Ink. I like to put a dab of ink on an Acrylic Block, mist it and then flick it onto my project.
I cut my background down to 2 1/8″ x 5 1/2″ and glued to the bottom of my card base.
I centered and glued my sentiment, added a left over “Peace on Earth” from my October Card Kit and finished with 3 black Neutral Hues Enamel Dots.
I made a quick Instagram reel for Card 2 if you are interested in watching the process.
I repeated steps 1-3 above.
I brushed some Icelandic Hero Wax onto my die-cuts for a shimmery glow that is even prettier in person. I applied the wax with a silicone shaper brush, but you could use your finger or a sponge dauber. This wax is an inexpensive way to spice up your projects. The key is to use just a little. And don’t worry, clean up is easy!
I trimmed my background down and ink blended a little Crimson and Black Licorice around the edges to frame the sentiment, but you could easily skip this step.
With a little craft foam, I glued my panel to an A2 card base.
I centered and glued my sentiment.
Thanks for stopping by today. Happy embossing, and happy holidays!
Imagine receiving a cheerful Yeti card to brighten your day—whether it’s a simple “hello” or a get-well wish, this handmade card will surely bring a smile. This die set is called Rocky the Dancin’ Yeti, buy I’ve renamed my set “Roxy” since I created a sweet furry little girl. Rocky is a new Spellbinders Paper Arts release.
Yetis are mythical Himalayan Abominal Snowmen, but this cutie from the Monster Friends Collection is not frightening at all! Using die-cutting techniques, you can easily bring this charming character to life. This die set is great for playing card-making dress up. The kit includes lots of extra accessories like scarves, ear muffs, knit caps etc.
Creating This Card:
I started by die cutting my Yeti components using my compact Scout Machine. I love small sets that work well with table die-cutters. I used Persimmon, Peridot and Sunshine from the Happy Day Cardstock Pack. I used Amythest for my base, and I really like the contrast. The other colors came from my scrap drawer.
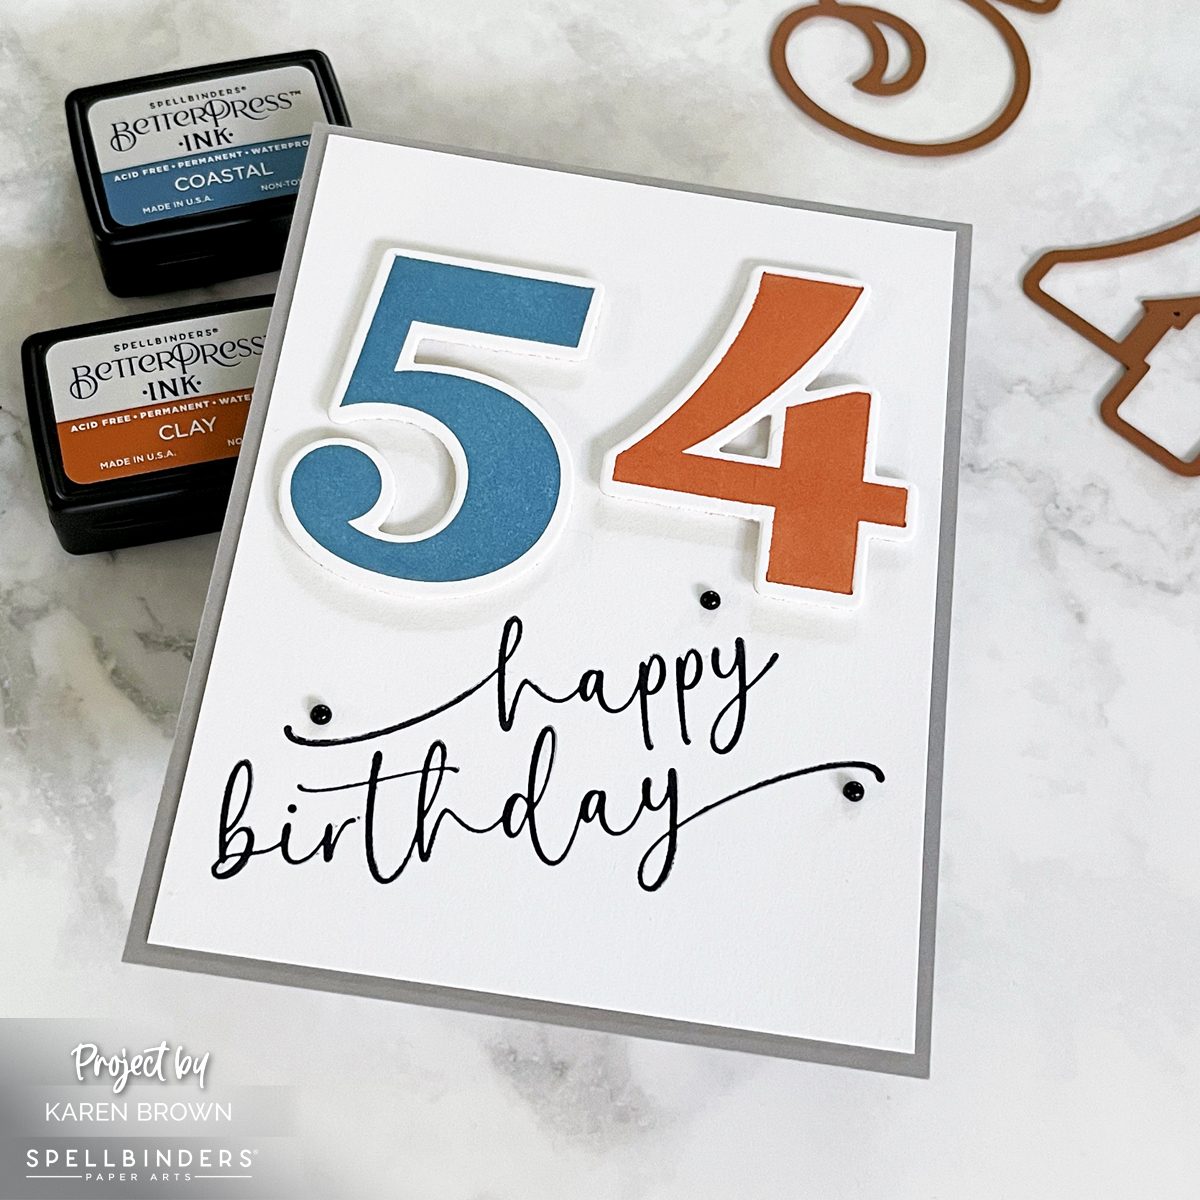
I adore the BetterPress Letterpress system! You can create beautiful, high-quality cards that blend modern design elements with traditional techniques. In this guide, I’ll show you how to use your BetterPress system to make colorful clean and simple cards that feel sophisticated and timeless. Today, I will be using Spellbinders new Color Mix Collection which is great for just about any celebration!
How to Get The Best BetterPress Letter Press Prints
After Experimenting for the past year, here are my tips for pristine BetterPress prints:
I was careful to ink the impressing plates really well. I did a “Tap and Twist” technique where I tapped the ink on the plate and then twisted the ink pad a few degrees. Don’t smash and smoosh or you will wind up with little pieces of ink pad on your plate and project. I ink well because I prefer to roll through the press only once for each plate.
I liked the sentiment going “uphill” with the “h” and “b” lower than the “y”.
I rolled my sandwich SLOWLY through my Platinum 6 die cutting machine. I think “Super Slo-Mo” while doing this to help me remember to go VERY slowly.
You’ll want a good stamp cleaner to clean your BetterPress and press plates. I’ve used Ultra Clean by Hero Arts and it works great!
I used the specially formulated BetterPress Inks for my pressing. For the “54” card I used Coastal and Clay from the Desert Sun Mini Sampler. For my Happy Anniversary card, I used Wild Berry and French Blue from the Nature Tones Mini Sampler. The black comes in a Full Size and you can find the smaller size in the Regal Tones Mini Ink Set. Waterproof or Hybrid inks as work well. Pigment ink is not recommended….you want a faster drying ink.
I found that my guillotine paper trimmer worked better than my Fiskar’s SureCut on cotton paper.
By focusing on clean, minimalist designs with bold colors, you can create cards that feel modern and fresh but have all the charm of traditional letterpress.
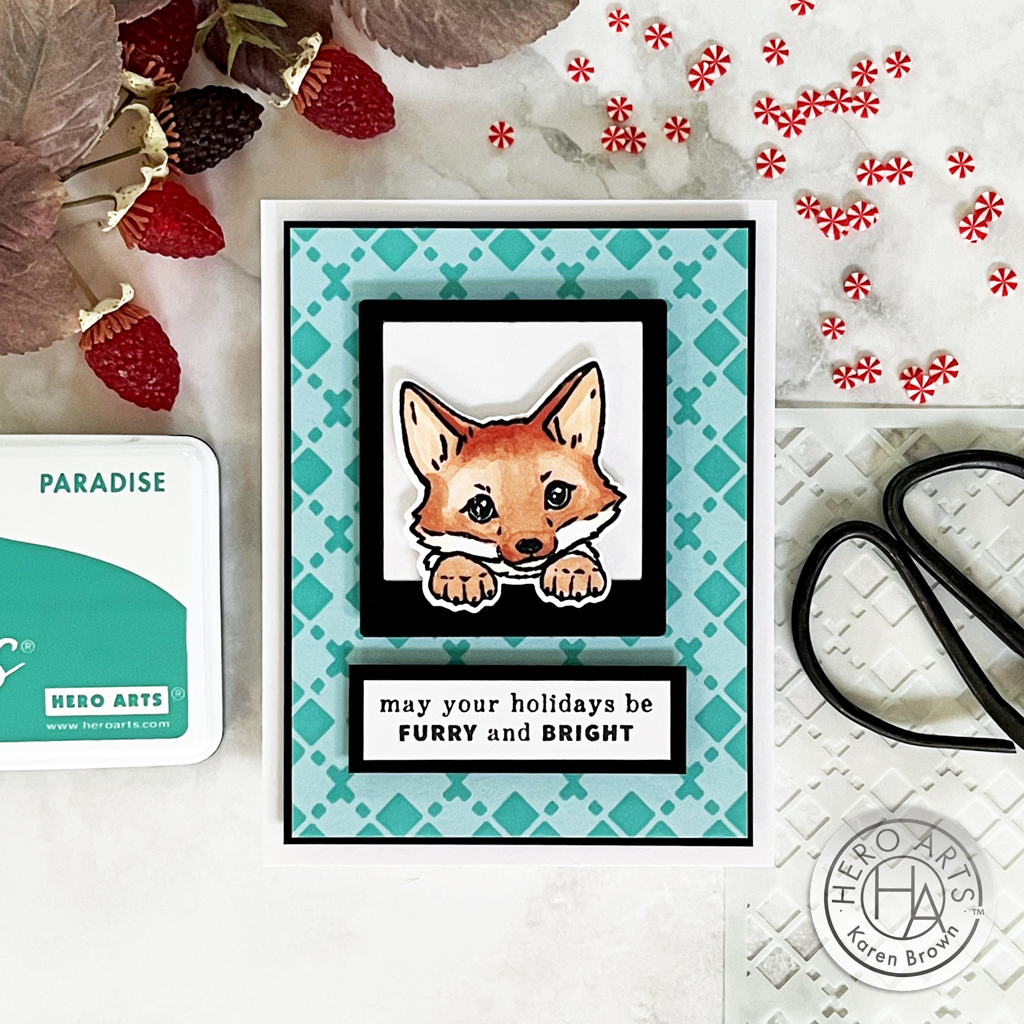
Adorable animals…..yes please! Stamping a cute puppy, reindeer or fox onto a “Holiday”, “Get Well Soon” or “Happy Birthday” card is a wonderful way to share encouragement and celebrate someone special. And it’s not just for the holidays, Hero Arts November Card Kit is going to be a year round favorite in my craft room as my family loves cute critter cards.
And, there are LOTS of changes going on at Hero Arts. I’ve included some Hero Studio changes later in this post, so keep scrolling!
Hero Studio November 2024 Card Kit of the Month
I obviously LOVE this kit! Today I am sharing three cards made with the November Kit and I can’t decide which is my favorite. The kit includes loads of greatness and I used 3 of the 8 charming animal stamps and dies, the two stencils and Merry Christmas sentiment.
Curious about this month’s kit? Let’s take a peek inside the November Card Kit:
KIT INCLUDES: • Peeking Animals Clear Stamp Set, 6” x 8” • 17 Coordinating Dies • 6 Fancy Dies • 2 Sheets Each of Pine & Cherry Cardstock, 5.5″ x 8.5″ • 2 Stencils in Argyle & Cable Knit Patterns, 4.75″ x 6″ • 28 White Die Cut Tags, 4 different styles • White Hero Pearls, 0.6 oz. • Berry Hero Wax, 1 oz.
Kit Cost:
$46 with Subscription + FREE SHIPPING!
$49.99 One Time Purchase (while supplies last)
5 Wonderful Kit Options:
For this blog post, I created with the November kit and two Extraordinary Extras, but there there are 5 kits plus 6 Extras available. You can also buy the Whole Studio, which includes all 5 kits at a wonderful savings.
I wanted to show you two more kit cards that I created. I used to have a sweet blond lab named Shelby, so I created this card with Shelby in mind. Isn’t she darling? My Shelby was with us for 12 1/2 wonderful years.
Sometimes I just like to color, and this Winter Foliage Pattern Stamp Setis perfect coloring fun! The stamps are already perfectly positioned on one large 4×6″ clear stamp, which makes stamping a breeze! I didn’t use it today, but there is also a coordinating Winter Foliage Pattern Cover Die.
Creation Details:
I stamped and Copic colored my foliage elements. Copic colors used: N1, R22, R24, R27, R39, YG03, YG25, YG17, BG11, BG23, Black.
Pro Tip: I added ink splatters by flicking the brush end of my Black Copic Marker along the inside of the cap towards the colored panel. This gives nice small ink splatters. Another easy way to add ink splatters is by putting some Licorice Reactive Ink on an Acrylic Block and then flicking the ink onto the panel with a fine brush or fan brush. Great results either way.
The sentiment is from the Holiday Messages Stamp and Die Bundle and I added a Vellum shadow.
Big Changes at Hero Arts:
Faster Orders: New subscribers will no longer have to wait until the following month to receive their first kit. Now receive the the same monthly design when you subscribe! The sign-up window will be open the 1st – 27th each month. Also, starting in December the Monthly Add-Ons will be available for purchase on the 1st of each month as well.
• Charge Edit Window: Subscription charge day is moving to the 3rd of each month. Beginning in December, we will revealing kits on the 1st, which means you can make subscription changes prior to the charge date following the reveal.
• Subscribers Come First: Non-subscribers will no longer be able to purchase the a la carte products that are live within the Hero Studio month. Those designs will ONLY be available to active subscribers the first month. If there are any leftovers, they will be available for a la carte purchase to non-subscribers the following month.
• Fulfillment Changes: We are also making some fulfillment changes to help us get the orders out quicker and more efficiently. One of the main changes will be the Hero Studio Add-Ons will ship separately from the recurring Hero Studio orders. Subscribers will still receive free shipping on the add-ons for the first week.
Want to learn more about all the changes coming to Hero Studio? Check out the FAQ section of the website.
BLOG HOP:
Hero Arts will give away a $50 gift card, drawn from the comments left across the hop. Enter by Sunday, November 10 at 11:59pm Pacific, and the winner will be announced on the Hero Arts blog the following week.
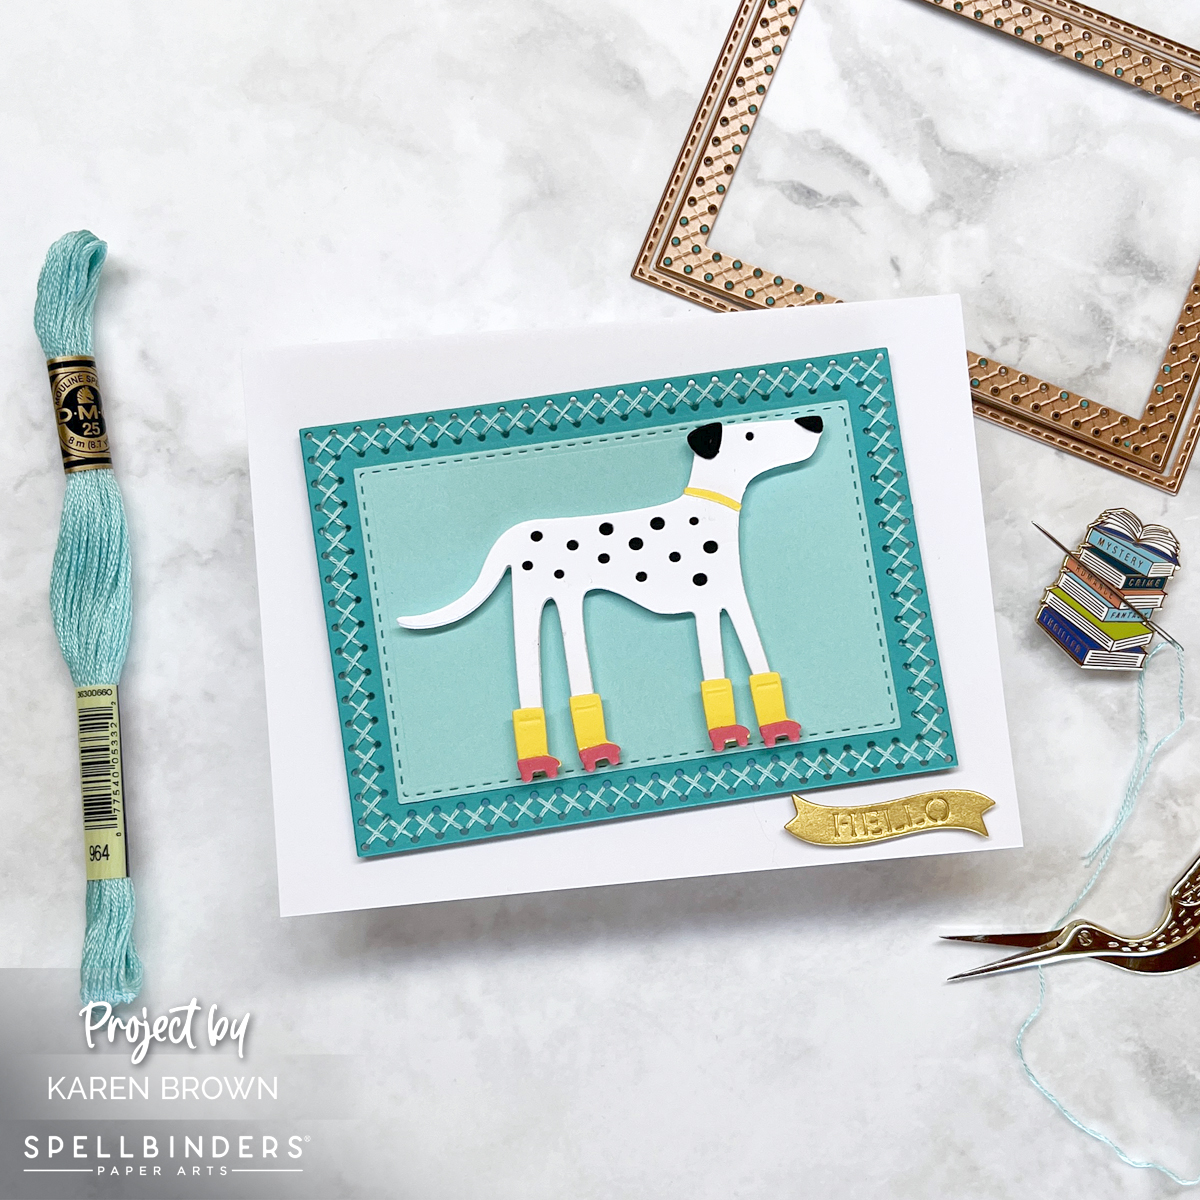
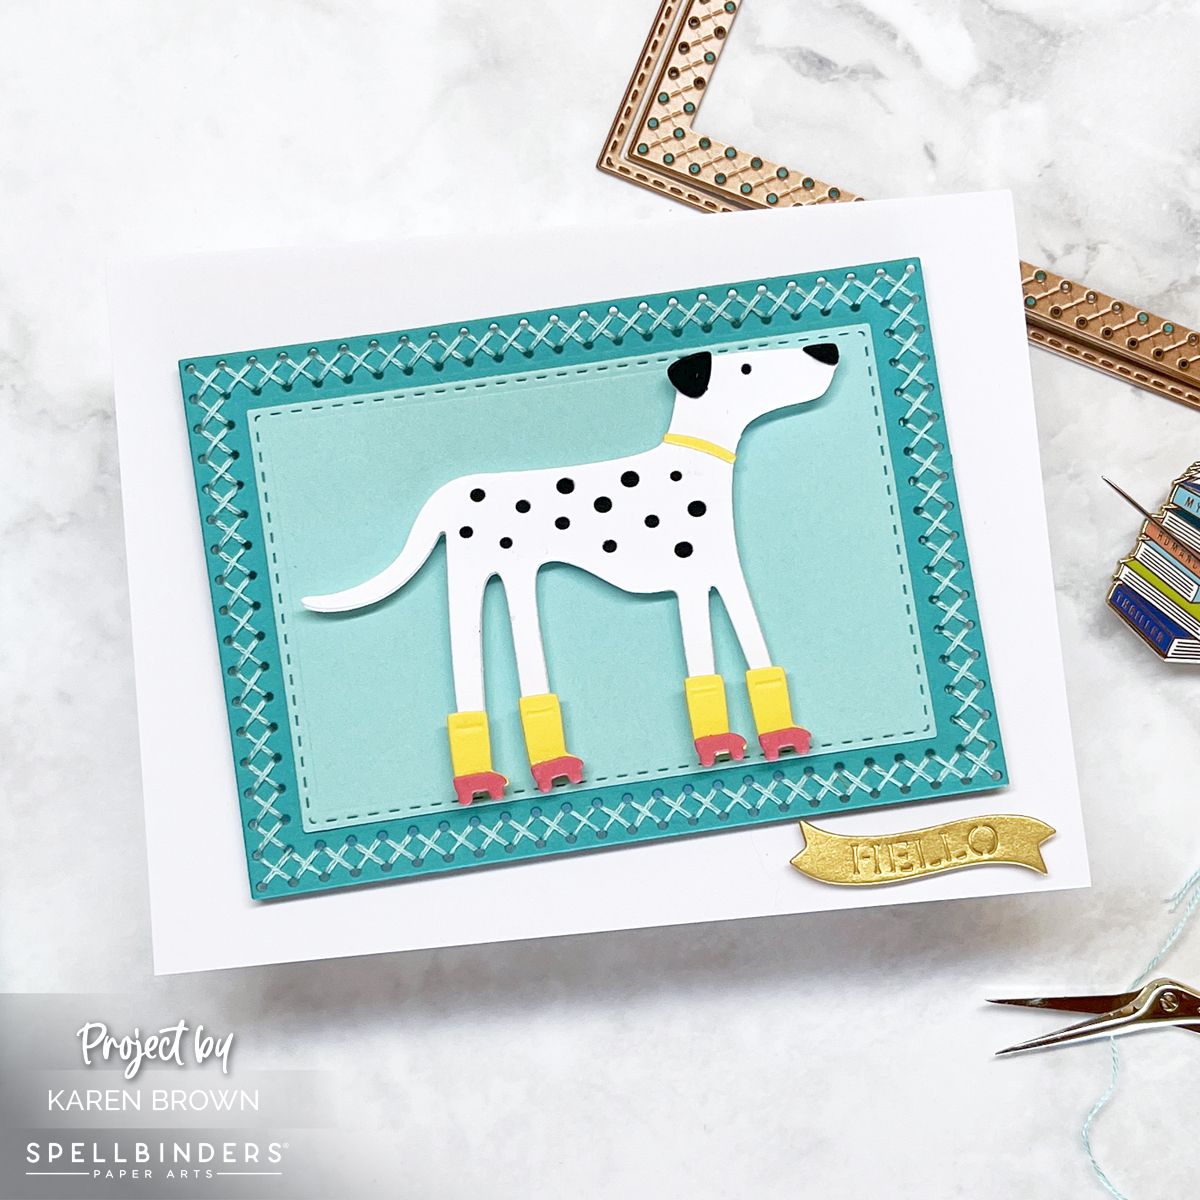
Frames add so much interest and I think this new stitched kit will become a staple in my craftroom. I can never have too many nesting inifity dies and this one would also be so pretty “unstitched”!
Cross Stitch Nested Card Front and Tag Kit
Stitching Kit Tips and Tricks:
I started by die cutting my Stitching Kit pieces with my Platinum 6 die cutting machine. This month’s kit has 7 wonderful cutting dies. I die cut the frame twice and glued them together for easier stitching. The frame is Teal Topaz and the stitched inset is Waterfall that I used from The Assorted Cardstock pack. This bundle has GREAT colors!
Spellbinders has a nice selection of stitching accessories in their shop that you can find HERE. Today, I used DMC 964 that is included in the Color Essentials Cool DMC Bundle. This thread bundle was selected to coordinate with Spellbinders cardstock colors.
When I started stitching, I took two strands of floss, separated them one at a time, brought them together and then stroked and lengthened them until they seemed tame and ready to use.
I used thin double sided tape to secure my floss to the die cuts. I like that this tape is easy to hide behind the die cuts and I don’t even bother to take the top release paper off the tape.
Remember to keep your floss taught as you stitch.
When I move from one area to the next, I run the floss through the just finished stitched area to keep the thread secure. This gives a nice look on the finished project.
Don’t stitch with threads that are too long or they are likely to knot.
When I was done, I added a bit of Bearly Glue to the ends so that they would stay in place.
Club members can cancel, upgrade or change clubs from the 1st-5th of each month. Popular Clubs frequently sell out during this period so club members get first dibs on everything.
NEW for 2024: Club Members get EARLY access to new releases on the 6th!
On the 6th, Clubs become available to non-members.
On the 27th, Club registration closes for the current month.
If a club did not sell out, you can buy under “Shop Past Clubs”. Past kits are available on the 10th of the FOLLOWING month.
Phenom Ralph Tyndall collaborated with Hero Arts for a fun new Fall Release. I created two iconic cards that are part of Hero Arts Instagram Hop that you can participate in HERE.
You can find Ralph Tyndall’s Fall Collection HERE.
Retro GameBoy-Themed Card 🎮
As a 90s kid at heart, I couldn’t pass up the chance to create a card inspired by the iconic GameBoy! The nostalgic colors, the pixelated graphics, and that satisfying ‘click’ of the buttons—this card was such a blast to make.
Tip 1: I snipped the star, heart, pull tab and game cartridge from the die set and then die cut the rest of the elements as one piece. This ensured that I had perfect placement for the buttons and screen. If you don’t snip the above mentioned components, they will die cut the back of the card.
I die cut the screen frame and buttons 3 times each and glue the pieces together for a realistic 3D look.
The die set has a great coordinating Retro Game Stamp Set that really makes the game come alive. I chose Winner for my Screen plus A & B, Select and Start Buttons. There are LOTS of Game related words included in the stamp set.
I added an Antique Ivory liner to inside of my card.
This GameBoy inspired card was one of my favorites to create, and I have to say Tetris was my favorite back in the day! It’s the perfect card for any gamer or someone who loves a throwback to the good ol’ days of handheld gaming.
Urban Heroscape Card
For my second card, I went in a completely different direction with a graphic linear urban Heroscape design. Ralph designed this set too and it is called Street View Heroscape. I’ve always been fascinated by cityscapes, especially the way modern architecture plays with lines and geometric shapes. So, I wanted to create a card that captured the energy of an urban environment using simple, clean lines.
I chose not to use the base stamp because I wanted to emphasize the linear grapic look of this stamp set. The set also comes with coordinating dies that you can find HERE.
TIP: Prior to stamping the Pool Party color building, I masked the Indigo and Purple Galaxy buildings with post it notes for clean stamping.
Today, we’re diving into a delightful project that combines creativity and a sprinkle of love: a hand-stitched Christmas card featuring Spellbinders October Stitching Club of the Month. The kit creates a whimsical Christmas tree under a starry night sky. Let’s get started on crafting a card that your loved ones will cherish!
Merry and Bright Cloche Stitching Kit
I started by die cutting my Stitching Kit pieces with my Platinum 6 die cutting machine. I die cut the stitching pieces twice and glued them together for easier stitching. My sky is navy cardstock and the background is kraft. The stitched base element and star were die cut from Brushed Gold, which is a real staple in my craft room.
The Merry and Bright etched sentiment is included in this month’s kit.
Spellbinders has a nice selection of stitching accessories in their shop that you can find HERE. I stitched the tree and base with DMC Antique Gold Thread. I hope you can see the shimmer!
I used thin double sided tape to secure my floss to the die cuts. I like that this tape is easy to hide behind the die cuts and I don’t even bother to take the top release paper off the tape.
Remember to keep your floss taught as you stitch.
When I move from one area to the next, I run the floss through the just finished stitched area to keep the thread secure. This gives a nice look on the finished project.
Don’t stitch with threads that are too long or they are likely to knot.
When I was done, I added a bit of Bearly Glue to the ends so that they would stay in place.
With scissors, I cut 2 triangles that I added behind the tree to pop it up a bit.
Club members can cancel, upgrade or change clubs from the 1st-5th of each month. Popular Clubs frequently sell out during this period so club members get first dibs on everything.
NEW for 2024: Club Members get EARLY access to new releases on the 6th!
On the 6th, Clubs become available to non-members.
On the 27th, Club registration closes for the current month.
If a club did not sell out, you can buy under “Shop Past Clubs”. Past kits are available on the 10th of the FOLLOWING month.
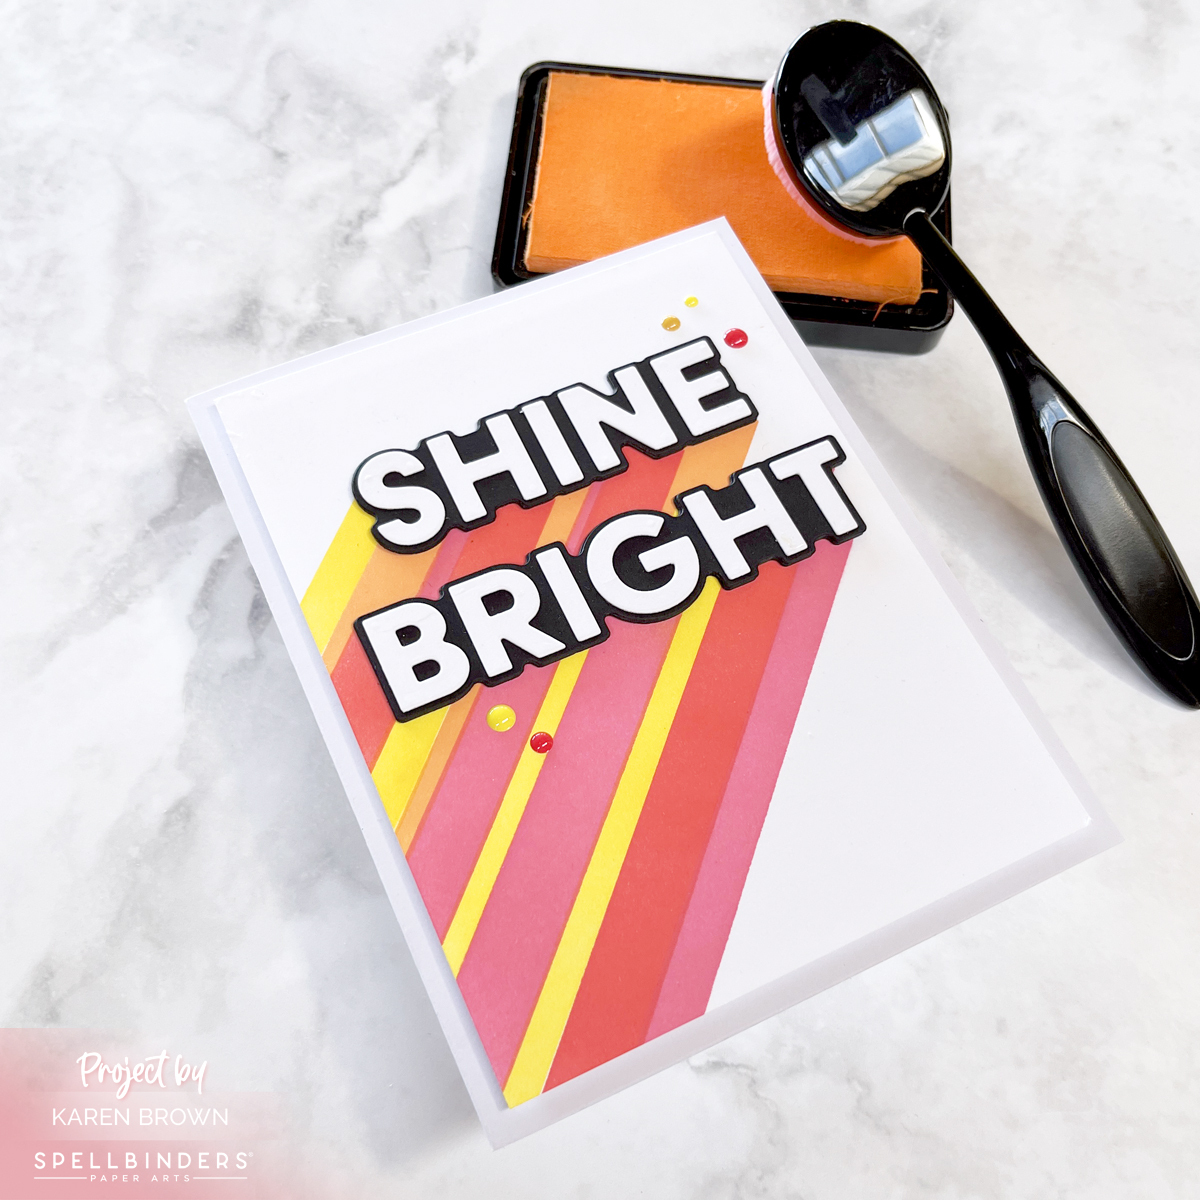
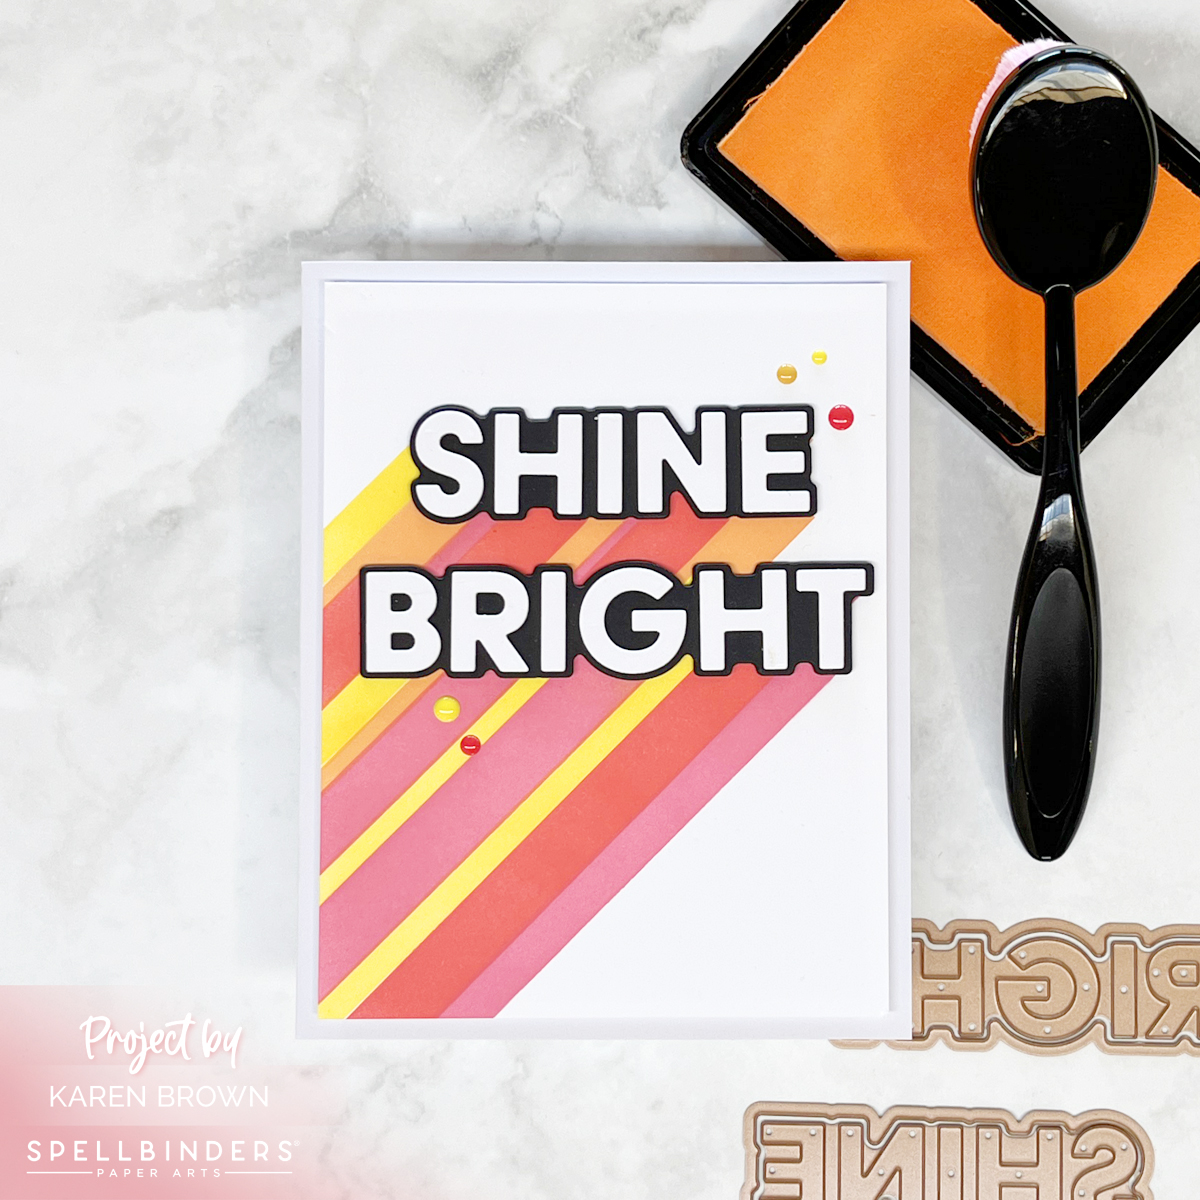
Are you ready to let your creativity shine? Today, we’re making a fun project that will have you glowing—literally! We’re going to create a stenciled and die-cut handmade card themed “Shine Bright.” Perfect for birthdays, encouragement, or just because, this card is sure to brighten anyone’s day. And I wanted to mention that the Shine Bright Collection was created by the great Carissa Wiley!
Colorful Analagous Stenciling
This card came together quickly!
I used the Layered Shine Bright Stencils to create my base, and I have to say the stencils lined up perfectly! I used Lemon Drop on layer 1, Creamsicle on #2, Fruit Punch on layer 3 and Taffy with the final stencil. I preplanned my colors and labeled my chosen color on each stencil so I wouldn’t get confused during my stenciling. I used Best Ever Craft Tape to both label my stencils and secure them to my craft mat.
Next I die cut my gorgeous sentiment. I die cut the black shadows three times and glued the layers together for nice dimension. I die cut the letters once from white cardstock. I used my Crystal Katana to pick up and place the letters.