cardmaking · Die cutting · Tutorial

Make a Splash: Postage Collage Summer Beach Card

Nothing says “happy birthday” like a burst of bright colors and a little beachy fun! Fresh off a trip to the shore, I felt inspired to bring the ocean breeze into my craft room—minus the sand in my die-cutting machine. Today’s card features stenciled beach balls, a fun postage stamp collage, and plenty of shimmer and shine. Let’s dive in!

Bringing the Beach to Paper: Creative Ways to Use Layering Stencils

A vibrant beach-themed birthday card featuring stenciled beach balls in yellow, green, and blue with a touch of shimmer.

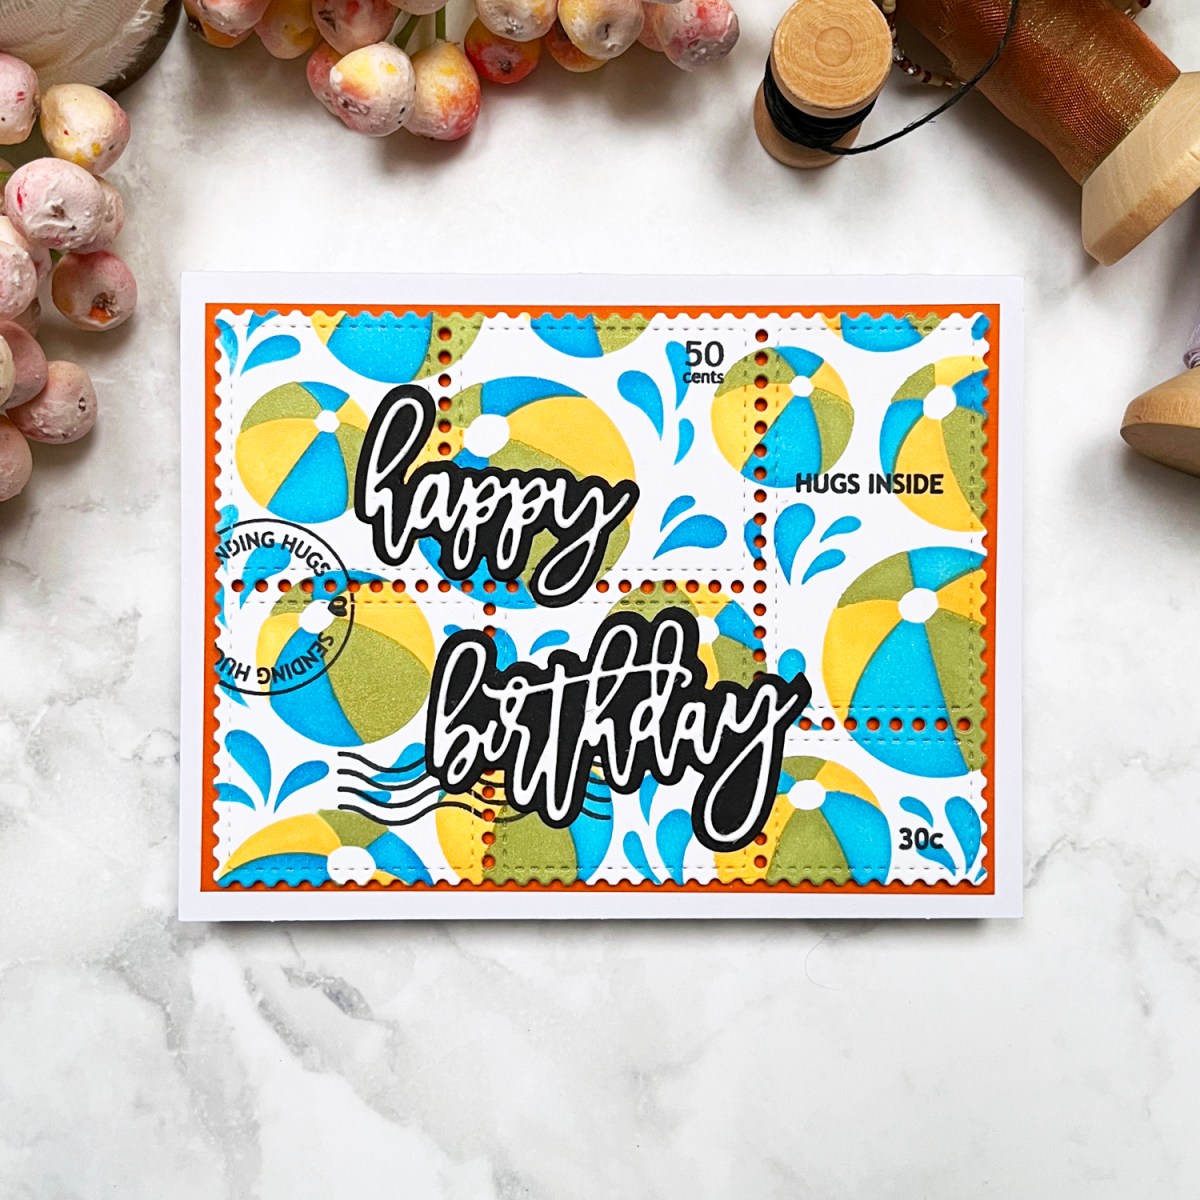
To set the seaside scene, I stenciled a flurry of yellow, green, and blue beach balls bouncing across the card. But what’s a day at the beach without a little shimmer? I used Glitz Inks to add a splash of shimmery shine.

Key Products Used:

Ink Blending Tips for a Seamless Look

  • Easy to Use 3 Layer Stencil: I started by stenciling my background with the fun Beach Ball Stencil. To keep my paper and stencil in place, I used my Sticky Grip Mat, which worked perfectly.
    • Click HERE to read my review on Sticky Grip Mats.
  • Use a circular motion: This prevents harsh lines and gives a softer, airbrushed effect. I also like to change direction frequently.
  • Let the shimmer do its thing: Glitz Inks add an extra pop. I used two shimmery Glitz Inks + Summer Sky for a really beachy vibe.

Postage Perfection

Nothing elevates a card quite like a postage stamp theme, so I pulled out my Waffle Flower Postage Collage die and stamp set to bring in some postal flair. Here’s what I included:

  • Postage-style die adds a fun and playful focus to your project, allowing pops of the orange mat to peek through the holes.
  • Stamped details like “sending hugs”, “50 cents”, “hugs inside”, and classic cancellation squiggles for that perfect mail-ready touch.
  • A crisp white scripty “Happy Birthday” sentiment with a black shadow, keeping it bold and readable amidst all the beachy goodness.
The Waffle Flower Postage Collage die-cut panel with stamped details like "sending hugs" and cancellation marks, framed by an orange mat.  Fun Beach Ball themed Birthday card with blue, yellow and green layered stencil ink blending.

The Final Splash

With the main panel matted in orange, this card bursts with sunny energy—perfect for anyone’s birthday, no matter their age! The beachy vibe, vibrant colors, and postal elements make it a playful, happy way to celebrate.. ☀️📬✨

cardmaking · Rainbow Colors

Review: Waffle Flower’s Sticky Grip Mat – A Crafting Essential (Just Updated)!

A review and tutorial for Waffle Flower's new and improved sticky Grip Mats + a die cut Window Scene Card.

As a passionate crafter, I’m always on the lookout for tools that make the creative process smoother and more enjoyable. Recently, I had the pleasure of testing out an updated re-released product that gently holds cardstock and stencils in place for stamping and ink blending— Waffle Flowers new and improved Grip Mats.

This innovative mat has been specifically designed to keep your cardstock firmly in place, eliminating the need for pesky adhesives or awkward hand placements that can often lead to smudges or uneven ink application. After putting the sticky Grip Mat through its paces, I’m excited to share my experience and why I believe it’s a must-have for any serious crafter.

Previously, I purchased a Grip Mat for both my Misti and Mini Misti and I found them invaluable. Waffle Flowers recently asked it they could send me two NEW mats, no strings attached. I was happy to test and play with two sizes of the new mats.

👉 TIP: With Grip Mats, there is no need to use magnets anymore when using my Misti Stamp Positioners!

Products Used and Referenced in This Review:

Waffle Flower die cut Window Scene Grid Card with ink blended Rainbow Panels + die cut trees.

The Testing Process

To truly test the Sticky Grip Mat’s capabilities, I decided to embark on an colorful project: ink blending six small rainbow-colored panels, which I would then assemble into a vibrant card. Here’s a step-by-step look at how the mat performed throughout the process:

  1. Securing the Cardstock: The Sticky Grip Mat held each piece of cardstock firmly in place, preventing any slipping or movement. This was a game-changer for achieving precise, even ink blending. Small panels and die cuts are difficult to work with so I die cut 6 small windows with Waffle Flower Window Scene Die for my testing purpose. I have a process photo below. I tested both the 7.5″ x 11″ mat (easily holds half letter size paper) and 4″ x 4″ mat for ink blending. The 4″ x 4″ mat was also very handy for holding my ink pads in place.
  2. Ink Blending: As I blended various rainbow hues onto the panels, I noticed how smoothly the ink applied. I used Hammermill’s smooth cardstock, which worked extremely well. I selected my favorite Hero Arts ink colors for my project. The stability provided by the mat allowed me to focus entirely on the blending process without worrying about the cardstock shifting. This resulted in beautifully blended panels with seamless color transitions.
  3. Stamping: Stamping on the secured cardstock was equally impressive. The mat kept the cardstock in place, ensuring crisp, clear impressions every time. I didn’t have to reposition or realign the cardstock, which saved me a significant amount of time and frustration. I stamped longtime favorite Warm Wishes using my Mini Misti Grip Mat.
  4. Assembly: After completing the six panels, assembling them into a card was a breeze. I used Waffle Flowers Window Scene Die to finish my card. The consistent, high-quality ink blending and stamping made the final product look professional and polished.
Review and Tutorial for Waffle Flowers new 7.5" x 11" sticky Grip Mat.

Pros and Cons

Pros:

  • Excellent Grip: The mat’s adhesive surface effectively holds cardstock in place, allowing for precise and effortless ink blending and stamping.
  • Reusable and Durable: After several uses, the mat maintained its tackiness and showed no signs of wear, making it a long-term investment for any crafter.
  • Easy to Clean: Any residual ink or debris wiped off easily with a damp lint free cloth, restoring the mat to its original condition.

Cons:

  • Initial Tackiness: The mat is extremely tacky when first used, which might cause lighter weight cardstock to tear upon removal. None of my panels tore during my testing process.
Notes:
  • To minimize cardstock warping, peel the mat off the cardstock. I didn’t touch the cardstock but gently bent the ends of the grip mat and slowly pulled away from my inked panel.
  • The mats each come with two guides that you can add above or below the mat. To prevent the print from transfering to your mat, apply the guide to the mat with the reverse side facing away from the grip mat.
  • The new mats are a bit cloudier than the 1st generation.
  • Air bubbles are expected and fine.
  • If the mat starts to lose it’s cling, clean with water or photopolymer safe cleaner.
  • Store your Grip Mats on the transparent sheets.
  • Do not stack heavy items on top of your grip mats.

I have another blog post and video coming this month that demonstrate using two sizes of Grip Mats in action for ink blending with layering stencils.

Bright colorful Warm Wishes Grid Scene card using Waffle Flower's Window Scene Die.

Products Used Today:

I hope you found this review helpful. Thanks for stopping by.

Karen

cardmaking · Die cutting · papercrafting

Waffle Flowers | Flourish Panel Cover Die 2 Ways

Waffle Flower Crafts Flourish Panel Die:  Cards Two Ways

Rainbow colors in cardmaking are always a good idea! I recently received a new cover die from Waffle Flower Crafts called Flourish Panel and it is a real beauty! I couldn’t decide whether to have the rainbow panel on the top layer or below the lattice so I opted to do it both ways. I still can’t choose which way I like it better. What do you think…..I’d love to hear your thoughts in the comments.

How To Add Dimension on Die-Cut Cards

Waffle Flower Flourish Panel + Using inexpensive Crayola Watercolors in Cardmaking

I have step-by-step directions (with process photos) below. On one card I die-cut the watercolor panel and on the second card I used the rainbow colors as a background.

Waffle Flower Crafts Flourish Panel Die + Print and Script Happy Birthday Sentiment dies.

Cardmaking Tutorial: How I Made These Two Die Cut Cards

Step 1: Make Your Rainbow Watercolor Panel. Today, I used watercolors for my colorful focal point. On the panel with the rainbow on the top layer, I used Kuretake Watercolors to blend a rainbow. I went over the watercolor panel twice to get an intense color. On the second, panel, I used inexpensive Crayola Watercolors and it worked beautifully! You could also ink blend your background.

Step 2: Die-cut your top layer with Waffle Flowers Flourish Panel Die. I have an electric Gemini Junior die-cutting machine that I used.

Step 3: You could stop die-cutting here, but I wanted a lot of dimension, so I die cut two additional panels so I could stack my layers.

Step 4: Glue Your Layers Together. Using Bearly Glue, I glued three lattice layers together for a substantial top panel. Be sure to weight them down after gluing so they stay nice and flat. I have a large acrylic block that I use. I also adhered the layers to an A2 Top-folding card.

Step 5: Add A Sentiment. I always need Birthday Cards so I used Waffle Flowers new Print and Script Birthday Sentiment Dies. I love that they come with both a cursive and block font with coordinating shadow dies. I cut the sentiments from white cardstock and the shadows from Navy.

Now I have two bright cheerful birthday cards to share.

Products Used: