cardmaking · Cardmaking Kit · stitching

Stitching Die of the Month | November 2024 | Spellbinders

Handmade stitched card tutorial with Spellbinders Novebmer 2024 Stitching Die of the Month and a die cut Dalmation dog.

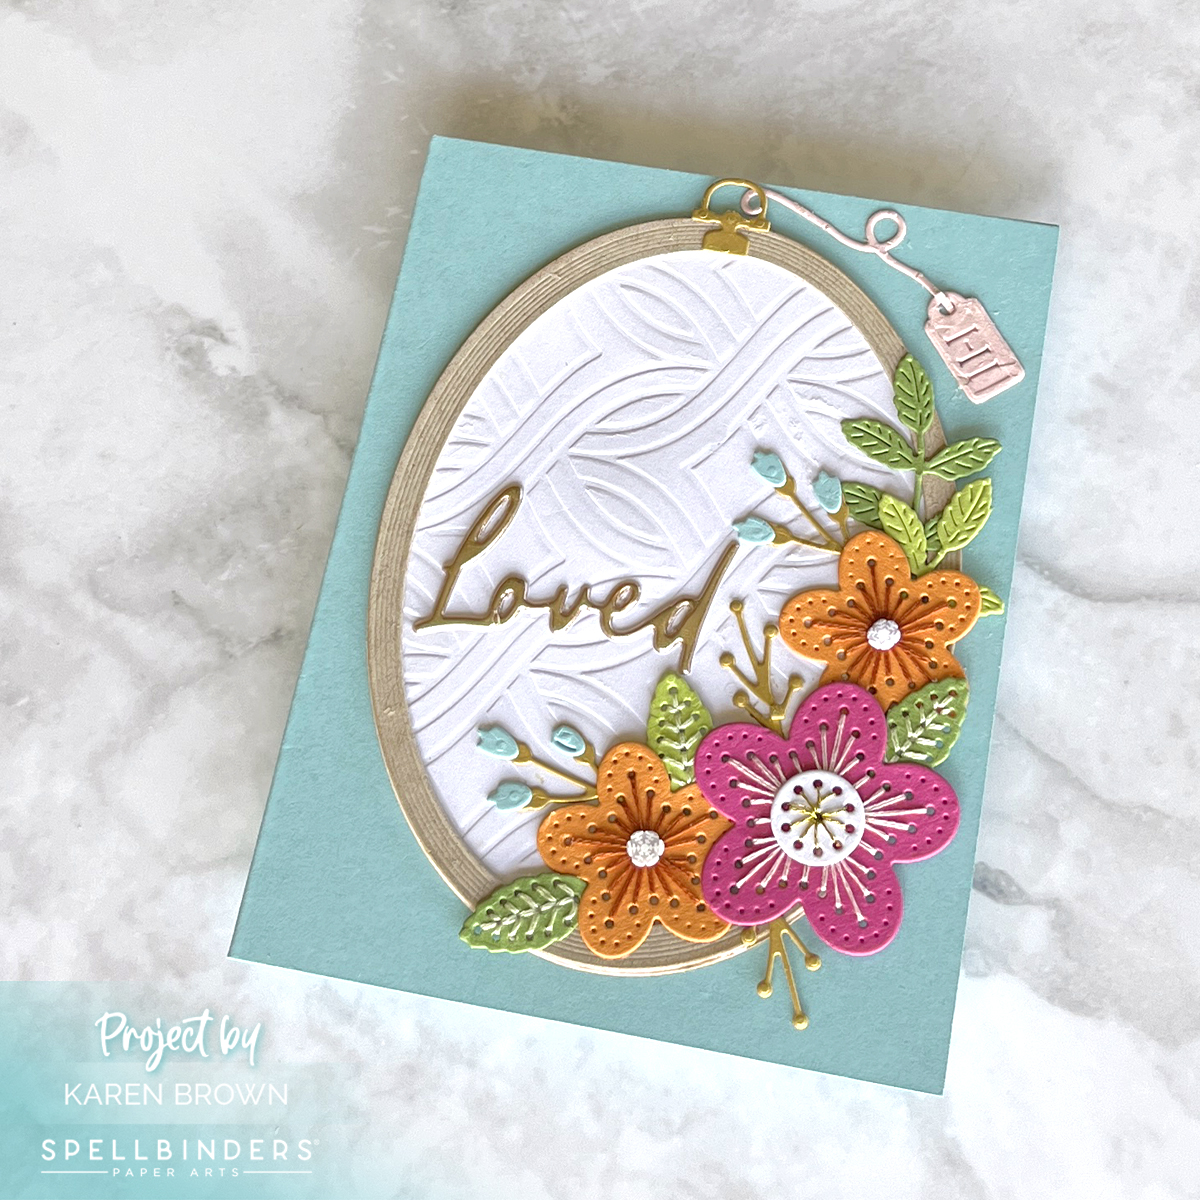
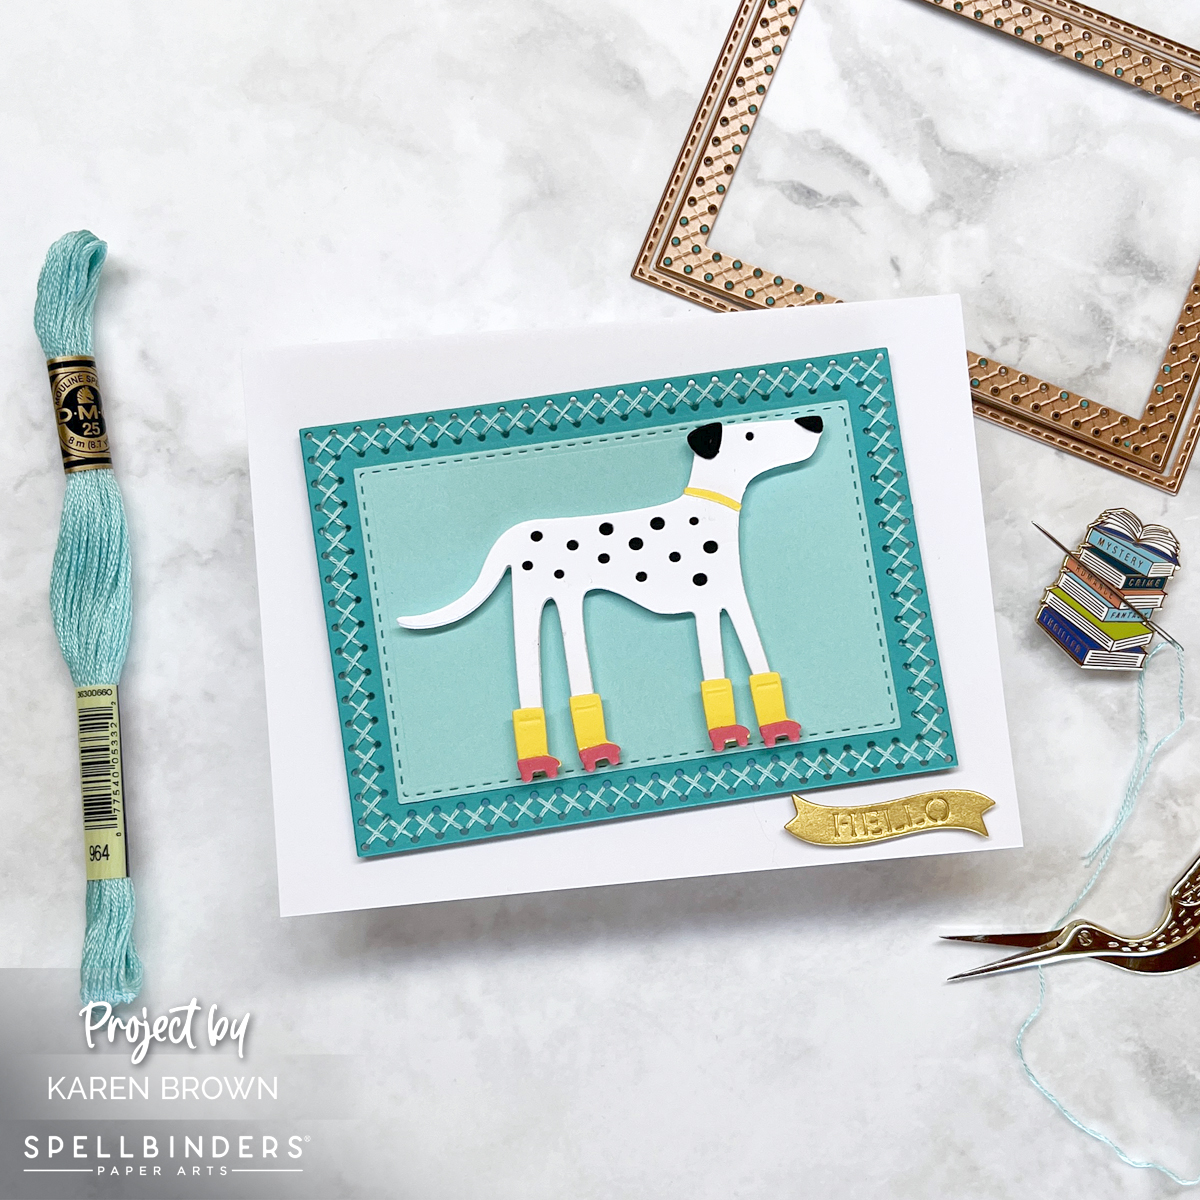
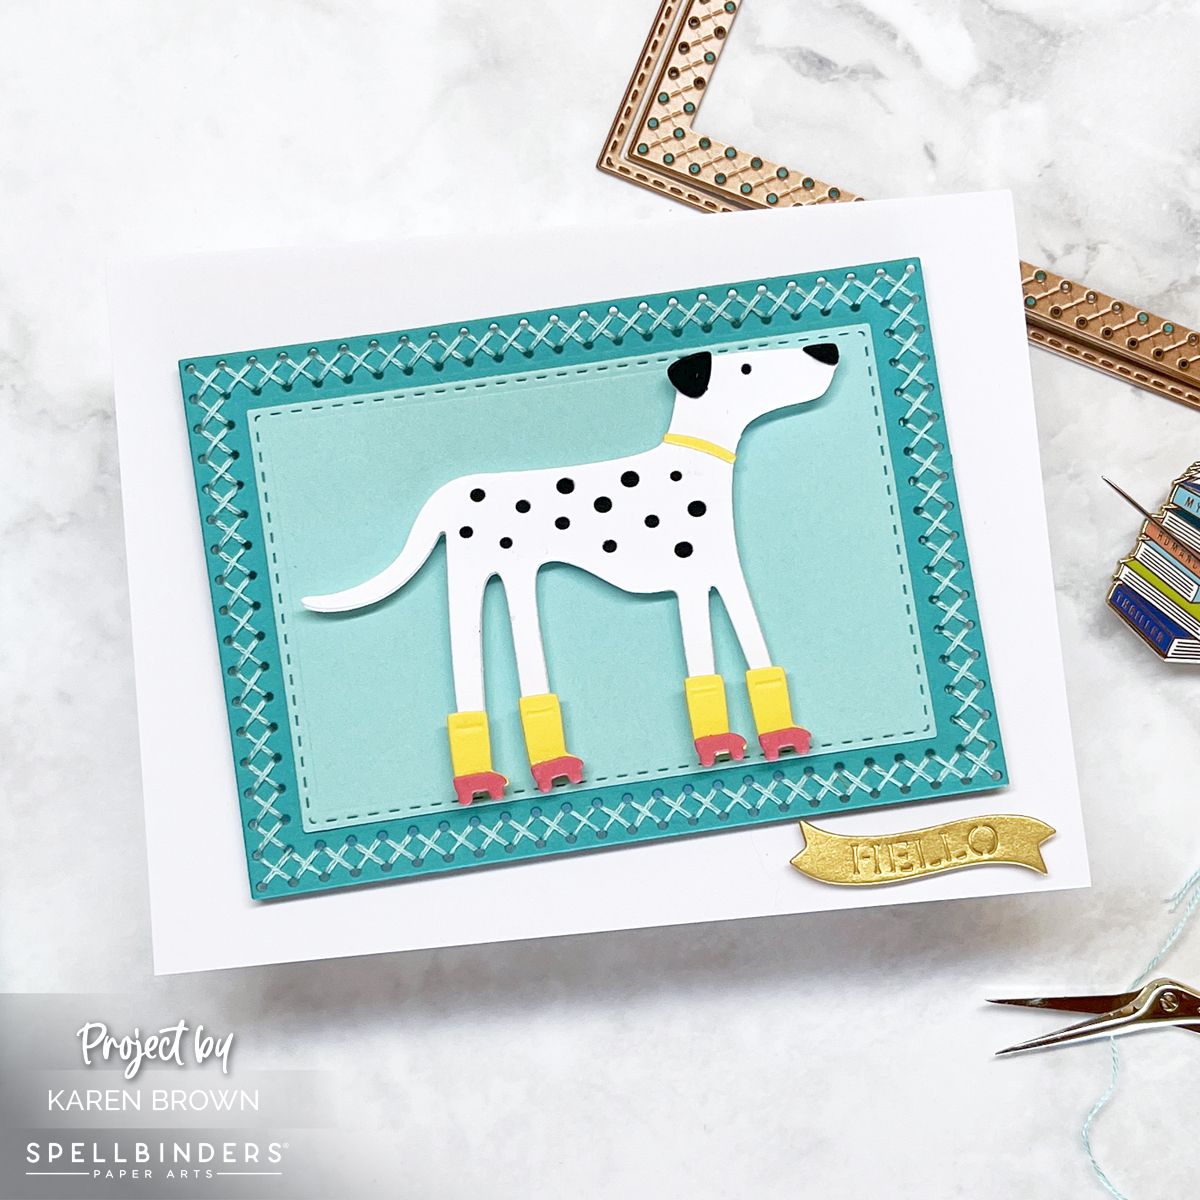
Today, I’m excited to share a simple yet charming project featuring a stitched frame and an adorable die-cut Dalmatian named Dottie!

I am using Spellbinders Paper Arts November Stitching Club of the Month and Roller Disco Dottie from the Out and About Collection.

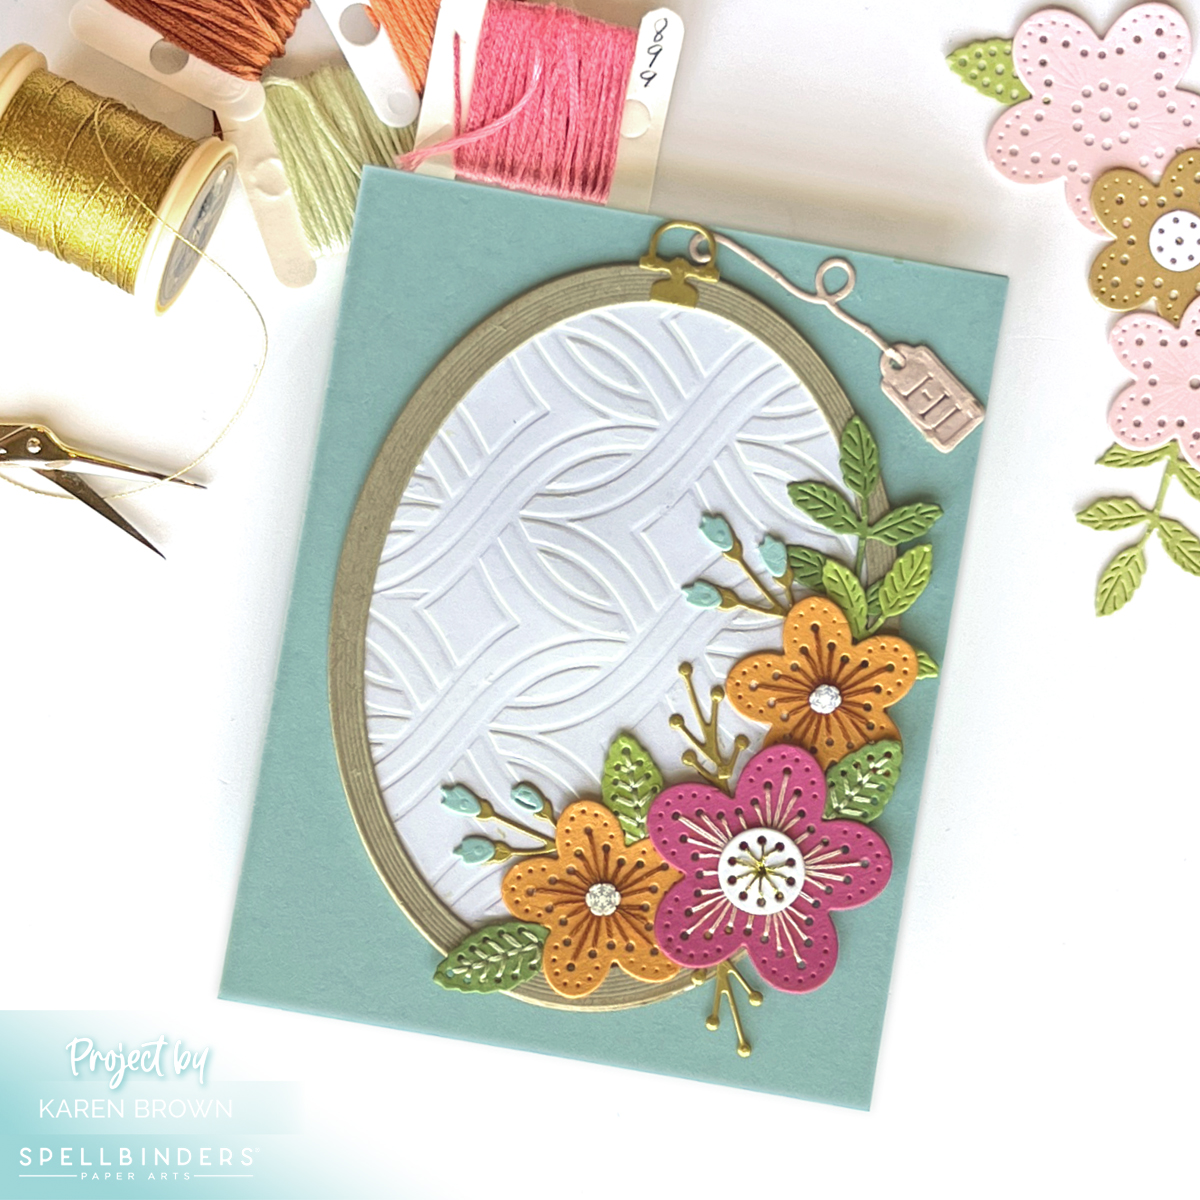
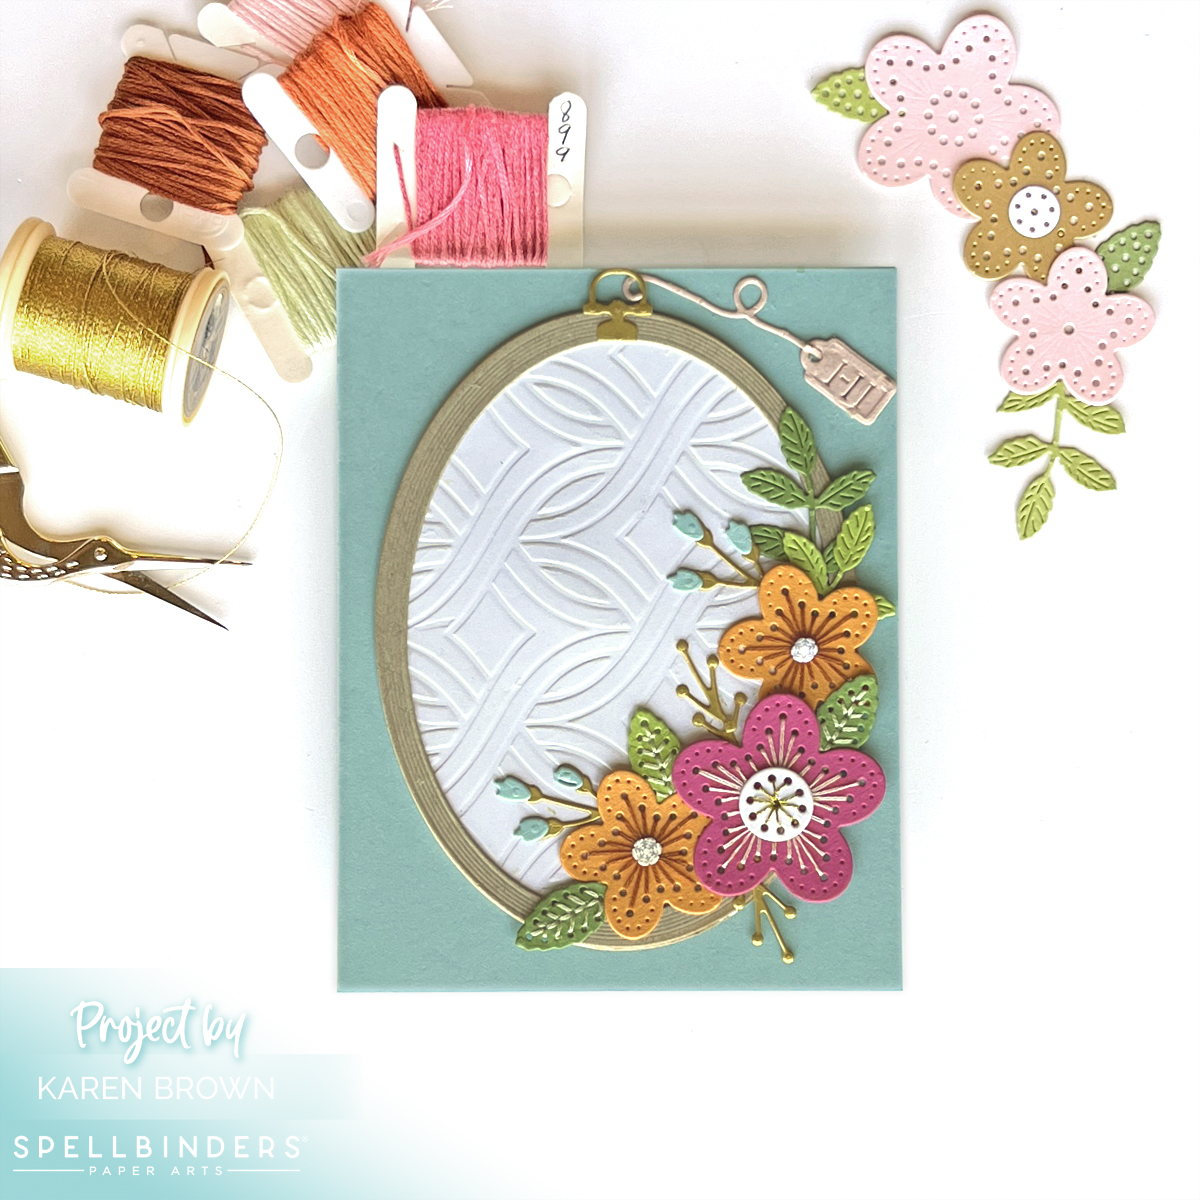
Frames add so much interest and I think this new stitched kit will become a staple in my craftroom. I can never have too many nesting inifity dies and this one would also be so pretty “unstitched”!

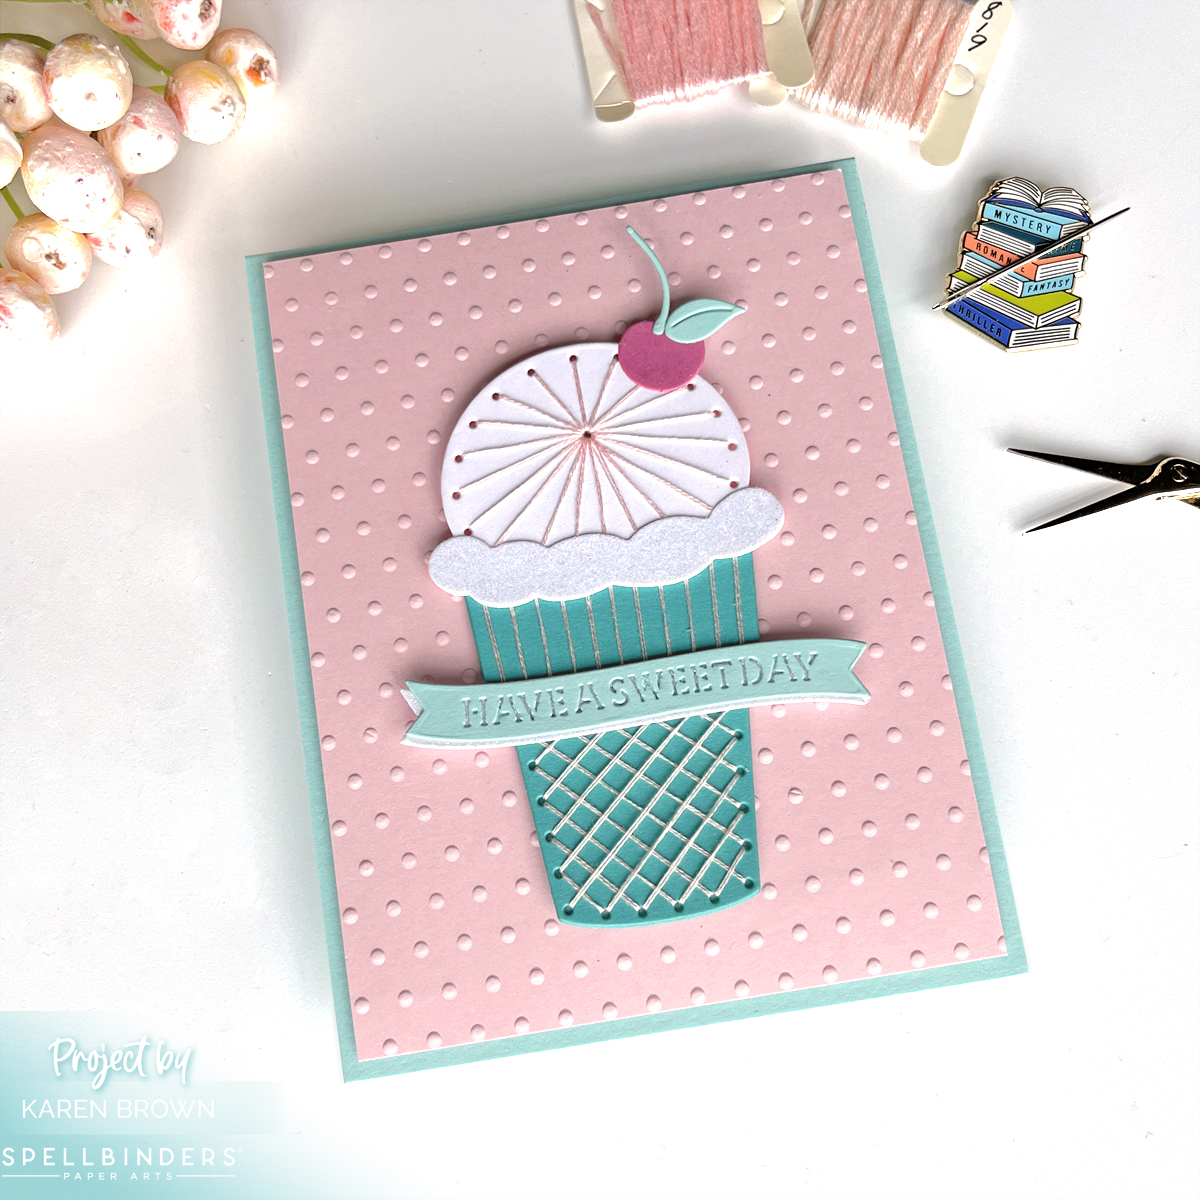
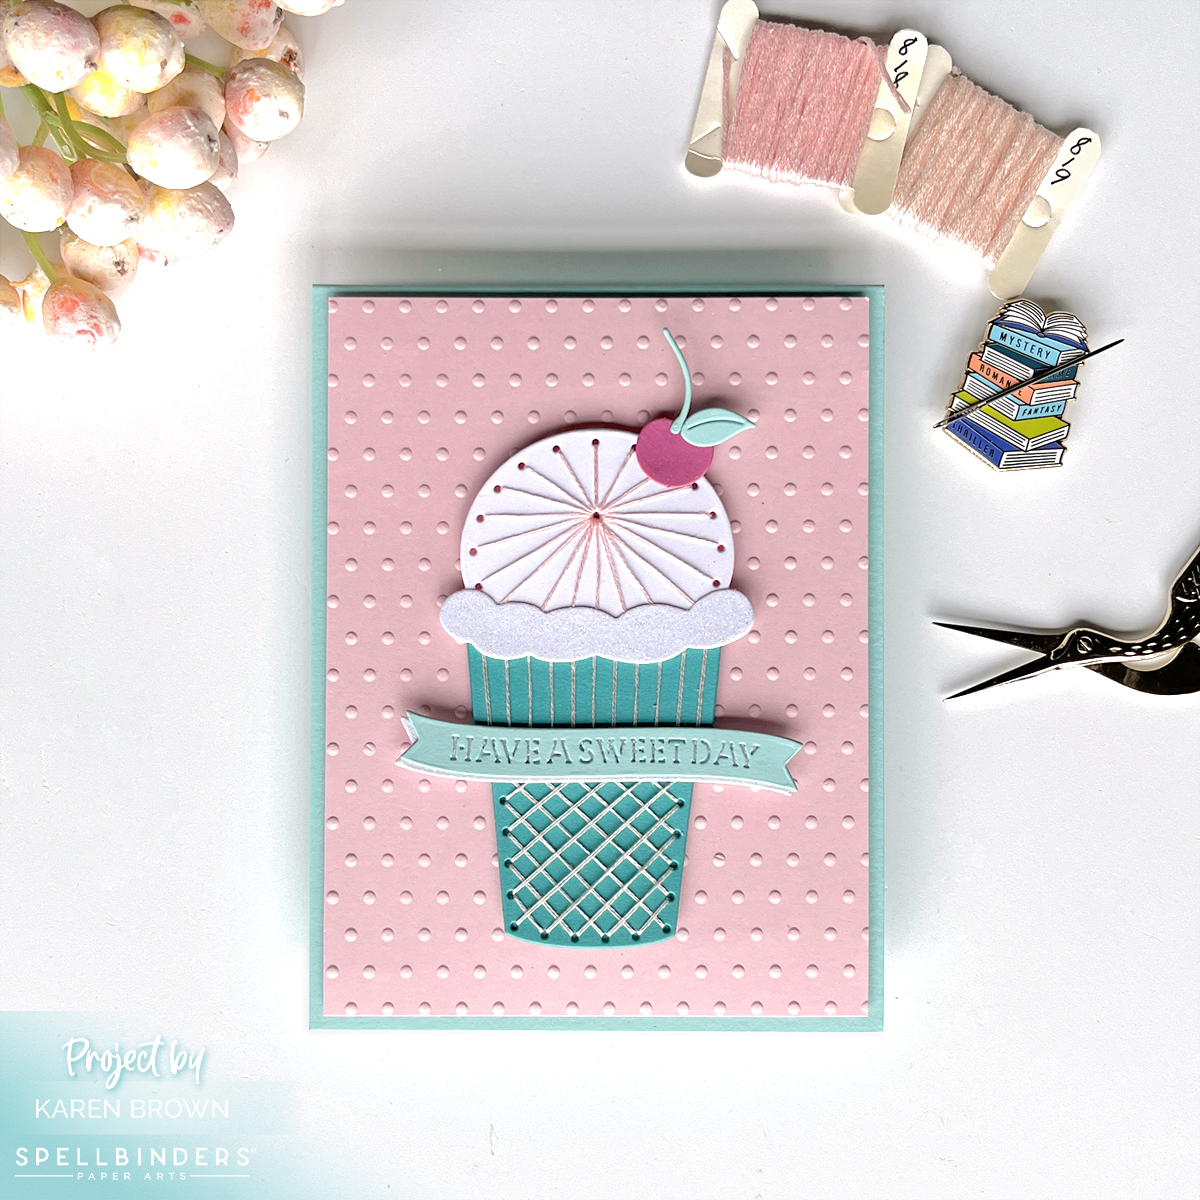
Cross Stitch Nested Card Front and Tag Kit

Adding handstitched details to your cardmkaing projects.

Stitching Kit Tips and Tricks:

  • I started by die cutting my Stitching Kit pieces with my Platinum 6 die cutting machine. This month’s kit has 7 wonderful cutting dies. I die cut the frame twice and glued them together for easier stitching. The frame is Teal Topaz and the stitched inset is Waterfall that I used from The Assorted Cardstock pack. This bundle has GREAT colors!
  • I die cut Dottie twice and assembled.
  • Spellbinders has a nice selection of stitching accessories in their shop that you can find HERE. Today, I used DMC 964 that is included in the Color Essentials Cool DMC Bundle. This thread bundle was selected to coordinate with Spellbinders cardstock colors.
  • When I started stitching, I took two strands of floss, separated them one at a time, brought them together and then stroked and lengthened them until they seemed tame and ready to use.
  • I usually stitch with size 22 Tapestry needles.
  • I used thin double sided tape to secure my floss to the die cuts. I like that this tape is easy to hide behind the die cuts and I don’t even bother to take the top release paper off the tape.
  • Remember to keep your floss taught as you stitch.
  • When I move from one area to the next, I run the floss through the just finished stitched area to keep the thread secure. This gives a nice look on the finished project.
  • Don’t stitch with threads that are too long or they are likely to knot. 
  • When I was done, I added a bit of Bearly Glue to the ends so that they would stay in place.
  • I assembled my piece with Bearly Glue and Craft Foam.

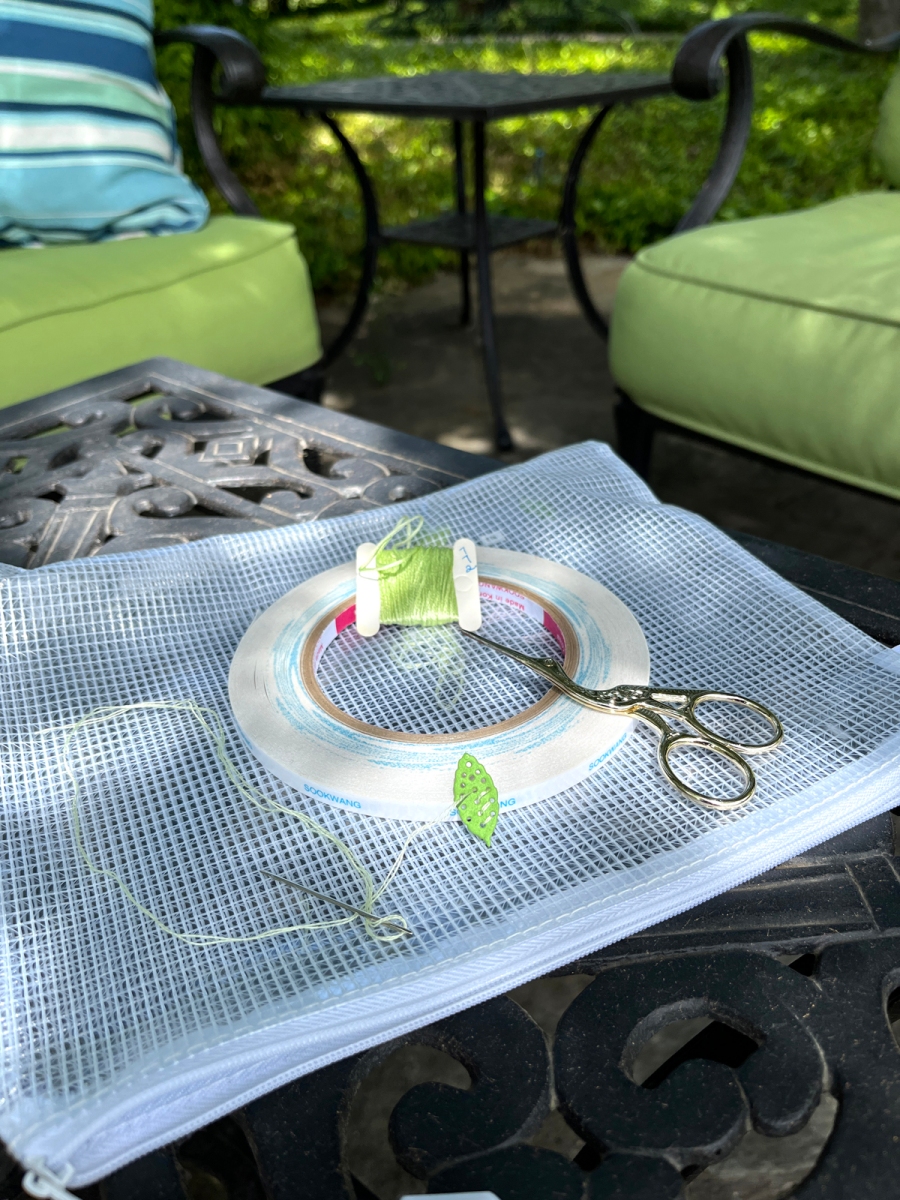
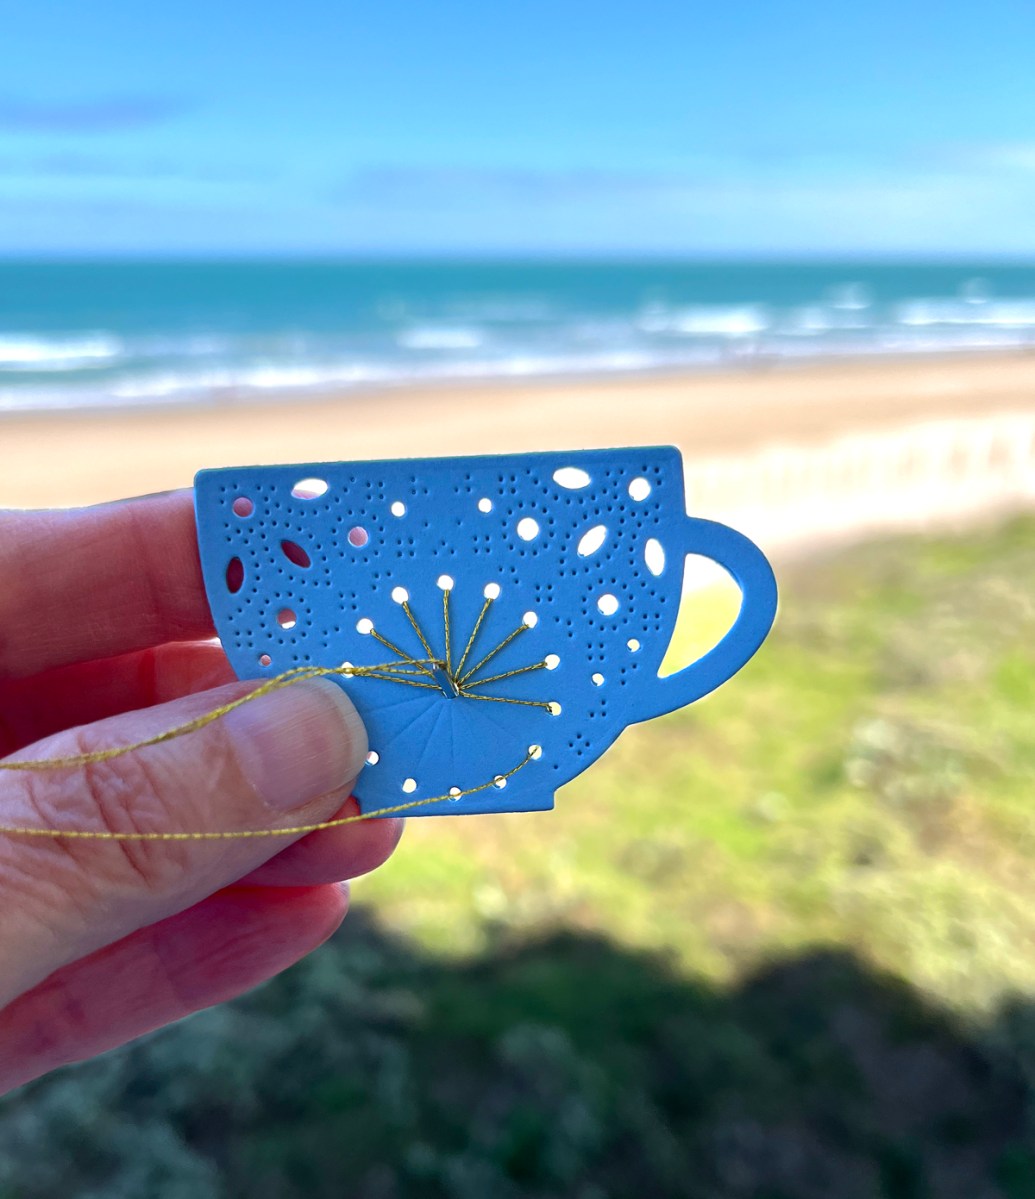
I thought it would be fun to include a process photo of my stitching in progress. I have a comfy chair by a window that I like to stitch in.

Process photo for a handstitched greeting card with a die cut dalmation puppy.

Helpful Links:

Spellbinders Club Info:

  • Clubs Preview on the 1st of each month.
  • Club members can cancel, upgrade or change clubs from the 1st-5th of each month. Popular Clubs frequently sell out during this period so club members get first dibs on everything.
  • NEW for 2024: Club Members get EARLY access to new releases on the 6th!
  • On the 6th, Clubs become available to non-members.
  • On the 27th, Club registration closes for the current month.
  • If a club did not sell out, you can buy under “Shop Past Clubs”. Past kits are available on the 10th of the FOLLOWING month.

Thanks for stopping by!

Karen

Cardmaking Kit · Die cutting · stitching

Crafting a Cozy Christmas | Spellbinders October Stitching Club

Spellbinders October 2024 Stitching Club of the Month hand crafted card.

Today, we’re diving into a delightful project that combines creativity and a sprinkle of love: a hand-stitched Christmas card featuring Spellbinders October Stitching Club of the Month. The kit creates a whimsical Christmas tree under a starry night sky. Let’s get started on crafting a card that your loved ones will cherish!

Hand stitched and crafted Christmas tree card set against a starry night.

Merry and Bright Cloche Stitching Kit

  • I started by die cutting my Stitching Kit pieces with my Platinum 6 die cutting machine. I die cut the stitching pieces twice and glued them together for easier stitching. My sky is navy cardstock and the background is kraft. The stitched base element and star were die cut from Brushed Gold, which is a real staple in my craft room.
  • The Merry and Bright etched sentiment is included in this month’s kit.
  • Spellbinders has a nice selection of stitching accessories in their shop that you can find HERE. I stitched the tree and base with DMC Antique Gold Thread. I hope you can see the shimmer!
  • I usually stitch with size 22 Tapestry needles.
  • I used thin double sided tape to secure my floss to the die cuts. I like that this tape is easy to hide behind the die cuts and I don’t even bother to take the top release paper off the tape.
  • Remember to keep your floss taught as you stitch.
  • When I move from one area to the next, I run the floss through the just finished stitched area to keep the thread secure. This gives a nice look on the finished project.
  • Don’t stitch with threads that are too long or they are likely to knot. 
  • When I was done, I added a bit of Bearly Glue to the ends so that they would stay in place.
  • With scissors, I cut 2 triangles that I added behind the tree to pop it up a bit.
  • I assembled with Bearly Glue and Craft Foam.

Helpful Links:

Spellbinders Club Info:

  • Clubs Preview on the 1st of each month.
  • Club members can cancel, upgrade or change clubs from the 1st-5th of each month. Popular Clubs frequently sell out during this period so club members get first dibs on everything.
  • NEW for 2024: Club Members get EARLY access to new releases on the 6th!
  • On the 6th, Clubs become available to non-members.
  • On the 27th, Club registration closes for the current month.
  • If a club did not sell out, you can buy under “Shop Past Clubs”. Past kits are available on the 10th of the FOLLOWING month.

Thanks for stopping by!

Karen

Cardmaking Kit · stitching

Frameable Art | Spellbinders September 2024 Stitching Club

Beautiful  die cut and handstitched sunflower in a 4" x 6" frame.  Spellbinders September 2024 "Stitched Flower" papercrafting kit.

WOW, WOW, WOW! I LOVE Spellbinder’s September Stitching Die of the Month Kit! This sunflower is so gorgeous that I decided to make a 4 x 6″ framed art piece for my guest bedroom. I have all the details below.

Stitched Sunflower Art | Tips and Tricks

  • I started by die cutting my Stitching Kit pieces with my Platinum 6 die cutting machine. This month’s kit has 15 dies. I die cut the flower petals and brown center twice and glued them together for easier stitching.
  • Spellbinders has a nice selection of stitching accessories in their shop that you can find HERE. Today, I used metallic gold floss on the center and 3 shades of DMC floss for the flower. I have been buying and collecting floss for decades, so some of these are vintage.
  • When I started stitching, I took two strands of floss, separated them one at a time, brought them together and then stroked and lengthened them until they seemed tame and ready to use.
  • I usually stitch with size 22 Tapestry needles.
  • I used thin double sided tape to secure my floss to the die cuts. I like that this tape is easy to hide behind the die cuts and I don’t even bother to take the top release paper off the tape.
  • Remember to keep your floss taught as you stitch.
  • When I move from one area to the next, I run the floss through the just finished stitched area to keep the thread secure. This gives a nice look on the finished project.
  • Don’t stitch with threads that are too long or they are likely to knot. 
  • When I was done, I added a bit of Bearly Glue to the ends so that they would stay in place.
  • I assembled my piece with Bearly Glue and foam squares.
  • Last, I popped my sunflower in a 4″ x 6″ frame and set it on the bedside table.
Spellbinders September Stitching Club Kit of the Month:  Stitched Sunflower.

Helpful Links:

Spellbinders Club Info:

  • Clubs Preview on the 1st of each month.
  • Club members can cancel, upgrade or change clubs from the 1st-5th of each month. Popular Clubs frequently sell out during this period so club members get first dibs on everything.
  • NEW for 2024: Club Members get EARLY access to new releases on the 6th!
  • On the 6th, Clubs become available to non-members.
  • On the 27th, Club registration closes for the current month.
  • If a club did not sell out, you can buy under “Shop Past Clubs”. Past kits are available on the 10th of the FOLLOWING month.

Thanks for stopping by!

Karen

Cardmaking Kit · Rainbow Colors · stitching

Colorful Rainbow Stitching | Spellbinders August 2024 Stitching Kit

Rainbow colors for this stunning hand stitched greeting card created with Spellbinders August 2024 Stitching Kit of the Month.

This may be my favorite Spellbinders kit of 2024! The August 2024 Stitching Kit of the Month is perfect for cardmakers, artists or anyone that loves a colorful card. I truly love rainbow cardstock and floss….put them together and you have a real keepsake.

Spellbinders has 9 great Club Options that you might want to check out + their Deluxe Caboodle, which includes all 9 kits + a bonus gift, all at a 60% savings.

Rainbow Craft Theme Card Kit:

Handmade paint palette card created with Spellbinders August 2024 Stitching Card Kit of the Month.

Tips and Tricks for Stunning Stitched Cards:

  • I started by die cutting my Stitching Kit pieces with my Platinum 6 die cutting machine. When I got to the smaller pieces, I found it easiest to use my desktop cutter: Scout. I used leftover colorful cardstock scraps for my paint palette. Since it was long and thin, I die cut the paintbrush twice and then glued it together for a substantial base. I die cut the other pieces once.
  • Spellbinders has a nice selection of stitching accessories in their shop that you can find HERE. Today, I used used DMC 776, 725, 745, 772, 504, 800, 211, 828, 646 and metallic gold floss. I have been buying and collecting floss for decades, so some of these are vintage.
  • When I started stitching, I took two strands of floss, separated them one at a time, brought them together and then stroked and lengthened them until they seemed tame and ready to use.
  • I usually stitch with size 22 Tapestry needles.
  • I used thin double sided tape to secure my floss to the die cuts. I like that this tape is easy to hide behind the die cuts and I don’t even bother to take the top release paper off the tape.
  • Remember to keep your floss taught as you stitch.
  • When I move from one area to the next, I run the floss through the just finished stitched area to keep the thread secure. This gives a nice look on the finished project.
  • Don’t stitch with threads that are too long or they are likely to knot. 
  • When I was done, I added a bit of Bearly Glue to the ends so that they would stay in place.
  • I assembled my card with Bearly Glue.

Helpful Links:

Spellbinders Club Info:

  • Clubs Preview on the 1st of each month.
  • Club members can cancel, upgrade or change clubs from the 1st-5th of each month. Popular Clubs frequently sell out during this period so club members get first dibs on everything.
  • NEW for 2024: Club Members get EARLY access to new releases on the 6th!
  • On the 6th, Clubs become available to non-members.
  • On the 27th, Club registration closes for the current month.
  • If a club did not sell out, you can buy under “Shop Past Clubs”. Past kits are available on the 10th of the FOLLOWING month.

Thanks for stopping by!

Karen

Cardmaking Kit · stitching

A Gift Inspired Delight | Spellbinders July 2024 Stitching Die of the Month Kit

Spellbinders July 2024 Stitching Card of the Month tutorial:  a beautiful blue die cut bow for Christmas or birthday cards.

This month, Spellbinders Stitching Die of the Month Kit allows us to create a very eye-catching gift bow. The kit is perfect for creating Christmas cards and decor or you can also use it all-year-round for birthdays and other celebrations. I chose to make a birthday card as I have a lot of friends with summer birthdays.

I think bows are so eye-catching on cards and if you’d like to see another I card I created featuring a die cut bow, click HERE.

A handmade card with a beautiful stitched die cut blue gift bow for Birthday Cards and  Christmas Cards.

Stitching On-The-Go

Stitching kits are great when you want a crafting project “on-the-go”. I am on vacation in Colorado and I really loved stitching on the patio while I enjoyed the view of the mountains. I included a photo of my al fresco stitching below. I die cut my components before I left home and then packed my supplies in a zipper bag. My stitching went quickly and took about 30 minutes to complete.

Tips and Tricks for Stunning Stitched Cards:

  • I started by die cutting all my Stitching Kit pieces with my Platinum 6 die cutting machine. I used Arctic cardstock for my bow. I die cut the elements I was going to stitch 2 times and then glued them together for a substantial base.
  • Spellbinders has a nice selection of stitching accessories in their shop that you can find HERE. I used used a buttery yellow (DMC #745) today.
  • When I started stitching, I took two strands of floss, separated them one at a time, brought them together and then stroked and lengthened them until they seemed tame and ready to use.
  • I usually stitch with size 22 Tapestry needles.
  • I changed things up this month and used good ol’ Scotch tape to attach my floss to the die cut.
  • Remember to keep your floss taught as you stitch.
  • When I move from one area to the next, I run the floss through the just finished stitched area to keep the thread secure. This gives a nice look on the finished project.
  • Don’t stitch with threads that are too long or they are likely to knot. 
  • When I was done, I added a bit of Bearly Glue to the ends so that they would stay in place.
  • To make my bow a little more stable, I added one vertical and two horizontal braces (3/8″ wide) on the back of my bow.
  • To finish my project I found some old printed paper to act as my gift wrap which I glued to an A2 Top Fold Card Base.
  • I adhered my bow to the background with Bearly Glue and Foam Squares.
  • The sentiment is a Chipboard Sticker from the Serenade of Autumn set.

Helpful Links:

Spellbinders Club Info:

  • Clubs Preview on the 1st of each month.
  • Club members can cancel, upgrade or change clubs from the 1st-5th of each month. Popular Clubs frequently sell out during this period so club members get first dibs on everything.
  • NEW for 2024: Club Members get EARLY access to new releases on the 6th!
  • On the 6th, Clubs become available to non-members.
  • On the 27th, Club registration closes for the current month.
  • If a club did not sell out, you can buy under “Shop Past Clubs”. Past kits are available on the 10th of the FOLLOWING month.

Thanks for stopping by!

Karen

cardmaking · Cardmaking Kit · stitching

Spellbinders Card | June Stitching Club | 2024

Spellbinders "Stitched Ice Cream" Stitching Die of the Month Club Kit for June 2024.

This month, Spellbinders Stitching Die of the Month Kit allows us to indulge in sweet delights with a yummy hand-stitched Ice Cream Cone Card. Looking for a sprinkle of sweetness to brighten someone’s day? Look no further! This kit is a reminder to cherish the simple pleasures in life, to savor each moment, and to spread kindness wherever we go.

The “Wow Factor” of Hand-Stitched Cards

This weekend, I had the pleasure of crafting this luscious handmade card with hand-stitched details, and let me tell you, the experience was delightful. The card came together quickly, but it is definitely high impact to the recipient. I find I get the most ooohs and aaahs from stitched cards and the “Wow Factor” they bring is truly priceless.

Pink, aqua, white and turquoise die-cut and hand-stitched ice cream cone card.

Tips and Tricks for Stunning Stitched Cards:

  • The kit has 12 cutting dies and I started by cutting all my pieces with my Platinum 6 die cutting machine. I used Teal Topaz and Waterfall cardstocks. I die cut the elements I was going to stitch 2 times and then glued them together for a substantial base. I used White Glitter cardstock for the accent on the ice cream.
  • Spellbinders has a nice selection of stitching accessories in their shop that you can find HERE. I used used two shades of pink: #818 Baby Pink (ice cream) and #819 Baby Pink Light (cone).
  • When I started stitching, I took two strands of floss, separated them one at a time, brought them together and then stroked and lengthened them until they seemed tame and ready to use.
  • I usually stitch with size 22 Tapestry needles.
  • I like to use 1/8th inch double sided liner tape to attach my floss to the die cut.
  • Remember to keep your floss taught as you stitch.
  • When I move from one area to the next, I run the floss through the just finished stitched area to keep the thread secure. This gives a nice look on the finished project.
  • Don’t stitch with threads that are too long or they are likely to knot. 
  • When I was done, I added a bit of Bearly Glue to the ends so that they would stay in place.
  • To finish my project I embossed Pink Sand cardstock with the Tiny Dots embossing folder.
  • The die cut sentiment is included in the kit.

Helpful Links:

Spellbinders Club Info:

  • Clubs Preview on the 1st of each month.
  • Club members can cancel, upgrade or change clubs from the 1st-5th of each month. Popular Clubs frequently sell out during this period so club members get first dibs on everything.
  • NEW for 2024: Club Members get EARLY access to new releases on the 6th!
  • On the 6th, Clubs become available to non-members.
  • On the 27th, Club registration closes for the current month.
  • If a club did not sell out, you can buy under “Shop Past Clubs”. Past kits are available on the 10th of the FOLLOWING month.

Thanks for stopping by!

Karen

cardmaking

Easy Elegant and Economical Card Sentiment Ideas | Spellbinders

Using easy economical premade puffy stickers from Spellbinders Bayfair in cardmaking.

I love easy sentiments, and Spellbinders just released three sets of sentiment stickers and embellishments from Bayfair that I found both economical and simple to use.

Quick and Easy Premade Card Sentiments

My mom’s birthday is tomorrow and I created this stitched card for her. The puffy “Loved” sentiment was exactly what I was looking for. This beautiful gold sticker is from Bayfair’s Puffy Sticker set. I also have a card in the works that uses the Chipboard Stickers, so stay tuned for that….

I used my April Stitching Die of the Month for this card. It’s called Stitched Wall Hanging and is a real show stopper and is now available in Spellbinders Shop without a subscription.

Helpful Links:

Bayfair Puffy Stickers (Sentiments and embellishments)

Bayfair Chipboard Stickers (2 pages of sentiments, frames & embellishments)

Bayfair Button Embellishments (12 fun buttons in 3 sizes)

Stitched Wall Hanging Kit

Stitching Die of the Month Club

Bayfair Puffy Stickers add elegance and beauty to your handmade cards.

Thanks for stopping by!

Karen

Cardmaking Kit · stitching

Spellbinders | Stitching Die of the Month | May 2024

Hand stitched Pineapple card with an embossed background and accent opal gems.

Aloha! Delight in the sweet essence of tropical charm with my latest crafting adventure using this month’s Spellbinders Stitching kit! I am diving into the art of hand-stitching to create a whimsical pineapple card that’s as vibrant as it is heartfelt. So, grab your needle, thread, and a sprinkle of creativity as we embark on this delightful journey together!

The Deluxe Caboodle

I also wanted to mention what a wonderful deal the Deluxe Caboodle Kit is. You save 60% off all TEN kits for the month + you get a bonus gift. So, if you are thinking about multiple kits, consider the Caboodle. The current cost is $120 but the kit value is $315, which is 60% off!

Stitched Pineapple Handmade Card

Die cut and hand stitched pineapple card in yellows, golds, and greens.

My Cardmaking Process:

  • The kit has 6 cutting dies and I started by cutting all my pieces with my Platinum 6 die cutting machine. I used the Happy Day Assorted Cardstock Pack + a sheet of Pesto for a 4th shade of green.
  • Spellbinders has a nice selection of stitching accessories in their shop that you can find HERE. I used a bronzy gold thread for my pineapple.
  • When I started stitching, I took two strands of floss, separated them one at a time, brought them together and then stroked and lengthened them until they seemed tame and ready to use.
  • I usually stitch with size 22 Tapestry needles.
  • I like to use 1/8th inch double sided liner tape to attach my floss to the die cut.
  • Remember to keep your floss taught as you stitch.
  • When I move from one area to the next, I run the floss through the just finished stitched area to keep the thread secure. This gives a nice look on the finished project.
  • Don’t stitch with threads that are too long or they are likely to knot. 
  • When I was done, I added a bit of Bearly Glue to the ends so that they would stay in place.
  • To finish my project I embossed white cardstock with the my longtime favorite embossing folder: Intertwined Lattice.
  • I hot foiled my sentiment with Yana’s Special Glimmer Sentiments and my Glimmer Hot Foil System.
  • I added 6 Opal Gems around the pineapple with my Ninja Pickup Tool.

Helpful Links:

Spellbinders Club Info:

  • Clubs Preview on the 1st of each month.
  • Club members can cancel, upgrade or change clubs from the 1st-5th of each month. Popular Clubs frequently sell out during this period so club members get first dibs on everything.
  • NEW for 2024: Club Members get EARLY access to new releases on the 6th!
  • On the 6th, Clubs become available to non-members.
  • On the 27th, Club registration closes for the current month.
  • If a club did not sell out, you can buy under “Shop Past Clubs”. Past kits are available on the 10th of the FOLLOWING month.

Thanks for stopping by!

Karen

Cardmaking Kit

Spellbinders | Stitching Die of the Month | April 2024

Spellbinders April 2024 Stitching Die of the Month handmade card.

It’s that time of the month again….time for Spellbinders April Club Kit releases. Today, I am sharing my floral stitched card. I know I always say this, but the April Stitching kit is a real beauty.

One of the things I like about stitching is that the project is transportable. I stitched my flowers in a doctor’s waiting room and I completed the leaves in my backyard on a beautiful Spring day (see photo below).

The Deluxe Caboodle

I also wanted to mention what a wonderful deal the Deluxe Caboodle Kit is. You save 60% off all TEN kits for the month + you get a bonus gift. So, if you are thinking about multiple kits, consider the Caboodle. The current cost is $160 but the kit value is $315.

Spellbinders Stitched Wall Hanging Kit

Spellbinders Hand Stitched Card using Die of the Month Stitching Club Kit.

My Stitching Process:

  • The kit has 18 dies and I started by cutting all my pieces with my Platinum 6 die cutting machine.
  • Spellbinders has a nice selection of stitching accessories in their shop that you can find HERE. I used DMC Gold Thread, #818 Soft Pink, #772 Light Yellow Green and #922 Light Copper for this project.
  • When I started stitching, I took two strands of floss, separated them one at a time, brought them together and then stroked and lengthened them until they seemed tame and ready to use.
  • I usually stitch with size 22 Tapestry needles.
  • I like to use 1/8th inch double sided liner tape to attach my floss to the die cut.
  • Remember to keep your floss taught as you stitch.
  • When I move from one area to the next, I run the floss through the just finished stitched area to keep the thread secure. This gives a nice look on the finished project.
  • Don’t stitch with threads that are too long or they are likely to knot. 
  • When I was done, I added a bit of Bearly Glue to the ends so that they would stay in place.
  • To finish my project I embossed white cardstock with the my longtime favorite embossing folder: Intertwined Lattice.
  • I used the Press and Seal method to keep my elements together after I arranged them. Place Press and Seal over arrangement, flip them over, apply glue, flip back over and adhere to card.

Other Supplies and Products Used:

Isn’t this a great place to stitch?

Handmade stitching card showing you can work on your stitching card anywhere including vacation or your backyard.

A Few Notes About Spellbinders Club Kits

  • Clubs Preview on the 1st of each month.
  • Club members can cancel, upgrade or change clubs from the 1st-5th of each month. Popular Clubs frequently sell out during this period so club members get first dibs on everything.
  • NEW for 2024: Club Members get EARLY access to new releases on the 6th!
  • On the 6th, Clubs become available to non-members.
  • On the 27th, Club registration closes for the current month.
  • If a club did not sell out, you can buy under “Shop Past Clubs”. Past kits are available on the 10th of the FOLLOWING month.

Helpful Links:

Thanks for stopping by!

Karen

Cardmaking Kit · stitching

Spellbinders | Stitching Die of the Month | March 2024

Spellbinders March 2024 Stitching Die of the Month Club Kit handmade card.

Spellbinders March 2024 Stitching Die Club Kit is another winner! I thought February would be hard to beat, but “Stitched Read and Sip” is a real favorite. I love to read, drink hot tea and stitch so add in some florals and this kit is a keeper. I’ll also be incorporating the versatile elements into future products as well.

Stitched Read and Sip Handmade Card

Beautiful stitched handmade card with a teacup, books and floral elements.

I really enjoyed making this card! I was going to the beach and thought I’d like to stitch this card on our balcony while I listened to the waves. Before we left, I die cut my elements. When stitching, I like sturdy substantial bases, so I die cut the teacup and ornate book two times and then glued them together.

Papercrafting and stitching at the beach.

My Stitching Process:

  • The kit has 17 dies and I started by cutting all my pieces.  I die cut the stitching elements twice and then glued them together for a sturdy substantial panel. This die cutting didn’t take long, but I think the extra effort was worth it. I recently purchased a Platinum 6 die cutting machine, and I have to say, I pull it out instead of my Gemini Junior. I wish I had bought one earlier.
  • Spellbinders has a nice selection of stitching accessories in their shop that you can find HERE. I used DMC Gold Thread for this project.
  • When I started stitching, I took two strands of floss, separated them one at a time, brought them together and then stroked and lengthened them until they seemed tame and ready to use.
  • I like to use 1/8th inch double sided liner tape to attach my floss to the die cut.
  • Remember to keep your floss taught as you stitch.
  • When I move from one area to the next, I run the floss through the just finished stitched area to keep the thread secure. This gives a nice look on the finished project.
  • Don’t stitch with threads that are too long or they are likely to knot. 
  • When I was done, I added a bit of Bearly Glue to the ends so that they would stay in place.
  • To finish my project I embossed white cardstock with the Tiny Dots Embossing Folder.
  • I arranged my scene and added a chipboard “Friend” sentiment from Serenade of Autumn Chipboard Stickers. I love how substantial these sentiments are!

A Few Notes About Spellbinders Club Kits

  • Clubs Preview on the 1st of each month.
  • Club members can cancel, upgrade or change clubs from the 1st-5th of each month. Popular Clubs frequently sell out during this period so club members get first dibs on everything.
  • NEW for 2024: Club Members get EARLY access to new releases on the 6th!
  • On the 6th, Clubs become available to non-members.
  • On the 27th, Club registration closes for the current month.
  • If a club did not sell out, you can buy under “Shop Past Clubs”. Past kits are available on the 10th of the FOLLOWING month.

Helpful Links:

Thanks for stopping by!

Karen