cardmaking · Die cutting · Stamping

Vintage Charm & Soft Elegance: Hero Arts March 2025 Release

Welcome to another exciting Hero Arts release! For March 2025, I created two unique cards that highlight the versatility of the new products. One is a vintage-inspired die-cut design featuring the Suitcase and Florals Fancy Die, while the other is a beautifully blended, pastel-hued circular stamped card. Let’s jump into the details!

Key Kits and Products Used:

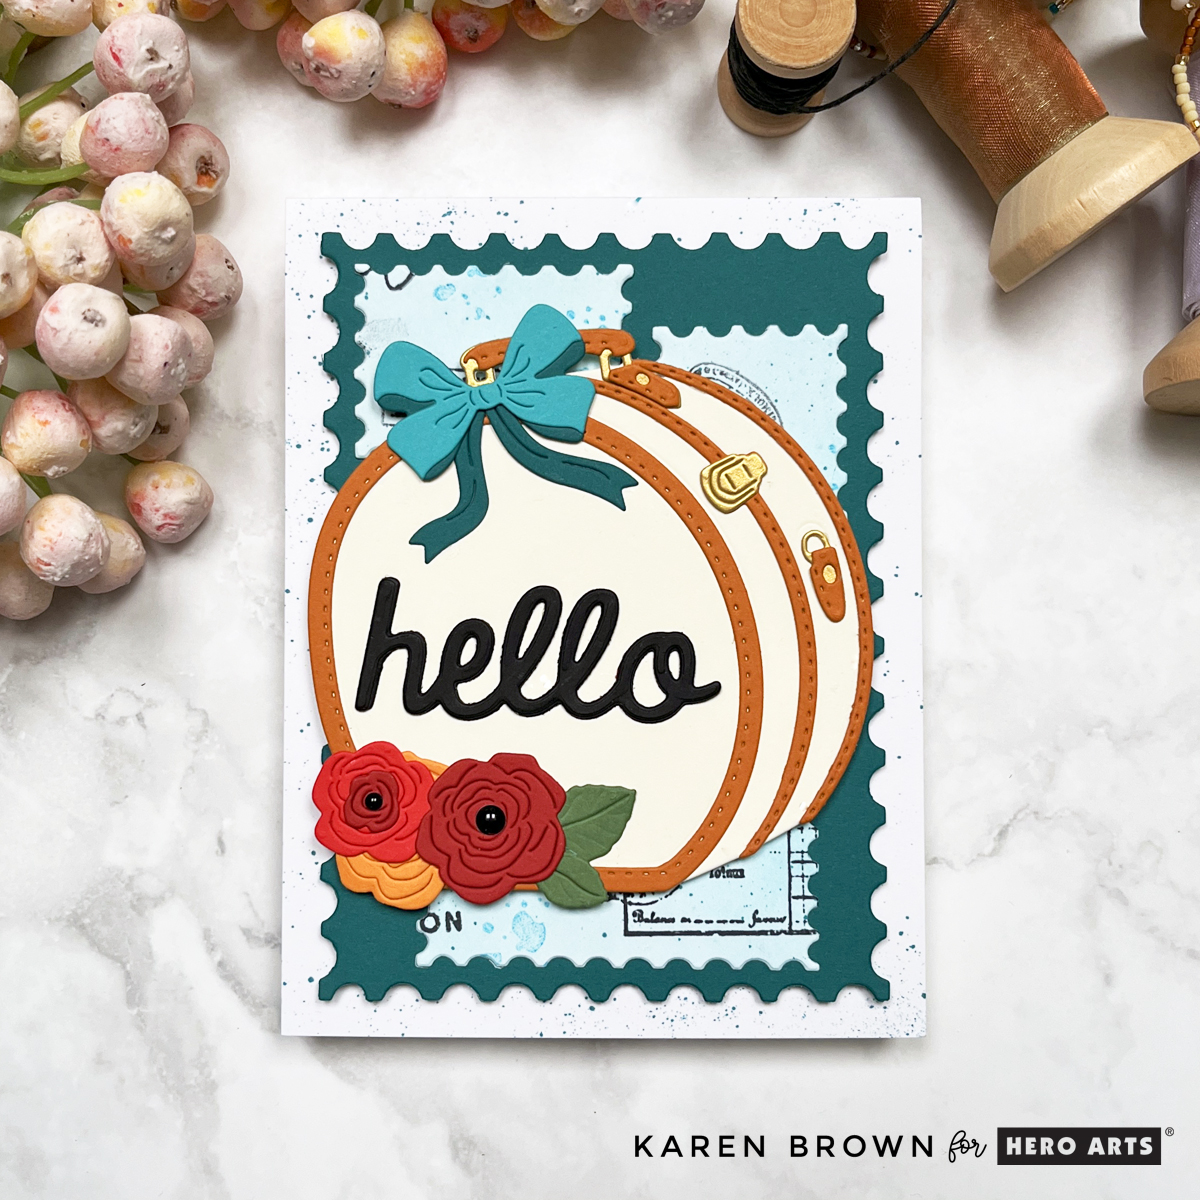
Card 1: Vintage Suitcase & Florals

A handmade card featuring a cream and tan die-cut hat box-style suitcase with a teal bow and florals, set against an aqua background of stamped vintage maps and postmarks.

This card is all about vintage charm! The focal point is a cream-colored hat box-style suitcase with tan trim, die-cut from the Suitcase and Florals Fancy Die. A lovely teal bow is tied to the handle, and delicate die-cut flowers add a soft floral touch.

Hero Studio Suitcase and Florals die cut handmade "hello" card with a charming hat box luggage, teal bow, and flowers in orange and red. The background is a mixed media postage stamp theme.

Design Details:

  • Color Palette: Teal, aqua, alabaster cream, marigold, and red from the Color Wheel Cardstock Collection .
  • Background: I loosely ink blended Splash ink on white cardstock and then added Splash ink splatters on the aqua panel and A2 cardbase. I then randomly stamped the panel in black ink using the Vintage Maps & Ledgers and Vintage Postmarks & Tickets stamps. Using my Nesting Postage Stamp Infinity dies, I die-cut stamp shapes that would serve as my background.
  • Framing: A vivid Blue Spruce mat behind the die-cut stamps makes the alabaster hat box pop.
  • Sentiment: A die-cut, scripty “hello” (Friend Words Sentiment Dies) that complements the vintage theme. Two black enamel dots in the center of the flowers continues the bold color palette.
Pro Tip:
A deep Blue Spruce background mat is key to making lighter elements like the alabaster suitcase stand out.

Color Swatching:

To help with color coordination, I also swatched my cardstock colors using the Spellbinders Color Swatch Petal Dies—a handy way to visualize your palette before committing to a design!

Color Wheel Cardstock Colors used: Alabaster, Terracotta, Poppy, Cranberry, Carrot, Teal Topaz, Blue Spruce, Fern and Brushed Gold.

You can find the entire Color Wheel Collection HERE.


Card 2: Pastel Bow-Themed Circular Card

A round handmade card with a stamped and Copic-colored bow pattern transitioning from yellow to pink, coral, lavender, and blue. The card base is deep charcoal gray.

For my second card, I went with a soft, rainbow gradient-colored design that’s easy to recreate. This is a DIY card that’s great for beginner cardmakers, offering a fun way to experiment with color blending and shaped card designs. The 6 x 6″ Bold Print makes stamping so easy! The bows are already laid out perfectly, so no need to spend time arranging your dies.

Design Details:

  • Stamp: The “Bows” Bold Cling Stamp stamped on smooth white cardstock and colored with pastel Copic markers.
  • Color Gradient: Blends from creamy yellow at the top to soft pinks, corals, lavender, and blues at the bottom.
  • Card Shape: Using my Nesting Circle Dies, I die cut a circle from my Copic colored panel. To make my card base, I die cut two circles from Charcoal cardstock, scored the back one at 3/4″ and then glued the tops together. To make this card even easier, you could make a traditional A2 rectangular card, which would exclude using infinity dies.
  • Finishing the Card: I added a small “for you” heat embossed sentiment and some Clear Enamel Dots.

Pro Tip:

Use craft foam behind your card panels for a polished, professional look with added dimension!

An easy DIY stamped card with 10 girly bows of different shapes and sizes, Copic colored in a rainbow gradient.

Final Thoughts

Both of these cards showcase the March 2025 Hero Arts release in different ways—one with vintage textures and layers, the other with simple stamping and coloring. Whether you’re a fan of intricate die-cutting or quick, colorful stamping, there’s something in this release for you!

Let me know in the comments—which card style do you love most? And don’t forget to check out the full Hero Arts release for more inspiration!

cardmaking · Die cutting

Spellbinders | Rocky the Dancin’ Yeti | Monster Friends Collection

Adorable female die cut Yeti handmade card in oranges and purple.

Imagine receiving a cheerful Yeti card to brighten your day—whether it’s a simple “hello” or a get-well wish, this handmade card will surely bring a smile. This die set is called Rocky the Dancin’ Yeti, buy I’ve renamed my set “Roxy” since I created a sweet furry little girl. Rocky is a new Spellbinders Paper Arts release.

Yetis are mythical Himalayan Abominal Snowmen, but this cutie from the Monster Friends Collection is not frightening at all! Using die-cutting techniques, you can easily bring this charming character to life. This die set is great for playing card-making dress up. The kit includes lots of extra accessories like scarves, ear muffs, knit caps etc.

Creating This Card:

  • I started by die cutting my Yeti components using my compact Scout Machine. I love small sets that work well with table die-cutters. I used Persimmon, Peridot and Sunshine from the Happy Day Cardstock Pack. I used Amythest for my base, and I really like the contrast. The other colors came from my scrap drawer.
  • I frequently use Sarah Renae Clarks Color Cubes Volume 1 and Volume 2 for color inspiration. I received mine for my birthday and they are a great gift!
  • My background and mats were die-cut using my Scallop Edge Infinity Dies.
  • I chose a fun font sentiment from Hero Arts Birthday Animals Stamp.
  • TIP: Some of the pieces are small so I found using a fine tip glue worked well. I used Bearly Glue.
Rocky the Dancin' Yeti die cut Hello handmade card from Spellbinders Monster Friends kit.

Happy crafting, and I hope Roxy the Yeti brought you a bit of cheer!

Karen

cardmaking · Die cutting · Stamping

Unique Cards Inspired by Retro and Urban Vibes + Ralph Tyndall/Hero Arts Instagram Hop

Iconic GameBoy Retro Game theme shaped handmade card from the Ralph Tyndall collection from Hero Arts.

Phenom Ralph Tyndall collaborated with Hero Arts for a fun new Fall Release. I created two iconic cards that are part of Hero Arts Instagram Hop that you can participate in HERE.

You can find Ralph Tyndall’s Fall Collection HERE.

Retro GameBoy-Themed Card 🎮

As a 90s kid at heart, I couldn’t pass up the chance to create a card inspired by the iconic GameBoy! The nostalgic colors, the pixelated graphics, and that satisfying ‘click’ of the buttons—this card was such a blast to make.

Key Ralph Tyndall Supplies:

Directions for Creating the Retro Game Card:

  • Tip 1: I snipped the star, heart, pull tab and game cartridge from the die set and then die cut the rest of the elements as one piece. This ensured that I had perfect placement for the buttons and screen. If you don’t snip the above mentioned components, they will die cut the back of the card.
  • I used Mustard Cardstock for the body, Charcoal Cardstock for the rim of the screen and Vellum for the screen
  • I die cut the screen frame and buttons 3 times each and glue the pieces together for a realistic 3D look.
  • The die set has a great coordinating Retro Game Stamp Set that really makes the game come alive. I chose Winner for my Screen plus A & B, Select and Start Buttons. There are LOTS of Game related words included in the stamp set.
  • I added an Antique Ivory liner to inside of my card.
Fun handmade card for the video gamer in you life - GameBoy Retro Game die set.

This GameBoy inspired card was one of my favorites to create, and I have to say Tetris was my favorite back in the day! It’s the perfect card for any gamer or someone who loves a throwback to the good ol’ days of handheld gaming.

Urban Heroscape Card

Colorful Urban Cityscape Heroscape card featuring stamps from Ralph Tyndall.

For my second card, I went in a completely different direction with a graphic linear urban Heroscape design. Ralph designed this set too and it is called Street View Heroscape. I’ve always been fascinated by cityscapes, especially the way modern architecture plays with lines and geometric shapes. So, I wanted to create a card that captured the energy of an urban environment using simple, clean lines.

Street View HeroScape Stamps by Ralph Tyndall and Hero Arts - handmade card.

I chose not to use the base stamp because I wanted to emphasize the linear grapic look of this stamp set. The set also comes with coordinating dies that you can find HERE.

TIP: Prior to stamping the Pool Party color building, I masked the Indigo and Purple Galaxy buildings with post it notes for clean stamping.

Supplies Used:

Die cutting · Wax Seals

Adding a Touch of Elegance: Using Wax Seals and Infinity Dies on a Floral Handmade Card

Adding wax seal elements to your cardmaking.

If you’re looking to add a touch of elegance and sophistication to your handmade cards, incorporating wax seals and infinity dies can elevate your designs to new heights. In this post, we’ll explore how to use these tools to create a stunning floral handmade card.

Today, Spellbinders released a wonderful new collection called Sealed 3D Botanical and I chose Scallop Labels and Tags Infinity Dies and the Forest Mushroom Wax Seal. Infinity Dies are definitely one of my most used craftroom essentials and wax seals are so interesting and fun!

Adding texture to your cardmaking with Mushroom Forest Wax Seals, Scallop Labels and Tags Infinity Dies and embossing folders.

Spellbinders 3D Botanical Collection

I knew I wanted to make a shaped floral card with a wax seal medallion on my vase. Here are step-by-step directions for this card:

  • I started by making a bunch of wax seals, which I really enjoy. If you’d like more details, I have a blog post titled 18 Tips and Tricks for Making Wax Seals that you can read HERE. I decided to use two Royal Blue seals and I planned my color scheme around the two seals. Spellbinders Wax Seal Kit is such a fun addition to any craftroom and I have really enjoyed playing with my kit this year.
  • Using my silver Deco Color Paint Pen, I added highlights to the wax mushrooms and foliage. Interestingly, the color looks a little more gold in the photographs, but it is silver in person.
  • I die cut my vase and flowers using one of my new favorites: Fresh Picked Vase. I used Cosmic Sky, Periwinkle, Charcoal and Coral cardstocks.
  • I wanted a bit more texture so I embossed my vase using my Luxe Backdrop Emboss and Cut 3D folder.
  • As I mentioned, I wanted a shaped card so I took an A2 Side Fold Card Base and die cut my white base with the Scallop Labels and Tag die. I made sure that the left cutting edge was to the left of the fold so it would stay intact. Then I cut a Periwinkle and White Mat and assembled my card with Bearly Glue and a few Foam Adhesive Squares.
  • I also made a coordinating wax seal envelop for my card that you can see below.

As I said, I really enjoy making wax seals so I made some extras for future projects. The other colors are Indigo Ink, Pistachio, Velvet Rose and Gold.

Adding wax seal elements to your envelops.

Conclusion

Using wax seals and infinity dies in your handmade cards adds a level of detail and elegance that will impress any recipient. These tools allow you to create intricate designs and sophisticated touches that make your cards truly stand out. Whether for birthdays, weddings, or just because, a floral handmade card with these elements will be cherished and remembered. Happy crafting!

Karen

Best Of · cardmaking · Die cutting

Spellbinders | Best Cards of 2023

Best Spellbinders Cards of 2023

I enjoy looking back through my projects, and as we end the year, I wanted to write a post about my most popular Spellbinders cards. I loved so many of my creations, but these are the crowd favorites for 2023.

Fan Favorite 2023 Card

By far, my most popular card on Instagram, Pinterest and my blog was this pink Be Bold Blooms Hello card. I wrote a blog post on how to use this kit three ways, and all the cards were well received. You can read my original post HERE.

Be Bold Blooms Hello Card

Products Used:

Simon Hurley’s Snow Globe Christmas Card

Best Christmas Card

My most popular Christmas card in 2023 was my Simon Hurley teal Snow Globe. I call it a CAS Die Cut Card….limited color palette but high visual impact. You can read my original post HERE.

Products Used:

Awesome Oval Shaped Cards

Best Shaped Card

Shaped dies can really change the look of your cards and projects so I loved Spellbinders Stylish Ovals Collection. You can see 4 cards I created with this collection HERE.

Products Used:

Unique Bow Shaped Card

Best Card for Female Friends

This giant die cut bow kit was one of my favorite releases this year! So versatile…..perfect for the holidays, birthdays, showers, graduation etc. You can read my original post HERE.

Products Used:

I’d like to wish you a Happy and Healthy New Year!

Karen

cardmaking · Die cutting · papercrafting

Spellbinders | Stylish Ovals Collection 4 Ways

Spellbinders Stylish Oval Hello You Floral Dies (S5-565) + Oval Nesting Dies (S5-562) on a handmade card.

Oval Shaped Cards

Shaped dies can really change the look of your cards and projects so I was excited to see Spellbinders new Stylish Ovals Collection. I created the first card for my mom’s upcoming birthday. Red is her signature color so I paired corally reds with aquas and greys for a very eye-catching color palette.

To make my oval cardbase, I used the largest oval die for the base. I took a white A2 top folding card base and put the top edge of the die just above the fold so that the die would cut around the top. I die cut the stem twice and glued together for added heft and stability.

Supplies Used:

Shaped Oval Card with Spellbinders Stylish Ovals Collection

Spellbinders Floral Die Cut Cards

Spellbinders Stylish Oval Hello You Floral Dies (S5-565) + Oval Infinity Punch and Pierce Plate Cover Die handmade card.

I needed a card for a bridal shower so I made a second oval shaped card with die cut flowers. This one is smaller than card 1, it is 5″ x 3 3/4″. I think it makes for a sweet gift encloser.

I used the same products as card one but added a pretty little oval frame from the Infinity Punch and Pierce Plate Cover Die. This die is so beautiful and a has an incredible amount of detail, but it cuts beautifully. I used just the middle section on this card and I used the other 2 sections on card #4 below.

Products Used:

White oval shaped card with die cut red flowers.

Die Cut Rainbow Arch Birthday Card

Colorful Rainbow Arch card with Spellbinders Stylish Oval Nesting Dies (S5-562) handmade card.

In case you haven’t noticed, I LOVE these oval nesting dies. Just for fun, I wanted to make a bright cheerful rainbow card so I selected 8 bright shades of cardstock and then die cut my rainbow elements.

This type of birthday card is so versatile that I love to keep them on hand. I could send this to anyone…man, woman or child.

Products Used:

Festive Rainbow Colored Die Cut Birthday card.

Spellbinders Infinity Punch and Pierce Plate Cover Die

Spellbinders Stylish Oval Infinity Punch and Pierce Plate Cover Die (S5-566) handmade card.

This cover die is gorgeous in person! I started by making a rainbow gradient background with inks and blending brushes. I then placed the center and exterior components of the cover die over the top and added two floral embellishments that echo the spring colors.

Supplies Used:

Oval pierced cover die with spring ink blending on a handmade card.

I hope I offered some inspiration for your crafting.

Karen

Uncategorized

Dare 2B Artzy 3D Shaped Scene Card

I went to a card convention in Irving, Texas and bought this fun stamp  and die set (Flowers for Mom) by Dare 2B Artzy.  They had the cutest booth  full of inspiration.
Handmade 3D shaped scene card.
   When I saw their current challenge I thought it would be fun to do a 3D shaped scene card. I stamped, colored with Zigs and then die cut three floral images.  Next I made made my card base by cutting a 5 1/2\” x 5 3/4\” panel and scoring at 3/4\” and 1 1/2\” on each end.  I then used brushes and Dare 2 B Artzy \”Blue Sky\” dye ink to create a sky background.  I wanted to layer the flowers so I created two panels of  \”grass\”. The back \”hill\” is 1/4\” above the sky panel so the card actually has three levels.

Recipe:
Dare 2B Arzy Flowers for Mom stamps
Dare 2B Artzy Joyful Flowers dies
Dare 2B Artzy Blue Sky die ink
Bristol card stock
Zig Clean Color Real Brush Markers

I am entering this card in:
Dare 2B Artzy Shaped Card Challenge – I created a 3D shaped card for my flowers.

Lil Red Wagon Repeat Challenge – I repeated the layers of flowers for a full dimensional look.

AAA Birthday \”For the Girls\” Challenge  I just discovered the AAA Birthday Challenge. I love their sister challenge AAA Cards. 
Thanks for stopping by!
Karen