Cardmaking Kit · stitching

My Favorite Stitching Kit Yet! | Spellbinders November 2025 Stitching Die of the Month

Adorable handmade card with a Chihuahua dog peeking out of a die cut handstitched purse with colors in 4 shades of aqua.

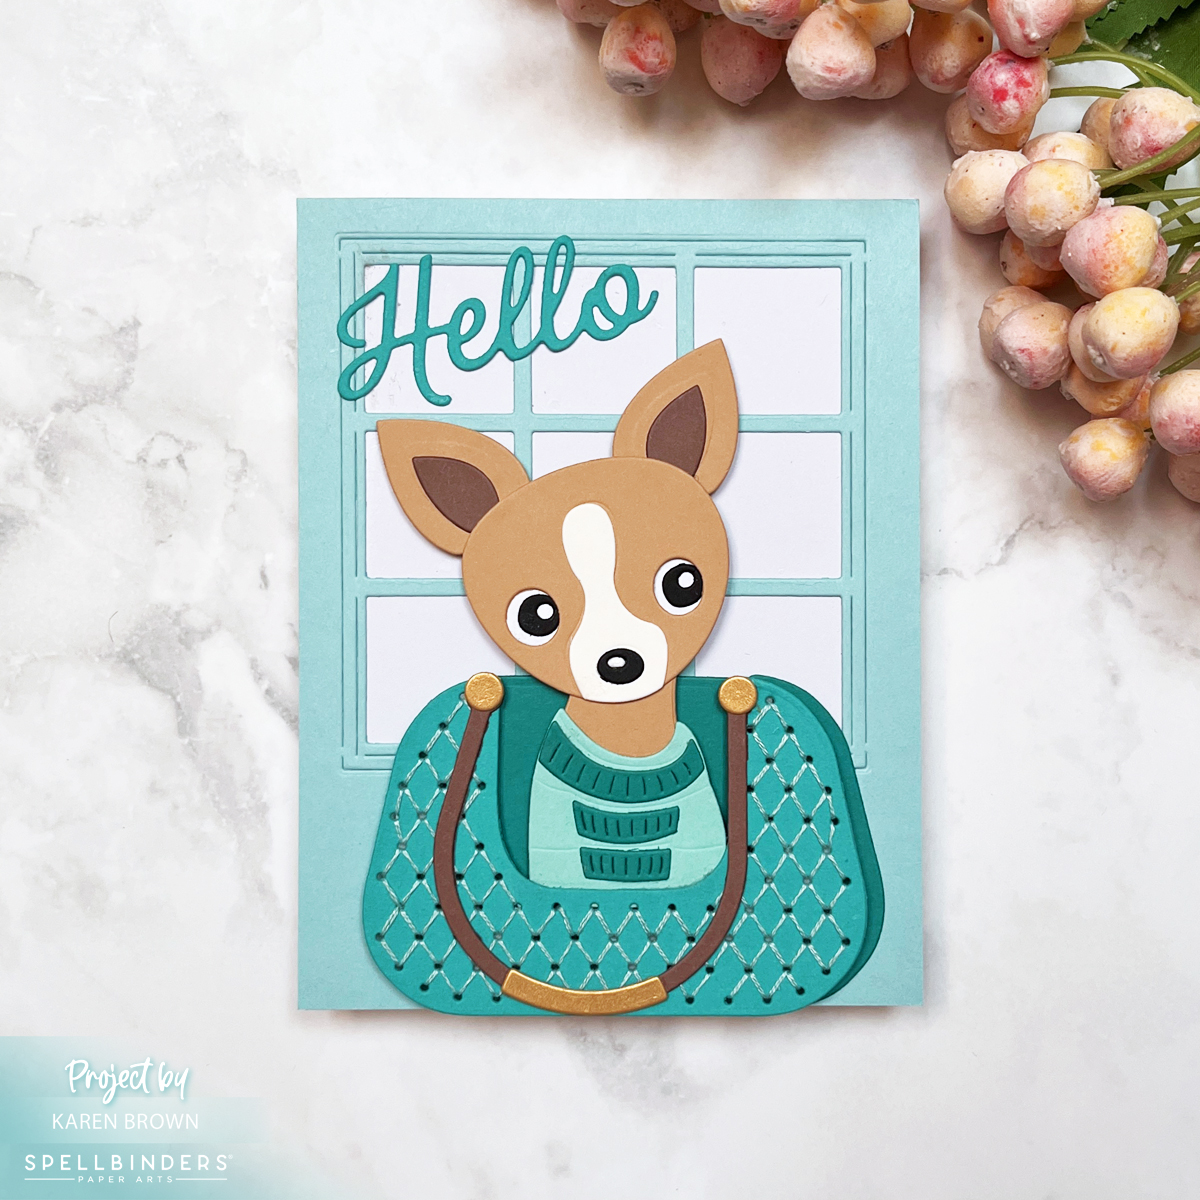
If you love stitching dies and adorable pups, you’re in for a treat with the Spellbinders November 2025 Stitching Die of the Month. This kit is pure joy — it features the most darling Chihuahua peeking out of a stitched purse, complete with a tiny sweater and irresistible details. I think this might be my favorite stitching kit of the year!
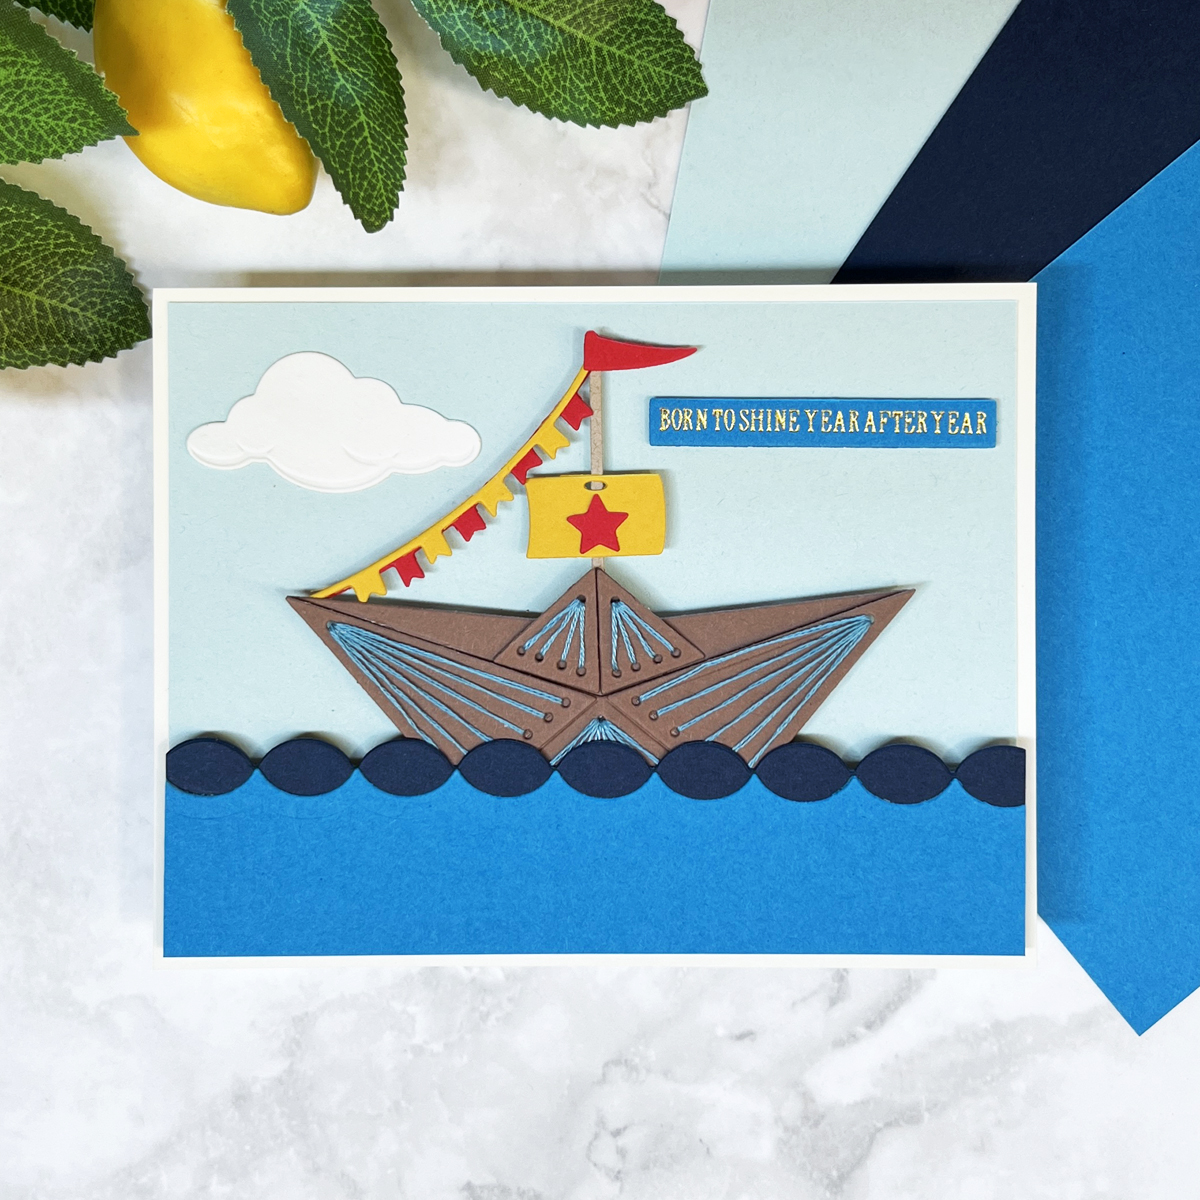
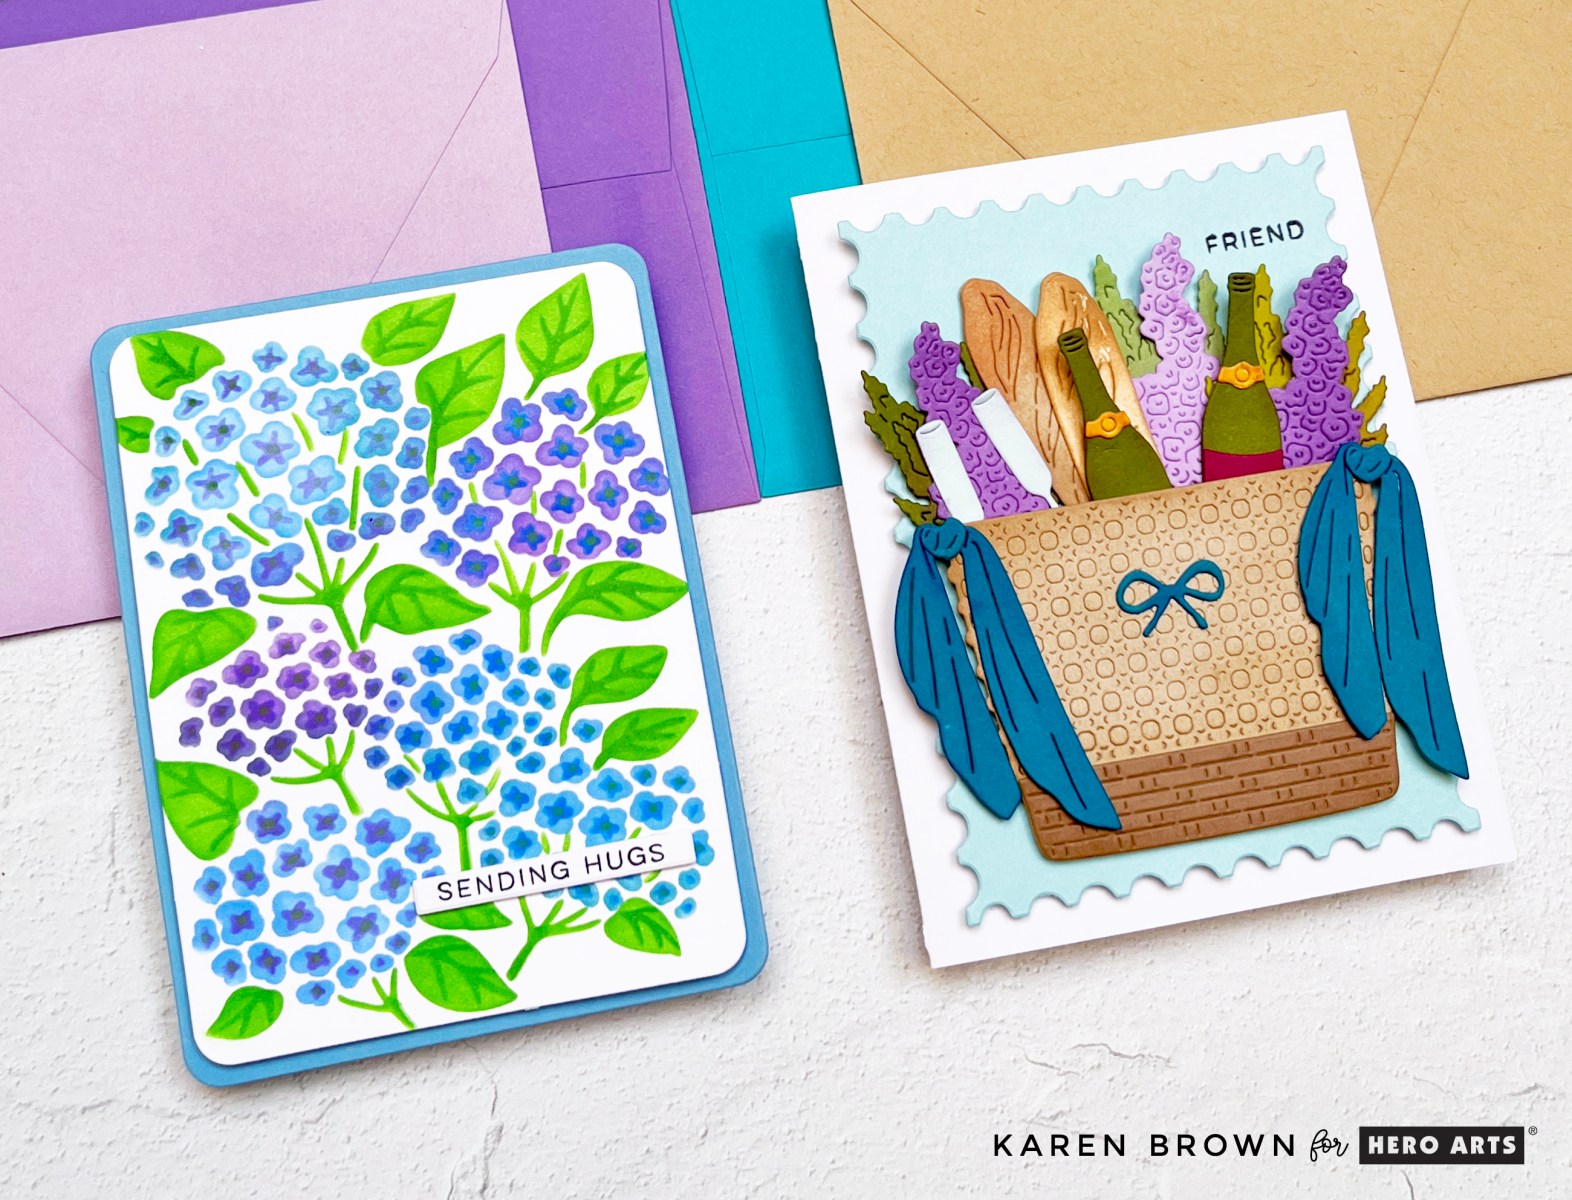
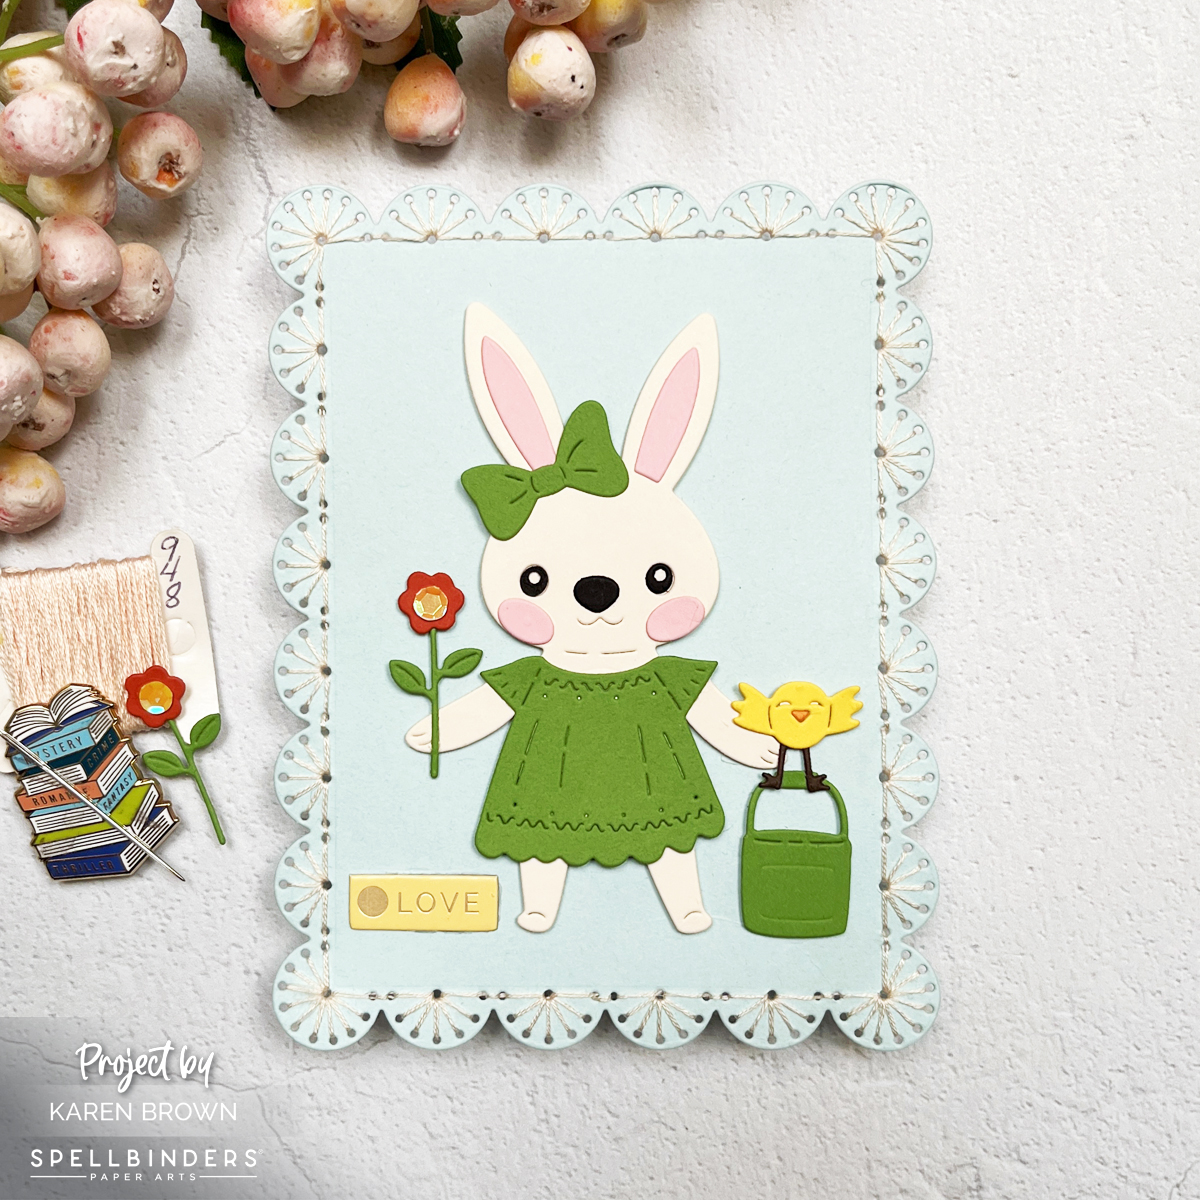
✂️ A Stitch Above the Rest

For the purse, I followed the etched diamond stitching guide using DMC #964 aqua floss (two strands). I like to die cut each stitched panel twice and glue them together before I start stitching — it gives the piece a nice sturdy base and helps it hold its shape.

The stitching adds beautiful texture, and the aqua floss blends perfectly with the Teal Topaz ColorWheel cardstock.

🎨 My Color Recipe

Here’s the cardstock and stitching palette I used:

Fun dog theme hand stitched die cut card created with Spellbinders November Stitching Die of the Month Club Kit.

👜 The Perfect Sentiment & Finishing Touches

For the sentiment, I used the “Hello” Die from Hero Arts’ November Fancy Die Kit — it’s the perfect elegant touch without stealing focus from the little pup. The background features the Hero Arts Elegant Window Fancy Die, which frames the scene beautifully.

The main ColorWheel palette of aquas and neutrals (Teal Topaz, Blue Spruce, Waterfall and Fawn) keeps everything cohesive while letting that sweet Chihuahua shine. The stitched purse adds just the right amount of dimension, making this card one of those “pick up and look closer” moments.

This one’s going to my daughter’s mother-in-law, who happens to have two Chihuahuas — so I know it’ll be a hit!

I have an adorable Color Block Food Theme card coming on November 11th…come back and take a peek.

Helpful Links:

Cardmaking Kit · Die cutting · stitching

Spellbinders August 2025 Club Kits: Under the Sea Magic!

2 colorful aquatic theme die cut scene cards featuring bright bold colors, a graphic look  and LOTS of fish.

This month’s Spellbinders Club Kits dive deep into all things aquatic—and let me tell you, these kits are fin-tastic! 🐠💦 From vibrant fish to stitched sailboats, the August kits are perfect for summer crafting or anytime you want to send a smile that makes a splash. I created three nautical-themed cards using the Die of the Month, Large Die of the Month, Stitching Die of the Month, and my Caboodle Bonus Gift.

🐟 Card 1: Colorful Coral Reef Scene (Die of the Month + Caboodle Bonus Gift)

Die cut coral reef scene with colorful fish on Oceanside blue background. Made with Spellbinders August 2025 Die of the Month and Caboodle Bonus.

This card is bright, whimsical, and just so much fun to put together! I started with a rich Oceanside cardstock panel for the background “water.” Then I built a vibrant underwater world using the Die of the Month and my Caboodle Bonus Gift for even more fishy flair. I skipped the scuba diver die cuts and instead filled the scene with colorful fish in pink, coral, orange, purple, yellow, white, and aqua, all cut from my scrap bin. 🌈

TIP: Many of the elements are quite small—my Bearly Art glue with the fine-tip nozzle was essential for precise placement. I love that this card feels playful and full of life without being fussy!

Die cut card with lots of cute colorful fish swimming around a coral reef.

🐡 Card 2: Make a Splash with the Large Die of the Month

Pink fish in a plastic bag on blue background with “Make a Splash” sentiment. Made with Spellbinders August 2025 Large Die of the Month.

This Large Die of the Month card features the cutest little pink fish swimming home in a plastic bag! It’s such a clever, nostalgic design. I layered the fish-in-bag die cut over another Oceanside background and added a pink string “tie” at the top of the bag. The sentiment “Make a Splash” is included in the kit and absolutely perfect. It’s a great all-occasion card—birthday, congratulations, or just because.

If you like the graphic look of these first two cards, you might be interested in reading my post: What’s Brewing.

Darling "fish in a plastic bag" die cut card card in pinks and blues.

🚢 Card 3: Stitched Sailboat on the Sea (Stitching Die of the Month)

Stitched and die cut brown sailboat with red and yellow flags on blue sea and “Born to Shine Year After Year” sentiment. Made with Spellbinder's August 2025 Stitching Die of the Month.

My final card gives major paper boat vibes, thanks to the Stitching Die of the Month. I die cut the boat from brown cardstock and stitched the details with marine blue embroidery floss. The little red and yellow pennants waving from the mast make it feel festive and fun. 🌊 I added a blue die cut sea, a white die cut cloud, and hot foiled the uplifting La Dolce Vita sentiment:
“Born to shine year after year.”

Stitching Tip: I die cut the boat twice and layered the pieces together before stitching for extra sturdiness. I used two threads of floss for the perfect amount of detail.

Masculine die cut and hands-stitched boat card perfect for birthdays.

These cards came together so easily and would be adorable for summer birthdays, kids’ celebrations, or just brightening someone’s day. Don’t forget—this is all part of the August 2025 Club Kit Release, and if you’re a Deluxe Caboodle subscriber, you get everything plus the bonus die, and save a whopping 58%!

Helpful Links:

cardmaking · Cardmaking Kit · stitching

Spellbinders | June 2025 Club Kit Cards

4 Spellbinders June 2025 Club Kit Cards in a fun nautical theme featuring a walrus wearing a rain slicker, die cut seaside village, cheery little sailboat and a stitched Captains Wheel with Captain Seagull.

The June 2025 Spellbinders Club Kits are making waves—and honestly, the buzz is real. This release might just be the best in a long time. If you’ve been waiting for the perfect moment to dive into the Deluxe Caboodle (all the kits plus the bonus item and a hefty 58% savings!), now’s the time to anchor your subscription!

Set Sail with the Spellbinders June Club Kits!

This month’s kits are delightfully nautical and full of personality. I had so much fun creating four playful and unique cards that capture everything from charming seaside scenes to silly sea life.

Card 1 – Graphic Nautical with the Die of the Month

Bold inky blue background with a die cut walrus in a yellow raincoat and red hat next to a seagull holding a flag. "Ahoy!" sentiment.  Spellbinders June 2025 Die of the Month Kit card in a bold graphic style.

Minimal color, maximum charm.
I created a bold and graphic card using the Die of the Month kit. The dark Oceanside cardstock background makes the characters pop—a seriously adorable walrus in a bright Beeswax yellow rain slicker and Poppy red beanie, alongside a flag-waving seagull in matching nautical flair. The clean white “Ahoy!” sentiment lets this duo shine.

The walrus was die cut from Fog and Anchor cardstocks and softly ink blended on the muzzle for extra dimension. All the cardstock is from the Color Wheel Sampler Pack.

Who knew a walrus could steal the show?

A fun die cut card featuring a Walrus wearing a yellow raincoat and red beanie with a seagull perched on his head:  Spellbinders Die of the Month Club Kit for June 2025.

⛵ Card 2 – Cheery Sailboat with the Caboodle Bonus

Small mint green notecard with a red, white, and yellow sailboat on blue waves and the sentiment "sending a wave."  Spellbinders June 2025 Deluxe Caboodle bonus gift.

This month’s Deluxe Caboodle Bonus Gift is a sweet little die cut sailboat, and I couldn’t wait to take it for a spin!

I crafted a bright red, white, and yellow boat cruising on gently layered waves of blue-green and white cardstock. Becuase the mast is somewhat delicate, I die cut the boat twice and glued together for a sturdier focal point. The wave dies are part of the Large Die of the Month Kit. The background is a soft mint green, die cut with my go-to Postage Stamp Infinity Dies. The sentiment, “sending a wave,” perfectly matches the cheerful tone. The card is slightly smaller at 4½ x 5″—perfect for a quick note.

Adorable die cut sailboat note card with a "sending a wave" sentiment using the June 2025 Spellbinder bonus gift from the Deluxe Caboodle.

🏠 Card 3 – Rainbow Coastal Village with the Large Die of the Month

A die cut seaside village scene card with rainbow sherbet-colored houses, blue waves, and a “just for you” sentiment. Spellbinders June 2025 Large Die of the Month kit.

Next up: a charming seaside scene built with the Large Die of the Month kit. I assembled four tiny houses in sunny rainbow sherbet hues nestled beside rolling waves. It’s a joyful and relaxing little coastal village, with a “Just for You” die cut sentiment on top.

Once again, the background is mint green, die cut with my postage stamp die for that crisp framed finish.

Spellbinders June 2025 Large Die of the Month card featuring a tiny village of rainbow colored cottages with rolling waves.

⚓ Card 4 – Stitched Captain’s Wheel with a Playful Seagull

Card with a Stitched captain's wheel on an aqua stenciled background with a seagull in a red and white striped shirt and “ahoy” sentiment.  Spellbinders June 2025 Stitching Die of the Month Kit.

Stitch lovers, you’re going to adore this one! I used the Stitching Die of the Month to create a weathered captain’s wheel, stitched with DMC 437 (tan) using two strands of floss. I doubled up the die cuts for stability before stitching.

The background is stenciled using Hero Arts Pebbles and Stones Stencil with Splash ink, giving the look of water or bubbling seafoam. A goofy seagull in a red and white shirt and cap is perched just off center on the wheel for a fun focal point. The included “ahoy” sentiment completes the look.

Spellbinders June 2025 Stitched Die of the Month with Captain Seagull perched on a stitched Captain's Wheel with an aqua and white stenciled background.

Helpful Links:

Whether you’re here for the critters, the stitching, the sea breeze vibes—or all of the above—the June 2025 Club Kits deliver something truly special. ⚓💙

Cardmaking Kit · Die cutting · Stenciling

Hero Arts June Club Kits – Coastal Vibes, Picnics & Petals!

The June 2025 Hero Arts Club Kits bring major Coastal Vibes, and I couldn’t resist turning the Beach Bag die into a dreamy die cut picnic basket, complete with wine, wisteria, and baguettes! Plus, don’t miss my hydrangea stenciled card in blues and purples—perfect for all occasions!

The Hero Arts June 2025 Club Kits are here, and the theme is everything I love about summer: Coastal Vibes! Think breezy afternoons, soft ocean light, and all the charm of an elegant seaside picnic. The kits this month are overflowing with creative possibilities—from charming die cuts to gorgeous stencils. I had so much fun turning these kits into two cards that I’m excited to share with you!

Card 1: A Coastal Picnic Basket

Card featuring a die-cut tan picnic basket filled with baguettes, wine bottles, wisteria flowers, and jewel-toned scarves.

For my first card, I used the June 2025 Card Kit featuring the Beach Bag die set—but instead of a beach bag, I turned mine into a coastal picnic basket bursting with summer goodies!

Inside the basket:
🥖 Baguette-style bread
🍷 Wine bottles and glasses
🌸 Gorgeous Wisteria flowers

To add a bit of flair, I included two flowing scarves draping down the sides of the basket in rich jewel tones, which contrast beautifully with the tan base of the basket. A little light ink blending on all the die cuts added subtle dimension and warmth to the scene. I used the Nesting Postage Stamp Infinity Dies to create my background panel. This die kit is perfect for the foodie in your life or for anyone who enjoys the simple joy of a summer picnic!

Hero Arts June 2025 Card Kit of the Month card featuring a tan picnic basket filled with baguette bread, wisteria flowers, wine glasses and two bottles of wine.

What’s Inside the June 2025 Hero Studio Card Kit?

• Summer State of Mind 6×8 Clear Stamp Set
• Summer State of Mind Coordinating Dies
• Beach Bag Die set
• Sand Embossing Powder, 0.5oz
• 10 Sheets of Cardstock- 2 of each color, 5.5″ x 8.5″ (Fawn, Coral, Seaside, Waterfall, Blue Spruce)

The Whole Studio  includes ALL 5 of the monthly subscriptions in one discounted bundle. Cling of the Month, Stamp & Cut of the Month (new name for the subscription!), Layering Stencil of the Month, Fancy Dies of the Month, and the Card Kit of the Month.

Receive a FREE Hiya Friend Sentiment stamp & die set when you purchase The Whole Studio!

Hero Arts has many different Monthly Kits that you can subscribe to including:

Die Cut Summer Picnic Basket card filled with yummy foodie goodies.

Card 2: Stenciled Hydrangea in Blue & Purple

Layered Stencil Hydrangea floral card in blues and purples with a Periwinkle background.

For my second card, I turned to the stunning new June 2025 Layering Stencils – Hydrangea. I blended blue and purple Hero Arts Inks to create a lush hydrangea bloom that nearly steals the show.

After stenciling, I used my Rounded Rectangle Infinity Dies to trim the panel neatly, and mounted it on a lovely Periwinkle card base. The sentiment is a clean and simple “sending hugs”—just enough to send a warm message without distracting from the florals.

This layering stencil set is so versatile—you could use it for a Get Well, Sympathy, Birthday, Thank You, or even a Mother’s Day card. It’s a floral design that truly fits any occasion.

Hero Arts June 2025 Layering Stencil card with a beautiful blue and purple  Hydrangea.

This post is part of the Hero Arts June Release Blog Hop, so be sure to check out the inspiration from other designers and leave comments for a chance to win a $50 gift card!

 
Hero Arts
Hero Arts Creative Team:
Michelle Short
Rachel Kleinman
Jeannie Lieu
Anna Mahtani
Natasha Polite
Seeka
Channin Pelletier
Rosie Lopez
Charlene Madrid
Jennifer Kotas
Mindy Eggen
Lisa Tilson
Michelle Lupton
Karen Brown <<< You Are Here!
Special Guests:
Nichol Spohr
Jenn Shurkus

Two summery cards created with Hero Arts June 2025 Card kits.

Happy crafting and happy summer!

🧺🌸💙

papercrafting · Rainbow Colors

Exploring Spellbinders’ 48 Colors – A Swatching Adventure!

Swatching Spellbinders 48 colors of cardstock was relaxing and stimulated my creativity.

Oh my goodness, I just got my new Spellbinders Color Wheel Cardstock, and I am having so much fun! If you’ve ever wanted to truly get to know your cardstock colors, swatching is the way to go. Not only is it an incredibly helpful reference for future projects, but I also found the process to be calming, relaxing, and—bonus!—it sparked my creativity in ways I didn’t expect.

Products Used:

48 hues of Spellbinders cardstock awatched and organize on a ring in rainbow order.  Also shown: 
 a card created using my new inspirational cardstock swatches.

Swatching Setup: Let the Color Journey Begin!

I ordered the 48-pack sampler to start, and I used the Spellbinders Color Swatch Petal Dies along with color name stamps to create my swatches. I decided to organize them in rainbow order, making it easy to compare shades and find the perfect hues for my future projects. There’s something so satisfying about seeing all the colors lined up in perfect harmony!

For organization, I put my swatched colors on a ring, which makes flipping through them a breeze. I also documented my process in a reel showing my die-cutting, stamping, and assembly. If you’re on the fence about swatching, trust me—it’s worth it!

New Friends & Old Favorites

There are some shades I already know and love, but this swatching process introduced me to some stunning new favorites. I’m still deciding whether to order the 5-pack of each shade or just stock up on my must-haves. Either way, I now have a better sense of which colors I’ll be reaching for the most!

A Fun Card Example

Vintage mixed media handmade card with a lovely die cut hat box luggage piece.  Travel theme, hello card with floral accents.

To put my swatches to use, I created a card using my newly organized colors. You might recognize this one—it’s the Hero Arts Suitcase & Florals Card that I recently shared in another blog post. Seeing the colors in action really drives home how valuable swatching is!

Click HERE to read my blog post about creating this Vintage Suitcase & Florals Card. 
Process photo showing how I created my Spellbinders Color Wheel Cardstock swatches with my Platinum 6 die cutting machine.

Final Thoughts

Swatching might seem like a simple task, but it’s an absolute game-changer for crafting. Not only does it help you choose colors with confidence, but it also makes designing so much easier. Have you ever done a cardstock swatch? If not, I highly recommend it! Let me know in the comments which Spellbinders colors are your favorites!

Happy crafting! 🎨✨

BetterPress · papercrafting

Ranch-Themed BetterPress Art Projects: Meet Clover and Cotton Ball

Create your own BetterPress framed  and watercolored art pieces of Clover the Cow and Cotton Ball the lamb.

There’s something special about bringing a little piece of the ranch indoors—especially when it comes in the form of charming letterpressed art. Today, I’m excited to share two BetterPress projects straight from my little hacienda, featuring Clover the cow and Cotton Ball the lamb from Spellbinders.

New To BetterPress?

If you’re new to BetterPress or want to refine your skills, check out my previous blog post, “9 Tips, Tricks and Insights for Spellbinders BetterPress Machine,” for helpful advice on how to achieve perfect impressions every time.

Key Products Used in This Post:

Meet Clover the Cow

Spellbinders Clover the Cow watercolored BetterPress Animal Art piece framed to display in home.

Clover isn’t just any cow—she’s inspired by a real-life, flower-munching culprit from my own yard. And yes, she was eating flowers from my garden!

The BetterPress version of Clover captures her mischievous spirit, complete with a whimsical flower wreath perched atop her head.

Inspiration photo for my Cow BetterPress framed art piece.

After BetterPressing Clover, I added soft watercolor washes that brought her to life, highlighting her gentle eyes and the delicate petals in her floral crown. What’s more, the print looks stunning even without the watercolor—just the crisp, tactile impression of the press is beautiful on its own.

Process photo showing my watercoloring technique for colorizing my Spellbinders BetterPress Cow print.

Introducing Cotton Ball the Lamb

Spellbinders Cotton Ball the lamb BetterPress watercolored and framed animal art piece.

Not to be outdone by Clover, Cotton Ball the lamb is equally charming with her own flower wreath. She’s the picture of pastoral sweetness, and the BetterPress captured every curl and detail of her woolly coat. Watercoloring Cotton Ball was a joy, blending soft pastels to match her gentle personality.

Framed with Love

Both prints sit in 4″ x 5″ easel frames that add a touch of ranch-inspired warmth to my home. The textures from the letterpress, the soft watercolor hues, and the rustic frames create an inviting, homey feel that reflects life on my little hacienda.

Try It Yourself

Whether you’re inspired by ranch life or just love the charm of whimsical animal art, BetterPress projects like Clover and Cotton Ball are a joy to create. The prints are beautiful whether you choose to watercolor them or leave them as crisp, letterpressed pieces.

Cardmaking Kit · Die cutting · papercrafting

Spellbinders | Club Kit Cards | February 2025

Spellbinders February 2025 Club Kit Cards:  Large Die of the Month, Small Die of the Month and Stitching Die of the Month die cut handmade cards.

Get ready to fall in love with the Spellbinders February 2025 Club Kits! This month’s releases are packed with charm and creativity, and I’m thrilled to share two whimsical scene cards that will have you reaching for your die-cutting machine in no time.

Easy Stitched Die Cut Bunny Card Full of Charm

A handmade card featuring a die-cut bunny in a spring green dress holding a flower, framed with a stitched border. The background is soft blues and warm yellows, creating a fresh and cheerful scene.  Spellbinders Stitching Die of the Month + Large Bunny Die of the Month.

This first card features the Stitching Die of the Month paired with the Large Die of the Month, creating a darling stitched frame. Inside the frame, a sweet die-cut bunny dressed in a spring green dress steals the spotlight. She’s holding a delicate flower, making this design ideal for Easter, baby showers, or even get-well cards. The soft blues, vivid greens, and warm yellows lend a fresh spring vibe, while the stitched frame adds texture and an elegant touch.

Key Products Used:

Notes About This Card:

Darling Spring die-cut bunny handmade card with hand stitched frame using Spellbinders February 2025 Large Die of the Month  + Stitching Die of the Month Kits.

Step Into Spring with This Floral Shoes Card

 A whimsical handmade card featuring olive green die-cut shoes with blue and olive anklet socks, with bright spring flowers tucked inside. The sentiment reads "Hello."  Spellbinders Small Die of the Month, February 2025.

The second card takes a playful turn with a pair of olive green shoes, complete with stylish blue and olive anklet socks. The Small Die of the Month works its magic, letting you create a unique scene where die-cut flowers are tucked into the patterned socks. You’ll spot the calves of a lady walking confidently into spring, and the sentiment “Hello” ties everything together. Perfect for birthdays, get-well wishes, or just saying hi, this design showcases the versatility of these dies.

Quick Notes About This Card:

  • I started by looking through my patterned paper for some fun “sock material”. I chose this eye-catching circular pattern, but a small floral or plaid would also work great!
  • Once I had my socks, I pulled together other colors that would work well for my scene. I frequently use my Color Cubes when selecting my color palette.
  • I die cut my Small Die Kit components with my Platinum 6 System.
  • I assembled my scene with Bearly Glue, Foam Squares and Craft Foam.
  • The hello sentiment is from my January Small Die of the Month Kit.
  • I cut the buckle and bows from Brushed Gold Cardstock.
Spellbinders February 2025 Small Die of the Month handmade card complete with a pair of shoes, patterned anklet socks and die cut floral blooms.

Helpful Links:

Handmade cards created with Spellbinders February 2025 Club Kits.

Why These Cards Shine

Both cards highlight the magic of die-cutting, with intricate details and stitching that bring each scene to life. Whether it’s the textured frame around the bunny or the whimsical floral shoes, these designs are sure to inspire intermediate and advanced crafters alike.

cardmaking · Rainbow Colors · Tutorial

Rainbows & Glitter: Tips on Making Your Own Glitter Cardstock

Tips and Tutorial on how to make a floral rainbow card with a custom tinted DIY glitter cardstock background.

Hi there! I’m so happy to share a card project that combines whimsical charm with vibrant color. If you love crafting as much as I do, you’ll want to stick around for all the dreamy details.

The Star of the Show: A Floral Rainbow

A handmade card featuring a colorful die-cut floral rainbow with fluffy white clouds, set against a sparkling custom glitter cardstock background and a bold scripty 'hello' sentiment

To me, Hero Arts Floral Rainbow and Clouds stamp and die bundle feels like a burst of happiness! I perched my rainbow and clouds on a custom background made of handmade glitter cardstock. By combining blue and green metallic shimmer sprays on watercolor paper, I created a sparkling, ethereal look that mimics a sunny sky. Now, let’s dive into the details of this colorful creation!

Key Products Used:

A colorful handmade card featuring Hero Arts Floral Rainbow stamp and die bundle.

At the heart of this design is a vibrant rainbow that I stamped and brought to life with Copic markers. The colors are rich yet soft, evoking a dreamy vibe that’s both uplifting and playful. After coloring, I used coordinating dies to cut out the floral arc, ensuring clean lines and perfect dimension. It’s not just a rainbow; it’s a celebration of color and joy!

Copic Colors Used: RV02, RV04, RV10, YR02, YR07, Y06, Y08, YG01, YG03, G43, BG11, BG45, B0000, B41, V01, V15

How To Make Your Own Custom Glitter Cardstock

Creative Process Photo: "An in-progress shot of painting blue and green shimmer sprays onto watercolor paper to create a custom glitter cardstock background."

Creating your own glitter cardstock is easier than you think and adds a personalized touch to your projects. Here is how I created my background:

  • I taped a panel of watercolor paper to a hard board and brushed water over the surface with a flat brush. I didn’t saturate the paper, but I did add a light coating of water.
  • Next, I mixed Blue + Shimmer Tone on Tone Metallic Spray with just a hint of Green + Shimmer Tone on Tone Metallic Spray in a paint palette and then painted the mixture on the wet watercolor paper with a damp flat brush. These sprays are very pigmented, so start with a little and add additional spray if you want more intense color, or more water if you want a more muted shade. I applied two layers but I didn’t bother to let it dry in between.
  • I let my shimmer panels dry overnight, but you could speed up the drying with your heat tool.

Experiment with different color combinations to make your custom glitter cardstock truly one-of-a-kind!

A shimmering custom-made glitter cardstock background in blue  green hues, adding sparkle and dimension to the card design.

To finish my focal point, I heat embossed the beautiful scripty “hello” sentiment that is included in the bundle.

Glitter can be tricky to capture on camera, but I hope you can see shimmer and sparkle in this close-up photo.

Close up shot of DIY handmade glitter cardstock to use in cardmaking, papercrafting and scrapbooking.

Who wouldn’t love a little rainbow magic in their mailbox? Let’s keep spreading those handmade vibes, one card at a time! 🌈✨


cardmaking · papercrafting

Help Me Craft an Amazing 2025—Your Ideas Wanted!

Hey there, crafty friends! 👋

Can you believe 2025 is just around the corner? I’m over here surrounded by paper scraps, embellishments, and a ton of ideas—but I want your input to make next year truly magical.

What types of blog posts, techniques, and projects do you want to see in 2025? Whether you’re a beginner still figuring out how to not glue your fingers together (been there) or a seasoned pro with a stash that could rival a craft store, I want to know what inspires you.

Here are a few questions to get those creative juices flowing:

  • Are there any papercrafting techniques you’ve been itching to learn?
  • What’s your favorite type of project—cards, scrapbook pages, 3D crafts, or something totally out of the box (literally)?
  • What is your favorite technique?
  • Would you like to see more tips, tutorials, or behind-the-scenes peeks into my crafting chaos?
  • What is your favorite: Blog Posts, Videos, Reels, Instagram Post?
  • Are there themes or occasions you want more ideas for—birthdays, holidays, just-because days?
  • Any products or tools you’re curious about that I could spotlight?

Drop your comments and let me know what would make 2025 your best crafting year yet. Your ideas help shape this space, and I can’t wait to hear them! Or, if you prefer, leave a comment on my coordinating post on Instagram: karens_mini

Let’s dream big, get messy, and make this our most creative year ever! 💖

Thanks for your input!

Karen

Cardmaking Kit · stitching

Frameable Art | Spellbinders September 2024 Stitching Club

Beautiful  die cut and handstitched sunflower in a 4" x 6" frame.  Spellbinders September 2024 "Stitched Flower" papercrafting kit.

WOW, WOW, WOW! I LOVE Spellbinder’s September Stitching Die of the Month Kit! This sunflower is so gorgeous that I decided to make a 4 x 6″ framed art piece for my guest bedroom. I have all the details below.

Stitched Sunflower Art | Tips and Tricks

  • I started by die cutting my Stitching Kit pieces with my Platinum 6 die cutting machine. This month’s kit has 15 dies. I die cut the flower petals and brown center twice and glued them together for easier stitching.
  • Spellbinders has a nice selection of stitching accessories in their shop that you can find HERE. Today, I used metallic gold floss on the center and 3 shades of DMC floss for the flower. I have been buying and collecting floss for decades, so some of these are vintage.
  • When I started stitching, I took two strands of floss, separated them one at a time, brought them together and then stroked and lengthened them until they seemed tame and ready to use.
  • I usually stitch with size 22 Tapestry needles.
  • I used thin double sided tape to secure my floss to the die cuts. I like that this tape is easy to hide behind the die cuts and I don’t even bother to take the top release paper off the tape.
  • Remember to keep your floss taught as you stitch.
  • When I move from one area to the next, I run the floss through the just finished stitched area to keep the thread secure. This gives a nice look on the finished project.
  • Don’t stitch with threads that are too long or they are likely to knot. 
  • When I was done, I added a bit of Bearly Glue to the ends so that they would stay in place.
  • I assembled my piece with Bearly Glue and foam squares.
  • Last, I popped my sunflower in a 4″ x 6″ frame and set it on the bedside table.
Spellbinders September Stitching Club Kit of the Month:  Stitched Sunflower.

Helpful Links:

Spellbinders Club Info:

  • Clubs Preview on the 1st of each month.
  • Club members can cancel, upgrade or change clubs from the 1st-5th of each month. Popular Clubs frequently sell out during this period so club members get first dibs on everything.
  • NEW for 2024: Club Members get EARLY access to new releases on the 6th!
  • On the 6th, Clubs become available to non-members.
  • On the 27th, Club registration closes for the current month.
  • If a club did not sell out, you can buy under “Shop Past Clubs”. Past kits are available on the 10th of the FOLLOWING month.

Thanks for stopping by!

Karen