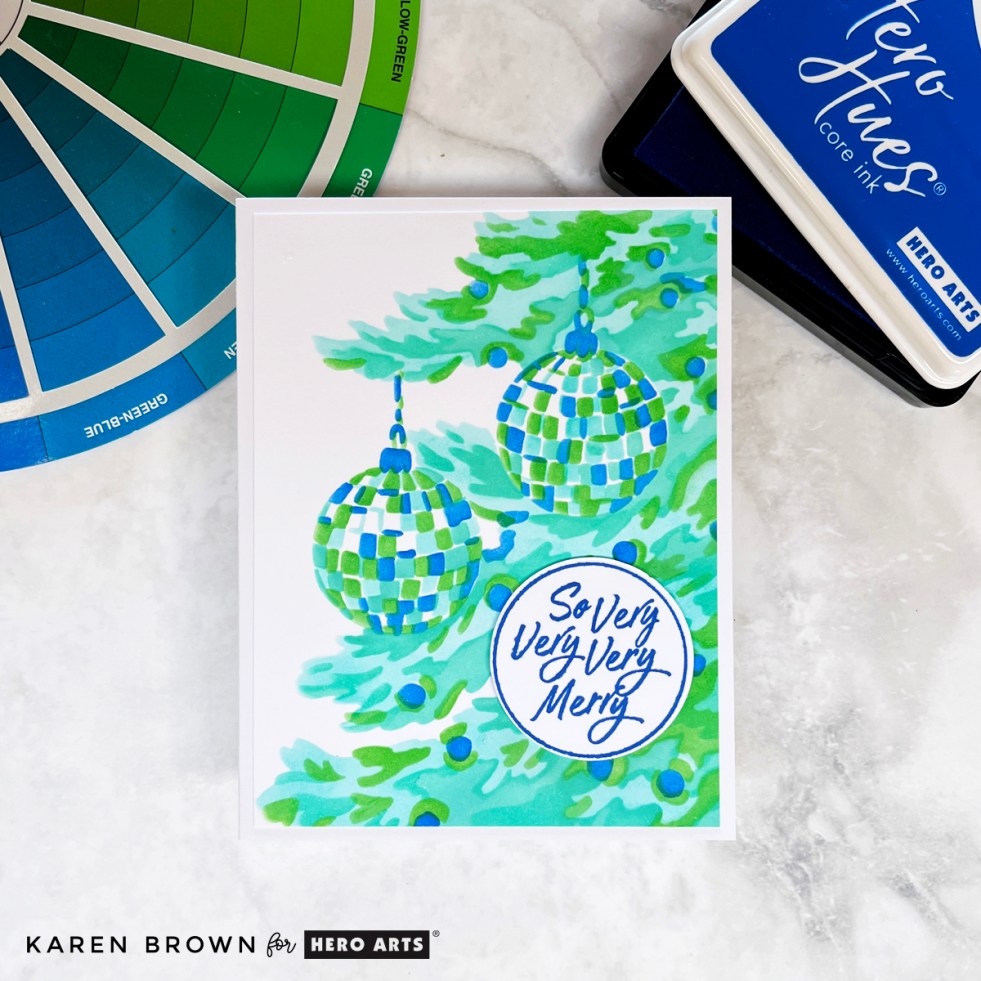
I couldn’t resist creating one more card with the October 2025 Release—this time featuring the Layering Stencil: The Tree. This gorgeous four-layer stencil creates a close-up view of a Christmas tree filled with ornaments, and it was such a joy to blend.
You can see my other October Club Kits Cards HERE.
I chose analogous colors (neighbors on the color wheel) for a soft, harmonious look in shades of greens, aquas, and blues:
Using Deluxe Smooth White Cardstock made the ink blending go on like butter, and as always with Hero Arts stencils, the layers lined up perfectly.
For the sentiment, I used the “So Very Very Merry” circular stamp and coordinating die from the October Card Kit, stamped in Indigo ink. The deep blue ties the whole design together beautifully.
This card has already gone into my holiday stash, ready to be mailed in December!
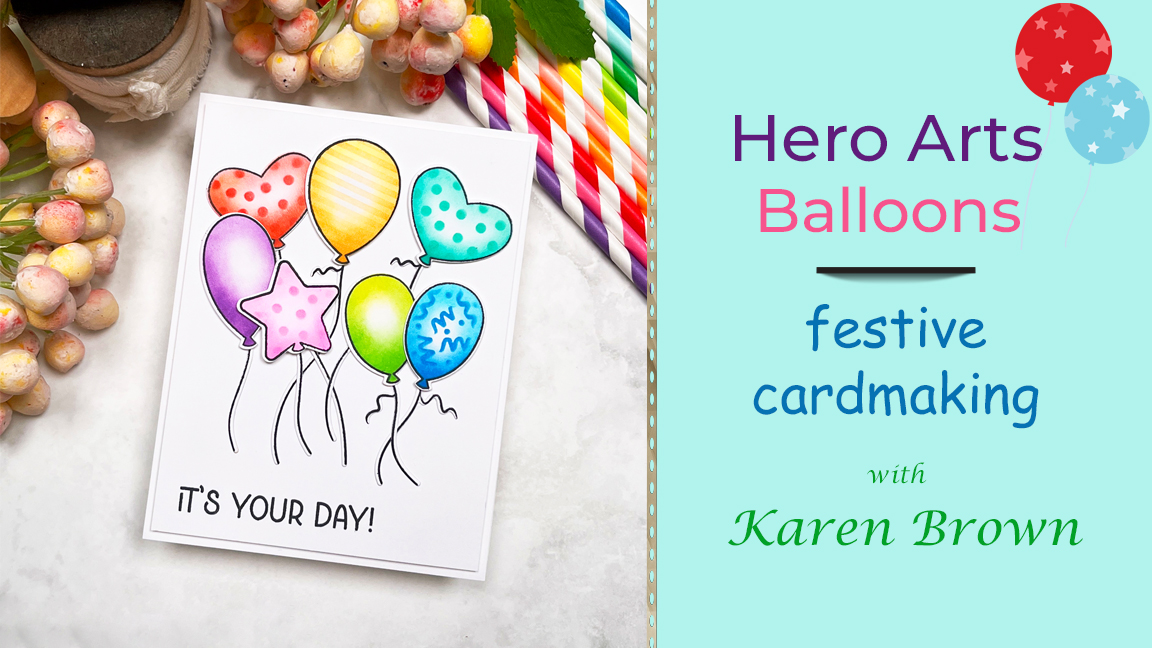
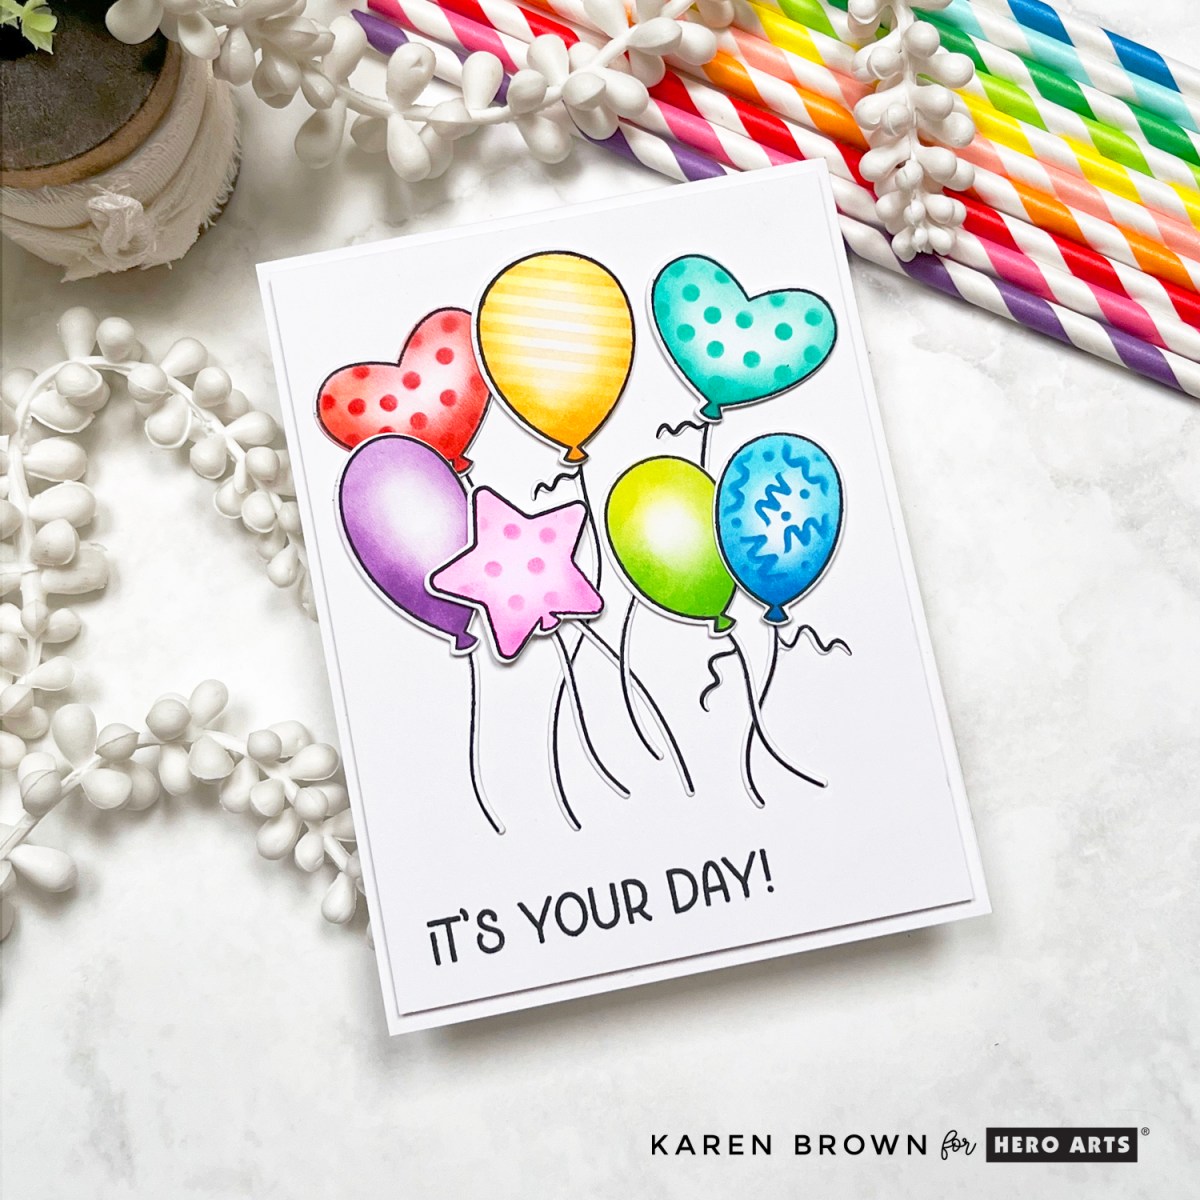
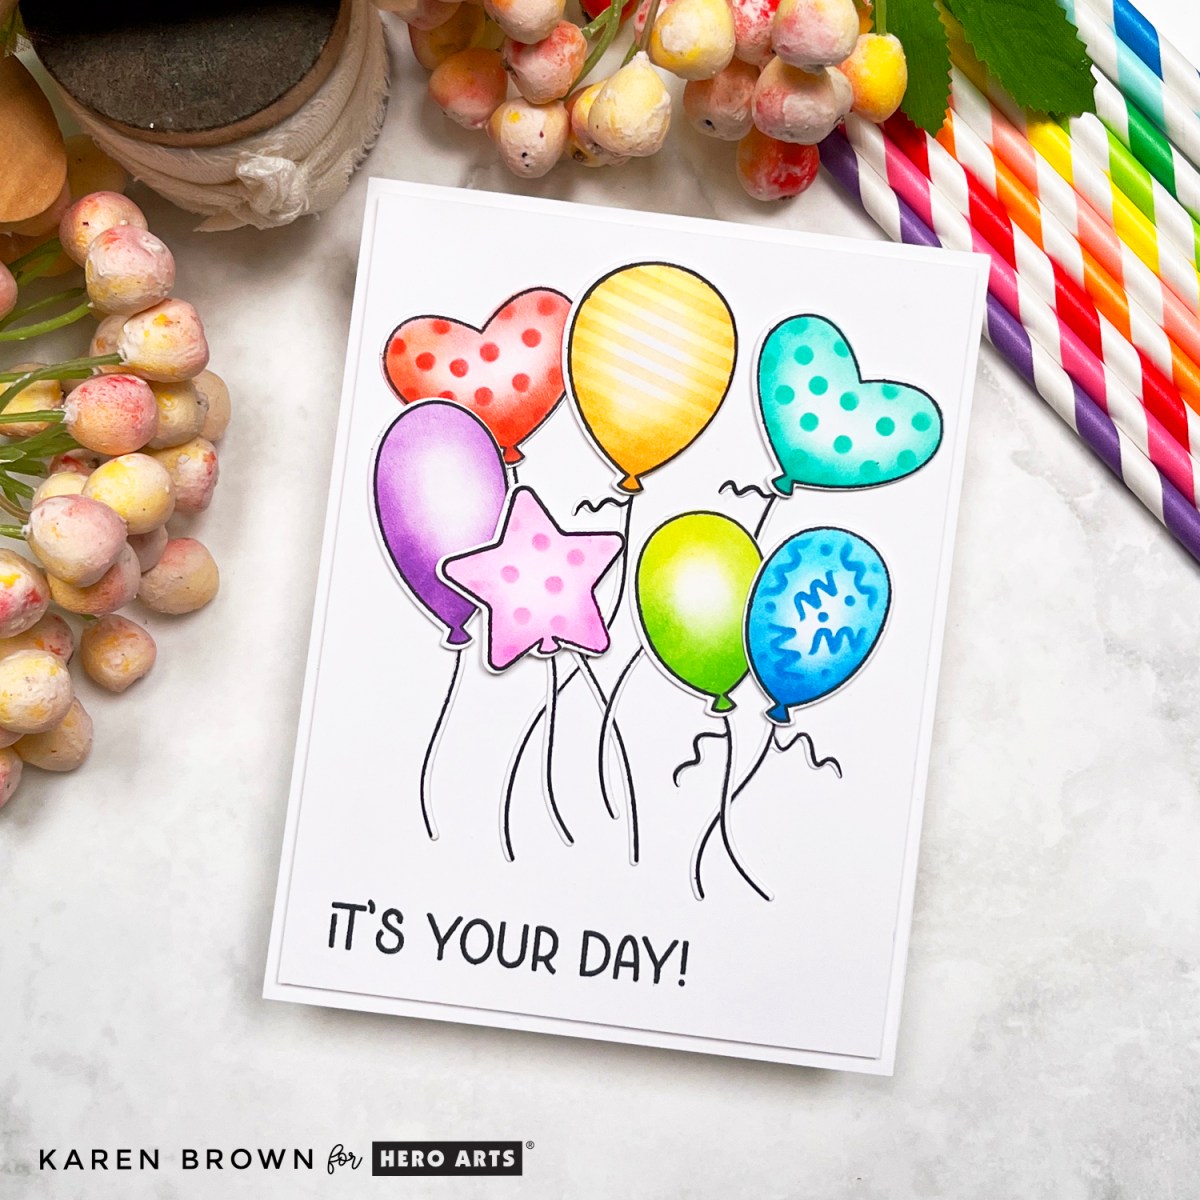
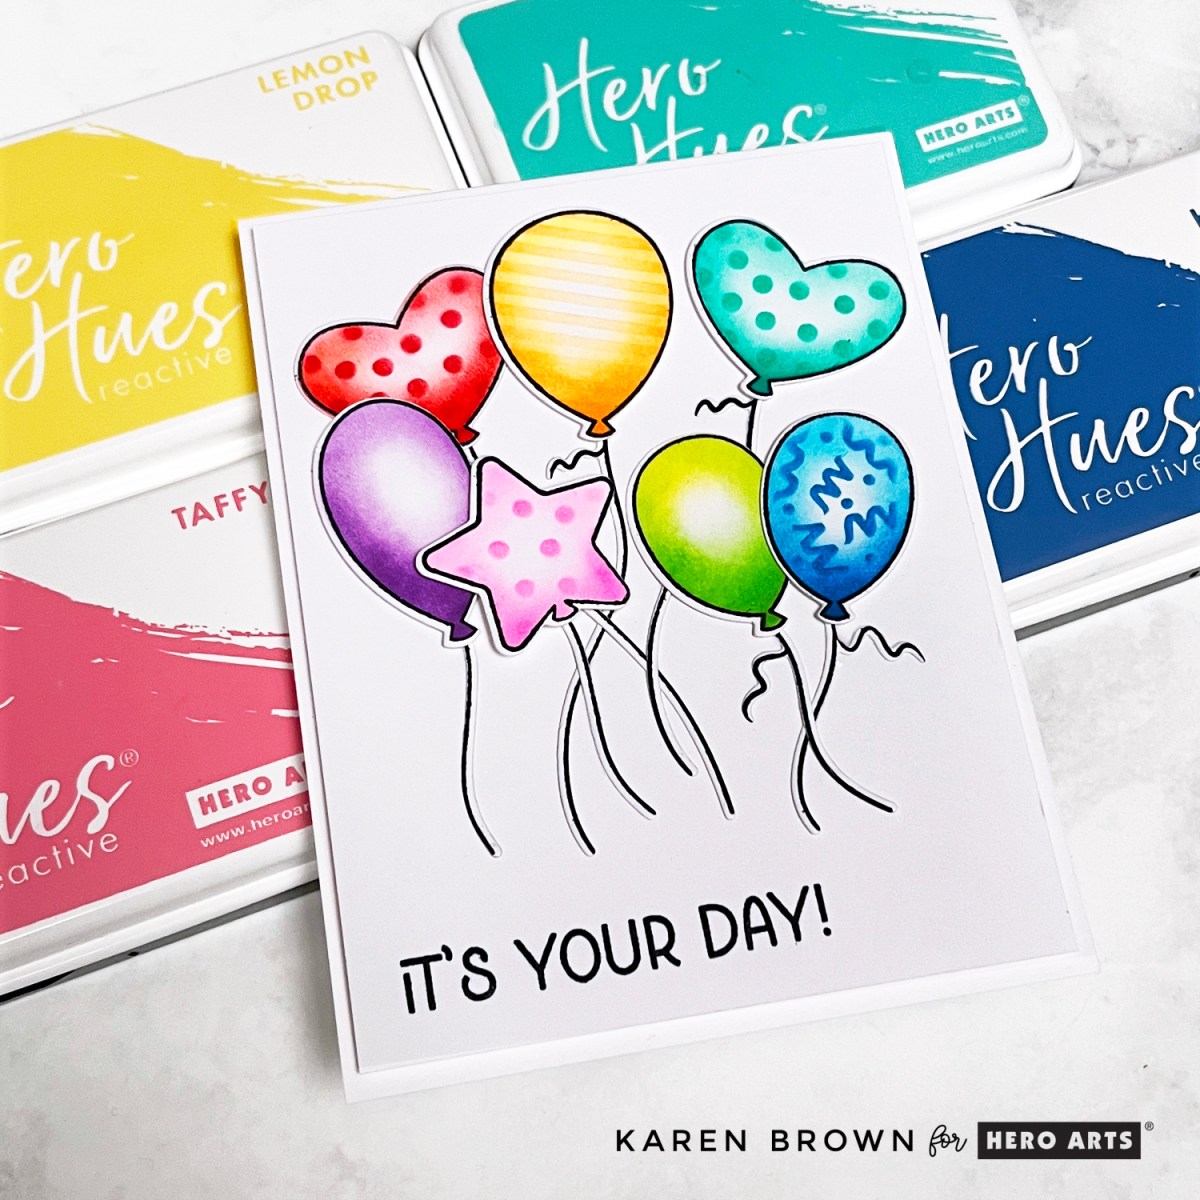
Ready to party? I had a blast creating this bright and festive birthday card using brand-new goodies from the Hero Arts Let’s Celebrate Collection! This project is perfect if you’re looking for a quick, colorful card that makes a big impact.
Card Details: Rainbow Balloons That Pop (Literally!)
This card features a happy cluster of seven stamped, ink-blended, and die-cut balloons, made with three coordinating products:
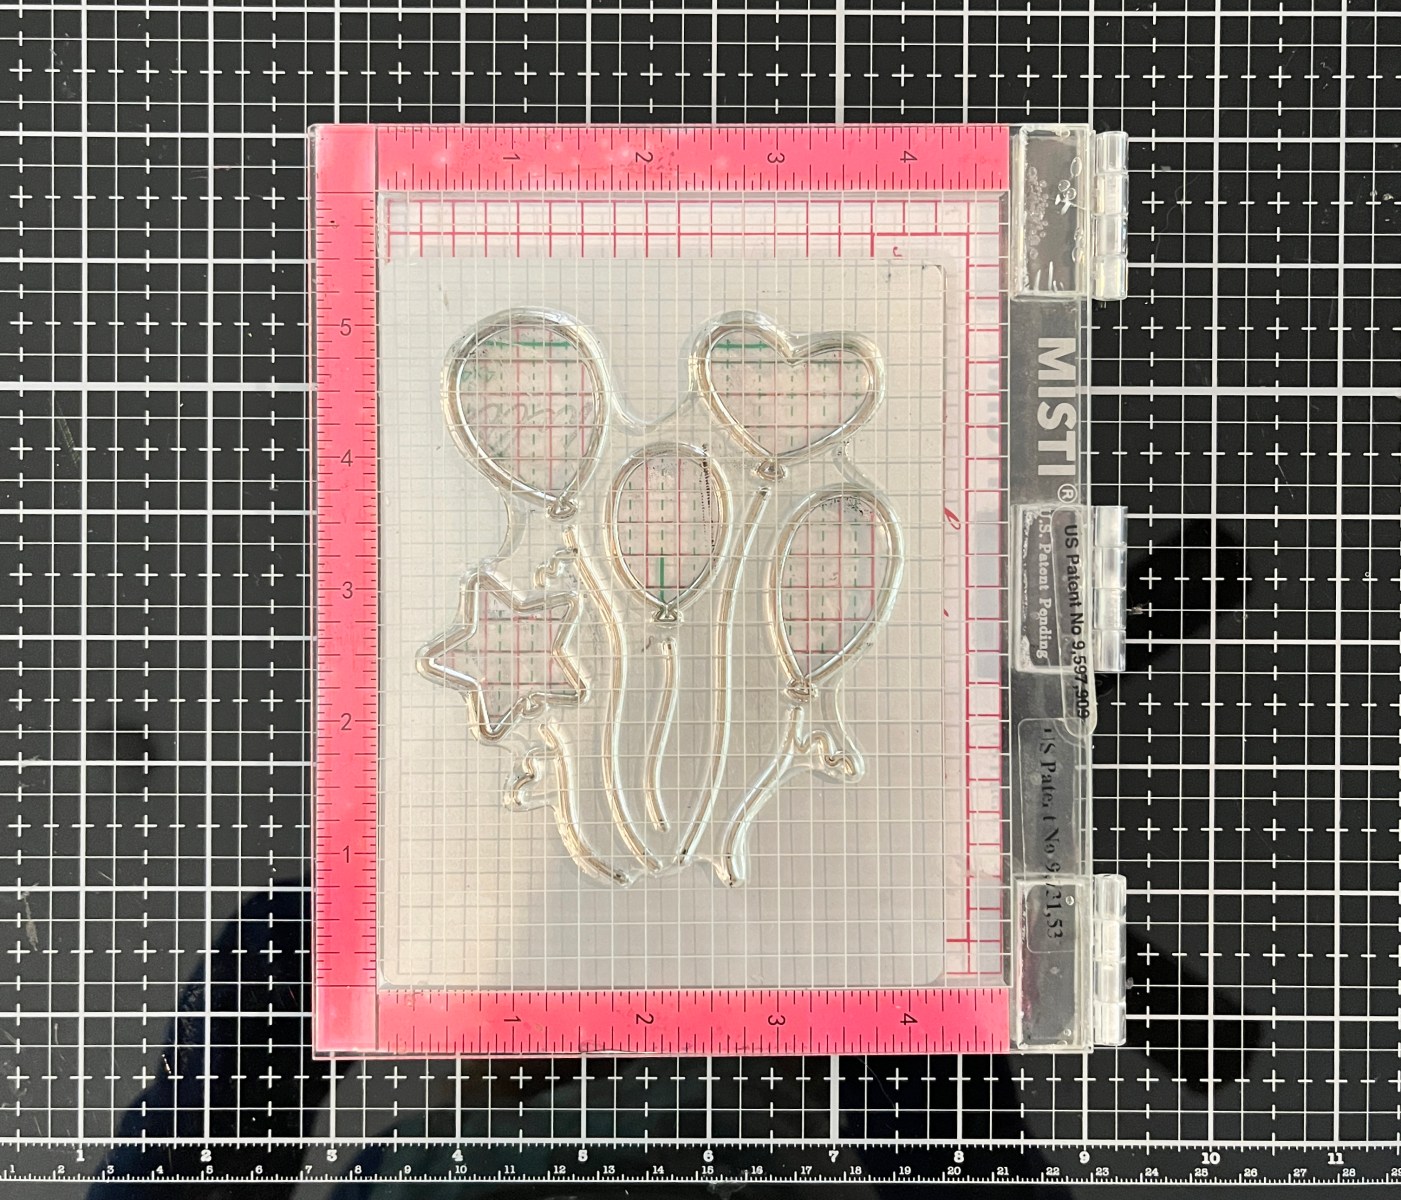
I started by placing the cover plate die in my stamp positioner and aligning the large balloon stamp (a cluster of five balloons) over the die. Once perfectly placed, I closed the lid so the stamp was now on the positioner lid, removed the die, and was ready to stamp and die cut with precision. There is a process photo below.
Since I wanted seven balloons, I stamped, inked, stenciled, and die-cut the design twice.
Color & Stencil Party
Each balloon got its own personality with Hero Arts Reactive Inks in cheerful rainbow shades. I blended two shades per balloon, adding darker ink toward the bottom for dimension. The layering stencils let me add playful squiggles, dots, and lines to five of the balloons for extra party vibes.
Reactive Inks Used: Taffy, Berry Smoothie, Lemon Drop, Creamsicle, Key Lime Fizz, Green Apple, Pool Party, Blue Raspberry, Splash, Blue Hawaii, Thistle and Grape Slush.
Two balloons are adhered flat to the background, and five are popped up with foam squares so they practically float off the page! 🎈
I finished the design with a stamped “It’s Your Day!” sentiment from the Party Fans Stamp Set.
Pro Tips for Balloon Perfection:
Use two coordinating ink colors per balloon to make them feel round and full.
Add stenciled patterns after ink blending for clean, vibrant detail.
Pop some balloons up on foam tape to add playful movement and dimension.
This design is fast, festive, and beginner-friendly—but has that pro finish thanks to the coordinated stamps, dies, and stencils.
What would you celebrate with this set? Birthday? Graduation? Just-because balloon-o-rama?
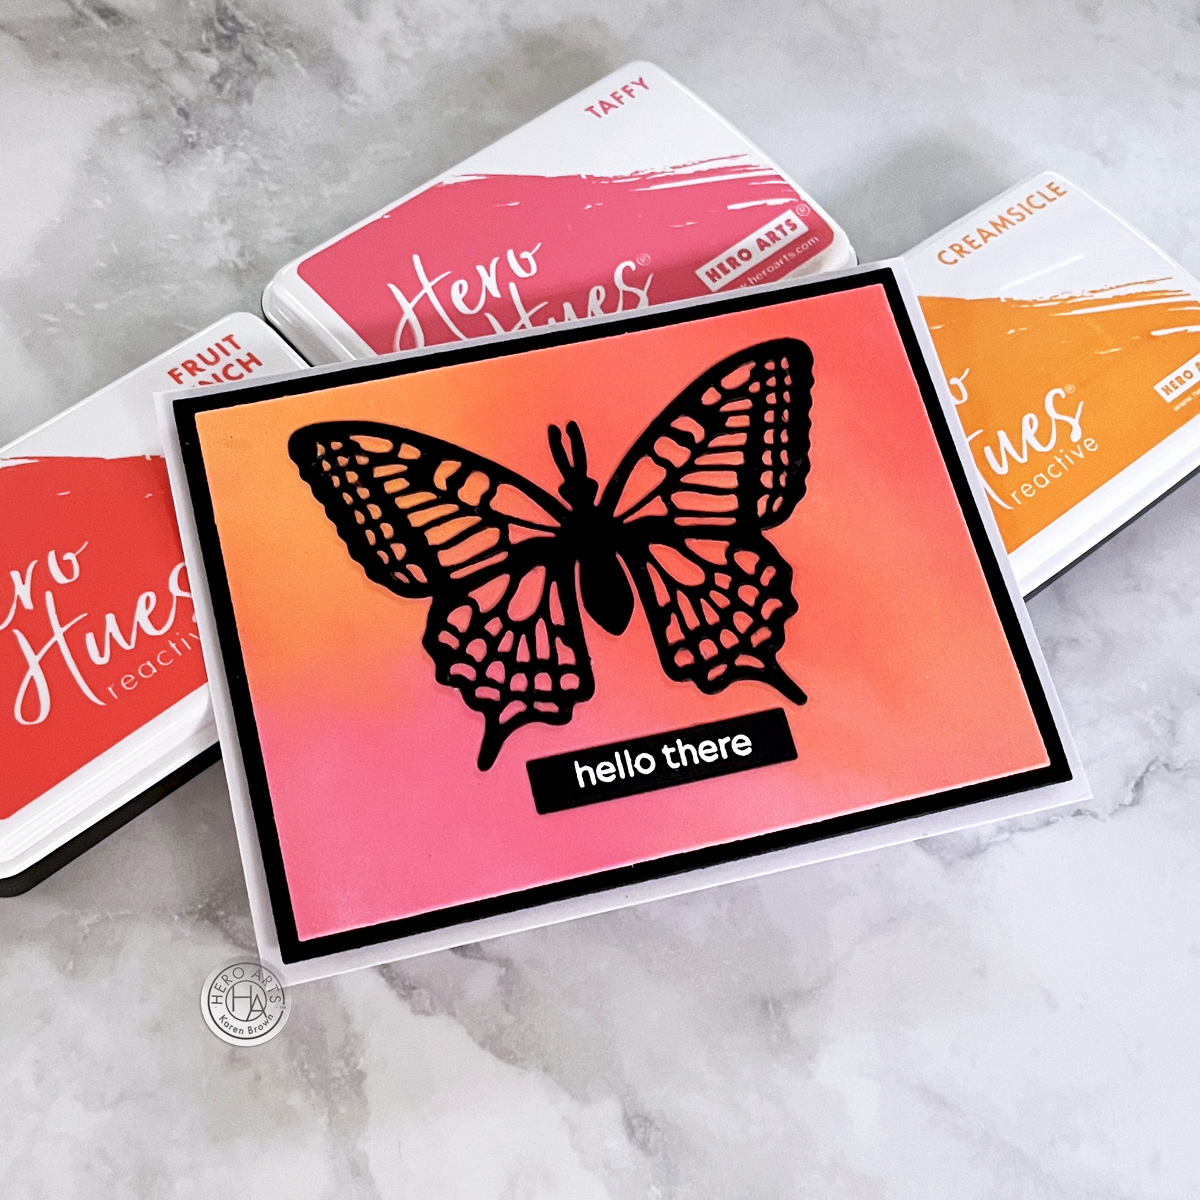
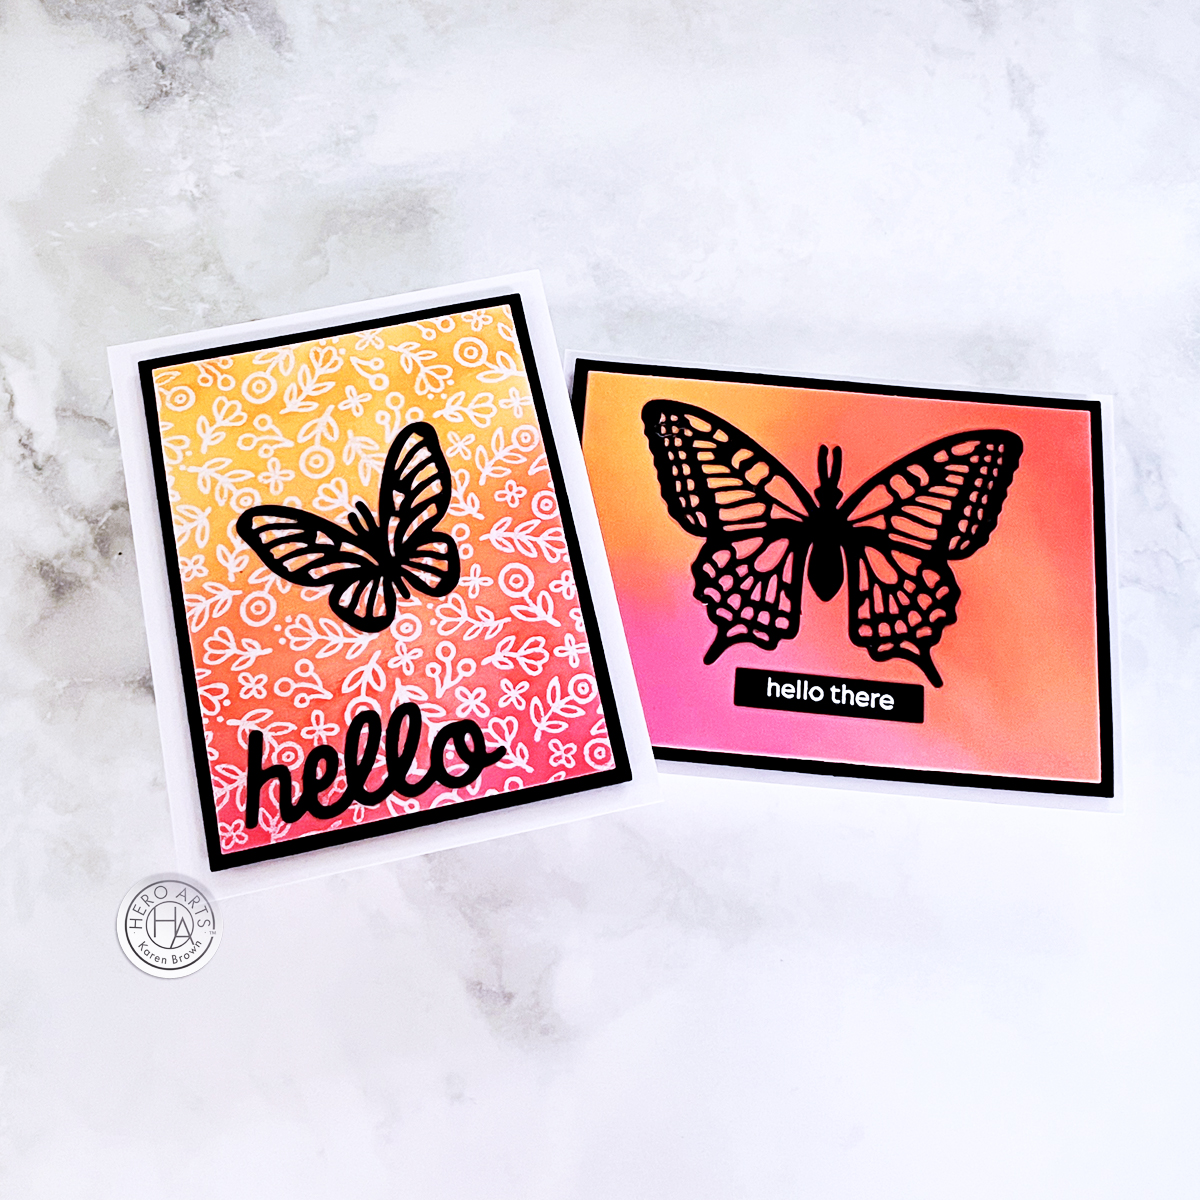
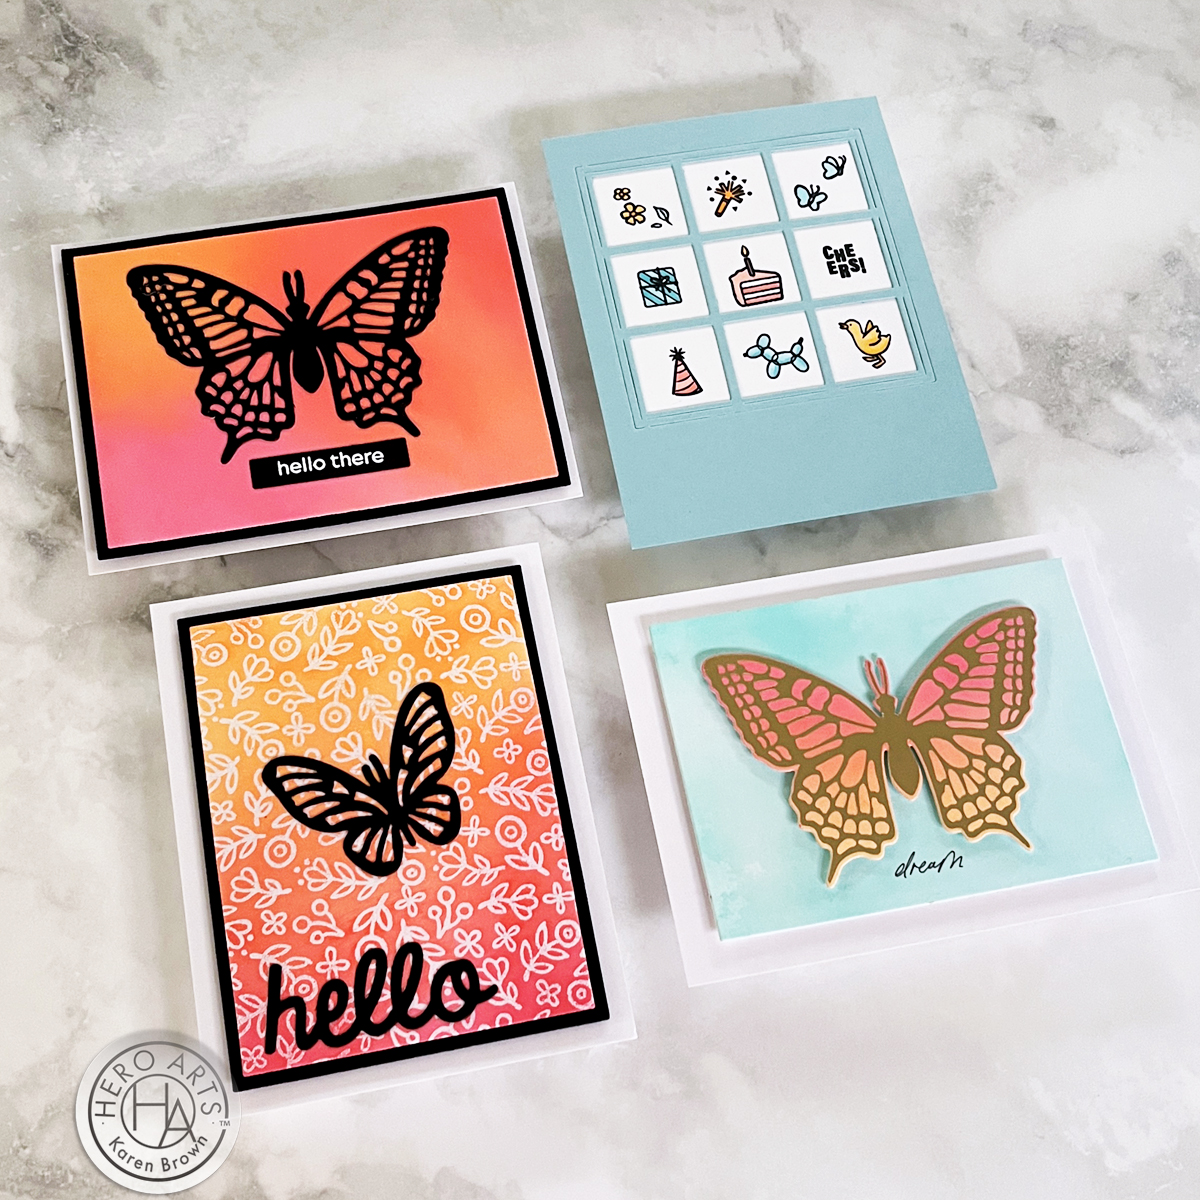
Spring is in the air, and so is a burst of bold color and whimsy! Today, I’m taking a closer look at the new Hero Arts Spring Whimsy Collection with four vibrant cards featuring hot foiling, ink smooshing, ink blending, heat embossing, and die cutting. Let’s get crafty!
This card is all about shimmer and movement! I started with an aqua ink-smooshed background—the perfect backdrop for a gorgeous, hot-foiled butterfly. The butterfly itself was hot foiled onto an ink-blended panel of soft pinks, corals, and oranges before being die cut and centered on the background.
My Process for Creating This Foiled Butterfly Card:
I liberally inked an 6×6″ acrylic block with Pool Party and Paradise inks. This is the panel I used for my background. I was going for a sky-like background and I like the color variation you achieve with ink-smooshing.
I “smooshed” the block onto a piece of Luxe watercolor paper
I weighted the inked block with a book for 5 minutes
I uncovered my panel. If the ink pooled, I dabbed with a paper towel.
I made a “second generation” panel for a future product by taking a piece of Bristol Cardstock and soaking up the excess ink on my work space.
I assembled my card with foam squares and craft foam.
✨ Pro Tip: Ink smooshing is a great way to create organic, watercolor-like backgrounds.
Card 2: Striking Ink-Blended Background & Black Butterfly
For a dramatic look, I ink blended a bold background using Fruit Punch, Creamsicle, and Taffy inks. These warm hues set the stage for a striking black die-cut butterfly, creating a high-contrast, modern design.
Card 3: Heat Embossed Floral Background + Die Cut Butterfly
This card keeps the same coral, pink, and orange hues but introduces texture with the Whimsy Floral Bold Print background stamp. I heat embossed the pattern in white over my ink-blended panel and added a small black die-cut butterfly and a “hello” sentiment for balance.
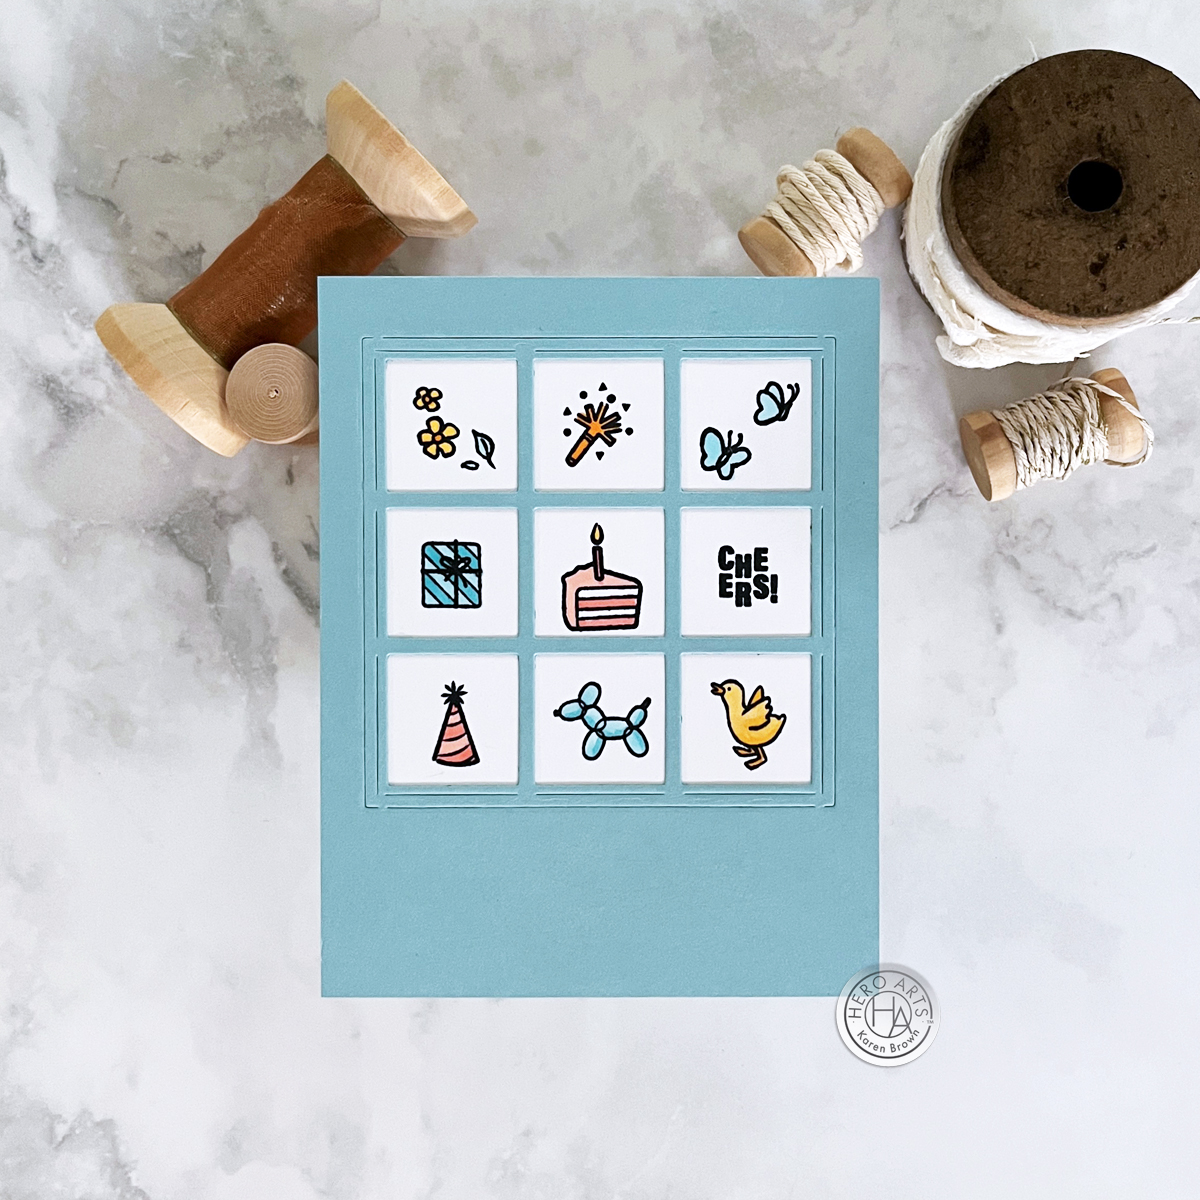
For a completely different vibe, I created a charming birthday card using the Elegant Window Fancy Die. The die creates a beautiful 9-pane window, which I die cut from Mist cardstock. Each pane features a tiny, Copic-colored stamped image from the Spring Bunny Stamps, Our Day Messages, and Birthday Animal stamp sets. A simple “cheers” sentiment ties it all together.
This collection is packed with so much creative potential! Whether you love hot foiling, ink blending, or stamping, there’s something here for every cardmaker. I hope these designs inspire you to play with color and try new techniques!
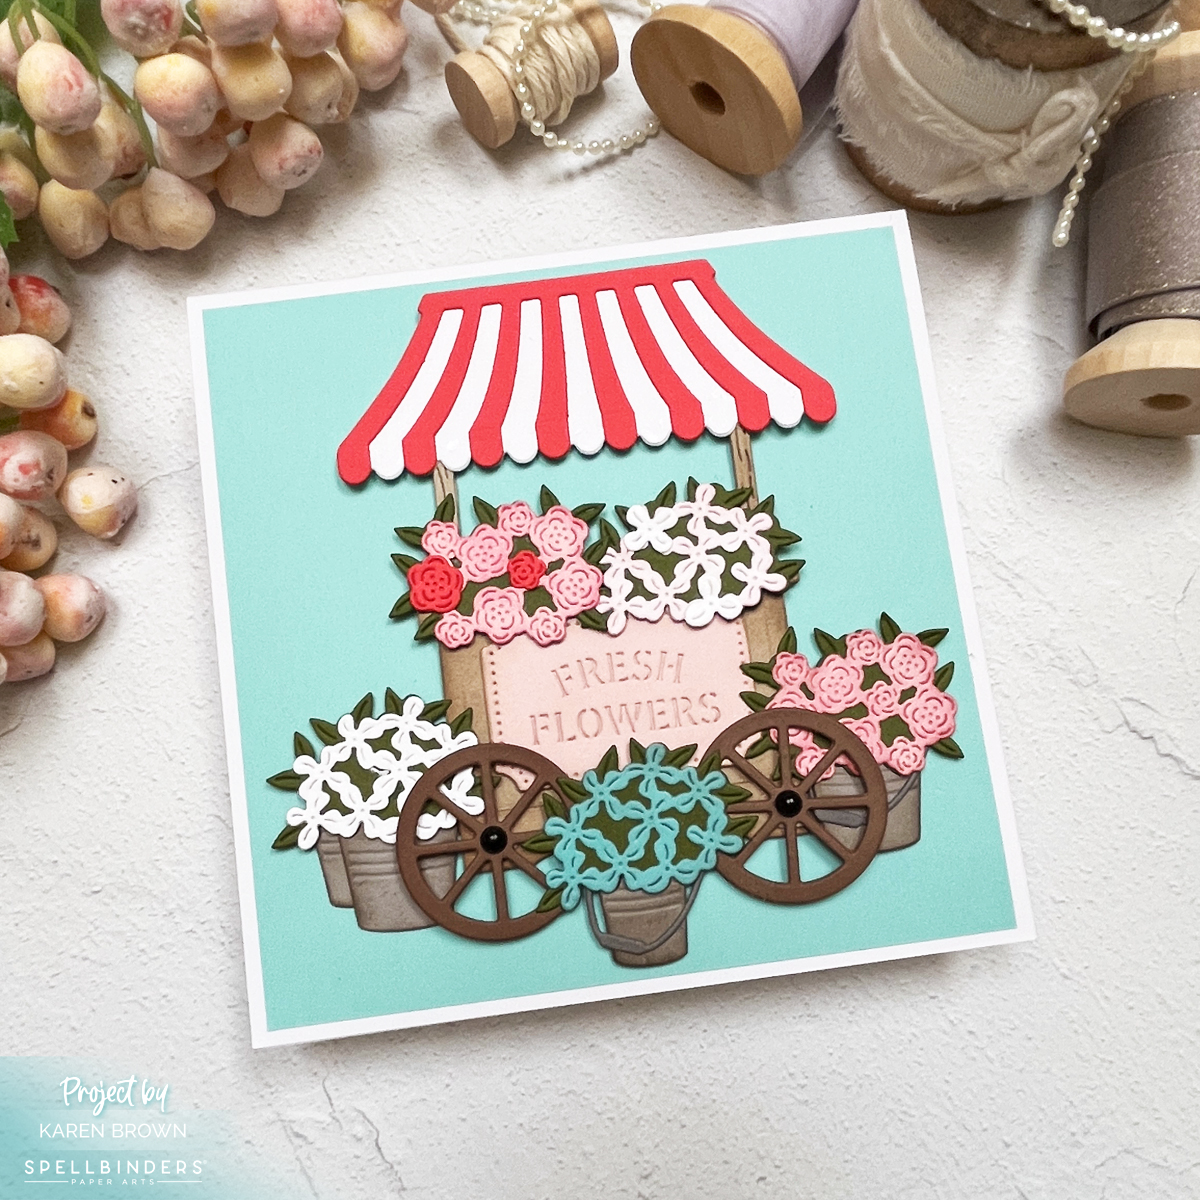
Today, I’m sharing a square card featuring the Flower Cart die set from Spellbinders’ Vintage Flower Shoppe collection. With a retro French inspired flower cart, coral, pink, blue and white blooms, and ink-blended details, this project is bursting with charm!
I fell in love with the Flower Cart die set the moment I saw it—there are so many creative possibilities! For this design, I started by die-cutting all the elements and then ink blending them to add depth and dimension. The soft shading makes the hand cart and baskets of coral, pink, blue and white blooms pop beautifully!
To give the cart a little extra personality, I added black enamel dots as the wheel nuts—a tiny detail that makes a big difference. And of course, the “Fresh Flowers” sign ties everything together with a market-fresh feel.
My completed card is 5 1/2″ x 5 1/2″ and the Teal Topaz background mat is 5 1/4″ x 5 1/4″.
Try It Yourself!
The Vintage Flower Shoppe collection has so many ways to mix and match floral elements. What colors would you use for your dream flower cart?
In this post/video, we’re spreading our creative wings and sharing three unique ways to stencil butterflies that’ll make your cards flutter with charm. From bold and dramatic to soft and dreamy, these techniques will have your projects soaring to new heights! 🦋✨
The butterfly outline is layer one and then there are 3 additional detail layers to add on top to customize your projects. I show you how to use all three top layers in the video.
I thought it would be fun to make some non-traditional Christmas cards featuring butterflies AND pastel colors. I always love to stretch my supplies beyond the predictable!
I also think the duo pictured above would make great Get Well, Thinking of You or Sympathy cards.
Let Your Creativity Soar
And, I had to make at least one traditional green and red Christmas butterfly card. I stenciled with Fresh Lawn and Cherry Ink, matted with Crimson cardstock and added a sentiment from the Swirly Christmas Tree Bundle.
With just a stencil and a splash of creativity, you can bring butterflies to life in endless, colorful ways. So, go ahead—spread your crafting wings, experiment with colors, and let your cards shine as bright and beautiful as a butterfly in full flight. Happy stenciling! 🦋✨
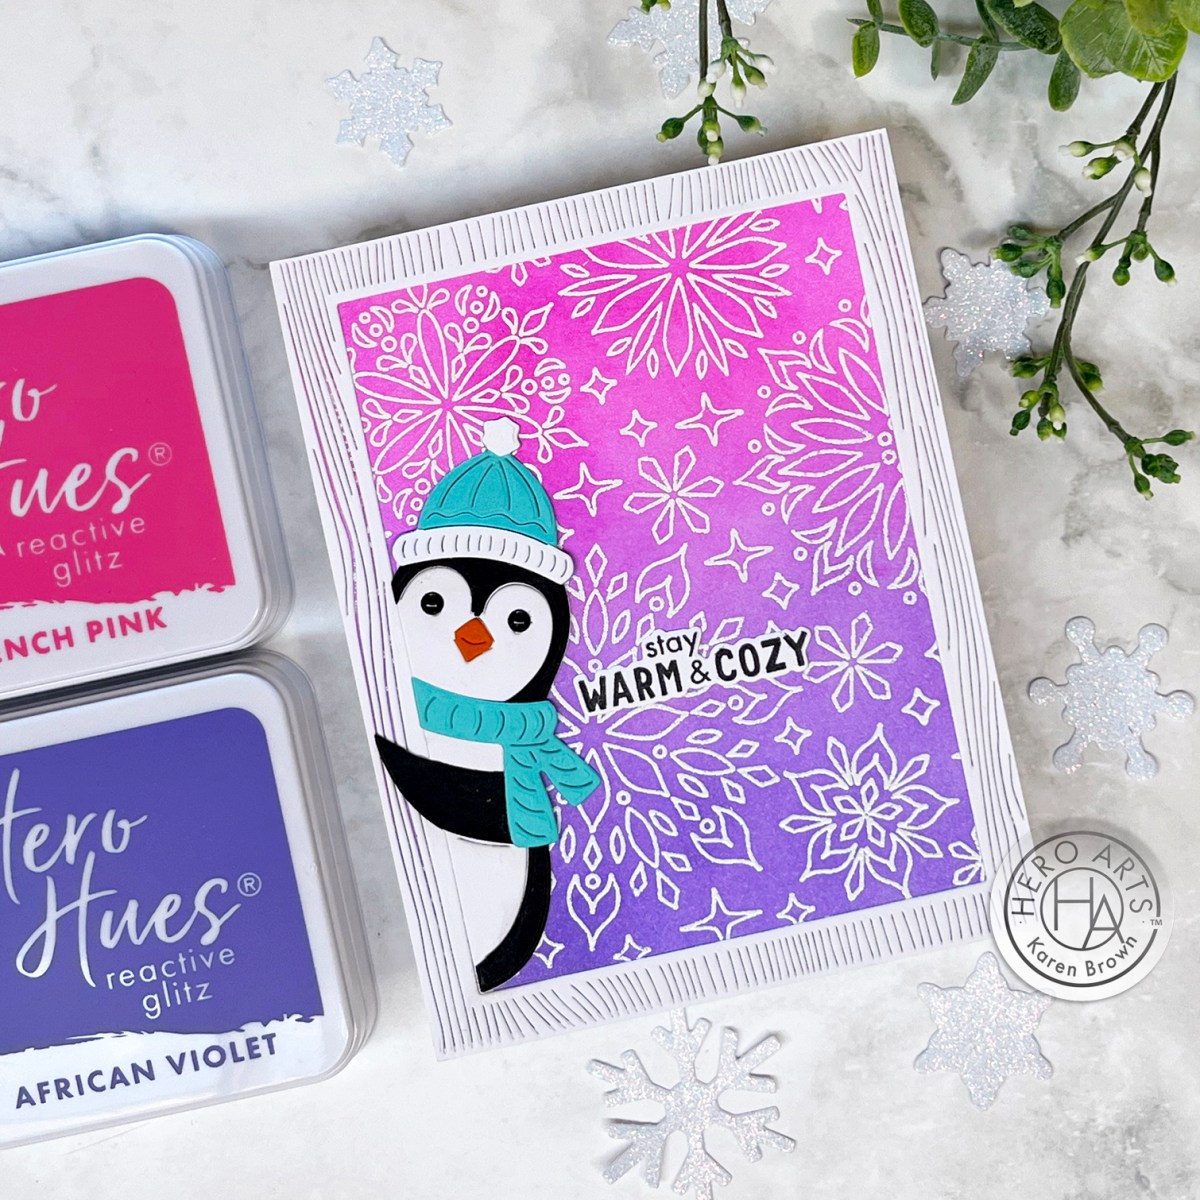
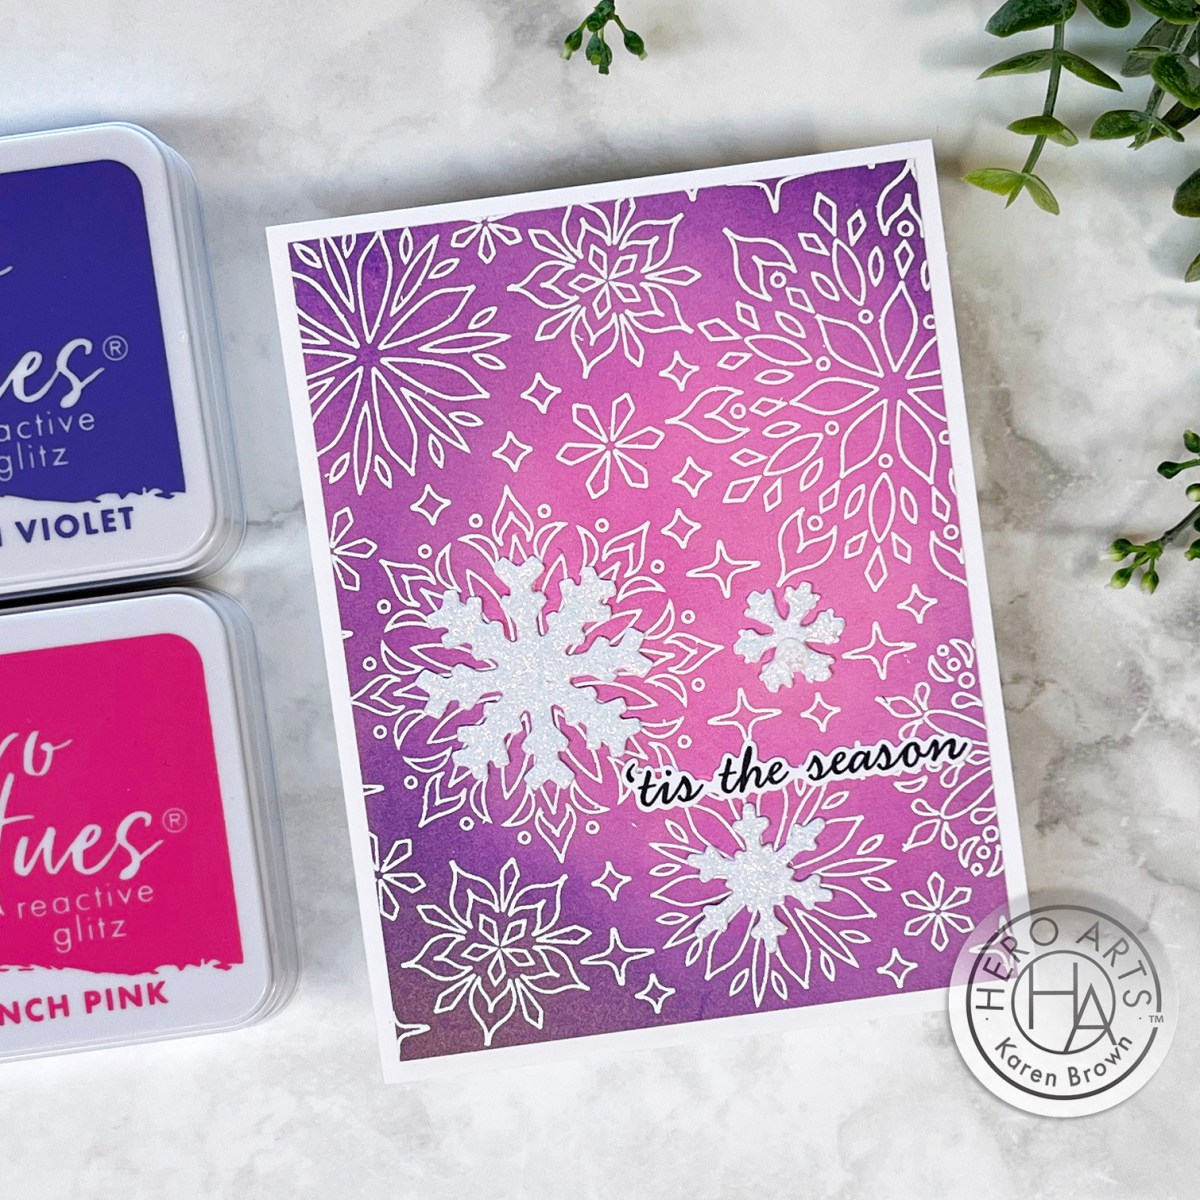
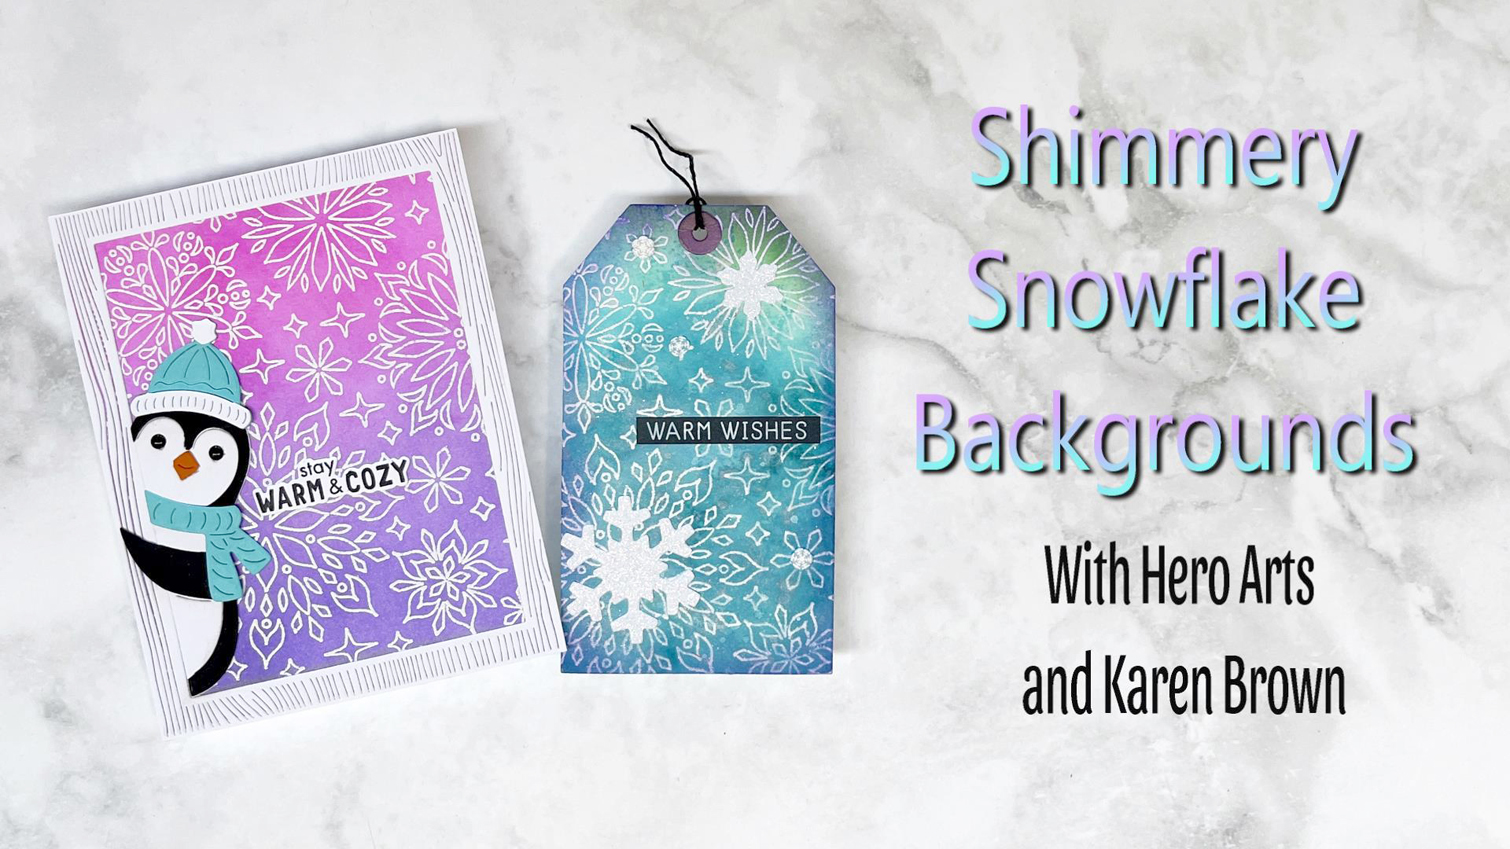
Are you ready to add a touch of winter magic to your card-making? In today’s video, I will guide you step-by-step through the enchanting process of creating shimmery snowflake backgrounds that will leave everyone in awe!
If you are having trouble viewing the video, click HERE to watch on YouTube.
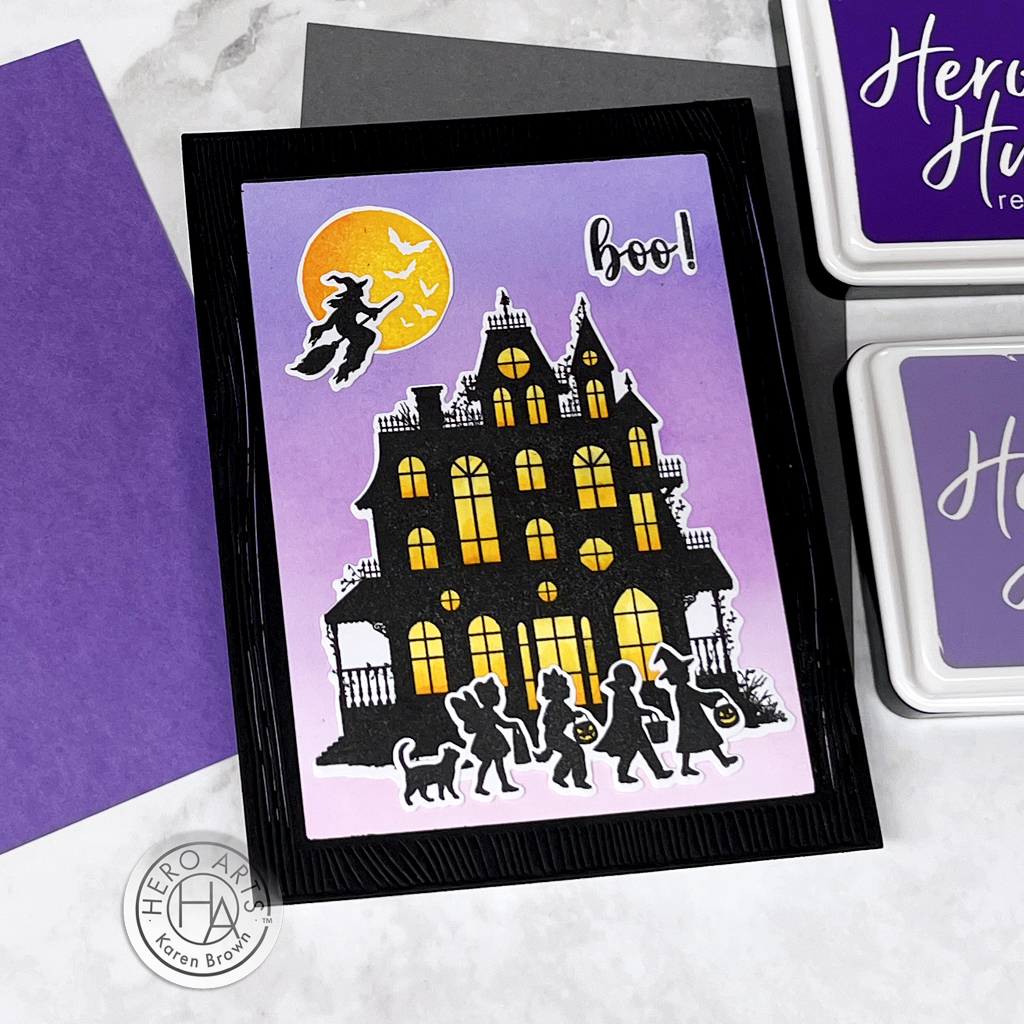
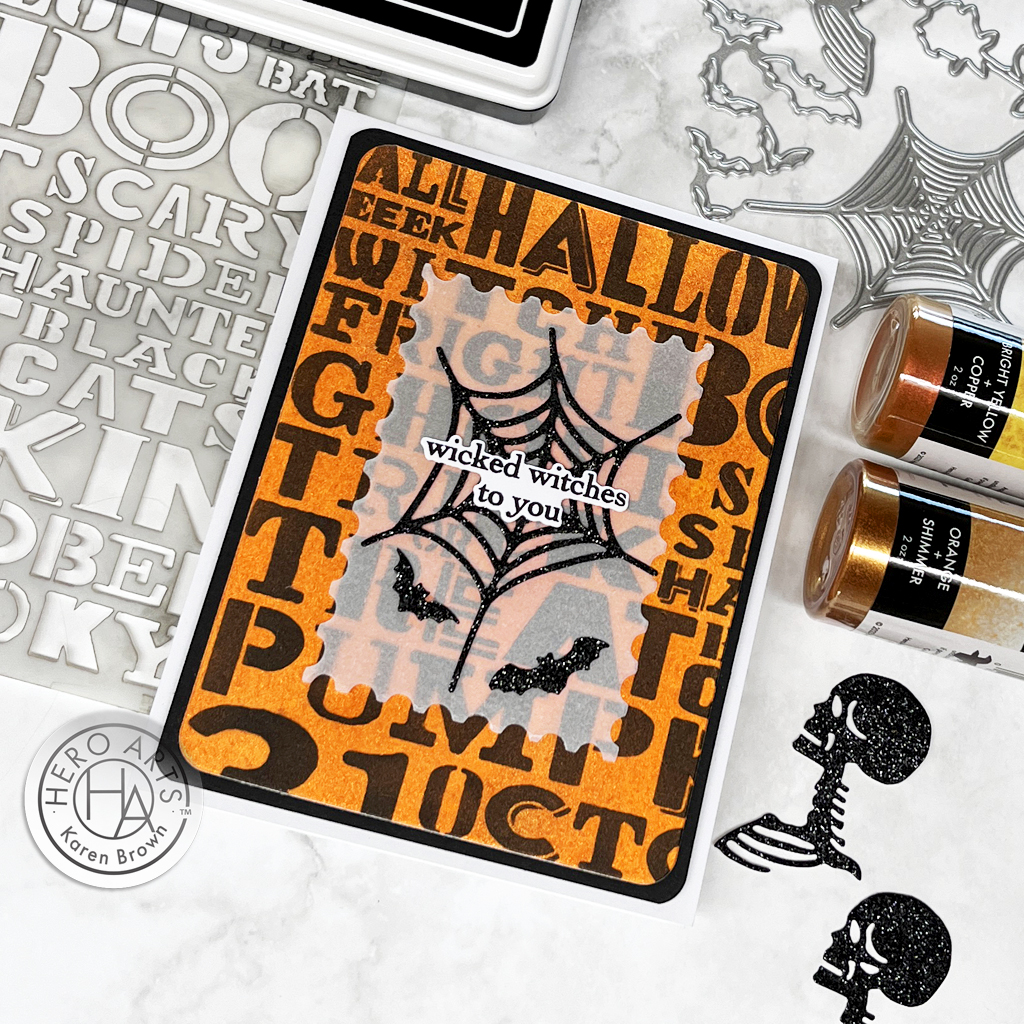
Halloween is creeping around the corner, and it’s the perfect time to brew up some crafty magic with die-cut Halloween scene cards! The September Hero Studio Release is bursting with fun new products + an exciting Blog Hop, so hop along and gather tons of inspiration from some incredibly talented crafters. Let’s dive into the cauldron of creativity and get started!
Witch’s Kitchen | Monthly Mini Clear Stamp and Die Set
Next, I stamped all the stamp elements, colored with alcohol markers and then die cut. Then, I played around with layouts until I liked my spooky little scene. A little magic potion anyone???
I started by ink blending my background with Taffy, Thistle and Purple Galaxy inks. On a different white card panel I stamped my elements using Intense Black ink. I stamped the black several times for a dark silhouette. I stamped the moon with Lemon Drop and Creamsicle, blending a bit on the stamp before stamping. To “light” my windows, I used a yellow and pale orange alcohol marker. After I completed my little scene, I decided my card needed a frame, so I die cut one from Pitch Black cardstock using my Wood Frame Infinity Dies.
$46 with Subscription + FREE SHIPPING $49.99 One-Time Purchase While Supplies Last
5 Wonderful Kit Options:
For this blog post, I created with two kits and two Extraordinary Extras, but there there are 5 kits plus 5 Extras available. You can also buy the Whole Studio, which includes all 5 kits at a wonderful savings.
The Whole Studio ($120 with subscription or $138.95 one-time purchase price)
Now it’s time for the Blog Hop! What’s a Blog Hop, you ask? It’s a fun, crafty event where you can hop from one blog to another, gathering inspiration, tips, and tricks from different crafters. Each blog in the hop will feature a Halloween project (or two or three!), so you’re sure to leave with your cauldron overflowing with ideas!
Hero Arts will give away a $50 gift card, drawn from the comments left across the hop. Enter by Sunday, September 8th at 11:59pm Pacific, and the winner will be announced on the Hero Arts blog the following week.
Here’s how to join:
Visit the Next Blog in the Hop: Check out the list of participating blogs (links below), and hop to the next one – Lydia Fiedler – to see what spooky creation she has brewed up!
Leave a Comment: Show some love to your fellow crafters by leaving a comment on their posts. It’s a great way to connect and share the Halloween spirit!
Creating die-cut Halloween scene cards is a fang-tastic way to get into the spooky spirit and share some handmade love with friends and family. Plus, participating in a Blog Hop is the perfect way to find inspiration and connect with the crafting community. So, grab your dies, fire up your die-cutting machine, and let’s make this Halloween a crafty one to remember!
Happy crafting, and don’t forget to join the Blog Hop! 🎃👻
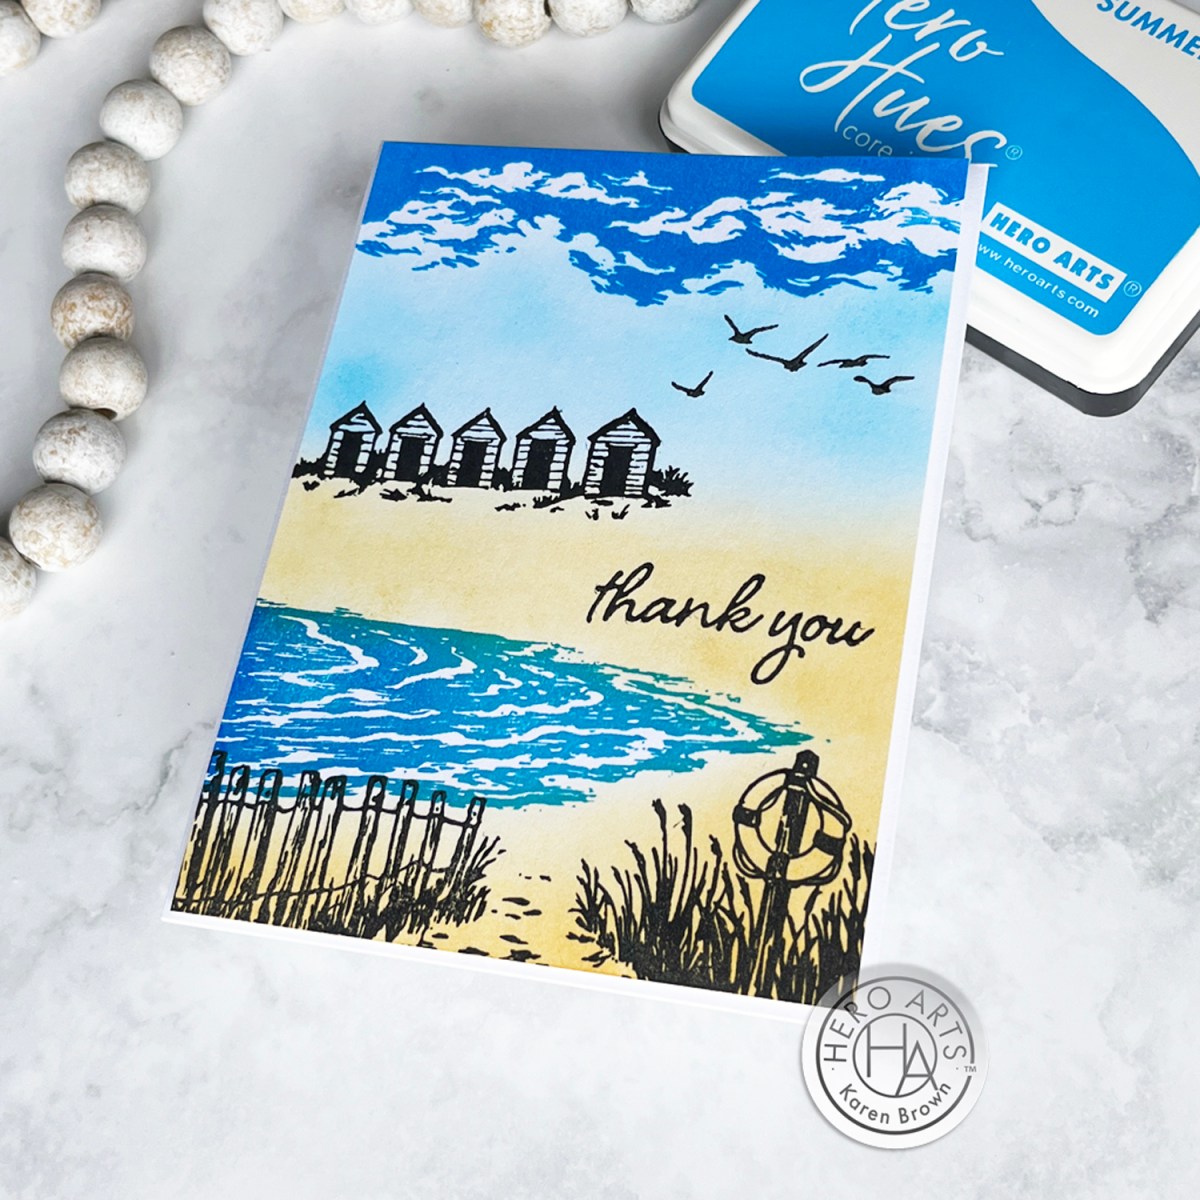
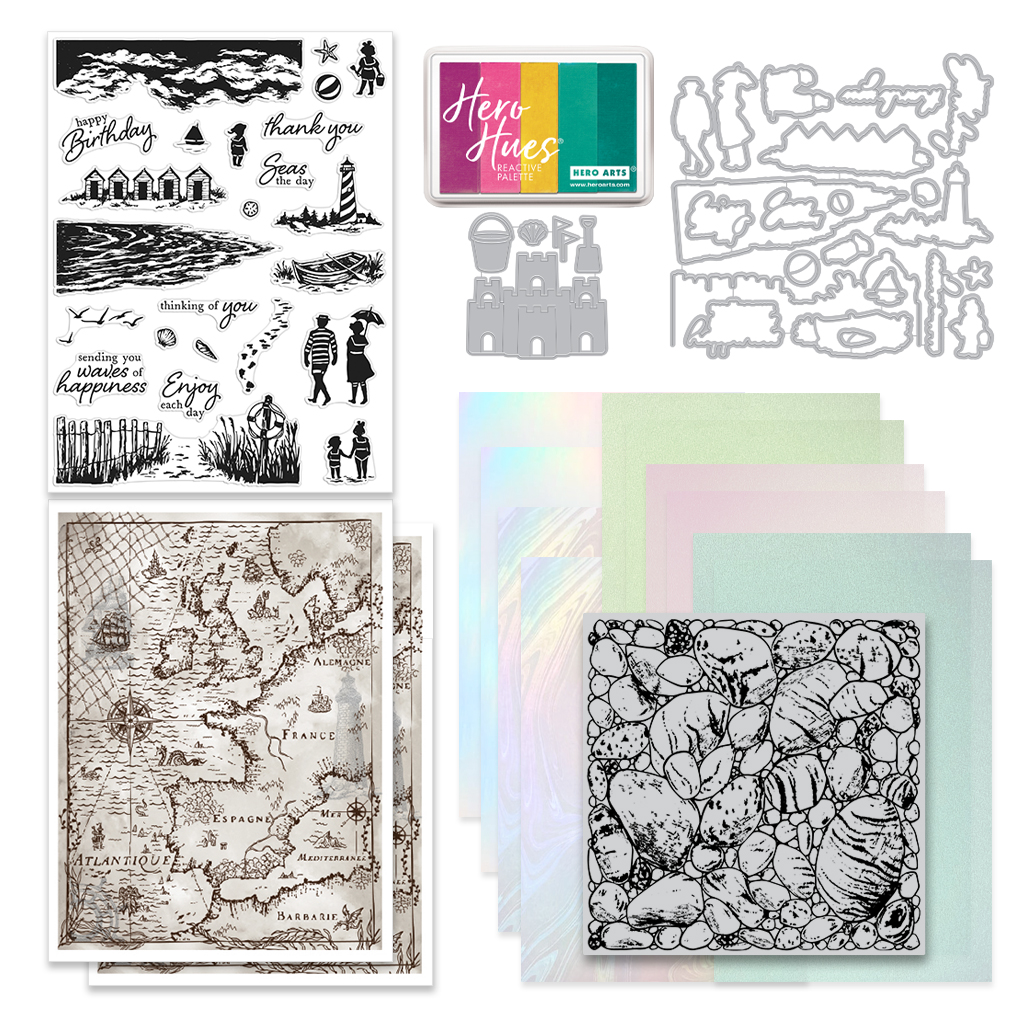
Welcome to the July Hero Studio release, where we are bringing a summery beach theme in Hero Arts signature style and quality! Get ready to ignite your creativity and elevate your crafting experience with the brand new lineup of the July Hero Studio cardmaking kits. Whether you’re a seasoned pro or just starting your crafting journey, these 5 cardmaking kits offer something for everyone.
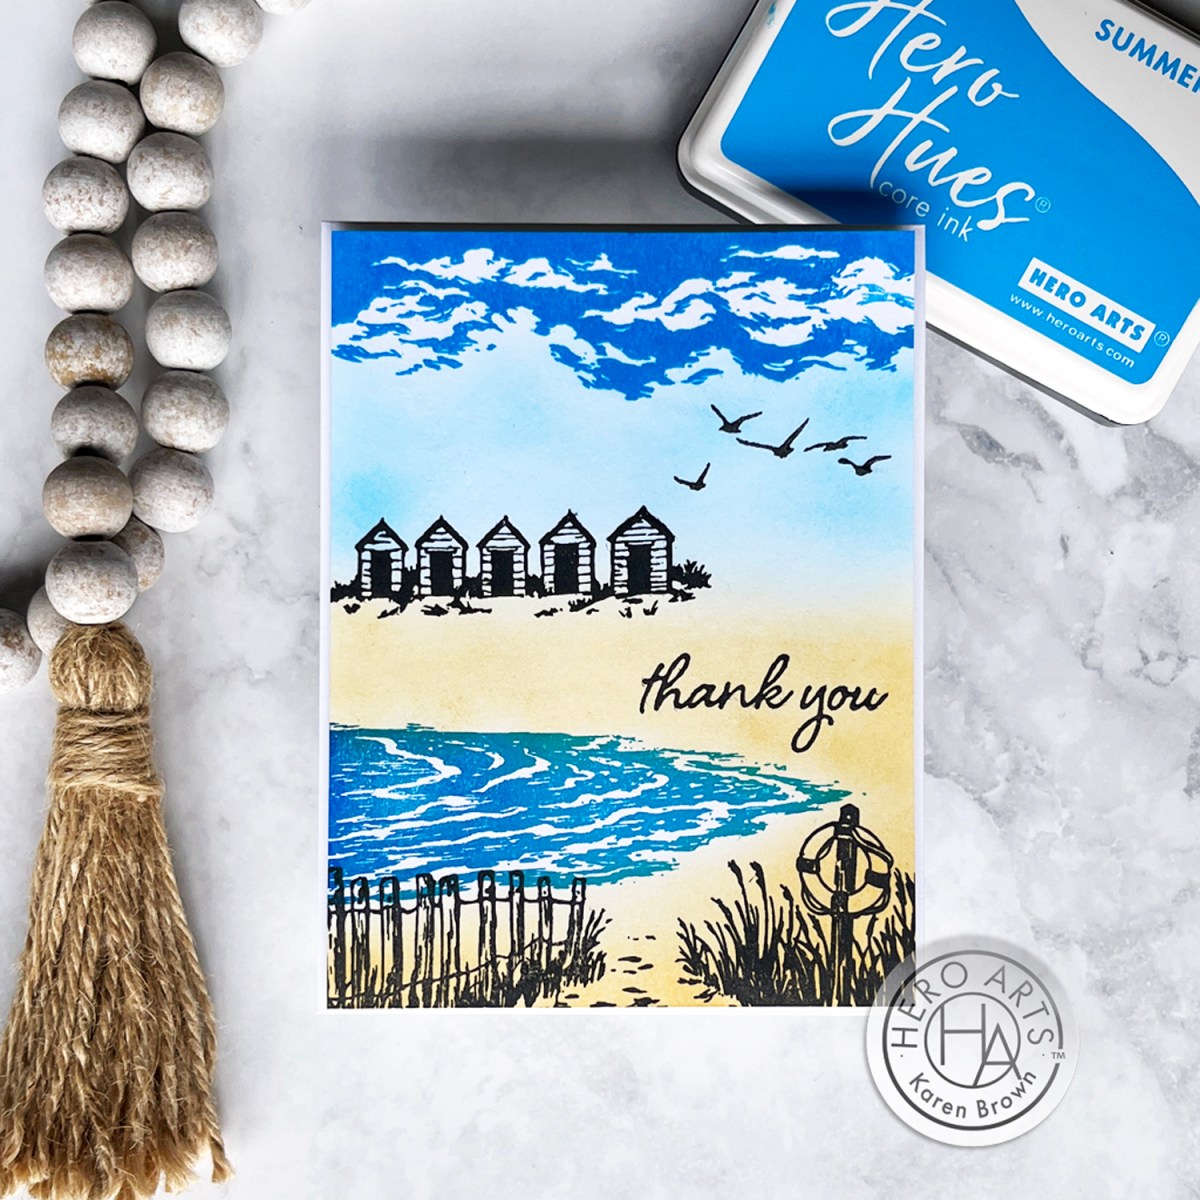
Summer is here, and there’s no better way to celebrate the sunny season than with a couple of beach-themed handmade cards. Today I’ve created two delightful designs that I hope will help inspire your crafting adventures.
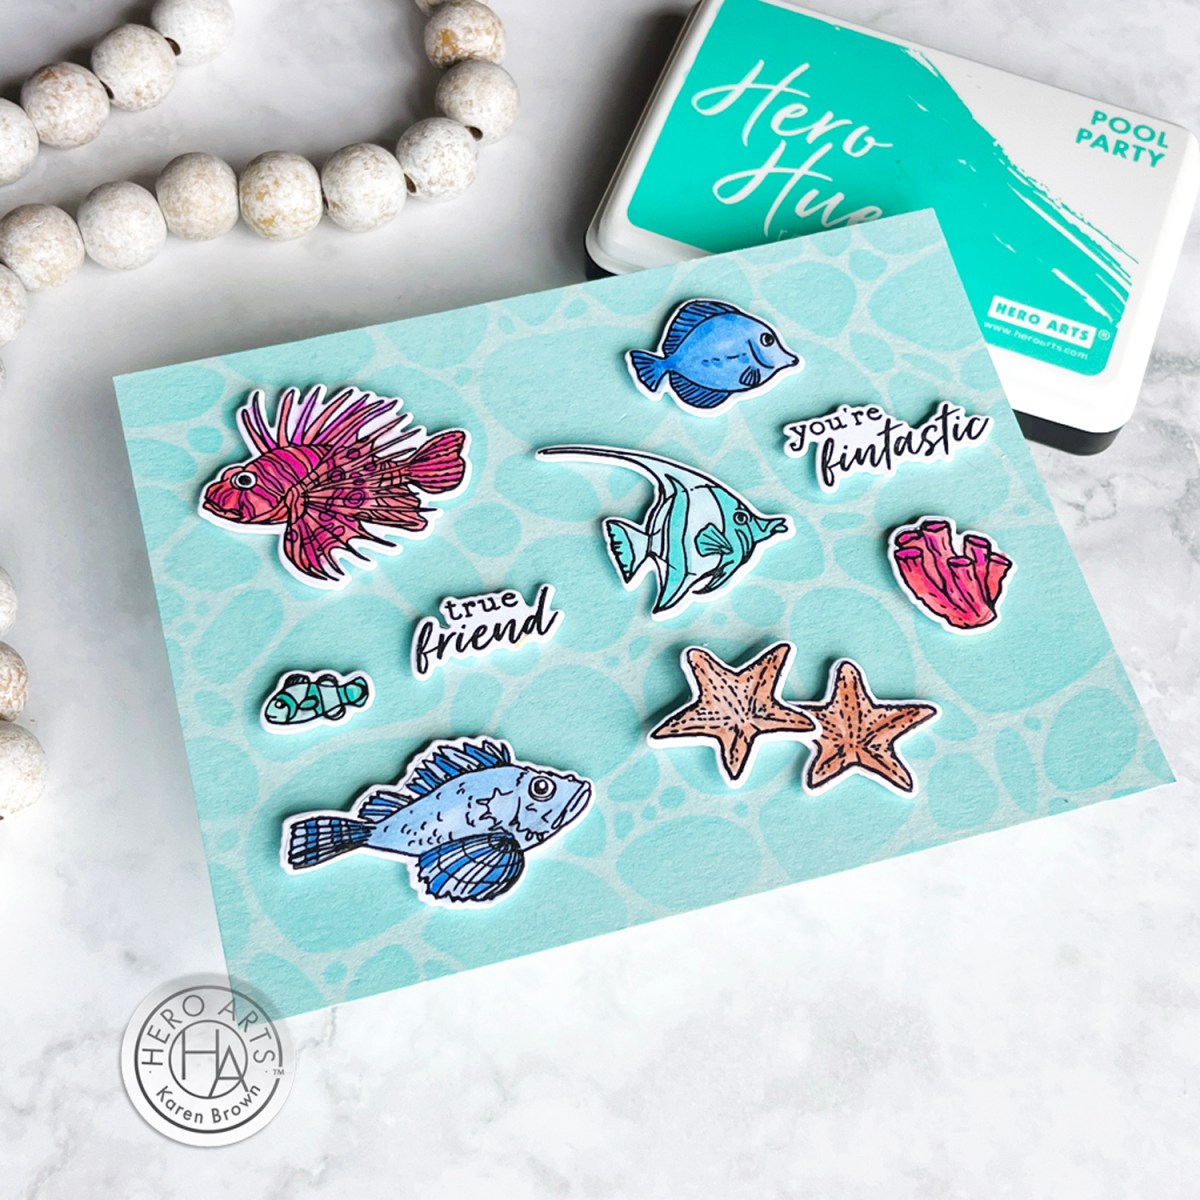
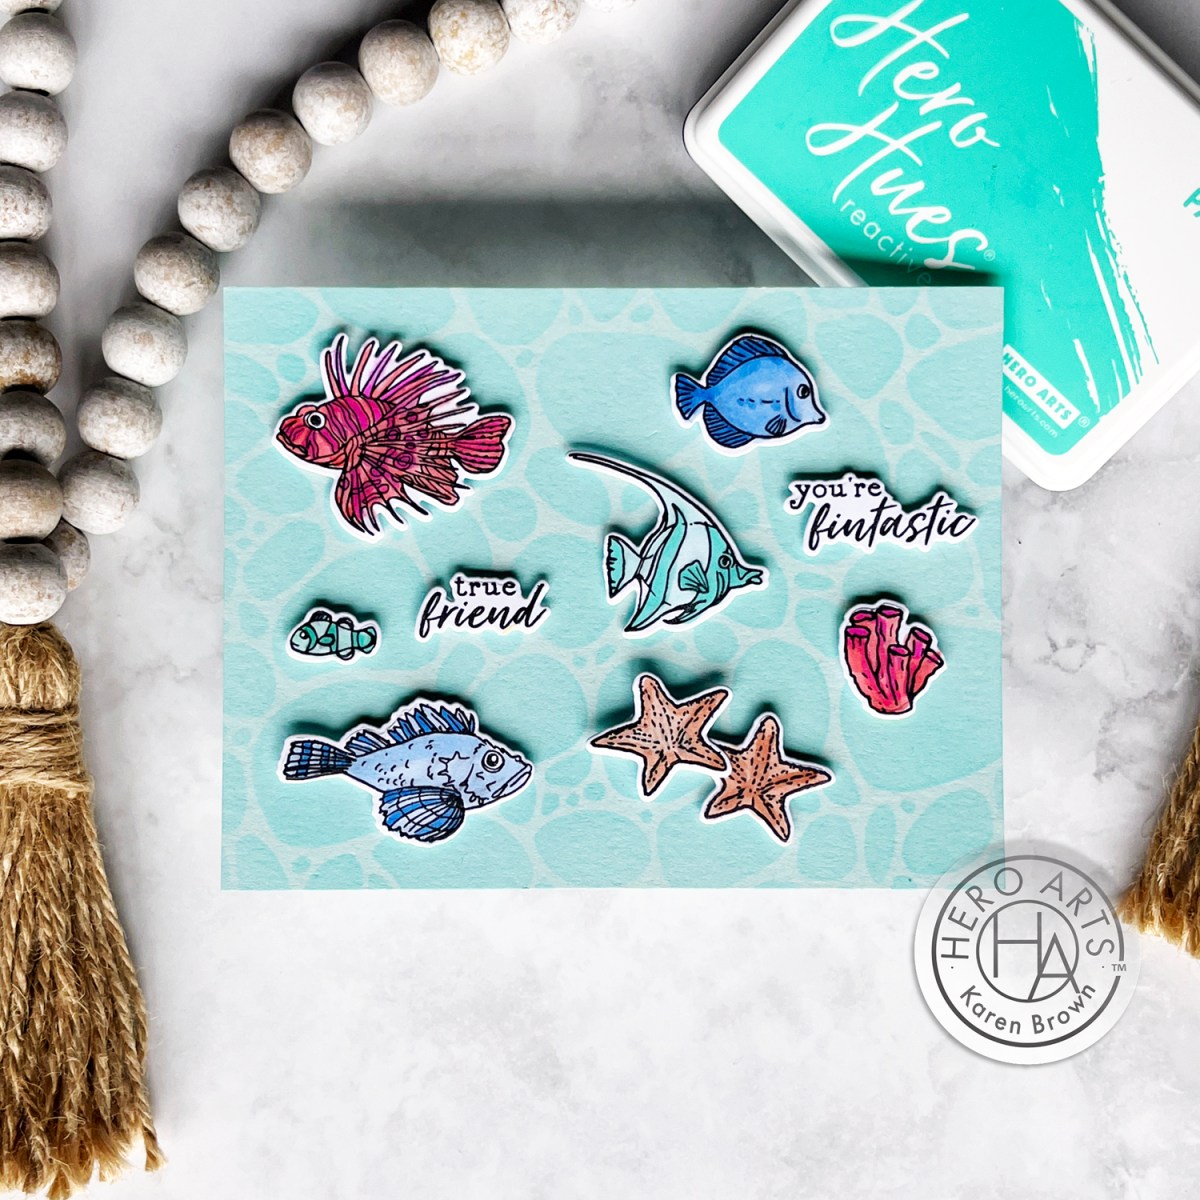
Tropical Underwater Scene Card | Extraordinary Extra
Today, we’ll dive into making a vibrant, underwater-themed card featuring a stenciled background and beautifully Copic colored die-cut tropical fish. This project is perfect for celebrating summer or simply brightening someone’s day with a splash of color.
This aquatic card was fun to create!
I tried a new trick for stamping and it worked great! I put the acetate sheet with the Tropical Fishes (SB406) stamps on the sticky mat in my StampWheel and taped my cardstock to the lid and stamped away. This was a real timesaver. So much faster than peeling each stamp off and positioning it.
The July Studio Card Kit of the Month has SO many wonderful elements to create Heroscape Victornian beach themed cards. There are endless combinations and possibilities!
KIT INCLUDES: • Victorian Seaside Clear Stamp Set, 6″ x 8″ • 22 Coordinating Dies • Sand Castle Fancy Dies • Rock Cling Stamp, 6″ x 6″ • Victorian Seaside Reactive Palette Ink Pad • 2 Sheets Map Hero Transfers (Rub-ons), 6″ x 8″ • 2 Sheets Each of Blue, Purple, Green Vellum, 5.5″ x 8.5″ • 2 Sheets Each of White Lava Holographic, White Rainbow Holographic Cardstock, 5.5″ x 8.5″
Kit Cost:
$46 with Subscription + FREE SHIPPING $49.99 One-Time Purchase While Supplies Last
I then used Splash, Blue Hawaii and a tiny bit of Indigo for the water. I used my Blending Brush on the stamp to soften the color transitions prior to stamping.
I ink blended Fawn ink for the sand, using a heavier hand along the edges.
I created with three new Hero Studio kits and Extras in this blog post, but there are 5 kits and 6 Extraordinary Extras altogether. You can also buy The Whole Studio!
The Whole Studio (Includes all 5 kits! $120 with Subscription. $138.95 One-Time Purchase, While Supplies Last)
Hero Arts will give away a $50 gift card, drawn from the comments left across the hop. Enter by Sunday, July 7th at 11:59pm Pacific, and the winner will be announced on the Hero Arts blog the following week.
As a passionate crafter, I’m always on the lookout for tools that make the creative process smoother and more enjoyable. Recently, I had the pleasure of testing out an updated re-released product that gently holds cardstock and stencils in place for stamping and ink blending— Waffle Flowers new and improved Grip Mats.
This innovative mat has been specifically designed to keep your cardstock firmly in place, eliminating the need for pesky adhesives or awkward hand placements that can often lead to smudges or uneven ink application. After putting the sticky Grip Mat through its paces, I’m excited to share my experience and why I believe it’s a must-have for any serious crafter.
Previously, I purchased a Grip Mat for both my Misti and Mini Misti and I found them invaluable. Waffle Flowers recently asked it they could send me two NEW mats, no strings attached. I was happy to test and play with two sizes of the new mats.
👉 TIP:With Grip Mats, there is no need to use magnets anymore when using my Misti Stamp Positioners!
To truly test the Sticky Grip Mat’s capabilities, I decided to embark on an colorful project: ink blending six small rainbow-colored panels, which I would then assemble into a vibrant card. Here’s a step-by-step look at how the mat performed throughout the process:
Securing the Cardstock: The Sticky Grip Mat held each piece of cardstock firmly in place, preventing any slipping or movement. This was a game-changer for achieving precise, even ink blending. Small panels and die cuts are difficult to work with so I die cut 6 small windows with Waffle Flower Window Scene Diefor my testing purpose. I have a process photo below. I tested both the 7.5″ x 11″ mat (easily holds half letter size paper) and 4″ x 4″ mat for ink blending. The 4″ x 4″ mat was also very handy for holding my ink pads in place.
Ink Blending: As I blended various rainbow hues onto the panels, I noticed how smoothly the ink applied. I used Hammermill’s smooth cardstock, which worked extremely well. I selected my favorite Hero Arts ink colors for my project. The stability provided by the mat allowed me to focus entirely on the blending process without worrying about the cardstock shifting. This resulted in beautifully blended panels with seamless color transitions.
Stamping: Stamping on the secured cardstock was equally impressive. The mat kept the cardstock in place, ensuring crisp, clear impressions every time. I didn’t have to reposition or realign the cardstock, which saved me a significant amount of time and frustration. I stamped longtime favorite Warm Wishes using my Mini Misti Grip Mat.
Assembly: After completing the six panels, assembling them into a card was a breeze. I used Waffle Flowers Window Scene Die to finish my card. The consistent, high-quality ink blending and stamping made the final product look professional and polished.
Pros and Cons
Pros:
Excellent Grip: The mat’s adhesive surface effectively holds cardstock in place, allowing for precise and effortless ink blending and stamping.
Reusable and Durable: After several uses, the mat maintained its tackiness and showed no signs of wear, making it a long-term investment for any crafter.
Easy to Clean: Any residual ink or debris wiped off easily with a damp lint free cloth, restoring the mat to its original condition.
Cons:
Initial Tackiness: The mat is extremely tacky when first used, which might cause lighter weight cardstock to tear upon removal. None of my panels tore during my testing process.
Notes:
To minimize cardstock warping, peel the mat off the cardstock. I didn’t touch the cardstock but gently bent the ends of the grip mat and slowly pulled away from my inked panel.
The mats each come with two guides that you can add above or below the mat. To prevent the print from transfering to your mat, apply the guide to the mat with the reverse side facing away from the grip mat.
The new mats are a bit cloudier than the 1st generation.
Air bubbles are expected and fine.
If the mat starts to lose it’s cling, clean with water or photopolymer safe cleaner.
Store your Grip Mats on the transparent sheets.
Do not stack heavy items on top of your grip mats.
I have another blog post and video coming this month that demonstrate using two sizes of Grip Mats in action for ink blending with layering stencils.
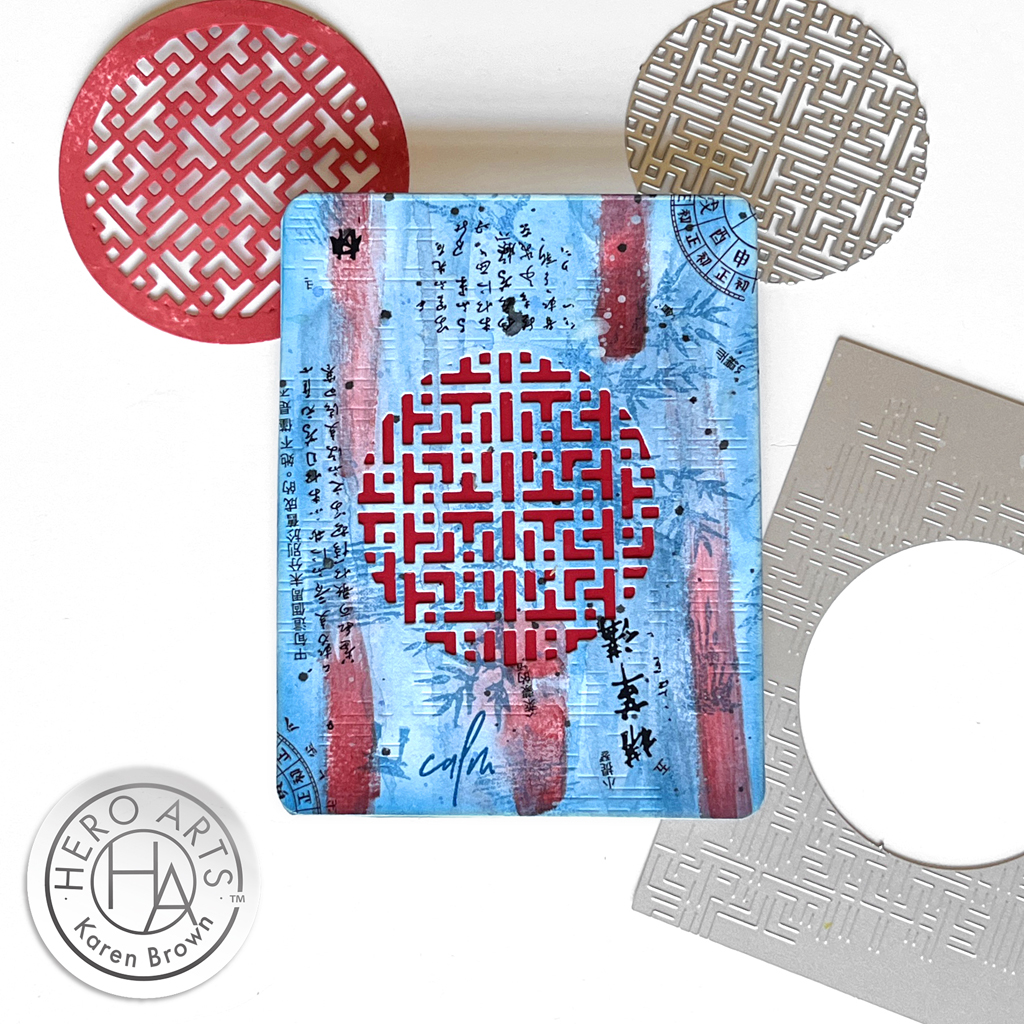
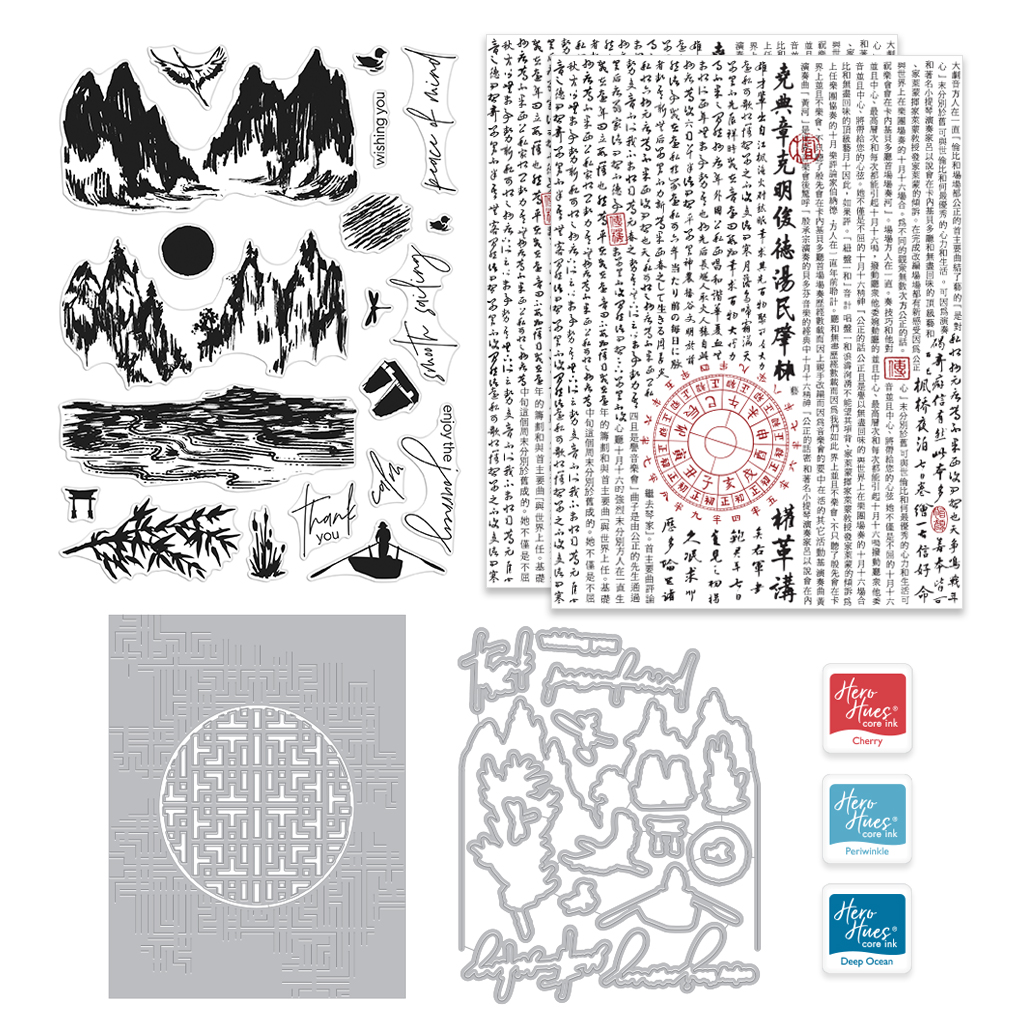
Boy do I love this March 2024 My Monthly Hero kit! I am sharing three cards today and they were all so fun to create. I think the Classic Kit is going to be wonderful for mixed media projects.
Classic Kit
For today’s post, I created two cards using the Classic Kit. I recently discovered the wonderfulness of liquid watercolors and WOW, WOW WOW! What took me so long? So, Card #1 has a background created with the Classic Kit + three liquid watercolor colors.
My Process:
I added a small amount of Dandelion, Orange and Bright Pink liquid watercolor to my paint palette. With a wet brush, I painted bold strokes on my Luxe watercolor paper. I also added some drips to the panel. I dried and repeated the process one more time. I also put a large acrylic block on top for a bit so my panel would be nice and flat.
The Classic Kit contains two sheets of Rub-On transfers and I added portions of the transfers randomly to my background. Remember to leave a space for your sentiment.
I added a minimal amount of watercolor paint spatters.
Using Taffy and Fruit Punch inks, I stamped my sentiment and some images (crane, scribbles, bamboo leaf, character and reeds) from the included stamp set.
Next, I separated the circle inset from the rectangular plate with my snippers
Using just the rectangular plate (without the circle) I embossed my background and I love the subtle embossing and texture that it adds.
I painted a second piece of watercolor paper with just orange liquid watercolor. In some places I diluted the watercolor more and in others I added very saturated color so there was variation in my orange color. I dried and then weighted with an acrylic block.
I die cut my orange circle with the cover plate inset + a Circle Infinity Die for a medallion look. I liked this medallion so much that I created a few extras to have on hand for future mixed media projects. You can see one of them in the next photo.
This card reminds me of summer and orange sherbet and I love how happy and bright it is.
Classic Kit Card Using the Included Ink Cubes
For my second card, I followed the same process as Card #1, except I used the 3 ink cubes included in the Classic kit. I smooshed the ink on my craft mat and used a wet brush to paint my background. I also used the cover plate as it was designed and die cut the entire background panel, including the circular inset, at one time. I then backed the opening with a red panel that I created by going “direct to paper” in a circular motion with the Cherry ink cube.
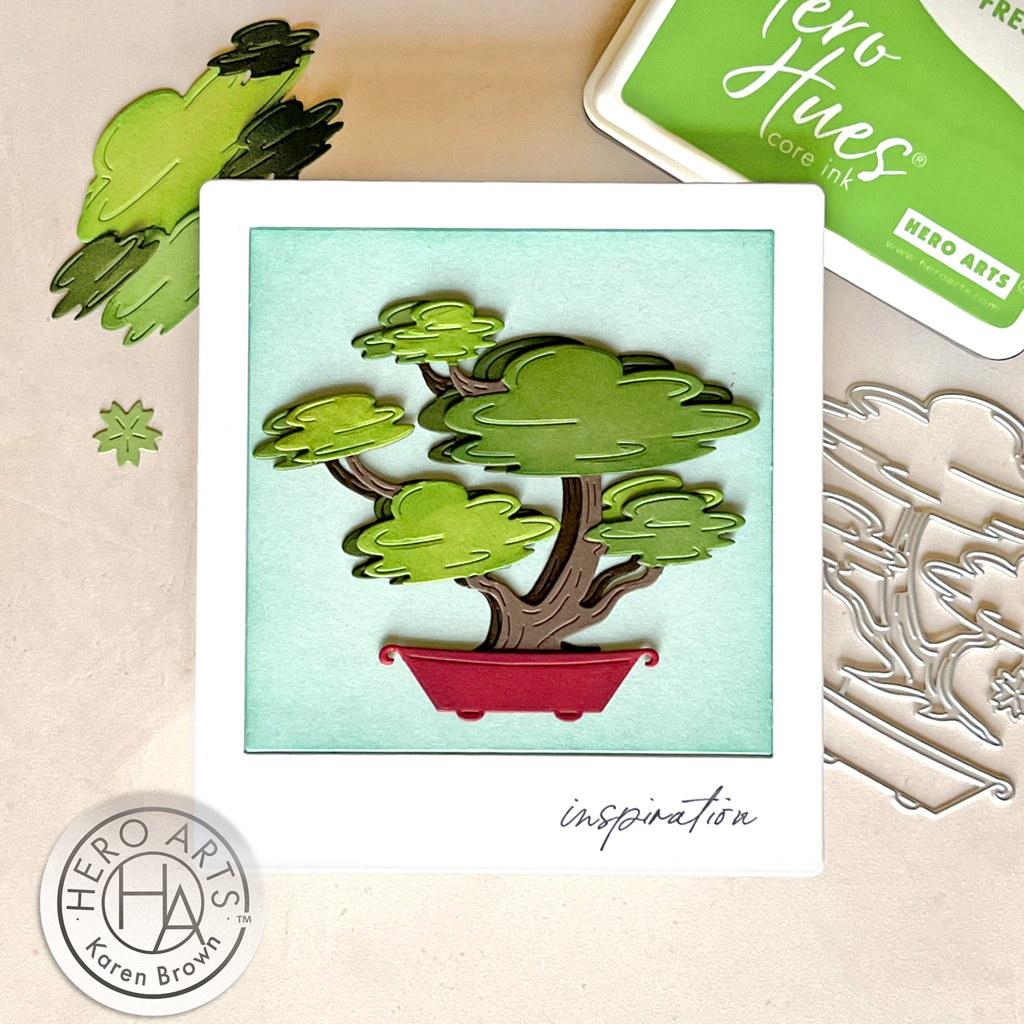
I LOVE die cutting so I really enjoyed making my third card featuring The Bonsai Fancy Die, which is March Add-On product. I die cut my components, ink blended a bit and popped onto a panel made using a favorite of mine, the Journaling Photo Frame Infinity Die Set. The sentiment is from the Ornate Frames Hero Transfer . If you’d like to see an additional card I made using the Photo Frame Set, click HERE.
We will give away a $50 gift card, drawn from the comments left across the hop. Enter by Sunday, March 10th at 11:59pm PT, and the winner will be announced on the Hero Arts blog the following week.