Spellbinders More Fresh Picked Collection offers an exquisite opportunity to create a contemporary cardmaking masterpiece. The entire Fresh Picked series offers modern, contemporary, stylized florals that really ignite my creativity and I couldn’t wait to get started die-cutting.
Fresh Picked Vase Bouquet
My Process:
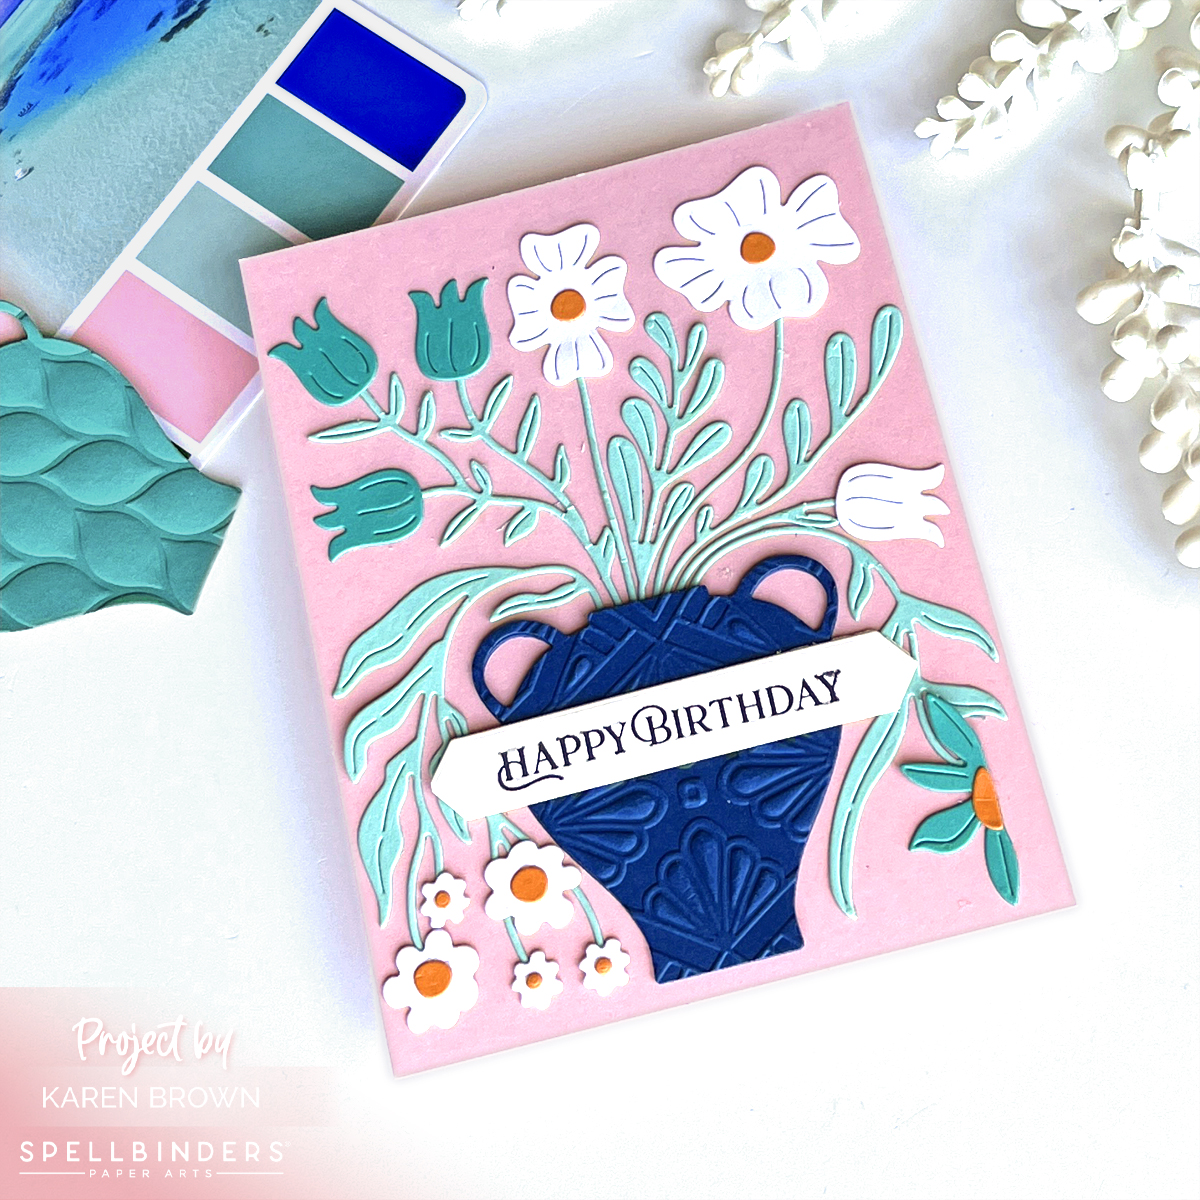
Today, I selected the Fresh Picked Vase Bouquet for my birthday card. I knew I wanted Waterfall leaves and greenery on my card so I did a quick search through my color cubes and decided on color combination #060, and I have to say I love this color palette!
I die cut all my elements using Spellbinders Happy Day Cardstock Assortment. I die cut the vase twice for a bit of dimension.
With its sleek lines and intricate designs, the Spellbinders Fresh Picked Vase Bouquet die set allows for the creation of stunning floral arrangements that exude modern elegance.
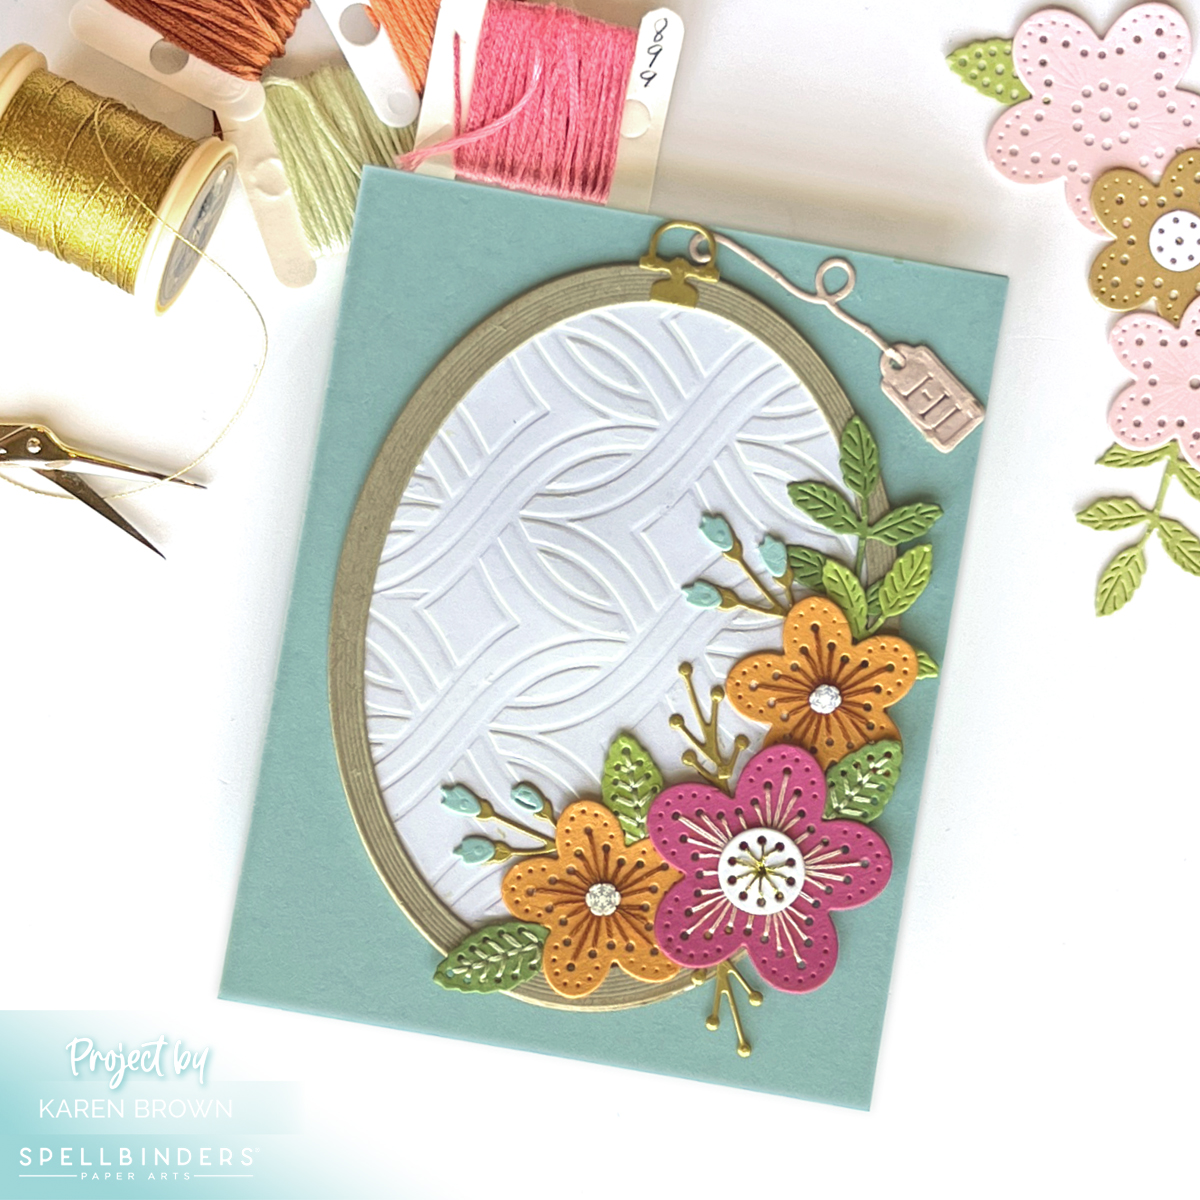
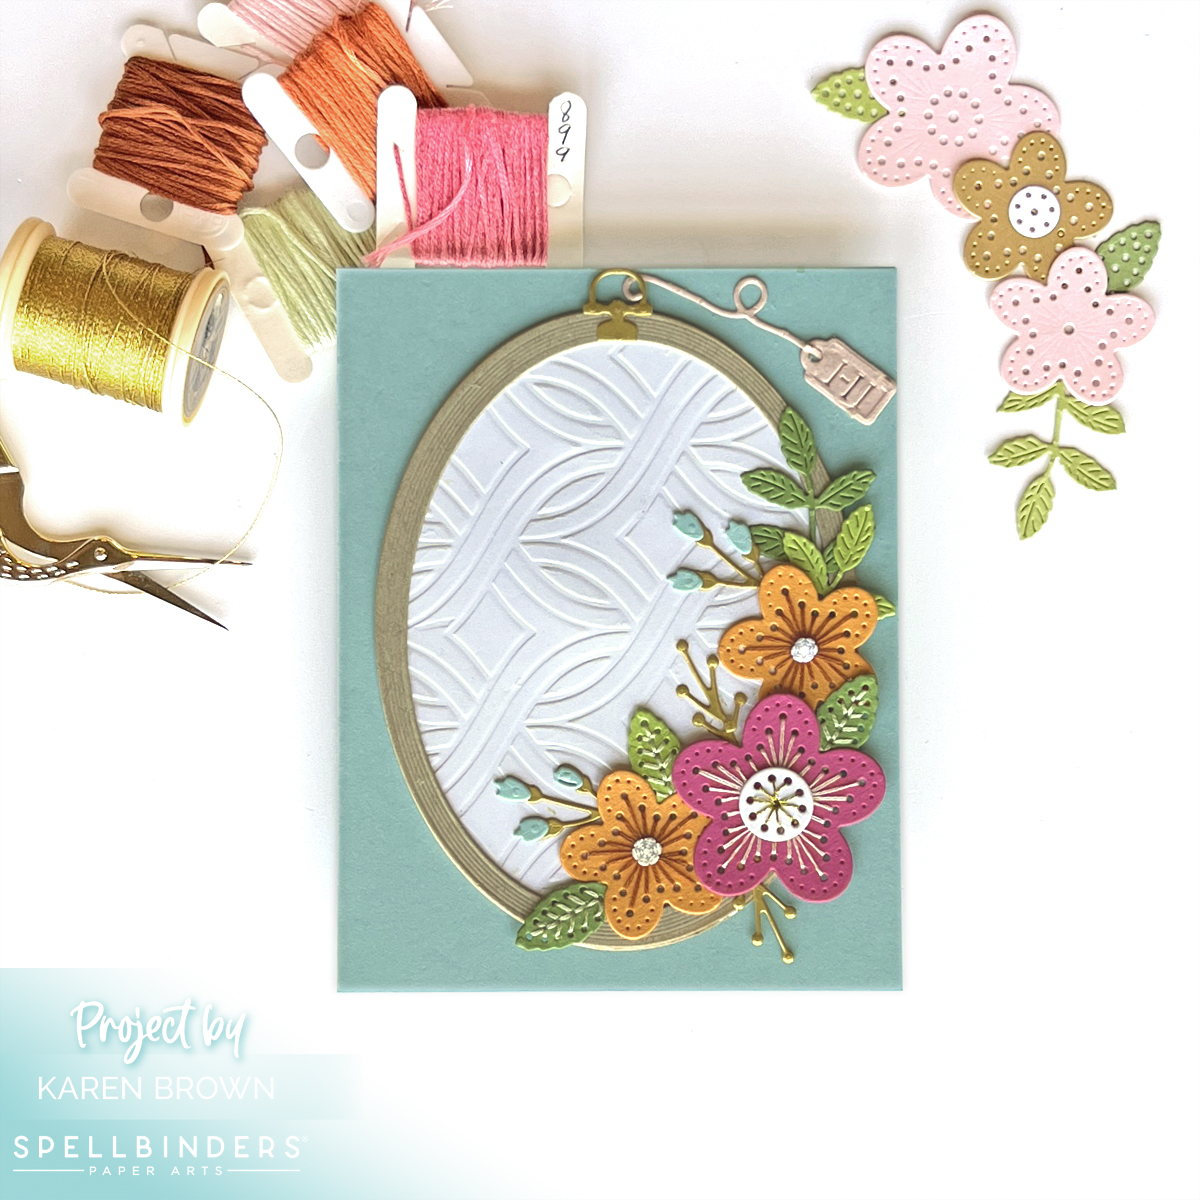
It’s that time of the month again….time for Spellbinders April Club Kit releases. Today, I am sharing my floral stitched card. I know I always say this, but the April Stitching kit is a real beauty.
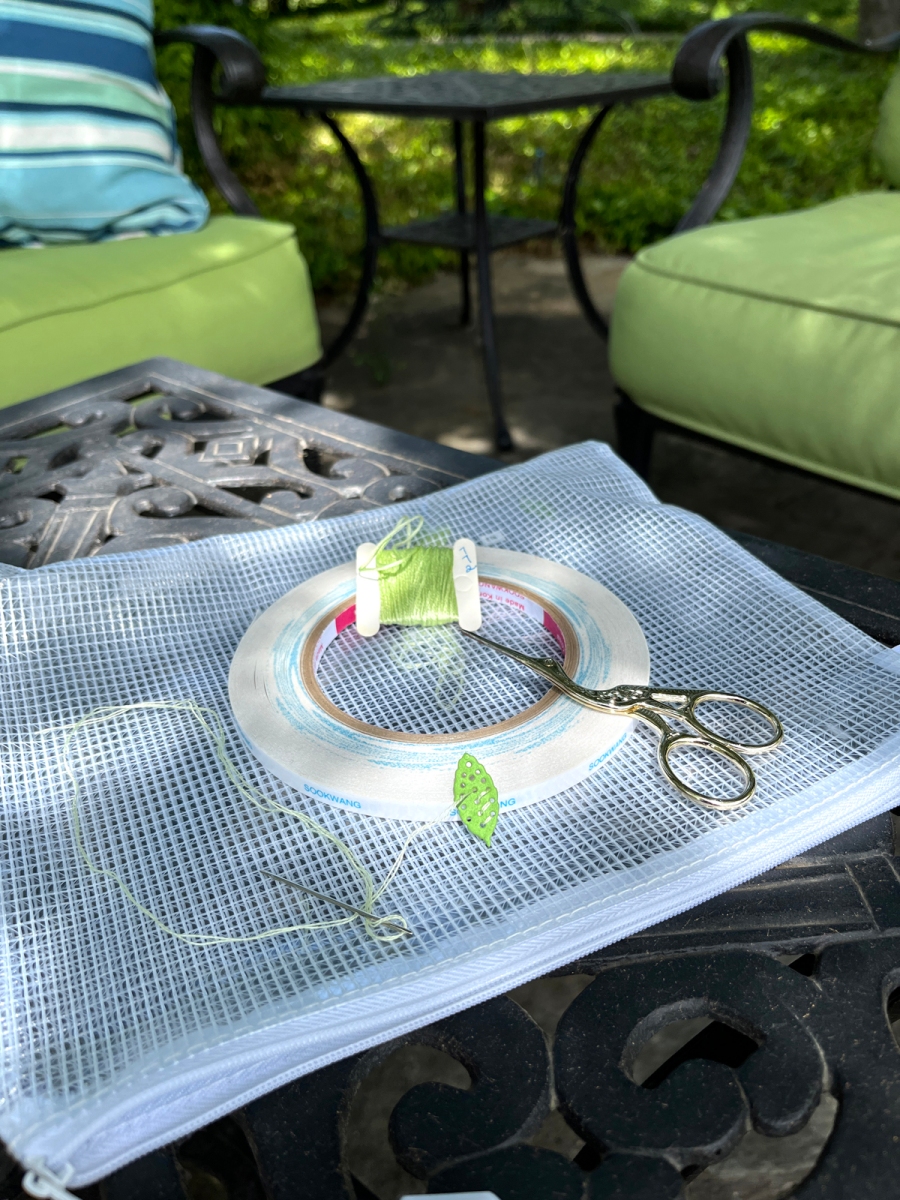
One of the things I like about stitching is that the project is transportable. I stitched my flowers in a doctor’s waiting room and I completed the leaves in my backyard on a beautiful Spring day (see photo below).
The Deluxe Caboodle
I also wanted to mention what a wonderful deal the Deluxe Caboodle Kit is. You save 60% off all TEN kits for the month + you get a bonus gift. So, if you are thinking about multiple kits, consider the Caboodle. The current cost is $160 but the kit value is $315.
Spellbinders has a nice selection of stitching accessories in their shop that you can find HERE. I used DMC Gold Thread, #818 Soft Pink, #772 Light Yellow Green and #922 Light Copper for this project.
When I started stitching, I took two strands of floss, separated them one at a time, brought them together and then stroked and lengthened them until they seemed tame and ready to use.
When I move from one area to the next, I run the floss through the just finished stitched area to keep the thread secure. This gives a nice look on the finished project.
Don’t stitch with threads that are too long or they are likely to knot.
When I was done, I added a bit of Bearly Glue to the ends so that they would stay in place.
To finish my project I embossed white cardstock with the my longtime favorite embossing folder: Intertwined Lattice.
I used the Press and Seal method to keep my elements together after I arranged them. Place Press and Seal over arrangement, flip them over, apply glue, flip back over and adhere to card.
Club members can cancel, upgrade or change clubs from the 1st-5th of each month. Popular Clubs frequently sell out during this period so club members get first dibs on everything.
NEW for 2024: Club Members get EARLY access to new releases on the 6th!
On the 6th, Clubs become available to non-members.
On the 27th, Club registration closes for the current month.
If a club did not sell out, you can buy under “Shop Past Clubs”. Past kits are available on the 10th of the FOLLOWING month.
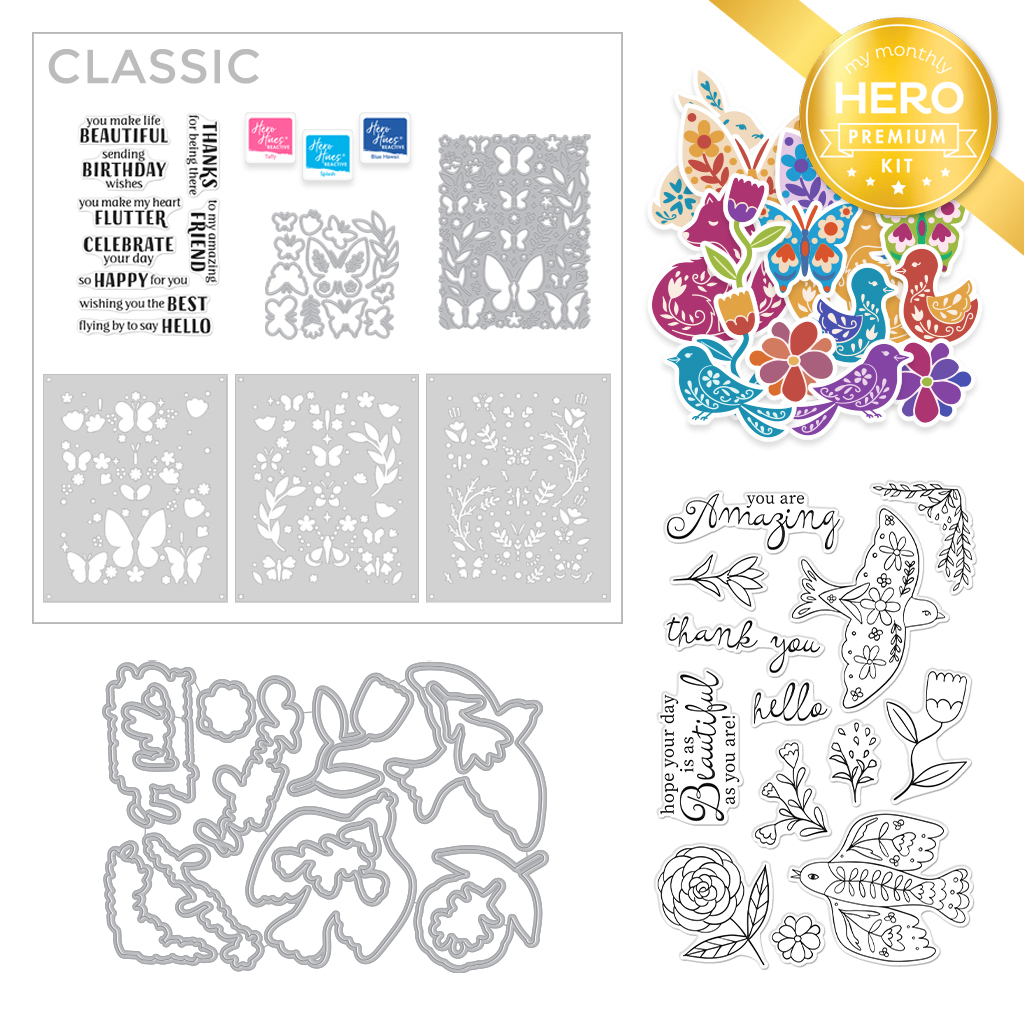
Greetings, fellow crafting enthusiasts! I am thrilled to unveil Hero Arts latest My Monthly Hero offering to the world of cardmaking: a delightful new kit that celebrates the timeless beauty of folk art and is sure to captivate your heart and ignite your creativity.
Folk art has long been cherished for its warmth, simplicity, and universal appeal. Rooted in heritage and passed down through generations, folk art motifs are infused with meaning, symbolism, and a deep sense of community. With the April kit, we pay homage to this cherished tradition while infusing it with a fresh, modern twist.
What’s Inside the Kit?
Curious to know what treasures await you in this cardmaking kit? Let’s take a peek inside the Premium Kit:
Premium Kit
Celebrate the whimsical charm and timeless tradition of folk art with our April My Monthly Hero kit. This kit features three Color Layering Stencils with butterflies and flowers that are perfect for Spring cardmaking. Also included are sixteen coordinating dies and a Cover Plate die that partially cuts the design to allow for elements to pop up. A clear message stamp set with nine everyday messages and three beautiful Reactive Ink Cubes complete this enchanting kit. The Premium kit also includes a 4″ x 6″ Bird and Flower Clear Stamp set in a lovely hand-drawn style that comes with thirteen coordinating dies. Also included are sixteen colorful washi stickers that are perfect for quick cardmaking or using in planners.
If you love all the fabulous Add-On products, you can Get Them All in a bundle at a discounted price, while supplies last.
A note to My Monthly Hero subscribers: You have the opportunity to shop and add items this month without any additional shipping charges. Simply log in to your account and place your order by 11:59am PT on April 4th, in order to take advantage of this offer. Your kit may ship in a separate box than any other extras and add-ons, but no additional shipping costs will apply.
Blog Hop and Giveaway:
Hero Arts will give away a $50 gift card, drawn from the comments left across the hop. Enter by Sunday, April 7th at 11:59pm Pacific, and the winner will be announced on the Hero Arts blog the following week.
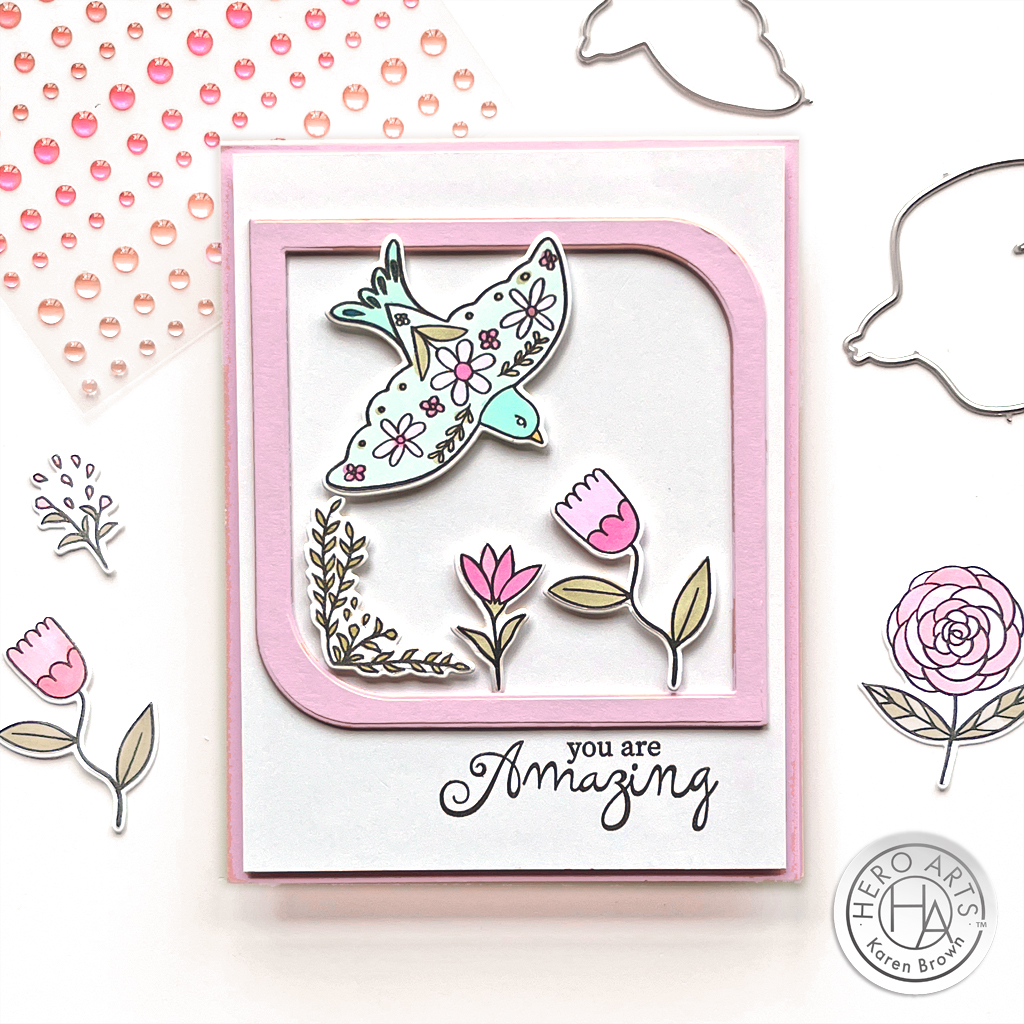
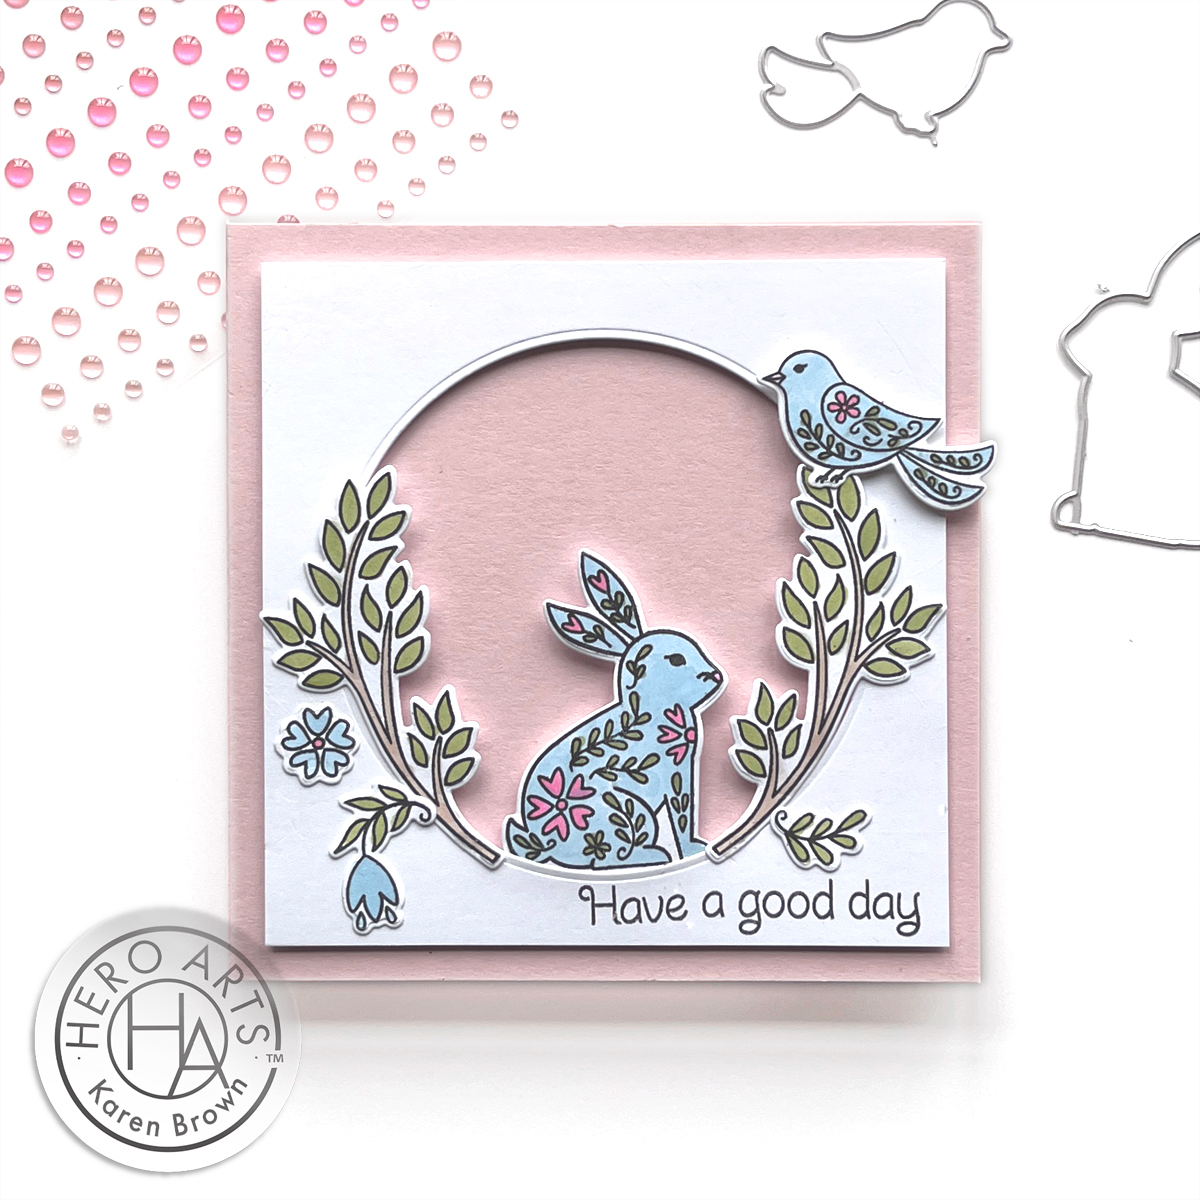
With our Folk Art cardmaking kit, the possibilities are endless. Whether you’re crafting a heartfelt birthday card for a loved one, sending warm wishes for a special occasion, or simply brightening someone’s day just because, our kit allows you to infuse your creations with the timeless charm of folk art.
Join us as we celebrate tradition, community, and the joy of handmade with our “Folk Art” My Monthly Hero cardmaking kit. Happy crafting!
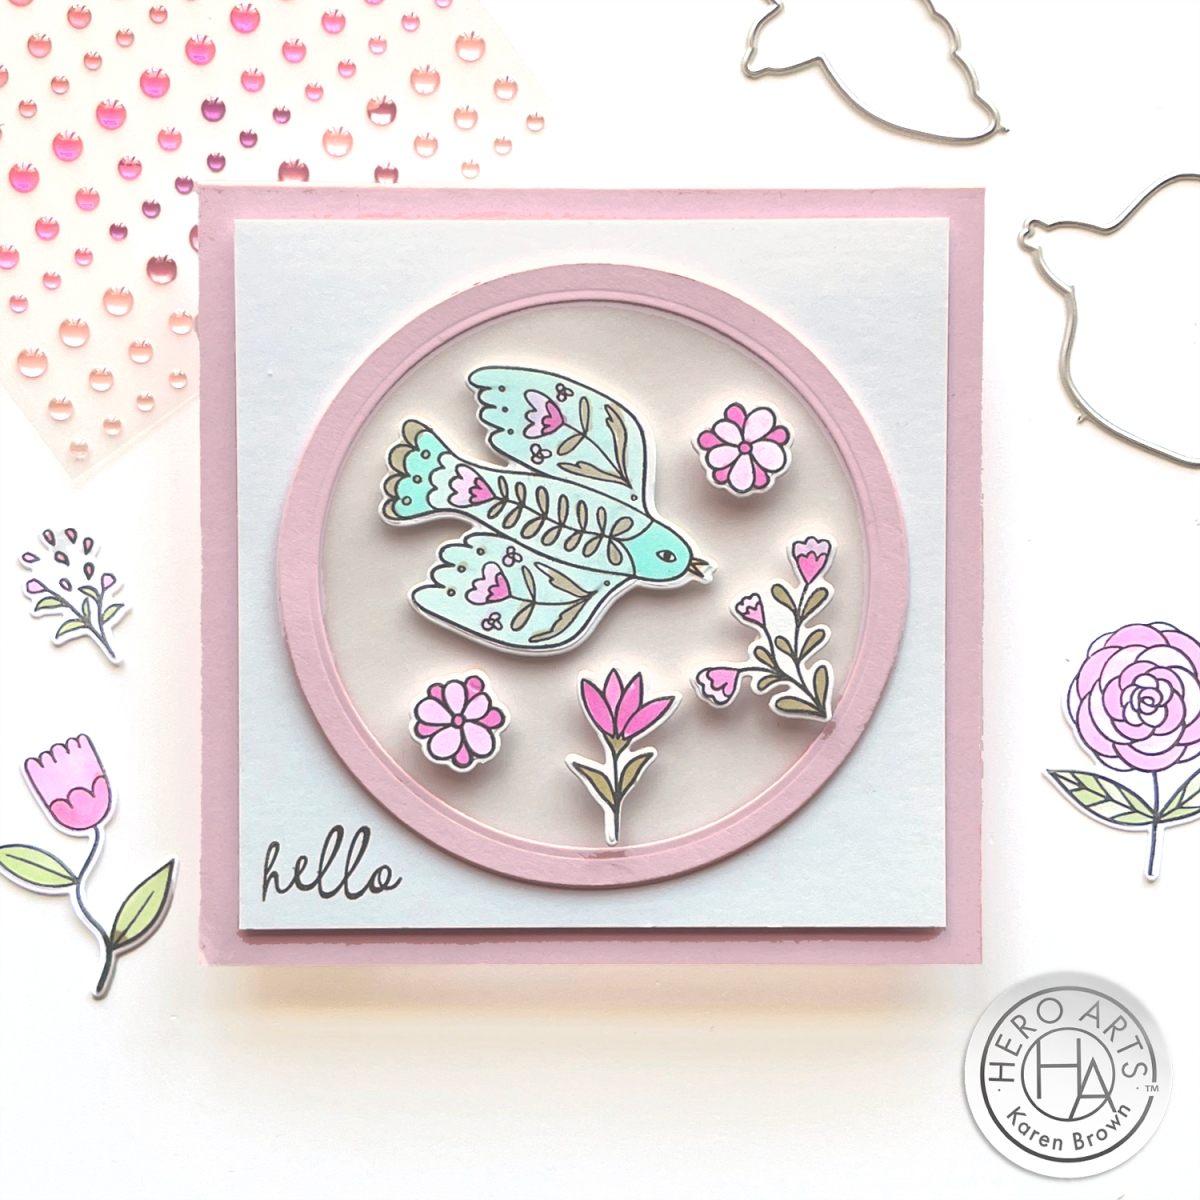
Hello and welcome to the April 2024 My Monthly Hero Countdown! I must say, this kit is full of wonderful products that I know you will love. The kit goes live on Monday, April 1st, so stay tuned. Meanwhile, sit back and enjoy some inspiration, sneak peeks and giveaways.
For today’s “peek”, I created a pink, white and aqua folk art scene card that I can’t wait to send!
WIN A KIT BEFORE YOU CAN BUY IT: Just leave a comment on this (and every) Countdown to Creativity post. Hero Arts will randomly draw one lucky winner from comments left across all countdown posts on the Hero Arts blog. The winner will be announced first thing Monday morning, April 1st, before the kit launches at 10am Pacific. The more you comment, the more chances you have to win!
Stop by the other designers blogs for more chances to win:
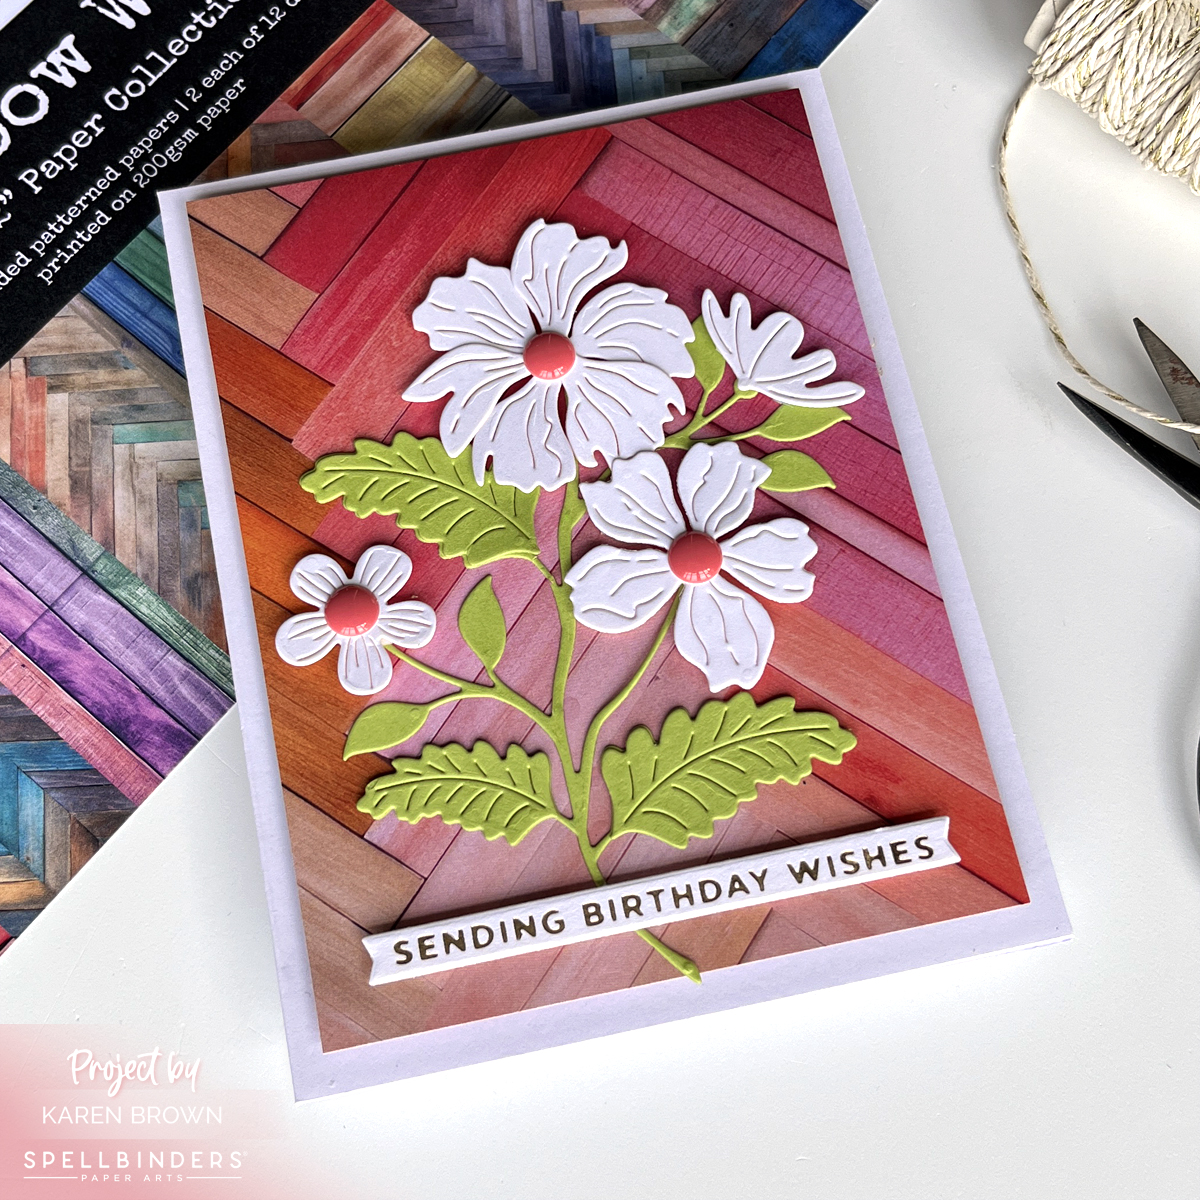
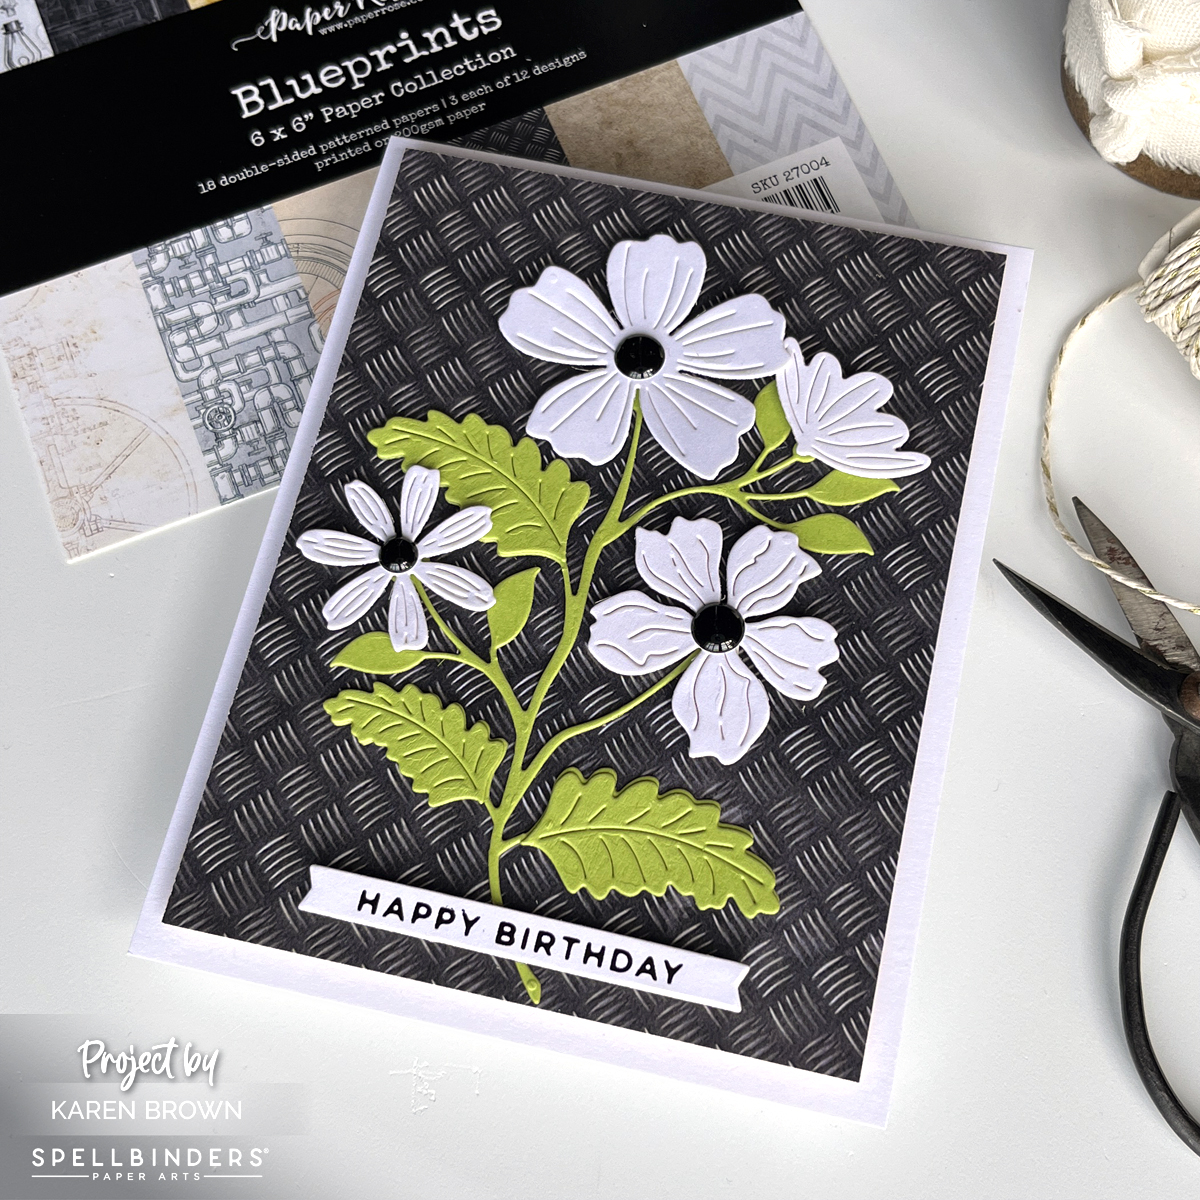
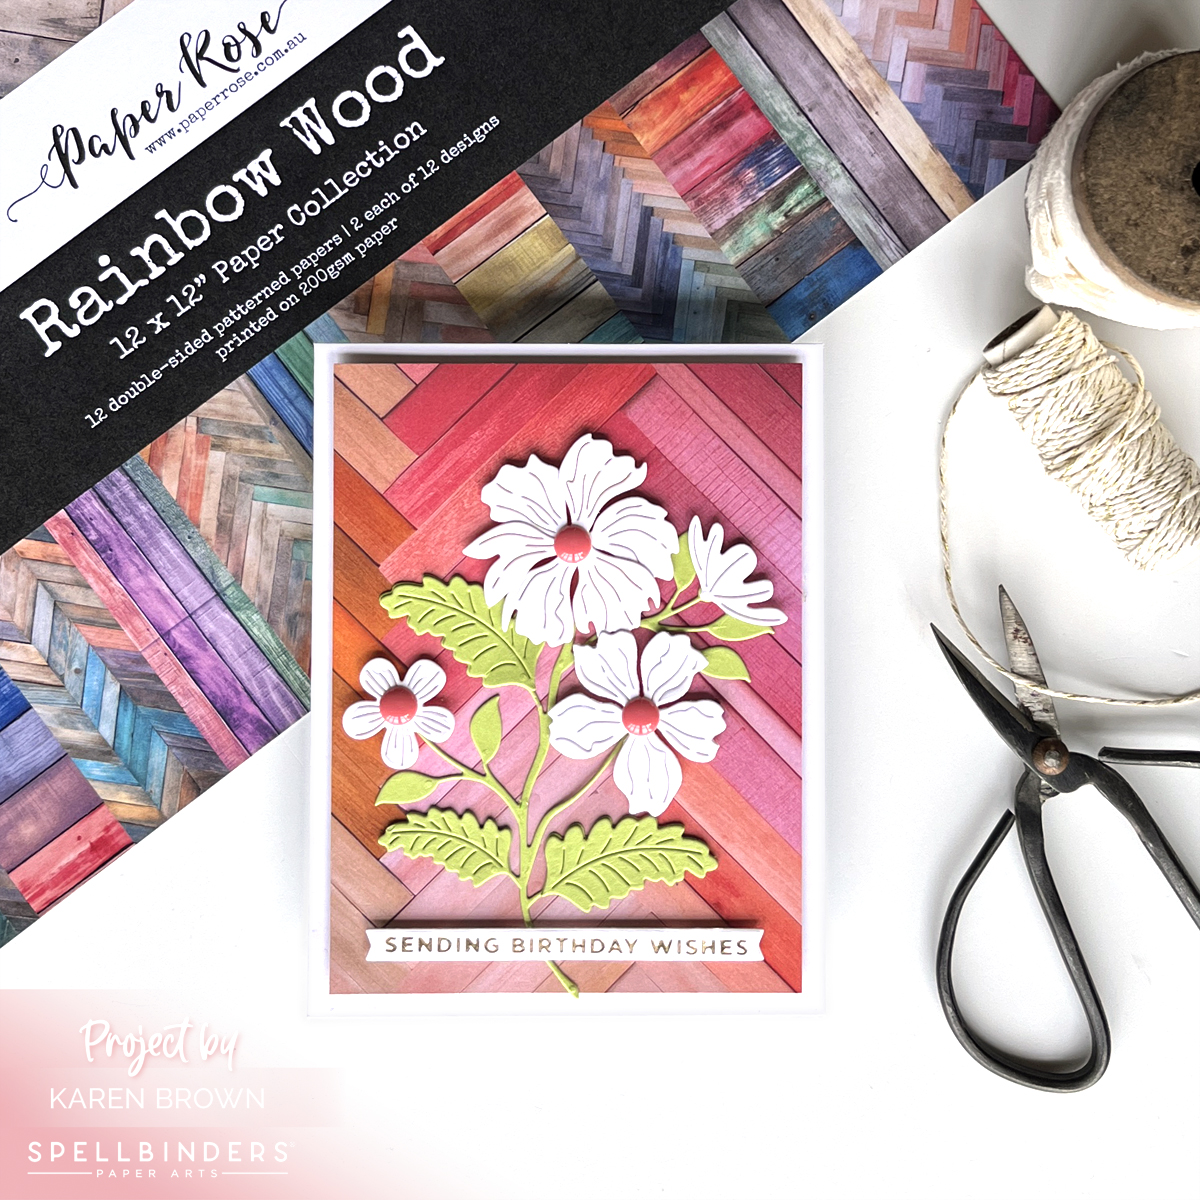
Hello, fellow crafting enthusiasts! Let’s explore one of the most versatile and exciting elements of the craft: printed paper. Whether you’re a seasoned cardmaker or just starting out on your creative journey, printed paper can add depth, texture, and personality to your handmade cards.
Today, I am using two beautiful Paper Collections from Paper Rose that Spellbinders recently started offering on their website. The Rainbow Wood pack is colorful and vibrant and the Blueprintscollection is funky, interesting and adds an edgy vibe. I used similar die cut focal points for each card but changed the background to illustrate how easy it is to alter the tone of your card.
Unleash Your Creativity: The Art of Using Printed Paper in Cardmaking
Printed paper, also known as patterned paper or designer paper, comes in a vast array of colors, patterns, and themes. From elegant florals to whimsical polka dots, there’s a printed paper to suit every style and occasion. But why incorporate printed paper into your cardmaking projects?
Instant Visual Appeal: Printed paper instantly adds visual interest to your cards, making them stand out and catch the eye.
Time-Saving: Using printed paper as a background or focal point can save you time compared to stamping or hand-coloring intricate designs.
Endless Variety: With so many designs to choose from, you can easily find printed paper to match any theme or mood, whether it’s a birthday, wedding, holiday, or just because.
Versatility: Printed paper can be used in a variety of ways, from backgrounds and borders to die-cut shapes and embellishments, giving you endless creative possibilities.
Now that we’ve covered why printed paper is a must-have in your cardmaking stash, let’s explore some fun and creative ways to incorporate it into your projects.
How to Use Pattern Paper
1. Background Bliss
One of the simplest yet most effective ways to use printed paper in cardmaking is as a background element. Choose a pattern that complements your card design, trim it to size, and adhere it to your card base for an instant burst of color and pattern. Whether you opt for bold stripes, delicate florals, or playful geometrics, a patterned background adds depth and dimension to your cards without overwhelming the overall design.
2. Focal Point Fun
Additionally, you can die-cut or fussy-cut designs from your favorite patterned paper and use them as the centerpiece of your card. Whether it’s a stunning floral cluster, a charming critter, or a bold sentiment, a printed paper focal point adds visual interest and personality to your handmade creations.
3. Layering Love
Layering printed paper is a great way to add depth and dimension to your cards. Mix and match coordinating patterns and colors to create eye-catching backgrounds, borders, or mats for your focal elements. Experiment with different combinations until you find the perfect balance of prints and solids to make your designs pop.
4. Embellishment Extravaganza
Printed paper isn’t just for backgrounds and layers—it also makes fabulous embellishments! Use punches, dies, or scissors to cut out shapes, borders, or accents from your favorite patterned paper and use them to embellish your cards. From flowers and leaves to banners and borders, printed paper embellishments add charm and whimsy to your handmade creations.
5. Theme Time
Take your cardmaking to the next level by choosing printed paper that fits a specific theme or occasion. Whether it’s a holiday, a season, or a special event, themed patterned paper sets the tone for your cards and ties your design together beautifully. From spooky Halloween motifs to festive Christmas patterns, themed printed paper adds instant flair and personality to your handmade creations.
In conclusion, printed paper is a cardmaker’s best friend, offering endless possibilities for creativity and expression. Whether you’re looking to add color, pattern, or texture to your cards, printed paper is sure to inspire and delight. So next time you sit down to create, don’t forget to reach for your favorite patterned paper and let your creativity soar!
Spellbinders March 2024 Stitching Die Club Kit is another winner! I thought February would be hard to beat, but “Stitched Read and Sip” is a real favorite. I love to read, drink hot tea and stitch so add in some florals and this kit is a keeper. I’ll also be incorporating the versatile elements into future products as well.
Stitched Read and Sip Handmade Card
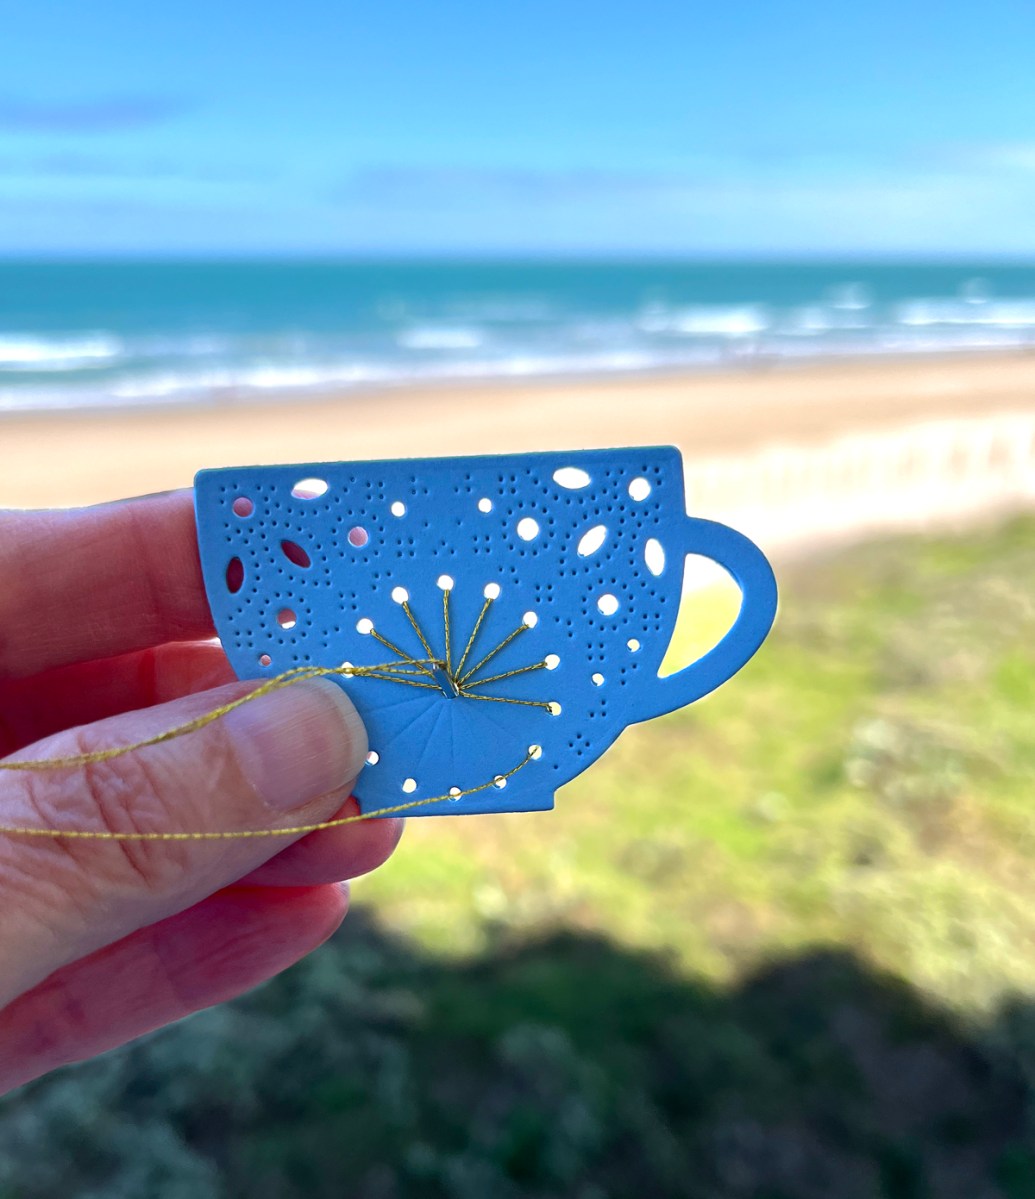
I really enjoyed making this card! I was going to the beach and thought I’d like to stitch this card on our balcony while I listened to the waves. Before we left, I die cut my elements. When stitching, I like sturdy substantial bases, so I die cut the teacup and ornate book two times and then glued them together.
My Stitching Process:
The kit has 17 dies and I started by cutting all my pieces. I die cut the stitching elements twice and then glued them together for a sturdy substantial panel. This die cutting didn’t take long, but I think the extra effort was worth it. I recently purchased a Platinum 6 die cutting machine, and I have to say, I pull it out instead of my Gemini Junior. I wish I had bought one earlier.
Spellbinders has a nice selection of stitching accessories in their shop that you can find HERE. I used DMC Gold Thread for this project.
When I started stitching, I took two strands of floss, separated them one at a time, brought them together and then stroked and lengthened them until they seemed tame and ready to use.
When I move from one area to the next, I run the floss through the just finished stitched area to keep the thread secure. This gives a nice look on the finished project.
Don’t stitch with threads that are too long or they are likely to knot.
When I was done, I added a bit of Bearly Glue to the ends so that they would stay in place.
Club members can cancel, upgrade or change clubs from the 1st-5th of each month. Popular Clubs frequently sell out during this period so club members get first dibs on everything.
NEW for 2024: Club Members get EARLY access to new releases on the 6th!
On the 6th, Clubs become available to non-members.
On the 27th, Club registration closes for the current month.
If a club did not sell out, you can buy under “Shop Past Clubs”. Past kits are available on the 10th of the FOLLOWING month.
Spellbinders just released the lovely Every Occasion Floral Alphabet and I had so much fun handcrafting a pile of cards. Each kit comes with the floral uppercase letter + a separate corresponding sentiment. You can buy the complete alphabet or individual letters.
It’s my birthday today and I wanted to create some elegant thank you notes. I love the beauty and texture of letterpress so I used the Floral K to make a set of monogrammed cards in various shades of blue. The K also comes with a sentiment, You Are So Kind, but I did not use it on my cards.
I inked the plates well and rolled just one time through my BetterPress Machine for a nice crisp impression.
I have another post “9 Tips, Tricks and Insights for Spellbinders BetterPress Machine” that you can read HERE.
I am so excited about today’s share, Spellbinder’s Stitched Floral Card Front. I used the February Stitching Club Kit, which is beautiful, and I think the finished card is so very special. This card is going to one of my closest friends for her upcoming birthday.
The kit has 5 dies and I started by cutting all my pieces. The flower center is pink, the flower is papaya, the background is waterfall and the overlay is blue. There is a lot of stitching this month, so I die cut all the elements twice and then glued them together for a sturdy substantial panel. This die cutting didn’t take long, but I think the extra effort was worth it. I recently purchased a Platinum 6 die cutting machine, and I have to say, I pull it out instead of my Gemini Junior. I wish I had bought one earlier.
Spellbinders has a nice selection of stitching accessories in their shop that you can find HERE.
When I started stitching, I took two strands of floss, separated them one at a time, brought them together and then stroked and lengthened them until they seemed tame and ready to use. I used DMC Aqua 598, Orange 741 and Pink 818.
When I move from one area to the next, I run the floss through the just finished stitched area to keep the thread secure. This gives a nice look on the finished project.
Don’t stitch with threads that are too long or they are likely to knot.
When I was done, I added a bit of Bearly Glue to the ends so that they would stay in place.
A Few Notes About Spellbinders Club Kits
Clubs Preview on the 1st of each month.
Club members can cancel, upgrade or change clubs from the 1st-5th of each month. Popular Clubs frequently sell out during this period so club members get first dibs on everything.
NEW for 2024: Club Members get EARLY access to new releases on the 6th!
On the 6th, Clubs become available to non-members.
On the 27th, Club registration closes for the current month.
If a club did not sell out, you can buy under “Shop Past Clubs”. Past kits are available on the 10th of the FOLLOWING month.
I adore the timeless elegance of BetterPress letter press cards. Today I wanted to share two cards using the press plate – A Friend Like You. One card is pure letter press….no coloring or embellishment. The second card is loosely colored with Zig Watercolor Brush Markers. I love them both!
If you’d like to read my post on Tips, Tricks and Insights into the BetterPress system you can find it HERE.
For my watercolor card, I repeated step one using watercolor paper.
I cleaned the press plate and BetterPress platform with Ultra Clean.
I taped my watercolor panel to a hardboard with painters tape.
Using Zig markers, I applied watercolor along the etched lines and then used a water brush to move the color around. I did wet-on-dry painting. I also scribbled some watercolor on my work surface and using my water brush, I added additional color to some areas. I experimented with watercolor brushes and my round water brush and I found that I liked the result with the water brush best.
I also used Stylish Ovals to cut down my watercolor panel.
For the black and white panel I die cut my letter press panel with Essential Rectangles, which unfortunately is retired. I matted with black and glued to an A2 top folding card base.
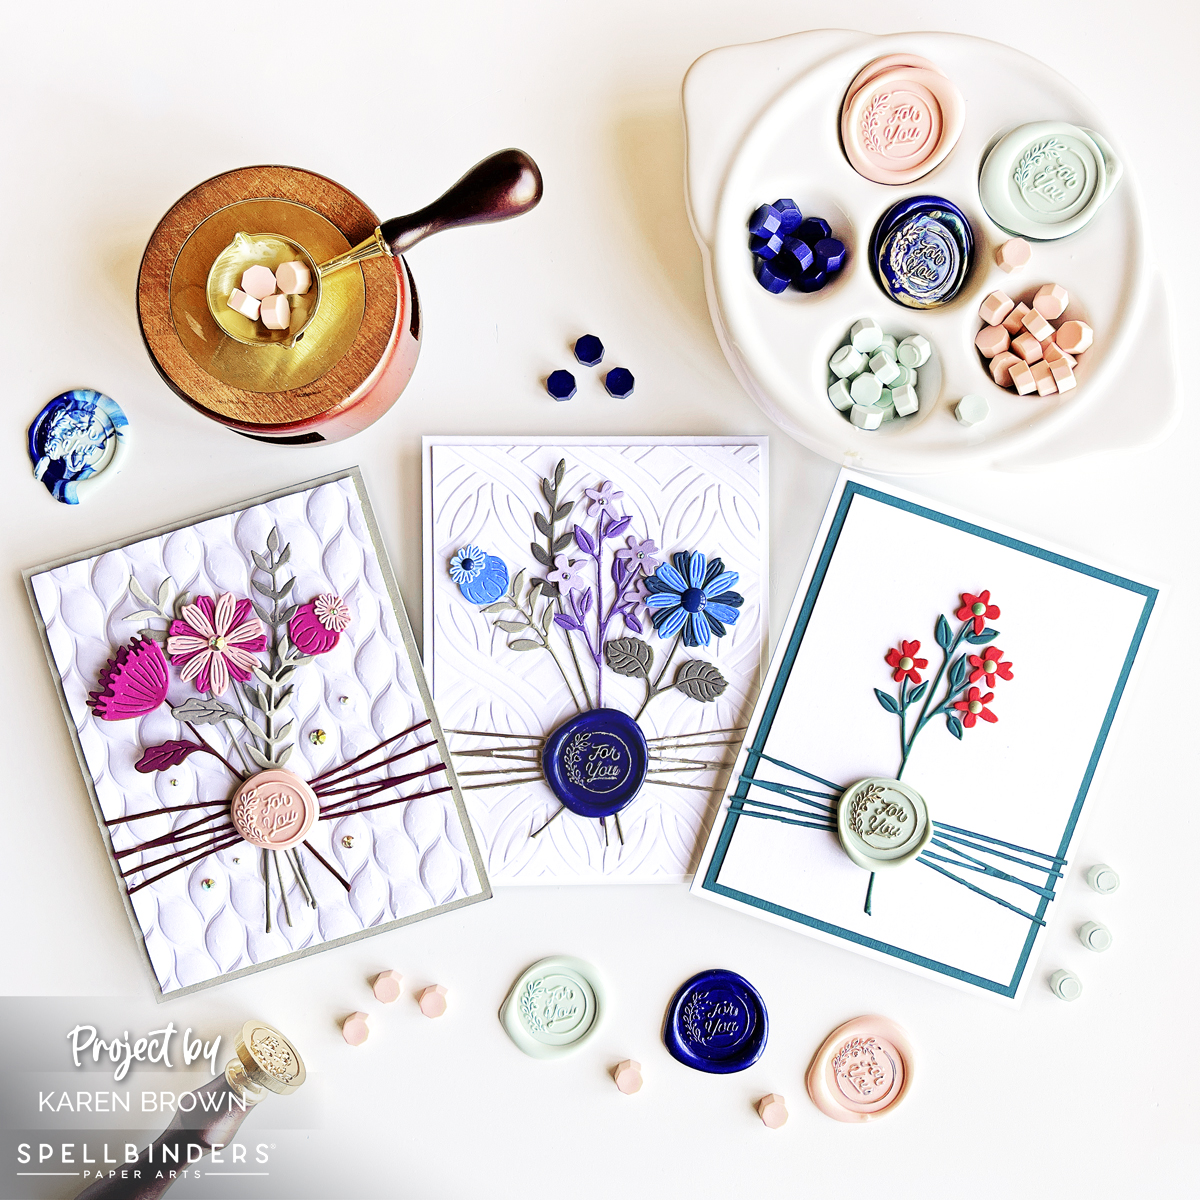
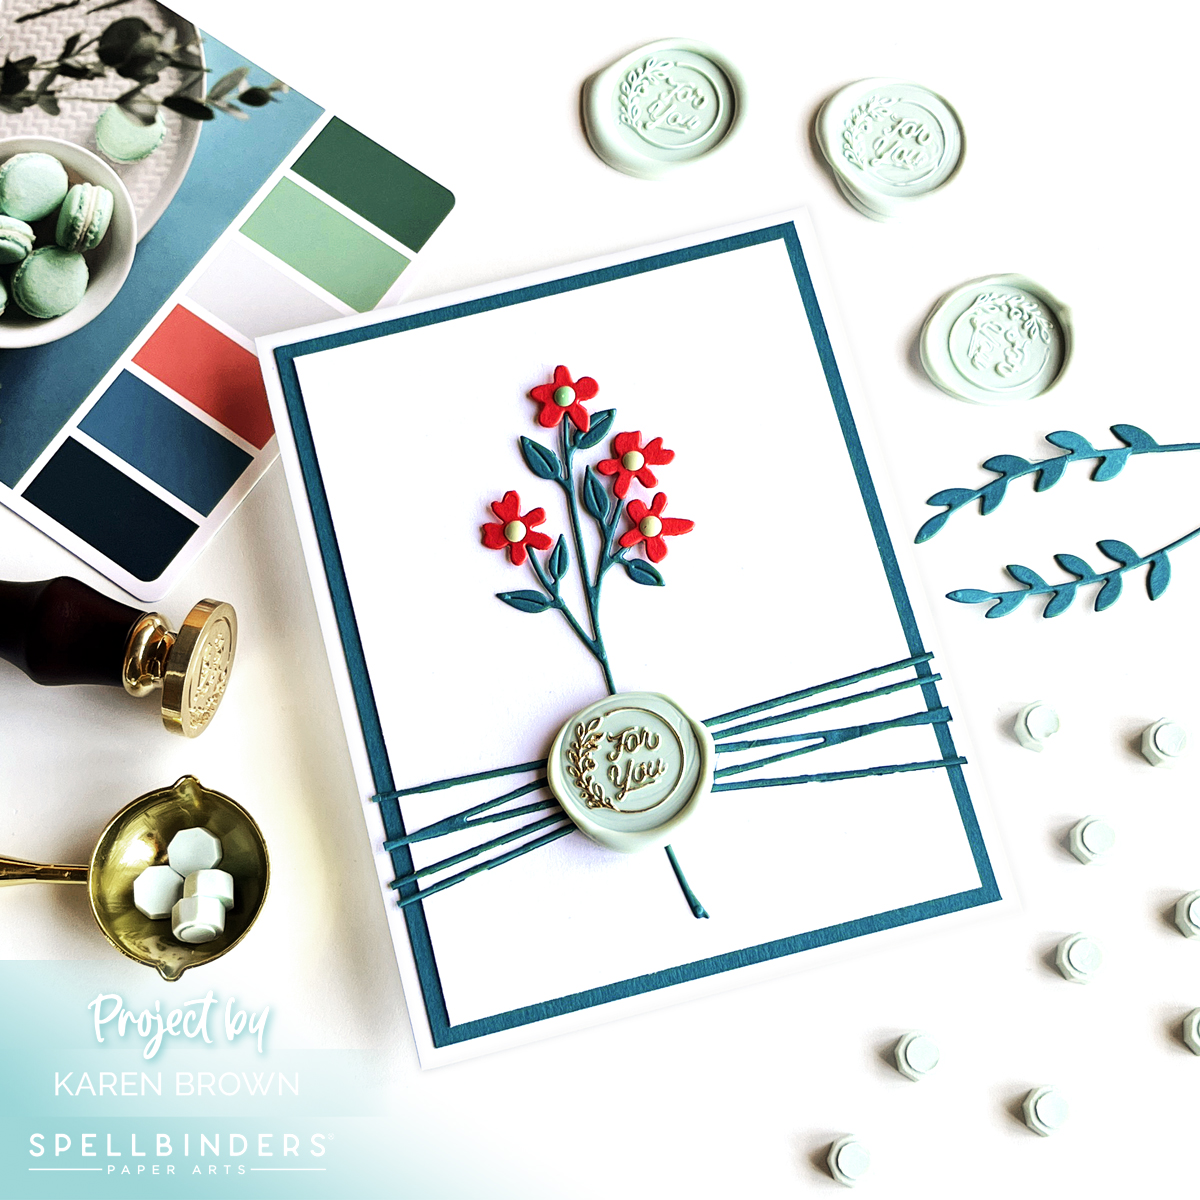
I wanted to make a traditional masculine card and I love how this one turned out. Minimalist yet elegant. The Sealed Cord press plates have 6 great sentiments, but I wanted to top my card with a wax seal. I used one of the included circular sentiments on a card that you can see HERE.
I love making and using wax seals. I have a blog post titled 18 Tips and Tricks For Making Wax Seals that you can read HERE. I used the wax beads and seal that were included in Spellbinders Wax Seal Starter Kit. I used a Posca Paint pen to highlight the sentiment. I haven’t tried it, but I think a Sharpie would also work.
Tutorial + 18 Tips and Tricks for Making Wax Seals:
With a Sharpie marker, I put a dot on my seal so it was easy to keep track of where the top of the design is.
I read that it helps reduce soot if you trim your tea candle wick, so I did this.
I put 4 beads in the warming spoon and it took 2 minutes to melt.
I poured the wax and found it is easy to make a circle pattern, but I do like seals that aren’t perfectly round.
Don’t press the seal into the wax, just gently position and allow gravity to work.
After experimenting, I found that if I wanted a thicker, more button like seal you should pour the wax and then wait 15-30 seconds before gently dropping the seal into the wax. The card with the pink seal was done this way.
If you like a thinner seal with a higher rim then place the seal immediately after pouring.
I found if I used just my thumb and pinky or middle finger that I was better able to center the seal more precisely.
I left the seal in the wax anywhere from 15 to 90 seconds. The time didn’t seem to matter and no wax was ever left on the seal itself.
I also found it helps to move your pours around on the silicone mat so you don’t get warm spots on your work surface.
I also let my seal cool in between pours.
If you don’t like a seal, you can remelt it.
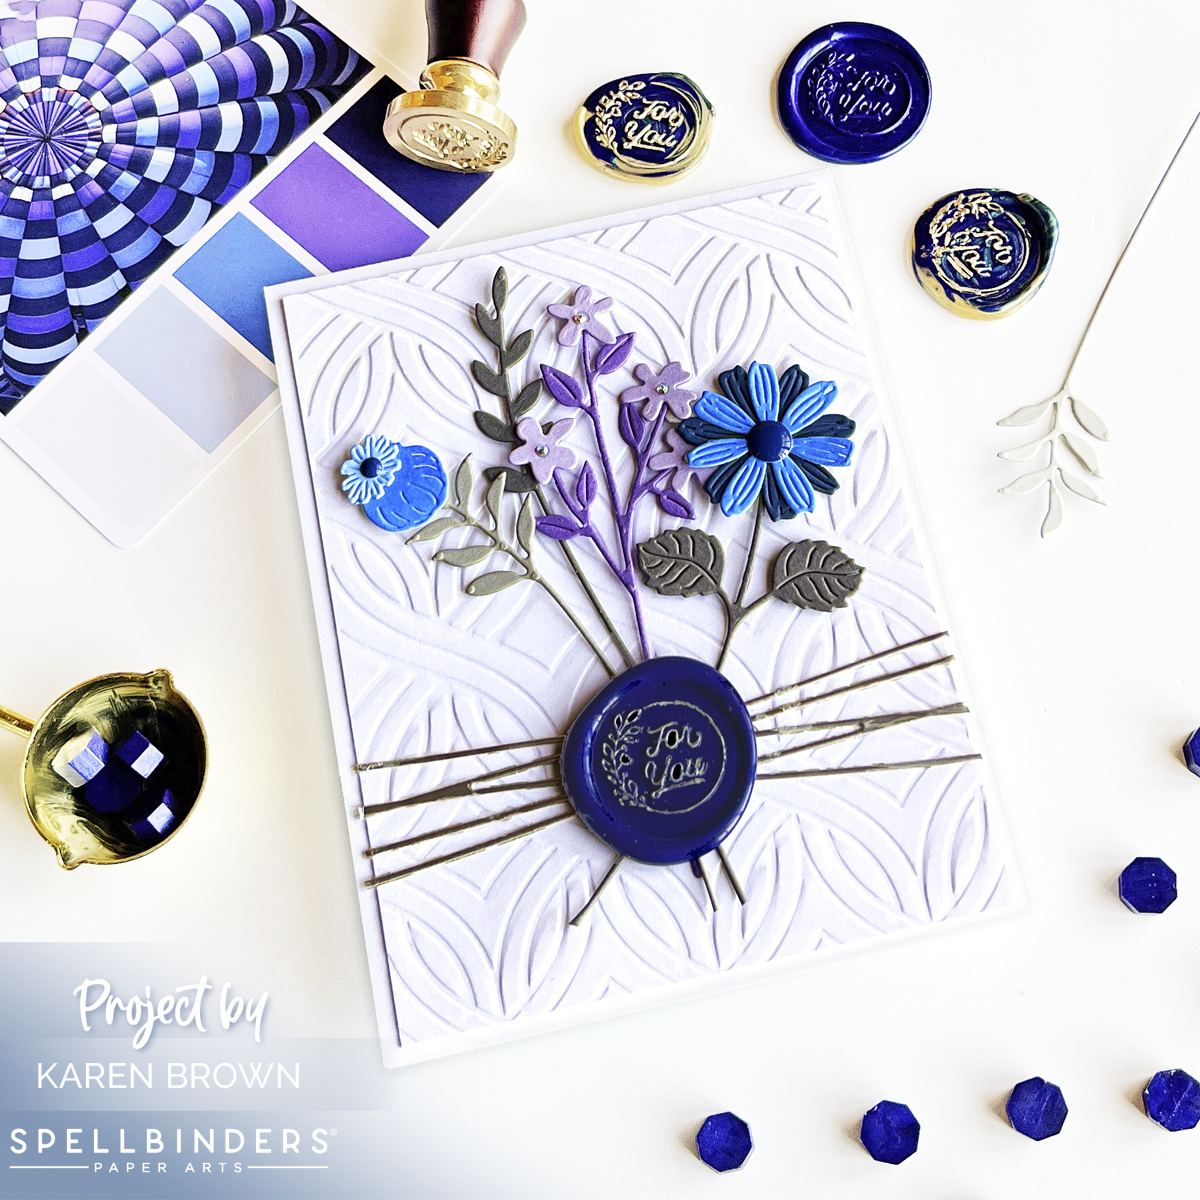
You can mix colors for a lovely marbled look. I really love the blue and green combination that I made which is shown in the upper left of the first photo. I also love blue and gold together and you can see two with that combination in the upper right corner on the blue card.
You can add flakes, glitter or pearls to the melted wax.
I used a paper towel to clean the spoon when changing wax colors.
I used a Decocolor marker on some of my seals (see the card with the green seal). I have Gold but wish I had bought silver too. Just lightly go over the raised ridges.
I experimented using Posca Pens too. They work, but I did like the result of the Decocolor markers better. The navy wax seal was highlighted with a silver Posca.