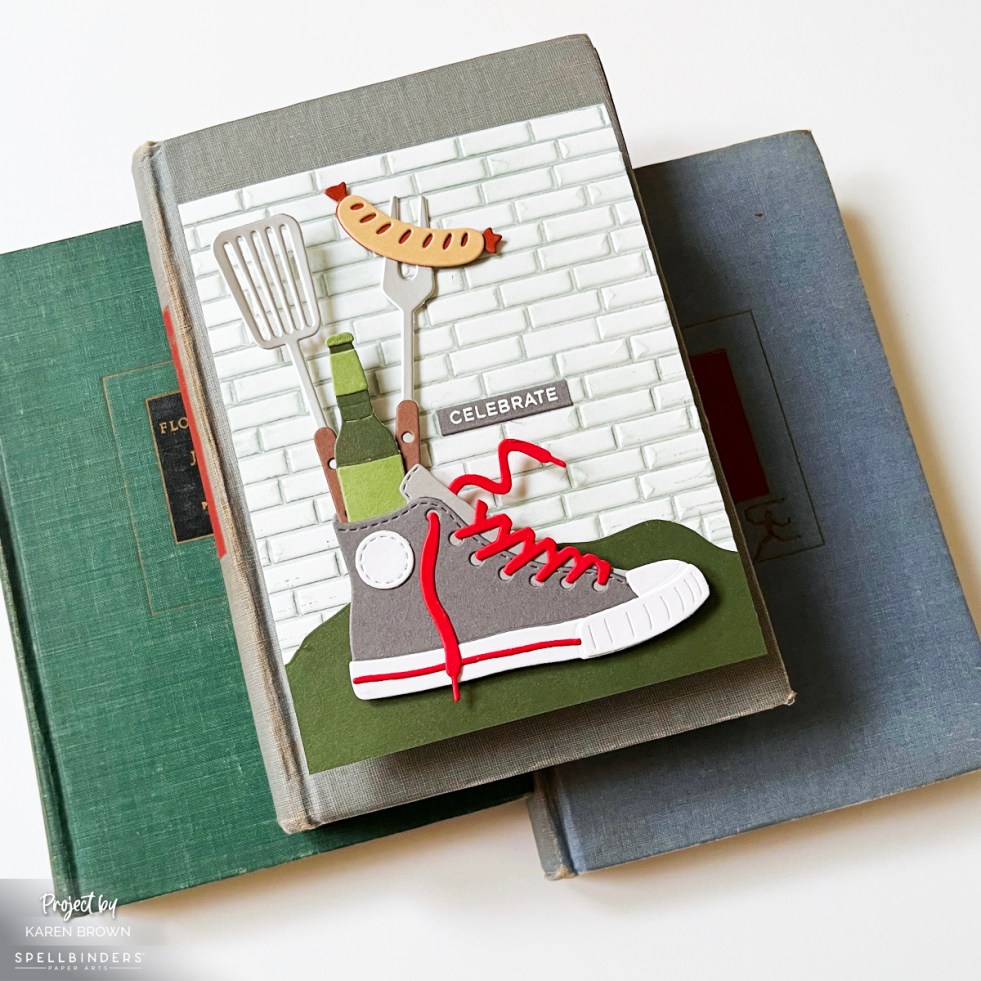
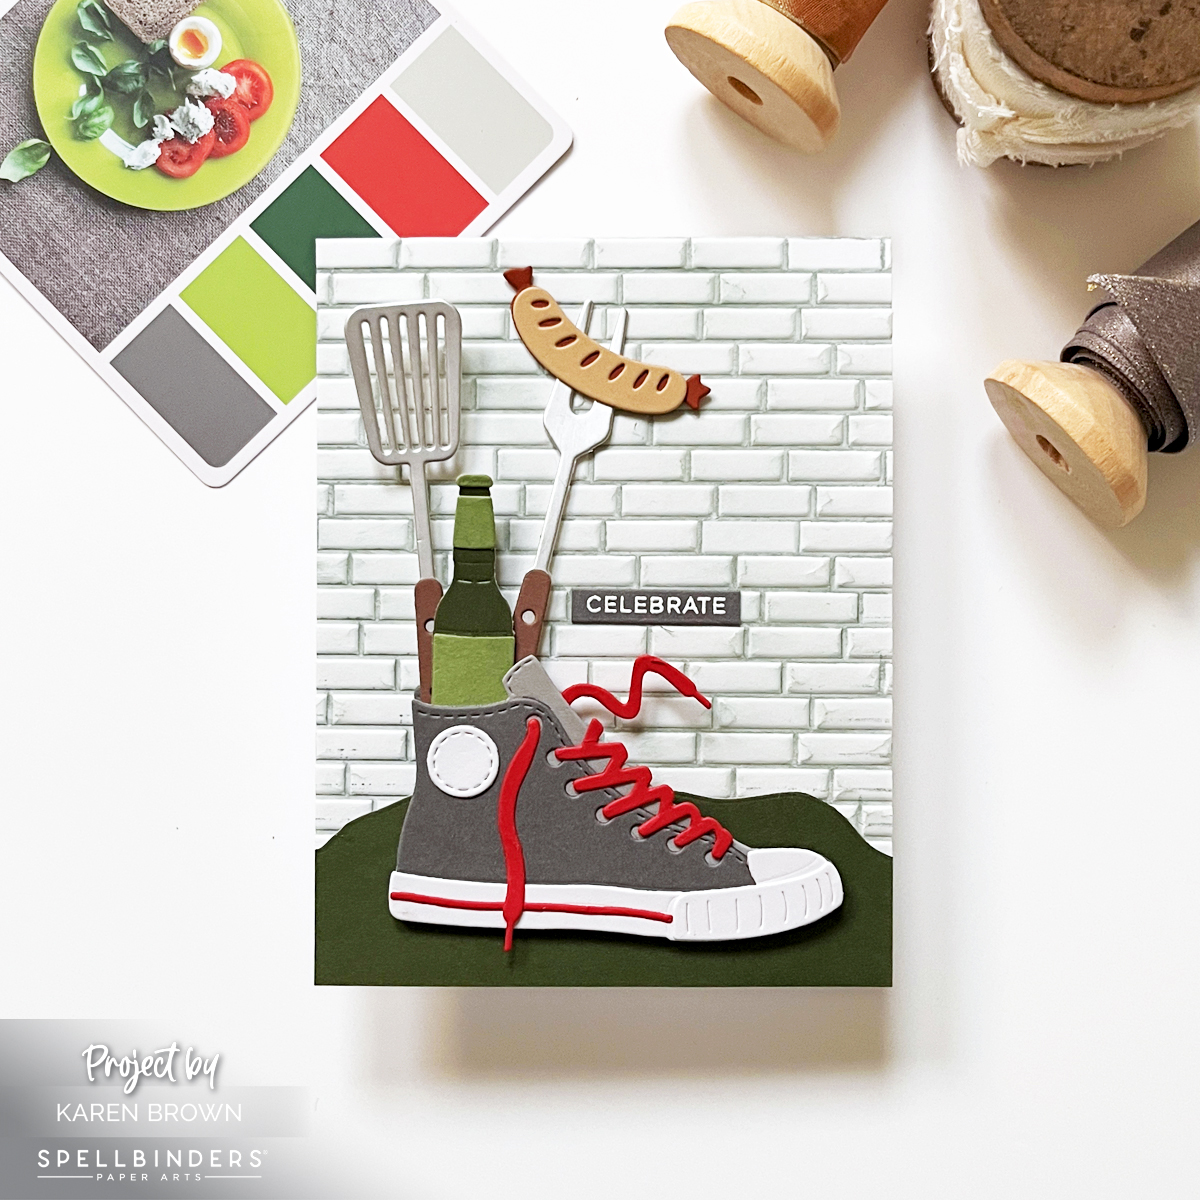
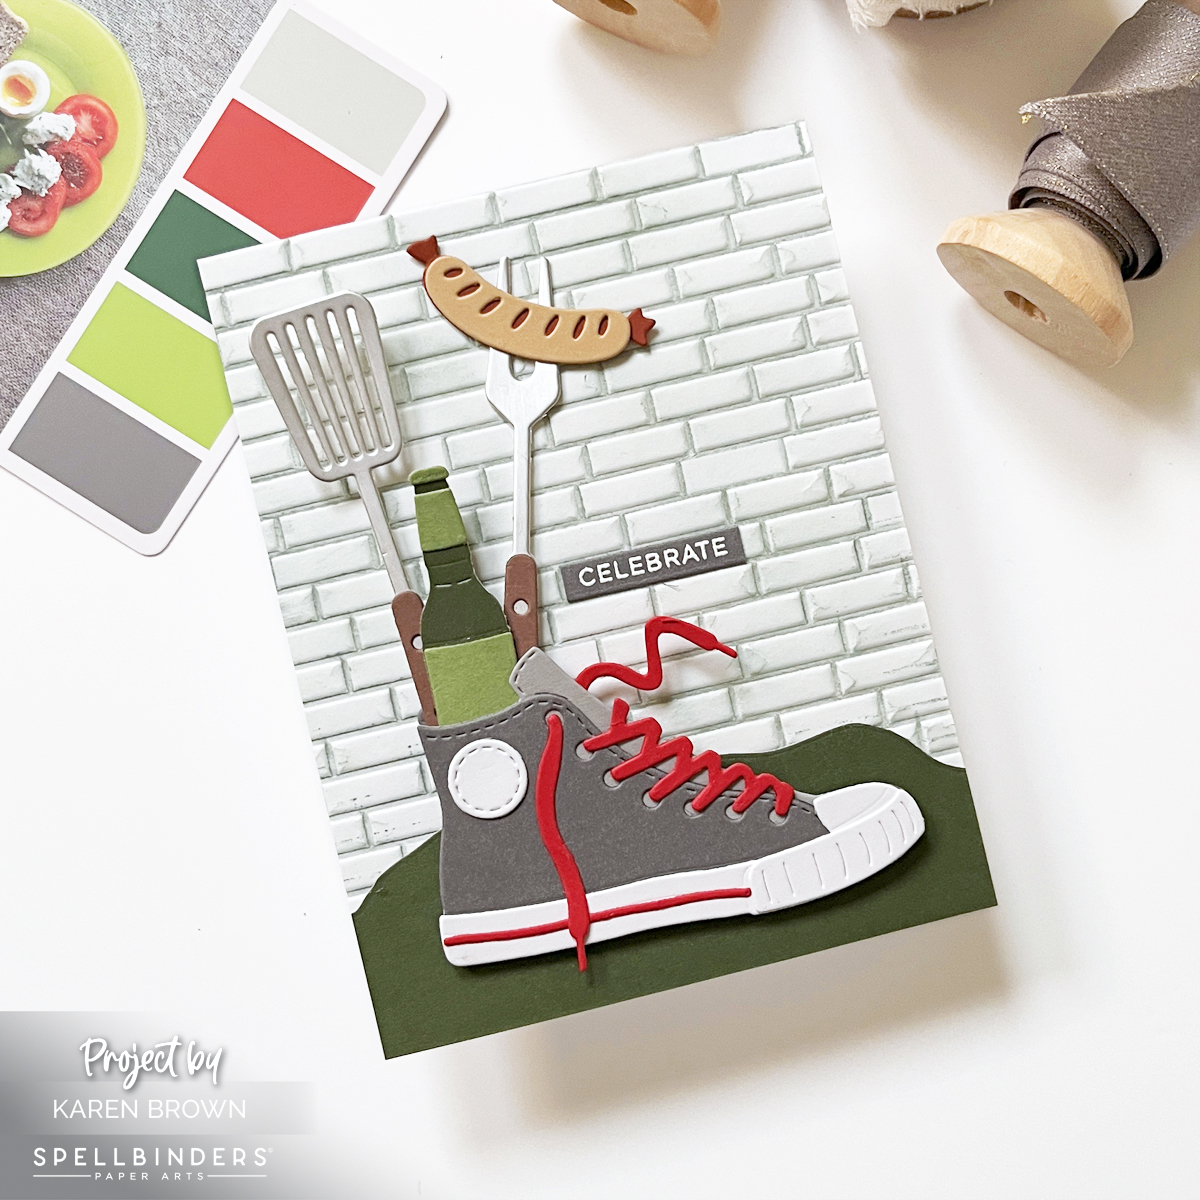
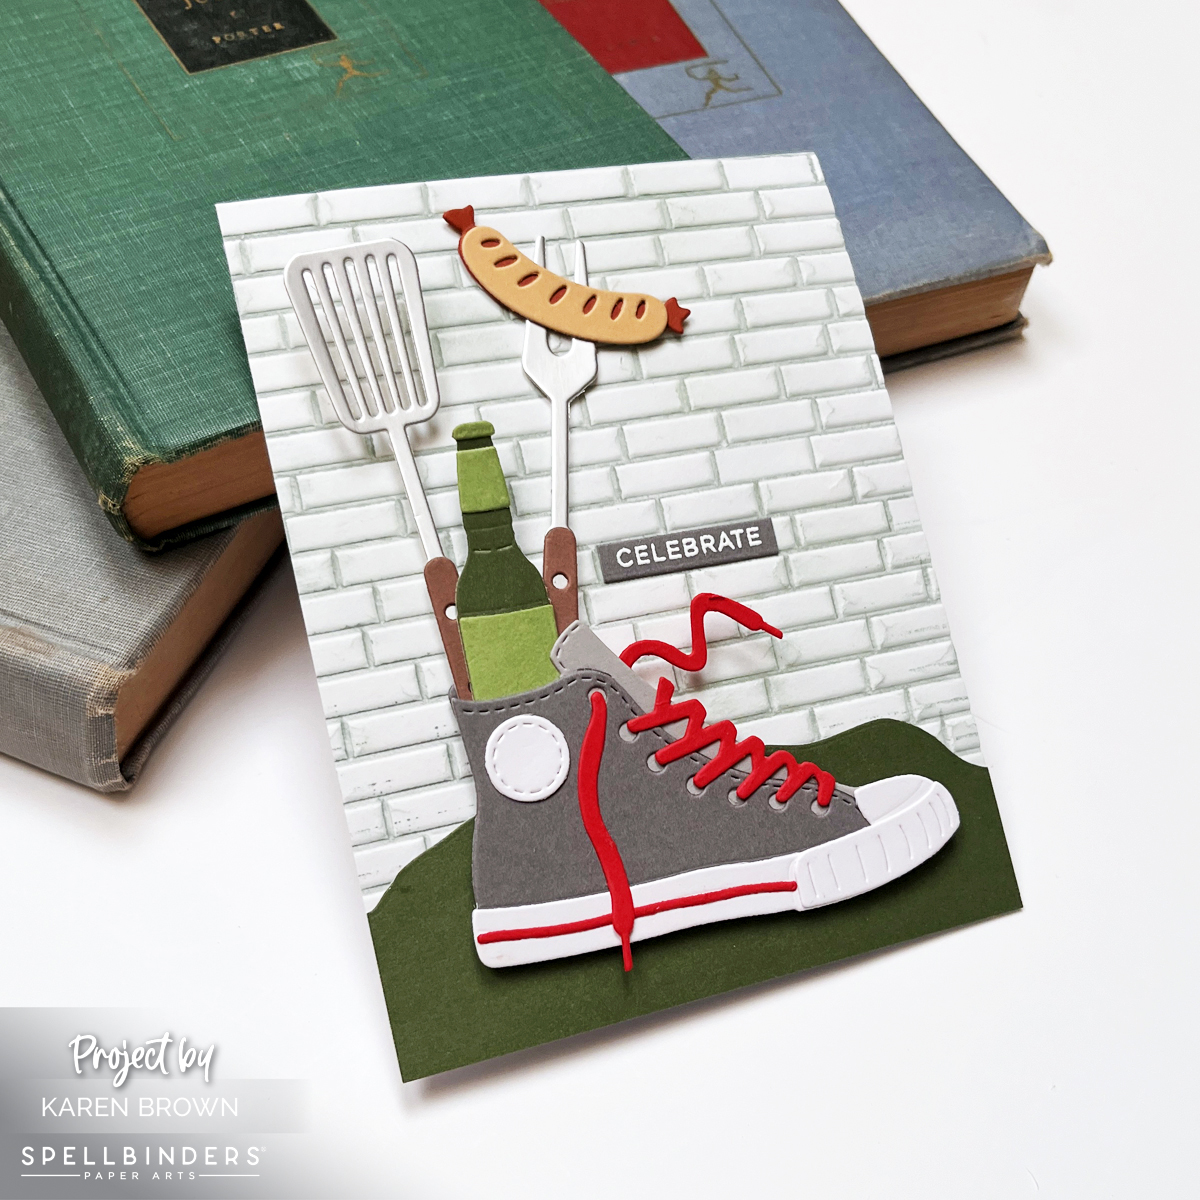
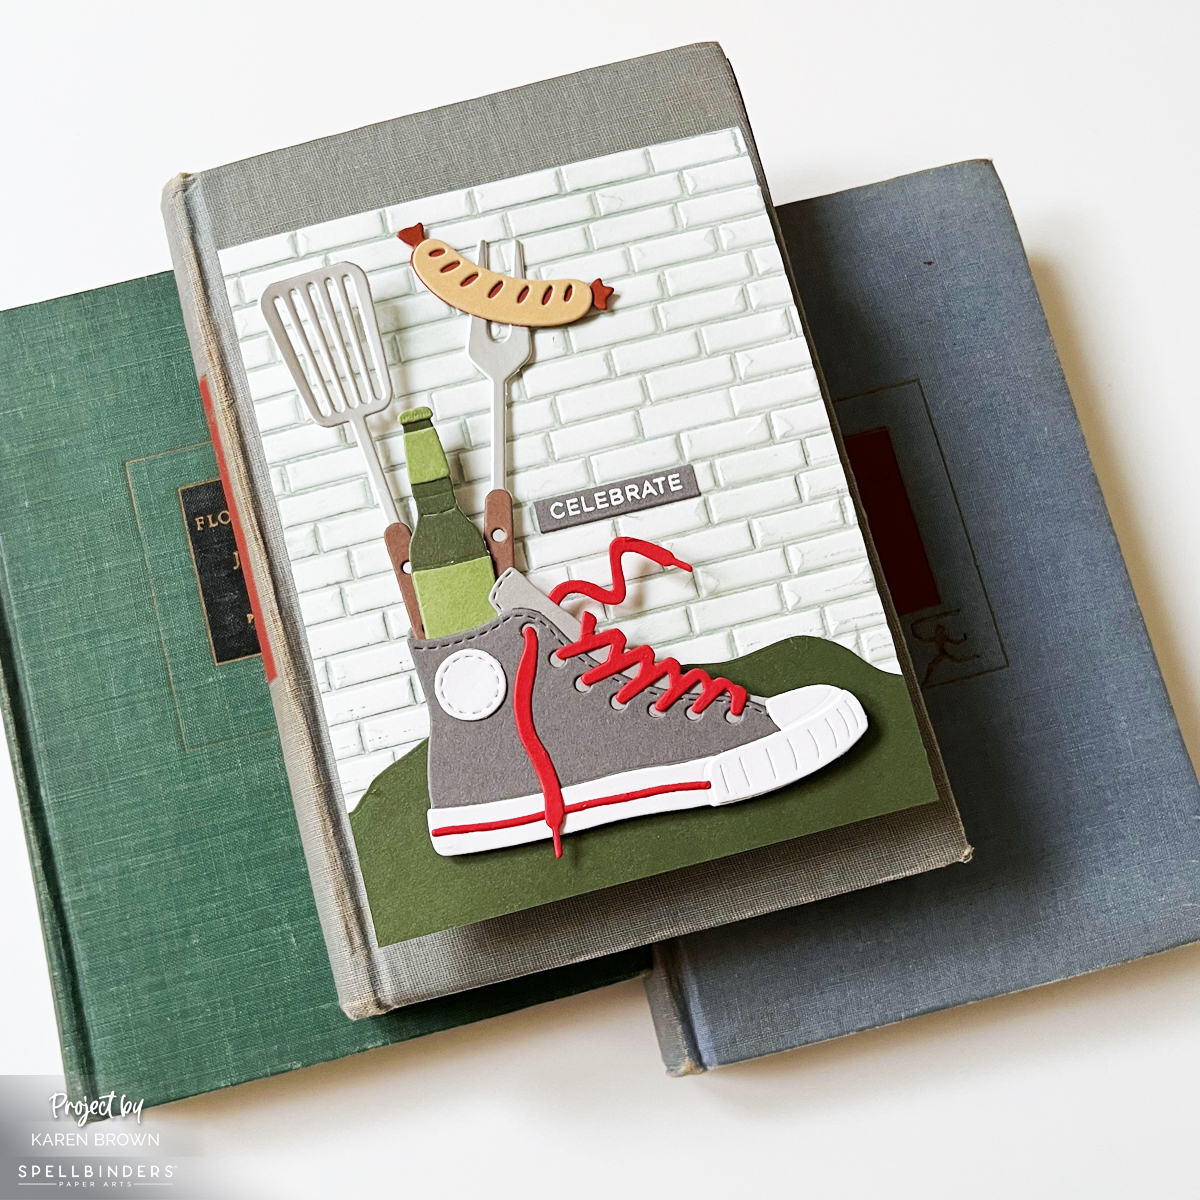
Die cut scene cards are one of the most eye-catching styles in cardmaking, and with a few simple design principles, they’re surprisingly easy to create. Today I’m sharing tips for building a cohesive, masculine die cut scene card using the Spellbinders March 2026 Large Die of the Month: Classic Kicks.
This kit made me smile instantly—a gray high-top sneaker stuffed with backyard cookout favorites like a spatula, grilling fork, hot dog, and bottled drink. It feels nostalgic, playful, and perfect for celebrating the men in our lives.
Ideal for birthdays, celebrations, and “just because”
This particular scene instantly evokes backyard cookouts, summer evenings, and casual gatherings—paper crafting at its best.
Die cutting is especially great for other masculine designs, like this Speedometer card I shared.
Choosing a Limited Color Palette
Because this kit has a bold, graphic style, I kept my color palette intentionally tight:
Gray
Green
A pop of bright red
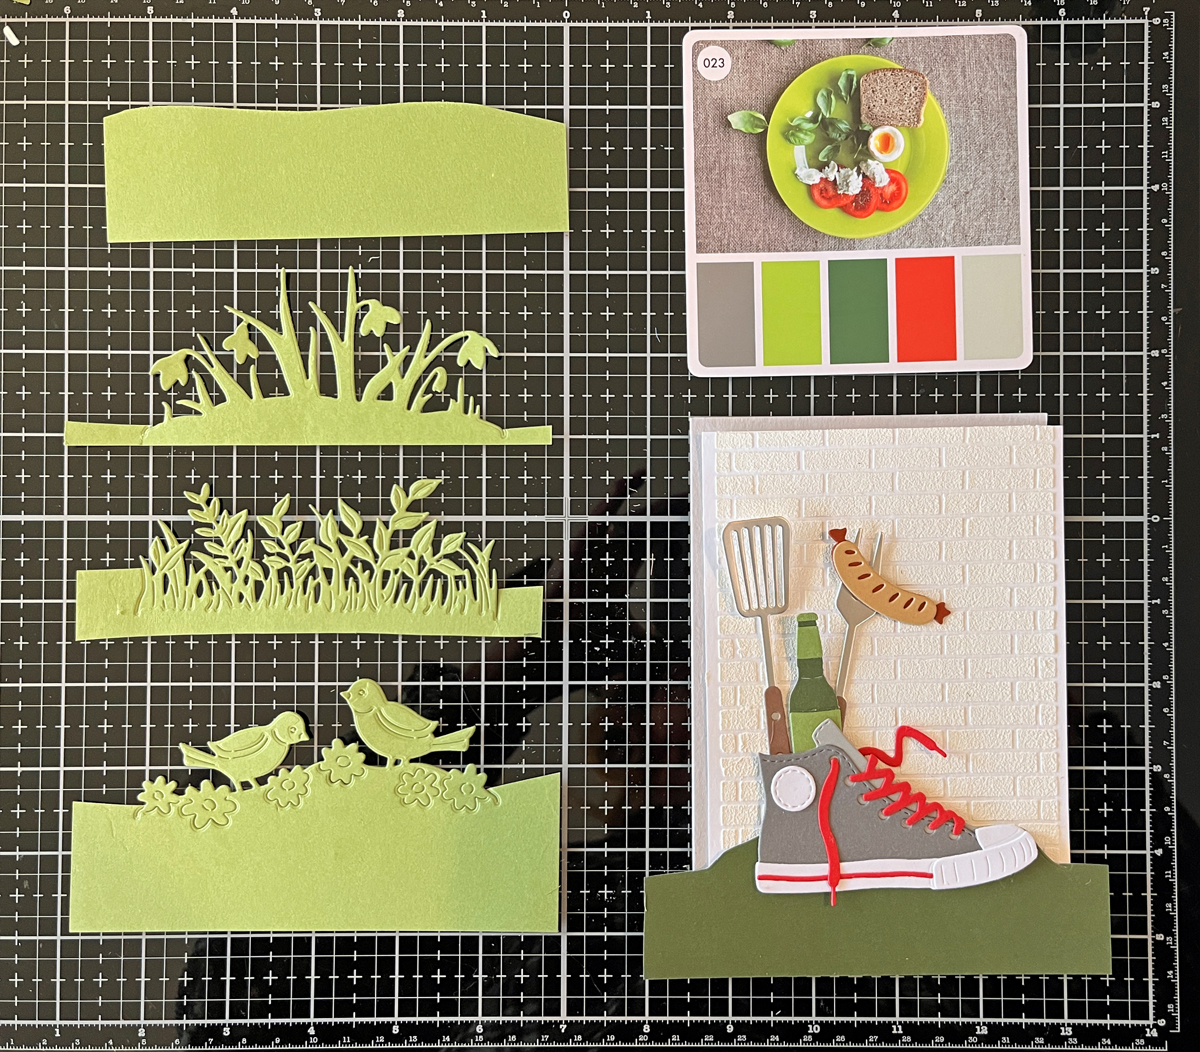
I was inspired by Color Cubes Palette #23, and as a general rule, I try to stick to 2–5 colors per card. This keeps the design cohesive and prevents a busy look—especially important for scene cards with lots of elements.
For this card, I used a 3D brick embossing folder, pressing Fog Ink directly onto the folder before running it through my Platinum 6. After embossing, I lightly ink blended more Fog inkover the panel to add subtle distressing and depth.
Before committing, I auditioned several premade backgrounds from my stash (you can see this in a process photo below). I love making two backgrounds at once—one for the project and one for later.
If you’d like an idea for an additional background to add to your stash, this video demonstrates a versatile but easy glimmer hot foil background. I store my extra background panels in rainbow order, which saves so much time and makes design decisions easier.
2. Foreground: Grounding the Scene
Foreground elements help anchor your focal point so it doesn’t feel like it’s floating.
I tested several green die-cut options and ultimately chose a simple grassy horizon cut from dark green cardstock. This small step made a huge difference visually. You could easily cut a foreground freehand if you don’t have a die.
I adhered the foreground directly to the embossed background.
3. Focal Point: The Star of the Card
The die-cut sneaker bouquet is the star here. I even used silver cardstock for the grilling utensils, which adds a realistic metallic look.
I attached the sneaker with foam squares to give it dimension and help it stand out from the scene.
These little details are my favorite part of scene card building. I always arrange everything loosely before gluing—it’s like solving a fun paper puzzle.
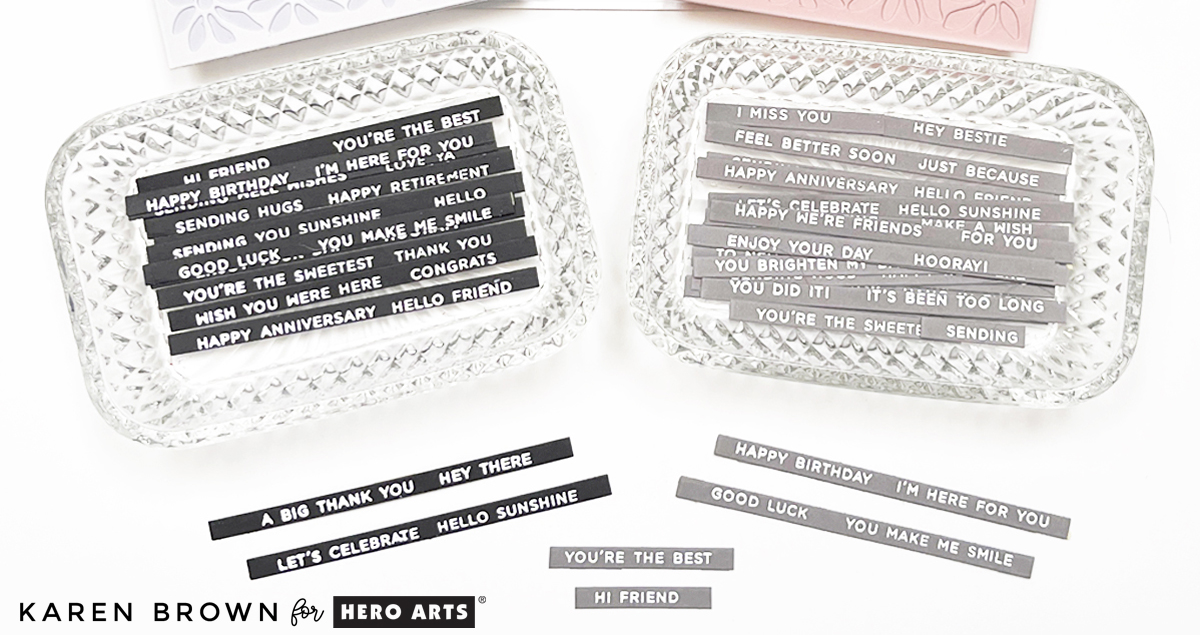
These sentiment strips are a huge time saver, which I demonstrate in this recent post.
Design Tip: Use the Rule of Thirds
To guide placement, I followed the rule of thirds, positioning the taller elements (spatula, fork, bottle) along the left vertical third of the card—about 1 1/3” from the edge of an A2 card. This adds balance and visual interest without overthinking the layout.
Scene cards may look complex, but when you break them into backgrounds, foregrounds, focal points, and details, they become incredibly approachable—and so fun to create.
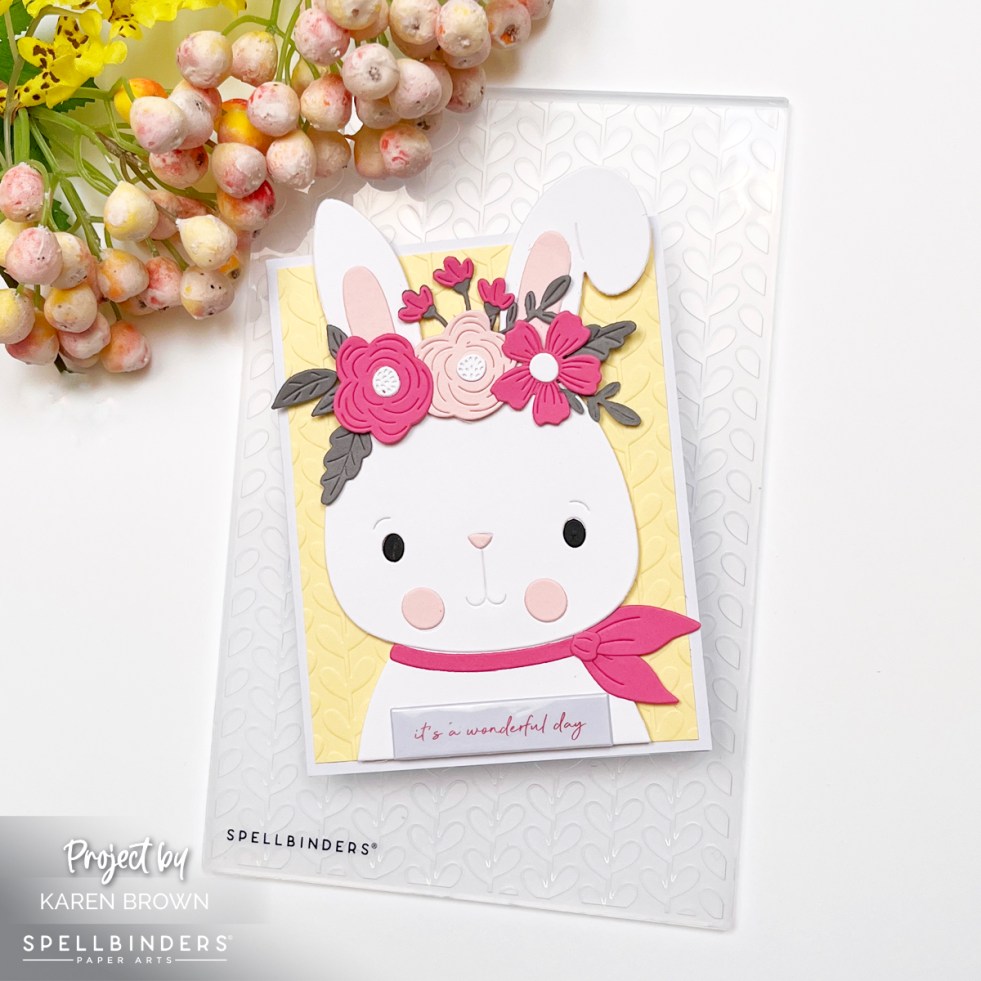
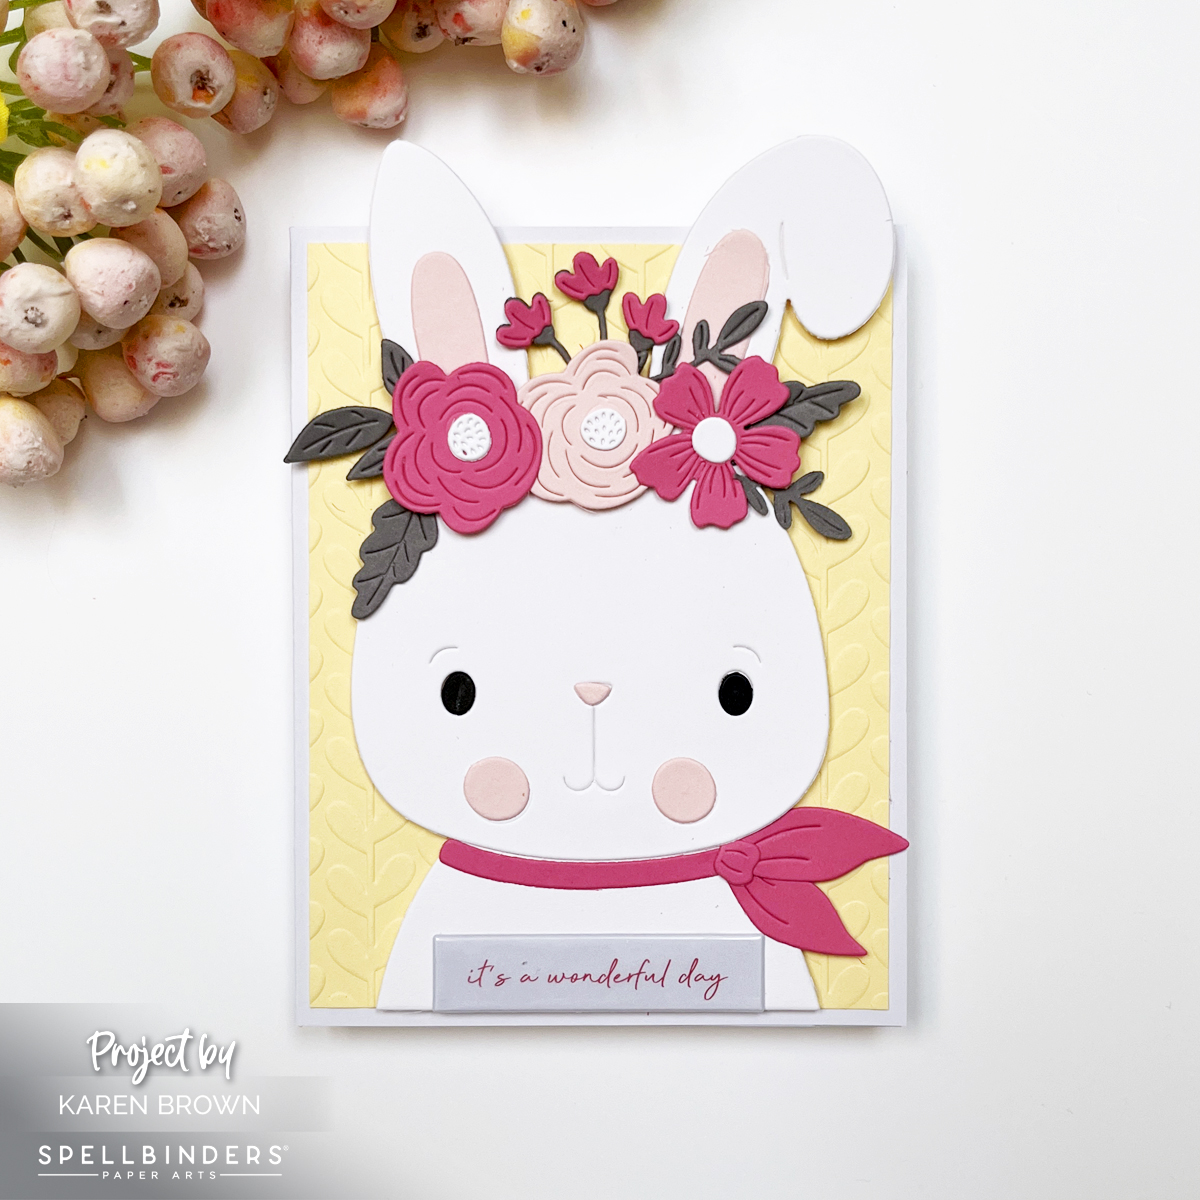
This die/folder combo made it incredibly easy to create an adorable bunny card that feels fresh, modern, and perfect for springtime sending. And, cards for kids are such fun to create!
👉 I’ll link all the helpful supplies below so you can easily recreate this project—or put your own spin on it.
👉 I created this card for a little girl, but you could easily customize the card for a boy as well by changing the color palette.
Although this is a large die (perfect for oversized cards), I chose to use it on an A2 card base and let the tops of the bunny’s ears peek above the card front. It’s such a simple design choice, but it adds instant charm and visual interest—plus, who doesn’t love a bunny that refuses to stay inside the lines?
For the background, I used a buttery yellow cardstock and embossed it with the Spring Stripes Embossing Folder of the Month. The subtle striped texture adds just the right amount of detail without competing with the bunny focal point. It’s one of those embossing folders you’ll reach for again and again.
To finish the card, I added an easy sentiment using a Bayfair Puffy Sticker that reads “it’s a wonderful day.” Quick, cute, and perfectly on theme.
This card came together fast, looks polished, and would be easy to mass-produce—always a win in my craft room.
When I first started cardmaking, I bought many tools that I didn’t really need.
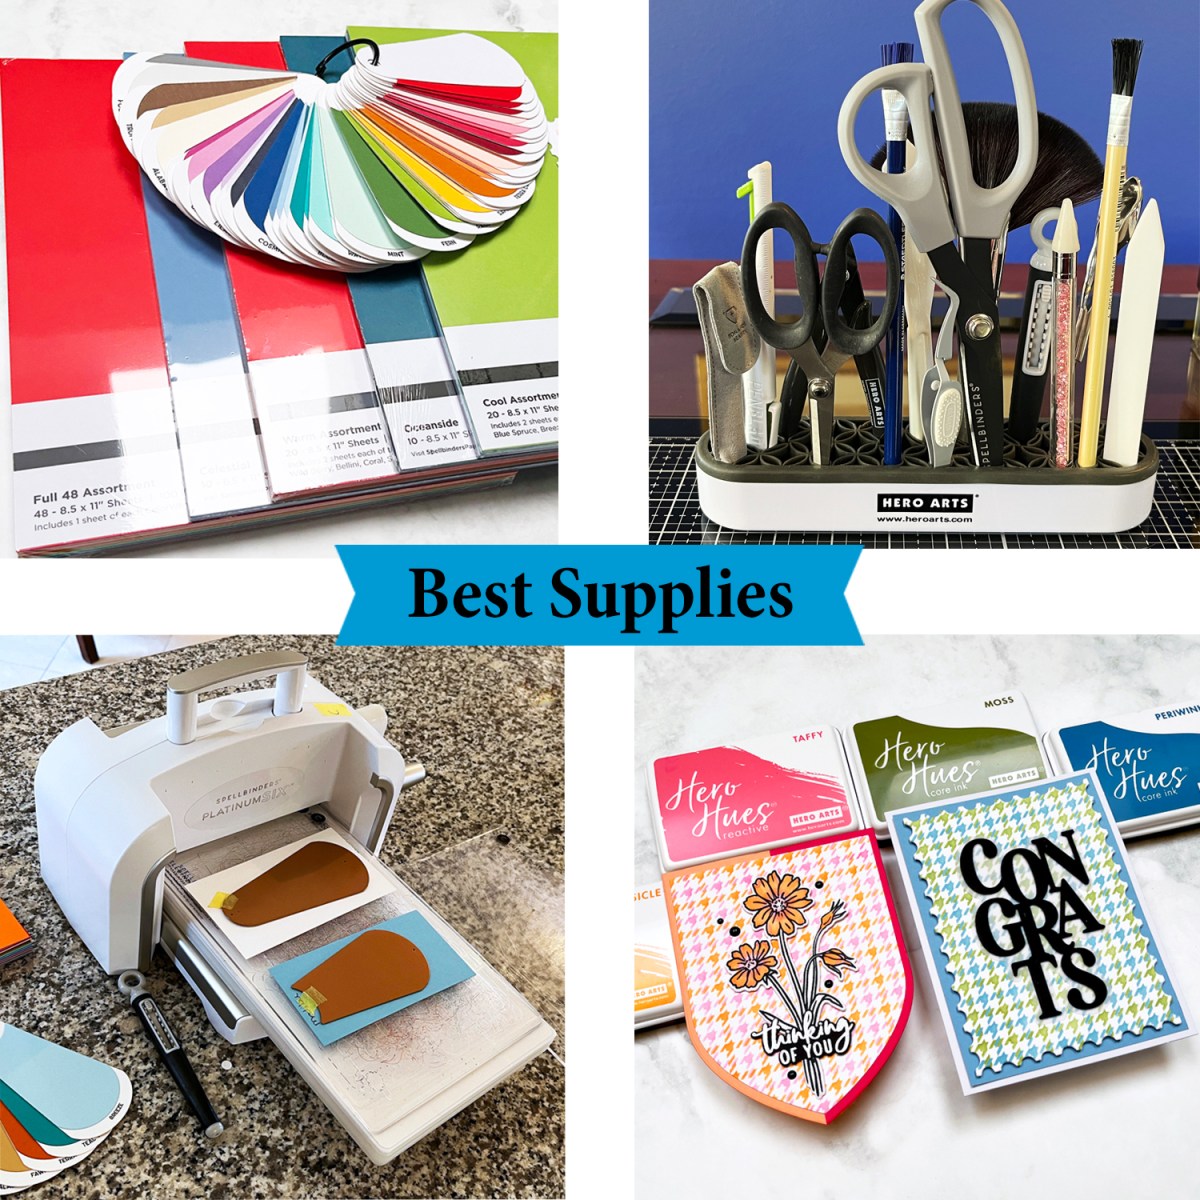
Today I’m sharing 14 of my most-used, most-loved cardmaking supplies for 2026. These aren’t just trendy products — they’re the tools I reach for again and again. I use them over and over in my craftroom and they are the products that I recommend to new cardmakers.
If you’re stocking your craft room, refining your supplies, or just love seeing what other cardmakers actually use, this list is for you.
📌 Save this for later on Pinterest
Karen’s Full List of Recommended Products for 2026
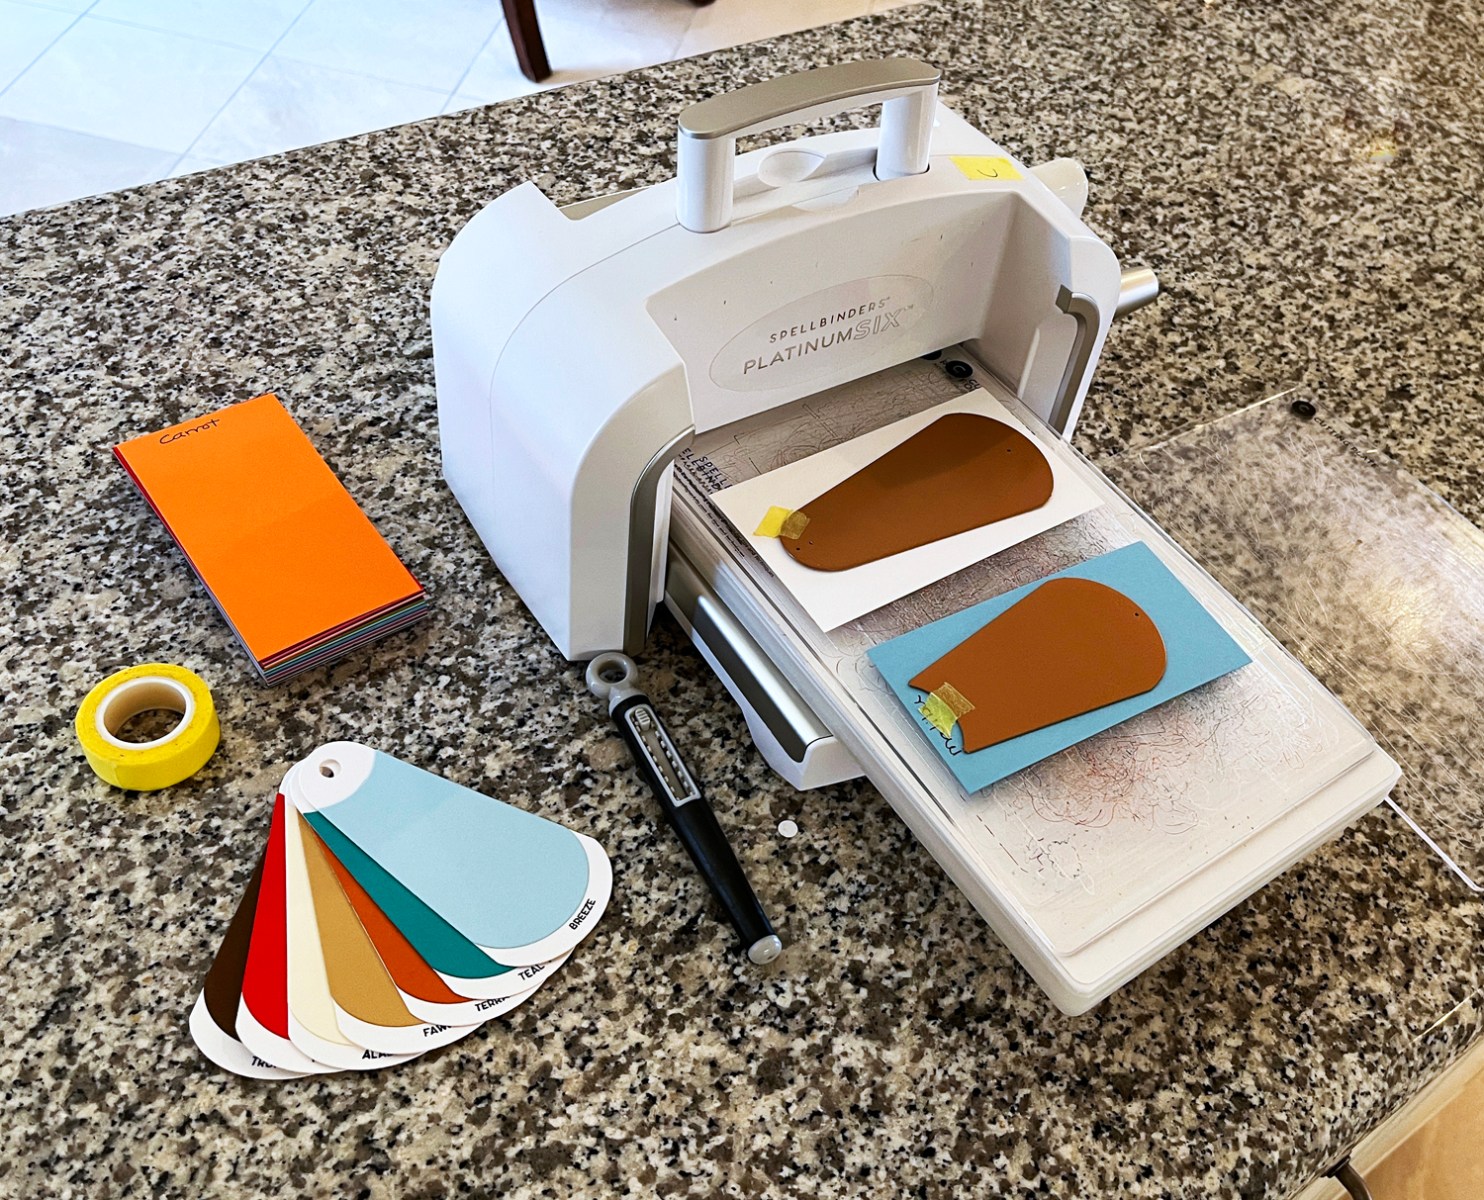
1. Best Die Cutting Machine: Spellbinders Platinum 6
My favorite die-cutting machine…and I’ve tried lots!
If you enjoy die cutting, a reliable machine is essential. I love the smooth cutting pressure and wide platform on the Platinum 6.
I use my Platinum 6 die cutting machine almost every single day. I’ve tried other machines over the years, but this one is reliable, smooth, and powerful. The others? They’re collecting dust.
Beginner Tip: Start with simpler less intricate shapes as you learn how layering works.
✨ I also have a Scoutportable die-cutter that I love to use with smaller dies or when I am taking my projects on the go.
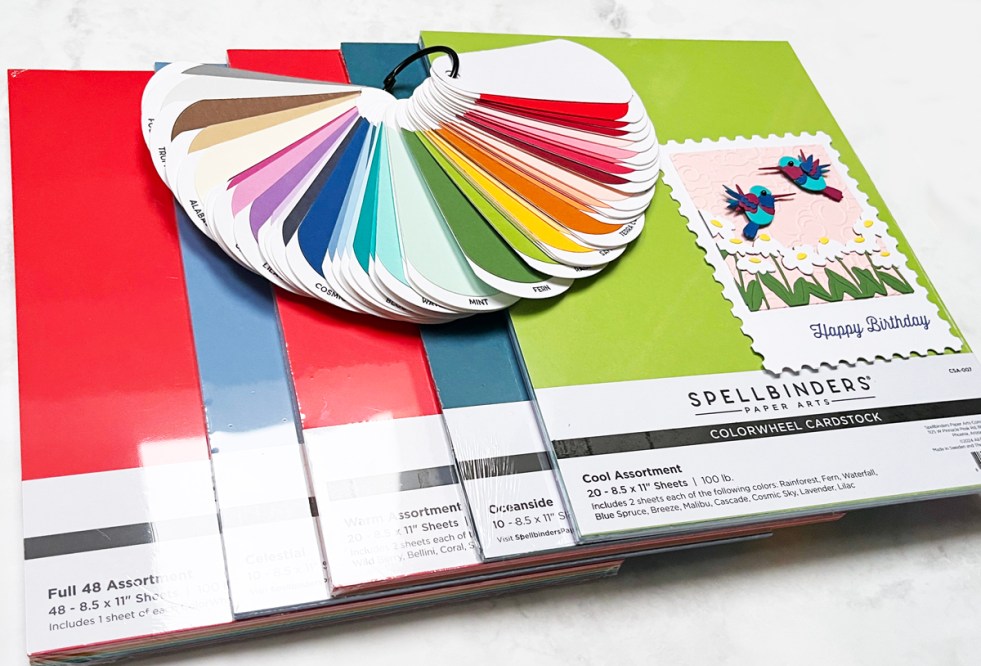
2. Best Cardstock: Spellbinders ColorWheel Cardstock
Colorful Cardstock is so important in cardmaking
With 48 gorgeous colors, ColorWheel cardstock makes color selection easy and stress-free. I use it almost exclusively and love that the result is beautiful cohesive designs.
Beginner Tip: Order the 48 Color Pack and see which colors call to you the most.
I recently placed a big order and am sharing a photo of my shipment, including:
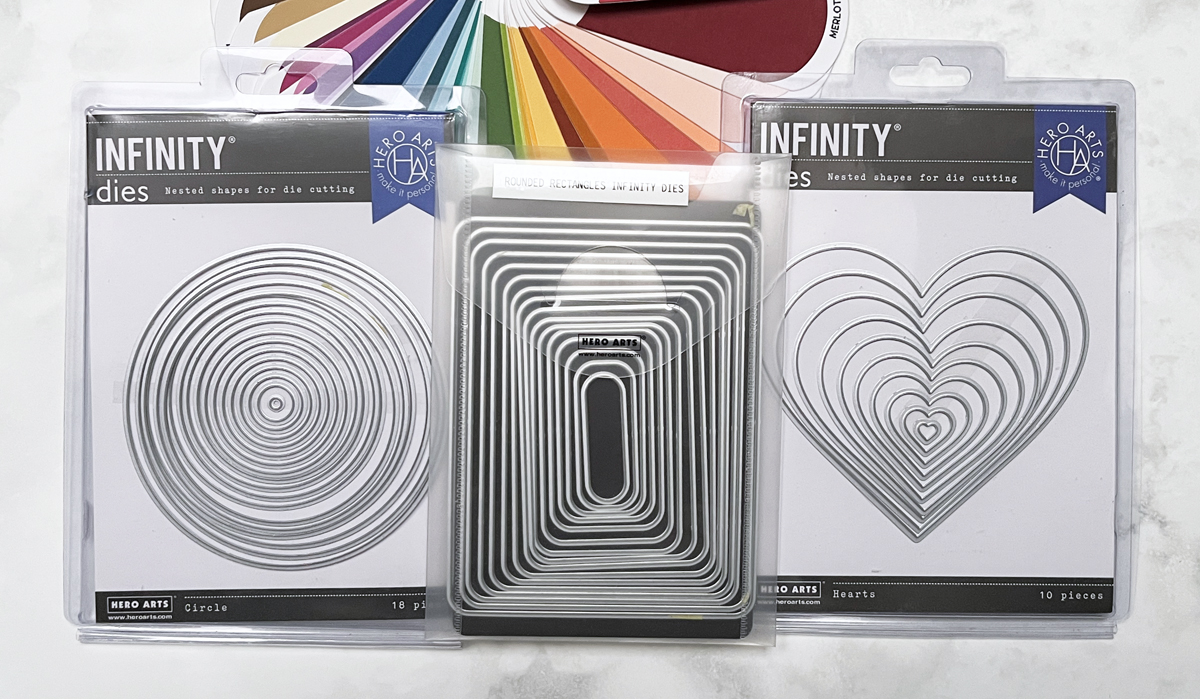
3. Best Die-Cutting Staple: Hero Arts Infinity Dies
Infinity Dies are the most versatile products in cardmaking
Nesting infinity diesare true craft room staples, and I use mine constantly. They are versatile time-savers that elevate your cardmaking and are perfect for matting, layering, spotlighting and framing.
I’ll be linking to 8 of my most-used sets in this post with my most used at the top. I’ll also link to a card using each die.
4. Favorite Card Kit Subscription: Spellbinders Large Die of the Month
Subscription card kits fuel creativity
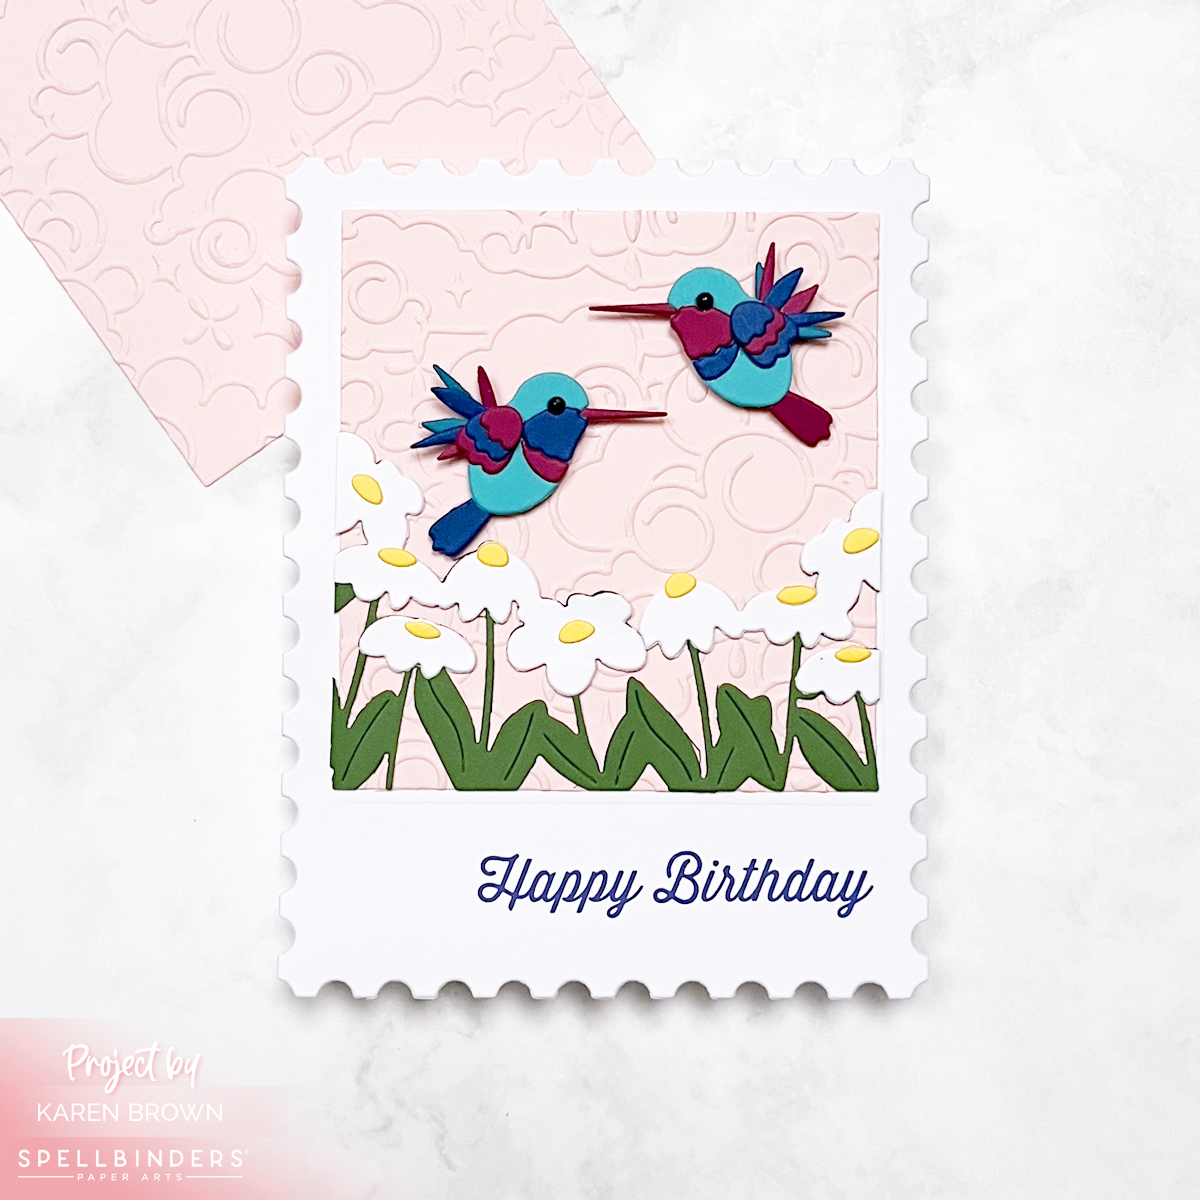
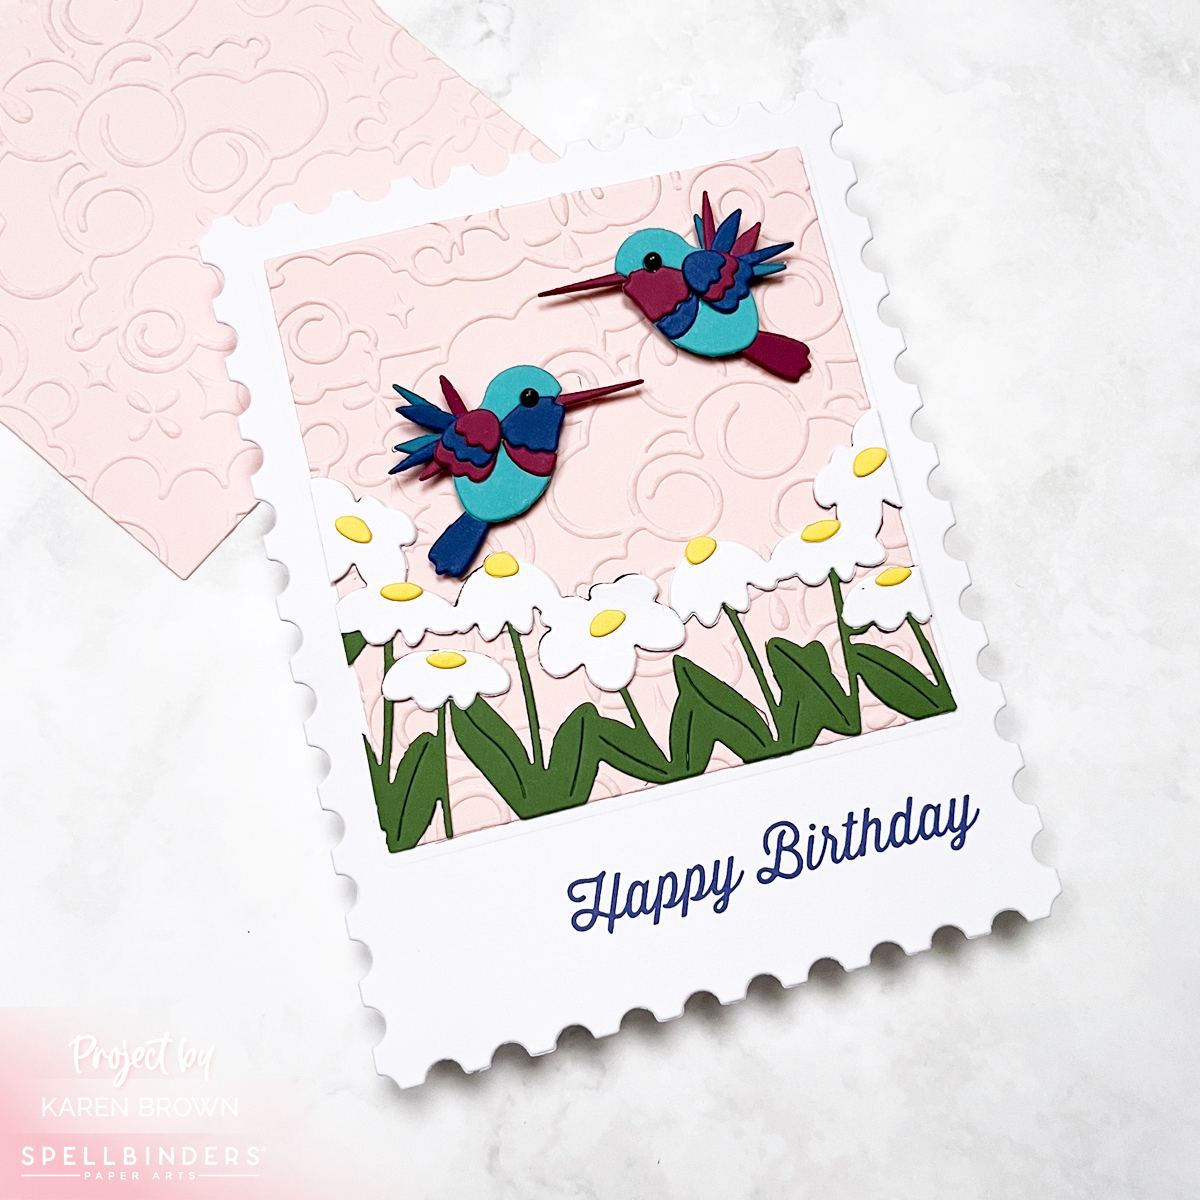
If I had to choose one subscription kit to keep, this would be it. The Spellbinders Large Die of the Month never disappoints, and January’s kit — Hummingbird Delight — truly lived up to its name.
Subscription Kits provide:
• excellent value • beautifully curated designs • coordinated supplies • inspiration delivered to your craft room every month
The Large Die of the Month Kit has the designs and versatile themes that I enjoy the most…the ones I use over and over. To illustrate for 2026:
The February Kit is perfect for kids, Easter and the young at heart.
The March Kit is great for masculine cards, but can also morph into a fun floral sneaker bouquet.
✨ Runner-Up Favorite Subscription: The very first kit I ever ordered — Hero Arts My Monthly Hero, now available in two versions for 2026:
Tip: Subscription kits are great for both beginners and experienced cardmakers.
5. Best Blending Brushes: Waffle Flower
Color coded blending brushes are an important staple in my craftroom
One of the biggest problems with ink blending is cross-color contamination.
I love that Waffle Flower blending brushes have color-coded handles, so I instantly know which brush goes with which ink family. This simple visual cue keeps me from accidentally putting my yellow brush into my blue ink, which could potentially ruin a project. It also keeps my colors bright….not muddy.
Small detail, huge time saver.
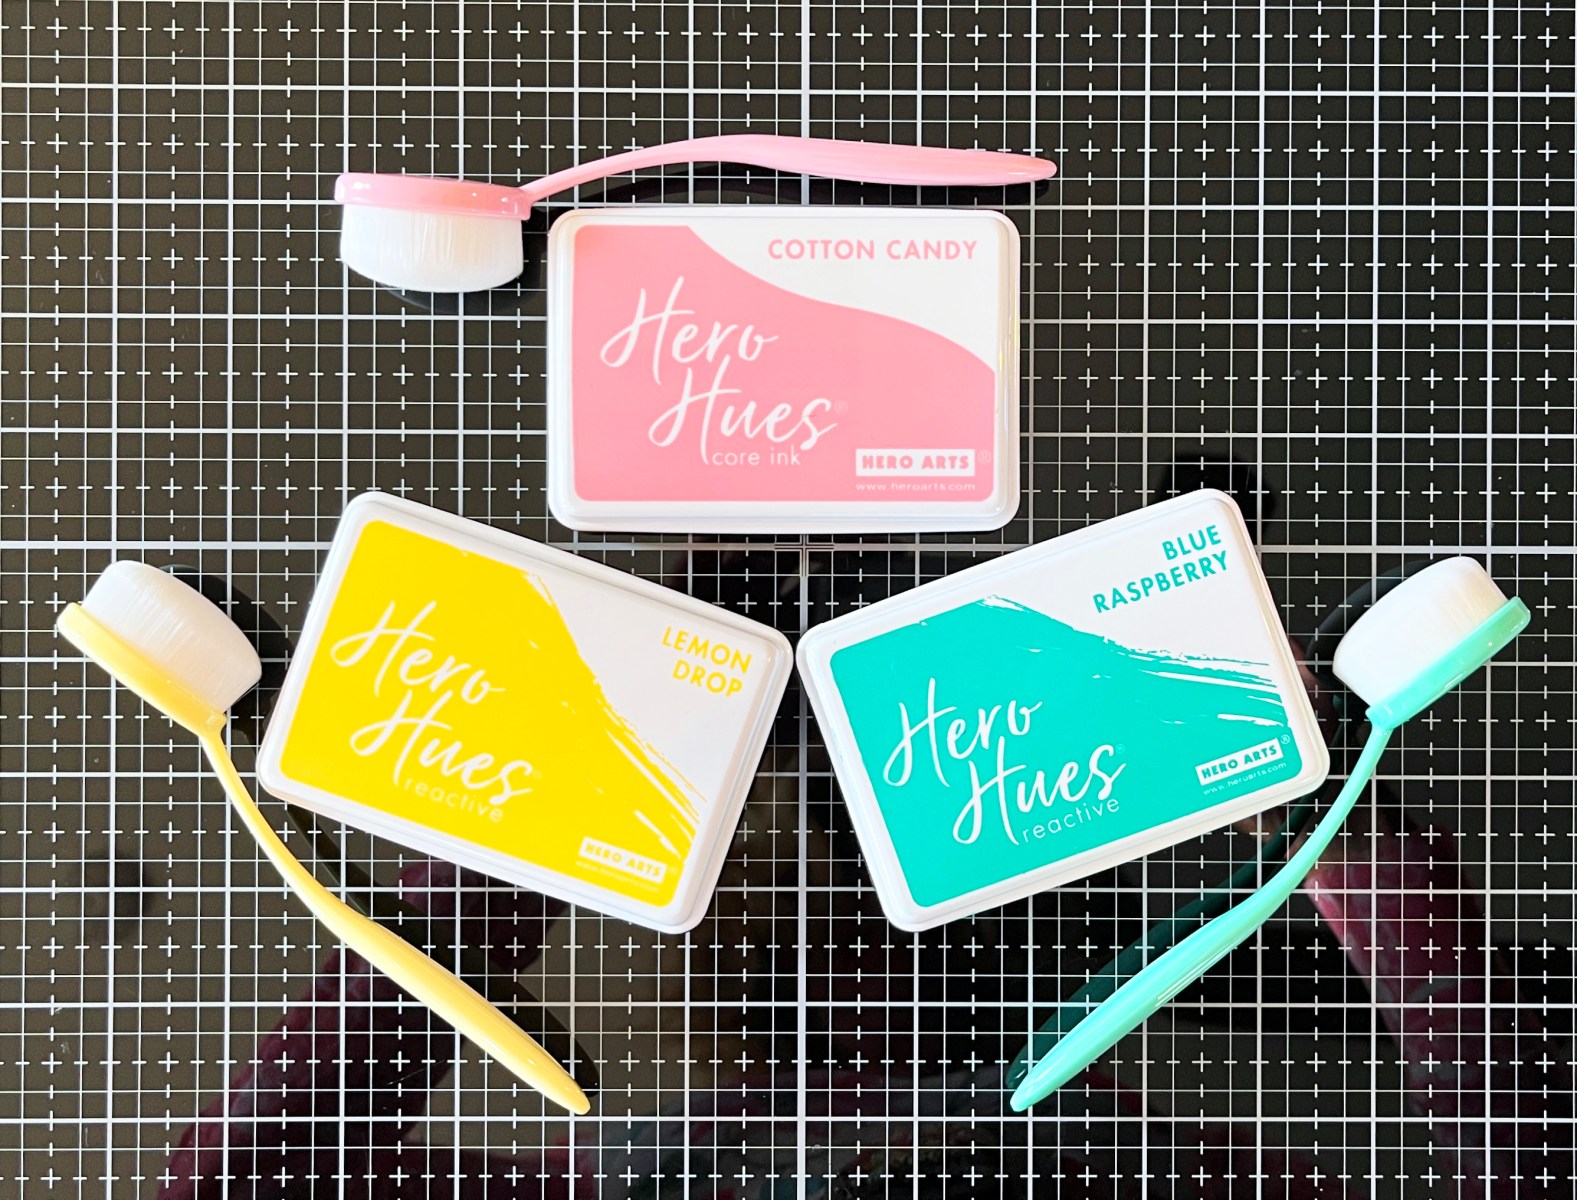
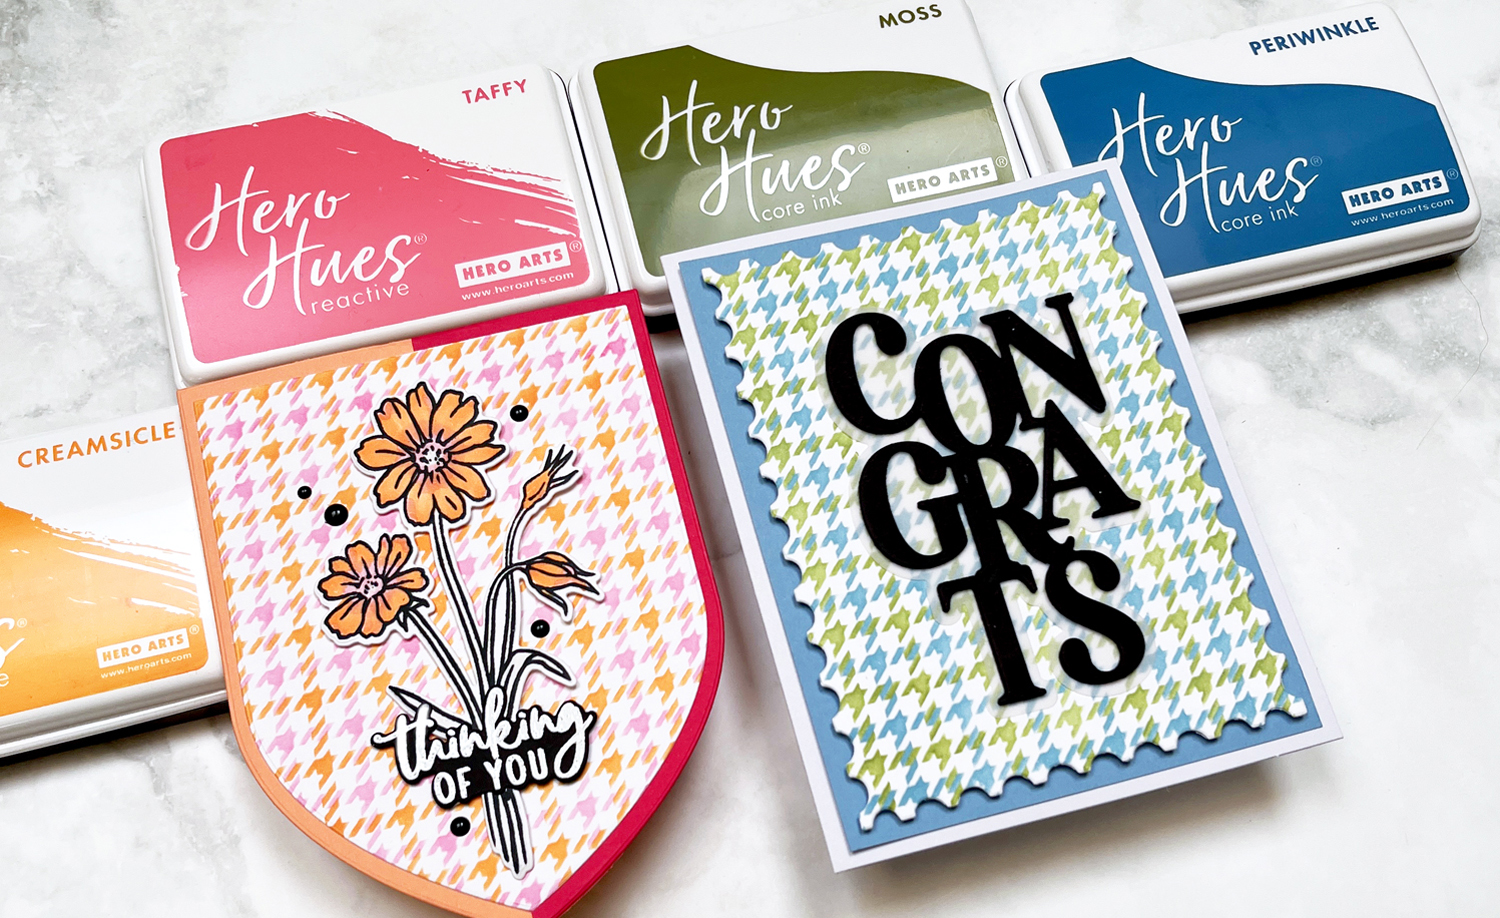
6. Best Inks: Hero Arts Reactive & Core Inks
Bright inks make such an impact in cardmaking
I have a large tub of Hero Arts inks — and honestly, I rarely reach for anything else. The colors are vibrant, blend beautifully, and are incredibly reliable. I love all the inks, but I find myself reaching for the Reactive Inks most often.
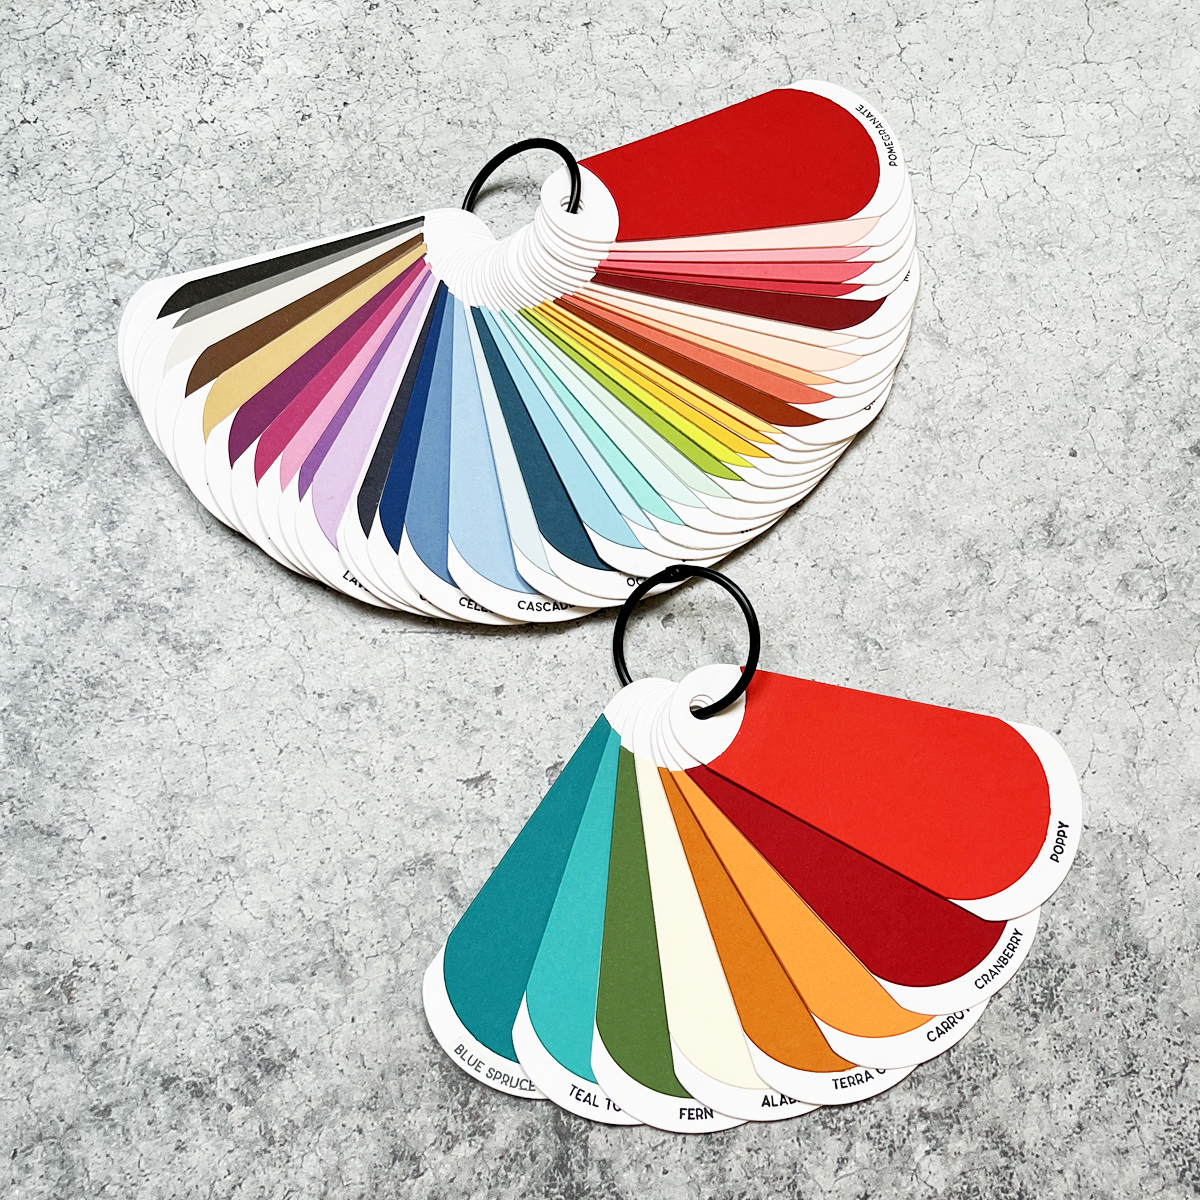
Color swatching is a great planning tool in cardmaking
I use my swatching dies on nearly every project. Being able to flip through physical cardstock swatches saves time and helps me confidently choose colors that work together.
You’ll see these swatches featured throughout this post.
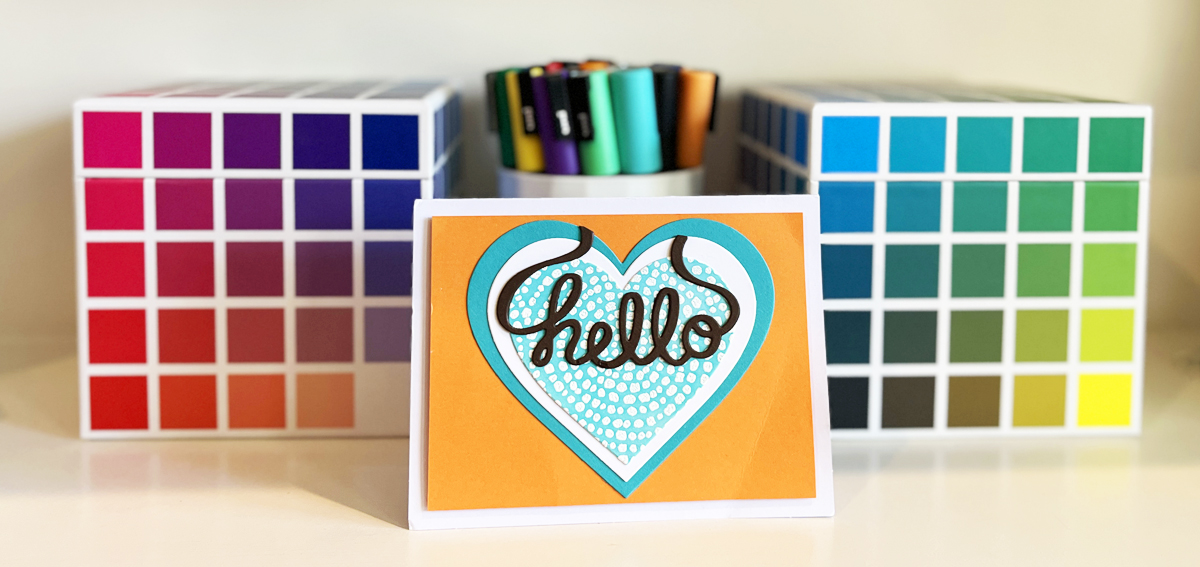
8. Best Inspiration Tool: Color Cubes
Color planning is always my starting point, and Color Cubes are essential to my process. I own two volumes (1&2), a birthday gift from several years ago, and they’re well loved.
Color Cubes are such an important inspiration tool in my craftroom
I like to start with the Color Catalogue where I can search by Color, Key Word or Collection and then I grab a few cards for inspiration.
Paired with my cardstock swatches, they make choosing beautiful color palettes effortless.
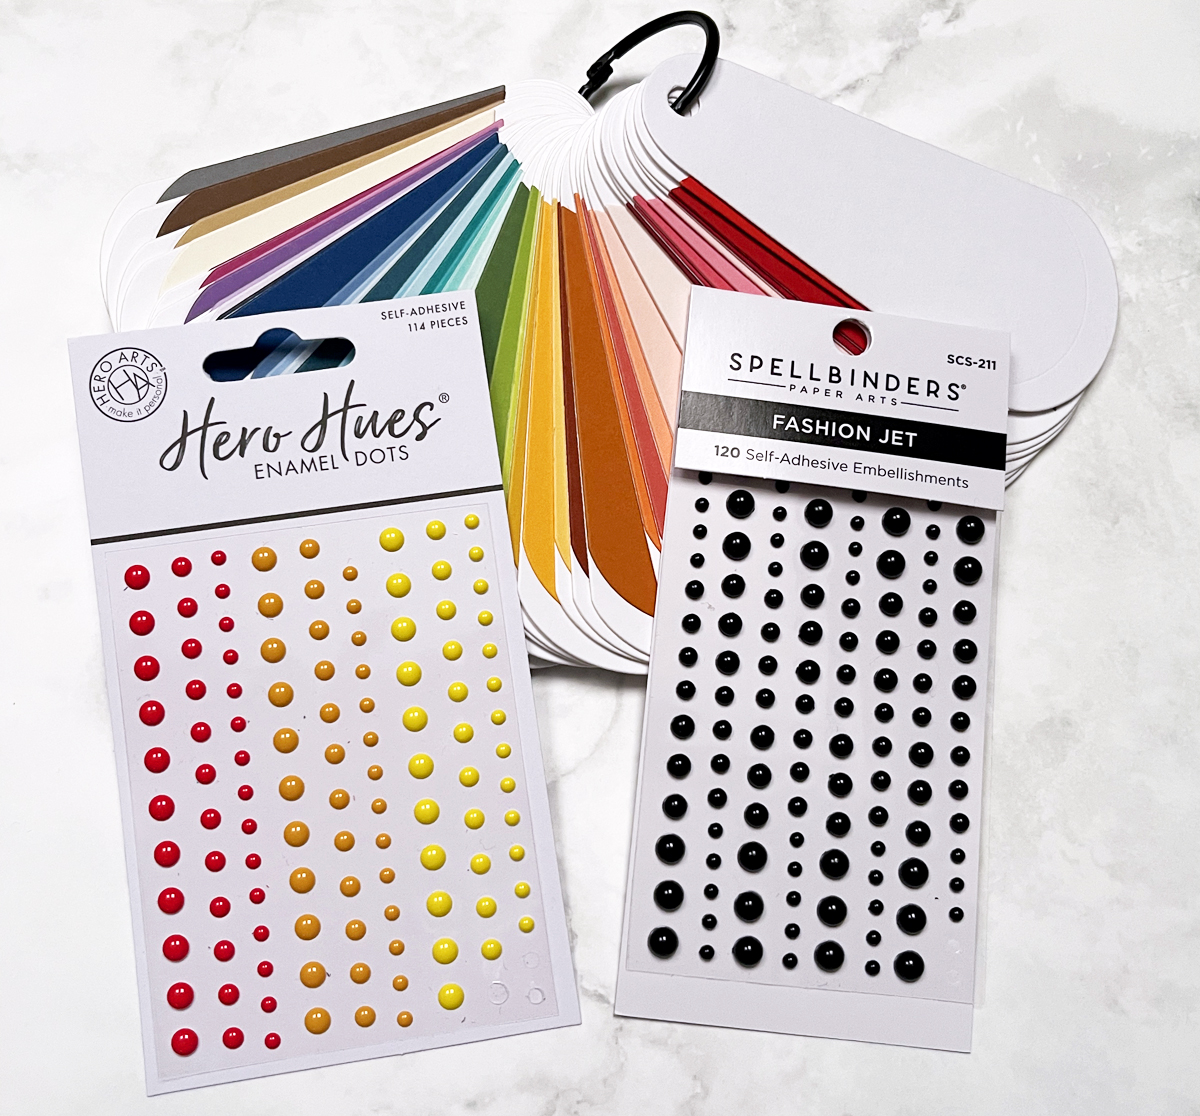
Enamel dots are hands down my favorite finishing touch. I use Spellbinders and Hero Arts enamel dotsthe most — clean, modern, and endlessly versatile. They add texture, shine and color to your projects while at the same time elevating your card.
TIP: I can’t tell you how many times I’ve covered a small mistake with an enamel dot! They can truly save a project.
10. Best Way to Add Texture: Embossing Folders
Embossing Folders add such impact to cardmaking….and they are so cost effective.
Embossing folders are one of the easiest ways to add interest to a card. I subscribe to the Spellbinders Embossing Folder of the Month, and my collection has grown quickly.
Embossing folders are a cost effective way to elevate most projects. They add texture, mood and dimension in one quick step.
If you are building up your crafting Toolkit, this is one of the best additions you can invest in.
I used January’s folder, Cloud Nine, on my Hummingbird card. It’s a stylized sky with clouds — perfect for so many scene cards.
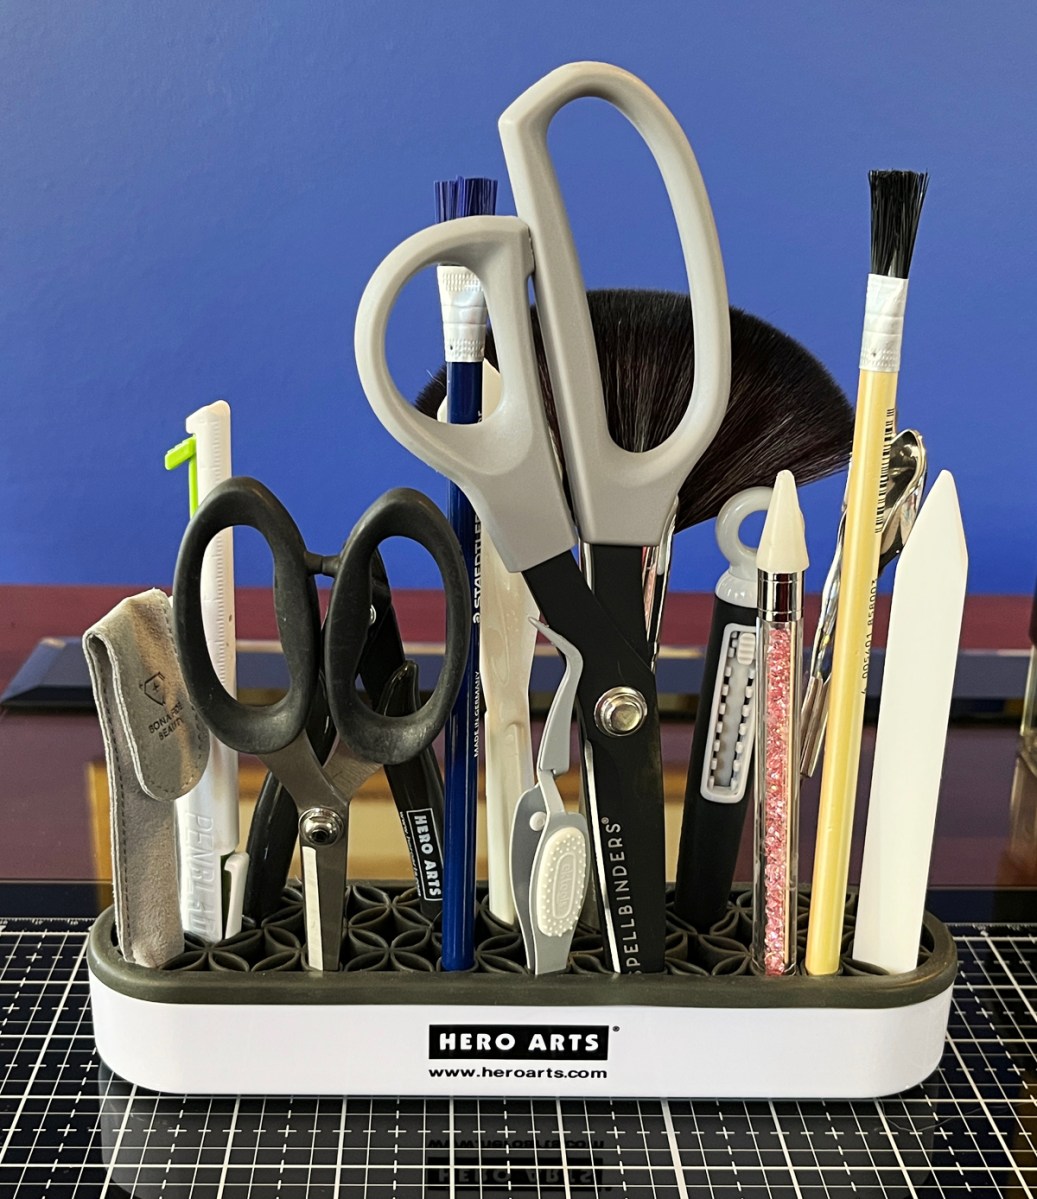
11. Best Desk Organizer: Hero Tools Handy Holder
I love a well designed crafty organizer.
This Handy Holder organizer keeps my scissors, tweezers, bone folder, palette knife, and brushes within arm’s reach. I love it so much… I own two!
They sit front and center on my desk and keep my most used (and often times oddly shaped) essentials close and organized.
I use this simple well-designed organizer everyday! Consider treating yourself.
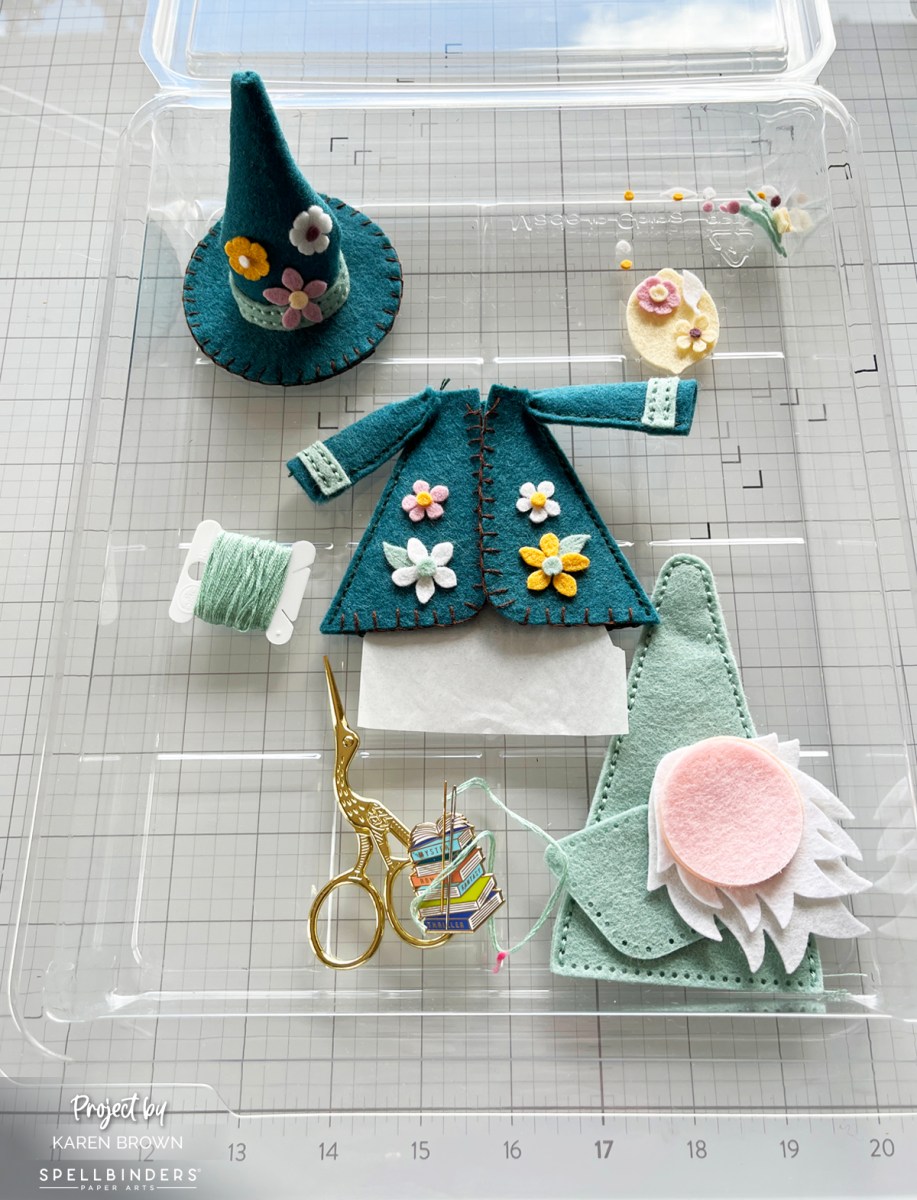
12. Best Work Surface Organizer: Craft Stax
Storage organizers are so helpful in my cardmaking.
One tool I reach for constantly while creating is Craft Stax. There are several sizes and they’re perfect for organizing, protecting, and corralling all of my crafting components as I work.
The photo above (with my Fergus Felt components) is the Stash Stax. I also love this size for storing cardstock.
I use Craft Stax to hold die-cut pieces, partially assembled cards, sentiments, and embellishments so nothing gets lost or damaged mid-project. They’re especially helpful when I’m working on detailed die-cut cards or stepping away and coming back later — everything stays exactly where I left it.
Craft Stax are so helpful mid-process in cardmaking
Craft Stax also make it easy to stack multiple projects on my desk without creating chaos (always a win!). Simple, smart, and incredibly useful — this is one of those tools you don’t realize you need until you have it… and then you can’t imagine crafting without it.
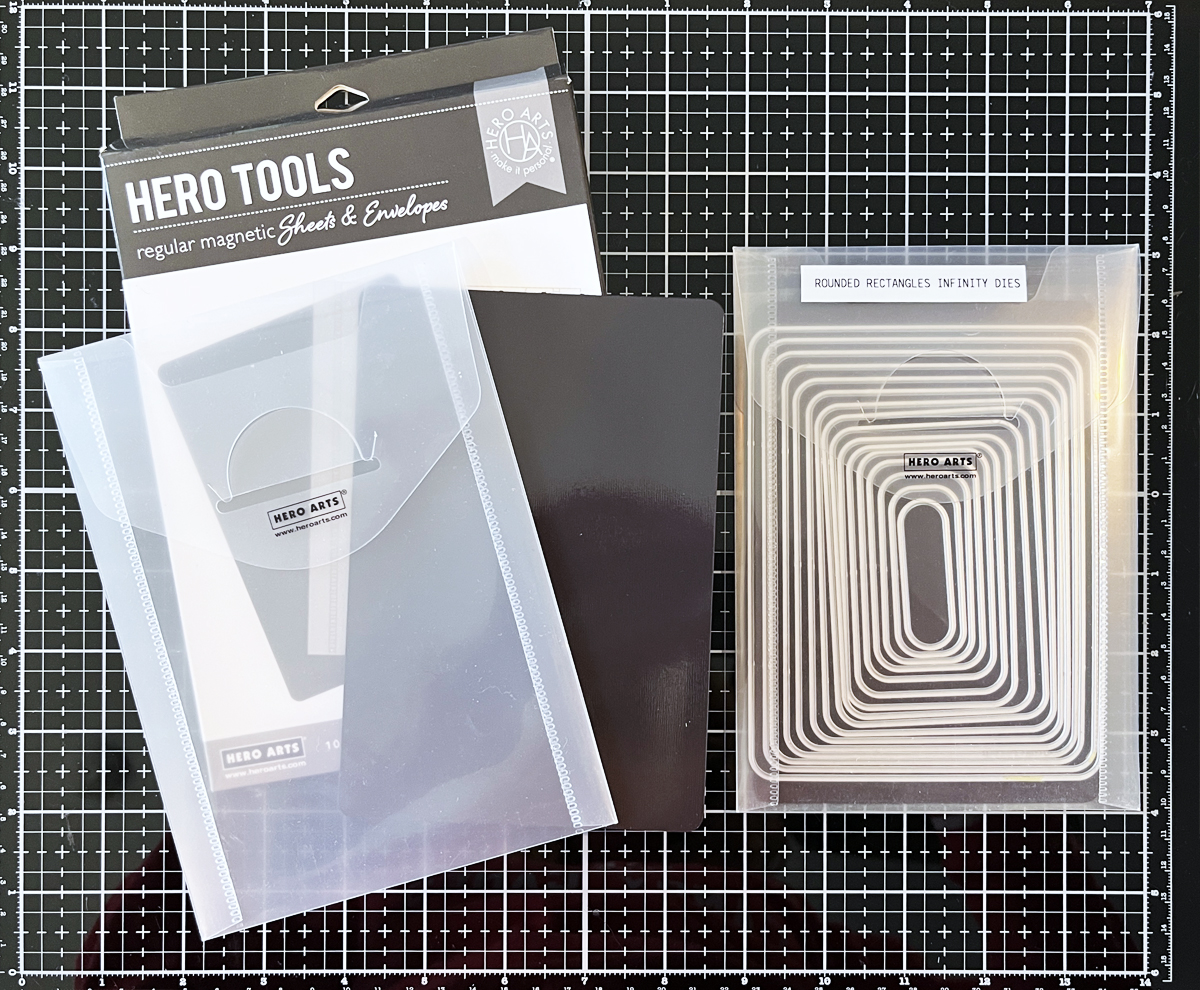
13. Best Die Organizer: Hero Arts Magnetic Sheets & Envelopes
I found magnetic sheets are the best way to organize dies
These are absolute must-haves for staying organized:
Sticky Grip Mats are perfect for stenciling and stamping. And they work great in your Misti and Mini Misti Stamp Positioners…no need for magnets anymore!
Spellbinders Platinum 6 die cutting machine. A true workhorse in my craftroom. I believe die-cutting is my favorite technique so I use my Platinum 6 most days.
These 14 products form the backbone of my cardmaking in 2026. They help me craft more efficiently, choose colors with confidence, and enjoy the creative process even more.
📌 Save this for later so you can come back when you’re ready to add to your Toolbox.
If you’re building or refreshing your craft room this year, I hope this list gives you a helpful starting point — and maybe a little inspiration too. 💛
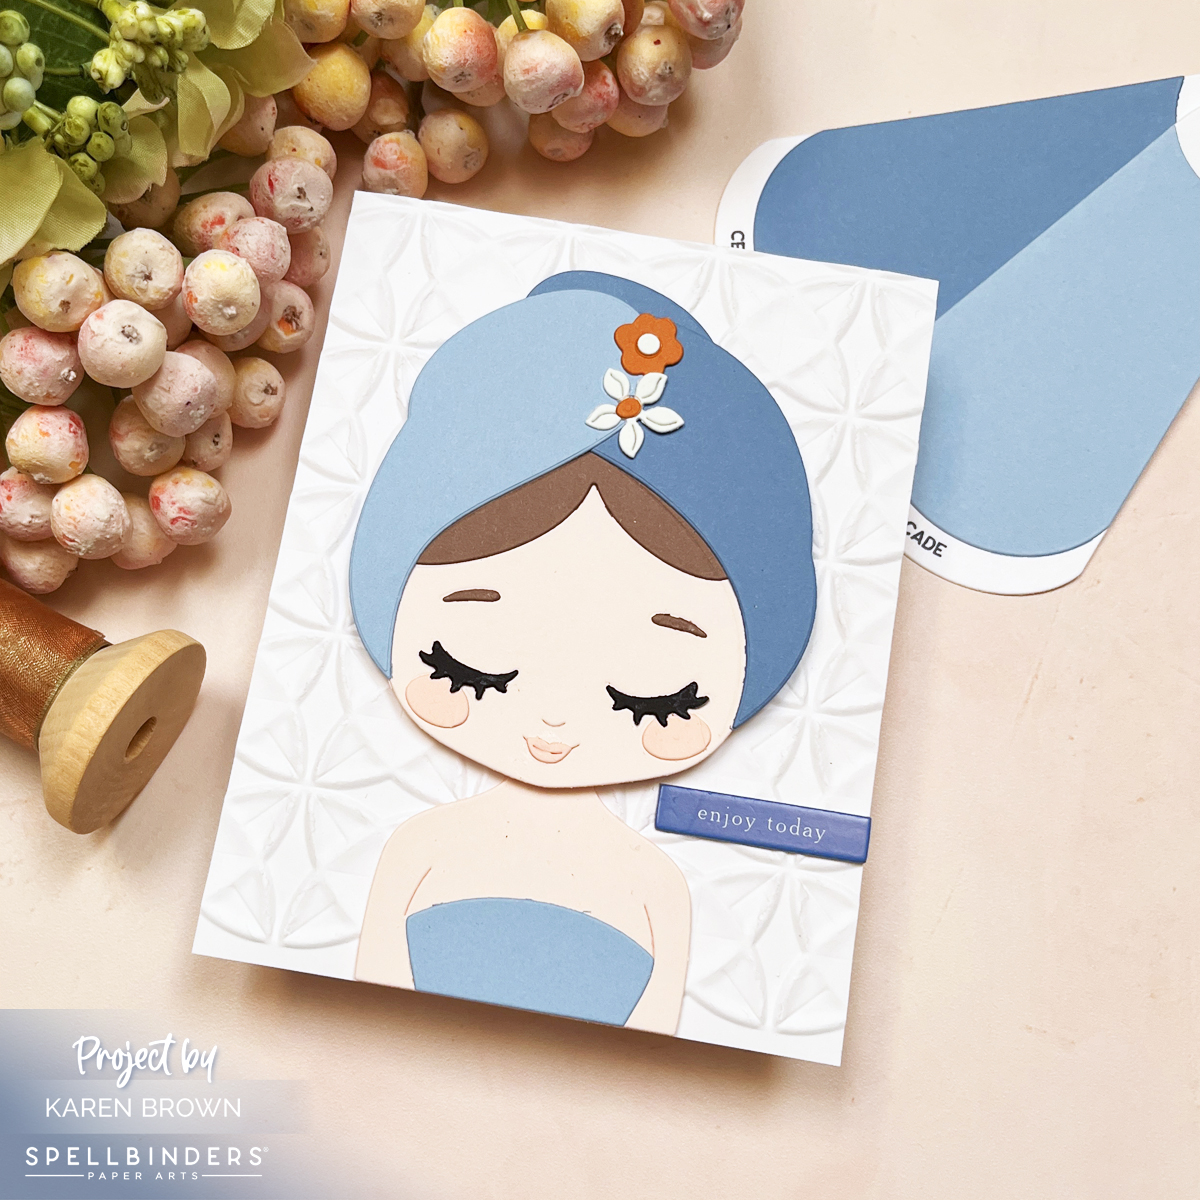
The Spellbinders December 2025 Large Die of the Month, Wrapped in Care, is an absolute delight—especially if you love creating feminine cards with personality. This adorable die set builds the sweetest girl wrapped in a fluffy spa towel turban, fully embracing her day of beauty. It’s charming, whimsical, and so customizable, which made it perfect for creating a card for my daughter. Naturally, I personalized her hair and skin tone to match!
If you enjoyed this post, you might be interested in cards for kids.
To build the scene, I embossed my background using a past Embossing Folder of the Month, which gave the card a serene, peaceful spa vibe. The textures really elevate the focal girl and tie the whole design together. For colors, I reached for my ColorWheel cardstock, one of my favorite studio essentials. The shades are Chiffon, Cascade, and Celestial, with additional details cut from scraps.
This blog post also highlights my trusty Swatching Dies and Stamps, which are invaluable when choosing harmonious colors.
Along the way, I’ll walk you through 4 tried-and-true tips that will make your holiday cardmaking easier, more enjoyable, and more beautiful.
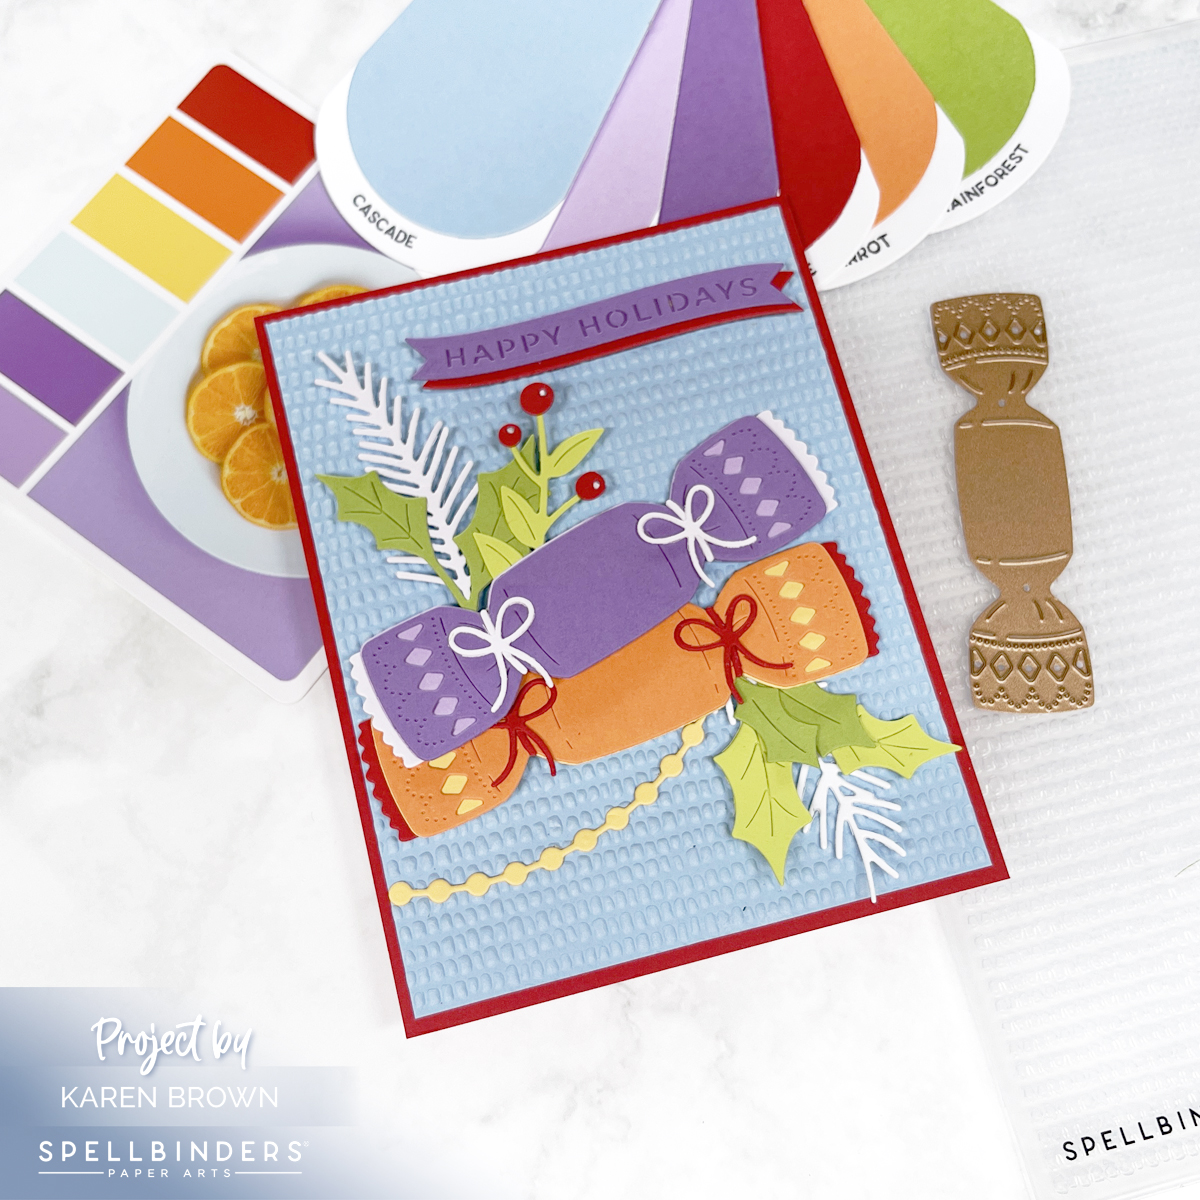
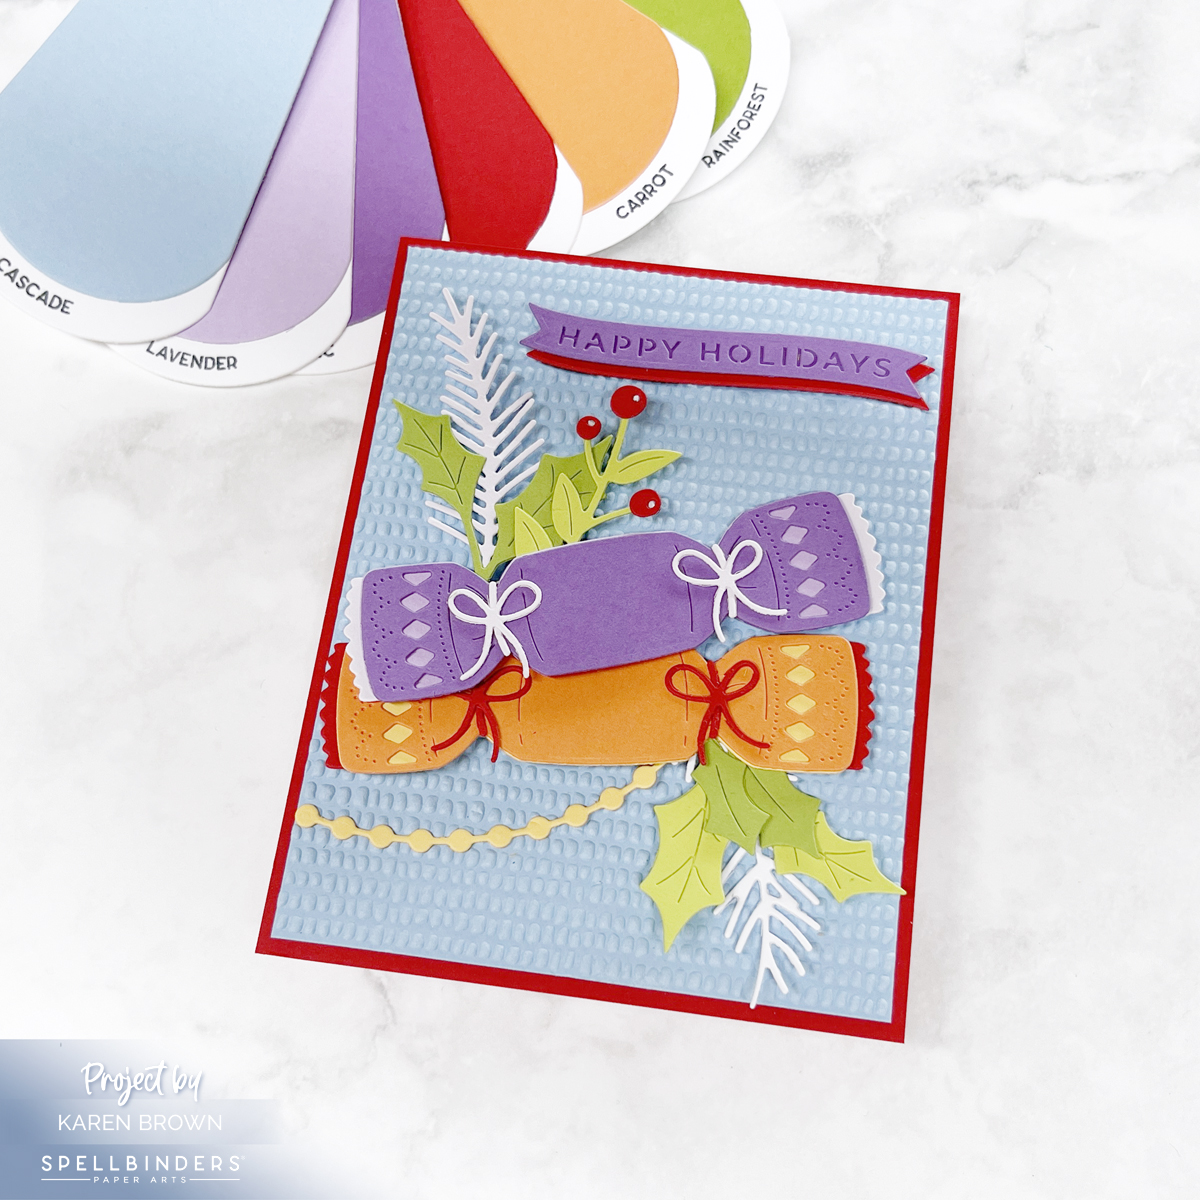
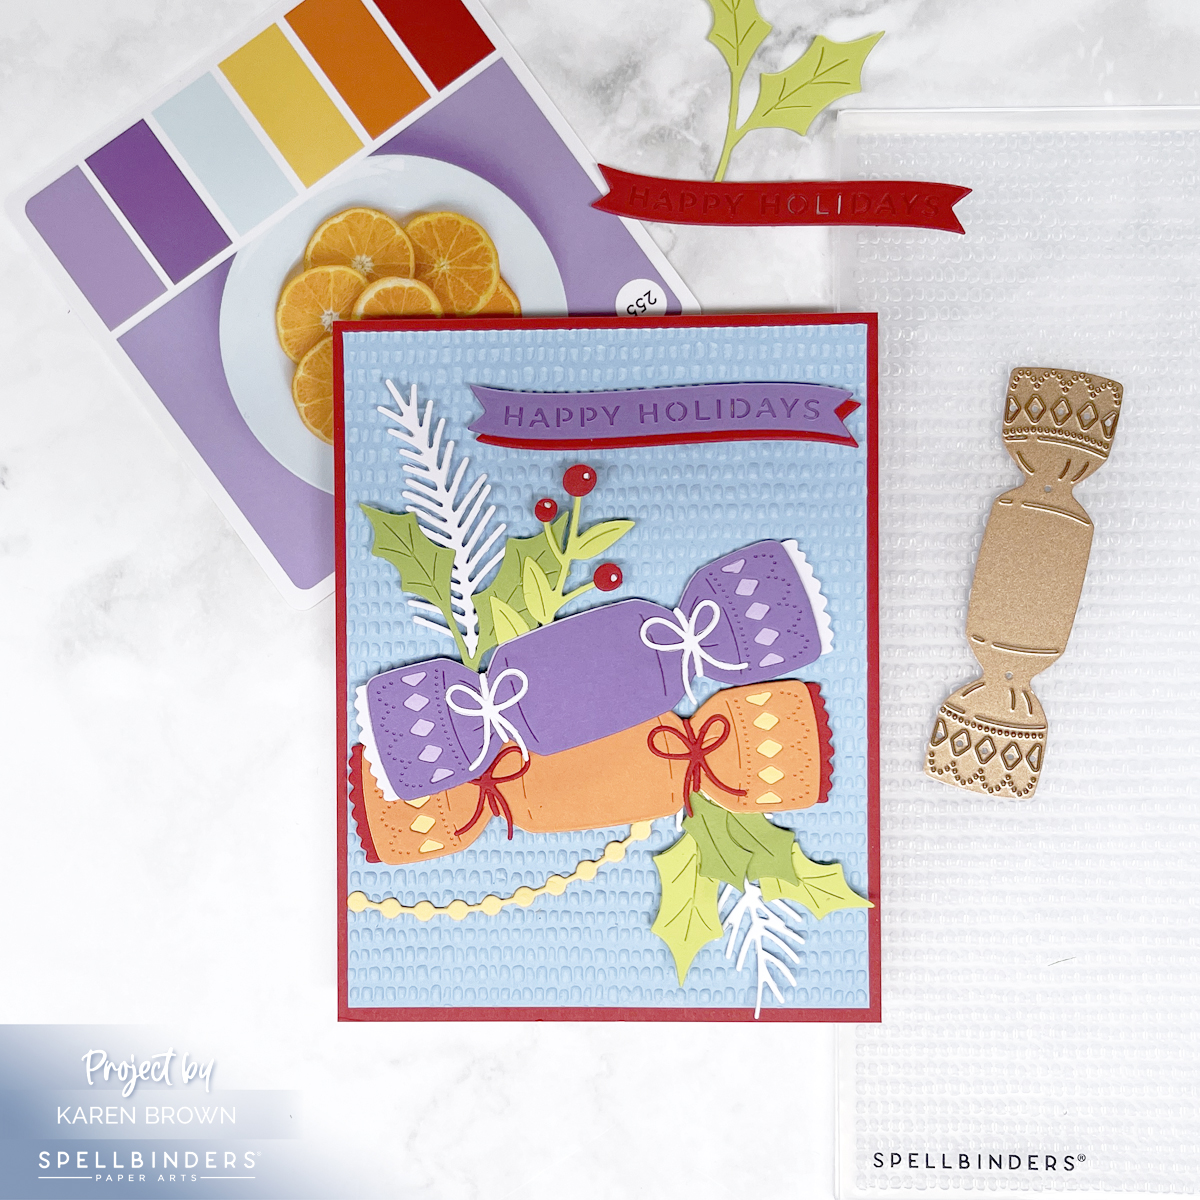
Tip 1: Use Quality Cardstock
The foundation of any good die cut is quality cardstock. Thin or flimsy paper isn’t substantial enough for die cutting. For this project, I used Spellbinders’ Color Wheel Cardstock—which is heavyweight, smooth, and cuts like butter.
Together these created a vibrant, cheerful, and slightly unexpected holiday palette.
Tip 2: Swatch Your Cardstock
Having your cardstock organized and swatched makes choosing colors so much faster. I’ll link HERE to a post where I go into detail on how I keep my swatches handy and easy to use.
For this project, I flipped through my swatches until I landed on the perfect non-traditional holiday mix. Seeing them side by side helped me visualize how the colors would work layered on the Christmas cracker.
When in doubt, let a color system do the heavy lifting! For this card, I turned to Color Cubes Volume 2, specifically palette card #252, which inspired the purple, red, orange, yellow, blue color mix. I also own Volume 1. You can find the Color Cubes BundleHERE.
I’ll also link to a previous blog post that features Spellbinders’ Color Deck System, another fabulous way to spark ideas when you feel stuck or want to try something different.
Click HEREif you’d like to see another Christmas Card using the same #252 Color Cubes palette card.
Tip 4: Add Texture and Dimension
Flat die cuts are nice, but texture and lift make a card pop. For this background, I embossed a panel with the new Dimpled 3D Embossing Folder—a subtle yet impactful pattern that catches the light beautifully.
I also used foam squares behind some of the cracker die cuts to add depth and shadow. Craft foam also works great, especially on larger die cuts. The best glue for smaller die cuts is Bearly Glue. I love the fine nozzle! Simple details like these can make your handmade card feel polished and professional.
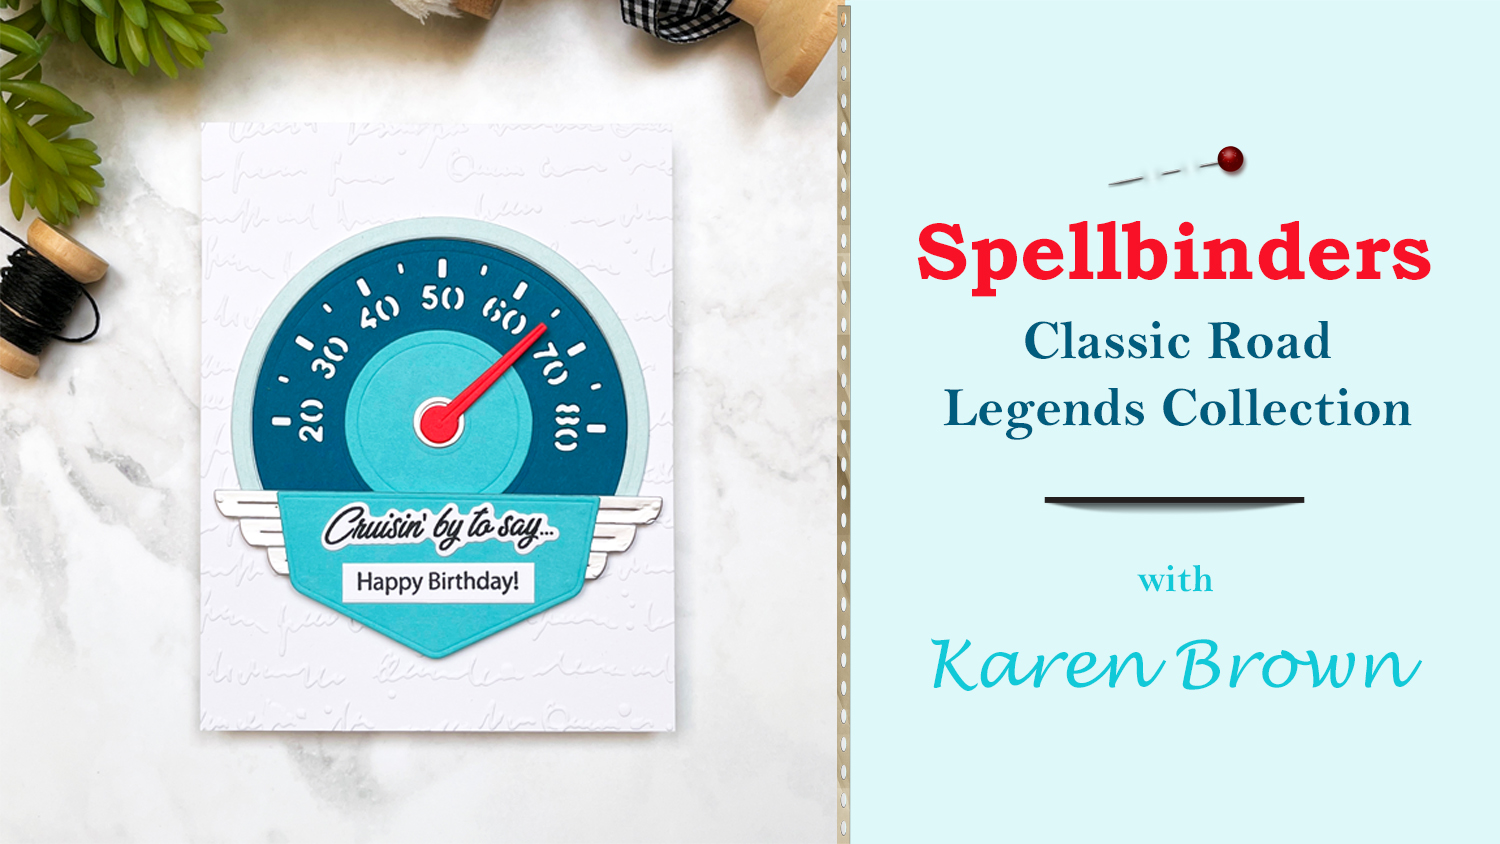
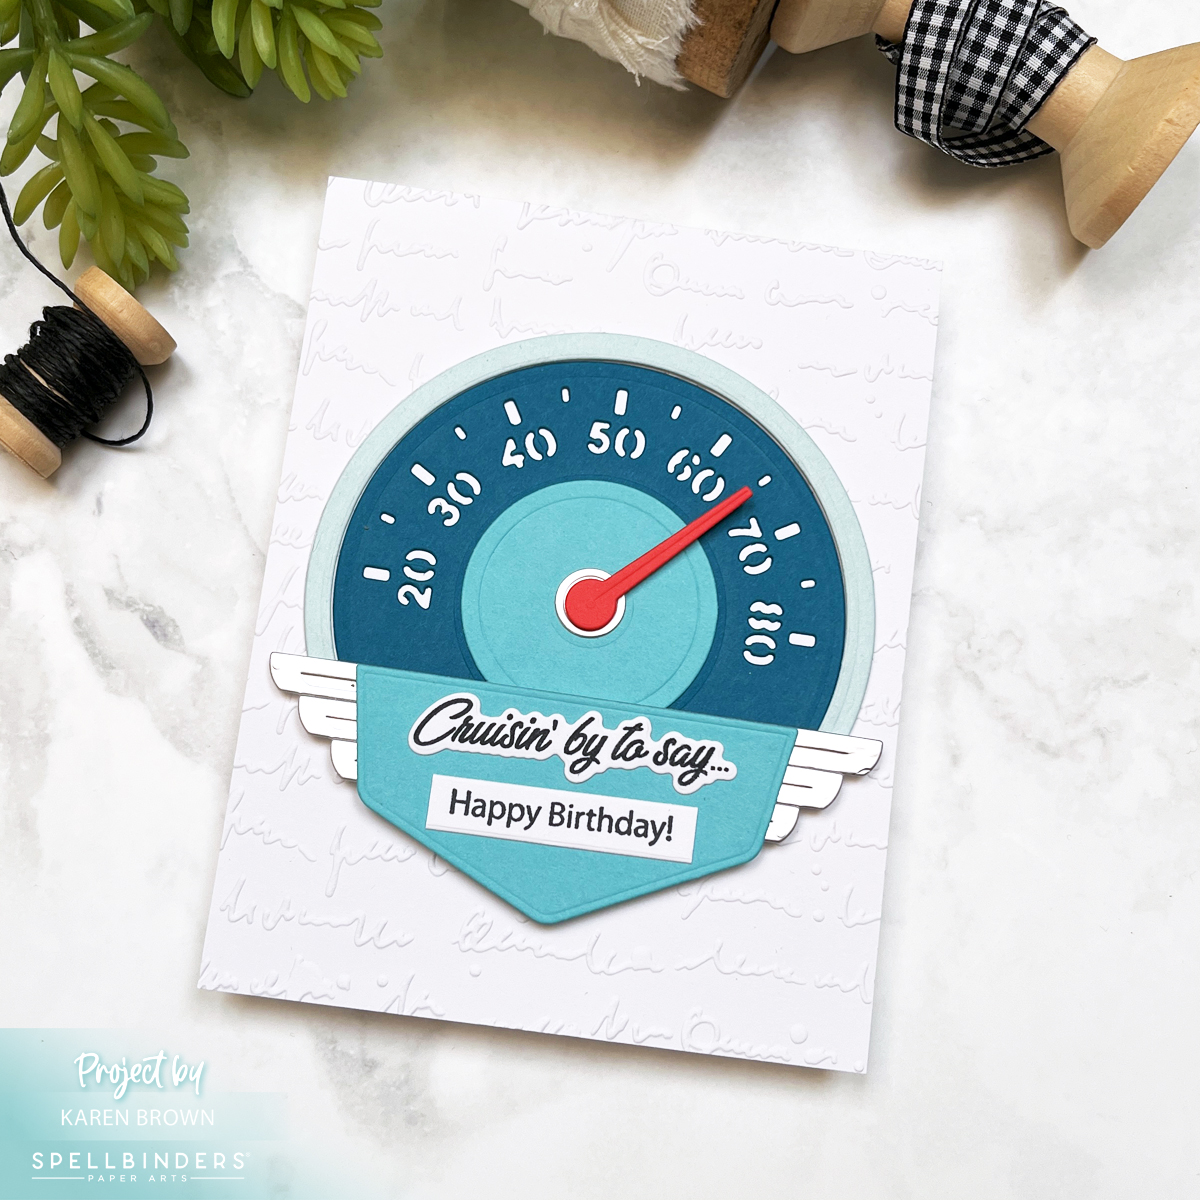
Buckle up, cardmakers—because today we’re putting the pedal to the cardstock with a sleek and fun masculine birthday card featuring the Speedometerfrom the Classic Road Legends collection by the incredibly talented Mindy Eggen! This is Mindy’s debut collection with Spellbinders, and it’s already racing to the top of my favorites list.
The star of the card? A bold, retro-inspired die cut speedometer with some of the coolest sentiments I’ve seen in a while.
🛠️ Building this Masculine Birthday Card
I wanted to create something unique and masculine with a fresh, modern color palette—so I went with monochromatic aquas and teals, using Adriatic, Paradise, and Arctic cardstocks from Hero Arts. To give the speedometer some shine and dimension, I added silver cardstock accents, and then for a bit of unexpected flair, I die cut the needle in coral cardstock—it’s just the right pop of contrast!
This die set includes tons of clever sentiments like:
“Have a Classic Day”
“Another Year in the Fast Lane”
“Enjoy Your New Adventure”
I chose “Cruisin’ by to say Happy Birthday” for this card
Perfect for Father’s Day, birthday cards, or anyone who appreciates a good throwback moment.
Once I finished assembling the speedometer, I mounted it onto a clean white background embossed with the Spellbinders Scribbled Letters Embossing Folder. The subtle texture adds just enough interest without taking the spotlight off the die cuts.
This card is headed straight to my brother for his birthday—he’s a car guy, and I think he’s going to love it!
💬 Why I Love It
Masculine cards can be a bit of a creative challenge, but this design was a total joy to put together. The bold shapes, retro vibes, and clever details made this one of my favorite guy cards I’ve ever made!
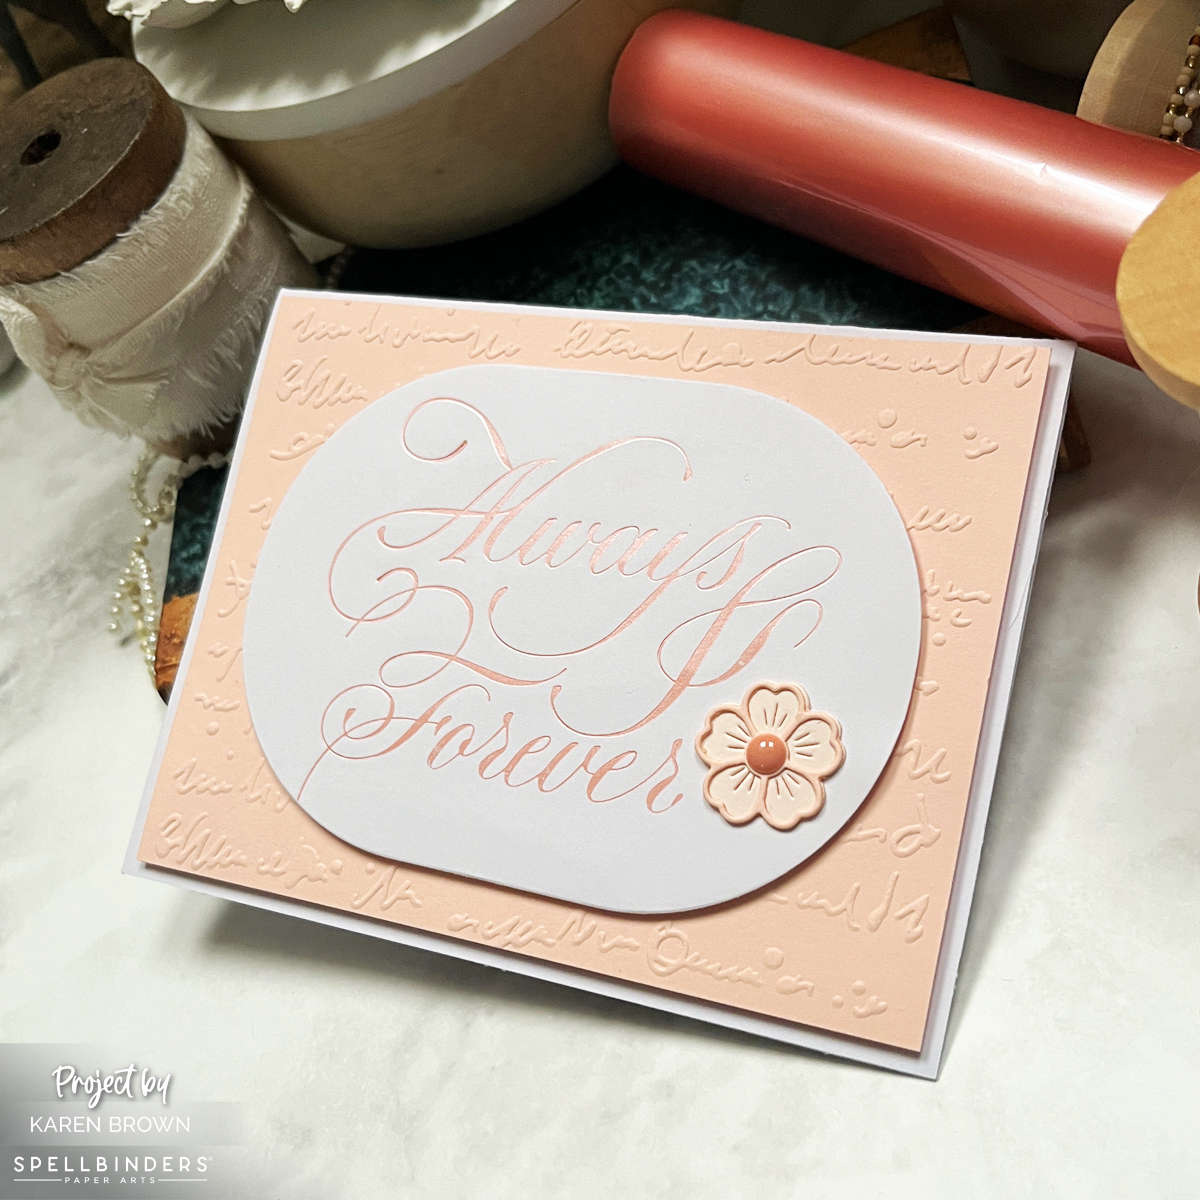
A few months ago, a follower asked me for wedding card inspiration, and I couldn’t resist diving into the timeless elegance of Spellbinders’ Copperplate on Your Wedding Day Collection by Paul Antonio. This collection, featuring gorgeous calligraphy BetterPress plates, was the perfect starting point for creating romantic, foiled wedding cards.
Monochromatic Elegance in Peach
For both cards, I used Peach Satin Matte Foil on smooth white cardstock. I embossed Bellini cardstock, creating a soft, monochromatic look that feels warm and sophisticated. The large, scripty sentiments—”Always and Forever” and “On Your Wedding Day“—take center stage, adding a touch of calligraphic artistry.
To enhance the elegance, I embossed the backgrounds with the Scribbled Letters Embossing Folder—a new favorite in my craft room! The subtle texture adds depth without overpowering the delicate foiling.
Finishing Touches
For the “On Your Wedding Day” card, I die-cut the sentiment using the Scallop Labels Die, which frames the lettering beautifully. I also added a few die-cut flowers in Bellini and Chiffon cardstock, softening the design with delicate floral accents.
Foiling Tips for a Flawless Finish
✨ Trim and round the edges of the foil before using a Glimmer Machine to prevent unwanted over-foiling marks. ✨ Roll slowly through the Platinum 6 Machine for even pressure and a crisp foiled impression.
These simple steps make a huge difference in achieving that professional, high-end look!
I love how these cards turned out—elegant, timeless, and perfect for celebrating love. Whether you’re making wedding cards for a special couple or building your card stash, this collection is a dream for anyone who loves calligraphy and foiled details.
Creating a handmade sympathy card is a thoughtful way to express your condolences, showing the recipient that you care enough to make something special. An embossed card is particularly elegant, yet it can be surprisingly quick and simple to create. Here’s a guide to making a beautiful embossed sympathy card that’s both fast and easy.
The first is that the folder embosses and die cuts with just one pass through the machine. This is a real timesaver!
The second, is that there are 3 templates on the folder so you create 3 components each time! YAY for 3 Fers!
How I created this card:
Using my paper trimmer, I cut a white card panel that was 8 3/4″ x 5 3/4″. I think white on white is always lovely for a sympathy card.
I wanted to tape my dies to the embossing folder to ensure there would be no shifting during the die-cutting. Using my Best Tape Ever, I tacked the 3 dies to the inside front cover with the cutting edge toward the interior of the sandwich. Then I added my pre-cut paper panel. I also taped the folder closed at the bottom to ensure everything stayed in place.
I ran the sandwich through my machine and viola, 3 cut and embossed elements with one pass through my machine!
I wanted to keep the card simple so I mounted the largest embossed die cut on an A2 top folding card with Bearly Glue and Craft Foam.
TIP FOR SUCCESS: Keep it Simple – Elegance often comes from simplicity. Stick to a few well-chosen elements rather than overloading the card with decorations.
Creating a handmade embossed sympathy card is a meaningful way to show your compassion and support. With a few simple steps and materials, you can craft a card that is not only fast and easy to make but also elegant and deeply personal.
Spellbinders has a wonderful NEW release called Out and About that is chock full of wonderfulness! Spellbinders is introducing their new compact die cutting machine called “Scout”, along with a fun collection of small but adorable die sets that work well with the pint-sized Scout. I love having a small light weight die cutting machine for smaller dies and sentiments. It allows me room to die cut, glue and assemble without having to tidy up in between steps.
I die cut Luna 3 times from Island Blue cardstock and then glued the layers together for a beautiful 3D focal point.
Using a Scallop Labels and Tags die, I die cut my background and THEN embossed the panel. If you emboss in this order, you will have more texture and dimension on your embossing. (If you emboss and then die cut, the die cutting process will smoosh the raised embossing.)
I added white accents with a thin Posca paint pen and added a black enamel dot for the eye.
I think little Luna is so cute! Thanks for stopping by and enjoy the rest of your day.
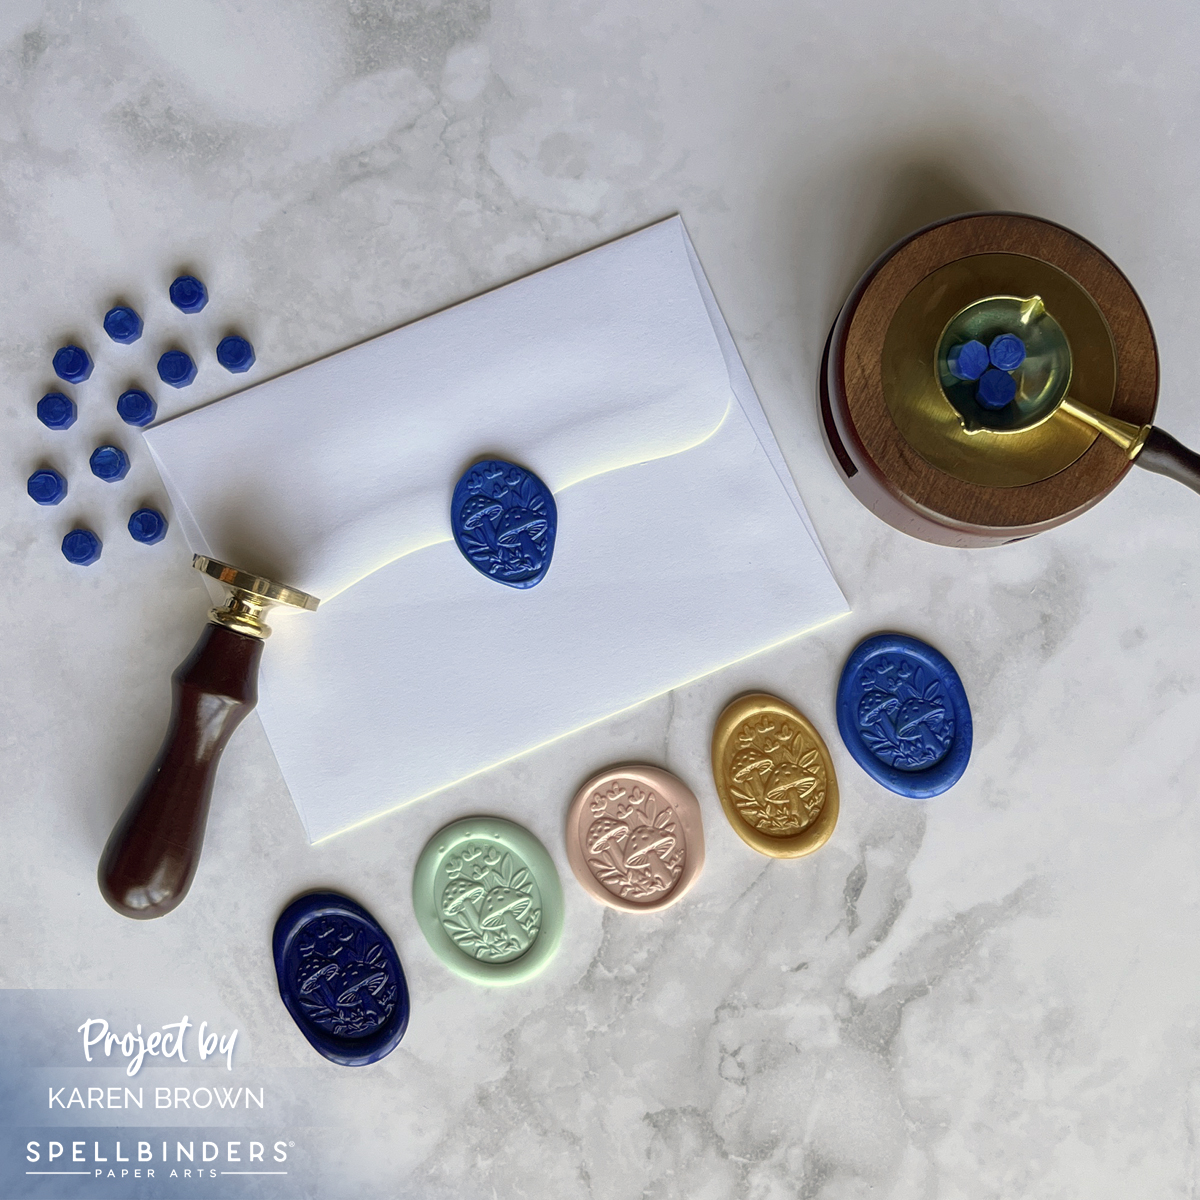
If you’re looking to add a touch of elegance and sophistication to your handmade cards, incorporating wax seals and infinity dies can elevate your designs to new heights. In this post, we’ll explore how to use these tools to create a stunning floral handmade card.
I knew I wanted to make a shaped floral card with a wax seal medallion on my vase. Here are step-by-step directions for this card:
I started by making a bunch of wax seals, which I really enjoy. If you’d like more details, I have a blog post titled 18 Tips and Tricks for Making Wax Seals that you can read HERE. I decided to use two Royal Blue seals and I planned my color scheme around the two seals. Spellbinders Wax Seal Kit is such a fun addition to any craftroom and I have really enjoyed playing with my kit this year.
Using my silver Deco Color Paint Pen, I added highlights to the wax mushrooms and foliage. Interestingly, the color looks a little more gold in the photographs, but it is silver in person.
As I mentioned, I wanted a shaped card so I took an A2 Side Fold Card Base and die cut my white base with the Scallop Labels and Tag die. I made sure that the left cutting edge was to the left of the fold so it would stay intact. Then I cut a Periwinkle and White Mat and assembled my card with Bearly Glue and a few Foam Adhesive Squares.
I also made a coordinating wax seal envelop for my card that you can see below.
As I said, I really enjoy making wax seals so I made some extras for future projects. The other colors are Indigo Ink, Pistachio, Velvet Rose and Gold.
Conclusion
Using wax seals and infinity dies in your handmade cards adds a level of detail and elegance that will impress any recipient. These tools allow you to create intricate designs and sophisticated touches that make your cards truly stand out. Whether for birthdays, weddings, or just because, a floral handmade card with these elements will be cherished and remembered. Happy crafting!