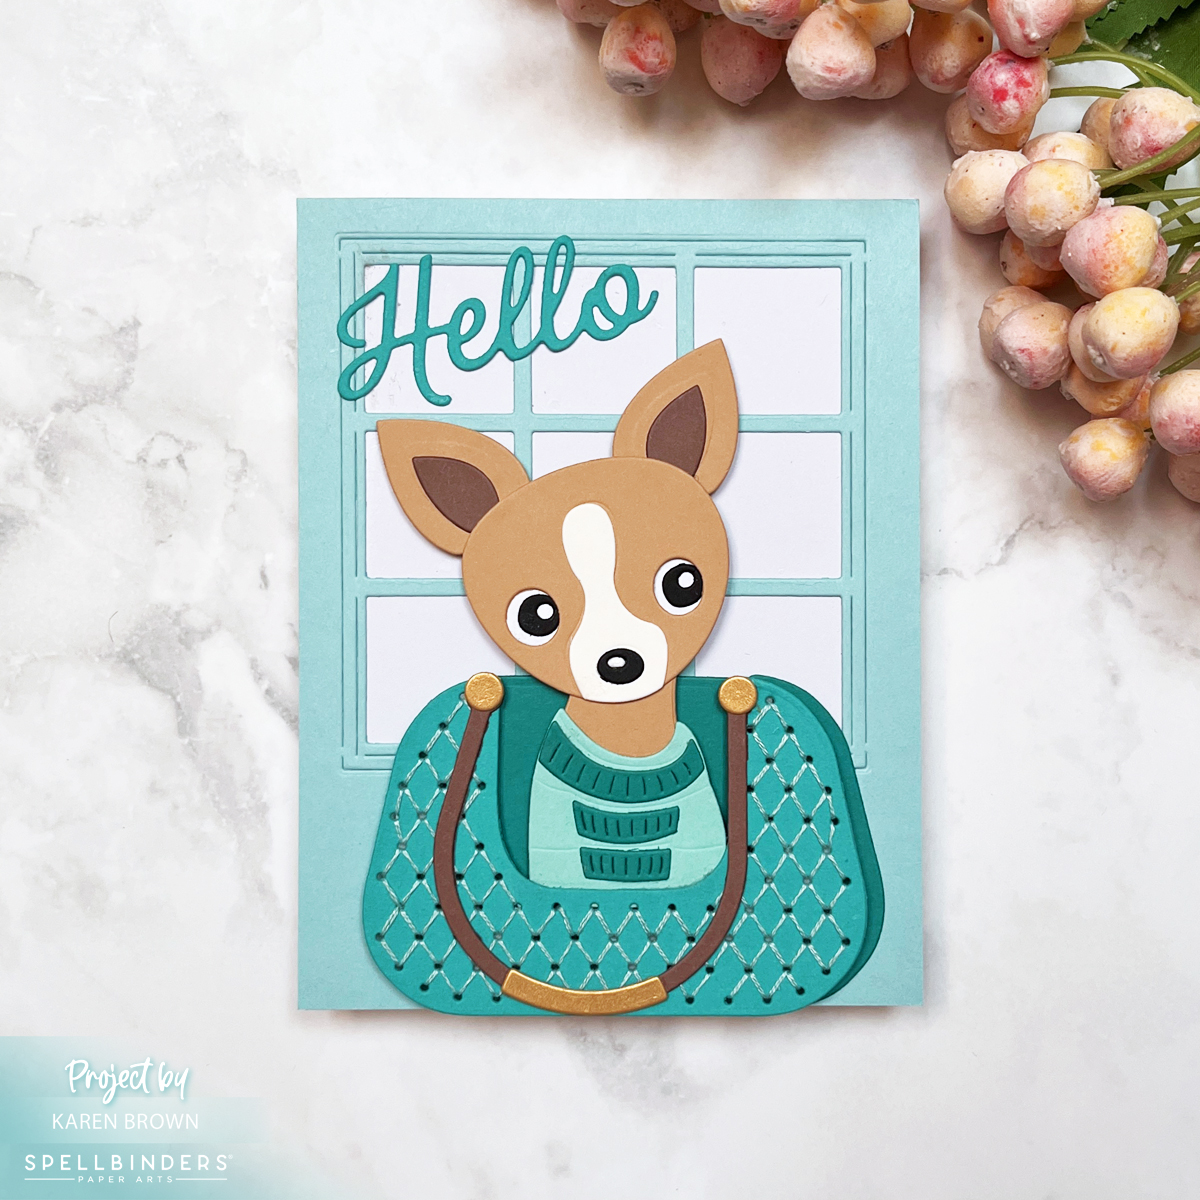
If you love stitching dies and adorable pups, you’re in for a treat with the Spellbinders November 2025 Stitching Die of the Month. This kit is pure joy — it features the most darling Chihuahua peeking out of a stitched purse, complete with a tiny sweater and irresistible details. I think this might be my favorite stitching kit of the year!
If you enjoyed this darling Chihuahua themed card you might enjoy a cute card for kids.
✂️ A Stitch Above the Rest
For the purse, I followed the etched diamond stitching guide using DMC #964 aqua floss (two strands). I like to die cut each stitched panel twice and glue them together before I start stitching — it gives the piece a nice sturdy base and helps it hold its shape.
The stitching adds beautiful texture, and the aqua floss blends perfectly with the Teal Topaz ColorWheel cardstock.
🎨 My Color Recipe
Here’s the cardstock and stitching palette I used:
For the sentiment, I used the “Hello” Die from Hero Arts’ November Fancy Die Kit — it’s the perfect elegant touch without stealing focus from the little pup. The background features the Hero Arts Elegant Window Fancy Die, which frames the scene beautifully.
The main ColorWheel palette of aquas and neutrals (Teal Topaz, Blue Spruce, Waterfall and Fawn) keeps everything cohesive while letting that sweet Chihuahua shine. The stitched purse adds just the right amount of dimension, making this card one of those “pick up and look closer” moments.
This one’s going to my daughter’s mother-in-law, who happens to have two Chihuahuas — so I know it’ll be a hit!
I have an adorable Color Block Food Theme card coming on November 11th…come back and take a peek.
Sometimes the cutest cards come together quickly—and this one might just be my favorite of the season! I couldn’t resist Spellbinders’ new Pupkin die set, which features an adorable dog all dressed up as a jack-o’-lantern and carrying a tiny skull-shaped trick-or-treat bucket. Cuteness overload!
This card is extra special because I made it for my daughter in memory of her sweet, goofy lab, Tank, who once rocked his very own pumpkin costume. ❤️
I layered several color coordinating mats from past Small Die of the Month and Large Die of the Month kits and I used ColorWheel cardstock and Sand for my pup’s body. The vibrant layers really make our little Pupkin pop! This design is fast, fun, and easy to assemble—perfect for Halloween cardmaking sessions.
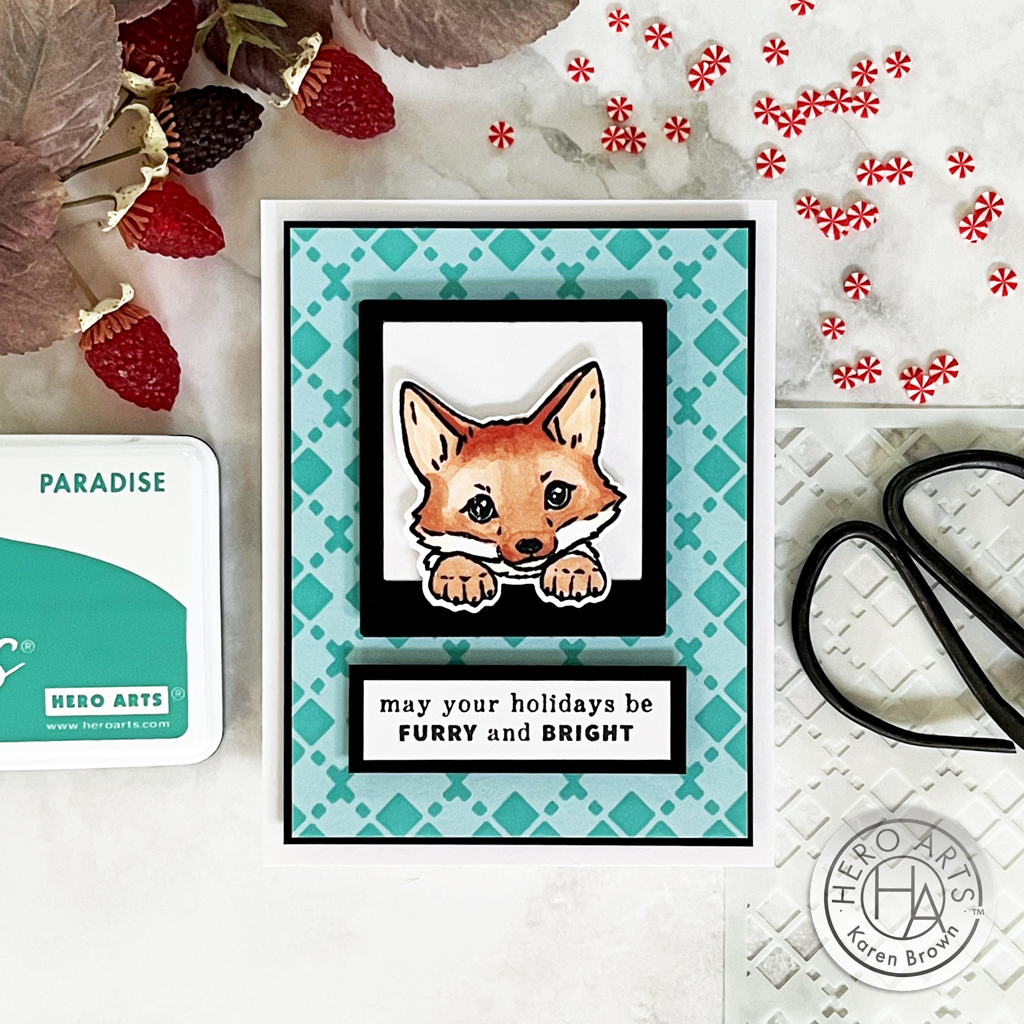
Adorable animals…..yes please! Stamping a cute puppy, reindeer or fox onto a “Holiday”, “Get Well Soon” or “Happy Birthday” card is a wonderful way to share encouragement and celebrate someone special. And it’s not just for the holidays, Hero Arts November Card Kit is going to be a year round favorite in my craft room as my family loves cute critter cards.
And, there are LOTS of changes going on at Hero Arts. I’ve included some Hero Studio changes later in this post, so keep scrolling!
Hero Studio November 2024 Card Kit of the Month
I obviously LOVE this kit! Today I am sharing three cards made with the November Kit and I can’t decide which is my favorite. The kit includes loads of greatness and I used 3 of the 8 charming animal stamps and dies, the two stencils and Merry Christmas sentiment.
Curious about this month’s kit? Let’s take a peek inside the November Card Kit:
KIT INCLUDES: • Peeking Animals Clear Stamp Set, 6” x 8” • 17 Coordinating Dies • 6 Fancy Dies • 2 Sheets Each of Pine & Cherry Cardstock, 5.5″ x 8.5″ • 2 Stencils in Argyle & Cable Knit Patterns, 4.75″ x 6″ • 28 White Die Cut Tags, 4 different styles • White Hero Pearls, 0.6 oz. • Berry Hero Wax, 1 oz.
Kit Cost:
$46 with Subscription + FREE SHIPPING!
$49.99 One Time Purchase (while supplies last)
5 Wonderful Kit Options:
For this blog post, I created with the November kit and two Extraordinary Extras, but there there are 5 kits plus 6 Extras available. You can also buy the Whole Studio, which includes all 5 kits at a wonderful savings.
I wanted to show you two more kit cards that I created. I used to have a sweet blond lab named Shelby, so I created this card with Shelby in mind. Isn’t she darling? My Shelby was with us for 12 1/2 wonderful years.
Sometimes I just like to color, and this Winter Foliage Pattern Stamp Setis perfect coloring fun! The stamps are already perfectly positioned on one large 4×6″ clear stamp, which makes stamping a breeze! I didn’t use it today, but there is also a coordinating Winter Foliage Pattern Cover Die.
Creation Details:
I stamped and Copic colored my foliage elements. Copic colors used: N1, R22, R24, R27, R39, YG03, YG25, YG17, BG11, BG23, Black.
Pro Tip: I added ink splatters by flicking the brush end of my Black Copic Marker along the inside of the cap towards the colored panel. This gives nice small ink splatters. Another easy way to add ink splatters is by putting some Licorice Reactive Ink on an Acrylic Block and then flicking the ink onto the panel with a fine brush or fan brush. Great results either way.
The sentiment is from the Holiday Messages Stamp and Die Bundle and I added a Vellum shadow.
Big Changes at Hero Arts:
Faster Orders: New subscribers will no longer have to wait until the following month to receive their first kit. Now receive the the same monthly design when you subscribe! The sign-up window will be open the 1st – 27th each month. Also, starting in December the Monthly Add-Ons will be available for purchase on the 1st of each month as well.
• Charge Edit Window: Subscription charge day is moving to the 3rd of each month. Beginning in December, we will revealing kits on the 1st, which means you can make subscription changes prior to the charge date following the reveal.
• Subscribers Come First: Non-subscribers will no longer be able to purchase the a la carte products that are live within the Hero Studio month. Those designs will ONLY be available to active subscribers the first month. If there are any leftovers, they will be available for a la carte purchase to non-subscribers the following month.
• Fulfillment Changes: We are also making some fulfillment changes to help us get the orders out quicker and more efficiently. One of the main changes will be the Hero Studio Add-Ons will ship separately from the recurring Hero Studio orders. Subscribers will still receive free shipping on the add-ons for the first week.
Want to learn more about all the changes coming to Hero Studio? Check out the FAQ section of the website.
BLOG HOP:
Hero Arts will give away a $50 gift card, drawn from the comments left across the hop. Enter by Sunday, November 10 at 11:59pm Pacific, and the winner will be announced on the Hero Arts blog the following week.
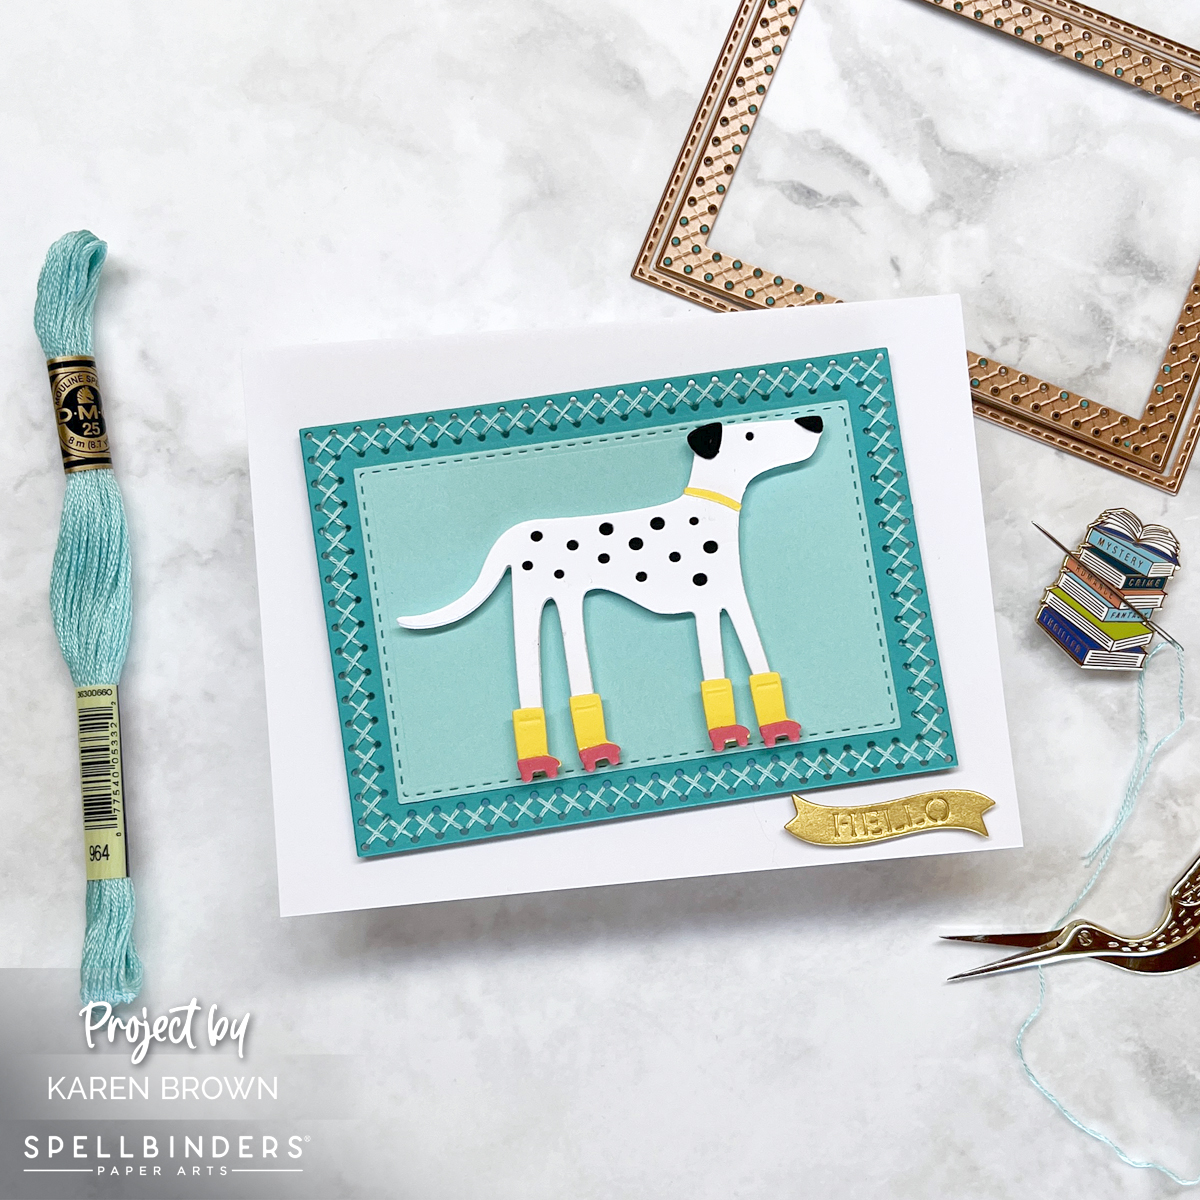
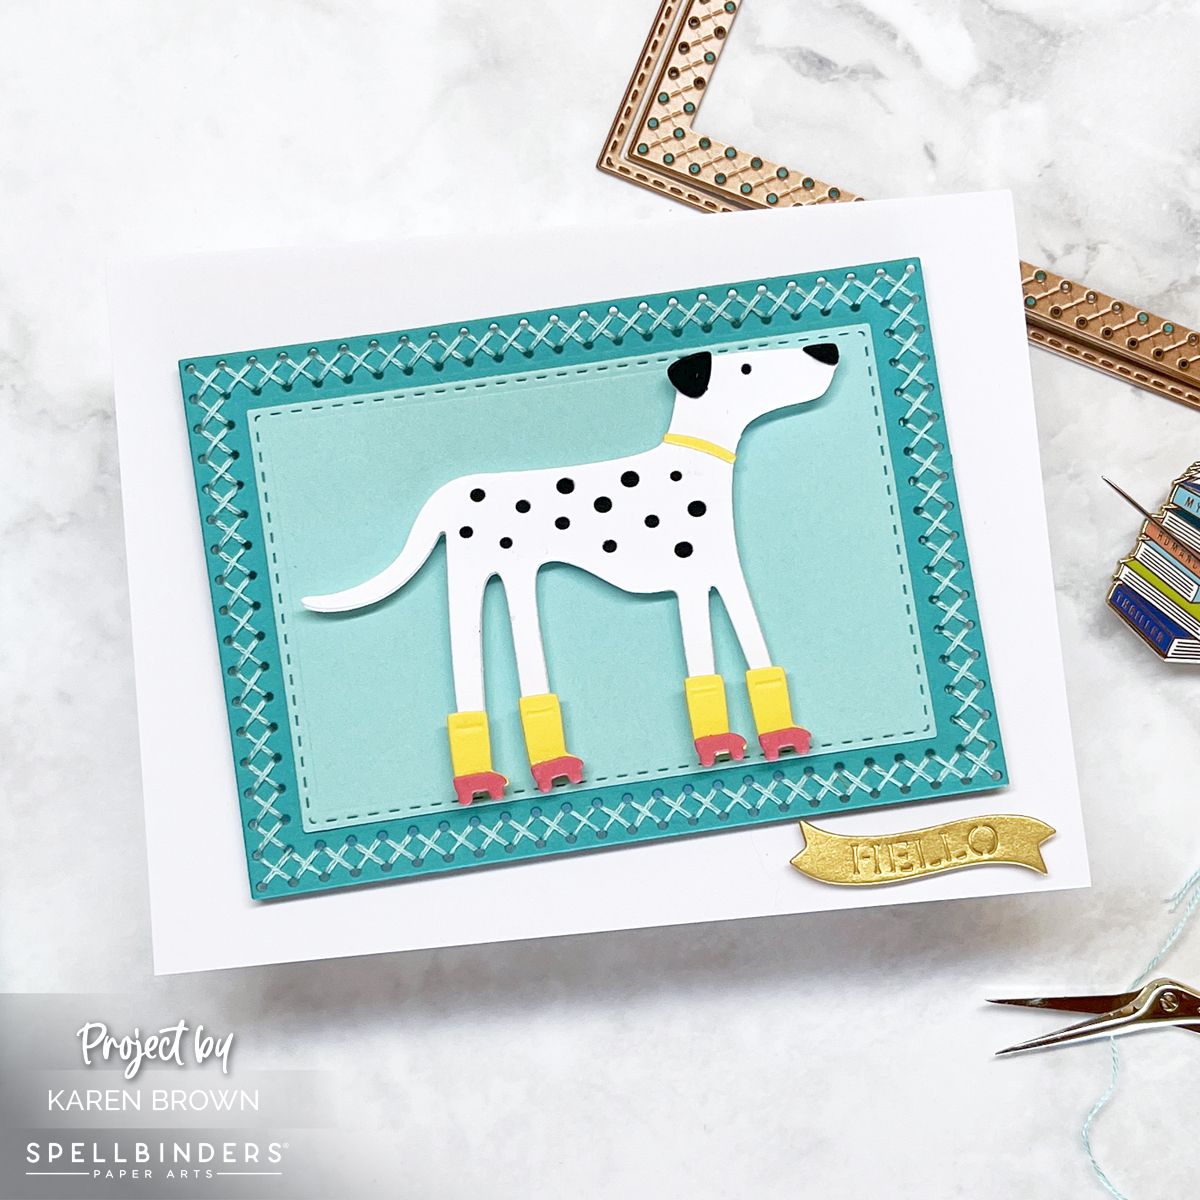
Frames add so much interest and I think this new stitched kit will become a staple in my craftroom. I can never have too many nesting inifity dies and this one would also be so pretty “unstitched”!
Cross Stitch Nested Card Front and Tag Kit
Stitching Kit Tips and Tricks:
I started by die cutting my Stitching Kit pieces with my Platinum 6 die cutting machine. This month’s kit has 7 wonderful cutting dies. I die cut the frame twice and glued them together for easier stitching. The frame is Teal Topaz and the stitched inset is Waterfall that I used from The Assorted Cardstock pack. This bundle has GREAT colors!
Spellbinders has a nice selection of stitching accessories in their shop that you can find HERE. Today, I used DMC 964 that is included in the Color Essentials Cool DMC Bundle. This thread bundle was selected to coordinate with Spellbinders cardstock colors.
When I started stitching, I took two strands of floss, separated them one at a time, brought them together and then stroked and lengthened them until they seemed tame and ready to use.
I used thin double sided tape to secure my floss to the die cuts. I like that this tape is easy to hide behind the die cuts and I don’t even bother to take the top release paper off the tape.
Remember to keep your floss taught as you stitch.
When I move from one area to the next, I run the floss through the just finished stitched area to keep the thread secure. This gives a nice look on the finished project.
Don’t stitch with threads that are too long or they are likely to knot.
When I was done, I added a bit of Bearly Glue to the ends so that they would stay in place.
Club members can cancel, upgrade or change clubs from the 1st-5th of each month. Popular Clubs frequently sell out during this period so club members get first dibs on everything.
NEW for 2024: Club Members get EARLY access to new releases on the 6th!
On the 6th, Clubs become available to non-members.
On the 27th, Club registration closes for the current month.
If a club did not sell out, you can buy under “Shop Past Clubs”. Past kits are available on the 10th of the FOLLOWING month.
Do you have a dog lover in your life? There’s nothing more delightful than receiving a card that perfectly captures the charm and whimsy of an adorable dog. Enter the cutest die cut handmade dog card— Big Pug Etched Dies – a perfect blend of creativity and cuteness that is sure to bring a smile to anyone’s face. And, there is a super fun accessory set so you can dress up your little creatures! The scarf and bow are in the accessory kit. I used Rainbow Wood Designer Paperfor my background, scarf and bow.
Bibi Cameron and Spellbinders just released a fun Cats and Pugs Collection that is going to be a longtime favorite in the Brown family. I really enjoyed creating this darling card. I added an easy but fun puffy sticker sentiment to finish my card.
I created an extra special big showy 5″ x 7″ (A7) card. Isn’t the expression on the Pug just precious?
Handmade die cut cards are more than just greeting cards; they are keepsakes that recipients will cherish. The thought and effort put into creating such a card make it a meaningful gesture, perfect for any occasion.
In a world filled with digital messages and mass-produced cards, a handmade card stands out as a unique and personal way to connect with others. So, why not try your hand at crafting one? Spread a little Pug love and make someone’s day with the cutest die cut Pug dog card!
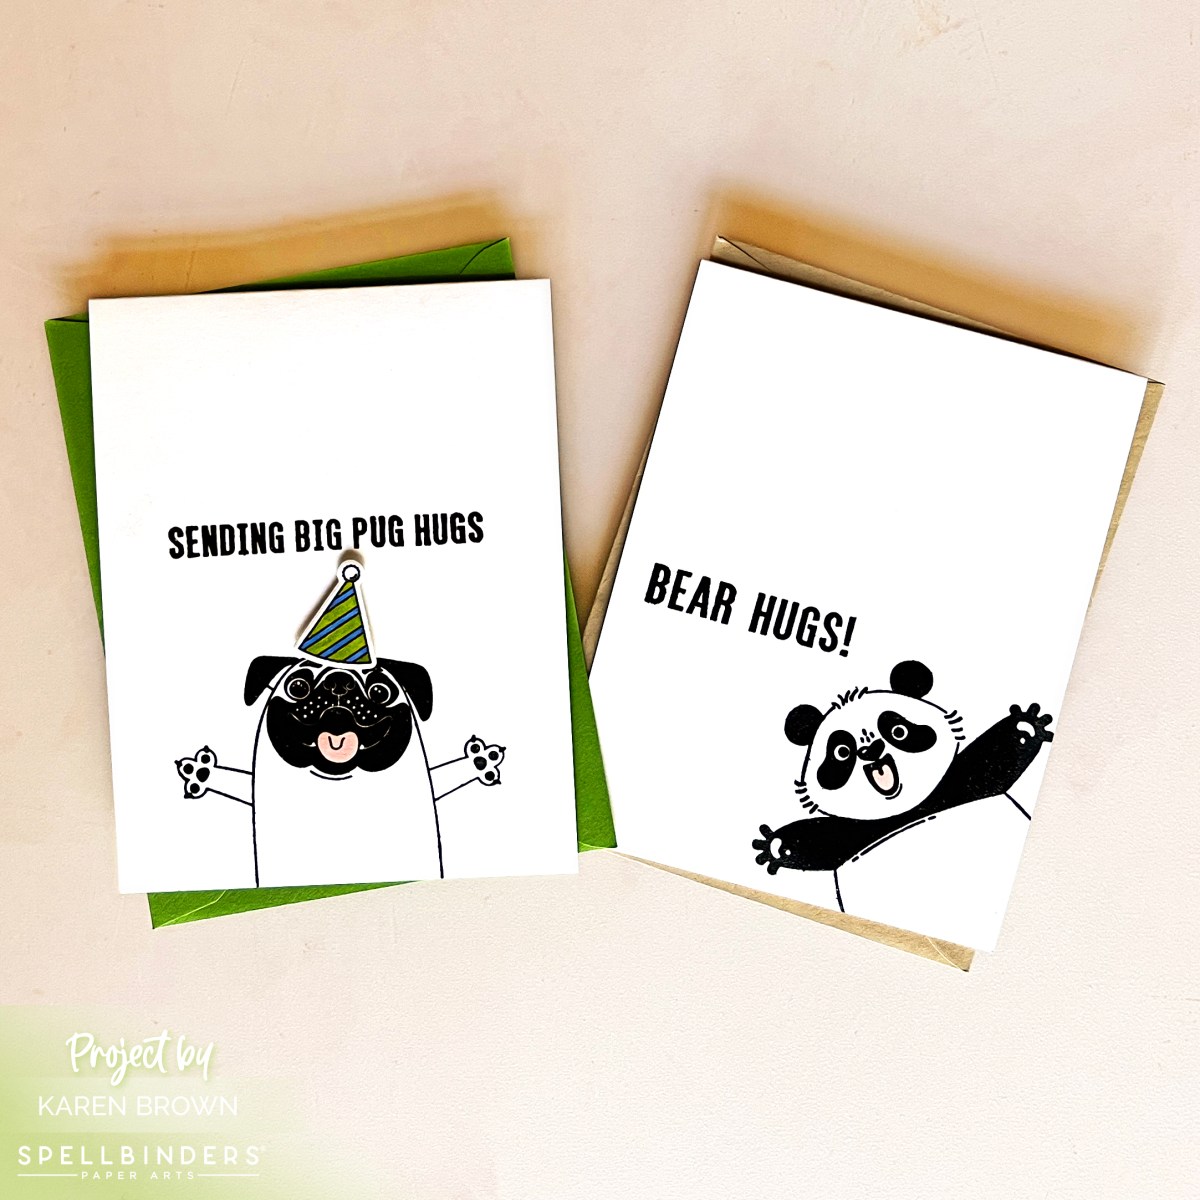
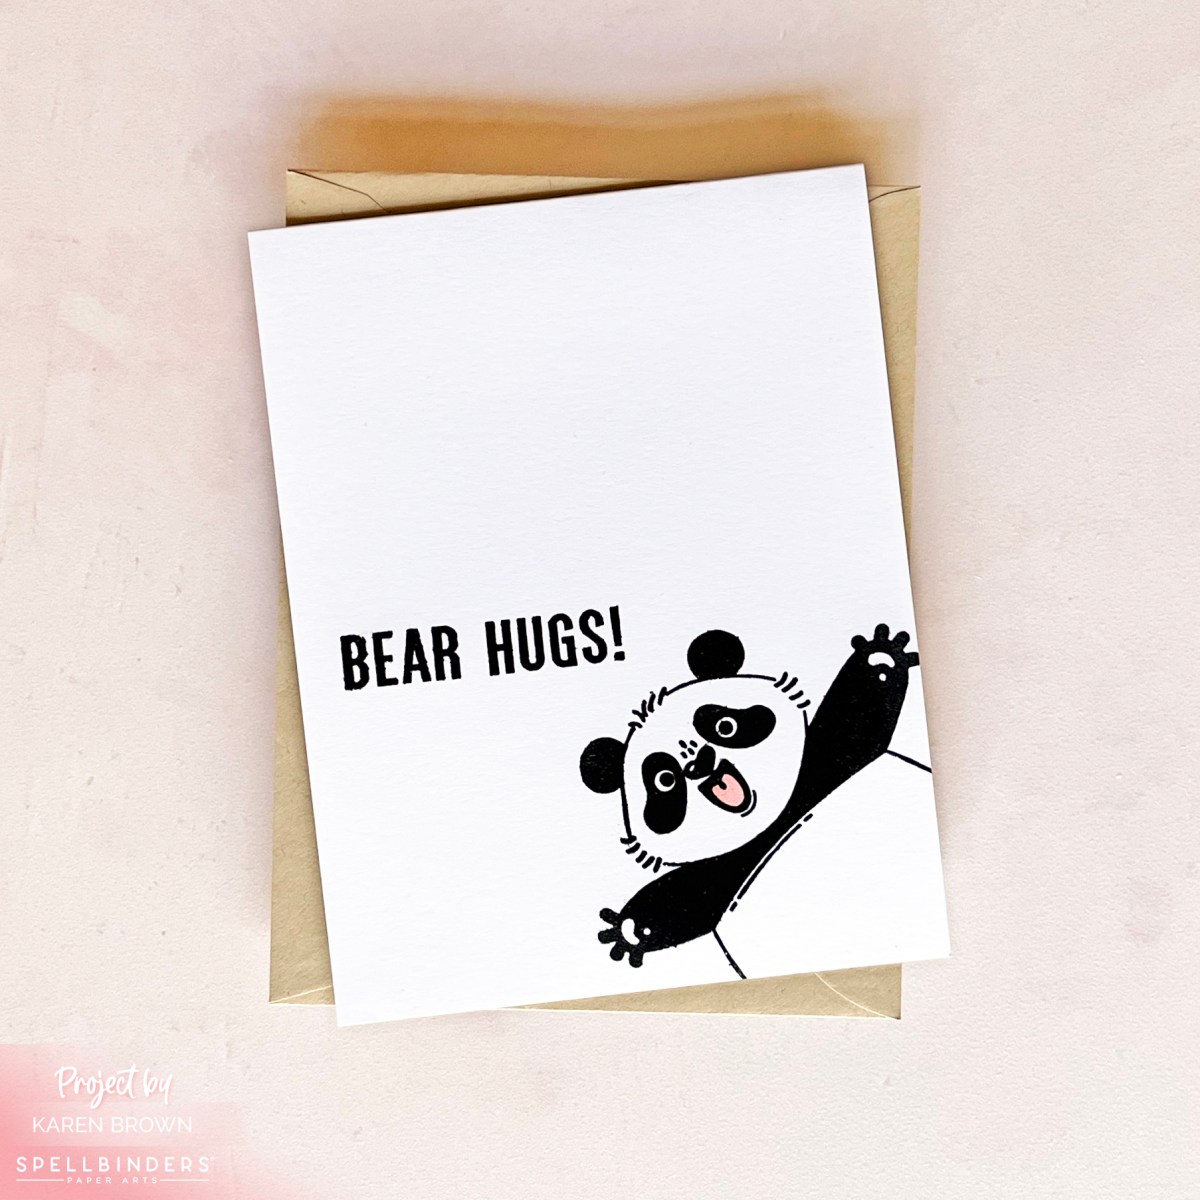
Can you have too many dog stamps? I think not! I am loving Spellbinders + Simon Hurley’s new Big Hugs stamp and die bundle. These cute critters – Pug dog, Panda bear and Zebra – are sure to be favorites in my family. I love this set so much I went a little crazy making cards!
Pug Dog Masculine Birthday Cards
My first card is for my husband and I wanted to make a quick little scene. I stamped and Copic colored my Pug (complete with a festive party hat), embossed a brick wall, ink blended a background and heat embossed a cute sentiment.
I like to keep Get Well cards on hand and this card is sure to make the recipient smile. This card came together very quickly. I stamped and Copic colored my Pug and added a blue mat for interest. Just two Copic markers!
Hello there and welcome! It\’s all about masculine cards this week at Watercooler Wednesday and Dawn is our hostess. I hope you will stop by the website, see what the artists have created and then submit one of your cards.
In my family, men (and ladies too!) enjoy a good humorous card. This dog (Fetch by Photoplay) makes me smile every time I use him. This is a simple one layer panel mounted on a Lilac A2 card.
Supplies used :
Photoplay Fetch Altenew Pinstripes Background Stamp SSS Brush Stroke Messages Sentiment Hero Arts Lilac Ink Copic markers MFT Stitched rectangular die STAX set 2 Inkadinkadoo Stamping Mask Paper
I stamped Fetch, colored with Copics, masked and then stamped the background stamp in lilac. I love how the dog almost makes a perfect square. I am entering this card in: June Papercraft Challenge
Hello there! I was at a cardmaking convention in February and saw this humorous dog and die set (Photo Play – Fetch) and knew I could make some really fun cards. Don\’t you love how the dog almost makes a perfect square?
I started by stamping Fetch and the small bird (SSS Stacking Animals), coloring with Copics and die-cutting. I knew I wanted to frame the little vignette so I die-cut a large frame. I had previously made the background (Tim Holtz Bricked Layering Stencil) in a bright vivid blue. Next I stamped the Hello sentiment (Altenew Pinstripes Background Stamp Set) on the frame. I wanted to emphasize the frame so I used foam tape to adhere the frame and animal die-cuts to the bricked background. I think this is a cheery little card that will be fun to send to a friend.
I am entering this card in the following challenges:
My daughter adopted a rescue mutt. Tank is a very handsome dog, but since he is not a purebred I had not been able to find a stamp that looks like him. At a Craft Convention I found Friends4Cookie by Stamps of Life and bought the set immediately, because Cookie looks like Tank. So, of course I wanted to make a card for my daughter.
Adorable Mixed Breed Mutt
Since Tank is a reddish brown color, I thought a bright background would make the card more interesting. I used distress ink mini cubes and a wide flat brush to paint a messy rainbow brushstroke background.
I stamped and colored Cookie/Tank, fussy cut the image and then went along the edge with a brown Copic so he wouldn\’t have a white edge. I thought the sentiment was cute so I fussy cut and mounted it as well.
I am entering this card in Card Concepts Colorful Basics Challenge I was drawn to the rainbow stripes in the inspiration photo. I think my card fits best in the Clean and Layered category.
I have two daughters and I wanted to send them each a personalized card. My youngest has blond hair and lives with a 95 pound rescue dog named \”Tank\”.
My oldest has brown hair and lives with the most adorable Corgi named \”Newton\”.
I used SSS Abby\’s Spring Showers for each of the girls and MFT Lucky Dog for both pups. I colored each card with Copic Markers. I also \”made my mark\” and colored in the sentiment for a brighter look.