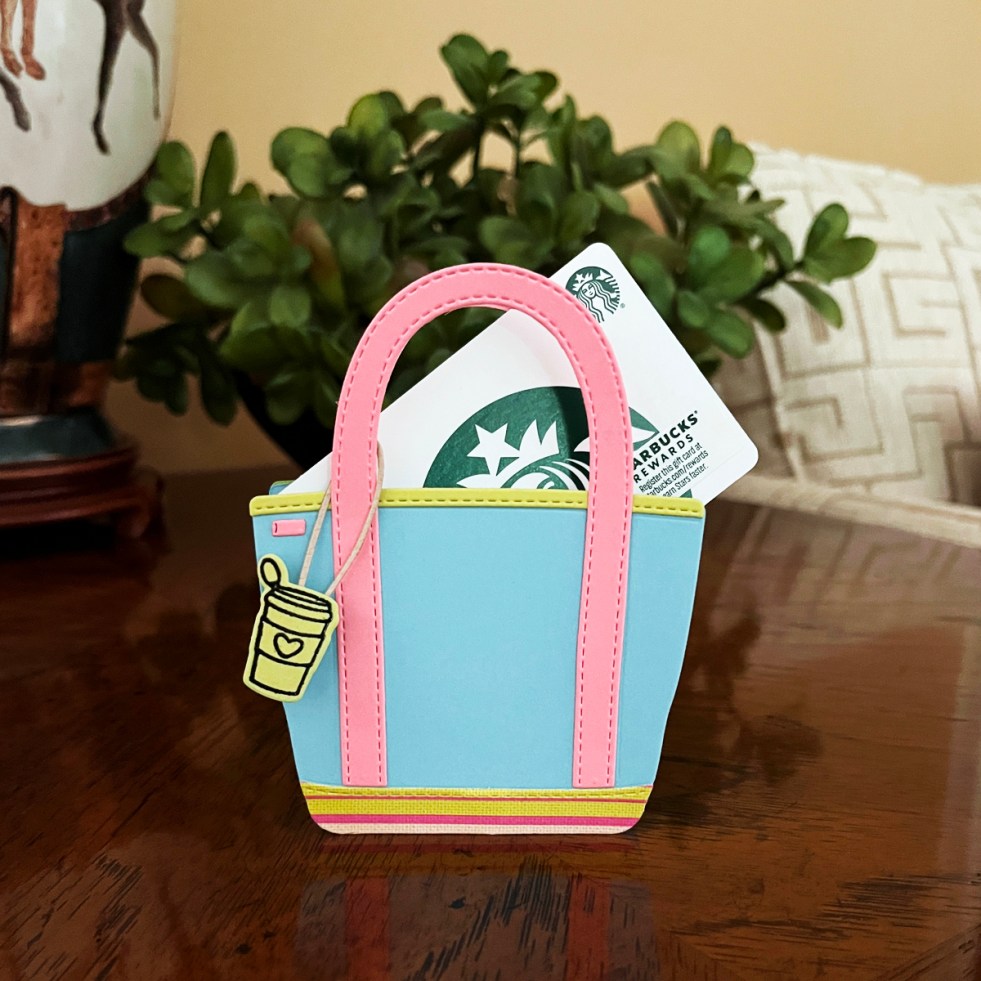
Die cutting · papercrafting

How to Create a Dimensional Die-Cut Tote Bag (That Doubles as a Gift Card Holder)

A fun, stand-up papercraft project perfect for summer, gifting, and display

Tote bag holding a gift card, styled as a decorative papercraft gift
DIY die-cut gift card holders are so much fun to give…and receive.

I was in the mood to create something a little different… something dimensional, display-worthy, and fun.

And then it hit me—what about a stand-up tote bag that could double as a gift card holder?

This die-cut tote is not exactly a traditional card… but it could easily become one. Instead, I designed mine as a summery beach tote, filled with bright, happy colors and just the right amount of personality.

It’s the kind of project that looks adorable sitting on a table, shelf, or countertop—and even better when it’s holding a little surprise inside.


What You’ll Learn in This Post

  • How to create a die-cut stand-up tote bag
  • Easy ways to customize your design for any occasion
  • Why dimensional papercrafts make such memorable gifts
  • Creative ideas for using this tote as a gift card holder
  • How to turn this design into a traditional card if desired


Product Spotlight: A Simple Die Set with Endless Possibilities

The Hero Arts Tote Bag die set (Tote-Ally Awesome Bundle) is wonderfully simple:

  • A large tote shape
  • Long, strappy handles
  • Two accent strips for added detail

To personalize my tote, I used the Tiny Treasures Stamp & Cut set, filled with adorable charms and sentiments. It also pairs well with sentiments from the Keep Calm Stamp Set, which work beautifully with this design.

What I love most is how versatile this tote is. With just a few small changes, you can create completely different looks—making this a die set you’ll reach for again and again.

If you enjoy working with versatile tools like this, you might also like my roundup of the 14 Best Cardmaking Products and Supplies for 2026, where I share the tools I truly use the most.


Why Dimensional Designs Are So Loved

There’s something special about a project that stands up on its own.

Dimensional designs feel:

  • Interactive
  • Giftable
  • Display-worthy
  • A little unexpected

This tote has that “keepsake” quality—the kind of project recipients don’t toss aside. They display it.

If you enjoy dimensional projects, you might also love my post 1 Die Set, 2 Moods: Coffee Shop Chalkboards & a Lemonade Easel Card, where I explore another fun stand-up design.

Die-cut dimensional tote bag in blue and pink with a coffee charm, standing upright on a white surface
Stand-up dimmensional die-cuts are keepsakes recipients love to receive.

📌 Pin This for Later


Ways to Customize Your Tote

This is where the fun really begins.

  • Add charms to match the recipient’s personality (coffee, hearts, cherries, lemons, bows… there are so many options!)
  • Choose colors based on the occasion:
    • Red & green for Christmas
    • School colors for graduation
    • Soft pastels for spring
  • Try masculine styles (camo paper would be amazing!)
  • Emboss the tote for added texture and dimension
  • Keep it simple with one charm—or layer multiple for a playful look

Today, I added a coffee cup charm, but there are endless ways to make this tote your own.


A Creative Gift Card Holder Idea

Finished tote displayed on a table as a decorative papercraft piece
Die cut standup beach bag tote is a unique and highly personalizable papercrafting project.

One of my favorite uses for this tote?

Slip a gift card inside.

It instantly becomes:

  • Thoughtful
  • Unique
  • Memorable

I’ll be sharing a few photos of this option, along with how it looks styled on a shelf—because this little tote truly deserves to be displayed.


How to Create Your Stand-Up Tote

I started by choosing a bright, beachy color palette:

  • Sky blue tote
  • Pink handles
  • Striped pink and lime green accent base

I die cut two of each piece to build dimension.

Craft desk showing tote die cuts, cardstock, and tools mid-project
Using scored strips of cardstock is a great way to create standup die-cut keepsakes.

To create the stand-up base:

  1. Cut a 1” strip of cardstock
  2. Score ¼” in from each side
  3. This leaves a ½” center base
  4. Trim into:
    • One 2¼” strip for the bottom
    • Two additional strips for the sides

This simple structure allows the tote to stand beautifully on its own.


Adding the Charm

To personalize my tote:

  • I stamped and heat embossed a coffee cup
  • Die cut the image
  • Attached it to the handle as a charm

You can:

  • Add one charm for a clean look
  • Or layer several for a more playful design

Both styles work beautifully.


🧰 Supplies I Used

These are the exact tools I used to create this technique-focused card.

If you’d like to recreate this card, here are the supplies I used:

If you’re building your craft stash, I also keep a curated list of my go-to cardmaking supplies pinned here:
👉 My Go-To Cardmaking Supplies

And if you love discovering new kits, don’t miss my guide to the Best Subscription Cardmaking Kits for 2026—it’s a great way to keep your creativity flowing.


Final Thoughts

This tote checks all the boxes:

  • Easy to die cut and assemble
  • Highly customizable
  • Display-worthy
  • Perfect for gifting

📌 Pin This for Later

And it’s just plain fun.

💙

🏆 Ranked among the Top Cardmaking Blogs by Feedspot


papercrafting

DIY Stenciled Gift Wrap

DIY Stenciled Gift Wrap using Altenew stencils.

Hello everyone, Karen Brown here! This post is on the Altenew Mixed Media blog and I also wanted to post it on my site as well.

I am so excited to show you how I created my stenciled DIY gift wrap. I love wrapping gifts and wanted to make some custom packaging for my daughter’s birthday and I knew Altenew stencils would be perfect for my projects. I spent an enjoyable afternoon creating the paper and wrapping my gifts. I used three favorite Altenew stencils: Bubble Wrap, Mega Bloom and Leaves and Berries.

How To DIY Stenciled Gift Wrap

HOW I CREATED MY GIFT WRAP:

  1. I had two colors of kraft paper plus a Gable Box in my craft room so I used them as the base for my projects. I sorted through my Altenew stencils and picked three that I thought would be beautiful on gift wrapping:
  2. I used painters tape to adhere my stencil to the kraft paper.
  3. I selected six bright fun shades of acrylic paint and squirted a dollop of each onto a plate. Using a stencil brush, I dipped the brush into the paint and then dabbed the brush on a paper towel. Too much paint on the brush will result in smeared stenciling. Next, using a circular motion, I applied the paint through the stencil opening. I went both clockwise and counter clockwise. I found the smaller brushes worked better than the larger sizes and I used one brush for each color.
  4. On the Bubble Wrap project, after I filled the stencil, I carefully lifted up my stencil and lined it up and filled it three more times so I would have a big enough sheet to cover the journal I was going to wrap.

PRO TIPS:

  • I found using high-contrast colors made for bright fun wrapping. I selected colors that stand out from the kraft background.
  • The stencils work best when when the paint is not too wet. I loved working with it right before it dried out.
How to Stencil Your Own Gift Wrap.

My daughter wanted a new journal so I made the Bubble Wrap paper specifically to wrap this cute bee themed gift. All it needed was a simple twine bow.

DIY Stenciled Gift Wrap using the Altenew Bubble Wrap Stencil and acrylic paint.
Bubble Wrap Stencil

The finished package is so happy and fun!

Stenciling with the Altenew Mega Bloom Stencil.
Mega Bloom Stencil

This Gable Box was very quick to create and the Mega Bloom stencil makes for a big showy design.

How to Make Your Own Gift Wrap with Stencils and acrylic paint
Mega Bloom and Leaves and Berries Stencils

I really enjoyed creating this custom gift wrap and I hope you found some inspiration. I love reading your comments so if you have a moment, let me know what you think about the gift wrap. Thanks for stopping by!

Karen

papercrafting

Altenew Educators "Anything But A Card" Blog Hop and Linky Party + Giveaway

DIY Gift Topper

Hello fellow papercrafters! The Altenew Educators are hopping and this time we are creating \”anything except a card\”.  I enjoy gift wrapping and decided  to craft a gift \”topper\”.  Altenew\’s Craft-A-Flower releases are always one of my favorites so I wanted to make a  layered die-cut flower using this month\’s Peruvian Lily.  I crafted my bloom from some handmade gel press prints and a bit of glitter cardstock.  

Orange, yellow and blue.


I wrapped my gift in Tiffany blue gift wrap, added some ribbon and then topped with my die-cut Lily. I think this makes for a beautiful gift.

Altenew Craft A Flower Peruivan Lily.


Prizes:

$200 in total prizes! Altenew is giving away a $35 gift certificate to 2 lucky winners and a $20 gift certificate to 5 winners! Please leave a comment on the Altenew Card Blog and/or each designer’s blog post on the blog hop list below by 07/04/2021 for a chance to win. 


There’s MORE! What’s a hop without YOU?! We have included an Inlinkz at the Altenew blog for you to enter your gorgeous Altenew “Anything But A Card” creations. We will pick 2 of our favorite handmade creations from those who joined the linky party and they will each receive a $15 Altenew gift certificate!


Altenew will draw 7 random winners from the comments left on each stop of this blog hop and announce the winners on the Altenew Winners Page on 07/06/2021.


I am so pleased you stopped by!
Karen
Uncategorized

WWC201 – Marsha\’s Special Two-Week Year End Anything Goes

I love Christmas and all the opportunities for paper crafting.  I\’ve decorated several boxes and gift bags and am especially happy with this particular gift.

I ordered some white and kraft boxes and had fun decorating them. This particular parcel features Avery Elle\’s Festive Wreath stamp set.  I colored with Copic markers, added shine with a shimmer pen and then fussy cut the images and attached with foam mounting squares.  To finish it off I tied on a bright red bow.

I am a design team member for Watercooler Wednesday and created this package for Marsha\’s Two-Week Year End Anything Goes Challenge  I hope you will pop over and see what the other artists have posted  and then link one of your creations.

I am entering my gift box in the following:
Stamping Sensations Winter Sparkle Challenge  My winter sparkle comes form the Wink of Stella I used on the wreath.
Please grab our logo

cupcake inspirations #460  My color scheme is kraft (gingerbread), red, green and white.

Casology Holly Challenge – Festive Wreath

Thanks for stopping by!
Karen