cardmaking · Die cutting · Stamping

It’s a Jungle! | August 2024 Hero Studio Release

3 cards created with Hero Arts August 2024 Jungle Theme Relsease.

I am so excited that it is Launch Day for Hero Studio’s playful August jungle theme release. I can’t wait to show you some of Hero Arts GORGEOUS new products, so kick back and hop along with the Creative Team.

Hero will give away a $50 gift card, drawn from the comments left across the hop. Enter by Sunday, August 11th at 11:59pm Pacific, and the winner will be announced on the Hero Arts blog the following week. Links to all the Hop Participants is below.

Create Your Own Jungle | Studio Card Kit of the Month

Colorful playful "have a wild birtthday" homemade card created with Hero Studio August 2024 Card Kit of the Month.

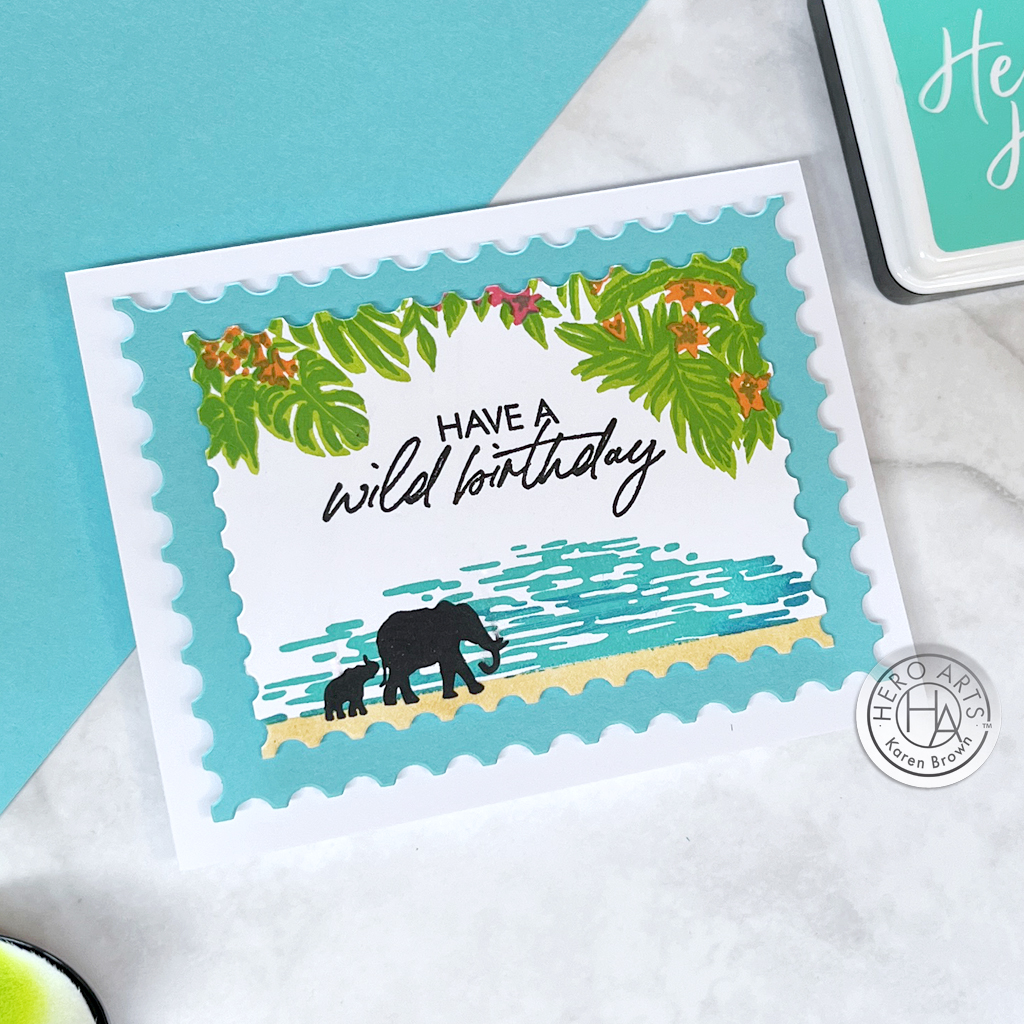
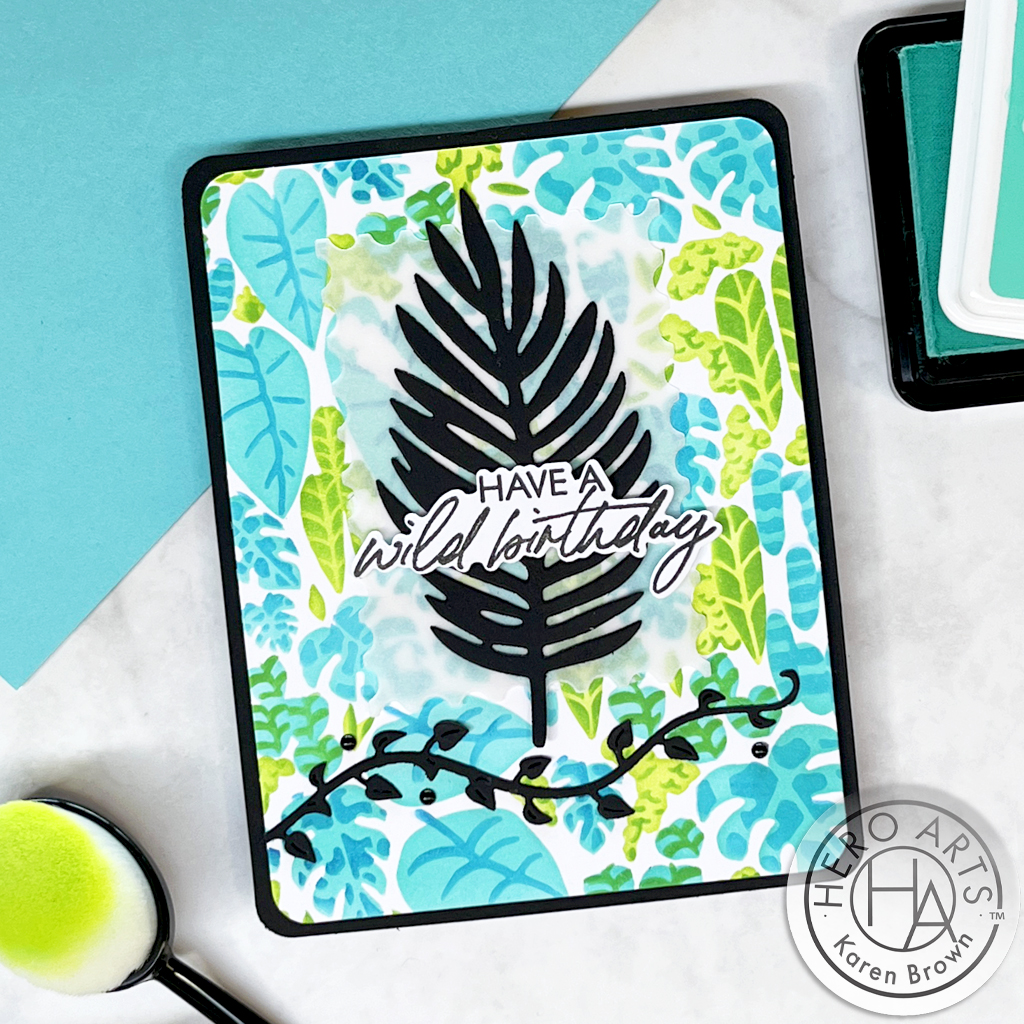
The August Card Kit of the Month is so playful with tons of wonderful elements to incorporate into your papercrafting projects. For my first card, I used the Heroscape stamp set to create a “wild” birthday card. I think the Nesting Postage Stamp Dies give an exotic travel feel to my card.

I masked and ink blended a tiny beach for my elephants to walk along, and then stamped the rest of my scene. I used Fawn (sand), Green Apple Core, Fresh Lawn Core, Pool Party, Deep Ocean, Pale Tomato and Tangerine. I then die cut my scene and a mat and adhered to my card base with craft foam.

What’s Inside the Kit?

Curious about this month’s kit? Let’s take a peek inside the August 2024 Hero Studio Card Kit.

KIT INCLUDES:
• Jungle HeroScape Clear Stamp Set, 6″ x 8″
• 12 Coordinating Dies
• 5 Fancy Dies
• Jungle Scenics Stencil, 6″ x 6″
• Olive Hero Wax
• White Plastic Palette Knife
• 3 Reactive Ink Cubes (Key Lime Fizz, Green Apple, Fruit Punch)
• 2 Reactive Glitz Ink Pads (French Pink, Byzantine Green)
• 5 Printed Sticker Sheets, 6″ x 6″

Kit Cost:

$46 with Subscription + FREE SHIPPING
$49.99 One-Time Purchase
While Supplies Last

5 Wonderful Kit Options:

For this blog post, I created with two kits and 1 Extraordinary Extra, but there there are 5 kits plus 5 Extras available. You can also buy the Whole Studio, which includes all 5 kits at a wonderful savings.

Jungle Serenity | August Extraordinary Extra

Colorful water lily card created with Hero Arts Jungle Serenity stamp and die bundle.

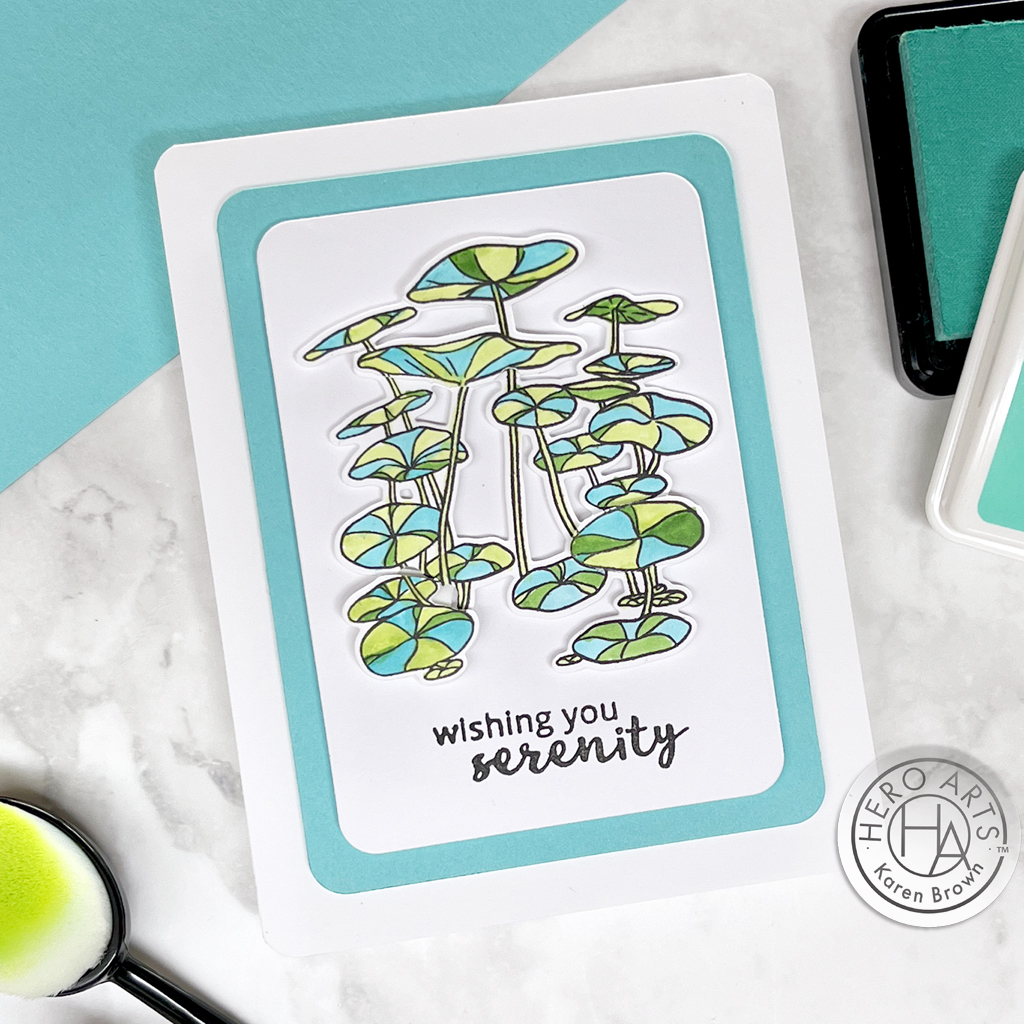
I used my favorite blues and greens for this cool and calm Jungle Serenity card. I stamped my images, colored with alcohol markers and layered my backdrop using my Rounded Rectangle Infinity Dies.

PRO TIP: There is a small die in the lower left corner that is easy to overlook when you are snipping your dies apart. Be sure to separate that piece before die cutting.

Jungle Serenity Stamp and Die Bundle

Colorful thkinkig of you sympathy card that is colored with alcohol markers and die cut.
Hero Studio Layering Stencil of the Month | Monthly Mini
Colorful laering stencil jungle foliage card with die cut accent elements.

If you want a background with loads of impact, then the August Layering Stencil of the Month is definitely for you!

I ink blended my background and then continued the foliage theme by adding die cuts and a sentiment from my August Card Kit of the Month. I love how the kit themes for each month all work together….endless possibilites!

Supplies Used:

Blog Hop Links:


Hero Arts

Seeka

Rosie Lopez

Rachel Kleinman

Natasha Vacca

Natasha Polite

Michelle Short

Lydia Fiedler

Karen Brown You Are Here!

Jennifer Kotas

Jeannie Lieu

Ilina Crouse

Heather Ruwe

Charlene Madrid

Channin Pelletier
I am so happy you stopped by today!

cardmaking

Ideas for Using Pre-Printed Paper in Cardmaking

Hello crafters! Karen Brown here and I am delighted to be back on the Spellbinders Blog with some ideas for streamlining your creative cardmaking process. Lately, I have been incorporating a lot of pre-printed elements into my cardmaking and I love how this allows me to focus on the joy of designing. Today I have a “sneak peek” of one of my cards, but you can read my entire blog post HERE on the Spellbinders Blog.

Maya's Garden Paper + Spellbinders Skateboarking Terry handmade card

Supplies Used:

Please head over to the Spellbinders Blog for all the details.

Karen

cardmaking

Hero Studio Countdown Peek | Colorful Tropical Layering Stencil Kit | August 2024

Hero Arts "Hero Studio" August 2024 Tropical Layering Stencil Kit handmade card in colorful blues and greens.

Get ready to unleash your creativity with the soon to be released August 2024 Layering Stencil Monthly Mini Card Making Kit! Dive into a lush paradise of tropical foliage as you create stunning, multi-dimensional cards that burst with vibrant blues and greens. All of Hero Arts August kits release on Monday, so stay tuned!

Today, Hero Arts is hosting their Day 2 Countdown Blog Hop and Giveaway that you can find HERE. The Day 1 Countdown Hop is HERE.

Colorful tropical jungle theme birthday card:  Have a Wild Birthday

I love bright fun colors and this layering stencil background was perfect for aqua blues and greens. I used a few items from my August Card Kit to embellish my card and continue with the jungle foliage theme.

Colorful layering stencil birthday card with a jungle theme

Products Used:

Be sure to come back Monday for the August Release and Blog Hop!

Cardmaking Kit · Rainbow Colors · stitching

Colorful Rainbow Stitching | Spellbinders August 2024 Stitching Kit

Rainbow colors for this stunning hand stitched greeting card created with Spellbinders August 2024 Stitching Kit of the Month.

This may be my favorite Spellbinders kit of 2024! The August 2024 Stitching Kit of the Month is perfect for cardmakers, artists or anyone that loves a colorful card. I truly love rainbow cardstock and floss….put them together and you have a real keepsake.

Spellbinders has 9 great Club Options that you might want to check out + their Deluxe Caboodle, which includes all 9 kits + a bonus gift, all at a 60% savings.

Rainbow Craft Theme Card Kit:

Handmade paint palette card created with Spellbinders August 2024 Stitching Card Kit of the Month.

Tips and Tricks for Stunning Stitched Cards:

  • I started by die cutting my Stitching Kit pieces with my Platinum 6 die cutting machine. When I got to the smaller pieces, I found it easiest to use my desktop cutter: Scout. I used leftover colorful cardstock scraps for my paint palette. Since it was long and thin, I die cut the paintbrush twice and then glued it together for a substantial base. I die cut the other pieces once.
  • Spellbinders has a nice selection of stitching accessories in their shop that you can find HERE. Today, I used used DMC 776, 725, 745, 772, 504, 800, 211, 828, 646 and metallic gold floss. I have been buying and collecting floss for decades, so some of these are vintage.
  • When I started stitching, I took two strands of floss, separated them one at a time, brought them together and then stroked and lengthened them until they seemed tame and ready to use.
  • I usually stitch with size 22 Tapestry needles.
  • I used thin double sided tape to secure my floss to the die cuts. I like that this tape is easy to hide behind the die cuts and I don’t even bother to take the top release paper off the tape.
  • Remember to keep your floss taught as you stitch.
  • When I move from one area to the next, I run the floss through the just finished stitched area to keep the thread secure. This gives a nice look on the finished project.
  • Don’t stitch with threads that are too long or they are likely to knot. 
  • When I was done, I added a bit of Bearly Glue to the ends so that they would stay in place.
  • I assembled my card with Bearly Glue.

Helpful Links:

Spellbinders Club Info:

  • Clubs Preview on the 1st of each month.
  • Club members can cancel, upgrade or change clubs from the 1st-5th of each month. Popular Clubs frequently sell out during this period so club members get first dibs on everything.
  • NEW for 2024: Club Members get EARLY access to new releases on the 6th!
  • On the 6th, Clubs become available to non-members.
  • On the 27th, Club registration closes for the current month.
  • If a club did not sell out, you can buy under “Shop Past Clubs”. Past kits are available on the 10th of the FOLLOWING month.

Thanks for stopping by!

Karen

cardmaking · Die cutting

Most Adorable Die Cut Dog Card | Spellbinders

Most Adorable handmade die cut dog card:  Spellbinders Big Pug Etched Dies.

Do you have a dog lover in your life? There’s nothing more delightful than receiving a card that perfectly captures the charm and whimsy of an adorable dog. Enter the cutest die cut handmade dog card— Big Pug Etched Dies – a perfect blend of creativity and cuteness that is sure to bring a smile to anyone’s face. And, there is a super fun accessory set so you can dress up your little creatures! The scarf and bow are in the accessory kit. I used Rainbow Wood Designer Paper for my background, scarf and bow.

Bibi Cameron and Spellbinders just released a fun Cats and Pugs Collection that is going to be a longtime favorite in the Brown family. I really enjoyed creating this darling card. I added an easy but fun puffy sticker sentiment to finish my card.

I created an extra special big showy 5″ x 7″ (A7) card. Isn’t the expression on the Pug just precious?

Key Products Used:

Cutest Pug Dog card ever!

The Joy of Giving and Receiving

Handmade die cut cards are more than just greeting cards; they are keepsakes that recipients will cherish. The thought and effort put into creating such a card make it a meaningful gesture, perfect for any occasion.

In a world filled with digital messages and mass-produced cards, a handmade card stands out as a unique and personal way to connect with others. So, why not try your hand at crafting one? Spread a little Pug love and make someone’s day with the cutest die cut Pug dog card!

Karen

cardmaking · Die cutting

Fun Summery “2-Fer” Die Cut Scene Cards | Spellbinders Tunnel Scapes Collection

"2-Fer" backgrounds with Spellbinders Tunnel Scape Collection.

What better way to celebrate the summer season than by creating charming die cut scene cards? These delightful creations bring a touch of whimsy and cheer, perfect for sending a bit of sunshine to friends and loved ones. Today, I used Vicky Papaioannou’s lovely new Spellbinder’s collection called Tunnel Scapes.

Let’s dive into crafting our two designs: one featuring a kite soaring amid fluffy clouds, and another with two birds perched on blooming branches.

Tunnel Clouds Die Kit

Hnadmade die cut scene card with Spellbinders "Perched Bird" die set.  2 birds perched on branches with a happy sun shining down.

I always love a good scene card, so I was so excited to create with the Perched Birds die set. To really add interest and dimension, I set the stage with Vicky’s delightful Tunnel Clouds background dies which include three unique stacking backgrounds dies + the adorable sun and other celestial elements. This entire collection is so fun and creative! And, the die cuts have so much lovely detail. I used a bunch of my favorite cardstock colors for these two companion cards.

2-Fer Backgrounds

Handmade card with Spellbinders "Fly Away" kit die kit and Bayfair Chipboard "Oh Happy Day" Bayfair chipboard sentiment.

Another wonderful benefit of the Tunnel Clouds die set is that you get “2-Fer backgrounds” each time you die cut! I created my second scene with The Fly Away kite die set. They work great with the Tunnel Clouds dies or you can use them by themself. The die set also includes a plane that would be perfect for a masculine card. I thought the “oh happy day” chipboard sentiment was perfect for this card.

Happy Crafting!

Karen

cardmaking · Die cutting

Darling Die Cut Birthay Card | Spellbinders Out and About Collection

Spellbinders Luna the Seahorse white and blue die cut birthday card.

Spellbinders has a wonderful NEW release called Out and About that is chock full of wonderfulness! Spellbinders is introducing their new compact die cutting machine called “Scout”, along with a fun collection of small but adorable die sets that work well with the pint-sized Scout. I love having a small light weight die cutting machine for smaller dies and sentiments. It allows me room to die cut, glue and assemble without having to tidy up in between steps.

Today I used Luna the Seahorse along with the new Happy Birthday Wishes die set.

Products:

Notes on Making This Card:

  • I die cut Luna 3 times from Island Blue cardstock and then glued the layers together for a beautiful 3D focal point.
  • Using a Scallop Labels and Tags die, I die cut my background and THEN embossed the panel. If you emboss in this order, you will have more texture and dimension on your embossing. (If you emboss and then die cut, the die cutting process will smoosh the raised embossing.)
  • I added white accents with a thin Posca paint pen and added a black enamel dot for the eye.
Creating a clean and simple summery die cut birthday card featuring Luna the Seahorse and Scallop Label Infinity dies.

I think little Luna is so cute! Thanks for stopping by and enjoy the rest of your day.

Karen

Die cutting · Wax Seals

Adding a Touch of Elegance: Using Wax Seals and Infinity Dies on a Floral Handmade Card

Adding wax seal elements to your cardmaking.

If you’re looking to add a touch of elegance and sophistication to your handmade cards, incorporating wax seals and infinity dies can elevate your designs to new heights. In this post, we’ll explore how to use these tools to create a stunning floral handmade card.

Today, Spellbinders released a wonderful new collection called Sealed 3D Botanical and I chose Scallop Labels and Tags Infinity Dies and the Forest Mushroom Wax Seal. Infinity Dies are definitely one of my most used craftroom essentials and wax seals are so interesting and fun!

Adding texture to your cardmaking with Mushroom Forest Wax Seals, Scallop Labels and Tags Infinity Dies and embossing folders.

Spellbinders 3D Botanical Collection

I knew I wanted to make a shaped floral card with a wax seal medallion on my vase. Here are step-by-step directions for this card:

  • I started by making a bunch of wax seals, which I really enjoy. If you’d like more details, I have a blog post titled 18 Tips and Tricks for Making Wax Seals that you can read HERE. I decided to use two Royal Blue seals and I planned my color scheme around the two seals. Spellbinders Wax Seal Kit is such a fun addition to any craftroom and I have really enjoyed playing with my kit this year.
  • Using my silver Deco Color Paint Pen, I added highlights to the wax mushrooms and foliage. Interestingly, the color looks a little more gold in the photographs, but it is silver in person.
  • I die cut my vase and flowers using one of my new favorites: Fresh Picked Vase. I used Cosmic Sky, Periwinkle, Charcoal and Coral cardstocks.
  • I wanted a bit more texture so I embossed my vase using my Luxe Backdrop Emboss and Cut 3D folder.
  • As I mentioned, I wanted a shaped card so I took an A2 Side Fold Card Base and die cut my white base with the Scallop Labels and Tag die. I made sure that the left cutting edge was to the left of the fold so it would stay intact. Then I cut a Periwinkle and White Mat and assembled my card with Bearly Glue and a few Foam Adhesive Squares.
  • I also made a coordinating wax seal envelop for my card that you can see below.

As I said, I really enjoy making wax seals so I made some extras for future projects. The other colors are Indigo Ink, Pistachio, Velvet Rose and Gold.

Adding wax seal elements to your envelops.

Conclusion

Using wax seals and infinity dies in your handmade cards adds a level of detail and elegance that will impress any recipient. These tools allow you to create intricate designs and sophisticated touches that make your cards truly stand out. Whether for birthdays, weddings, or just because, a floral handmade card with these elements will be cherished and remembered. Happy crafting!

Karen

cardmaking · Cardmaking Kit · stitching

Spellbinders Card | June Stitching Club | 2024

Spellbinders "Stitched Ice Cream" Stitching Die of the Month Club Kit for June 2024.

This month, Spellbinders Stitching Die of the Month Kit allows us to indulge in sweet delights with a yummy hand-stitched Ice Cream Cone Card. Looking for a sprinkle of sweetness to brighten someone’s day? Look no further! This kit is a reminder to cherish the simple pleasures in life, to savor each moment, and to spread kindness wherever we go.

The “Wow Factor” of Hand-Stitched Cards

This weekend, I had the pleasure of crafting this luscious handmade card with hand-stitched details, and let me tell you, the experience was delightful. The card came together quickly, but it is definitely high impact to the recipient. I find I get the most ooohs and aaahs from stitched cards and the “Wow Factor” they bring is truly priceless.

Pink, aqua, white and turquoise die-cut and hand-stitched ice cream cone card.

Tips and Tricks for Stunning Stitched Cards:

  • The kit has 12 cutting dies and I started by cutting all my pieces with my Platinum 6 die cutting machine. I used Teal Topaz and Waterfall cardstocks. I die cut the elements I was going to stitch 2 times and then glued them together for a substantial base. I used White Glitter cardstock for the accent on the ice cream.
  • Spellbinders has a nice selection of stitching accessories in their shop that you can find HERE. I used used two shades of pink: #818 Baby Pink (ice cream) and #819 Baby Pink Light (cone).
  • When I started stitching, I took two strands of floss, separated them one at a time, brought them together and then stroked and lengthened them until they seemed tame and ready to use.
  • I usually stitch with size 22 Tapestry needles.
  • I like to use 1/8th inch double sided liner tape to attach my floss to the die cut.
  • Remember to keep your floss taught as you stitch.
  • When I move from one area to the next, I run the floss through the just finished stitched area to keep the thread secure. This gives a nice look on the finished project.
  • Don’t stitch with threads that are too long or they are likely to knot. 
  • When I was done, I added a bit of Bearly Glue to the ends so that they would stay in place.
  • To finish my project I embossed Pink Sand cardstock with the Tiny Dots embossing folder.
  • The die cut sentiment is included in the kit.

Helpful Links:

Spellbinders Club Info:

  • Clubs Preview on the 1st of each month.
  • Club members can cancel, upgrade or change clubs from the 1st-5th of each month. Popular Clubs frequently sell out during this period so club members get first dibs on everything.
  • NEW for 2024: Club Members get EARLY access to new releases on the 6th!
  • On the 6th, Clubs become available to non-members.
  • On the 27th, Club registration closes for the current month.
  • If a club did not sell out, you can buy under “Shop Past Clubs”. Past kits are available on the 10th of the FOLLOWING month.

Thanks for stopping by!

Karen

Cardmaking Kit

Introducing 5 NEW Exciting Hero Arts Subscription Card Kits | June 2024

4 handmade cards and tags created with Hero Arts NEW Studio Subscription Card Kits - June 2024.

Elevate Your Crafting Experience

Calling all crafters and cardmaking enthusiasts! Welcome to the June release, where we are bringing the boldness of urban textures in the signature Hero Arts style and quality! Get ready to ignite your creativity and elevate your crafting experience with the brand new lineup of Hero Studio cardmaking kits. Whether you’re a seasoned pro or just starting your crafting journey, these 5 new kits offer something for everyone. Let’s dive in!

Studio Card Kit of the Month

A vibrant handmade card with rainbow colored clouds created with the June 2024 Hero Arts Studio Card Kit.

I started by creating with the new Hero Studio Card Kit, which is full of wonderfulness! This month’s theme is Urban Skyline.

For my first card, I used the HeroScape layering cloud stamps to create a dramatic sunrise. I laid down and blended LOTS of ink for a really saturated look. I love color and thought the cloud layering stamps would make a stunning, almost abstract background.

What’s Inside the Kit?

Curious to know what treasuries await you in this cardmaking kit? Let’s take a peek inside The Hero Studio Card Kit:

KIT INCLUDES:
Urban Sky HeroScape Clear Stamp Set, 6” x 8”
Neighborhood Message Clear Stamp Set, 4″ x 6″
Coordinating Dies
City Stencil, 6×6 (with 3 Fall-Out City Skylines)
5 Ink Cubes (Peony, Pitch Black, Dusty Blue, Stonewash, Amethyst)
2 Sheets each of Silver Foil, Silver Glitter, Silver Cube & Pitch Black Cardstock, 5.5″ x 8.5″
2 Sheets City Textures Hero Transfers

Kit Cost and Value:

$46 with Subscription, $95 Value (Cancel Anytime)
$49.99 One-Time Purchase (While Supplies Last)

How I Created This Urban Sunrise Card:

A colorful handmade thank you card simulating a vibrant sunrise.  The card was created with the June 2024 Hero Studio HeroScape card kit.

Colorful Sunset Cityscape Tags

I also created two tags with the Hero Studio Card Kit stencils. These tags were featured in Hero Arts Countdown Hop and you can read more about my process HERE.

Colorful DIY tags simulating a Sunset over a cityscape created with liquid watercolors, a stencil and Hero Gold Wax.

Hero Studio Fancy Dies

I love die cutting, so I had tons of fun creating my window scene card with the new Hero Studio Fancy Dies. This month’s background die is called Urban Window and I think there are endless design options. I love creating scenes, so I know I will be using this die again!

A charming handmade card window scene with birds, tree branches and a potted plant.
  • I began by selecting colored cardstock: Peacock, Papaya, Mist, Arctic and Meadow.
  • My base is a leftover piece of background from a project you can read about HERE.
  • I die cut my window frame from Peacock cardstock and trimmed off the greenery. I die cut the window frame a second time from Meadow cardstock and layered it behind the Peacock frame, so that my branches would be green. The sky is Arctic.
  • I added two birds, a potted plant and a die cut sentiment to finish my scene.

FD0624 Fancy Dies of the Month (Urban Window) $25 with Subscription, $26.99 One-Time Purchase, While Supplies Last.

Hero Arts Hero Studio Fancy Die of the month (June 2024) handmade card window scene.

I have a quick reel for the Fancy Die of the Month Kit:

I created with two Hero Studio kits in this blog post, but there are 5 kits altogether. You can also buy The Whole Studio!

Blog Hop and Giveaway:

Hero Arts will give away a $50 gift card, drawn from the comments left across the hop. Enter by Sunday, June 9th at 11:59pm Pacific, and the winner will be announced on the Hero Arts blog the following week.

Hero Arts
Hero Arts Creative Team:
Channin Pelletier
Charlene Madrid
Dana Joy
Heather Ruwe
Ilina Crouse
Jennifer Kotas
Kailash Naidoo
Karen Brown
Lydia Fiedler
Michelle Short
Natasha Polite
Natasha Vacca
Pocono Pam
Rachel Kleinman
Rosie Lopez
Seeka
Special Guests:
Nichol Spohr
Kelly Taylor