Cardmaking Kit

Hero Studio Blog Hop | Hello, May Blooms!

Hero Studio May 2025 Club Kit floral cards with  soft gray sentiment strip backgrounds.

It’s time to celebrate all things fresh, floral, and fabulous with the Hero Arts May Release called Flower Shoppe! This month’s Card Kit of the Month is bursting with blooming potential, and I couldn’t resist crafting a set of cards that range from bold and beautiful to clean and graphic.

Big Bouquet Energy

Lovely pink layering stenciled and die cut floral card with a stamped sentiment strip background that is perfect for Mother's Day, Birthday or Get Well cards.

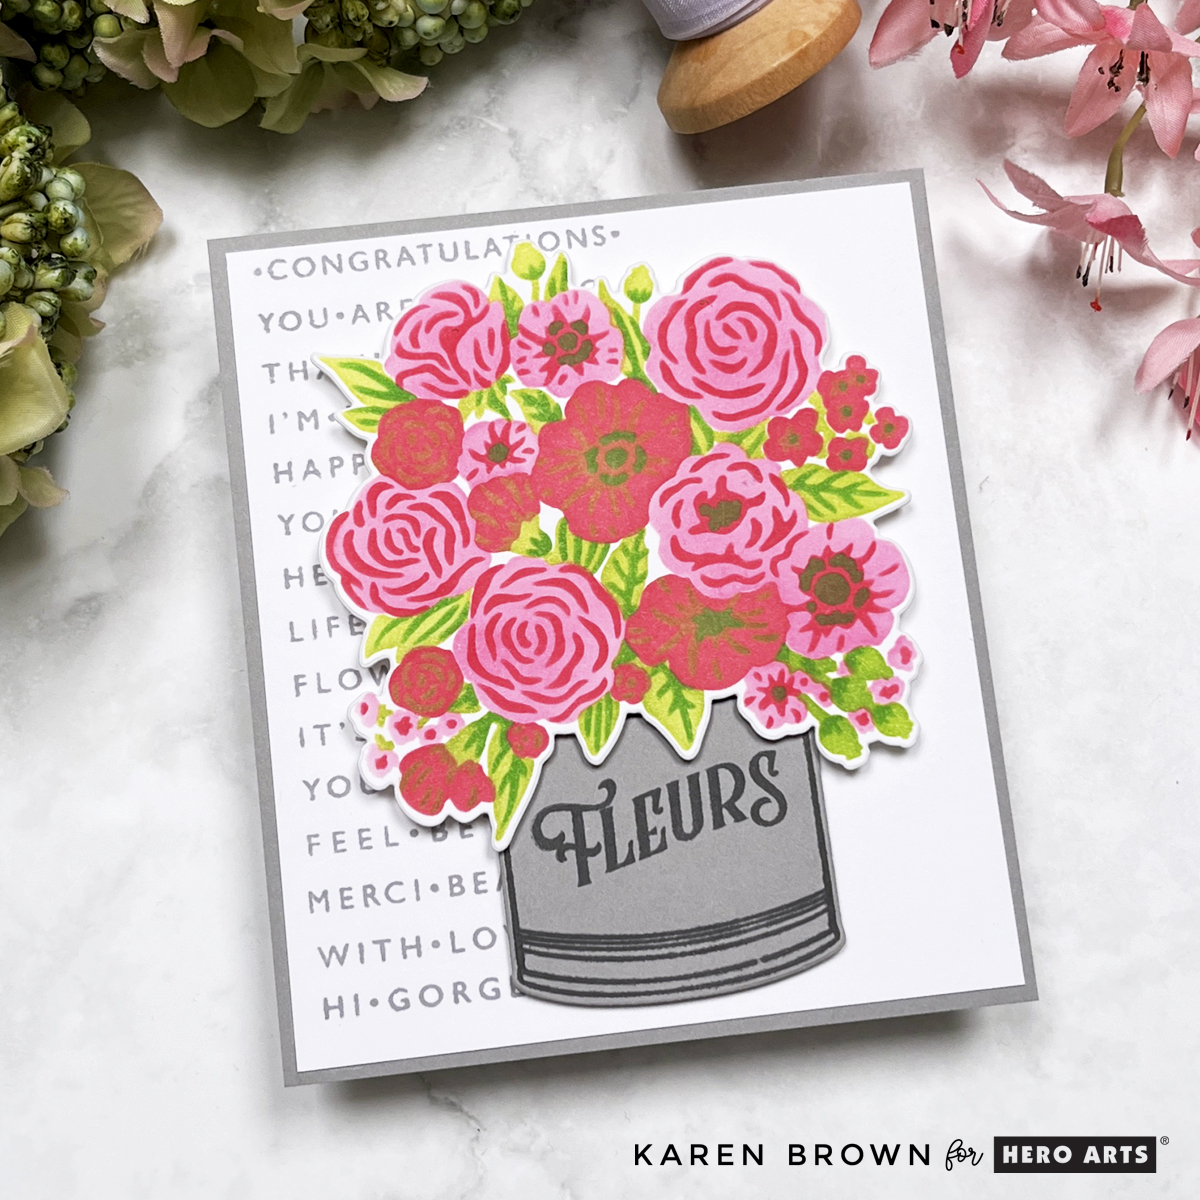
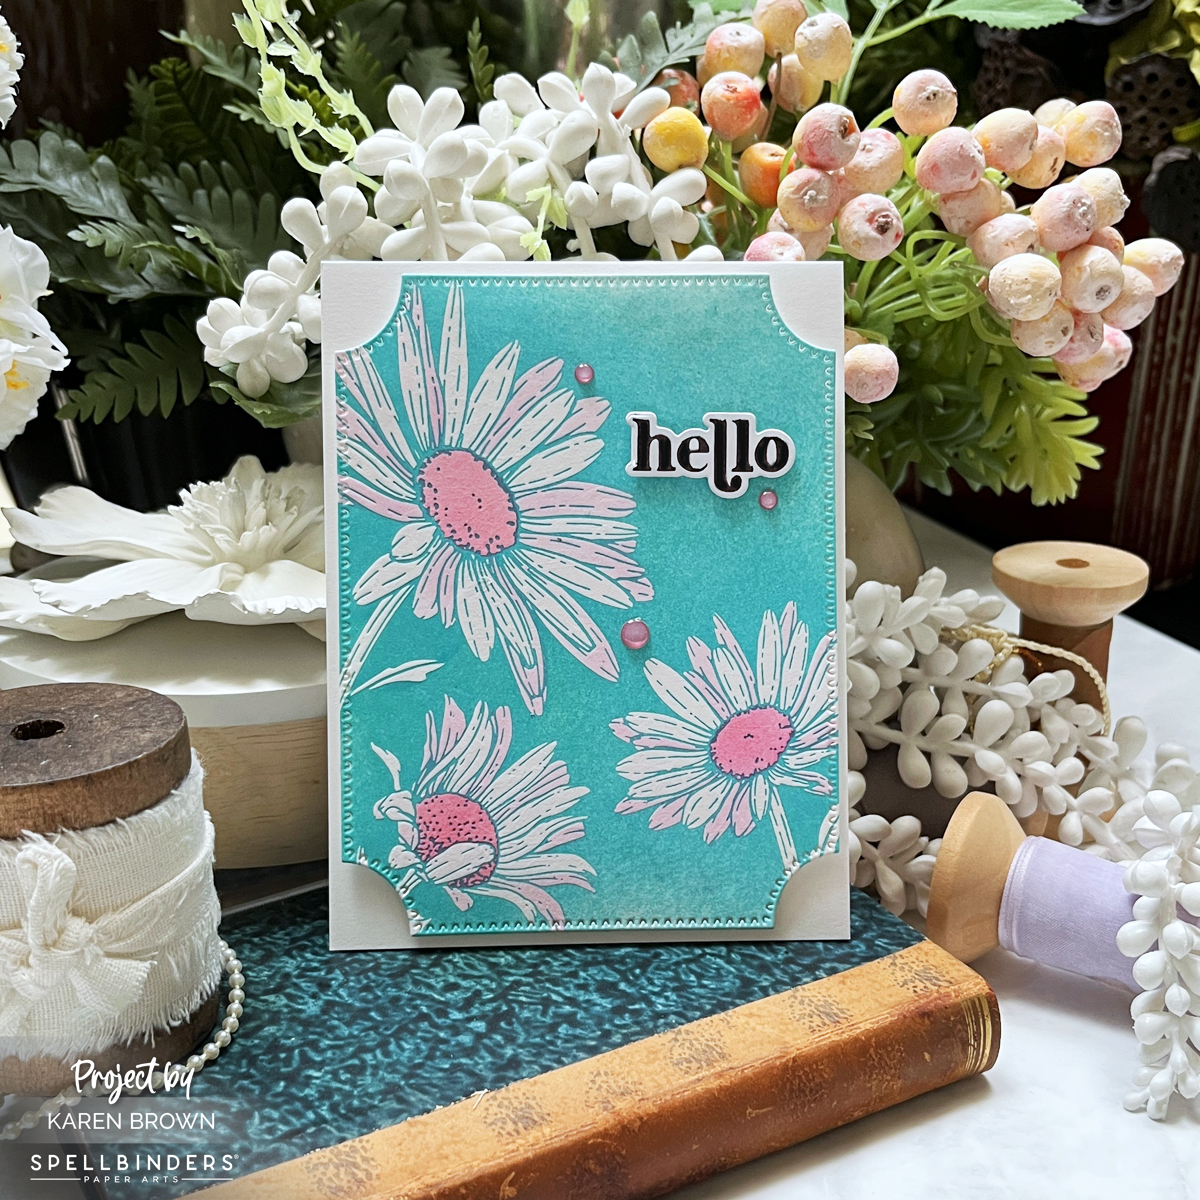
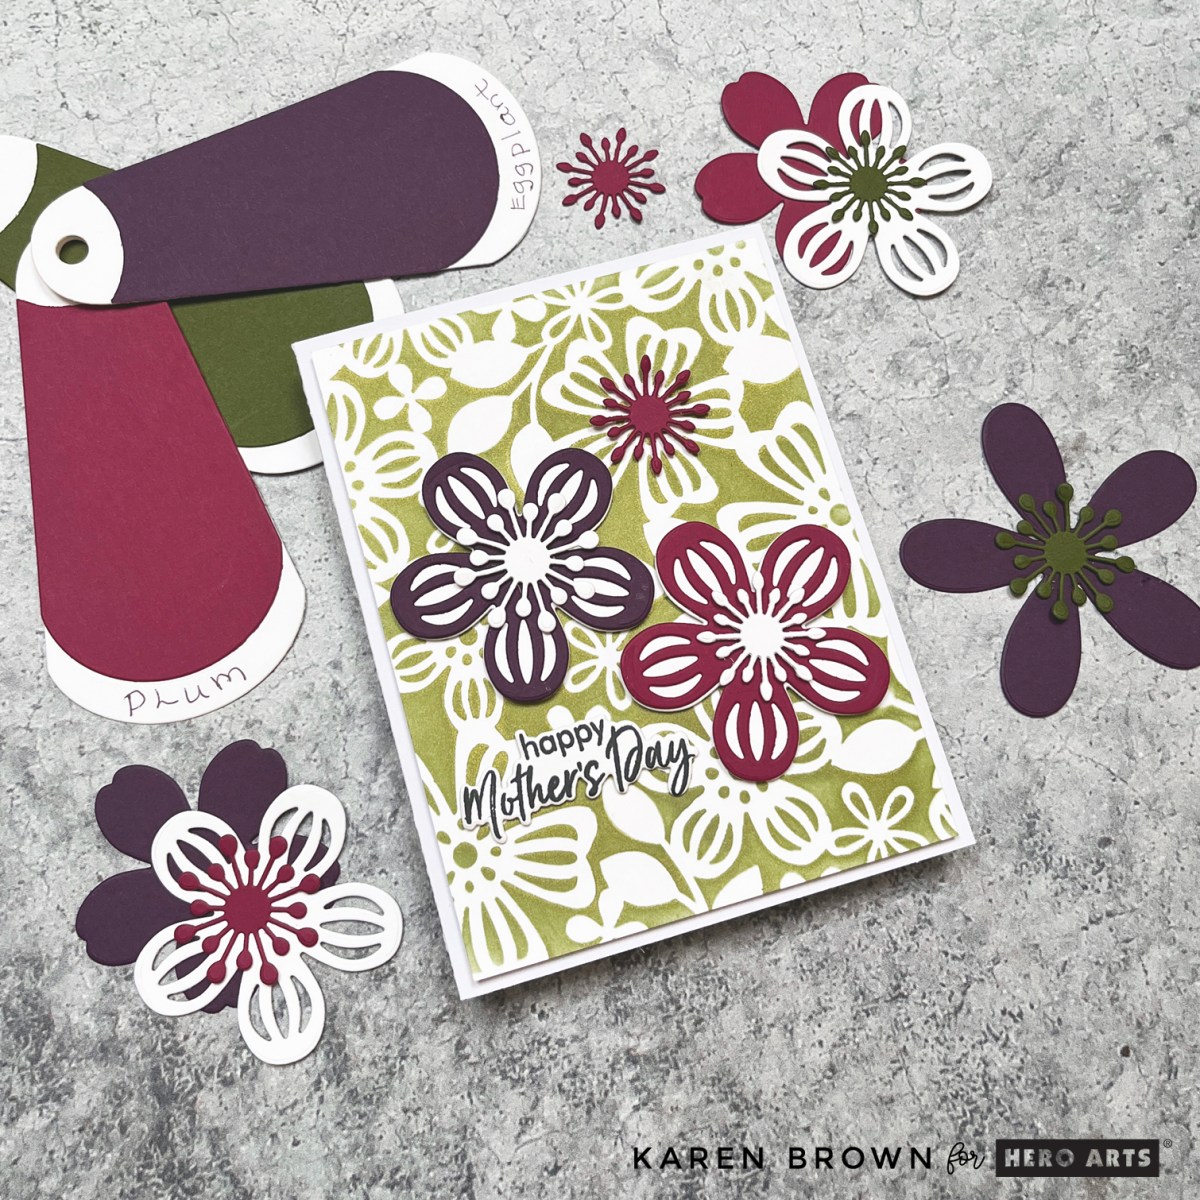
Let’s start with some floral drama (the good kind). For this card, I created a lush bouquet of die-cut and stenciled flowers in soft, springy shades of pink, all arranged in a granite gray can-style vase. The vase gives it that perfect rustic-meets-modern vibe!

  • The background features a subtle stamped design using Granite Ink for added texture without stealing the show.
  • For details on how I created my background, see my second card.
  • The sentiment? Just one fabulous French word: Fleurs. Because everything sounds fancier in French, right?

✨ Pro Tip: Use low-tack tape to hold your stencil and dies in place when layering florals for crisp, clean shapes every time.


Pink and Gray stenciled and die cut floral bouquet card for birthdays, Get Well, Mother's Day etc.

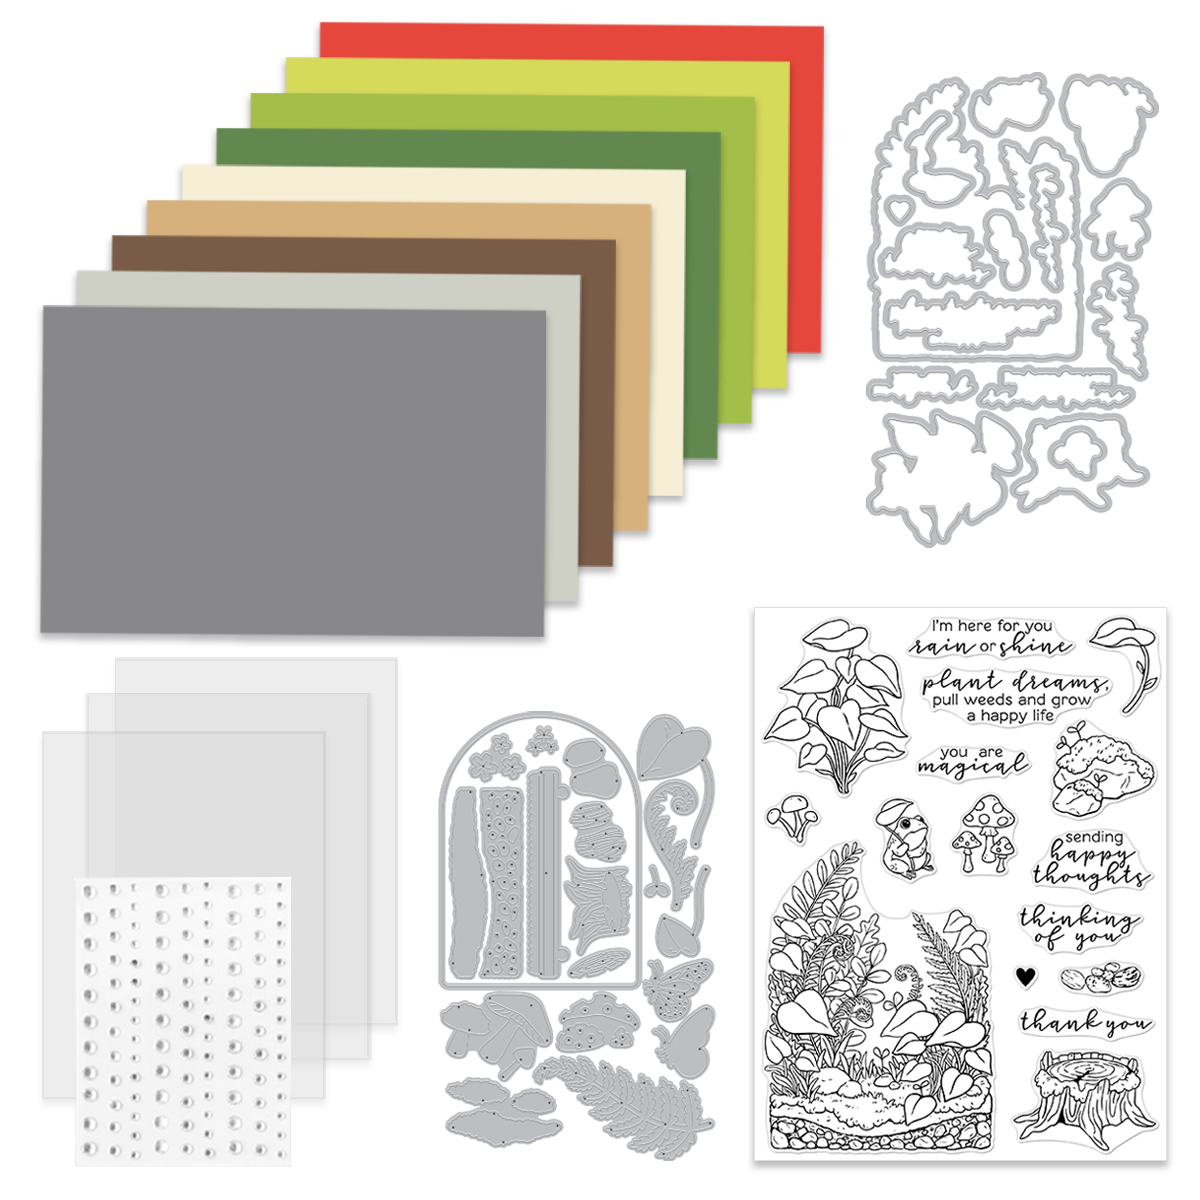
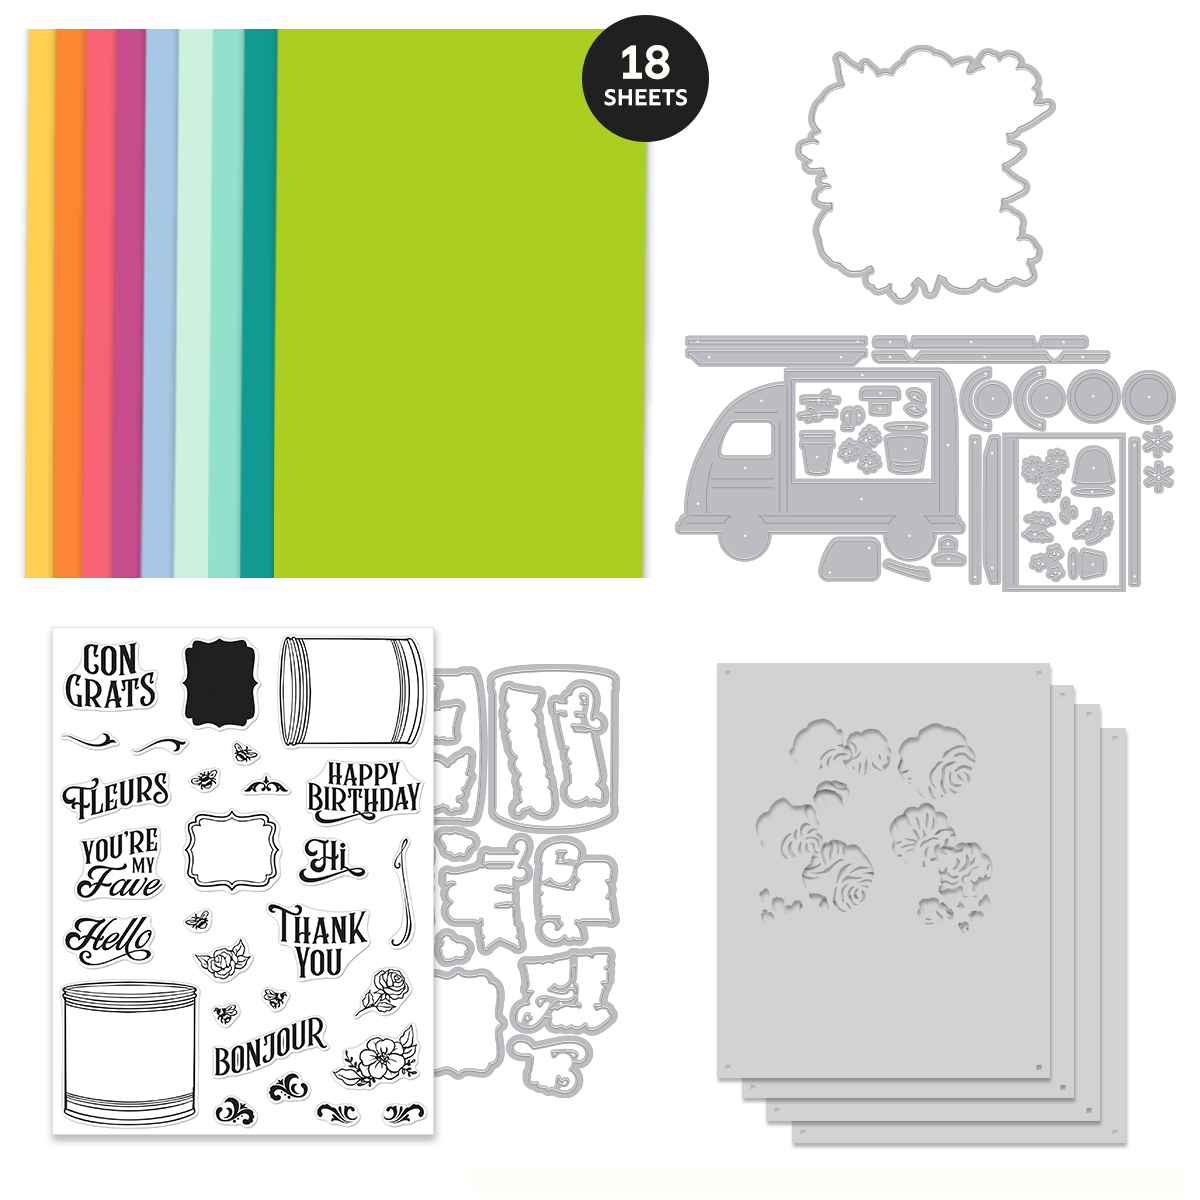
What’s inside the May Card Kit?

          • Vintage Blooms 6×8 Clear Stamp Set
          • Vintage Blooms Die Set
          • Flower Delivery Truck Die Set
          • BoHo Bouquet Layering Stencils
          • BoHo Bouquet Stencil Frame Cut
          • 9 Sheets of Cardstock, 5.5″ x 8.5″

The Whole Studio includes ALL 5 of the monthly subscriptions in one discounted bundle. Cling of the Month, Stamp & Cut of the Month (new name for the subscription!), Layering Stencil of the Month, Fancy Dies of the Month, and the Card Kit of the Month.

This month, receive a FREE sentiment stamp set when you purchase The Whole Studio! See this bonus gift in action below.

Hero Arts has many different Monthly Kits that you can subscribe to including:

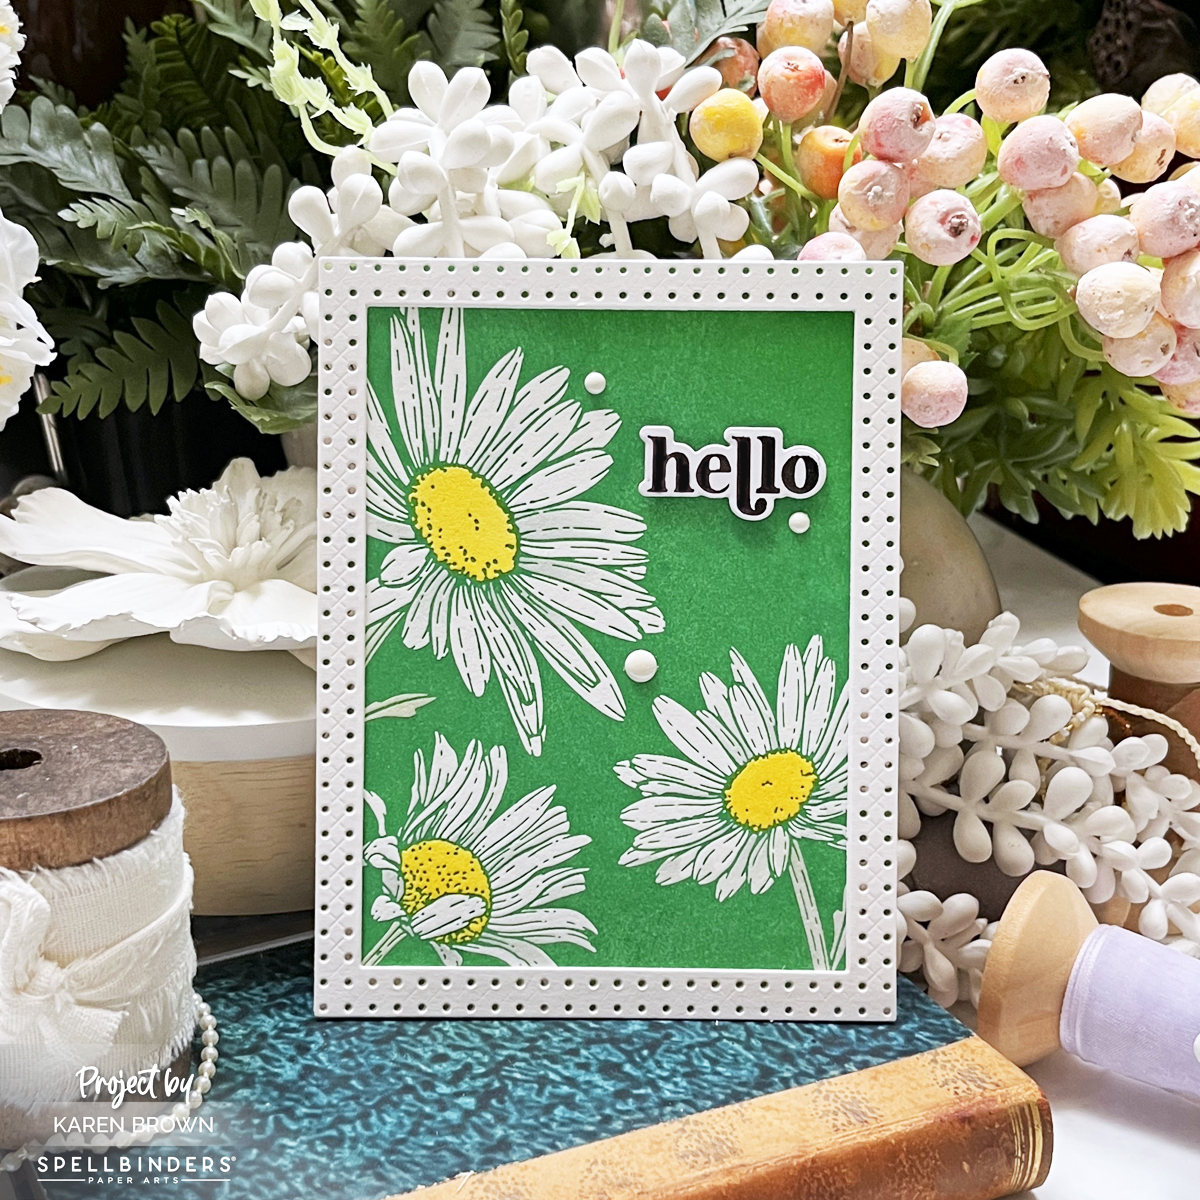
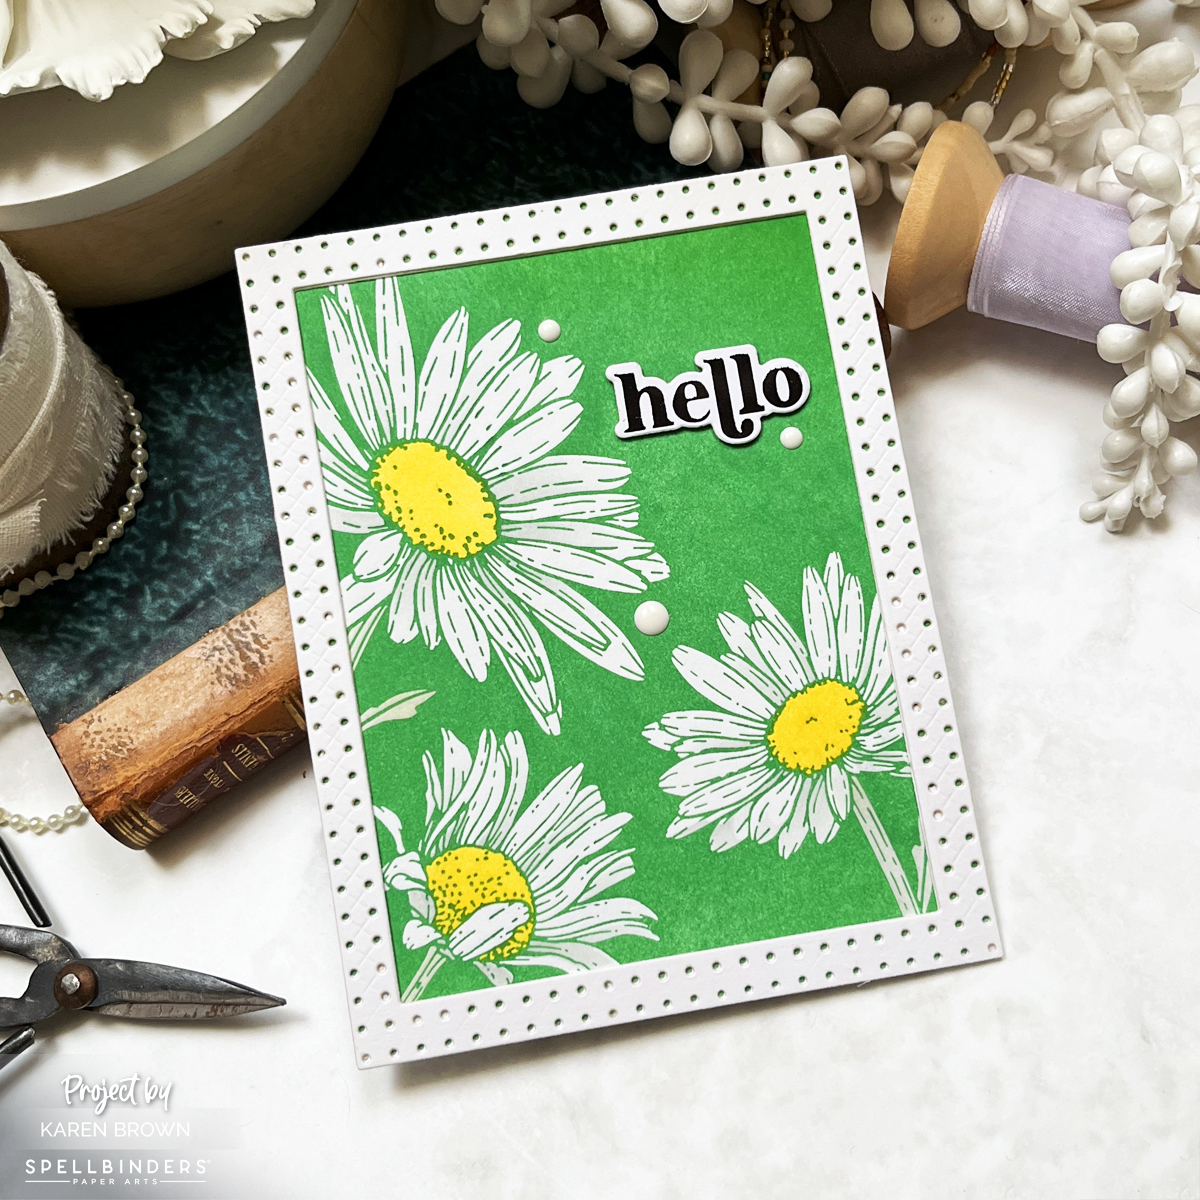
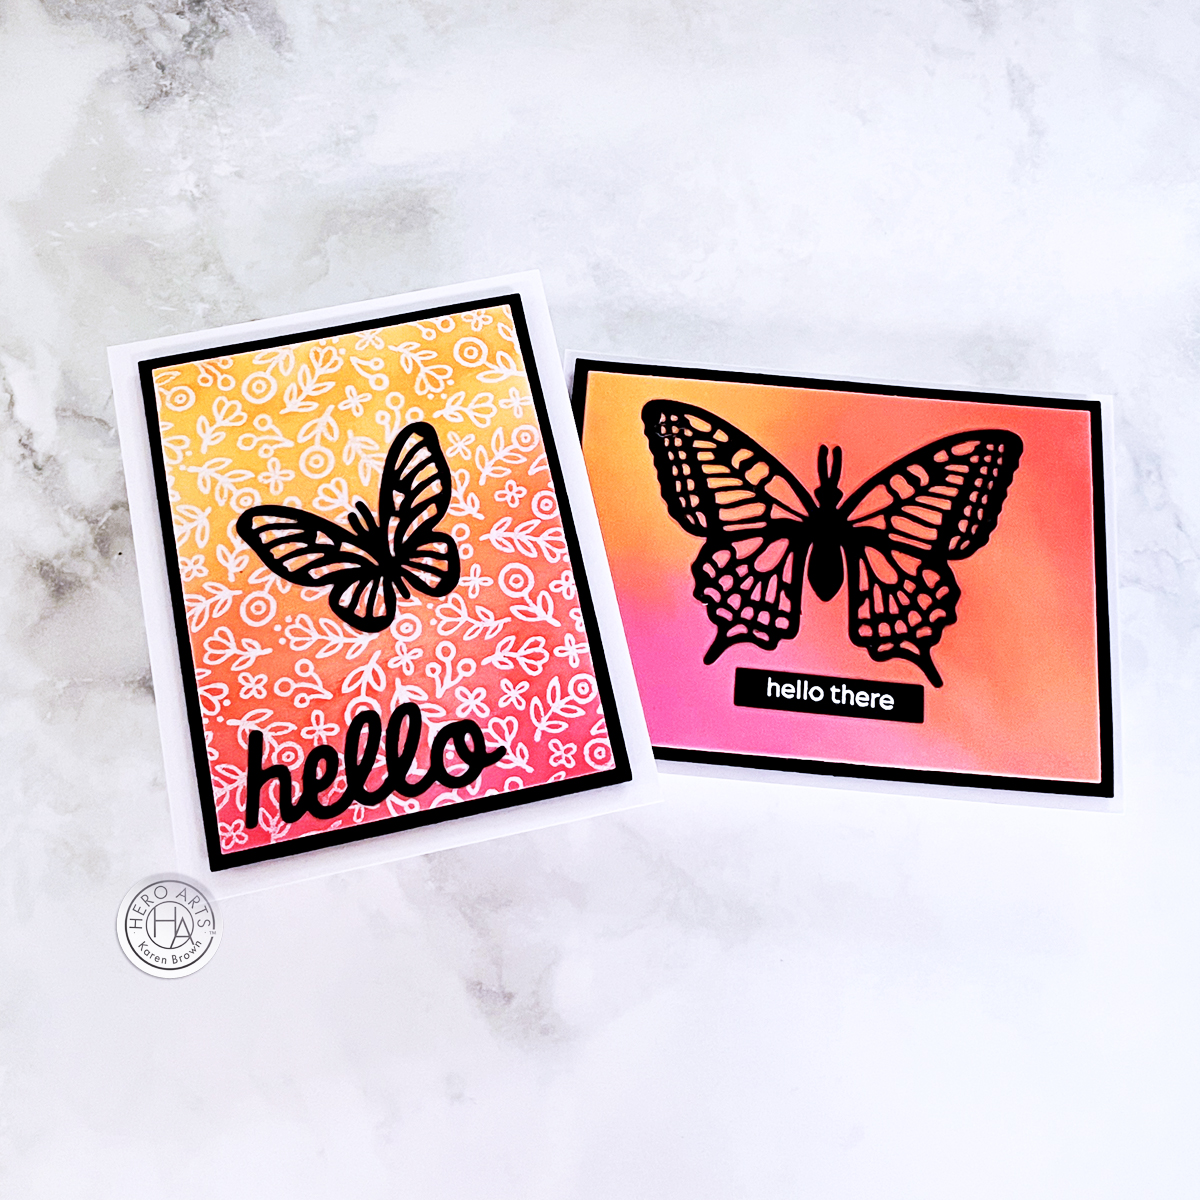
Sentiment Spotlight: Stamping Sentiment Strip Backgrounds

Easy gray sentiment strip background for a clean and classic card design with two die cut floral embellishments.

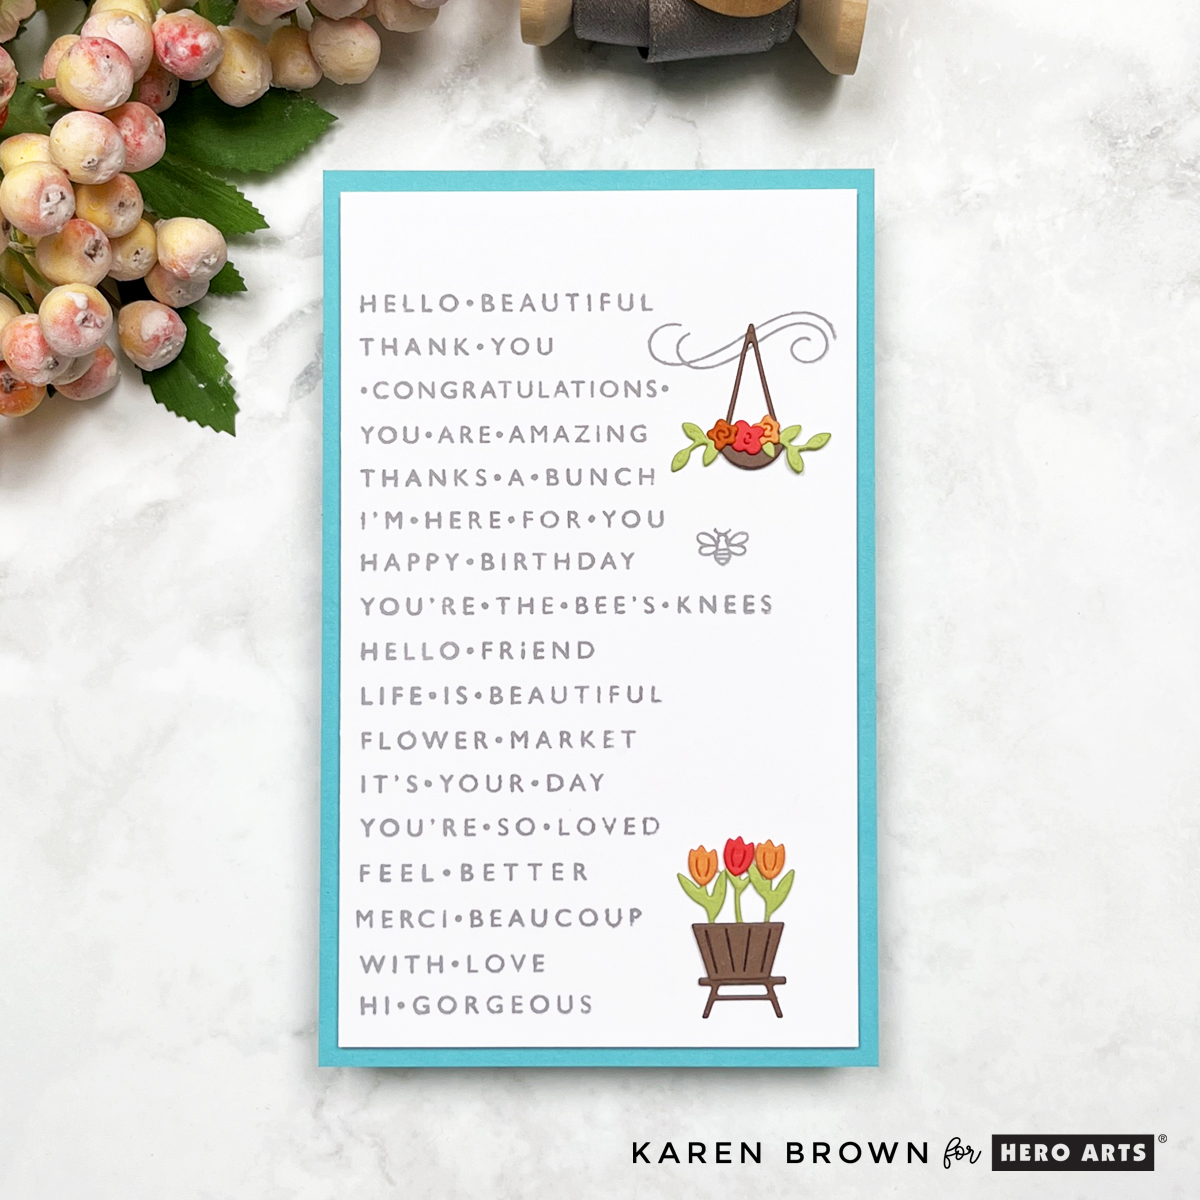
For this second card, I wanted to let the background shine—literally. I used the same Granite stamped design from Card 1, but this time made it the focal point. What makes it special? The bonus gift from the Whole Studio Kit!

  • The bonus set includes 17 sentiment strip stamps with messages like:
    • “Hi Gorgeous”
    • “You are Amazing”
    • “Merci Beaucoup”
  • I left the stamps on their acetate and placed on my Sticky Grip Mat (which was inside my MISTI) and stamped them all at once using Granite Ink. I used Washi tape to adhere my cardstock to the lid! This method kept the sentiments straight and evenly spaced.
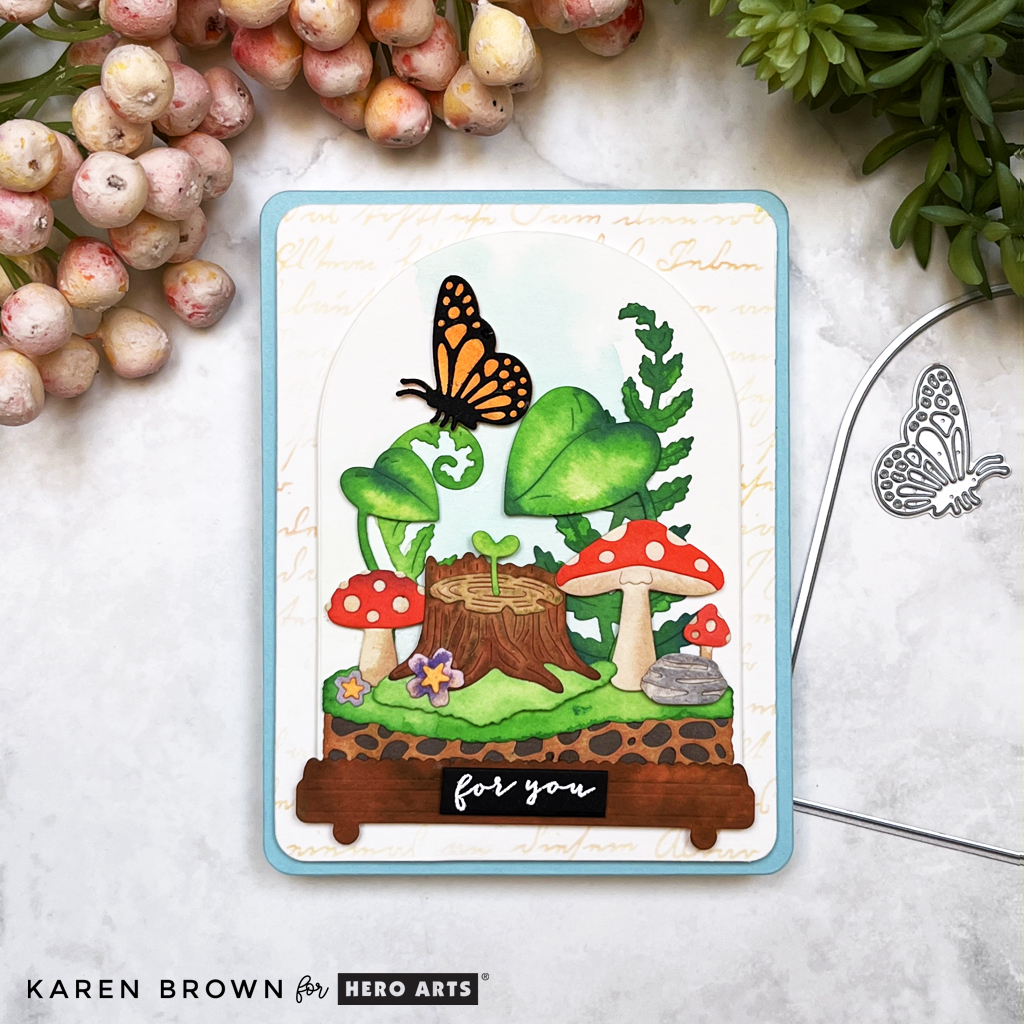
  • For embellishments, I added two sweet little die cuts: a hanging plant and a planter box. Clean, simple, and full of charm. These die cuts are from the May Fancy Die Kit. I want to use the entire Fancy Die Kit soon!
  • You can never have too many sentiment strip stamps! Pre-stamp them in neutrals like black, gray, or navy to always have the perfect sentiment ready to go.
Handmade Card with an easy neutral gray sentiment strip background + 2 floral die cut embellishments that add a fun pop of color.

Hop Along!

This post is part of the Hero Arts May Release Blog Hop, so don’t forget to visit the other amazing creators linked below for more floral inspiration, clever techniques, and paper-crafting joy. Let’s keep those crafty blooms growing all month long!

GIVEAWAY 

Hero Arts will give away a $50 gift card, drawn from the comments left across the hop. Enter by Tuesday, May 6 at 11:59pm PDT, and the winner will be announced on the Hero Arts blog the following week. Leave a comment on all stops for more chances to win!
  

BLOG HOP ORDER:


Hero Arts
Hero Arts Creative Team:
Anna Mahtani
Channin Pelletier
Charlene Madrid
Jeannie Lieu
Jennifer Kotas
Karen Brown You Are Here!
Lisa Tilson
Michelle Lupton
Michelle Short
Mindy Eggen
Natasha Polite
Natasha Vacca
Rachel Kleinman
Rosie Lopez
Seeka
Special Guests:
Rebecca Keppel
Nichol Spohr

Which card is your favorite—the bold bouquet or the sentiment showstopper? Let me know in the comments!

cardmaking · Die cutting

Spellbinders | Up, Up, and Adorable!

Spellbinders card using the Up and Away die set to create a scene card with a boy flying a kite.

Today, we’re soaring high with a sweet and sunny scene card, perfect for celebrating birthdays or welcoming a baby boy into the world! 🌤️🎈

This design features a playful little boy flying his kite beneath a big smiling sun and a puffy white cloud—an instant mood-lifter in card form. All the elements were crafted using the brand-new Up and Away die set from the Sky is the Limit collection by none other than the crafting wunderkind himself, Simon Hurley.

Handmade card featuring a die-cut boy flying a kite, with a die-cut sun and cloud above. Background is a soft aqua watercolor wash. Card uses teal and aqua cardstock in a playful, kite and sky-themed scene.

Color Me Happy

The card showcases a bright and breezy color palette, with Waterfall and Teal Topaz cardstock stealing the spotlight. These shades of aqua and teal give off major sky-blue vibes that feel both fresh and fun.

Background with a Breeze

For the sky, I created a soft, dreamy wash using Pool Party Reactive Ink on watercolor paper. I used a flat brush for that gentle sweep—like a serene spring sky just waiting for a kite to dance across it.

Die Cut Delight

Every piece on this card—from the kite and the boy to the sun and cloud—is die cut and carefully layered for a dimensional scene that really pops. The clean lines and whimsical style of the dies make them a joy to work with. And let’s be honest: the Up and Away set is pure magic!

Die cut scene card with a boy flying a kite.  Spellbinders Up and Away die set - S4-1433.

Perfect for…

  • Baby showers (especially for little boys!) The repeating aqua and teal color palette reinforce the baby theme.
  • Kiddo birthdays
  • Or just sending sunshine and smiles on a cloudy day

This one’s going into my “make again soon” pile—because how can you not love a card that makes you want to run outside and fly a kite?

Happy crafting, and may your skies stay sunny! ☀️🪁

cardmaking · Rainbow Colors · Stamping

Hero Arts Balloon Bash! Stamping, Ink Blending and Stenciling

Ready to party? I had a blast creating this bright and festive birthday card using brand-new goodies from the Hero Arts Let’s Celebrate Collection! This project is perfect if you’re looking for a quick, colorful card that makes a big impact.


A handmade card with seven colorful stenciled balloons in rainbow colors, layered with foam tape. Balloons feature squiggles, dots, and stripes. Sentiment reads "It’s Your Day!"

Card Details: Rainbow Balloons That Pop (Literally!)

This card features a happy cluster of seven stamped, ink-blended, and die-cut balloons, made with three coordinating products:

The process was pure fun:

  • I started by placing the cover plate die in my stamp positioner and aligning the large balloon stamp (a cluster of five balloons) over the die. Once perfectly placed, I closed the lid so the stamp was now on the positioner lid, removed the die, and was ready to stamp and die cut with precision. There is a process photo below.
  • Since I wanted seven balloons, I stamped, inked, stenciled, and die-cut the design twice.

Color & Stencil Party

Each balloon got its own personality with Hero Arts Reactive Inks in cheerful rainbow shades. I blended two shades per balloon, adding darker ink toward the bottom for dimension. The layering stencils let me add playful squiggles, dots, and lines to five of the balloons for extra party vibes.

Reactive Inks Used: Taffy, Berry Smoothie, Lemon Drop, Creamsicle, Key Lime Fizz, Green Apple, Pool Party, Blue Raspberry, Splash, Blue Hawaii, Thistle and Grape Slush.

Two balloons are adhered flat to the background, and five are popped up with foam squares so they practically float off the page! 🎈

I finished the design with a stamped “It’s Your Day!” sentiment from the Party Fans Stamp Set.

Festive rainbow hued balloon card featuring Hero Arts Balloons stamp, cover plate die and layering stencils.  CM790, DF241, SA299.

Pro Tips for Balloon Perfection:

  • Use two coordinating ink colors per balloon to make them feel round and full.
  • Add stenciled patterns after ink blending for clean, vibrant detail.
  • Pop some balloons up on foam tape to add playful movement and dimension.
7 stamped, rainbow ink blended, stenciled and die cut dancing and floating balloons on a handmade card perfect for Birthdays, Graduation or any festive occasion.

This design is fast, festive, and beginner-friendly—but has that pro finish thanks to the coordinated stamps, dies, and stencils.

Stenciled and stamped card with 7 rainbow colored balloons floating across the background.

What would you celebrate with this set? Birthday? Graduation? Just-because balloon-o-rama?

BetterPress · cardmaking · Die cutting

Spellbinders | Yana’s Daisies

Two handmade daisy-themed cards side by side—one with die-cut florals and the other with a bold BetterPress letterpress design.

Talented cardmaker Yana Smakula has done it again! Her new Yana’s Daisies collection for Spellbinders is a fresh take on classic florals, and I was thrilled to get my hands on a few advance products for this launch.

I created two stunning daisy-themed cards using:
🌼 Daisy Trio Etched Dies – A gorgeous, detailed die set perfect for layering.
🎨 Daisy Trio BetterPress Plates & Stencil Bundle – For an elegant, high-contrast letterpress effect. (Link for BetterPress Plates without stencils.)

Card 1: Layered Die-Cut Daisies with Wildflower Background

Layered Die-Cut Daisy Card: A handmade card featuring three yellow die-cut daisies with dark outlines, mounted on a blue wildflower-seeded specialty paper background from Your Paper Insider Subscription Box.

For this card, I used Yana’s Daisy Etched Dies and three premium papers from my Your Paper Insider subscription—because who doesn’t love a little happy mail surprise?

✂️ The Process:

  • Sunflower Yellow Cardstock petals: Using my Platinum 6, I Die-cut the trio from Sunflower Yellow Cardstock and lightly ink-blended with two shades of golden brown for dimension.
  • Wrought Iron Raw cardstock: Used for the intricate daisy outlines and leaves.
  • Vellum shadow layer: Softens the look and adds elegance.
  • Paper shim tip: These dies are beautifully intricate! Adding a paper shim while die-cutting ensures crisp, clean cuts.

🌼 Layered, Not Inlaid! After debating between inlaying or layering, I chose to layer the Sunflower Yellow petals onto the Wrought Iron Raw outlines—and I LOVE the result! I used Bearly Art Glue and a Ninja sticky wand for precision placement.

📜 Background Paper: I wanted something special, so I chose Blue Confetti Wildflower paper from my paper subscription. It’s 100% recycled and embedded with wildflower seeds—a perfect pairing for this floral design!

Layered and die cut Daisy Sunflower  handmade card created with Spellbinders + Yana's Daisy Etched dies.

Card 2: Bold, Graphic BetterPress Daisies

A high-contrast BetterPress letterpress card with white daisies, Leaf Green inked background, and a foiled black "Hello" sentiment. Framed in white with three enamel dots.

For my second card, I wanted to go for high contrast and a bold graphic style, so I turned to the Daisy Trio BetterPress plates. You might be interested in my post: 9 Tips, Tricks and Insights Into Spellbinders BetterPress System

🎨 The Process:

  • I used my BetterPress System.
  • Leaf BetterPress Ink: I tapped, twisted, and generously inked the BetterPress plate before running it through my Platinum 6 machine SUPER SLOW (pro tip: slow rolling = perfect impressions).
  • Coordinating stencils: I added shading in Lemon Drop and Granite to bring the design to life.
  • White daisies (un-inked): Letting the design speak for itself.

📏 The Frame: I die-cut a white stitched frame (November 2024 Stitching Die of the Month) twice and stacked them for dimension.

✉️ Finishing Touches: A black foiled “Hello” (BetterPress sentiment) and three white enamel dots added the perfect crisp, modern touch.

Bold graphic green and white Daisy BetterPress card finished off with a white die cut frame.

Card 3: Aqua and Pink Sunflower Card

Aqua, White and Pink Better Press + stenciled handmade card using Yana  | Spellbinders Daisy Trio Better Press plates and Hydrangea ink.

For my third card, I experimented a bit. I wanted to try a BetterPress fade, so I inked my plate with Hydrangea BetterPress ink, but added less ink at the top and bottom. I used Taffy Reactive Ink and the coordinating stencils for my pink accents.

Bright happy aqua, pink and white hello card with giant BetterPress daisies.

Final Thoughts

This collection is an absolute must-have if you love florals with a modern, sophisticated edge! The detailed etched dies are perfect for paper piecing, and the BetterPress plates create stunning impressions with minimal effort.

Which card do you love most—the layered daisy trio or the bold graphic BetterPress look? Let’s chat in the comments! 💛🌿

Cardmaking Kit · Die cutting

Blog Hop: Enchanted Paper Gardens with the Hero Studio April Release!

Hero Arts Studio:  April 2025 - two whimsical die-cut cards: one featuring a lush, layered terrarium full of mushrooms, leaves, and a fluttering butterfly, and another with bold, hand-painted leaves and a cheerful “hello” sentiment. Both are packed with watercolor magic, intricate details, and playful techniques!

Once upon a time, in a land filled with ink and creativity, a whimsical cardmaker (that’s me!) discovered the Hero Studio April Release and its magical Tranquil Terrarium Kit. With a wave of my die-cutting wand and a splash of watercolor, I crafted a dreamy terrarium scene—one fit for a fairy tale!

Step into a Paper Fairy Tale: A Lush, Layered Terrarium


A handcrafted die-cut card featuring a whimsical terrarium scene with mushrooms, leaves, rocks, and an orange butterfly, all watercolored in bright, vivid hues. The background has a vintage script stencil effect, and the card base is soft Mist blue

Picture this: a tiny enchanted world encased in glass (well, cardstock), teeming with lush leaves, charming red and tan mushrooms, green grass, rustic rocks, and a tiny tree stump. Perched on a delicately curled leaf is a radiant orange butterfly, completing this little forest wonderland.

  • Die-cut magic: Every element was cut from watercolor paper, allowing for beautifully blended, organic colors.
  • Coloring adventure: I used brightly colored reactive inks to hand-paint each die cut piece, adding depth and dimension. I enjoyed painting each piece individually, but you could also paint several card panels and then die cut the elements. Reactive inks used: Green Apple, Key Lime Fizz, Blue Hawaii, Granite, Purple Galaxy, Fawn, Fruit Punch,
  • Serene background: I put a light Pool Party watercolor wash on the rounded terrarium panel. It shows up better in person and adds a lovely subtle dimension.
  • Vintage charm: The background panel features a subtle Script Stencil in tan ink, lending a storybook feel to this enchanted setting. Stencil Used: Script Stencil
  • Rounded elegance: To echo the terrarium’s shape, I rounded the corners of both the panel and card base using Rounded Rectangle Infinity Dies.
  • The final touch: Layered on a dreamy Mist blue card base, this card is a burst of color, depth, and whimsy.

✨ Pro Tip: When layering die-cut scenes, use thin foam squares on select elements (like the butterfly) to create a natural sense of depth without overwhelming the design.

Botanical terrarium card  full of lush leaves, adorable red and tan mushrooms, green grass, rocks, a tree stump with a beautiful orange butterfly perched on a gently curling leaf.  I die cut my pieces from watercolor paper and then watercolored the components with brightly colored reactive inks.   Card created with Hero Studios April 2025 Card Kit of the Month

What’s Inside the April 2025 Hero Studio Card Kit?

  • 20 Terrarium Fancy Dies
  • Terrarium Clear Stamp Set, 6″ x 8″
  • 16 Terrarium Coordinating Dies
  • Clear Hero Enamel Dots
  • 3 Clear Card Panels, 4.25″ x 5.5″
  • 9 Sheets of Cardstock, 5.5″ x 8.5″ (Poppy, Peridot, Rainforest, Fern, Alabaster, Fawn, Truffle, Fog, Anchor)

The Whole Studio includes ALL 5 of the monthly subscriptions in one discounted bundle. Cling of the Month, Stamp & Cut of the Month (new name for the subscription!), Layering Stencil of the Month, Fancy Dies of the Month, and the Card Kit of the Month.

This month, receive a FREE adorable “froggy” stamp & die set when you purchase The Whole Studio!

Hero Arts has many different Monthly Kits that you can subscribe to including:

Card 2: A Bold, Botanical Hello

A bold, colorful handmade card with die cut watercolored leaves and fronds on a creamy white background.  Uses Hero Studio April 2025 Fancy Dies kit.

For my second card, I embraced bold color and graphic design with the Fancy Dies of the Month Kit. This set features five striking leaf dies and a scripty “hello” with a shadow layer.

  • Hand-painted beauty: Each leaf was die cut from watercolor paper and hand-painted in vibrant greens and blue-greens. Reactive Inks Used: Splash, Key Lime Fizz, Blue Hawaii, Blue Raspberry, Green Apple. I started with the lightest color and then layered on darker shades.
  • A pop of fun: To contrast the cool tones, I painted the “hello” with Fruit Punch Reactive Ink-blended cardstock, giving it a lively coral-red pop.
  • Artful splatter: I added Licorice Reactive Ink splatters for an artsy, organic touch. I simply dabbed the ink on an acrylic block and flicked splatters on my die cuts with a fine wet watercolor brush. I turned my splatter box for even splatter distribution.
  • Design balance: The leaves are arranged in a radiating composition, leading the eye toward the bottom-right hello.
  • Crisp and clean: Everything is anchored on an Adriatic blue card base, making those greens pop!

🎨 Pro Tip: When adding splatters, dab the ink on an acrylic block and flick splatters on the die cuts with a fine wet watercolor brush. Thie results in controlled yet artistic splatters. Don’t forget to rotate your splatter box to get an even, natural distribution!

A bold handmade card with  hand-painted die-cut leaves in vibrant greens and blue-greens. The sentiment "hello" stands out in a coral-red shade.  The leaves have black ink splatters adding artistic detail. The background is clean white on a deep Adriatic blue A2 card base making the colors pop.

BLOG HOP!

Don’t forget, this is part of a blog hop, so there’s plenty more enchanting inspiration ahead! Be sure to follow along for more crafty adventures. ✂️✨

Giveaway:

Hero Arts will give away a $50 gift card, drawn from the comments left across the hop. Enter by Sunday, April 6 at 11:59pm PST, and the winner will be announced on the Hero Arts blog the following week. Leave a comment on all stops for more chances to win!


Hero Arts
Hero Arts Creative Team:
Mindy Eggen
Anna Mahtani
Seeka
Channin Pelletier
Rosie Lopez
Charlene Madrid
Michelle Short
Rachel Kleinman
Jeannie Lieu
Natasha Vacca
Jennifer Kotas
Natasha Polite
Karen Brown You Are Here!
Lisa Tilson
Michelle Lupton
Special Guests:
Nichol Spohr
Kelly Taylor

A Fairy-Tale Ending? Or Just the Beginning?

These cards brought to life the whimsy of a storybook forest and the bold beauty of botanical art, all with the magic of the Hero Arts April Release. Whether you love layered die cuts, ink blending, or just an excuse to play with paint, this kit delivers endless creative inspiration!

I’d love to hear your thoughts—which card is your favorite? Let’s chat in the comments!

cardmaking · Die cutting · Hot Foiling

Spring Whimsy with Hero Arts: Bold Colors, Butterflies & Birthday Cheer

Spring is in the air, and so is a burst of bold color and whimsy! Today, I’m taking a closer look at the new Hero Arts Spring Whimsy Collection with four vibrant cards featuring hot foiling, ink smooshing, ink blending, heat embossing, and die cutting. Let’s get crafty!

>>> You may also be interested in my recent video and blog post: Easy and Festive Cardmaking <<<

Card 1: Hot Foil Butterfly Elegance

This card is all about shimmer and movement! I started with an aqua ink-smooshed background—the perfect backdrop for a gorgeous, hot-foiled butterfly. The butterfly itself was hot foiled onto an ink-blended panel of soft pinks, corals, and oranges before being die cut and centered on the background.

A hot-foiled butterfly in pink, coral, and orange, die-cut and placed on an ink-smooshed aqua background.

My Process for Creating This Foiled Butterfly Card:

Pro Tip: Ink smooshing is a great way to create organic, watercolor-like backgrounds.

Gorgeous Hot Foil Glimmer Butterfly card on a dreamy aqua ink smooshed background.

Card 2: Striking Ink-Blended Background & Black Butterfly

A bold ink-blended background in Fruit Punch, Creamsicle, and Taffy with a striking black die-[cut butterfly as the focal point.

For a dramatic look, I ink blended a bold background using Fruit Punch, Creamsicle, and Taffy inks. These warm hues set the stage for a striking black die-cut butterfly, creating a high-contrast, modern design.

Key Product: Delicate Butterfly Fancy Die (also used on card #1 and #3)
Bold pink, coral and orange ink blended background with a lovely die cut black butterfly focal element.  Hero Arts Delicate Butterfly Fancy Die.

Card 3: Heat Embossed Floral Background + Die Cut Butterfly

A white heat-embossed floral background over a vibrant coral and pink ink-blended panel, accented with a small black butterfly and a die cut “hello” sentiment.  Hero Arts Whimy Floral Bold Print Stamp.

This card keeps the same coral, pink, and orange hues but introduces texture with the Whimsy Floral Bold Print background stamp. I heat embossed the pattern in white over my ink-blended panel and added a small black die-cut butterfly and a “hello” sentiment for balance.

Key Products Used:

Hero Arts Floral Bold Print Stamp heat embossed over an ink blended gradient from soft orange to hot pink.

This next photo shows two cards I created with the Delicate Butterfly Fancy Die.

2 handmade cards featuring Hero Arts Delicate Butterfly Fancy Dies.  Both cards have an orange to pink gradient color scheme with black die cut butterflies.

Card 4: Elegant Window Birthday Card

A birthday card featuring a 9-pane Hero Artd Elegant Window Die with small, Copic-colored birthday images and a stamped “cheers” sentiment with Mist  blue cardstock.

For a completely different vibe, I created a charming birthday card using the Elegant Window Fancy Die. The die creates a beautiful 9-pane window, which I die cut from Mist cardstock. Each pane features a tiny, Copic-colored stamped image from the Spring Bunny Stamps, Our Day Messages, and Birthday Animal stamp sets. A simple “cheers” sentiment ties it all together.

Charming 9 window pane stamped and die cut birthday card featuring small stamped images of cake, party hats, balloon animal, duck, butterflies and flowers.

This collection is packed with so much creative potential! Whether you love hot foiling, ink blending, or stamping, there’s something here for every cardmaker. I hope these designs inspire you to play with color and try new techniques!

Four beautiful handmade cards created with Hero Arts Spring Whimsy Collection + hot foiling, ink blending, stamping, ink smooshing and die cutting.

Thank you for stopping by!

cardmaking · Video

VIDEO | Spring Floral Stenciling & Color Theory: Create with Confidence!

Welcome back, crafty friends! Today, I’m diving into stenciled floral backgrounds with a focus on color theory and shimmering inks. If you’ve ever struggled with picking colors that pop or wondered how to make your stenciled backgrounds shine, this post (and my video!) is for you!

If you are having difficulty watching the video above, click HERE to watch on YouTube.

Three Ways to Use a Stenciled Floral Background

I’m using the Spring Floral Stencil and Large and Small Floral Layering Dies from the new Hero Arts Friendship Blooms Collection to create three different looks. Each one explores color, contrast, and shimmer, so let’s get into it!

3 bold floral stenciled backgrounds turned into cards with bold die cut focal elements.

Card #1: Byzantine Green Glitz + Bold Plum Congrats

A handmade card with a shimmering Byzantine Green floral stenciled background, featuring a bold Plum die-cut ‘Congrats’ sentiment with a vellum shadow.

For my first card, I wanted a rich, elegant background with plenty of shine. I stenciled with Byzantine Green Glitz Ink, which gives a gorgeous shimmer, and paired it with a bold Plum “Congrats” sentiment. Here’s the magic:

  • The background is a mossy olive hue.
  • The sentiment is red-violet, which is directly opposite on the color wheel—hello, instant contrast!
  • The large vellum shadow behind the sentiment softens everything just enough.

Pro Tip: When in doubt, check your color wheel! Using complementary colors creates high-impact contrast, making your card visually striking.

Card #2: 3. Aqua Gradient for a Fresh Take

A soft and elegant aqua gradient stenciled card featuring a layered white and aqua die-cut bloom, perfect for Mother’s Day.

For the next card, I switched things up with a cool-toned, gradient background using Pool Party, Paradise, and Blue Raspberry inks. The result? A soft, dreamy floral backdrop that’s perfect for spring!

Pro Tip: If you’re unsure which colors to use, swatching your cardstock makes a world of difference! I swatched mine with Spellbinders Color Swatch Petal Dies, and it made choosing my die-cut colors so much easier.

Card #3: Layered Floral Mother’s Day Card

A Mother’s Day card with a rich plum and eggplant stenciled background, adorned with delicate die-cut flowers in shades of plum, eggplant, and white.

Since I was loving that Byzantine Green shine, I stenciled a second background—but this time, I turned it into a Mother’s Day card!

Spring Floral stenciling 3 ways for bold Mother's Day and Congrats cards.

I am so pleased you stopped by today!

cardmaking · Die cutting · Tutorial

Make a Splash: Postage Collage Summer Beach Card

Nothing says “happy birthday” like a burst of bright colors and a little beachy fun! Fresh off a trip to the shore, I felt inspired to bring the ocean breeze into my craft room—minus the sand in my die-cutting machine. Today’s card features stenciled beach balls, a fun postage stamp collage, and plenty of shimmer and shine. Let’s dive in!

Bringing the Beach to Paper: Creative Ways to Use Layering Stencils

A vibrant beach-themed birthday card featuring stenciled beach balls in yellow, green, and blue with a touch of shimmer.

To set the seaside scene, I stenciled a flurry of yellow, green, and blue beach balls bouncing across the card. But what’s a day at the beach without a little shimmer? I used Glitz Inks to add a splash of shimmery shine.

Key Products Used:

Ink Blending Tips for a Seamless Look

  • Easy to Use 3 Layer Stencil: I started by stenciling my background with the fun Beach Ball Stencil. To keep my paper and stencil in place, I used my Sticky Grip Mat, which worked perfectly.
    • Click HERE to read my review on Sticky Grip Mats.
  • Use a circular motion: This prevents harsh lines and gives a softer, airbrushed effect. I also like to change direction frequently.
  • Let the shimmer do its thing: Glitz Inks add an extra pop. I used two shimmery Glitz Inks + Summer Sky for a really beachy vibe.

Postage Perfection

Nothing elevates a card quite like a postage stamp theme, so I pulled out my Waffle Flower Postage Collage die and stamp set to bring in some postal flair. Here’s what I included:

  • Postage-style die adds a fun and playful focus to your project, allowing pops of the orange mat to peek through the holes.
  • Stamped details like “sending hugs”, “50 cents”, “hugs inside”, and classic cancellation squiggles for that perfect mail-ready touch.
  • A crisp white scripty “Happy Birthday” sentiment with a black shadow, keeping it bold and readable amidst all the beachy goodness.
The Waffle Flower Postage Collage die-cut panel with stamped details like "sending hugs" and cancellation marks, framed by an orange mat.  Fun Beach Ball themed Birthday card with blue, yellow and green layered stencil ink blending.

The Final Splash

With the main panel matted in orange, this card bursts with sunny energy—perfect for anyone’s birthday, no matter their age! The beachy vibe, vibrant colors, and postal elements make it a playful, happy way to celebrate.. ☀️📬✨

cardmaking · Die cutting · Stamping

Vintage Charm & Soft Elegance: Hero Arts March 2025 Release

Welcome to another exciting Hero Arts release! For March 2025, I created two unique cards that highlight the versatility of the new products. One is a vintage-inspired die-cut design featuring the Suitcase and Florals Fancy Die, while the other is a beautifully blended, pastel-hued circular stamped card. Let’s jump into the details!

Key Kits and Products Used:

Card 1: Vintage Suitcase & Florals

A handmade card featuring a cream and tan die-cut hat box-style suitcase with a teal bow and florals, set against an aqua background of stamped vintage maps and postmarks.

This card is all about vintage charm! The focal point is a cream-colored hat box-style suitcase with tan trim, die-cut from the Suitcase and Florals Fancy Die. A lovely teal bow is tied to the handle, and delicate die-cut flowers add a soft floral touch.

Hero Studio Suitcase and Florals die cut handmade "hello" card with a charming hat box luggage, teal bow, and flowers in orange and red. The background is a mixed media postage stamp theme.

Design Details:

  • Color Palette: Teal, aqua, alabaster cream, marigold, and red from the Color Wheel Cardstock Collection .
  • Background: I loosely ink blended Splash ink on white cardstock and then added Splash ink splatters on the aqua panel and A2 cardbase. I then randomly stamped the panel in black ink using the Vintage Maps & Ledgers and Vintage Postmarks & Tickets stamps. Using my Nesting Postage Stamp Infinity dies, I die-cut stamp shapes that would serve as my background.
  • Framing: A vivid Blue Spruce mat behind the die-cut stamps makes the alabaster hat box pop.
  • Sentiment: A die-cut, scripty “hello” (Friend Words Sentiment Dies) that complements the vintage theme. Two black enamel dots in the center of the flowers continues the bold color palette.
Pro Tip:
A deep Blue Spruce background mat is key to making lighter elements like the alabaster suitcase stand out.

Color Swatching:

To help with color coordination, I also swatched my cardstock colors using the Spellbinders Color Swatch Petal Dies—a handy way to visualize your palette before committing to a design!

Color Wheel Cardstock Colors used: Alabaster, Terracotta, Poppy, Cranberry, Carrot, Teal Topaz, Blue Spruce, Fern and Brushed Gold.

You can find the entire Color Wheel Collection HERE.


Card 2: Pastel Bow-Themed Circular Card

A round handmade card with a stamped and Copic-colored bow pattern transitioning from yellow to pink, coral, lavender, and blue. The card base is deep charcoal gray.

For my second card, I went with a soft, rainbow gradient-colored design that’s easy to recreate. This is a DIY card that’s great for beginner cardmakers, offering a fun way to experiment with color blending and shaped card designs. The 6 x 6″ Bold Print makes stamping so easy! The bows are already laid out perfectly, so no need to spend time arranging your dies.

Design Details:

  • Stamp: The “Bows” Bold Cling Stamp stamped on smooth white cardstock and colored with pastel Copic markers.
  • Color Gradient: Blends from creamy yellow at the top to soft pinks, corals, lavender, and blues at the bottom.
  • Card Shape: Using my Nesting Circle Dies, I die cut a circle from my Copic colored panel. To make my card base, I die cut two circles from Charcoal cardstock, scored the back one at 3/4″ and then glued the tops together. To make this card even easier, you could make a traditional A2 rectangular card, which would exclude using infinity dies.
  • Finishing the Card: I added a small “for you” heat embossed sentiment and some Clear Enamel Dots.

Pro Tip:

Use craft foam behind your card panels for a polished, professional look with added dimension!

An easy DIY stamped card with 10 girly bows of different shapes and sizes, Copic colored in a rainbow gradient.

Final Thoughts

Both of these cards showcase the March 2025 Hero Arts release in different ways—one with vintage textures and layers, the other with simple stamping and coloring. Whether you’re a fan of intricate die-cutting or quick, colorful stamping, there’s something in this release for you!

Let me know in the comments—which card style do you love most? And don’t forget to check out the full Hero Arts release for more inspiration!

Cardmaking Kit · Die cutting · stitching

Spellbinders March 2025 Club Kits – Two Cards, Endless Creativity!

Die Cut handmade cards created with Spellbinders March 2025 Club Kits.

March is here, and with it comes Spellbinders’ March 2025 Club Kits, featuring some truly exciting club kits! This month, I crafted two very different—but equally fun—cards: one celebrating the great outdoors and another bringing stitched floral elegance to life. Let’s dive in!

Kits Used Today:

Card 1: A Fishing Adventure

Masculine fishing theme die cut card using Spellbinders March 2025 Small Die of the Month Kit.  Two men are fishing on a dock, there is a "caught" fish on a line and the colors are primarily blue with the men wearing orange and green shirts and hats.

For my first card, I used the Die of the Month Club Kit – Fairways and Fish Tales, a perfect choice for masculine cards. This set brings all the charm of a peaceful fishing trip, complete with fishing rods, tackle boxes, and two friends casting their lines from a dock.

Since my husband is a fly-fishing enthusiast, this card is especially meaningful. The “Happiness is…” sentiment captures the joy of a day spent on the water. The color palette leans into lovely blues, accented with pops of orange and green, giving the scene a fresh and lively look. If you’re looking for a kit that’s perfect for the men in your life, this one is a winner!

For assembly, I used Bearly GlueFoam Squares and Craft Foam. To finish, I added some Clear Enamel Dots to simulate water splashes.

Handmade die-cut card featuring two male friends fishing on a wooden dock with fishing rods, tackle boxes, and a 'Happiness is...' sentiment. The color scheme is blue with pops of orange and green.

Card 2: Floral Elegance with Stitching & Die Cuts

Elegant handmade stitched card with a gold-threaded white background and die-cut flowers in pink, orange, and white, accented with gold detail.  Created with Spellbinders March 2025 Stitching Die and Large Die Club Kits.

For my second card, I combined the Stitching Club of the Month Kit with the Large Die of the Month, which offers three design options: floral, dog, and dinosaur. I chose the floral dies and paired them with the intricate stitching background for a stunning, textured effect.

The stitching panel was cut from white cardstock and hand-stitched with gold thread, giving it a luxe feel. Then, I added die-cut flowers in pink, orange, and white, accented with gold, to create a truly elegant design. Stitched cards always have that “WOW” factor, and this one is no exception—handmade beauty that recipients love!

One thing I love about the stitching die background is that it’s just as beautiful unstiched. I plan to use it that way in the future for a more subtle yet equally stunning effect.

Notes About This Card:

Two beautiful handmade and die-cut cards created with Spellbinders March 2025 Club Kits.

Helpful Links:

Final Thoughts

March’s Spellbinders release has something for everyone—whether you’re crafting for the outdoorsman in your life or making a stitched masterpiece. Which of these styles speaks to you the most? Let me know in the comments!