cardmaking · Die cutting · Stamping

Best Quick & Easy Get Well Card

Clean and modern handmade get well card featuring a stamped soup cup, blue chopsticks, black enamel dots, and a yellow die-cut circle window.

The December 2025 Hero Arts Stamp & Die Kit of the Month is called Cup of Love, and it’s perfect for creating quick, modern, and heartfelt get well cards. I always need get well cards on hand, so I love having clean and simple designs that I can mass produce—and this one definitely delivers.

This month’s kit features a charming soup cup, chopsticks, labels, and warm “feel better” sentiments that make it easy to whip up comforting cards for friends and family who need a little cheer.

Clean + Modern Design With Easy Stamping

A simple and easy handmade get well card with a die cut yellow recessed circle that showcases and cup of noodle soup, crossed chopsticks and 5 black enamel dots.

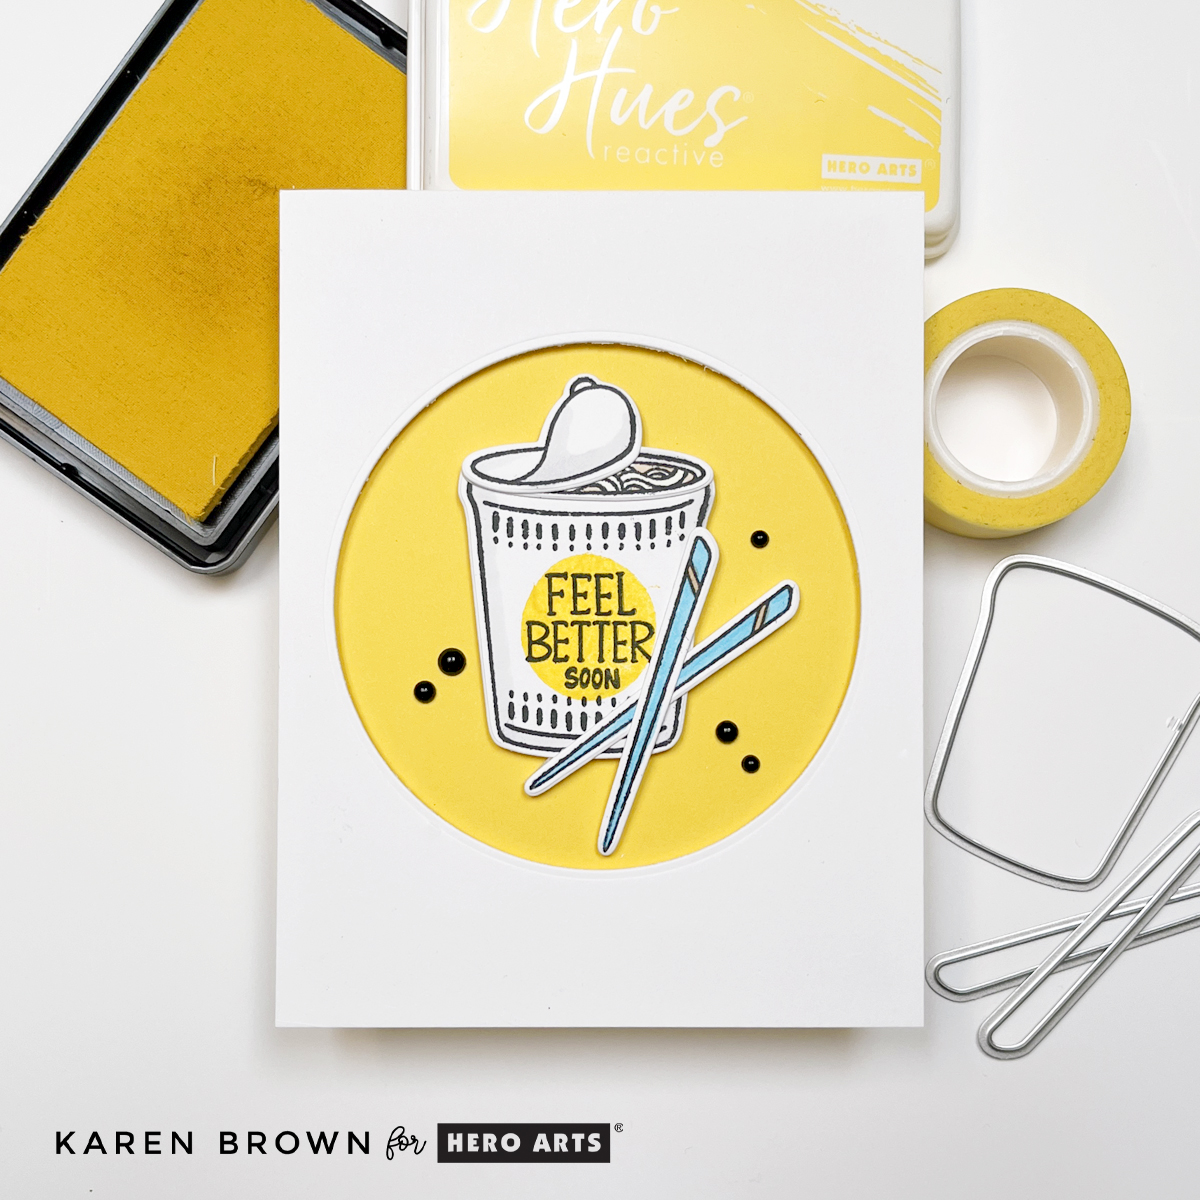
For today’s card, I leaned into a fresh white and yellow color palette with pops of crisp black stamping and a hint of blue. The combination feels clean, modern, and cheerful—just the mood you want in a get well card.

Key Products Used:

How I Made the Card

  • I stamped the “cup of noodle soup” image in black ink for sharp contrast.
  • Next, I stamped the round yellow label with Lemon Drop Ink. I waited a minute for the ink to dry, stamped the sentiment “feel better soon” and die cut the image.
  • I stamped and colored the blue chopsticks, die cut them, and crossed them for a playful finishing touch.
  • For the background, I die cut a circle from the center of a white A2 cardstock panel using my Hero Arts Nesting Circle Dies.
  • I layered this white panel over a yellow A2 card base, popping it up with craft foam for dimension.
  • In the recessed yellow circle, I glued the soup cup and chopsticks.
  • Finally, I added five black enamel dots. These tiny accents brought so much contrast and visual interest to the finished design.

The result? A clean and cheerful get well card with modern charm and just enough shading and dimension to feel special—without slowing you down.

Interested in two other recent Get Well Cards I created? Click HERE.


Tip for Mass Production

If you want to make a full batch of these cards (and I definitely recommend it!), simply die cut a yellow circle and adhere it directly to a white card base. Or alternatively, you could ink blend a yellow circle. You can skip the popped-up window panel and still get the same bold pop of color.

Thanks for stopping by!

BetterPress · cardmaking

Celebrate | How to Get the Best Prints with Your BetterPress | Spellbinders

Creating fresh clean BetterPress cards for any celebration using Number and Sentiment press plates.

I adore the BetterPress Letterpress system! You can create beautiful, high-quality cards that blend modern design elements with traditional techniques. In this guide, I’ll show you how to use your BetterPress system to make colorful clean and simple cards that feel sophisticated and timeless. Today, I will be using Spellbinders new Color Mix Collection which is great for just about any celebration!

How to Get The Best BetterPress Letter Press Prints

Bold masculine die-cut BetterPress happy birthday card using Srellbinders Bold Color Mix Numbers and Sweeping Celebrations Sentiments.

After Experimenting for the past year, here are my tips for pristine BetterPress prints:

  • I started by using Best Ever Craft Tape to attach my BetterPress A2 Porcelain card panel to the BetterPress top plate. I wanted a clean white look, so I used the Porcelain cardstock. In my opinion, BetterPress Cotton Paper or handmade watercolor papers work the best with BetterPress.
  • The magnetic lower plate works really well to hold my Bold Color Mix Numbers and Sweeping Celebrations Sentiments impressing plates in place. 
  • I was careful to ink the impressing plates really well. I did a “Tap and Twist” technique where I tapped the ink on the plate and then twisted the ink pad a few degrees. Don’t smash and smoosh or you will wind up with little pieces of ink pad on your plate and project. I ink well because I prefer to roll through the press only once for each plate.
  • I liked the sentiment going “uphill” with the “h” and “b” lower than the “y”.
  • I rolled my sandwich SLOWLY through my Platinum 6 die cutting machine. I think “Super Slo-Mo” while doing this to help me remember to go VERY slowly. 
  • The Color Mix Numbers Bundle has coordinating dies that are just beautiful! You can use them with the press plates…or separately.
  • You’ll want a good stamp cleaner to clean your BetterPress and press plates. I’ve used Ultra Clean by Hero Arts and it works great!
  • I used the specially formulated BetterPress Inks for my pressing.  For the “54” card I used Coastal and Clay from the Desert Sun Mini Sampler. For my Happy Anniversary card, I used Wild Berry and French Blue from the Nature Tones Mini Sampler. The black comes in a Full Size and you can find the smaller size in the Regal Tones Mini Ink Set. Waterproof or Hybrid inks as work well. Pigment ink is not recommended….you want a faster drying ink. 
  • I found that my guillotine paper trimmer worked better than my Fiskar’s SureCut on cotton paper.
  • My base is Granite cardstock and I used Craft Foam, Bearly Glue and Fashion Jet Enamel Dots to finish my cards.

Spellbinders Color Mix BetterPress Collection

Colorful clean minimalist Happy Anniversary card created with Spellbinders Bold Color Mix Press plates.

Key Products I Used on My BetterPress LetterPress Prints:

Bold yet clean and simple BetterPress cards using the Bold Color Mix Numbers and Dies Bundle + Sweeping Celebrations Sentitments

By focusing on clean, minimalist designs with bold colors, you can create cards that feel modern and fresh but have all the charm of traditional letterpress.

Thanks for stopping by today!

Karen

cardmaking · Die cutting

Darling Die Cut Birthay Card | Spellbinders Out and About Collection

Spellbinders Luna the Seahorse white and blue die cut birthday card.

Spellbinders has a wonderful NEW release called Out and About that is chock full of wonderfulness! Spellbinders is introducing their new compact die cutting machine called “Scout”, along with a fun collection of small but adorable die sets that work well with the pint-sized Scout. I love having a small light weight die cutting machine for smaller dies and sentiments. It allows me room to die cut, glue and assemble without having to tidy up in between steps.

Today I used Luna the Seahorse along with the new Happy Birthday Wishes die set.

Products:

Notes on Making This Card:

  • I die cut Luna 3 times from Island Blue cardstock and then glued the layers together for a beautiful 3D focal point.
  • Using a Scallop Labels and Tags die, I die cut my background and THEN embossed the panel. If you emboss in this order, you will have more texture and dimension on your embossing. (If you emboss and then die cut, the die cutting process will smoosh the raised embossing.)
  • I added white accents with a thin Posca paint pen and added a black enamel dot for the eye.
Creating a clean and simple summery die cut birthday card featuring Luna the Seahorse and Scallop Label Infinity dies.

I think little Luna is so cute! Thanks for stopping by and enjoy the rest of your day.

Karen

cardmaking · papercrafting · Video

3 Colorful Sentiment Focused Cards +Video

3 Sentiment Focused Handmade Cards

Sometimes, you just want your sentiment to be the star of your card. Today I am sharing three cards where the focal point is the sentiment. The video (below) is also part of Altenew’s Let’s Get Sentimental Video Hop.

Love Card or Valentine

Love, Love, Love Die Cut Valentine Card

I felt like getting a little inky and messy, which is always fun in the craft room! I started by creating three gradient watercolor panels that were the basis for my sentiment die cuts. I wanted BOLD colors so I used Altenew’s lusciously pigmented Spring Garden Mix Watercolor Markers + the love die from Altenew’s Script Words set. I kept things Clean and Simple for this first card.

I made this card for my husband, but wouldn’t it be great for a Valentine?

VIDEO

I created a short video for Altenew’s “Let’s Get Sentimental “Video Hop that shows my process. Watch below on YouTube or click below to watch on my blog.

Watch on my blog:

Congratulations Card for Graduation

Die Cut Congrats Graduation Card

I needed a Graduation card for my nephew and I came up with this design using Altenew’s Archway die set (includes both the wave and tree + a rainbow that I used twice HERE) + Script Words Congrats Die. The Archway die set is one of my favorite 2023 releases.

Hello Friend Card

Hello Friend handmade card.

I wanted to add some texture to my next card so I embossed my background with Altenew’s Playful Circles. The die cuts are Simply Hello and Simply Friend.

Here is another variation of a bright fun “hello friend” card I did a few months ago.

Altenew Spring Garden Mix Watercolor Markers +  Script Word Dies + Archways die set.

Supplies:

Here are links to the supplies I used on these cards….click the icon to start shopping. Compensated Affiliate links are used at no additional cost to you. Your support helps me bring you new projects, content and videos. Thank you!

Other Supplies Available at Amazon:

Faber Castell Collapsible Watercolor Cup

Tonic Studios paper trimmer

Removeable Highlighter Tape

Tonic Studios Craft Pick

3M Painter’s Tape
Altenew Script Words "love" die + handmade card.

I took a bunch of photos and am including the rest here.

Altenew Script Words die cut handmade cards.

And finally, one standing photo…. Don’t you just love top fold cards?

Clean and Simple CAS Valentine

Thanks for stopping by!

Karen

cardmaking · hot foiling · papercrafting

Spellbinders | Its My Party Too Collection: 3 Colorful Rainbow Card Ideas

Spellbinders Hip Hip Hooray clean and simple foil glimmer card.  GLP-388

Clean and Simple Foil Glimmer Card

Today I am sharing some sentiment focused hot foil cards and the first one was so quick and easy! I wanted to spotlight the fun sentiment so I added some 1/4″ paper strips to the bottom right corner and then angled my sentiment. Done!

Products Used:

Paper Trimmer available at Amazon:

Tonic Studios paper trimmer

Spellbinders Glimmering Hooray Hot Foil Plate and Die Set + handmade card | GLP-388

Hot Foil Stamping + Texture + Rainbow Colors

For my second card, I wanted some texture on my background panel and I thought the Tiny Dots Embossing Folder would be perfect. To add fun pops of color, I added a 1″ rainbow accent strip to the bottom of my card. The width of each strip is 1/4″.

Products Used:

Spellbinders Glimmering All About You Hot Foil Plate and Dies Set  GLP-389 + handmade card

Hot Foiling + White and Gold Floral Die Cuts

For card #3, I kept the rainbow color theme but I added lots of white and gold floral elements to emphasize the lovely gold foiled sentiment. I started with the star of the card, which is the gorgeous hot foiled sentiment. Next, I ink blended a rainbow panel that I die cut into an oval shape and then embossed with the Tiny Dots embosssing folder. At this point, I thought the card looked too plain so I die cut a bunch of my favorite flowers and added them around the perimeter of the center oval. I also embellished with some colorful enamel dots. I die cut the card base from an A2 top folding card. To keep the top fold, I positioned the top edge of the die just above the fold.

Spellbinders Glimmering All About You Hot Foil Plate and Dies Set  GLP-389 + Tiny Dots Embossing Folder SES-051.

cardmaking · papercrafting

Altenew | Mini Stamps

CAS Clean and Simple card using Altenew's Typewriter Flowers mini stamp and die bundle.

Using Mini Stamp Sets in Cardmaking

Hello and welcome! I think mini stamps can make such fun cards! This set, called Typewriter Flowers, is my new favorite mini stamp and die set. I wanted to create a clean and simple card and I like how this technique focuses on the whimsical typewriter.

I used my Altenew Artist Alcohol Markers to do some simple coloring. In addition to the regular brush, Altenew markers have a second fine coloring head for small areas. I used the fine nib a lot on this card and it is one of the reasons I usually reach for Altenew markers over other brands.

Altenew's Typewriter Flowers mini stamp and die bundle + handmade card.

My second card uses Altenew’s Letter Flowers Stamp and Dies. I again colored with Altenew Artist Alcohol Markers and made a simple background using three strips of coordinating washi tape. I die cut the letter and adhered to my background with Instant Dimension Foam Tape.

This set makes such a bright cheerful card.

Altenew Letter Flowers mini stamp and die bundle.

My last card uses Altenew’s Journal Flowers Bundle. I did some quick coloring and made a background with Altenew’s Playful Circles Embossing Folder. I adhered the book with Instant Dimension Foam Tape and then added a pink Enamel Dot to the center of the Turquoise flower.

Altenew's Journal Flowers mini stamp and die bundle + handmade card.

I like the texture that the embossing adds to this card.

Altenew's Playful Circles 3D Embossing background + Journal Flowers mini stamp.

Thanks for stopping by!

Karen

cardmaking · papercrafting

Spellbinders | Floral Reflections Collection

Spellbinders Sealed Wildflower Die kit for clean and simple die cut cards.

Sealed Wildflower Die Kit (S4-1255)

I am so happy you stopped by! Spellbinders new Floral Reflections Collection is live and I LOVE how fresh the collection is. I made two cheerful cards, one for a friend’s birthday the second is ready to send for a get well.

Spellbinders Sealed Wildflower Kit S4-1255 die cut card.

For my first card, I used the Sealed Wildflower die kit (S4-1255). I felt like clean and simple was the way to showcase these lovely die cuts so I selected Waterfall cardstock for my backdrop. I kept my color palette simple: aqua, melon, dark green and white and added coordinating enamel dots to my flower centers. My sentiment was hot foiled and die cut using GLP-260: Mini Everyday Sentiments. Using an A2 top folding card base, I added my waterfall panel with craft foam for a bit of dimension.

Spellbinders "Sealed Wildflower" kit (S4-1255) on a die cut handmade card in aqua, white and orange.

Flower Frenzy Embossing Folder (E3D-048)

I adore the lovely texture on the new Flower Frenzy Embossing Folder (E3D-048). I embossed a panel of Waterfall cardstock and then die cut a tag. I die cut a second tag in white which acts as a shadow backdrop.

All I needed was one sweet grouping of flowers to embellish the tag and I again used the Sealed Wildflowers die kit. My base is an A2 top folding card and then I added a kraft background mat and enamel dots to the flower centers and mounted my tags using foam tape for dimension.

I love the texture that the embossing folder adds to the card, but by using a tag, the overall feel is still clean and simple.

Flower Frenzy Embossing Folder (E3D-048) die cut handmade embossed tag and card in aqua, orange and kraft.

I like to keep Get Well cards on hand so they are ready to send when the need arises. This card is in my desk drawer ready to go.

Embossing tags for handmade cards.

Thanks for stopping by and taking a peek at my die cut cards.

Karen

cardmaking · papercrafting

Spellbinders September 2022 Card Club Kits

Spellbinders Large Die of the Month Thankful Tractor handmade card.
Thankful Tractor Card

Hello friends! It’s reveal day for Spellbinders September Club Kits and I am excited to share four cards with you. My projects feature the Large Die of the Month, Small Die of the Month and Embossing Folder of the Month and as you can see, the new kits are so fun!

Spellbinders September 2022 Large Die of the Month Club Kit: Thankful Tractor

Its harvest time and I love the veggies and adorable tractor included with this month’s Large Die of the Month kit called Thankful Tractor! The kit is large so I made a substantial 5 x 7″ card. I used bright bold green, yellow and orange cardstock for my focal elements. To set the stage I embossed my background with the September Embossing Folder of the Month. Next, I tore a piece of kraft cardstock and then lightly ink blended my “dirt”. I assembled my project with glue and foam tape. I found using a sticky mat helped with the die cut assembly.

Die Cut Tractor Card with trailer filled with vegetables, pumpkin, corn and squash.
Spellbinders Thankful Tractor

Spellbinders September Embossing Folder of the Month: Scattered Fall

I love the vegetables so much that I made a second card. I again embossed the background with the September Embossing Folder of the Month. The basket was die cut from Frosted Silver Mirror Cardstock using last month’s Large Die Kit of the Month called “Strawberry Patch”.

Spellbinders September 2022 Large Die of the Month card with die-cut vegetables.
Spellbinders Scattered Fall Embossing Folder

I added a sentiment (retired) and flowers from the kit that were embellished with Crystal Mix Gems (SCS-128) and then used a Spellbinders A2 Top Fold Card Base.

Die Cut Basket full of vegetables card with pumpkin, eggplant, squash, and corn.

Spellbinders Small Die of the Month: Stitched Fall Leaves

This month’s Small Die of the Month has loads of beautiful stitched leaves with coordinating shadows plus two word sentiments (hello fall). For my first card, I wanted to showcase the elegant simplicity of just one leaf. The stitching went very quickly and I kept the rest of the card clean and simple.

I used the included hello sentiment die. This is a beautiful yet delicate die and I’ve found it works well if you attach a sheet of double sided adhesive paper to the cardstock prior to die cutting. After you die cut, just pull away the backing paper and apply!

Wouldn’t it be fun to make a series of these as a gift?

Spellbinders September 2022 Small Die of the Month card:  Stitched Fall Leaves.
Stitched Fall Leaves

Products Used:

Clean and Simple stitched die cut leaf card.

“Unstitched” Card

Spellbinders Unstitched Leaf Card.
“Unstitched” Fall Leaves

The leaf dies in the September Small Die of the Month kit are so fun that I wanted to make a card without stitching. To keep the theme, I mounted the leaf and shadow on a panel die-cut with one of my favorites, Essential Rectangles Dies. I love how this keeps the unstitched card theme. The gold details are achieved using Brushed Gold Cardstock and I mounted the panel with foam tape on an A2 Top Fold Cardbase. I find the result is a fresh clean card.

Spellbinders September 2022 Die of the  Month Card:  Stitched Leaves in white and gold.

I think the September kits are sure to be favorites…what do you think?

Karen

cardmaking

Altenew Educators’ “Clean and Simple” Blog Hop and Linky Party + Giveaway

Altenew's Modern Eucalyptus on a Clean and Simple handmade card.

Tips for Clean and Simple Handmade Cards

Hello and welcome! You are probably here “hopping” with the Altenew Educators and I am pleased you stopped by! To start at the beginning of Altenew’s Hop, please click HERE.

Today I have two clean and simple cards to share. This is not my typical style, but I do love CAS cards. To me, Clean and Simple means LOTs of white space. To make that work, I like contrast so I used bold colors and black accents to make my card pop.

Tips for Clean and Simple Cards.

I think Mini stamps work so well with CAS cards so I chose Altenew’s Modern Eucalyptus Stamp and Die Bundle for my first card. I did some simple coloring with Altenew Artist Markers (Sets F: Sunshine Valley and G: Water Garden) and then die cut my Eucalyptus. I wanted to spotlight the plant, so I also cut a small background panel using one of my most used staples – Rounded Rectangles Dies. I heat embossed the sentiment (Birthday Greetings) and laid it over the rounded rectangle die cut. A thin black border helps tie the elements together.

Tips for Clean and Simple Cardmaking

For my second card, I used Altenew’s Tall Vase Stamp and Die Bundle. I colored and die cut the image and then mounted on a small die cut (Rounded Rectangles Dies) and added my sentiment: Birthday Greetings.

Using mini stamp sets in cardmaking.

Pro Tips for Successful Clean and Simple Cards:

  • Mini Stamps Work Great
  • Bold Simple Colors
  • Add a hint or two of black
  • Remember to use contrast
  • Don’t forget to leave lots of open white space

I think it would be fun to make a pack with thank you sentiments for a handmade gift.

Prizes:

$130 in total prizes! Altenew is giving away a $20 gift certificate to 3 lucky winners and a $15 gift certificate to 4 winners! To win, please comment on the Altenew Card Blog and/or each designer’s blog post on the blog hop list below by 07/03/2022. 

There’s MORE! Join our party! We have included an Inlinkz at the Altenew blog for you to enter your beautiful, Altenew “Clean and Simple” creations. 

We will pick one of our favorite handmade creations from those who joined the linky party, and they will receive a $10 Altenew gift certificate!

Altenew will draw 5 random winners from the comments left on each blog hop stop and announce the winners on the Altenew Winners Page on 07/04/2022.

Hop list:

Altenew Card Blog

Michelle Burnier

Annemarie Caister

Kari VanNoy

Susan Stagno

Ann Taylor

Susan Busada

Nenette S. Madero

Irina Fonina

Eva Bussom

Rosie Neustaedter

Joylita D’souza

Helen Kalb

Lana Taber

Neha Aggarwal

Penny Pynnonen

Karen Brown You Are Here! 🙂

Bridget Casey

Nandini Karmarkar

Nancy Souza

Pam Boedeker

Tenia Nelson

Rachael Shedeed

Virginia Lu

Amber Rain Davis

Roteja Galvan

Laurie Patterson

Keep hopping!

Karen