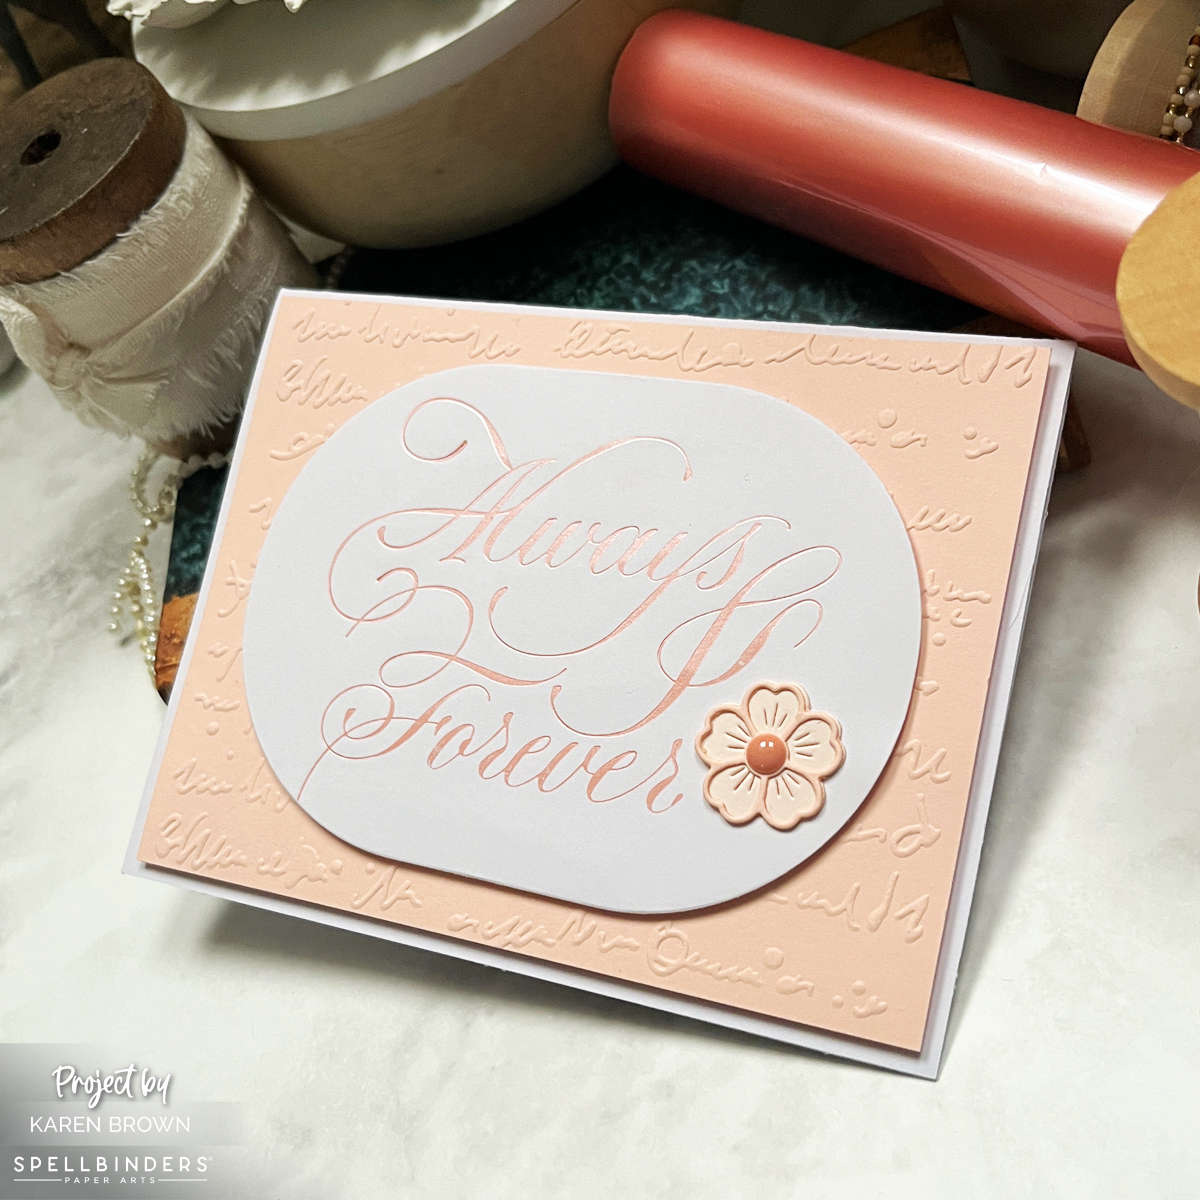
A few months ago, a follower asked me for wedding card inspiration, and I couldn’t resist diving into the timeless elegance of Spellbinders’ Copperplate on Your Wedding Day Collection by Paul Antonio. This collection, featuring gorgeous calligraphy BetterPress plates, was the perfect starting point for creating romantic, foiled wedding cards.
Monochromatic Elegance in Peach
For both cards, I used Peach Satin Matte Foil on smooth white cardstock. I embossed Bellini cardstock, creating a soft, monochromatic look that feels warm and sophisticated. The large, scripty sentiments—”Always and Forever” and “On Your Wedding Day“—take center stage, adding a touch of calligraphic artistry.
To enhance the elegance, I embossed the backgrounds with the Scribbled Letters Embossing Folder—a new favorite in my craft room! The subtle texture adds depth without overpowering the delicate foiling.
Finishing Touches
For the “On Your Wedding Day” card, I die-cut the sentiment using the Scallop Labels Die, which frames the lettering beautifully. I also added a few die-cut flowers in Bellini and Chiffon cardstock, softening the design with delicate floral accents.
Foiling Tips for a Flawless Finish
✨ Trim and round the edges of the foil before using a Glimmer Machine to prevent unwanted over-foiling marks. ✨ Roll slowly through the Platinum 6 Machine for even pressure and a crisp foiled impression.
These simple steps make a huge difference in achieving that professional, high-end look!
I love how these cards turned out—elegant, timeless, and perfect for celebrating love. Whether you’re making wedding cards for a special couple or building your card stash, this collection is a dream for anyone who loves calligraphy and foiled details.
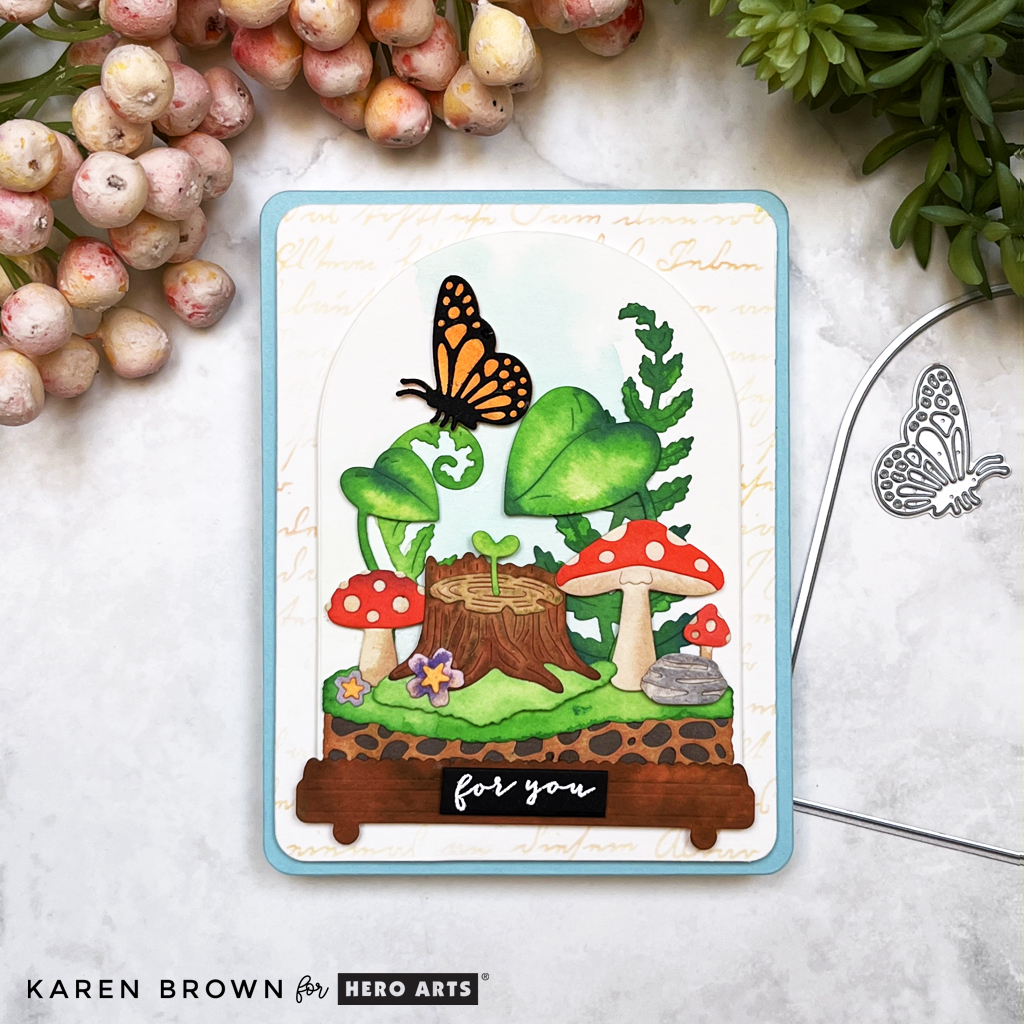
Once upon a time, in a land filled with ink and creativity, a whimsical cardmaker (that’s me!) discovered the Hero Studio April Release and its magical Tranquil Terrarium Kit. With a wave of my die-cutting wand and a splash of watercolor, I crafted a dreamy terrarium scene—one fit for a fairy tale!
Step into a Paper Fairy Tale: A Lush, Layered Terrarium
Picture this: a tiny enchanted world encased in glass (well, cardstock), teeming with lush leaves, charming red and tan mushrooms, green grass, rustic rocks, and a tiny tree stump. Perched on a delicately curled leaf is a radiant orange butterfly, completing this little forest wonderland.
Die-cut magic: Every element was cut from watercolor paper, allowing for beautifully blended, organic colors.
Coloring adventure: I used brightly colored reactive inks to hand-paint each die cut piece, adding depth and dimension. I enjoyed painting each piece individually, but you could also paint several card panels and then die cut the elements. Reactive inks used: Green Apple, Key Lime Fizz, Blue Hawaii, Granite, Purple Galaxy, Fawn, Fruit Punch,
Serene background: I put a light Pool Party watercolor wash on the rounded terrarium panel. It shows up better in person and adds a lovely subtle dimension.
Vintage charm: The background panel features a subtle Script Stencil in tan ink, lending a storybook feel to this enchanted setting. Stencil Used: Script Stencil
Rounded elegance: To echo the terrarium’s shape, I rounded the corners of both the panel and card base using Rounded Rectangle Infinity Dies.
The final touch: Layered on a dreamy Mist blue card base, this card is a burst of color, depth, and whimsy.
✨ Pro Tip: When layering die-cut scenes, use thin foam squares on select elements (like the butterfly) to create a natural sense of depth without overwhelming the design.
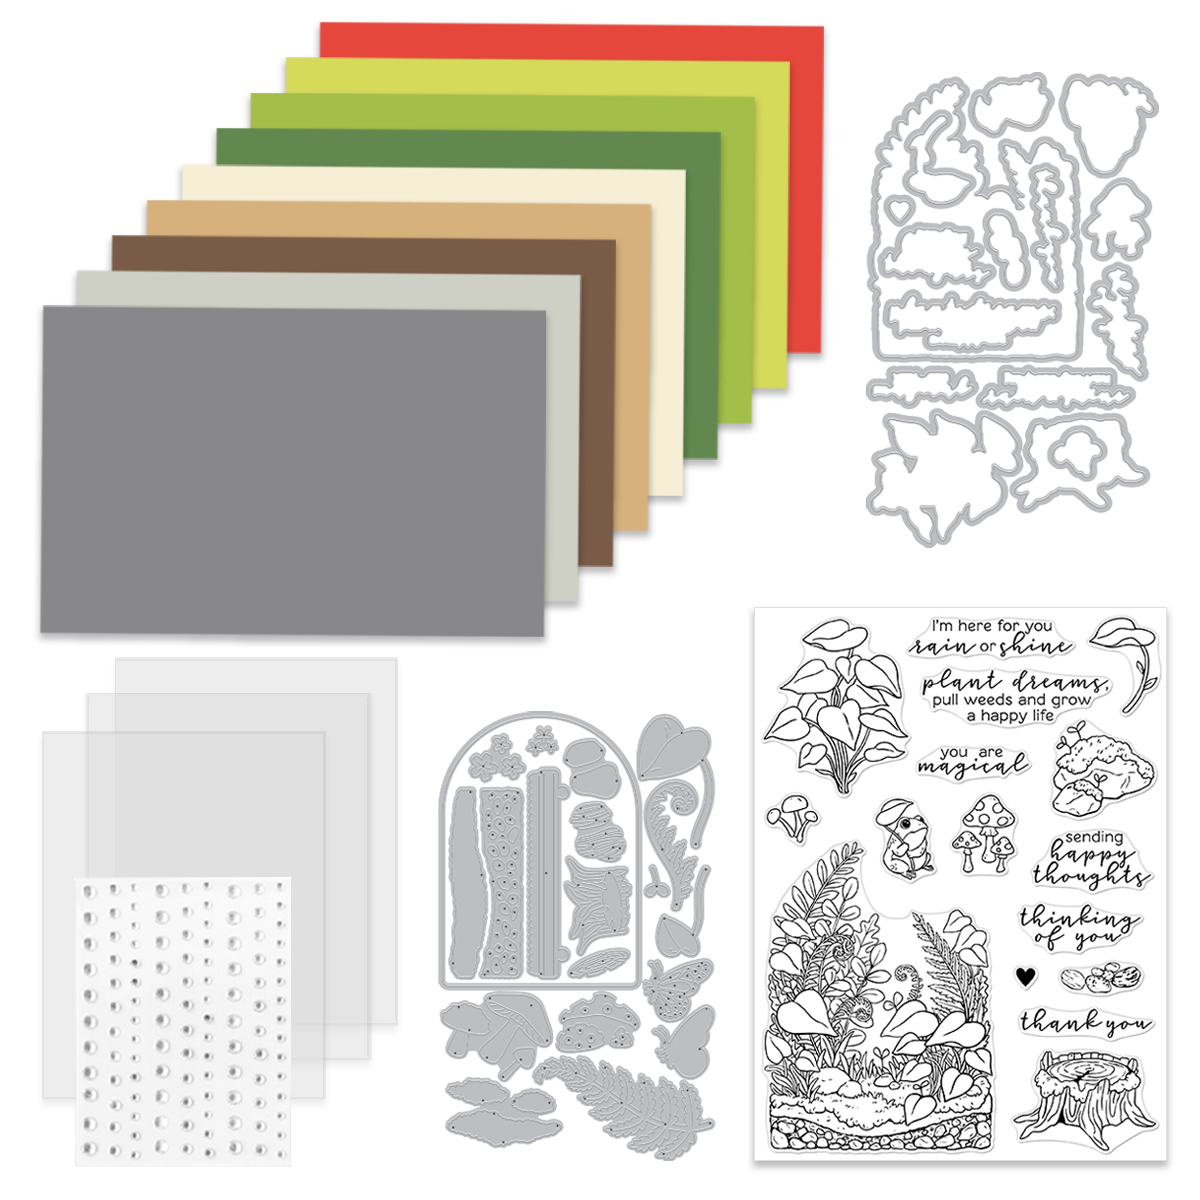
What’s Inside the April 2025 Hero Studio Card Kit?
20 Terrarium Fancy Dies
Terrarium Clear Stamp Set, 6″ x 8″
16 Terrarium Coordinating Dies
Clear Hero Enamel Dots
3 Clear Card Panels, 4.25″ x 5.5″
9 Sheets of Cardstock, 5.5″ x 8.5″ (Poppy, Peridot, Rainforest, Fern, Alabaster, Fawn, Truffle, Fog, Anchor)
The Whole Studio includes ALL 5 of the monthly subscriptions in one discounted bundle. Cling of the Month, Stamp & Cut of the Month (new name for the subscription!), Layering Stencil of the Month, Fancy Dies of the Month, and the Card Kit of the Month.
This month, receive a FREE adorable “froggy” stamp & die set when you purchase The Whole Studio!
Hero Arts has many different Monthly Kits that you can subscribe to including:
The WHOLE Studio – All 5 Kits ($130 subscription + Free Shipping)
For my second card, I embraced bold color and graphic design with the Fancy Dies of the Month Kit. This set features five striking leaf dies and a scripty “hello” with a shadow layer.
Hand-painted beauty: Each leaf was die cut from watercolor paper and hand-painted in vibrant greens and blue-greens. Reactive Inks Used: Splash, Key Lime Fizz, Blue Hawaii, Blue Raspberry, Green Apple. I started with the lightest color and then layered on darker shades.
A pop of fun: To contrast the cool tones, I painted the “hello” with Fruit Punch Reactive Ink-blended cardstock, giving it a lively coral-red pop.
Artful splatter: I added Licorice Reactive Ink splatters for an artsy, organic touch. I simply dabbed the ink on an acrylic block and flicked splatters on my die cuts with a fine wet watercolor brush. I turned my splatter box for even splatter distribution.
Design balance: The leaves are arranged in a radiating composition, leading the eye toward the bottom-right hello.
Crisp and clean: Everything is anchored on an Adriatic blue card base, making those greens pop!
🎨 Pro Tip: When adding splatters, dab the ink on an acrylic block and flick splatters on the die cuts with a fine wet watercolor brush. Thie results in controlled yet artistic splatters. Don’t forget to rotate your splatter box to get an even, natural distribution!
BLOG HOP!
Don’t forget, this is part of a blog hop, so there’s plenty more enchanting inspiration ahead! Be sure to follow along for more crafty adventures. ✂️✨
Giveaway:
Hero Arts will give away a $50 gift card, drawn from the comments left across the hop. Enter by Sunday, April 6 at 11:59pm PST, and the winner will be announced on the Hero Arts blog the following week. Leave a comment on all stops for more chances to win!
These cards brought to life the whimsy of a storybook forest and the bold beauty of botanical art, all with the magic of the Hero Arts April Release. Whether you love layered die cuts, ink blending, or just an excuse to play with paint, this kit delivers endless creative inspiration!
I’d love to hear your thoughts—which card is your favorite? Let’s chat in the comments!
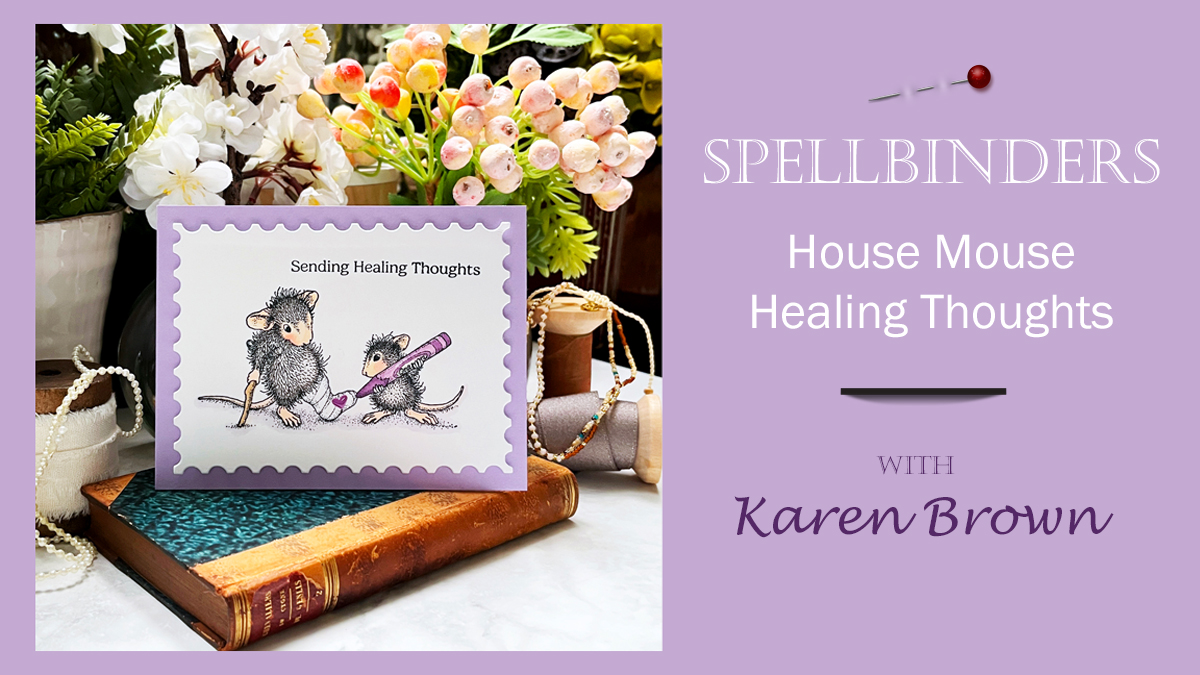
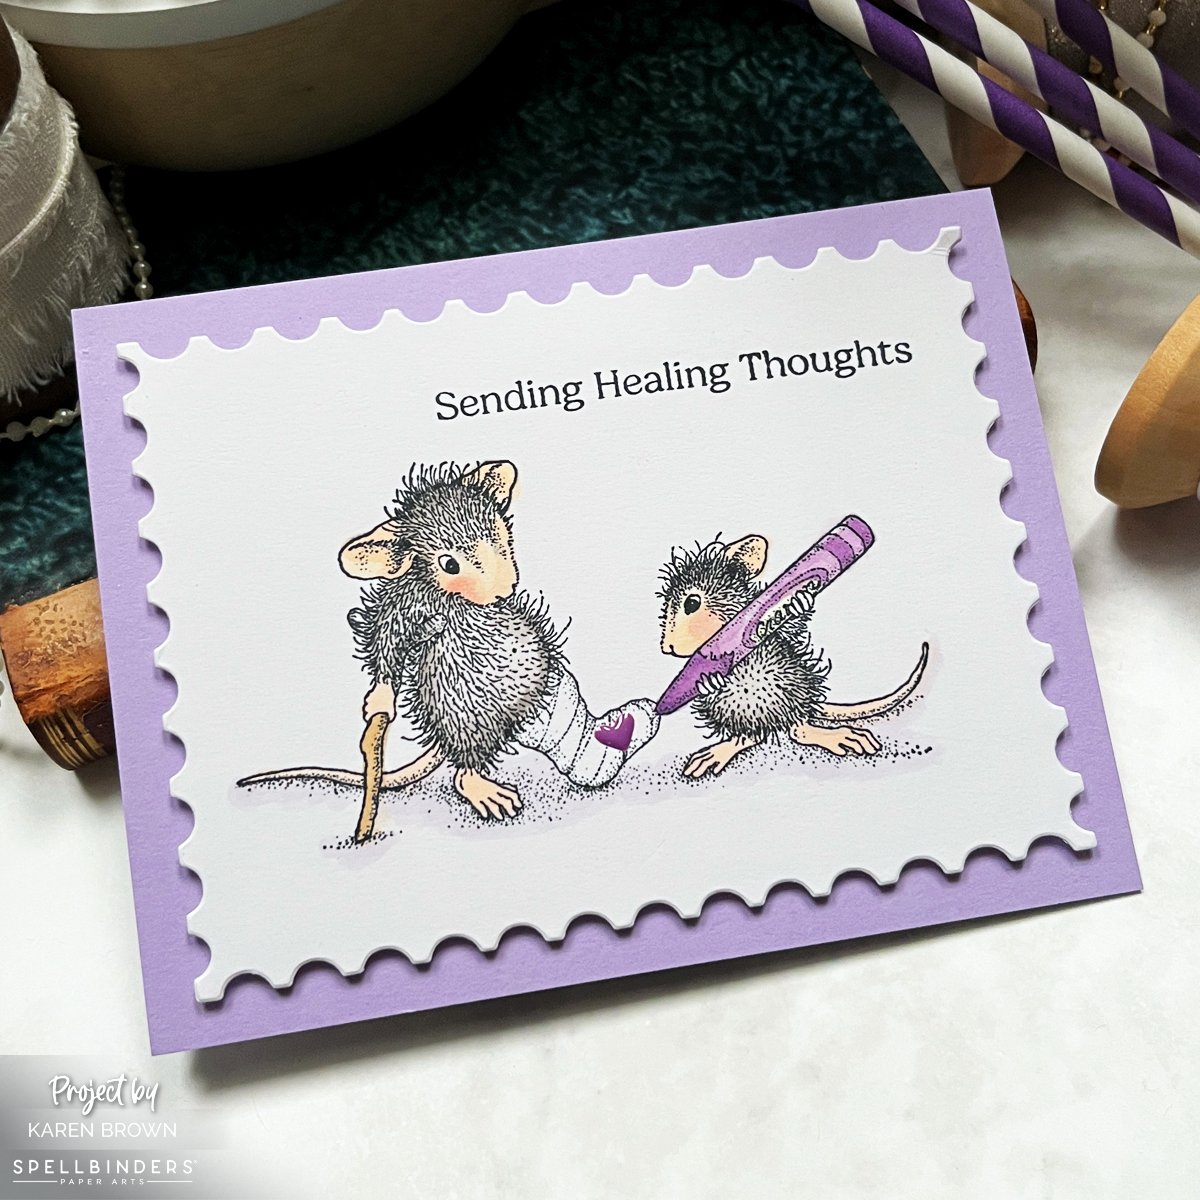
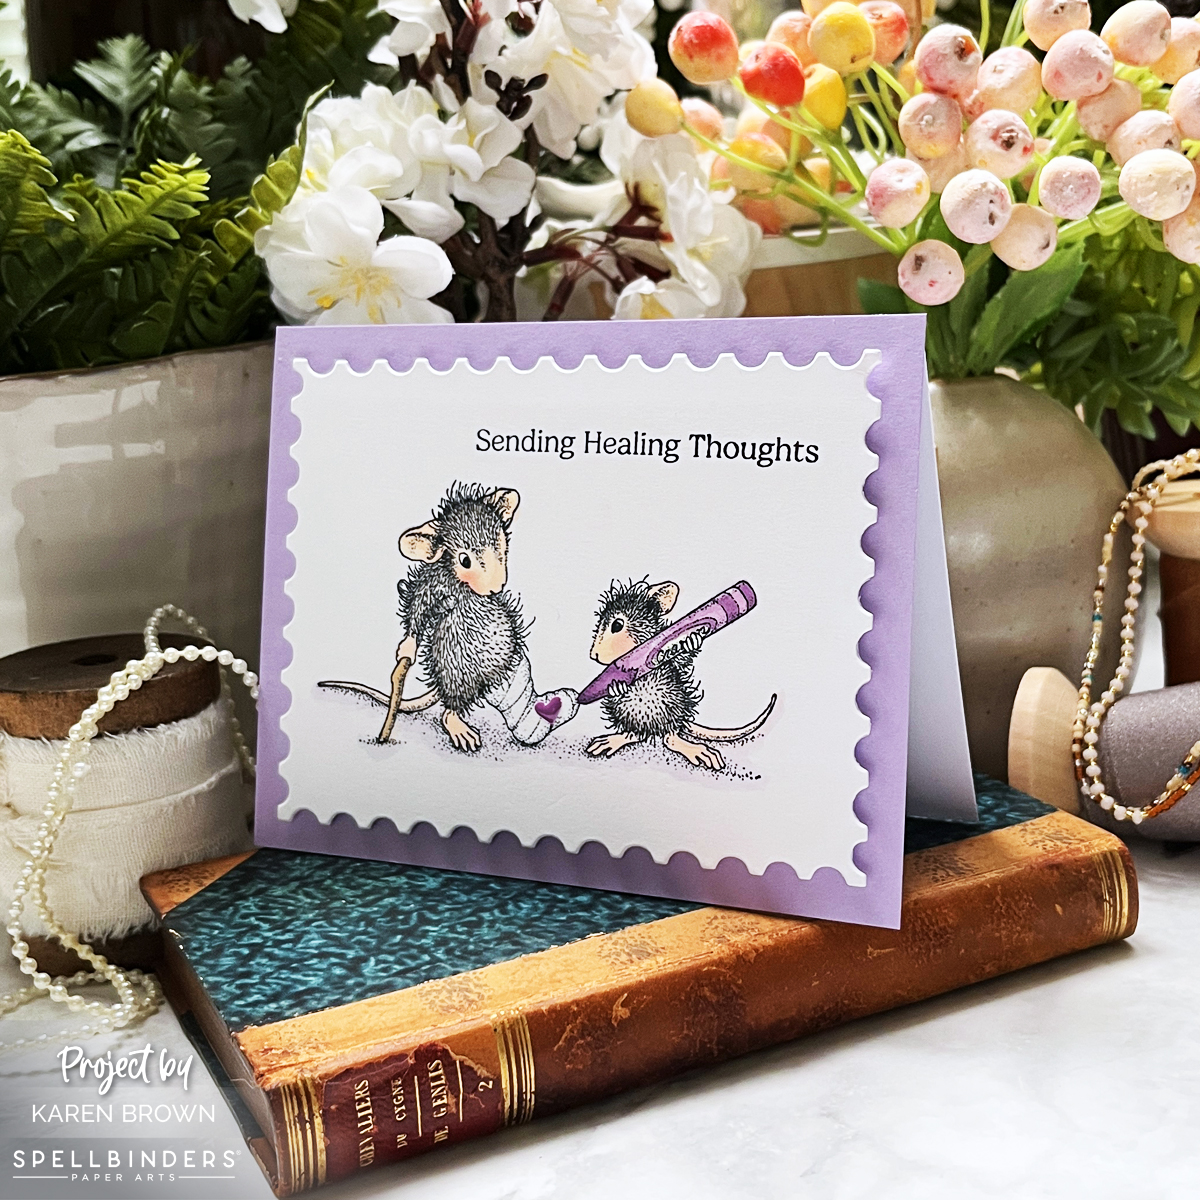
There’s nothing quite like sending a little handmade kindness when someone isn’t feeling their best. Today’s card features the always-adorable House Mouse stamps in a sweet and simple Healing Thoughts Get Well design. With its soft monochromatic colors and heartwarming scene, this card is as charming as it is easy to make!
A Look at the Design
The stamped image showcases an adult mouse with a cast on his left leg, while a juvenile mouse signs the cast with a giant purple crayon—adding a little heart for extra love. It’s a scene that captures both the innocence and warmth of these stamps so well!
To keep the design clean and simple, I used the Nesting Postage Stamp Infinity Die to cut out the panel and mounted it on a Passion Flower lavender card base. The soft lavender hue adds a soothing touch, making this card perfect for lifting someone’s spirits.
The sentiment, “Sending Healing Thoughts,” ties everything together beautifully—because sometimes, a thoughtful card is just the thing to brighten someone’s day.
Why I Love House Mouse Stamps
There’s just something irresistible about House Mouse stamps! 🐭💜 These little critters bring so much warmth, charm, and personality to every card. Whether they’re getting into mischief, sharing a sweet moment, or—like in today’s card—spreading a little cheer, they always manage to bring a smile.
I love how these stamps work for so many occasions. Their soft, sketchy details make them a joy to color, whether you go for bold tones or a simple, monochromatic look like I did here.
House Mouse cards are always a hit with recipients, and I can’t wait to share more of my little mousey creations with you!
Copic Colors Used
Mice: W0, W3, W5, E00, E50, R000, R20
Crayon: V01, V15, V17
Cane: E31
Shadows: BV0000
Final Thoughts
Having a few Get Well cards on hand is always a great idea, and this quick and easy House Mouse design is perfect for the job! Sometimes simple is best, and this card proves that a heartfelt sentiment and a sweet image can go a long way in brightening someone’s day.
Do you love House Mouse as much as I do? Let me know in the comments! And if you’re looking for more inspiration, check out these previous House Mouse creations:
Some days, you want to craft without fuss—no fussy cutting, no intricate techniques, just pure creative fun. That’s where printed paper and stickers come in! These supplies make it easy to create layered, dimensional cards that look anything but basic. Bonus: they’re beginner-friendly and perfect for a cardmaking party!
I have links to the products used at the end of this post. Each of my cards features 3-5 layers, creating rich dimension in no time. Let’s take a look!
Card 1: Lavender Rain Boots in Bloom
This sweet card features a pair of lavender chipboard rain boots, filled with flowers. The background is a vintage-look mint printed paper, layered over a lavender and white polka dot card base.
The card base is chiffon and brown plaid printed paper
The layered elements make it feel warm and rustic
Card 3: A Galvanized Bucket of Blooms
This card carries over the chiffon paper and lined school paper from Card #2, tying the collection together. The chipboard enameled pitcher works well for a Get Well Card.
💖 Finishing Touches:
Chipboard butterflies and hearts for a sweet, dimensional effect
A vintage look frame that enhances the soft, romantic feel
Printed cardstock gives you instant color, pattern, and texture, while chipboard stickers add depth and detail without extra effort. These elements are substantial and high quality, making them perfect for layering without feeling flimsy.
The Magic of Printed Paper & Stickers: Products Used in This Post
Spring is in the air, and so is a burst of bold color and whimsy! Today, I’m taking a closer look at the new Hero Arts Spring Whimsy Collection with four vibrant cards featuring hot foiling, ink smooshing, ink blending, heat embossing, and die cutting. Let’s get crafty!
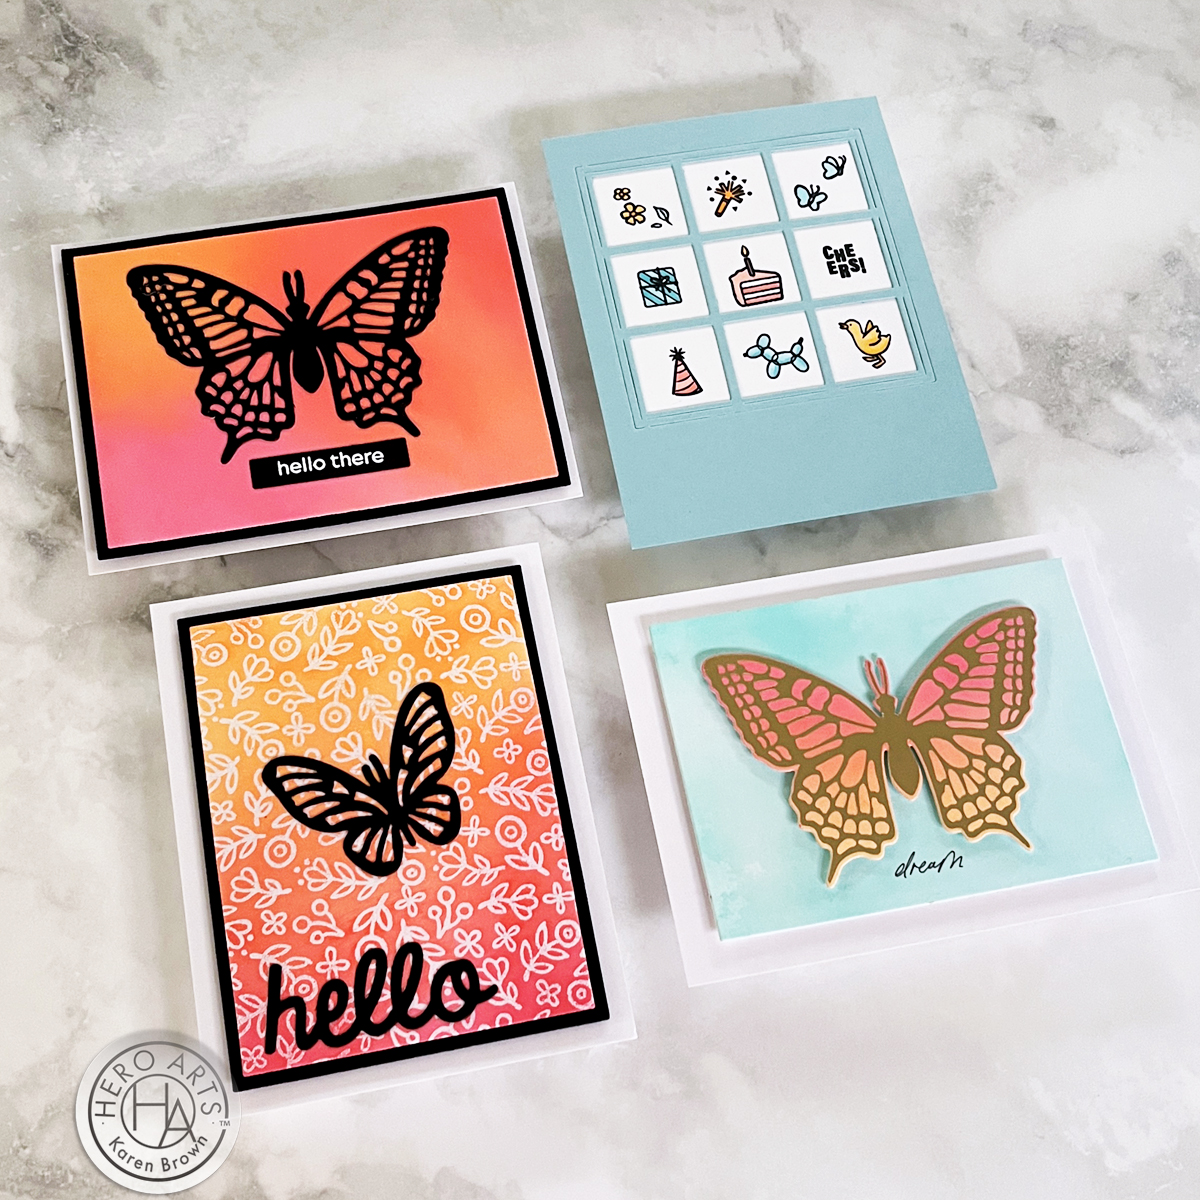
This card is all about shimmer and movement! I started with an aqua ink-smooshed background—the perfect backdrop for a gorgeous, hot-foiled butterfly. The butterfly itself was hot foiled onto an ink-blended panel of soft pinks, corals, and oranges before being die cut and centered on the background.
My Process for Creating This Foiled Butterfly Card:
I liberally inked an 6×6″ acrylic block with Pool Party and Paradise inks. This is the panel I used for my background. I was going for a sky-like background and I like the color variation you achieve with ink-smooshing.
I “smooshed” the block onto a piece of Luxe watercolor paper
I weighted the inked block with a book for 5 minutes
I uncovered my panel. If the ink pooled, I dabbed with a paper towel.
I made a “second generation” panel for a future product by taking a piece of Bristol Cardstock and soaking up the excess ink on my work space.
I assembled my card with foam squares and craft foam.
✨ Pro Tip: Ink smooshing is a great way to create organic, watercolor-like backgrounds.
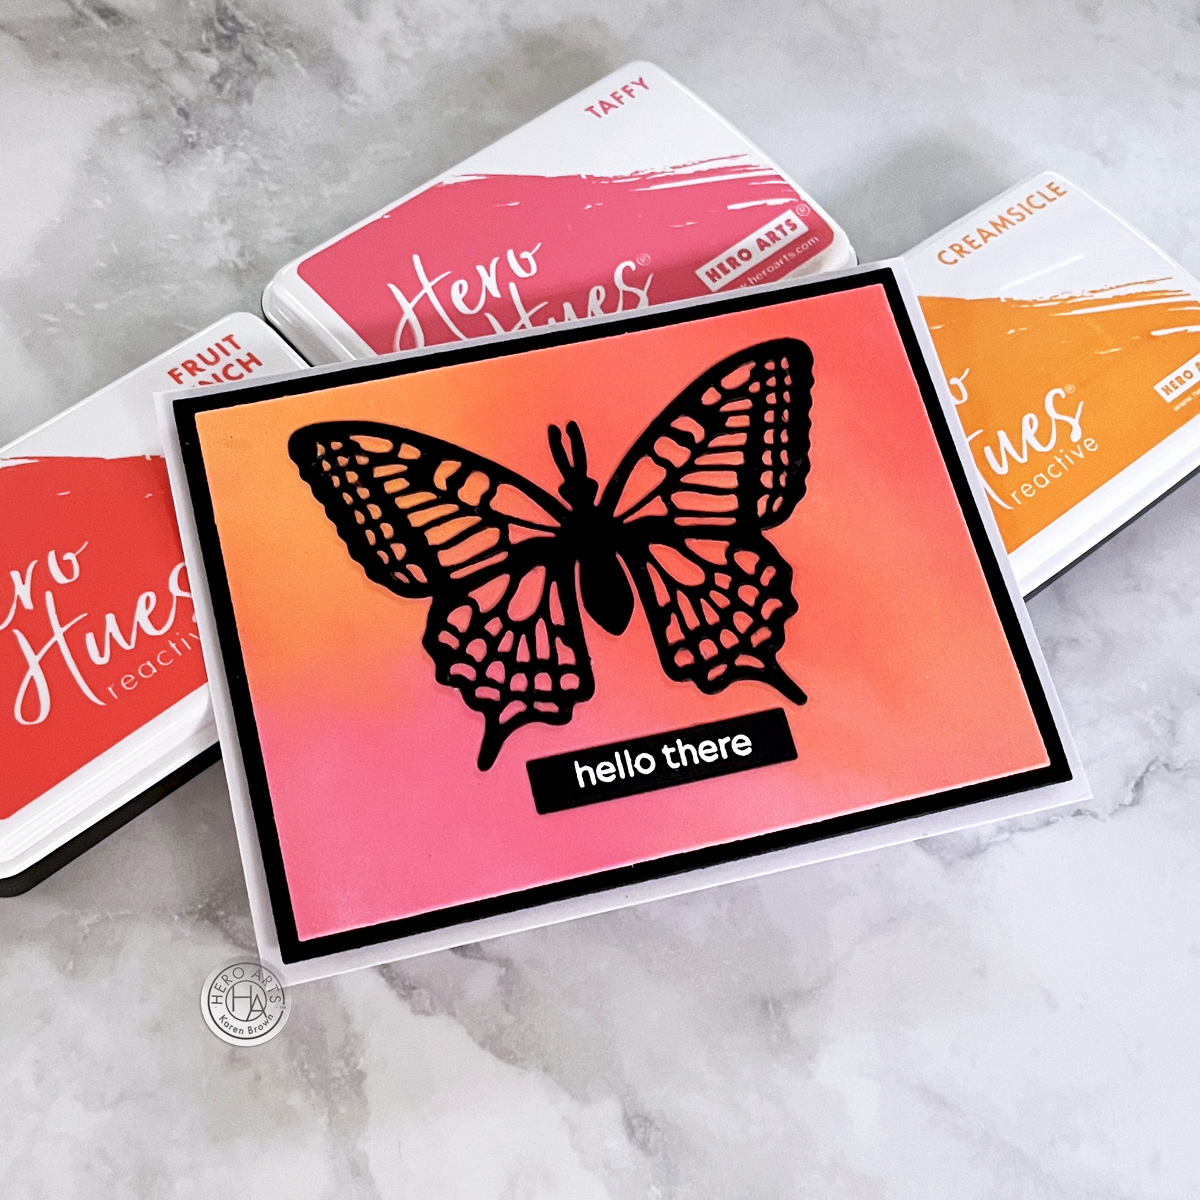
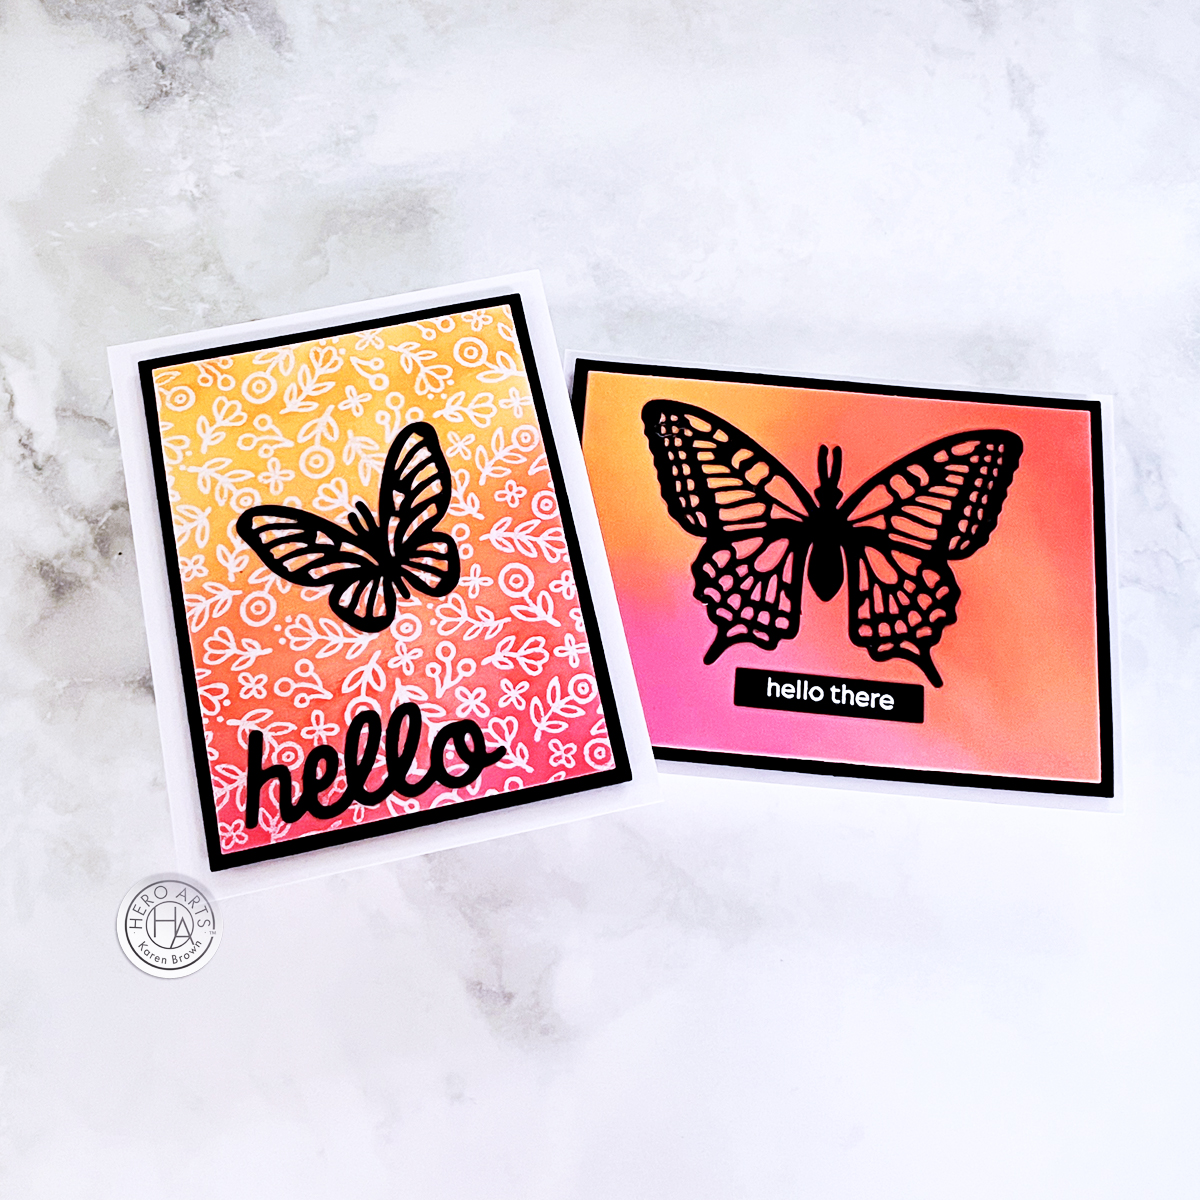
Card 2: Striking Ink-Blended Background & Black Butterfly
For a dramatic look, I ink blended a bold background using Fruit Punch, Creamsicle, and Taffy inks. These warm hues set the stage for a striking black die-cut butterfly, creating a high-contrast, modern design.
Card 3: Heat Embossed Floral Background + Die Cut Butterfly
This card keeps the same coral, pink, and orange hues but introduces texture with the Whimsy Floral Bold Print background stamp. I heat embossed the pattern in white over my ink-blended panel and added a small black die-cut butterfly and a “hello” sentiment for balance.
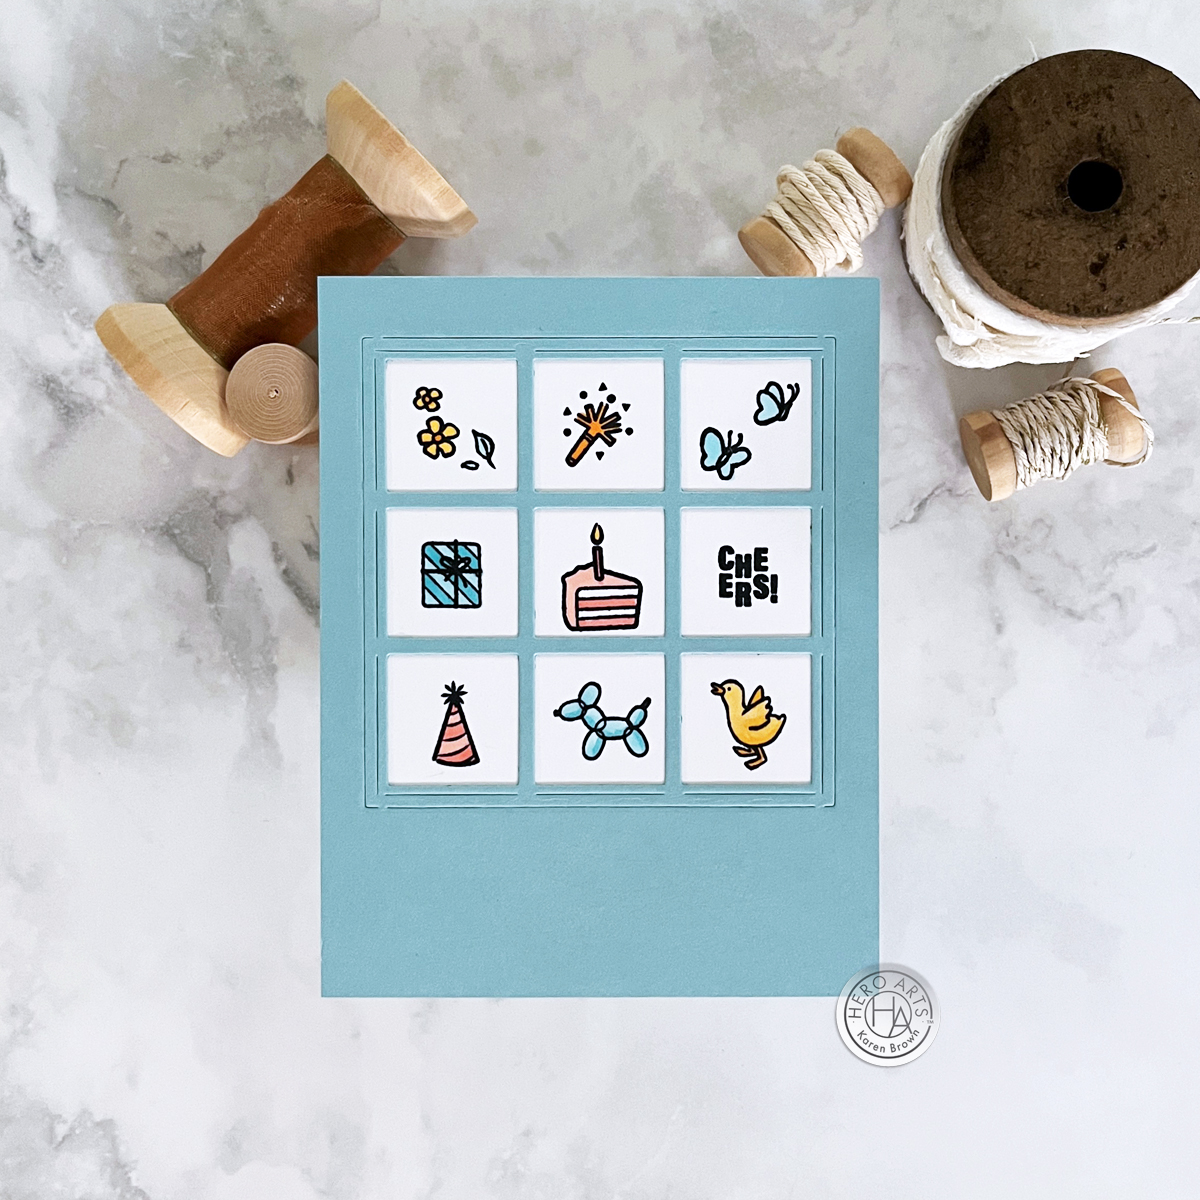
For a completely different vibe, I created a charming birthday card using the Elegant Window Fancy Die. The die creates a beautiful 9-pane window, which I die cut from Mist cardstock. Each pane features a tiny, Copic-colored stamped image from the Spring Bunny Stamps, Our Day Messages, and Birthday Animal stamp sets. A simple “cheers” sentiment ties it all together.
This collection is packed with so much creative potential! Whether you love hot foiling, ink blending, or stamping, there’s something here for every cardmaker. I hope these designs inspire you to play with color and try new techniques!
Can you ever have too many birthday cards? I think not! Today, I’m sharing a fun, modern, and eye-catching birthday card featuring the Hero Arts Celebrate Stamp & Stencil Set—perfect for anyone on your list!
You can watch the video above, or you can click the link HERE to watch on YouTube.
Plus, this video is part of a Video Hop, so be sure to check out the other fabulous creators linked below.
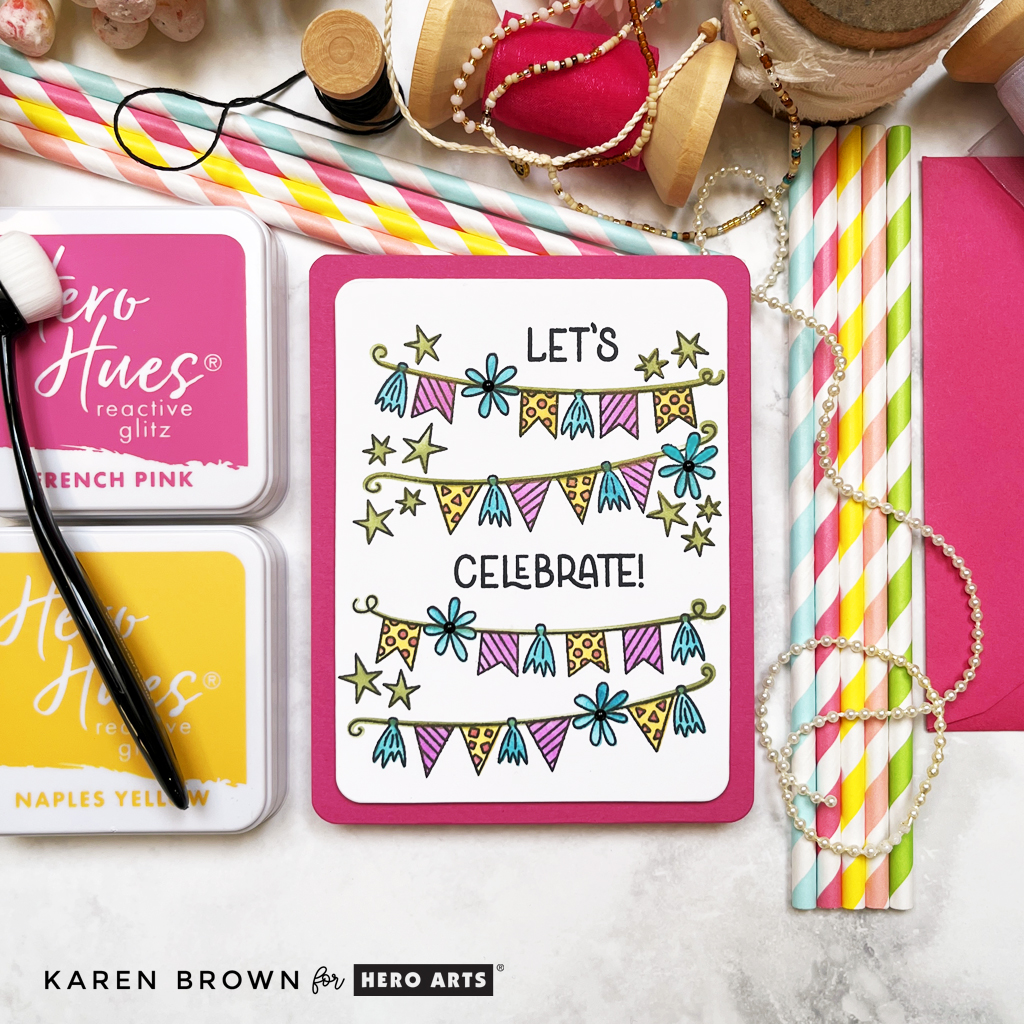
Bold Colors & Easy Techniques
For this card, I started with a large focal stamp of four birthday banners—such a fun and festive design! Instead of traditional coloring, I brought in Glitz Inks and Color Layering Stencilsto add French Pink, Naples Yellow, Byzantine Green and Egyptian Blue to the banners. These inks add beautiful shimmer that makes the design pop without needing extra embellishments (but you know I couldn’t resist a few black enamel dots in the flower centers!). This is totally optional, but I used my Rounded Rectangle Infinity Dies to round the corners and trim down my panel.
Pro Tip:Glitz Inks are not only stunning, but they’re also super easy to clean up! A quick rinse, and your brushes are good as new.
Organizing My Stamps & Dies
I also wanted to share a quick tip on storing stamps and dies. I use Hero Arts Magnetic Sheets and Storage Sleeves, which help keep my dies neat, tidy, and easy to find. No more hunting for that one missing die—it’s all in one place and ready for my next crafting session! I also love their Stamp Storage Sleeves. More details in the video.
This card was a joy to make, and I hope it inspires you to break out your Glitz Inks and stencils! Be sure to check out the Video Hop and leave a comment on my video—I’d love to hear what you think! And tell me… do you think it’s possible to have too many birthday cards? (Spoiler: I don’t!) 🎉
Welcome back, crafty friends! Today, I’m diving into stenciled floral backgrounds with a focus on color theory and shimmering inks. If you’ve ever struggled with picking colors that pop or wondered how to make your stenciled backgrounds shine, this post (and my video!) is for you!
If you are having difficulty watching the video above, click HERE to watch on YouTube.
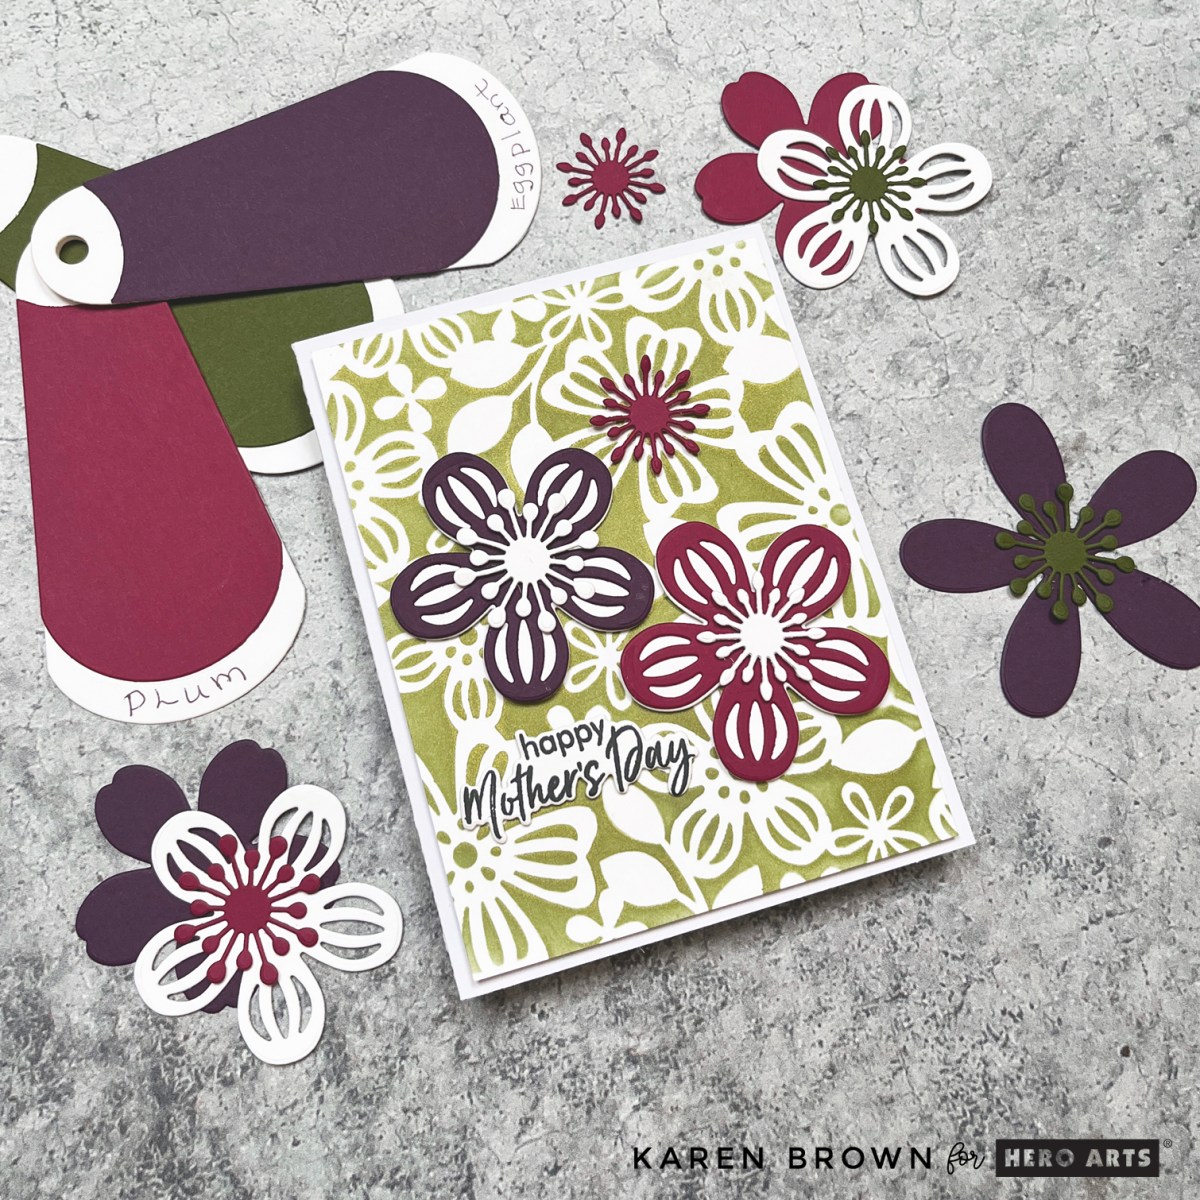
Card #1: Byzantine Green Glitz + Bold Plum Congrats
For my first card, I wanted a rich, elegant background with plenty of shine. I stenciled with Byzantine Green Glitz Ink, which gives a gorgeous shimmer, and paired it with a bold Plum “Congrats” sentiment. Here’s the magic:
The background is a mossy olive hue.
The sentiment is red-violet, which is directly opposite on the color wheel—hello, instant contrast!
The large vellum shadow behind the sentiment softens everything just enough.
✨ Pro Tip: When in doubt, check your color wheel! Using complementary colors creates high-impact contrast, making your card visually striking.
Card #2: 3. Aqua Gradient for a Fresh Take
For the next card, I switched things up with a cool-toned, gradient background using Pool Party, Paradise, and Blue Raspberry inks. The result? A soft, dreamy floral backdrop that’s perfect for spring!
✨ Pro Tip: If you’re unsure which colors to use, swatching your cardstock makes a world of difference! I swatched mine with Spellbinders Color Swatch Petal Dies, and it made choosing my die-cut colors so much easier.
Card #3: Layered Floral Mother’s Day Card
Since I was loving that Byzantine Green shine, I stenciled a second background—but this time, I turned it into a Mother’s Day card!
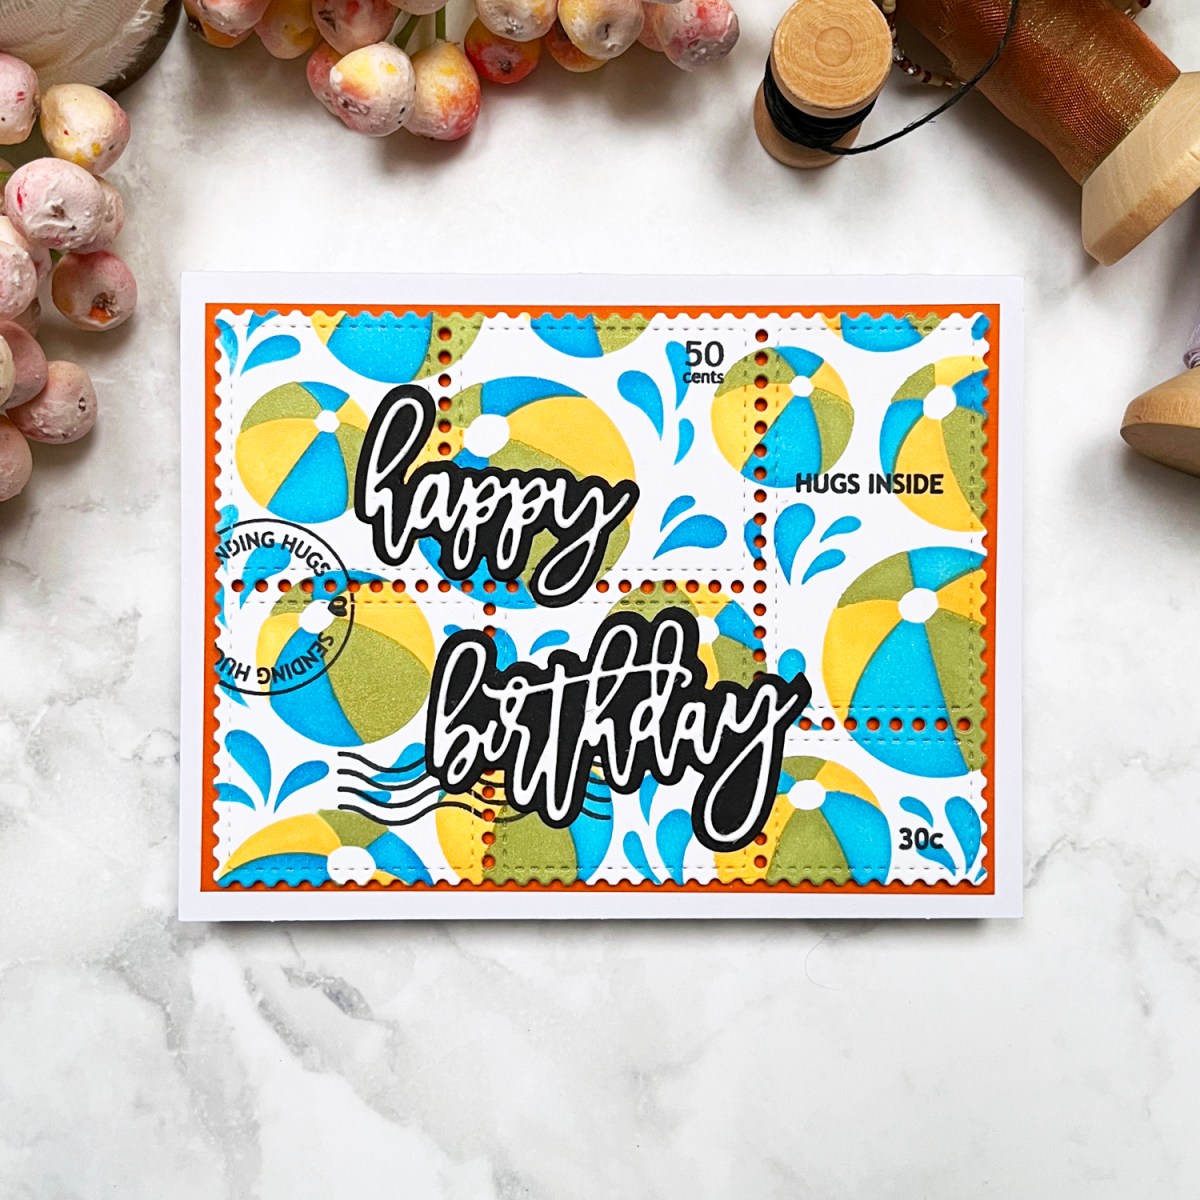
Nothing says “happy birthday” like a burst of bright colors and a little beachy fun! Fresh off a trip to the shore, I felt inspired to bring the ocean breeze into my craft room—minus the sand in my die-cutting machine. Today’s card features stenciled beach balls, a fun postage stamp collage, and plenty of shimmer and shine. Let’s dive in!
Bringing the Beach to Paper: Creative Ways to Use Layering Stencils
To set the seaside scene, I stenciled a flurry of yellow, green, and blue beach balls bouncing across the card. But what’s a day at the beach without a little shimmer? I used Glitz Inks to add a splash of shimmery shine.
Easy to Use 3 Layer Stencil: I started by stenciling my background with the fun Beach Ball Stencil. To keep my paper and stencil in place, I used my Sticky Grip Mat, which worked perfectly.
Use a circular motion: This prevents harsh lines and gives a softer, airbrushed effect. I also like to change direction frequently.
Let the shimmer do its thing: Glitz Inks add an extra pop. I used two shimmery Glitz Inks + Summer Sky for a really beachy vibe.
Postage Perfection
Nothing elevates a card quite like a postage stamp theme, so I pulled out my Waffle Flower Postage Collage die and stamp set to bring in some postal flair. Here’s what I included:
Postage-style die adds a fun and playful focus to your project, allowing pops of the orangemat to peek through the holes.
Stamped details like “sending hugs”, “50 cents”, “hugs inside”, and classic cancellation squiggles for that perfect mail-ready touch.
A crisp white scripty “Happy Birthday” sentiment with a black shadow, keeping it bold and readable amidst all the beachy goodness.
The Final Splash
With the main panel matted in orange, this card bursts with sunny energy—perfect for anyone’s birthday, no matter their age! The beachy vibe, vibrant colors, and postal elements make it a playful, happy way to celebrate.. ☀️📬✨
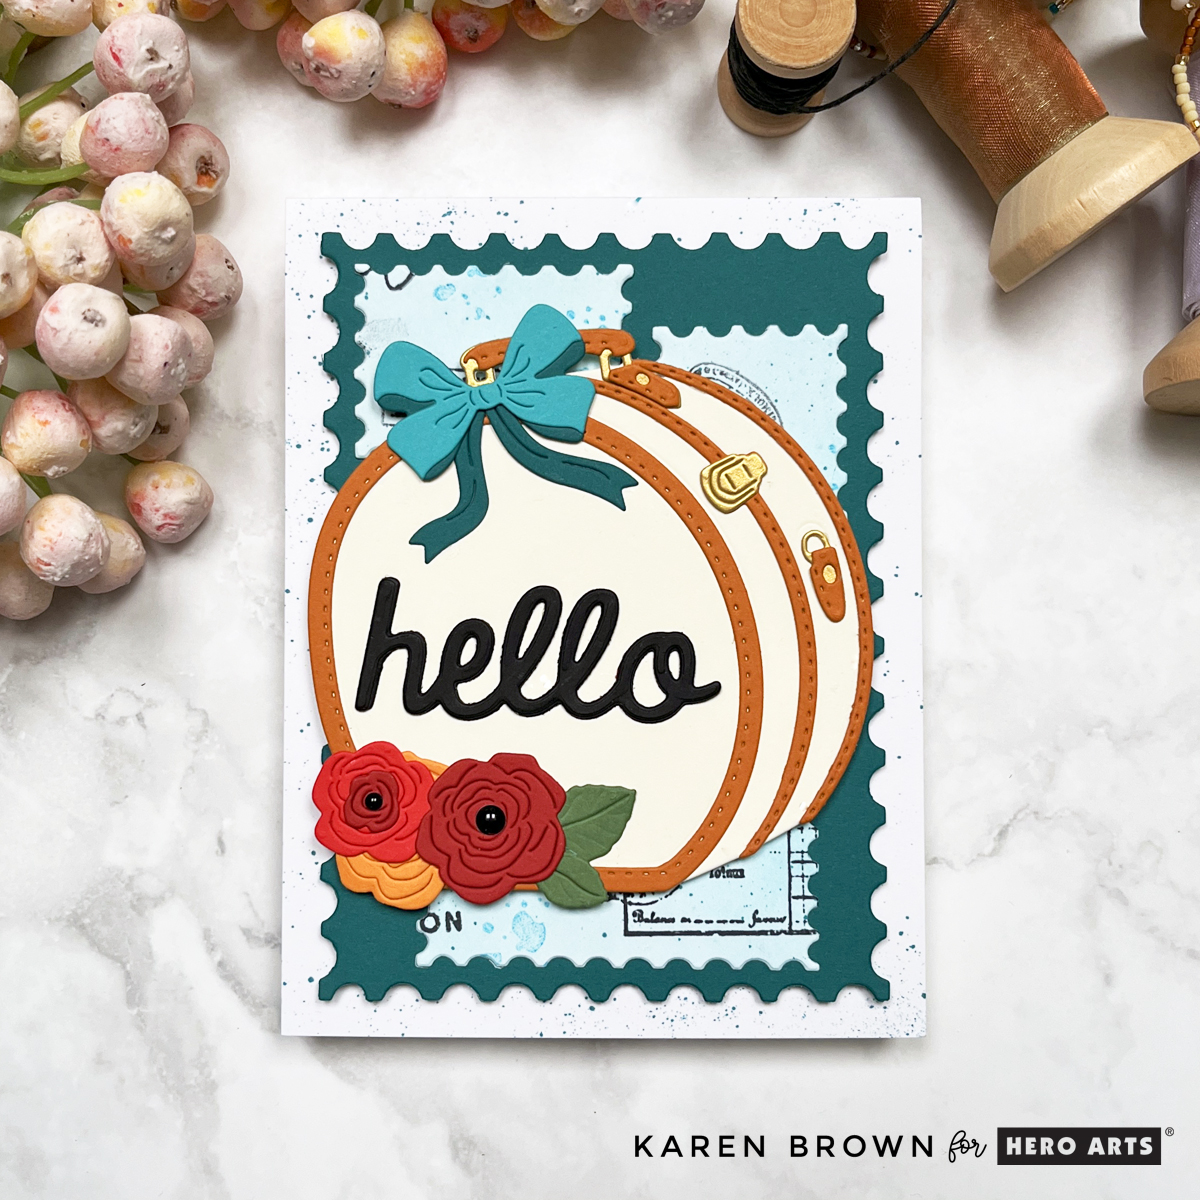
Welcome to another exciting Hero Arts release! For March 2025, I created two unique cards that highlight the versatility of the new products. One is a vintage-inspired die-cut design featuring the Suitcase and Florals Fancy Die, while the other is a beautifully blended, pastel-hued circular stamped card. Let’s jump into the details!
This card is all about vintage charm! The focal point is a cream-colored hat box-style suitcase with tan trim, die-cut from the Suitcase and Florals Fancy Die. A lovely teal bow is tied to the handle, and delicate die-cut flowers add a soft floral touch.
Framing: A vivid Blue Spruce mat behind the die-cut stamps makes the alabaster hat box pop.
Sentiment: A die-cut, scripty “hello” (Friend Words Sentiment Dies) that complements the vintage theme. Two black enamel dots in the center of the flowers continues the bold color palette.
Pro Tip:
A deep Blue Spruce background mat is key to making lighter elements like the alabaster suitcase stand out.
Color Swatching:
To help with color coordination, I also swatched my cardstock colors using the Spellbinders Color Swatch Petal Dies—a handy way to visualize your palette before committing to a design!
Color Wheel Cardstock Colorsused: Alabaster, Terracotta, Poppy, Cranberry, Carrot, Teal Topaz, Blue Spruce, Fern and Brushed Gold.
You can find the entire Color Wheel Collection HERE.
Card 2: Pastel Bow-Themed Circular Card
For my second card, I went with a soft, rainbow gradient-colored design that’s easy to recreate. This is a DIY card that’s great for beginner cardmakers, offering a fun way to experiment with color blending and shaped card designs. The 6 x 6″ Bold Print makes stamping so easy! The bows are already laid out perfectly, so no need to spend time arranging your dies.
Design Details:
Stamp: The “Bows” Bold Cling Stampstamped on smooth white cardstock and colored with pastel Copic markers.
Color Gradient: Blends from creamy yellow at the top to soft pinks, corals, lavender, and blues at the bottom.
Card Shape: Using my Nesting Circle Dies, I die cut a circle from my Copic colored panel. To make my card base, I die cut two circles from Charcoal cardstock, scored the back one at 3/4″ and then glued the tops together. To make this card even easier, you could make a traditional A2 rectangular card, which would exclude using infinity dies.
Finishing the Card: I added a small “for you” heat embossed sentiment and some Clear Enamel Dots.
Pro Tip:
Use craft foam behind your card panels for a polished, professional look with added dimension!
Final Thoughts
Both of these cards showcase the March 2025 Hero Arts release in different ways—one with vintage textures and layers, the other with simple stamping and coloring. Whether you’re a fan of intricate die-cutting or quick, colorful stamping, there’s something in this release for you!
Let me know in the comments—which card style do you love most? And don’t forget to check out the full Hero Arts release for more inspiration!
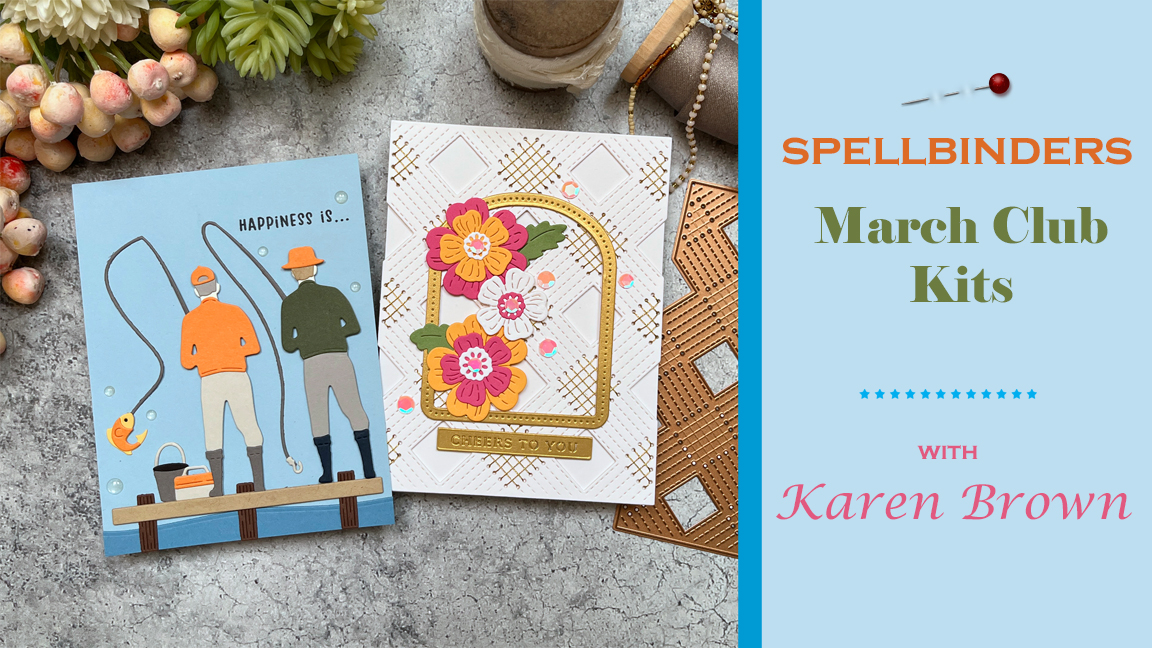
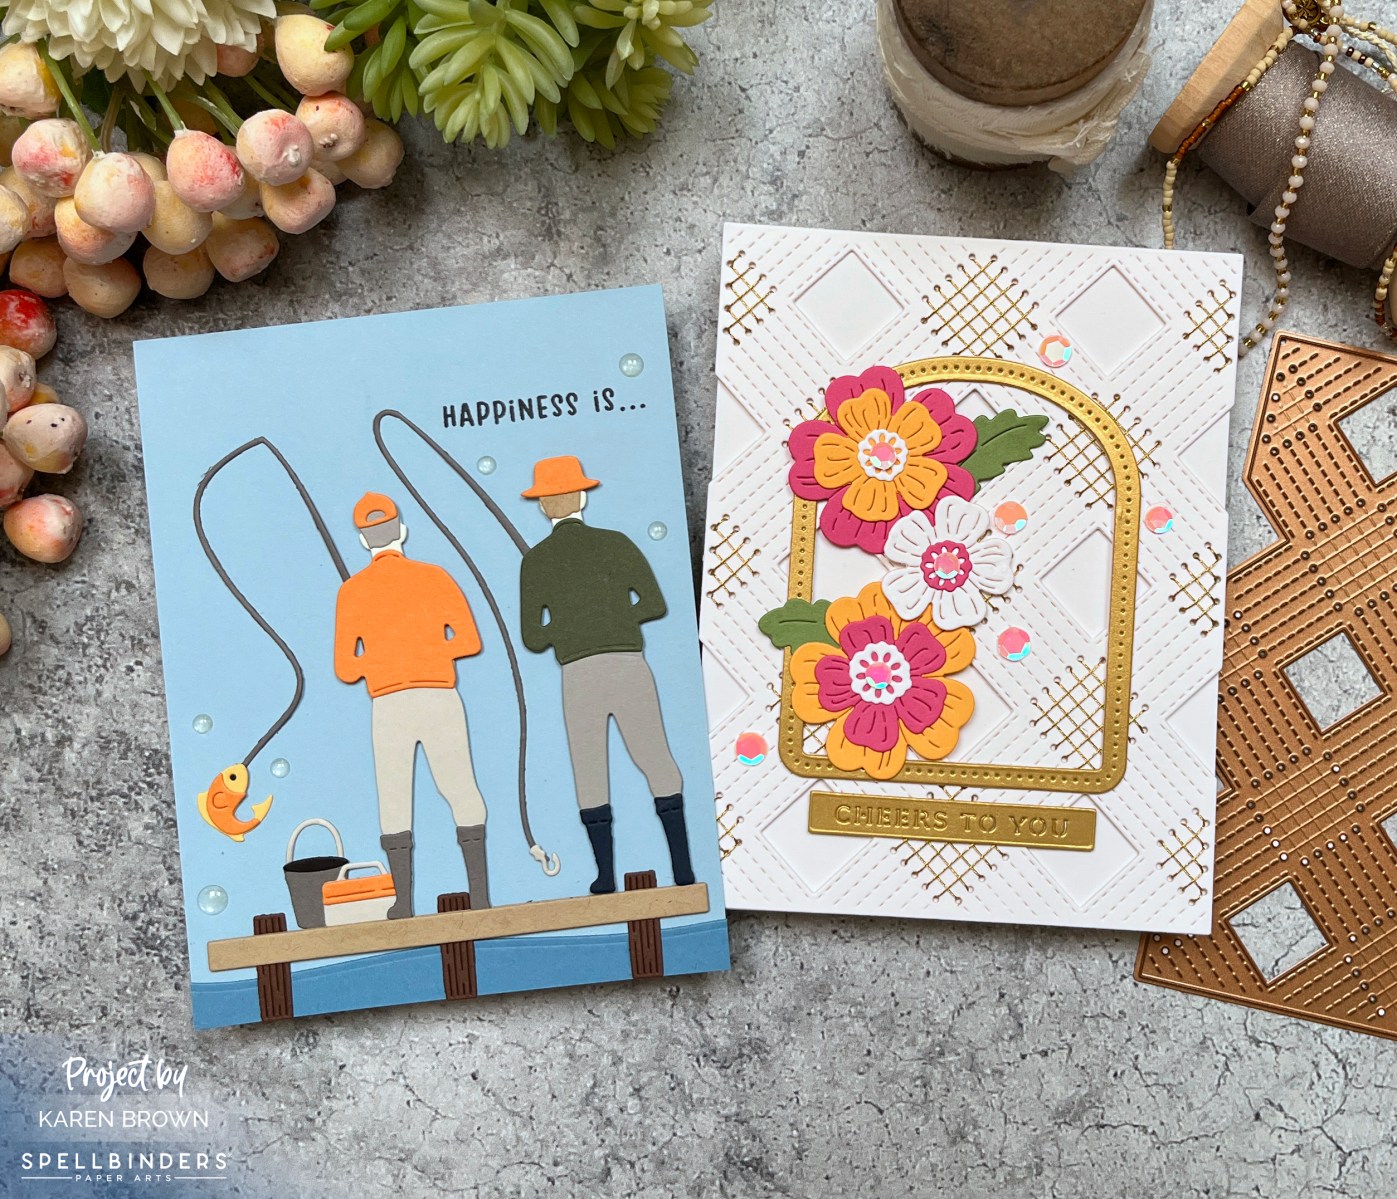
March is here, and with it comes Spellbinders’ March 2025 Club Kits,featuring some truly exciting club kits! This month, I crafted two very different—but equally fun—cards: one celebrating the great outdoors and another bringing stitched floral elegance to life. Let’s dive in!
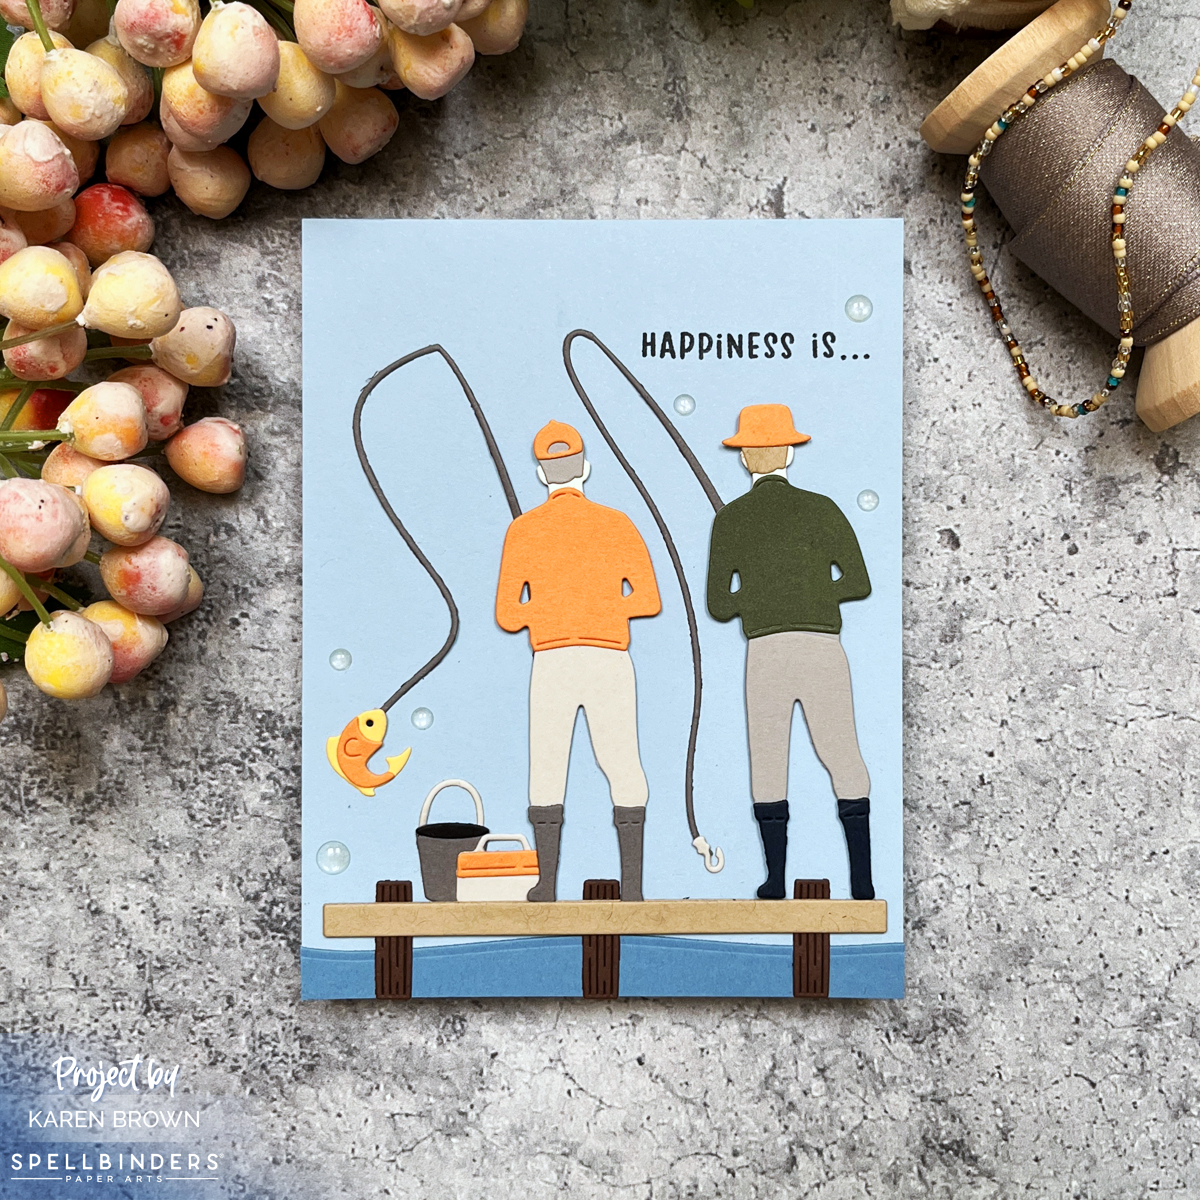
For my first card, I used the Die of the Month Club Kit – Fairways and Fish Tales, a perfect choice for masculine cards. This set brings all the charm of a peaceful fishing trip, complete with fishing rods, tackle boxes, and two friends casting their lines from a dock.
Since my husband is a fly-fishing enthusiast, this card is especially meaningful. The “Happiness is…” sentiment captures the joy of a day spent on the water. The color palette leans into lovely blues, accented with pops of orange and green, giving the scene a fresh and lively look. If you’re looking for a kit that’s perfect for the men in your life, this one is a winner!
For my second card, I combined the Stitching Club of the Month Kit with the Large Die of the Month, which offers three design options: floral, dog, and dinosaur. I chose the floral dies and paired them with the intricate stitching background for a stunning, textured effect.
The stitching panel was cut from white cardstock and hand-stitched with gold thread, giving it a luxe feel. Then, I added die-cut flowers in pink, orange, and white, accented with gold, to create a truly elegant design. Stitched cards always have that “WOW” factor, and this one is no exception—handmade beauty that recipients love!
One thing I love about the stitching die background is that it’s just as beautiful unstiched. I plan to use it that way in the future for a more subtle yet equally stunning effect.
Notes About This Card:
I started by die-cutting all my components with my Platinum 6 System.
March’s Spellbinders release has something for everyone—whether you’re crafting for the outdoorsman in your life or making a stitched masterpiece. Which of these styles speaks to you the most? Let me know in the comments!