Spellbinders has a wonderful NEW release called Out and About that is chock full of wonderfulness! Spellbinders is introducing their new compact die cutting machine called “Scout”, along with a fun collection of small but adorable die sets that work well with the pint-sized Scout. I love having a small light weight die cutting machine for smaller dies and sentiments. It allows me room to die cut, glue and assemble without having to tidy up in between steps.
I die cut Luna 3 times from Island Blue cardstock and then glued the layers together for a beautiful 3D focal point.
Using a Scallop Labels and Tags die, I die cut my background and THEN embossed the panel. If you emboss in this order, you will have more texture and dimension on your embossing. (If you emboss and then die cut, the die cutting process will smoosh the raised embossing.)
I added white accents with a thin Posca paint pen and added a black enamel dot for the eye.
I think little Luna is so cute! Thanks for stopping by and enjoy the rest of your day.
As a passionate crafter, I’m always on the lookout for tools that make the creative process smoother and more enjoyable. Recently, I had the pleasure of testing out an updated re-released product that gently holds cardstock and stencils in place for stamping and ink blending— Waffle Flowers new and improved Grip Mats.
This innovative mat has been specifically designed to keep your cardstock firmly in place, eliminating the need for pesky adhesives or awkward hand placements that can often lead to smudges or uneven ink application. After putting the sticky Grip Mat through its paces, I’m excited to share my experience and why I believe it’s a must-have for any serious crafter.
Previously, I purchased a Grip Mat for both my Misti and Mini Misti and I found them invaluable. Waffle Flowers recently asked it they could send me two NEW mats, no strings attached. I was happy to test and play with two sizes of the new mats.
👉 TIP:With Grip Mats, there is no need to use magnets anymore when using my Misti Stamp Positioners!
To truly test the Sticky Grip Mat’s capabilities, I decided to embark on an colorful project: ink blending six small rainbow-colored panels, which I would then assemble into a vibrant card. Here’s a step-by-step look at how the mat performed throughout the process:
Securing the Cardstock: The Sticky Grip Mat held each piece of cardstock firmly in place, preventing any slipping or movement. This was a game-changer for achieving precise, even ink blending. Small panels and die cuts are difficult to work with so I die cut 6 small windows with Waffle Flower Window Scene Diefor my testing purpose. I have a process photo below. I tested both the 7.5″ x 11″ mat (easily holds half letter size paper) and 4″ x 4″ mat for ink blending. The 4″ x 4″ mat was also very handy for holding my ink pads in place.
Ink Blending: As I blended various rainbow hues onto the panels, I noticed how smoothly the ink applied. I used Hammermill’s smooth cardstock, which worked extremely well. I selected my favorite Hero Arts ink colors for my project. The stability provided by the mat allowed me to focus entirely on the blending process without worrying about the cardstock shifting. This resulted in beautifully blended panels with seamless color transitions.
Stamping: Stamping on the secured cardstock was equally impressive. The mat kept the cardstock in place, ensuring crisp, clear impressions every time. I didn’t have to reposition or realign the cardstock, which saved me a significant amount of time and frustration. I stamped longtime favorite Warm Wishes using my Mini Misti Grip Mat.
Assembly: After completing the six panels, assembling them into a card was a breeze. I used Waffle Flowers Window Scene Die to finish my card. The consistent, high-quality ink blending and stamping made the final product look professional and polished.
Pros and Cons
Pros:
Excellent Grip: The mat’s adhesive surface effectively holds cardstock in place, allowing for precise and effortless ink blending and stamping.
Reusable and Durable: After several uses, the mat maintained its tackiness and showed no signs of wear, making it a long-term investment for any crafter.
Easy to Clean: Any residual ink or debris wiped off easily with a damp lint free cloth, restoring the mat to its original condition.
Cons:
Initial Tackiness: The mat is extremely tacky when first used, which might cause lighter weight cardstock to tear upon removal. None of my panels tore during my testing process.
Notes:
To minimize cardstock warping, peel the mat off the cardstock. I didn’t touch the cardstock but gently bent the ends of the grip mat and slowly pulled away from my inked panel.
The mats each come with two guides that you can add above or below the mat. To prevent the print from transfering to your mat, apply the guide to the mat with the reverse side facing away from the grip mat.
The new mats are a bit cloudier than the 1st generation.
Air bubbles are expected and fine.
If the mat starts to lose it’s cling, clean with water or photopolymer safe cleaner.
Store your Grip Mats on the transparent sheets.
Do not stack heavy items on top of your grip mats.
I have another blog post and video coming this month that demonstrate using two sizes of Grip Mats in action for ink blending with layering stencils.
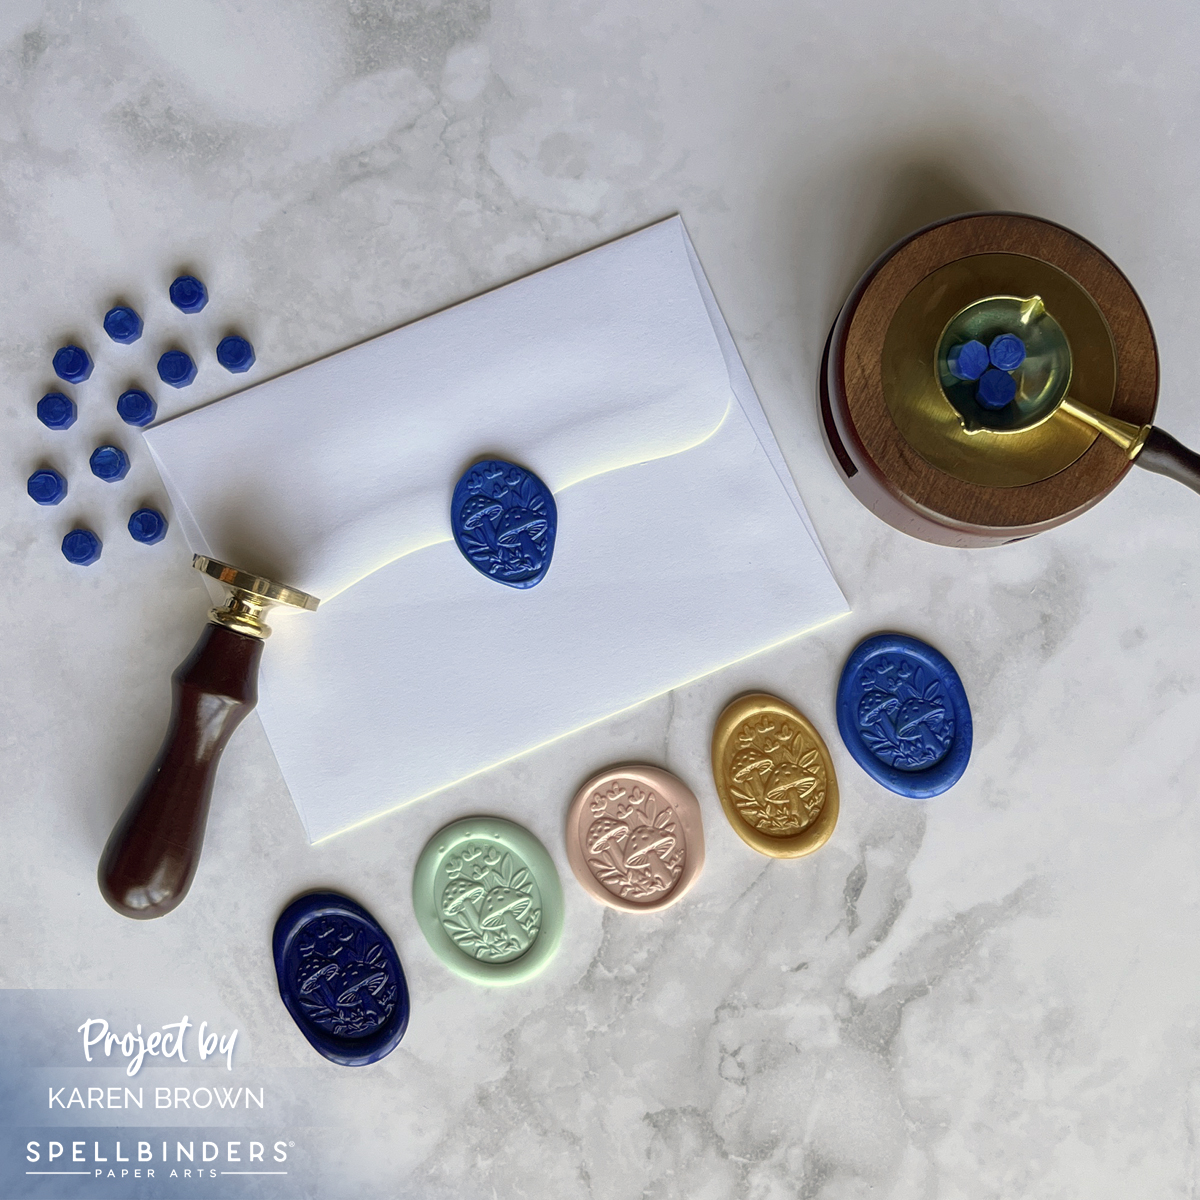
If you’re looking to add a touch of elegance and sophistication to your handmade cards, incorporating wax seals and infinity dies can elevate your designs to new heights. In this post, we’ll explore how to use these tools to create a stunning floral handmade card.
I knew I wanted to make a shaped floral card with a wax seal medallion on my vase. Here are step-by-step directions for this card:
I started by making a bunch of wax seals, which I really enjoy. If you’d like more details, I have a blog post titled 18 Tips and Tricks for Making Wax Seals that you can read HERE. I decided to use two Royal Blue seals and I planned my color scheme around the two seals. Spellbinders Wax Seal Kit is such a fun addition to any craftroom and I have really enjoyed playing with my kit this year.
Using my silver Deco Color Paint Pen, I added highlights to the wax mushrooms and foliage. Interestingly, the color looks a little more gold in the photographs, but it is silver in person.
As I mentioned, I wanted a shaped card so I took an A2 Side Fold Card Base and die cut my white base with the Scallop Labels and Tag die. I made sure that the left cutting edge was to the left of the fold so it would stay intact. Then I cut a Periwinkle and White Mat and assembled my card with Bearly Glue and a few Foam Adhesive Squares.
I also made a coordinating wax seal envelop for my card that you can see below.
As I said, I really enjoy making wax seals so I made some extras for future projects. The other colors are Indigo Ink, Pistachio, Velvet Rose and Gold.
Conclusion
Using wax seals and infinity dies in your handmade cards adds a level of detail and elegance that will impress any recipient. These tools allow you to create intricate designs and sophisticated touches that make your cards truly stand out. Whether for birthdays, weddings, or just because, a floral handmade card with these elements will be cherished and remembered. Happy crafting!
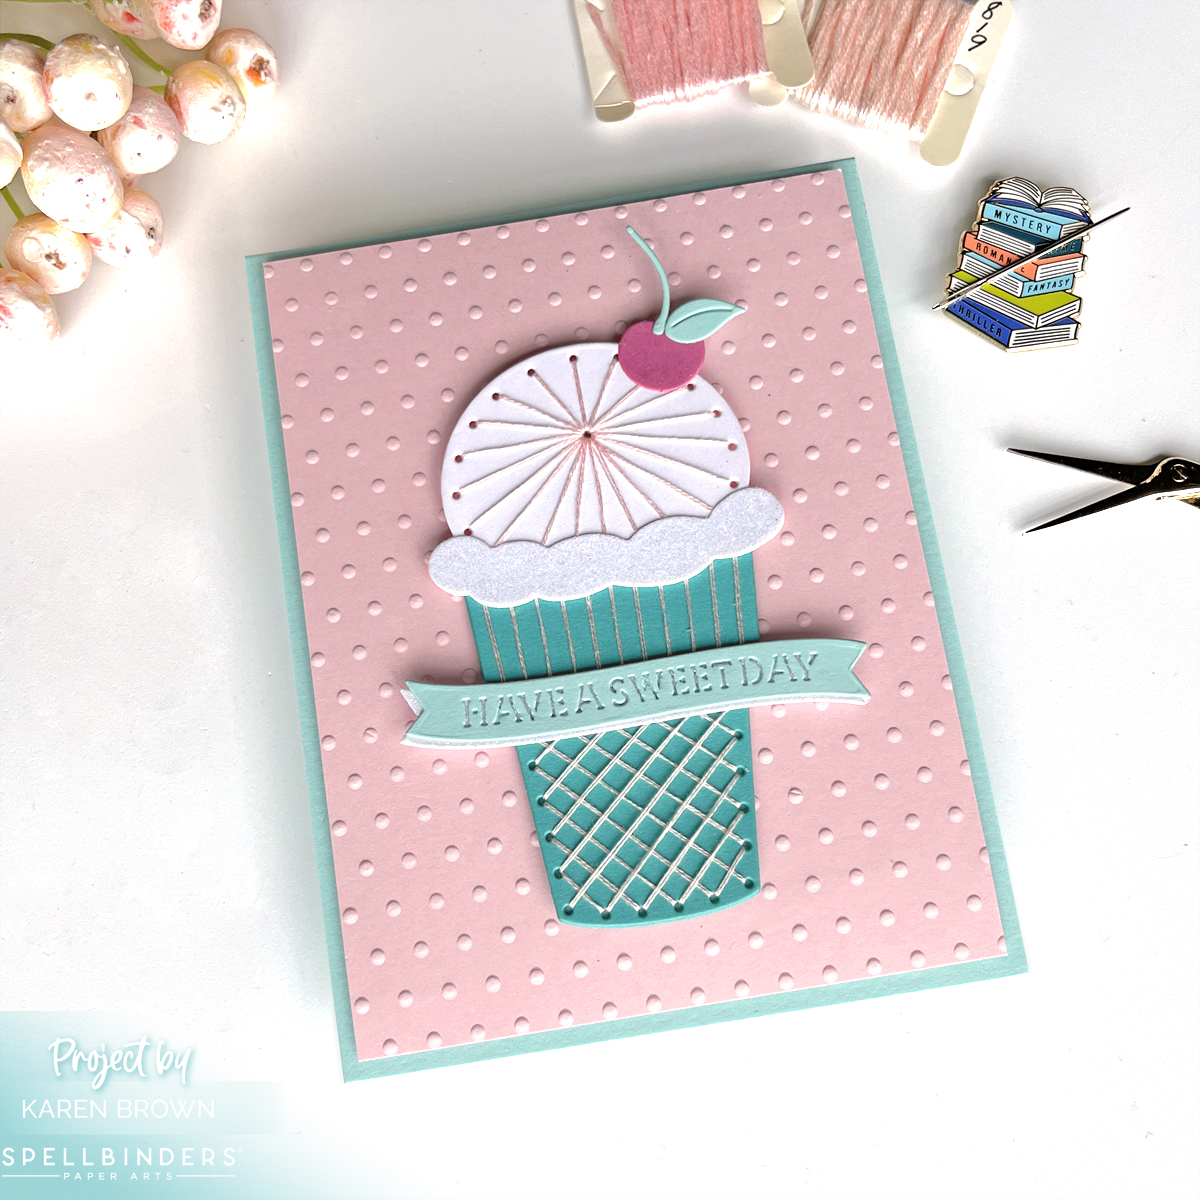
This month, Spellbinders Stitching Die of the Month Kit allows us to indulge in sweet delights with a yummy hand-stitched Ice Cream Cone Card. Looking for a sprinkle of sweetness to brighten someone’s day? Look no further! This kit is a reminder to cherish the simple pleasures in life, to savor each moment, and to spread kindness wherever we go.
The “Wow Factor” of Hand-Stitched Cards
This weekend, I had the pleasure of crafting this luscious handmade card with hand-stitched details, and let me tell you, the experience was delightful. The card came together quickly, but it is definitely high impact to the recipient. I find I get the most ooohs and aaahs from stitched cards and the “Wow Factor” they bring is truly priceless.
Tips and Tricks for Stunning Stitched Cards:
The kit has 12 cutting dies and I started by cutting all my pieces with my Platinum 6 die cutting machine. I used Teal Topaz and Waterfall cardstocks. I die cut the elements I was going to stitch 2 times and then glued them together for a substantial base. I used White Glitter cardstock for the accent on the ice cream.
Spellbinders has a nice selection of stitching accessories in their shop that you can find HERE. I used used two shades of pink: #818 Baby Pink (ice cream) and #819 Baby Pink Light (cone).
When I started stitching, I took two strands of floss, separated them one at a time, brought them together and then stroked and lengthened them until they seemed tame and ready to use.
When I move from one area to the next, I run the floss through the just finished stitched area to keep the thread secure. This gives a nice look on the finished project.
Don’t stitch with threads that are too long or they are likely to knot.
When I was done, I added a bit of Bearly Glue to the ends so that they would stay in place.
To finish my project I embossed Pink Sand cardstock with the Tiny Dots embossing folder.
Club members can cancel, upgrade or change clubs from the 1st-5th of each month. Popular Clubs frequently sell out during this period so club members get first dibs on everything.
NEW for 2024: Club Members get EARLY access to new releases on the 6th!
On the 6th, Clubs become available to non-members.
On the 27th, Club registration closes for the current month.
If a club did not sell out, you can buy under “Shop Past Clubs”. Past kits are available on the 10th of the FOLLOWING month.
Calling all crafters and cardmaking enthusiasts! Welcome to the June release, where we are bringing the boldness of urban textures in the signature Hero Arts style and quality! Get ready to ignite your creativity and elevate your crafting experience with the brand new lineup of Hero Studio cardmaking kits. Whether you’re a seasoned pro or just starting your crafting journey, these 5 new kits offer something for everyone. Let’s dive in!
Studio Card Kit of the Month
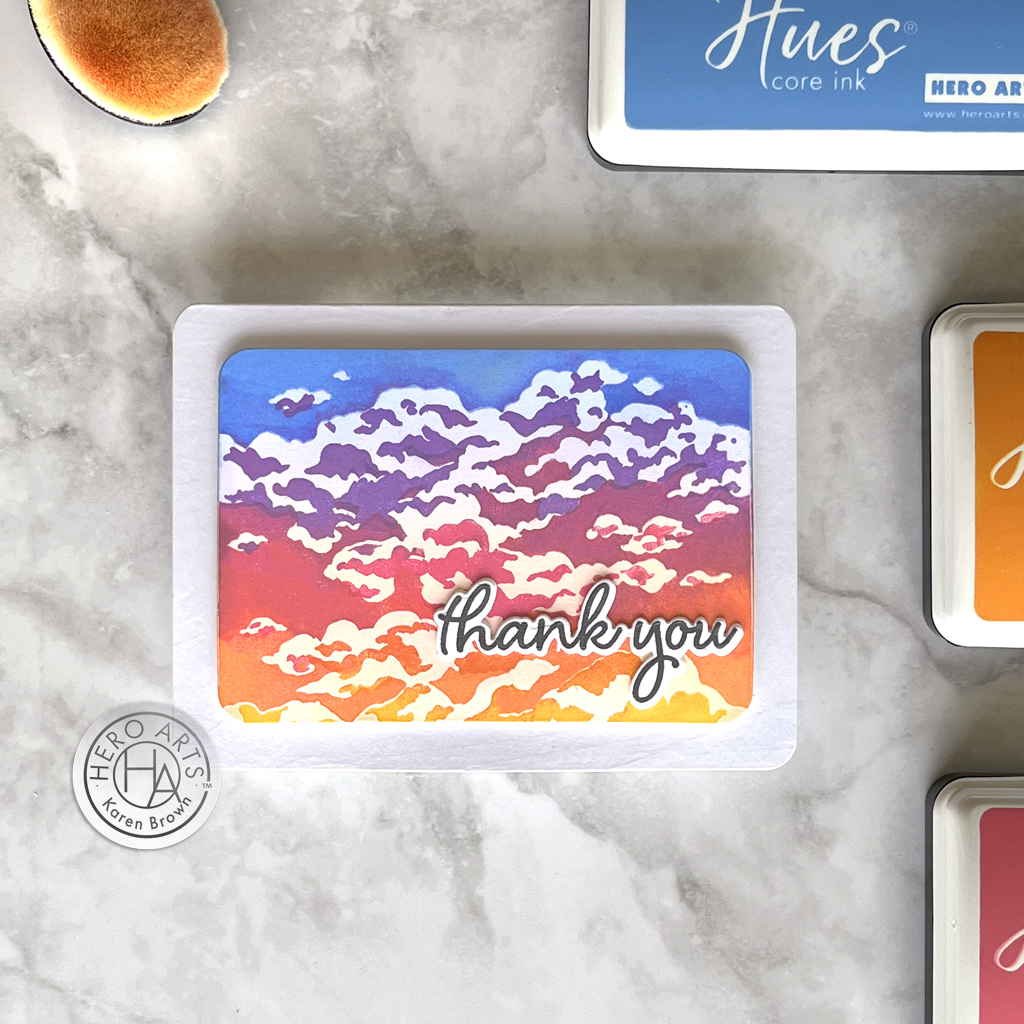
I started by creating with the new Hero Studio Card Kit, which is full of wonderfulness! This month’s theme is Urban Skyline.
For my first card, I used the HeroScape layering cloud stamps to create a dramatic sunrise. I laid down and blended LOTS of ink for a really saturated look. I love color and thought the cloud layering stamps would make a stunning, almost abstract background.
What’s Inside the Kit?
Curious to know what treasuries await you in this cardmaking kit? Let’s take a peek inside The Hero Studio Card Kit:
KIT INCLUDES: Urban Sky HeroScape Clear Stamp Set, 6” x 8” Neighborhood Message Clear Stamp Set, 4″ x 6″ Coordinating Dies City Stencil, 6×6 (with 3 Fall-Out City Skylines) 5 Ink Cubes (Peony, Pitch Black, Dusty Blue, Stonewash, Amethyst) 2 Sheets each of Silver Foil, Silver Glitter, Silver Cube & Pitch Black Cardstock, 5.5″ x 8.5″ 2 Sheets City Textures Hero Transfers
Kit Cost and Value:
$46 with Subscription, $95 Value (Cancel Anytime) $49.99 One-Time Purchase (While Supplies Last)
My first step was to lightly blend bands ink on my background (Deluxe Smooth Cardstock) so that the cloud highlights would be slightly tinted. For my base, before I used my layering stamps, I used Lemon Drop, Taffy, Thistle and Cornflower inks.
I then used the following colors for Stamp 1: Cornflower, Thistle, Taffy and Creamsicle, overlapping each color a bit. I also used a blending brush on the stamp to soften the color changes. I put down a lot of ink for a vibrant effect and I used my Misti stamp positioner so I could restamp my layers. I found a photograph of a beautiful sunrise and used it as my color inspiration.
The kit has LOTS of sentiments and I stamped and die cut my thank you.
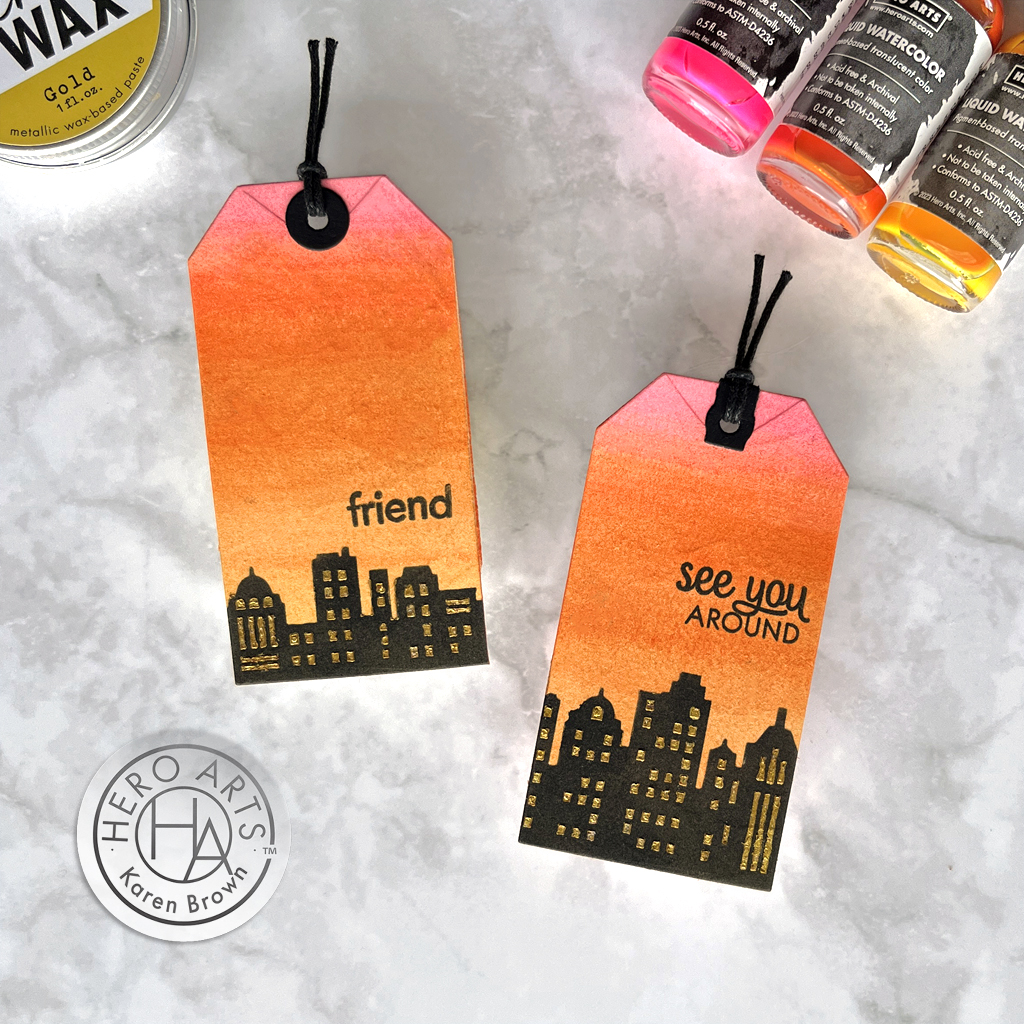
Colorful Sunset Cityscape Tags
I also created two tags with the Hero Studio Card Kit stencils. These tags were featured in Hero Arts Countdown Hop and you can read more about my process HERE.
Hero Studio Fancy Dies
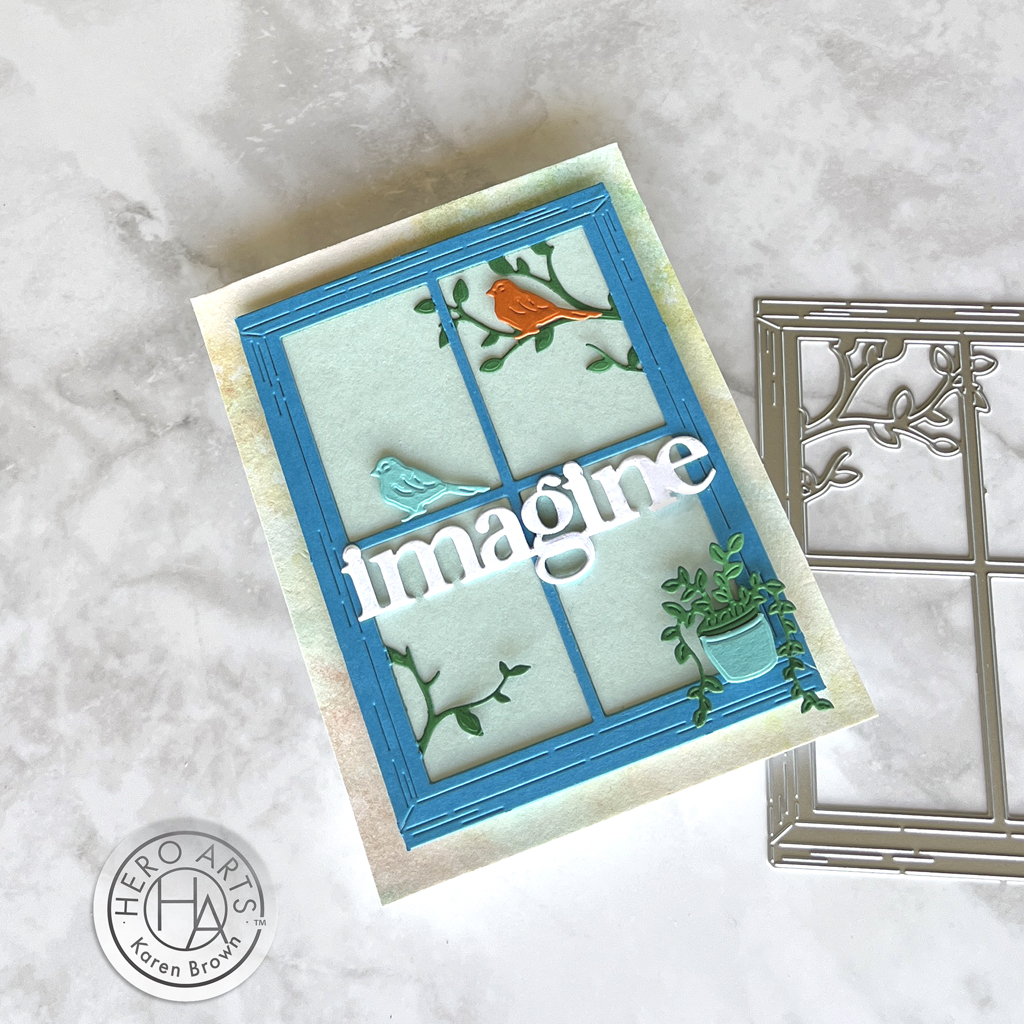
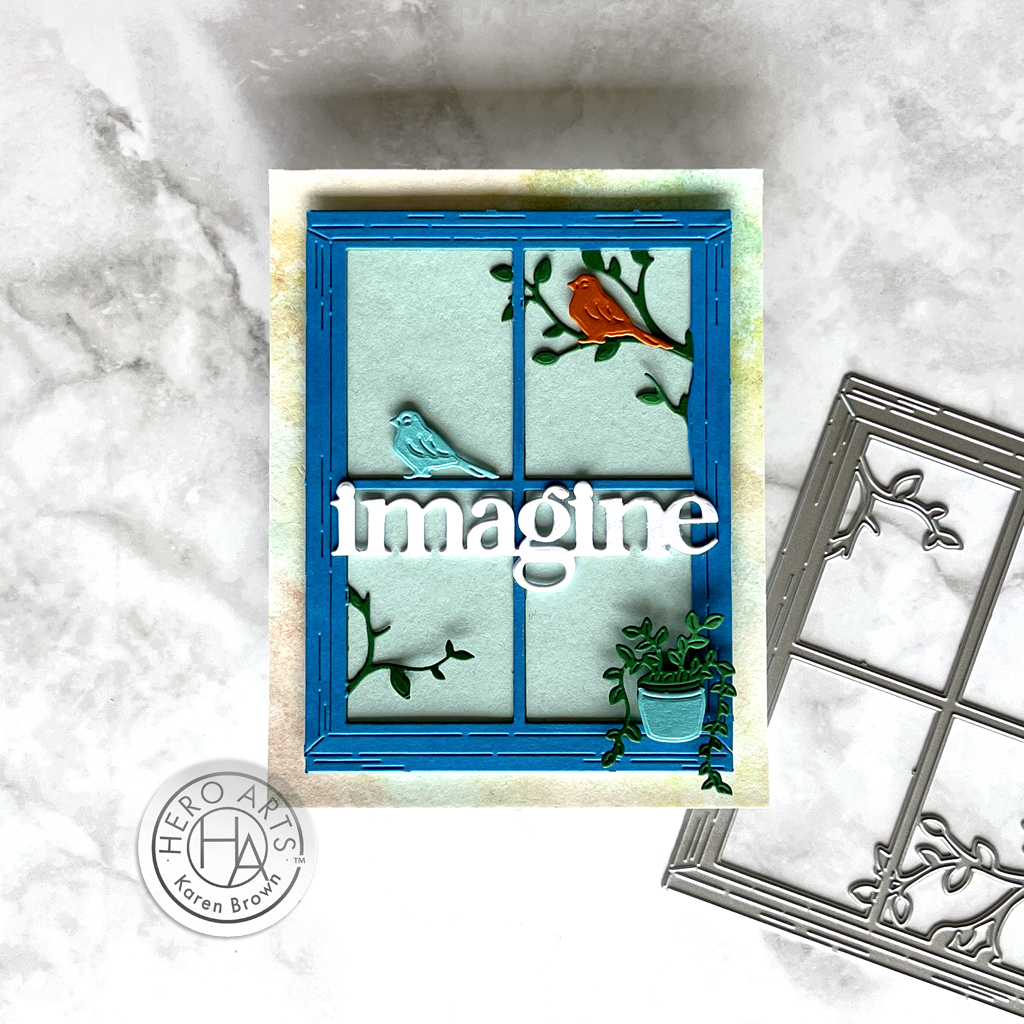
I love die cutting, so I had tons of fun creating my window scene card with the new Hero Studio Fancy Dies. This month’s background die is called Urban Window and I think there are endless design options. I love creating scenes, so I know I will be using this die again!
My base is a leftover piece of background from a project you can read about HERE.
I die cut my window frame from Peacock cardstock and trimmed off the greenery. I die cut the window frame a second time from Meadow cardstock and layered it behind the Peacock frame, so that my branches would be green. The sky is Arctic.
I added two birds, a potted plant and a die cut sentiment to finish my scene.
Hero Arts will give away a $50 gift card, drawn from the comments left across the hop. Enter by Sunday, June 9th at 11:59pm Pacific, and the winner will be announced on the Hero Arts blog the following week.
Today, the Hero Arts Creative Team is thrilled to offer you a sneak peek into their newly re-imagined subscription cardmaking kit called Hero Studio Card Kit of the Month. Each month will have a fresh beautiful collection of handpicked supplies that are sure to ignite your creativity. The kits will go live the first Monday of the month so you can view the entire kit on Monday, June 3rd at 2:00 PM PST. Or, you can pre-order today! Until then, here is your sneak peek….
To celebrate, Hero Arts is hosting a Blog Hop and Giveaway that you can find HERE.
As we countdown to the premiere, I wanted to share two sunset cityscape tags I created with The June 2024 Studio Card Kit. Liquid Watercolors make the MOST vibrant backgrounds, which is what I wanted for this project.
Crafting the Urban Skyline: A Sneak Peek into Hero Arts Studio Card Subscription Kit
My Process:
I started by using Liquid Watercolors to create my sunset background. I put a sheet of Luxe Watercolor Paper on my craft mat, brushed the paper with water and then painted bands of color with Dandelion, Orange and Brights Pink liquid watercolor.
I dried my panel and repeated step one.
I put my sunset panel on my Sticky Mat, attached the cityscape stencil to my background with washi tape and applied Onyx Pigment Ink with a Small Blending Brush to create my building silhouettes.
Using the next stencil, I applied Gold Wax to simulate lighted windows. While the stencil was still in place, I smoothed the wax with an old gift card. Work quickly so the wax doesn’t dry on the stencil. This will give you a good result when you peel back the stencil. I did let the wax set on the stencil while I finished my tags, but I soaked it for a bit and the wax washed right off.
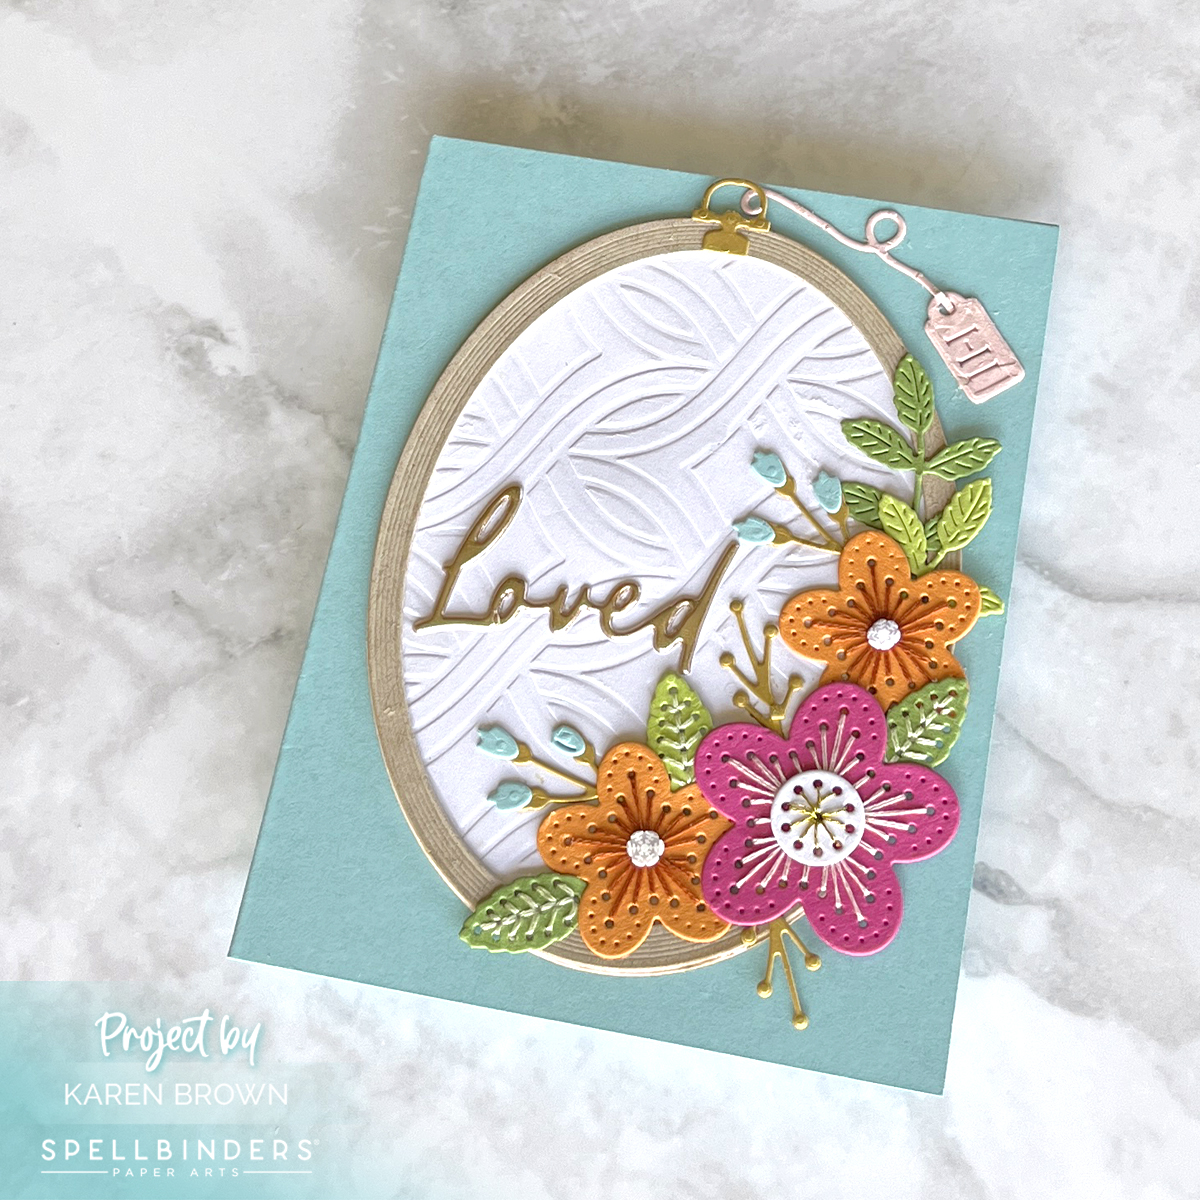
I love easy sentiments, and Spellbinders just released three sets of sentiment stickers and embellishments from Bayfair that I found both economical and simple to use.
Quick and Easy Premade Card Sentiments
My mom’s birthday is tomorrow and I created this stitched card for her. The puffy “Loved” sentiment was exactly what I was looking for. This beautiful gold sticker is from Bayfair’s Puffy Sticker set. I also have a card in the works that uses the Chipboard Stickers, so stay tuned for that….
Happy 50th Anniversary Hero Arts! Hero Arts is celebrating their impressive milestone!
I wanted to acknowledge the occasion with a little cardmaking, so I created this “Congrats Card” using my Premium Special (50th Anniversary) Gift that was included in my May Monthly Hero Premium Kit.
This card would also be perfect for graduation, retirement or any other congratulatory event.
With my Flat Water Brush, I brushed the pink paint onto my stamp and then stamped on my watercolor paper. I used Fuchsia + Gold Two Tone Metallic spray that was a fairly thick consistency. I did not dilute with more water.
I die cut my sentiment from the Congrats and Yay Stamp and Cut XL set 3 times from Nautical cardstock and then glued together for a substantial look and feel. I also added a die cut Vellum shadow.
I really love this bold card, and it would be so easy to mass produce.
Last month, I did a trio of cards using the same technique. Click HERE if you’d like to read that post.
In the world of cardmaking, some stamps hold a special place in our hearts, evoking memories of past projects and creative journeys. As Hero Arts celebrates their 50th Anniversary, I thought it would be fun to grab one of my oldest stamps and rediscover the magic of this long time favorite: Venetian Neighborhood.
Best Background Stamp for Coloring
I’ve owned and loved Hero Arts Venetian Neighborhood for five years. I bought this stamp in April 2019 when it was part of that month’s MMH release. It’s been such a fan favorite over the years, that it is still available in the shop.
The Best of Hero Arts
I created a quick Instagram Reel of my cardmaking process that you can find BELOW:
There’s a unique joy that comes with coloring a beautiful stamp like Venetian Neighborhood. The process is meditative, therapeutic even, as we lose ourselves in the rhythm of shading and blending, completely absorbed in the act of creation. And when we finally step back to admire our handiwork, there’s a sense of pride and satisfaction that comes from making it uniquely ours. In a world filled with hustle and bustle, coloring a beautiful stamp offers a moment of peace and serenity, a chance to reconnect with our inner artist and revel in the simple pleasure of creating something beautiful.
We’ve discovered in today’s blog post, there’s something truly special about revisiting old favorites like the “Venetian Neighborhood” background stamp. I enjoyed our trip down memory lane and am so pleased you stopped by today!
Do you ever find yourself craving a burst of color and creativity in your life? Look no further than the art of stenciling! It’s a simple yet profoundly satisfying technique that allows you to transform a background into a cardmaking masterpiece. And what better way to dive into stenciling than with the vibrant hues of the rainbow? Today I am using Hero Arts wonderful new Floral Trove Stencil (SA-274), and it is stunning in rainbow colors!
Hero Arts Floral Trove Stencil Design Ideas:
This stencil is 6″ x 6″, so it is large enough to make most any card size you desire, but one portion is perfect for A2 cards.
I created a short reel showing my process that you can VIEW HERE:
I used an A2 size panel of Deluxe Smooth Cardstock as my base. I placed this on the sticky mat of my StampWheel, so the cardstock would not shift.
In rainbow order, I rotated around the Floral Trove stencil, starting in the top left hand corner with Amethyst. I went left to right, dropped down a row and went right to left, dropped a row and finished going left to right again.
To keep from inadvertently stenciling in the wrong section, I masked off with Post-It Note squares. You can see the process in the Instagram reel I referenced above.
I experimented with all my blending brushes using small, medium,large and XL to see which size worked best on my project. My choice was medium, but they all worked just fine, so use what you have. Hero Arts does sell a blending brush sampler pack, which is so handy to have in my craft room.
I trimmed my background down and mounted on a Peacock A2 cardbase that I created.