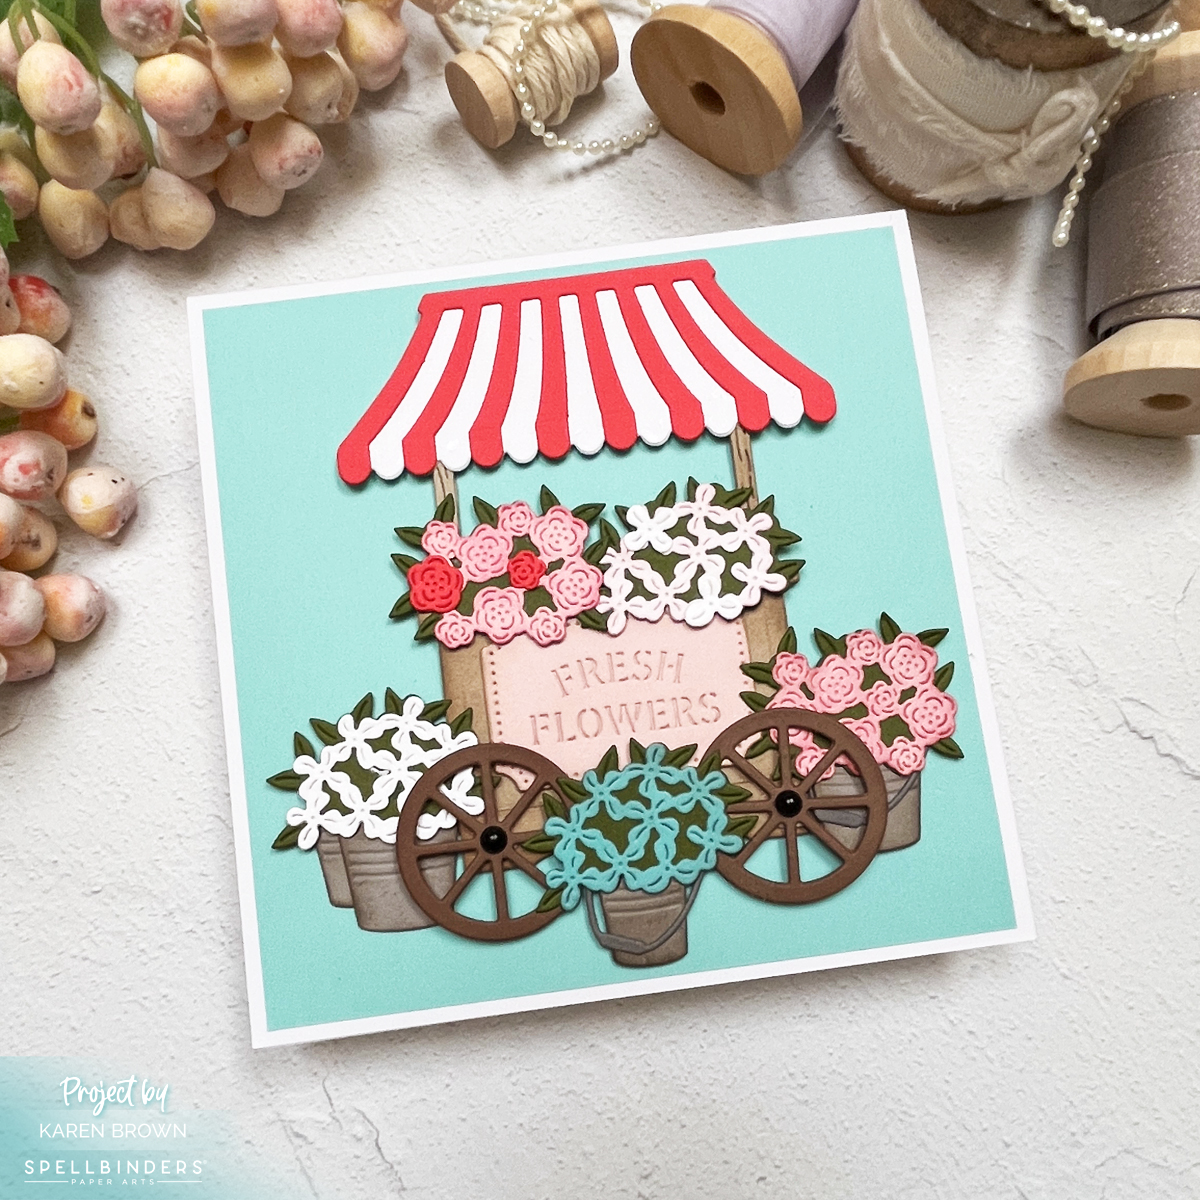
Today, I’m sharing a square card featuring the Flower Cart die set from Spellbinders’ Vintage Flower Shoppe collection. With a retro French inspired flower cart, coral, pink, blue and white blooms, and ink-blended details, this project is bursting with charm!
I fell in love with the Flower Cart die set the moment I saw it—there are so many creative possibilities! For this design, I started by die-cutting all the elements and then ink blending them to add depth and dimension. The soft shading makes the hand cart and baskets of coral, pink, blue and white blooms pop beautifully!
To give the cart a little extra personality, I added black enamel dots as the wheel nuts—a tiny detail that makes a big difference. And of course, the “Fresh Flowers” sign ties everything together with a market-fresh feel.
My completed card is 5 1/2″ x 5 1/2″ and the Teal Topaz background mat is 5 1/4″ x 5 1/4″.
Try It Yourself!
The Vintage Flower Shoppe collection has so many ways to mix and match floral elements. What colors would you use for your dream flower cart?
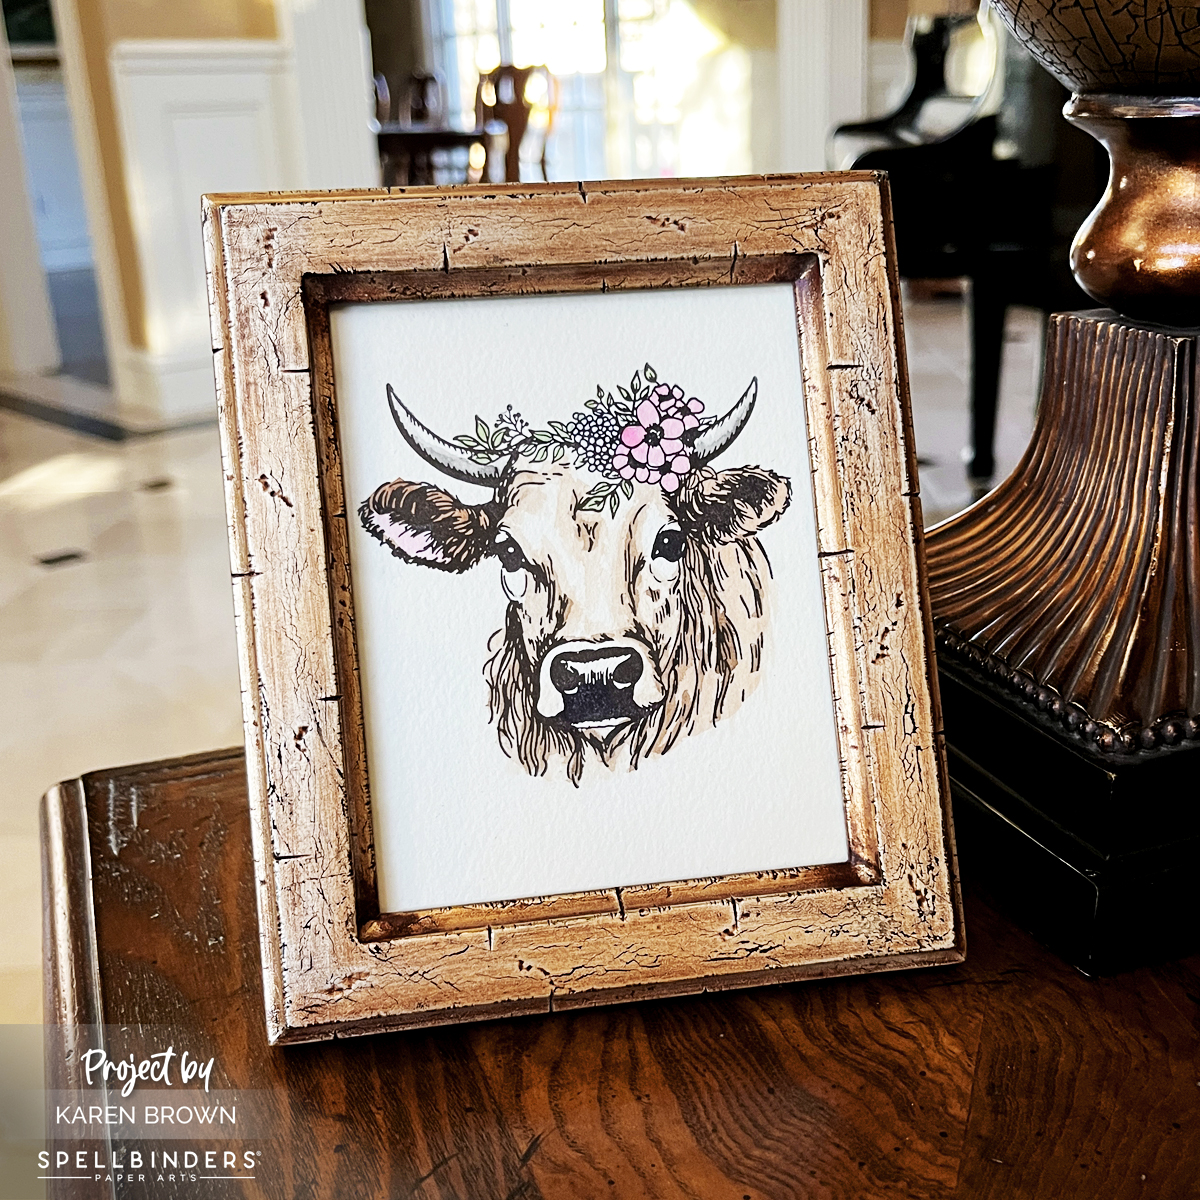
There’s something special about bringing a little piece of the ranch indoors—especially when it comes in the form of charming letterpressed art. Today, I’m excited to share two BetterPress projects straight from my little hacienda, featuring Clover the cow and Cotton Ball the lamb from Spellbinders.
Clover isn’t just any cow—she’s inspired by a real-life, flower-munching culprit from my own yard. And yes, she was eating flowers from my garden!
The BetterPress version of Clover captures her mischievous spirit, complete with a whimsical flower wreath perched atop her head.
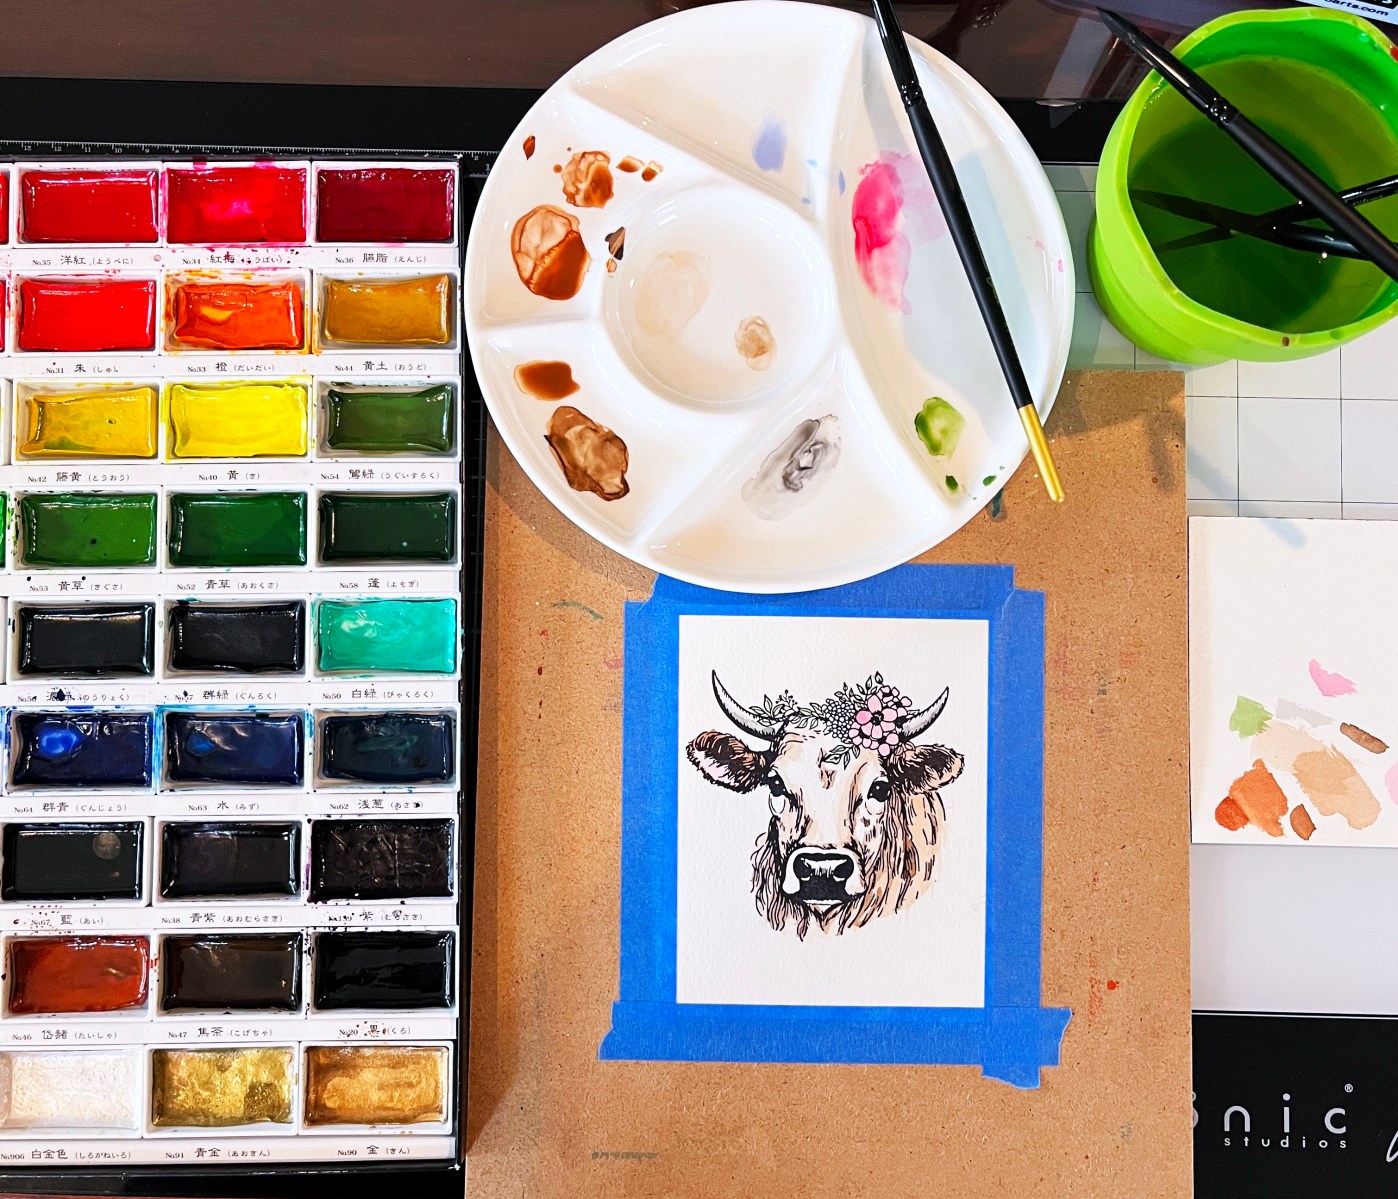
After BetterPressing Clover, I added soft watercolor washes that brought her to life, highlighting her gentle eyes and the delicate petals in her floral crown. What’s more, the print looks stunning even without the watercolor—just the crisp, tactile impression of the press is beautiful on its own.
Introducing Cotton Ball the Lamb
Not to be outdone by Clover, Cotton Ball the lambis equally charming with her own flower wreath. She’s the picture of pastoral sweetness, and the BetterPress captured every curl and detail of her woolly coat. Watercoloring Cotton Ball was a joy, blending soft pastels to match her gentle personality.
Framed with Love
Both prints sit in 4″ x 5″ easel frames that add a touch of ranch-inspired warmth to my home. The textures from the letterpress, the soft watercolor hues, and the rustic frames create an inviting, homey feel that reflects life on my little hacienda.
Try It Yourself
Whether you’re inspired by ranch life or just love the charm of whimsical animal art, BetterPress projects like Clover and Cotton Ball are a joy to create. The prints are beautiful whether you choose to watercolor them or leave them as crisp, letterpressed pieces.
Get ready to fall in love with theSpellbinders February 2025 Club Kits! This month’s releases are packed with charm and creativity, and I’m thrilled to share two whimsical scene cards that will have you reaching for your die-cutting machine in no time.
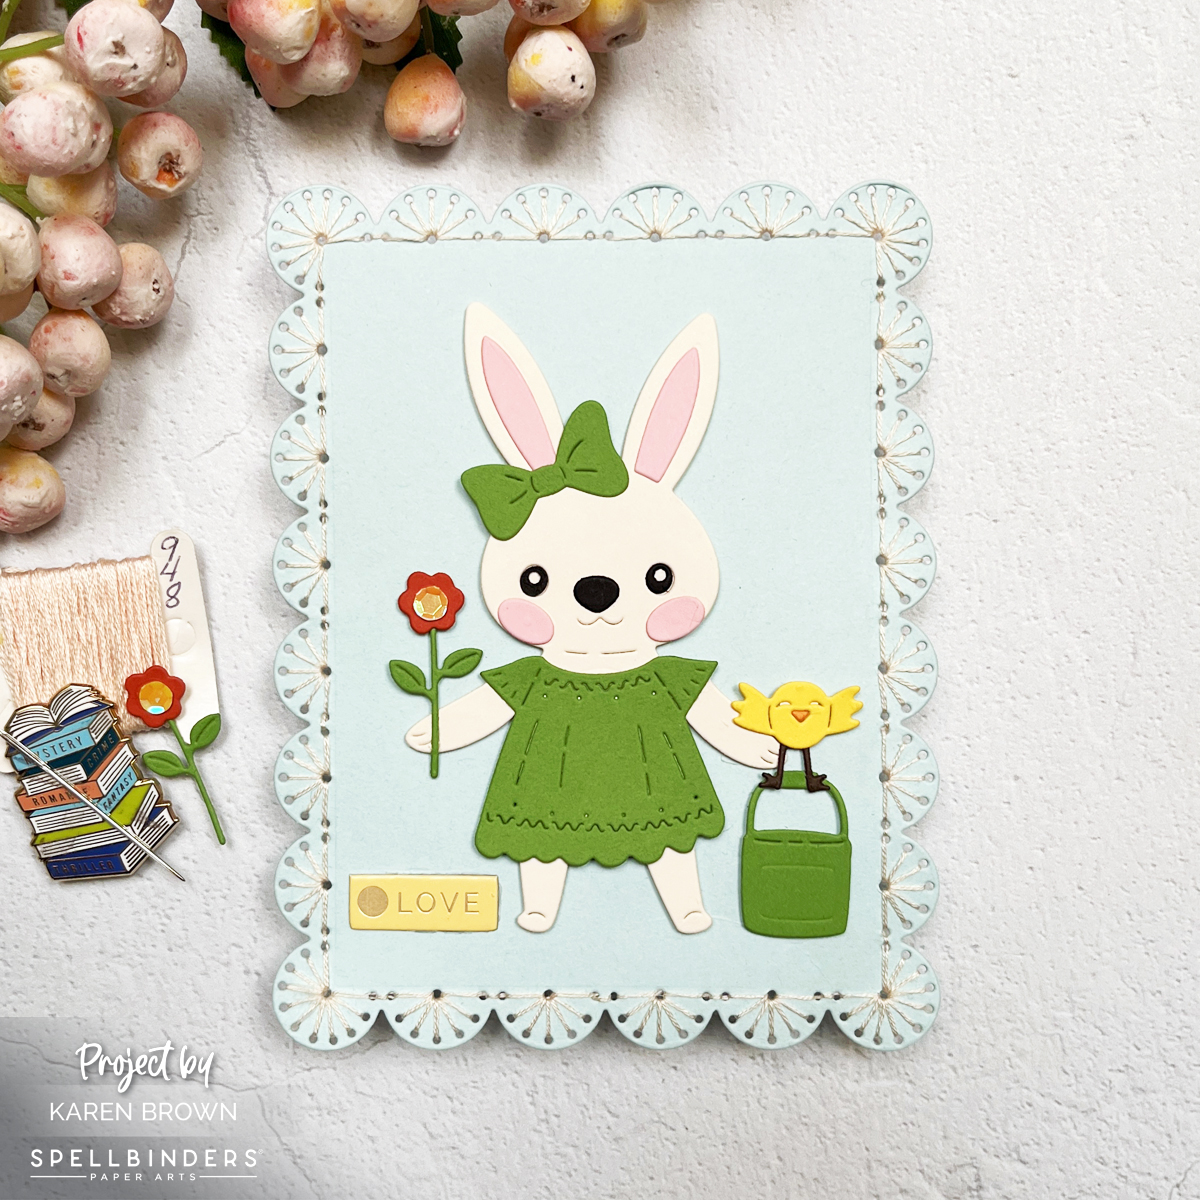
Easy Stitched Die Cut Bunny Card Full of Charm
This first card features the Stitching Die of the Monthpaired with the Large Die of the Month, creating a darling stitched frame. Inside the frame, a sweet die-cut bunny dressed in a spring green dress steals the spotlight. She’s holding a delicate flower, making this design ideal for Easter, baby showers, or even get-well cards. The soft blues, vivid greens, and warm yellows lend a fresh spring vibe, while the stitched frame adds texture and an elegant touch.
The second card takes a playful turn with a pair of olive green shoes, complete with stylish blue and olive anklet socks. The SmallDie of the Month works its magic, letting you create a unique scene where die-cut flowers are tucked into the patterned socks. You’ll spot the calves of a lady walking confidently into spring, and the sentiment “Hello” ties everything together. Perfect for birthdays, get-well wishes, or just saying hi, this design showcases the versatility of these dies.
Quick Notes About This Card:
I started by looking through my patterned paper for some fun “sock material”. I chose this eye-catching circular pattern, but a small floral or plaid would also work great!
Once I had my socks, I pulled together other colors that would work well for my scene. I frequently use my Color Cubes when selecting my color palette.
Both cards highlight the magic of die-cutting, with intricate details and stitching that bring each scene to life. Whether it’s the textured frame around the bunny or the whimsical floral shoes, these designs are sure to inspire intermediate and advanced crafters alike.
Hello, hello! Today’s card features Spellbinders Large Die of the Month Kit for January 2025. The Botanical Atrium, is a die-cut lover’s dream with gorgeous floral details, a luxurious gold frame, and a fresh aqua-and-coral palette.
Creating With the Large Die of the Month Kit | January 2025
I used shiny gold cardstock to make the atrium stand out against a crisp white background, and wow—does it ever pop! Inside the frame, delicate coral and aqua florals cascade in a lush arrangement, creating a playful yet refined design. I’ll be using the florals on loads of future cards!
It’s a great time to buy paper because Spellbinders is having a Paper Party Sale until January 26th!
Textured Touches: The Brick Background
To add a subtle yet striking detail, I stenciled a brick pattern on the white background using grit paste. Just here and there, mind you—like peeking through a garden wall. This little bit of texture gives the card depth without taking attention away from the gorgeous die-cut elements. It’s understated but oh-so-effective!
January 2025 Papercrafting Kits and Blog Posts
This year, I’ll be creating with 3 Spellbinders Kits each month. I’ve already published two posts that you might enjoy reading:
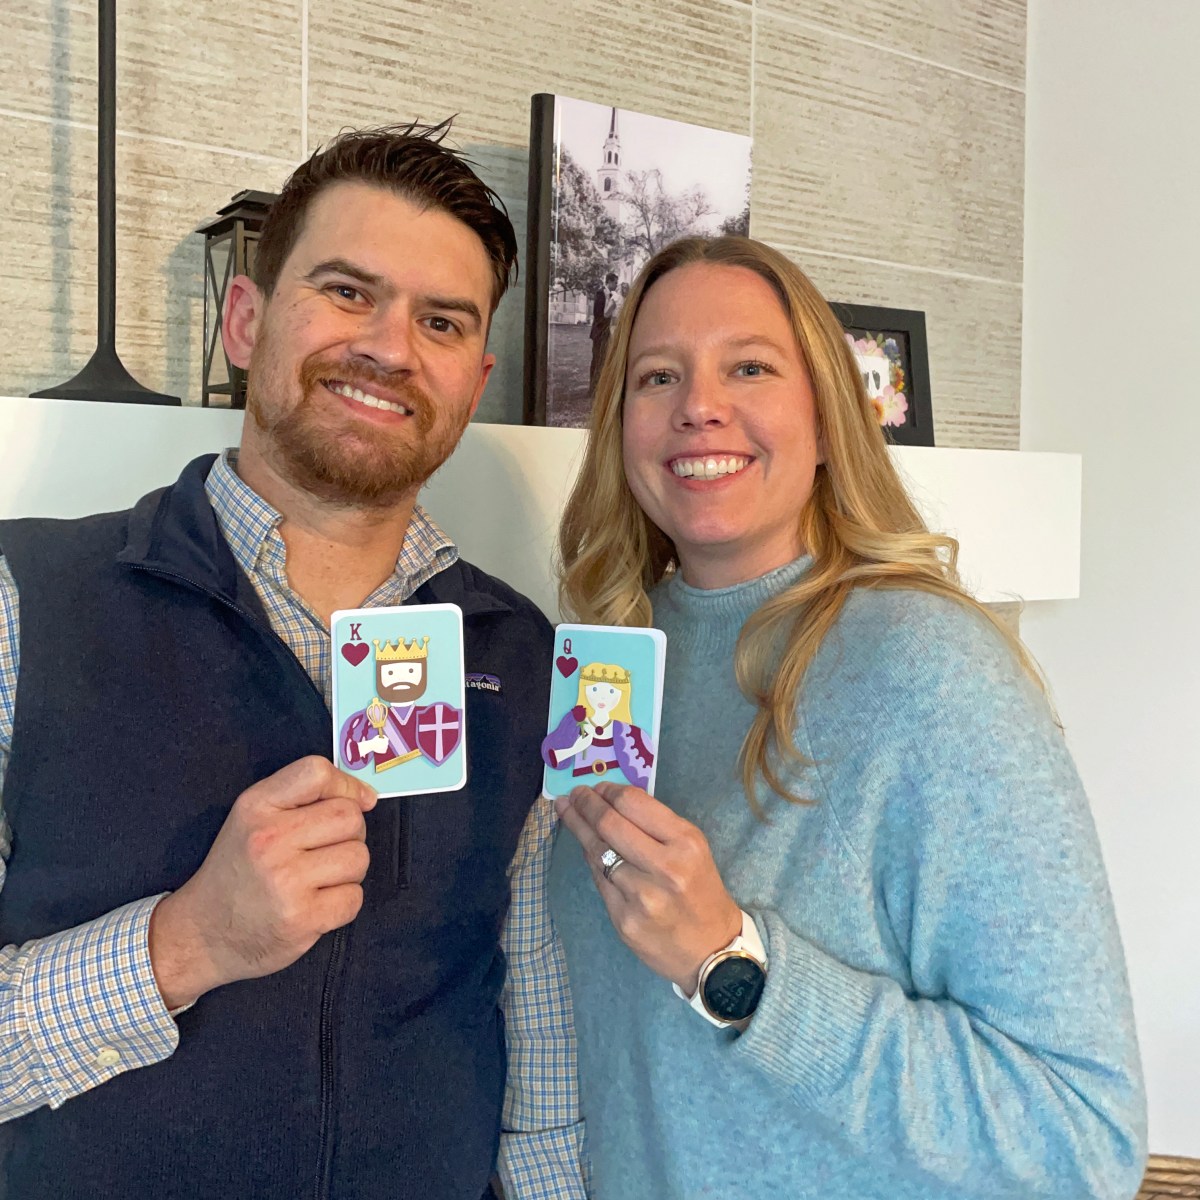
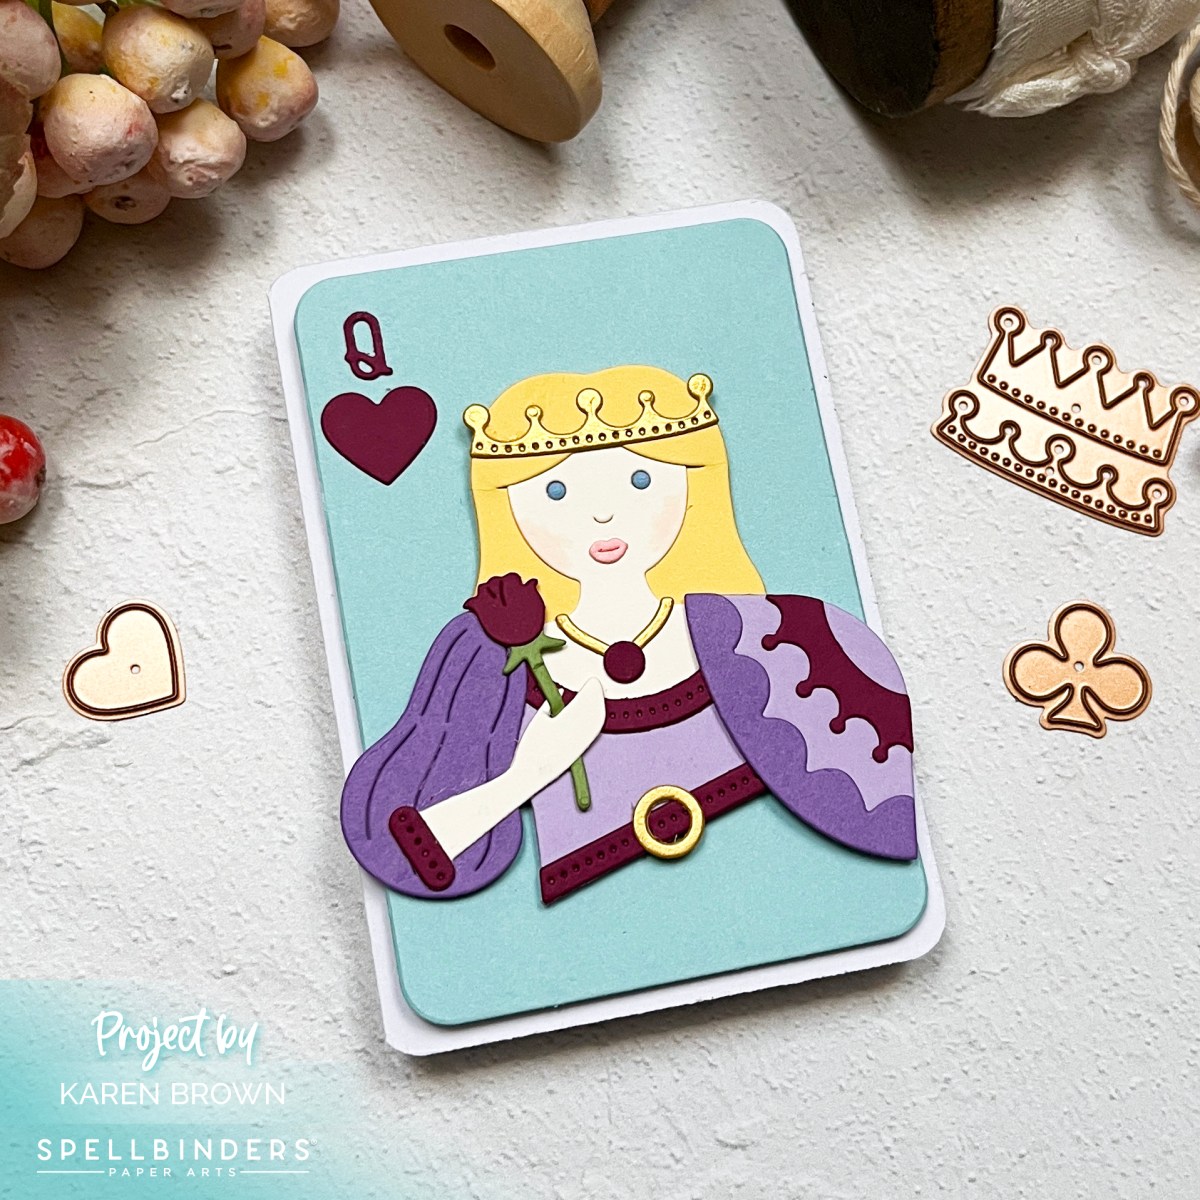
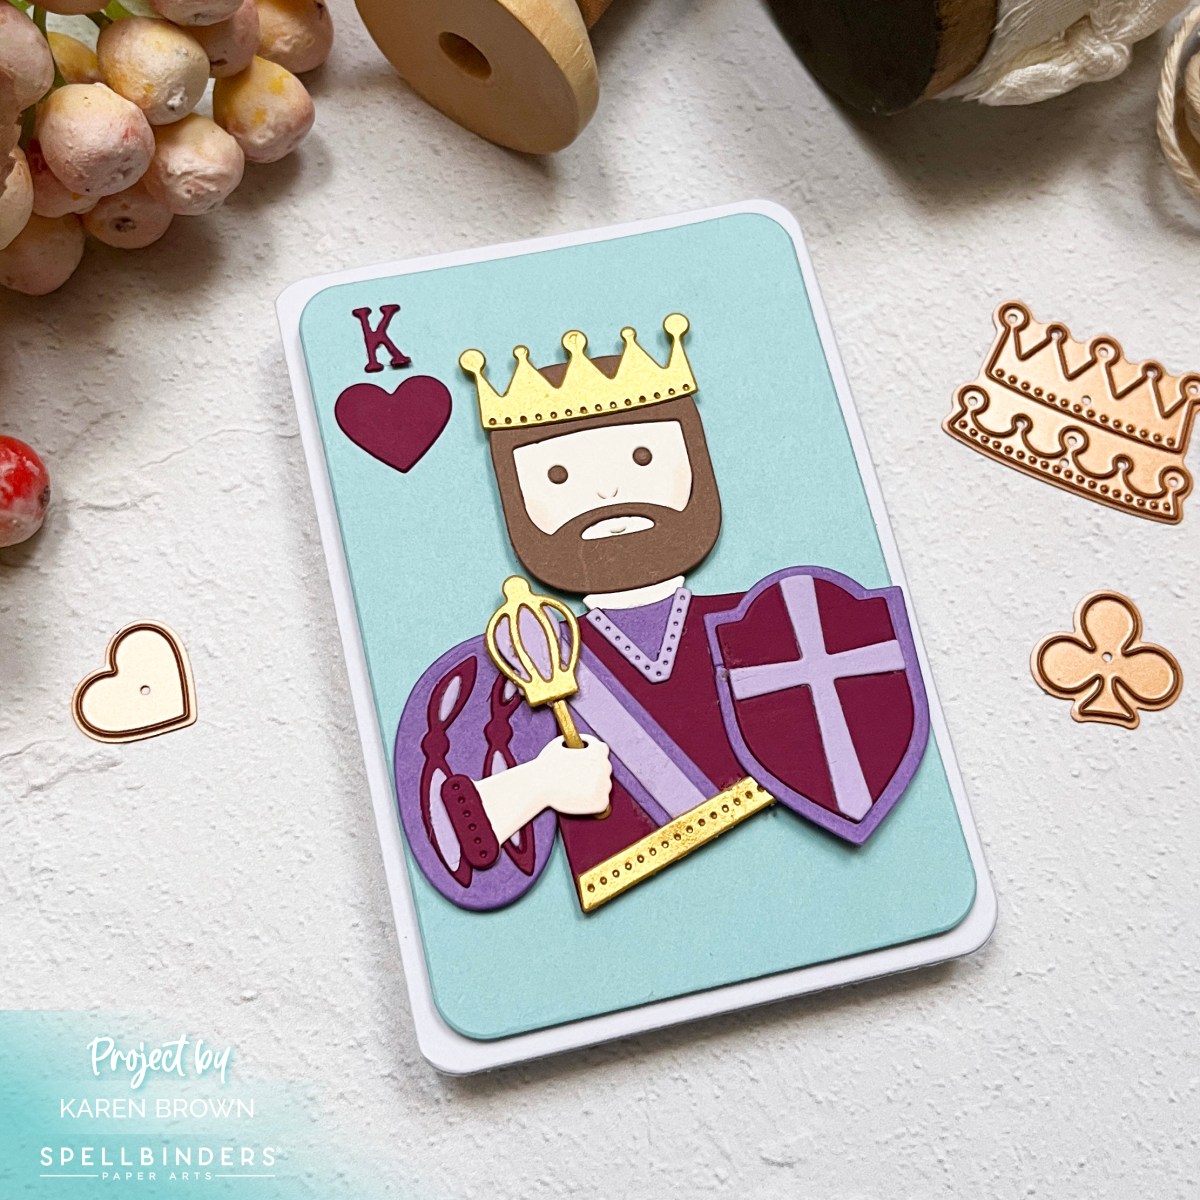
Welcome, welcome! Today, we’re diving into the world of handmade cards inspired by the regal charm of playing cards. Our stars of the show? The Queen of Hearts and King of Hearts, reimagined with a dreamy color palette of lavender, plum, and aqua. These cards are extra special because they’re personalized to look like my daughter and son-in-law, making them a true celebration of love and individuality. These cards are perfect for Valentine’s Day, birthdays, anniversaries, or any occasion that calls for a touch of royal flair.
These cards were so fun to make! You can personalize the peeps in so many different ways…favorite colors, hair and eye color, props….
I used Cardstock in the following colors: Passion Flower, Amethyst, Plum, Antique Ivory, Cup O Joe, Periwinkle and Meadow plus Brushed Gold accents.
Queen of Hearts: Elegance in Lavender
This Queen of Hearts card is a tribute to my daughter, featuring elements that reflect her grace and personality.
King of Hearts: Bold and Regal
Inspired by my son-in-law, this King of Hearts card brings a bold and charismatic vibe to the design.
Crafting these playing card-themed designs has been such a delightful journey of personalization and creativity. Whether you’re celebrating a couple you adore or channeling your own inner royalty, these projects are a great way to share the love. So, what will your Queen and King of Hearts look like?
Can you believe 2025 is just around the corner? I’m over here surrounded by paper scraps, embellishments, and a ton of ideas—but I want your input to make next year truly magical.
What types of blog posts, techniques, and projects do you want to see in 2025? Whether you’re a beginner still figuring out how to not glue your fingers together (been there) or a seasoned pro with a stash that could rival a craft store, I want to know what inspires you.
Here are a few questions to get those creative juices flowing:
Are there any papercrafting techniques you’ve been itching to learn?
What’s your favorite type of project—cards, scrapbook pages, 3D crafts, or something totally out of the box (literally)?
What is your favorite technique?
Would you like to see more tips, tutorials, or behind-the-scenes peeks into my crafting chaos?
What is your favorite: Blog Posts, Videos, Reels, Instagram Post?
Are there themes or occasions you want more ideas for—birthdays, holidays, just-because days?
Any products or tools you’re curious about that I could spotlight?
Drop your comments and let me know what would make 2025 your best crafting year yet. Your ideas help shape this space, and I can’t wait to hear them! Or, if you prefer, leave a comment on my coordinating post on Instagram: karens_mini
Let’s dream big, get messy, and make this our most creative year ever! 💖
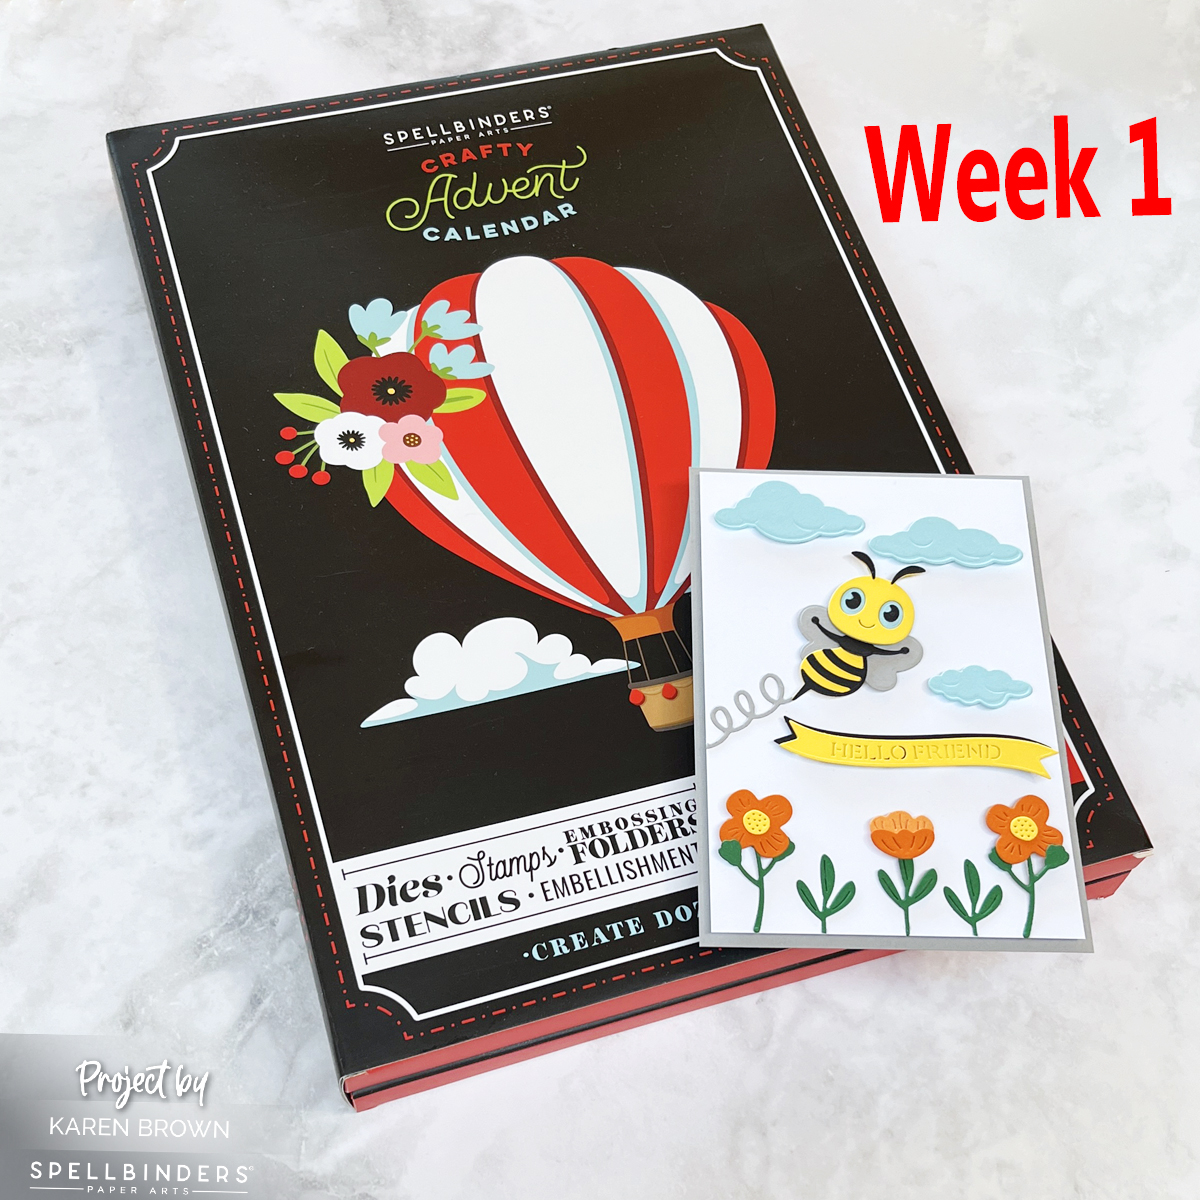
I recently opened my SpellbindersCrafty Advent Calendar and, oh my, I can already tell this is going to be an exciting month filled with DIY fun! For those who might not be familiar, a Crafty Advent Calendar contains 24 days of creative supplies and surprises, all designed to inspire your crafting. This week, I dove into the first few projects, and I can’t wait to share the magic of it all with you.
Opening the Advent Calendar: Day 1 to Day 7
The anticipation of opening each little door in the calendar is half the fun! Each day has revealed a mix of supplies and cute embellishments. I could feel my creativity bubbling the moment I opened Day 1.
If you missed it, you can read my Day 1 post HERE.
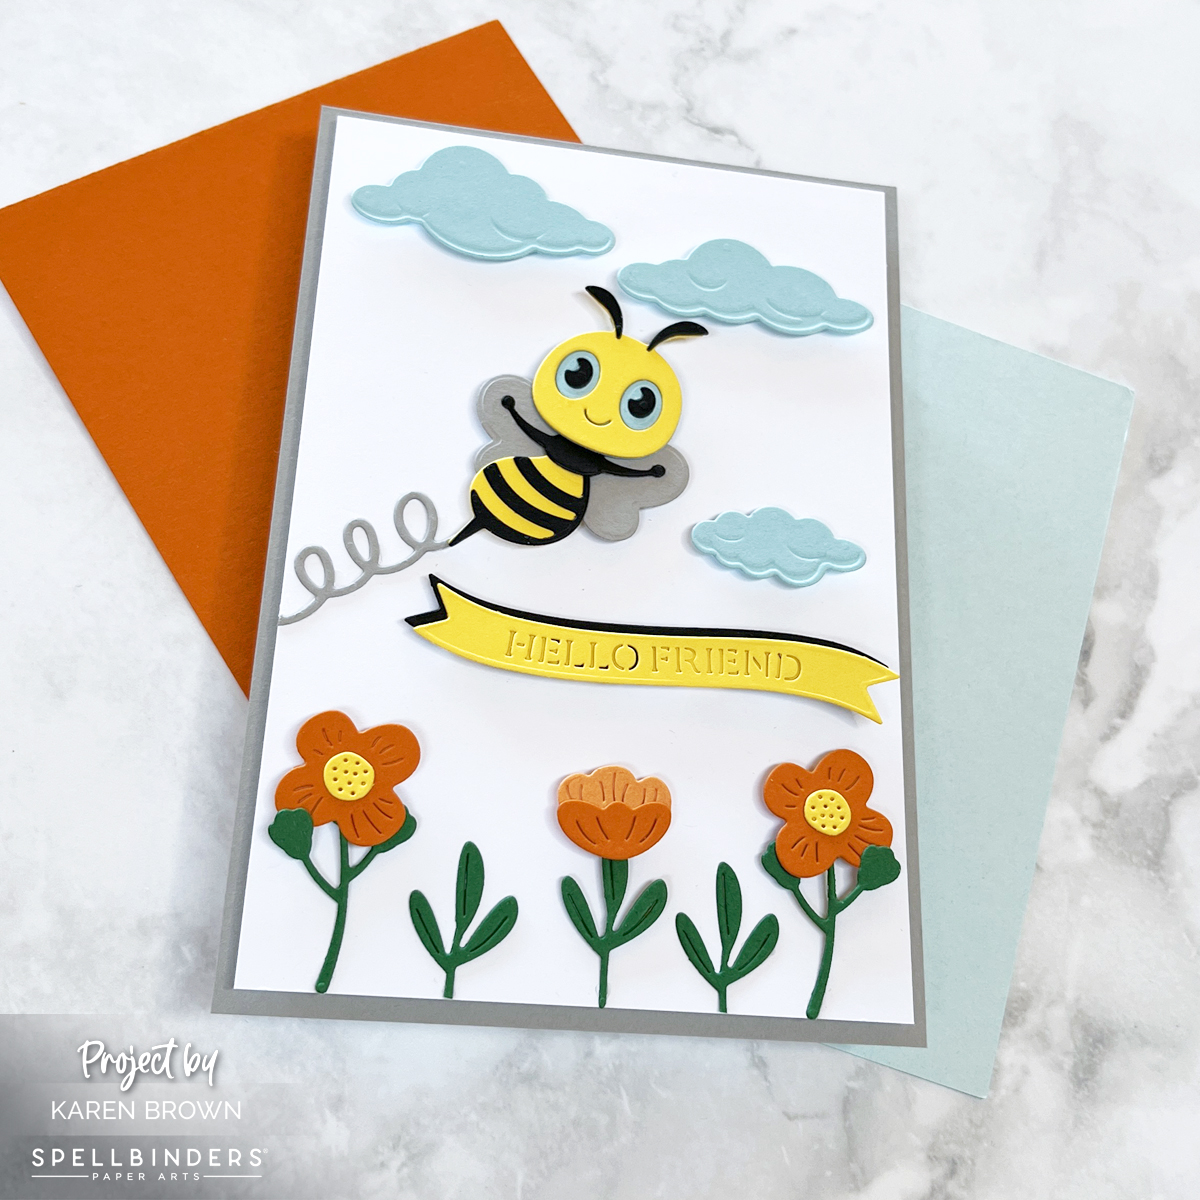
The adorable bee (day 6) captured my heart and I used those dies along with days 3, 4 and 5 to create this cute Hello Friend scene card. The clouds from the Fly Away die set were the only things I added that were not included in the Crafty Advent Calendar.
I wanted a little more vertical room for my scene, so my white panel is 4″ x 6″.
I loved the inspiration that came with each day’s reveal. I’m excited to continue opening the calendar and discovering what new projects await in the coming weeks. Stay tuned for more fun holiday crafts—I’ll be sharing new projects each week!
Have you opened a Crafty Advent Calendar this season? What are you making with yours? Let me know in the comments—I’d love to see your creations!
December is finally here, and I couldn’t be more excited to kick off the festive season with my Spellbinders Paper ArtsCrafty Advent Calendar! If you’re anything like me, the thought of crafting something new each day leading up to Christmas brings so much joy—and this year, the fun starts with a surprise die inside Day 1. Let’s open it together and make a holiday card!
The anticipation is real. As I carefully peel open Day 1, I reveal… a beautiful hot air balloon die! It’s intricate yet versatile, perfect for adding that extra touch of winter magic to any holiday card.
This balloon die is just adorable with tons of detail! So here is a quick tutorial on how I created this bright happy card:
I started by die cutting my balloon 3 times in the following combinations: orange and hot pink, aqua and lime, lavendar and purple. This project is perfect for my compact desk top Scout Die Cutting Machine.
The only die I added is the cloud from the Fly Away die set. I use this cloud on a lot of projects and find it is a great accent to have in my craft room.
My background panel is 4 1/4″ x 6″. I little longer than an A2 card but I like the layout better with a bit more vertical space.
My card base is charcoal grey for a bit of lovely contrast.
And There You Have It!
I can’t wait to see what’s behind the other doors! Stay tuned for more crafty inspiration as we count down to Christmas together. I will be back in a few days with more Crafty Advent Inspiration.
If you’re already dreaming of decking your craft room with fresh supplies, Hero Arts December Release is about to paint your world with inspiration! This month’s theme is color, and it’s bursting with playful possibilities. Imagine stamps that bring your designs to life, a fancy circle-shaped die perfect for creating a BOLD striking focal point, and a die-cut box of crayons that’s as whimsical as it is nostalgic. And let’s not forget the butterflies—because no colorful creation is complete without a touch of fluttery elegance. It’s everything you need to make your cards shine brighter.
A Kaleidoscope of Creativity: December’s Theme is “Color”!
A Colorful Recipe for Success: Hero Studio December Card Kit of the Month
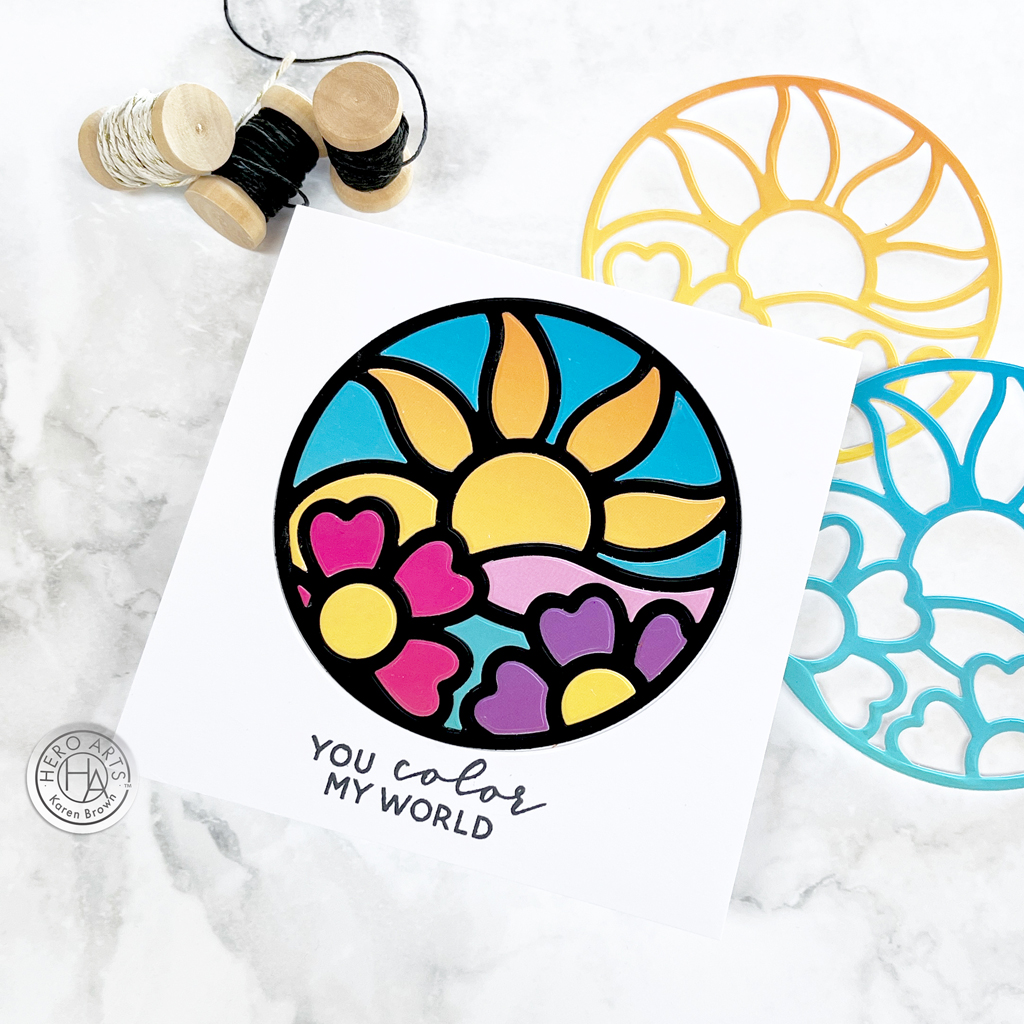
I wanted a bold color palette with variations in shade so I grabbed the new Sky Ombres Hero Transfers for die cutting my Floral Circle Fancy Die (part of the December Card Kit). I used the Inlay Die Cutting Technique which produces a beautiful “stained glass window” look.
Select the colors you want from the Sky Ombres Hero Transfers and rub on white cardstock. I enjoy using Rub-On Transfers and I love the beautiful gradients in this sampler.
With the Floral Circle Fancy Die, cut a circle in a 5″ x 5″ white cardstock panel and stamp the sentiment (included in the kit).
Glue the white panel created in step 3 to a second 5″ x 5″ panel of white cardstock.
Insert your black frame in the round window.
Die cut your colors using the panels you created in step 2. Inset these into the black frame. I kept all the die cut pieces in a small bowl until I was sure I had all the pieces I needed to create my stained glass. I placed each piece prior to gluing to make sure they were all in the correct spot. Once I was happy with my placement, I put glue in the “well” and then placed and glued the die cut components.
This techinque is great for mass-producing cards. You can see two of the leftovoer frames in the top right corner of the photo. These would be beautiful just glued to a card for a bright clean and simple look.
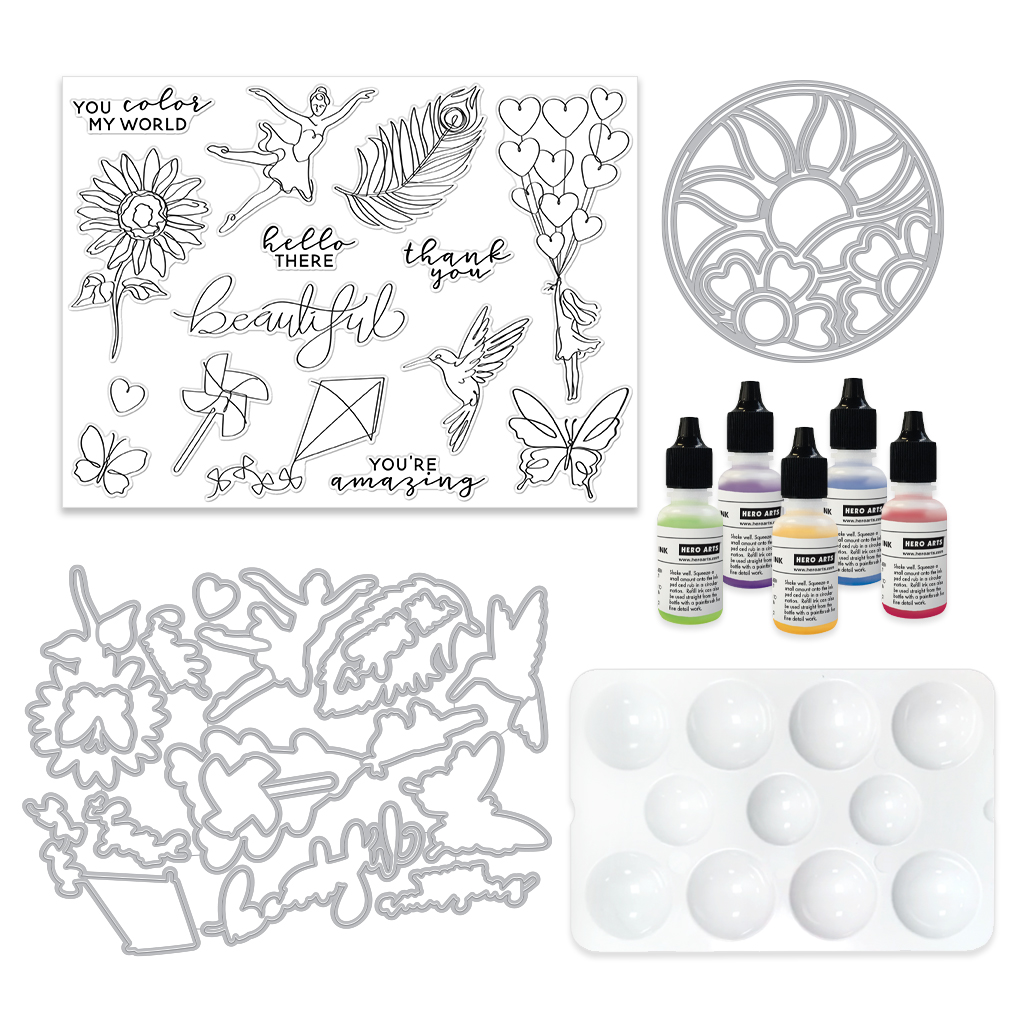
• Clear Stamp Set, 6” x 8” • 15 Coordinating Dies • Floral Circle Fancy Die • 5 Reinkers, 1/2 oz. (Purple Galaxy, Blue Hawaii, Green Apple, Lemon Drop, Fruit Punch) • Plastic Watercolor Palette
5 Wonderful Kit Options:
For this blog post, I created with the December Kit, The Clear Stamp and Dies Kit and two Extraordinary Extras, but there are 5 kits plus 6 Extras available. You can also buy the Whole Studio, which includes all 5 kits at a wonderful savings.
Hero Arts has many different Monthly Kits that you can subscribe to including:
The WHOLE Studio – All 5 Kits ($120 subscription + Free Shipping)
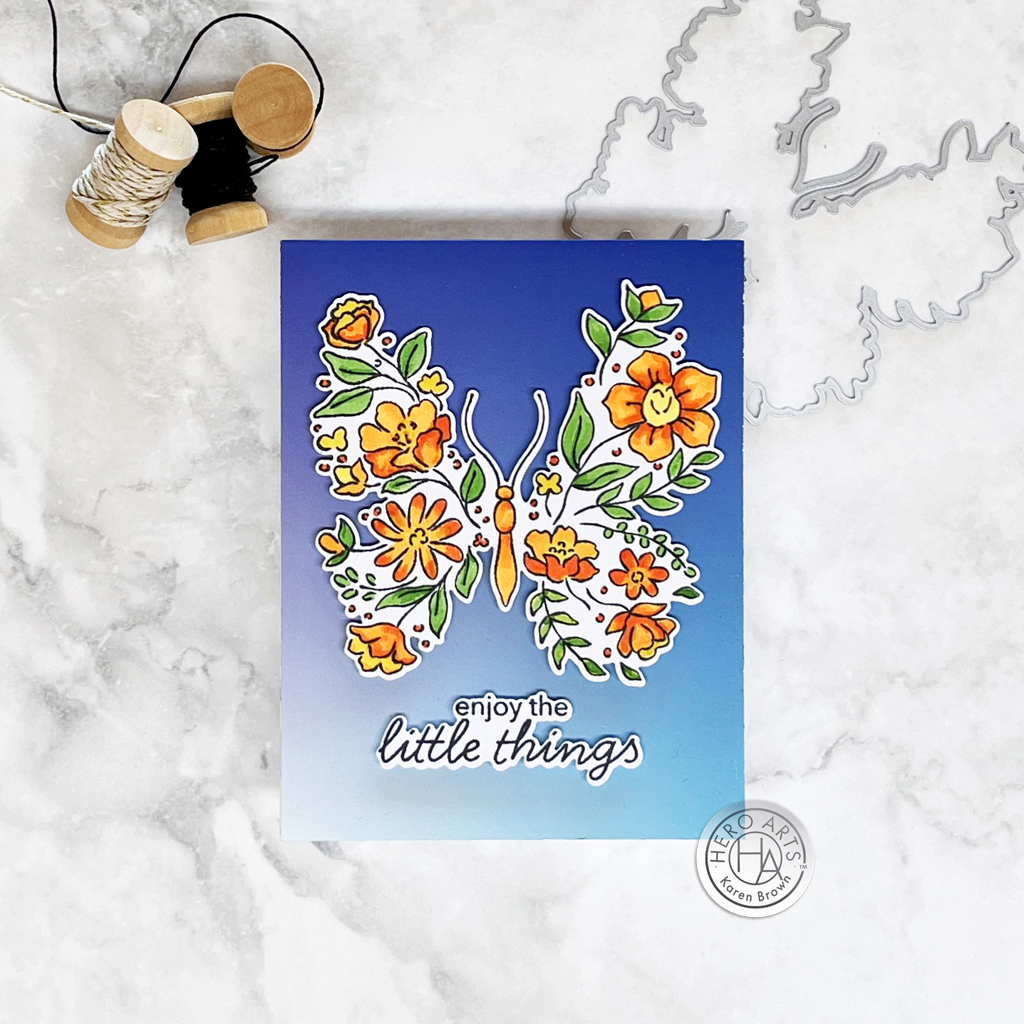
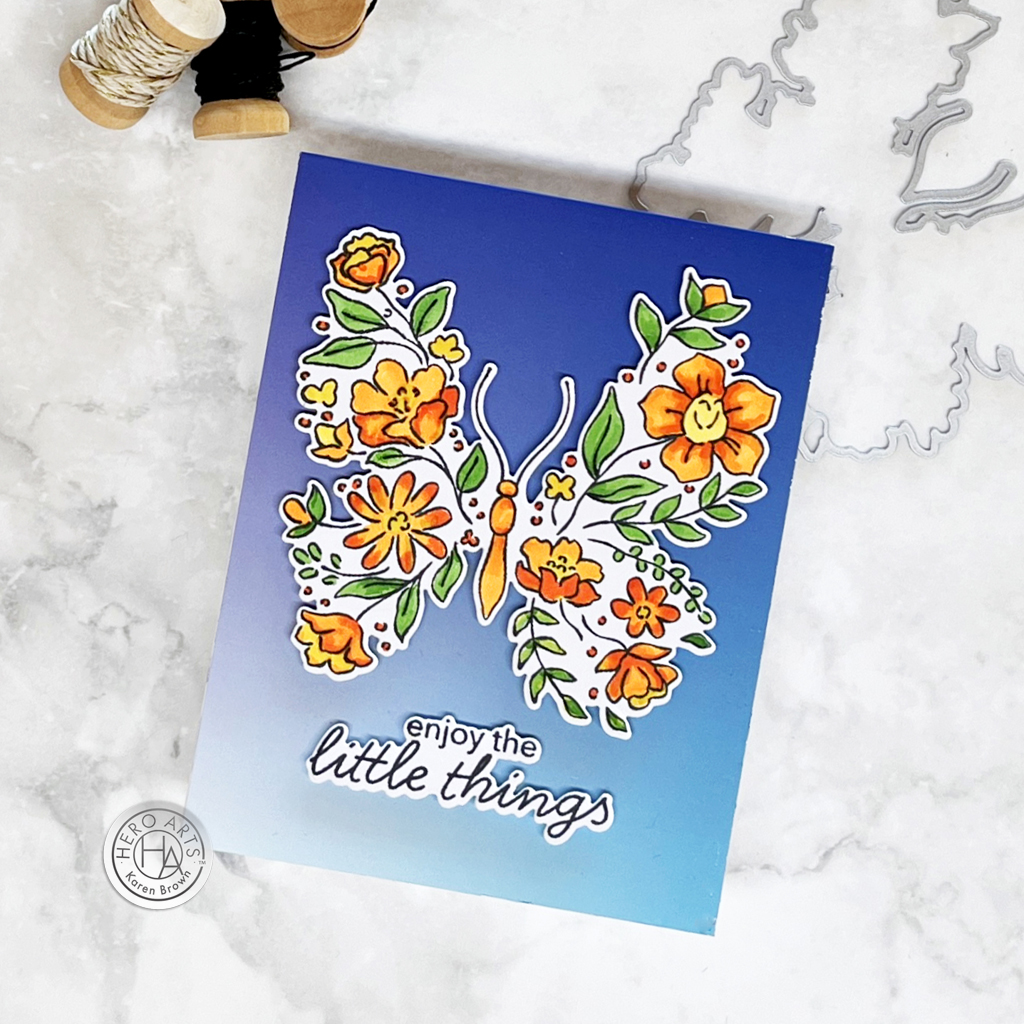
Clear Stamp and Die of the Month: Floral Butterfly
For a card that truly takes flight, try stamping the gorgeous Floral Butterfly as your centerpiece. Use alcohol markers to bring it to life with vibrant shades—blend rich oranges, sunny yellows, and lush greens to make those petals pop. Once your butterfly is a kaleidoscope of color, grab your coordinating die and cut it out. Adhere it to an ombre blue sky background, fading from light to dark, for a dreamy effect. I created my background panel by “rubbing” on the Sky Ombres Hero Transfer onto cardstock. So easy and beautiful! It’s like sending a little piece of summer to your favorite person, no sunscreen required! 🦋✨
Make their birthday extra colorful with a slimline card that’s all about the crayons! I used Box of Crayons Fancy Dies and started by die-cutting a cheerful box of crayons and filling it with every shade imaginable—this is your chance to go full rainbow mode. Hero Arts recently introduced a limited edition sampler of Rainbow Cardstock that is perfect for your favorite colorful die cutting.
I die cut each crayon in two shades of each color and then trimmed the top of the lighter toned “label” with scissors to make for a more realistic crayon look.
Hero Arts will give away a $50 gift card, drawn from the comments left across the hop. Enter by Sunday, December 8 at 11:59pm PST, and the winner will be announced on the Hero Arts blog the following week.
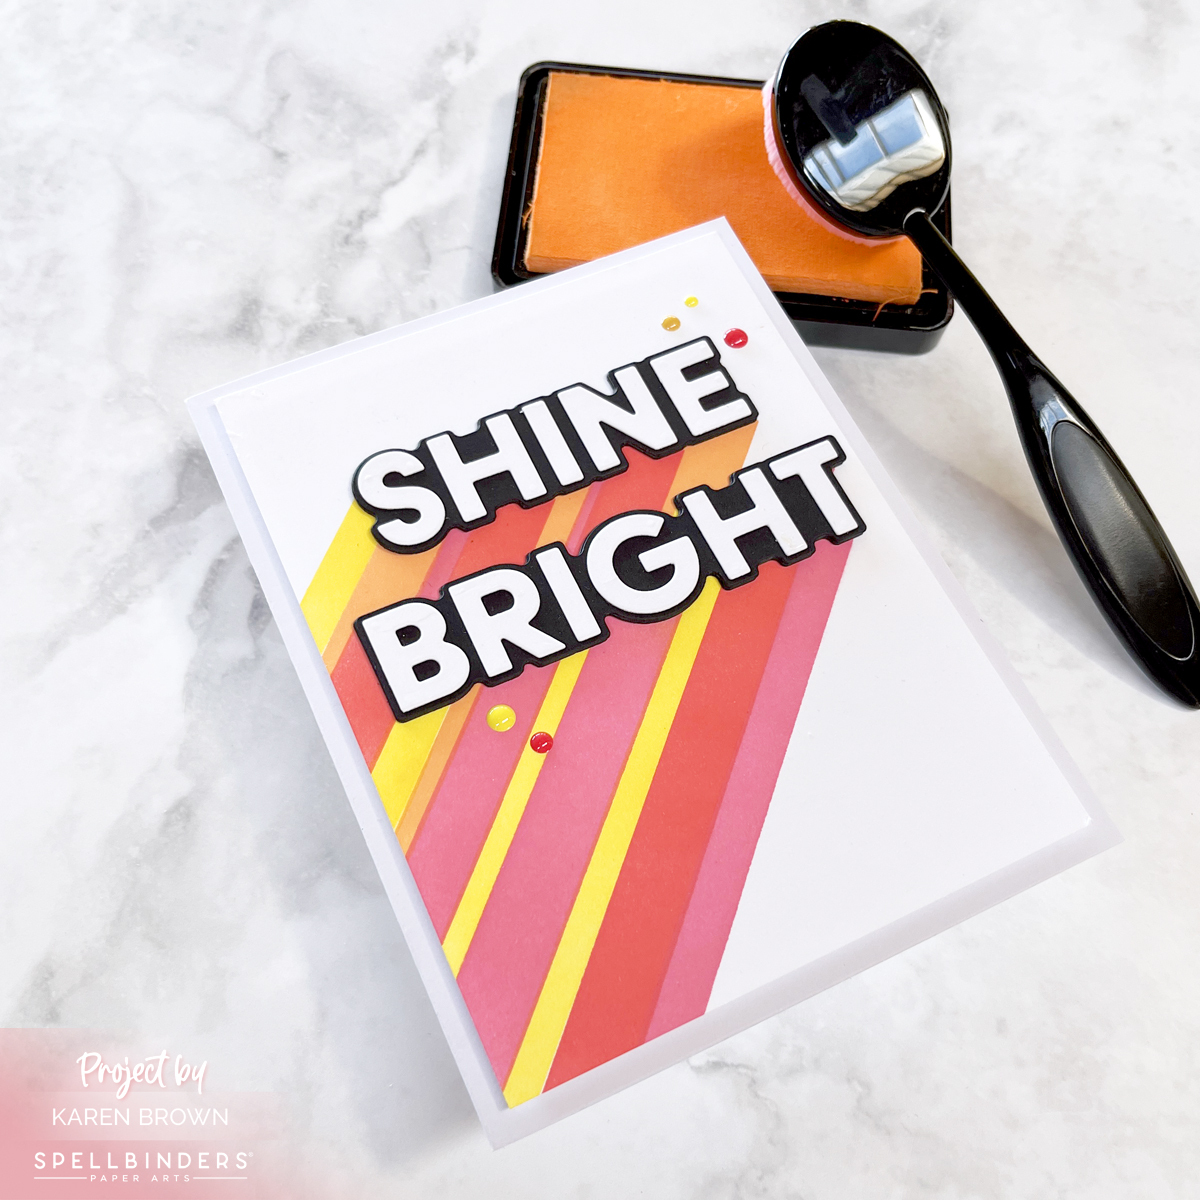
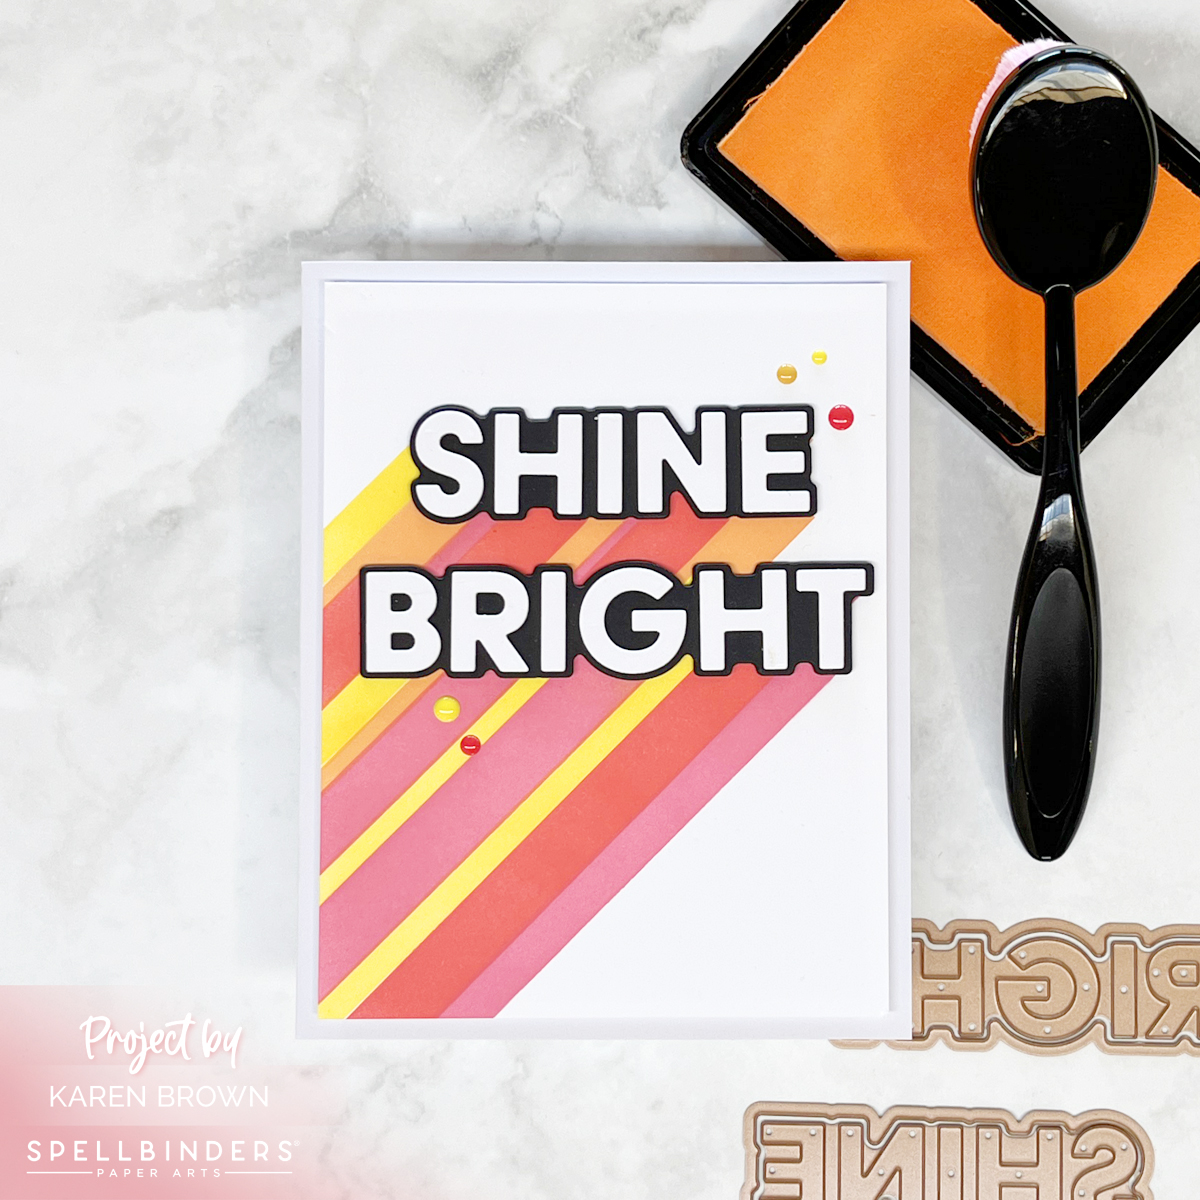
Are you ready to let your creativity shine? Today, we’re making a fun project that will have you glowing—literally! We’re going to create a stenciled and die-cut handmade card themed “Shine Bright.” Perfect for birthdays, encouragement, or just because, this card is sure to brighten anyone’s day. And I wanted to mention that the Shine Bright Collection was created by the great Carissa Wiley!
Colorful Analagous Stenciling
This card came together quickly!
I used the Layered Shine Bright Stencils to create my base, and I have to say the stencils lined up perfectly! I used Lemon Drop on layer 1, Creamsicle on #2, Fruit Punch on layer 3 and Taffy with the final stencil. I preplanned my colors and labeled my chosen color on each stencil so I wouldn’t get confused during my stenciling. I used Best Ever Craft Tape to both label my stencils and secure them to my craft mat.
Next I die cut my gorgeous sentiment. I die cut the black shadows three times and glued the layers together for nice dimension. I die cut the letters once from white cardstock. I used my Crystal Katana to pick up and place the letters.