cardmaking · Die cutting · papercrafting

Royal Inspiration: Playing Card-Themed Cards | Spellbinders

Die-cut handmade cards featuring The Queen of Hearts and King of Hearts with a playing card theme.  The dies are from Spellbinders Jack of All Trades Collection:  Royal Court and Pip and Rank.

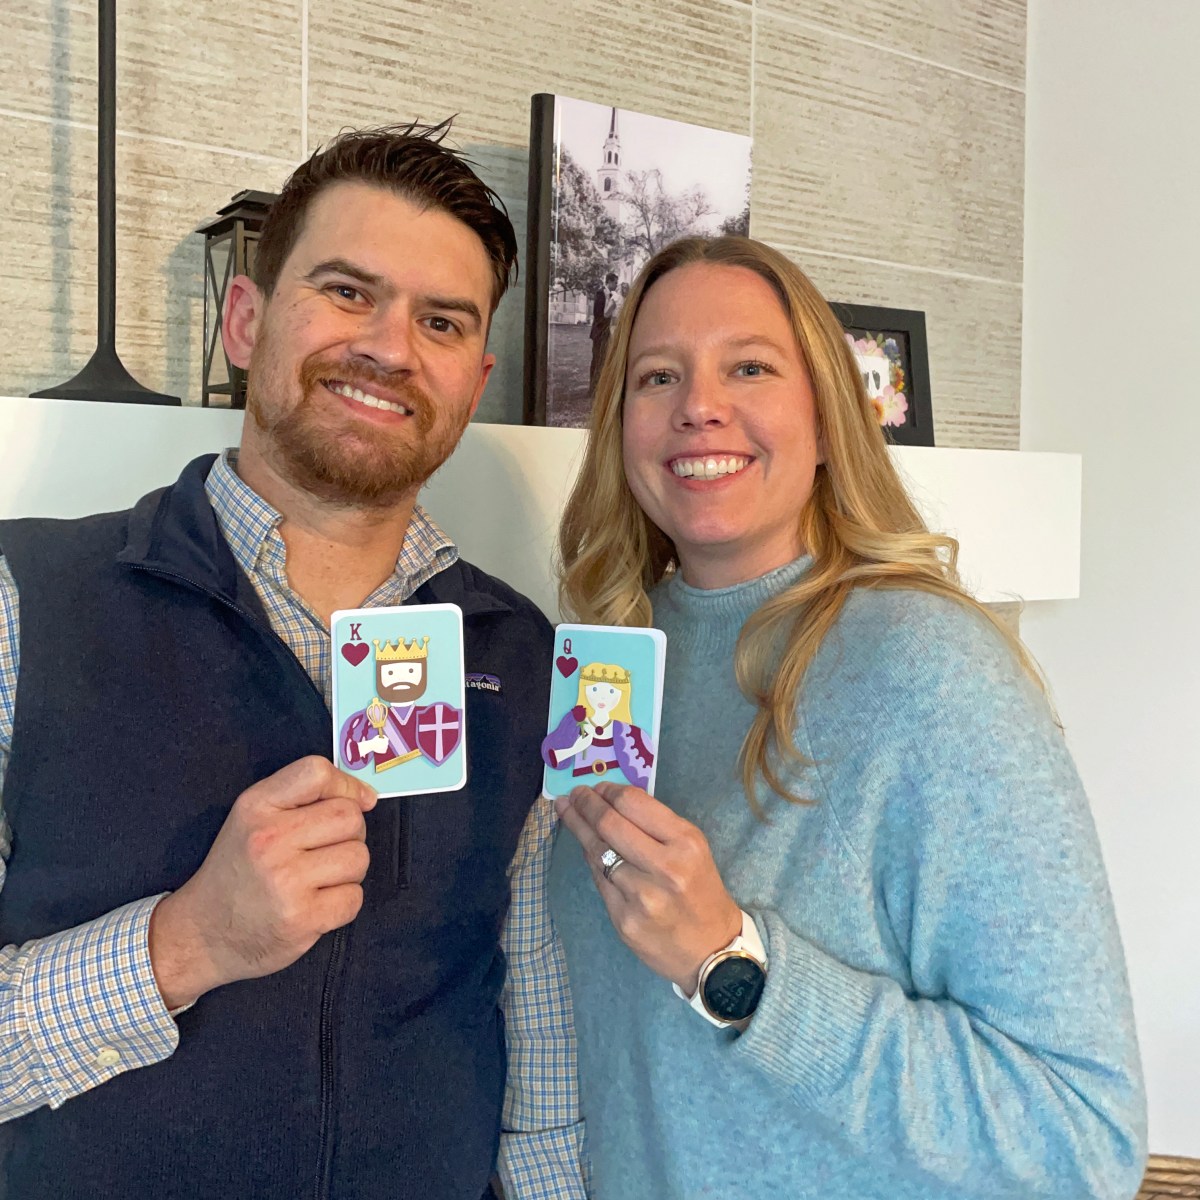
Welcome, welcome! Today, we’re diving into the world of handmade cards inspired by the regal charm of playing cards. Our stars of the show? The Queen of Hearts and King of Hearts, reimagined with a dreamy color palette of lavender, plum, and aqua. These cards are extra special because they’re personalized to look like my daughter and son-in-law, making them a true celebration of love and individuality. These cards are perfect for Valentine’s Day, birthdays, anniversaries, or any occasion that calls for a touch of royal flair.

Key Products Used:


King and Queen of Hearts playing card theme die cut handmade cards.  Wonderful customizable ideas for Weddings, Anniversaries, Birthdays and more.

These cards were so fun to make! You can personalize the peeps in so many different ways…favorite colors, hair and eye color, props….

I used Cardstock in the following colors: Passion Flower, Amethyst, Plum, Antique Ivory, Cup O Joe, Periwinkle and Meadow plus Brushed Gold accents.

Queen of Hearts: Elegance in Lavender

Queen of Hearts handmade card from Spellbinders Reversible Royal Court die set.  Great for Birthdays, Anniveraries or Valentines Day.

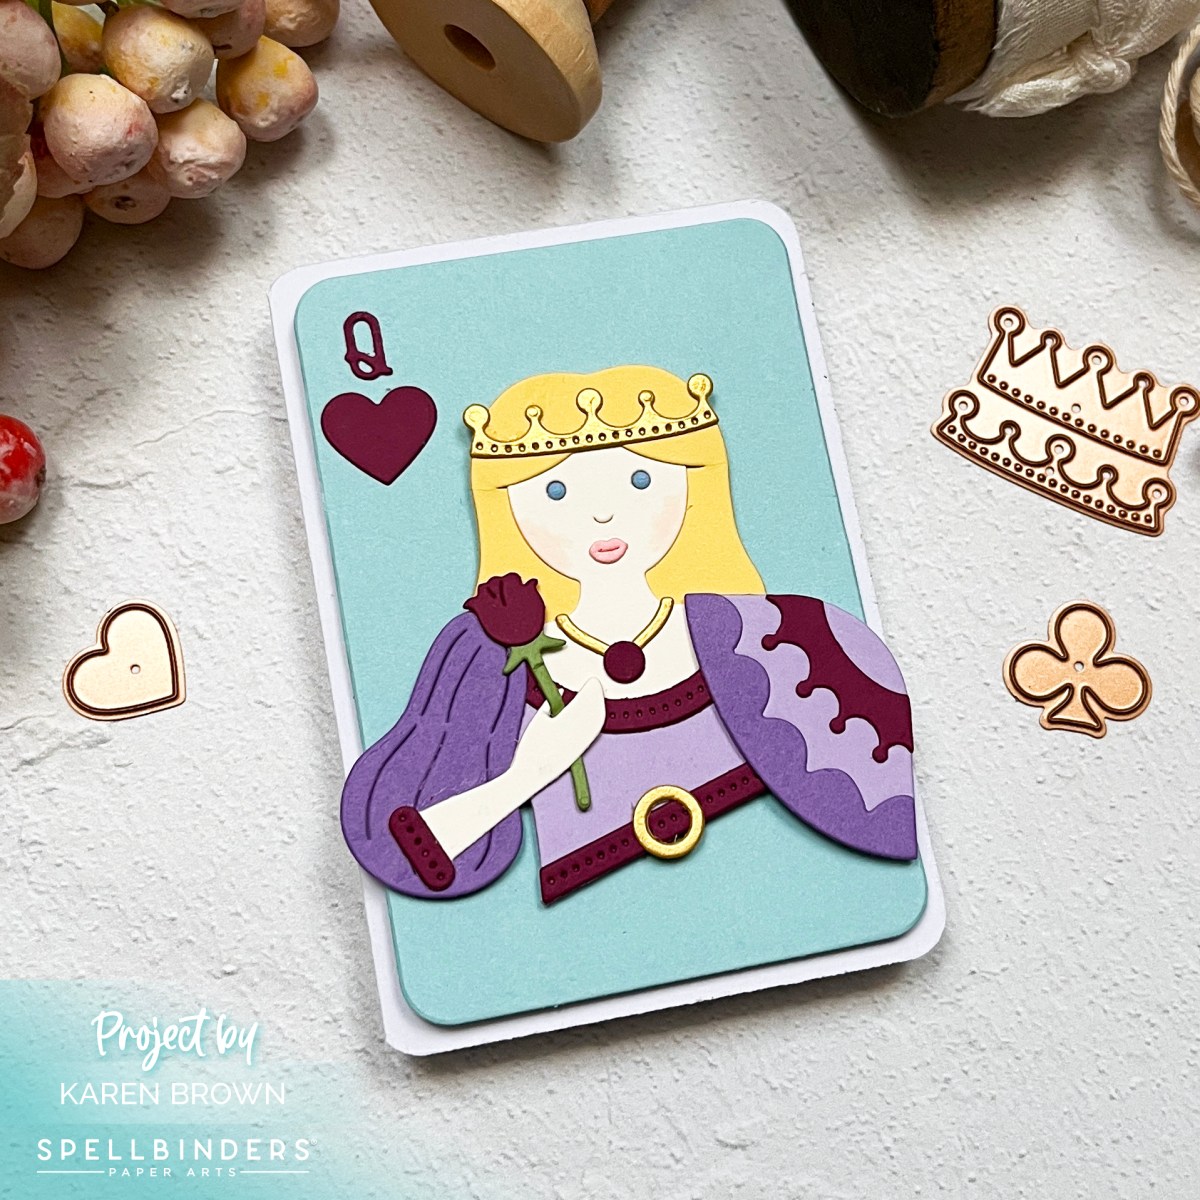
This Queen of Hearts card is a tribute to my daughter, featuring elements that reflect her grace and personality.

King of Hearts: Bold and Regal

King of Hearts handmade card from Spellbinders Jack of All Trades Collection.  Great masculine card for birthdays or Valentines.

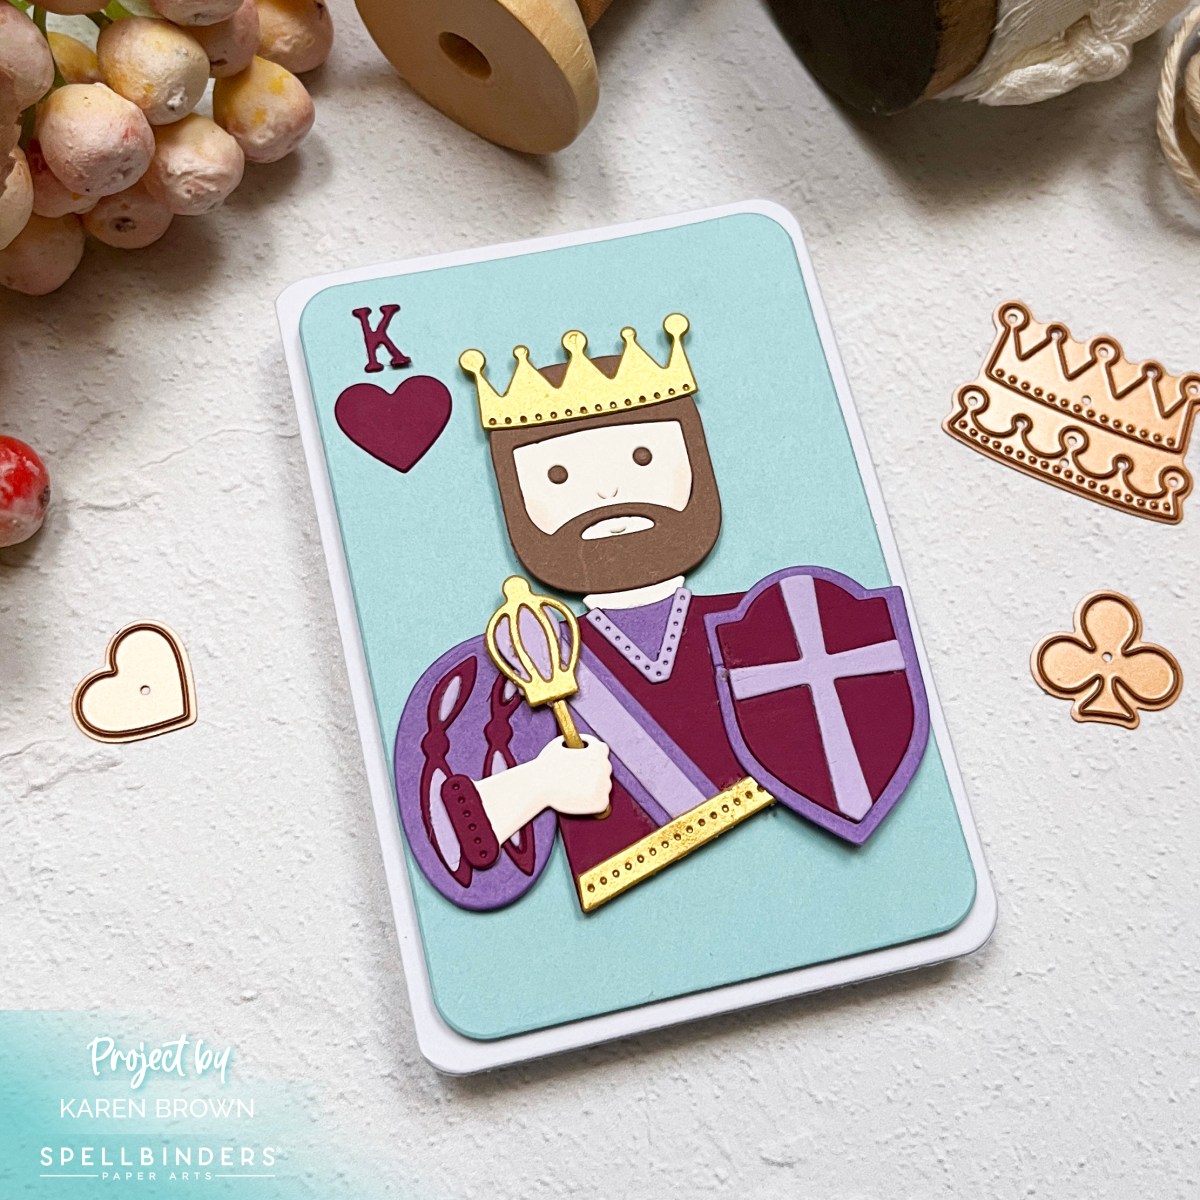
Inspired by my son-in-law, this King of Hearts card brings a bold and charismatic vibe to the design.

Crafting these playing card-themed designs has been such a delightful journey of personalization and creativity. Whether you’re celebrating a couple you adore or channeling your own inner royalty, these projects are a great way to share the love. So, what will your Queen and King of Hearts look like?

Karen

cardmaking · Die cutting

A Birthday Card Full of Whimsy: Winnie the Pooh and Piglet Scene

Whimsical blog post showing how I created a charming Winnie the Pooh (and Piglet too!) die cut birthday card from Spellbinders Classic Pooh Collection.

Sometimes, a handmade card can transport us to a place of pure nostalgia and joy. That’s exactly what this Winnie the Pooh-inspired birthday card does! With die cuts, soft ink blending, and a cheerful color palette, this whimsical creation captures a moment straight out of the Hundred Acre Wood.

Key Products Used:

You might also enjoy reading my recent post: Cozy Little Hello Cards with BetterPress | Winnie the Pooh Scene Cards.

A handmade Winnie the Pooh-inspired birthday card featuring Pooh and Piglet holding hands, an orange balloon, a honey pot, and a soft green grass background framed with a periwinkle postage stamp border.

Creating the Scene

This card brings to life a heartwarming scene of Winnie the Pooh and Piglet holding hands, walking side by side. The duo is accompanied by a playful orange balloon on a string, gently floating above. A honey pot rests on the ground, completing the sweet and simple vignette. The background features softly ink-blended green grass, framed by a charming postage stamp-style border in periwinkle blue, adding just the right touch of whimsy.

Techniques for Dimension and Charm

The die cuts are the stars of this card, and a touch of light ink blending adds depth and dimension to each element. Winnie the Pooh’s honey-colored body gets a subtle gradient to make him pop, while Piglet’s pink details are gently shaded for softness. The balloon shines bright in orange, with its string creating a delightful sense of movement.

The grass is ink blended in gentle greens, giving the scene a soft, storybook feel. Meanwhile, the periwinkle frame ties everything together with its postage stamp shape, reminiscent of a cherished letter from the Hundred Acre Wood.


Winnie the Pooh (and Piglet too!) handmade die cut birthday scene card in periwinkle blue, honey yellow and Piglet pink.

Why This Card is a Classic

This Pooh-themed birthday card is more than just a greeting; it’s a tiny piece of nostalgia wrapped in creativity. Perfect for anyone who loves the timeless tales of Winnie the Pooh, this card is sure to bring a smile to their face and a touch of magic to their special day.

Today’s card is for a friend’s birthday, but I think it would also be great as a Get Well Card.

Happy crafting and see ya next time!

cardmaking · stitching

Spellbinders | Stitching Die of the Month | Ladybug

Blog post tutorial showing how I created an adorable Ladybug handstitched card with Spellbinders January 2025 Stitching Die of the Month.

Get ready to fall in love with stitching! Today, we’re exploring how to create a charming handmade card featuring a stitched ladybug and an elegant stitched oval frame using Spellbinders January 2025 Stitching Die of the Month. This project is a delightful mix of texture, color, and whimsy, making it perfect for a wide range of occasions.

You might also enjoy my blog post about this months Small Die of the Month.

Whimsical Stitching: A Handmade Ladybug Card

Delightful handmade greeting card with stitched ladybug and oval frame elements perfect for any occasion.

My Cardmaking Process:

  • I started by die cutting my Stitching Kit pieces with my Platinum 6 die cutting machine. I die cut the Sand stitched oval frame twice and glued them together for easier stitching. Next, I cut my lady bug components plus the sentiment (included in kit) and flowers.
  • Prepping your stitching pieces: I use the piercing/pokey tool to ensure clean stitching holes on the die-cut pieces. This will make stitching a breeze.
  • I frequently use Sarah Renae Clarks Color Cubes Volume 1 and Volume 2 for color inspiration. I received mine for my birthday and they are a great gift!
  • Spellbinders has a nice selection of stitching accessories in their shop that you can find HERE. I stitched with DMC Gold and 839 Brown threads. I hope you can see the shimmer on the ladybug!
  • I usually stitch with size 22 Tapestry needles.
  • I used thin double sided tape to secure my floss to the die cuts. I like that this tape is easy to hide behind the die cuts and I don’t even bother to take the top release paper off the tape.
  • Remember to keep your floss taught as you stitch.
  • When I move from one area to the next, I run the floss through the just finished stitched area to keep the thread secure. This gives a nice look on the finished project.
  • Don’t stitch with threads that are too long or they are likely to knot. 
  • When I was done, I added a bit of Bearly Glue to the ends so that they would stay in place.
  • Adhere the stitched oval frame to an aqua cardstock background for a beautiful pop of color. Place the stitched ladybug at the center of the frame, creating a striking focal point. I assembled with Bearly Glue .
Spellbinders January 2025 Stitching Die of the Month Club Kit handmade card featuring a red and black ladybug with gold stitching and a lovely tan stitched oval frame,

Here is a photo of me stitching in front of a crackling fire—it’s the perfect way to add warmth (literally and figuratively) to your crafting session. I always like to pick a cozy or picturesque spot to stitch.

Why You’ll Love This Card

This project combines the tactile joy of stitching with the charm of die-cut details. The vivid red ladybug against the aqua background is eye-catching, while the stitched elements add a handmade touch that’s sure to impress. Whether you’re crafting for a birthday, thank-you note, or just because, this stitched ladybug card is a creative way to show you care.

Helpful Links:

Spellbinders Club Info:

  • Clubs Preview on the 1st of each month.
  • Club members can cancel, upgrade or change clubs from the 1st-5th of each month. Popular Clubs frequently sell out during this period so club members get first dibs on everything.
  • Club Members get EARLY access to new releases on the 6th!
  • On the 6th, Clubs become available to non-members.
  • On the 27th, Club registration closes for the current month.
  • If a club did not sell out, you can buy under “Shop Past Clubs”. Past kits are available on the 10th of the FOLLOWING month.

Karen


cardmaking · Cardmaking Kit · Die cutting

Hero Studio January Card Kit Release and Blog Hop: Love is in the Air!

Hero Arts Studio January Release featuring bright colorful die cut handmade Valentine Cards with The Card Kit and Folded Love Notes die set.

Happy New Year, crafty friends! Let’s kick off 2025 with something truly special—Hero Studio’s brand-new January Card Kit is here, and it’s all about spreading love and creativity. This kit invites you to explore a world of vibrant designs that celebrate love in every shade. Plus, we’re celebrating with a Blog Hop full of inspiration and a $50 gift card. You can see the entire January Release HERE.

Colorful Die Cut Hearts: Hero Studio January Card Kit of the Month

Hero Studio January 2025 Card Kit of the Month:  2 die cut heart valentine cards in teals, aquas, and red.

My color palette for the January Kit combines cool teals and aquas with warm pinks, reds, and plums for a luscious duo of cards.

Layered die cut hearts with floral accents for a colorful handmade valentine card made with Hero Arts January 2025 Card Kit of the Month.

Products Used on my Kit Cards:

I used the negative, or leftover die cuts, from Card 1 and added a few more hearts to create a second card (below).

Stacked die cut hearts on a colorful teal and red handmade Valentine Card.

What’s Inside the Kit?

Let’s take a peek inside the January 2025 Kit:
              • Color Layering Typewriter Clear Stamp Set, 6” x 8”, 
              • Typewriter Messages Clear Stamp Set, 4″ x 6″
              • 7 Typewriter Frame Cut Dies
              • 8 Typewriter Fancy Dies
              • Nesting Hearts Cover Plate Die
              • Mini Clay Hearts
              • 8 Sheets of Cardstock, 5.5″ x 8.5

January 2025 The Whole Studio
The Whole Studio includes ALL 5 of the monthly subscriptions in one discounted bundle. Cling of the Month, Clear + Dies of the Month, Layering Stencil of the Month, Fancy Dies of the Month, and the Card Kit of the Month.

Hero Arts has many different Monthly Kits that you can subscribe to including:


Rainbow of Hearts: A Burst of Color | Folded Love Notes Fancy Die Kit


Rainbow Color die cut heart Valentine card created with Hero Arts Folded Love Notes die set.

You can craft a unique card using the “Extraordinary Extra” Folded Love Notes. Layer colorful die-cut hearts on the folds to create a dynamic, interactive design…. This is the idea I started with, but once I began die cutting my concept totally changed! I used a vibrant mix of colors from the rainbow and then stacked them on different sized hearts with a high contrast value. I love the end result. All the hearts were cut with dies from the kit. I used Cardstock in the following colors: Arctic, Paradise, Adriatic, Kiwi, Cranberry, Cherry, Plum, Passion Flower, Amethyst, Peony, Papaya, Azalea.

Bright fun and playful die cut heart Valentine Card.

Join the Blog Hop!

Our Blog Hop is your chance to see this kit in action. Some of your favorite crafters are showcasing their takes on the January Release, and trust us—the inspiration is next-level! Hop along, leave comments on each blog for a chance to win a fabulous prize, and pick up tips and tricks to use in your own projects.

 
Hero Arts
Hero Arts Creative Team:
Anna Mahtani
Channin Pelletier
Charlene Madrid
Jeannie Lieu
Jennifer Kotas
Karen Brown You Are Here!
Lisa Tilson
Michelle Lupton
Mindy Eggen
Natasha Polite
Natasha Vacca
Rachel Kleinman
Rosie Lopez
Seeka
Special Guests:
Nichol Spohr
Kelly Taylor

Don’t Miss Out!

The January Card Kit is available now, but supplies are limited. Be sure to grab yours before they’re gone, and join us on the Blog Hop for a chance to win, get inspired, and start 2025 on a crafty high note!

Let me know in the comments—what’s your favorite element in this month’s kit? ❤️

Best Of · cardmaking

Best and Favorite Cards of 2024: The Year’s Most-Loved Designs

As the year comes to a close, I’m taking a moment to reflect on all the creative projects I’ve shared across my Blog, YouTube channel, and Instagram. The journey has been filled with color, craftiness, and, most importantly, connecting with all of you!

Many of these items featured on my “Fan Favorites” list are currently on sale too!

  • Find Hero Arts New Year’s Eve sale items HERE
  • Hero Arts Final Sale items can be found HERE.
  • Shop Hero Arts HERE
  • Shop Spellbinders New Year’s Eve Sale HERE
  • Find Spellbinders Clearance Sale HERE
  • Shop Spellbinders newer collections HERE.

YouTube’s Card Tutorial: Most Watched Video

Best and Most Popular YouTube Cardmaking Video in 2024.

On YouTube, it was all about bringing techniques to life. Here is the tutorial that flew the highest:

Blog Post Link: Shimmery Snowflake Backgrounds 3 Ways

YouTube Link: Shimmery Snowflake Backgrounds

I created this video for HeroArts Blog and YouTube channel but I also posted on my YouTube Channel for my followers as well.

Top Blog Post in 2024

This year on my blog, I focused on techniques that ranged from beginner-friendly to advanced, and your feedback has been the cherry on top! My most read blog post this year was:

9 Tips, Tricks and Insights for Spellbinders BetterPress Machine

I received a BetterPress LetterPress system for Christmas in 2023, and I had lots of fun learning and experimenting with my new crafty toy. You can read my original blog post by clicking on the link above.

Best, Favorite, Most Popular Cardmaking Blog Post of 2024,

Instagram Reels: Quick Crafting, Big Inspiration

Favorite and Most Popular Instagram Reel in 2024.

This year, Instagram Reels became a go-to for sharing bite-sized creativity. These short videos were packed with techniques, tips, and a splash of fun. Here is my most popular 2024 Reel.

Instagram Reel Link: Floral Trove Stenciled Friend Card

Corresponding Blog Post Link: Stunning Stenciling Magic with Rainbow Colors

Instagram Highlights: Most-Liked and Commented on Creations

Instagram brought quick inspiration and behind-the-scenes sneak peeks to your feeds. Here are the top posts.

For Spellbinders, these were the fan favorites. You can find links to the corresponding blog posts below:

Best Handmade Spellbinders Cards in 2024.

And here are my most popular Hero Arts Instagram posts along with links to the correstponding Blog Posts:

Best Hero Arts Handmade Cards in 2024.

I’m so grateful to share this journey with all of you. Your comments, likes, and creations inspire me every day. Here’s to an even brighter, more colorful 2025 filled with new techniques, bold designs, and, of course, plenty of fun! Let me know in the comments—what were your favorite projects this year? I’d love to hear your thoughts!

Happy crafting, and see you in the new year! ✨☕

Karen

cardmaking · Video

VIDEO: 3 Creative Ways to Stencil Butterfly Cards

Video tutorial with step-by-step instructions on how to make 3 creative cards using layering stencils.

Hello friends, Karen Brown here with a colorful new video. Butterflies and stencils—can you name a more dynamic duo? The December (Butterfly) Layering Stencil of the Month is SO much fun!

Or you can click HERE to watch the video.

Textured Flights of Fancy

In this post/video, we’re spreading our creative wings and sharing three unique ways to stencil butterflies that’ll make your cards flutter with charm. From bold and dramatic to soft and dreamy, these techniques will have your projects soaring to new heights! 🦋✨

The butterfly outline is layer one and then there are 3 additional detail layers to add on top to customize your projects. I show you how to use all three top layers in the video.

Beautiful butterfly cards created with layering stencils + Hero Wax and Hero Paste.

I thought it would be fun to make some non-traditional Christmas cards featuring butterflies AND pastel colors. I always love to stretch my supplies beyond the predictable!

For my first two cards, I stenciled a panel of Deluxe Smooth Cardstock with a gradient of 3 colors and then added White Hero Wax (card on the left) and Hero Glitter Paste (card on the right). I used Thistle, Taffy and Creamsicle for the card on the left. For the card on the right, I wanted a frosty, icy, wintry blend so I used Amethyst, Thistle and Splash.

The mats are Amethyst with a Granite base.

I also think the duo pictured above would make great Get Well, Thinking of You or Sympathy cards.

Let Your Creativity Soar

Stenciled and Ink blended non-traditional butterfly Christmas card.

And, I had to make at least one traditional green and red Christmas butterfly card. I stenciled with Fresh Lawn and Cherry Ink, matted with Crimson cardstock and added a sentiment from the Swirly Christmas Tree Bundle.

Other Supplies Used in the Video:

Hero Studio December Layering Stencil of the Month - 3 handmade butterfly cards.

The Final Flutter

With just a stencil and a splash of creativity, you can bring butterflies to life in endless, colorful ways. So, go ahead—spread your crafting wings, experiment with colors, and let your cards shine as bright and beautiful as a butterfly in full flight. Happy stenciling! 🦋✨

cardmaking · papercrafting

Help Me Craft an Amazing 2025—Your Ideas Wanted!

Hey there, crafty friends! 👋

Can you believe 2025 is just around the corner? I’m over here surrounded by paper scraps, embellishments, and a ton of ideas—but I want your input to make next year truly magical.

What types of blog posts, techniques, and projects do you want to see in 2025? Whether you’re a beginner still figuring out how to not glue your fingers together (been there) or a seasoned pro with a stash that could rival a craft store, I want to know what inspires you.

Here are a few questions to get those creative juices flowing:

  • Are there any papercrafting techniques you’ve been itching to learn?
  • What’s your favorite type of project—cards, scrapbook pages, 3D crafts, or something totally out of the box (literally)?
  • What is your favorite technique?
  • Would you like to see more tips, tutorials, or behind-the-scenes peeks into my crafting chaos?
  • What is your favorite: Blog Posts, Videos, Reels, Instagram Post?
  • Are there themes or occasions you want more ideas for—birthdays, holidays, just-because days?
  • Any products or tools you’re curious about that I could spotlight?

Drop your comments and let me know what would make 2025 your best crafting year yet. Your ideas help shape this space, and I can’t wait to hear them! Or, if you prefer, leave a comment on my coordinating post on Instagram: karens_mini

Let’s dream big, get messy, and make this our most creative year ever! 💖

Thanks for your input!

Karen

BetterPress · cardmaking · Tutorial

Quick and Easy BetterPress Notecards | Spellbinders

BetterPress Tutorial detailing how to create easy and elegant letterpress notecards using Spellbinders Florals Through the Year Collection.

Nothing says thoughtful elegance like a handcrafted notecard. I really enjoy the letterpress process and I wanted to create some notecards to have on hand for the coming year. Spellbinders recently released their Florals Through the Year Collection and I think it is quite beautiful. There are 12 plates…one for each month.

I have a detailed tutorial below.

Products Used:

A Year in Bloom

Handmade BetterPress letter press floral Morning Glory card.

May Morning Glory: Symbolizes love and affection.

BetterPress takes the art of letterpress and makes it accessible for all. Its crisp impressions and sophisticated designs bring timeless beauty to your cards. Plus, the ease of use means you can create a dozen cards in a single sitting—perfect for stocking up or gifting!

Better Press Tutorial:

  • I started by using Best Ever Craft Tape to attach my BetterPress card panel to the top plate of my BetterPress System.
  • I tried several types of paper (BetterPress, Watercolor and Cardstock) and they all worked with the BetterPress. I liked cottony paper the best. My preferred paper would be the BetterPress cotton paper or a handmade watercolor paper. 
  • The magnetic lower plate works really well to hold the BetterPress impressing plate in place. 
  • I was careful to ink the impressing plate really well. I did a “Tap and Twist” technique where I tapped the ink on the plate and then twisted the ink pad a few degrees. Don’t smash and smoosh or you will wind up with little pieces of ink pad on your plate and project. I ink well because I only like to roll through the press once for each panel.
  • For smaller sentiment plates, I tapped but didn’t twist. When I twisted smaller plates they tended to move out of alignment. If the plate moves it is easy to reposition with a pair of tweezers.
  • Roll your sandwich slowly through the die cutting machine. I think “Super Slo-Mo” while doing this to help me remember to go VERY slowly. 
  • You will want a good stamp cleaner for the BetterPress and plates. I’ve used Hero Arts Ultra Clean for years and it works great.
  • Waterproof or Hybrid inks well. I used the specially formulated BetterPress Inks. Pigment ink is not recommended. You want a faster drying ink. 
  • I found that my guillotine paper trimmer worked better than my Fiskar’s SureCut on cotton paper.
Handmade BetterPress letterpress Florals Through The Year Violet (Feburary) hand crafted notecard using Spellbinders plates.

February Violets: Elegant and full of love for Valentine’s Day

Spellbinders BetterPress letterpress Floral Through the Year handmade card:  Lily of the Valley for May.

Lily of the Valley: A nod to nature’s beauty in full bloom.

With a unique card for every month, you’ll always have the perfect notecard ready for any occasion. Which month’s design are you most excited to try?

Karen

cardmaking · Die cutting · papercrafting

Opening My Crafty Advent Calendar | Week 1 | Spellbinders

Opening Week 1 and creating with Spellbinders 2024 Crafty Advent Calendar.

I recently opened my Spellbinders Crafty Advent Calendar and, oh my, I can already tell this is going to be an exciting month filled with DIY fun! For those who might not be familiar, a Crafty Advent Calendar contains 24 days of creative supplies and surprises, all designed to inspire your crafting. This week, I dove into the first few projects, and I can’t wait to share the magic of it all with you.

Opening the Advent Calendar: Day 1 to Day 7

Creating an adorable die cut handmade bumblebee Hello Friend with dancing flowers.

The anticipation of opening each little door in the calendar is half the fun! Each day has revealed a mix of supplies and cute embellishments. I could feel my creativity bubbling the moment I opened Day 1.

If you missed it, you can read my Day 1 post HERE.

Here’s a quick peek at what I found:

  • Day 1: Hot Air Balloon: Read my post HERE
  • Day 2: Hello Friend Stamp
  • Day 3: 6 Flower Dies
  • Day 4: Sentiment with Banners
  • Day 5: 2 Squiggle Dies
  • Day 6: Bee Dies
  • Day 7: 3 Darling Floral Stencils

The adorable bee (day 6) captured my heart and I used those dies along with days 3, 4 and 5 to create this cute Hello Friend scene card. The clouds from the Fly Away die set were the only things I added that were not included in the Crafty Advent Calendar.

My Scout desktop die cutting machine was perfect for cutting my die cuts.

I wanted a little more vertical room for my scene, so my white panel is 4″ x 6″.

I loved the inspiration that came with each day’s reveal. I’m excited to continue opening the calendar and discovering what new projects await in the coming weeks. Stay tuned for more fun holiday crafts—I’ll be sharing new projects each week!

Have you opened a Crafty Advent Calendar this season? What are you making with yours? Let me know in the comments—I’d love to see your creations!

Happy crafting! 🎄✨

Karen

Cardmaking Kit · stitching

Handstitched Love | Spellbinders December 2024 Stitching Club of the Month

Handstitched Valentine "Love You" card in lovely pinks and gold created with Spellbinders December 2024 Stitching Die of the Month kit.

This Valentine’s Day, why not make something that’s truly one-of-a-kind? Spellbinders December 2024 Stitching Die of the Month is a truly lovely kit.

A hand-stitched Valentine card is a beautiful way to show you care. Whether you’re creating it for a friend, family member, or your special someone, adding a touch of stitching makes it both heartfelt and stylish.

Here’s how to make this charming Valentine from scratch! I shot a quick reel that you can watch HERE, or if you prefer, I also included written notes.


Create a Charming Hand-Stitched Valentine in Pink and Gold

  • I started by die cutting my Stitching Kit pieces with my Platinum 6 die cutting machine. I die cut the pink stitched background twice and glued them together for easier stitching. I used Pink Sand and Dahlia cardstock from the Happy Day Sampler. The mat was die cut from Brushed Gold, which is a real staple in my craft room.
  • I frequently use Sarah Renae Clarks Color Cubes Volume 1 and Volume 2 for color inspiration. I received mine for my birthday and they are a great gift!
  • The Love You dies are included in this month’s kit.
  • Spellbinders has a nice selection of stitching accessories in their shop that you can find HERE. I stitched the tree and base with DMC Gold and 948 threads. I hope you can see the shimmer!
  • I usually stitch with size 22 Tapestry needles.
  • I used thin double sided tape to secure my floss to the die cuts. I like that this tape is easy to hide behind the die cuts and I don’t even bother to take the top release paper off the tape.
  • Remember to keep your floss taught as you stitch.
  • When I move from one area to the next, I run the floss through the just finished stitched area to keep the thread secure. This gives a nice look on the finished project.
  • Don’t stitch with threads that are too long or they are likely to knot. 
  • When I was done, I added a bit of Bearly Glue to the ends so that they would stay in place.
  • I assembled with Bearly Glue and a bit of  Craft Foam.
Handstitched Valentine "Love You" card in lovely pinks and gold created with Spellbinders December 2024 Stitching Die of the Month kit.

Helpful Links:

Spellbinders Club Info:

  • Clubs Preview on the 1st of each month.
  • Club members can cancel, upgrade or change clubs from the 1st-5th of each month. Popular Clubs frequently sell out during this period so club members get first dibs on everything.
  • Club Members get EARLY access to new releases on the 6th!
  • On the 6th, Clubs become available to non-members.
  • On the 27th, Club registration closes for the current month.
  • If a club did not sell out, you can buy under “Shop Past Clubs”. Past kits are available on the 10th of the FOLLOWING month.

Thanks for stopping by!

Karen