stitching

Let’s Decorate the Tree! Hand Crafted Stitched Felt Ornaments

Spellbinders Nichol Spohr Felt Stitch and Create hand-crafted stitched Christmas ornaments with a darling star shaped snowman and an adorable Gingerbread Girl.

There’s something about handmade ornaments that makes a Christmas tree feel extra special—like it’s dressed in memories and love. This year, why not add a touch of cozy charm to your tree with hand-stitched felt ornaments? Today, I’m sharing how to create two adorable characters: a Snowman Star and a Gingerbread Girl using Spellbinders/Nichol Spohr’s Felt Stitch and Create Kits. These cuties are sure to bring a smile to everyone’s face!

Hand-Stitched Christmas Cheer: Felt Ornaments for Your Tree

Creating a handmade felt Snowman Christmas ornament with Spellbinders and Nichol Spohr's Stitch and Create Ornament Die Kit.

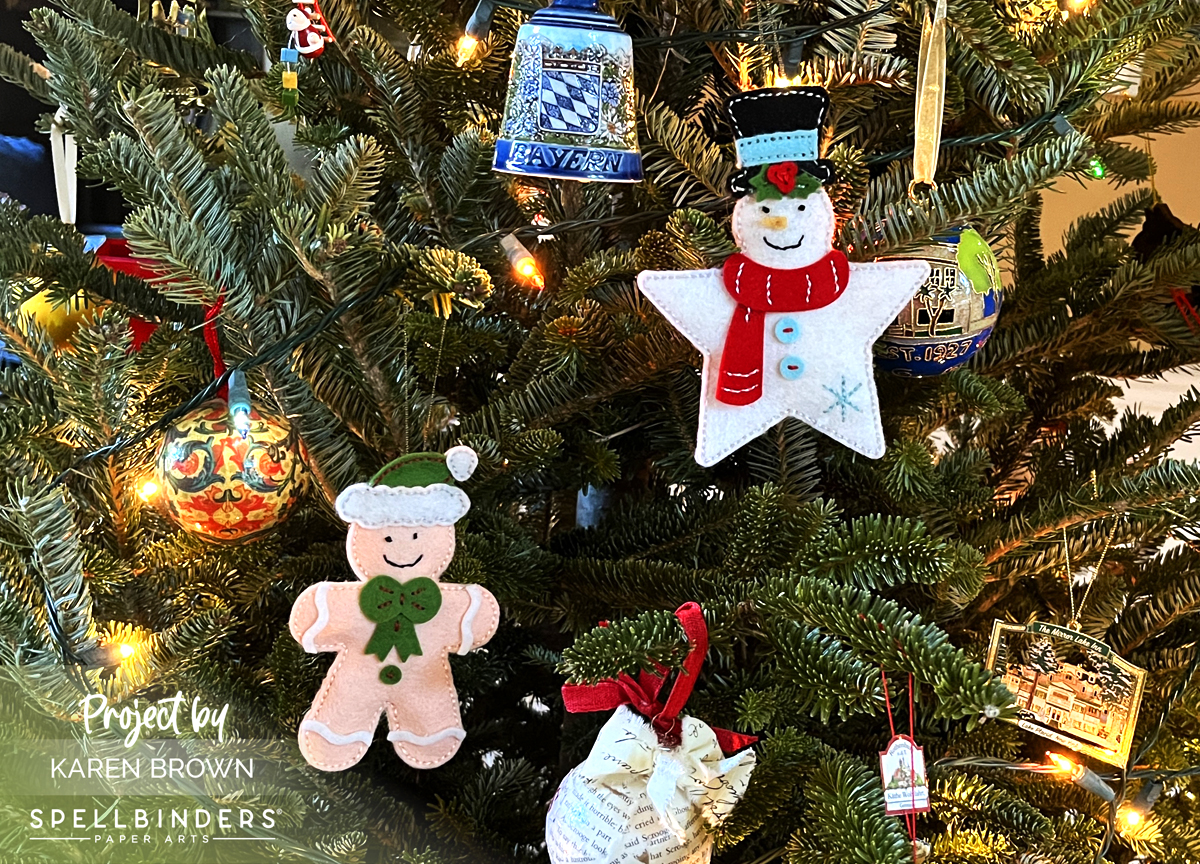
Nothing says winter wonderland like a snowman! This star-shaped snowman brings the frosty fun with its dapper hat and a cheery scarf.

My Process:

  • I die cut my felt using my Platinum 6 Machine and a regular die cutting sandwich. I used Spellbinders Merino Wool Felt Holiday Collection Sampler but there are other Felt Samplers as well.
  • I used my Pokey Tool to pop out any remaining felt chads for easier stitching.
  • I stuffed my ornaments with felt for dimension.
  • I used the running stitch and three strands of thread for my stitching. Using the running stitch, I went around my felt twice to have continous stitching.
  • I used a mini hot glue gun to adhere the pieces and accessories that were not stitched on.
  • To make my hangar, I ran a needle with floss through the back layer of felt and then knotted the floss at the top.
Creating a handmade felt Gingerbread Girl Christmas ornament with Spellbinders and Nichol Spohr's Stitch and Create Ornament Die Kit.

Sweet as can be, this Gingerbread Girl brings a dash of whimsy to your tree. Her hat and bow gives her a festive flair, perfect for the holiday season.

Key Products Used:

Creating  handmade felt  Christmas ornaments with Spellbinders and Nichol Spohr's Stitch and Create Ornament Die Kits.

These felt ornaments are keepsakes that I will hang on my tree year after year. They would also make wonderful gifts for family and friends. Happy Holiday!

Karen

cardmaking · Die cutting · papercrafting

Opening Day 1 of the Crafty Advent Calendar | Spellbinders

Opening Day 1 of Spellbinders Crafty Advent Calendar and making a handmade card with the included dies.

December is finally here, and I couldn’t be more excited to kick off the festive season with my Spellbinders Paper Arts Crafty Advent Calendar! If you’re anything like me, the thought of crafting something new each day leading up to Christmas brings so much joy—and this year, the fun starts with a surprise die inside Day 1. Let’s open it together and make a holiday card!

Spellbinders 2024 Advent Calendar Options:

What’s Behind Door #1?

The anticipation is real. As I carefully peel open Day 1, I reveal… a beautiful hot air balloon die! It’s intricate yet versatile, perfect for adding that extra touch of winter magic to any holiday card.

Spellbinders trio of colorful die cut hot air balloons on a handmade card.

This balloon die is just adorable with tons of detail! So here is a quick tutorial on how I created this bright happy card:

  • I started by die cutting my balloon 3 times in the following combinations: orange and hot pink, aqua and lime, lavendar and purple. This project is perfect for my compact desk top Scout Die Cutting Machine.
  • I used Brushed Gold cardstock for the sentiment and accents.
  • The only die I added is the cloud from the Fly Away die set. I use this cloud on a lot of projects and find it is a great accent to have in my craft room.
  • My background panel is 4 1/4″ x 6″. I little longer than an A2 card but I like the layout better with a bit more vertical space.
  • I adhered my elements with Craft Foam and Bearly Glue.
  • My card base is charcoal grey for a bit of lovely contrast.

And There You Have It!

I can’t wait to see what’s behind the other doors! Stay tuned for more crafty inspiration as we count down to Christmas together. I will be back in a few days with more Crafty Advent Inspiration.

Happy crafting! ❄️🎄

Karen

cardmaking · Tutorial

BOLD Heat Embossing | Hero Arts

How to get beautiful bold heat embossing results everytime.  Hero Arts Abstract Poinsettia Pattern Cling Stamp - November 2024

Hello, Karen Brown here from kennyscard.com and today I’ve got two projects with BOLD heat embossing that practically pops off the card! Heat embossing definitely adds that wow factor to your cards and it is always a fan favorite.

Today I am using the lovely new Abstract Poinsettia Pattern Cling stamp on both my cards. With a red rubber cling stamp and a bit of heat, you can create raised glossy designs that catch the light beautifully. Embossing give cards a tactile element that feels luxurious and makes your creations stand out.

Abstract Poinsettia Pattern 2 Ways

"JOY" die cut and heat embossed Christmas card with fine black heat spatter and Adriatic teal and Crimson red color scheme.

Let’s get started!

  1. For both cards, I started by creating my backgrounds. I applied my anti-static powder tool to a 6″ x 6″ panel of Cranberry cardstock. I always like to take a clean flat brush and move the powder around the cardstock before I start stamping.
  2. Using my StampWheel, I stamped the Abstract Poinsettia Pattern background stamp with Unicorn Pigment Ink and then heat set with White Embossing Powder. I use this double white combination when I want really bright white embossing. I let my heat tool warm up for 3 minutes so it was good and hot.
  3. I die cut my JOY sentiment three times from Adriatic Cardstock and then glued the stacks together for nice dimension.
  4. I added some fine paint splatters to an A2 White Card Base using a fine brush and lightly diluted Black Licorice Ink. I like to put a dab of ink on an Acrylic Block, mist it and then flick it onto my project.
  5. I cut my background down to 2 1/8″ x 5 1/2″ and glued to the bottom of my card base.
  6. I centered and glued my sentiment, added a left over “Peace on Earth” from my October Card Kit and finished with 3 black Neutral Hues Enamel Dots.
Bold red and white heat embossing  with teal die cut JOY Letter sentiment.

I made a quick Instagram reel for Card 2 if you are interested in watching the process.

  1. I repeated steps 1-3 above.
  2. I brushed some Icelandic Hero Wax onto my die-cuts for a shimmery glow that is even prettier in person. I applied the wax with a silicone shaper brush, but you could use your finger or a sponge dauber. This wax is an inexpensive way to spice up your projects. The key is to use just a little. And don’t worry, clean up is easy!
  3. I trimmed my background down and ink blended a little Crimson and Black Licorice around the edges to frame the sentiment, but you could easily skip this step.
  4. With a little craft foam, I glued my panel to an A2 card base.
  5. I centered and glued my sentiment.
Two bold heat embossed Christmas cards in Crimson red and Aquatic Teal with bright white heat embossing.

Thanks for stopping by today. Happy embossing, and happy holidays!

cardmaking · Die cutting

Spellbinders | Rocky the Dancin’ Yeti | Monster Friends Collection

Adorable female die cut Yeti handmade card in oranges and purple.

Imagine receiving a cheerful Yeti card to brighten your day—whether it’s a simple “hello” or a get-well wish, this handmade card will surely bring a smile. This die set is called Rocky the Dancin’ Yeti, buy I’ve renamed my set “Roxy” since I created a sweet furry little girl. Rocky is a new Spellbinders Paper Arts release.

Yetis are mythical Himalayan Abominal Snowmen, but this cutie from the Monster Friends Collection is not frightening at all! Using die-cutting techniques, you can easily bring this charming character to life. This die set is great for playing card-making dress up. The kit includes lots of extra accessories like scarves, ear muffs, knit caps etc.

Creating This Card:

  • I started by die cutting my Yeti components using my compact Scout Machine. I love small sets that work well with table die-cutters. I used Persimmon, Peridot and Sunshine from the Happy Day Cardstock Pack. I used Amythest for my base, and I really like the contrast. The other colors came from my scrap drawer.
  • I frequently use Sarah Renae Clarks Color Cubes Volume 1 and Volume 2 for color inspiration. I received mine for my birthday and they are a great gift!
  • My background and mats were die-cut using my Scallop Edge Infinity Dies.
  • I chose a fun font sentiment from Hero Arts Birthday Animals Stamp.
  • TIP: Some of the pieces are small so I found using a fine tip glue worked well. I used Bearly Glue.
Rocky the Dancin' Yeti die cut Hello handmade card from Spellbinders Monster Friends kit.

Happy crafting, and I hope Roxy the Yeti brought you a bit of cheer!

Karen

BetterPress · cardmaking

Celebrate | How to Get the Best Prints with Your BetterPress | Spellbinders

Creating fresh clean BetterPress cards for any celebration using Number and Sentiment press plates.

I adore the BetterPress Letterpress system! You can create beautiful, high-quality cards that blend modern design elements with traditional techniques. In this guide, I’ll show you how to use your BetterPress system to make colorful clean and simple cards that feel sophisticated and timeless. Today, I will be using Spellbinders new Color Mix Collection which is great for just about any celebration!

How to Get The Best BetterPress Letter Press Prints

Bold masculine die-cut BetterPress happy birthday card using Srellbinders Bold Color Mix Numbers and Sweeping Celebrations Sentiments.

After Experimenting for the past year, here are my tips for pristine BetterPress prints:

  • I started by using Best Ever Craft Tape to attach my BetterPress A2 Porcelain card panel to the BetterPress top plate. I wanted a clean white look, so I used the Porcelain cardstock. In my opinion, BetterPress Cotton Paper or handmade watercolor papers work the best with BetterPress.
  • The magnetic lower plate works really well to hold my Bold Color Mix Numbers and Sweeping Celebrations Sentiments impressing plates in place. 
  • I was careful to ink the impressing plates really well. I did a “Tap and Twist” technique where I tapped the ink on the plate and then twisted the ink pad a few degrees. Don’t smash and smoosh or you will wind up with little pieces of ink pad on your plate and project. I ink well because I prefer to roll through the press only once for each plate.
  • I liked the sentiment going “uphill” with the “h” and “b” lower than the “y”.
  • I rolled my sandwich SLOWLY through my Platinum 6 die cutting machine. I think “Super Slo-Mo” while doing this to help me remember to go VERY slowly. 
  • The Color Mix Numbers Bundle has coordinating dies that are just beautiful! You can use them with the press plates…or separately.
  • You’ll want a good stamp cleaner to clean your BetterPress and press plates. I’ve used Ultra Clean by Hero Arts and it works great!
  • I used the specially formulated BetterPress Inks for my pressing.  For the “54” card I used Coastal and Clay from the Desert Sun Mini Sampler. For my Happy Anniversary card, I used Wild Berry and French Blue from the Nature Tones Mini Sampler. The black comes in a Full Size and you can find the smaller size in the Regal Tones Mini Ink Set. Waterproof or Hybrid inks as work well. Pigment ink is not recommended….you want a faster drying ink. 
  • I found that my guillotine paper trimmer worked better than my Fiskar’s SureCut on cotton paper.
  • My base is Granite cardstock and I used Craft Foam, Bearly Glue and Fashion Jet Enamel Dots to finish my cards.

Spellbinders Color Mix BetterPress Collection

Colorful clean minimalist Happy Anniversary card created with Spellbinders Bold Color Mix Press plates.

Key Products I Used on My BetterPress LetterPress Prints:

Bold yet clean and simple BetterPress cards using the Bold Color Mix Numbers and Dies Bundle + Sweeping Celebrations Sentitments

By focusing on clean, minimalist designs with bold colors, you can create cards that feel modern and fresh but have all the charm of traditional letterpress.

Thanks for stopping by today!

Karen

cardmaking · Cardmaking Kit · stitching

Stitching Die of the Month | November 2024 | Spellbinders

Handmade stitched card tutorial with Spellbinders Novebmer 2024 Stitching Die of the Month and a die cut Dalmation dog.

Today, I’m excited to share a simple yet charming project featuring a stitched frame and an adorable die-cut Dalmatian named Dottie!

I am using Spellbinders Paper Arts November Stitching Club of the Month and Roller Disco Dottie from the Out and About Collection.

Frames add so much interest and I think this new stitched kit will become a staple in my craftroom. I can never have too many nesting inifity dies and this one would also be so pretty “unstitched”!

Cross Stitch Nested Card Front and Tag Kit

Adding handstitched details to your cardmkaing projects.

Stitching Kit Tips and Tricks:

  • I started by die cutting my Stitching Kit pieces with my Platinum 6 die cutting machine. This month’s kit has 7 wonderful cutting dies. I die cut the frame twice and glued them together for easier stitching. The frame is Teal Topaz and the stitched inset is Waterfall that I used from The Assorted Cardstock pack. This bundle has GREAT colors!
  • I die cut Dottie twice and assembled.
  • Spellbinders has a nice selection of stitching accessories in their shop that you can find HERE. Today, I used DMC 964 that is included in the Color Essentials Cool DMC Bundle. This thread bundle was selected to coordinate with Spellbinders cardstock colors.
  • When I started stitching, I took two strands of floss, separated them one at a time, brought them together and then stroked and lengthened them until they seemed tame and ready to use.
  • I usually stitch with size 22 Tapestry needles.
  • I used thin double sided tape to secure my floss to the die cuts. I like that this tape is easy to hide behind the die cuts and I don’t even bother to take the top release paper off the tape.
  • Remember to keep your floss taught as you stitch.
  • When I move from one area to the next, I run the floss through the just finished stitched area to keep the thread secure. This gives a nice look on the finished project.
  • Don’t stitch with threads that are too long or they are likely to knot. 
  • When I was done, I added a bit of Bearly Glue to the ends so that they would stay in place.
  • I assembled my piece with Bearly Glue and Craft Foam.

I thought it would be fun to include a process photo of my stitching in progress. I have a comfy chair by a window that I like to stitch in.

Process photo for a handstitched greeting card with a die cut dalmation puppy.

Helpful Links:

Spellbinders Club Info:

  • Clubs Preview on the 1st of each month.
  • Club members can cancel, upgrade or change clubs from the 1st-5th of each month. Popular Clubs frequently sell out during this period so club members get first dibs on everything.
  • NEW for 2024: Club Members get EARLY access to new releases on the 6th!
  • On the 6th, Clubs become available to non-members.
  • On the 27th, Club registration closes for the current month.
  • If a club did not sell out, you can buy under “Shop Past Clubs”. Past kits are available on the 10th of the FOLLOWING month.

Thanks for stopping by!

Karen

cardmaking · Die cutting · Stamping

Unique Cards Inspired by Retro and Urban Vibes + Ralph Tyndall/Hero Arts Instagram Hop

Iconic GameBoy Retro Game theme shaped handmade card from the Ralph Tyndall collection from Hero Arts.

Phenom Ralph Tyndall collaborated with Hero Arts for a fun new Fall Release. I created two iconic cards that are part of Hero Arts Instagram Hop that you can participate in HERE.

You can find Ralph Tyndall’s Fall Collection HERE.

Retro GameBoy-Themed Card 🎮

As a 90s kid at heart, I couldn’t pass up the chance to create a card inspired by the iconic GameBoy! The nostalgic colors, the pixelated graphics, and that satisfying ‘click’ of the buttons—this card was such a blast to make.

Key Ralph Tyndall Supplies:

Directions for Creating the Retro Game Card:

  • Tip 1: I snipped the star, heart, pull tab and game cartridge from the die set and then die cut the rest of the elements as one piece. This ensured that I had perfect placement for the buttons and screen. If you don’t snip the above mentioned components, they will die cut the back of the card.
  • I used Mustard Cardstock for the body, Charcoal Cardstock for the rim of the screen and Vellum for the screen
  • I die cut the screen frame and buttons 3 times each and glue the pieces together for a realistic 3D look.
  • The die set has a great coordinating Retro Game Stamp Set that really makes the game come alive. I chose Winner for my Screen plus A & B, Select and Start Buttons. There are LOTS of Game related words included in the stamp set.
  • I added an Antique Ivory liner to inside of my card.
Fun handmade card for the video gamer in you life - GameBoy Retro Game die set.

This GameBoy inspired card was one of my favorites to create, and I have to say Tetris was my favorite back in the day! It’s the perfect card for any gamer or someone who loves a throwback to the good ol’ days of handheld gaming.

Urban Heroscape Card

Colorful Urban Cityscape Heroscape card featuring stamps from Ralph Tyndall.

For my second card, I went in a completely different direction with a graphic linear urban Heroscape design. Ralph designed this set too and it is called Street View Heroscape. I’ve always been fascinated by cityscapes, especially the way modern architecture plays with lines and geometric shapes. So, I wanted to create a card that captured the energy of an urban environment using simple, clean lines.

Street View HeroScape Stamps by Ralph Tyndall and Hero Arts - handmade card.

I chose not to use the base stamp because I wanted to emphasize the linear grapic look of this stamp set. The set also comes with coordinating dies that you can find HERE.

TIP: Prior to stamping the Pool Party color building, I masked the Indigo and Purple Galaxy buildings with post it notes for clean stamping.

Supplies Used:

Cardmaking Kit · Die cutting · stitching

Crafting a Cozy Christmas | Spellbinders October Stitching Club

Spellbinders October 2024 Stitching Club of the Month hand crafted card.

Today, we’re diving into a delightful project that combines creativity and a sprinkle of love: a hand-stitched Christmas card featuring Spellbinders October Stitching Club of the Month. The kit creates a whimsical Christmas tree under a starry night sky. Let’s get started on crafting a card that your loved ones will cherish!

Hand stitched and crafted Christmas tree card set against a starry night.

Merry and Bright Cloche Stitching Kit

  • I started by die cutting my Stitching Kit pieces with my Platinum 6 die cutting machine. I die cut the stitching pieces twice and glued them together for easier stitching. My sky is navy cardstock and the background is kraft. The stitched base element and star were die cut from Brushed Gold, which is a real staple in my craft room.
  • The Merry and Bright etched sentiment is included in this month’s kit.
  • Spellbinders has a nice selection of stitching accessories in their shop that you can find HERE. I stitched the tree and base with DMC Antique Gold Thread. I hope you can see the shimmer!
  • I usually stitch with size 22 Tapestry needles.
  • I used thin double sided tape to secure my floss to the die cuts. I like that this tape is easy to hide behind the die cuts and I don’t even bother to take the top release paper off the tape.
  • Remember to keep your floss taught as you stitch.
  • When I move from one area to the next, I run the floss through the just finished stitched area to keep the thread secure. This gives a nice look on the finished project.
  • Don’t stitch with threads that are too long or they are likely to knot. 
  • When I was done, I added a bit of Bearly Glue to the ends so that they would stay in place.
  • With scissors, I cut 2 triangles that I added behind the tree to pop it up a bit.
  • I assembled with Bearly Glue and Craft Foam.

Helpful Links:

Spellbinders Club Info:

  • Clubs Preview on the 1st of each month.
  • Club members can cancel, upgrade or change clubs from the 1st-5th of each month. Popular Clubs frequently sell out during this period so club members get first dibs on everything.
  • NEW for 2024: Club Members get EARLY access to new releases on the 6th!
  • On the 6th, Clubs become available to non-members.
  • On the 27th, Club registration closes for the current month.
  • If a club did not sell out, you can buy under “Shop Past Clubs”. Past kits are available on the 10th of the FOLLOWING month.

Thanks for stopping by!

Karen

cardmaking · papercrafting

Cheerful Shine Bright Card | Spellbinders

Shine Bright layer stenciled card with bold die cut sentiment all from Spellbinders.

Hey crafty friends!

Are you ready to let your creativity shine? Today, we’re making a fun project that will have you glowing—literally! We’re going to create a stenciled and die-cut handmade card themed “Shine Bright.” Perfect for birthdays, encouragement, or just because, this card is sure to brighten anyone’s day. And I wanted to mention that the Shine Bright Collection was created by the great Carissa Wiley!

Colorful Analagous Stenciling

Analagous stenciling on a bright, happy, colorful chandmade card perfect for many occasions.

This card came together quickly!

  • I used the Layered Shine Bright Stencils to create my base, and I have to say the stencils lined up perfectly! I used Lemon Drop on layer 1, Creamsicle on #2, Fruit Punch on layer 3 and Taffy with the final stencil. I preplanned my colors and labeled my chosen color on each stencil so I wouldn’t get confused during my stenciling. I used Best Ever Craft Tape to both label my stencils and secure them to my craft mat.
  • Next I die cut my gorgeous sentiment. I die cut the black shadows three times and glued the layers together for nice dimension. I die cut the letters once from white cardstock. I used my Crystal Katana to pick up and place the letters.
  • I finished by using Sunset Enamel Dots embellishments.

You can buy the Shine Bright Bundle (stencil and die) or the Sentiment Dies separately.

Shine bright, and let your creativity light up the world!

Thanks for stopping by and happy crafting!

Karen

Cardmaking Kit · stitching

Frameable Art | Spellbinders September 2024 Stitching Club

Beautiful  die cut and handstitched sunflower in a 4" x 6" frame.  Spellbinders September 2024 "Stitched Flower" papercrafting kit.

WOW, WOW, WOW! I LOVE Spellbinder’s September Stitching Die of the Month Kit! This sunflower is so gorgeous that I decided to make a 4 x 6″ framed art piece for my guest bedroom. I have all the details below.

Stitched Sunflower Art | Tips and Tricks

  • I started by die cutting my Stitching Kit pieces with my Platinum 6 die cutting machine. This month’s kit has 15 dies. I die cut the flower petals and brown center twice and glued them together for easier stitching.
  • Spellbinders has a nice selection of stitching accessories in their shop that you can find HERE. Today, I used metallic gold floss on the center and 3 shades of DMC floss for the flower. I have been buying and collecting floss for decades, so some of these are vintage.
  • When I started stitching, I took two strands of floss, separated them one at a time, brought them together and then stroked and lengthened them until they seemed tame and ready to use.
  • I usually stitch with size 22 Tapestry needles.
  • I used thin double sided tape to secure my floss to the die cuts. I like that this tape is easy to hide behind the die cuts and I don’t even bother to take the top release paper off the tape.
  • Remember to keep your floss taught as you stitch.
  • When I move from one area to the next, I run the floss through the just finished stitched area to keep the thread secure. This gives a nice look on the finished project.
  • Don’t stitch with threads that are too long or they are likely to knot. 
  • When I was done, I added a bit of Bearly Glue to the ends so that they would stay in place.
  • I assembled my piece with Bearly Glue and foam squares.
  • Last, I popped my sunflower in a 4″ x 6″ frame and set it on the bedside table.
Spellbinders September Stitching Club Kit of the Month:  Stitched Sunflower.

Helpful Links:

Spellbinders Club Info:

  • Clubs Preview on the 1st of each month.
  • Club members can cancel, upgrade or change clubs from the 1st-5th of each month. Popular Clubs frequently sell out during this period so club members get first dibs on everything.
  • NEW for 2024: Club Members get EARLY access to new releases on the 6th!
  • On the 6th, Clubs become available to non-members.
  • On the 27th, Club registration closes for the current month.
  • If a club did not sell out, you can buy under “Shop Past Clubs”. Past kits are available on the 10th of the FOLLOWING month.

Thanks for stopping by!

Karen