Cardmaking Kit · Die cutting

Girly Spa-Themed Die Cut Card | Wrapped in Care – December 2025 Club Kit

Feminine die cut card idea:  delightful spa day theme card of a girl in a spa towel turban enjoying a day of beauty.

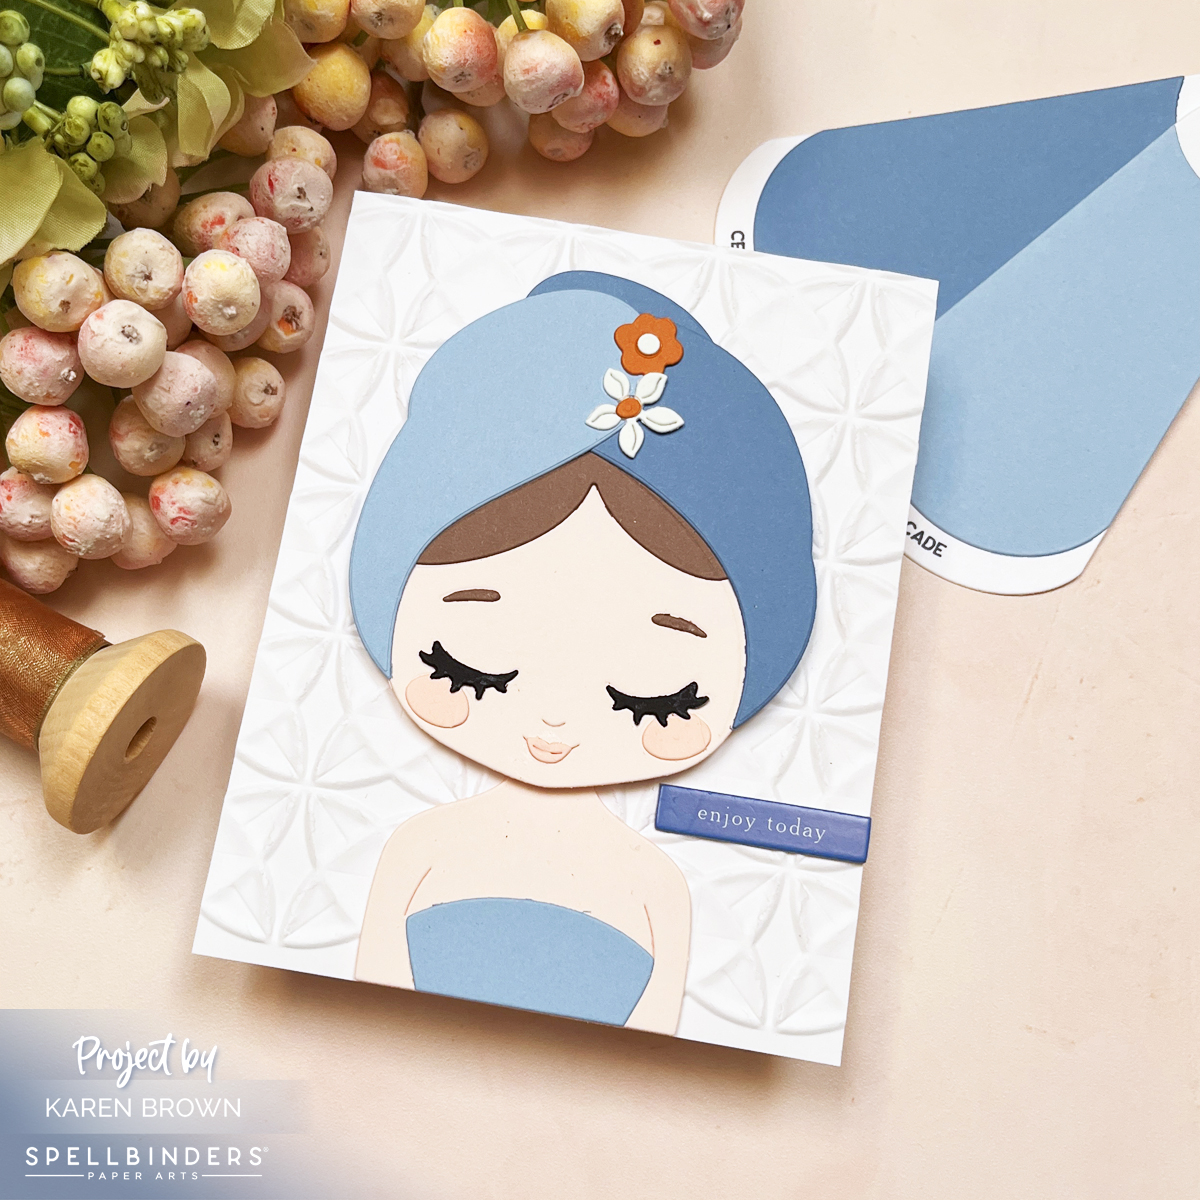
The Spellbinders December 2025 Large Die of the Month, Wrapped in Care, is an absolute delight—especially if you love creating feminine cards with personality. This adorable die set builds the sweetest girl wrapped in a fluffy spa towel turban, fully embracing her day of beauty. It’s charming, whimsical, and so customizable, which made it perfect for creating a card for my daughter. Naturally, I personalized her hair and skin tone to match!

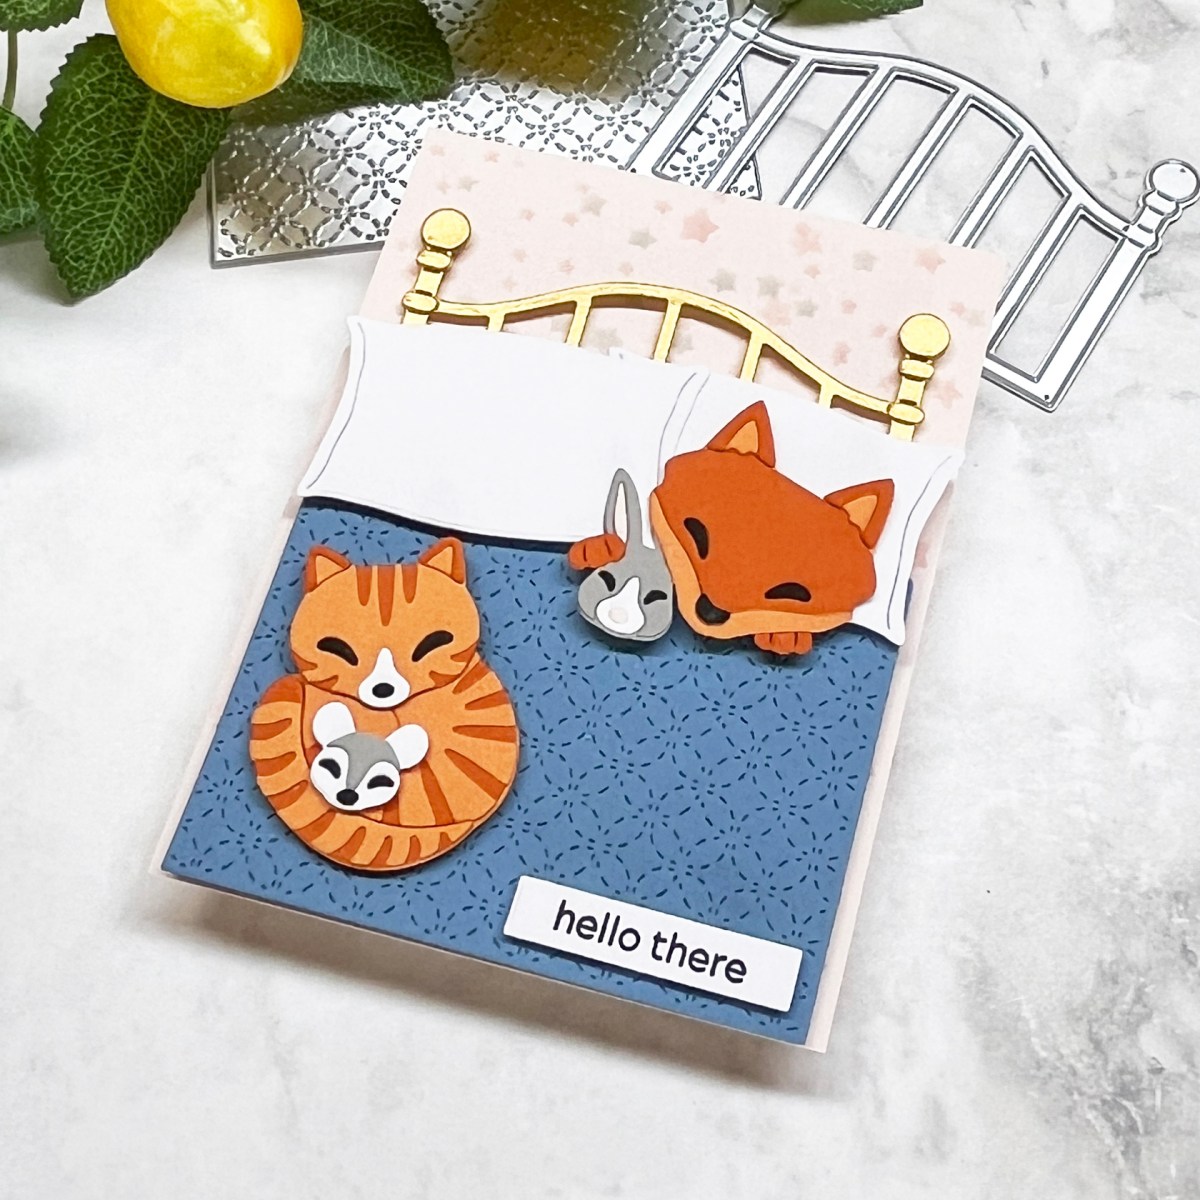
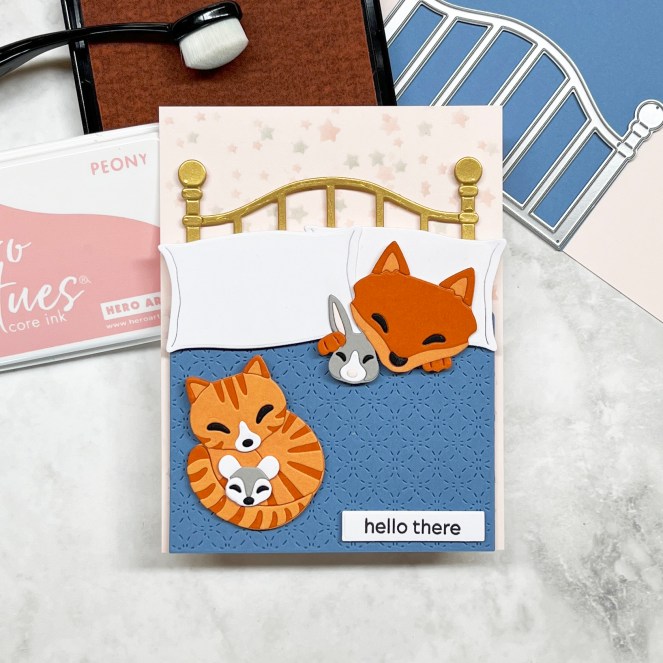
If you enjoyed this post, you might be interested in cards for kids.

To build the scene, I embossed my background using a past Embossing Folder of the Month, which gave the card a serene, peaceful spa vibe. The textures really elevate the focal girl and tie the whole design together. For colors, I reached for my ColorWheel cardstock, one of my favorite studio essentials. The shades are Chiffon, Cascade, and Celestial, with additional details cut from scraps.

This blog post also highlights my trusty Swatching Dies and Stamps, which are invaluable when choosing harmonious colors.

Die cutting process photo showing the assembly of my December 2025 Large Die of the Month card.

I included a process photo that shows my Spellbinders Shears, my Craft Stax Tray Set (perfect for corralling all the tiny die cut bits), and of course, I used my trusty Platinum 6 die cutting machine—the real MVP.

A simple chipboard sentiment—“enjoy today”—finishes the card with the perfect message for a little self-care moment.

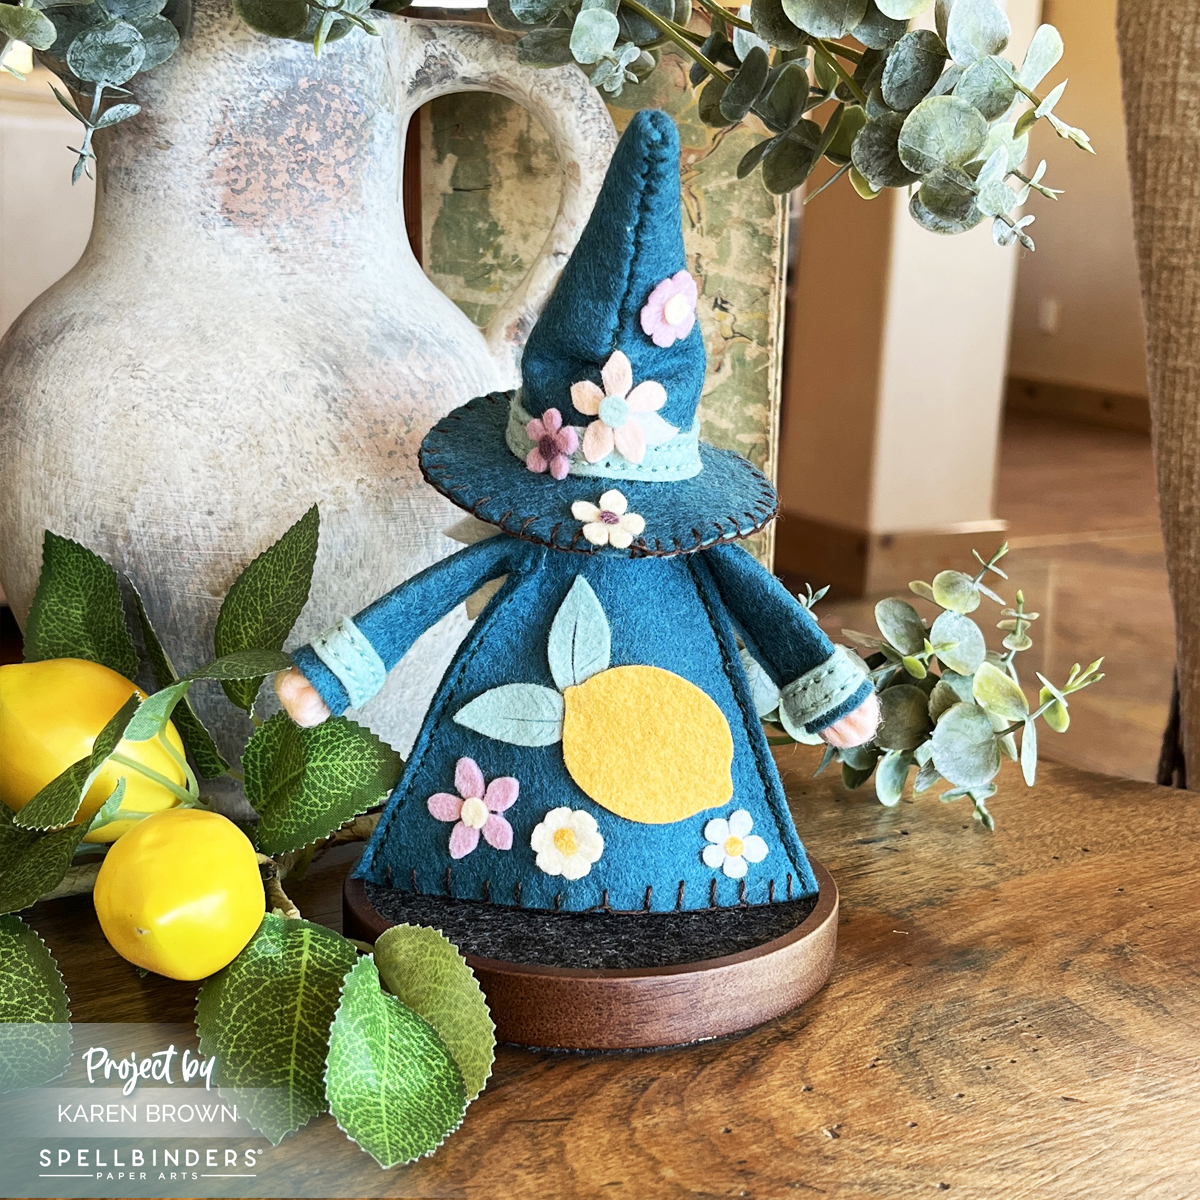
If you love spa themes, feminine cards, or die cutting with loads of personality, the Wrapped in Care kit is going to be a favorite.

Helpful Links:

Spellbinders December 2025 Die of the Month: Wrapped in Care die cut handmade girlfriend card.
Die cutting · Stamping

How to Create Clean & Mixed Media Backgrounds | Hero Arts December 2025 Release & Blog Hop

Two cozy stamped and die cut Get Well Cards; one is clean and fresh the other is an easy mixed media card.

Hello friends! Karen Brown here, and today I’m sharing two cards for the Hero Arts December 2025 Release + Blog Hop. This month’s theme—Soup There It Is—is warm, clever, and absolutely perfect for building a stash of Get Well cards. I don’t know about you, but I always seem to need get well cards, and this release is packed with comforting imagery and punny sentiments that make them so fun to create.

Hero Arts just announced a fantastic price drop on their subscription programs, making this the perfect time to sign up if you’ve been on the fence. The Monthly Card Kit is now $45 instead of $60, and the Whole Studio Subscription dropped from $75 to $55. That’s a big monthly savings and an incredible value considering how many products, techniques, and creative opportunities you get in each box. If you love building your stash, trying new tools, and being inspired each month, this is truly the best time to jump in.

My two cards today both feature the December Cling Stamp of the Month: Dotty—a fantastic, versatile background stamp that deserves a spot in every crafter’s studio. To help you get the most out of this staple, I’m showing two completely different background styles:
Clean, fresh, and modern
🎨 Easy, layered mixed media

Let’s jump in!

Card 1 – A Clean & Modern Background Using Pigment Ink

Cozy Alphabet Soup "Get Well Soon" card with a charming blue and white stamped polka dot background.

For my first card, I created a crisp and contemporary background using the Rubber Cling Dotty stamped in Unicorn White Pigment Ink on Breeze Cardstock. This combination creates a soft, airy polka dot look that works for any occasion, but feels especially soothing for a get well theme.

Background Tips:

  • Pigment ink gives gorgeous coverage, but it dries slowly.
  • Speed things along with a quick blast from your heat tool.
  • Try this technique on any mid-tone cardstock—it’s a great way to stretch your ink stash.

For the focal point, I used the December Die of the Month: Alphabet Soup to create an adorable soup bowl, complete with:
🥣 a spoon
🍘 cracker-style accents
🌿 sprigs of parsley
…and swirling alphabetical noodles!

The spoon cleverly spells out “Get Well Soon”—such a comforting detail. This card feels clean, uplifting, and perfect for sending warm wishes to someone who needs a little TLC.

Stamped polka dot background on a cozy die cut Get Well card.  White pigment ink on light blue cardstock.

>>> Receive a FREE Bread Bowl Stamp and Cut (see card #2)  when you purchase The Whole Studio!

Hero Arts has many different Monthly Kits that you can subscribe to including:

Card 2 – Easy Mixed Media Using Dotty + Gel Press Print

Mixed media card featuring Gel Press print stamped with white Dotty pattern background stamp, distressed and ink-blended edges, brown speckles, and die-cut bread bowl with “Feel Better” sentiment.

For my second card, I wanted to show the versatility of the Rubber Cling Dotty stamp by pairing it with a mixed media background.

I pulled a Gel Press print from my stash—a great way to use your pre-made backgrounds—and stamped Dotty over the top with Unicorn White Pigment Ink. After drying with my heat tool, I:

  • Distressed the edges using a distressing tool
  • Ink blended around the outer edges for depth and warmth
  • Added Brown Acrylic Speckle (from the December Card Kit) for texture and personality. I like to use a fan brush and rotate my background for even distribution.

My focal point is the die cut from the December Whole Studio Bonus Gift: Bread Bowl, shaded with inks to mimic the look of warm crusty bread. The “Feel Better” sentiment ties the whole card together in the coziest way.

This mixed media-style card is earthy, rich, and full of character—but still incredibly easy to make.

Mixed media background card featuring Hero Arts "Dotty" red rubber cling background stamp on a distressed gel press print.  The background features white circles on an aqua blue background with brown paint splatters.

Blog Hop and Giveaway: 

Hero Arts will give away a $50 gift card, drawn from the comments left across the hop. Enter by Sunday, December 7th at 11:59pm MT, and the winner will be announced on the Hero Arts blog the following week. Leave a comment on all stops for more chances to win!  

Hero Arts
Seeka
Rosie Lopez
Rachel Kleinman
Nichol Spohr
Natasha Polite
Mindy Eggen
Michelle Short
Michelle Lupton
Lisa Tilson
Karen Brown
Jennifer Kotas
Jeannie Lieu
Charlene Madrid
Channin Pelletier
Anna Mahtani

Final Thoughts

Whether you prefer clean and modern or layered and artsy, the Dotty Cling Stamp opens up endless background possibilities. Paired with this month’s heartwarming soup-themed dies, you can build a versatile stash of Get Well cards to share comfort all year long.

Be sure to hop along with the rest of the designers—there are prizes to be won and loads of inspiration waiting for you!
Happy crafting, friends. ❤️

cardmaking · Die cutting

Spellbinders November 2025 Large Die of the Month – Charmed to Know You

2 handmade purse theme cards created with Spellbinders November 2025 Large Die of the Month Kit.

Today I’m sharing two darling purse-themed cards using the Spellbinders November 2025 Large Die of the Month Kit Charmed to Know You. This set is pure cuteness with so many ways to personalize your bag design. Think mini luxury handbag boutique… but in cardstock form!

This die kit creates a fabulous purse with dangling charms, handles, layered details, and all the embellishments your fashionable heart could want. While it’s designed for 5” x 7” cards, I also made a 4” x 6” version because these purses are just too cute not to size-down and play.

💡 Crafter tip: I keep a clear pouch full of scrap cardstock and it was PERFECT for cutting the tiny charms. Little paper leftovers finally had their big couture moment!


💜 Card 1 – Cream & Lilac Glam

Feminine birthay card featuring a die cut handbag with three cute charms dangling from the handle.

For my first card, I created a Alabaster cream purse with brown leather straps and brushed gold hardware — classic and chic!

I paired it with a lilac background (ColorWheel cardstock) and added a darling mini change purse, a pink scarf, and two charms:
✨ a sweet little bear with a matching pink neck kerchief
🍒 happy smiling cherries

The finishing touch? A gorgeous La Dolce Vita hot foil sentiment on lilac cardstock:

Make it a Day to Remember

And yes — this purse absolutely feels like it’s ready for brunch, shopping, and maybe a macaron or two.


🖤 Card 2 – Chic Neutrals & Lucky Charms

Fun girly birthday card featuring a gray and gold handbag with three charms hanging from the gold hardware:  two dice and a pink pig.

My second purse fits a 4” x 6” card base and features granite and anchor gray cardstock with a brushed gold chain handle — sleek and modern!

I got playful with my charms:
🐷 I turned the Caboodle Bonus Gift pig into a charm
🎲 and added two dangling dice on each side

A sweet mini pink bow sits above all three — because even edgy handbags deserve a touch of sweetness.

The sentiment is a dainty Glimmer-foiled “Happy Birthday” — perfect for the girly-girl in your life who loves a little luxury and whimsy.


2 handmade die cut cards featuring cute charms and purses created from the November 2025 Spellbinders Large Die of the Month Kit.

🌟 Final Thoughts

This month’s Large Die of the Month is a handbag lover’s dream — charming (pun absolutely intended), customizable, and so much fun to style. Try different color palettes, charm combos, and sizes to create purses for every personality.

Interested in my other November Card Kit Creations?

Helpful Links:

Cardmaking Kit · Die cutting · papercrafting

Bold Color Block Brunch Theme Card | Spellbinders November Kit

Handmade brunch-themed card with bold color-block rectangles in pink, green, lilac, and blue, featuring die-cut egg, bacon, champagne glass, and waffle with stick arms and legs, plus a 'Thanks a Brunch' sentiment.

Let’s Do Brunch! | Spellbinders November 2025 Small Die of the Month

If you love playful cardmaking and adorable food-themed dies, this month’s Spellbinders Die of the Month — Let’s Do Brunch — is going to spark so much joy! This clever die set is packed with cheeky breakfast and brunch icons, complete with arms, legs, and serious personality. Think cute eggs, dancing bacon, bubbly champagne… all ready to brunch and boogie.

And the sentiment?
“Thanks a Brunch.”

Brunch food theme die cut card created with Spellbinders November 2025 Die of the Month Kit.

My Bold + Graphic Brunch Card

For today’s project, I leaned into a bold, graphic color-block look to really spotlight each quirky character. I trimmed and pieced together four vibrant cardstock quadrants to create a modern grid background. The clean, high-contrast shapes make the little food friends shine!

Card Details

  • Theme: Foodie / Brunch / Thank You
  • Style: Modern color-block + cute character die cuts
  • Colors:
  • Characters:
    ✅ Smiling sunny-side-up egg
    ✅ Dancing bacon strip
    ✅ Cheerful champagne glass (cut from vellum for fun transparency!)
    ✅ Sweet little waffle

Each food item gets tiny stick arms and legs — a charming little detail that gives them so much life.

📐 Measurements

To create the crisp color-blocked effect:

  • Cut four rectangles: 2 1/8″ x 2 ¾” each
  • Tape all four from the back
  • Adhere the full panel to an A2 card base to stabilize

Simple steps, big visual impact!

Close-up of smiling die-cut breakfast characters on a modern graphic card with vellum champagne glass and bright pastel cardstock blocks

Design Tips

  • Vellum = perfect for glasses, bottles, and any glass objects
  • Foam Squares behind your food characters adds dimension and personality
  • Mixing playful images with clean graphic lines = fresh modern design

Don’t Miss This Kit!

If you’ve been looking for a unique, fun die set that works for birthdays, thank-yous, brunch invites, foodie friends, or just-because cards — this one’s a winner.

Be sure to check out my post for the November Stitching Die of the Month too — my favorite stitching kit of the year!

Thanks a brunch for stopping by today — and tell me, which cute brunch buddy is your favorite?

Helpful Links:

Die cutting · stitching

Fergus the Gnome – Tips and Tricks for Stitching

Hand-stitched wool felt Fergus the Gnome decorated with a die cut lemon and flowers in teal, aqua, yellow, lavender, and pink  Two photos:  one of the front and a second showing the back.

Meet Fergus the Gnome—Spellbinders’ newest Felt Décor project! Fergus is a hand-stitched wool felt doll with endless opportunities for personalization. Using high-quality merino wool felt, I created my own version: a cheerful Lemon Gnome, decorated with citrus and flowers.

the front of hand-stitched merino wool felt Fergus the Gnome decorated with a die cut lemon and flowers in teal, aqua, yellow, lavender, and pink

✂️ Why Wool Felt?

I’ve tried different felts in the past, but they sometimes frayed or stretched, leaving me frustrated. Merino wool felt cuts beautifully with Spellbinders dies and keeps its shape. For this project, I used my Platinum 6 Die Cutting System + felt from the Trend and Holiday Collections—smooth, sturdy, and vibrant.

🍋 My Lemon Gnome

The back of Fergus the Lemon Gnome's coat and hat with all the embellishments.

Fergus can be customized with accessory kits or your own creativity. I decided to make a “Lemon Gnome” using the Citrus Spritz dies:

  • A die cut lemon + layered flowers for front and back
  • Teal, aqua, and white wool felt for Fergus himself
  • Yellow, lavender, and pink flowers for accents

To add personality, I stitched:

  • Blanket stitching along Fergus’s giant hat brim and coat edges
  • Running stitches for construction
    I stitched with 3 strands of embroidery floss, pulling up, not sideways, to keep the felt smooth.

🧵 Stitching & Assembly

Process photo showing me handstitch Fergus the Gnomes felt hat.

  • LINK to multiple YouTube Fergus Instruction Videos
  • Stitches used: running stitch + blanket stitch. I used three strands of DMC floss.
  • Accessories: Fergus has two coordinating accessories die sets, but I used one of my favorite die sets, Citrus Spritz. Use your favorite dies to personalize your gnomes.
  • Die cutting: use a regular sandwich in your machine; Spellbinders Platinum 6 dies cut felt beautifully
  • Stitching: For my Fergus running stitch assembly, I used floss the same color as the felt. For the decorative blanket stitching, I used chocolate brown floss, which contrasted nicely with the teal and aqua felt.
  • Stuffing: I used cotton fiber filling for the stuffing and then added uncooked rice to the bottom of the gnome’s body to add ballast. I inserted about an inch of rice right before I stitched on the base.
  • Assembly: Bearly Art Glue worked great for securing embellishments and components. I used a generous amount. I also cut a little triangle from deli paper and inserted inside the coat prior to gluing (see photo 2 down). This kept the glue from seeping to the other side.
  • Tip: keep floss taut, not tight, for smooth edges

You build Fergus piece by piece—hat, coat, nose, accessories—and then assemble him. He’s adorable, sturdy, and so fun to make.

Process photo showing die cut felt lemon and flowers ready to be attached  to  Fergus the Gnome

📸 Organization Process Photo

I used my Stash Stax to keep me organized while I created Fergus.

Process photo showing die cut felt Fergus the Gnome in my  to the front of Fergus the Gnome in my Stash Stax organizer.

Giftable & Customizable

You can decorate Fergus for any season, occasion, or holiday. Imagine Christmas gnomes, Valentine’s gnomes, Easter gnomes, or even citrusy summer gnomes like mine. They make unique gifts, handmade keepsakes, or cheerful décor.


Cardmaking Kit · Die cutting

Tips for Arranging Die Cut Scenes | Spellbinders October 2025 Club Kits

Handmade winter card with a girl in shades of pink pulling a sled stacked with three gifts. Periwinkle blue-gray sky with foiled white falling snow and snowy ground. Two decorated Christmas trees frame the scene, with rainbow foiled ribbon sentiment reading 'Christmas Greetings'

One of my favorite things about cardmaking is building little worlds with die cuts. The Spellbinders October 2025 Club Kits are perfect for creating playful, outdoor winter scenes full of joy, color, and personality. Today I’m sharing two companion cards I made using the Die of the Month Kit and the Large Die of the Month Kit—both with matching colors and snowy backdrops.

At the bottom, I’ll also walk you through a few of my favorite tips for planning and arranging die cut scenes.

Sled of Gifts (Large Die of the Month)

Spellbinders October 2025 Large Die of the Month winter snow scene of a child pulling a sled piled with gifts.

I started with the Large Die of the Month Kit, creating a cheerful winter scene of a little girl, pulling a sled piled high with gifts. To set the stage, I added two decorated Christmas trees with colorful ornaments.

The background is periwinkle blue-gray cardstock, foiled in white using the Hero Arts Celebration LetterPress Plate with the Spellbinders Glimmer system. The falling dots create a snowy sky, while snow on the ground grounds the scene.

For the sentiment, I used a ribbon hot foil design from the Merry & Bright Press Plate set, foiled in rainbow foil for a festive and eye-catching finish.

This card feels full of movement and energy—perfect for capturing the joy of the season.

Building a Snowman (Die of the Month)

Handmade winter card featuring a girl in pink and a boy in burgundy and yellow building a snowman in front of a snowy evergreen tree. Periwinkle blue-gray sky foiled with white falling snow. Sentiment reads 'for U' in hot pink cardstock

Since I loved the colors in my first card, I made a companion card using the Die of the Month Kit.

This time, the scene features two children building a snowman.

The background is the same as my first card—periwinkle sky with white foiled falling snow and a snowy ground. Hero Arts Celebration LetterPress Plate + white foil

For the sentiment, I combined a scripty “for” with a giant U (both from the October Caboodle Bonus Gift), both die cut in hot pink. Together, they form a bold, playful greeting.

This card has a storybook charm and pairs perfectly with the sled design.

Spellbinders October Die of the Month scene card showing 2 children building a snowman in front of a snowy sky and flocked tree.

📝 Tips for Arranging Die Cut Scenes

Here are five simple steps I use whenever I build a die cut scene:

  1. Plan Colors First: Choose your key colors. For these cards, I used blue gray, hot pink, and fern green as my anchors. White cardstock provided snowy contrast.
  2. Die Cut All Elements: Having all the pieces ready makes it easier to plan your layout.
  3. Assemble Each Element: I use Bearly Art glue and a Crystal Katana jewel picker to precisely assemble my elements. Once they are fully assembled, it is much easier to determine exactly where I want to place each component.
  4. Mock Up Layouts: I arrange several versions, take quick photos, and then choose the most balanced design.
  5. Construct Your Scene: I like to use glue, foam squares and craft foam to complete my card.

These tricks make arranging die cut winter wonderlands more fun and less stressful.

Helpful Links:

Cardmaking Kit · Die cutting

Hero Arts October 2025 Release and Blog Hop | Merry Era

2 bright and colorful handmade holiday cards created with the Hero Arts Studio October 2025 Kits

Hero Arts October 2025 Release | Merry Era

It’s time for the Hero Arts October 2025 Release Blog Hop, and this month’s theme is Merry Era! I had so much fun creating two festive cards that sparkle and shine in very different ways.

Glittery Pink Christmas Ball

Handmade Christmas card featuring a large white glitter ornament on Dahlia pink cardstock with a layered yellow  bow, and a navy sentiment reading “Merry & Bright.”

For my first card, I reached for the “Have a Ball” Die Set from the October 2025 Card Kit. I wanted a sparkly look, so I die cut the large Christmas ball twice from white glitter cardstock for extra stability. My card base is Dahlia cardstock (included in the kit) which makes the ornament pop.

The layered bow was cut from Beeswax and Tuscan cardstock, also in the kit, and I finished it off with a BetterPress “Merry & Bright” sentiment stamped on navy cardstock. I love the subtle glitter that catches the light—this card is festive yet elegant.

💡 Design tip: This die set would work beautifully for New Year’s cards too!

What’s Included in the Kit?
October 2025 Hero Arts Card Kit contents

           • Deck the Halls with Disco Balls 6×8 Stamp Set
           • Deck the Halls with Disco Balls Coordinating Dies
           • Have a Ball Die Set
           • Gold Embossing Powder .5 oz
           • 10 Sheets of Cardstock- 1 of each color, 5.5″ x 8.5″   
           • Two Sheets of Gold Matte Paper, 5.5″ x 8.5″ 

Merry & Bright die cut Christmas Ornament card created with Hero Arts Studio October 2025 Card Kit of the Month.

Receive a FREE beautiful Merry Everything Die Set when you purchase The Whole Studio!

Hero Arts has many different Monthly Kits that you can subscribe to including:

Twinkling Lights

Handmade holiday card with gold die-cut light strings and colorful cardstock bulbs arranged on teal cardstock, finished with a bold circular sentiment reading “Christmas is Too Sparkly … Said No One Ever.”

For my second card, I used the Twinkle Lights Fancy Dies. I die cut the string of Christmas lights from gold paper (included in the kit) and then added pops of color by cutting the bulbs from colorful cardstock scraps.

Placing the strands artfully across teal cardstock created a playful, modern background. The circular sentiment—“Christmas is Too Sparkly … Said No One Ever”—is also part of the October Card Kit.

💡 Tip for small die cuts: A Ninja Jewel Picker and Bearly Arts Glue are lifesavers when attaching those tiny bulbs!

The combination of shiny gold strings, bright bulbs, and the bold sentiment makes this card full of Christmas cheer.

Hero Arts Twinkle Lights die cut card with strands of colorful Christmas lights strung across a vivid blue background.

>>> Click HERE. to see my other October Card Kit Cards.

GIVEAWAY 

Hero Arts will give away a $50 gift card, drawn from the comments left across the hop. Enter by Sunday, October 5th at 11:59pm PT, and the winner will be announced on the Hero Arts blog the following week. Leave a comment on all stops for more chances to win!
  

BLOG HOP ORDER


Hero Arts
Nichol Spohr
Seeka
Rosie Lopez
Rachel Kleinman
Natasha Polite
Mindy Eggen
Michelle Short
Michelle Lupton
Lisa Tilson
Karen Brown You Are Here!
Jennifer Kotas
Jeannie Lieu
Charlene Madrid
Channin Pelletier
Anna Mahtani

Cardmaking Kit · Die cutting

Spellbinders September Club Kits – Seasonal Fun!

Two seasonal  die cut fall/Halloween cards featuring Spellbinders September 2025 Large Die of the Month Kit (whimsical pumpkin house) and Small Die of the Month (smiling Jack-o-lantern with black cat, ghost and flowers)

The Spellbinders September 2025 Club Kits are here, and this month’s themes are packed with seasonal charm—perfect for Halloween, autumn, and everything in between! Today, I’m sharing two cards featuring the Large Die of the Month and Small Die of the Month.

👉 A quick reminder: the last day to subscribe is September 27th—so don’t miss out!

Large Die of the Month – Pumpkin House

Adorable Seasonal autumn card with vivid oranges, teals and greens created with Spellbinders September 2025 Large Die of the Month Kit

The Large Die of the Month is designed as an Acorn House, but I gave it a seasonal twist by transforming mine into a Pumpkin House! I can’t seem to get enough orange this month.

A gray squirrel is making his way to the front door, while the acorn cap roof is decorated with green and teal leaves plus two aqua flowers. The playful colors and crisp white background bring the whole scene to life.

It’s whimsical, unexpected, and full of cozy fall personality.

Die cut "pumpkin" house card, with a gray squirrel walking toward the door. The roof is decorated with teal and green leaves and two aqua flowers.

Small Die of the Month – Boo to You!

Card with a smiling jack-o’-lantern, a ghost, a cat, and flowers in bright orange, teal, aqua, and green cardstock on a white card base. Sentiment reads 'Boo to You' in heat embossed lettering.

This month’s Small Die of the Month might be one of the cutest yet! It features a smiling jack-o’-lantern, along with a sweet little cat, a friendly ghost, and whimsical flowers.

I loved carrying over the same vibrant color scheme from my Large Die card—orange, teal, aqua, and green—so the two feel like companion pieces.

I couldn’t resist heat embossing a “Boo to You” sentiment to go along with this cheerful pumpkin scene. The vivid colors—bright orange paired with teal, aqua, and green—make the characters pop against the crisp white A2 card base. A touch of gray and black adds grounding contrast while keeping the vibe playful.

This card is pure Halloween happiness! 🎃✨

Fun handmade Halloween card created with Spellbinders September 2025 Small Die of the Month Kit.

Coordinated Companion Cards

I love how these two cards—though built with different kits—look like they belong together. The shared palette of vivid oranges, aquas, teals, greens, and neutrals ties them into a cheerful seasonal set.

And if you’d like even more inspiration, I’ll also link to my September Stitching Die of the Month card—another beauty from this month’s Club collection.

Helpful Links:

Cardmaking Kit · Die cutting · Stamping

Apple Picking Scene Card | Hero Arts ‘I Pick You’ Collection

Handmade fall card featuring a stamped and stenciled apple orchard scene with ladder, basket, and boots. Apples are shaded red, leaves in green, and scene is framed with a navy die cut rounded rectangle.

Fall is in the air! Today I’m sharing a heartwarming scene card I created with the Hero Arts September Collection: I Pick You. The In The Orchard Bundle instantly brought back childhood memories of going apple picking with my family at Wiggins Farms—where we’d spend the day filling baskets and sipping fresh cider.

This Collection is also part of an Instagram Hop…come hop with us! @karens_mini

Helpful Links:

🍏 Building the Scene

Hero Arts In the Orchard stamped, stenciled and die cut scene card featuring picking apples in an orchard.

This stamp + stencil combo makes it easy to create a layered, idyllic orchard scene. I stamped the images first, then used the coordinating layering stencils to add color with small blending brushes. To give my coloring more depth and dimension, I used two shades of ink for each color family:

  • Apples: Pale Tomato + Cherry
  • Leaves: Fresh Lawn + Green Apple
  • Boots: Lemon Drop + Spicy Mustard

The combination of stamping + stencil blending creates crisp, dimensional images that still look soft and organic. And Hero Arts stencils always line up beautifully with the stamped images!

Handmade autumn scene card of a whimsical apple orchard and featuring Hero Arts "In the Orchard" stamp, stencil and die bundle.

🍎 Finishing Details

Once everything was colored, I die cut my elements to build the orchard scene—complete with a ladder, a basket, and classic Hunter-style boots. For the finishing touch, I die cut a navy frame using my Rounded Rectangle Infinity Dies to bring everything together.

This seasonal card is full of fall charm and is perfect for sending a cozy autumn hello!

cardmaking · Die cutting

Cozy Die Cut Scene Card

Hello, crafty friends! Karen Brown here today with a card that is extra cozy, extra cute, and full of September Hero Studio goodness. This month’s release is all about comfort and charm, and I couldn’t resist creating a sweet little bedtime scene featuring some of the most adorable die-cut critters ever.

Key Products: Hero Studio Fancy Die of the Month and Whole Studio Bonus Gift

I really LOVE this die set and I created another card that you might like to see HERE.

Card Details

For my design, I started with the September Fancy Die of the Month: Cozy Critters. At the center of the card is a fox, tucked snugly into a brass bed, clutching its “lovey”—a tiny stuffed bunny. To set the scene, I crafted a Celestial Blue quilt with lovely etched stitching details and paired it with two crisp Snow White pillows.

At the foot of the bed, a striped orange tabby cat curls up contentedly, holding its own little stuffed animal. This cutie comes from the Whole Studio Kit Bonus: Cozy Kitty, which coordinated perfectly to complete my charming bedtime vignette.

Background & Sentiment

Every good bedroom needs wallpaper, so I created a subtle patterned background. I stenciled soft stars over ColorWheel Chiffon cardstock using the Scattered Stars Stencil (from the Hocus Pocus Collection) with Peony and Contour inks. The result reminded me of Twinkle, Twinkle, Little Star—a sweet lullaby touch for a bedtime card.

To finish, I added a clean and simple sentiment, “hello there”, from the Message Strips stamp and cut set. It felt like the perfect greeting for this dreamy scene.

I had so much fun creating this bedtime scene with the September 2025 Hero Studio Release. Between the fox, the kitty, and those snuggly quilts, I think this one might be my coziest card yet! I can already picture more cards made with this die set— seasonal quilts, or even personalized critter bedrooms.

Thanks so much for stopping by today, and sweet dreams of your next crafty adventure!