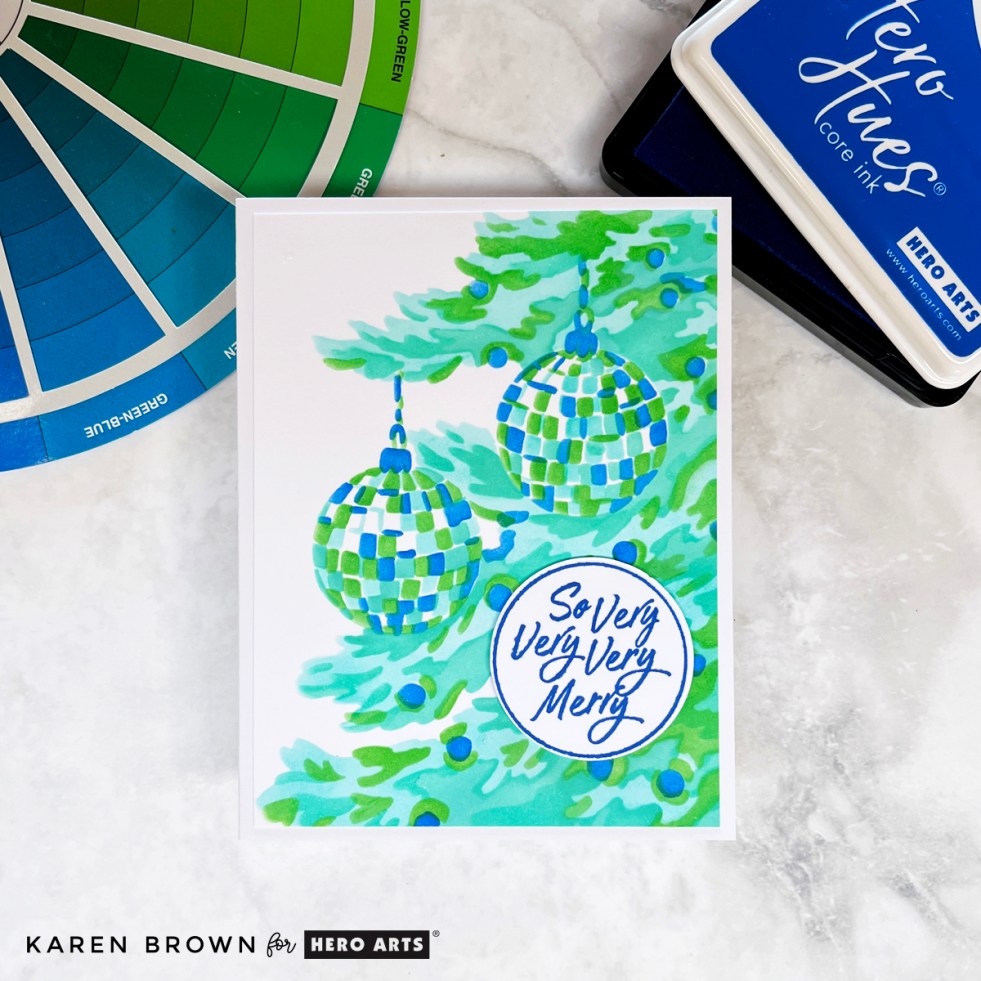
I couldn’t resist creating one more card with the October 2025 Release—this time featuring the Layering Stencil: The Tree. This gorgeous four-layer stencil creates a close-up view of a Christmas tree filled with ornaments, and it was such a joy to blend.
You can see my other October Club Kits Cards HERE.
I chose analogous colors (neighbors on the color wheel) for a soft, harmonious look in shades of greens, aquas, and blues:
Using Deluxe Smooth White Cardstock made the ink blending go on like butter, and as always with Hero Arts stencils, the layers lined up perfectly.
For the sentiment, I used the “So Very Very Merry” circular stamp and coordinating die from the October Card Kit, stamped in Indigo ink. The deep blue ties the whole design together beautifully.
This card has already gone into my holiday stash, ready to be mailed in December!
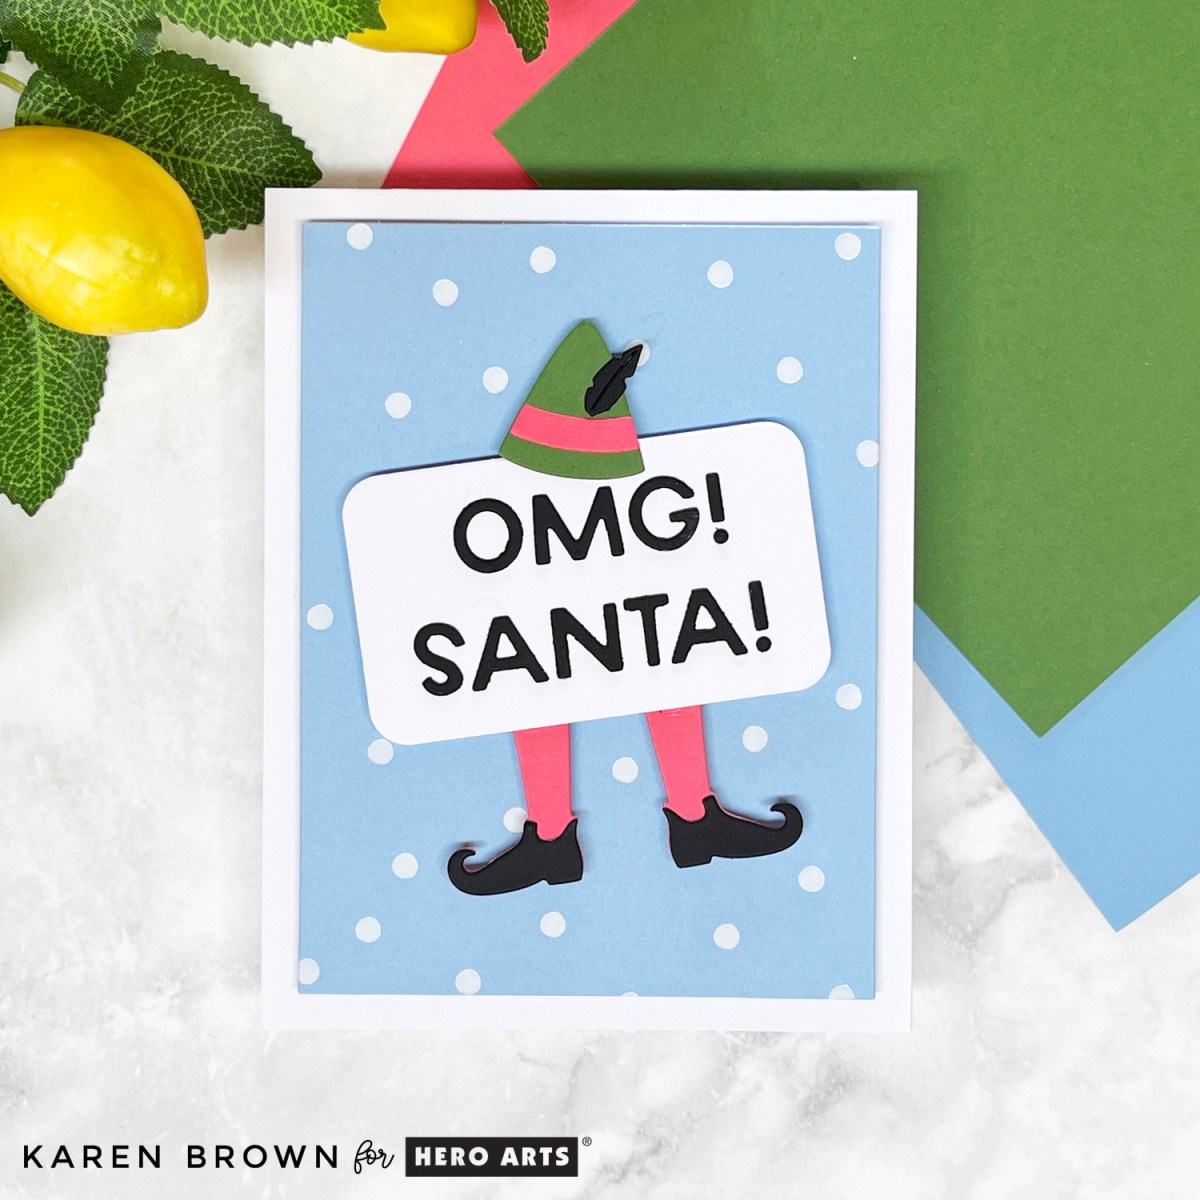
Today I’m sharing a playful Christmas elf card that combines bold colors, a cheeky sentiment, and a versatile foiled background. Even better—I filmed the entire process so you can craft along step by step.
I have a list of key supplies used below the video.
I started with the Hero Arts Celebration Press Plate (part of the Yule Fuel Collection). I love how versatile this plate is—it looks like snowflakes when foiled in white but could also become a confetti background in bright colors. For this project, I went snowy, since my elf needed a winter wonderland to stand in.
The Sassy Elf
Next came my focal point: a die cut elf from the Yule Fuel Collection. He’s cheeky, a little silly, and absolutely festive. To give him personality, I used ColorWheel Cardstock in:
Cascade (blue)
Dahlia (pink)
Fern (green)
The mix of colors makes him bold and fun—perfect for standing out against the snowy background.
The Cheeky Sentiment
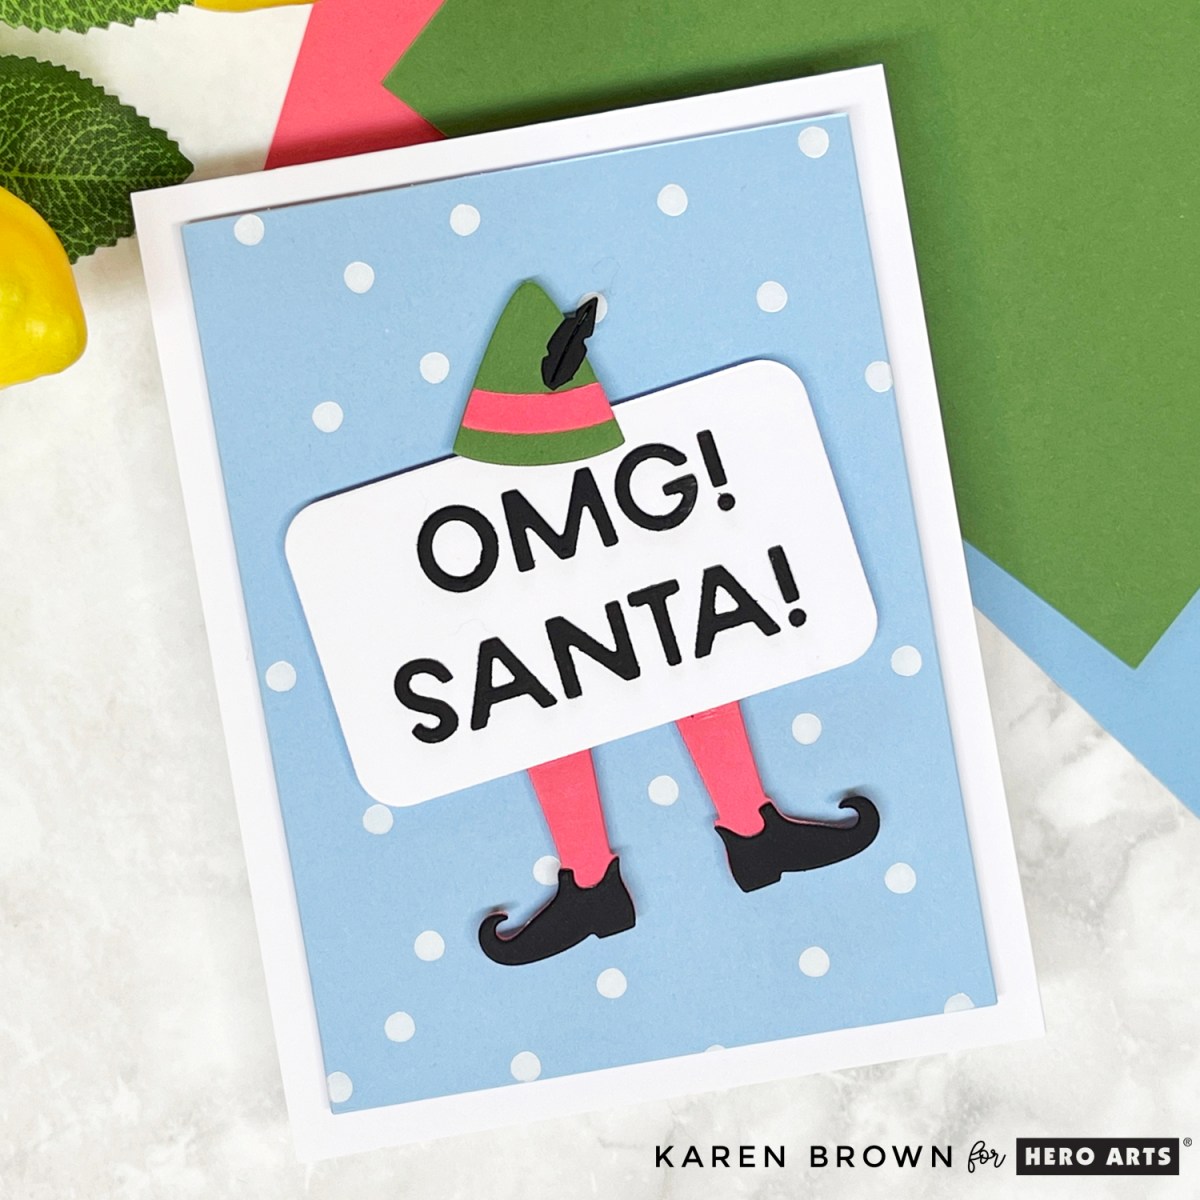
Every good elf needs a punchline, and this one couldn’t be better: “OMG! Santa!”
The die cut letters are crisp, bright, and perfectly straight across the card front (in the video, I share my favorite tip for gluing letters evenly every time).
Watch the Video Tutorial
And in my video, I show you:
Exactly how I foiled the Celebration Press Plate
How to glue tricky die cut letters so they’re straight and evenly spaced
My step-by-step process for putting the whole card together
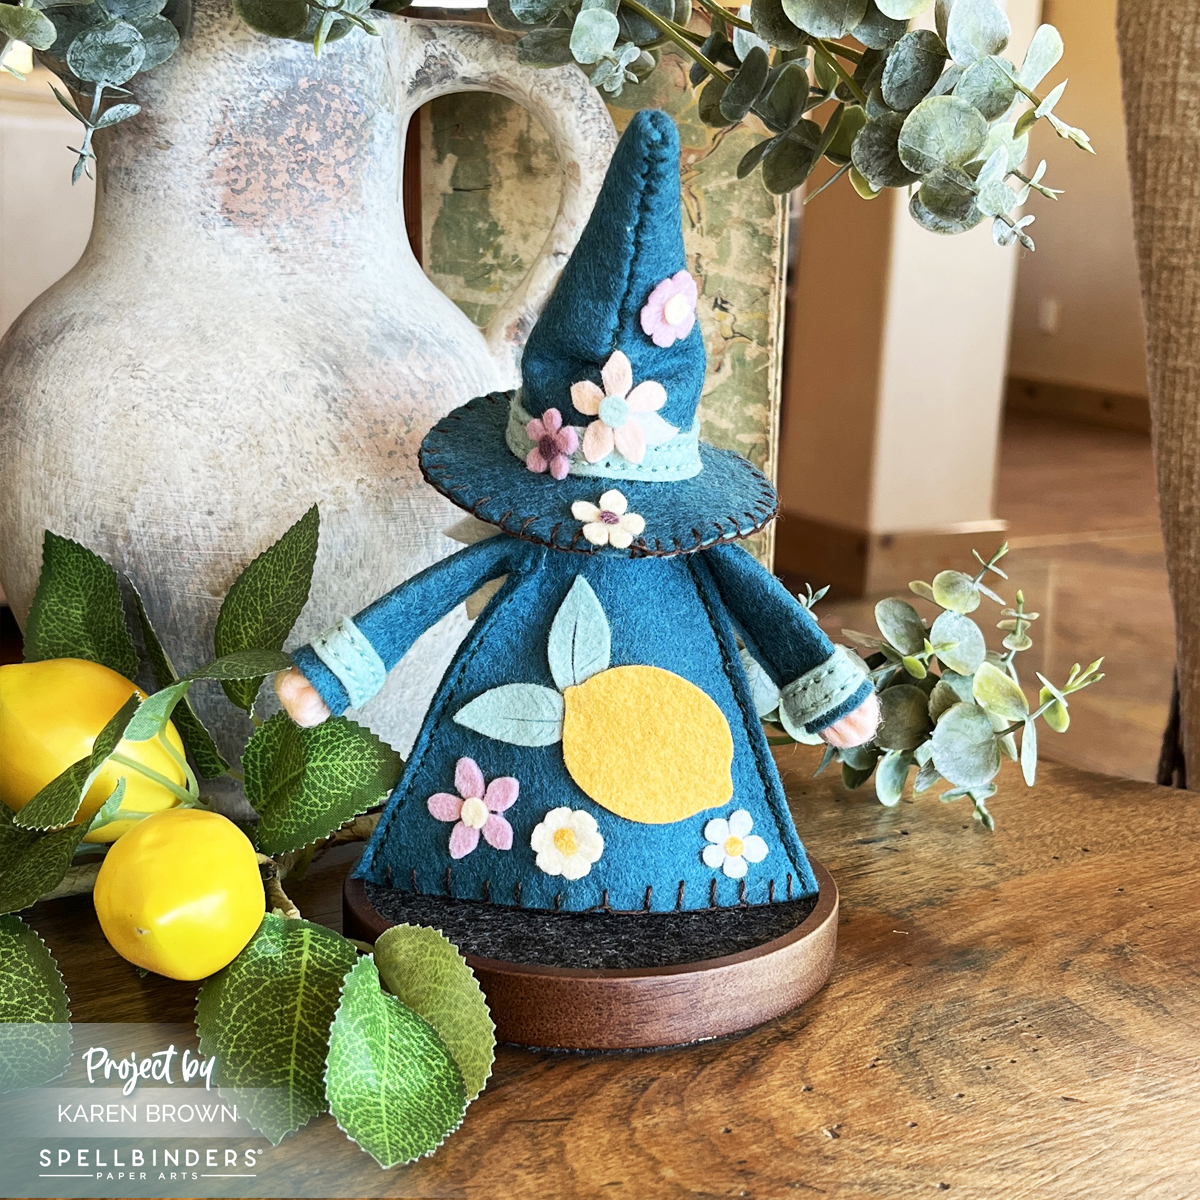
Meet Fergus the Gnome—Spellbinders’ newest Felt Décor project! Fergus is a hand-stitched wool felt doll with endless opportunities for personalization. Using high-quality merino wool felt, I created my own version: a cheerful Lemon Gnome, decorated with citrus and flowers.
✂️ Why Wool Felt?
I’ve tried different felts in the past, but they sometimes frayed or stretched, leaving me frustrated. Merino wool felt cuts beautifully with Spellbinders dies and keeps its shape. For this project, I used my Platinum 6 Die Cutting System + felt from the Trend and Holiday Collections—smooth, sturdy, and vibrant.
🍋 My Lemon Gnome
Fergus can be customized with accessory kits or your own creativity. I decided to make a “Lemon Gnome” using the Citrus Spritz dies:
A die cut lemon + layered flowers for front and back
Teal, aqua, and white wool felt for Fergus himself
Yellow, lavender, and pink flowers for accents
To add personality, I stitched:
Blanket stitching along Fergus’s giant hat brim and coat edges
Running stitches for construction I stitched with 3 strands of embroidery floss, pulling up, not sideways, to keep the felt smooth.
🧵 Stitching & Assembly
LINK to multiple YouTube Fergus Instruction Videos
Stitches used: running stitch + blanket stitch. I used three strands of DMC floss.
Die cutting: use a regular sandwich in your machine; Spellbinders Platinum 6 dies cut felt beautifully
Stitching: For my Fergus running stitch assembly, I used floss the same color as the felt. For the decorative blanket stitching, I used chocolate brown floss, which contrasted nicely with the teal and aqua felt.
Stuffing: I used cotton fiber filling for the stuffing and then added uncooked rice to the bottom of the gnome’s body to add ballast. I inserted about an inch of rice right before I stitched on the base.
Assembly:Bearly Art Glue worked great for securing embellishments and components. I used a generous amount. I also cut a little triangle from deli paper and inserted inside the coat prior to gluing (see photo 2 down). This kept the glue from seeping to the other side.
Tip: keep floss taut, not tight, for smooth edges
You build Fergus piece by piece—hat, coat, nose, accessories—and then assemble him. He’s adorable, sturdy, and so fun to make.
📸 Organization Process Photo
I used my Stash Stax to keep me organized while I created Fergus.
Giftable & Customizable
You can decorate Fergus for any season, occasion, or holiday. Imagine Christmas gnomes, Valentine’s gnomes, Easter gnomes, or even citrusy summer gnomes like mine. They make unique gifts, handmade keepsakes, or cheerful décor.
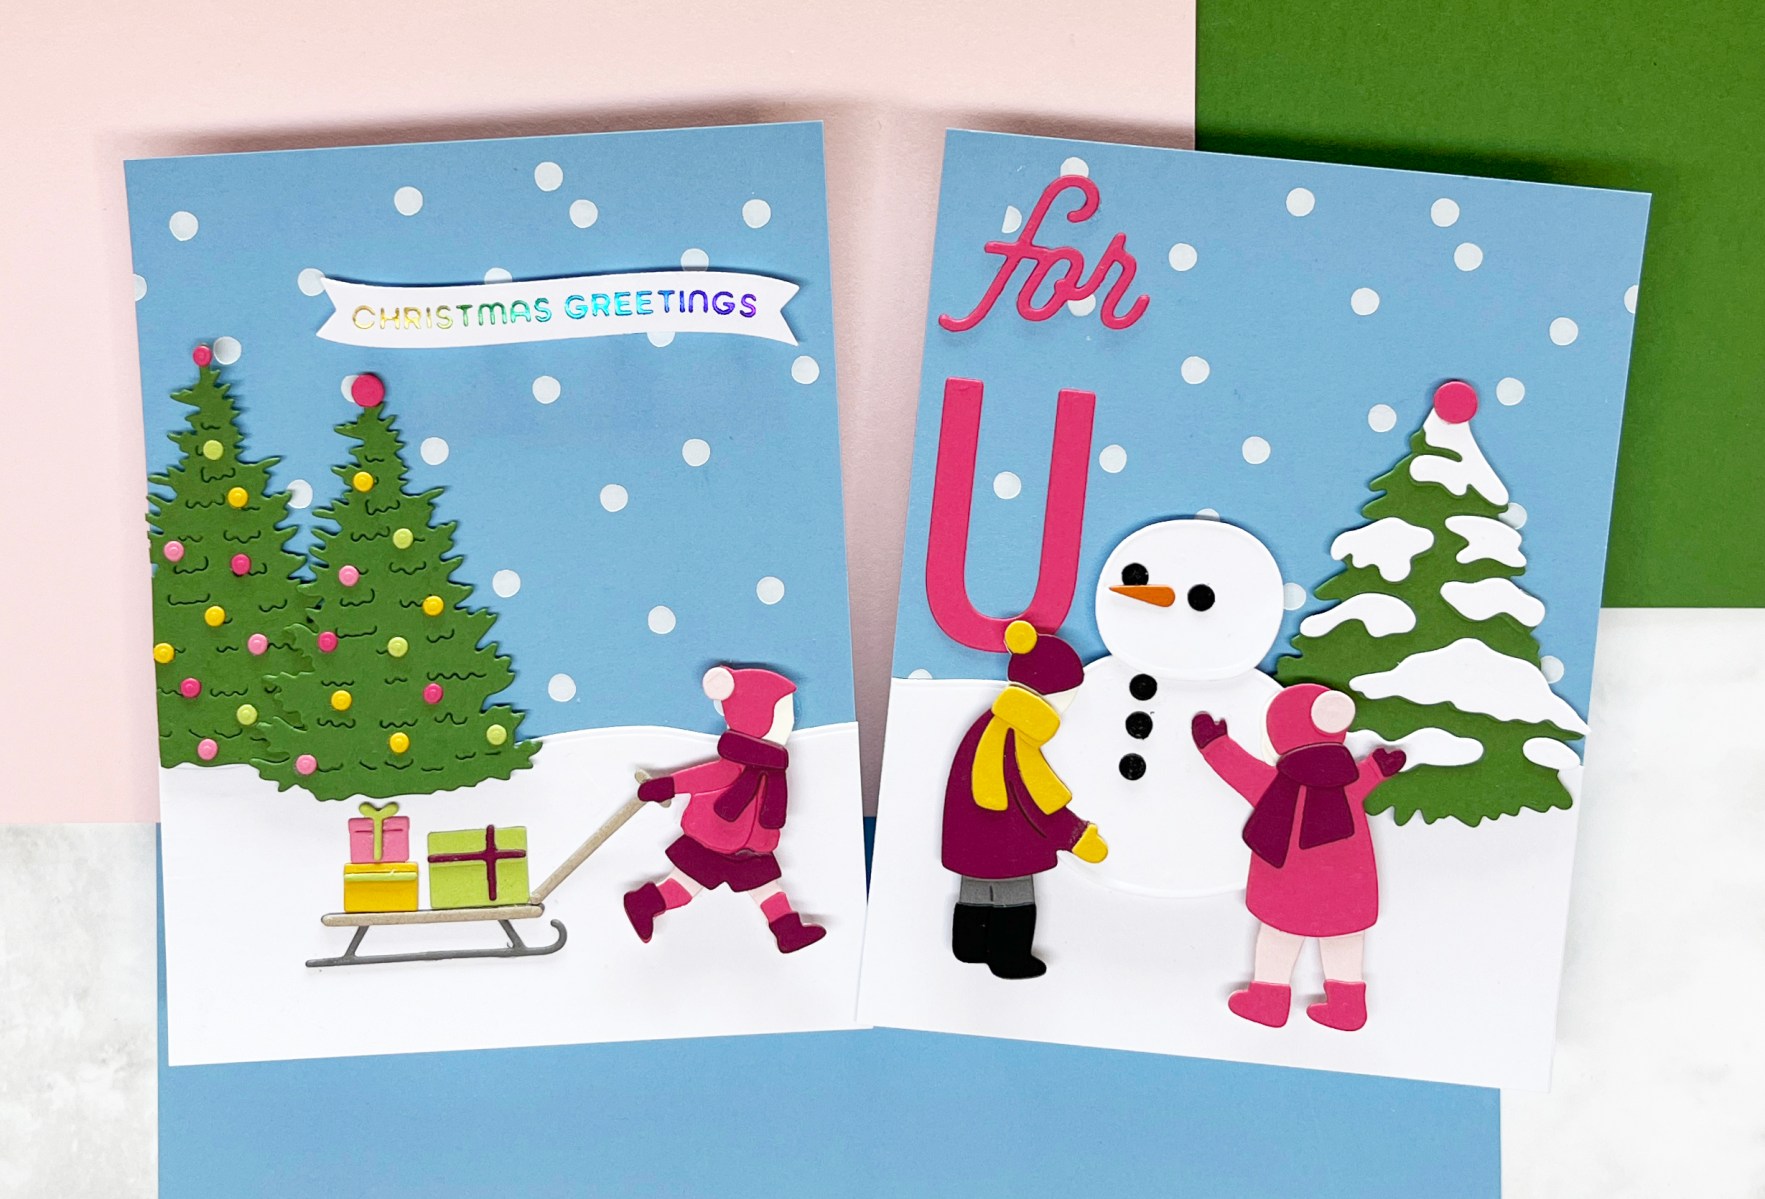
One of my favorite things about cardmaking is building little worlds with die cuts. The Spellbinders October 2025 Club Kits are perfect for creating playful, outdoor winter scenes full of joy, color, and personality. Today I’m sharing two companion cards I made using the Die of the Month Kitand the Large Die of the Month Kit—both with matching colors and snowy backdrops.
At the bottom, I’ll also walk you through a few of my favorite tips for planning and arranging die cut scenes.
Sled of Gifts (Large Die of the Month)
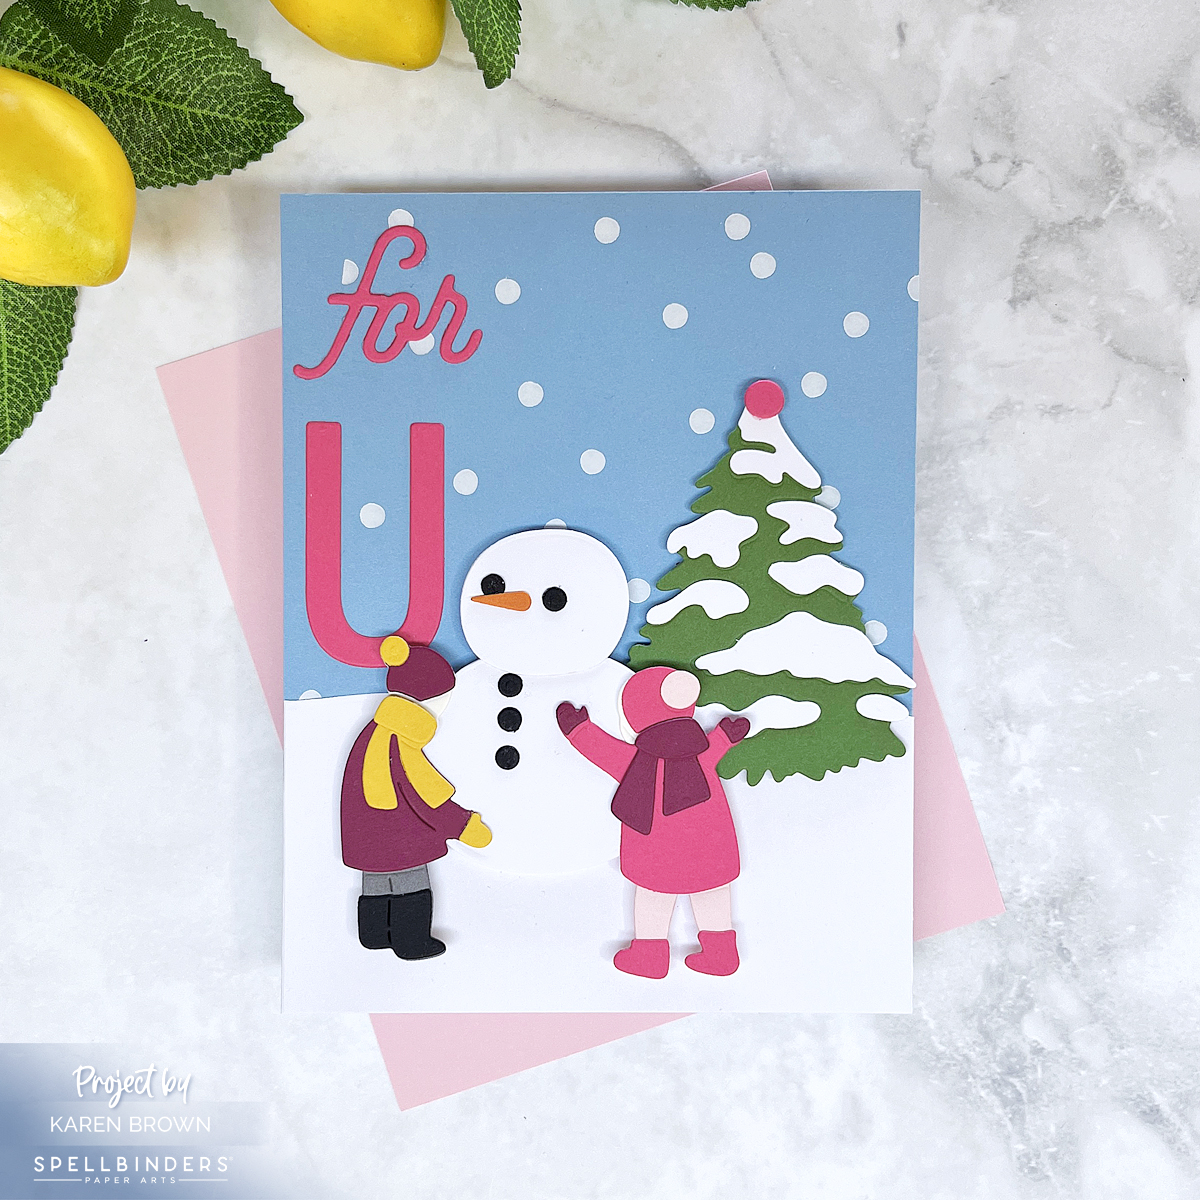
I started with the Large Die of the Month Kit, creating a cheerful winter scene of a little girl, pulling a sled piled high with gifts. To set the stage, I added two decorated Christmas trees with colorful ornaments.
For the sentiment, I combined a scripty “for” with a giant U (both from the October Caboodle Bonus Gift), both die cut in hot pink. Together, they form a bold, playful greeting.
This card has a storybook charm and pairs perfectly with the sled design.
📝 Tips for Arranging Die Cut Scenes
Here are five simple steps I use whenever I build a die cut scene:
Plan Colors First: Choose your key colors. For these cards, I used blue gray, hot pink, and fern green as my anchors. White cardstock provided snowy contrast.
Die Cut All Elements: Having all the pieces ready makes it easier to plan your layout.
AssembleEach Element: I use Bearly Art glue and a Crystal Katana jewel pickerto precisely assemble my elements. Once they are fully assembled, it is much easier to determine exactly where I want to place each component.
Mock Up Layouts: I arrange several versions, take quick photos, and then choose the most balanced design.
Construct Your Scene: I like to use glue, foam squares and craft foam to complete my card.
These tricks make arranging die cut winter wonderlands more fun and less stressful.
It’s time for the Hero Arts October 2025 Release Blog Hop, and this month’s theme is Merry Era! I had so much fun creating two festive cards that sparkle and shine in very different ways.
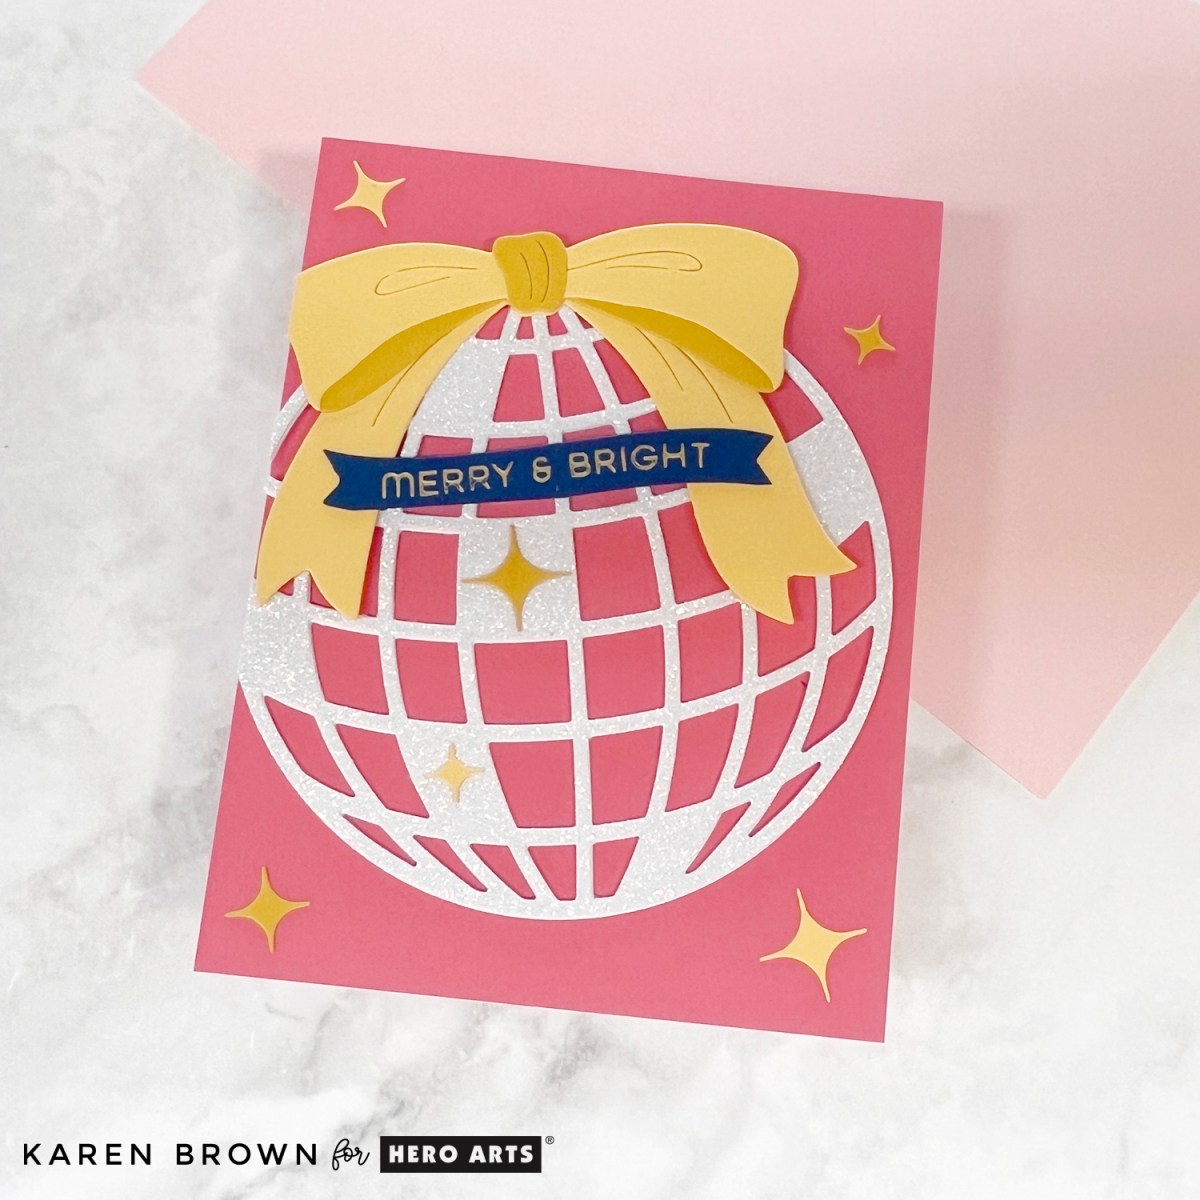
Glittery Pink Christmas Ball
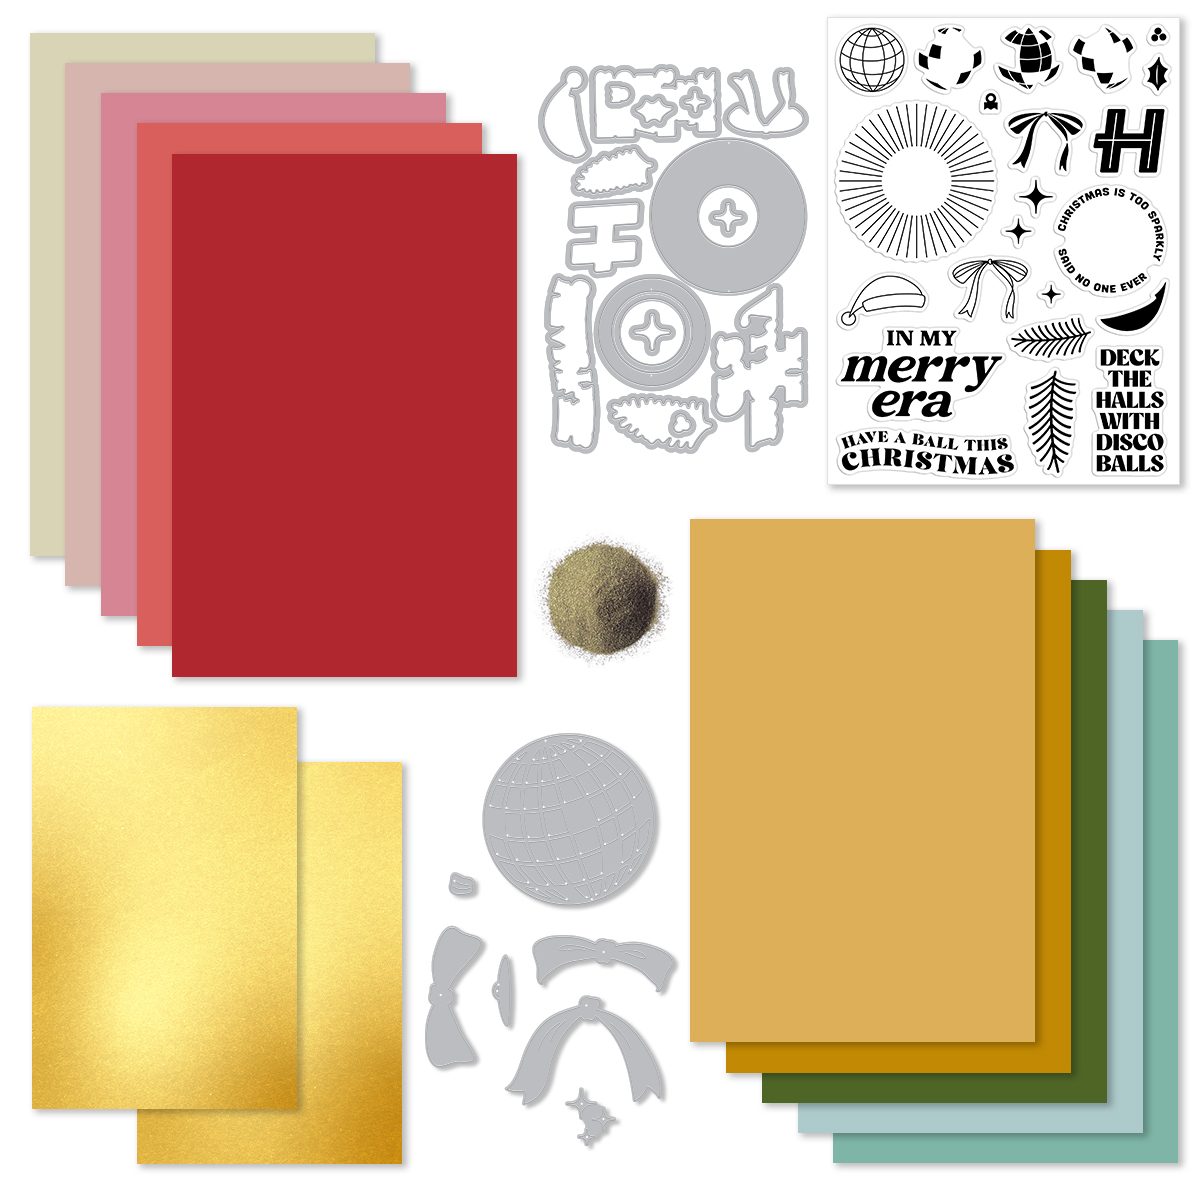
For my first card, I reached for the “Have a Ball” Die Set from the October 2025 Card Kit. I wanted a sparkly look, so I die cut the large Christmas ball twice from white glitter cardstock for extra stability. My card base is Dahlia cardstock (included in the kit) which makes the ornament pop.
💡 Design tip: This die set would work beautifully for New Year’s cards too!
What’s Included in the Kit?
• Deck the Halls with Disco Balls 6×8 Stamp Set • Deck the Halls with Disco Balls Coordinating Dies • Have a Ball Die Set • Gold Embossing Powder .5 oz • 10 Sheets of Cardstock- 1 of each color, 5.5″ x 8.5″ • Two Sheets of Gold Matte Paper, 5.5″ x 8.5″
Receive a FREE beautiful Merry Everything Die Set when you purchase The Whole Studio!
Hero Arts has many different Monthly Kits that you can subscribe to including:
The WHOLE Studio – All 5 Kits (a 40% savings: $130 subscription + Free Shipping)
For my second card, I used the Twinkle Lights Fancy Dies. I die cut the string of Christmas lights from gold paper (included in the kit) and then added pops of color by cutting the bulbs from colorful cardstock scraps.
The combination of shiny gold strings, bright bulbs, and the bold sentiment makes this card full of Christmas cheer.
>>> Click HERE. to see my other October Card Kit Cards.
GIVEAWAY
Hero Arts will give away a $50 gift card, drawn from the comments left across the hop. Enter by Sunday, October 5th at 11:59pm PT, and the winner will be announced on the Hero Arts blog the following week. Leave a comment on all stops for more chances to win!
👉 A quick reminder: the last day to subscribe is September 27th—so don’t miss out!
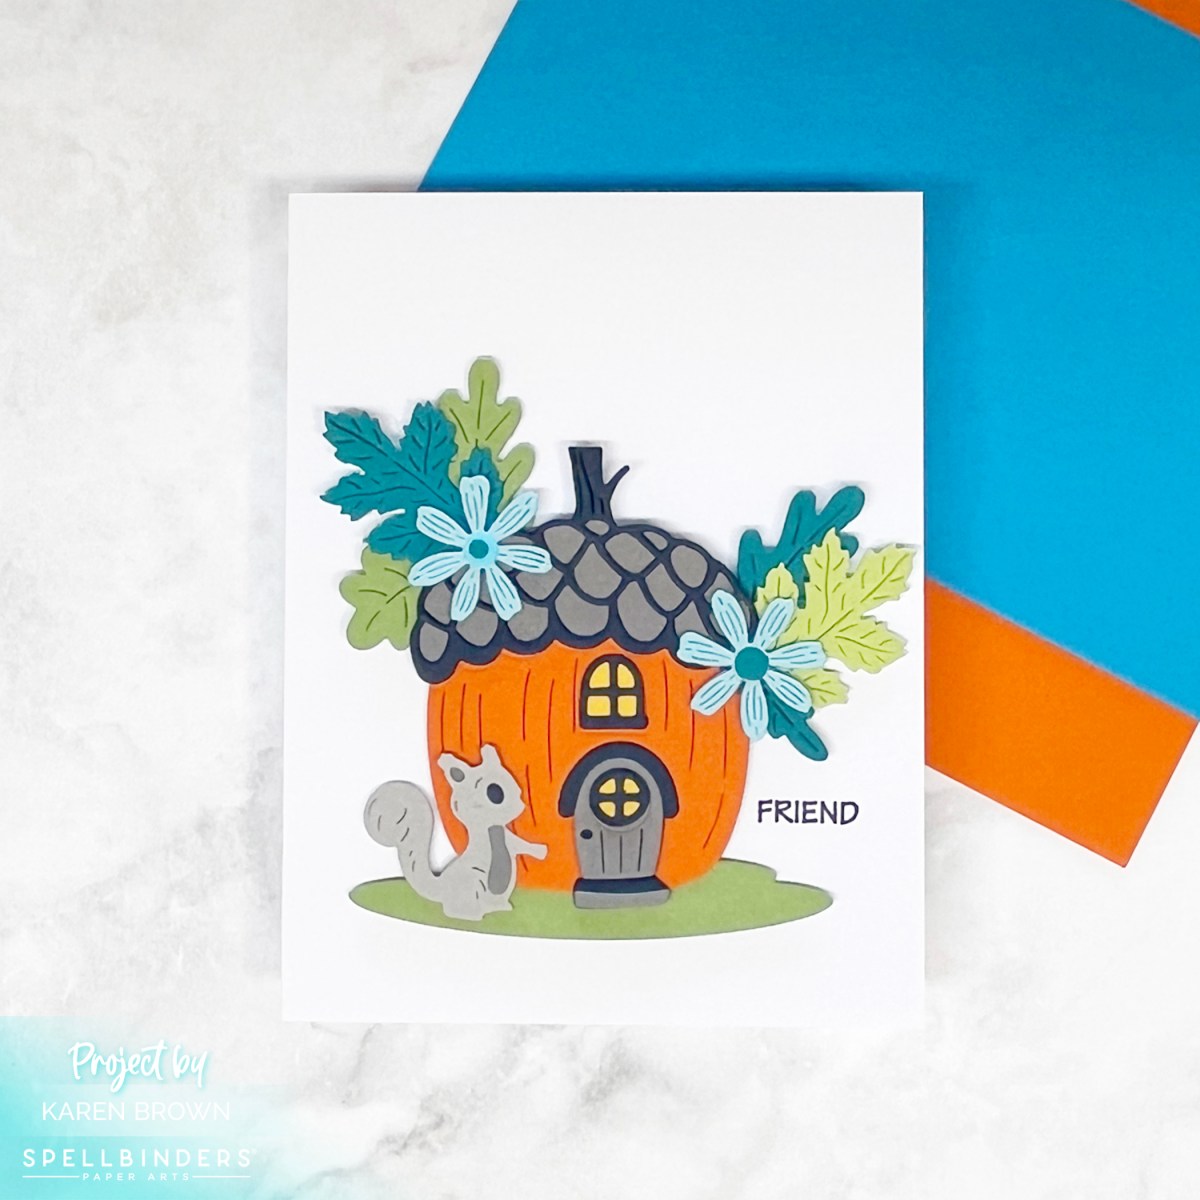
Large Die of the Month – Pumpkin House
The Large Die of the Month is designed as an Acorn House, but I gave it a seasonal twist by transforming mine into a Pumpkin House! I can’t seem to get enough orange this month.
A gray squirrel is making his way to the front door, while the acorn cap roof is decorated with green and teal leaves plus two aqua flowers. The playful colors and crisp white background bring the whole scene to life.
It’s whimsical, unexpected, and full of cozy fall personality.
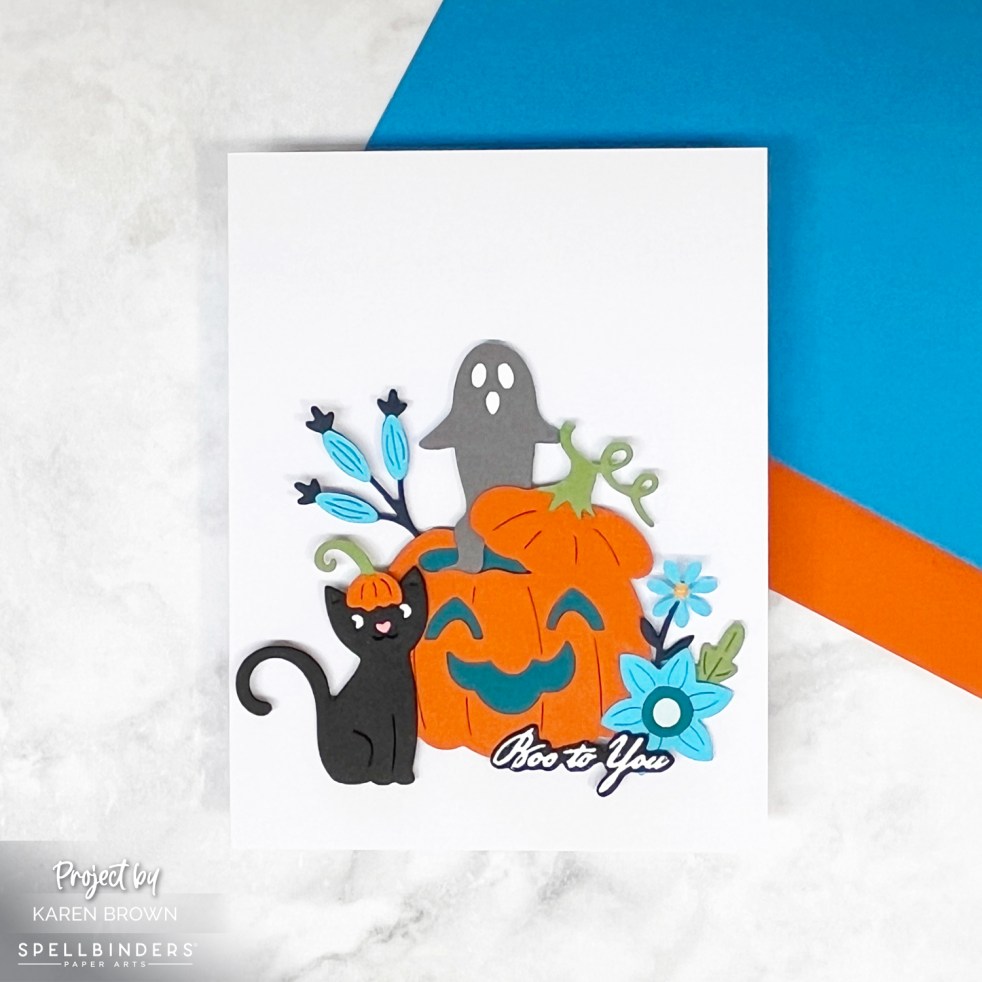
Small Die of the Month – Boo to You!
This month’s Small Die of the Month might be one of the cutest yet! It features a smiling jack-o’-lantern, along with a sweet little cat, a friendly ghost, and whimsical flowers.
I loved carrying over the same vibrant color scheme from my Large Die card—orange, teal, aqua, and green—so the two feel like companion pieces.
I couldn’t resist heat embossing a “Boo to You” sentiment to go along with this cheerful pumpkin scene. The vivid colors—bright orange paired with teal, aqua, and green—make the characters pop against the crisp white A2 card base. A touch of gray and black adds grounding contrast while keeping the vibe playful.
This card is pure Halloween happiness! 🎃✨
Coordinated Companion Cards
I love how these two cards—though built with different kits—look like they belong together. The shared palette of vivid oranges, aquas, teals, greens, and neutrals ties them into a cheerful seasonal set.
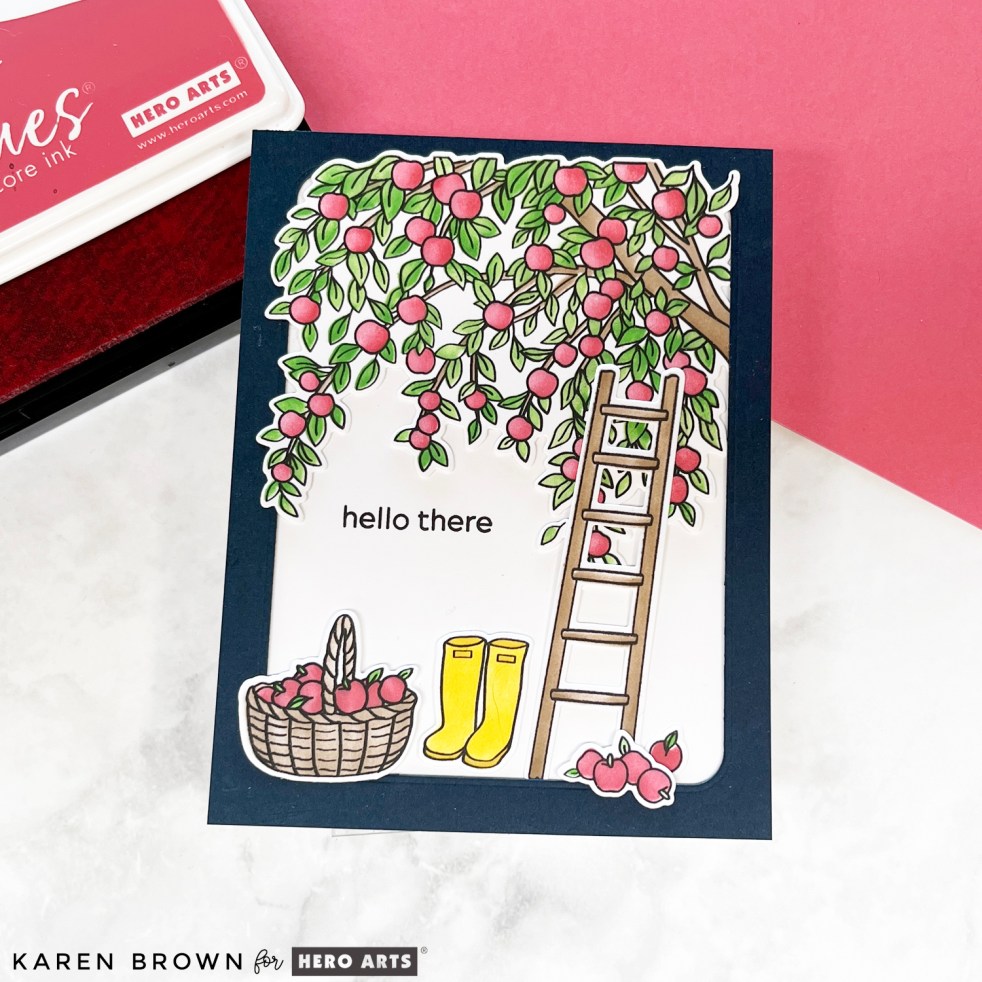
Fall is in the air! Today I’m sharing a heartwarming scene card I created with the Hero Arts September Collection: I Pick You. The In The Orchard Bundle instantly brought back childhood memories of going apple picking with my family at Wiggins Farms—where we’d spend the day filling baskets and sipping fresh cider.
This Collection is also part of an Instagram Hop…come hop with us! @karens_mini
This stamp + stencil combo makes it easy to create a layered, idyllic orchard scene. I stamped the images first, then used the coordinating layering stencils to add color with small blending brushes. To give my coloring more depth and dimension, I used two shades of ink for each color family:
Apples: Pale Tomato + Cherry
Leaves: Fresh Lawn + Green Apple
Boots: Lemon Drop + Spicy Mustard
The combination of stamping + stencil blending creates crisp, dimensional images that still look soft and organic. And Hero Arts stencils always line up beautifully with the stamped images!
🍎 Finishing Details
Once everything was colored, I die cut my elements to build the orchard scene—complete with a ladder, a basket, and classic Hunter-style boots. For the finishing touch, I die cut a navy frame using my Rounded Rectangle Infinity Diesto bring everything together.
This seasonal card is full of fall charm and is perfect for sending a cozy autumn hello!
This month’s Spellbinders Stitching Die of the Month is a true floral beauty! The set includes three sizes of blooms, and I couldn’t wait to dive in with floss, cardstock, and gems to create a stitched garden full of detail and color.
You might also enjoy my blog post for the September Small and Large Die of the Month Kit.
🌼 My Stitching Process
To give my flowers a sturdy stitching base, I die cut each bloom twice and glued the layers together before stitching. This little extra step makes the stitching so much easier and helps the finished blooms hold their shape beautifully.
I used two threads of floss throughout, which was just the right weight for crisp yet delicate details.
🎨 Stitching Recipe & Color Palette
For this project, I worked from the Color Cubes Palette #391 (Color Cubes Bundle) and pulled together a warm, happy scheme:
The combo of pinks, corals, and yellows pops beautifully against the fresh aqua-blue background!
✨ Finishing Touches
I added a touch of sparkle with Woodland Tales gems, which highlight the flower centers perfectly.
For the foliage, I decided to switch things up! Instead of using the leaves included in the set, I reached for the pretty die cut leaves from Citrus Spritz (Here is a LINK to a post using the Citrus Spritz Die Set).
💡 Extra Tips for Stitched Dies
Don’t be afraid to mix and match leaves, blooms, and embellishments from other kits for added variety.
Layering blooms in groups of three always creates a pleasing, balanced look.
Keep a small piece of tape handy to hold your floss tails on the back of stitched elements until you’re ready to glue them down.
This month’s kit is such a joy—relaxing to stitch, yet bold and beautiful when assembled. I can see these blooms being used for birthdays, thank you cards or just becuase.
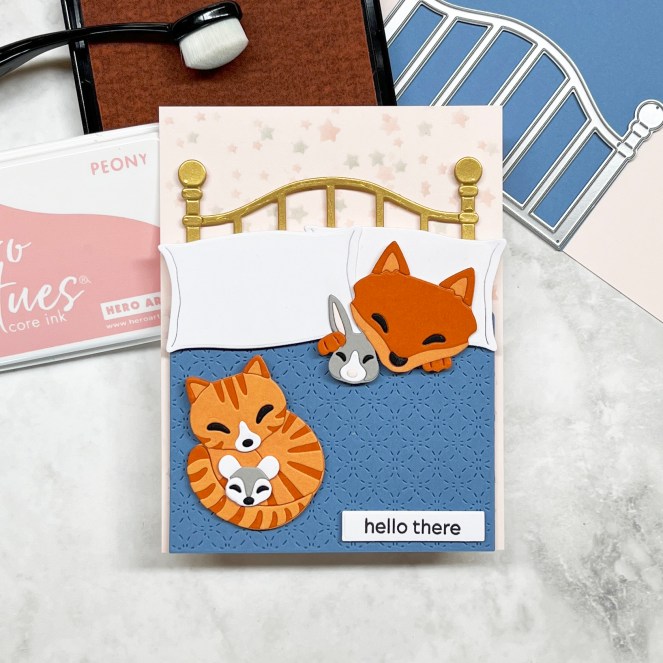
Hello, crafty friends! Karen Brown here today with a card that is extra cozy, extra cute, and full of September Hero Studio goodness. This month’s release is all about comfort and charm, and I couldn’t resist creating a sweet little bedtime scene featuring some of the most adorable die-cut critters ever.
I really LOVE this die set and I created another card that you might like to see HERE.
Card Details
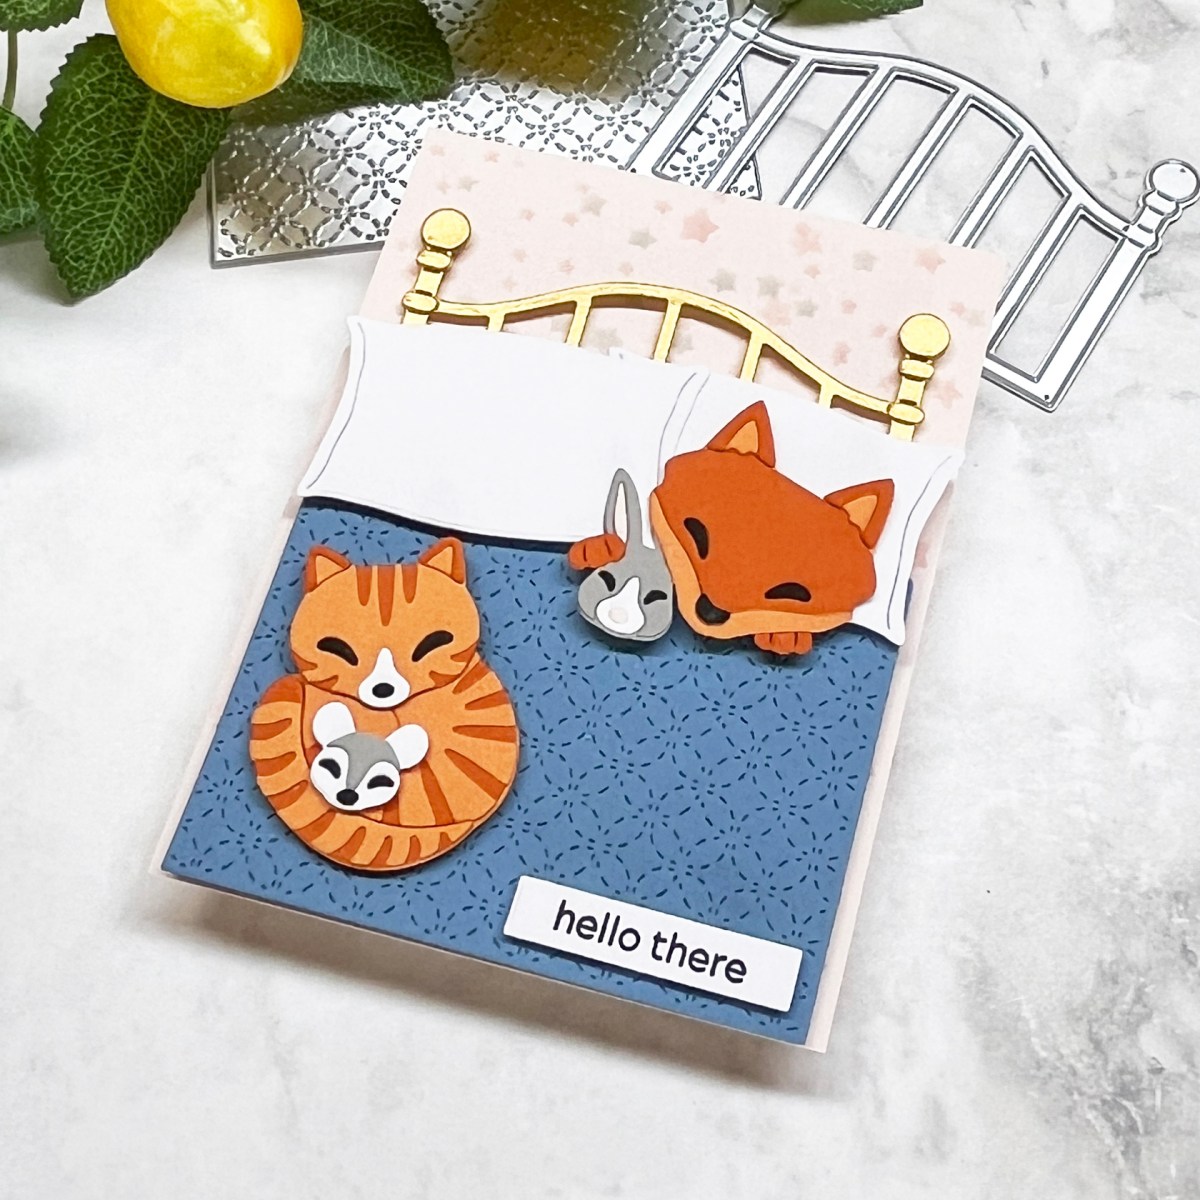
For my design, I started with the September Fancy Die of the Month: Cozy Critters. At the center of the card is a fox, tucked snugly into a brass bed, clutching its “lovey”—a tiny stuffed bunny. To set the scene, I crafted a Celestial Blue quilt with lovely etched stitching details and paired it with two crisp Snow White pillows.
At the foot of the bed, a striped orange tabby cat curls up contentedly, holding its own little stuffed animal. This cutie comes from the Whole Studio Kit Bonus: Cozy Kitty, which coordinated perfectly to complete my charming bedtime vignette.
To finish, I added a clean and simple sentiment, “hello there”, from the Message Strips stamp and cut set. It felt like the perfect greeting for this dreamy scene.
I had so much fun creating this bedtime scene with the September 2025 Hero Studio Release. Between the fox, the kitty, and those snuggly quilts, I think this one might be my coziest card yet! I can already picture more cards made with this die set— seasonal quilts, or even personalized critter bedrooms.
Thanks so much for stopping by today, and sweet dreams of your next crafty adventure!
Hello friends! It’s time for the Hero Arts September Club Kit Release, and this month’s theme is Fall into Fall. 🍁 Autumn crafting is one of my very favorite seasons, and this release is packed with stamps, dies, and sentiments perfect for cozy, colorful cardmaking. I have two very different projects to share with you today—one-layer stamping and coloring, and a layered die cut scene—that both capture the warmth of fall.
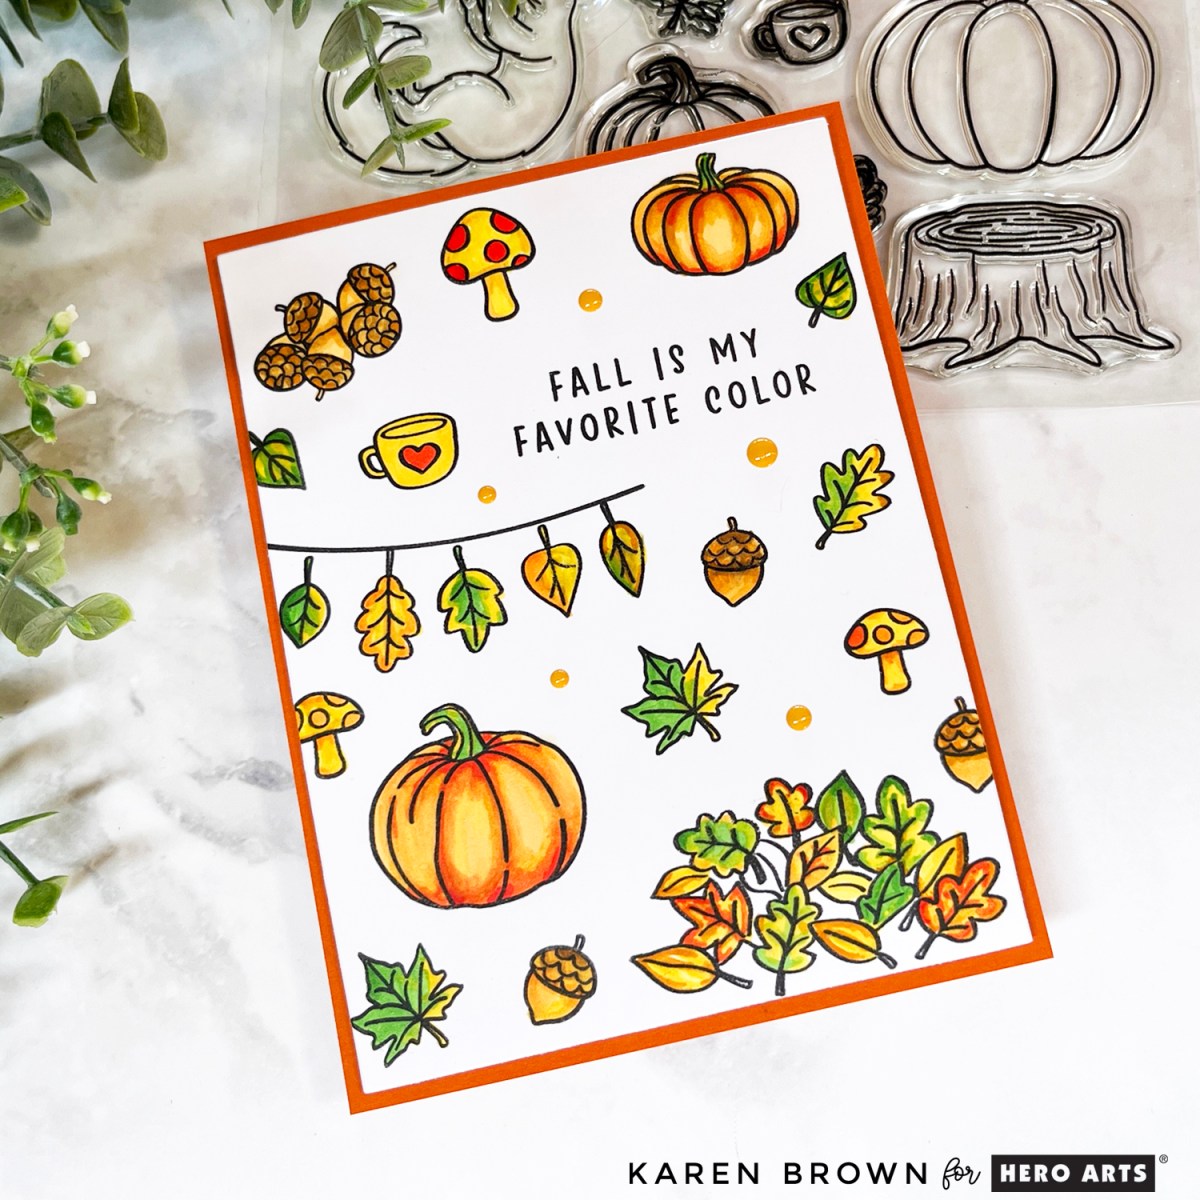
Card 1: One-Layer Stamped + Colored Fall Scene
The September Card Kit includes gorgeous fall imagery: pumpkins, acorns, mushrooms, leaves, and more. I wanted to let the stamps take center stage, so I designed a one-layer background that doubles as the focal point.
I stamped a scattering of pumpkins, mushrooms, and leaves across a white card panel, then brought them to life with alcohol marker coloring in classic fall hues:
Oranges and yellows for pumpkins
Warm tans and browns for acorns
Fresh greens, yellows and oranges for leaves
The finishing touch is the sentiment, “Fall is My Favorite Color,” stamped boldly in black. A few enamel dots (also included in the kit!) add just the right amount of shine.
This card is simple, flat, and easy to mail—but still rich in detail and warmth.
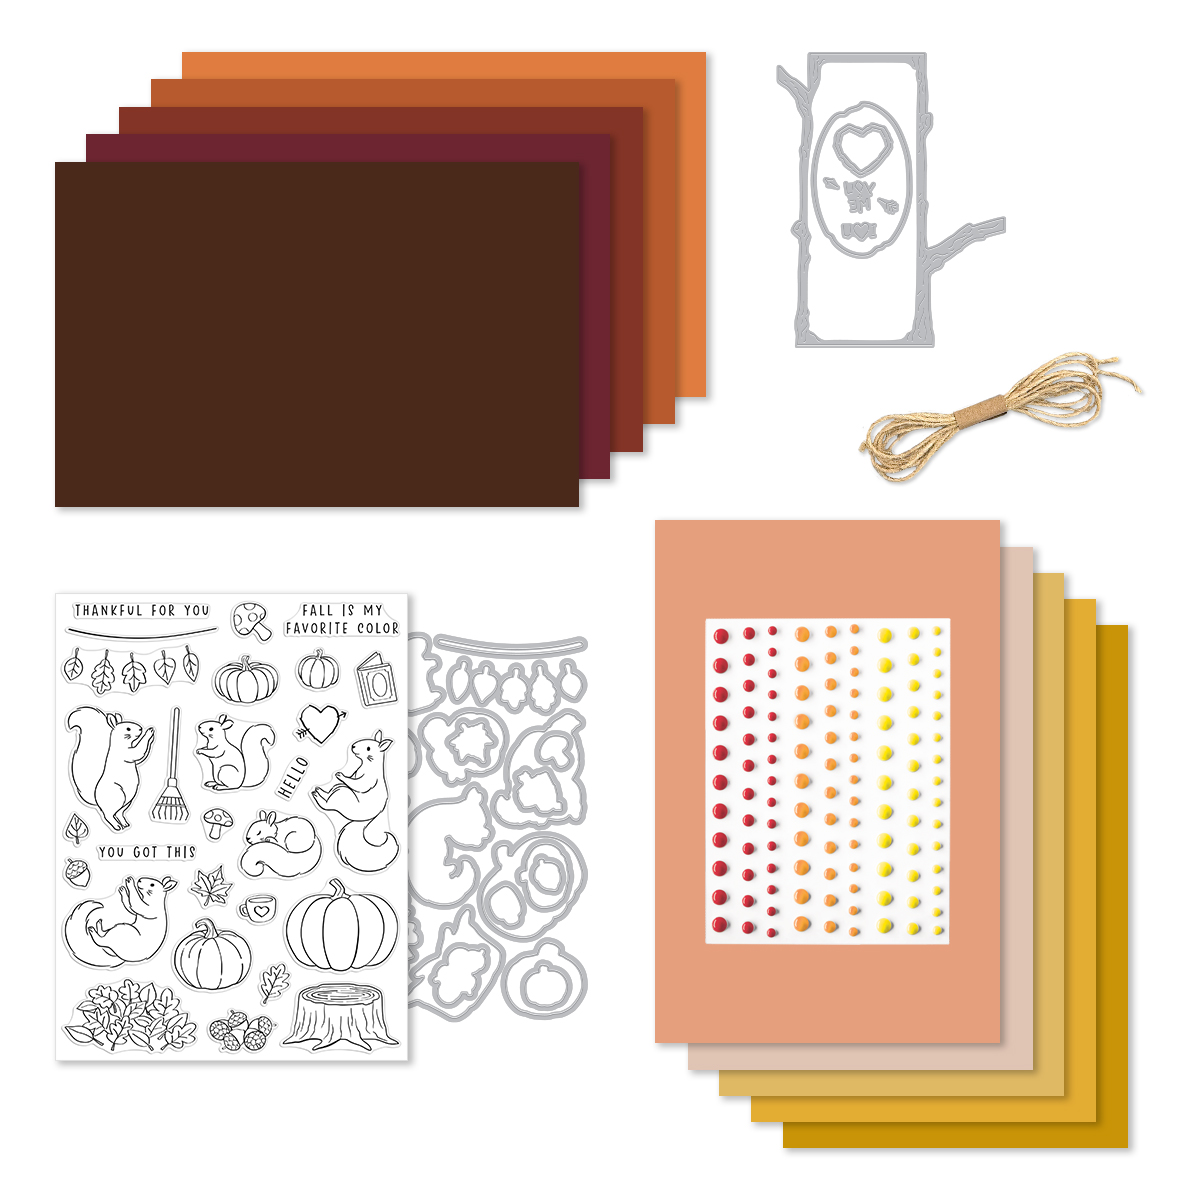
What’s Included in the September Card Kit?
Fall is my Favorite 6×8 Stamp Set
Fall is my Favorite Coordinating Dies
Treehouse Die Set
Sunset Enamel Dots
Brown Twine, 1 yard
10 Sheets of Cardstock- 1 of each color, 5.5″ x 8.5″ (Truffle, Merlot, Cinnamon, Terra Cotta, Carrot, Coral, Bellini, Beeswax, Saffron, Tuscan)
Receive a FREE adorable Cozy Kitty Die Set when you purchase The Whole Studio!
Hero Arts has many different Monthly Kits that you can subscribe to including:
The WHOLE Studio – All 5 Kits (a 40% savings: $130 subscription + Free Shipping)
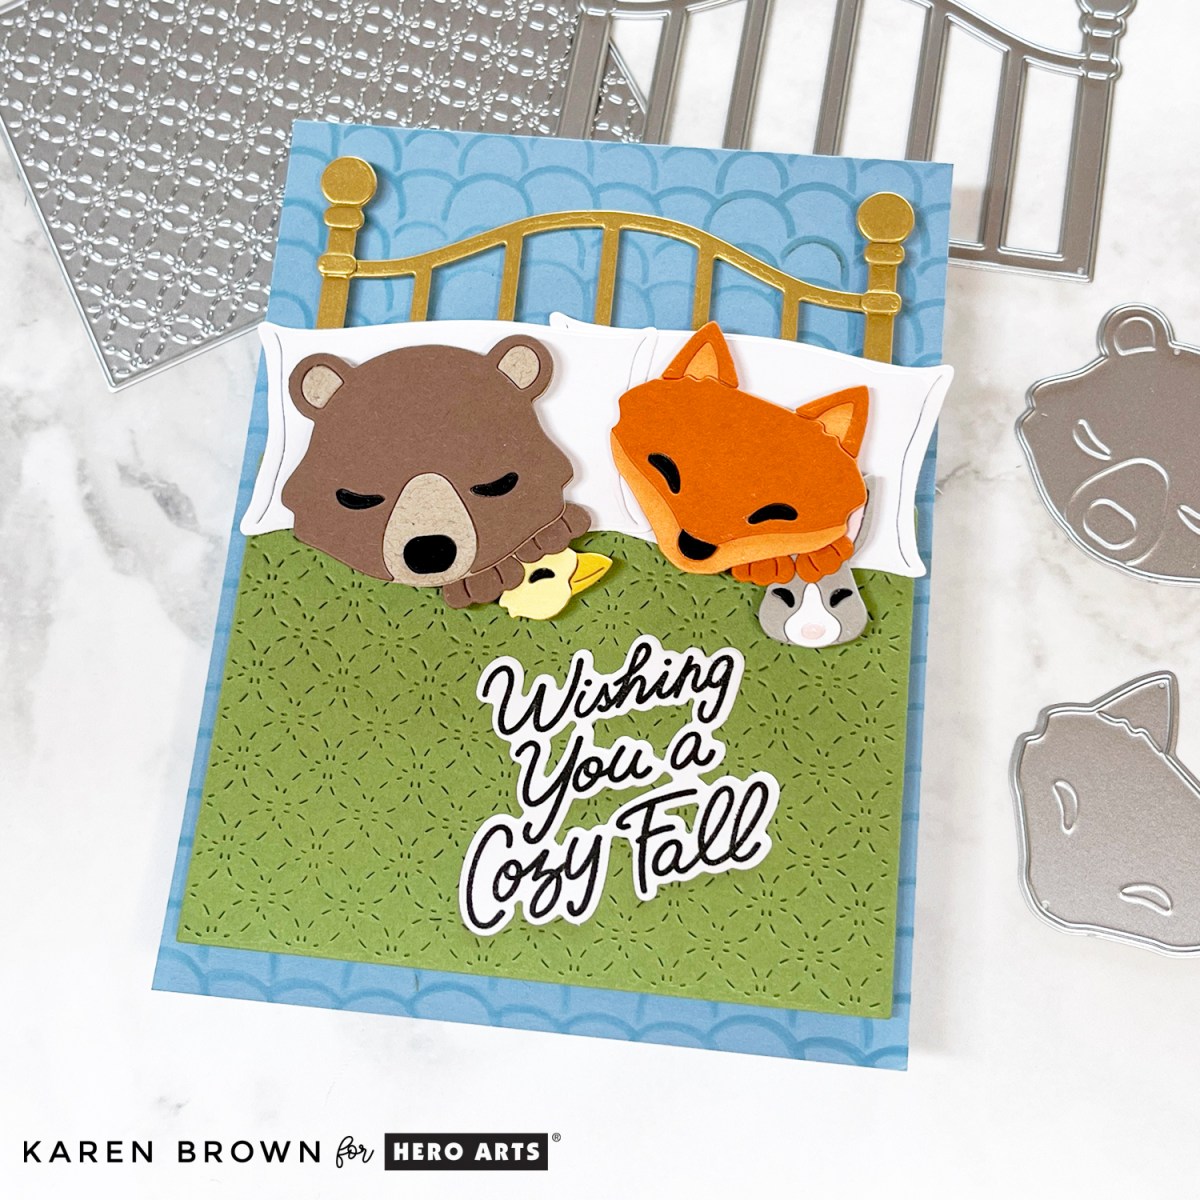
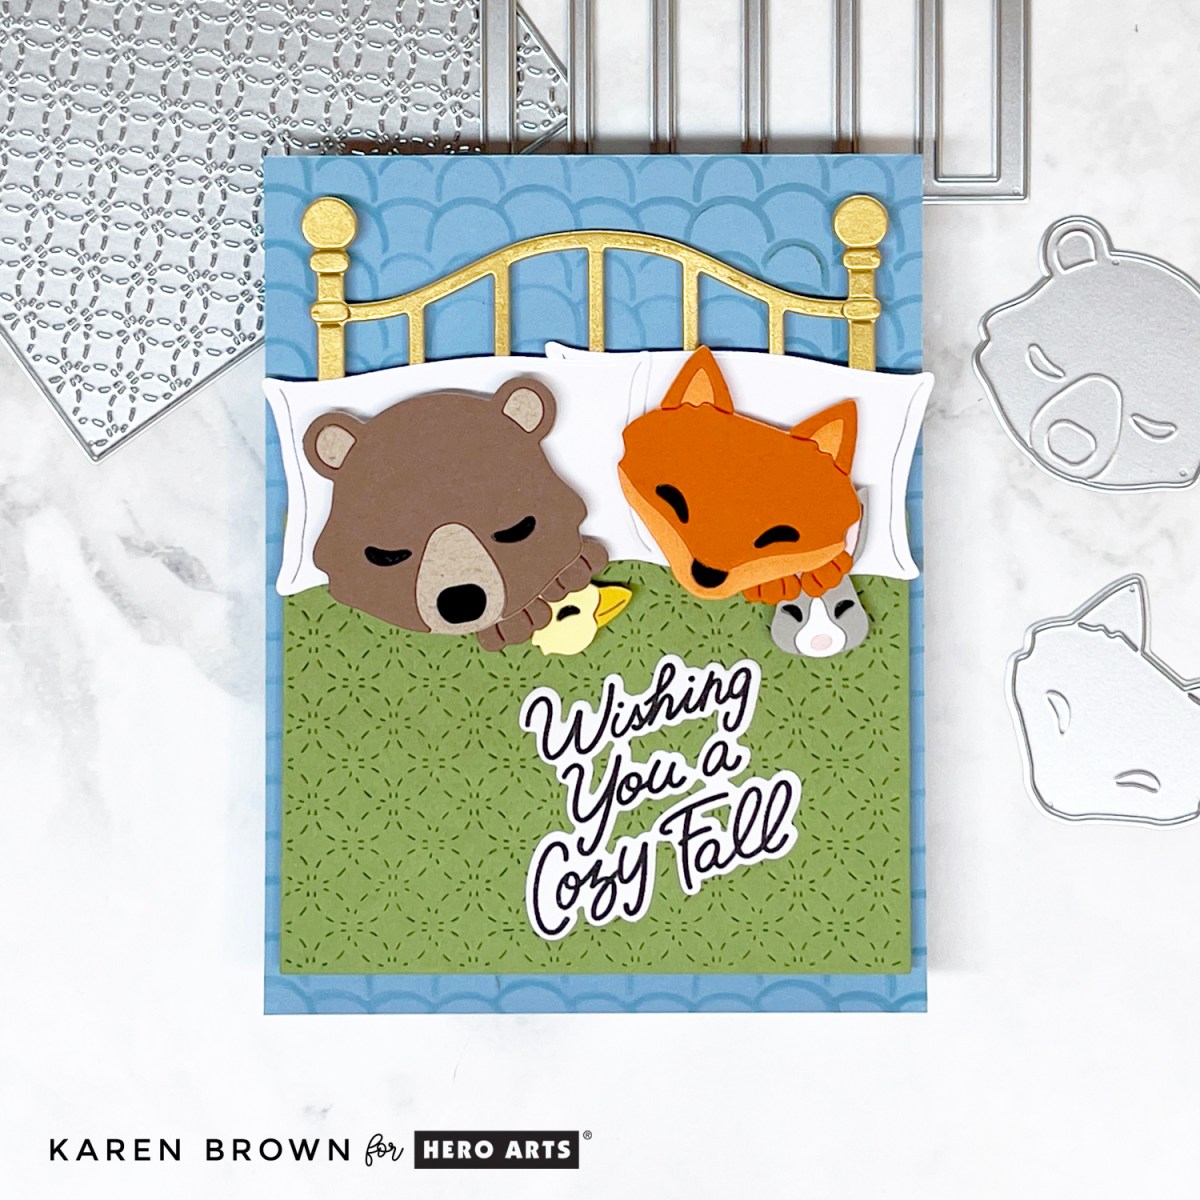
Next, I dove into the September Fancy Dies: Cozy Critters. This set has my heart! I created a cozy little bedtime scene featuring a brown bear and an orange fox tucked into a brass bed with a green quilt.
The bear is snuggling with a little stuffed duck.
The fox is holding the sweetest bunny.
The scene is playful, heartwarming, and perfect for fall—but I think it would also make an adorable Valentine’s Day card!
The sentiment, “Wishing You a Cozy Fall,” comes from the September Clear Stamp & Cut Setand fits perfectly with the theme. For the background, I added a touch of subtle pattern using the Retro Rainbow Stencil with Contour Ink. The soft “wallpaper” design adds depth without competing with the cozy critters in bed.
Love this die set? I have another adorable creation that you can see HERE.
Blog Hop
Hero Arts is celebrating this release with a Blog Hop full of inspiration from the creative team. Hero Arts will give away a $50 gift card, drawn from the comments left across the hop. Enter by Friday, September 5th at 11:59pm PT, and the winner will be announced on the Hero Arts blog the following week. Leave a comment on all stops for more chances to win!