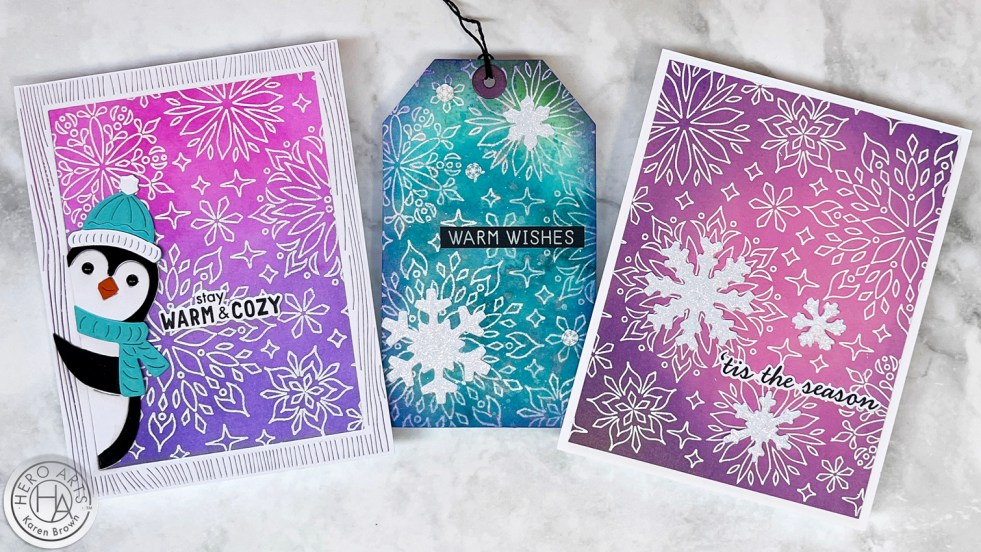
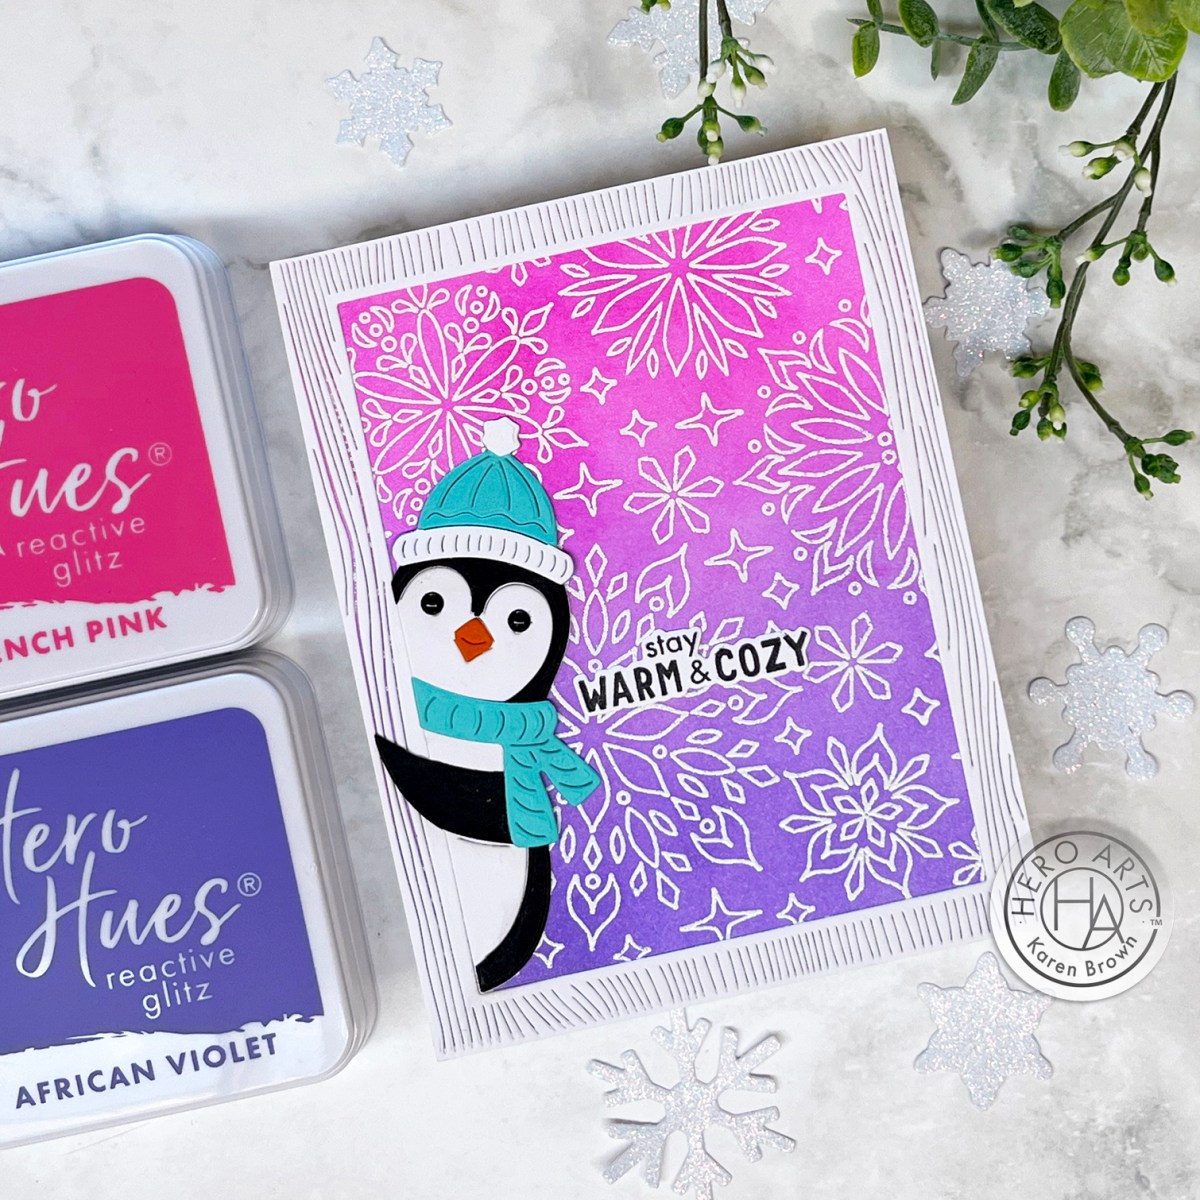
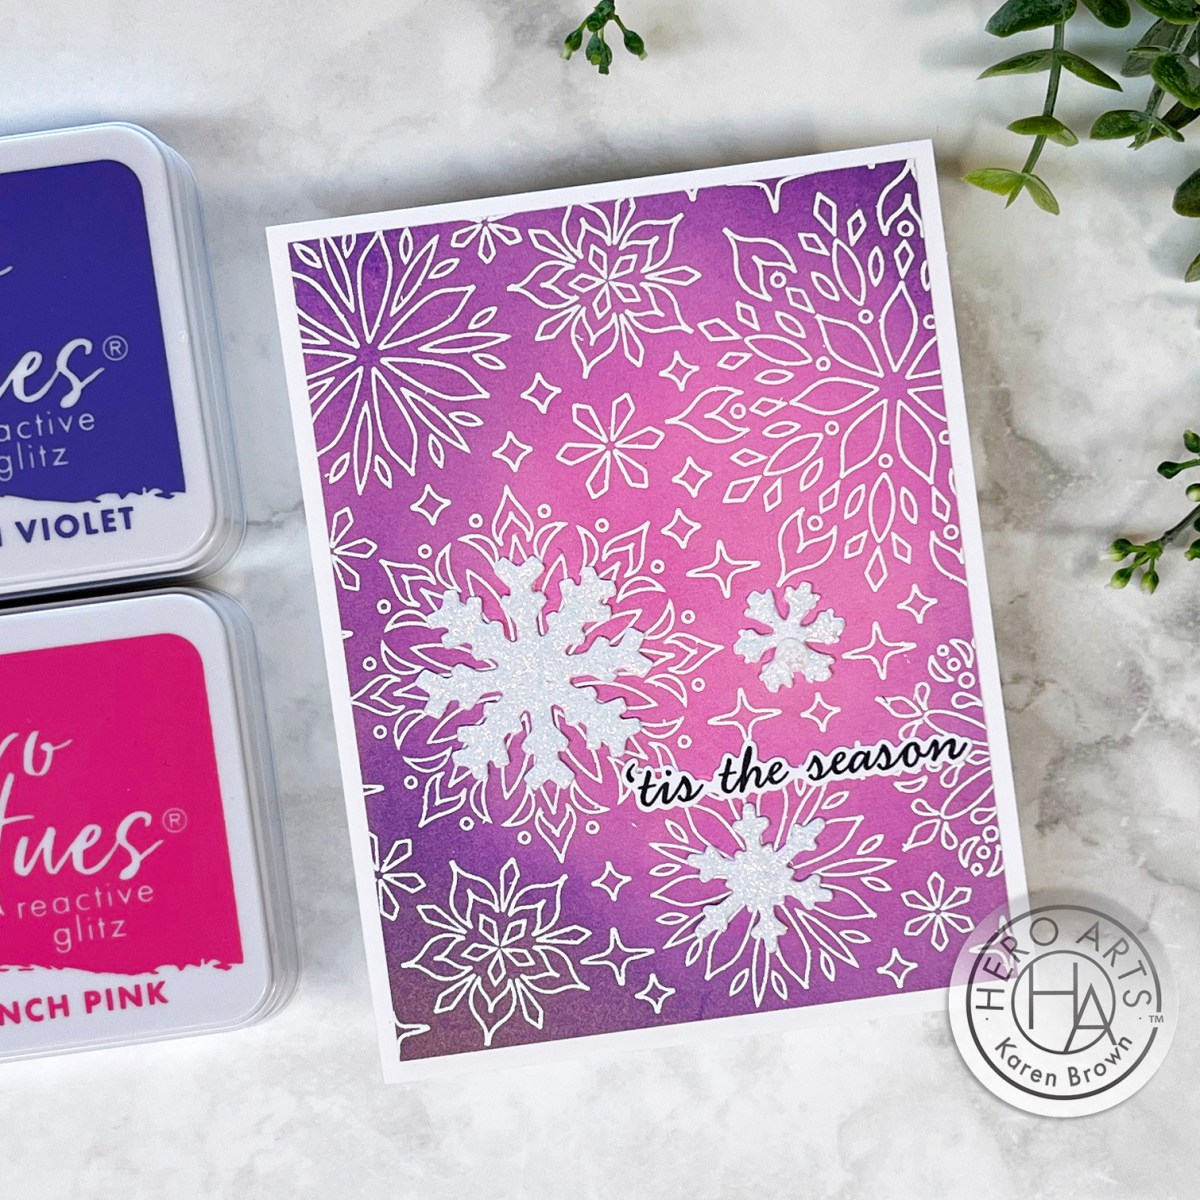
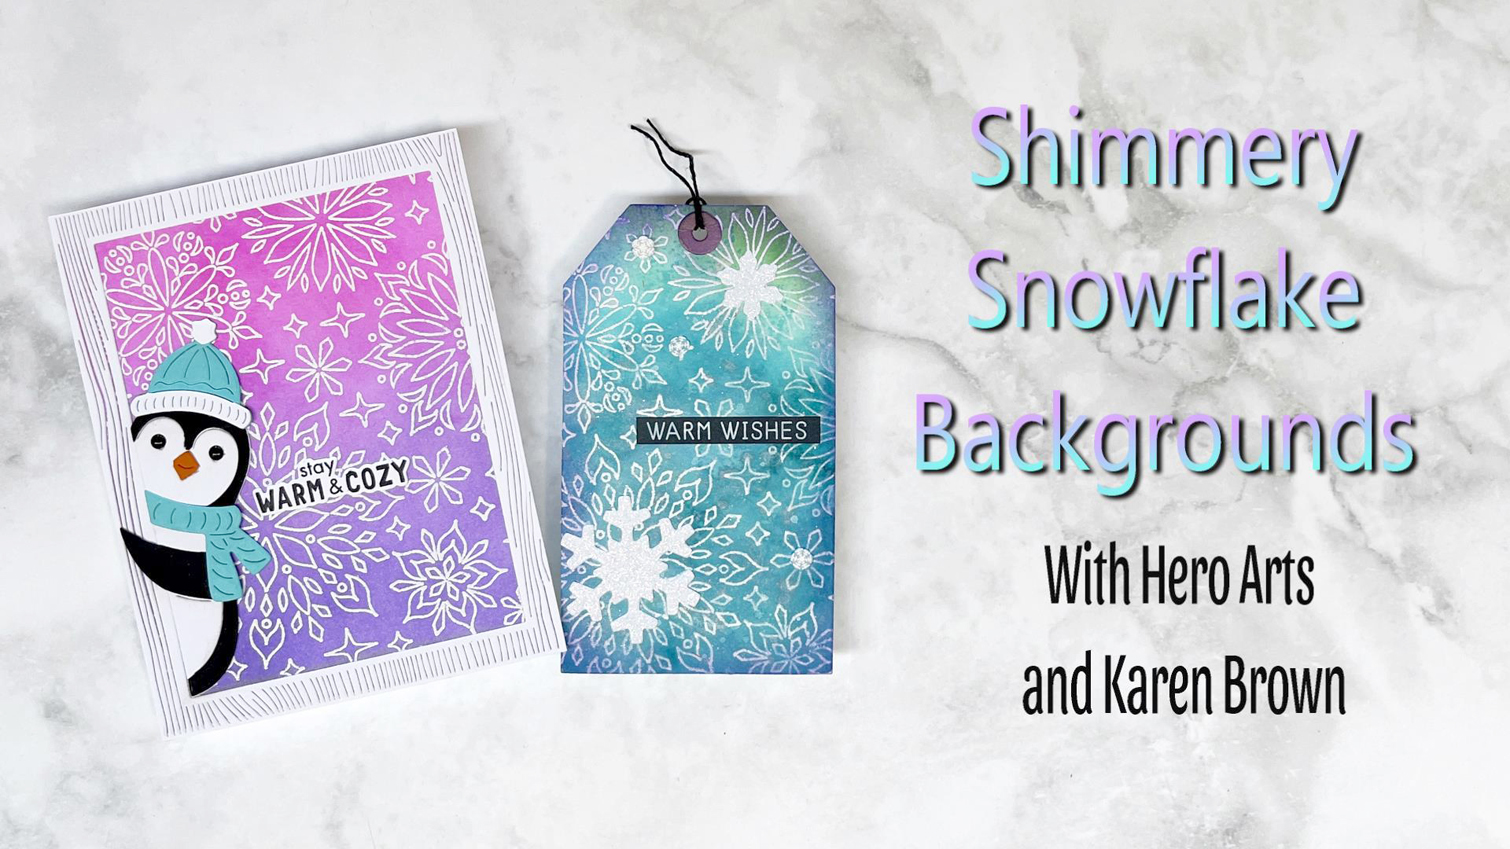
Are you ready to add a touch of winter magic to your card-making? In today’s video, I will guide you step-by-step through the enchanting process of creating shimmery snowflake backgrounds that will leave everyone in awe!
If you are having trouble viewing the video, click HERE to watch on YouTube.
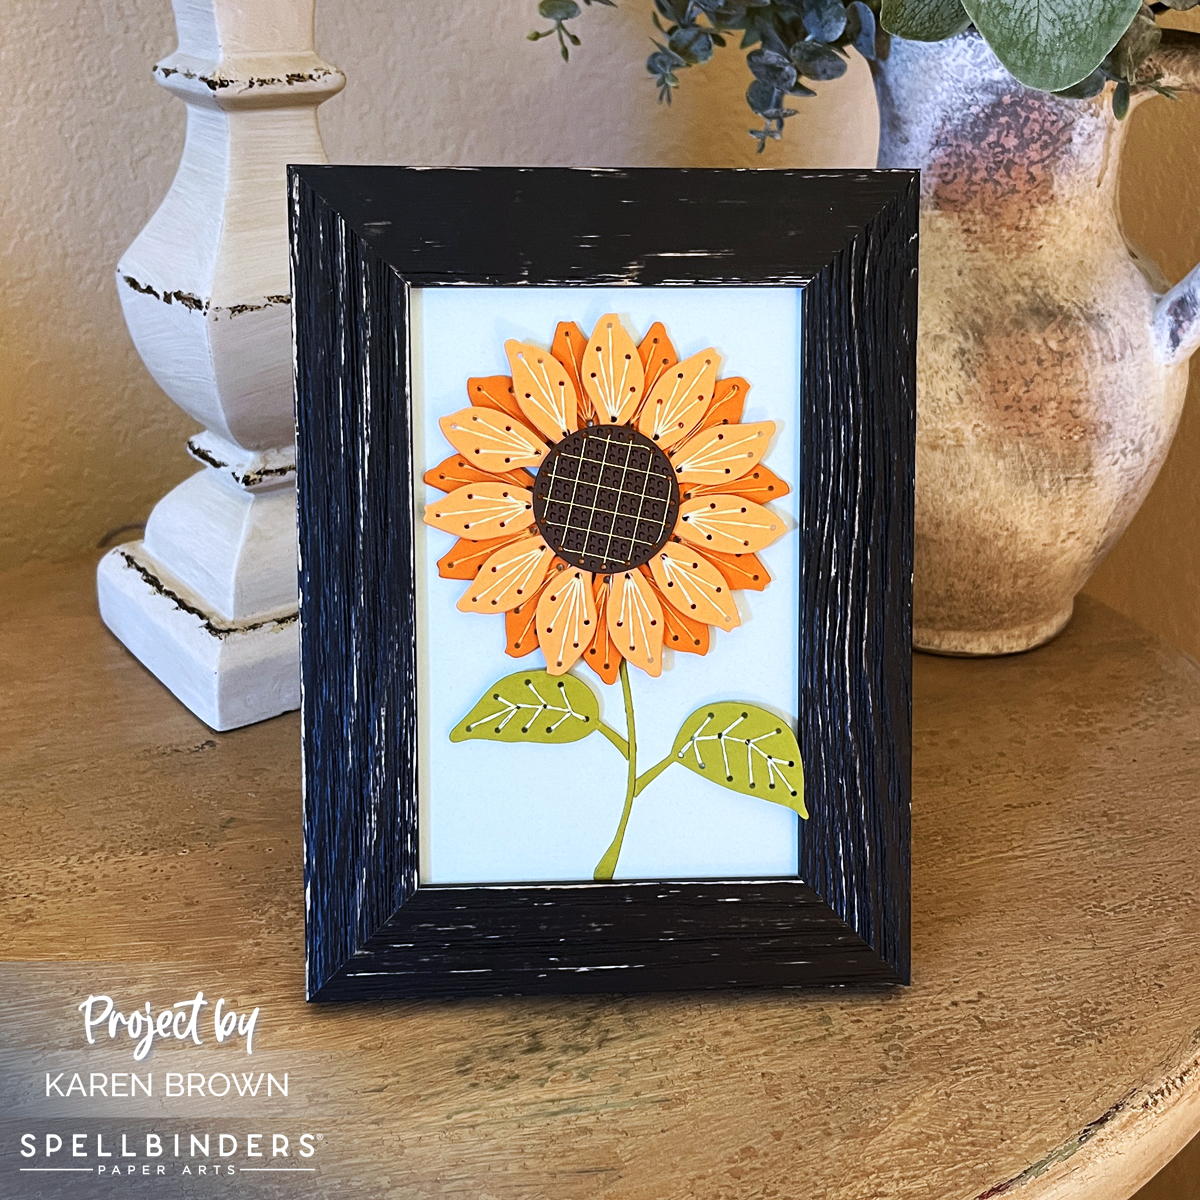
WOW, WOW, WOW! I LOVE Spellbinder’s September Stitching Die of the Month Kit! This sunflower is so gorgeous that I decided to make a 4 x 6″ framed art piece for my guest bedroom. I have all the details below.
Stitched Sunflower Art | Tips and Tricks
I started by die cutting my Stitching Kit pieces with my Platinum 6 die cutting machine. This month’s kit has 15 dies. I die cut the flower petals and brown center twice and glued them together for easier stitching.
Spellbinders has a nice selection of stitching accessories in their shop that you can find HERE. Today, I used metallic gold floss on the center and 3 shades of DMC floss for the flower. I have been buying and collecting floss for decades, so some of these are vintage.
When I started stitching, I took two strands of floss, separated them one at a time, brought them together and then stroked and lengthened them until they seemed tame and ready to use.
I used thin double sided tape to secure my floss to the die cuts. I like that this tape is easy to hide behind the die cuts and I don’t even bother to take the top release paper off the tape.
Remember to keep your floss taught as you stitch.
When I move from one area to the next, I run the floss through the just finished stitched area to keep the thread secure. This gives a nice look on the finished project.
Don’t stitch with threads that are too long or they are likely to knot.
When I was done, I added a bit of Bearly Glue to the ends so that they would stay in place.
I assembled my piece with Bearly Glue and foam squares.
Last, I popped my sunflower in a 4″ x 6″ frame and set it on the bedside table.
Club members can cancel, upgrade or change clubs from the 1st-5th of each month. Popular Clubs frequently sell out during this period so club members get first dibs on everything.
NEW for 2024: Club Members get EARLY access to new releases on the 6th!
On the 6th, Clubs become available to non-members.
On the 27th, Club registration closes for the current month.
If a club did not sell out, you can buy under “Shop Past Clubs”. Past kits are available on the 10th of the FOLLOWING month.
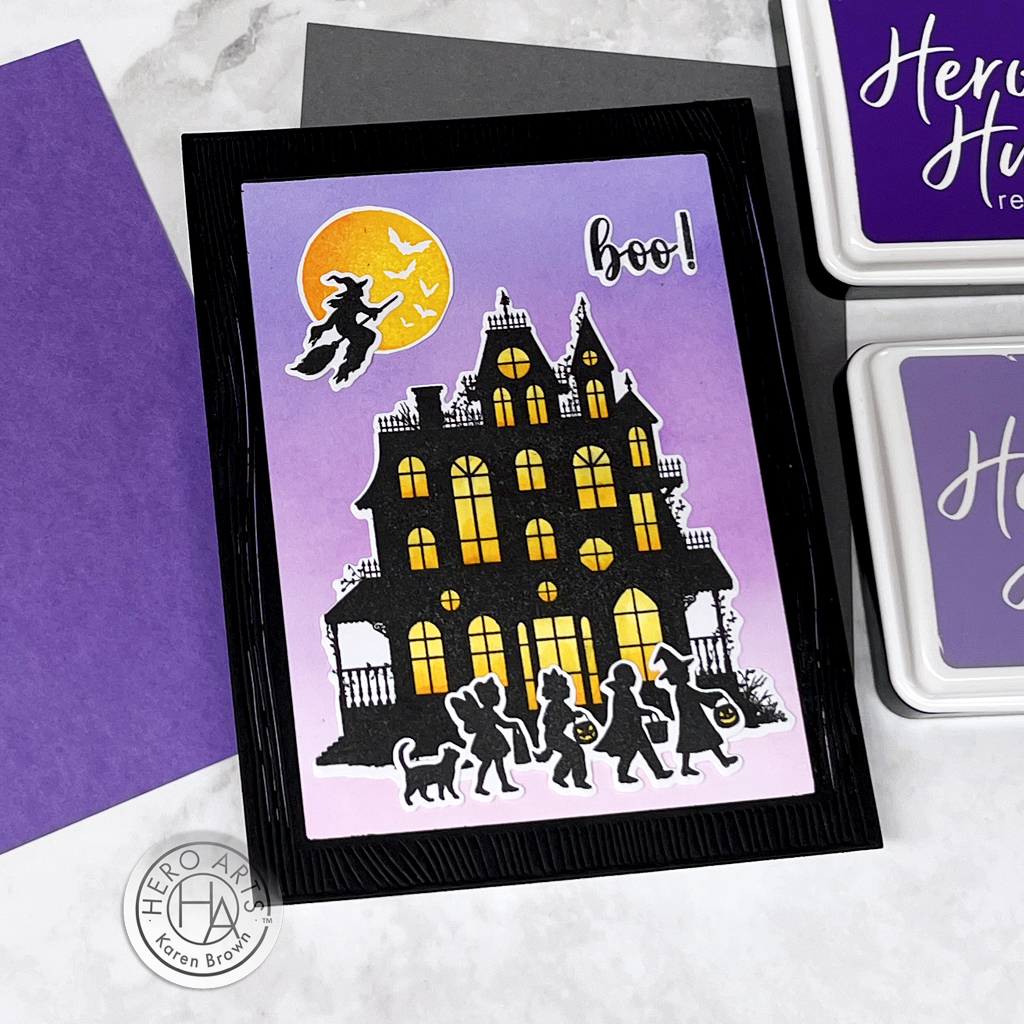
Halloween is creeping around the corner, and it’s the perfect time to brew up some crafty magic with die-cut Halloween scene cards! The September Hero Studio Release is bursting with fun new products + an exciting Blog Hop, so hop along and gather tons of inspiration from some incredibly talented crafters. Let’s dive into the cauldron of creativity and get started!
Witch’s Kitchen | Monthly Mini Clear Stamp and Die Set
Next, I stamped all the stamp elements, colored with alcohol markers and then die cut. Then, I played around with layouts until I liked my spooky little scene. A little magic potion anyone???
I started by ink blending my background with Taffy, Thistle and Purple Galaxy inks. On a different white card panel I stamped my elements using Intense Black ink. I stamped the black several times for a dark silhouette. I stamped the moon with Lemon Drop and Creamsicle, blending a bit on the stamp before stamping. To “light” my windows, I used a yellow and pale orange alcohol marker. After I completed my little scene, I decided my card needed a frame, so I die cut one from Pitch Black cardstock using my Wood Frame Infinity Dies.
$46 with Subscription + FREE SHIPPING $49.99 One-Time Purchase While Supplies Last
5 Wonderful Kit Options:
For this blog post, I created with two kits and two Extraordinary Extras, but there there are 5 kits plus 5 Extras available. You can also buy the Whole Studio, which includes all 5 kits at a wonderful savings.
The Whole Studio ($120 with subscription or $138.95 one-time purchase price)
Now it’s time for the Blog Hop! What’s a Blog Hop, you ask? It’s a fun, crafty event where you can hop from one blog to another, gathering inspiration, tips, and tricks from different crafters. Each blog in the hop will feature a Halloween project (or two or three!), so you’re sure to leave with your cauldron overflowing with ideas!
Hero Arts will give away a $50 gift card, drawn from the comments left across the hop. Enter by Sunday, September 8th at 11:59pm Pacific, and the winner will be announced on the Hero Arts blog the following week.
Here’s how to join:
Visit the Next Blog in the Hop: Check out the list of participating blogs (links below), and hop to the next one – Lydia Fiedler – to see what spooky creation she has brewed up!
Leave a Comment: Show some love to your fellow crafters by leaving a comment on their posts. It’s a great way to connect and share the Halloween spirit!
Creating die-cut Halloween scene cards is a fang-tastic way to get into the spooky spirit and share some handmade love with friends and family. Plus, participating in a Blog Hop is the perfect way to find inspiration and connect with the crafting community. So, grab your dies, fire up your die-cutting machine, and let’s make this Halloween a crafty one to remember!
Happy crafting, and don’t forget to join the Blog Hop! 🎃👻